

Nikon MB-D15 User Manual
A
Notice for Customers in Europe
Notice for Customers in the U.S.A.
Notice for Customers in Canada
The MB-D15 and Supplied Accessories
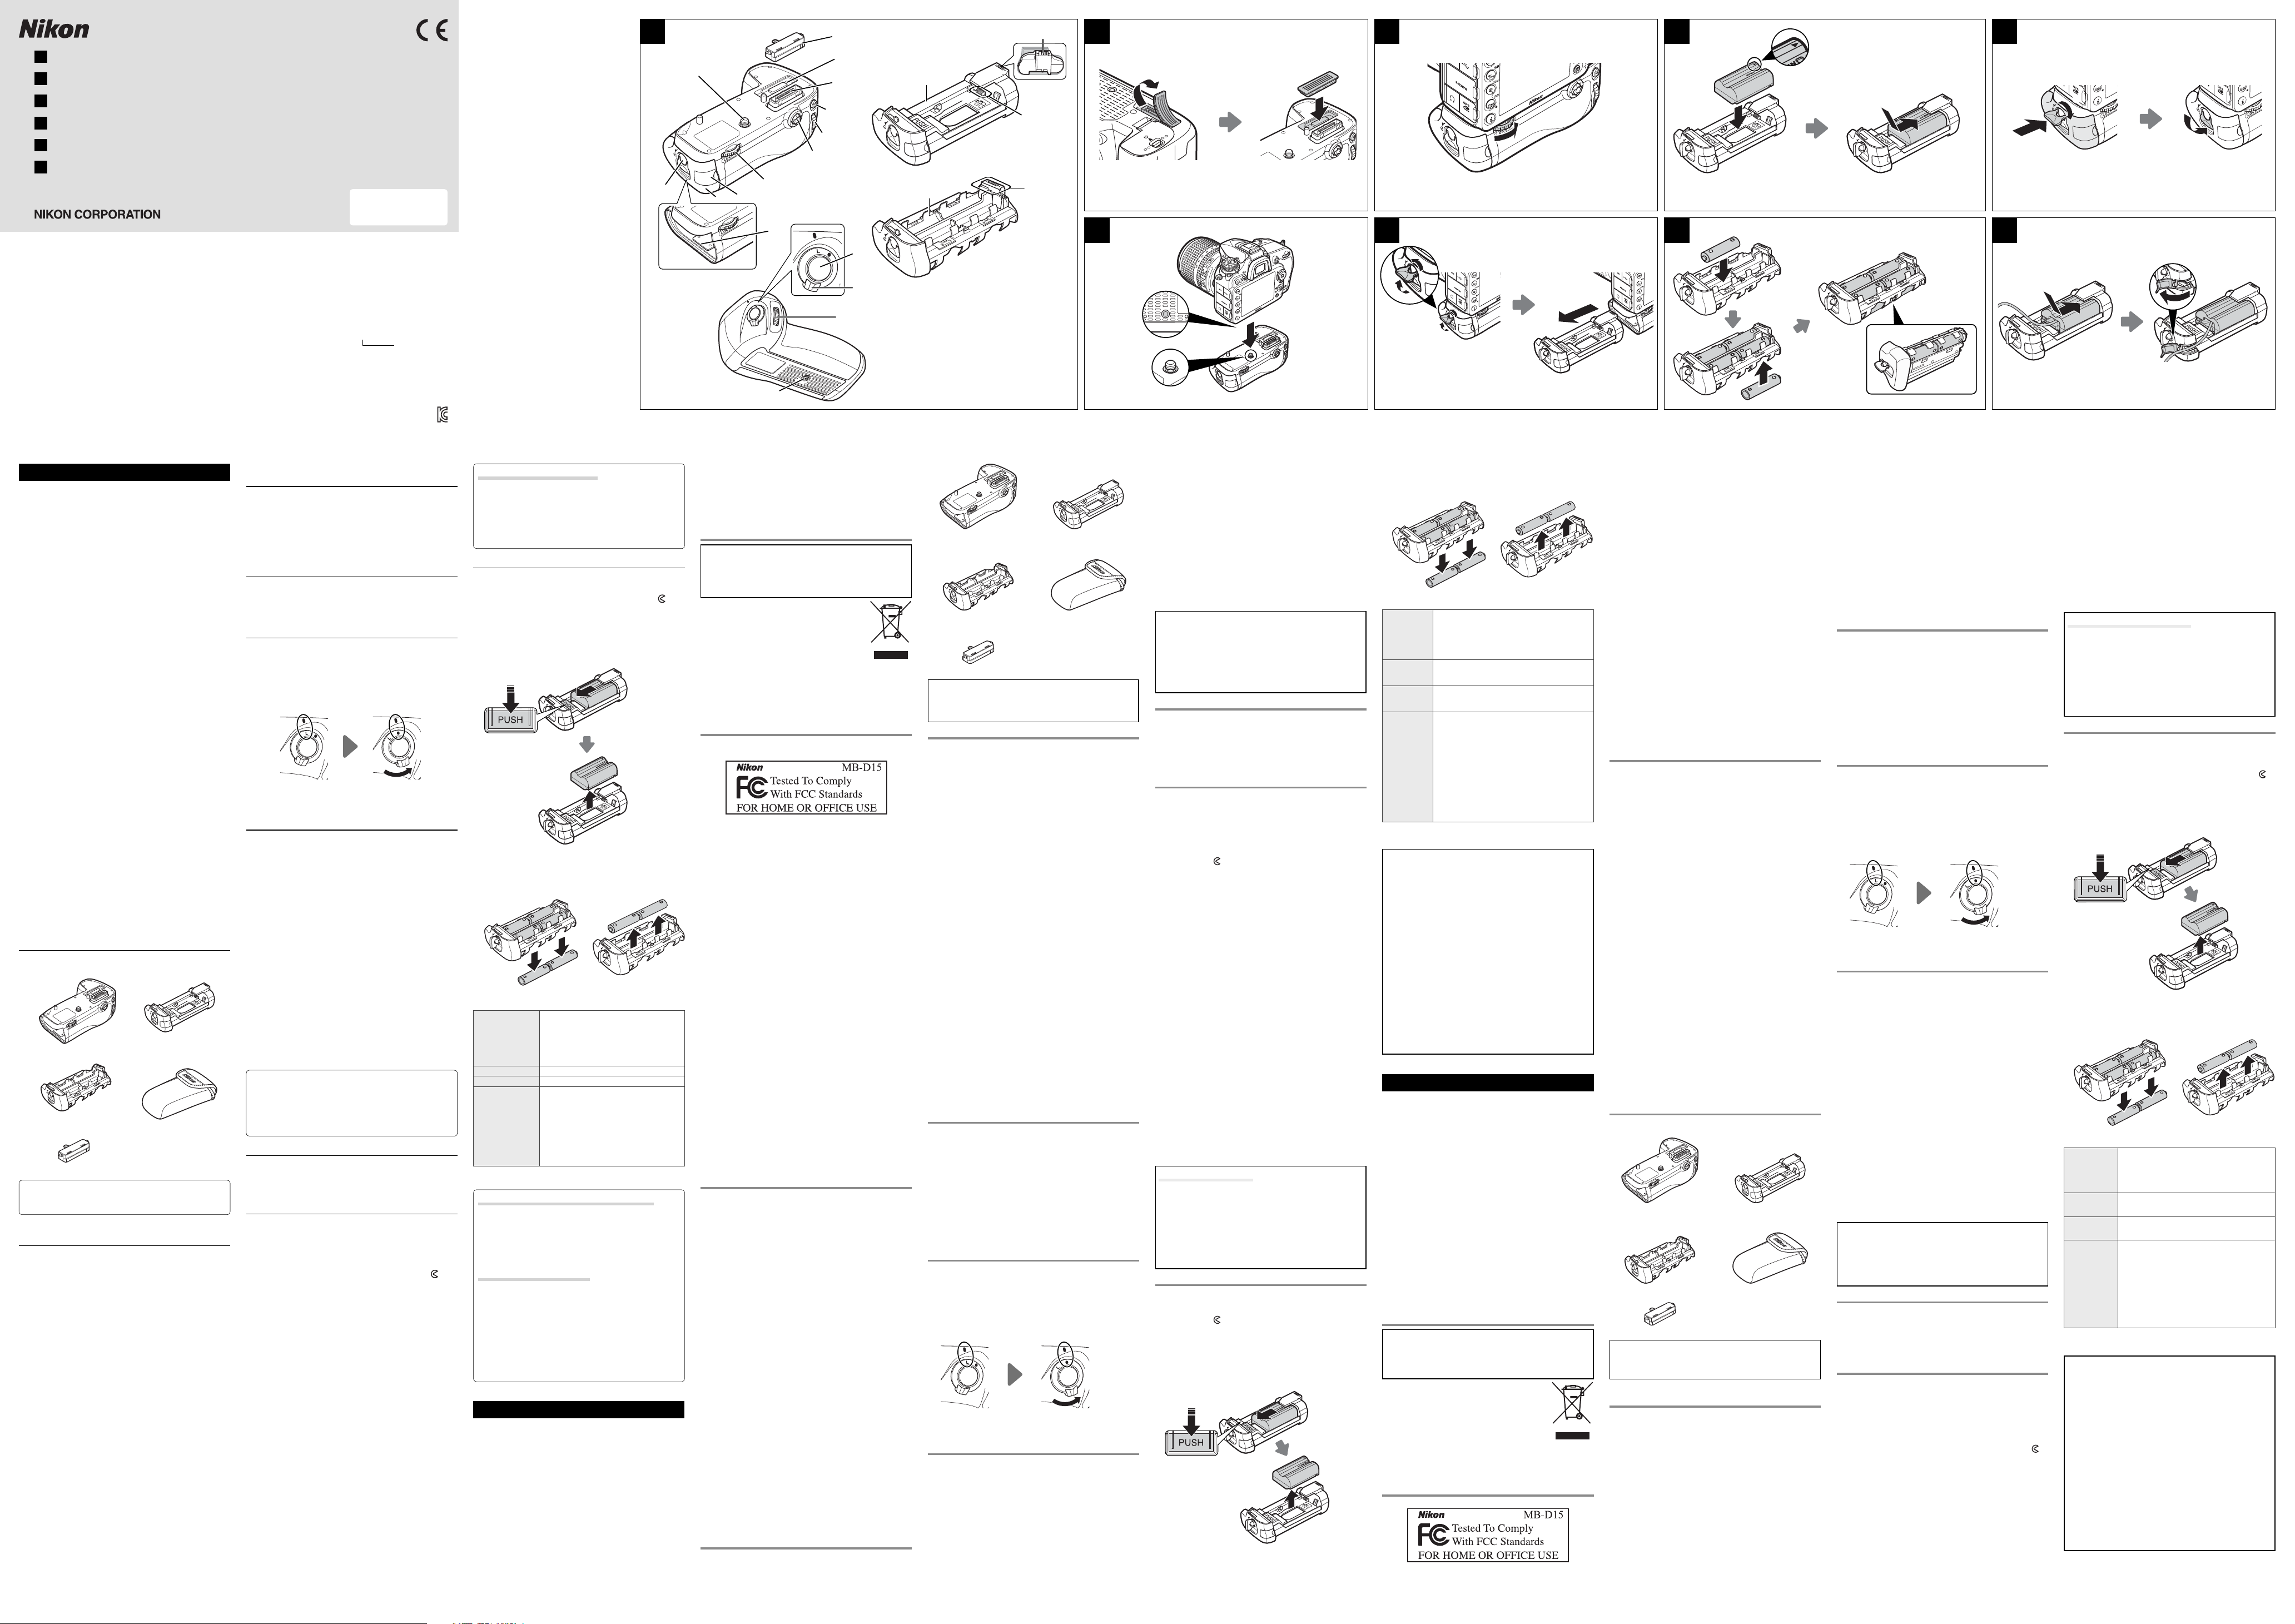
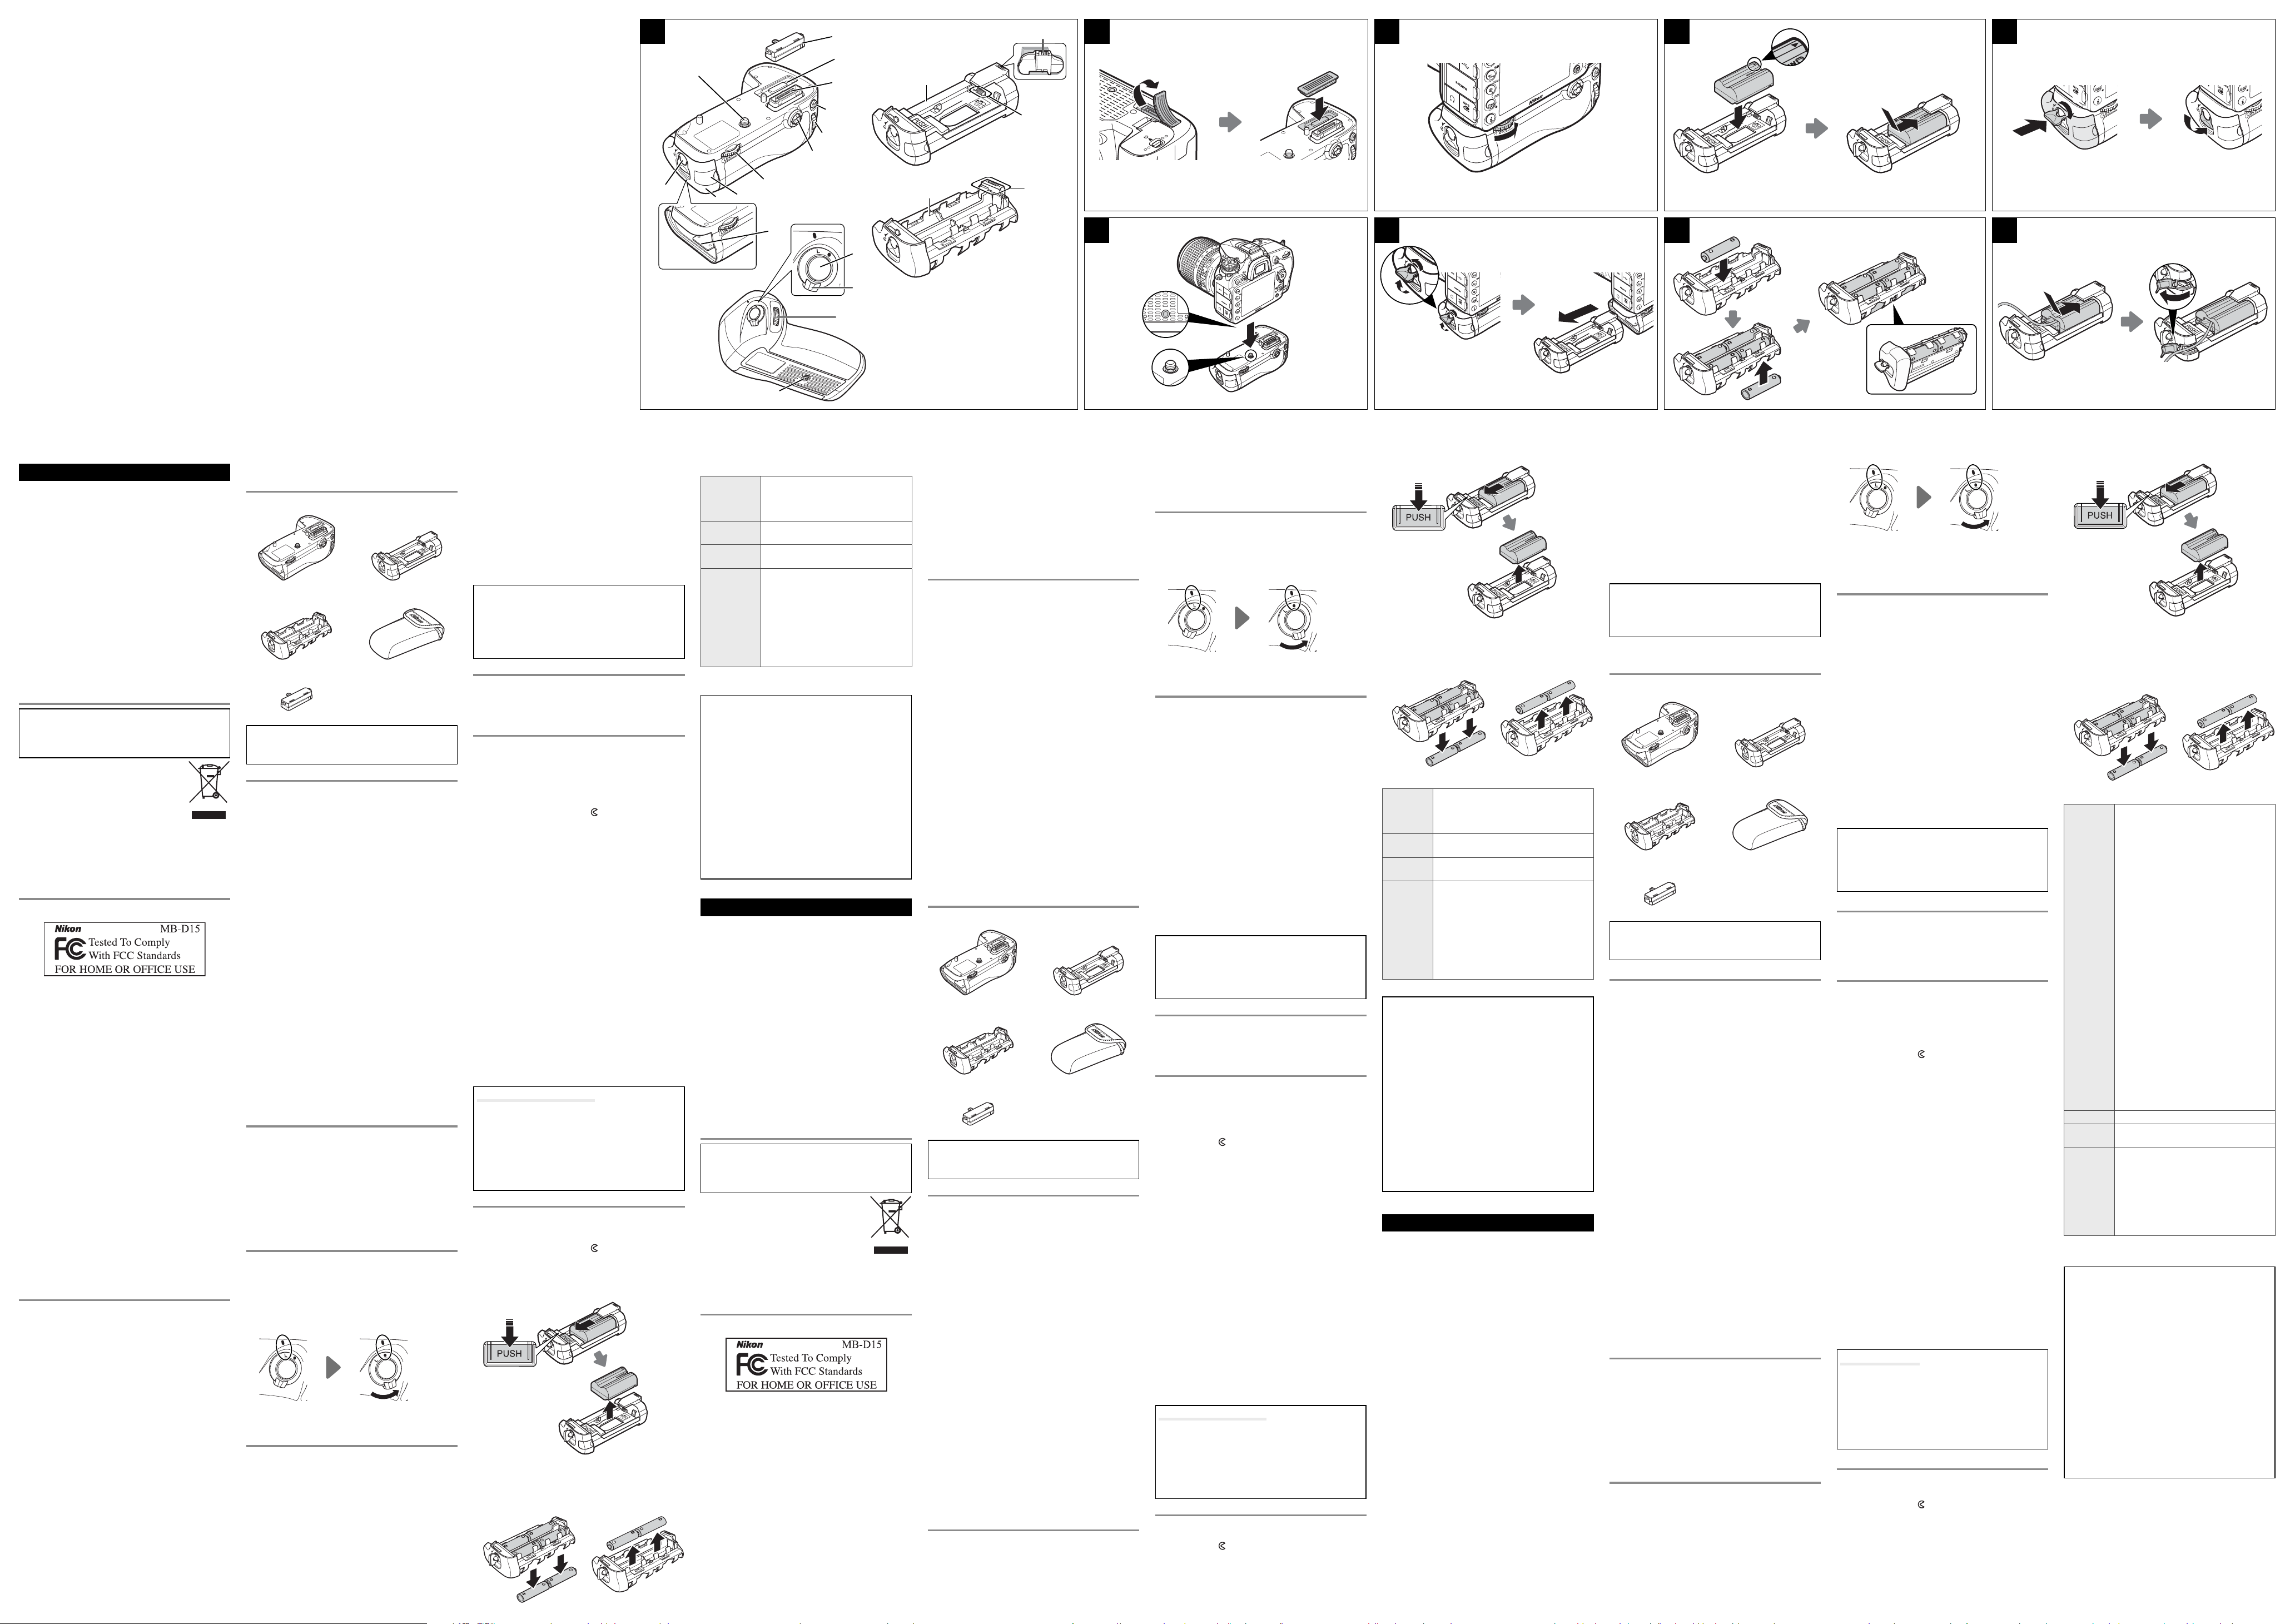
MB-D15 Controls
The MB-D15 Control Lock
Attaching the Battery Pack
Removing the Battery Pack
Inserting Batteries
Removing Batteries
Avis pour les clients en Europe
Avertissements à l’attention des utilisateurs américains
Avertissements à l’attention des utilisateurs canadiens
La MB-D15 et les accessoires fournis
Utilisation d’un adaptateur secteur et d’un connecteur d’alimentation
Commandes de la MB-D15
Le verrouillage de commande de la MB-D15
Montage de la poignée-alimentation
Retrait de la poignée-alimentation
Insertion des accumulateurs/piles
Retrait des accumulateurs/piles
q
!9
B
D
F
H
Jp
マルチパワーバッテリーパックMB-D15
En
MB-D15 Multi-Power Battery Pack User’s Manual
Fr
Poignée-alimentation MB-D15
Es
Pack de baterías múltiple MB-D15 Manual del usuario
Pb
Pacote de bateria de multialimentação MB-D15 Manual do usuário
Kr
멀티 파워 배터리 팩 MB-D15
使用説明書
Manuel d’utilisation
사용설명서
제조연월:
모델명:MB-D15
제조자:Nikon Corporation
제조국가:중국
상호명:( 주 ) 니콘이미징코리아
Printed in China
SB2K01(6B)
6MFC066B-01
w
!2
e
r
t
y
!1
o
u
i
!0
!3
!4
!5
!6
!7
!8
@0
@1
C
q
w
q
E
w
q
q
w
G
w
q
I
q
w
w
日本語
このたびはマルチパワーバッテリーパック MB-D15 をお買
い上げくださいまして、誠にありがとうございます。
MB-D15 を対応するニコン製デジタルカメラ※に取り付ける
と、Li-ion リチャージャブルバッテリー EN-EL15、または
単 3 形電池(アルカリ電池、ニッケル水素充電池、リチウ
ム電池のいずれかのうち、同じ種類の電池 6 本)を電源と
して使用することができます。
また、カメラ本体にバッテリーを挿入したまま MB - D15 を
取り付けたときは、カメラ側の設定によってバッテリーの使
用順序を決めることができます。
さらに、縦位置での撮影に操作しやすい縦位置シャッターボ
タン、縦位置マルチセレクター、縦位置メインコマンドダイ
ヤル、縦位置サブコマンドダイヤルと縦位置 AE/AF ロック
ボタンを装備しています。
ご使用の前に、本書およびカメラの使用説明書をよくお読み
ください。
※MB-D15 に対応したカメラについては、ご使用のカメラの使
用説明書でご確認ください。
本製品の使用上のご注意
•MB-D15 に対応していないカメラには、使用しないでくだ
さい。
•本書に記載されていないバッテリー、電池および電池ホル
ダーは使用しないでください。
•金属製品などによりバッテリーパックの電源接点がショー
トするおそれがありますので、バッテリーパックを保管し
たり、持ち運ぶときは、付属の接点端子キャップを付けて
ください。
•単 3 形電池ホルダーまたは EN-EL15 ホルダーに電池を装
着したまま単体で携帯するときは、他の金属などとの接触
によるショートを防ぐため、電池を取り出すか、ケースな
どに収納してください。
•MB-D15 をカメラに取り付けたり取り外す際に、カメラの
メモリーカードアクセスランプが点灯することがあります
が故障ではありません。
•万一、異常や不具合が起きたときは、すぐに使用を中止し
て販売店またはニコンサービス機関に修理を依頼してくだ
さい。
•MB-D15 に電源スイッチはありません。電源の ON(オ
ン)・OFF(オフ)の切り換えは、カメラの電源スイッチを
使用してください。
本体と付属品
MB-D15 と付属品を確認する
以下のものがすべてそろっていることを確認してください。
※バッテリー、電池は別売です。
EN-EL15 ホルダー
MB-D15
単 3 形ホルダー
MS-D14
接点端子キャップ
ご購入時、MS-D14EN は MB-D15 に装着されています。
MS -D14E N の取り外し方については、「バッテリーの入
れ方」の手順 1 をご覧ください。
MS-D14EN
ホルダーケース
• 使用説明書(本書)
• 保証書
AC アダプター EH-5b とパワーコネクター
EP-5B について(別売)
別売の AC アダプター EH-5b とパワーコネクター E P-5B
を使うと、長時間カメラを使用するときに安定して電源を
供給できます。MB-D15 と AC アダプターを組み合わせ
て使う場合は、「パワーコネクター EP-5B の入れ方」の
手順で、パワーコネクター EP-5B をバッテリーホルダー
MS - D14E N に装着してから AC アダプターに接続します。
パワーコネクター EP-5B と AC アダプター EH-5b の接続
方法については、EP-5B の使用説明書をご覧ください。
各部名称(図 A)
接点端子キャップ
q
MB-D15 用接点カバーホルダー
w
電源接点 / 信号接点
e
縦位置 AE/AF ロックボタン
r
縦位置メインコマンドダイヤル
t
縦位置マルチセレクター
y
カメラ取り付けノブ
u
パワーコネクターカバー
i
バッテリー室カバー
o
バッテリー室
!0
バッテリー室カバー開閉ノブ
!1
カメラ取り付けネジ
!2
縦位置シャッターボタン
!3
ロックレバー
!4
縦位置サブコマンドダイヤル
!5
三脚ネジ穴
!6
EN-EL15 ホルダー MS-D14EN
!7
電源接点
!8
EN-EL15 ホルダー電源接点
!9
単 3 形電池ホルダー MS-D14
@0
単 3 形電池ホルダー電源接点
@1
KCC-REI-NKR-MB-D15
縦位置シャッターボタン、縦位置マルチセレク
ター、縦位置コマンドダイヤル
MB - D15 は縦位置シャッターボタン(図 A‒!3)、縦位置マル
チセレクター(図 A‒y)、縦位置メインコマンドダイヤル(図
A‒t)、縦位置サブコマンドダイヤル(図 A ‒!5)を搭載し
ています。これらの機能はカメラ本体と同様です。また、カ
メラのカスタムメニュー f[操作]でコマンドダイヤルの機
能を変更した場合は、MB-D15 の機能も変更されます。
詳しくはカメラの使用説明書をご覧ください。
縦位置 AE/AF ロックボタン
MB-D15 は縦位置 AE/AF ロックボタン(図 A‒r)を搭載
しています。このボタンの機能はカメラのカスタムメニュー
f[操作]→[ MB-D15 の
詳しくはカメラの使用説明書をご覧ください。
ボタンの機能]で設定できます。
4
ロックレバー(MB-D15)
MB -D15 の各ボタンやダイヤル、マルチセレクターを不用意
に操作しないよう、MB - D15 にはロックレバー ( 図 A‒!4)を
装備しています。MB -D15 のボタン、ダイヤルを操作する場
合は、ロックレバーを回して、ロックを解除してください。
•
ロックレバーは電源スイッチではありません。カメラの電
源の ON(オン)・OFF(オフ)はカメラ本体の電源スイッ
チで切り換えてください。
ロックの状態 ロック解除の状態
バッテリーパックの準備
バッテリーパックの取り付け方
MB-D15 を取り付ける前に、カメラ本体の電源が OFF(オ
フ)になっていること、および MB-D15 のロックレバー(図
A‒!4)が L 側にセットされていることを確認してください。
1.MB-D15 の電源接点端子キャップを取り外す(図 A‒q)
•MB-D15をカメラ本体に取り付けていないときには、
必ず接点端子キャップを MB-D15に取り付けてくだ
さい。
2.カメラの底面にある MB-D15 用接点カバーを取り外す
(図 B‒q)
•取り外したカメラのMB-D15用接点カバーは、
MB-D15用接点カバーホルダーに収納してください
(図B‒w)。
3.MB-D15 をカメラに取り付ける
•カメラの三脚ネジ穴(図C‒q)とカメラ取り付けネジ
(図C‒w)を合わせて、カメラ取り付けノブを LOCK
の指標の方向に回して固定します(図D)。
▼
•カメラにバッテリーを挿入したまま、MB-D15 を取り
付けることができます。初期設定では、MB-D15 に装
着したバッテリーから使用して、残量がなくなり次第、
カメラ側のバッテリーを使用します。カメラのカスタ
ムメニュー d[撮影・記 録・表 示]→[電池の使用順序]
で、MB-D15 側とカメラ側のどちらのバッテリーから
使用するかを設定できます。
•紛失を防ぐため、取り外したカメラの MB-D15 用接点
カバーは、MB-D15 用接点カバーホルダーに必ず収納
してください。また、MB-D15 の接点端子キャップは
なくさないように保管してください。
•
ベローズ PB-6 をカメラに取り付ける場合は、オート接
写リング PK-13 と PB-6D を併用して使用してください。
バッテリーパックの取り外し方
MB-D15 を取り外す場合は、カメラの電源を必ず OFF(オ
フ)にし、MB-D15 のロックレバーを L 側にセットしてから、
カメラ取り付けノブを LOCK▼の指標の反対方向に回して
取り外します。
バッテリーの入れ方
MB-D15 は Li-ion リチャージャブルバッテリー EN-EL15、
または単 3 形電池(6 本)を使用します。
バッテリーを装着する前に、カメラ本体の電源が OFF(オフ)
になっていることと、MB-D15 のロックレバーが L 側にセッ
トされていることを確認してください。
1.M B-D15 側面のバッテリー室カバー開閉ノブを
回してロックを外し、MB-D15 に装着されているホル
ダーを取り外す(図 E)
2.バッテリーまたは単 3 形電池をホルダーに装着する
【EN-EL15 使用時】
EN-EL15 の▲マークを EN-EL15 ホルダー MS-D14EN
内にある電源接点の方向に向け、EN-EL15 の切り欠き部
分をホルダーの突起に合わせて上に置きます(図F‒q)。
EN-EL15 を軽く下に押しながら、電源接点の方向にカ
チッと音がして止まるまでスライドさせます(図F‒w)。
【単 3 形電池使用時】
単 3 形電池 6 本を単 3 形電池ホルダー MS-D14 内の表
示に合わせ、+と−の向きに注意しながらホルダーに装
着します(図G)。
3.バッテリーまたは単 3 形電池を装着したホルダーを
MB-D15 に挿入し、バッテリー室カバー開閉ノブを図 H
のように回してロックする
•ホルダーを挿入してから、バッテリー室カバー開閉ノ
ブを回してロックしてください。
カメラの電源を ON(オン)にして、カメラの表示パネル、
4.
またはファインダー内表示でバッテリーの残量を確認する
•カメラの電源を ON にして作動しない場合は、バッテ
リーが正しく装着されているかご確認ください。
•バッテリーの残量表示については、カメラの使用説明
書をご覧ください。
MB-D15 に関連するカメラのメニューは次の通りです。
•
‒[ 電池の使用順序 ]
‒[MB-D15 電池設定 ]
‒[ 電池チェック ]
詳しくは、カメラの使用説明書をご覧ください。
側に
パワーコネクター EP-5B の入れ方
手順 2 で、パワーコネクター EP-5B の▲マークを EN-EL15
ホルダーMS-D14EN 内にある電源接点の方向に向け、
EP-5B の切り欠き部分をホルダーの突起に合わせて上に置き
ます。EP-5B を軽く下に押しながら、電源接点の方向にカチッ
と音がして止まるまでスライドさせます(図I‒q)。
ホルダーのパワーコネクターカバーを開けて、EP-5B のコード
を通します
(図I‒w)。
バッテリーの取り外し方
バッテリーの取り外しの際には、バッテリーやホルダーが落
下しないようにご注意ください。
1.M B-D15 側面のバッテリー室カバー開閉ノブを 側に
回してロックを外し、MB-D15 に装着されているホル
ダーを取り外す(図 E)
2.ホルダーからバッテリーを取り外す
【EN-EL15 使用時】
ホルダーの「PUS H」ボタンを押しながら、バッテリーを
「PUSH」ボタンの方向へスライドさせて取り外します。
•パワーコネクター EP-5B をホルダーから取り外す方法
は、EN-EL15 の場合と同じです。
【単 3 形電池使用時】
下図のように装着した電池を、全て取り外してください。
取り外しの際は、電池が落下しないようにご注意ください。
仕様
電源
使用温度 0℃〜 40℃
寸法(W×H×D)約 138.5 × 50.5 × 76mm
質量
•仕様、外観の一部を、改善のため予告なく変更することが
あります。
D
EN-EL15 を低温時に使用する場合について
低温時(約 10℃以下)に消耗したバッテリーを使用すると、
カメラが作動しないことがあります。低温時には充分に充電さ
れたバッテリーを使用し、保温した予備のバッテリーを用意し
て温めながら交互に使用してください。低温のために一時的に
性能が低下して使えなかったバッテリーでも、常温に戻ると使
えることがあります。
D
単 3 形電池の使用について
•アルカリ電池を使用した場合、他の電源と比較して撮影でき
るコマ数が少なくなることがあります。アルカリ電池は緊急
用として使用してください。また、低温時のご使用はおすす
めできません。
•電池のメーカーや銘柄によっては、使用できないことや、撮
影できるコマ数が極端に少ないことがあります。
•周囲の温度が 20℃よりも低い環境で使用するときは、撮影
できるコマ数が減少することがあります。
•電池の使用推奨期間内であっても、保管状態によっては撮影
できるコマ数が減少したり、使用できないことがあります。
Li-ion リチャージャブルバッテリー EN-EL15
(1 個)、または単 3 形電池(アルカリ電池、
ニッケル水素充電池、リチウム電池のいずれ
かのうち、同じ種類の電池 6 本)、AC アダプ
ター EH-5b(パワーコネクター EP-5B と組
み合わせて使用)
・約 340g(MS-D14EN、別売の EN-EL15
装着時)
・約 395g(MS-D14、市販の単 3 形電池
6 本装着時)
・約 280g(MS-D14EN、別売の EP-5B 装
着時)
・約 255g(MS-D14EN 装着時)
・約 255g(MS-D14 装着時)
English
Introduction
Thank you for your purchase of an MB-D15 multipower battery pack for use with all Nikon digital cameras that list the MB-D15 as a compatible accessory in
the camera manual. The MB-D15 takes one EN-EL15
rechargeable Li-ion battery or six AA batteries (alkaline, Ni-MH, or lithium) and includes an alternate
shutter-release button, AEL/AFL button, multi selector, and main and sub-command dials for taking
pictures in “tall” (portrait) orientation. Camera menu
options allow the user to choose whether the camera
battery or the batteries in the MB-D15 are used rst;
see the camera manual for details.
Safety Precautions
To ensure proper operation, read this manual thoroughly before using this product. After reading, be
sure to keep it where it can be seen by all those who
use the product.
Notice for Customers in Europe
CAUTION
RISK OF EXPLOSION IF BATTERY IS REPLACED BY AN INCORRECT TYPE. DISPOSE OF USED BATTERIES ACCORDING TO THE INSTRUCTIONS.
This symbol indicates that this product is to
be collected separately.
The following apply only to users in European
countries:
• This product is designated for separate collection at an
appropriate collection point. Do not dispose of as household waste.
• For more information, contact the retailer or the local authorities in charge of waste management.
Notice for Customers in the U.S.A.
Federal Communications Commission (FCC) Radio Frequency Interference Statement
This equipment has been tested and found to com ply
with the limits for a Class B digital device, pursuant to Part
15 of the FCC rules. These limits are designed to provide
rea son able pro tec tion against harmful in ter fer ence in a
res i den tial in stal la tion. This equip ment gen er ates, uses,
and can radiate radio fre quen cy en er gy and, if not in stalled
and used in ac cor dance with the instructions, may cause
harmful in ter fer ence to radio com mu ni ca tions. How ev er,
there is no guar an tee that in ter fer ence will not occur in a
par tic u lar in stal la tion. If this equip ment does cause harm ful in ter fer ence to radio or tele vi sion re cep tion, which can
be de ter mined by turn ing the equipment off and on, the
user is en cour aged to try to correct the in ter fer ence by one
or more of the fol low ing mea sures:
• Reorient or relocate the receiving an ten na.
• Increase the separation between the equip ment and re ceiv er.
• Connect the equipment into an outlet on a circuit diff er ent from that to which the receiver is con nect ed.
• Consult the dealer or an experienced radio/television
tech ni cian for help.
CAUTION
Modi cations: The FCC requires the user to be notifi ed that
any changes or mod i fi ca tions made to this device that are
not ex press ly ap proved by Nikon Corporation may void the
user’s au thor i ty to operate the equipment.
Nikon Inc.,
1300 Walt Whitman Road, Melville, New York
11747-3064, U.S.A.
Tel.: 631-547-4200
Notice for Customers in Canada
CAUTION
This Class B digital apparatus complies with Canadian ICES-
003.
ATTENTION
Cet appareil numérique de la classe B est conforme à la
norme NMB-003 du Can a da.
Precautions for Use
• The MB-D15 is for use with compatible cameras only.
• Do not use with batteries and battery holders not recommended in this manual.
• To prevent electrical shorts caused by metal objects
touching the power terminals, replace the contact cap
when the MB-D15 is not in use.
• When a battery holder is removed from the MB-D15,
remove the batteries or place the holder or cover in the
holder case to prevent electrical shorts caused by contact
with other metal objects.
• The memory card access lamp may light up when the
MB-D15 is attached or removed from the camera, but this
is not malfunction.
• Should you notice smoke or an unusual smell or noise
from the battery pack, discontinue use immediately. After
removing the batteries, take the device to the retailer or
a Nikon-authorized service representative for inspection.
• The MB-D15 is not equipped with a power switch. Use
the camera power switch to turn the power on or off .
The MB-D15 and Accessories
The MB-D15 and Supplied Accessories
Con rm that the following items are supplied with
the MB-D15 (batteries are sold separately).
MB-D15 MS-D14EN holder for
EN-EL15 batteries
MS-D14 holder for
Holder case
AA batteries
• User’s Manual
(this manual)
Contact cap
• Warranty
The MS-D14EN is inserted in the MB-D15 at shipment.
See “Inserting Batteries” for information on removing the
battery holder.
Using an AC Adapter and Power Connector
The optional EH-5b AC adapter and EP-5B power
connector provide a reliable power source when the
camera is used for extended periods. To use an AC
adapter with the MB-D15, insert the EP-5B into the
MS-D14EN battery holder as described in “The EP-5B
Power Connector” (below) and then connect the
EH-5b as described in the documentation provided
with the EP-5B.
Parts of the MB-D15 (Figure A)
Contact cap
q
Contact cover holder
w
Power/signal contacts
e
AEL/AFL button
r
Main command dial
t
Multi selector
y
Attachment wheel
u
Holder power connector cover
i
Battery-chamber cover
o
Battery chamber
!0
Battery-chamber latch
!1
Mounting screw
!2
Shutter-release button
!3
Control lock
!4
Sub-command dial
!5
Tripod socket
!6
MS-D14EN holder for EN-EL15 batteries
!7
Power terminals
!8
Power terminals (MS-D14EN battery holder)
!9
MS-D14 holder for AA batteries
@0
Power terminals (MS-D14 battery holder)
@1
MB-D15 Controls
The MB-D15 is equipped with a shutter-release button
(Figure A- !3), multi selector (Figure A- y), main command dial (Figure A- t), sub-command dial (Figure
A- !5), and AEL/AFL button (Figure A- r) for use when
taking photographs in vertical (“tall,” or portrait) orientation. These controls perform the same functions as
the corresponding controls on the camera and are affected by changes to options in the Custom Settings
menu (Group f) that a ect these camera controls. See
the camera manual for more information.
The MB-D15 Control Lock
The control lock (Figure A- !4) locks the controls on
the MB-D15 to prevent unintended use. Before using
these controls to take photographs in vertical (portrait) orientation, release the lock as shown.
The control lock is not a power switch. Use the camera power switch to turn the camera on and o .
Locked Unlocked
Using the Battery Pack
Attaching the Battery Pack
Before attaching the battery pack, be sure that the
camera is o and that the MB-D15 control lock (Figure
A-
) is in the L position.
!4
Remove the contact cap (Figure A- q) from the
1
battery pack.
The contacts for the MB-D15 are in the base of the
2
camera, where they are protected by a contact
cover. Remove the contact cover as shown in Figure B-q and place it in the contact cover holder on
the MB-D15 (Figure B- w).
Position the MB-D15, keeping the MB-D15 mount-
3
ing screw (Figure C- w) aligned with the camera
tripod socket (Figure C- q) and tighten the attachment wheel by rotating it in the direction shown
by the LOCK arrow (Figure D). There is no need to
remove the battery from the camera before connecting the MB-D15. At default settings, the battery inserted in the camera will be used only after the battery in the MB-D15 is exhausted. The
Battery order option in the camera Custom Settings menu (Group d) can be used to change the
order in which the batteries are used.
Be sure to place the camera contact cover in the contact
cover holder and to keep the MB-D15 contact cap in a
safe place to prevent loss.
A PB-6D and PK-13 auto extension ring are required
when using PB-6 bellows focusing attachment with the
MB-D15.
Removing the Battery Pack
To remove the MB-D15, turn the camera o and set
the control lock on the MB-D15 to L, then loosen the
attachment wheel by rotating it in the direction opposite to that shown by the LOCK arrow and remove
the MB-D15.
Inserting Batteries
The MB-D15 can be used with one EN-EL15 rechargeable Li-ion battery or with six AA batteries.
Before inserting batteries, be sure that the camera is o
and that the MB-D15 control lock is in the L position.
Unlatch the MB-D15 by rotating the battery-cham-
1
ber latch to and remove the battery holder (Figure E).
Ready the batteries as described below.
2
EN-EL15: Matching the indentations on the battery
to the projections on the MS-D14EN holder, insert
the battery with the arrow (▲) on the battery toward the battery holder power terminals (Figure
F- q). Press the battery lightly downward and slide
it in the direction of the arrow until the power terminals click into place (Figure F- w).
AA batteries: Place six AA batteries in the MS-D14
battery holder as shown in Figure G, making sure
that the batteries are in the correct orientation.
Insert the battery holder in the MB-D15 and latch
3
the battery-chamber cover (Figure H). Make sure
the holder is inserted before turning the latch.
Turn the camera on and check the battery level in
4
the control panel or view nder as described in the
camera manual. If the camera does not turn on,
check that the battery is correctly inserted.
For more information, see the camera manual.
The following camera menus o er options for the
MB-D15:
Battery info
Battery order, MB-D15 battery type
.
, and
The EP-5B Power Connector
When using the EP-5B power connector, insert it into the
MS-D14EN holder with the arrow (▲) on the connector
toward the battery power terminals. Press the connector
lightly downward and slide it in the direction of the arrow
until the power terminals click into place (Figure I- q).
Open the holder power connector cover and pass the
EP-5B power cable through the opening (Figure I- w).
Removing Batteries
Be careful not to drop batteries or the holder.
Unlatch the MB-D15 by rotating the battery-cham-
1
ber latch to and remove the battery holder (Figure E).
Remove the battery or batteries from the holder.
2
EN-EL15: While pressing the holder PUSH button,
slide the battery toward the button. The battery
can then be removed as shown.
The procedure for removing the EP-5B power connector is the same as that for the EN-EL15.
AA batteries: Remove the batteries as shown. Be
careful not to drop the batteries when removing
them from the holder.
Speci cations
Power source One EN-EL15 rechargeable Li-ion battery,
six alkaline, Ni-MH, or lithium AA batteries,
or EH-5b AC adapter (requires EP-5B power
connector)
Operating
0 °C– 40 °C (32 °F – 104 °F)
temperature
Dimensions
(W × H × D)
Approx. 138.5 × 50.5 × 76 mm
(5.5 × 2.0 × 3.0 in.)
Weight Approx. 340 g (12.0 oz) with MS-D14EN
and optional EN-EL15 battery
Approx. 395 g (13.9 oz) with MS-D14 and
six AA batteries (available separately from
third-party suppliers)
Approx. 280 g (9.9 oz) with MS-D14EN and
optional EP-5B power connector
Approx. 255 g (9.0 oz) with MS-D14EN
Approx. 255 g (9.0 oz) with MS-D14
Specifi cations and design are subject to change without
notice.
EN-EL15 Batteries
The performance of EN-EL15 batteries drops at temperatures below about 10 °C (50 °F). Be sure the battery is
fully charged and keep a warm spare battery on hand
ready to exchange as necessary. Cold batteries may recover some of their charge when warmed.
AA Batteries
Due to their limited capacity, AA alkaline batteries should
be used only when no other alternative is available.
The capacity of AA batteries varies with make and storage conditions and may in some instances be extremely
low; in some cases, AA batteries may suff er a drop in capacity or cease to function before their expiry date. Note
that the capacity of AA batteries may drop at temperatures below 20 °C (68 °F). Use is not recommended at
low temperatures.
Français
Présentation
Nous vous remercions d’avoir acheté la poignée-alimentation MB-D15 qui peut être utilisée avec tous les appareils
photo numériques Nikon pour lesquels elle est signalée
comme accessoire compatible dans leur manuel d’utilisation. La poignée MB-D15 fonctionne avec un accumulateur
Li-ion EN-EL15 ou six piles AA (alcalines, Ni-MH ou lithium),
et inclut un déclencheur, une touche AEL/AFL, un sélecteur
multidirectionnel, ainsi qu’une molette principale et une
molette secondaire pour la prise de vue en cadrage vertical
(portrait). Les options du menu de l’appareil photo permettent à l’utilisateur de choisir si l’appareil photo fonctionne
d’abord grâce à son accumulateur ou grâce à la MB-D15 ; se
reporter au manuel de l’appareil pour plus de détails.
Mesures de précaution
A n de garantir le bon fonctionnement de votre matériel,
lisez attentivement ce manuel avant d’utiliser le produit. Ensuite, rangez-le dans un endroit où il pourra être consulté
par tous ceux qui auront à s’en servir.
Avis pour les clients en Europe
ATTENTION
IL Y A UN RISQUE D’EXPLOSION SI L’ACCUMULATEUR EST REMPLACÉ PAR UN AUTRE DE TYPE INCORRECT. DÉBARRASSEZ-VOUS
DES ACCUMULATEURS USAGÉS EN SUIVANT LES CONSIGNES.
Ce symbole indique que ce produit doit être collecté séparément.
Les mentions suivantes s’appliquent uniquement
aux utilisateurs situés dans les pays européens :
• Ce produit doit être déposé dans un point de collecte approprié.
Il ne doit pas être jeté avec les déchets ménagers.
• Pour plus d’informations, contactez votre revendeur ou les autorités locales chargées de la gestion des déchets.
Avertissements à l’attention des utilisateurs américains
Federal Communications Commission (FCC) Radio Frequency Interference Statement
Cet équipement a été testé et trouvé conforme aux limites défi nies
pour les appareils numériques de classe B selon la partie 15 de la
réglementation FCC. Ces limites assurent une protection raisonnable contre les interférences dangereuses lorsque l’équipement
est utilisé en environnement résidentiel. Cet équipement génère,
utilise et peut irradier des radiofréquences qui peuvent, en cas
d’une installation et d’une utilisation contraires aux instructions,
provoquer des interférences néfastes aux communications radio.
Cependant, il n’existe aucune garantie que ce matériel ne provoquera pas des interférences dans une installation particulière. Si ce
matériel provoque eff ectivement des interférences préjudiciables
à la réception radio ou télévisée, ce qui peut être déterminé en
allumant et en éteignant le matériel, l’utilisateur est vivement encouragé à essayer de corriger ces interférences en ayant recours à
une ou plusieurs des mesures suivantes :
• Réorientez ou repositionnez l’antenne de réception.
• Augmentez la distance séparant l’équipement du récepteur.
• Connectez l’appareil photo à une prise reliée à un circuit diff érent de celui où est connecté le récepteur.
• Consultez un revendeur ou un technicien radio/télévision spécialisé.
AVERTISSEMENTS
Modi cations : Le FCC demande qu’il soit notifi é à l’utilisateur que
tout changement ou modifi cation sur cet appareil qui n’aurait pas
été expressément approuvé par Nikon Corporation peut annuler
tout droit à l’utilisateur d’utiliser l’équipement.
Nikon Inc.,
1300 Walt Whitman Road, Melville, New York
11747-3064, U.S.A.
Tél.: 631-547-4200
Avertissements à l’attention des utilisateurs canadiens
ATTENTION
Cet appareil numérique de la classe B est conforme à la norme
NMB-003 du Can a da.
CAUTION
This Class B digital apparatus complies with Canadian ICES-003.
Précautions d’utilisation
• La MB-D15 s’utilise uniquement avec des appareils photo compatibles.
• N’utilisez pas des piles ou des accumulateurs ainsi que des supports pour piles ou accumulateur non recommandés dans ce
manuel.
• Pour éviter tout court-circuit dû au contact entre des objets
métalliques et les contacts de l’alimentation, replacez le cachecontacts lorsque vous n’utilisez pas la MB-D15.
• Lorsqu’un support pour piles ou accumulateur est retiré de la
MB-D15, enlevez les piles/l’accumulateur ou mettez le support ou
le cache-contacts dans l’étui du support afi n d’éviter les courtscircuits causés par le contact avec d’autres objets métalliques.
• Le voyant d’accès à la carte mémoire peut s’allumer lorsque la
MB-D15 est fi xée ou retirée de l’appareil photo, mais il ne s’agit
pas d’un dysfonctionnement.
• Si vous remarquez que de la fumée, une odeur ou un bruit inhabituel provient de la poignée-alimentation, cessez immédiatement de l’utiliser. Après avoir retiré l’accumulateur ou les piles,
portez le produit à un centre de service Nikon agréé pour le faire
inspecter (veillez à ne pas vous brûler).
• La MB-D15 ne comporte pas de commutateur marche-arrêt.
Pour l’allumer ou l’éteindre, utilisez le commutateur marche-arrêt de l’appareil photo.
La MB-D15 et ses accessoires
La MB-D15 et les accessoires fournis
Véri ez que les éléments suivants se trouvent bien avec
votre MB-D15 (piles et accumulateurs vendus séparément).
MB-D15 Support MS-D14EN pour
Support MS-D14 pour piles AA Étui du support
Cache-contacts
Le MS-D14EN est inséré dans la MB-D15 à la livraison. Se reporter à “Insertion des accumulateurs/piles” pour obtenir des informations sur le retrait du support pour accumulateur.
Utilisation d’un adaptateur secteur et d’un connecteur d’alimentation
L’adaptateur secteur EH-5b et le connecteur d’alimentation
EP-5B (optionnels) fournissent une source d’alimentation
able lorsque vous utilisez l’appareil photo pendant des périodes prolongées. Pour utiliser un adaptateur secteur avec la
poignée MB-D15, insérez le connecteur EP-5B dans le support
pour accumulateur MS-D14EN comme décrit dans le paragraphe « Le connecteur d’alimentation EP-5B » (ci-dessous), et
branchez l’adaptateur EH-5b comme décrit dans la documentation fournie avec le connecteur EP-5B.
accumulateur EN-EL15
• Manuel d’utilisation (ce
manuel)
• Garantie
Descriptif de la MB-D15 ( gure A)
q Cache-contacts
w Support pour le cache-contacts
Contacts d’alimentation/de communication
e
r Touche AEL/AFL
t Molette de commande principale
y Sélecteur multidirectionnel
u Molette de xation
i Volet du connecteur d’alimentation du support
o Volet du logement pour accumulateur/piles
!0 Logement pour accumulateur/piles
Loquet du logement pour accumulateur/piles
!1
!2 Vis de montage
!3 Déclencheur
!4 Verrouillage de commande
!5 Molette de commande secondaire
!6 Filetage de xation sur trépied
!7 Support MS-D14EN pour accumulateur EN-EL15
!8 Contacts d’alimentation
!9 Contacts d’alimentation (pour support MS-D14EN)
@0 Support MS-D14 pour piles AA
@1 Contacts d’alimentation (pour support MS-D14)
Commandes de la MB-D15
La MB-D15 est équipée d’un déclencheur (Figure A- !3), d’un
sélecteur multidirectionnel (Figure A- y), d’une molette de
commande principale (Figure A- t), d’une molette de com-
mande secondaire (Figure A- !5), et d’une touche AEL/AFL
(Figure A- r) à utiliser pour prendre des photographies
orientées à la verticale (portrait). Ces commandes remplissent les mêmes fonctions que les commandes correspondantes sur l’appareil et sont concernées par les modi cations
apportées aux options du menu Réglages perso. (Groupe f)
qui ont une incidence sur ces mêmes commandes. Se reporter au manuel de l’appareil pour plus d’informations.
Le verrouillage de commande de la MB-D15
Le verrouillage de commande (Figure A- !4) empêche
toute utilisation involontaire des commandes de la MB-D15.
Avant d’utiliser ces commandes pour prendre des photos
en cadrage vertical (portrait), déverrouillez les commandes
comme indiqué.
Le verrouillage de commande ne coupe pas l’alimentation.
Servez-vous du commutateur marche-arrêt de l’appareil
photo pour allumer et éteindre l’appareil photo.
Verrouillage Déverrouillage
Utilisation de la poignée-alimentation
Montage de la poignée-alimentation
Avant de monter la poignée-alimentation, assurez-vous que
l’appareil photo est éteint et que le verrouillage de commande de la MB-D15 ( gure A- !4) est en position L.
Retirez le cache-contacts (Figure A- q) de la poignée.
1
Les contacts pour la MB-D15 se trouvent sous l’appareil
2
photo où ils sont protégés par un cache-contacts. Retirez le cache-contacts comme indiqué dans la Figure B-q
et placez-le sur le support pour cache-contacts de la
MB-D15 (Figure B- w).
Positionnez la poignée MB-D15 en alignant sa vis de
3
montage (Figure C- w) avec le letage de xation sur
trépied de l’appareil photo (Figure C- q) et bloquez
l’ensemble en tournant la molette de xation dans la direction indiquée par la èche LOCK (Figure D). Il n’est pas
nécessaire de retirer l’accumulateur de l’appareil photo
avant de connecter la MB-D15. Par défaut, l’appareil
photo n’utilise sa propre alimentation qu’une fois les
piles ou l’accumulateur de la MB-D15 complètement
déchargé(es). L’option
menu Réglages perso. de l’appareil photo (Groupe d)
peut être utilisée pour modi er l’ordre dans lequel les alimentations sont utilisées.
Veillez à placer le cache-contacts de l’appareil photo sur le support pour cache-contacts et gardez celui de la poignée MB-D15
dans un endroit sûr pour éviter de le perdre.
Un espaceur PB-6D et une bague allonge PK-13 sont nécessaires
en cas d’utilisation d’un souffl et PB-6 avec la MB-D15.
Retrait de la poignée-alimentation
Pour retirer la MB-D15, mettez l’appareil photo hors tension
et le verrouillage de commande de la MB-D15 sur L, puis
desserrez la molette de xation en la faisant tourner dans
le sens opposé à celui indiqué par la èche LOCK et retirez
la MB-D15.
Insertion des accumulateurs/piles
La MB-D15 peut être utilisée avec un accumulateur EN-EL15
ou avec six piles AA.
Avant l’insertion de l’accumulateur/des piles, véri ez que
l’appareil est éteint et que le verrouillage de commande de
la MB-D15 est en position L.
Déverrouillez la MB-D15 en positionnant le loquet du lo-
1
gement pour accumulateur/piles de la MB-D15 sur
retirez le support pour piles ou accumulateur (Figure E).
Installez l’accumulateur ou les piles comme indiqué ci-
2
dessous.
EN-EL15 : Alignez les encoches de l’accumulateur avec les
parties saillantes du support MS-D14EN, insérez l’accumulateur avec la èche (▲) sur l’accumulateur orientée vers les
contacts d’alimentation du support (Figure F- q). Appuyez
légèrement sur l’accumulateur et faites-le glisser dans le
sens indiqué par la èche jusqu’à ce que ses contacts d’alimentation s’encliquent en position (Figure F- w).
Piles AA : Installez six piles AA dans le support MS-D14
comme indiqué dans la Figure G, en veillant à insérer les
piles dans le bon sens.
Ordre d’alimentation
dans le
et
Insérez le support pour piles ou accumulateur dans la
3
MB-D15 et verrouillez le volet du logement pour accumulateur/piles (Figure H). Véri ez que le support pour piles
ou accumulateur est enfoncé avant de tourner le loquet.
Mettez l’appareil photo sous tension et véri ez le niveau
4
de charge sur l’écran de contrôle ou dans le viseur comme
décrit dans le manuel de l’appareil photo. Si l’appareil ne
se met pas sous tension, véri ez que l’accumulateur ou
les piles sont correctement insérés.
Se reporter au manuel de l’appareil photo pour plus d’informations. Les menus suivants comportent des options pour
la MB-D15 : Ordre d’alimentation, Type d’accu./pile
MB-D15 et Informations de l’accumulateur.
Le connecteur d’alimentation EP-5B
Pour utiliser le connecteur d’alimentation EP-5B, insérez-le dans
le support pour accumulateur MS-D14EN en positionnant la
fl èche (▲) du connecteur vers les contacts d’alimentation du
support. Appuyez doucement sur le connecteur et faites-le glisser dans le sens de la fl èche jusqu’à ce que les contacts d’alimentation s’encliquent en position (Figure I- q). Ouvrez le volet
du connecteur d’alimentation du support et faites passer le
câble d’alimentation du EP-5B à travers l’ouverture (Figure I- w).
Retrait des accumulateurs/piles
Veillez à ne pas faire tomber les accumulateurs ou le support
pour piles ou accumulateur.
Déverrouillez la MB-D15 en positionnant le loquet du lo-
1
gement pour accumulateur/piles de la MB-D15 sur et
retirez le support pour piles ou accumulateur (Figure E).
Retirez l’accumulateur ou les piles.
2
EN-EL15 : Tout en appuyant sur la touche PUSH, faites glis-
ser l’accumulateur vers elle. Vous pouvez ensuite retirer
l’accumulateur comme sur l’illustration.
La procédure pour retirer le connecteur d’alimentation
EP-5B est la même que pour le EN-EL15.
Piles AA : Retirez les piles comme indiqué en veillant à ne
pas les faire tomber.
Caractéristiques
Alimentation
Température de
fonctionnement
Dimensions
(L × H × P)
Poids Environ 340 g avec le MS-D14EN et un accumu-
Les caractéristiques et la conception peuvent être modifi ées sans
préavis.
Accumulateur EN-EL15
Les performances de l’accumulateur EN-EL15 diminuent à des
températures inférieures à 10 °C. Assurez-vous que l’accumulateur est entièrement rechargé et gardez au chaud un accumulateur de rechange à portée de main au cas où il faudrait
le remplacer. Les accumulateurs refroidis peuvent retrouver un
peu d’énergie s’ils sont réchauff és.
Piles AA
En raison de leur capacité limitée, les piles alcalines AA ne doivent
être utilisées que lorsqu’aucune autre alternative n’est disponible.
La capacité des piles AA varie selon les conditions de fabrication
et de stockage et peut s’avérer parfois extrêmement faible ; il
peut arriver que les piles AA subissent une baisse de leur capacité ou cessent de fonctionner avant leur date d’expiration.
Notez que la capacité des piles AA peut chuter aux températures inférieures à 20 °C. Leur utilisation n’est pas recommandée
à basse température.
Un accumulateur Li-ion EN-EL15, six piles AA
alcalines, Ni-MH ou lithium, ou encore un adaptateur secteur EH-5b (nécessitant le connecteur
d’alimentation EP-5B)
0 °C – 40 °C
138,5 × 50,5 × 76 mm environ
lateur optionnel EN-EL15
Environ 395 g avec le MS-D14 et six piles AA
(disponibles auprès d’autres fournisseurs)
Environ 280 g avec le MS-D14EN et le connecteur d’alimentation optionnel EP-5B
Environ 255 g avec le MS-D14EN
Environ 255 g avec le MS-D14
A
Aviso para los clientes en Europa
Avisos para los clientes de EE.UU.
Avisos para los clientes de Canadá
La MB-D15 y Accesorios suministrados
Uso de un adaptador de CA y un conector a la red eléctrica
Controles del MB-D15
MB-D15 Bloqueo del control
Montaje de la unidad de alimentación
Extracción de la unidad de alimentación
Introducción de las baterías
Extracción de las baterías
Informação para clientes na Europa
Informação para clientes nos EUA
Informação para clientes no Canadá
O MB-D15 e acessórios fornecidos
Controles MB-D15
Trava do controle do MB-D15
Acoplar o pacote de bateria
Remoção do pacote de bateria
Introduzir baterias
Remoção das baterias
q
w
!2
e
r
t
y
!7
!9
!8
B D
q
w
F
H
q
w
q
w
Español
Introducción
Queremos agradecer su compra del pack de baterías múltiple MB-D15 para utilizarse con todas las cámaras digitales
Nikon que indiquen el MB-D15 como accesorio compatible
en el manual de la cámara. El MB-D15 utiliza una batería recargable EN-EL15 de ion de litio o seis baterías AA (alcalinas,
Ni-MH o de litio) e incluye un disparador, un botón AEL/AFL,
un multiselector, y diales principal y secundario alternativos
para la realización de fotografías en orientación “vertical”
(retrato). Las opciones del menú de la cámara permiten al
usuario seleccionar si se utiliza primero la batería de la cámara o las baterías en el MB-D15; consulte el manual de la
cámara para más detalles.
Precauciones de seguridad
Para asegurarse de que hace un uso correcto, lea completamente este manual antes de utilizar el producto. Después
de leerlo, asegúrese de guardarlo en un lugar donde puedan
consultarlo todas las personas que utilicen el producto.
Aviso para los clientes en Europa
PRECAUCIÓN
RIESGO DE EXPLOSIÓN SI LA BATERÍA ES REEMPLAZADA POR
EL TIPO INCORRECTO. DESECHE LAS BATERÍAS UTILIZADAS DE
ACUERDO A LAS INSTRUCCIONES.
Este símbolo indica que este producto se debe desechar por separado.
La nota siguiente corresponde únicamente a los
usuarios de los países europeos:
• Este producto se ha diseñado para desecharlo por separado en
un punto de recogida de residuos adecuado. No lo tire con la
basura doméstica.
• Para obtener más información, puede ponerse en contacto con
el vendedor o con las autoridades locales encargadas de la gestión de residuos.
Avisos para los clientes de EE.UU.
Declaración de interferencias con radiofrecuencias de la Comisión Federal de
Comunicaciones (FCC)
Este equipo ha sido probado y se ajusta a los límites establecidos
para los aparatos digitales de la clase B, según la sección 15 de las
normas de la FCC. Estos límites se han establecido para proporcionar una protección razonable contra interferencias peligrosas
en instalaciones residenciales. Este equipo genera, utiliza y puede
emitir radiofrecuencias, y si no se instala y utiliza como indican las
instrucciones, puede causar interferencias en las comunicaciones
por radio. Sin embargo, no se puede garantizar que no se produzcan interferencias en una instalación en concreto. Si este aparato
causa interferencias en la recepción de la televisión o la radio, lo
cual puede comprobarse encendiendo y apagando el equipo, se
ruega al usuario que intente corregir las interferencias tomando
alguna de las siguientes medidas:
• Reorientar o colocar en otro lugar la antena de recepción.
• Aumentar la separación entre el equipo y el aparato receptor.
• Conecte el equipo a una toma de un circuito distinto a aquél al
que el receptor esté conectado.
• Consulte al proveedor o a un técnico de radio/televisión experimentado.
PRECAUCIONES
Modi caciones: La FCC exige que se notifi que al usuario que cualquier cambio o modifi cación realizado en este aparato que no
haya sido aprobado expresamente por Nikon Corporation podría
invalidar el derecho del usuario a utilizar el equipo.
Nikon Inc.,
1300 Walt Whitman Road, Melville, New York
11747-3064, EE.UU.
Tel.: 631-547-4200
Avisos para los clientes de Canadá
PRECAUCIÓN
Este aparato digital de tipo B cumple con la norma canadiense
ICES-003.
ATTENTION
Cet appareil numérique de la classe B est conforme à la norme
NMB-003 du Canada.
Precauciones de uso
• La MB-D15 se debe utilizar solamente con cámaras compatibles.
• No la utilice con baterías ni portabaterías que no estén recomendadas en este manual.
• Para evitar que los objetos metálicos originen un cortocircuito al
entrar en contacto con los terminales, vuelva a colocar la tapa de
los contactos cuando no utilice la MB-D15.
• Cuando retire el portabaterías del MB-D15, quite las baterías o
coloque el portabaterías o la tapa en la caja para evitar cortocircuitos provocados por entrar en contacto con otros objetos
metálicos.
• La lámpara de acceso de la tarjeta de memoria podría encenderse al insertar la MB-D15 o al quitar de la cámara, pero esto no
signifi ca un mal funcionamiento.
• Si notara que la unidad de alimentación desprende humo o un
ruido u olor inusuales, deje de utilizarla inmediatamente. Cuando haya retirado las baterías, lleve el dispositivo al vendedor o a
un servicio técnico autorizado Nikon para su revisión.
• La MB-D15 no tiene interruptor de corriente. Utilice el interruptor de la cámara para encenderla o apagarla.
La MB-D15 y Accesorios
La MB-D15 y Accesorios suministrados
Con rme que los siguientes artículos se hayan suministrado
con la MB-D15 (las baterías se venden por separado).
MB-D15 Soporte MS-D14EN para
Soporte MS-D14 para bate-
La MS-D14EN se encuentra ya insertada en la MB-D15 al momento de embarque. Consulte “Introducción de las baterías”
para leer la información de como quitar el portabaterías.
Uso de un adaptador de CA y un conector a la red eléctrica
El adaptador opcional EH-5b CA y el conector a la red eléctrica EP-5B suministran una fuente de energía able cuando
se usa la cámara durante largos períodos. Para usar un adaptador CA con el MB-D15, inserte el EP-5B dentro del portabaterías MS-D14EN tal y como se describe en “El conector a
la red eléctrica EP-5B” (a continuación), y luego conecte el
EH-5b tal y como se describe en la documentación provista
con el EP-5B.
rías AA
Tapa de los contactos
baterías EN-EL15
Estuche del soporte
• Manual del Usuario (este
manual)
• Garantía
Partes de la MB-D15 (Figura A)
q Tapa de los contactos
w Soporte de la cubierta de contactos
e Contactos de la energía/señal
r Botón AEL/AFL
t Dial de control principal
y Multiselector
u Rueda de jación
i Tapa del conector de alimentación del portabaterías
o Tapa del compartimento de las baterías
!0 Compartimento de las baterías
!1 Pestillo del compartimento de las baterías
!2 Tornillo de montaje
!3 Disparador
!4 Bloqueo del control
!5 Dial de control secundario
!6 Rosca para el trípode
!7 Soporte MS-D14EN para baterías EN-EL15
!8 Terminales de corriente
!9 Terminales de corriente (Portabaterías MS-D14EN)
@0 Soporte MS-D14 para baterías AA
@1 Terminales de corriente (Portabaterías MS-D14)
Controles del MB-D15
La MB-D15 está equipada con un disparador (Figura A- !3),
un Multiselector (Figura A- y), un Dial de control principal
(Figura A- t), un dial de control secundario (Figura A- !5),
y un botón AEL/AFL (Figura A- r) para utilizarse al tomar
fotografías en orientación vertical (“alta,” o retrato). Estos controles tienen las mismas funciones que los controles correspondientes a la cámara y se ven afectados por los cambios
en las opciones en el menú de ajustes personalizados (Grupo f ) que afectan estos controles de la cámara. Consulte el
manual de la cámara para más información.
MB-D15 Bloqueo del control
El bloqueo de control (Figura A- !4) bloquea los controles en
el MB-D15 para prevenir un uso no intencionado. Antes de
utilizar estos controles para tomar fotografías en orientación
vertical (retrato), libere el bloqueo como se muestra.
El bloqueo de control no es un interruptor de energía. Utilice el interruptor de alimentación para encender y apagar
la cámara.
Bloqueado Desbloqueado
Uso de la unidad de alimentación
Montaje de la unidad de alimentación
Antes de montar la unidad de alimentación, asegúrese de
que la cámara esté apagada y que el bloqueo del control de
la MB-D15 (Figura A- !4) está en la posición L.
Retire la tapa de los contactos (Figura A- q) del paquete
1
de baterías.
Los contactos para la MB-D15 se encuentran en la base
2
de la cámara, donde se encuentran protegidos por una
cubierta de contactos. Retire la tapa de contactos como
se muestra en la Figura B- q y colóquela en el soporte de
tapa de contactos en la MB-D15 (Figura B- w).
!1
Coloque la MB-D15, manteniendo alineado el tornillo de
3
montaje (Figura C- w) con la rosca para el trípode de la
cámara (Figure C- q) y apriete la rueda accesoria girándo-
la en la dirección mostrada por la echa LOCK (Figura D).
No hay necesidad de quitar la batería de la cámara antes
de conectar la MB-D15. En los ajustes predeterminados,
la batería insertada en la cámara se utilizará solamente
después de que se ha agotado la batería en la MB-D15.
La opción Orden de baterías en el menú de ajustes personalizados (Grupo d) se puede utilizar para cambiar el
orden en el cual las baterías se van a utilizar.
Asegúrese de colocar la tapa de contacto de la cámara en el
soporte de la tapa y para mantener la tapa de contacto de la
MB-D15 en un lugar seguro para evitar que se pierda.
Al utilizar el accesorio para enfoque con fuelle PB-6 con el
MB-D15, será necesario un anillo de extensión automático
PK-13 y PB-6D.
Extracción de la unidad de alimentación
Para extraer el MB-D15, apague la cámara y establezca el bloqueo de control en el MB-D15 en L, después a oje la rueda
de jación girándola en la dirección opuesta a la mostrada
por la echa LOCK y retire el MB-D15.
Introducción de las baterías
El MB-D15 podrá utilizarse con una batería recargable de ión
de litio EN-EL15 o con seis baterías AA.
Antes de insertar las baterías, asegúrese de que la cámara
se encuentre apagada y de que el bloqueo de control de la
MB-D15 se encuentre en la posición L.
Desbloquee el MB-D15 girando el pestillo del compar-
1
timento de las baterías hacia y quite el portabaterías
(Figura E).
Coloque las baterías como se describe a continuación.
2
EN-EL15: Coincidiendo las hendiduras de la batería con las
proyecciones en el soporte MS-D14EN, inserte la batería con
la echa (▲) en la batería hacia los terminales de corriente
de la batería (Figura F- q). Presione ligeramente la batería
hacia abajo y deslícela en la dirección de la echa hasta que
los terminales de corriente hagan clic (Figura F- w).
Baterías AA: Coloque seis baterías AA en el soporte de batería MS-D14 tal y como se indica en la gura G, y asegúrese de que las baterías estén colocadas en la orientación
correcta.
Inserte el portabaterías en el MB-D15 y coloque la tapa
3
del compartimento de las baterías (Figura H). Asegúrese
de que el soporte esté insertado antes de girar el pestillo.
Encienda la cámara y veri que el nivel de la batería en el
4
panel de control o en el visor tal y como se describe en el
manual de la cámara. Si la cámara no enciende, veri que
que la batería se encuentre correctamente insertada.
Para más información, consulte el manual de la cámara. Los
siguientes menús de la cámara ofrecen opciones para el
Orden de baterías, Tipo batería del MB-D15
MB-D15:
Información de batería
.
e
El conector a la red electrica EP-5B
Cuando utilice el conector a la red electrica EP-5B, insértelo en
el portabaterías MS-D14EN con la fl echa (▲) en el conector hacia el terminal de alimentación de la batería. Pulse el conector
ligeramente hacia abajo y deslícelo en la dirección de la fl echa
hasta que el terminal de alimentación haga clic al encajar en su
sitio (Figura I- q). Abra la tapa del conector a la red electrica
del portabaterías y pase el cable EP-5B a través de la apertura
(Figure I- w).
Extracción de las baterías
Tenga cuidado de no dejar caer las baterías o el portabaterías.
Desbloquee el MB-D15 girando el pestillo del compar-
1
timento de las baterías hacia y quite el portabaterías
(Figura E).
Quite la batería o las baterías del portabaterías.
2
EN-EL15: Al pulsar el botón PUSH, deslice la batería hacia el
botón. La batería puede quitarse como se muestra.
El procedimiento para quitar el conector a la red electrica
EP-5B es el mismo que para el EN-EL15.
Baterías AA: Quite las baterías como se muestra. Tenga
cuidado de no dejar caer las baterías al quitarlas del portabaterías.
u
i
o
!0
!3
!4
!5
!6
Especi caciones
Fuente de alimentación
Temperatura de
funcionamiento
Dimensiones
(an × al × pr)
Peso Aprox. 340 g (12,0 onzas) con MS-D14EN y la
Las especifi caciones y el diseño pueden cambiar sin notifi cación
previa.
Batería EN-EL15
El rendimiento de la batería EN-EL15 disminuye a temperaturas
inferiores a 10 °C (50 °F). Asegúrese de que la batería esté completamente cargada y mantenga lista una batería de repuesto a
temperatura ambiente para cambiarla si es necesario. Las baterías frías podrían recuperar algo de su carga al calentarlas.
Baterías AA
Debido a su capacidad limitada, las baterías alcalinas AA deberán utilizarse solamente cuando no tenga otra alternativa.
La capacidad de las baterías AA depende de las condiciones de
almacenamiento y podría ser extremadamente baja en algunas
ocasiones; en algunos casos, las baterías AA podrían sufrir una
caída de capacidad o dejar de funcionar antes de la fecha de
expiración. Tenga en cuenta que la capacidad de las baterías AA
podría disminuir a temperaturas inferiores a 20 °C (68 °F). No se
recomienda el uso a bajas temperatura.
Una batería recargable de ion de litio
EN-EL15, seis alcalinas, Ni-MH o baterías de
litio AA, o un adaptador de CA EH-5b (necesita un conector a la red eléctrica EP-5B)
0 °C – 40 °C (32 °F – 104 °F)
138,5 × 50,5 × 76 mm (5,5 × 2,0 × 3,0 pulgadas) aprox.
batería opcional EN-EL15
Aprox. 395 g (13,9 onzas) con MS-D14 y seis
baterías AA (disponible por separado en
terceros proveedores)
Aprox. 280 g (9,9 onzas) con MS-D14EN y el
conector a la red eléctrica opcional EP-5B
Aprox. 255 g (9,0 onzas) con MS-D14EN
Aprox. 255 g (9,0 onzas) con MS-D14
Português (Brasil)
Apresentação
Obrigado por sua compra de um pacote de bateria de multialimentação MB-D15. Esta bateria é concebida para uso em
todas as câmeras digitais Nikon que listam o MB-D15 como
um acessório compatível no manual da câmera. O MB-D15
aceita uma bateria recarregável de Li-ion EN-EL15 ou seis
pilhas AA (alcalinas, de Ni-MH ou de lítio) e inclui um botão alternativo de liberação do obturador, botão AEL/AFL,
seletor múltiplo e discos de comando e subcomando para
tirar fotogra as na orientação vertical (retrato). O menu de
opções da câmera permite ao usuário escolher se as baterias
da câmera, ou as baterias do MB-D15, são usadas primeiro.
Veja o manual da câmera para detalhes.
Precauções de segurança
Para assegurar uma operação correta, leia cuidadosamente este manual antes de usar este produto. Depois de ler,
mantenha-o num local onde possa ser visto por todos que
usem o produto.
Informação para clientes na Europa
ATENÇÃO
RISCO DE EXPLOSÃO SE A BATERIA FOR SUBSTITUÍDA POR OUTRA DE TIPO INCORRETO. DESCARTE AS BATERIAS USADAS DE
ACORDO COM AS INSTRUÇÕES.
Este símbolo indica que este produto deve ser recolhido separadamente.
O seguinte aplica-se apenas aos usuários em países
europeus:
• Este produto foi concebido para coleta seletiva num ponto de
coleta apropriado. Não descarte como lixo doméstico.
• Para mais informações, contate o revendedor ou as autoridades
locais encarregadas da gestão do lixo.
Informação para clientes nos EUA
Declaração de interferência de frequência de rádio da Federal Communications
Commission (FCC)
Este equipamento foi testado e está em conformidade com os
limites para um dispositivo digital Classe B, conforme a Parte
15 das regras da FCC. Estes limites são projetados para fornecer
proteção razoável contra interferência prejudicial em uma instalação residencial. Este equipamento gera, usa e pode irradiar
energia de frequência de rádio e, se não for instalado e utilizado
de acordo com as instruções, pode causar interferência prejudicial
às comunicações de rádio. No entanto, não há garantia de que
não ocorrerão interferências em uma instalação em particular. Se
este equipamento provocar interferência prejudicial à recepção
de rádio ou televisão, o que pode ser determinado desligando e
ligando o equipamento, o usuário é encorajado a tentar corrigir a
interferência com uma das seguintes medidas:
• reoriente ou mude de lugar a antena de recepção.
• Aumente a distância entre o equipamento e o receptor.
• Conecte o equipamento a uma tomada num circuito diferente
daquele onde o receptor está conectado.
• Consulte o revendedor ou um técnico de rádio/televisão experiente para ajuda.
@0
@1
C
ATENÇÃO
Alterações: a FCC exige que o usuário seja notifi cado de que quaisquer alterações ou modifi cações realizadas a este dispositivo, que
não sejam expressamente aprovadas pela Nikon Corporation, poderão anular o direito do usuário de operar o equipamento.
Nikon Inc.,
1300 Walt Whitman Road, Melville, New York
11747-3064, U.S.A.
Tel.: 631-547-4200
Informação para clientes no Canadá
ATENÇÃO
Este aparelho digital Classe B está de acordo com o ICES-003 canadense.
ATTENTION
Cet appareil numérique de la classe B est conforme à la norme
NMB-003 du Canada.
Precauções de utilização
• O MB-D15 deve ser usado apenas com câmeras compatíveis.
• Não use com baterias e suportes de bateria não recomendados
neste manual.
• Para evitar curtos-circuitos causados por objetos metálicos tocando os terminais de alimentação, recoloque a tampa do contato quando o MB-D15 não estiver sendo usado.
• Quando um suporte de bateria é removido do MB-D15, retire as
baterias ou coloque o suporte ou tampa no estojo do suporte
para evitar curtos-circuitos causados pelo contato com outros
objetos metálicos.
• A luz indicadora de acesso ao cartão de memória poderá acender quando o MB-D15 for acoplado ou removido da câmera,
mas isto não é um mau funcionamento.
• Caso notar fumaça ou um odor ou ruído estranho do pacote da
bateria, interrompa imediatamente a utilização. Depois de remover as baterias, leve o dispositivo ao revendedor ou a um representante de assistência técnica autorizada Nikon para inspeção.
• O MB-D15 não está equipado com uma chave liga/desliga. Use a
chave liga/desliga da câmera para ligar e desligar a alimentação.
O MB-D15 e acessórios
O MB-D15 e acessórios fornecidos
Con rme se os seguintes itens são fornecidos com o MB-D15
(as baterias são vendidas separadamente).
MB-D15 Suporte MS-D14EN para
Suporte MS-D14 para
pilhas AA
Tampa dos contatos
O MS-D14EN vem introduzido no MB-D15 na expedição. Consulte “Introduzir baterias” para obter informações sobre a remoção do suporte da bateria.
Usando um adaptador AC e um conector de alimentação
O adaptador AC opcional EH-5b e o conector de alimentação EP-5B oferecem uma fonte de energia con ável quando
a câmera for usada por períodos prolongados. Para usar um
adaptador AC com o MB-D15, introduza o EP-5B no suporte
de baterias MS-D14EN tal como descrito em “Conector de
alimentação EP-5B” (abaixo) e então conecte o EH-5b como
descrito na documentação fornecida com o EP-5B.
Partes do MB-D15 (Figura A)
Tampa dos contatos
q
Suporte da tampa dos contatos
w
Contatos de alimentação/sinal
e
Botão AEL/AFL
r
Disco de comando principal
t
Seletor múltiplo
y
Roda de acessório
u
Suporte da tampa do conector de alimentação
i
Tampa do compartimento da bateria
o
Compartimento da bateria
!0
Trava do compartimento da bateria
!1
Parafuso de montagem
!2
Botão de liberação do obturador
!3
Trava de controle
!4
Disco de subcomando
!5
Soquete do tripé
!6
Suporte MS-D14EN para baterias EN-EL15
!7
Terminais de alimentação
!8
Terminais de alimentação (suporte de bateria MS-D14EN)
!9
Suporte MS-D14 para pilhas AA
@0
Terminais de alimentação (suporte de bateria MS-D14)
@1
Controles MB-D15
O MB-D15 é equipado com um botão de liberação do obturador (Figura A- !3), seletor múltiplo (Figura A- y), disco
de comando principal (Figura A- t), disco de subcomando
(Figura A- !5) e botão AEL/AFL (Figura A- r) para utilização
quando tirar fotogra as na orientação vertical (ao alto ou
retrato). Estes controles executam as mesmas funções que
os controles correspondentes na câmera e são afetados por
baterias EN-EL15
Estojo do suporte
• Manual do usuário
(este manual)
• Garantia
q
w
alterações a opções no menu de con gurações personalizadas (Grupo f ) que afetam estes controles da câmera. Consulte o manual da câmera para obter mais informações.
Trava do controle do MB-D15
A trava de controle (Figura A- !4) bloqueia os controles no
MB-D15 para evitar a utilização não intencional. Antes de
usar estes controles para tirar fotogra as na orientação vertical (retrato), libere a trava como mostrado.
A trava de controle não é uma chave liga/desliga. Use a chave liga/desliga da câmera para ligar e desligar a câmera.
Bloqueado Desbloqueado
Usar o pacote de bateria
Acoplar o pacote de bateria
Antes de acoplar o pacote de bateria, con rme se a câmera
está desligada e se a trava de controle do MB-D15 (Figura
A-
) está na posição L.
!4
Remova a tampa do contato (Figura A- q) do pacote de
1
bateria.
Os contatos para o MB-D15 estão na base da câmera,
2
onde são protegidos por uma tampa de contato. Remova a tampa de contato como mostrado na Figura B-q e
coloque-a no suporte da tampa do contato no MB-D15
(Figura B- w).
Posicione o MB-D15, mantendo o parafuso de monta-
3
gem MB-D15 (Figura C- w) alinhado com o soquete do
tripé da câmera (Figura C- q) e aperte a roda do acessório girando-a no sentido indicado pela seta LOCK TRAVAR
(Figura D). Não é necessário remover a bateria da câmera
antes de conectar o MB-D15. Em con gurações padrão, a
bateria introduzida na câmera será usada apenas depois
de a bateria no MB-D15 estar esgotada. A opção
da bateria
câmera (Grupo d) pode ser usada para alterar a ordem
pela qual as baterias são usadas.
Certifi que-se de colocar a tampa do contato da câmara no suporte da tampa de contato e de manter a tampa do contato do
MB-D15 num local seguro para evitar perdê-la.
São necessários um anel de extensão automático PB-6D e um
PK-13 quando usar o fole de extensão PB-6 com o MB-D15.
Remoção do pacote de bateria
Para remover o MB-D15, desligue a câmara e coloque a trava
de controle no MB-D15 em L, e depois desaperte a roda de
acessórios e girando-a na direção oposta àquela mostrada
pela seta da LOCK TRAVAR e remova o MB-D15.
Introduzir baterias
O MB-D15 pode ser usado com uma bateria recarregável de
Li-ion EN-EL15 ou seis pilhas AA.
Antes de introduzir as baterias, veri que se a câmera está
desligada e se a trava de controle MB-D15 está na posição L.
Destranque o MB-D15 girando a trava do compartimento
1
da bateria para
Prepare as baterias como descrito abaixo.
2
EN-EL15: fazendo coincidir os entalhes da bateria com as
saliências do suporte MS-D14EN, introduza a bateria com
a seta (▲) da bateria apontando para os terminais de alimentação do suporte da bateria (Figura F- q). Pressione
a bateria ligeiramente para baixo e deslize-a na direção
da seta até que os terminais de alimentação façam um
clique no seu lugar (Figura F- w).
Pilhas AA: coloque seis pilhas AA no suporte de pilhas
MS-D14 como indicado na Figura G, assegurando-se que
as pilhas estejam na posição correta.
Insira o suporte da bateria no MB-D15 e trave a tampa
3
do compartimento da bateria (Figura H). Certi que-se de
que o suporte esteja inserido antes de girar a trava.
Ligue a câmera e veri que a carga da bateria no painel
4
de controle ou no visor, como descrito no manual da
câmera. Se a câmera não ligar, veri que se a bateria está
corretamente introduzida.
Para mais informações consulte o manual da câmera.
Os seguintes menus da câmera oferecem opções para o
MB-D15:
Informações da bateria
no menu de con gurações personalizadas da
e remova o suporte da bateria (Figura E).
Ordem da bateria, Tipo de bateria MB-D15
.
Conector de alimentação EP-5B
Quando usar o conector de alimentação EP-5B, introduza-o no
suporte MS-D14EN com a seta (▲) no conector apontando para
os terminais de alimentação da bateria. Pressione ligeiramente
para baixo o conector e deslize-o na direção da seta até que os
terminais de alimentação façam um clique no seu lugar (Figura
I-q). Abra a tampa do conector de alimentação e passe o cabo
de alimentação do EP-5B através da abertura (Figura I-w).
Remoção das baterias
Tenha cuidado para não deixar cair as baterias ou o suporte.
Destranque o MB-D15 girando a trava do compartimento
1
da bateria para e remova o suporte da bateria (Figura E).
Remova a bateria ou baterias do suporte.
2
EN-EL15: enquanto pressiona o botão PUSH APERTE, desli-
ze a bateria na direção do botão. A bateria pode então ser
removida como mostrado.
Ordem
e
E
w
q
O procedimento para a remoção do conector de alimentação EP-5B é o mesmo que para EN-EL15.
Pilhas AA: remova as pilhas como indicado. Tenha cuidado
para não deixar as pilhas cairem quando as remover do
suporte.
Especi cações
Fonte de
alimentação
Temperatura
de operação
Dimensões
(L × A × P)
Peso Aprox. 340 g com o MS-D14EN e a bateria
Especifi cações e design sujeitos a alteração sem aviso prévio.
Baterias EN-EL15
O rendimento das baterias EN-EL15 diminui em temperaturas
inferiores a cerca de 10 °C. Assegure-se de que a bateria esteja completamente carregada e mantenha uma bateria reserva
quente à mão pronta para trocar quando necessário. As baterias
frias podem recuperar alguma carga quando aquecidas.
Pilhas AA
Devido à sua capacidade limitada, as pilhas AA alcalinas devem
apenas ser utilizadas quando não houver mais nenhuma alternativa.
A capacidade das pilhas AA varia com a marca e condições de
armazenagem e poderá em algumas circunstâncias ser extremamente baixa. Em alguns casos as baterias AA podem sofrer
uma redução na capacidade ou deixar de funcionar antes de
suas datas de validade. Note que a capacidade das baterias AA
poderá diminuir em temperaturas inferiores a 20 °C. O seu uso
não é recomendado a baixas temperaturas.
한국어
사용하기 전에
카메라 사용설명서에 기재된 호환 가능한 액세서리
목록에 MB-D15 가 있는 모든 니콘 디지털 카메라용
멀티파워 배터리 팩 MB-D15 를 구입해 주셔서 감사
합니다 . MB-D15 는 EN-EL15 충전식 Li-ion 배터
리 1 개 또는 AA 배터리 ( 알카라인, Ni-MH, 리튬 ) 6
개를 사용하고 세로 방향의 사진을 촬영하기 위해 대
체 셔터 버튼 , AE-L/AF-L 버튼 , 멀티 셀렉터 , 메인
및 서브 커맨드 다이얼을 가지고 있습니다 . 카메라
메뉴 옵션에서 카메라 배터리 또는 MB-D15 배터리
의 우선 사용 여부를 선택할 수 있습니다 . 자세한 내
용은 카메라의 사용설명서를 참조하여 주십시오 .
안전상의 주의
올바른 조작을 위해 이 제품을 사용하기 전에 본 매뉴
얼을 철저하게 읽어 주십시오 . 다 읽으신 후에는 반
드시 사용자가 언제나 볼 수 있는 곳에 보관하여 주십
시오 .
사용상의 주의사항
•
MB-D15와 호환되지 않는 카메라에는 사용하지
마십시오 .
•
본 설명서에 기재되어 있지 않은 배터리 및 배터리
홀더는 사용하지 마십시오 .
•
MB-D15를 사용하지 않을 때 , 금속 물체가 전원
단자와 접촉하여 전기적인 단락이 발생하는 것을
방지하기 위해 접점 캡을 다시 설치해 주십시오 .
•
배터리 홀더가 MB-D15 에서 제거된 경우 , 배터리
를 제거하거나 홀더 케이스에 홀더나 커버를 설치
하여 다른 금속 물체와 접촉하여 전기적인 단락이
발생하지 않도록 방지합니다 .
Uma bateria recarregável de Li-ion EN-EL15,
seis pilhas AA alcalinas, de Ni-MH, ou de lítio, ou
adaptador AC EH-5b (requer um conector de
alimentação EP-5B)
0 °C– 40 °C
Aprox. 138,5 × 50,5 × 76 mm
EN-EL15 opcional
Aprox. 395 g com o MS-D14 e seis pilhas AA
(disponíveis separadamente de fornecedores
independentes)
Aprox. 280 g com o MS-D14EN e o conector de
alimentação EP-5B opcional
Aprox. 255 g com o MS-D14EN
Aprox. 255 g com o MS-D14
G
•
MB-D15를 카메라에 부착하거나 분리할 때 카메
라의 메모리카드 액세스램프가 점등하는 경우가 있
지만 고장이 아닙니다 .
•
배터리 팩에서 연기 또는 이상한 냄새 또는 이음이
발생하는 경우 , 즉시 사용을 중지해 주십시오 . 배
터리를 제거한 후 , 소매점 또는 Nikon 서비스 지정
점에 장치를 가져가서 검사를 받으십시오 .
•
MB-D15에는 전원 스위치가 없습니다 . 전원의
ON/OFF는 카메라 본체의 전원스위치를 사용하십
시오 .
B 급기기 ( 가정용 방송통신기기 )
이 기기는 가정용(B급)전자파적합기기로서 주로
가정에서 사용하는 것을
목적으로 하며, 모든 지역에서 사용 할 수 있습니다 .
MB-D15와 부속품
MB-D15와 제공 부속품 확인
아래와 같이 MB-D15 와 함께 제공된 부속품들이 모
두 있는지 확인해 주십시오 ( 배터리는 별매입니다 ).
MB-D15 EN-EL15 배터리용
MS-D14EN 홀더
AA 배터리용 MS-D14
홀더
접점 캡
구입시 MS-D14EN 은 MB-D15 에 삽입되어 있습
니다 . 배터리 홀더 제거에 대한 것은 " 배터리 삽입
방법 " 을 참조하십시오 .
AC 어댑터 및 파워 커넥터 사용
별매 EH-5b AC 어댑터 및 EP-5B 파워 커넥터는
카메라를 장시간 사용할 경우 신뢰할 수 있는 전원
을 공급합니다 . MB-D15 에서 AC 어댑터를 사용하
려면 , “EP-5B 파워 커넥터”( 아래) 에 설명한 대로
EP-5B 를 MS-D14EN 배터리 홀더에 삽입한 다음
EP-5B 와 함께 제공된 설명서의 지시대로 E H-5b
를 연결해 주십시오 .
MB-D15 의 각부 명칭( 그림 A)
접점 캡
q
접점 커버 홀더
w
전원 /신호접점
e
세로위치 AE-L/AF-L 버튼
r
메인 커맨드 다이얼
t
멀티셀렉터
y
장착 휠
u
홀더 파워 커넥터 커버
i
배터리실 커버
o
배터리실
!0
배터리실 레버
!1
장착나사
!2
셔터 버튼
!3
컨트롤 록
!4
서브 커맨드 다이얼
!5
삼각대 소켓
!6
EN-EL15 배터리용 MS-D14EN 홀더
!7
전원 단자
!8
전원 단자 (MS-D14EN 배터리 홀더)
!9
AA 배터리용 MS-D14 홀더
@0
전원 단자 (MS-D14 배터리 홀더)
@1
MB-D15 컨트롤
MB-D15 에는 세로위치 셔터버튼 (그림 A- !3), 세
로위치 멀티셀렉터 ( 그림 A- y), 세로위치 메인커
맨드다이얼( 그림 A- t), 세로위치 서브커맨드다이
얼(그림A- !5), 세로위치 AE-L/AF-L 버튼( 그림
A- r) 이 탑재되어 있습니다 . 이 기능들은 카메라 본
체와 같습니다. 또한 카메라의 사용자 설정 메뉴 f [조
작 ] 에서 기능을 변경하였을 경우 , MB-D15 의 기능
도 변경됩니다 . 자세한 사항은 카메라의 사용설명서
를 참조해 주십시오 .
MB-D15 컨트롤 록
컨트롤 록 (그림 A- !4) 은 실수로 조작하는 것을 방
지하기 위해 MB-D15의 컨트롤을 잠급니다. 이 컨
트롤을 사용해 세로 방향의 사진을 촬영하기 전에 그
림과 같이 잠금을 해제해 주십시오 .
컨트롤 록은 전원 스위치가 아닙니다 . 전원의 ON/
OFF 는 카메라 본체의 전원 스위치를 사용하십시오 .
홀더 케이스
•
사용설명서(본 설명서)
•
보증서
I
q
잠금 상태 잠금 해제
상태
배터리 팩 사용
배터리 팩 장착방법
배터리 팩을 장착하기 전에 카메라 본체의 전원이
OFF 로 되어 있는지 , 그리고 MB-D15 의 컨트롤 록
(그림A- !4)이 L 쪽으로 설정되어 있는지 확인해 주
십시오 .
배터리 팩에서 접점 캡(그림 A- q)을 분리합니다.
1.
2. 카메라 밑 부분에 있는 MB-D15용 접점은 접점
커버로 보호됩니다 . 이 접점 커버를 그림 B- q에
보이는 것처럼 분리하고 MB-D15 의 접점커버 홀
더에 넣어 주십시오 ( 그림 B- w).
3. MB-D15 장착나사 ( 그림 C- w) 를 카메라의 삼
각대 소켓 (그림 C- q) 과 일치시켜서 MB-D15
를 카메라에 위치시키고 장착 휠을 LOCK 방향으
로 돌려서 장착합니다 ( 그림 D). MB-D15를 연결
하기 전에 카메라에서 배터리를 제거할 필요는 없
습니다. 초기 설정에서는 MB-D15의 배터리가
소진된 후에만 카메라에 삽입된 배터리를 사용합
니다 . 카메라의 사용자 설정 메뉴 ( 그룹 d)의 배터
리 순서 옵션에서 어느 쪽 배터리를 먼저 사용할지
순서를 변경할 수 있습니다 .
분실을 방지하기 위해 반드시 접점커버 홀더에 접
점커버를 넣고 MB-D15 접점 캡은 안전한 곳에 보
관해 주십시오 .
PB-6D 및 PK-13 자동 확장 링은 MB-D15 와 함
께 PB-6 벨로우즈 접사링을 사용할 때 필수입니다.
배터리 팩 분리방법
MB-D15를 분리하려면, 카메라 전원을 끄고
MB-D15 의 컨트롤 록을 L 쪽으로 설정한 후 , LOCK
화살표로 나타나는 것과 반대 방향으로 돌려 장착 휠
을 풀고 MB-D15 를 분리해 주십시오 .
배터리 삽입방법
MB-D15는 EN-EL15 충전식 Li-ion 배터리 1개
또는 AA 배터리 6 개와 함께 사용할 수 있습니다 .
배터리를 삽입하기 전에 카메라 본체의 전원이 OFF
로 되어 있는지 그리고 MB-D15 의 컨트롤 록이 L 쪽
으로 설정되어 있는지 확인해 주십시오 .
1. 배터리실 레버를
배터리 홀더를 분리합니다 ( 그림 E).
2. 아래 설명대로 배터리를 준비합니다.
EN-EL15
배터리에 있는 표시와 MS-D14EN 홀더의 돌출부
와 맞추고 배터리의 화살표 ( ▲ )가 배터리 홀더 전
원 단자 (그림 F- q) 로 향하도록 삽입합니다 . 배
터리를 가볍게 아래로 누르고 화살표 방향으로 전
원 단자가 제자리에 찰칵하고 들어갈 때까지 밉니
다 ( 그림 F- w).
AA 형 배터리
그림 G 처럼 배터리가 올바른 방향인지 확인하면
서 MS-D14 배터리 홀더 안에 6 개의 AA 형 배터
리를 넣습니다 .
3. 배터리 홀더를 MB-D15 에 삽입하고 배터리실 커
버를 고정합니다 ( 그림 H). 확실하게 홀더를 삽입
한 후 돌려서 고정시킵니다 .
4. 카메라를 켜고 카메라 설명서에 설명된 대로 컨트
롤 패널이나 뷰파인더로 배터리 잔량을 확인합니
다 . 카메라 전원이 켜지지 않을 경우에는 배터리
가 올바르게 삽입되어 있는지 확인하십시오 .
자세한 내용은 카메라 설명서를 참조하십시오 . 배터
리 순서 , MB-D15 배터리 유형 , 및 배터리 체크 등
의 카메라 메뉴가 MB-D15 에 옵션으로 제공됩니다 .
EP-5B 파워 커넥터
EP-5B 파워 커넥터를 사용할 때는 커넥터의 화
살표(▲)가 배터리 전원 단자를 향하도록 하여
MS-D14EN 홀더에 삽입합니다 . 커넥터를 가볍게
아래로 누르고 전원 단자가 제자리에 찰칵 맞을 때
까지 화살표 방향으로 밉니다 (그림 I- q). 홀더 파
워 커넥터 커버를 열고 EP-5B 전원 케이블을 구멍
으로 통과시킵니다 ( 그림 I- w).
배터리 분리방법
배터리를 분리할 때에는 배터리나 홀더가 떨어지지
않도록 주의하여 주십시오 .
1. 배터리실 레버를
배터리 홀더를 분리합니다 ( 그림 E).
2. 홀더에서 배터리 또는 모든 배터리를 분리합니다.
EN-EL15
홀더의 PUSH 버튼을 누르면서 배터리를 버튼 방
향으로 밉니다 . 배터리를 아래 그림과 같이 제거
할 수 있습니다 .
쪽으로 돌려 MB-D15 를 풀고
쪽으로 돌려 MB-D15 를 풀고
w
EP -5B 파 워 커넥터를 분리하는 절차는
EN-EN15 의 경우와 동일합니다 .
AA형 배터리
아래의 그림과 같이 배터리를 모두 꺼내어 주십시
오 . 홀더에서 배터리를 꺼낼 때에는 떨어지지 않
도록 주의하여 주십시오 .
사양
전원 EN-EL15 충 전 식 Li-ion 배 터 리 1
사용온도 0℃ ~40℃
크기
(W×H×D)
무게 MS-D14EN 및 별매 EN-EL15 배터
•
사양 및 외관의 일부는 개량을 위하여 예고없이 변
경하는 경우가 있습니다 .
EN-EL15 배터리
EN-EL15 배터리의 성능이 약 10℃ 이하의 온도에
서 저하될 수 있습니다 . 배터리가 완전히 충전되어
있는지 확인하고 따뜻한 여분의 배터리를 준비하여
필요에 따라 교환할 수 있도록 합니다 . 차가운 배터
리가 따뜻해지면 충전량의 일부가 회복될 수 있습
니다 .
AA 형 배터리
용량에 제한이 있으므로 다른 대안이 없을 경우에만
AA 알카라인 배터리를 사용해야 합니다 .
AA 배터리의 용량은 제조사와 보관 상태에 따라 달
라지며 때로는 극히 낮을 수도 있습니다 . 경우에 따
라서는 유효기간이 끝나기 전에 용량 저하나 배터
리 수명이 다할 수도 있습니다. 주위 온도가 20℃보
다 낮은 경우에는 AA 배터리의 용량이 급격히 감소
할 수 있습니다 . 저온 환경에서는 사용을 권장하지
않습니다 .
개, 알카라인 , Ni-MH, 또는 리튬 AA
배터리 6 개 , 또는 EH-5b AC 어 댑터
(EP-5B 파워 커넥터 필수 )
※ 경고:발연 , 화재 , 폭발 등의 위험을 수
반할 수 있으니 다음 사항을 지켜주시
기 바랍니다 .
•
육안으로 식별이 가능할 정도의 부풀
음이 발생된 전지는 위험할 수 있으므
로 제조자 또는 판매자로 즉시 문의할
것
•
지정된 정품 충전기만을 사용할 것
•
화기에 가까이 하지 말 것 ( 전자레인
지에 넣지 말 것 )
•
여름철 자동차 내부에 방치하지 말 것
•
찜질방 등 고온 다습한 곳에서 보관,
사용하지 말 것
•
전지 단자에 목걸이 , 동전 , 열쇠 , 시
계 등 금속 제품이 닿지 않도록 주의
할 것
•
휴대 기기 , 제조 업체가 보증한 리튬
2 차전지 사용할 것
•
분해 , 압 착 , 관 통 등의 행위를 하지
말 것
•
높은 곳에서 떨어뜨리는 등 비정상적
충격을 주지 말 것
•
60 °C 이상의 고온에 노출하지 말 것
•
습기에 접촉되지 않도록 할 것
약 138.5 × 50.5× 76 mm
리와 함께 약 340 g
MS-D14 및 6 개의 AA 형 배터리 ( 타
회사 제품 별매 ) 와 함께 약 395 g
MS-D14EN 및 별매 EP-5B 파워 커
넥터와 함께 약 280 g
MS-D14EN 약 255 g
MS-D14 약 255 g
2012 Nikon Corporation
©
 Loading...