

Page 1
Quick Start Guide
DIGITAL CAMERA
Quick Start Guide
Package Contents pg. 2
First Steps pg. 4
En
Taking Pictures pg. 9
Installing PictureProject pg. 12
Viewing Pictures on a Computer pg. 21
NOTE: Illustrations show the COOLPIX L1.
Page 2

Pack
Package Contents
Quick St
t Guide
age Contents
Remove the camera and accessories from the box and confi rm that you have all
the items listed below.
The Nikon Guide to Digital Photography
with the
DIGITAL CAMERA
En
DIGITAL CAMERA
Quick St
art Guide
Quick Start Guide
En
Quick Start Guide (this guide)
Guide to Digital PhotographyCOOLPIX L1/L101
digital camera
Rechargeable EN-MH1-B2
batteries (× 2)
and
MH-71 battery charger
with power cable
or
LR6 (AA) alkaline
batteries (× 2)
(also available as options)
EG-CP14 audio/video cableCamera strap UC-E6 USB cable
Warranty
Warranty
PictureProject installer CD
(yellow)
PictureProject reference
manual CD (silver)
Depending on the countr y or region of purchase, the package will include either alkaline
batteries or an MH-71 battery charger with rechargeable EN-MH1-B2 batteries.
NOTE: Memory card not provided. See page 58 of the Guide to Digital Photography for a list
of approved memory cards.
2
Page 3
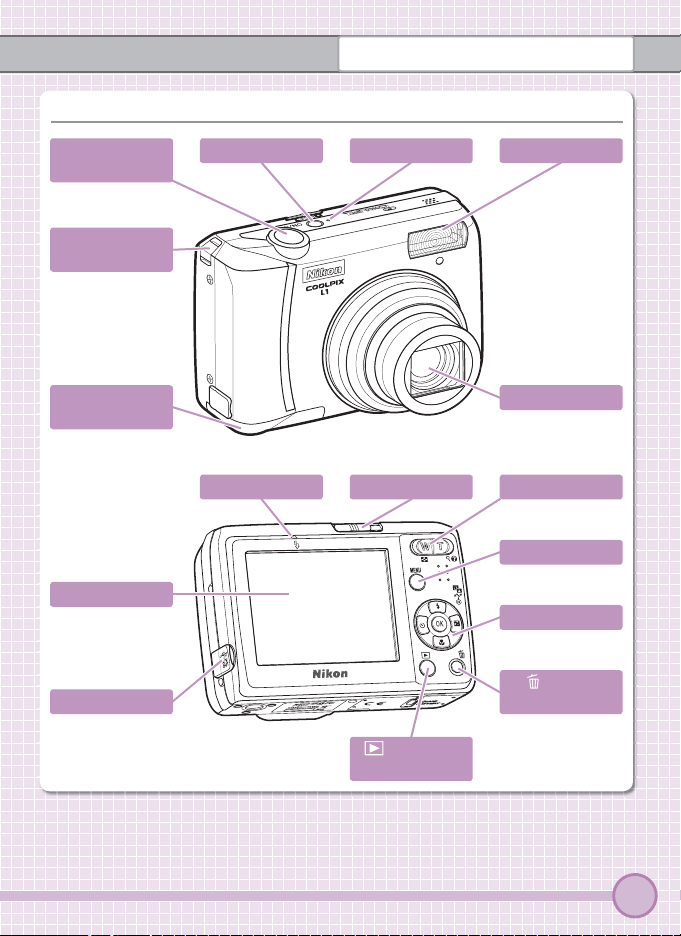
Parts of the Camera
Parts of the Camera
Package Contents
Shutter-release
button
Eyelet for
camera strap
Battery-chamber
cover
Monitor
Connector cover
FlashPower-on lampPower switch
Lens
Zoom buttonMode selectorFlash lamp
MENU button
Multi selector
(delete)
button
(playback)
button
3
Page 4

Fi
First Steps
Step
1
—Attach the Camera Strap
Step
2
—Charge the Batteries
2
..1
2
..2
햲
햳
햴
Step
3
—Insert the Batteries
햲
햳햳햴
햳
햲
rst Steps
Step
1
—Attach the Camera Strap
Step
2
—Charge the Batteries
If your camera came with alkaline batteries, skip this step and proceed directly
to Step 3.
1 Connect the power cable to the charger (햲햲)
2
and then plug it into a power outlet (햳햳). The
CHARGE lamp will light (햴햴).
2 Insert the batteries as indicated on the charger.
2
The CHARGE lamp will start to blink. Charging is complete when the CHARGE lamp stops
blinking.
A pair of new or fully exhausted batteries will
charge in about two and a half hours.
햲
햴
햳
4
Step
3
—Insert the Batteries
햲
햴
햳
햲
Note orientation of “+”
and “–” terminals
Page 5
Step
Step
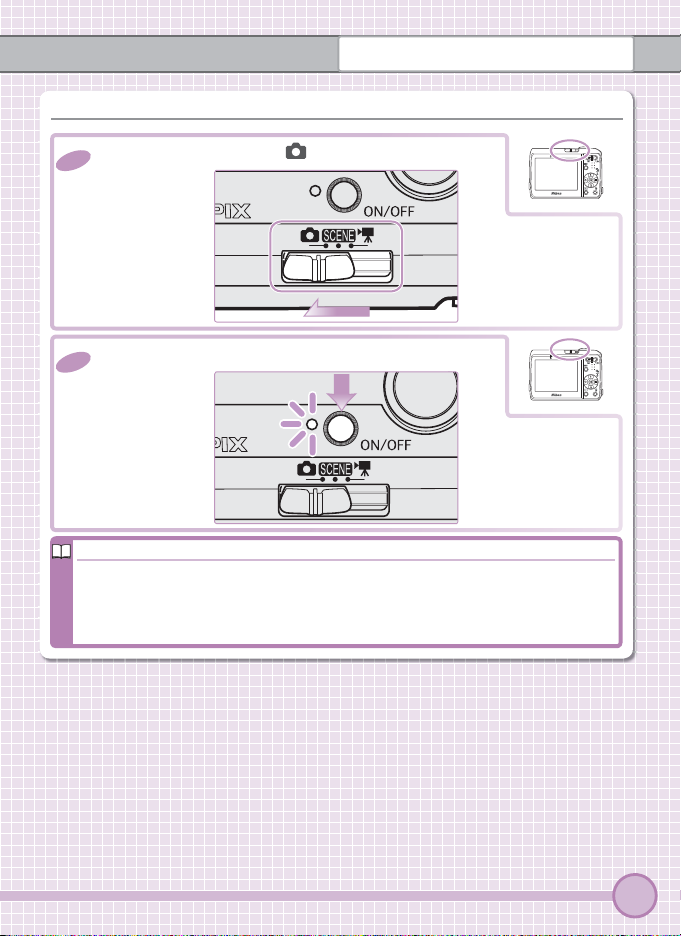
4
—Turn the Camera On
4
..2
4
..1
Auto off (Stand-by Mode)
4
—Turn the Camera On
1 Slide the mode selector to .
4
2 Press the power switch to turn the camera on.
4
Auto off (Stand-by Mode)
If no operations are performed for about a minute, the monitor will turn off to save
power. The power-on lamp will blink, and the display can be reactivated by pressing the shutter-release button. If no operations are performed for a further three
minutes, the camera will turn off automatically.
First Steps
5
Page 6

First Steps
The Multi Selector
5
..1
5
..2
5
..3
5
..4
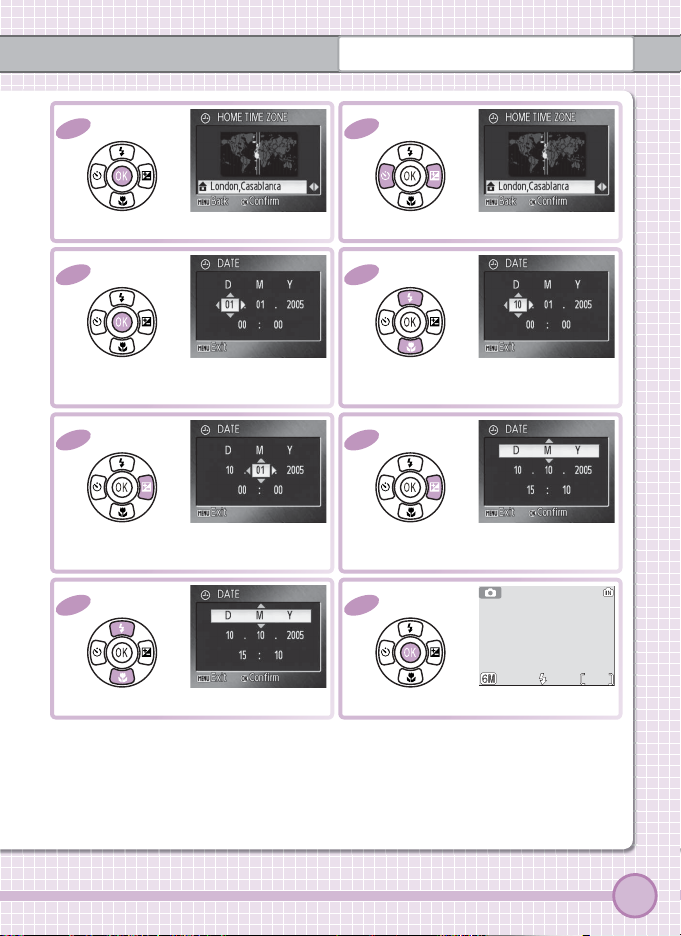
Step
5
—Choose a Language and Set the Camera Clock
Step
5
—Choose a Language and Set the Camera Clock
A language-selection dialog is displayed the fi rst time the camera is turned on.
Follow the steps below to choose a language and set the time and date.
The Multi Selector
Use the multi selector to navigate the camera menus.
Move cursor up
Make selection
Move cursor left Move cursor right
Move cursor down
In the description that follows, the buttons used to perform a task
are shown in color; if more than one button is highlighted, any
of the highlighted buttons can be used. For example, “press the
multi selector up or down” is shown as illustrated at right.
1
5
Highlight language.
3
5
Highlight Yes .
* I f da yl i gh t s a vi ng t im e i s i n eff ec t, press multi selector down to highlight DaylightSaving
and press center to select. Press multi selector up to return to Step 5.4.
6
2
5
Confi rmation dialog displayed.
4
5
TIME ZONE menu displayed.
*
Page 7
First Steps
5
..5
5
..6
5
..7
5
..8
5
..9
5
..10
5
..11
5
..12
AUTO
5
5
Display map of world time zones.
7
5
Display DATE menu.
9
5
Select Month. Repeat Steps 5.8–5.9 to
edit Month, Year, hour, and minute
11
5
Choose date display order.
6
5
Select home time zone.
8
5
Edit Day (order of Day, Month, and Year
may diff er in some areas).
10
5
Highlight D M Y.
12
5
AUTO
AUTO
Exit to shooting mode.
6
6
7
Page 8
Step
6
—Choose the Battery Type
6
..1
6
..2
6
..3
6
..4
6
..5
6
..6
6
..8
AUTO
6
..7
Replacing the Batteries
First Steps
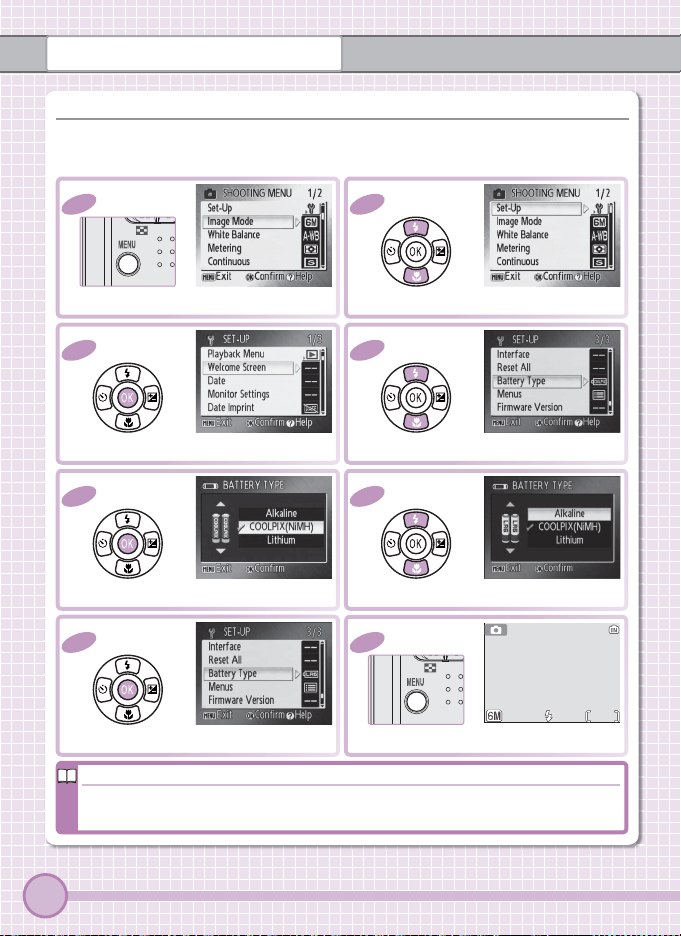
Step
6
—Choose the Battery Type
This step is only required with alkaline batteries. If your camera came with ENMH1-B2 NiMH batteries, skip this step and proceed directly to “Taking Pictures.”
1
6
Display shooting menu.
3
6
Display setup menu.
5
6
7
6
Select and return to setup menu.
2
6
Highlight Set-Up.
4
6
Highlight Battery Type.
6
6
Highlight Alkaline.Display options.
8
6
Exit to shooting mode.
AUTO
AUTO
6
6
Replacing the Batteries
After inserting new batteries, check that the correct type is selected in the Battery
Typ e menu as described on page 47 of the Guide to Digital Photography.
8
Page 9

Step
1
—
Taking Pictures
AUTOAUTOAUTO
66
66
Where Are My Pictures Stored?
Step
2
—
aking Pictures
Step
1
—Check Indicators in the Monitor
Check the battery level and number of exposures remaining.
Number of exposures remaining
Battery level indicator
Display Description
NO ICON Battery fully charged.
Low battery. Ready spare batteries.
WARNIN G!!
BATTERY EXHAUSTED
Where Are My Pictures Stored?
The camera stores pictures in internal memory (approximately 10 MB) or on removable Secure Digital (SD) memory cards (available separately; a list of approved mem-
ory cards is provided on page 58 of the Guide to Digital Photography). Pictures are
stored in internal memory when no memory card is inserted.
Batteries exhausted. No pictures can be taken until fresh batteries
are inserted.
Step
2
—Ready the Camera
Hold the camera steady in both hands, keeping your
fi ngers and other objects away from the lens, fl ash,
and microphone.
9
Page 10

Tak ing Pi ctu res
Step
3
—
Step
4
—
4
..1
AUTOAUTOAUTO
66
Step
3
—Frame a Picture
Use the zoom button to frame the subject near the center of the monitor.
The zoom button
Press to zoom in on the subject so that it fi lls
a larger area of the frame. Press
increasing the area visible in the frame.
Step
4
—Focus and Shoot
1 Lightly press the shutter-release button about
4
halfway, stopping when you feel resistance.
The camera will set focus and exposure for the
subject closest to the camera. Focus and exposure remain locked while the shutter-release
button is pressed halfway.
With the shutter-release button pressed halfway, check the focus indicator and fl ash lamp:
Focus indicator
On (green) Subject in focus.
Blinks red
Camera unable to focus.
Change composition and
try again.
to zoom out,
Flash lamp
On Flash will fi re when picture is taken.
Blinks Flash charging.
Off Flash off or not required.
10
Page 11

4
..2
2 Smoothly press the shutter-release button the
Step
5
—View Pictures
5
..1
100NIKON100NIKON
5/55/5
100NIKON
0005.JPG
0005.JPG0005.JPG
5
..2
4
rest of the way down to release the shutter and
take the picture. To prevent blur, avoid moving
the camera while pressing the shutter-release
button.
Step
5
—View Pictures
1 Press the button to view a picture in the
5
monitor.
Use the multi selector to view other pictures.
Press the multi selector down or right to view
pictures in the order recorded, up or left to view
pictures in reverse order.
Press the button again to return to shooting mode.
Tak ing Pi ctu res
button
View previous picture
View next picture
2 Press the power switch to turn the camera off .
5
The power-on lamp will go out.
11
Page 12

I
Installing PictureProject
PictureProject
nstalling PictureProject
PictureProject
Install the supplied PictureProject software to transfer pictures to a computer
for easy viewing and storage. The main controls in the PictureProject are shown
below. See the PictureProject reference manual on the silver CD for details.
Edit: Crop pictures, adjust brightness and
hue, and use other retouch tools.Organize: View and organize pictures.
Collection list: Group pictures into
collections and folders.
Picture list: View the pictures in
the current collection or folder.
PictureProject can also be used for a variety of other tasks, including printing
pictures, sending pictures by e-mail, viewing slide shows, and copying pictures
to CD or DVD (requires Windows or Mac OS X version 10.2.8 or later).
12
Design: Arrange pictures.
Page 13

Installing PictureProject
Notice to Users of Nikon View or Nikon Capture
Log on as an Administrator
Before You Begin: System Requirements
Confi rm that your system meets the following requirements:
Windows
CPU
OS
Hard dis k space 60 MB required for installation
RAM Minimum 64 MB (128 MB for muvee)
Video resolution 800 × 600 or more with 16-bit color (High Color) or better
Miscellaneous Only computers with built-in USB ports supported
Macintosh
OS Mac OS X version 10.1.5 or later (10.2.8 or later required for Burn Disc)
Hard dis k space 60 MB required for installation
RAM Minimum 64 MB
Video resolution 800 × 600 or more with 16-bit color (thousands of colors) or better
Miscellaneous Only computers with built-in USB ports supported
Exit All Other Applications
Important!
Exit all other applications and turn off any virus-checking software.
Notice to Users of Nikon View or Nikon Capture
Uninstall Nikon View before installing PictureProject. For information on using
PictureProject with Nikon Capture, see the PictureProject reference manual on the silver
CD.
Log on as an Administrator
Use an account with administrator privileges to install or uninstall PictureProject under
Windows XP Home Edition, Windows XP Professional, Windows 2000 Professional, or
Mac OS X.
300 MHz Pentium or better recommended (550 MHz Pentium III or better
recommended for muvee)
Preinstalled versions of Windows XP Home Edition, Windows XP Professional, Windows 2000 Professional, Windows Millennium Edition (Me), or
Windows 98 Second Edition (SE)
13
Page 14

Installing PictureProject
Installing PictureProject: Windows
1
2
3
4
If the Install Center Does Not Start
Installing PictureProject: Windows
Turn the computer on and wait for Windows to start up.
1
Insert the yellow installer CD. The Install Center
2
program will start and a “Select Region” dialog
w il l b e d is pl ay ed . S el e ct a r eg io n an d c li ck Next.
(The “Select Region” dialog is not displayed in
the European release of PictureProject. European users can proceed directly to Step 3.)
If the Install Center Does Not Start
Open the “My Computer” window by selecting My Computer from the
Start menu (Windows XP) or by double-clicking the My Computer icon
on the desktop (other versions of Windows), then double-click the CD
(PictureProject) icon.
Select a language and click Next.
3
Click Easy Install to install the following:
4
• PTP drivers for COOLPIX-series cameras (Windows XP only)
• Nikon Mass Storage Camera Drivers (Windows
98 SE only)
• Panorama Maker
• Apple QuickTime 6
• Nikon Fotoshare (Europe only)
• PictureProject
• Microsoft DirectX 9
Windows
NOTE: The dialogs displayed during installation may diff er from those shown here.
14
Page 15

Windows
5
6
7
8
Installing Drivers (Windows XP/Windows 98 SE Only)
Installing Drivers (Windows XP/Windows 98 SE Only)
Follow the on-screen instructions to
install the drivers. On some Windows
XP systems the installation may be performed by a wizard.
Windows XP Windows 98 SE
Follow the on-screen instructions to install
5
Panorama Maker.
Click Yes to install QuickTime 6.
6
Follow the on-screen instructions to install
7
Fotoshare (Europe only).
Read the license agreement and click Ye s.
8
Installing PictureProject
15
Page 16

Installing PictureProject
9
10
11
12
DirectX 9
Click Next to install PictureProject to the des-
9
tination shown, or click Browse… to choose a
diff erent folder.
Click Yes to create the destination folder.
10
Click Ye s to create a shortcut to PictureProject
11
on the desktop.
Click Finish.
12
DirectX 9
If DirectX 9 is not already installed, the dialog
shown at right will be displayed. Follow the onscreen instructions to install DirectX 9.
Windows
16
Page 17

Windows
13
14
1
2
15
Click Finish or Yes to restart the
13
computer.
DirectX 9 not
installed in Step 12.
The PictureProject Import Assistant will be dis-
14
played once the computer restarts. To catalog
the images in the “Import from” folder for display in PictureProject:
1 Click Import. The time needed to catalog
the images is proportional to the number of
images in the folder.
2 Click Close to close the Import Assistant when import is complete.
To proceed without cataloging images, click Close. Images can be cataloged at any time; see the PictureProject reference manual on the silver CD
for details.
Remove the PictureProject installer CD from the CD-ROM drive.
15
You can now to transfer pictures to the computer as described on page 21.
Installing PictureProject
DirectX 9 installed
in Step 12.
17
Page 18

Installing PictureProject
Installing PictureProject: Macintosh
1
2
3
4
5
Installing PictureProject: Macintosh
Turn the computer on and insert the yellow installer CD.
1
Double-click the CD icon on the desktop and
2
then double-click the Welcome icon. The Install Center program will start and a “Select Region” dialog will be displayed. Select a region
and click Next. (The “Select Region” dialog is not displayed in the European release of PictureProject. European users can proceed directly to
Step 3.)
Select a language and click Next.
3
Click Easy Install to install the following:
4
• Panorama Maker
• PictureProject
• Apple QuickTime 6
Follow the on-screen instructions to install
5
Panorama Maker.
Macintosh
NOTE: The dialogs displayed during installation may diff er from those shown here.
18
Page 19

Macintosh
9
7
6
8
10
11
Apple QuickTime 6
Enter the administrator name and password
6
and click OK.
Read the license agreement and click Accept.
7
Take a few moments to view the ReadMe fi le,
which may contain important information that
could not be included in this guide. Click Con-
tinue… to proceed with installation.
Click Install.
8
Click Ye s to have PictureProject start automati-
9
cally when the camera is connected.
Click Yes to add PictureProject to the Dock.
10
Installing PictureProject
Click Quit.
11
Apple QuickTime 6
If an earlier version of QuickTime is installed,
the QuickTime 6 installer will start. Follow the
on-screen instructions to complete installation.
When the dialog shown at right is displayed, click
Continue. Do not complete the “Registered To,”
“Organization,” and “Registration Number” fi elds.
19
Page 20

Installing PictureProject
12
13
1
2
14
Installing Nikon Fotoshare (Europe Only)
Click Restart to restart the com-
12
puter. When the computer restarts, log in to the account used
to install PictureProject.
The PictureProject Import Assistant will be dis-
13
played once the computer restarts. To catalog
the images in the “Import from” folder for display in PictureProject:
1 Click Import. The time needed to catalog
the images is proportional to the number of
images in the folder.
2 Click Close to close the Import Assistant when import is complete.
To proceed without cataloging images, click Close. Images can be cataloged at any time; see the PictureProject reference manual on the silver CD
for details.
Installing Nikon Fotoshare (Europe Only)
To install Nikon Fotoshare (available only in Europe), open the “Fotoshare” folder
on the PictureProject installer CD and drag Nikon Fotoshare to the “Applications”
folder on the computer hard disk.
QuickTime 6 not
installed in Step 11.
QuickTime 6
installed in Step 11.
Macintosh
Remove the PictureProject installer CD from the CD-ROM drive.
14
You can now to transfer pictures to the computer as described on page 21.
20
Page 21

r
Viewing Pictures on a Computer
1
3
Windows XP
2
iewing Pictures on a Compute
Install PictureProject Before Connecting the Camera
If PictureProject is not installed before the camera is connected, a hardware wizard
may be displayed. Click Cancel to exit and then disconnect the camera.
Turn the camera off .
1
Connect the USB cable as shown at right. Con-
2
nect the camera directly to the computer; do
not connect the cable via a USB hub or keyboard. Do not use force.
Turn the camera on. PictureProject will automatically detect the camera
3
and the PictureProject Transfer window will be displayed in the computer
monitor. Click Tra nsf er to copy all the pictures in the camera memory to
the computer.
Windows XP
If the dialog shown at right is displayed, select Copy
pictures to a folder on my computer using
PictureProject and click OK. To bypass this dialog in
future, check Always do the selected action.
NOTE: The screenshots in this section are from Windows XP.
21
Page 22

Viewing Pictures on a Computer
4
Use a Reliable Power Source
Automatic Updates
The pictures are displayed in PictureProject when transfer is complete.
4
Use a Reliable Power Source
Nikon recommends using the optional EH-62B AC adapter kit to power the camera
for extended periods. Do not use another make or model of AC adapter.
Automatic Updates
PictureProject periodically checks for updates when the computer is connected to
the Internet. If an update is detected when PictureProject starts, an update dialog
will be displayed. Follow the on-screen instructions to update to the latest version
of PictureProject.
22
Page 23

Viewing Pictures on a Computer
Disconnecting the Camera
Disconnecting the Camera
Before turning the camera off and disconnecting the USB cable, remove the
camera from the system as described below.
• Windows XP: Click the “Safely Remove Hardware” ( )
icon in the taskbar and select Safely Remove USB
Mass Storage Device from the menu that appears.
• Windows 2000: Click the “Unplug or Eject Hardware”
(
) icon in the taskbar and select Stop USB Mass
Storage Device from the menu that appears.
• Windows Me: Click the “Unplug or Eject Hardware”
( ) icon in the taskbar and select Stop USB Disk
from the menu that appears.
• Windows 98 SE: In My Computer, right click on the
removable disk corresponding to the camera and
select Eject from the menu that appears.
• Macintosh: Drag the untitled camera volume (“NO
NAME”) into the Trash.
Please refer to the Guide to Digital Photography for more information on using
your Nikon digital camera.
23
Page 24

Viewing the PictureProject Reference Manual
1
2
3
Other Features of the COOLPIX L1/L101
Other Features of the COOLPIX L1/L101
D-Lighting
((Guide to Digital Photography
, pg. 28)
Face-Priority AF
((Guide to Digital Photography
, pp. 19–20)
Movie Mode
((Guide to Digital Photography
, pg. 25)
PictBridge
((Guide to Digital Photography
, pp. 34–38)
Advanced Red-Eye Reduction
((Guide to Digital Photography
, pg. 14)
Advanced Red-Eye Reduction
Reduce “red-eye” when using the fl ash.
Face-Priority AF
Let the camera fi nd the focus point for portraits.
Movie Mode
Record short movies with sound.
D-Lighting
Bring out details in shadows.
PictBridge
Print pictures directly from the camera.
Viewing the PictureProject Reference Manual
Start the computer and insert the silver reference CD.
1
Double-click the CD icon.
2
• Windows: Double-click the CD (Nikon) icon in My Computer.
• Macintosh: Double-click the CD (Nikon) icon on the desktop.
Double-click the INDEX or INDEX.pdf icon to display a language selec-
3
tion screen. Click a language to display an index of the documentation
available for PictureProject and click a title to view.
Guide to Digital Photography
Guide to Digital Photography
Guide to Digital Photography
Guide to Digital Photography
Guide to Digital Photography
, pg. 14)
, pp. 19–20)
, pg. 25)
, pg. 28)
, pp. 34–38)
Printed in China
SB5G01(11)
6MA13211-01
 Loading...