

Page 1

Image Converter
User Manual
Model “Oszi” 400 Series
1
Page 2

2
Page 3

Congratulations!
You now have the power to produce the look and feel of 35mm film using a MiniDV camcorder.
The P+S Technik Mini35Digital image converter is designed for use on the Canon XL1 and
Canon XL1S camcorders as well as the Sony DSR-PD150/ DCR-VX2000/ DCR-VX1000
cameras, Panasonic AG-DVX100 and coming soon, the JVC JY HD10. The unit is optimized for
35mm lenses with large rear optical elements, such as Cooke S4 Primes, Zeiss Ultra Primes
and Zeiss Super Speeds. Zeiss Distagons with focal lengths over 40mm will also work.
Improved features of the “Oszi” 400 series
• Improved image screen – Finer grain pattern for better imaging
• New oscillating movement – The elliptical motion of the PRO35 has been
incorporated…no more center spot!
• Adjustable speed control - Allows greater control over the speed setting of
the moving focus screen (we recommend the setting be kept between 3 and 4).
• Improved optics for Sony connecting kit
• New unified body construction
3
Page 4

World Wide Technical Support
P+S Technik GmbH
Email info@pstechnik.de
Phone +49 89 45 09 82 30
North America
ZGC., Inc.
Email sales@zgc.com
Phone +1 973-335-4460
printed January 04
4
Page 5

Contents
Congratulations....................................................................................................................... 3
Contents ................................................................................................................................. 5
Delivery Content ..................................................................................................................... 6
Connecting Kits....................................................................................................................... 7
Preparation ............................................................................................................................. 8
General Description ................................................................................................................ 9
With CANON XL1 / XL1S........................................................................................................ 13
With SONY DSR-PD150 / DCR-VX1000 / DCR-VX2000 ....................................................... 21
With PANASONIC AG-DVX100.............................................................................................. 29
Maintenance ........................................................................................................................... 37
Optional Accessories & Mounts.............................................................................................. 37
Frequently Asked Questions................................................................................................... 38
Dealers ................................................................................................................................... 44
Technical Data........................................................................................................................ 45
Technical Support................................................................................................................... 46
5
Page 6

Delivery Content - Basic Module
• 1 – Mini35Digital Image converter, fitted with an
interchangeable lens mount of your choice
(PL, Panavision, Nikon, et al.)
• 2 – Hand Grips (top and side)
• 1 – Support Interface with Integrated Shoulder
Set and 15mm LWS systems
The support interface provides 1/4" and 3/8”
attachment points allowing the use of all
industry standard tripods, bridge plates and
other support systems e.g. Steadicam. The
15mm LWS system accepts all film style
accessories including follow focus and matte
boxes. An ordered connecting kit is already
mounted.
6
Page 7

- Connecting Kits
–
• 1 - Relay Lens with protective cap
• 1 - Mounting Plate
• 1 - Battery Plate with power cable
• 1 - Remote Control Cable
• 1 – Hex screwdriver set and screws
• 1 - Color Viewfinder Holder
(Canon Connecting Kit)
A Connecting Kit ordered with the basic
module is already mounted when delivered.
Camera connecting kits must be purchased
separately for each brand and are available for
the following Mini Digital Video Cameras.
Canon XL1/XL1S –
Sony DSR-PD150 /DCR-VX1000 /DCR-VX2000 –
Panasonic AG-DVX100
7
Page 8

Preparation
Avoid Murphy’s Law!!
Assemble the Mini35Digital image converter on
your camcorder BEFORE the first day of your
production. After attaching the unit to your camera
according to the steps outlined below, be sure to
check each of your lenses, f-stop combinations and
shutter adjustments for compatibility. We
recommend at least a half, if not full, day of testing
before production. You will need a more robust film
lighting “package” rather then the typical video
lighting “kit” for optimal image capture. The
Mini35Digital is not a magical device, time and
effort will be needed to obtain the desired images
at first, but will become second nature as your
productions progress.
***USAGE NOTE***
The Mini35Digital creates a lively cine-like image
with an artificial film grain pattern. How much the
film grain pattern is adequate for you depends on
your preference. To adjust the visibility of the
pattern use the 8-step speed control wheel (J) and
the T-stops. To optimize the effect, the taking lens
should be as wide open as possible: Use the iris on
the relay lens of the XL1(S) Mini35, and ND filters
for bright outdoor shots. With the Panasonic and
Sony Mini35, exposure control is done on the
camera lens with the camera set in full manual
mode.
Items needed before you begin:
• A 2.5mm hex wrench (delivery content)
• A 35mm format film lens for testing and
• A high quality test chart, such as the Putora 7A9
• A control monitor is recommended.
Munich / New York, December 2003
P+S Technik GmbH
8
Page 9

General Description
Pos. Description Comment
A Hook For Tape Measure
B LWS System Light Weight
Support System
C Wheel Clamping screw
D Intermediate
Flange
Takes the
Interchangeable
Mount
Prepared for
15mm rods
for LWS
Interchangeable
Mount connects to
Lens
9
Page 10

Pos. Description Comment
E Bayonet
Mount
F BATT. Battery Cable
G Rose Wheel
H RUN GREEN button Manual RUN /
I Control LED
RUN
LOW BAT
J Speed Control Wheel
K Focal Plane White
Takes Relay
Lens
Input Connector
GREEN Æ
RED
(low power) Æ
Blinking light Æ
8 steps
Engravure
Relay Lens
connects to Camera
Pin 1 – Bat -
Pin 2 – Bat. +
STOP
Runs with chosen
speed
Acceptable speed
Prepare new battery
Below minimum
speed, change bat.
Controls oscillating
movement
10
Page 11
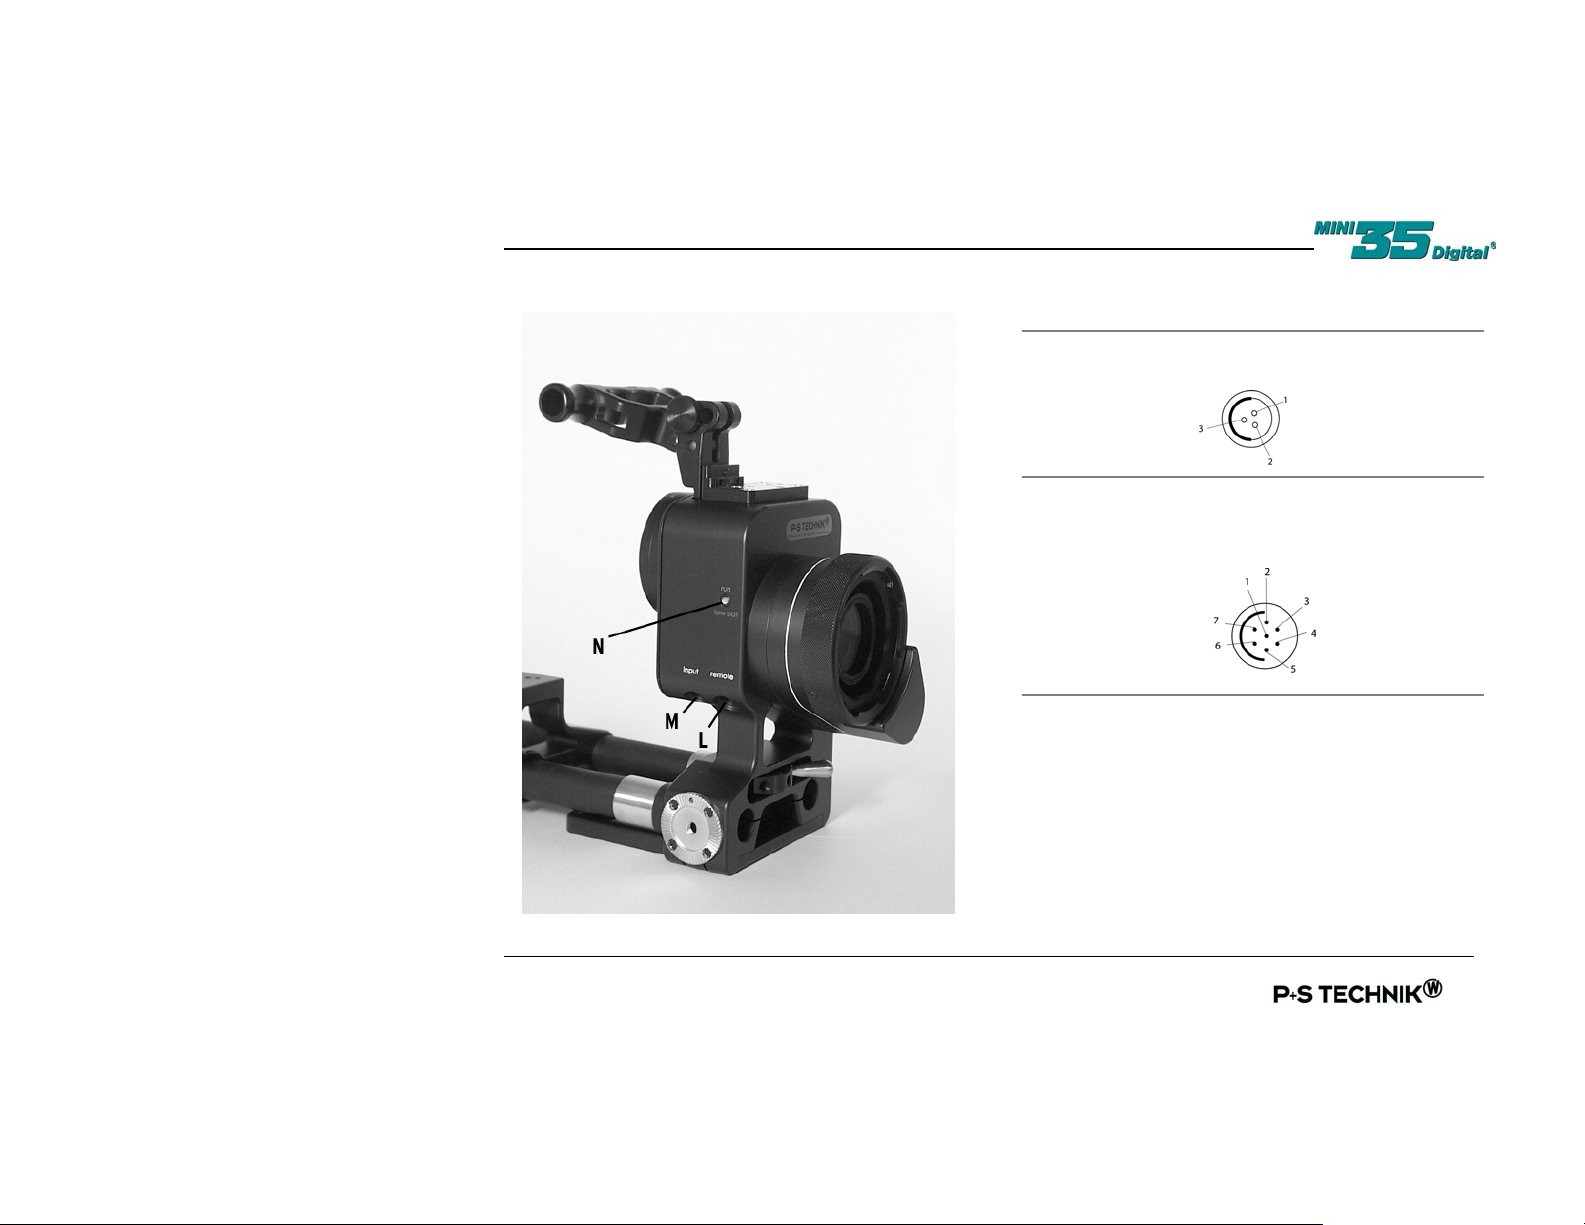
Pos. Description Comment
L
REMOTE
input
M
INPUT
(for LANC
cable)
N Control LED
RUN
LOW BAT
3 Pin Fisher
female socket
7 Pin Fischer
female socket
GREEN Æ
RED
(low power) Æ
Blinking light Æ
Pin 1 – GND
Pin 2 – N.C.
Pin 3 – VTR
Pin 1 – not
connected
Pin 2 – VTR trigger
Pin 3 – Bat +
Pin 4 – U Bat ex
Pin 5 – not
connected
Pin 6 – Bat -
Pin 7 – RET
Good speed control
Acceptable speed
Below minimum
speed
11
Page 12

Power Connection
Connect the cable from the battery plate with
the battery input (F) and load battery in the
plate. The Connecting Kit uses the same
battery type as the camera.
LANC & Remote Control with the Mini35Digital
The Mini35 can also be controlled via a
remote control unit. Use the LANC cable to
connect the Mini35 via the INPUT connection
(M) with the camera. Then connect the Mini35
via the REMOTE connection (L) with the
remote control unit.
7-pin LANC Cable
Red connector – Canon & Sony
Black connector - Panasonic
Canon XL1/XL1S
Sony DSR-PD150 / DCR-VX1000 /
DCR VX2000
The Mini35 can now be controlled:
• Independent & manually by the Mini35
RUN button or
• Both manually via the camera START
button or
• Together via a Remote Control System
Panasonic AG-DVX100
The camera has no LANC interface and can
only receive commands. So both can be
controlled
• Independent & manually by the Mini35
RUN button or
• Together via a Remote Control System
12
Page 13

CANON XL1 / XL1s
Follow the steps below to properly attach the Mini35Digital image converter
to your Canon XL1 / XL1S with lightweight support
a – Viewfinder Holder
b - Top Cover
c - Lock Ring
d - Relay Lens
e - Spring loaded pad
f – Support release
Lever
g - Camera Screw
h - Battery Holder
k - Bottom Screws
C
a
n
o
n
13
Page 14

C
a
n
o
n
Steps Instructions Explanatory Notes
1 Make sure the camera is turned off.
2 Remove the relay lens from the Mini35:
a. Locate the lock ring (c).
b. Rotate the lock ring (c) counter clockwise.
3 Attach the relay lens onto the camera:
The relay lens attaches like any other XL
mounted lens.Æ
The relay is attached to the rear of the Mini35
via a bayonet type mount.
The lock ring (c) is the ring located in the front
of the relay lens, nearest to the body of the
Mini35 (photo page 11).
a. Line up the red dots
b. Engage the lens in the mount
c. Rotate the lens until the lock clicks in
place.
14
Page 15

4 Prepare the Mini35:
a. Release the two screws (k) on the bottom of
the camera support, and slide the support
toward the rear battery holder.
The first time a camera has to be installed you
will find it easier to start by sliding the camera
support out of the way.
C
a
n
o
n
b. Release the lever (f), push the pad (e) down
and lock it in that position by tightening
lever (f).
The camera support platform has a spring-
loaded pad in the center that adjusts for the
height of the camera. The knob with a lever (f),
at the back of the camera platform, locks the
spring-loaded pad in place. By releasing that
knob, the spring will push the pad to its
highest position making the mounting of the
camera difficult.
15
Page 16

C
a
n
o
n
5 Mount the relay lens (now attached to the
camera) onto the Mini35Digital image
converter:
16
Engage the relay into the back port of the
Mini35 and secure it in place with the lock ring
(c).Æ
a. Open the lock ring (c).
b. Line up the relay lens into the port holding
the camera by its top handle. Make sure
the locating pin is fully engaged.
c. Close the lock ring (c) clockwise to secure
the relay lens.
Note: Be sure the camera does not
accidently disengage.
Page 17

6 Attach the camera support:
Slide the camera support bracket under the
camera and attach the knob (g) to the bottom
of the camera:
Lock the lever (f) at the back of the camera
support and lock the screws at the bottom of
the camera support.
a. The big knurled knob (g) through the
camera platform has to line up with the ¼”
threaded hole on the camera bottom.
b. Start engaging the thread of the knob in
the thread of the camera but do not tighten
it yet.
c. Release the lever (f) at the back of the
platform to allow the spring-loaded pad (e)
to come in contact with the base of the
camera.
Finish tightening the knob (g) at the bottom of
the platform.
C
a
n
o
n
17
Page 18

C
a
n
o
n
Follow the steps below to test the image once the Mini35 is attached to the
camera:
Steps Instructions Explanatory Notes
1 Install a 35mm film lens in the mount.
2 Turn on the camera in the fully manual
position.Æ
3 Focus the 35mm film lens on an object. The image should be sharp in the viewfinder and
*) The Canon XL1 and XL1S will electronically recognize only lenses made by Canon to work with these cameras. Accordingly, you will
see a lens warning light in the viewfinder when using the Mini35Digital Image converter. This is normal and will have no effect on the
footage you shoot. With the XL1 camera, you cannot eliminate the lens warning light from blinking in the viewfinder, but it is possible to
remove it from an external monitor using the “ON SCREEN” key of the remote control. With the XL1S camera, you can control the lens
warning light via the “EFV DISPLAY ON/OFF” key on the left side of the camera.
The message “CHECK THE LENS” will be
displayed in the viewfinder for several seconds,
then the image should appear with the word
“LENS” blinking. *)
If the image is too dark:
a. Open the iris on the film lens.
b. Open the iris on the relay lens.
on the field monitor.
18
Page 19

If the image does not appear as sharp as expected, a back focus adjustment is necessary. Before
changing the back focus please note that the image photographed by the camera is generated on
the focus screen inside the Mini35. This focus screen lowers the contrast of the image similar to
the effect of a low contrast filter. This is desirable since it removes some of the electronic detail
artifact typical in a DV image, even though at a quick glance the image may appear less sharp than
the one recorded by the unfiltered original lens.
Test if the back focus is properly adjusted
Place the camera with the Mini35Digital image converter mounted with a 35mm lens, in front of a
high quality test definition chart, such as the Putora 7A9 chart. The iris on the relay should be fully
opened. The film lens should be focused by eye to the point of best resolution (highest number of
circles visible on the Putora chart). Without changing anything else, close the iris of the relay a
couple of stops. The resolution should not visibly increase. If it does, the back focus of the relay
needs to be adjusted. Follow the steps below to adjust the relay back focus.
C
a
n
o
n
19
Page 20

C
a
n
o
n
Follow the steps below to adjust the relay back focus.
Steps Instructions Explanatory Notes
1 Release the hex screw k (1.5mm) by about a
half a turn. Now the ring is free for adjustment:
2 Leave the Iris on the relay lens fully open and
adjust the back focus ring until you have
achieved the sharpest image.
3 Check that the film lens is at the best focus
before you check the back focus a second
time.
4 Once satisfied with the image, lock the hex
screw to secure this adjustment and double
check the image.
You will need a good quality monitor to
accurately judge the sharpness.
By using a Putora 7A9 chart you will be able to
see the moiré effect of the test circles visible
through the relatively low definition of the
viewfinder.
20
Page 21

SONY DSR-PD150 / DCR-VX1000 / DCR-VX2000
Follow the steps below to properly attach the Mini35Digital Image converter
to your Sony DSR-PD150 / DCR-VX1000 /DCR-VX2000 with lightweight support
a - Top Cover
b - Lock Ring
c - Relay Lens
d - Spring loaded Pad
e - Support release
Lever
f - Camera Screw
g - Battery Holder
h - Bottom Screws
S
O
N
Y
21
Page 22

Steps Instructions Explanatory Notes
1 Make sure the camera is turned off.
S
O
N
Y
2 Remove the relay lens from the Mini35:
a. Locate the lock ring (b).
b. Rotate the lock ring (b) counter clockwise.
3 Attach the relay lens onto the camera: Remove all filters, sunshades, adapter rings,
The relay is attached to the rear of the Mini35
via a bayonet type mount.
The lock ring (b) is the ring located in the front
of the relay lens, nearest to the body of the
Mini35.
etc. before attaching the relay lens directly
onto the camera front lens
22
Page 23

4 Prepare the Mini35:
a. Release the two screws (h) on the bottom
of the camera support, and slide the
support toward the rear battery holder.
b. Release the knob (e), push the pad (d)
down and lock it in that position by
tightening knob (e).
The first time a camera has to be installed you
will find it easier to start by sliding the camera
support out of the way.
The camera support platform has a spring-
loaded pad in the center that adjusts for the
height of the camera. The knob with a lever
(e), at the back of the camera platform, locks
the spring-loaded pad in place. By releasing
that knob the spring will push the pad to its
highest position making the mounting of the
camera difficult
S
O
N
Y
23
Page 24

S
O
N
Y
5 Mount the relay lens (now attached to the
camera) onto the Mini35Digital image
converter:
Before the 1st attachment, the bayonet mount
of the relay lens has to be adjusted:
a. Open the lock ring (b)
b. Slightly release the 4 screws (s) in front of
the relay lens. The bayonet ring (r) must be
moveable.
c. Line up the relay lens into the port holding
the camera by its top handle. Make sure
the locating pin is fully engaged. Close lock
ring.
d. Bring the camera carefully into a standard
vertical position. Then remove camera
without losing this position.
e. Lock the 4 screws in the relay front and re-
connect relay lens to the adapter port
f. Close the lock ring (b) clockwise to secure
the relay lens.
24
Engage the relay into the back port of the
Mini35 and secure it in place with the lock ring
(b).
Note: Be sure the camera cannot disengage
accidentally.
Page 25

6 Attach the camera support:
Slide the camera support bracket under the
camera and attach the knob (f) to the bottom
of the camera:
Lock the lever (e) at the back of the camera
support and lock the screws at the bottom of
the camera support
a. The big knurled knob (f) through the
camera platform has to line up with the ¼”
threaded hole on the camera bottom.
b. Start engaging the thread of the knob in the
thread of the camera but do not tighten it
yet.
c. Release the lever (e) at the back of the
platform to allow the spring-loaded pad
(d) to come in contact with the base of the
camera.
d. Finish tightening the knob (f) at the bottom
of the platform.
S
O
N
Y
25
Page 26

S
O
N
Y
Follow the steps below to test the image once the Mini35 is attached to the camera:
Steps Instructions Explanatory Notes
1 Install a 35mm film lens in the mount.
2 Turn on the camera in the fully manual
position:
3 Focus the 35mm film lens on an object. The image should be sharp in the viewfinder
a. Turn off the AutoFocus and Zoom function
b. Focus camera lens on the ground glass
inside the converter
If the image is too dark:
c. Open the iris on the film lens.
d. Open the iris on the camera lens.
and on the field monitor.
26
Page 27

If the image does not appear as sharp as expected, there is a back focus adjustment on the relay.
But before we change the setting of the back focus it is important to realize that the image
photographed by the camera is generated on the focus screen inside the Mini35. This focus screen
lowers the contrast of the image somewhat in a way similar to the effect of a low contrast filter. This
is desirable since it removes some of the electronic detail artifact typical in a DV image, even
though at a quick glance the image may appear less sharp than the one recorded by the unfiltered
original lens.
Test if the back focus is properly adjusted
Place the camera with the Mini35Digital image converter mounted with a 35mm lens, in front of a
high quality test definition chart, such as the Putora 7A9 chart. The iris on the relay should be fully
open. The film lens should be focused by eye to the point of best resolution (highest number of
circles visible on the Putora chart). Without changing anything else, close the iris of the relay a
couple of stops. The resolution should not visibly increase. If it does, the back focus of the relay
needs to be adjusted. Follow the steps below to adjust the relay back focus.
S
O
N
Y
27
Page 28

S
O
N
Y
Follow the steps below to adjust the relay back focus.
Steps Instructions Explanatory Notes
1 Leave the Iris on the camera lens fully
open and adjust the camera back focus
until you have achieved the sharpest
image.
2 Check that the film lens is at the best focus
before you check the back focus a second
time.
3 Lock the back focus and double check the
image.
You will need a good quality monitor to
accurately judge the sharpness of the image.
By using a Putora 7A9 chart you will be able
to see the moiré effect of the test circles
visible through the relatively low definition of
the viewfinder.
28
Page 29

PANASONIC DVX100
Follow the steps below to properly attach the Mini35Digital image converter
to your Panasonic AG-DVX100 camera with lightweight support
a - Top Cover
b - Lock Ring
c - Relay Lens
d - Spring loaded Pad
e - Support release
Lever
f - Camera Screw
g - Battery Holder
h - Bottom Screws
29
P
A
N
A
S
O
N
I
C
Page 30

Steps Instructions Explanatory Notes
1 Make sure the camera is turned off.
P
A
N
A
S
O
N
I
C
2 Remove the relay lens from the Mini35:
a. Locate the lock ring (b).
b. Rotate the lock ring (b) counter clockwise.
3 Attach the relay lens onto the camera: a. Remove all filters, sunshades, adapter
30
The relay is attached to the rear of the Mini35
via a bayonet type mount.
The lock ring (b) is the ring located in the front
of the relay lens, nearest to the body of the
Mini35.
rings, etc. before attaching the relay lens
directly onto the camera front lens
b. Eventually you need a rubber pad to grip
the protective cap, recessed deeply in the
hood
Page 31

4 Prepare the Mini35:
a. Release the two screws (h) on the
bottom of the camera support, and slide
the support toward the rear battery
holder.
b. Release the knob (e), push the pad (d)
down and lock it in that position by
tightening knob (e).
The first time a camera has to be installed you
will find it easier to start by sliding the camera
support out of the way.
The camera support platform has a spring-
loaded pad in the center that adjusts for the
height of the camera. The knob with a lever
(e), at the back of the camera platform, locks
the spring-loaded pad in place. By releasing
that knob the spring will push the pad to its
highest position making the mounting of the
camera difficult
31
P
A
N
A
S
O
N
I
C
Page 32

P
A
N
A
S
O
N
I
C
5 Mount the relay lens (now attached to the
camera) onto the Mini35Digital image
converter:
Before the 1st attachment, the bayonet mount
of the relay lens has to be adjusted:
Engage the relay into the back port of the
Mini35 and secure it in place with the lock ring
(b).
32
a. Open the lock ring (b)
b. Slightly release the 4 screws (s) in front of
the relay lens. The bayonet ring (r) must be
moveable.
c. Line up the relay lens into the port holding
the camera by its top handle. Make sure
the locating pin is fully engaged. Close lock
ring.
d. Bring the camera carefully into a standard
vertical position. Then remove camera
without losing this position.
e. Lock the 4 screws in the relay front and re-
connect relay lens to the adapter port
f. Close the lock ring (b) clockwise to secure
the relay lens.
Note: Be sure the camera cannot disengage
accidentally.
Page 33

6 Attach the camera support:
Slide the camera support bracket under the
camera and attach the knob (f) to the bottom
of the camera:
Lock the lever-knob (e) at the back of the
camera support and lock the screws at the
bottom of the camera support
a. The big knurled knob (f) through the
camera platform has to line up with the ¼”
threaded hole on the camera bottom.
b. Start engaging the thread of the knob in
the thread of the camera but do not tighten
it yet.
c. Release the lever-knob (e) at the back of
the platform to allow the spring-loaded pad
(d) to come in contact with the base of the
camera.
d. Finish tightening the knob (f) at the bottom
of the platform.
33
P
A
N
A
S
O
N
I
C
Page 34

P
A
N
A
S
O
N
I
C
Follow the steps below to test the image once the Mini35 is attached to the camera:
Steps Instructions Explanatory Notes
1 Install a 35mm film lens in the mount.
2 Turn on the camera in the fully manual
position.
3 Focus the 35mm film lens on an object. The image should be sharp in the viewfinder
34
• Turn off the AutoFocus and Zoom function
• Focus camera lens on the ground glass
inside the converter
If the image is too dark:
a. Open the iris on the film lens.
b. Open the iris on the camera lens.
and on the field monitor.
Page 35

If the image does not appear as sharp as expected, there is a back focus adjustment on the relay.
But before we change the setting of the back focus it is important to realize that the image
photographed by the camera is generated on the focus screen inside the Mini35. This focus screen
lowers the contrast of the image somewhat in a way similar to the effect of a low contrast filter. This
is desirable since it removes some of the electronic detail artifact typical in a DV image, even
though at a quick glance the image may appear less sharp than the one recorded by the unfiltered
original lens.
Test if the back focus is properly adjusted
Place the camera with the Mini35Digital image converter mounted with a 35mm lens, in front of a
high quality test definition chart, such as the Putora 7A9 chart. The iris on the relay should be fully
opened. The film lens should be focused by eye to the point of best resolution (highest number of
circles visible on the Putora chart). Without changing anything else, close the iris of the relay a
couple of stops. The resolution should not visibly increase. If it does, the back focus of the relay
needs to be adjusted. See the following steps to adjust the relay back focus.
35
P
A
N
A
S
O
N
I
C
Page 36

Follow the steps below to adjust the relay back focus.
Steps Instructions Explanatory Notes
1 Leave the Iris on the camera lens fully
open and adjust the camera back focus
until you have achieved the sharpest
image.
P
A
N
A
S
O
N
I
C
2 Check that the film lens is at the best focus
before you check the back focus a second
time.
3 Lock the back focus and double check the
image.
36
You will need a good quality monitor to
accurately judge the sharpness of the image.
By using a Putora 7A9 chart you will be able
to see the moiré effect of the test circles
visible through the relatively low definition of
the viewfinder.
Page 37

Maintenance
The prism should be cleaned periodically depending on environmental conditions,
Always use a professional lens cleaning solution.
Optional Accessories for the Mini35Digital
• Adapter kit for Canon B&W viewfinder
• Additional side handgrips
• Additional camera connecting kits
• Custom lens mounts and support interfaces
• Top handle for use with EasyRig or Marzpak
Available Lens Mounts
• PL-Mount
• Pana-Mount
• Nikon
• Canon EF
• Zeiss Contax
• Leica R + M
Contact you local P+S Technik dealer for prices
and availability.
37
Page 38

Frequently Asked Questions
Q: Will the Angle of View of the lens I’m using
be affected?
A: No, the Angle of View of the lens on the
Mini35 will be similar to the Angle of View as
seen in the Academy 35mm frame. Reason:
The image the Mini35Digital creates is not
projected directly onto the camera’s CCDs,
but is first resolved onto the focus screen.
The camera then captures this image, with
all of its filmic characteristics, including
Depth of Field.
Q: My image is vignetted (dark frame around
image). Why?
A: Make sure that your matte box and any
equipment in front of the lens does not cause
the vignetting.
Some old lens designs with small rear lenses
do not work properly with the Mini35, because
the diameter of the last lens is to small. This is
concerning the Cooke Series II & III and Zeiss
Distagons below 40mm. The 25-250mm zooms
by Angenieux as well as Cooke are both tight,
but work properly. We did not test all still
photography lenses, but due to the bigger
image size (Still - 24x36mm vs. Cine –
18x24mm) no vignetting is expected.
Q: Do I have to send my camera to P+S Technik
to do any mechanical or electronic changes
before I can use the Mini35Digital image
converter?
A: No. No modifications to the camera are
necessary.
38
Page 39

Q: Does the Mini35Digital require a power
supply?
A: Yes. You will need a battery to run the motor
of the Mini35Digital. Each camera
connecting kit includes a battery mount
specific to the brand of camera so no new
batteries or chargers are needed, simply the
batteries you already have for your system;
one for the camera and one for the
Mini35Digital.
Q: What will the image look like as compared to
a digital video look?
A: A textbook-perfect digital video image is
uniformly sharp, background and
foreground. The professional 35mm motion
picture film “look” is sharp but less starkly
so. Capturing the image in 35mm format
with a 35mm lens also allows you to
capture gradations of focus (depth of field)
like the human eye sees images on a image
plane.
Tip For the best effect when composing a shot,
aim for out-of-focus objects in both the
foreground and background.
Q: How can I avoid having the grain of the
projection glass showing up on the tape?
A: Don’t stop the taking lens down above 4 -
5.6. Regulate the light as much as possible
with the relay lens only (XL1(s) version).
Use neutral density filters when there is too
much light.
Q: Are there differences between the Canon
XL1 and XL1S when using the Mini35Digital
image converter?
39
Page 40

A: With the XL1S, you can use the slow shutter
without Canon lenses. Also, the XL1S chip
is more sensitive to light – an advantage
when using the Mini35Digital image
converter.
Q: Do I need any additional editing equipment?
A: No. The Mini35 does not affect the format of
the camera. The images are still being
recorded in the 1/3” MiniDV format for use in
your current post chain.
A: General information is available from
www.pstechnik.de. Questions can be
forwarded to info@pstechnik.de. DVInfo.net
(www.dvinfo.net) hosts a P+S Technik forum
(http://www.dvinfo.net/conf/forumdisplay.php
?s=&forumid=58) where many users post
questions, insight into, and experiences with
the device. Mizell Wilson of ZGC, Inc. is the
offical monitor of this forum and is happy to
answer any questions that the community
cannot.
Q: How much light is lost?
A: -In general, 1 Stop.
Q: Where can I get more information on the
Mini35 or connect with other users of the
adapter?
40
Q: I want to include a credit for P+S and the
Mini35 in my production; do you have a
preferred format of your logo or artwork
available?
A: We appreciate this very much. Logos and
artwork are available for download at
www.pstechnik.de.
Page 41

Q: Is there any prejudice towards the MiniDV
format?
A: Yes. Even though MiniDV is a SMPTE
standard “broadcast quality” format, many
television stations and other venues will not
accept MiniDV tapes and/or assume that the
production value of MiniDV is low. We
recommend burning your footage to DVD or
transferring it to a higher format ( BetaSP,
DigiBeta, DVCPRO50 ) for presentation to
these types of outlets.
Q: I’ve finished my movie and want the world to
see it; can you help me distribute it?
A: Our tip Check out www.customflix.com for
the latest in independent distribution of your
film.
Q: I am using an XL1(S) and want a progressive
look, but I don’t like Frame mode, are there
any options?
A: While we have not tested it ourselves, we
have heard very good things about
DVFilmMaker from www.dvfilm.com.
Q: I am using a PAL XL1(S) for the increased
resolution and color, but plan to distribute
in NTSC. Is there a simple process for
converting from one format to another?
A: In the past this would have required you to
go to a professional transfer house, and for
the best results, you still might want to
consider this. With the same caveat as
above, check out Atlantis from
www.dvfilm.com.
41
Page 42

Q: Do I need a support for my prime lenses?
What about cine zooms?
A: Most cine and still primes will not need any
support. Larger still primes and zooms,
typically special-use telephoto lenses, will
need additional support. All cine zooms will
require the use of an external bridge plate
system for support.
Q: What are the major differences between
using cine lenses and still lenses?
A: As far as optical quality, the SLR still lenses
are on a par with cine primes. The major
difference is the ergonomics of the lenses.
Since they were not designed to capture
moving images, the focus and zoom
movements may not be as smooth as the
movement on a cine lens. In addition, older
zoom lenses will not hold their focus while
zooming in and out and functionally become
variable primes. We do have reports that the
newest SLR zooms will hold focus
throughout the range. Make sure to test the
individual lens before production.
Q: Can I use 16mm lenses?
A: No, this is not possible. The 16mm lenses
project an image (10,4x7,4mm) not half as
big as the 35mm image (18x24mm) the
Mini35 is working with. Strong vignetting will
appear.
You can only use 35mm cine and still
photography lenses.
Q: Can I use Nikon AF lenses?
A: Yes. The physical mount of the AF lenses is
the same as the standard (MF) lenses and
focus, iris, and zoom control can be set to
42
Page 43

manual. There are reports that these lenses
are not as smooth in their movement in
manual mode as compared to the MF lenses
but will otherwise function normally. The
Mini35 does not provide any type of
electronic lens control.
Q: Will the Mini35 control the iris of my Canon
EF lenses?
A: No. The Mini35 does not provide any type of
electronic lens control. EF lenses are wide
open by default, which means there is no
problem using them with the Mini35; you will
simply have no way to stop down the lens
for Depth of Field control.
Q: Can I use commercially available
anamorphic adapters with the Mini35?
A: No. The Mini35 connects directly to the
cameras and does not allow for the use of
any of the prosumer anamorphic
attachments. There are two methods for
shooting 16x9. The first is to shoot 4:3,
composing for 16x9 and then masking in
post. The XL1S provides on-screen guides
to assist in this process. The second is to
use the in-camera 16x9 feature. To achieve
a 2.4:1 “scope” look you are able to use
anamorphic cine lenses from companies
such as Panavision and Hawk. Most NLE
systems will allow for an anamorphic
unsqueeze during capture. The image will
appear squeezed in the viewfinder or field
monitor unless you have a monitor that can
perform an unsqueeze or you use an inline
unsqueeze device similar to the Transvideo
format converter.
43
Page 44

Dealers
France
EMIT Modern Images Techniques
Tel: +33-1-48 13 90 10
Email: emit@wanadoo.fr
Germany
P+S Technik GmbH
Tel: +49-89-45 09 82 30
Email: info@pstechnik.de
Great Britain
OpTex International
Tel: +44-20-84 41 21 99
Email: simon@optexint.com
Holland
Holland Equipment B.V.
Tel: +31-20-694 35 75
Email: sales@hollandequipment.nl
Sweden
Svensk Film & Ljusteknik AB
Tel: +46-8-54 55 18 20
Email: Stig@sfl.se
Spain
Video Cine Import S.A.
Tel: +349-663 64 66
Email: vci@terra.es
North American Distributor
ZGC, Inc.
Tel: +1 973-335-4460
Email: sales@zgc.com
Peru, Equador, Bolivia, Brasil
Moviecenter
Tel. : 00511-221 40 58
Australia
LEMAC Film & Video Equipment
Tel: +61-2-94 38 44 88
Email: jbowring@ozemail.com.au
GUS
Dedo Weigert Film GmbH
Tel: +49-89-35 61 61 11
Email: mwarnck
@dedoweigertfilm.de
China
SUI SUN TRADING CO., LTD.
Email: pspro35@yahoo.com.tw
Japan
SHOTOKU CORP.
Tel: +81-44-833 33 51
Email: ebimoto@shotoku.co.jp
Korea
SAMA Electronics Corp.
Tel: +82-2-34 72 05 65
Email: inn@samakorea.com
Singapore, Thailand, Malaysia,
Philipines, Indonesia
Transmarco H. Warta Pte Ltd
Email: thwarta.general
@transmarco234.com
Sri Lanka
Maclear Film Equipment Services
Tel: +9412-58 55 73
Email: maclear@slt.lk
Taiwan
Viewpoint Image Assembling
Tel: +8862-23 03 78 99
Email: vpia@ms64.hinet.net
44
Page 45

Technical Data
Mini35Digital
Camera Mount
(converter to camera)
Mini35Digital Lens Mount
(converter to lens)
Tuning for Shooting Sensor
Length of Mini35Digital unit
Weight
Frame position
Pro35Digital’s Iris Diaphragm
(behind lens)
Current consumption
Power supply
Image Target Frequency
Eccentric
Sony DSR-PD150
Canon XL1(S)
Canon XL1 Mount Screw Mount Screw Mount
Back Focus
Relay Lens
345 mm 345 mm 345 mm
2.85 kg
6.27 lbs.
/ DCR-VX1000 /
DCR-VX2000
Mount by Choice
Back Focus - Camera Lens
3.0 kg
6.6 lbs
Upright, Emulsion Side Up
Built-in for Light Reduction (No effect on depth-of-focus)
300mA / 7.2 V
Adapter Battery connected via 2-pin cable
Variable speed - 8 steps
Panasonic AG-
DVX100
3.0 kg
6.6 lbs
JVC HD10U
Coming
Soon
45
Page 46

World Wide Technical Support
P+S Technik GmbH
Email info@pstechnik.de
Phone +49 89 45 09 82 30
North America
ZGC., Inc.
Email sales@zgc.com
Phone +1 973-335-4460
printed January 04
46
 Loading...