

Page 1

Image Authentication Software Instruction Manual
Introduction
Introduction 2
About This Manual
Install Guide
System Requirements 5
Installing Image Authentication Software
Starting and Exiting Image Authentication Software
Viewing the Instruction Manual
Software Updates
Uninstalling Image Authentication Software
Using Image Authentication Software
Screen Layout 17
Verifying Authenticity: Start Image Authentication Software
Verifying Authenticity: Start the Verifi cation
Verifying Authenticity: Check the Results
Verifying Authenticity: Sort the Results
Verifying Authenticity: Delete Selected Results
Saving Verifi cation Results
Menu List
4
6
12
14
15
16
18
19
21
23
23
24
25
Customer Support and Registration 26
Important: USB key
Keep the supplied USB key in a safe place. The USB key is required
when using this software and can not be replaced if lost.
Do not insert the USB key until installation of Image Authentication Software is complete. If the USB key is inserted before the
software has been installed, a “Found New Hardware” wizard will
be displayed; click Cancel to exit the wizard.
Important: Product Key
The product key may be found on the CD-ROM case. Do not lose this key. It is required when
installing or upgrading this software and can not be replaced if lost.
Page 2

Introduction
Conventions
Illustrations
Printing This Manual
Installing/Uninstalling Image Authentication Software
Introduction 1/2
Thank you for your purchase of Image Authentication Software
for use exclusively with Nikon
digital single-lens refl ex (SLR) cameras that support “Image Authentication,” which makes it
possible to detect modifi cations to photographs after shooting.
This Install Guide includes information that you should know before using Image
Authentication Software, such as how to install and start the software and how to view online help. Please read this guide thoroughly before installing the software.
Conventions
This manual assumes basic knowledge of cameras and Windows operating systems. Refer to the
documentation provided with your computer or camera for more information. Where multiple
menu items or folders are selected in sequence, the menu items are separated by a “>”.
Throughout this manual, Windows XP Professional and Windows XP Home Edition are referred to as
“Windows XP.” Windows 2000 Professional is referred to as “Windows 2000.”
Illustrations
The illustrations in this manual are from Windows XP. Depending on the operating system used, the
dialogs and menus may diff er slightly from those shown here. Some illustrations are composites.
Printing This Manual
To p rint this manual, select Print from the File menu in Adobe Reader. This manual is A5 size, allowing facing pages to be printed on one sheet of A4 paper (to print facing pages, start printing from
an even-numbered page).
Installing/Uninstalling Image Authentication Software
Use an account with administrator privileges to install or uninstall Image Authentication Software
under Windows XP and Windows 2000.
Return to fi r s t page
2
Page 3

Introduction
Notices
Trademark Information
Introduction 2/2
Customer Support and Registration
See Customer Support and Registration for more information.
Customer Support
Visit Nikon technical support web sites
or view the ReadMe fi le.
Product Registration
Register your Nikon product on-line
(Internet connection required).
Notices
• The copying or reproduction of copyrighted creative works is governed by national and inter-
national copyright laws. Do not use the camera for the purpose of making illegal copies or to
infringe copyright laws. Do not use the camera in venues where photography or recording is
prohibited.
• No part of the manuals included with this product may be reproduced, transmitted, transcribed,
stored in a retrieval system, or translated into any language in any form, by any means, without
Nikon’s prior written permission.
• Nikon reserves the right to change the specifi cations and performance of the hardware and soft-
ware described in these manuals at any time and without prior notice.
• While every eff ort has been made to ensure that the information in these manuals is accurate and
complete, we would appreciate it were you to bring any errors or omissions to the attention of
the Nikon representative in your area (address provided separately).
• Nikon will not be held liable for any damages resulting from errors or omissions in these manuals
or for incidental damages (e.g., photography-related expenses or lost profi ts) arising from defects
in this product.
Trademark Information
Microsoft® and Windows® are registered trademarks of Microsoft Corporation. Adobe Reader is a
trademark of Adobe Systems, Inc. Pentium is a trademark of Intel Corporation. All other company
names and product names mentioned in this manual or other documentation provided with your
Nikon product are trademarks or registered trademarks of their respective holders.
Return to fi r s t page
3
Page 4
Introduction
Display Full Path
About This Manual
How to Use This Manual
The pages of this manual are structured as shown here:
Using Image Authentication Software
Verifying Authenticity 4/6
Check the Results
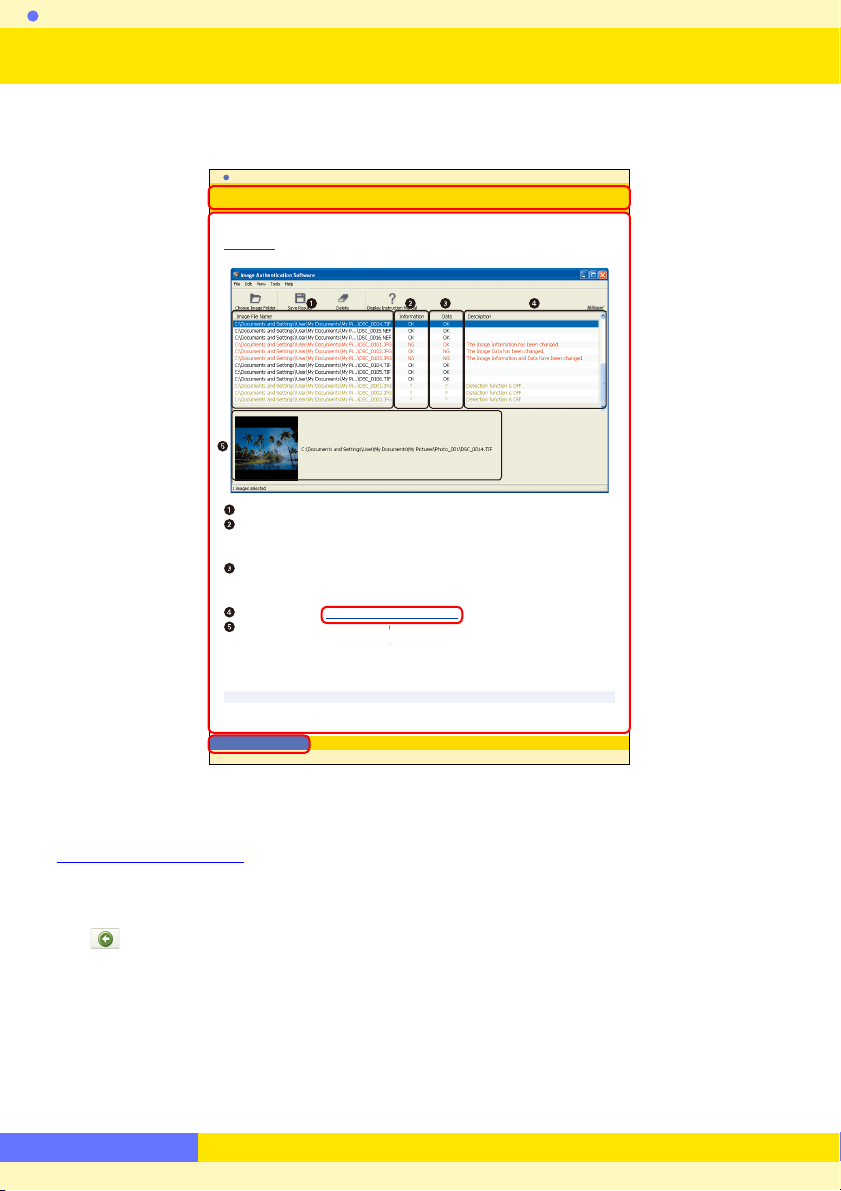
Verifi cation is complete when the progress bar is no longer displayed. The results are dis-
played in the result area as follows:
Image File Names: The names of the fi les that have been verifi e d.
Information: The results of verifi cation checks performed on Exif data and other photo
information. OK is displayed if no information has been changed, NG if information has
been changed, and ? if the authenticity of the information could not be determined.
Data: The results of verifi cation checks performed on the actual image data. OK is dis-
played if the image has not been changed, NG if the image has been changed, and ? if
the authenticity of the image could not be determined.
Description: Detailed verifi cation results and errors are displayed here.
Preview area: Preview the images selected in the result area. Double- click the preview to
open the image in the default application for images of the selec ted type.
Display Full Path
The Display Full Path option in the View menu is used to choose whether the full fi le path is displayed in the Image File Name column.
Return to fi rst page
Page title
Description
Blue underlined text indicates a link to another part of this manual or the World Wide
2121
Web. Click the text to follow the link (note that a web browser and an Internet connection are required to link to the World Wide Web). To return to the previous topic, click
the
Click here to return to the fi rst page.
button in Adobe Reader or Adobe Acrobat Reader.
Return to fi r s t page
4
Page 5

Install Guide
System Requirements
Before installing Image Authentication Software, be sure that your system meets the following requirements:
CPU Pentium 4, 1 GHz or better (or the equivalent) recommended
Preinstalled versions of Windows XP Home Edition or Windows XP
OS
Hard-disk space
RAM 512 M B or more recommended
Video resolution 800 × 600 pixels or more with 16-bit color (High Color) or more
Camera
Miscellaneous One built-in USB port (for the USB key)
• Operation is not guaranteed when the key is connected via a USB hub.
• Check the support information at the web site below for the latest on compatible cameras
and operating systems.
Profes sional (Service Pack 2 or later), or Windows 2000 Professional
(Service Pack 4 or later)
50 MB required for installation, with an additional 200 MB required
when Image Authentication Software is running
Nikon digital single-lens refl ex (SLR) cameras that support Image
Authentication
Europe ,Africa : www.europe-nikon.com/support
Asia, Oceania, Middle East:
www.nikon-asia.com
U.S. A.: www.nikonusa.com
Additional information may be available from the Nikon representative in your area.
Visit http://nikonimaging.com/ for contact information.
Return to fi r s t page
5
Page 6
Install Guide
If the “Select Region” Dialog Is Not Displayed
Existing Versions of Image Authentication Software
Installing Image Authentication Software 1/6
Before installing Image Authentication Software:
• Confi rm that the computer satisfi es the System Requirements for Image Authentication
Software.
• Exit any other applications that may be running, including anti-virus software.
• Do not plug the supplied USB key into a USB port.
Starting the Installation
Use an account with administrator privileges when installing Image Authentication Software.
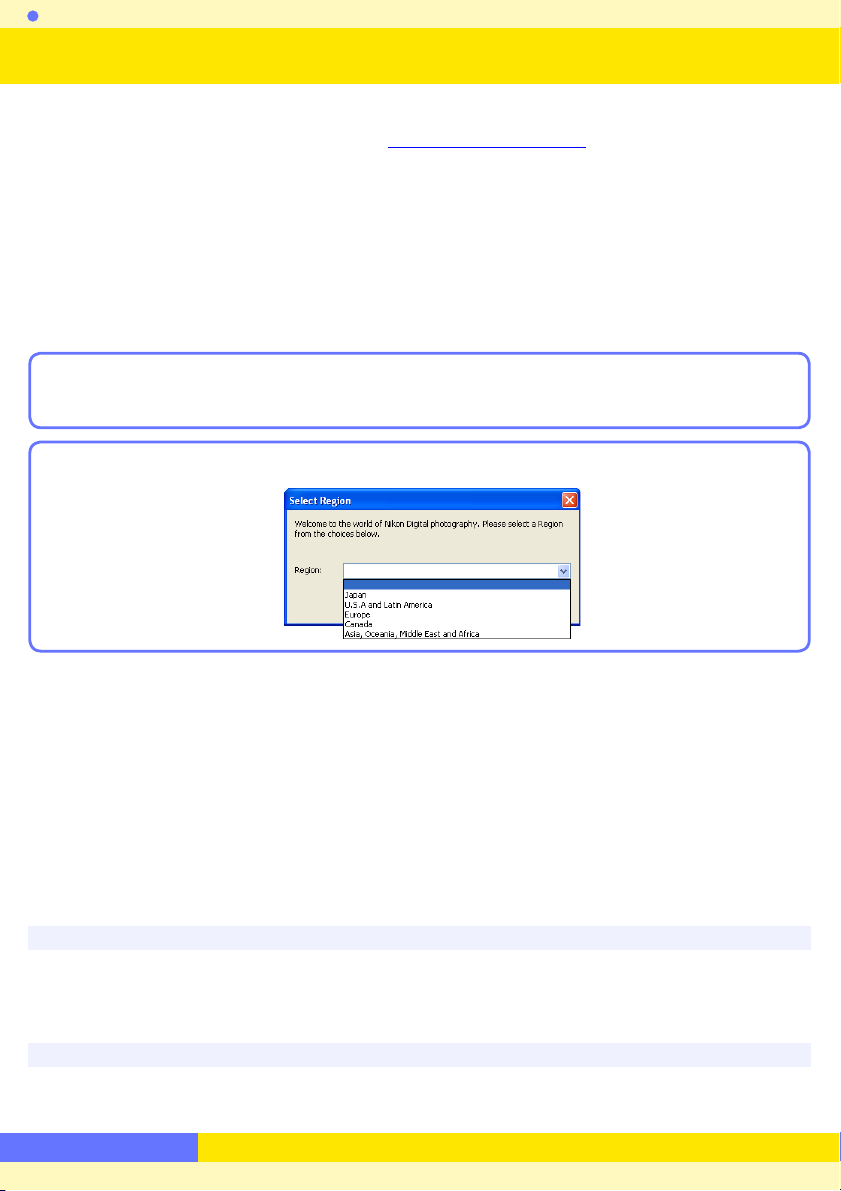
Place the Image Authentication Software CD-ROM into the CD-ROM drive.
1
A “Select Region” dialog will be displayed. Select a region and click Next.
2
If the “Select Region” Dialog Is Not Displayed
To display the “Select Region” dialog, select My Computer from the Start menu (Windows XP) or
double-click the My Computer icon on the desktop (Windows 2000) and double-click the CD-ROM
(Authentication) icon in the My Computer window.
Existing Versions of Image Authentication Software
If an existing copy of Image Authentication Software is detected during installation, a notifi cation
will be displayed. Follow the on-screen instructions.
Return to fi r s t page
6
Page 7
Install Guide
Installing Image Authentication Software 2/6
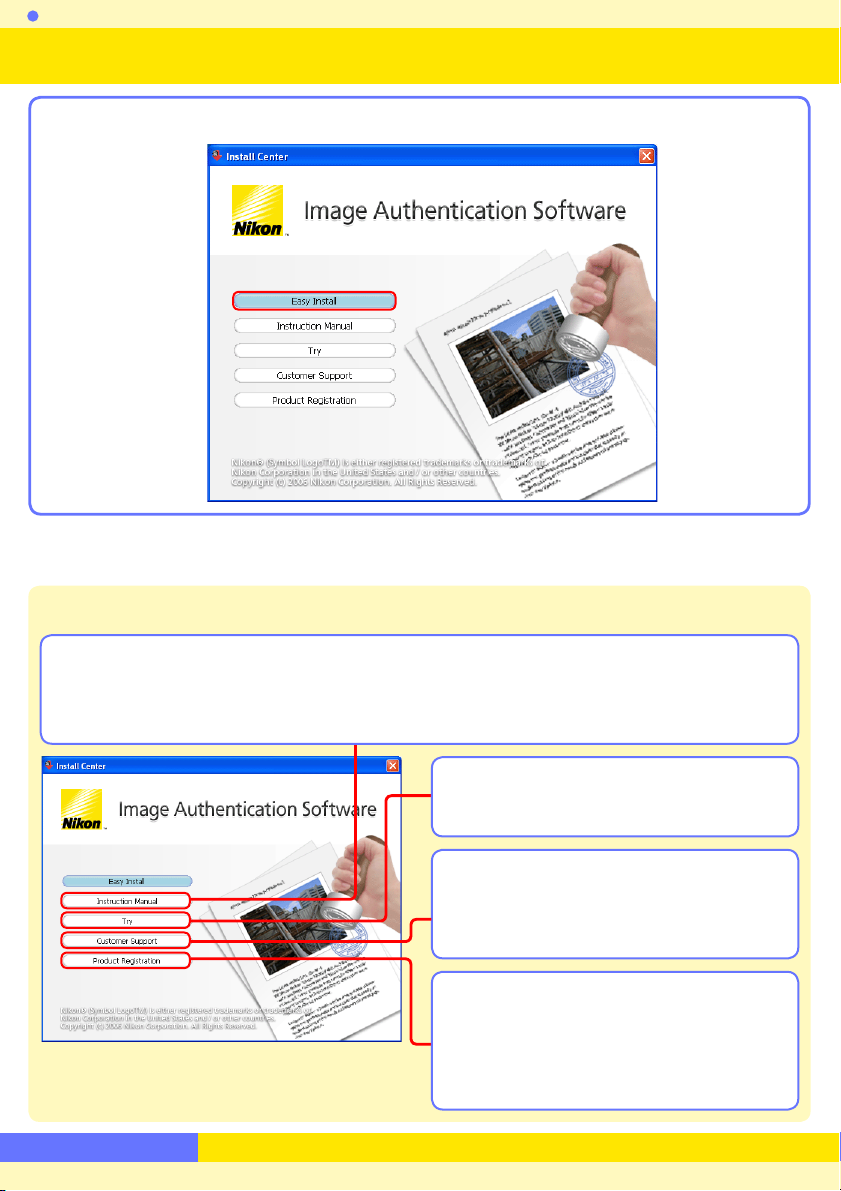
The Install Center window will open. Click Easy Install.
3
Other Options in the Install Center Window
Instruction Manual: Open the Manuals folder on the installer CD. Double-clicking
Index.pdf displays a list of languages; click a language to open this instruction
manual.
Tr y: Download trial versions of Nikon soft-
ware (Internet connection required).
Customer Support: View the ReadMe fi le
or visit Nikon technical support web
sites (Internet connection required).
Product Registration: Register your Nikon
product on-line (Internet connection required). Not available in some
regions.
Return to fi r s t page
7
Page 8
Install Guide
Installing Image Authentication Software 3/6
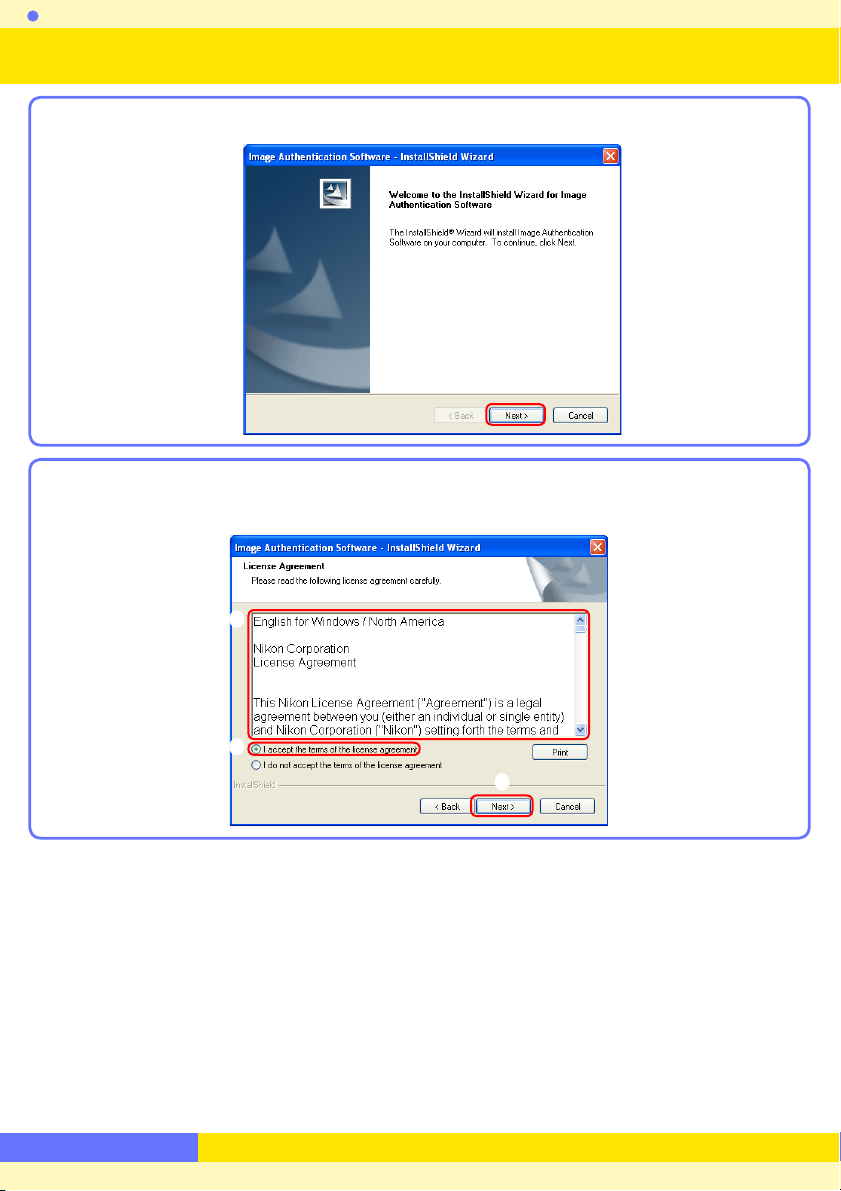
Click Next.
4
After reading the license agreement (), select I accept the terms of the license
5
agreement () and click Next () to proceed with installation.
Return to fi r s t page
8
Page 9
Install Guide
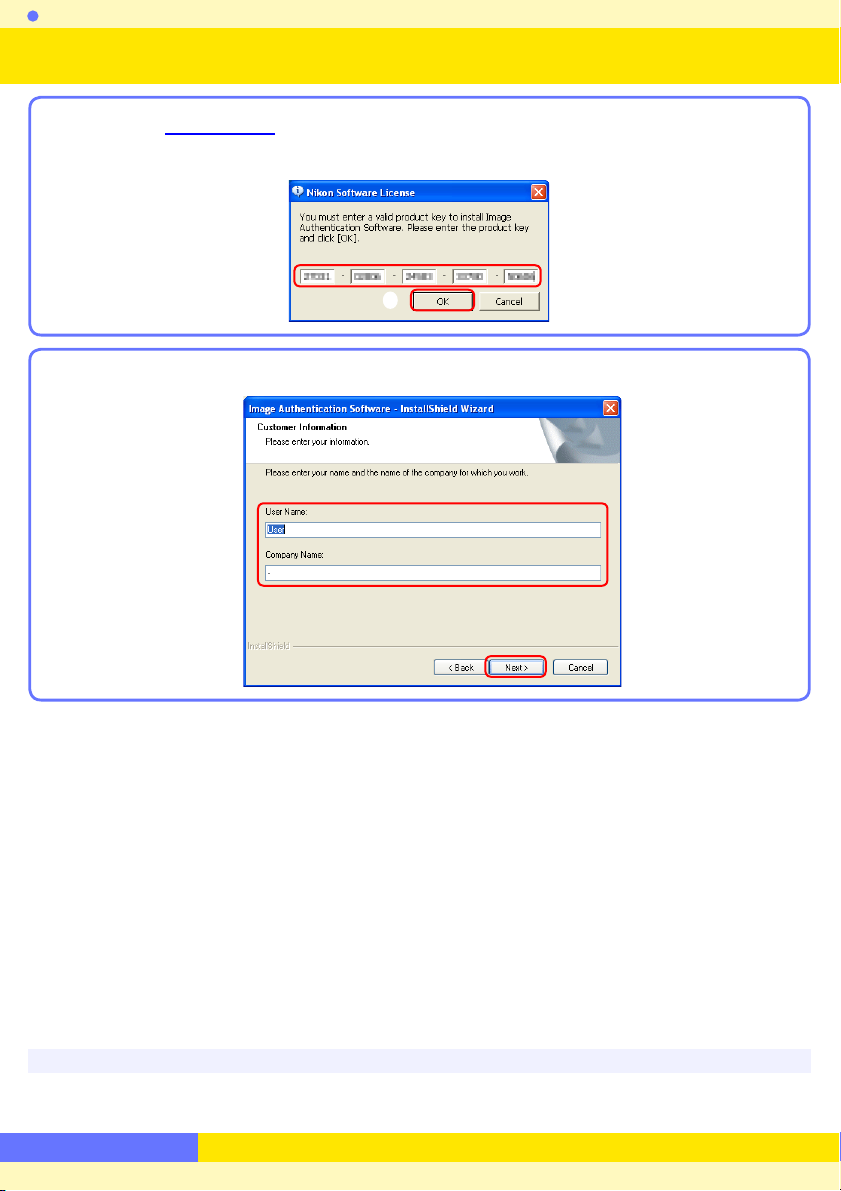
Product Key
Installing Image Authentication Software 4/6
Enter the product key () found on the CD case and click OK ().
6
Personalize your copy of Image Authentication Software () and click Next ().
7
Product Key
Do not lose this key. It is required when installing or upgrading this software and cannot be replaced
if lost.
Return to fi r s t page
9
Page 10

Install Guide
Installing Image Authentication Software 5/6
The destination folder for Image Authentication Software will be displayed under
8
“Install Image Authentication Software to.” Click Next to install Image Authentica-
tion Software to this folder, or click Change… to select another destination.
Click Install.
9
Return to fi r s t page
10
Page 11

Install Guide
Installing Image Authentication Software 6/6
Click Finish.
10
Click Ye s and remove the Image Authentication Software CD-ROM from the CD-
11
ROM drive.
If a dialog box is displayed directing you to restart the computer, follow the onscreen instructions.
This completes the installation of Image Authentication Software.
See Uninstalling Image Authentication Software for information on uninstalling Image
Authentication Software.
Return to fi r s t page
11
Page 12

Install Guide
The USB Key
Starting and Exiting Image Authentication Software
1/2
Starting Image Authentication Software
The supplied USB key is required when starting Image Authentication Software. Do not
remove the USB key while the software is running.
Insert the supplied USB key into a USB port. Connect the key directly to the com-
1
puter; do not use a USB hub or keyboard.
Some computers may need some time to recognize the USB key when it is fi rst connected. Wait for a “Found New Hardware” message before proceeding to Step 2.
Windows XP
The “Found New Hardware” message is displayed in the task bar.
Windows 2000
The following dialog is displayed.
The USB Key
Removing the USB key while the software is running may interrupt operation for up to fi ve minutes.
If the key is removed while the software is running, reinsert it into the same USB port. Do not lose
the USB key.
Return to fi r s t page
12
Page 13

Install Guide
Starting and Exiting Image Authentication Software
Start Image Authentication Software using either of the methods described below.
2
Method 1:
Method 2: Click Start and select Image Authentication Software > Image
Exiting Image Authentication Software
Select Exit from the File menu.
Double-click the Image Authentication Software shortcut on the desktop.
Authentication Software from All Programs (Windows XP) or
Programs (Windows 2000).
1
2/2
If you need to remove the USB key from the USB port, be sure to keep it in a safe
2
place.
Return to fi r s t page
13
Page 14

Install Guide
Viewing the Instruction Manual
To view the Image Authentication Software instruction manual, select Display Instruction Manual… from the Help menu (Adobe Acrobat Reader 5.0 or later required).
Return to fi r s t page
14
Page 15

Install Guide
Downloading Software Updates
Dial-up Connections
Privacy Policy
Software Updates
Image Authentication Software is equipped with an automatic update function known as
Nikon Message Center. Nikon Message Center checks for updates to a variety of Nikon
digital products, including Image Authentication Software. If the computer is connected
to the Internet, Nikon Message Center will automatically check for updates when Image
Authentication Software starts. You can also check for updates by selecting Check for
Updates… from the Help menu. If an update is available, an update dialog box will be
displayed.
Downloading Software Updates
An Internet connection is required to download software updates. The user bears all applicable fees
charged by the Internet service provider or telephone company.
Dial-up Connections
When using a dial-up connection, be aware that the connection is not automatically terminated
when download is completed. Be sure to terminate the connection manually.
Privacy Policy
Information provided by the user as part of this service will not be given to third parties without the
user’s permission.
Return to fi r s t page
15
Page 16

Install Guide
Uninstalling Image Authentication Software
When uninstalling Image Authentication Software, use an account with administrator privileges and remove the USB key from the USB port.
Click Start and select Image Authentication Software > Image Authentication
1
Software Uninstall from the program list.
Click Ye s to begin removing Nikon View Pro and all of its components.
2
If uninstaller encounters read-only fi les or components shared by another applica-
3
tion, a confi rmation dialog will be displayed. Read the information displayed carefully before deciding what to do with the aff ected components.
Click Finish. If directed to restart the computer, follow the on-screen instructions.
4
Return to fi r s t page
16
Page 17

Using Image Authentication Software
Screen Layout
The layout of the Image Authentication Software window is described below.
Menu bar: Click a menu name to display menu items.
Too lba r: Provides quick access to frequently-used options.
Choose Image Folder Selects image folders to be verifi ed.
Save Results Saves the verifi cation results.
Delete Deletes selected image fi les from the list.
Display
Instruction Manual
Result area: Verifi cation results are displayed in this area.
Preview/progress area: Preview the images selected in the result area and view verifi cation
Displays this manual.
progress.
Status bar: Lists the number of images selected in the result area, or when no images are
selected, the total number of images in the result area.
Return to fi r s t page
17
17
Page 18

Using Image Authentication Software
Verifying Authenticity 1/6
Starting Image Authentication Software
Controls used
Be sure the USB key is inserted in a USB port before starting Image Authentication Software.
Double-click the Image Authentication Software shortcut on the desktop or click Start and
select Image Authentication Software > Image Authentication Software from All
Programs (Windows XP) or Programs (Windows 2000). The Image Authentication Software
window will be displayed.
Insert the USB key into a USB port, then double click the application shortcut or select the application from the Start menu.
Return to fi r s t page
18
18
Page 19

Using Image Authentication Software
Verifying Authenticity 2/6
Start the Verifi cation
Controls used Drag and drop fi les or folders into the result area
Drag and drop the fi les or folders to be verifi ed into the result area (). A progress indicator
will be displayed in the preview/progress area. Verifi cation results are displayed in the result
area () as verifi cation is completed for each fi le.
Preview: Previews of the images selected in the result area are displayed here.
File path: The full fi le names and paths for selected images are displayed here.
Search progress: The folder currently being searched and search progress for the fi le cur-
rently being verifi ed.
Verifi cation progress: The name of the fi le currently being verifi ed and overall verifi cation
progress.
Suspend: Click to end verifi cation and display the results for the fi les that have been
verifi ed to this point. Verifi cation can not be resumed once suspended; to restart verifi cation, select the folder containing the images to be verifi ed.
Return to fi r s t page
19
19
Page 20

Using Image Authentication Software
Sub-folders
Selecting Folders
Supported File Formats
NEF (RAW) + JPEG
Renaming Files
Verifying Authenticity 3/6
Sub-folders
At default settings, the contents of sub-folders in the folders selected for verifi cation will also be
verifi ed. To exclude images in sub-folders, select Options… from the To ol s menu and uncheck
Search Subfolders.
Selecting Folders
In addition to the drag-and-drop option described on the preceding page, folders can be selected
by clicking Choose Image Folder in the toolbar or by selecting Choose Image Folder… from
the File menu and selecting folders in the “Browse for Folder” dialog. Note that individual fi les can
not be selected for verifi cation using this method.
Supported File Formats
Image Authentication Software supports JPEG, TIFF, and NEF (RAW) formats. Images in other formats can not be verifi ed and will not be displayed in the result area.
NEF (RAW) + JPEG
NEF (RAW) and JPEG images recorded at image qualities of NEF (RAW) + JPEG are treated as separate
fi l e s f o r the purposes of verifi cation.
Renaming Files
Renaming fi les does not aff ect verifi cation results.
Return to fi r s t page
20
20
Page 21

Using Image Authentication Software
Display Full Path
Verifying Authenticity 4/6
Check the Results
Verifi cation is complete when the progress bar is no longer displayed. The results are dis-
played in the result area as follows:
Image File Names: The names of the fi les that have been verifi ed.
Information: The results of verifi cation checks performed on Exif data and other photo
information. OK is displayed if no information has been changed, NG if information has
been changed, and ? if the authenticity of the information could not be determined.
Data: The results of verifi cation checks performed on the actual image data. OK is dis-
played if the image has not been changed, NG if the image has been changed, and ? if
the authenticity of the image could not be determined.
Description: Detailed verifi cation results and errors are displayed here.
Preview area: Preview the images selected in the result area. Double-click the preview to
open the image in the default application for images of the selected type.
Display Full Path
The Display Full Path option in the View menu is used to choose whether the full fi le path is dis-
played in the Image File Name column.
Return to fi r s t page
21
21
Page 22

Using Image Authentication Software
Verifi cation Results
Verifying Authenticity 5/6
Verifi cation Results
Verifi cation results are displayed as follows:
Tex t
Information
color
Black OK OK
Red OK NG
Red NG OK
Red NG NG
column
Data
column
Description
column
Not displayed
The Image Data has been changed.
The Image Information has been
changed.
The Image Information and Data
have been changed.
Meaning
Image data and image information
have not been changed.
Image data have been changed.
Image information has been
changed.
Both image data and image information have been changed.
Red NG ?
Yel low ? ?
Yel low ? ?
Yel low ? ?
Yel low ? ?
The Image Information was
changed. Whether the Image Data
was changed cannot be determined.
Detection Error
Unsupported File
Changed File or Unsupported File
Image Authentication Function is
OFF.
Image information has been
changed; authenticity of image data
can not be determined.
Memory insuffi cient or unable to
verify image information.
File is not in JPEG, TIFF, or NEF format
or fi le extension is not “.JPG”, “.TIF”, or
“.N EF”.
Image was created with camera that
does not support image authentication.
Image was taken with Off selected
for Image Authentication in
camera setup menu.
Return to fi r s t page
22
22
Page 23

Using Image Authentication Software
Verifying Authenticity 6/6
Sort the Results
To sor t results in ascending order by Image File Name (), Information (), Data (),
or Description (), click the column name. Click again to sort in descending order.
Delete Selected Results
To de lete verifi cation res ult s for a selected fi le, select it in the Image File Name column ()
and click Delete () or press the Del key (the associated image fi le will not be deleted). To
select multiple results, press Ctrl while clicking the fi le names, or press Shift while selecting
two fi le names to select these fi les and all results in between.
Return to fi r s t page
23
23
Page 24

Using Image Authentication Software
Important: Altering Verifi cation Results
Saving Verifi cation Results
Controls used The Save Results button
To save verifi cation results, click Save Results (). A “Save As” dialog will be displayed
(); choose a destination and fi le name and click Save. Results are saved in a generic “.csv”
(Comma-Separated Values) format supported by many spreadsheet and word-processing
applications. The fi elds are ordered as listed in the result area: full fi le path followed by verifi c a t i o n r e s u l t s for photo information and image data, with the description coming last.
Important: Altering Verifi cation Results
Note that verifi cation results saved in “.csv” format can be altered and consequently can not be used
to guarantee of image authenticity.
Return to fi r s t page
24
24
Page 25

Using Image Authentication Software
Menu List
File Menu
Choose Image Folder
Save Results
Exit
Edit Menu
Delete
Select All
View Menu
Display Full Path
Tool s Menu
Options…
Help Menu
Display Instruction Manual…
Check for Updates…
About Image
Authentication
Software…
Ctrl + I
Ctrl + S
Alt + F4
Delete
Ctrl + A
F1
Select folders for verifi c a t i o n .
Save verifi cation results.
Exit Image Authentication software.
Delete selected verifi cation results.
Select all verifi cation results.
Check this option to display full fi le paths in
the result area.
Choose whether to verify images in subfolders.
View this manual.
Check for software updates.
View software version information.
Return to fi r s t page
25
25
Page 26

Customer Support and Registration 1/3
Nikon User Support Information (U.S.A.)
Thank you for choosing Nikon, and welcome to our family of Digital Imaging products.
We are confi dent your Nikon product will meet and exceed the high level of quality, reliability and innovative design you have come to expect from Nikon.
Please contact us if you have any questions or suggestions. We value your feedback, and
want to be sure you are completely satisfi ed with your purchase. To assist us in serving you
better, we ask that you please register your product on-line at www.prodreg.com/nikon.
If you have any questions or suggestions about Nikon Digital Imaging products, please call
the Nikon Digital Imaging Hotline:
1-800 -NIKON-UX (1-800-645-6689)
Technical Support ..........24 hours a day, 7 days a week
Other Services ................Mon. through Fri., 10am to 10pm EST
Technic al support for your Nikon Digital Imaging product is free. Support for computer
related issues is free for either six or twelve months from the date of your fi rst call to Nikon,
depending on your product. Please ask our Customer Service Representative for details.
Also, visit our technical support web site at www.nikontechusa.com for FAQs, software
updates, manuals and solution forums. Information on other exciting Nikon products is
available at www.nikonusa.com.
Technical support and repair services is only available in the United States, the Caribbean,
and South and Central America. If you are in this service area but cannot reach our toll free
number, please call 1-631-547-4311. Software and other items cannot be shipped outside of
this service area.
Thank you for choosing a Nikon Digital Imaging product.
Return to fi r s t page
26
Page 27

Customer Support and Registration 2/3
Austria
Nikon GmbH
Modecenterstr. 14, A - 1030 Wien
Tel: +43-(0)900-150066
Phone line costs (# 0,45€/min)
Belgium
H. De Beukelaer & Co. N.V./S.A.
Boomsesteenweg 77, B-2630 Aartselaar
Tel: +32-(0)3-870-59-00 Fax: +32-(0)3-877-01-25
Czech Republic
Nikon SRO
Kodanska 46, 100 10 Praha 10
Tel: +420-267-154-560
Denmark
Nikon Nordic AB, dansk filial
Ørestads Boulevard 67, 1, DK-2300 København S
Tel: +45-32452000
Finland
Nikon Nordic AB Suomen toimisto
Ojahaanrinne 4, 01600 VANTAA
Tel: +358 9 5660 060
France
Nikon France S.A.S.
191, Rue du Marché Rollay, 94504 Champigny
Sur Marne Cedex
Tel: +33-(0)8-25-82-10-10
Germany
Nikon GmbH
Tiefenbroicher Weg 25, 40472 Düsseldorf
Tel: +49-(0)900-1225564
Phone line costs (# 0,24 €/min)
Greece
D. & J. Damkalidis S.A.
44 Zefyrou St. 17564
Tel: +30-210-9410888 Fax: +30-210-9427058
Hungary
Nikon Kft.
Budapest, Fóti út 56. 1047 Hungary
Tel: +36-1-232-13-71
Italy
Nital S.p.A.
Via Tabacchi 33, 10132 Torino
Tel: +39-199-12-41-72 Fax: +39-011-81-44-233
Netherlands
Inca Import B.V.
Rutherfordstraat 7, 2014 KA Haarlem
Tel: +31-(0)23-5101910 Fax: +31-(0)23-5243551
Norway
Nikon Nordic AB NUF
Martin Linges vei 17, 1367 Snarøya
Tel: +47-67-82-74-00
Poland
Nikon Polska Sp. z o.o.
ul. Post pu 14, 02-676 Warszawa
Tel: +48-22-6079400
Rep. of South Africa
Foto Distributors, Head Office
Nikon House, 516 Kyalami Boulevard,
Kyalami Business Park, Midrand 1685.
Tel: +27-(0)11-466-2500 Fax: +27-(0)11-466-3400
Russia
Nikon Europe BV, CIS Representative Office
Zubarev pereulok, d.15, k.1, office 541, 129164 Moscow
Tel: +7 (095) 733 91 70
Spain
Finicon S.A.
C/Ciencias, 81 Nave-8, Poligono Pedrosa
08908 L’Hospitalet de Llobregat, Barcelona
Tel: +34-(0)93-2649090 Fax: +34-(0)93-3363400
Sweden
Nikon Nordic AB
Anton Tamms väg 3, 194 22
Upplands Väsby
Tel: +46-(0)8-594-109-00
Switzerland
Nikon A.G.
Im Hanselmaa 10, CH-8132 Egg Zurich
Tel: +41-(0)848-277-000
United Kingdom
Nikon U.K. Ltd.
380 Richmond Road, Kingston, Surrey KT2 5PR
Tel: +44-(0)870-770-0231
AT
BE
CZ
DK
FI
FR
DE
GR
HU
NL
NO
ZA
PL
ES
RU
SE
CH
IT
GB
Nikon User Support Information (Users in Other Areas)
If you are in need of technical assistance with the installation or operation of your Nikon
product(s), please do not hesitate to contact one of the following Nikon representatives.
When calling support, you will be asked to supply the serial and/or version number(s) of
your Nikon software. For effi cient communication, it is highly recommended that you have
your Nikon product in front of you.
Europe and Africa
Return to fi r s t page
27
Page 28

Customer Support and Registration 3/3
Australia
Maxwell Optical Industries Pty Ltd.
Unit F1, Lidcombe Business Park
3-29 Birnie Avenue, Lidcombe NSW 2141
Tel: +61-(0)2-8748-5200 Fax: +61-(0)2-8748-5220
Canada
Nikon Canada Inc.
1366 Aerowood Drive, Mississauga, Ontario L4W 1C1
Tel: +1-(0)905-625-9910 Fax: +1-(0)905-625-6446
China
Beijing Hua Xun Nikon Service Center
57, Xuanwumen Xidajie, Beijing 100803
Tel: +86-(0)10-6307-4142 Fax: +86-(0)10-6307-4122
Hong Kong
Nikon Hong Kong Ltd.
Suite 1001, 10F, Cityplaza One, 1111 King’s Road,
Taikoo Shing
Tel: +852-(0)2902-9000 Fax: +852-(0)2907-0378
India
Photo Vision
223, Okhla Industrial Estate Phase III,
Near Modi Flour Mill, New Delhi - 110 020
Tel: +91-(0)11-2692-8913 Fax: +91-(0)11-2692-9856
Indonesia
Pt Alta Nikindo
Kompleks Mangga Dua Square
Block H 1&2 Jl.Gunung Sahariraya, Jakarta Utara 10730
Tel: +62-(0)21-6231-2700 Fax: +62-(0)21-6231-2777
Israel
Hadar Photo Supply Agencies Ltd.
36 - 38 Achad Haam St., Tel-Aviv
P.O. Box 1686
Tel: +972-(0)3-5603947 Fax: +972-(0)3-5603905
Korea
Nikon Imaging Korea Co., Ltd.
12th Floor, Seoul Chamber Of Commerce &
Industry Building,
4-45, Namdaemoon-Ro, Jung-Ku, Seoul 100-743
Tel: +82-(0)2-6050-1800 Fax: +82-(0)2-6050-1801
Lebanon
Gulbenk Trading Co.
Hamra-Makdessi Street, Adhami Building,
5th Floor, Beirut
P. O. Box 113-6645
Tel: +961-(0)1-353742 Fax: +961-(0)1-347613
Malaysia
Nikon (Malaysia) Sdn. Bhd.
11th Floor, Block A Menara PKNS
No. 17, Jalan Yong Shook Lin 46050 Petaling Jaya
Selangor Darul Ehsan
Tel: +60-(0)3-7809 3688 Fax: +60-(0)3-7809 3600
New Zealand
T.A. Macalister Ltd.
65-73, Parnell Rise, Auckland
Tel: +64-(0)9-303-4334 Fax: +64-(0)9-309-6502
Philippines
Columbia Global Photo Sales Corporation
#129-135 Gregorio Roxas Street,
SFDM, Quezon city, 1117
Tel: +63-(0)2-363-8550 Fax: +63-(0)2-364-3334
Singapore
Nikon Singapore Pte. Ltd.
80 Anson Road #10-01/02 Fuji Xerox Towers
Singapore 079907
Tel: +65-6559-3618 Fax: +65-6559-3665
Taiwan
Lin Trading Co., Ltd.
8F, 272 Nangking Road, Sec. 3, Taipei 10566
Tel: +886-(0)2-2740-3366 Fax: +886-(0)2-2781-2525
Thailand
Niks (Thailand) Co., Ltd.
166 Silom Road 12, Bangkok 10500
Tel: +66-(0)2-235-2929-39 Fax: +66-(0)2-236-7240
Turkey
Teleoptik Ltd Sti
Ankara Caddesi Dedehan No. : 118-120,
Kat : 1-2, Sirkeci 34112, Istanbul
Tel: +90-(0)212-527-0789 Fax: +90-(0)212-520-6716
U. A. E.
Grand Stores, L.l.c
Saleh Bin Lahej Building, Mezzanine Floor,
Al Garhoud, Deira, Dubai
P. O. Box 2144
Tel: +971-(0)4-2823700 Fax: +971-(0)4-2828382
MY
LB
KR
NZ
PH
TR
AE
HK
CA
AU
IN
ID
CN
IL
SG
TW
TH
Asia, Oceania, Middle-East and Canada
Asia Pacifi c A r e a
http://www.nikon-asia.com
Nikon Imaging Global Site
http://nikonimaging.com/global/
Please visit the web site appropriate for your area of purchase for downloads of updated software,
replacement manuals and technical support information:
Europe and Africa
http://www.europe-nikon.com/support/
Korea
http://www.nikon.co.kr
Return to fi r s t page
28
 Loading...