


INSTRUCTION MANUAL
1
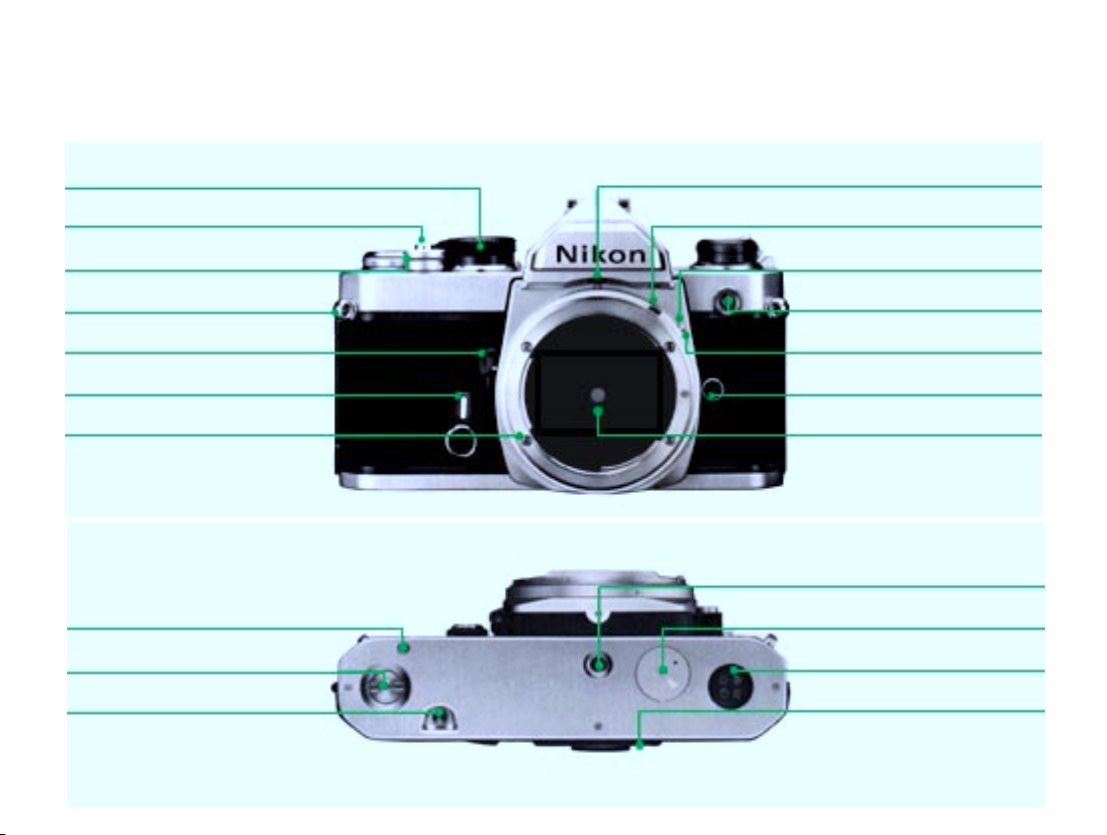
N O MEN C L A T U R
E
S h utter Spe eed / AS A sel ector rin g
S h utter r el e a s e button
S h utter r e leas e f ing ergu a r d
N eck str ap eyel e
De pth- o f f i eld p r evi ew l ev er
S e l f-tim er le v er
Lens mo u ntin g fla n ge
Motor drive shutter couplling
Motor dr ive co u pl ing
Film rewind button
t
Le ns apertur e dire ct rea dout window
Meter co u pling leve r
Meter cou pling lev er rel eas e
Sync terminal (cover provided)
Lens mo u ntin g ind ex
Lens release button
Reflex mir ro r
Tri pod so c ke
Batter y cham ber lid
Motor drive electrical contacts
Mem o hold er
t
2
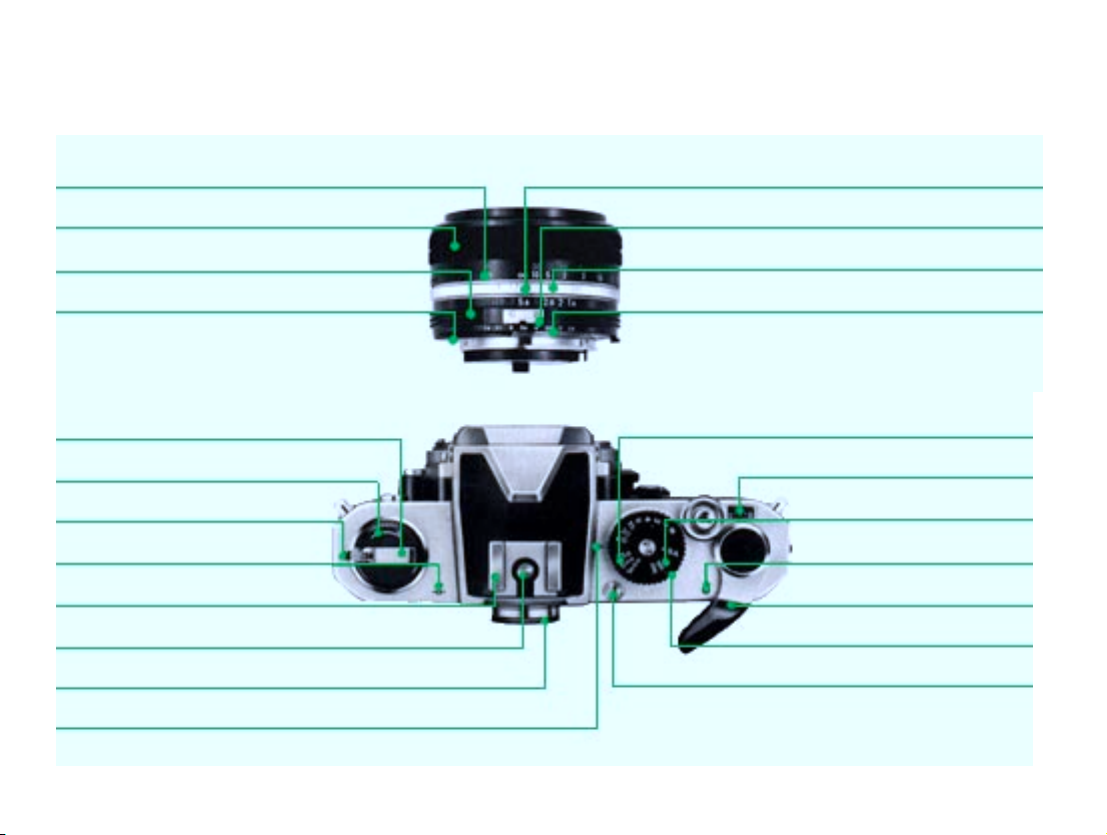
Foc u s ing distanc e sc a l e
Apertur e / distance sc ale ind ex
Foc u s ing ring
Aperture rin g
Meter co u pll ing ridge
Fil m r ew ind c r a nk
Fil m r ewi nd kn o b
Safety l o ck
Fil m pl a n e in dicator
Hot-s ync shoe
Hot-s hoe contac
Viewfinder ey epiec e
S h utter speed i nde x
t
Meter c oup l ing s ho e
De pth- o f-f ield indic ators
Apertur e-dir ect-r ead out sca l e
S h utter sp eed se l ector
Fram e cou nter
AS A fi lm sp eed wi ndo w
Meter O N ind ex
Fi lm- adva nce leve r
AS A f ilm s pee d indx
Multi- expo s ure button
3

C O N TEN T S
Fo re w or d. . .. .. . .. .. . .. .. . .. .. . .. .. . .. .. . . . .. .. . .5
Preparation for use.........................................6
Installing the batteries . .........................6
Checking battery power..........................6
Loading film.......................................7
Prior to shooting................................8
Memo holder........................................9
Setting the film speed.......................9
Operation of camera controls........................ 10
Setting the shutter speed.................. 10
Setting the aperture................................ 10
Film-advance lever............................. 11
Frame counter................................... 11
Self-timer........................................ 12
Unloading film......................................... 13
Holding the camera..................................14
Shu tter rel ease ope ration.............. .....15
Operation by cable release...................15
Focusing.....................................................16
Infrared photography.........................18
Film-planeindicator................................18
Depth of field............................................19
Depth-of-field preview lever..............19
Depth-of-field indicators.................20
Exposure measurement...............................22
Determining degree of exposure...........22
Exposure control................................24
Metering range ....................................24
High-contrast lighting.....................25
Stop-down exposure measurement...................26
Exposure compensation adjustment...................27
Multiple exposures.......................................28
Flash synchronization ....................................29
Tips on camera care....................................30
Mounting and removing lenses ....................31
Accessories. .. . . . . . . . .. . . ............................32
Features/Specifications.. ..............................34
4

F
O REW O R D
The Nikon FM is a compact 35mm single-lens reflex camera that offers a host of advanced features
amateur photographers and professionals alike will
appreciate.It is designed to accept virtually every
accessory of the Nikon System-the most comprehensive ever created for photography-so it can do
virtually everything the top rated SLR’s can do . .
. with that unique precision and reliability which
you have come to associate with Nikon. To get the
most out of this camera, study the instructions in
this manual carefully, as well as those in related
manuals, and practice using the controls—before
loading the camera with film. Keep the manual on
hand for ready reference until you have mastered
operation. The few minutes you spend familiarizing yourself with the camera will guarantee you
the best results and increase your pleasure in taking pictures many times over.
5

PREPARATION FOR US
E
Installing the Batteries
The Nikon FM’s built-in exposure meter is powered by two
button-cell type 1.5V silver-oxide batteries. These are
mounted in the battery clip, which forms a single unit with
the battery chamber’s coin-slotted lid, in the camera’s baseplate. To install the batteries, first unscrew the lid by turning
it counterclockwise, with a coin or something similar, until it
can be freely removed by hand. Then, seat the two batteries
in the battery clip, one on top of the other, making sure that
their respective plus (+) and minus ( - ) indications correspond with similar marks provided in the clip. After seating
the batteries correctly, replace the lid, and secure the connection by turning it clockwise with the coin as far as it will
go. It is advisable to remove the batteries, when the camera
is not to be used for a long period, to prevent battery leakage
within the camera; for additional information on this, refer
to “Tips on Camera Care” on page
Checking Battery Power
To check battery power, move the camera’s film advance lever from the flush to the stand off position by pulling it just
far enough to uncover the red index on top of the camera.
Then, look through the viewfinder. If any of the LED (light
emitting diode) exposure indicators is on, battery power is
sufficient for proper operation. Otherwise, check battery seating and make adjustments, if necessary. Should the LED display still fail to light up, change batteries.
Important: When the camera is not in use, make sure
that the film advance lever is positioned flush with the camera body. As the lever doubles as the meter on/off switch, leaving it in the stand-off position will result in the camer4’s battery being completely drained in just a few days.
6
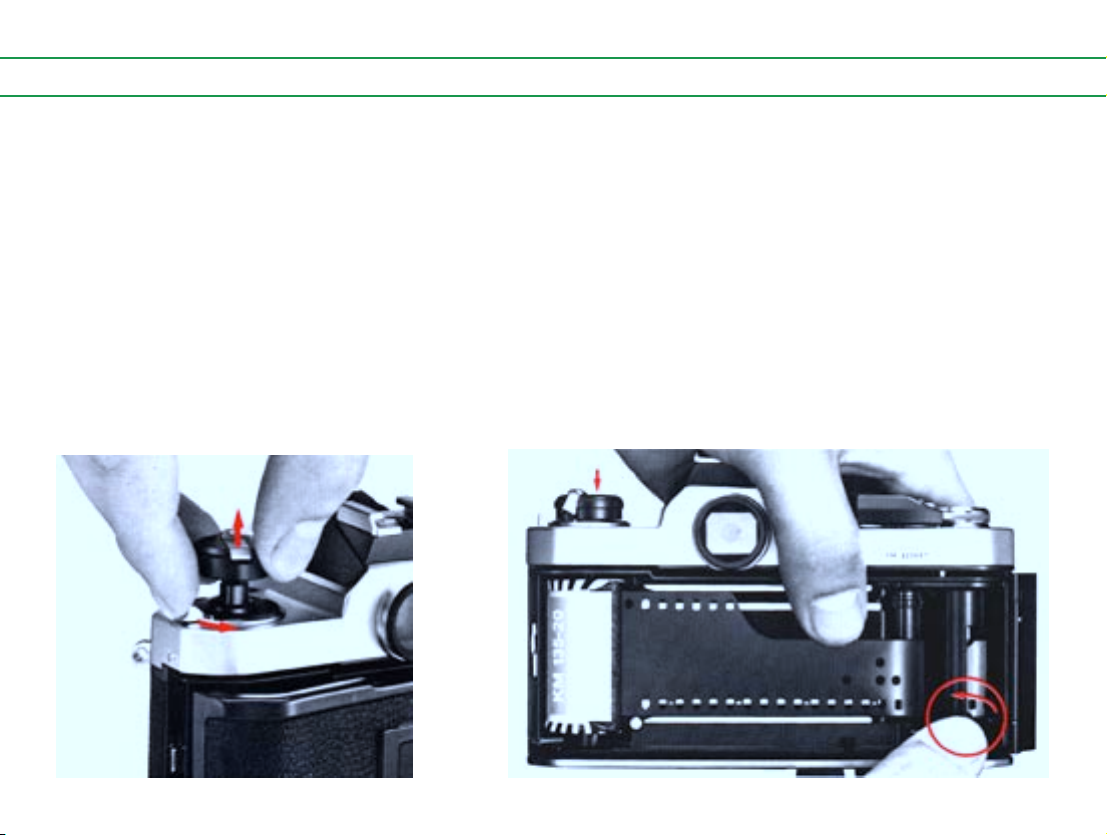
Loading Film
First, open the camera back by sliding its safety lock
to the rear and lifting the film rewind knob as far as it will
go. Position the film cartridge or cassette in the film chamber, which is located on the left-hand side, with the film leader
aligned along the film guide rails; then, push the rewind knob
to hold the cartridge in place. Pull the film leader out sufficiently for feeding into the film take-up spool, and insert its
end into any of the spool’s slots. Rotate the take-up spool as
shown in the illustration so that the film passes under the
spool with its emulsion
side (dull side) facing out. Make sure that the perforations
along the edges of the film mesh with the sprockets. If necessary, release the shutter by cocking the shutter release button,
and stroke the film advance lever slowly to make sure that the
leader winds smoothly on the spool and that the film edge
perforations engage the film sprocket roller. When you are
certain that the film is being fed properly onto the spool and
traveling correctly along the film guide rails, close the camera back by pressing it until it snaps into place.
7
PREPARATION FOR U SE - continue
d
Prior to Shooting
Fold out the film rewind crank, and turn it gently in the direction of the engraved arrow until you feel a slight resistance; this will indicate that any slack in the film cartridge
has been taken up. Then, fold the rewind crank into place.
Advance the film (refer to page 11 for film advance operation), and make two blank exposures; this will dispose of the
initial portion of the film exposed during loading. As you
advance the film, confirm that the rewind crank turns in the
direction opposite the arrow. This indicates that the film has
been loaded properly and is being advanced.
After advancing the film two frames, check that the frame
counter is at “O”; then, advance the film one more frame to
prepare the camera for taking the first picture.
8
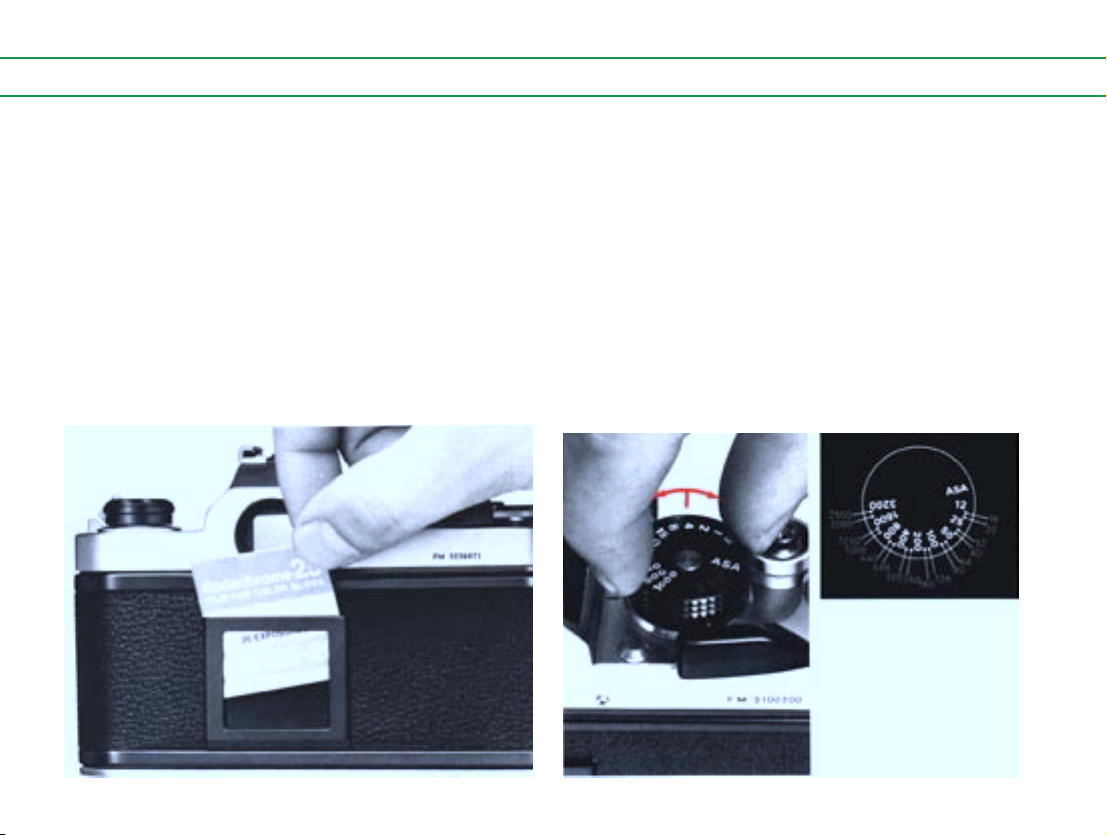
Memo Holder
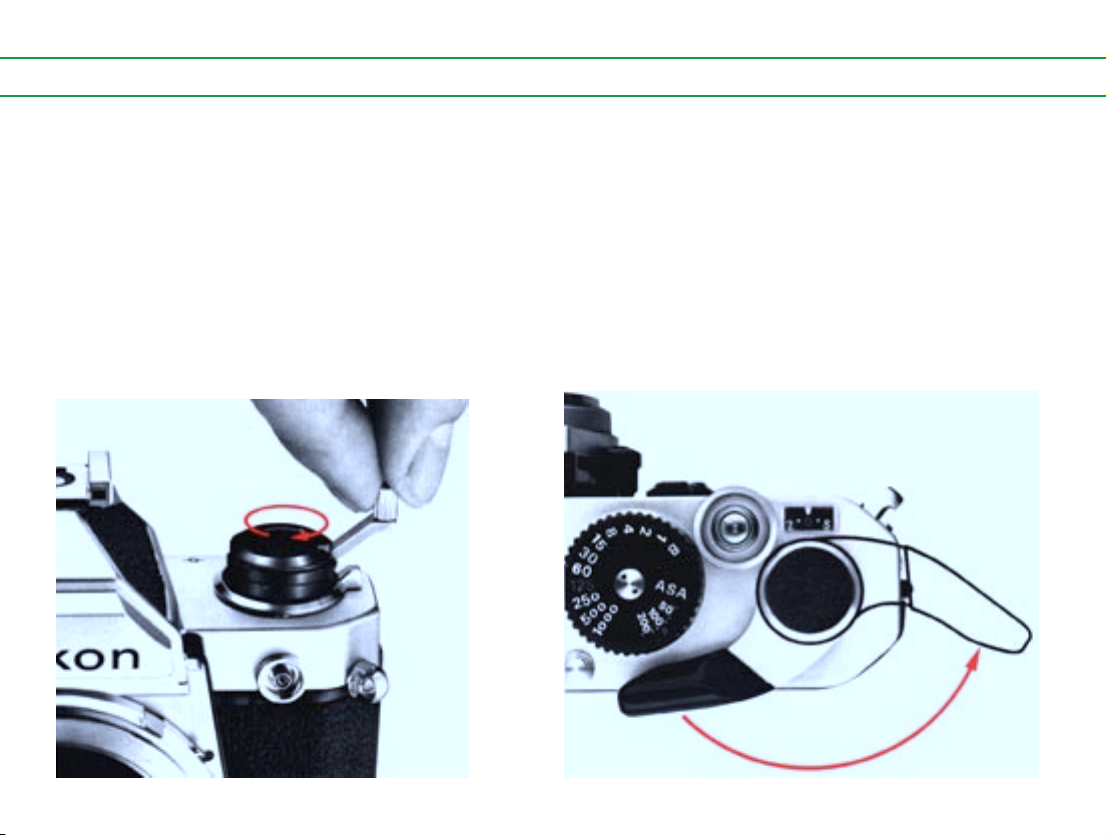
Setting the Film Speed
A special holder is provided on the camera back for convenient storage of any relevant information. You can use it, for
instance, to hold the end flap of a film carton to remind you
of the type of film loaded in the camera, the ASA film speed
and the total number of exposures available.
The camera’s exposure meter must be adjusted to the speed of
the film in use to ensure correct measurement. Accordingly,
the camera is provided with an ASA film speed scale. To make
the necessary adjustment, lift the knurled ASA film speed ring,
and turn it until the triangular red index is aligned with the
ASA value of the film loaded in the camera. The meter is
sensitive across the full range of from ASA 12 to ASA 3200;
there are two dots between each number for intermediate ASA
settings, i.e., 64, 80, 125, etc.
9

OPE
RATION OF CAMERA CONTROLS
Setting the Shutter Speed
The Nikon FM’s shutter speed selector is knurled for slipfree, easier manipulation; the face of the dial is engraved
with the 11 shutter speed settings available: 1 for one second, and 2, 4, 8, 15, 30, 60, 125, 250, 500 and 1000 for fractional values of from 1/2 to 1/1000th of a second. A “B”
setting, also engraved, is provided for longer time exposures.
To set the shutter speed, turn the shutter speed selector until
the desired speed is aligned with the shutter speed index.
The speed selected (including “ B”) is shown on the lefthand side of the viewfinder, too, for instant reference.
Note that the 125 setting is engraved in red; this indicates 1/
125 sec., the fastest shutter speed available for flash synchronization with electronic flash units. (Refer to page 29
for additional information on flash photography.) Also, at
the “B” setting, the shutter remains open for as long as the
shutter release button is kept depressed.
Setting the Aperture
The Nikon FM works best with Nikkor lenses. The aperture
rings of these lenses are knurled for slip-free, easier manipulation.
To set the lens aperture, turn the lens aperture ring until the
desired f/number setting on the lens aperture scale is aligned
with the index mark on the lens; intermediate settings are also
usable, when required.
Note that, with Nikkor lenses provided with an aperturedirectreadout (ADR) secondary lens aperture scale, the f/number
for the aperture selected appears on the upper portion of the
viewfinder for convenient reference when shooting.
10
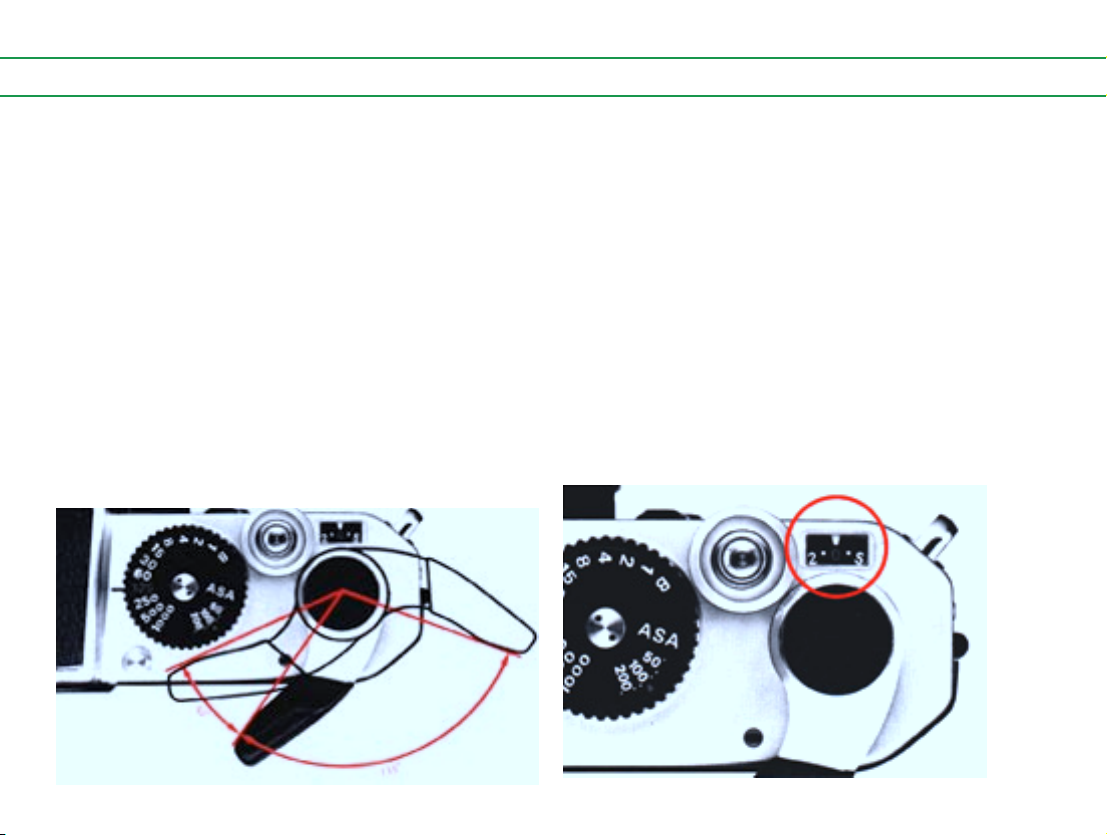
Film-Advance Lever
Frame Counter
The film-advance lever simultaneously advances the film,
cocks the shutter and operates the frame counter. It also
doubles as the Nikon FM’s meter on/off switch and shutter
button lock.
To advance the film, stroke the lever with your right thumb
as far as it will go. The film will be advanced a full frame.
The lever automatically returns to its 30° stand-off position
when released upon the completion of the film advance.
The film-advance lever switches the meter on when moved
to its stand-off position; it switches the meter off when moved
back flush with the camera body. With the lever set flush
against the camera body, it serves also as a lock to prevent
accidental tripping when the shutter is cocked.
Each time the film is advanced one frame by a full stroke of
the film advance lever, the frame counter operates to show
how many frames have been exposed. It is automatically reset to S (start), two frames before 0, when the camera back is
opened to remove an exposed film cartridge and/or load a new
roll of film. The frame counter dial has indications for up to a
maximum of 36 frames, with all odd numbers calibrated in
dots and all even numbers in figures. The figures are in white,
except for 12, 20 and 36 which appear in red to indicate the
maximum number of exposures available, respectively, with
standard film cartridges.
11

OPE
RATION OF CAMERA CONTROLS - continue
d
Self-Timer
The built-in self-timer provides an approximately 8 to 14
second delay between the time the shutter release button is
depressed and the time the shutter is actually fired. It can be
used with any of the marked shutter speeds between 1/1000
and 1 sec. Avoid using the selftimer with the shutter speed
dial set to “B” as, on this setting, the shutter will only open
momentarily and incorrect exposure will invariably result.
To take a picture using the self-timer, first set the aperture
and shutter speed controls, advance the film, and cock the
self-timer by turning the self-timer lever downwards. Then,
depress the shutter release button and the timer wiLl start. A
unique feature of the FM’s self-timer lever is that its setting is
“cancellable.” In other words, should you decide not to use
the self-timer after setting it, you simply turn it back upwards
and resume normal shutter tripping operation. For critical
close-up photography, the self-timer, in combination with a
tripod, is particularly useful in preventing vibration.
12

UNLOADING FI
LM
As soon as the frame counter indicates that the last exposure
has been made, or when the film advance lever can no longer
be stroked, the roll of film has been fully exposed and can
now be removed.
To unload the roll of film, first press the rewind button on
the camera’s baseplate; then, unfold the film rewind crank
and turn it in the direction of the engraved arrow with smooth,
even pressure. Rewind tension will cease to indicate that the
film leader has left the take-up spool. Now, open the camera
back by sliding its safety lock and pulling up the rewind knob
as far as it will go; then, remove the film cartridge. Note that
when the film advance lever is stroked for the next exposure
(with the next roll of film), the rewind button will be released
to engage the filmadvance mechanism once again.
You should not push the rewind button during film advance
operation; otherwise, film advance will temporarily stop and
frame-overlap may result. Note, too, that the camera back can
be removed from the body by depressing the locking catch on
the hinge.
13

HOLDING THE CAMERA
Camera shake is one of the most common causes of blurred,
unsharp pictures, especially at slow shutter speeds. To prevent this, study how to hold the camera correctly and practice steady shutter squeezing.
Wrap the fingers of the right hand around the camera body
so that the index finger of your right hand rests comfortably
on the shutter release button and the thumb fits between the
camera body and the film advance lever. Position the camera
in such a way that the eye looks through the center of the
viewfinder. Cradle the camera with your left hand for additional support, using the thumb and middle finger to grasp
the focusing ring. This way, the camera is properly supported
and can easily be switched from horizontal to vertical shooting.
14

SHU TTER RELEASE OPE
RATION
Correct shutter release operation is just as important in obtaining sharp pictures as holding the camera properly. To release the shutter correctly, move the advance lever to its standoff position, hold the camera steadily and depress the shutter
release button with smooth, even pressure. Relax even when
you’re in a hurry—a quick jab at the shutter release button
will cause camera shake and result in an unintentionally
blurred photograph.
Operation by Cable Release
The shutter release button can also be tripped with the use of
a cable release (or some similar accessory). To attach the cable
release to the camera, screw the threaded cable connector onto
the mount provided with the button. The shutter is then tripped
by depressing the cable release plunger. Cable release operation is especially recommended for critical shooting situations,
su ch as photomic rog raphy or ti me exposu re, where
vibrationfree shutter release is of prime importance.
Important:: If you mount the Nikon FM on a tripod with a
large head, contact between the lens body and the head may
make it impossible to turn the lens aperture ring. If this happens, use the special tripod adapter (supplied with the camera) between the tripod head and camera body.
15

F
OCUSING
When the FM is used with a Nikkor lens fitted with an automatic diaphragm, focusing is done at full aperture. This makes
for the brightest possible images on the focusing screen, enabling easy focusing and composing. The focusing screen
itself gives you a choice of three focusing aids: a central splitimage rangefinder spot, an annular microprism grid and a
fine matte outfield.
To focus, using the split-image rangefinder spot, turn the focusing ring of the lens until the two halves of the rangefinder
spot perfectly coincide, forming a single, crisp image. To
focus with the microprism grid, turn the focusing ring until
the image seen through the microprism pattern appears sharp
and crisp. With the matte outfield, turn the ring until the image viewed in the field appears sharp.
The split-image rangefinder spot is considered the most suitable for precise, pinpoint focusing, and the microprism grid
for rapid focusing in sports or action-type photography. The
fine matte outfield, on the other hand, is ideal for use with
telephoto lenses or in close-up and macrophotography.
You can also prefocus the lens with the use of the distance
scale engraved in both meters and feet on the lens barrel. Simply turn the focusing ring until the measured or estimated camera-to-subject distance is lined up with the distance scale index on the lens barrel. This technique is useful for picturetaking situations where either the subject is elusive or time
does not permit throughthe-lens focusing.
16

17

F
OCUSING - continue
d
Infrared Photography
The plane of sharpest focus for infrared light is slightly farther away than its counterpart for visible light as seen through
the camera’s viewfinder. To compensate for this, first focus
the image sharply through the viewfinder. Then, turn the focusing ring counterclockwise until the point focused is aligned
with the red dot (or line) provided on the lens barrel. For
example, in the picture below, the lens has been focused for
infinity (oh) infrared shooting. Note that when lenses with a
focal length of 50mm or less are used stopped-down to f/8 or
below, compensation is not necessary due to the large depth
of field available.
There are some Nikkor lenses that do not require refocusing
for infrared photography; refer to their instruction manuals
for details.
Film-Plane Indicator
To ensure the best results in critical picture-taking
situations, such as close-up or copy photography, it is necessary to determine the exact subject-to-film-plane distance. The
Nikon FM is thus provided with a film plane indicator ( - );
this is positioned exactly in the film plane, which is 46.5mm
from the front surface of the lens mounting flange.
18

DEP
TH OF FIELD
When you focus on your subject, you will find that not only
is the subject itself in focus but that objects both in front of
and behind it appear to be in focus. This “zone”of focus is
called “depth of field.”
Depth of field is not a fixed quantity. It varies by lens, depending on both the subject’s distance from the camera and
the specific lens aperture in use. A third factor, the focal length
of the.lens, also influences the apparent depth of field, i.e.,
the longer the lens, the shallower the depth of field appears
to be, and vice versa. In the same manner, the wider the taking aperture (i.e., the lower the f/stop number), the shallower
the depth of field, and vice versa. Also, the closer you approach your subject, the shallower the depth of field becomes,
and vice versa. In all cases, you will find that the depth of
field behind the subject is larger than that in front; this enables selective blurring of the background elements of the
picture, a technique most often used by the creative photographer.
Depth-of-Field Preview Lever
Most of the Nikkor lenses you will find yourself using with
the Nikon FM are “automatic.” This means that the aperture
diaphragm of the lens is kept open at its widest setting while
you are viewing, focusing and metering. When you press the
shutter release button, the camera’s mechanism automatically
“stops down” (i.e., closes the lens aperture) the lens to the
aperture at which it is set.
To examine the depth of field before taking a picture, it is
necessary to stop down the lens manually. You can do this by
exerting slight finger pressure on the FM’s conveniently situated depth-of-field preview lever. Assuming that the lens is
set to an aperture other than its maximum, gentle pressure on
the lever will stop down the lens to that aperture. You will
then be able to see the elements in front of and behind the
main subject that will appear in sharp focus in the actual photograph— although some of them may have appeared not to
be in focus prior to pressing the lever. A side effect of this
picture-taking process is the “darkening” of the image in the
viewfinder (the higher the f/number, the “darker” the image
appears); this is normal and should be no cause for concern.
19

DEP
TH OF FIELD - continue
d
Depth-of-Field Indicators
The Nikkor lens’ depth-of-field indicators come in the form
of the three scales fitted on the lens barrel. The first is the
lens aperture scale, with the f/numbers colorcoded. The second consists of two sets of colored lines, the colors corresponding to the colors of the f/numbers. The third is the focusing scale which is calibrated in meters and feet.
To determine depth of field, note the color of the f/ number
in use. The depth of field at the taking aperture is indicated
by the numbers on the focusing scale which are adjacent to
the colored lines that correspond to the color of the f/number
set.
Example
Taking aperture: f/16 Color: Blue
Focusing distance: Sm
In the example above, the farthest point of sharp focus behind the subject is infinity (on); this is the figure on the focusing scale which is adjacent to the blue line on the second
scale, which in turn corresponds to the blue color of the f/16
setting. The closest point of sharp focus is 2.7m, although
this number does not appear in the focusing scale.
Note that for exact depth-of-field determination, you should
refer to the depth-of-field tables in the instruction manual
for the Nikkor lens in use.
20

Lens at f/8:Depth of
field extended in front
of/behind the main subject.
Lens at f/16:Sharp focus is extended to encompass the entire foreground and background
21

EXPOSURE MEASUREMENT
The Nikon FM’s built-in exposure meter utilizes Nikon’s
proven center-weighted through-the-lens metering system
which is cross-coupled with both the shutter speed control of
the camera and the aperture control of the lens mounted on
the camera. The meter reads the intensity of the light coming
through the lens over the entire focusing screen at full aperture but favors the central 12mm-diameter area outlined on
the screen— allowing you to make precise readings and making for overall balanced exposures.
Determining Degree of Exposure
The viewfinder has three exposure indicators visible within
the viewfield: + for overexposure, o for correct exposure and
— for underexposure. These indicators have corresponding
LED’s which light up when the film advance lever is moved
to its 30° stand-off position; as you can see in the chart on the
left, there are five combinations possible. Also included inside the viewfinder as aids to exposure determination are the
shutter speed selected and the lens aperture setting. With nonAI type lenses, the lens aperture is not visible. To determine
correct exposure, first switch the meter on by moving the film
advance lever to its stand-off position. One or two of the
LED’swill light up opposite the corresponding exposure indicator/s to show you the precise degree of exposure. If the +
indicator LED lights up, increase the shutter speed or decrease
the aperture—or vice versa— until the o indicator LED lights
up and the + indicator LED turns off; the procedure is the
same if the—indicator LED lights up alone or with the Vindicator LED.
It is normally impossible for all three LED’s to light up at the
same time, or for the + indicator LED and—indicator LED to
light up simultaneously. The exception to this is when photographing a television screen. The rapidly scanning spot pattern that produces the TV picture results in a cyclic effect that
causes all three LED’s to light up when the exposure setting is
correct.
22

23

EXPOSURE MEASUREMENT - continue
d
Exposure Control
The amount of light reaching the film plane is determined by
a combination of the shutter speed and the lens aperture. Since
the two are interrelated, different combinations will give the
same degree of exposure. A 1-step change in shutter speed,
or a 1-stop change in aperture setting, will either halve or
double the degree of exposure. For example, a shutter speed
of 1/125 sec. lets in twice as much light as a setting of 1/250
sec., and only half as much light at a speed of 1/60 sec.; for
an aperture setting of f/11, twice as much light as f/16, and
half as much as f/8, is let in. Thus, if the correct exposure for
a particular picture-taking situation is 1/125 at f/11, then 1/
60 at f/16 or 1/250 at f/8 will be equally acceptable. The
following table illustrates the interrelationship between shutter speed and aperture we have just described.
Shutter speed
(second)
Aperture
1/1000 1/500
f/4 f/5.6
1/250 1/25
f/8 f/11
The “best” combination will depend on the results you want.
Use fast shutter speeds to “freeze” motion; use slow speeds
to produce a deliberate blur. Also, small apertures give greater
depth of field, while large apertures restrict sharp focus to
the main subject. Make your choice accordingly.
24
1/60
f/16
Metering Range
If the central exposure indicator LED (lo) fails to light up,
even after all possible lens aperture and shutter speed combinations have been tried, then the available light is either too
bright or too dim for the meter’s range. In this case, you can
either use artificial light (such as an electronic flash unit) to
increase subject illumination or mount a neutral density filter
on the lens to decrease the amount of light reaching the film.
Remember, too, that the lens in use is an equally important
factor to consider. For example, a 50mm f/1.4 lens (with ASA
100 film) couples from EV 1 (f/1.4 at 1 sec.) to EV 18 (f/16 at
1/1000 sec.), making it suitable for low-lightlevel picture-taking situations; on the other hand, a 135mm f/2.8 lens proves
more suitable for bright-light shooting, coupling (with ASA
100 film) from EV 3 (f/2.8 at 1 sec.) to EV 20 (f/32 at 1/
1000). Thus, choose the lens carefully to match the existing
lighting conditions.

High-Contrast Lighting
When there is a substantial difference in brightness between
the main subject and the background, seemingly unimportant bright spots or dark spots can adversely influence the
finder reading and thus affect the actual exposu ret
To compensate for an excessively bright (or dark) background, target the main subject in the center of the focusing
screen, then perform metering (i.e., determine the degree of
exposure you want) by making the necessary shutter speed
and/or lens aperture adjustments.
After completing this procedure, make your final picturt composition and shoot without readjustingeithershutte’ speed or
lens aperture. When shooting landscapes, fo’ example, it is
often advisable to aim your camera slightly downwards while
metering to eliminate the effects of bright expanse (i.e., the
sky); without such compen sation, the landscape may appear
underexposed in the final print. Also, for backlit subjects, it
may be necessary to move closer to ensure proper exposure
measurement
•M etering wi th a brigh t area in the ce nter wi ll
causeunderexposure of the main subject.
•For correct exposure, first measure the main subject then,
recompose and shoot.
25

STOP-
The vast selection of lenses available for use with your Nikon
FM includes some which are fitted neither with an automatic
diaphragm nor a meter coupling ridge, both of which are essential to full-aperture exposure measurement. The FM works
even with such lenses, through an alternative method called
“stop-down” exposure measurement. Note that when this type
of lens is used with the camera, the meter coupling lever
should be raised and locked up out of way manually by depressing and holding the coupling lever release button; to
avoid accidental damage, make sure you do not use excessive force when raising up the lever.
This is how stop-down exposure measurement is performed.
After you’ve composed your picture, move the film advance
lever to its stand-off position and press the camera’s depthof-field preview lever. Keep the lever pressed, and adjust
either the shutter speed dial or the lens aperture ring (or
both)—until the correct exposure indicator (a) LED lights
up. Then, release the lever and shoot.
It is advisable, at all times, to refer to the instruction manual
of the lens in use—especially if it is a fixedaperture lens (e.g.,
Reflex-Nikkor) or one requiring a focusing unit (e.g., Nikkor
1200mm f/11)—when performing stop-down exposure measurement. The same applies when bellows units, extension
rings, preset lens (e.g., PC-Nikkor), etc. are used with the
FM.
DOW N EXP
OSURE MEASUREMENT
26

EXPOSURE COMPE
NSATION ADJUSTMENT
“Correct exposure” is not an absolute value. It depends on
the characteristics of the metering system, the film in use
and the subject. Thus, all film and camera manufacturers
calibrate their meters, using the correct rendition of skin tones
as the standard or most representative of the vast majority of
shooting subjects.
For some specialized subject-and-film combinations, however, these meter calibrations require some compensation to
be made in order to ensure correct exposure. The following
table lists the corrections required for these combinations.
Note that the corrections are listed in terms of exposure value,
or EV. A change of +1 EV, for instance, can be achieved by
moving the lens aperture ring by one stop, or the shutter speed
dial by one shutter speed indication (i.e., a change from f/2
to f/2.8 represents a change of +1 EV, and a change of shutter speeds from 1/60 to 1/30 represents a change of —1 EV).
Repro-copying & slide-copying
Original
Type of
film
Panchromatic
film for general
use
B&W
color photo
No
compensa-
tion
necessary
Letters or
figures on
light
background
+1 1/2 stops
Letters or
figures on
dark
background
- 1/2 stop
Photo-
microg-
raphy
+1 stop
For very specialized application, consult both the instruction
manual of the accessory in use and the technical literature
provided by the film manufacturer. Also, you will find the
special 18% reflective gray card available from Nikon and
major film companies especially useful for copying and general studio work.
27

MULTIPLE PURPOSE
Intentional multiple exposure (two or more exposures on the
same frame) for creative effects are easy with the FM. First,
make the initial exposure. Then, slide the multi-exposure
button as far as it will go, and hold it while you stroke the
film-advance lever; repeat this procedure for each additional
exposure on the same frame. When you have achieved the
desired number of exposures on the same frame, release the
button and stroke the film advance lever once more. Note
that during multiple exposure operation, both the camera’s
shutter speed and the lens aperture can be freely changed to
any setting; also, the frame counter will remain at the same
setting until the multi-exposure button is released—a convenient way of confirming that multiple exposure operation is
proceeding properly.
28

F
LASH SYNCH RO NIZATION
Flash photography with the FM is easy. The camera is designed to synchronize with electronic flash at speeds up to 1/
125 sec. You can use its hot-sync shoe to mount any ISOtype electronic flash unit or speedlight directly onto the camera. For off-camera flash photography, or when using a nonlSO-type speedlight, you will need a sync cord to connect
the unit to the camera’s threaded sync terminal.
Flashbulb
FP
M
MF
Speedlight
Shuttter speed (sec.)
1/1000
1/500 1/250
Synchronized Cannot be used
1/25 1/60
1/30 1/15
1/8 1/4
1/21B
29

TIP
S ON CAMERA CAR
E
Tough and durable though your Nikon FM is, it is a precision optical instrument, and careless or rough handling can
cause irreparable damage. Observe the following tips, and
the camera will always work as perfectly as the day you
bought it.
• Remember that the camera’s controls are designed to oper-
ate with a minimum of pressure. If you find yourself exerting extra force, take it as a warning that you’re doing something wrong.
• Keep all lens and prism surfaces free from dust, dirt and
fingerprints. These not only impair viewing—they also generally result in a deterioration of optical performance. Clean
such surfaces either with a blower-type brush or with lens
tissue moistened with absolute alcohol. Never use lens tissue dry—it will scratch the lens. In general, avoid using cleaning fluids and lens tissue containing silicone (i.e., eyeglass
tissue).
• When loading or unloading film, ensure that the interior of
the camera body is free of dust, grit or chips of film. Use a
blower brush to remove such foreign articles. Avoid touching all internal surfaces, particularly the shutter mechanism
and film pressure plate.
• When mounting or removing lenses, prevent the entry of
foreign matter, and take extra care not to damage the rear
por” tion of the lens. Use a blower-type brush to do your
cleaning.
•Use the cleaning cloth to clean the external surfaces of the
camera body.
•If condensation should form on the lens surfaces (i.e., when
the camera is exposed to sudden temperature changes or to
high humidity), dry the camera thoroughly at room temperature without using anything before storing it in a cool, dry
place.
•Should you drop the camera accidentally on the floor or in
water, take it to an authorized Nikon dealer or service facility
for servicing immediately.
It is best to store the camera in a case or something similar
when you’re not using it. In this case, make sure the camera’s
shutter or self~timer is not cocked; also, don’t leave film in
the camera if it is to be stored for a long period of time.
Do not lubricate any part of the camera yourself; all such work
should be left to an authorized Nikon dealer or service facility. It is good practice to test your camera for proper operation
before preceding to your shooting assignment. Observe normal battery handling procedures to ensure your camera delivers maximum performance at all times: (1) Install batteries
correctly, (2) clean them periodically with a dry cloth; (3) remove batteries when the camera is stored for a long period of
time; (4) store unused batteries in a cool, dry place; (5) change
weak batteries promptly to prevent leakage within the camera. Also; dispose of used batteries properly (i.e., they should
never be burnt), and keep them out of the reach of children.
For details on battery performance by brand, refer to the literature available from the manufacturer.
30

MOU NTING AND REMOVING LENSES
To mount a lens fitted with a meter coupling ridge, first make
sure that the camera’s meter coupling lever is in the normal
position (i.e., it protrudes from the camera’s lens mounting
flange). Position the lens in the flange so that the mounting
index on the lens is aligned with the mounting index on the
camera body. Then, twist the lens counterclockwise until it
clicks and locks into place. The lens’ maximum aperture is
automatically indexed to the camera’s meter as soon as it is
mounted.
To mount a lens not fitted with a meter coupling ridge, first
make sure that the camera’s meter coupling lever is locked
up out of the way by pushing the coupling lever release and
manually lifting the lever up. Mounting procedure is the same
as described previously. Remember that stop-down exposure
measurement is required for lenses of this type (see page 26).
To remove the lens from the camera body, press the lens release button and keep it depressed while twisting the lens clockwise as far as it will go. Lift the lens out when it comes loose.
Note: The Nikon Fisheye 6mm f/5.6 and OP 10mm f/5.6 cannot be used with the Nikon FM, because the camera does not
have a provision for locking the mirror in the “up” position.
31

ACCESSORIE
S
M D-1 2 Motor Drive Un it
The Nikon FM’s own compact motor drive. Handsomely finished in black and durably constructed, the MD-12 attaches
to the FM in seconds, requiring absolutely no modification or
special adjustment of the camera body. Continuous and single
frame operation available, with a maximum shooting speed
of 3.5 frames per second from 1/125 sec. to 1/1000 sec. Firing
speed automatically adjusted as shutter speed is adjusted. Builtin battery pack contributes to overall reduced size and weight.
Fitted with remote control socket for use with Nikon remote
control accessories such as the MT-1 Intervalometer and the
MOO-1 Radio Remote Control Set.
32

Camera Cases
Recommended for storing camera body and lenses. Different sizes available to accommodate most Nikkor lenses.
Lens Hoods
Recommended to prevent extraneous light from striking the
lens and causing flare and ghost; also useful for protecting
the lens. All kinds of models to match all kinds of Nikkor
lenses.
Filters
A wide selection of sizes and types to meet the needs of color
or black-and-white photography. These filters work best with
Nikkor lenses, and vice versa. Also useful for protecting the
front portion of the lens.
33

FEATURES /SPECIFI
CATIONS
Type of camera: 35mm single-lens reflex (SLR)
Picture format:: 24mm x 36mm (35mm film)
Lens mount:: Nikon F mount (bayonet type)
Lenses available: Nikkor 50mm f/1.4, f/1.8 or 50mm f/1.2 as
standard; more than 50 interchangeable Nikkor lenses in all
Viewing system: Fixed eye-level pentaprism viewfinder with
approx. 93% frame coverage; shutter speed selected indicated in the viewfinder; lens aperture setting indicated in the
viewfinder when lens in use is fitted with a meter coupling
ridge and an aperturedirect-readout lens aperture scale; matte
Fresnel focusing screen with central split-image rangefinder
spot and microprism ring (similar to Nikon Type K screen)
Exposure metering: Through-the-lens, center-weighted, full
aperture exposure measurement with Nikkor lenses fitted with
meter coupling ridge; stop-down exposure measurement applies for other lenses; exposure correctly set by adjusting
shutter speed and/or lens aperture until correct exposure indicator LED lights up; meter cross-coupled with both lens
diaphragm and shutter speed controls; metering range EV 1
to EV 1 8 (i.e., f/1.4,1 sec. ~ f/16,1/1000 sec.) with 50mm f/
1.4 lens at ASA 100; built-in meter coupling lever can be
locked up, enabling use with both Al-type and non-AI-type
Nikkor lenses; ASA range 12 ~ 3200; aperture coupling range
f/1.2 ~
f/32; meter powered by two 1.5 silver-oxide batteries
Shutter: Vertical-travel focal-plane shutter with speeds from
1 to 1/1000 sec., plus “B”
Reflex mirror: Automatic instant-return type
Self-timer: Can be set for approx. 8 ~ 14 sec. delay; setting
“cancellable”
Film advance lever: Single-stroke type; 30° stand-off posi-
tion switches meter on (flush position switches meter off);
135° winding angle
Frame counter: Additive type; automatically resets to “S.” two
frames before “0,” when camera back is opened
Flash synchronization: Built-in ISO-type hot-shoe contact with
safety switch for synchronization with electronic flash units
at speeds up to 1/125 sec.;sync terminal provided
Film rewind: Manual crank-type
Camera back: Hinged, swing-open type; removable; memo
holder provided
Dimensions: Approx. 142mm x 89.5mm x 60.5mm
Weight: Approx. 590g (body only)
34

35
 Loading...