

Nikon Eclipse Ci-E Quick Manual
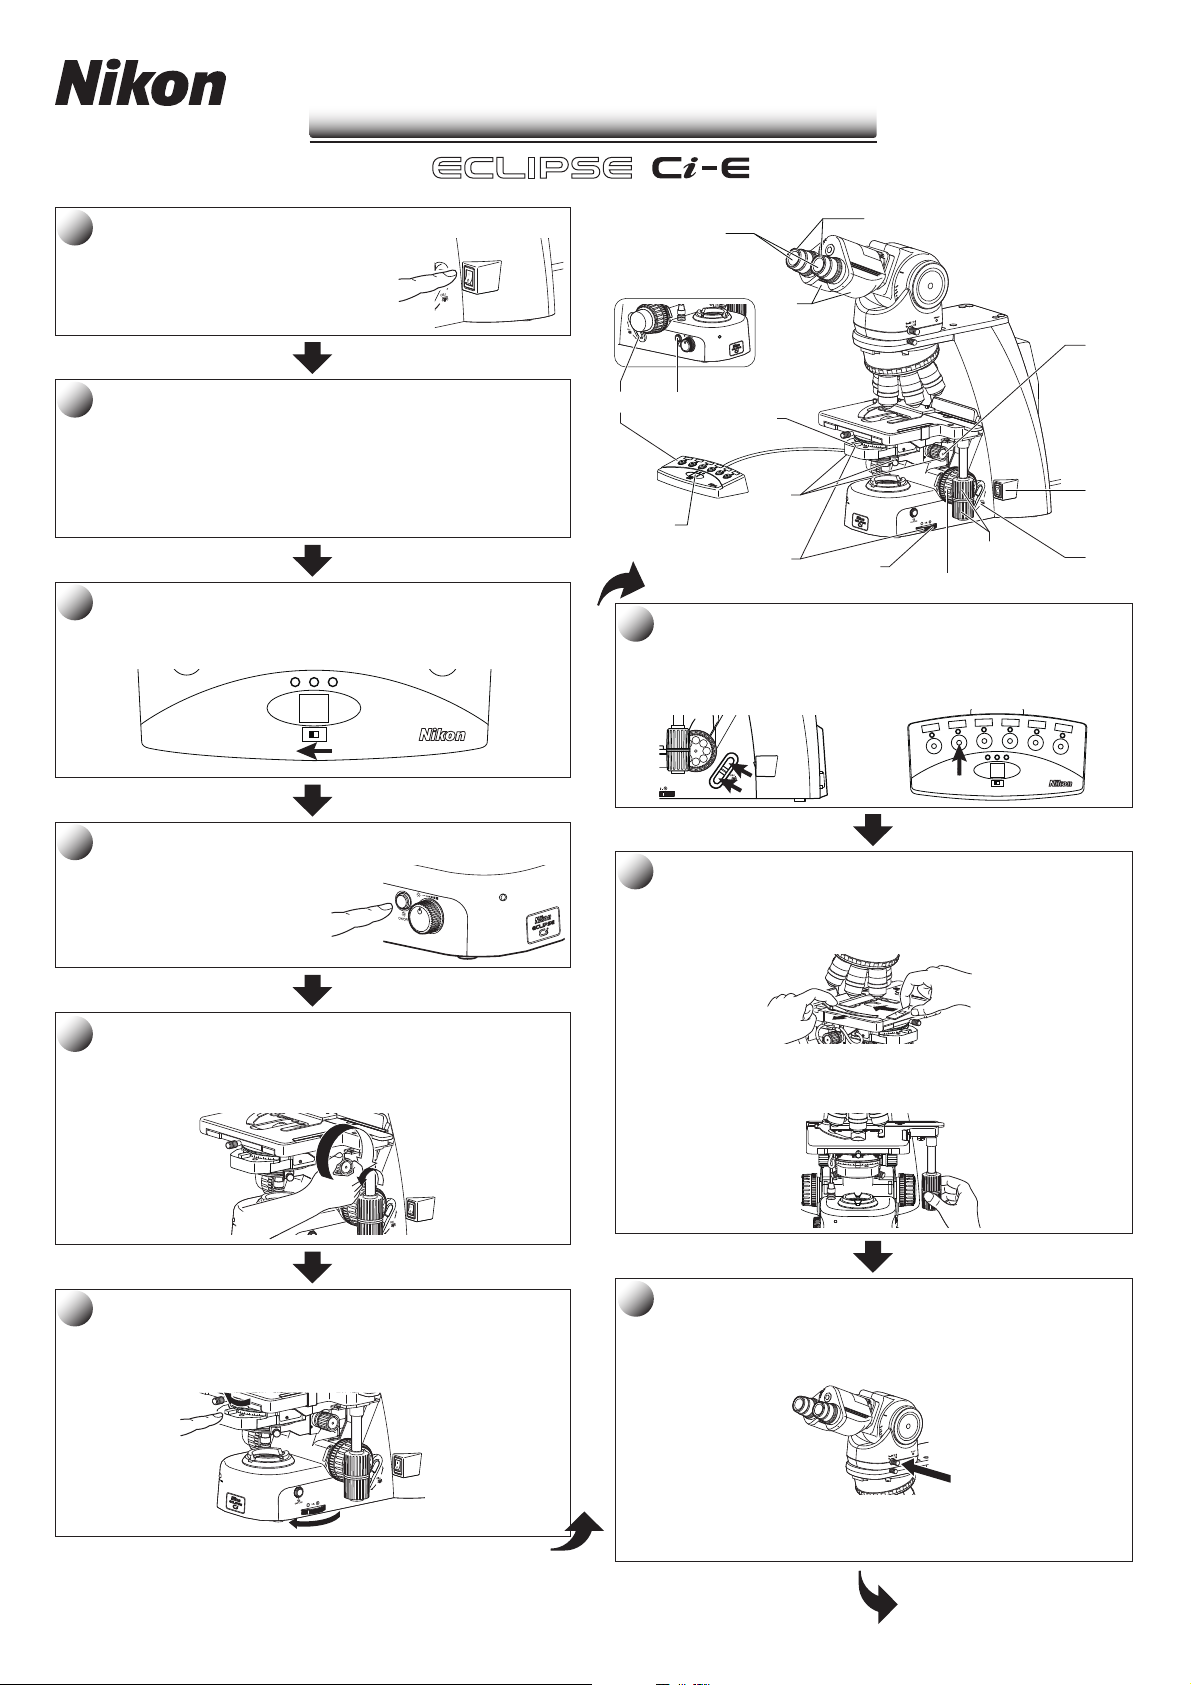
Turn on the power.
Bright-field Microscopy Quick Guide
Bright-field Microscopy Quick Guide
1
2
3
4
5
6
Set the setting mode switch to the left side
(operation mode).
Turn on the dia-illumination lamp.
Select the setup target with the toggle pattern switch,
and then switch to the setting mode to configure
the motorized functions.
Lower the condenser slightly from the uppermost position.
Fully open the field diaphragm and aperture diaphragm.
Bring the 10x objective into the optical path.
Focus on the specimen.
(
See Chapter 2, Section 2 in the instruction manual for details)
CLAMP
TORQUE
0.1
0.3
0.4
0.5
0.2
0.9
0.8
7
9
Place a specimen on the stage, and move the stage
to bring the target into view.
8
M569 E
11.8.NF.1 (2/2)
Turn on the power.
Turn on the power switch (press to the "|" position)
for the microscope. (The power LED on
the front of the main body will light up.)
Select the setup target with the toggle pattern switch,
and then switch to the setting mode to configure
the motorized functions.
Before using a motorized swing-out condenser for the first time,
configure the swing-out of the top lens. (
instruction manual for details.)
pattern. (
See Chapter 2, Section 12.2 in the instruction manual for details)
Set the setting mode switch to the left side
(operation mode).
To use the toggle function, configure the toggle
See Chapter 2, Section 13.1 in the
Set the setting mode switch on the remote control pad to the left side.
OFF
12
TOGGLE
PATTERN
MEMORY
17
10
80
TORQUE
70
90
60
0
50
10
40
20
30
4713
OFF12
T
OGGLE
PATTERN
MEMO
RY
11
WER
O
P
14
0.9
0.8
0.5
0.4
0.3
0.2
0.1
T
ORQUE
CLAMP
12
2
3
6
Bring the 10x objective into the optical path.
16
Press the nosepiece forward/reverse rotation buttons, or
the nosepiece address button on the remote control pad
to bring the 10x objective into the optical path.
8
159
10x
OFF
12
TOGGLE
PATTERN
MEMORY
5
1
18
7
13
Turn on the dia-illumination lamp.
Press the dia-illumination ON/OFF switch
to turn on the lamp.
Lower the condenser slightly from the uppermost position.
WER
O
P
Turn the condenser focus knob until the condenser is positioned at
the upper limit (where it clicks to a stop), and then lower it a little.
0.9
0.8
0.5
0.4
0.3
0.2
0.1
TORQ
UE
CLAMP
Fully open the field diaphragm and aperture diaphragm.
Turn the field diaphragm dial and the aperture diaphragm lever
clockwise to open them completely.
Place a specimen on the stage, and move the stage
to bring the target into view.
(1)
Open the claw of the specimen holder's moving part and place
the specimen onto the stage, gently stowing the claw back
to fix the specimen.
0.1
0.2
0.5
0.6
0.7
0.8
0.9
(2)
Rotate the stage knob to move the stage and bring the target into
the optical path.
(So that the sample sealed under the cover glass will be lighted.)
0.9
0.1
0.8
0.2
0.7
0.3
0.40.6
POWER
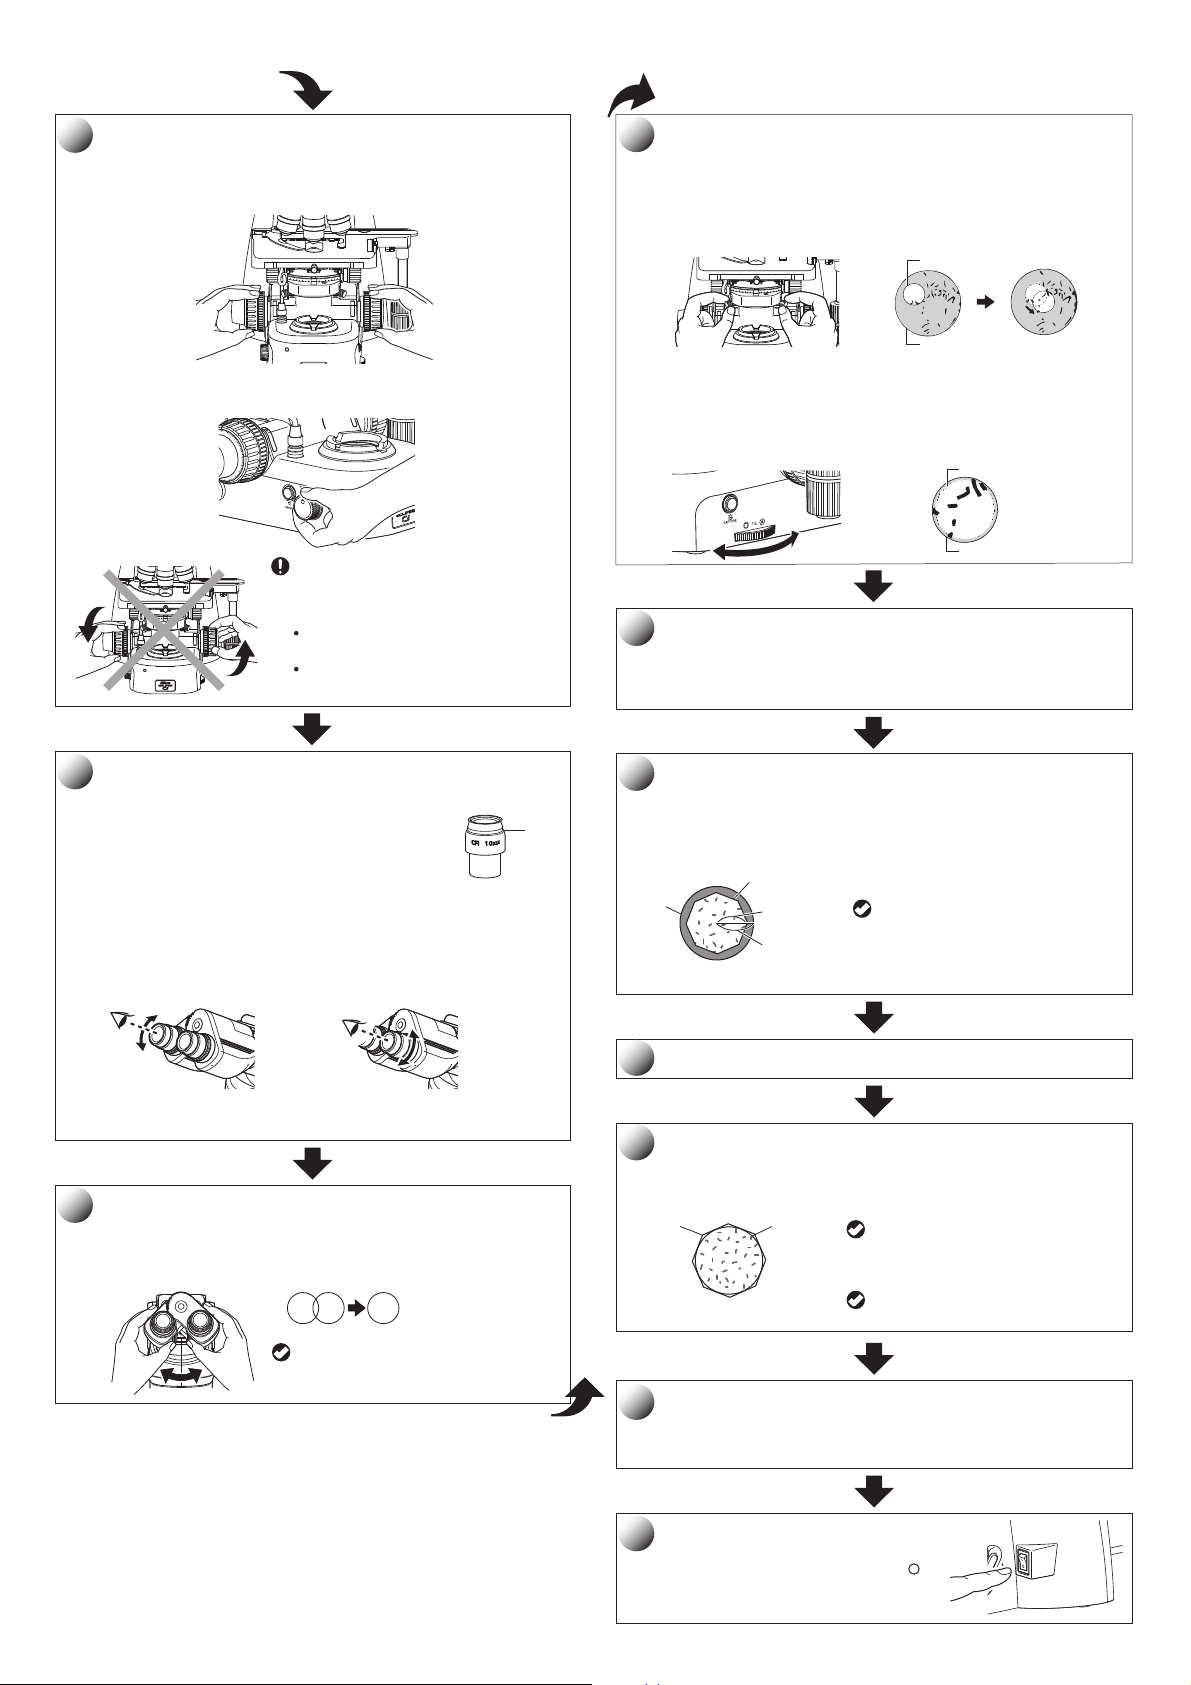
Focus on the specimen.
See Chapter 2, Section 2 in the instruction manual for details)
(1)
When using the trinocular tube or ergonomic tube, push in the
optical path switching lever to distribute 100% light to the
binocular section.
(2)
Look into the eyepiece and turn the coarse focus knob away to
raise the stage to the upper limit. From there, focus on the
specimen by lowering the stage.
9
Adjust the field diaphragm
16
13
View the specimen.
17
14
Turn off the power.
18
15
10
11
Focus on the specimen.
12
A
(Continuation)
(Continuation)
Focus on the specimen.
(
See Chapter 2, Section 2 in the instruction manual for details)
Notes on controlling the focus knobs
Adjust the diopter.
(
See
Chapter 2, Section 4 in the instruction manual for details)
Adjust the interpupillary distance.
Focus and center the condenser.
(
See Chapter 2, Section 5 in the instruction manual for details)
Select the desired objective.
Adjust the aperture diaphragm.
(
See
Chapter
2, Section 6 in the instruction manual for details)
See Chapter 2, Section 2 in the instruction manual for details)
(3)
When the focus was roughly adjusted using coarse focus knob,
Focus on the specimen.
turn the fine focus knob to accurately adjust the focus.
0.9
0.1
0.8
0.2
0.7
0.3
0.40.6
Focus and center the condenser.
See Chapter 2, Section 5 in the instruction manual for details)
Look into the eyepiece with the field diaphragm stopped down
(1)
to the minimum. Focus on the field diaphragm image using
the condenser focus knob, then adjust the condenser centering
screws to center the diaphragm image within the field of view.
Field diaphragm image
0.9
0.1
0.8
0.2
0.7
0.3
0.40.6
POWER
(4)
Adjust the brightness of the field of view by turning
the dia-illumination lamp brightness control knob.
80
TORQUE
90
0
10
20
30
Notes on controlling the focus knobs
CL
WER
O
P
Avoid the following actions, which can
0.9
0.1
0.8
0.2
0.7
0.3
0.40.6
cause equipment malfunction.
Rotating the right and left focus
knobs in opposite directions.
POWER
Turning the coarse focus knob past
its limit point.
Adjust the diopter.
See
Chapter 2, Section 4 in the instruction manual for details)
(1)
Turn the diopter adjustment ring on the right and
left eyepieces to align the end face of the diopter
adjustment ring with the line.
(This is the diopter adjustment reference position.)
(2)
Focus on the specimen using the 40x objective.
(3)
Bring the 10x (or 4x) objective into the optical path.
(4)
Look into the right eyepiece with your right eye and the left
eyepiece with your left eye. Turn the diopter adjustment ring
of each eyepiece to focus on the specimen.
At this point no focus knobs are used.
Line
Eyepiece field of view
Bring the 40x objective into the optical path to check the focus
(2)
and centering of the field diaphragm image. Make adjustments
in the same way as step (1) as necessary.
Turn the field diaphragm dial and adjust the field diaphragm image
(3)
so that its size is almost the same as the field of view.
Field diaphragm image
Eyepiece field of view
Select the desired objective.
Press the nosepiece forward/reverse rotation buttons, or
the nosepiece address button on the remote control pad to move
the desired objective into the optical path.
Adjust the aperture diaphragm.
See
Chapter
2, Section 6 in the instruction manual for details)
Turn the aperture diaphragm lever on the condenser to adjust
the aperture diaphragm so that it is set to 70 to 80% of
the numerical aperture of the objective used.
Pupil of
objective
Appropriate size of
the aperture diaphragm
Aperture diaphragm
image
70 to 80
100
Be sure to adjust the aperture
diaphragm each time you change
the objective.
(You can see the aperture diaphragm
image with the centering telescope.)
(5)
Repeat steps (2) through (4) to make sure the focus has been
adjusted properly.
Adjust the interpupillary distance.
Look into both eyepieces and rotate the binocular part to adjust
the binocular part's opening until the fields of view for the right
and left eyes coincide.
For easy adjustment, look into
the eyepiece as if you were looking
at a distant object.
Focus on the specimen.
Adjust the field diaphragm
Turn the field diaphragm dial to adjust the field diaphragm so that
it almost circumscribes the field of view.
Field diaphragm
Field of view
Opening the field diaphragm too much
results in stray light entering the field
of view, generating flare and reducing
the image contrast.
Circumscribe around
the field of view
View the specimen.
Be sure to adjust the field diaphragm
each time you change the objective.
Rotate the stage knob to move the target. If the target is not in focus,
use the focus knob to adjust the focus.
Turn off the power.
Turn off the power switch (press to the " "
position) for the microscope. (The power
OFF
LED on the front of the main body will turn off.)
 Loading...