

Nikon D70S Owner Manual
The Nikon Guide to Digital Photography
with the
DIGITAL CAMERA
En

Product Documentation
The documentation for this product includes the manuals listed below.
Please be sure to read all instructions thoroughly to get the most from your
cam era.
Quick Start Guide
The Quick Start Guide takes you through the process of unpacking and
set ting up your Nikon digital camera, taking your fi rst photographs, and
trans fer ring them to your computer.
Guide to Digital Photography
The Guide to Digital Photography (this manual) provides complete op er at ing
in struc tions for your camera.
PictureProject Reference Manual (on CD)
The PictureProject Reference Manual contains information on using the
PictureProject software provided with your camera. For information on
view ing the reference manual, see the Quick Start Guide.
CAUTION: Foreign Matter on the Low-Pass Filter
Nikon takes every possible precaution to pre vent foreign matter from com ing into
con tact with the low-pass fi lter during production and ship ping. The D70S, how ev er,
is designed to be used with interchangeable lens es, and for eign matter may enter the
camera when lens es are removed or exchanged. Once inside the camera, this for eign
matter may adhere to the low-pass fi lter, where it may appear in photographs tak en
under cer tain con di tions. To prevent foreign matter from entering the camera, do not
exchange lenses in dusty environments. To pro tect the camera when no lens is in place,
be sure to replace the body cap pro vid ed with the camera, being care ful to fi rst remove
all dust and other foreign matter that may be ad her ing to the body cap.
Should foreign matter fi nd its way onto the low-pass fi lter, clean the low-pass fi lter as
instructed on pages 194–195 of this manual, or have the low-pass fi lter cleaned by
authorized Nikon ser vice per son nel. Pho to graphs affected by the presence of for eign
matter on the low-pass fi lter can be re touched us ing Nikon Capture 4 version 4.2 or
later (available separately) or the clean image options available in some third-party
im ag ing software.
How to Read This Manual
First, be aware of the warnings, cautions, and notices on pages ii–v.
Next, read “Overview” and “Getting to Know the
Camera” to fa mil iar ize your self with the con ven tions used in this man u al and the names of cam era
parts, then set up your cam era as de scribed in
“First Steps.”
Now you are ready to take photographs and
play them back. You can then try your hand
at creative composition as described in “Digital
Vari-Programs.”
Getting to Know the Camera
Basic Photography
Digital Vari-Programs
Image Quality and Size
Sensitivity (ISO Equivalency)
Optimizing Images
Overview
First Steps
Basic Playback
White Balance
Once you have mastered the basics of dig i tal
photography, you can read these sections for
complete in for ma tion on when and how to use
camera controls.
Refer to these chapters for more on play back…
…on cam era menus and cus tom settings… Menu Guide
…on connecting to a com put er or TV…
…on printing photos on a PictBridge printer…
…and on ac ces so ries and trou ble shoot ing.
Choosing a Shooting Mode
Focus
Exposure
Flash Photography
Self-Timer Mode
Using the Remote Control
Two-Button Reset
More About Playback
Connections
Printing Photographs
Technical Notes

For Your Safety
To prevent damage to your Nikon product or injury to yourself or to others,
read the following safety precautions in their entirety before using this equipment. Keep these safety instructions where all those who use the product
will read them.
The consequences that could result from failure to observe the precautions
listed in this section are indicated by the following symbol:
This icon marks warnings, information that should be read before using this
Nikon product to prevent possible injury.
WARNINGS
Do not look at the sun through the view-
fi nder
Viewing the sun or other strong light
source through the viewfi nder could
cause per ma nent visual im pair ment.
Turn off immediately in the event of
malfunction
Should you notice smoke or an un usu al
smell coming from the equip ment or
from the AC adapt er (avail able sep a rate ly), unplug the AC adapt er and
re move the battery im me di ate ly, taking care to avoid burns. Con tin ued
op er a tion could re sult in injury. After
re mov ing the bat tery, take the equip ment
to a Nikon-au tho rized service cen ter for
in spec tion.
Do not use in the presence of fl am-
ma ble gas
Do not use electronic equip ment in the
presence of fl ammable gas, as this could
result in ex plo sion or fi re.
Do not place strap around the neck of
an infant or child
Placing the camera strap around the
neck of an infant or child could result
in strangulation.
Do not disassemble
Touching the product’s internal parts
could result in injury. In the event of
a malfunction, the prod uct should be
re paired only by a qualifi ed tech ni cian.
Should the product break open as the
re sult of a fall or other ac ci dent, re move
the battery and/or AC adapt er and then
take the prod uct to a Nikon-au tho rized
ser vice cen ter for in spec tion.
Observe proper precautions when han-
dling batteries
Batteries may leak or explode if im prop er ly handled. Observe the fol low ing
pre cau tions when handling bat ter ies for
use in this product:
• Be sure the product is off before re plac ing the battery. If you are using an
AC adapter, be sure it is un plugged.
• Use only batteries approved for use in
this equipment. Do not mix old and new
batteries or batteries of different types.
• Do not at tempt to insert the battery
upside down or back wards.
• Do not short or disassemble the bat tery.
• Do not expose the battery to fl ame or
to excessive heat.
• Do not immerse in or expose to wa ter.
ii

• Replace the terminal cover when transporting the battery. Do not transport
or store with metal objects such as
neck lac es or hair pins.
• Batteries are prone to leakage when
fully discharged. To avoid damage to
the prod uct, be sure to remove the battery when no charge re mains.
• When the battery is not in use, at tach
the terminal cover and store in a cool
place.
• Immediately after use, or when the
prod uct is used on battery power for
an ex tend ed period, the bat tery may
become hot. Before re mov ing the bat tery, turn the camera off and al low the
battery to cool.
• Discontinue use immediately should you
notice any changes in the bat tery, such
as dis col or a tion or de for ma tion.
Use appropriate cables
When connecting cables to the in put and
output jacks, use only the ca bles pro vid ed or sold by Nikon for the pur pose,
to main tain com pli ance with prod uct
reg u la tions.
Keep out of reach of children
Particular care should be tak en to pre vent
infants from putting the bat tery or other
small parts into their mouths.
Removing memory cards
Memory cards may become hot dur ing use. Observe due cau tion when
re mov ing memory cards from the
cam era.
CD-ROMs
The CD-ROMs on which the soft ware
and manuals are dis trib ut ed should not
be played back on audio CD equip ment.
Playing CD-ROMs on an audio CD play er
could cause hear ing loss or dam age the
equip ment.
Observe caution when using the fl ash
• Do not operate the fl ash with the fl ash
window touching a person or object.
Failure to observe this precaution could
result in burns or fi re.
• Using the fl ash close to your sub ject’s
eyes could cause tem po rary vi su al
im pair ment. Par tic u lar care should
be observed if pho to graph ing in fants,
when the fl ash should be no less than
one meter (39˝) from the sub ject.
When using the viewfi nder
When operating the diopter ad just ment
control with your eye to the viewfi nder,
care should be tak en not to put your
fi n ger in your eye ac ci den tal ly.
Avoid contact with liquid crystal
Should the monitor break, care should
be tak en to avoid injury due to bro ken
glass and to pre vent liq uid crystal from
the mon i tor touch ing the skin or en ter ing
the eyes or mouth.
iii

Notices
• No part of the manuals included with
this product may be reproduced, transmitted, transcribed, stored in a retrieval
system, or translated into any language
in any form, by any means, without
Nikon’s prior written permission.
• Nikon reserves the right to change the
specifi cations of the hardware and software described in these manuals at any
time and without prior notice.
Notice for customers in the U.S.A.
Federal Communications Commission (FCC) Radio Frequency Interference Statement
This equipment has been tested and found
to comply with the limits for a Class B digital device, pursuant to Part 15 of the FCC
rules. These limits are designed to provide
reasonable protection against harmful
interference in a residential installation.
This equipment generates, uses, and can
radiate radio frequency energy and, if not
installed and used in accordance with the
instructions, may cause harmful interference to radio communications. However,
there is no guarantee that interference
will not occur in a particular installation.
If this equipment does cause harmful interference to radio or television reception,
which can be determined by turning the
equipment off and on, the user is encouraged to try to correct the interference by
one or more of the following measures:
•
Reorient or relocate the receiving antenna.
• Increase the separation between the
equipment and receiver.
• Connect the equipment into an outlet
on a circuit different from that to which
the receiver is connected.
• Consult the dealer or an experienced
radio/television technician for help.
• Nikon will not be held liable for any
damages resulting from the use of this
product.
• While every effort has been made to
ensure that the information in these
manuals is accurate and complete, we
would appreciate it were you to bring
any errors or omissions to the attention
of the Nikon representative in your area
(address provided separately).
D70S
Tested To Comply
With FCC Standards
FOR HOME OR OFFICE USE
CAUTIONS
Modifi cations
The FCC requires the user to be notifi ed
that any changes or modifi cations made to
this device that are not expressly approved
by Nikon Corporation may void the user’s
authority to operate the equipment.
Interface Cables
Use the interface cables sold or provided
by Nikon for your equipment. Using other
interface cables may exceed the limits of
Class B Part 15 of the FCC rules.
Notice for customers in the State of California
WARNING: Handling the cord on this
product will expose you to lead, a chemical
known to the State of California to cause
birth defects or other reproductive harm.
Wash hands after handling.
Nikon Inc.,
1300 Walt Whitman Road, Melville, New York
11747-3064, U.S.A. Tel.: 631-547-4200
iv

Notice for customers in Canada
CAUTION
This class B digital apparatus meets all requirements of the Canadian Interference
Causing Equipment Regulations.
ATTENTION
Cet appareil numérique de la classe B respecte toutes les exigences du Règlement
sur le matériel brouilleur du Canada.
Notice Concerning Prohibition of Copying or Reproduction
Note that simply being in possession of material that has been digitally copied or reproduced
by means of a scanner, digital camera or other device may be punishable by law.
• Items prohibited by law from being
copied or reproduced
Do not copy or reproduce paper money,
coins, securities, government bonds, or
local government bonds, even if such
copies or reproductions are stamped
“Sample.”
The copying or reproduction of paper
money, coins, or securities which are
circulated in a foreign country is prohibited.
Unless the prior permission of the
government has been obtained, the
copying or reproduction of unused postage stamps or post cards issued by the
government is prohibited.
The copying or reproduction of stamps
issued by the government and of certifi ed documents stipulated by law is
prohibited.
• Cautions on certain copies and reproductions
The government has issued cautions on
copies or reproductions of securities issued by private companies (shares, bills,
checks, gift certifi cates, etc.), commuter
passes, or coupon tickets, except when
a minimum of necessary copies are to be
provided for business use by a company.
Also, do not copy or reproduce passports issued by the government, licenses
issued by public agencies and private
groups, ID cards, and tickets, such as
passes and meal coupons.
• Comply with copyright notices
The copying or reproduction of copyrighted creative works such as books,
music, paintings, woodcut prints, maps,
drawings, movies, and photographs is
governed by national and international
copyright laws. Do not use this product
for the purpose of making illegal copies
or to infringe copyright laws.
Trademark Information
Macintosh, Mac OS, and QuickTime are reg is tered trade marks of Apple Computer, Inc. Microsoft and Win dows are
reg is tered trade marks of Microsoft Corporation. Pentium is a trade mark of Intel Cor po ra tion. CompactFlash is a
trade mark of SanDisk Cor po ra tion. Microdrive is a registered trademark of Hitachi Global Storage Technologies in
the United States and/or other countries. Lexar Me dia is a trade mark of Lexar Me dia Cor po ra tion. PictBridge is a
trademark. All oth er trade names men tioned in this man u al or the oth er doc u men ta tion pro vid ed with your Nikon
prod uct are trade marks or reg is tered trade marks of their re spec tive holders.
v

Table of Contents
For Your Safety ................................................................................................ ii
Notices ............................................................................................................ iv
Introduction....................................................................................................... 1
Overview .......................................................................................................... 2
Getting to Know the Camera.......................................................................... 3
First Steps ......................................................................................................... 13
Attaching the Camera Strap............................................................................. 13
Inserting Batteries ............................................................................................ 14
Basic Setup ...................................................................................................... 16
Attaching Lenses.............................................................................................. 18
Inserting Memory Cards................................................................................... 20
Tutorial............................................................................................................... 23
Basic Photography ........................................................................................... 24
Step 1—Rotate the Mode Dial to
Step 2—Ready the Camera .............................................................................. 24
Step 3—Adjust Camera Settings ...................................................................... 26
Step 4—Frame a Photograph ........................................................................... 27
Step 5—Focus.................................................................................................. 28
Step 6—Take the Photograph .......................................................................... 30
Basic Playback .................................................................................................. 31
Digital Vari-Programs ...................................................................................... 32
Taking Photographs .......................................................................................... 35
When to Use Shooting Options........................................................................ 36
Using Camera Menus....................................................................................... 39
Image Quality and Size.................................................................................... 41
Image Quality .................................................................................................. 41
Image Size ....................................................................................................... 43
Sensitivity (ISO Equivalency)............................................................................ 46
White Balance .................................................................................................. 48
Fine-Tuning White Balance ............................................................................... 50
Preset White Balance........................................................................................ 52
Optimizing Images........................................................................................... 56
Customizing Image Enhancement Options ....................................................... 57
Choosing a Shooting Mode............................................................................. 62
Focus ................................................................................................................. 64
Focus Mode ..................................................................................................... 64
Focus Area Selection ........................................................................................ 66
Focus Lock ....................................................................................................... 70
The AF-Assist Illuminator.................................................................................. 72
Getting Good Results with Autofocus .............................................................. 73
Manual Focus .................................................................................................. 74
vi
................................................................ 24

Exposure ........................................................................................................... 75
Metering.......................................................................................................... 75
Exposure Mode................................................................................................ 76
Autoexposure Lock .......................................................................................... 84
Exposure Compensation................................................................................... 86
Bracketing ....................................................................................................... 87
Flash Photography ........................................................................................... 94
Flash Sync Modes............................................................................................. 95
Using the Built-in Speedlight ............................................................................ 97
Self-Timer Mode............................................................................................... 105
Using a Remote Control .................................................................................. 107
Two-Button Reset............................................................................................. 111
More About Playback ....................................................................................... 113
Single-Image Playback...................................................................................... 114
Photo Information............................................................................................ 116
Viewing Multiple Images: Thumbnail Playback.................................................. 118
Taking a Closer Look: Playback Zoom ............................................................... 120
Protecting Photographs from Deletion.............................................................. 121
Deleting Individual Photographs....................................................................... 122
Menu Guide....................................................................................................... 123
The Playback Menu.......................................................................................... 124
Delete.............................................................................................................. 124
Playback Fldr.................................................................................................... 126
Rotate Tall ........................................................................................................ 126
Slide Show....................................................................................................... 127
Hide Image ...................................................................................................... 129
Print Set........................................................................................................... 130
The Shooting Menu ......................................................................................... 132
Optimize Image................................................................................................ 132
Long Exp. NR ................................................................................................... 133
Image Quality .................................................................................................. 134
Image Size ....................................................................................................... 134
White Bal......................................................................................................... 134
ISO .................................................................................................................. 134
Custom Settings ............................................................................................... 135
The Setup Menu............................................................................................... 155
Folders............................................................................................................. 156
File No. Seq...................................................................................................... 159
Format............................................................................................................. 160
CSM Menu ...................................................................................................... 161
Date ................................................................................................................ 161
vii

LCD Brightness ................................................................................................ 161
Mirror Lock-Up................................................................................................. 162
Video Mode..................................................................................................... 162
Language......................................................................................................... 163
Image Comment.............................................................................................. 163
USB ................................................................................................................. 165
Dust Ref Photo................................................................................................. 166
Firmware Ver.................................................................................................... 167
Image Rotation ................................................................................................ 168
Connections....................................................................................................... 169
Television Playback .......................................................................................... 170
Connecting to a Computer.............................................................................. 171
Printing Photographs........................................................................................ 175
Technical Notes.................................................................................................. 181
Camera Settings ............................................................................................... 182
Optional Accessories........................................................................................ 183
Lenses for the D70S ......................................................................................... 183
Optional Speedlights........................................................................................ 186
Other Accessories............................................................................................. 190
Caring for the Camera..................................................................................... 193
Troubleshooting............................................................................................... 198
Specifi cations ................................................................................................... 201
Index .................................................................................................................. 206
viii

Introduction
Getting Started
This chapter is divided into the following sections:
Overview
Read this section for a description of how this
man u al is organized and for an ex pla na tion of the
symbols and conventions used.
Getting to Know the Camera
Bookmark this section and refer to it for information on the names and func tions of camera parts.
First Steps
This section details the steps required to ready the
camera for use: inserting the battery and memory
card, attaching a lens and cam era strap, and setting the date, time, and lan guage.
1
Overview
About This Manual
Thank you for your purchase of a Nikon D70S single-lens refl ex (SLR) digital
camera with interchangeable lenses. This manual has been written to help
Introduction—Overview
you enjoy taking pictures with your Nikon digital camera. Read this manual
thoroughly before use, and keep it handy when using the product.
To make it easier to fi nd the information you need, the following sym bols
and con ven tions are used:
This icon marks cautions, information that should be read before use
to prevent damage to the camera.
This icon marks notes, information
that should be read before using
the camera.
This icon marks settings that can be
adjusted using camera menus.
Take Te st Shots
Before taking pictures on important occasions (for example, at weddings or be fore
tak ing the cam era with you on a trip), take a test shot to ensure that the camera is
func tion ing normally. Nikon will not be held liable for damages or lost profi ts that may
result from product malfunction.
Life-Long Learning
As part of Nikon’s “Life-Long Learning” commitment to ongoing prod uct sup port and
ed u ca tion, con tin u al ly-updated information is avail able on-line at the following sites:
• For users in the U.S.A.: http://www.nikonusa.com/
• For users in Europe: http://www.europe-nikon.com/support
• For users in Asia, Oceania, the Middle East, and Africa: http://www.nikon-asia.com/
Visit these sites to keep up-to-date with the latest product in for ma tion, tips, an swers
to fre quent ly-asked ques tions (FAQs), and gen er al advice on digital imaging and pho tog ra phy. Ad di tion al information may be available from the Nikon rep re sen ta tive in
your area. See the URL below for contact in for ma tion:
http://nikonimaging.com/
Replacing This Manual
Should you lose this manual, replacements can be ordered, for a fee, from any au tho rized Nikon service representative.
This icon marks tips, additional information that may be helpful when
using the camera.
This icon indicates that more information is available elsewhere in this
manual or in the Quick Start Guide.
This icon marks settings that can be
fi ne-tuned from the Custom Set tings menu.
2
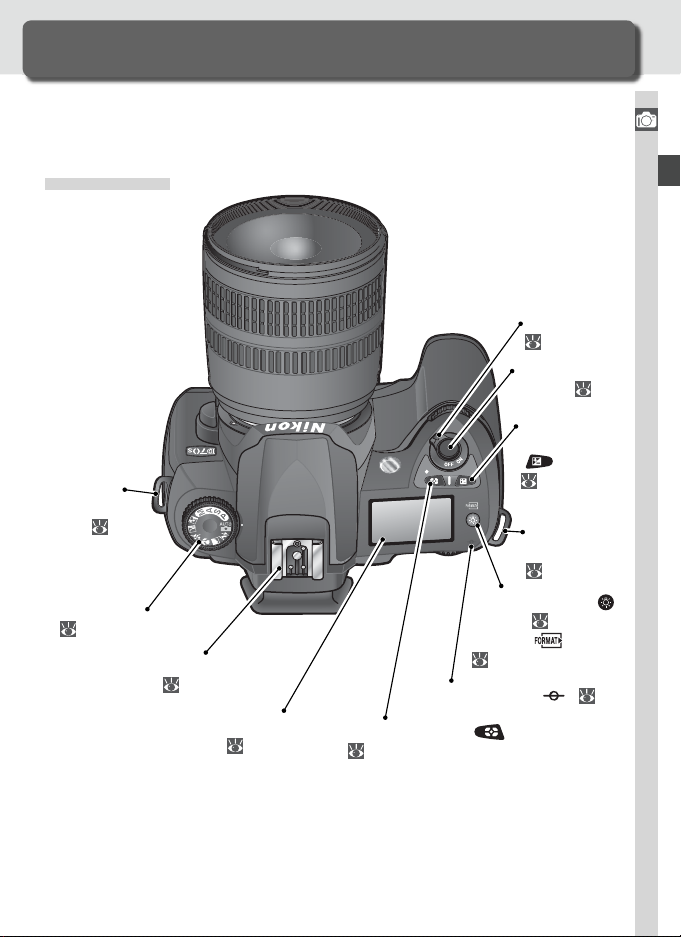
Getting to Know the Camera
Camera Controls and Displays
Take a few moments to familiarize yourself with camera controls and displays. You may fi nd it helpful to bookmark this section and refer to it as you
read through the rest of the manual.
Camera Body
Power switch:
24
Shutter-release
Eyelet for
camera
strap: 13
Mode dial:
10
Accessory shoe:
187
Control panel:
6
Focal plane mark (
Metering mode (
75
button:
Exposure
compensation
(
Eyelet for
camera strap:
LCD illuminator ( )
button: 7
Format ( ) button:
21
) button:
12
) button:
86
13
): 74
Introduction—Getting to Know the Camera
3
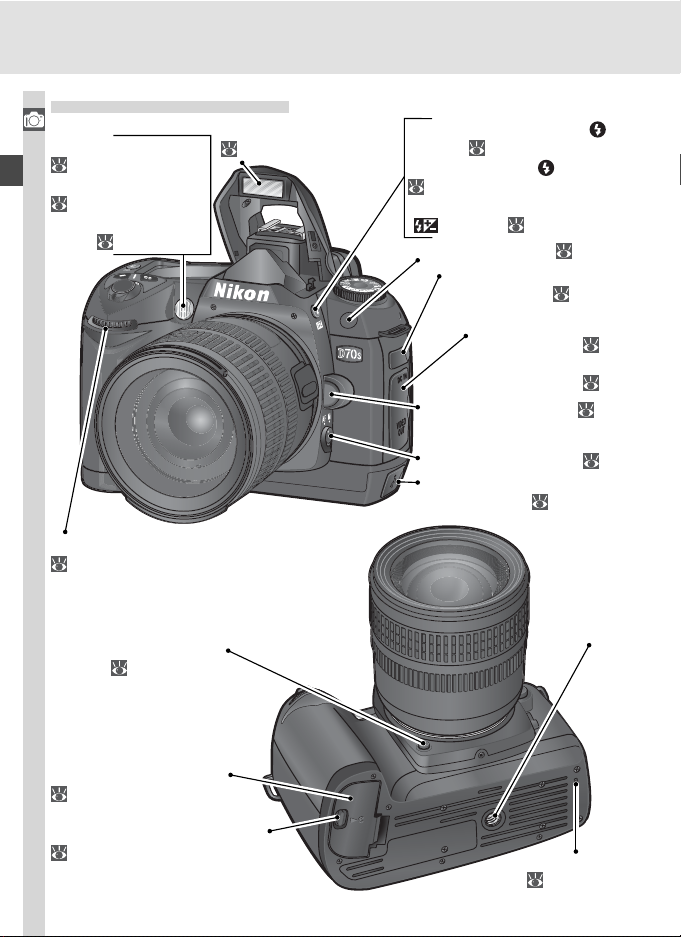
Camera Body (continued)
Introduction—Getting to Know the Camera
Self-timer lamp:
105, 107
AF-assist illuminator:
72
Red-eye reduction
lamp: 95
Built-in Speedlight:
94
Speedlight lock release (
button: 97
Flash sync mode ( ) button:
97
Flash exposure compensation
(
) button: 102
Infrared receiver:
Remote cord connector
(under cover): 191
DC-in connector
(under cover): 170
Video connector
(under cover): 170
Lens release button: 19
)
107
Sub-command dial:
147
Depth-of-fi eld preview
button:
Battery-chamber cover:
Battery-chamber cover latch:
76
14
14
4
Focus-mode selector:
USB connector
(under cover):
171
Reset switch:
200
64
Tripod
socket
Viewfi nder eyepiece:
27
Shooting mode ( )
button: 62
Format ( ) button:
21
Bracketing (
87
Playback (
button: 114
Menu (
button: 39
Sensitivity (ISO)
button:
Thumbnail ( )
button: 118
White balance (WB)
button:
Protect ( ) button:
121
Help ( ) button:
136
) button:
)
)
46
48
Viewfi nder eyepiece
cup:
27
Diopter adjustment
control:
27
AE / AF lock ( )
button: 84
Multi selector:
12
Main command
147
dial:
Introduction—Getting to Know the Camera
Image quality / size
(QUAL) button:
41
Playback zoom ( )
button: 120
Enter ( )
button: 40
Monitor:
13, 193
Delete (
122
) button:
Focus selector
lock: 66
Memory
card slot
cover:
20
Memory card
slot cover
latch: 20
Memory card access
lamp:
30
5
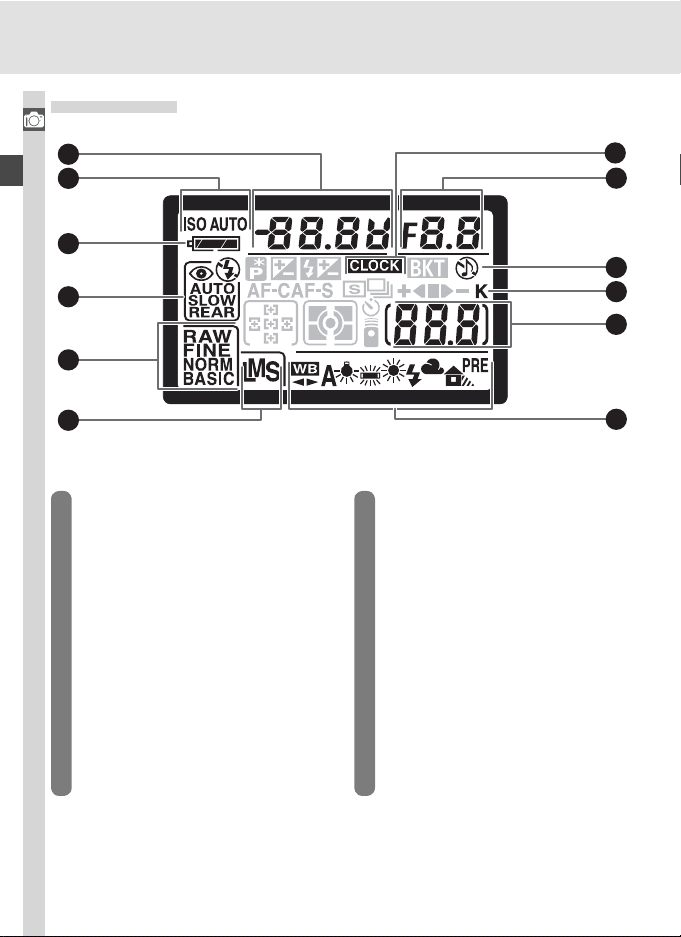
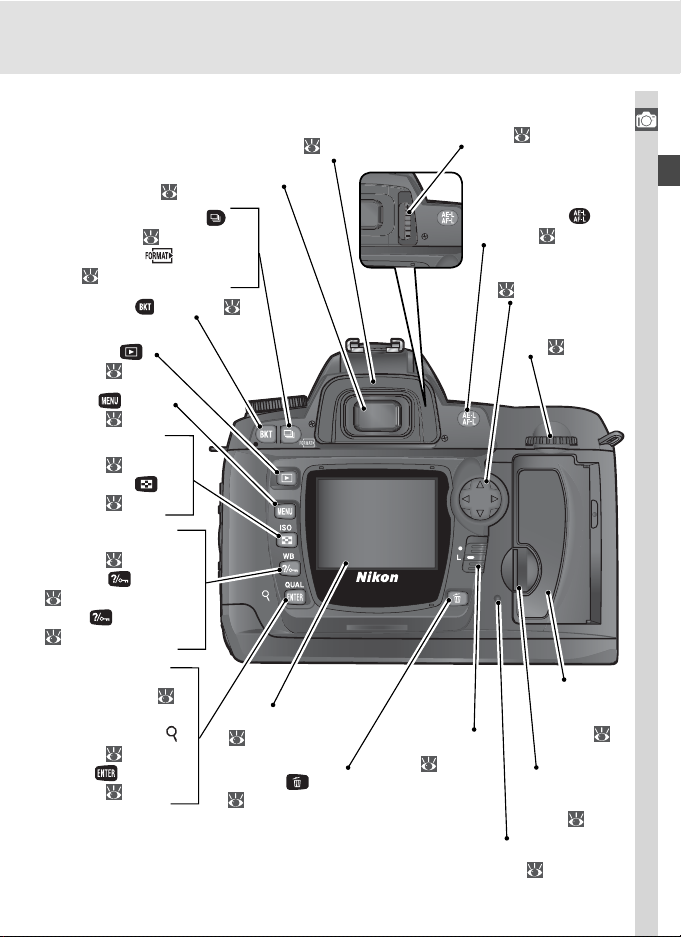
Control Panel
Introduction—Getting to Know the Camera
1
2
3
4
5
12
11
10
9
8
6
1 Shutter speed ............................... 76
Exposure compensation value ....... 86
Flash compensation value ........... 102
White balance adjustment ............ 50
Number of shots in bracketing
sequence ...................................... 87
2 Sensitivity (ISO) indicator............... 46
Auto sensitivity indicator............. 142
3 Battery indicator ........................... 24
4 Flash sync mode ........................... 95
5 Image quality................................ 41
6 Image size .................................... 43
7 White balance mode..................... 48
6
7
8 Number of exposures
remaining ..................................... 25
Number of shots remaining
before memory buffer fi lls............. 62
Preset white balance recording
indicator ....................................... 52
Remote control mode indicator... 107
9 “K” (appears when memory remains
for over 1000 exposures) .............. 45
10 “Beep” indicator ........................ 138
11 Aperture (f/-number) .................... 76
Bracketing increment.................... 87
PC mode indicator ...................... 172
12 Clock battery indicator.................. 16
13
14
Introduction—Getting to Know the Camera
22
15
16
17
18
13 Flash compensation indicator...... 102
14 Exposure compensation indicator.. 86
15 Flexible program indicator............. 77
16 Autofocus mode......................... 139
17 Focus area .................................... 66
AF-area mode............................. 140
18 Metering mode............................. 75
19 Self-timer indicator ..................... 105
Remote control indicator ............ 107
20 Bracketing progress indicator........ 87
21 Bracketing indicator...................... 87
22 Shooting mode............................. 62
21
20
19
LCD Illuminator
Pressing the button activates the control panel backlight (LCD illuminator), allowing
the display to be read in the dark.
7
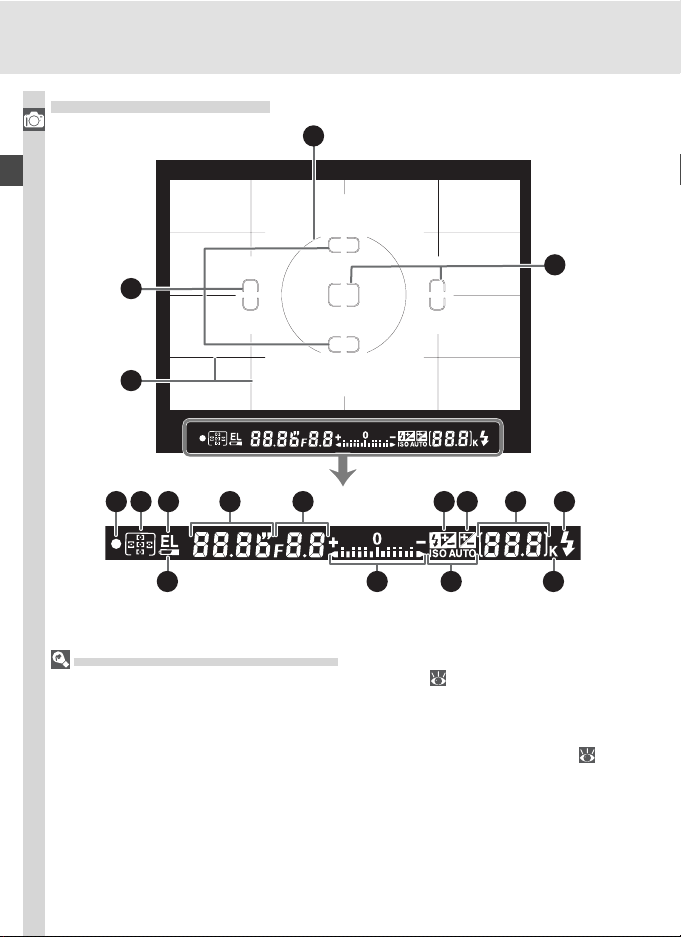
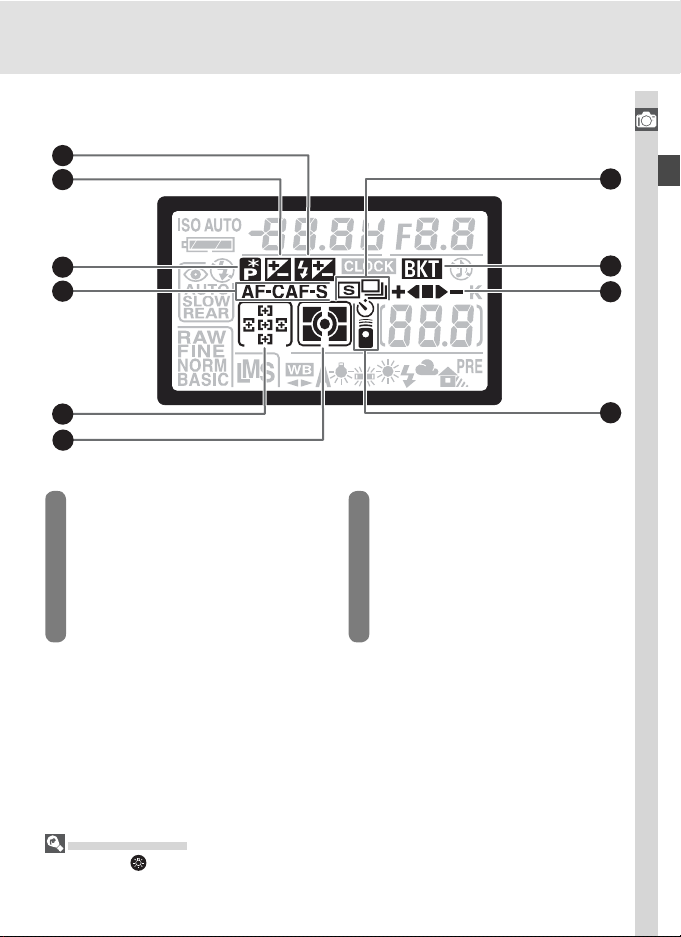
The Viewfi nder Display
Introduction—Getting to Know the Camera
2
3
4 5 6 7 8 9 10 11 12
1
2
13
Advanced Focusing Screen Display
When the background is bright, the active focus area (
When the background is dark, the active focus area is highlighted briefl y in red as
needed to establish contrast with the background (“Vari-Brite” focus areas), making
it easier to identify the selected focus area. The viewfi nder is also equipped with ondemand grid lines. When On is selected for Custom Setting 8 (Grid display;
a reference grid is superimposed over the display in the viewfi nder. This grid is a useful
aid when composing landscape shots or when tilting or shifting a PC Nikkor lens.
Owing to the characteristics of this type of viewfi nder display, you may notice fi ne lines
radiating outwards from the selected focus area, or that the display in the viewfi nder
turns red when the selected focus area is highlighted. These phenomena are normal
and do not indicate a malfunction.
14
15
66) is highlighted in black.
16
144),
8

1 8-mm (0.31˝) reference circle for
center-weighted metering............. 75
2 Focus brackets (focus areas).......... 66
Spot metering targets ................... 75
3 Reference grid (displayed when On is
selected for Custom Setting 8).... 144
4 Focus indicator ............................. 28
5 Focus area .................................... 66
AF-area mode............................. 140
6 Autoexposure (AE) lock................. 84
FV lock indicator ......................... 103
7 Shutter speed ............................... 76
8 Aperture (f/-number) .................... 76
9 Flash compensation indicator...... 102
10 Exposure compensation indicator.. 86
The Viewfi nder Display
The focus-area and grid-line displays in the viewfi nder (advanced focusing screen display) tend to brighten at high temperatures and to darken and exhibit slower response
times at low temperatures. The other displays in the viewfi nder tend darken at high
temperatures and exhibit slower response times at low temperatures. All displays will
return to normal at room temperature.
No Battery
When the battery is totally exhausted or no battery is inserted, the display in the viewfi nder will dim. This is normal and does not indicate a malfunction. The viewfi nder
display will return to normal when a fully-charged battery is inserted.
11 Number of exposures
remaining ..................................... 25
Number of shots remaining
before memory buffer fi lls............. 62
Preset white balance recording
indicator ....................................... 52
Exposure compensation value ....... 86
Flash compensation value ........... 102
PC mode indicator ...................... 172
12 Flash-ready indicator ..................... 97
13 Battery indicator ........................... 24
14 Electronic analog exposure
display .......................................... 82
Exposure compensation ................ 86
15 Auto sensitivity indicator ............. 142
16 “K” (appears when memory remains
for over 1000 exposures) .............. 45
Introduction—Getting to Know the Camera
9
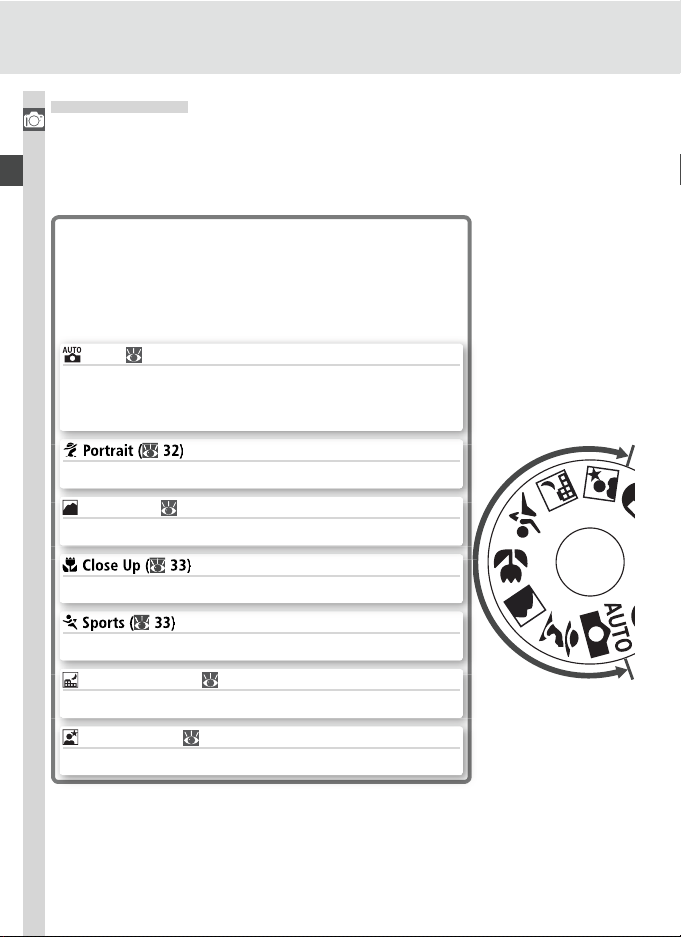
The Mode Dial
In addition to Digital Vari-Programs that allow settings to be adjusted to suit
Introduction—Getting to Know the Camera
a particular scene simply by rotating the mode dial to the appropriate mode,
the D70S is equipped with exposure modes that offer complete control over
settings.
Digital Vari-Programs
Selecting a Digital Vari-Program automatically optimizes settings to suit the selected scene, making
creative photography as simple as rotating the mode
dial.
Auto ( 32)
Use for “point-and-shoot” snapshots that leave the camera in charge of settings. Recommended for fi rst-time
users of digital SLR cameras.
Shoot portraits with the background in soft focus.
Landscape ( 32)
Preserve details in landscape shots.
Take close-ups of fl owers, insects, or other small objects.
Freeze motion in sports shots.
Night Landscape ( 33)
Use when taking landscape shots at night.
Night Portrait ( 34)
Shoot portraits against a dimly-lit backdrop.
10
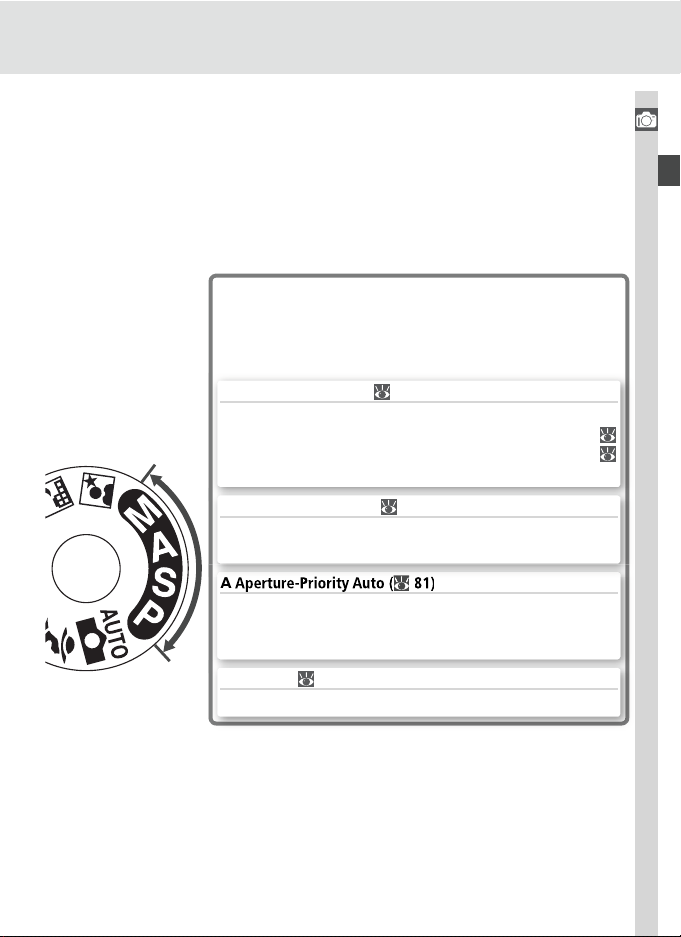
Exposure Modes
Select these modes for full control over camera settings, including shutter speed and aperture, fl ash
mode, and camera menus.
P Auto Multi Program ( 77)
Let the camera optimize exposure to suit the subject. Use
fl exible program to control shutter speed and aperture (
77), or adjust exposure with exposure compensation (
86).
S Shutter-Priority Auto ( 79)
Choose fast shutter speeds to freeze action, slow shutter
speeds to suggest motion by blurring moving objects.
Adjust aperture to soften background details, or increase
depth of fi eld to bring both the main subject and the background into focus.
M Manual ( 82)
Match shutter speed and aperture to your creative intent.
Introduction—Getting to Know the Camera
11
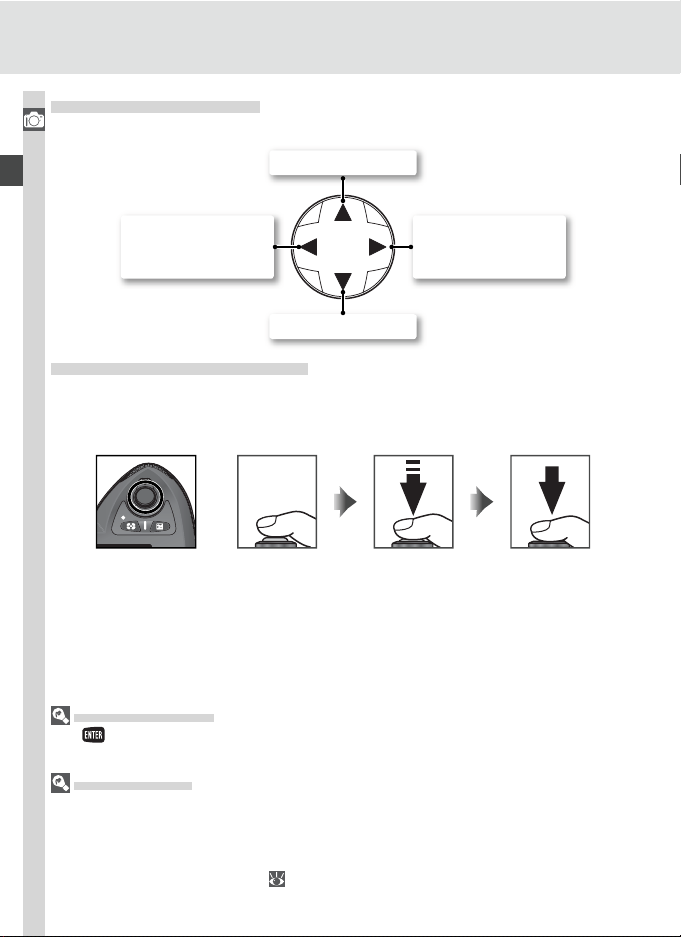
Navigating the Menus
The multi selector is used to navigate through the camera menus.
Introduction—Getting to Know the Camera
Move cursor up
Cancel and return
to previous menu,
or move cursor left
Move cursor down
Display sub-menu,
move cursor right,
or make selection.
The Shutter-Release Button
The camera has a two stage shutter-release button. The camera sets focus
and exposure when the button is pressed halfway. To take the picture, press
the shutter-release button the rest of the way down.
The Multi Selector
The button can also be used to select items highlighted in the camera menus.
There may be some cases in which the operations listed on this page do not apply.
Auto Meter Off
At default settings, the camera continues to meter exposure for six seconds after you
remove your fi nger from the shutter-release button. The shutter speed and aperture
indicators in the control panel and all indicators in the viewfi nder then turn off to save
power (auto meter off). The length of the auto meter off delay can be adjusted using
Custom Setting 23 (Meter-off; 153).
12
First Steps
Getting the Camera Ready for Use
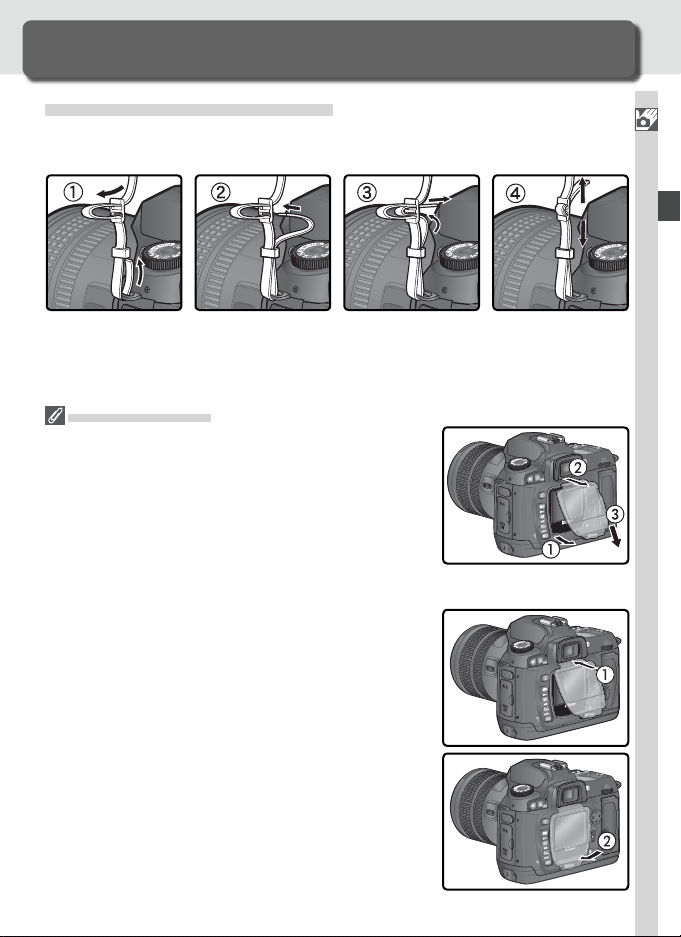
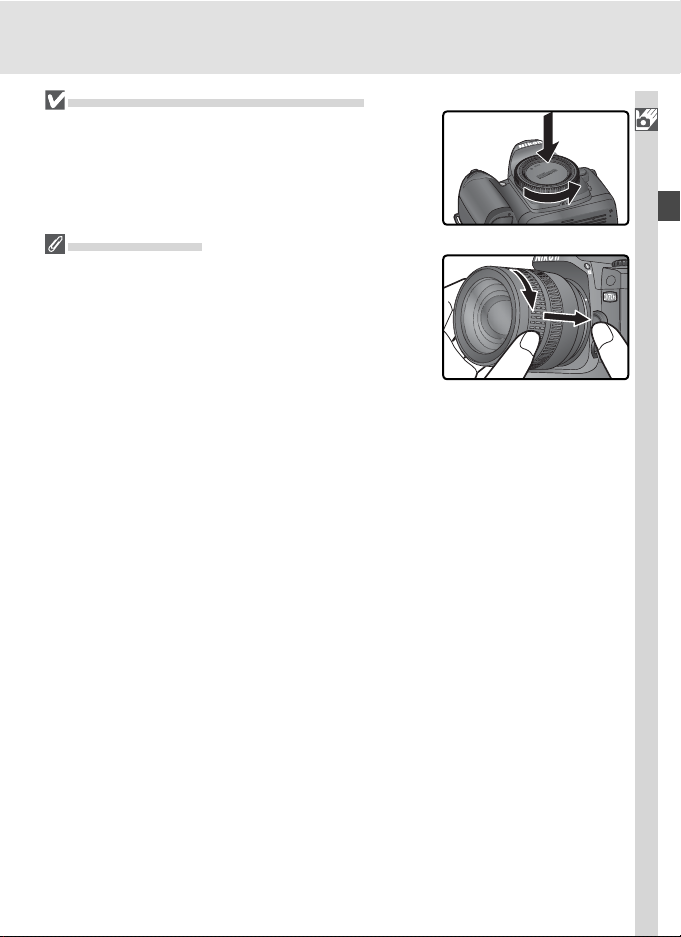
Attaching the Camera Strap
Attach the camera strap securely to the two eyelets on the camera body as
shown below.
The Monitor Cover
A clear plastic cover (the BM-5 LCD monitor cover) is
pro vid ed with the cam era to keep the monitor clean,
and to pro tect the mon i tor when the camera is not
in use or when you are trans port ing the camera. To
re move the mon i tor cover, hold the cam era fi rmly and
pull the bot tom of the cover gen tly out wards as shown
at right (). Once the cover is un latched, you can move
it slightly away from the mon i tor () and then remove
it as shown ().
To replace the cover for shooting or stor age, insert the
two projections on the top of the cover into the match ing in den ta tions above the camera monitor (), then
press the bot tom of the cover un til you hear it click into
place ().
Introduction—First Steps
13
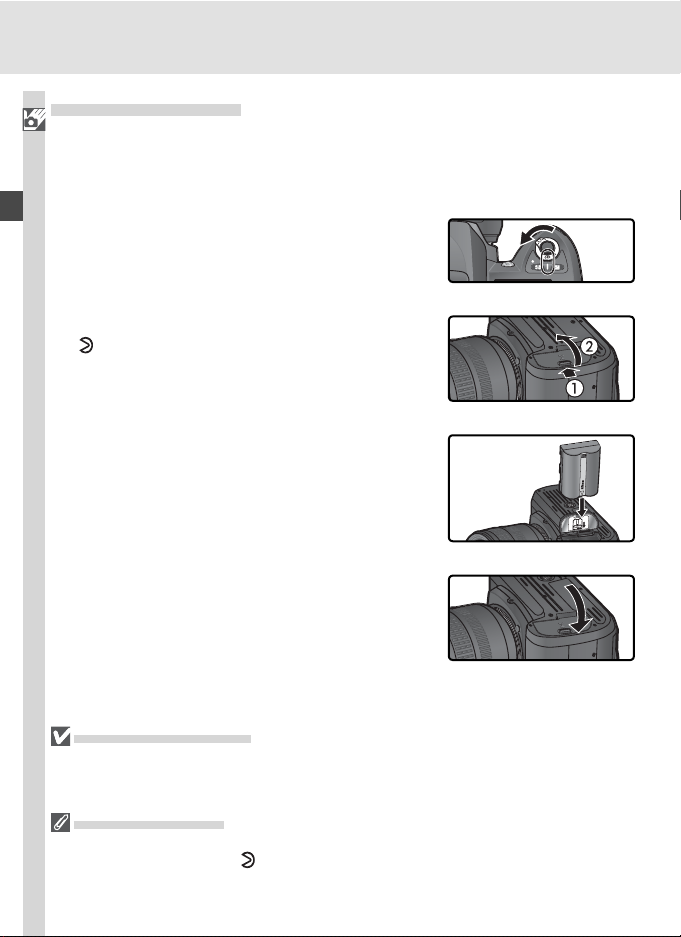
Inserting Batteries
L
i
-
i
o
n
B
A
T
T
E
R
Y
P
A
C
K
The D70S uses a rechargeable EN-EL3a Li-ion battery (supplied). Charge the
Introduction—First Steps
battery before fi rst use or after long periods of disuse (see the charger manual
for details). About two hours are required to recharge a fully-discharged battery.
Turn the camera off
1
Turn the cam era off before inserting or re mov ing bat ter ies.
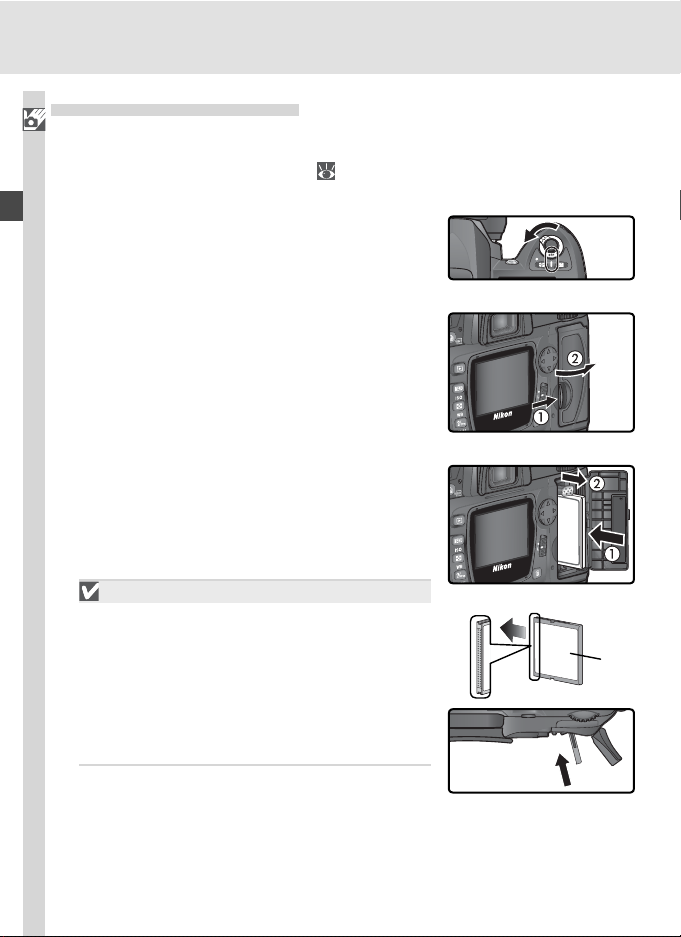
Open the bat tery-chamber cover
2
Slide the battery-chamber cover latch to the
position () and open the battery-chamber
cover ().
In sert the bat tery
3
In sert the battery as shown at right.
Latch the battery-cham ber cover
4
To prevent the battery from being dis lodged
during operation, be sure the cover is securely
latched.
Read Battery Warnings
Read and follow the warnings and cautions on pages ii–iii and 196–197 of this
manual, together with any warnings and instructions provided by the battery
manufacturer.
Removing Batteries
Before removing batteries, turn the camera off and slide the bat tery-chamber cover
latch to the open po si tion ( ). Replace the terminal cover when the EN-EL3a is not
in use.
14
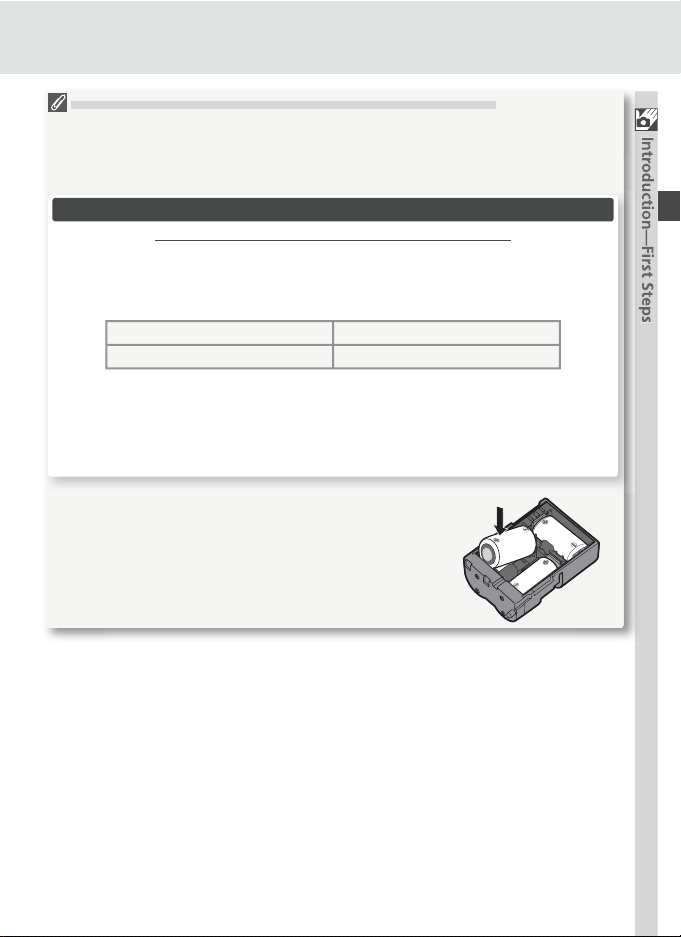
Using the Optional MS -D70 CR2 Lithium Battery Holder
Note the following when using CR2 lithium batteries:
When inserted in the MS-D70 battery holder (available separately), CR2 lithium batteries can be used as a backup power source in place of the EN-EL3a. CR2 batteries
are however suited to use at a restricted range of temperatures. Read the following
notice before using CR2 batteries.
Using CR2 Lithium Batteries
Note the following when using CR2 lithium batteries:
The capacity of CR2 batteries drops sharply when the ambient temperature is below
20 °C (68 °F).
Operation has been confi rmed with the following CR2 lithium batteries:
The capacity of the above batteries may vary with storage conditions; in some cases,
they may cease to function before their expiry date. The presence of fi ngerprints or
other foreign matter on the battery terminals or on the battery contacts inside the
holder can also affect battery performance; clean the terminals and contacts with
a dry cloth before use.
Place three CR2 batteries in the MS-D70 battery holder
as shown in the illustration on the holder and insert the
holder in the battery chamber as described on the previous page. CR2 batteries can not be recharged.
SANYO CR2 lithium batteries Toshiba CR2 lithium batteries
Maxell CR2 lithium batteries Energizer CR2 lithium batteries
15
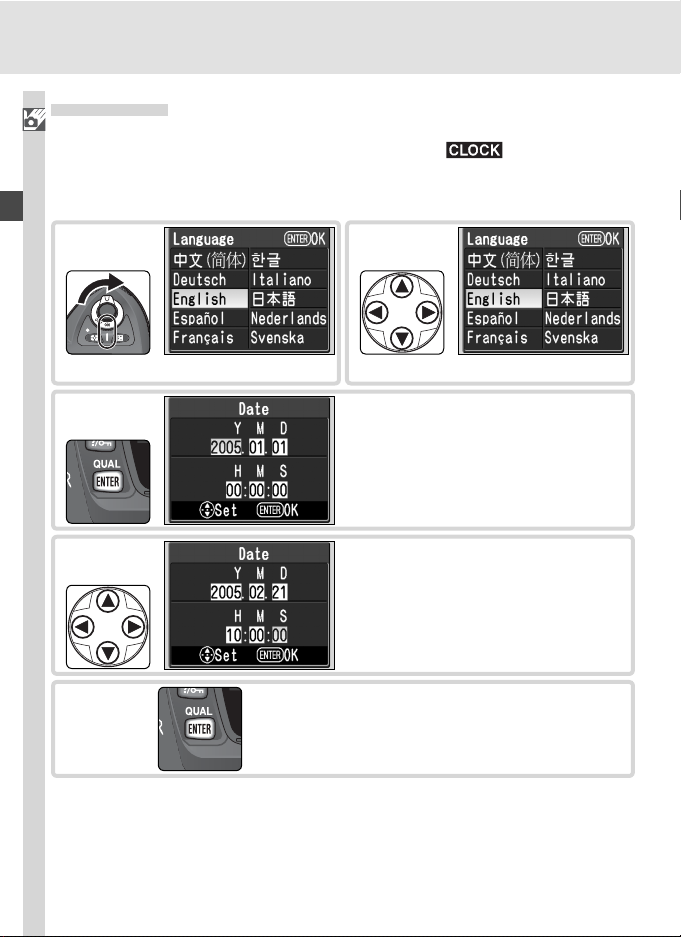
Basic Setup
The fi rst time the camera is turned on, the language selection dialog shown
Introduction—First Steps
in Step 1 will be displayed in the monitor and the icon will fl ash in
the control panel. Follow the steps below to choose a language and set the
time and date.
1
Language selection dialog displayed.
3
4
5
2
Select language.
Display DATE menu.
Edit Year, Month, Day, Hour, Minute,
and Second. Press multi selector left
or right to select item, up or down to
change.
Exit DATE menu. Monitor turns off.
16
Basic Setup
If the button is not pressed at the completion of basic setup, the language selection
dialog will be displayed the next time the camera is turned on. Until setup is complete,
the icon will continue to fl ash, and no photographs can be taken nor other
operations performed.
The Clock Battery
The clock-calendar is powered by an independent, rechargeable power source, which
is charged as necessary when the main batteries are installed or the camera is powered by an optional EH-5 AC adapter. Three days of charging will power the clock for
about one month. If the icon fl ashes in the control panel, the clock battery is
exhausted and the clock has been reset to 2005.01.01 00:00:00. Set the clock to the
correct date and time as described in “The Setup Menu: Date” ( 161).
The Camera Clock
The camera clock is less accurate than most watches and household clocks. Check the
clock regularly against more accurate time pieces and reset as necessary.
Language ( 163)
To change the language in which camera menus and messages are displayed, use the
Language option in the setup menu.
Date ( 161)
Use the Date option in the setup menu to change the time and date.
Introduction—First Steps
17

Attaching Lenses
Nikon recommends using a type G or type D CPU lens to take full ad van tage
Introduction—First Steps
of the features the camera offers.
contacts
Turn the camera off
1
Turn the camera off before attaching or re mov ing lenses.
Attach a lens
2
Keep ing the mounting mark on the lens
aligned with the mounting mark on the cam era body, position the lens in the cam era’s
bayonet mount. Being careful not to press
the lens-release button, ro tate the lens counter-clockwise until it clicks into place.
Lock aperture at the minimum setting
3
This step is not necessary if you are using a
type G lens not equipped with an aperture
ring. If you are using a lens of another type,
lock aperture at the minimum setting (highest
f/-num ber).
If this step is omitted when attaching a CPU
lens, the ap er ture dis plays in the con trol panel
and viewfi nder will show a blinking when
the camera is turned on. Pho to graphs can not
be taken until the cam era is turned off and
ap er ture locked at the highest f/-num ber.
Type D lensType G lensCPU lenses have CPU
18
Protect the Camera from Dirt and Dust
Any dust, dirt, or other foreign matter inside your
cam era could show up as specks or blotches in your
pho to graphs or the viewfi nder display. When no lens is
in place, keep the lens mount covered with the supplied
body cap. When exchanging lenses or replacing the
body cap, keep the lens mount pointed down.
Detaching Lenses
Be sure the camera is off when removing or exchanging
lenses. To remove the lens, press and hold the lens-release button while turning the lens clockwise.
Introduction—First Steps
19
Inserting Memory Cards
In place of fi lm, the D70S uses CompactFlash or microdrive memory cards
Introduction—First Steps
to store photographs. For a list of approved mem o ry cards, see “Technical
Notes: Approved Memory Cards” (
Turn the cam era off
1
Turn the cam era off before inserting or re mov ing mem o ry cards.
Open the card slot cover
2
Open the card slot cover as shown at right.
Insert a memory card
3
Insert the memory card with the rear label
toward the monitor (). When the memory
card is fully inserted, the access lamp will light
and the eject button will pop up (). Close
the card slot cover.
Inserting Memory Cards
Insert the memory card terminals fi rst. Inserting the card upside down or backwards could
damage the camera or the card. Check to be
sure that the card is in the correct orientation.
The memory card slot is on a slight angle (see
illustration at right). Match the angle of the
memory card slot when inserting cards.
192).
Di rec tion of insertion
Ter mi nals
Rear
label
20
 Loading...