

Nikon D700 - Digital Camera SLR Quick Manual
1
cv

2
Table of Contents
Quick Start Guide .......................................... 3
Copying Pictures to a Computer .................. 8
ViewNX........................................................ 12
Buttons and Dials ....................................... 13
The Quick Settings Display........................ 16
The Command Dials ................................... 18
Release Mode.............................................. 23
Using the Flash ........................................... 24
Live View ..................................................... 26
g Hand-Held .......................................................... 26
h Tripod.................................................................... 28
Picture Controls.......................................... 30
Custom Picture Controls .................................... 32
The Fn Button ............................................. 34
Guides and Tips .......................................... 35
Help............................................................................ 35
Formatting Memory Cards ................................ 35
Two-Button Reset:
Restoring Default Settings ............................ 35
Menu Guide................................................. 36
D PLAYBACK MENU ............................................ 36
C SHOOTING MENU............................................ 37
A CUSTOM SETTING MENU.............................. 39
B SETUP MENU ...................................................... 45
N RETOUCH MENU .............................................. 48
O MY MENU ............................................................ 48
3
Quick Start Guide
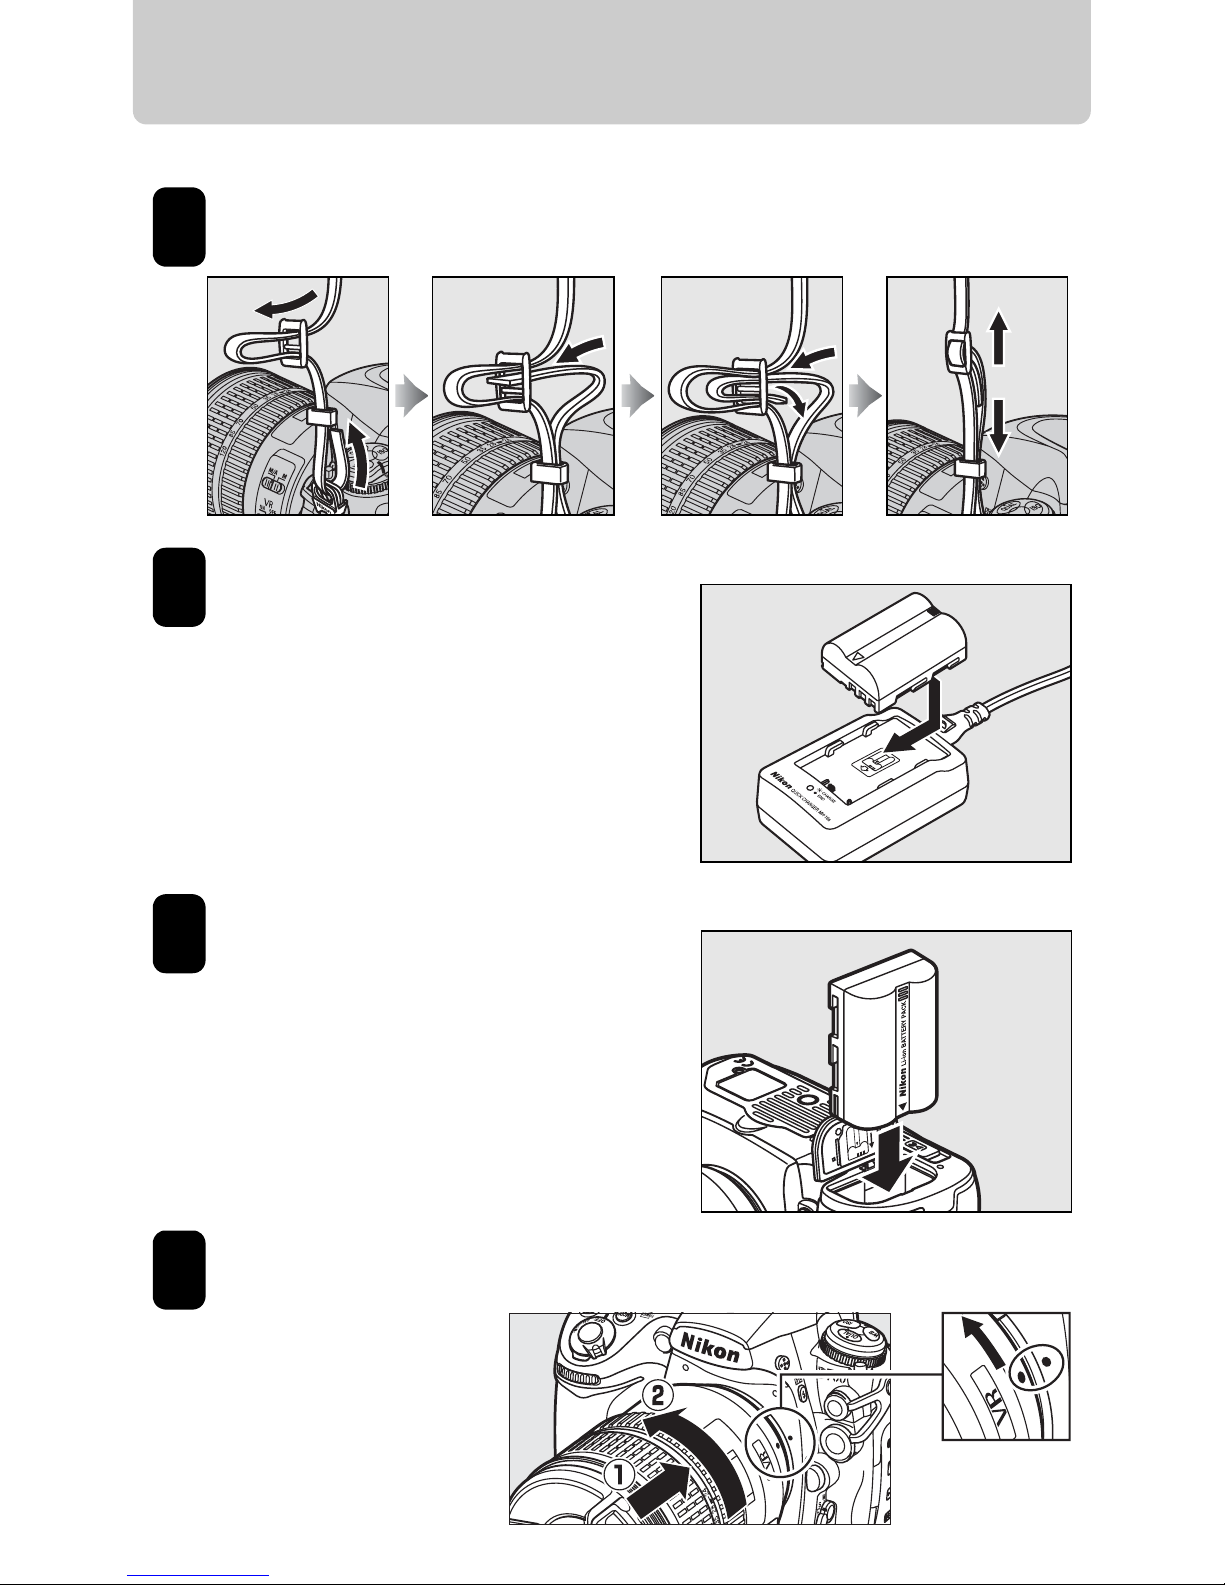
Follow these steps for a quick start with your camera.
Attach the strap.
Charge the battery.
Insert the battery.
Attach a lens.
Rotate the lens
until it clicks
into place.
1
2
3
4
Mounting
index
4
Quick Start Guide
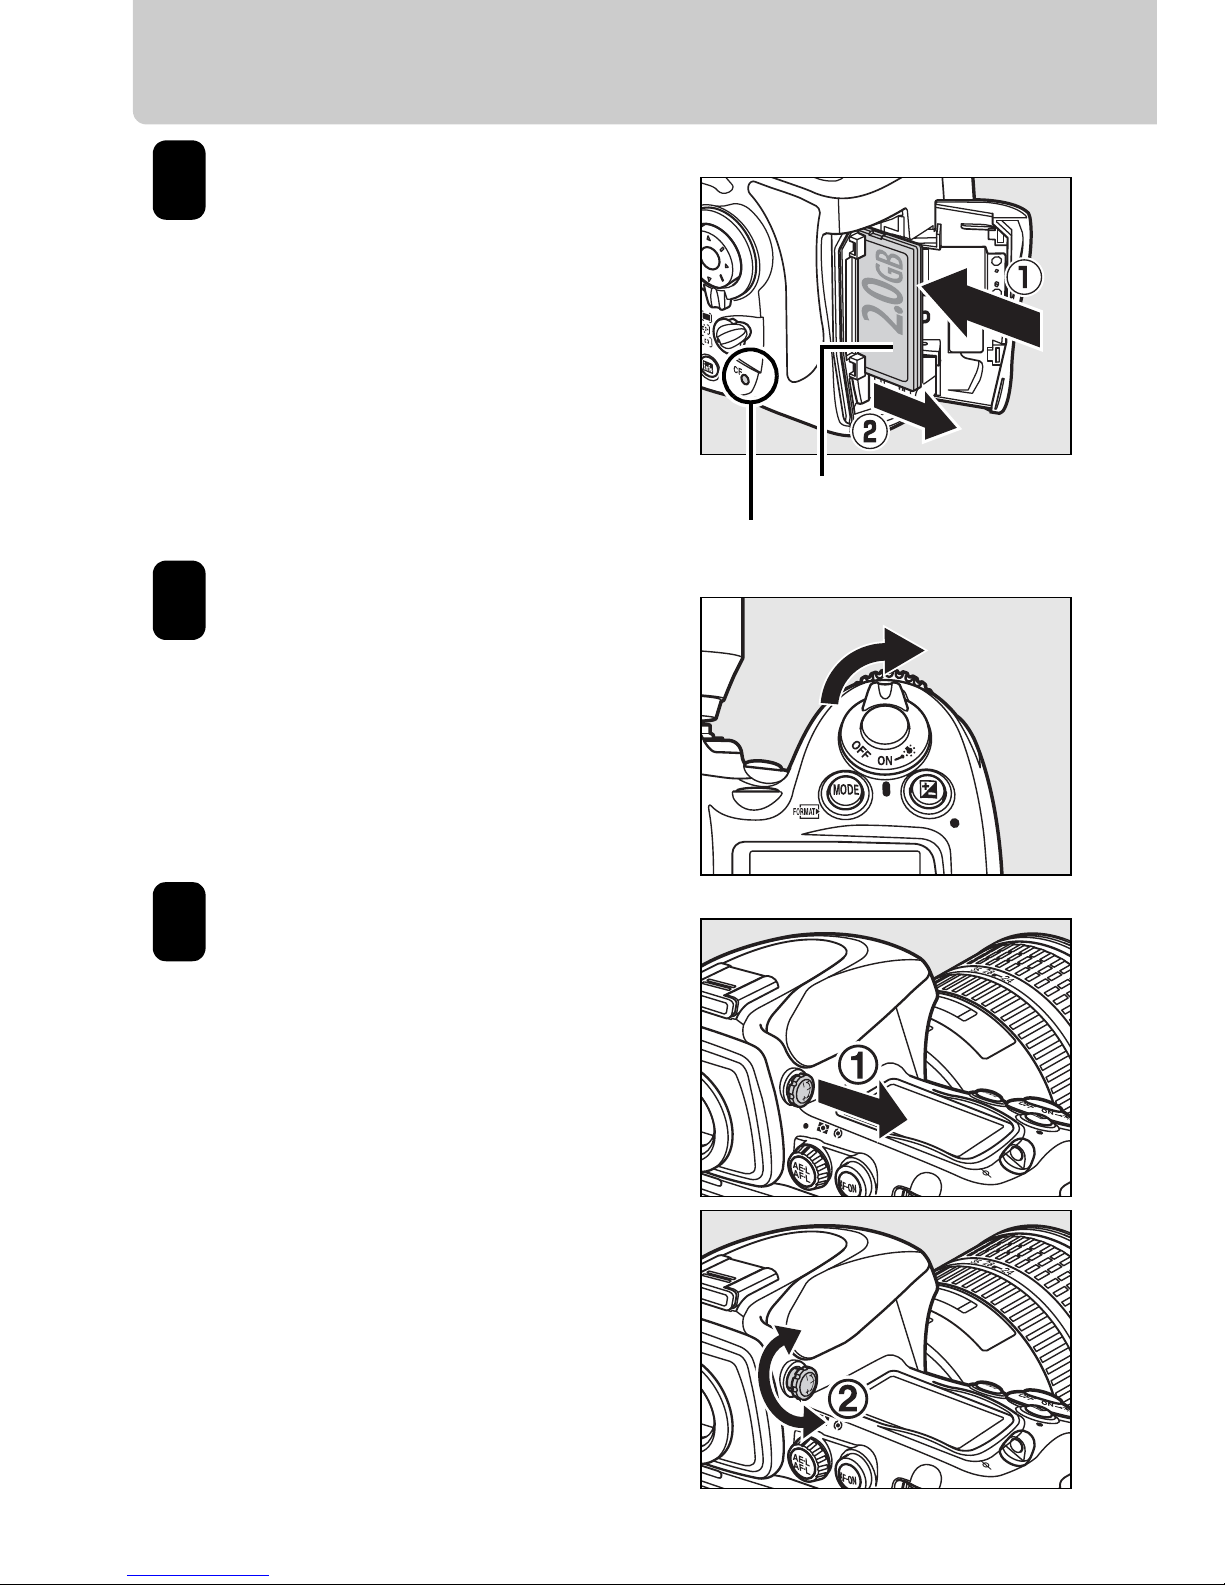
Insert a Type I
CompactFlash memory
card (q).
When the memory card is
fully inserted, the eject
button will pop up (w) and
the green access lamp will
light briefly.
Turn the camera on.
See page 38 of the User’s
Manual for information on
choosing a language and
setting the time and date.
Adjust viewfinder
focus.
Lift the diopter adjustment
control (q) and rotate it until
the frame in the viewfinder is
in sharp focus (w), then push
the diopter adjustment
control back in.
Front
Access Lamp
5
6
7
5
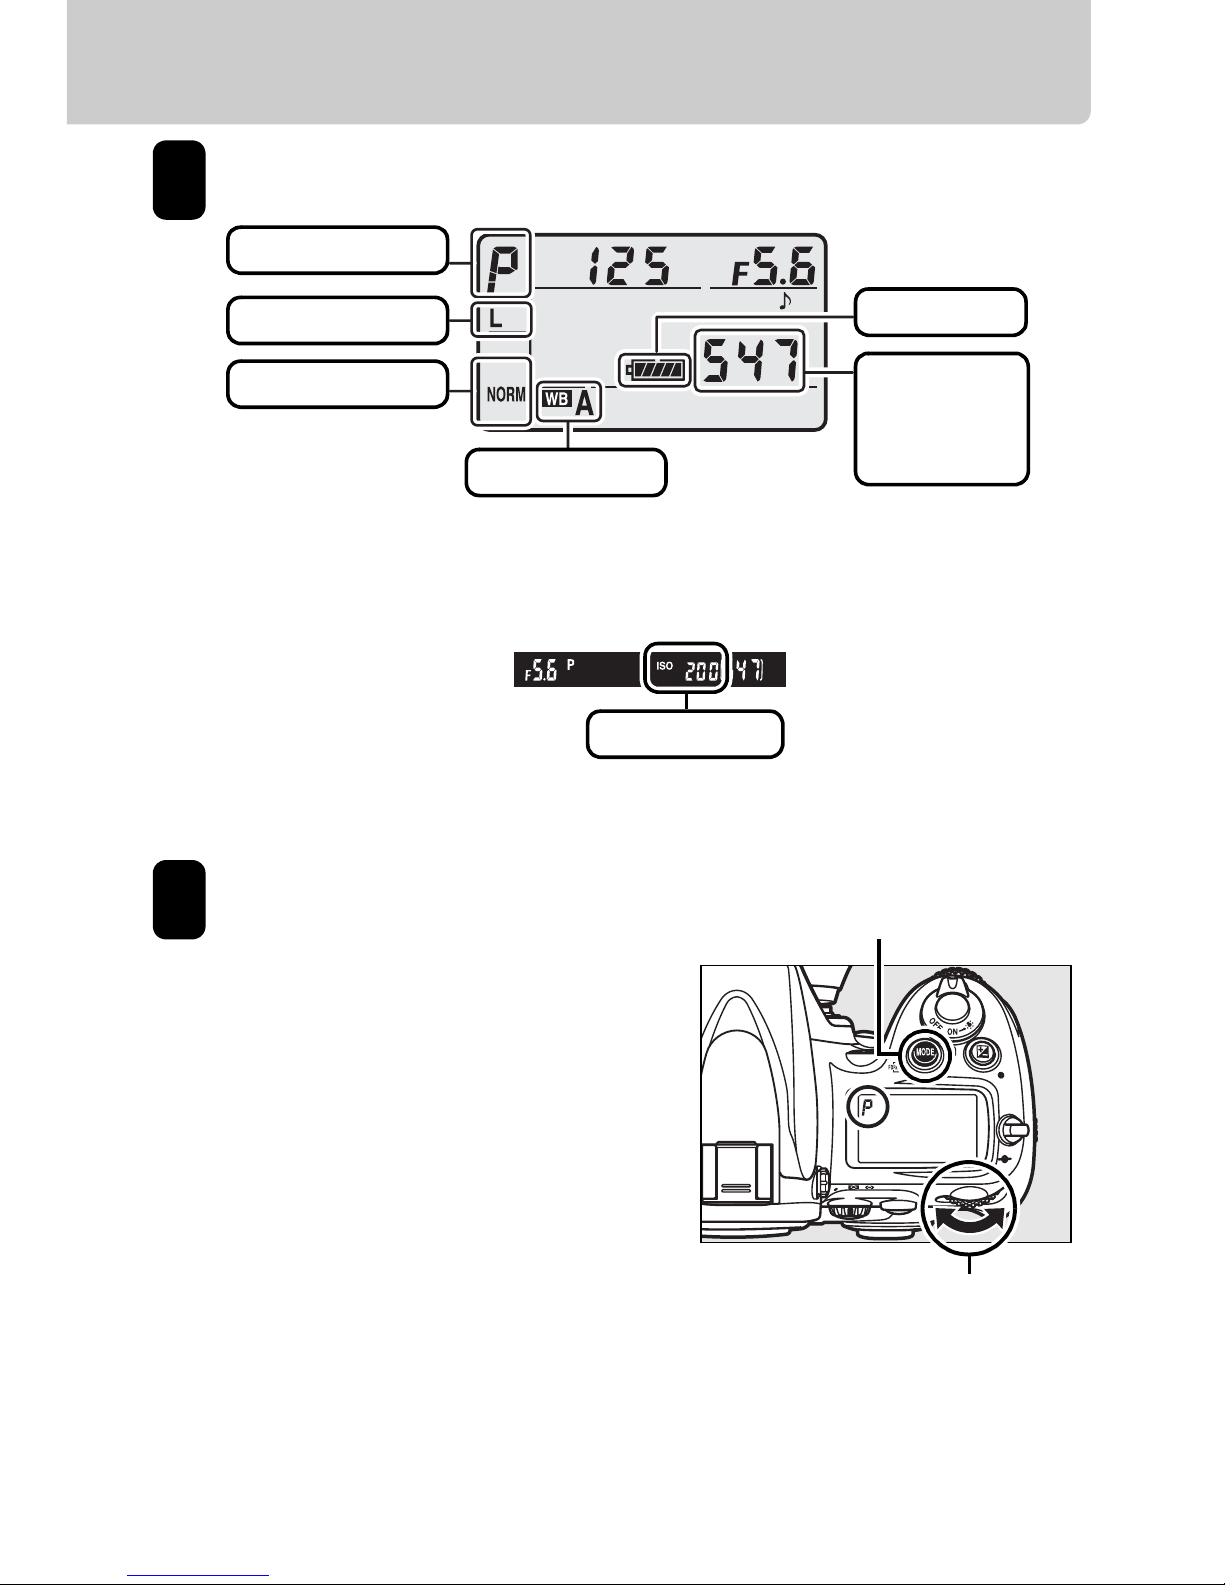
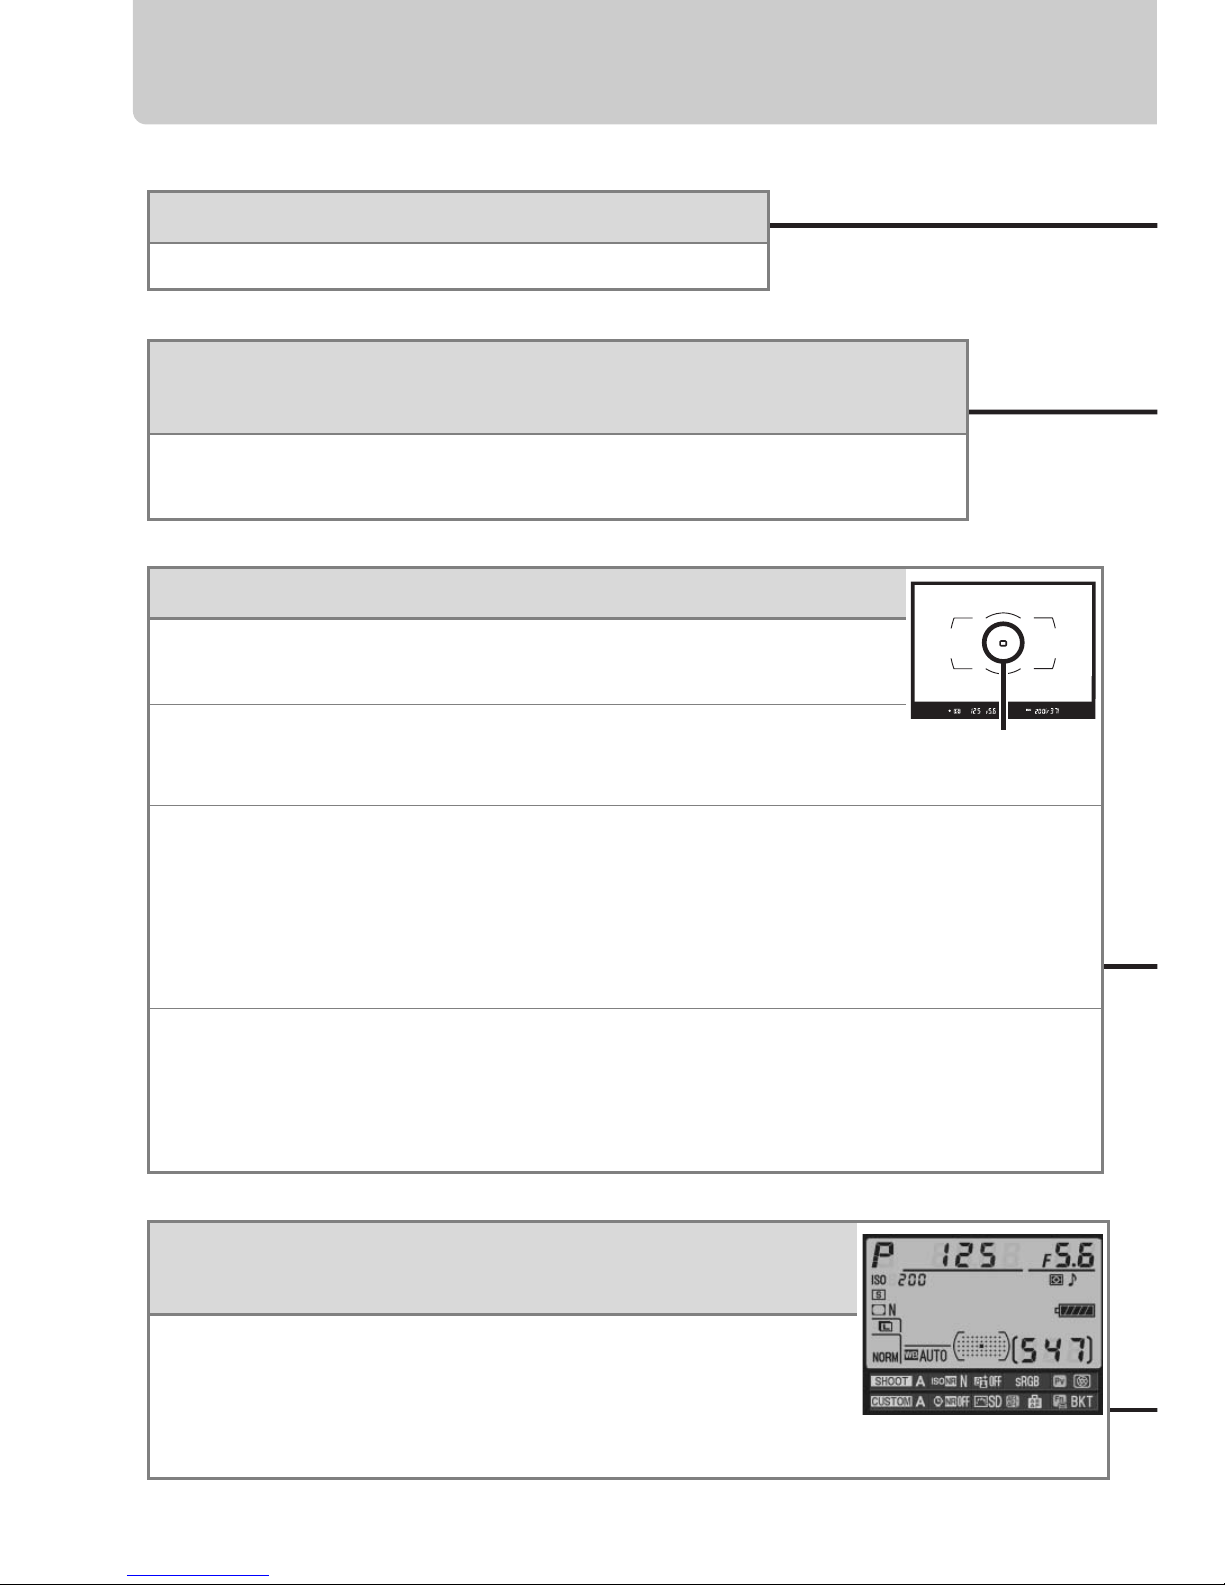
Check camera settings.
Choose exposure mode e.
Press the I button and
rotate the main command
dial to select exposure
mode e
(programmed
auto).
8
Exposure mode
Control panel
White balance
Viewfinder display
Image size
Image quality
Battery level
Number of
exposures
remaining
ISO sensitivity
I button
Main command dial
9
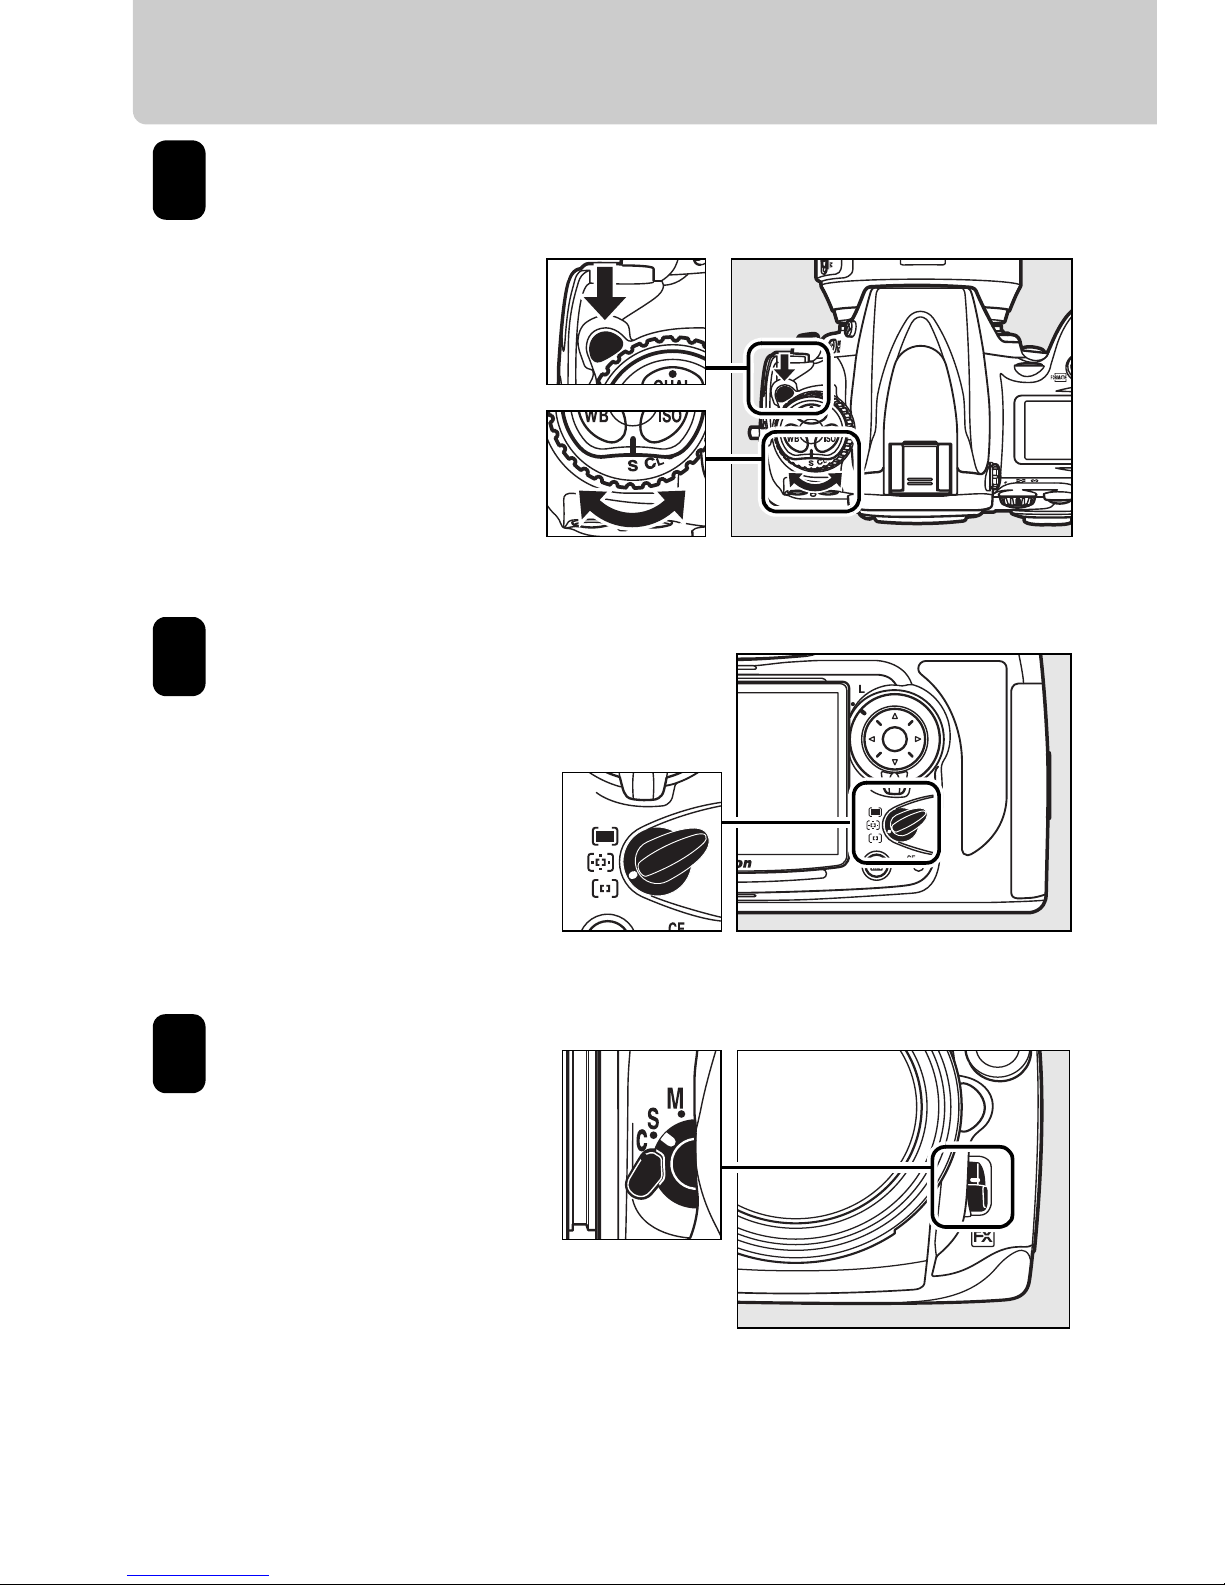
6
Quick Start Guide
Choose single
frame release
mode.
Hold the release
mode dial lock
release down and
turn the release
mode dial to S
(single frame).
Rotate the
AF-area mode
selector to
K
(single-point AF).
This allows the
focus point to be
selected manually.
Rotate the focusmode selector to S
(single-servo AF).
The camera
focuses when the
shutter-release
button is pressed
halfway, and focus locks while the shutter-release
button is held in this postion.
Release mode dial
Release mode dial lock
release
10
AF-area mode selector
11
12
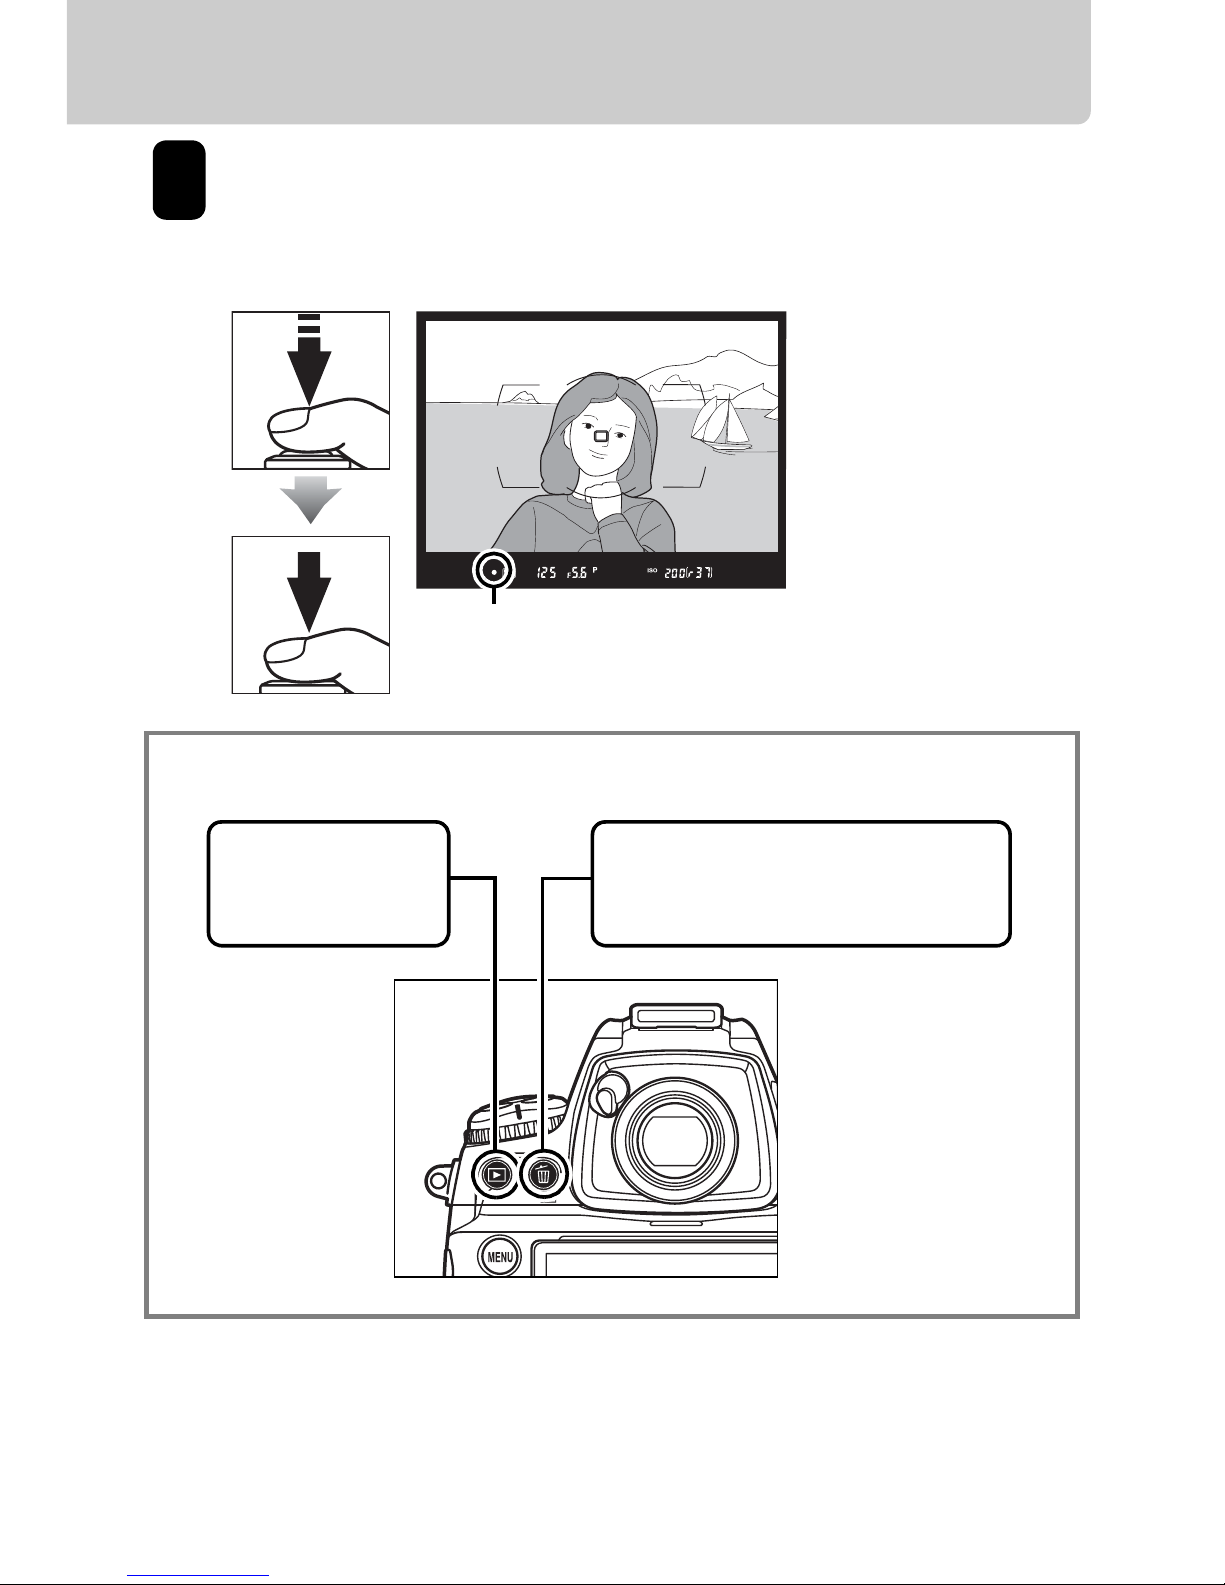
7
Press the shutter-release button halfway to focus,
then press it the rest of the way down to take the
photograph.
Viewing and Deleting Photographs
13
Focus indicator
Press O twice to delete the
photograph currently displayed in the monitor.
Press K to view
photographs.

8
Copying Pictures to a Computer
This section describes how to use the supplied UC-E4 USB
cable to connect the camera to a computer. Before
connecting the camera, install Nikon Transfer and ViewNX
from the supplied Software Suite CD (see the Software
Installation Guide for more information). Nikon Transfer
starts automatically when the camera is connected and is
used to copy photographs to the computer, where they can
be viewed using ViewNX (Nikon Transfer can also be used to
back up photographs and embed information in
photographs as they are transferred, while ViewNX can be
used to sort photographs, convert images to different file
formats, and perform simple editing on NEF (RAW)
photographs). To ensure that data transfer is not
interrupted, be sure the camera battery is fully charged. If in
doubt, charge the battery before use or use an EH-5a or EH-5
AC adapter (available separately).
Supported Operating Systems
The camera can be connected to computers running the
following operating systems:
• Windows: Windows Vista Service Pack 1 (32-bit Home
Basic/Home Premium/Business/Enterprise/Ultimate)
and Windows XP Service Pack 2 (Home Edition/
Professional)
• Macintosh: Mac OS X (version 10.3.9, 10.4.11, or 10.5.2)

9
Turn the camera off.
Turn the camera off and confirm that a memory card is
inserted.
Turn the computer on and connect the supplied UCE4 USB cable as shown below.
Do not use force or attempt to insert the connectors at
an angle. Connect the camera directly to the
computer; do not connect the cable via a USB hub or
keyboard.
1
2
10
Copying Pictures to a Computer
Turn the camera on.
Windows Vista: If an AutoPlay dialog is displayed, click
Copy pictures to a folder on my computer using
Nikon Transfer to start Nikon Transfer. To skip the
AutoPlay dialog in future, select Always do this for
this device before clicking the “copy pictures…”
option.
Windows XP: If an AutoPlay dialog is displayed, select
Nikon Transfer Copy pictures to a folder on my
computer and click OK to start Nikon Transfer. To skip
the AutoPlay dialog in future, select Always use this
program for this action before clicking OK.
Macintosh: Nikon Transfer will start automatically if
Yes was selected in the Auto-Launch setting dialog
when Nikon Transfer was first installed.
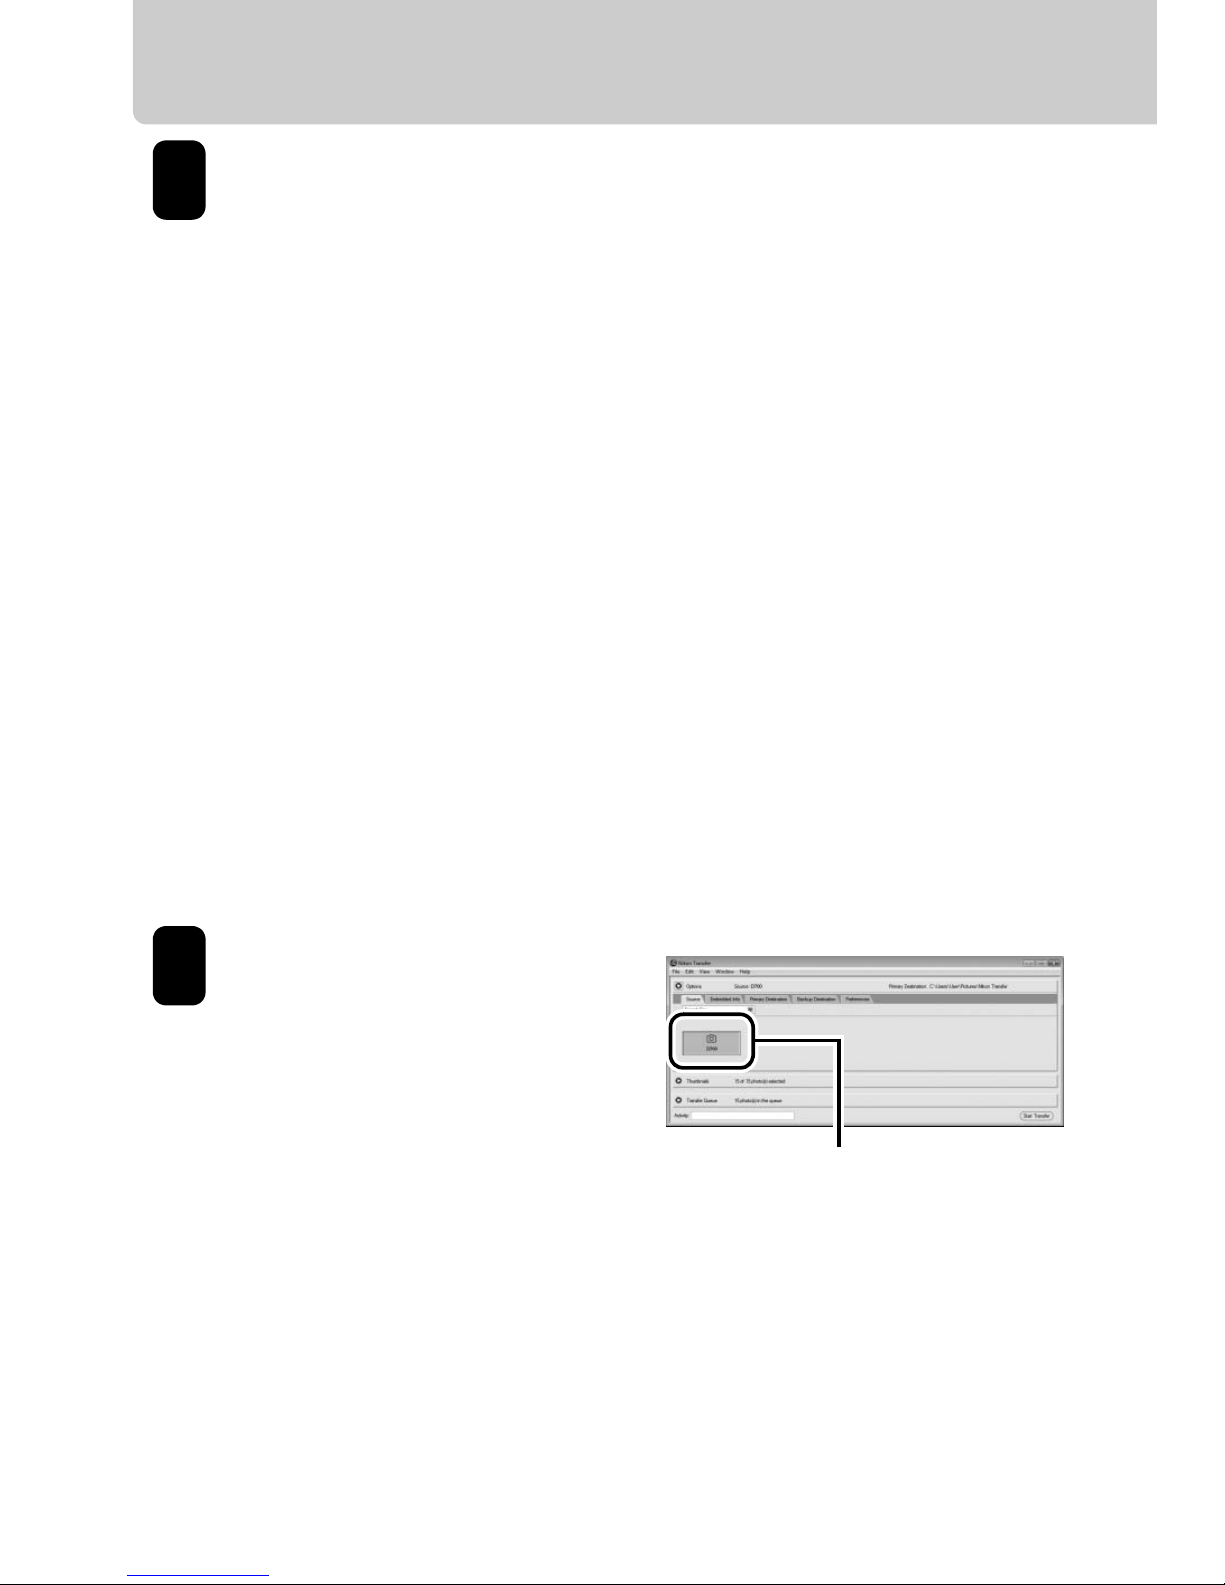
Confirm that the camera is
displayed in the transfer
options “Source” panel.
If the camera is not displayed,
check that the camera is on
and connected to the
computer.
3
D700
4

11
Click Start Transfer.
At default settings, all
pictures on the camera
memory card will be
transferred. When transfer
is complete, pictures will
be displayed in ViewNX.
ViewNX
ViewNX is used to view photographs after they have
been transferred to the computer. ViewNX can also be
started by:
• Windows: Double-clicking the ViewNX shortcut on the
desktop.
• Macintosh: Clicking the ViewNX icon in the Dock.
Online Help
To view online help, start Nikon Transfer or ViewNX and
select the appropriate option from the Help menu.
Turn the camera off and disconnect the USB cable.
Start Transfer button
5
6
12
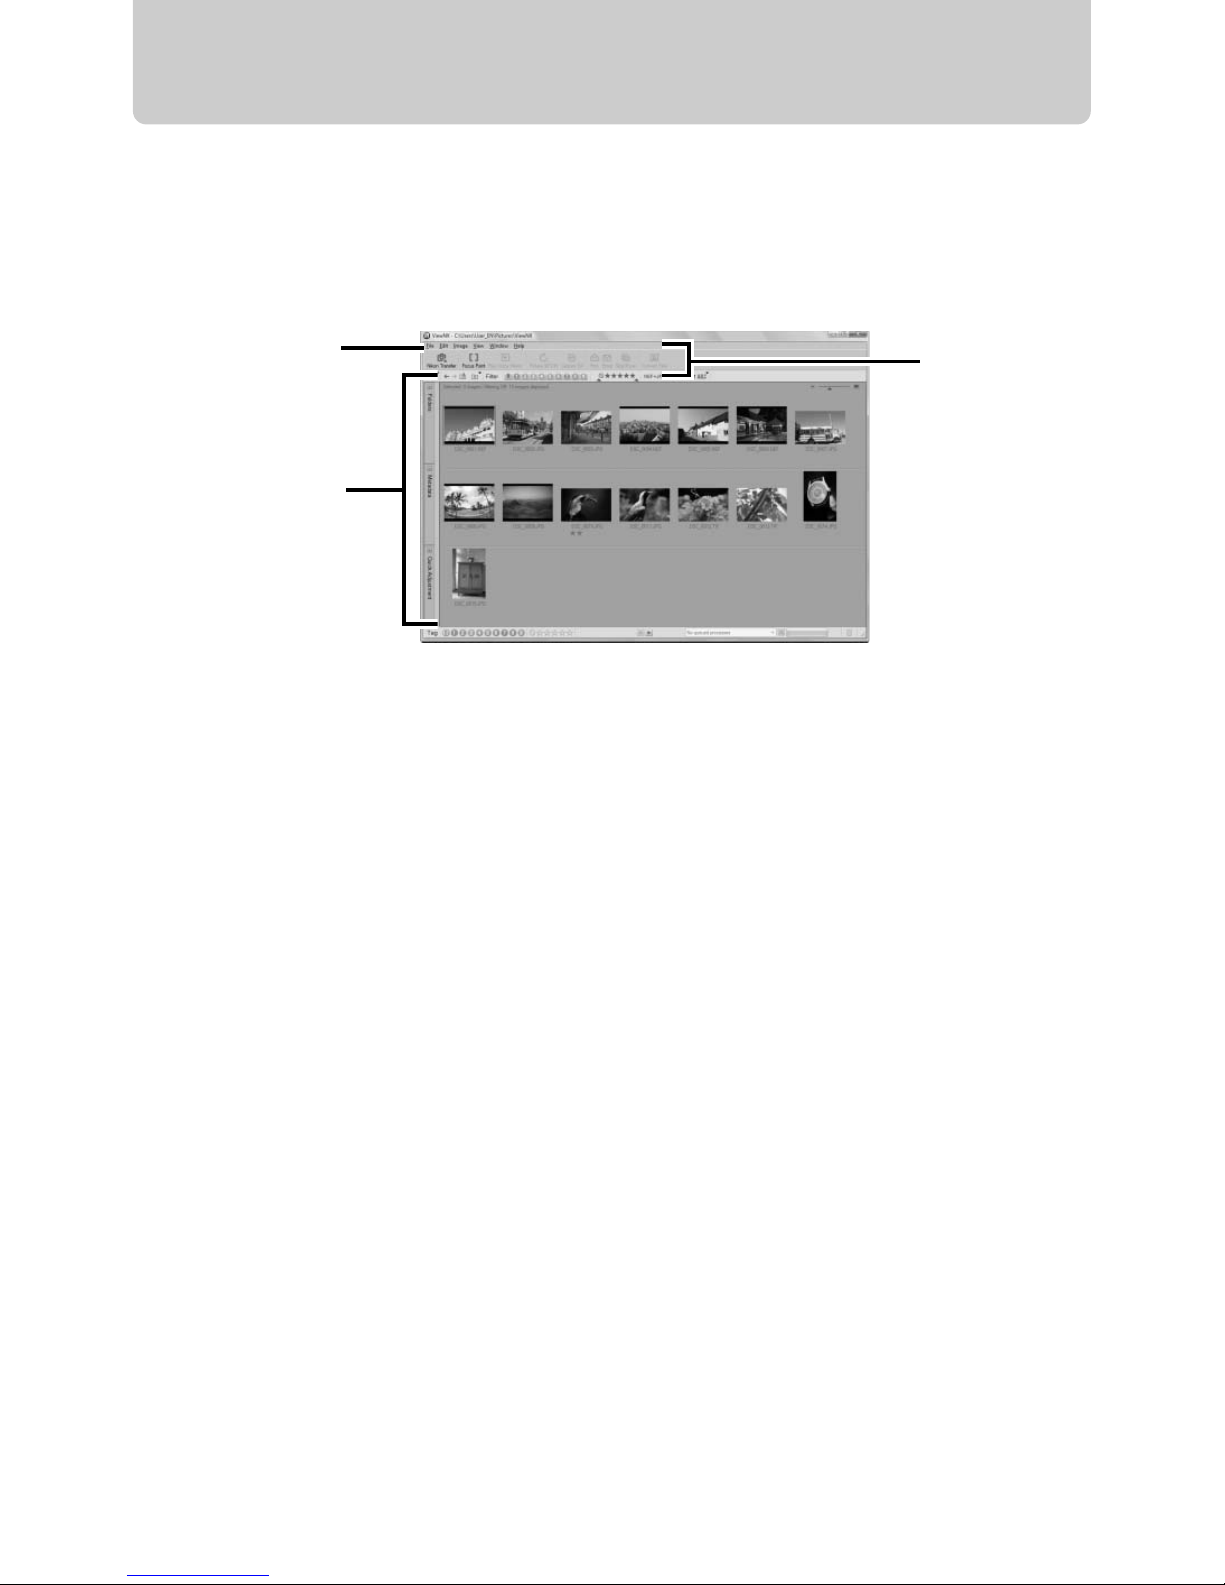
ViewNX
ViewNX can be used to sort photographs, convert images to
different file formats, and perform simple editing on NEF
(RAW) photographs.
1 Menu bar: Displays the menus available in each mode.
2 Toolbar: The customizable toolbar provides quick access to
frequently-used tools.
3 Navigation Tab: The navigation tab contains the following
palettes.
• Folders: Navigate the folder tree.
• Metadata: View information (including XMP/IPTC data)
on selected photographs
• Quick Adjustment: Make simple changes to NEF (RAW)
images, including adjustments to exposure
compensation, white balance and Picture Control
settings.
1
3
2
13
Buttons and Dials
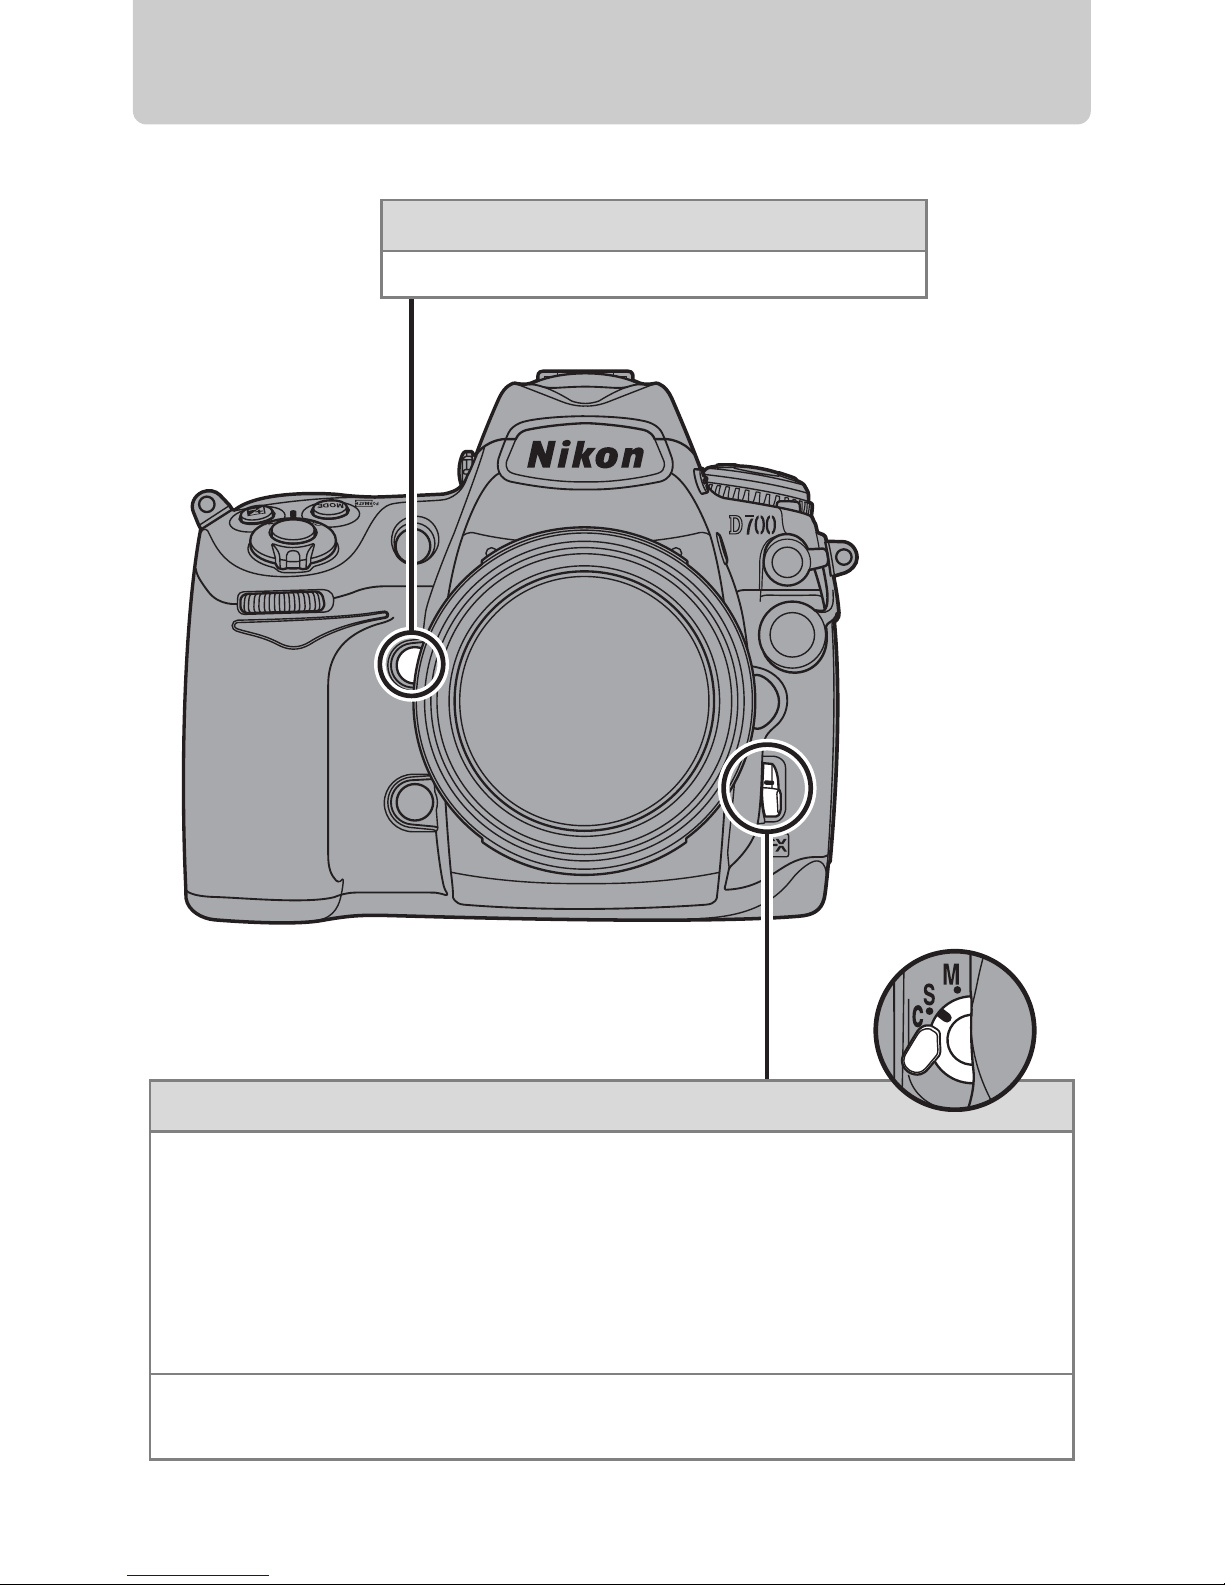
Depth-of-field preview button
Preview depth of field.
Focus-mode selector
Modes S and C (autofocus)
The camera focuses using autofocus (AF) when shutter-release
button is pressed halfway.
In mode S (single-servo AF), focus locks
when the camera focuses.
In mode C (continuous-servo AF), the
camera continues to adjust focus until the shutter is released
(pg. 39).
Mode M (manual)
Focus is adjusted manually using the lens focusing ring.
14
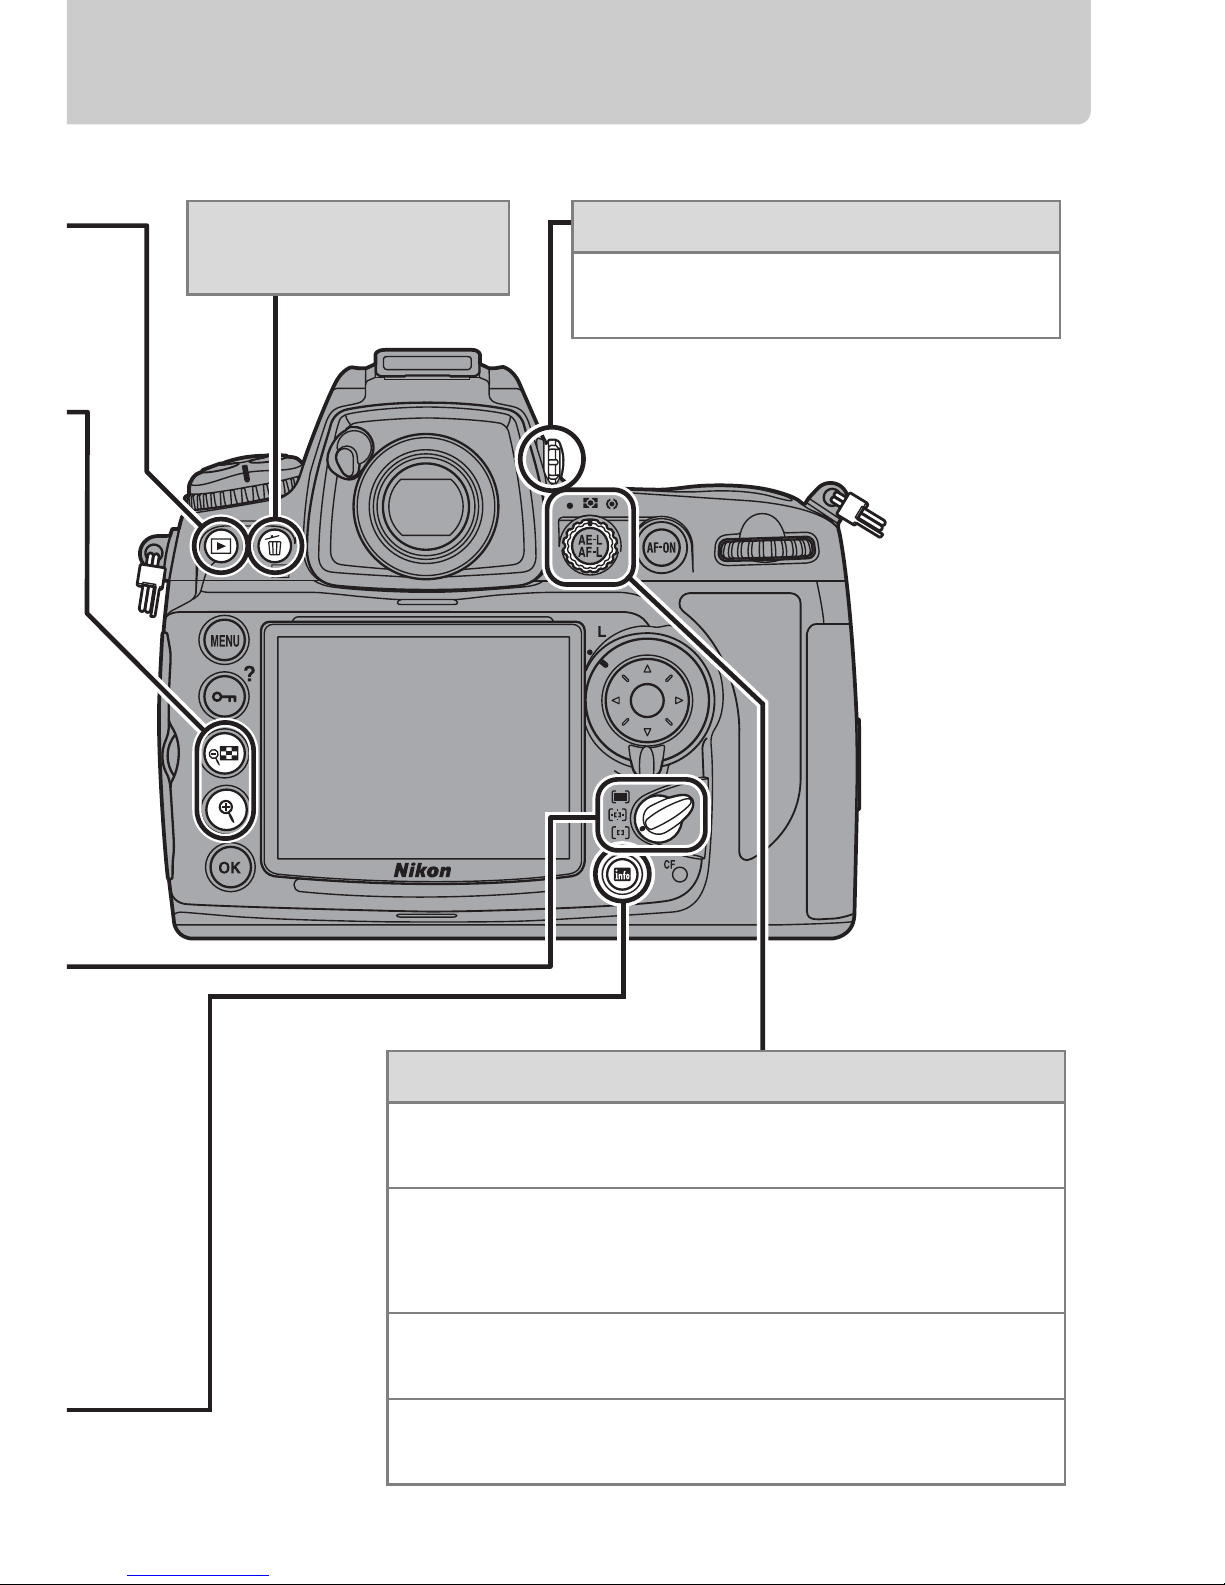
Buttons and Dials
K (playback) button
View photographs in the monitor (pg. 7).
R (information display/quick settings
display) button
Press once to view the focus point, shutter speed,
aperture, and other shooting information in the
monitor; press again to make changes to selected
settings (pp. 16, 42).
AF-area mode selector
Choose how the camera selects the focus point for
autofocus.
H
Auto-area AF: The camera automatically detects the
subject and selects the focus point.
I
Dynamic-area AF: The user selects the focus point with the multi
selector (if focus selection is locked, rotate the focus selector lock
to I). If the subject briefly leaves the selected focus point in focus
mode C (pg. 13), the camera will focus based on information from
surrounding focus points (pg. 40).
K
Single-area AF (default): The user selects the focus point with the
multi selector (if focus selection is locked, rotate the focus selector
lock to I); the camera focuses on the subject in the selected
focus point only.
Focus point
X (playback zoom in)/
W (thumbnail/playback zoom out) button
During playback, press the X button to zoom in. When the
image is zoomed in, press the W button to zoom out.
15
Metering selector
Rotate the metering selector to choose a
metering method.
Z
Center-weighted (pg. 41)
Assigns the greatest weight to the center
of the frame.
a
Matrix
Meters most of the frame.
b
Spot
Meters the selected focus point.
Diopter adjustment control
Lift and rotate until the display in
the viewfinder is in focus.
O (delete) button
(pg. 7)
 Loading...