

Page 1
Page 2
Page 3
Page 4
Page 5
Page 6
Page 7
Page 8
Page 9
Page 10
Page 11

Page 12

Page 13
Page 14
Page 15
Page 16
Page 17
Page 18
Page 19
Page 20
Page 21
Page 22
Page 23
Page 24
Page 25
Page 26
Page 27
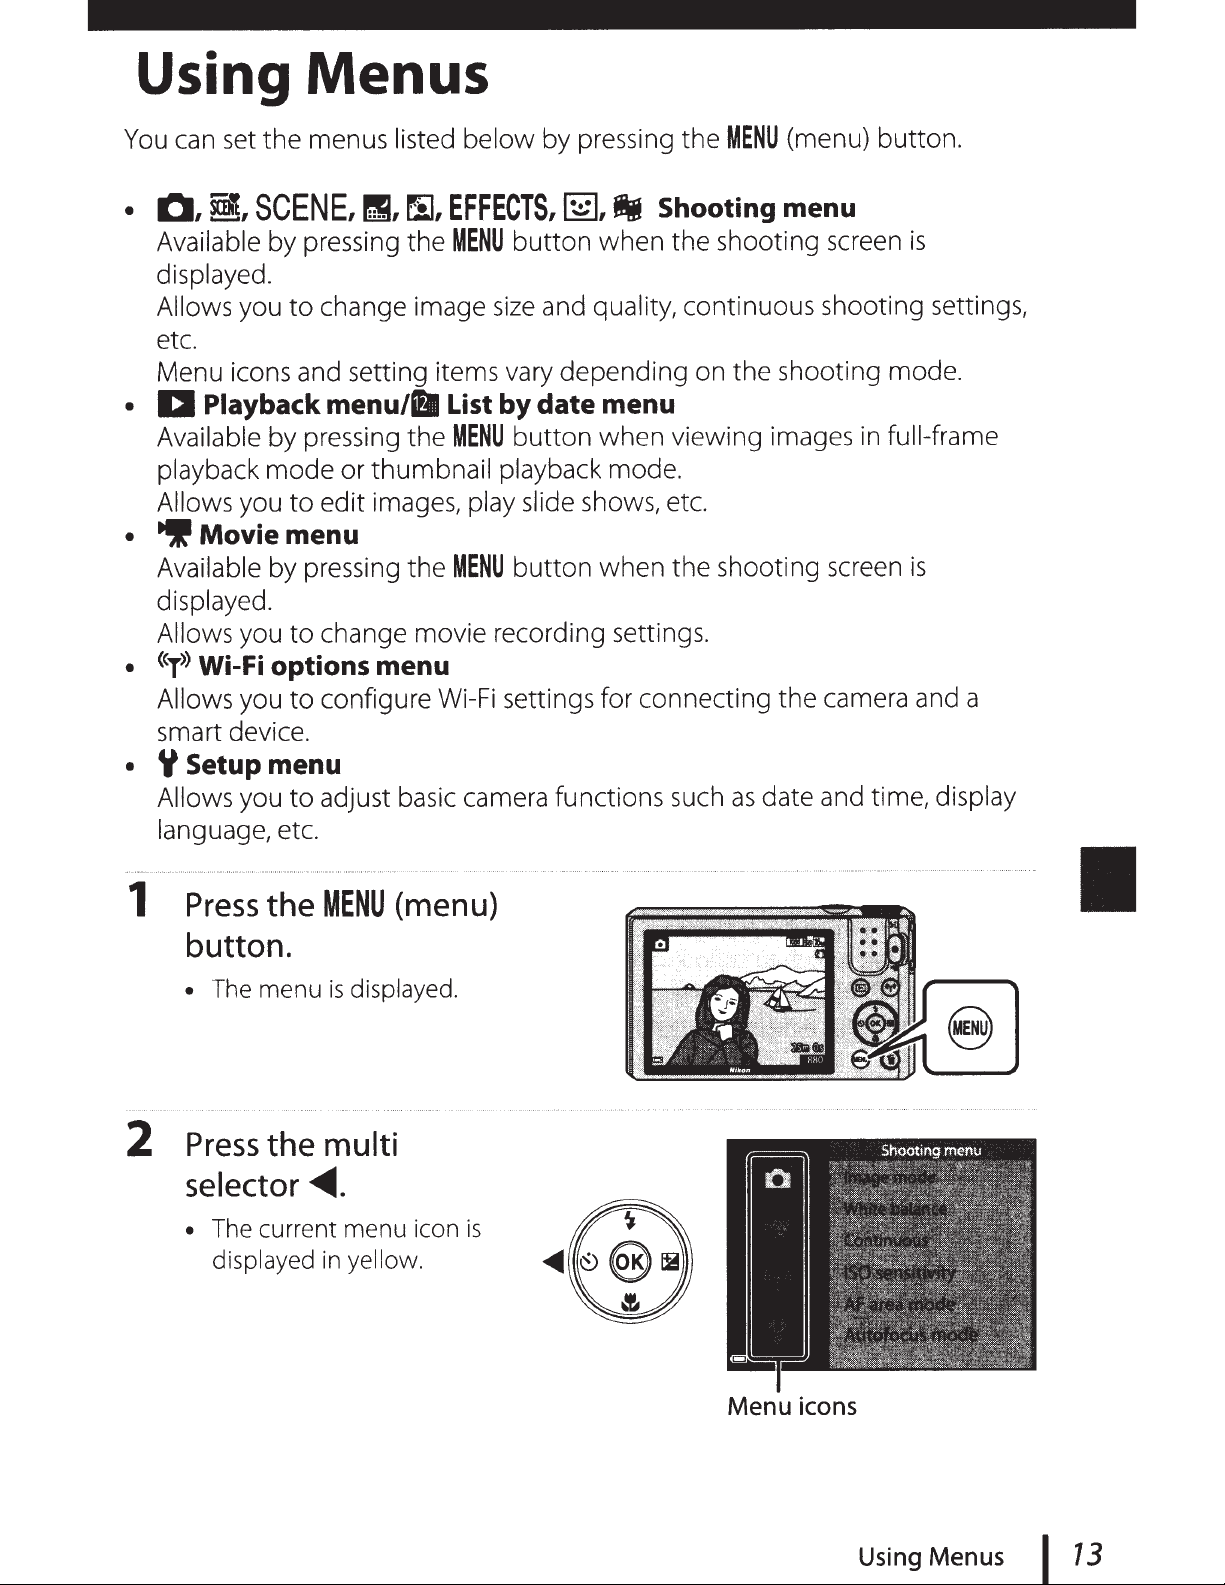
Page 28
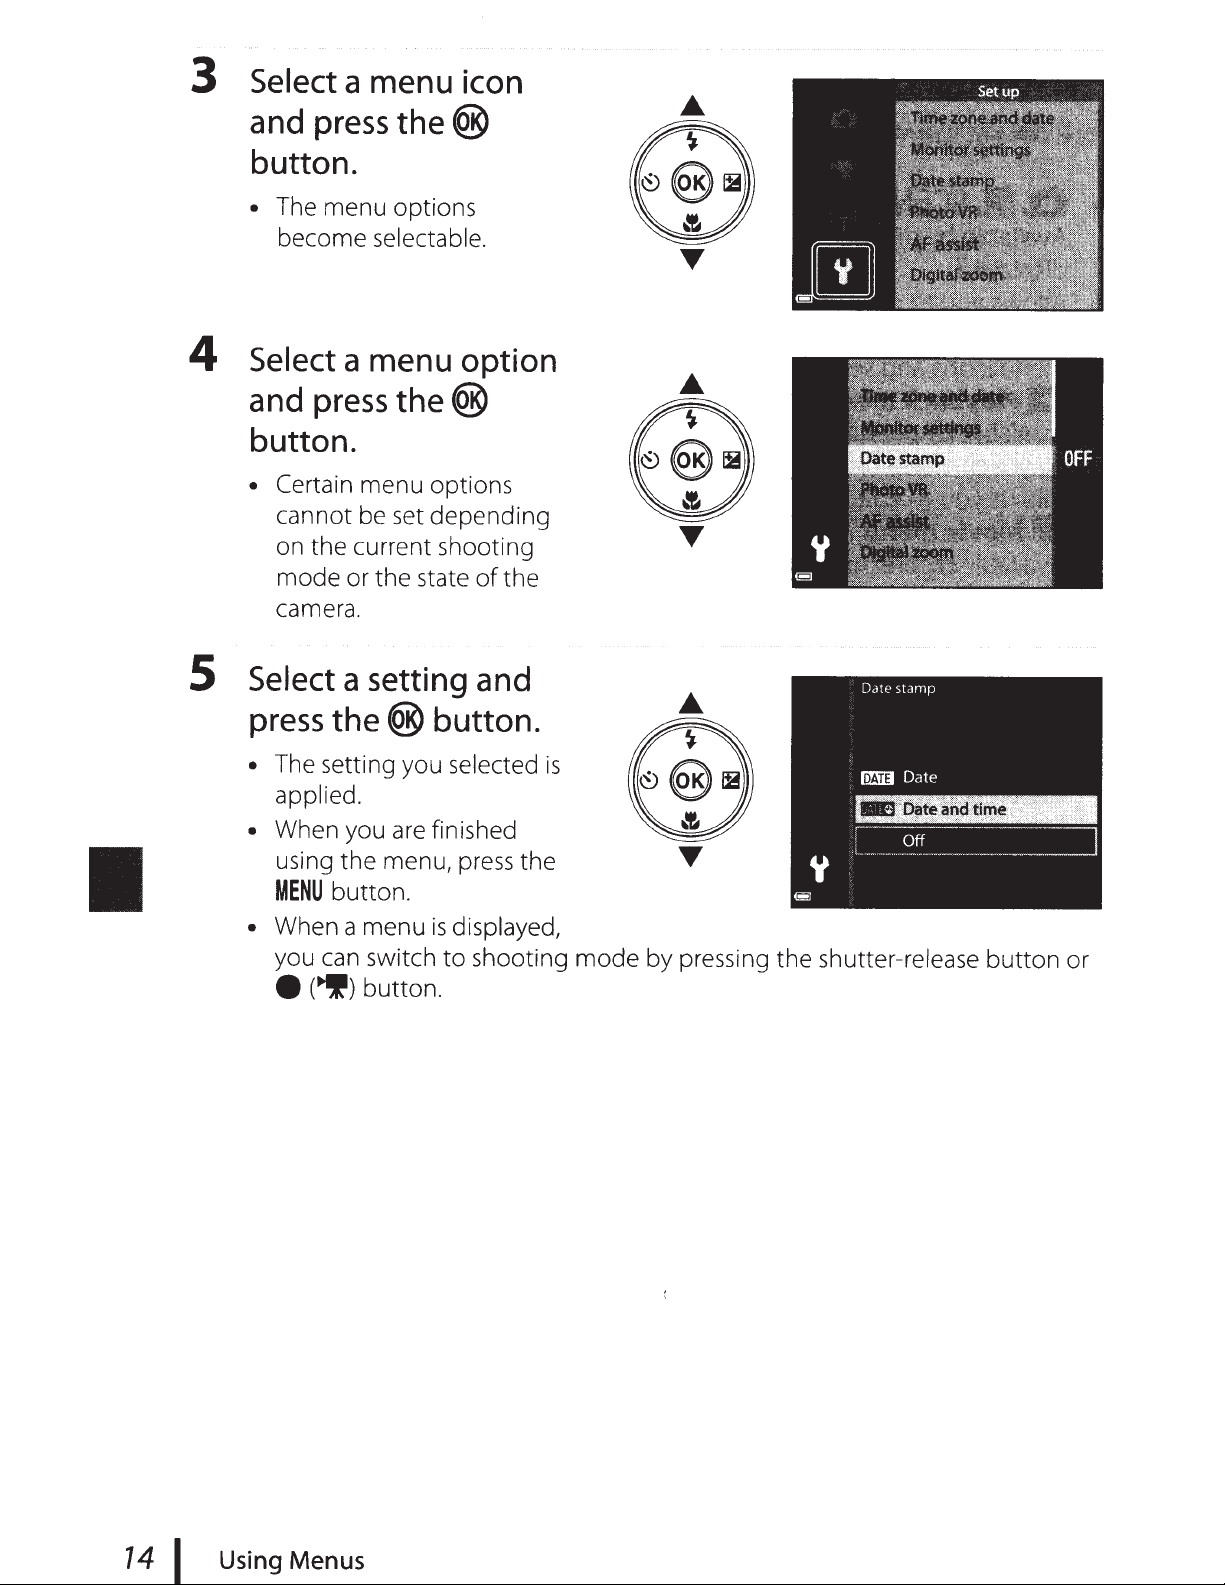
Page 29
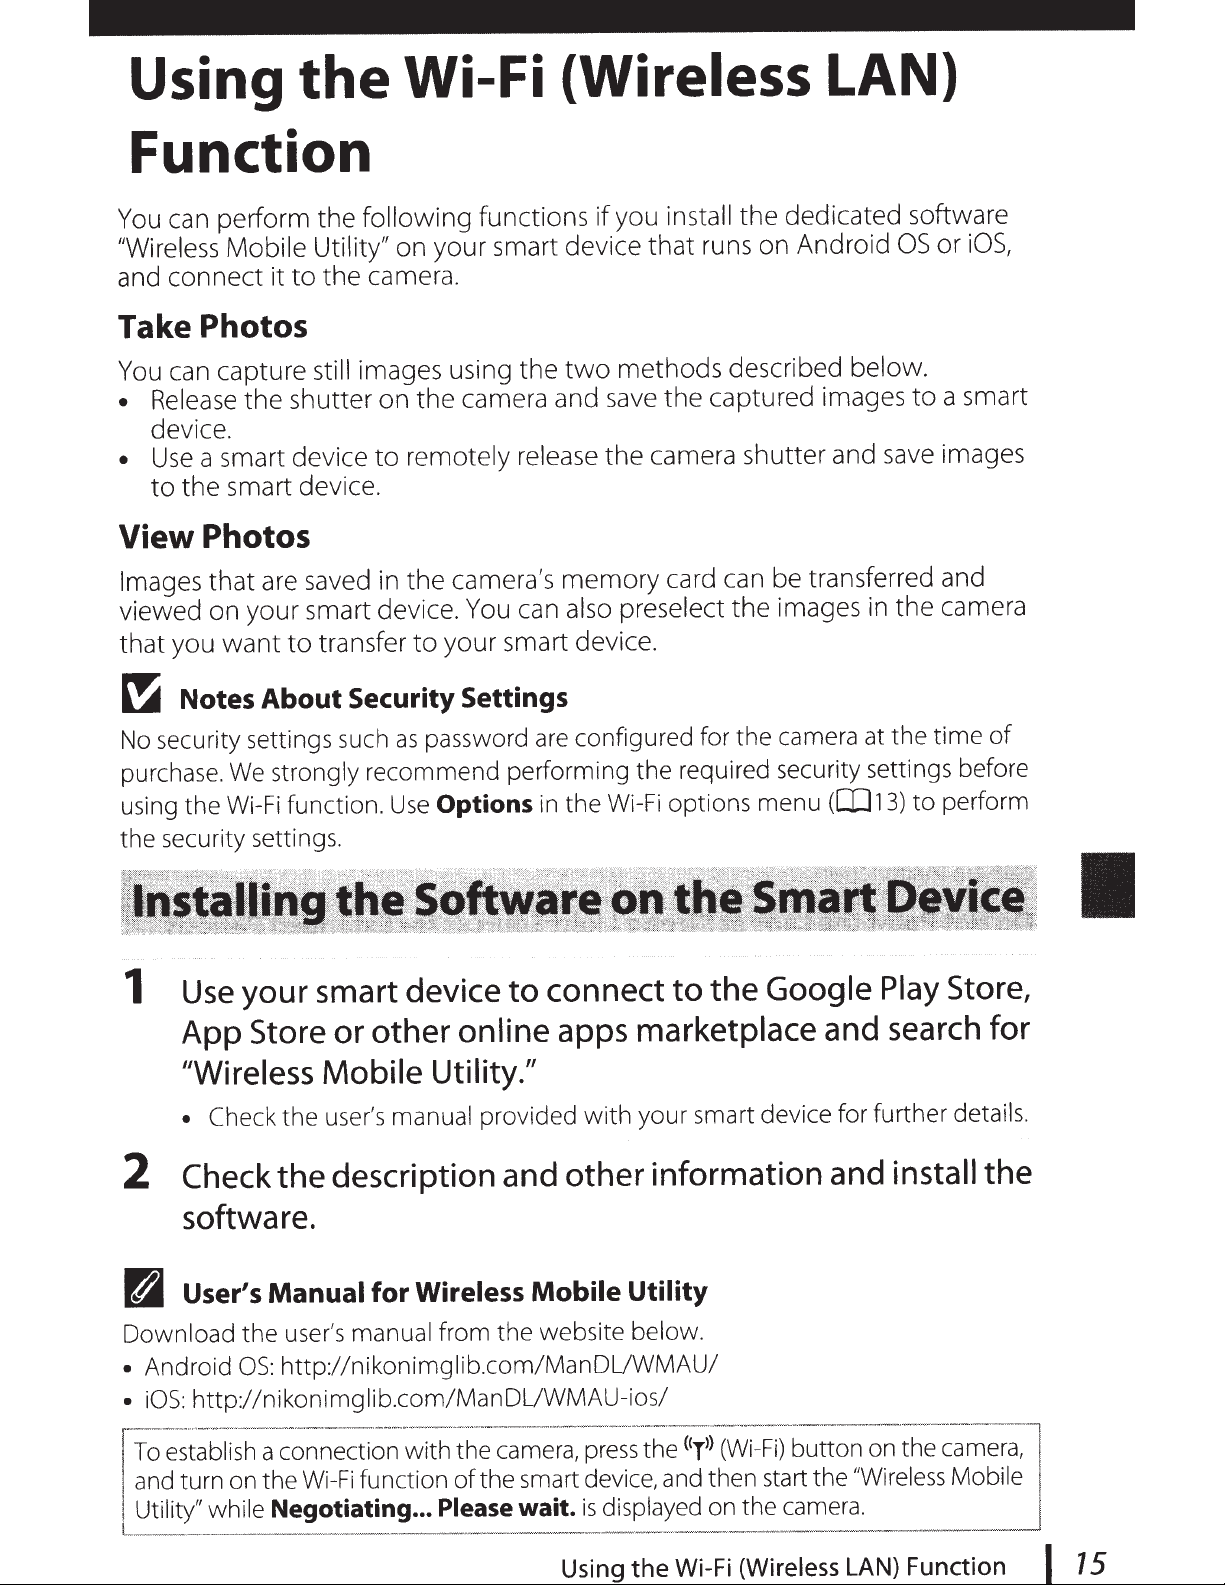
Page 30
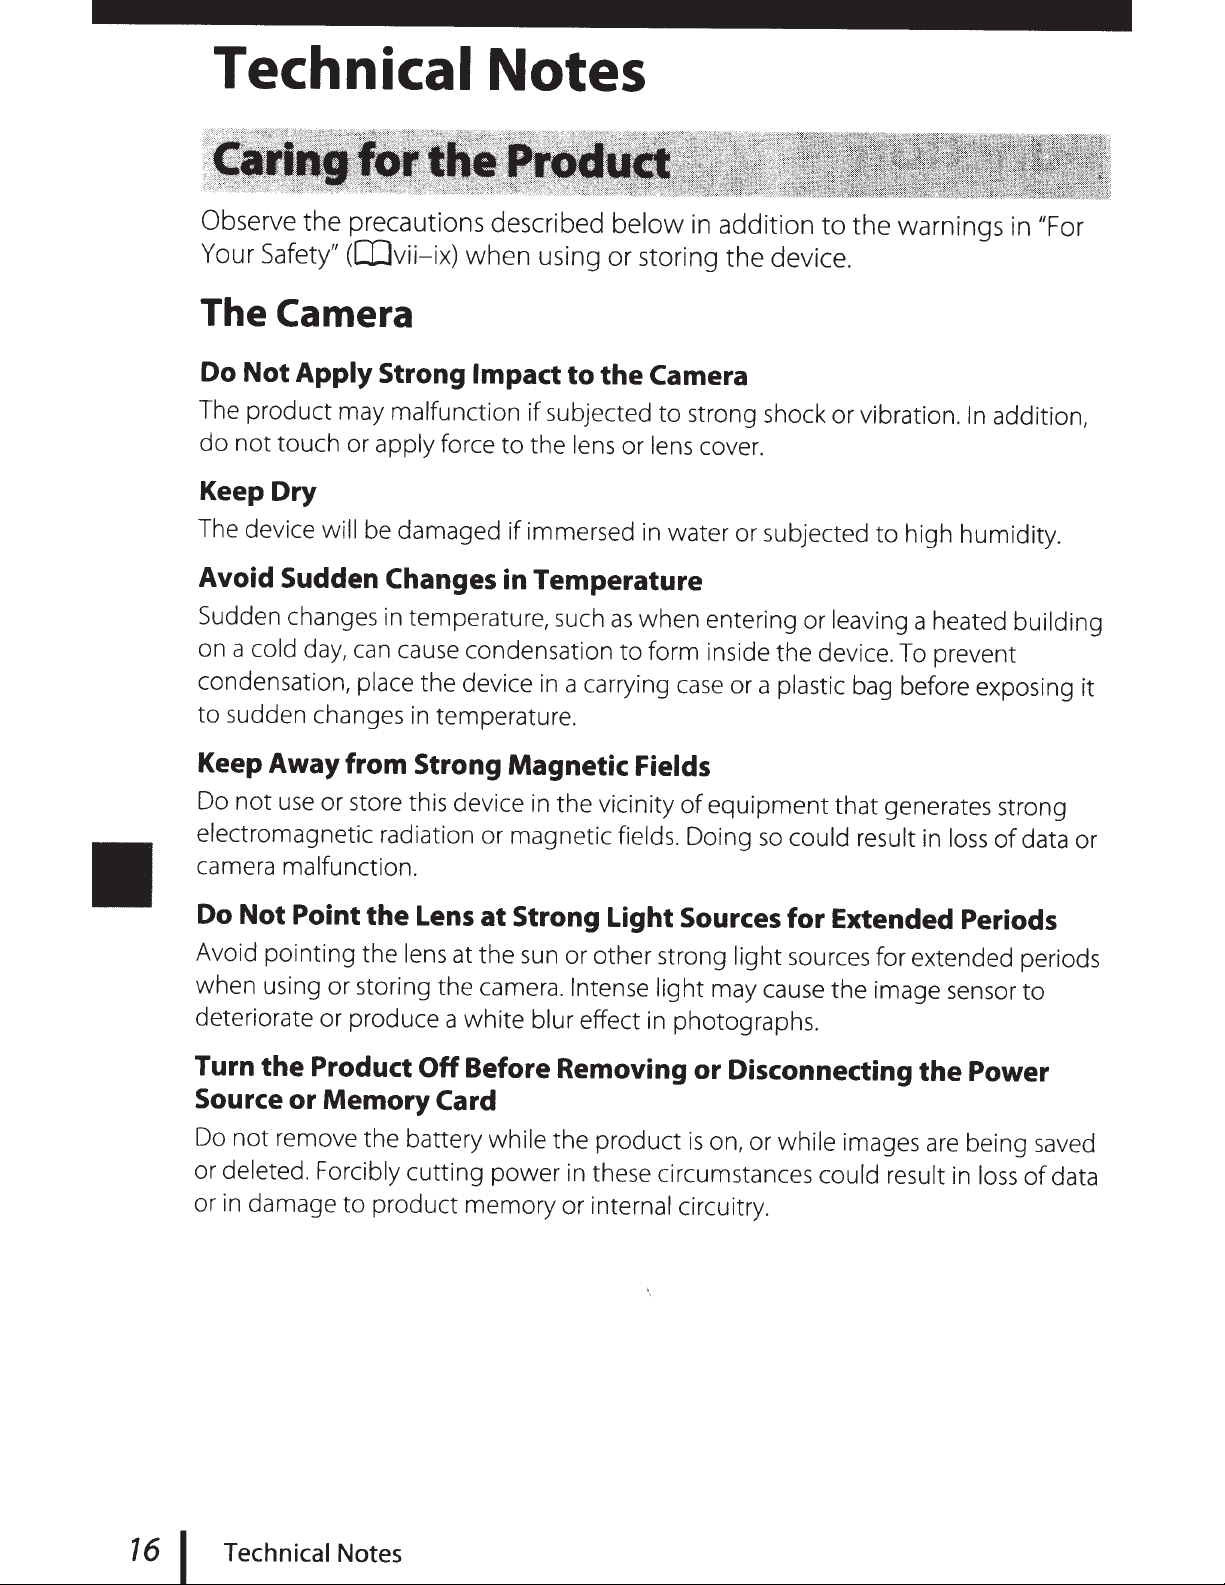
Page 31
Page 32
Page 33
Page 34
Page 35
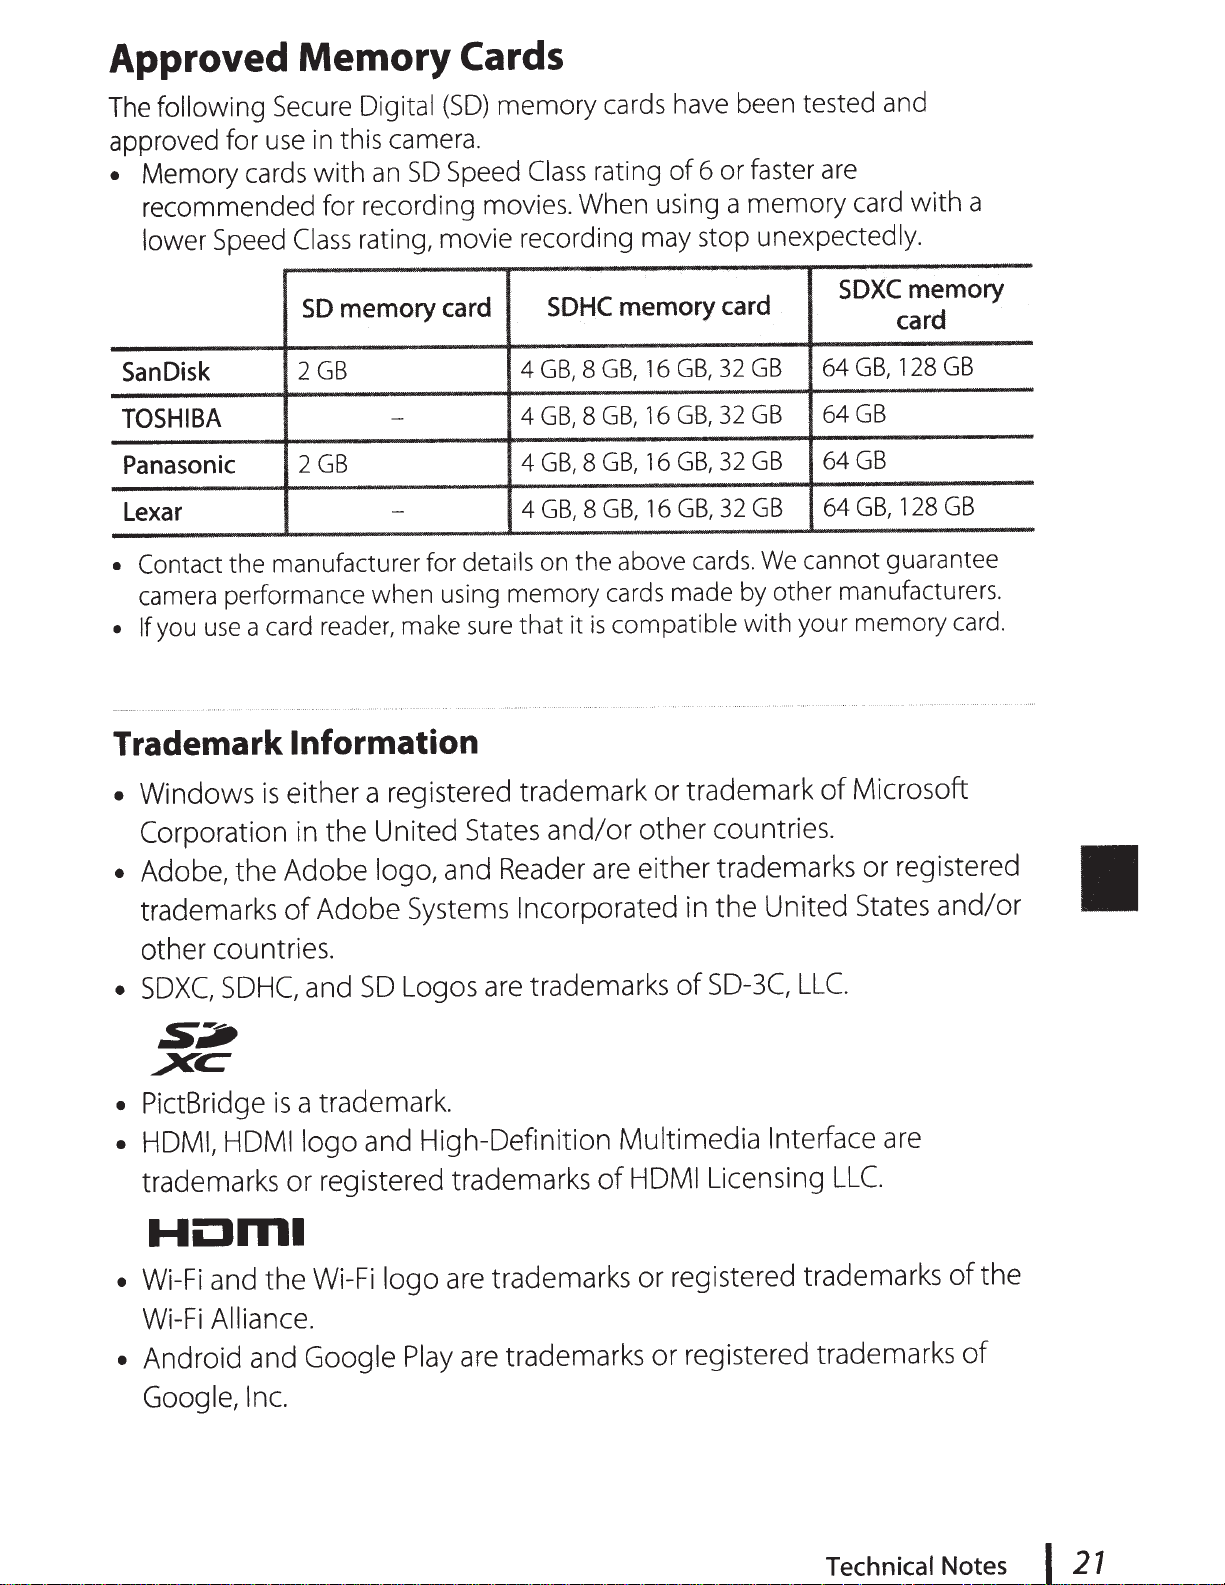
Page 36
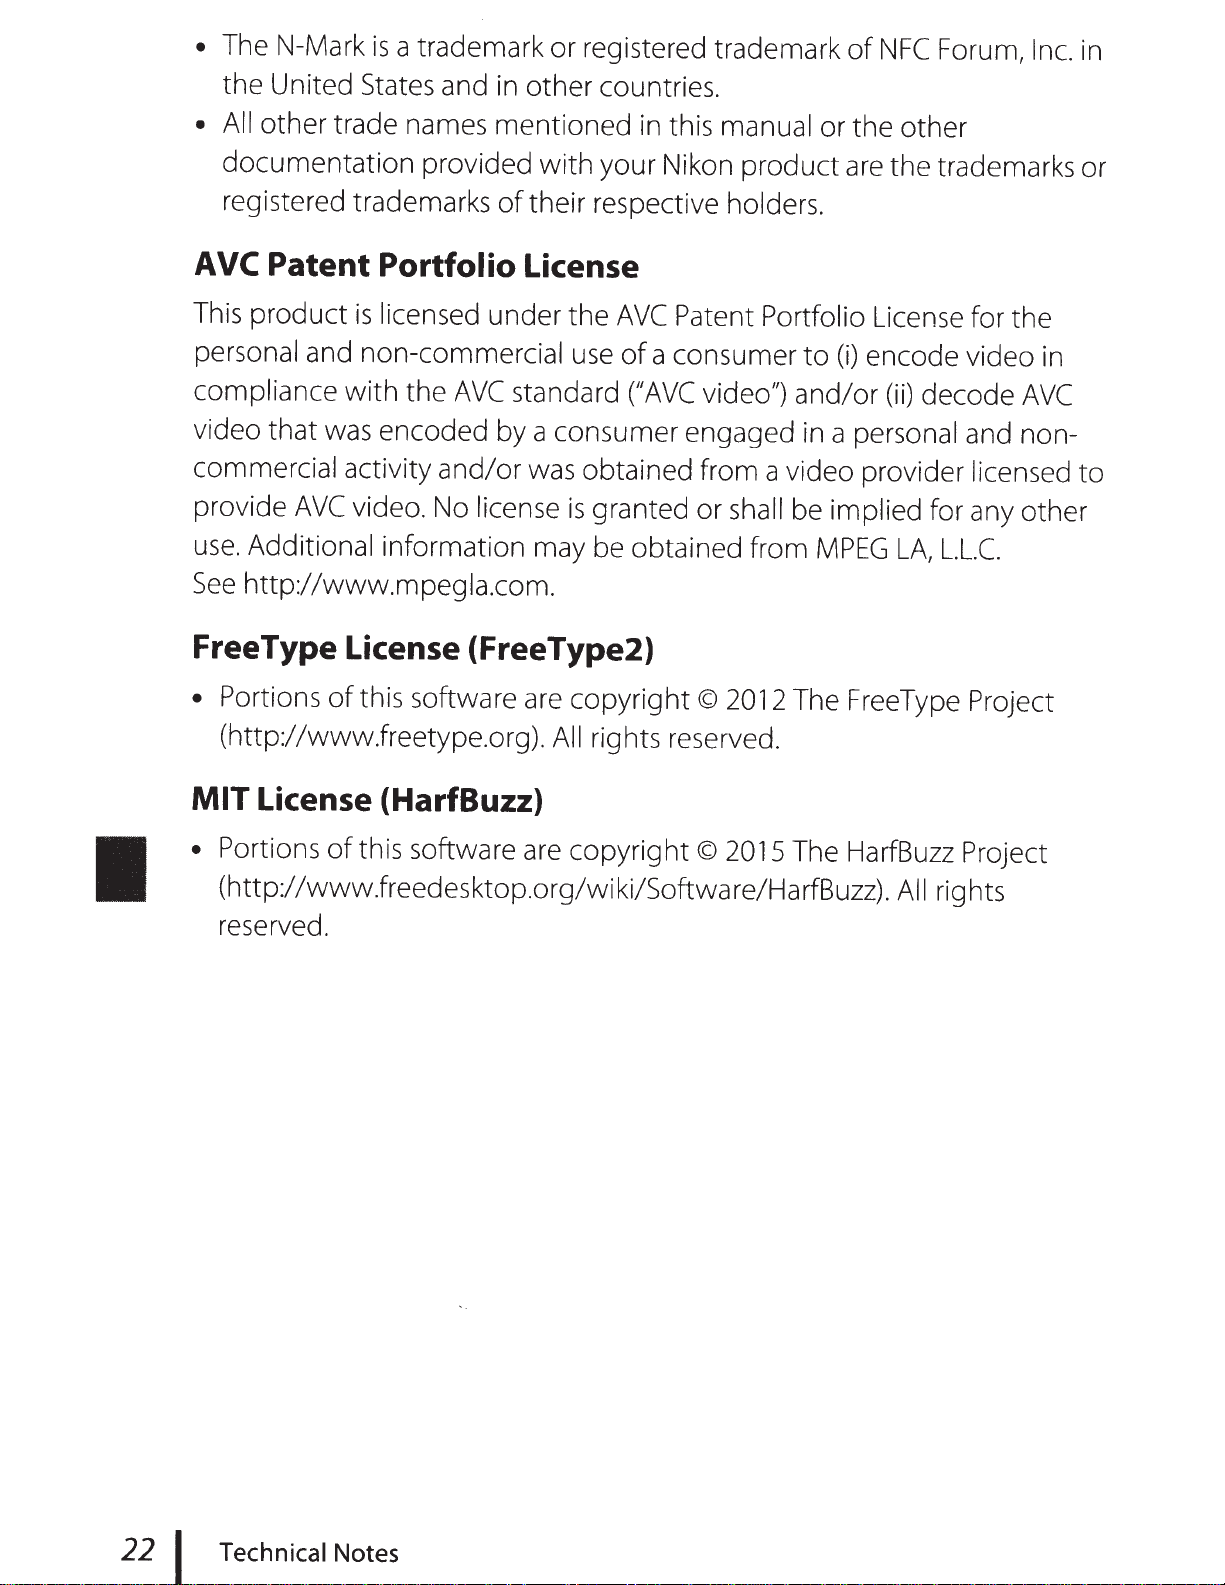
Page 37

Page 38

Page 39

Page 40
Reference Manual
En
DIGITAL CAMERA
Page 41
Introduction
i
Table of Contents
Parts of the Camera
Preparing for Shooting
Basic Shooting and Playback Operations
Shooting Features
Playback Features
Recording and Playing Back Movies
Using Menus
Using the Wi-Fi (Wireless LAN) Function
Connecting the Camera to a TV, Printer, or Computer
Technical Notes
xiv
1
7
12
21
58
69
76
117
121
130
Page 42
Introduction
Read This First
To get the most from this Nikon product, be sure to read “For Your Safety”
(Avi–viii) and “Wi-Fi (Wireless LAN Network)” (Axi), and all other instructions
thoroughly and keep them where they will be read by all who use the camera.
• If you want to start using the camera right away, see “Preparing for
Shooting” (A7) and “Basic Shooting and Playback Operations” (A12).
Other Information
• Symbols and Conventions
Symbol Description
This icon marks cautions and information that should be read
B
before using the camera.
This icon marks notes and information that should be read
C
before using the camera.
A This icon marks other pages containing relevant information.
• SD, SDHC, and SDXC memory cards are referred to as “memory cards” in this
manual.
• The setting at the time of purchase is referred to as the “default setting.”
• The names of menu items displayed in the camera monitor, and the names
of buttons or messages displayed on a computer monitor appear in bold.
• In this manual, images are sometimes omitted from monitor display samples
so that monitor indicators can be more clearly shown.
Introduction
i
Page 43
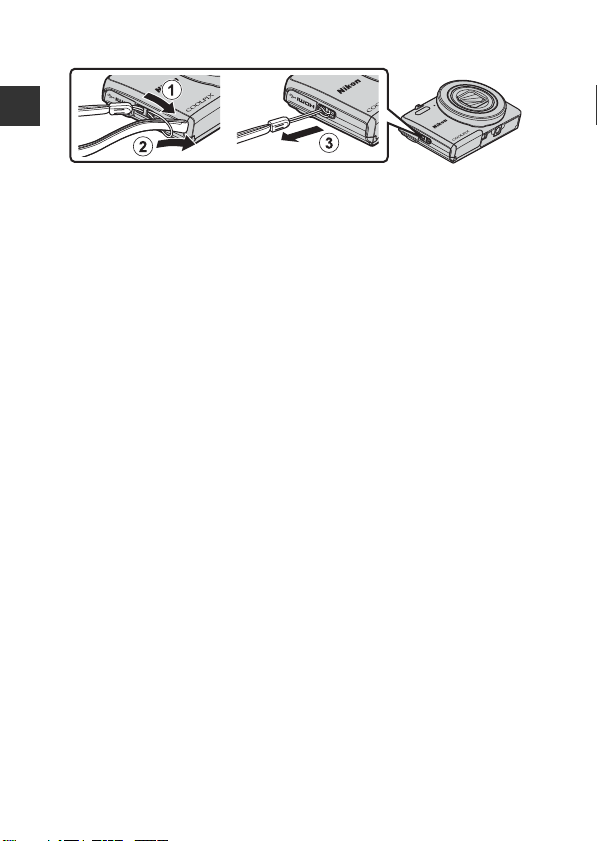
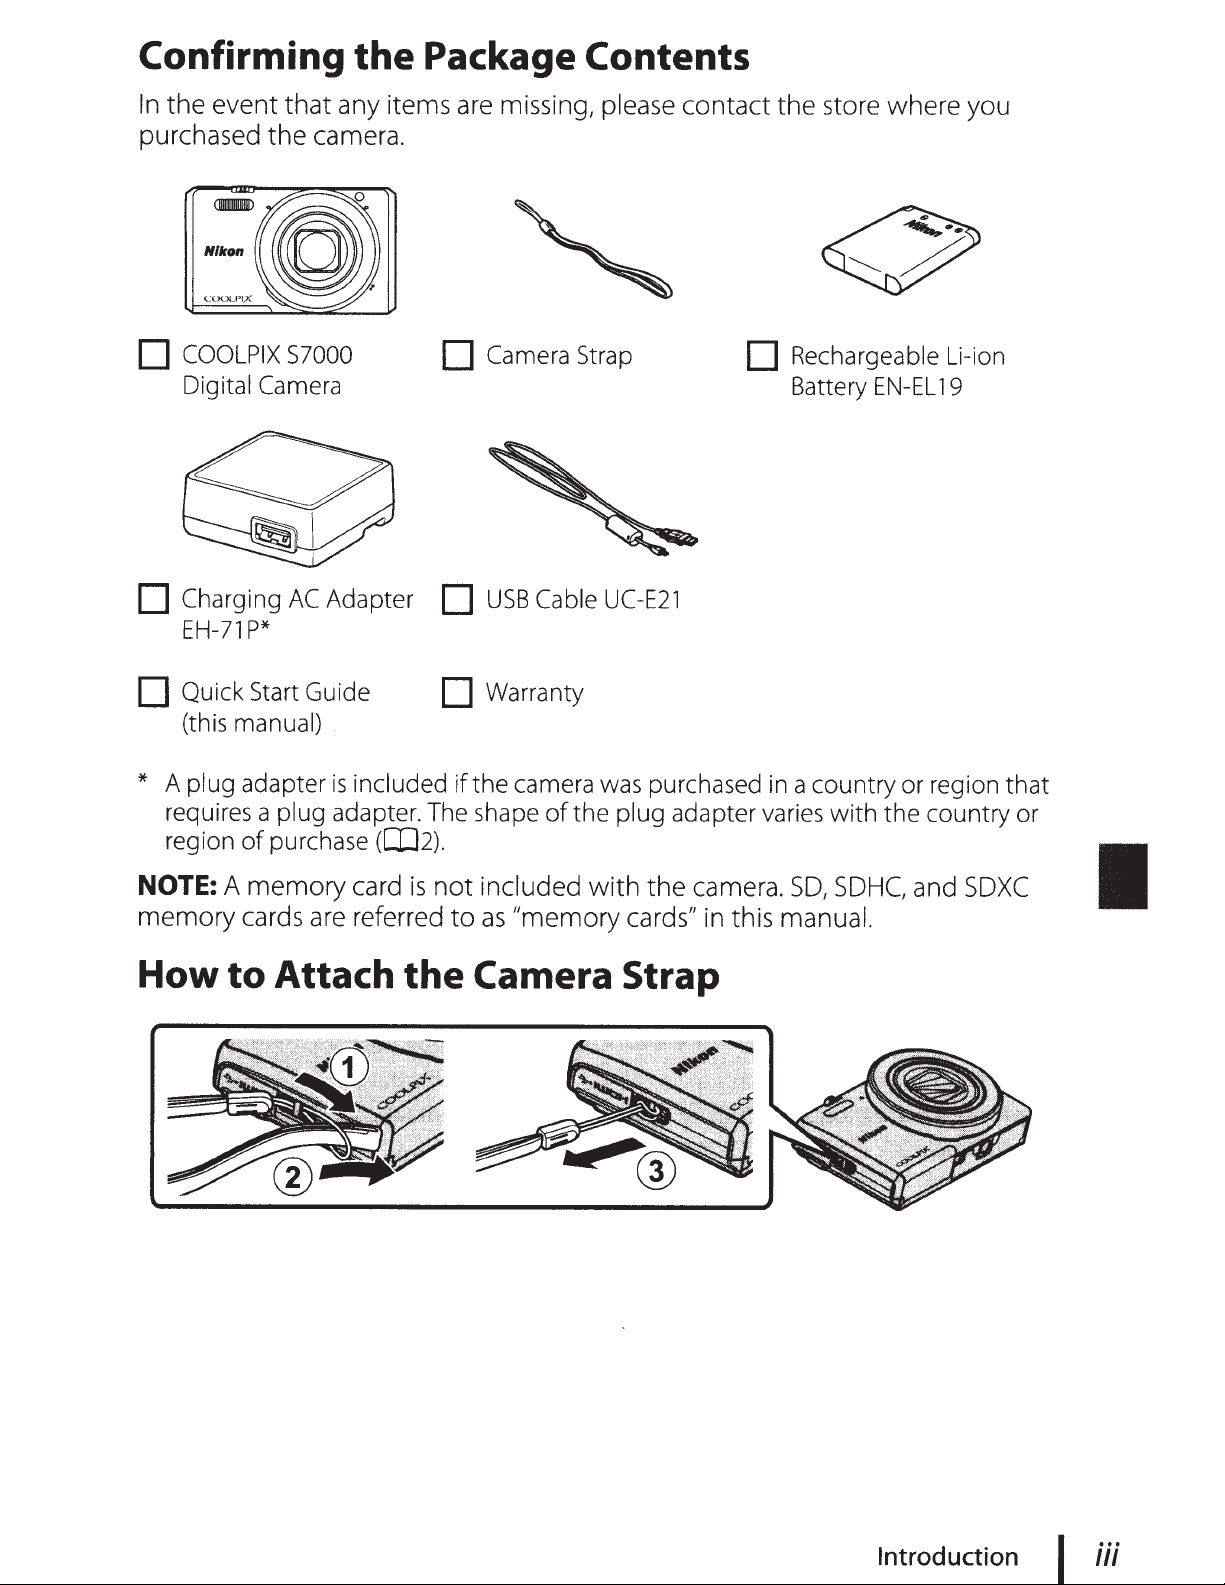
How to Attach the Camera Strap
Introduction
ii
Page 44

Information and Precautions
Life-Long Learning
As part of Nikon’s “Life-Long Learning” commitment to ongoing product support
and education, continually updated information is available online at the following
websites:
• For users in the U.S.A.: http://www.nikonusa.com/
• For users in Europe and Africa: http://www.europe-nikon.com/support/
• For users in Asia, Oceania, and the Middle East: http://www.nikon-asia.com/
Visit these websites to keep up-to-date with the latest product information, tips,
answers to frequently asked questions (FAQs), and general advice on digital imaging
and photography. Additional information may be available from the Nikon
representative in your area. Visit the website below for contact information.
http://imaging.nikon.com/
Use Only Nikon Brand Electronic Accessories
Nikon COOLPIX cameras are designed to the highest standards and include complex
electronic circuitry. Only Nikon brand electronic accessories (including battery
chargers, batteries, Charging AC Adapters, AC adapters and, USB cables) certified by
Nikon specifically for use with this Nikon digital camera are engineered and proven
to operate within the operational and safety requirements of this electronic circuitry.
THE USE OF NON-NIKON ELECTRONIC ACCESSORIES COULD DAMAG E THE CAMERA
AND MAY VOID YOUR
The use of third-party rechargeable Li-ion batteries not bearing the Nikon
holographic seal could interfere with normal operation of the camera or result in the
batteries overheating, igniting, rupturing, or leaking.
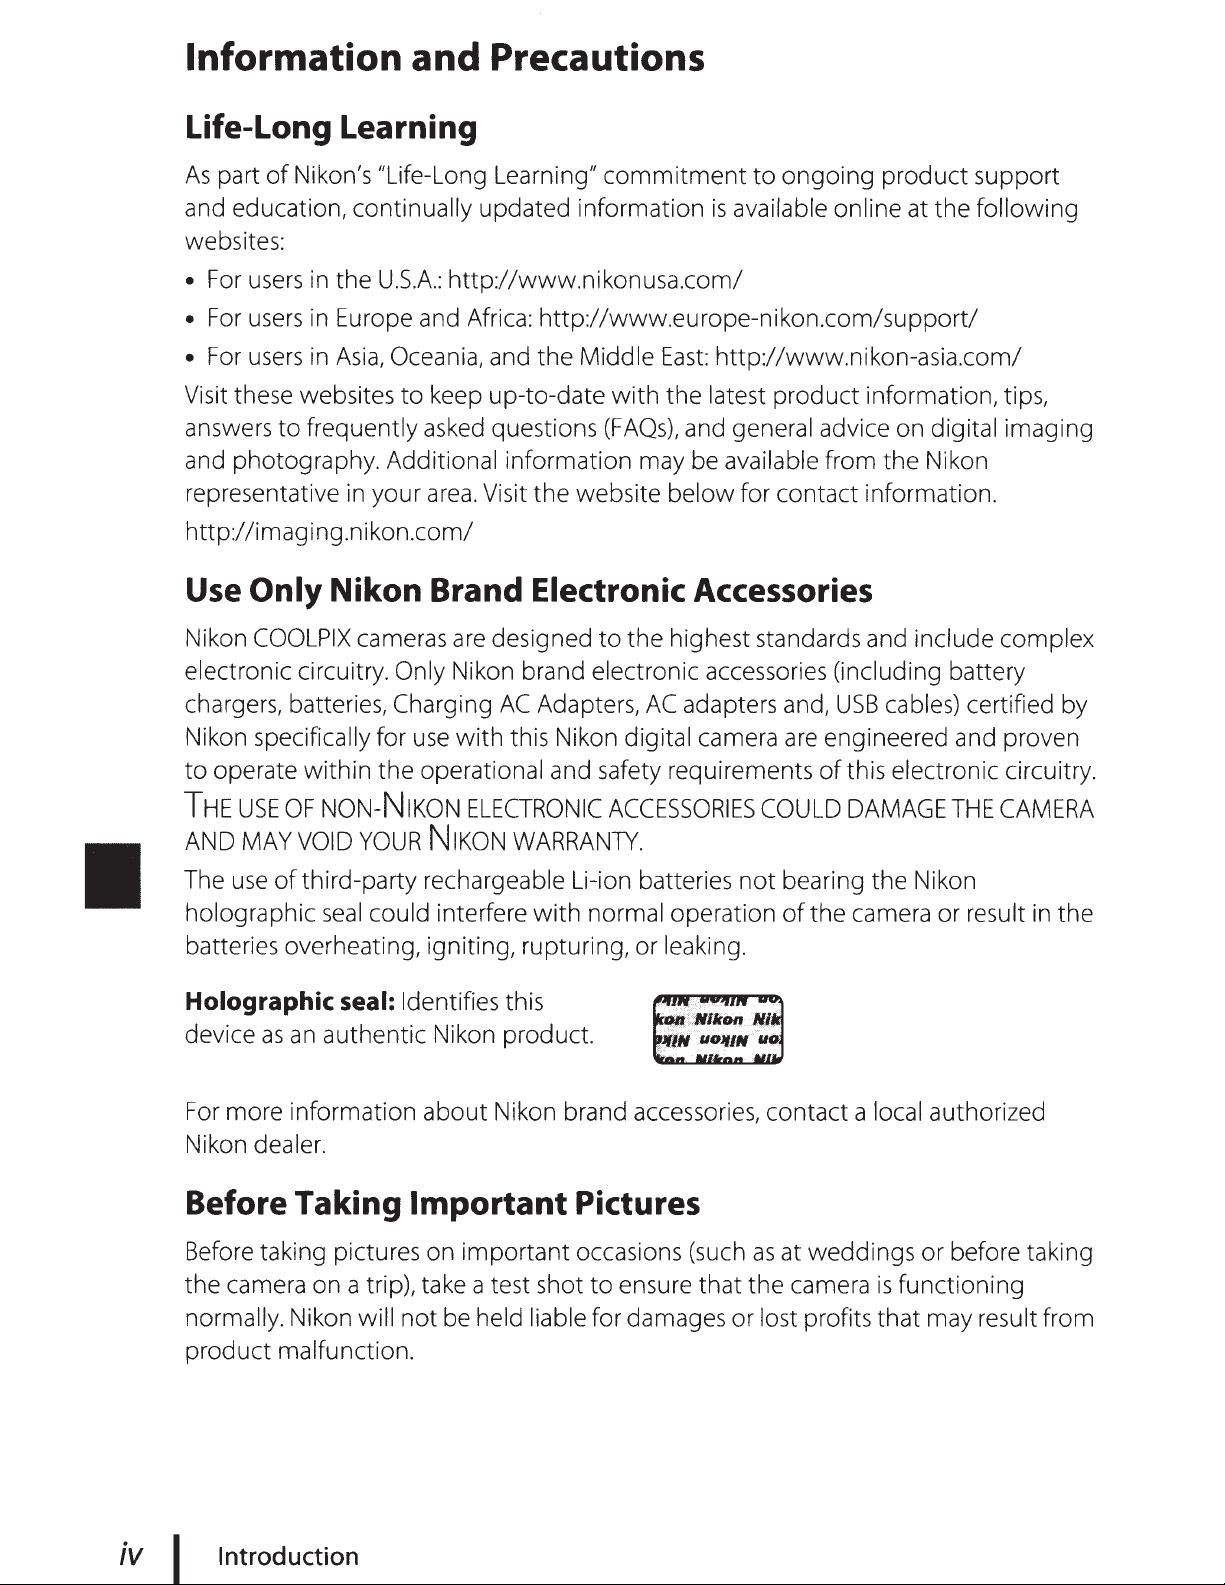
Holographic seal: Identifies this
device as an authentic Nikon product.
For more information about Nikon brand accessories, contact a local authorized
Nikon dealer.
Before Taking Important Pictures
Before taking pictures on important occasions (such as at weddings or before taking
the camera on a trip), take a test shot to ensure that the camera is functioning
normally. Nikon will not be held liable for damages or lost profits that may result from
product malfunction.
NIKON WARRANTY.
Introduction
iii
Page 45

About the Manuals
• No part of the manuals included with this product may be reproduced,
transmitted, transcribed, stored in a retrieval system, or translated into any
language in any form, by any means, without Nikon’s prior written permission.
• Illustrations and monitor content shown in this manual may differ from the actual
Introduction
product.
• Nikon reserves the right to change the specifications of the hardware and software
described in these manuals at any time and without prior notice.
• Nikon will not be held liable for any damages resulting from the use of this
product.
• While every effort was made to ensure that the information in these manuals is
accurate and complete, we would appreciate it were you to bring any errors or
omissions to the attention of the Nikon representative in your area (address
provided separately).
Notice Concerning Prohibition of Copying or Reproduction
Note that simply being in possession of material that was digitally copied or
reproduced by means of a scanner, digital camera or other device may be
punishable by law.
• Items prohibited by law from being copied or reproduced
Do not copy or reproduce paper money, coins, securities, gove rnment bonds or local
government bonds, even if such copies or reproductions are stamped “Sample.” The
copying or reproduction of paper money, coins, or securities which are circulated in a
foreign country is prohibited. Unless the prior permission of the government was
obtained, the copying or reproduction of unused postage stamps or post cards
issued by the government is prohibited.
The copying or reproduction of stamps issued by the government and of certified
documents stipulated by law is prohibited.
• Cautions on certain copies and reproductions
The government has issued cautions on copies or reproductions of securities issued
by private companies (shares, bills, checks, gift certificates, etc.), commuter passes, or
coupon tickets, except when a minimum of necessary copies are to be provided for
business use by a company. Also, do not copy or reproduce passports issued by the
government, licenses issued by public agencies and private groups, ID cards and
tickets, such as passes and meal coupons.
• Comply with copyright notices
The copying or reproduction of copyrighted creative works such as books, music,
paintings, woodcut prints, maps, drawings, movies, and photographs is governed by
national and international copyright laws. Do not use this product for the purpose of
making illegal copies or to infringe copyright laws.
iv
Page 46

Disposing of Data Storage Devices
Please note that deleting images or formatting data storage devices such as memory
cards or built-in camera memory does not completely erase the original image data.
Deleted files can sometimes be recovered from discarded storage devices using
commercially available software, potentially resulting in the malicious use of personal
image data. Ensuring the privacy of such data is the user’s responsibility.
Before discarding a data storage device or transferring ownership to another person,
erase all data using commercial deletion software, or format the device and then
completely refill it with images containing no private information (for example,
images of empty sky). Care should be taken to avoid injury or damage to property
when physically destroying data storage devices.
To delete the Wi-Fi settings, select Restore default settings in the Wi-Fi options
menu (A76).
Conformity Marking
Follow the procedure below to display some of the conformity markings that the
camera complies with.
Press the d button M z menu icon M Conformity marking M k button
Introduction
v
Page 47
For Your Safety
To prevent damage to your Nikon product or injury to yourself or to others,
read the following safety precautions in their entirety before using this
equipment. Keep these safety instructions where all those who use the product
Introduction
will read them.
The consequences that could result from failure to observe the precautions
listed in this section are indicated by the following symbol:
This icon marks warnings, information that should be read before using
this Nikon product, to prevent possible injury.
WARNINGS
Turn off in the event of malfunction
Should you notice smoke or an unusual smell coming from the camera or
Charging AC Adapter, unplug the Charging AC Adapter and remove the
battery immediately, taking care to avoid burns. Continued operation could
result in injury. After removing or disconnecting the power source, take the
equipment to a Nikon-authorized service representative for inspection.
Do not disassemble
Touching the internal parts of the camera or Charging AC Adapter could result
in injury. Repairs should be performed only by qualified technicians. Should the
camera or Charging AC Adapter break open as the result of a fall or other
accident, take the product to a Nikon-authorized service representative for
inspection, after unplugging the product and/or removing the battery.
Do not use the camera or Charging AC Adapter in the presence of
flammable gas
Do not use electronic equipment in the presence of flammable gas, as this
could result in explosion or fire.
Handle the camera strap with care
Never place the strap around the neck of an infant or child.
Keep out of reach of children
Particular care should be taken to prevent infants from putting the battery or
other small parts into their mouths.
vi
Page 48

Do not remain in contact with the camera, Charging AC Adapter,
or AC adapter for extended periods while the devices are on or in
use
Parts of the devices become hot. Leaving the devices in direct contact with the
skin for extended periods may result in low-temperature burns.
Do not leave the product where it will be exposed to extremely
high temperatures, such as in an enclosed automobile or in direct
sunlight
Failure to observe this precaution could cause damage or fire.
Observe caution when handling the battery
The battery may leak, overheat, or explode if improperly handled. Observe the
following precautions when handling the battery for use in this product:
• Before replacing the battery, turn the product off. If you are using the
Charging AC Adapter/AC adapter, be sure it is unplugged.
• Use only a Rechargeable Li-ion Battery EN-EL19 (included). Charge the
battery by using a camera that supports battery charging. To perform this
operation, use the Charging AC Adapter EH-71P (included) and USB Cable
UC-E21 (included). The Battery Charger MH-66 (available separately) is also
available to charge the battery without using a camera.
• When inserting the battery, do not attempt to insert it upside down or
backwards.
• Do not short or disassemble the battery or attempt to remove or break the
battery insulation or casing.
• Do not expose the battery to flame or to excessive heat.
• Do not immerse in or expose to water.
• Put the battery in a plastic bag, etc. in order to insulate it before transporting.
Do not transport or store with metal objects such as necklaces or hairpins.
• The battery is prone to leakage when fully discharged. To avoid damage to
the product, be sure to remove the battery when no charge remains.
• Discontinue use immediately should you notice any change in the battery,
such as discoloration or deformation.
• If liquid from the damaged battery comes in contact with clothing or skin,
rinse immediately with plenty of water.
Observe the following precautions when handling the Charging
AC Adapter
• Keep dry. Failure to observe this precaution could result in fire or electric
shock.
• Dust on or near the metal parts of the plug should be removed with a dry
cloth. Continued use could result in fire.
• Do not handle the plug or go near the Charging AC Adapter during
lightning storms. Failure to observe this precaution could result in electric
shock.
Introduction
vii
Page 49
• Do not damage, modify, forcibly tug or bend the USB cable, place it under
heavy objects, or expose it to heat or flames. Should the insulation be
damaged and the wires become exposed, take it to a Nikon-authorized
service representative for inspection. Failure to observe these precautions
could result in fire or electric shock.
• Do not handle the plug or Charging AC Adapter with wet hands. Failure to
Introduction
observe this precaution could result in electric shock.
• Do not use with travel converters or adapters designed to convert from one
voltage to another or with DC-to-AC inverters. Failure to observe this
precaution could damage the product or cause overheating or fire.
Use the appropriate power supply (battery, Charging AC adapter,
AC adapter, USB cable)
Using a power supply other than those provided or sold by Nikon could result
in damage or malfunction.
Use appropriate cables
When connecting cables to the input and output jacks, use only the cables
provided or sold by Nikon for the purpose, to maintain compliance with
product regulations.
Do not touch the moving parts of the lens
Failure to observe this precaution could result in injury.
Handle moving parts with care
Be careful that your fingers or other objects are not pinched by the lens cover
or other moving parts.
visual impairment
The flash should be no less than 1 meter (3 ft 4 in.) from the subject.
Particular care should be observed when photographing infants.
Do not operate the flash with the flash window touching a person
or object
Failure to observe this precaution could result in burns or fire.
Avoid contact with liquid crystal
Should the monitor break, care should be taken to avoid injury caused by
broken glass and to prevent liquid crystal from the monitor touching the skin
or entering the eyes or mouth.
Follow the instructions of airline and hospital personnel
viii
Page 50
Notices
Notices for Customers in the U.S.A.
IMPORTANT SAFETY INSTRUCTIONS SAVE THESE INSTRUCTIONS.
DANGER - TO REDUCE THE RISK OF FIRE OR ELECTRIC SHOCK,
CAREFULLY FOLLOW THESE INSTRUCTIONS
For connection to a supply not in the U.S.A., use an attachment plug adapter of
the proper configuration for the power outlet if needed.
The power supply unit is intended to be correctly orientated in a vertical or
floor mount position.
Federal Communications Commission (FCC) Radio Frequency
Interference Statement
This equipment has been tested
and found to comply with the
limits for a Class B digital device,
pursuant to Part 15 of the FCC
rules. These limits are designed
to provide reasonable
protection against harmful
interference in a residential installation. This equipment generates, uses, and
can radiate radio frequency energy and, if not installed and used in accordance
with the instructions, may cause harmful interference to radio
communications. However, there is no guarantee that interference will not
occur in a particular installation. If this equipment does cause harmful
interference to radio or television reception, which can be determined by
turning the equipment off and on, the user is encouraged to try to correct the
interference by one or more of the following measures:
• Reorient or relocate the receiving antenna.
• Increase the separation between the equipment and receiver.
• Connect the equipment into an outlet on a circuit different from that to
which the receiver is connected.
• Consult the dealer or an experienced radio/television technician for help.
CAUTIONS
Modifications
The FCC requires the user to be notified that any changes or modifications
made to this device that are not expressly approved by Nikon Corporation may
void the user’s authority to operate the equipment.
Interface Cables
Use the interface cables sold or provided by Nikon for your equipment. Using
other interface cables may exceed the limits of Class B Part 15 of the FCC rules.
Introduction
ix
Page 51
Notice for Customers in the State of California
WARNING
Handling the cord on this product will expose you to lead, a chemical known to
the State of California to cause birth defects or other reproductive harm.
Wash hands after handling.
Introduction
Nikon Inc.,
1300 Walt Whitman Road, Melville, New York 11747-3064, U.S.A.
Tel: 631-547-4200
Notice for Customers in Canada
CAN ICES-3 B / NMB-3 B
Notices for Customers in Europe
CAUTIONS
RISK OF EXPLOSION IF BATTERY IS REPLACED BY AN INCORRECT TYPE.
DISPOSE OF USED BATTERIES ACCORDING TO THE INSTRUCTIONS.
This symbol indicates that electrical and electronic equipment is to
be collected separately.
The following apply only to users in European countries:
• This product is designated for separate collection at an
appropriate collection point. Do not dispose of as household
waste.
• Separate collection and recycling helps conserve natural resources and
prevent negative consequences for human health and the environment
that might result from incorrect disposal.
• For more information, contact the retailer or the local authorities in charge
of waste management.
This symbol on the battery indicates that the battery is to be
collected separately.
The following apply only to users in European countries:
• All batteries, whether marked with this symbol or not, are
designated for separate collection at an appropriate collection
point. Do not dispose of as household waste.
• For more information, contact the retailer or the local authorities in charge
of waste management.
x
Page 52

Wi-Fi (Wireless LAN Network)
This product is controlled by the United States Export Administration
Regulations, and you are required to obtain permission from the United States
government if you export or re-export this product to any country to which the
United States embargoes goods. The following countries were subject to
embargo: Cuba, Iran, North Korea, Sudan, and Syria. Since the target countries
are subject to change, please contact the United States Department of
Commerce for the latest information.
Restrictions on Wireless Devices
The wireless transceiver included in this product conforms to wireless
regulations in the country of sale and is not for use in other countries (products
purchased in the EU or EFTA can be used anywhere within the EU and EFTA).
Nikon does not accept liability for use in other countries. Users who are unsure
as to the original country of sale should consult with their local Nikon service
center or Nikon-authorized service representative. This restriction applies to
wireless operation only and not to any other use of the product.
Notice for Customers in the U.S.A. and Canada
Federal Communications Commission (FCC) and Industry of Canada
(IC)
Declaration of Conformity
This device complies with Part 15 of FCC Rules and Industry Canada licenceexempt RSS standard(s). Operation is subject to the following two conditions:
(1) this device may not cause interference, and (2) this device must accept any
interference, including interference that may cause undesired operation of this
device.
FCC/IC RF Exposure Statement
This transmitter must not be co-located or operated in conjunction with any
other antenna or transmitter.
The available scientific evidence does not show that any health problems are
associated with using low power wireless devices. There is no proof, however,
that these low power wireless devices are absolutely safe. Low power wireless
devices emit low levels of radio frequency energy (RF) in the microwave range
while being used. Whereas high levels of RF can produce health effects (by
heating tissue), exposure of low-level RF that does not produce heating effects
causes no known adverse health effects. Many studies of low-level RF
exposures have not found any biological effects. Some studies have suggested
that some biological effects might occur, but such findings have not been
confirmed by additional research.
Introduction
xi
Page 53

COOLPIX S7000, which is equipped with a WSDB-686GN (FCC
ID:2AAD3AA1G0J0 / IC ID: 4634A-2150EC) Wireless LAN Module, has been
tested and found to comply with FCC/IC radiation exposure limits set forth for
an uncontrolled environment and meets the FCC radio frequency (RF)
Exposure Guidelines in Supplement C to OET65 and RSS-102 of the IC radio
frequency (RF) Exposure rules. Please refer to the SAR test report that was
Introduction
uploaded to FCC website.
Declaration of Conformity (Europe)
Hereby, Nikon Corporation, declares that COOLPIX S7000 is in compliance with
the essential requirements and other relevant provisions of Directive 1999/5/
EC. The declaration of conformity may be consulted at
http://imaging.nikon.com/support/pdf/DoC_S7000.pdf.
Notice for Customers in Jamaica
This product contains a Type Approved Module by Jamaica: “SMA – WSDB-
xii
Page 54

Precautions when Using Radio Transmissions
Always keep in mind that radio transmission or reception of data is subject to
interception by third parties. Note that Nikon is not responsible for data or
information leaks that may occur during data transfer.
Personal Information Management and Disclaimer
• User information registered and configured on the product, including
wireless LAN connection settings and other personal information, is
susceptible to alteration and loss resulting from operational error, static
electricity, accident, malfunction, repair or other handling. Always keep
separate copies of important information. Nikon is not responsible for any
direct or indirect damages or lost profits resulting from alteration or loss of
content that is not attributable to Nikon.
• Before discarding this product or transferring it to another owner, perform
Reset all in the setup menu (A76) to delete all user information registered
and configured with the product, including wireless LAN connection
settings and other personal information.
Introduction
xiii
Page 55

Table of Contents
Introduction ................................................................................................................. i
Read This First .............................................................................................................................. i
Other Information......................................................................................................................................... i
How to Attach the Camera Strap....................................................................................................... ii
Table of Contents
Information and Precautions ............................................................................................................... iii
For Your Safety ......................................................................................................................... vi
WARNINGS ...................................................................................................................................................... vi
Notices......................................................................................................................................... ix
Wi-Fi (Wireless LAN Network).............................................................................................. xi
Parts of the Camera .................................................................................................. 1
The Camera Body...................................................................................................................... 1
The Monitor ................................................................................................................................ 3
Shooting Mode ............................................................................................................................................. 3
Playback Mode .............................................................................................................................................. 5
Preparing for Shooting............................................................................................ 7
Insert the Battery and Memory Card ................................................................................. 7
Removing the Battery or Memory Card ......................................................................................... 7
Memory Cards and Internal Memory............................................................................................... 7
Charge the Battery ................................................................................................................... 8
Turn the Camera On and Set the Display Language, Date, and Time ................. 10
Basic Shooting and Playback Operations....................................................... 12
Shooting with A (Auto) Mode......................................................................................... 12
Using the Zoom......................................................................................................................................... 15
The Shutter-release Button ................................................................................................................. 15
Play Back Images..................................................................................................................... 16
Delete Images .......................................................................................................................... 17
Changing the Shooting Mode ........................................................................................... 19
Using the Flash, Self-timer, Etc........................................................................................... 20
Recording Movies ................................................................................................................... 20
xiv
Page 56

Shooting Features................................................................................................... 21
A (Auto) Mode ...................................................................................................................... 21
Scene Mode (Shooting Suited to Scenes)...................................................................... 22
Tips and Notes ............................................................................................................................................ 23
Shooting Time-lapse Movies ............................................................................................................. 28
Shooting with Easy Panorama .......................................................................................................... 30
Playback with Easy Panorama ........................................................................................................... 32
Special Effects Mode (Applying Effects When Shooting)......................................... 33
Smart Portrait Mode (Enhancing Human Faces When Shooting)......................... 35
Using Smile Timer..................................................................................................................................... 36
Using Self-Collage..................................................................................................................................... 37
Short Movie Show Mode (Combining Movie Clips to Create Short Movies) .... 38
Flash Mode ................................................................................................................................ 41
Self-timer ................................................................................................................................... 43
Macro Mode (Taking Close-up Pictures)......................................................................... 45
Creative Slider (Adjusting Brightness (Exposure Compensation),
Vividness, and Hue)................................................................................................................ 46
Exposure Compensation (Adjusting Brightness) ........................................................ 49
Default Settings (Flash, Self-timer, Etc.).......................................................................... 50
Focusing..................................................................................................................................... 52
Using Target Finding AF ....................................................................................................................... 52
Using Face Detection ............................................................................................................................. 53
Using Skin Softening............................................................................................................................... 54
Subjects Not Suitable for Autofocus ............................................................................................. 54
Focus Lock..................................................................................................................................................... 55
Functions That Cannot Be Used Simultaneously When Shooting........................ 56
Table of Contents
xv
Page 57

Playback Features.................................................................................................... 58
Playback Zoom ........................................................................................................................ 58
Thumbnail Playback/Calendar Display........................................................................... 59
List by Date Mode................................................................................................................... 60
Viewing and Deleting Images Captured Continuously (Sequence) ..................... 61
Viewing Images in a Sequence ........................................................................................................ 61
Deleting Images in a Sequence ....................................................................................................... 62
Editing Images (Still Images) .............................................................................................. 63
Table of Contents
Before Editing Images ............................................................................................................................ 63
Quick Effects: Changing Hue or Mood ....................................................................................... 63
Quick Retouch: Enhancing Contrast and Saturation .......................................................... 64
D-Lighting: Enhancing Brightness and Contrast .................................................................. 64
Red-eye Correction: Correcting Red-eye When Shooting with the Flash ............. 65
Glamour Retouch: Enhancing Human Faces........................................................................... 66
Small Picture: Reducing the Size of an Image ........................................................................ 67
Crop: Creating a Cropped Copy ...................................................................................................... 68
Recording and Playing Back Movies................................................................. 69
Capturing Still Images While Recording Movies ......................................................... 72
Operations During Movie Playback ................................................................................. 73
Editing Movies ......................................................................................................................... 74
Extracting Only the Desired Portion of a Movie..................................................................... 74
Saving a Frame from a Movie as a Still Image ......................................................................... 75
Using Menus.............................................................................................................. 76
The Shooting Menu (The Common Shooting Options)............................................ 78
Image Mode (Image Size and Quality)......................................................................................... 78
The Shooting Menu (for A (Auto) Mode).................................................................... 80
White Balance (Adjusting Hue) ........................................................................................................ 80
Continuous Shooting ............................................................................................................................. 82
ISO Sensitivity .............................................................................................................................................. 84
AF Area Mode.............................................................................................................................................. 85
Autofocus Mode........................................................................................................................................ 88
The Smart Portrait Menu ...................................................................................................... 89
Self-Collage .................................................................................................................................................. 89
Blink Proof...................................................................................................................................................... 90
xvi
Page 58

The Playback Menu ................................................................................................................ 91
Mark for Wi-Fi Upload ........................................................................................................................... 91
Slide Show..................................................................................................................................................... 92
Protect.............................................................................................................................................................. 93
Rotate Image .............................................................................................................................................. 93
Copy (Copy Between the Memory Card and Internal Memory).................................. 94
Sequence Display Options ................................................................................................................. 95
The Image Selection Screen............................................................................................................... 96
The Movie Menu ..................................................................................................................... 97
Movie Options............................................................................................................................................. 97
Autofocus Mode .................................................................................................................................... 101
Movie VR...................................................................................................................................................... 102
Wind Noise Reduction ........................................................................................................................ 103
Frame Rate ................................................................................................................................................ 103
The Wi-Fi Options Menu.................................................................................................... 104
Operating the Text Input Keyboard ........................................................................................... 105
The Setup Menu ................................................................................................................... 106
Time Zone and Date ............................................................................................................................ 106
Monitor Settings ..................................................................................................................................... 108
Date Stamp................................................................................................................................................ 110
Photo VR ...................................................................................................................................................... 111
AF Assist ...................................................................................................................................................... 111
Digital Zoom ............................................................................................................................................. 112
Sound Settings ....................................................................................................................................... 112
Auto Off........................................................................................................................................................ 113
Format Card/Format Memory........................................................................................................ 114
Language .................................................................................................................................................... 114
Charge by Computer ........................................................................................................................... 115
Reset All........................................................................................................................................................ 116
Conformity Marking ............................................................................................................................ 116
Firmware Version .................................................................................................................................. 116
Using the Wi-Fi (Wireless LAN) Function ..................................................... 117
Installing the Software on the Smart Device ............................................................. 117
Connecting the Smart Device to the Camera............................................................ 118
Preselecting Images in the Camera That You Want to Transfer to
a Smart Device ...................................................................................................................... 120
Table of Contents
xvii
Page 59

Connecting the Camera to a TV, Printer, or Computer........................... 121
Connecting the Camera to a TV (Playback on a TV)................................................ 123
Connecting the Camera to a Printer (Direct Print)................................................... 124
Connecting the Camera to a Printer .......................................................................................... 124
Printing Images One at a Time ...................................................................................................... 125
Printing Multiple Images ................................................................................................................... 126
Using ViewNX 2 (Transferring Images to a Computer) .......................................... 128
Table of Contents
Installing ViewNX 2 ............................................................................................................................... 128
Transferring Images to a Computer ........................................................................................... 128
Technical Notes..................................................................................................... 130
Caring for the Product ....................................................................................................... 131
The Camera................................................................................................................................................ 131
The Battery ................................................................................................................................................. 132
The Charging AC Adapter................................................................................................................. 133
Memory Cards.......................................................................................................................................... 134
Cleaning and Storage......................................................................................................... 135
Cleaning....................................................................................................................................................... 135
Storage ......................................................................................................................................................... 135
Error Messages...................................................................................................................... 136
Troubleshooting .................................................................................................................. 140
File Names .............................................................................................................................. 147
Optional Accessories .......................................................................................................... 148
Specifications ........................................................................................................................ 149
Approved Memory Cards.................................................................................................................. 153
Index......................................................................................................................................... 155
xviii
Page 60
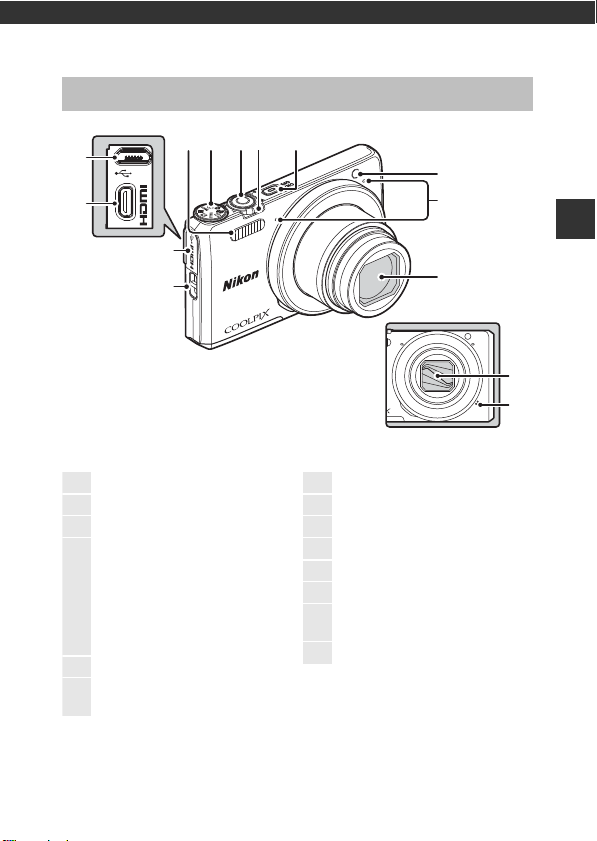
Parts of the Camera
Lens cover closed
1
Flash............................................................ 41
2
Mode dial......................................... 12, 19
3
Shutter-release button....................13
4
Zoom control........................................ 15
f: Wide-angle................................15
g: Telephoto..................................... 15
h: Thumbnail playback
........................................................... 16, 59
i: Playback zoom.................. 16, 58
j: Help ............................................... 23
5
Power switch/power-on lamp...10
6
Self-timer lamp .................................... 44
AF-assist illuminator
7
Microphone (stereo)......................... 12
8
Lens
9
Lens cover
10
Speaker
11
Eyelet for camera strap ......................ii
12
Connector cover......................... 8, 121
13
HDMI micro connector (Type D)
.................................................................... 121
14
Micro-USB connector............... 8, 121
The Camera Body
2 3 4 5
14
13
1
6
7
12
11
Parts of the Camera
8
9
10
1
Page 61
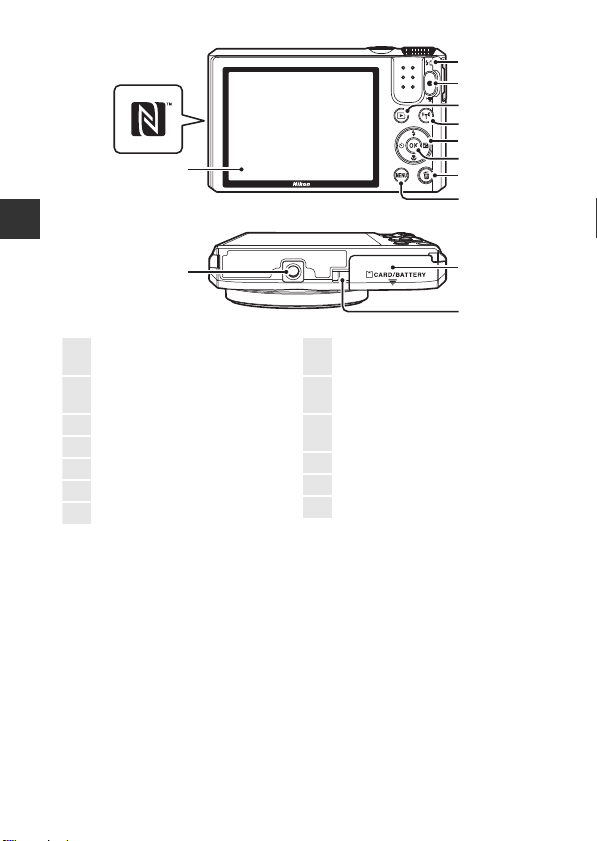
Parts of the Camera
10
4
2
1
5
7
9
3
6
8
11
12
13
1
Charge lamp............................................. 8
Flash lamp............................................... 41
2
b (e movie-record) button
............................................................... 20, 69
3
c (playback) button ...................... 16
4
Z (Wi-Fi) button........117, 118, 120
5
Multi selector ........................ 16, 20, 76
6
k (apply selection) button .........10
7
l (delete) button ...................... 17, 62
8
d (menu) button
............................................ 33, 68, 76, 126
9
Battery-chamber/
memory card slot cover ....................7
10
Power connector cover (for
optional AC adapter)
11
Tripod socket ..................................... 151
12
Monitor........................................................3
13
N-Mark (NFC antenna)........118, 120
2
Page 62
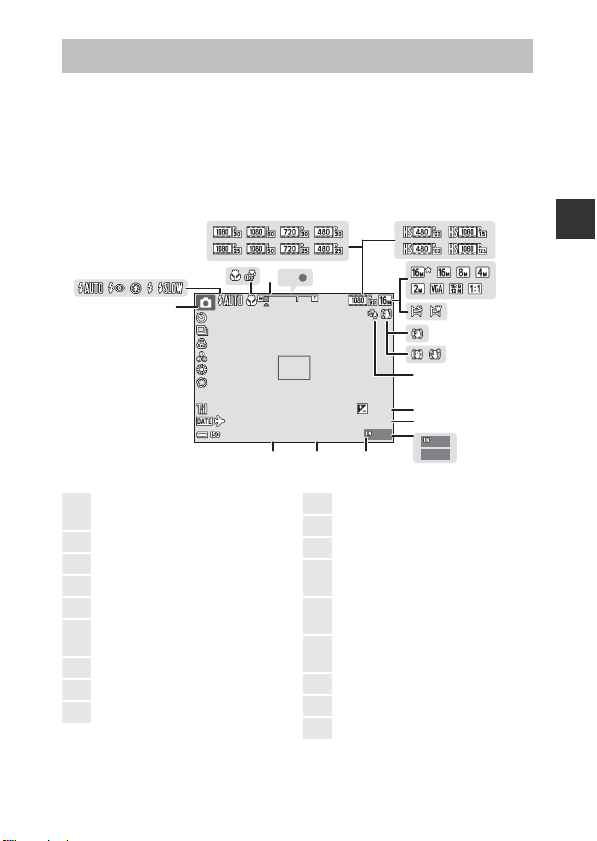
The Monitor
1
Shooting mode
................................19, 21, 22, 33, 35, 38
2
Flash mode............................................. 41
3
Macro mode ..........................................45
4
Zoom indicator............................ 15, 45
5
Focus indicator .................................... 13
6
Movie options (normal speed
movies) ..................................................... 97
7
Movie options (HS movies) ..........98
8
Image mode ..........................................78
9
Easy panorama..................................... 30
10
Photo VR icon .................................... 111
11
Movie VR icon.................................... 102
12
Wind noise reduction ................... 103
13
Exposure compensation value
............................................................... 47, 49
14
Remaining movie recording time
....................................................................... 69
15
Number of exposures remaining
(still images)........................................... 12
16
Internal memory indicator............ 12
17
Aperture value ..................................... 15
18
Shutter speed ....................................... 15
The information that is displayed in the monitor during shooting and playback
changes depending on the camera’s settings and state of use.
By default, information is displayed when the camera is turned on and when
you operate the camera, and turns off after a few seconds (when Photo info is
set to Auto info in Monitor settings (A108)).
Shooting Mode
2
6
3
4
AF
5
1
7
Parts of the Camera
8
9
10
11
12
+1.0
13
29m
0s
14
16
999
999
9999
15
F3.4
1/250
400
1718
3
Page 63
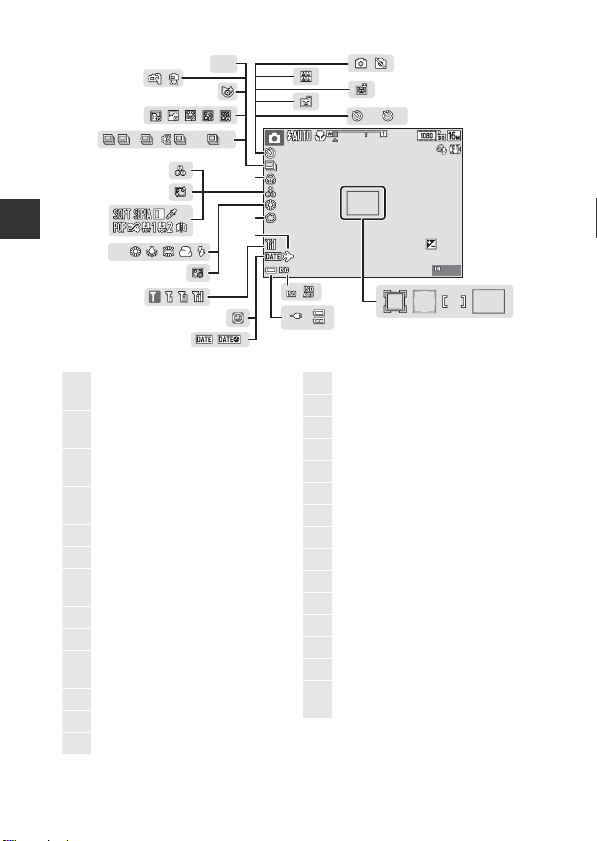
Parts of the Camera
19
Focus area (target finding AF)
............................................................... 52, 86
20
Focus area (manual or center)
............................................................... 55, 85
21
Focus area (face detection,
pet detection)................27, 35, 53, 85
22
Focus area (subject tracking)
............................................................... 86, 87
23
ISO sensitivity........................................ 84
24
Battery level indicator ......................12
25
Charging AC Adapter connection
indicator
26
Date stamp.......................................... 110
27
“Date not set” indicator ............... 141
28
Wi-Fi communication indicator
..........................................................104, 118
29
Travel destination icon................. 106
30
Soft .............................................................. 35
31
Foundation makeup.........................35
32
White balance mode........................80
33
Special effects....................................... 33
34
Skin softening....................................... 35
35
Hue...................................................... 35, 46
36
Vividness .......................................... 35, 46
37
Continuous shooting mode........ 82
38
Time-lapse movie............................... 28
39
Blink proof icon....................................90
40
Hand-held/tripod ....................... 24, 25
41
Backlighting (HDR) ............................ 24
42
Self-timer indicator............................ 43
43
Smile timer ............................................. 36
44
Pet portrait auto release................. 27
45
Self-Collage ............................................ 37
46
Still image capture (during movie
recording) ............................................... 72
33
32
37
PRE
40
38
28
HDR
41
39
120
60
36
H
L
35
34
45
43
10
46
44
2
10
42
30
31
29
400
1/250
F3.4
29m
+1.0
999
0s
23
26
27
2425
19202122
4
Page 64
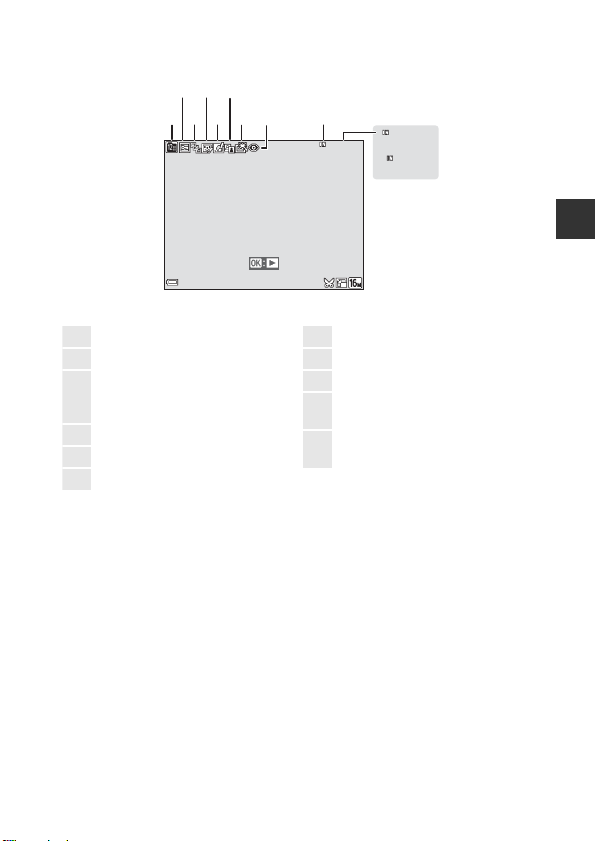
Playback Mode
1
List by date icon.................................. 60
2
Protect icon............................................ 93
3
Sequence display (when
Individual pictures is selected)
....................................................................... 95
4
Glamour retouch icon .....................66
5
Quick effects icon............................... 63
6
D-Lighting icon.................................... 64
7
Quick retouch icon............................ 64
8
Red-eye correction icon................. 65
9
Internal memory indicator
10
Current image number/
total number of images
11
Movie length or elapsed playback
time
2314
9999. JPG
15/11/2015 15:30
6
7
5
9
8
999 / 999
999 / 999
9999 / 9999
29m00s
29m00s
10
11
Parts of the Camera
5
Page 65
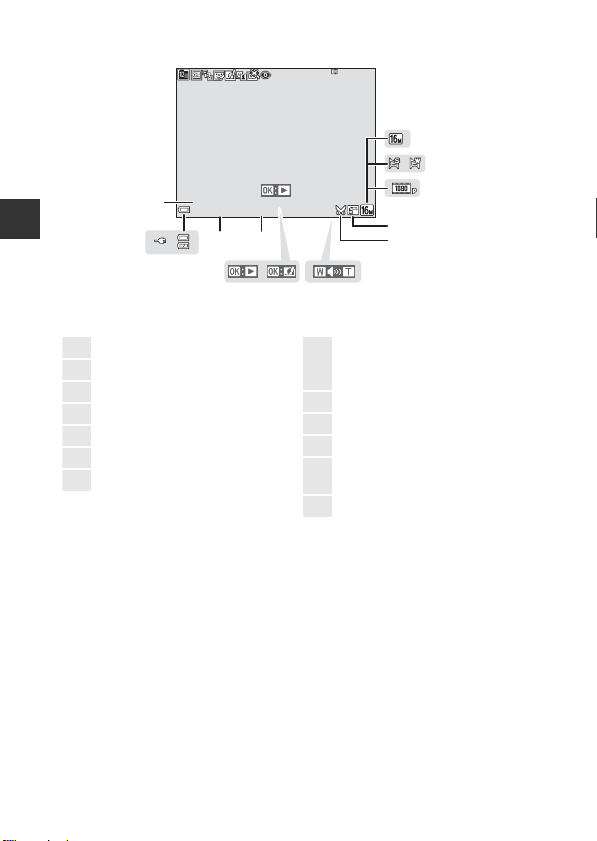
Parts of the Camera
12
Image mode ..........................................78
13
Easy panorama..................................... 32
14
Movie options.......................................97
15
Small picture icon .............................. 67
16
Crop icon......................................... 58, 68
17
Volume indicator ................................73
18
Quick effects guide
19
Easy panorama playback guide
Sequence playback guide
Movie playback guide
20
Time of recording
21
Date of recording
22
Battery level indicator...................... 12
23
Charging AC Adapter connection
indicator
24
File number and type ................... 147
24
9999. JPG
15/11/2015 15:30
21
2223
19
20
999 / 999
12
13
14
15
16
1718
6
Page 66
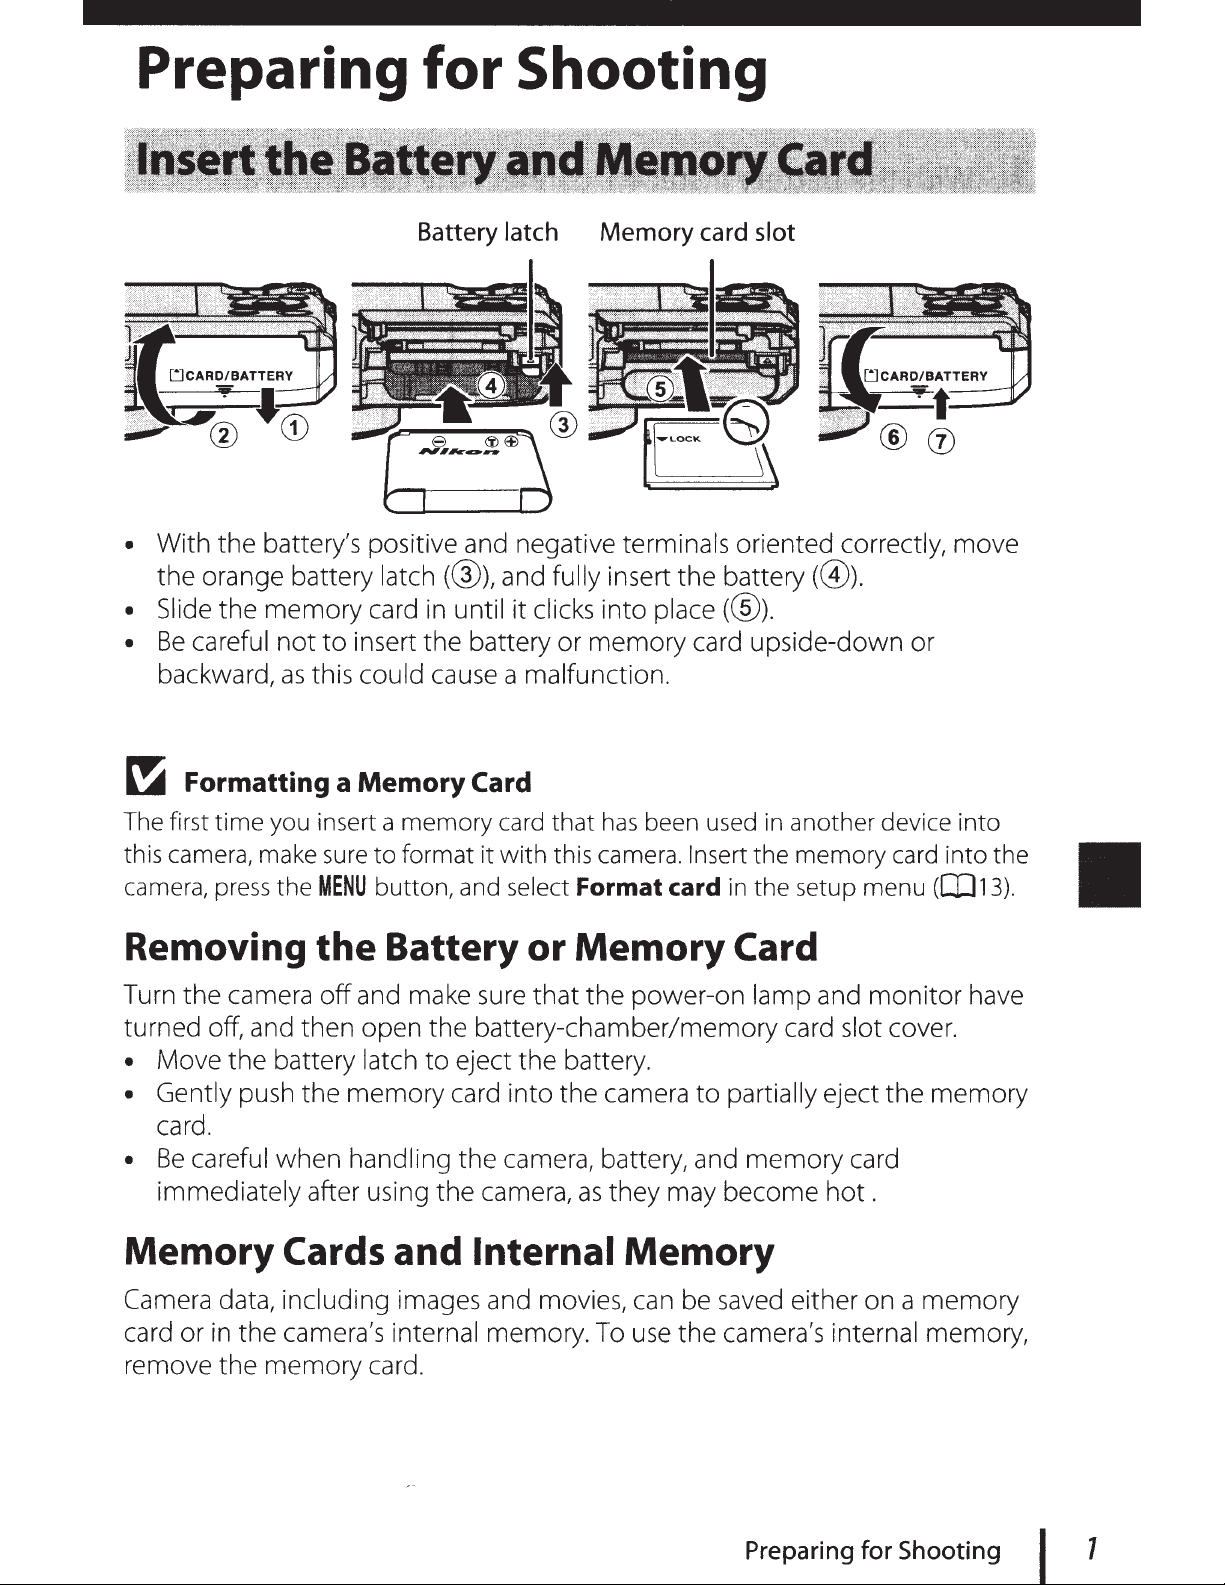
Preparing for Shooting
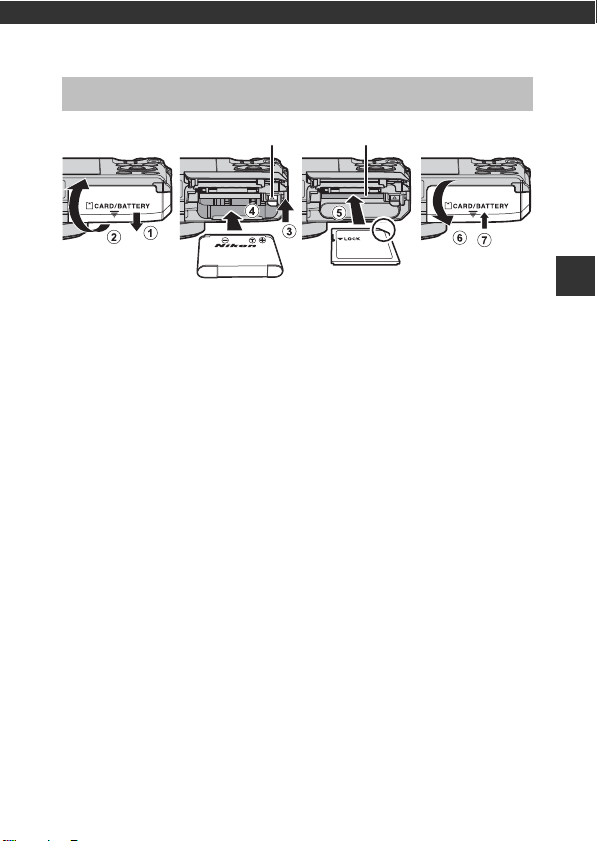
Battery latch Memory card slot
Insert the Battery and Memory Card
• With the battery’s positive and negative terminals oriented correctly, move
the orange battery latch (3), and fully insert the battery (4).
• Slide the memory card in until it clicks into place (5).
• Be careful not to insert the battery or memory card upside-down or
backward, as this could cause a malfunction.
B Formatting a Memory Card
The first time you insert a memory card that has been used in another device into
this camera, make sure to format it with this camera. Insert the memory card into the
camera, press the d button, and select Format card in the setup menu (A76).
Removing the Battery or Memory Card
Turn the camera off and make sure that the power-on lamp and monitor have
turned off, and then open the battery-chamber/memory card slot cover.
• Move the battery latch to eject the battery.
• Gently push the memory card into the camera to partially eject the memory
card.
• Be careful when handling the camera, battery, and memory card
immediately after using the camera, as they may become hot .
Memory Cards and Internal Memory
Camera data, including images and movies, can be saved either on a memory
card or in the camera’s internal memory. To use the camera’s internal memory,
remove the memory card.
Preparing for Shooting
7
Page 67
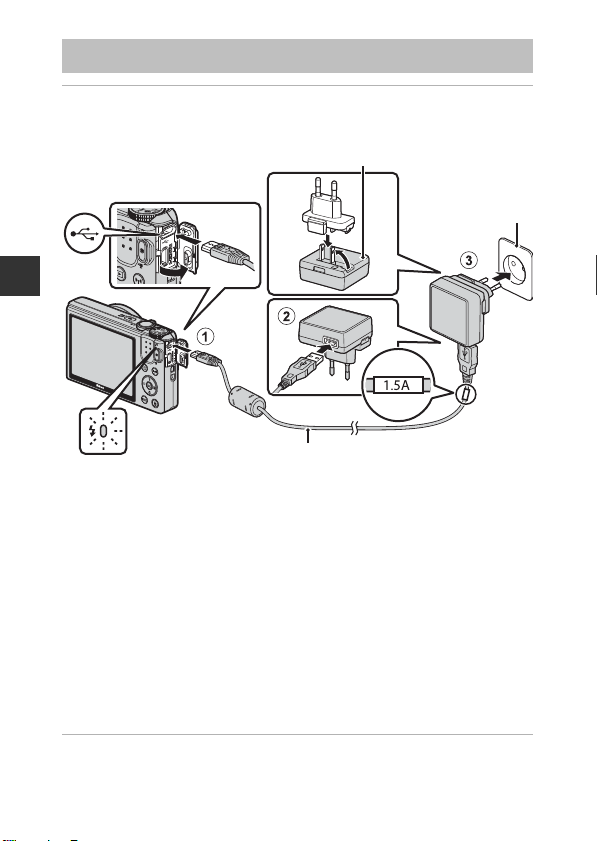
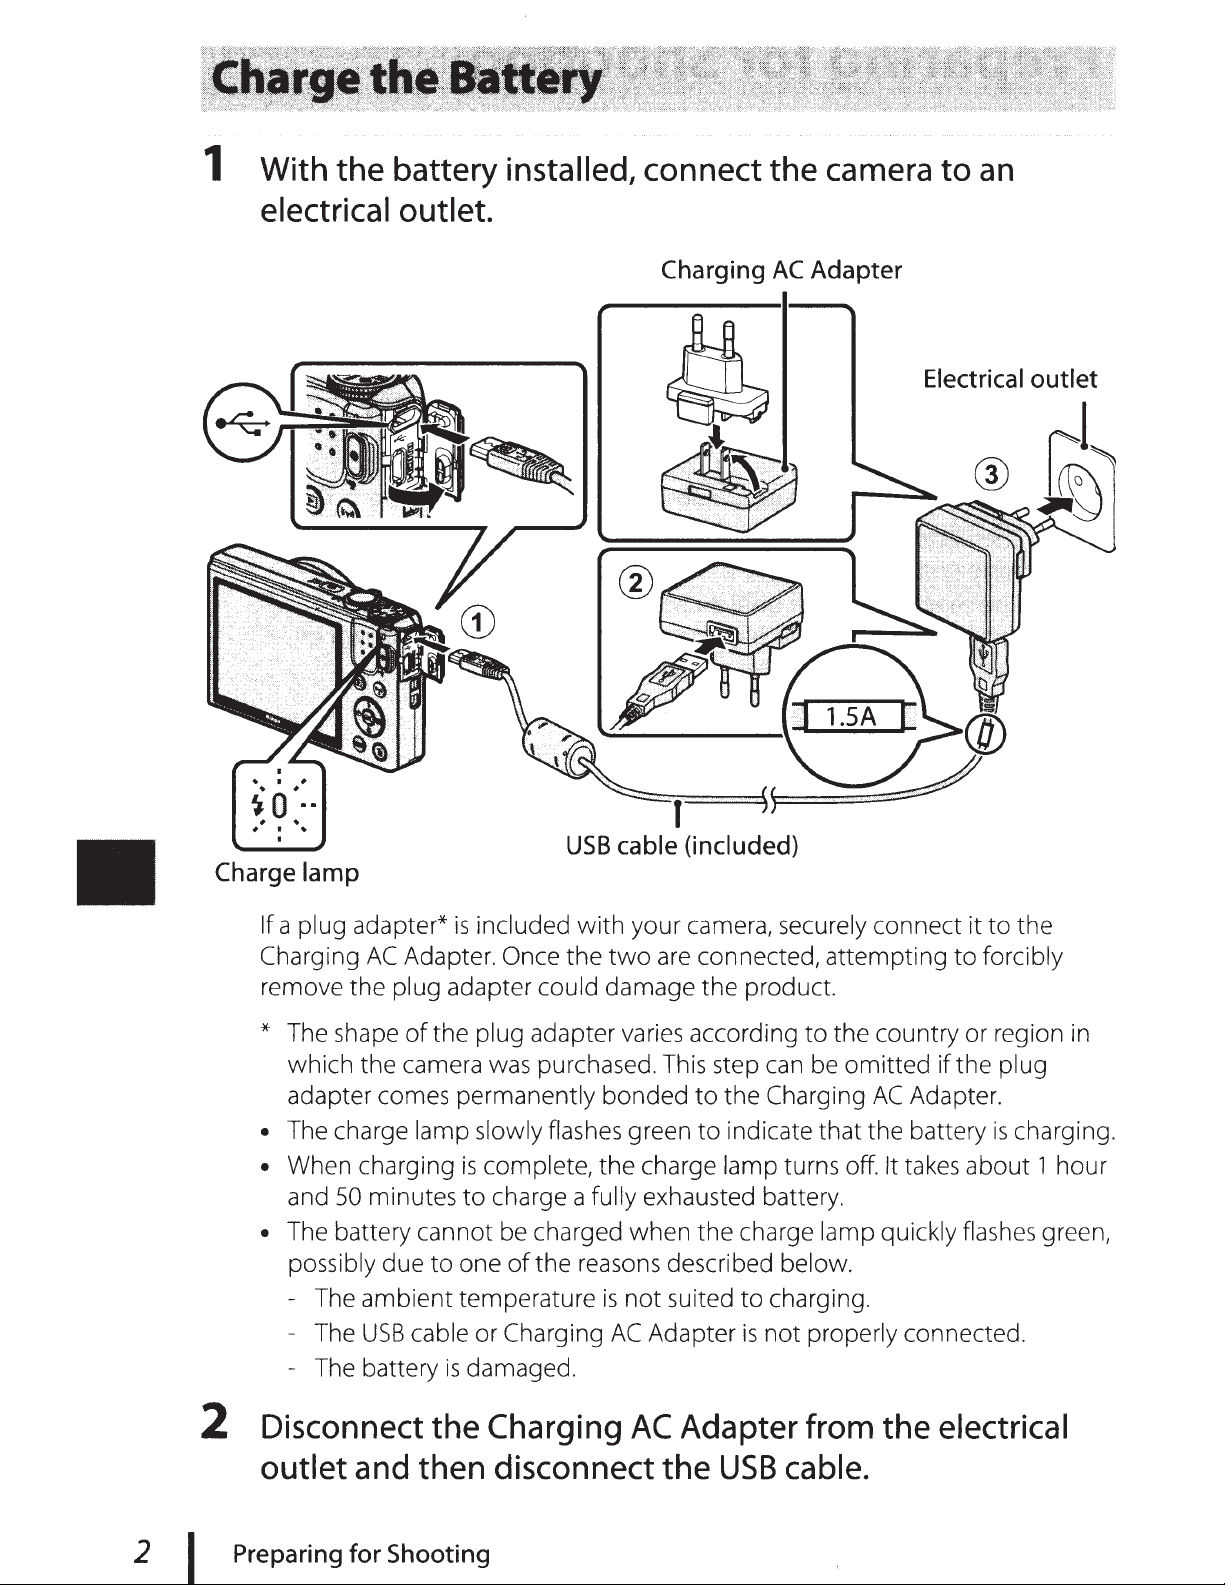
Charge the Battery
USB cable (included)
Charge lamp
Electrical outlet
Charging AC Adapter
1 With the battery installed, connect the camera to an
electrical outlet.
Preparing for Shooting
If a plug adapter* is included with your camera, securely connect it to the
Charging AC Adapter. Once the two are connected, attempting to forcibly
remove the plug adapter could damage the product.
* The shape of the plug adapter varies according to the country or region in
which the camera was purchased. This step can be omitted if the plug
adapter comes permanently bonded to the Charging AC Adapter.
• The charge lamp slowly flashes green to indicate that the battery is charging.
• When charging is complete, the charge lamp turns off. It takes about 1 hour
and 50 minutes to charge a fully exhausted battery.
• The battery cannot be charged when the charge lamp quickly flashes green,
possibly due to one of the reasons described below.
- The ambient temperature is not suited to charging.
- The USB cable or Charging AC Adapter is not properly connected.
- The battery is damaged.
2 Disconnect the Charging AC Adapter from the electrical
outlet and then disconnect the USB cable.
8
Page 68

B Notes About the USB Cable
• Do not use a USB cable other than the UC-E21. Using a USB cable other than the
UC-E21 could result in overheating, fire or electric shock.
• Make sure that the plugs are properly oriented. Do not insert or remove the plugs
at an angle when connecting or disconnecting them.
B Notes About Charging the Battery
• The camera can be operated while the battery is charging, but the charging time
increases.
• If the battery level is extremely low, you may not be able to operate the camera
while the battery is charging.
• Do not, under any circumstances, use another make or model of AC adapter other
than Charging AC Adapter EH-71P, and do not use a commercially available USBAC adapter or a battery charger for a mobile phone. Failure to observe this
precaution could result in overheating or in damage to the camera.
C Charging Using a Computer or Battery Charger
• You can also charge the battery by connecting the camera to a computer.
• You can use the Battery Charger MH-66 (available separately) to charge the battery
without using the camera.
Preparing for Shooting
9
Page 69
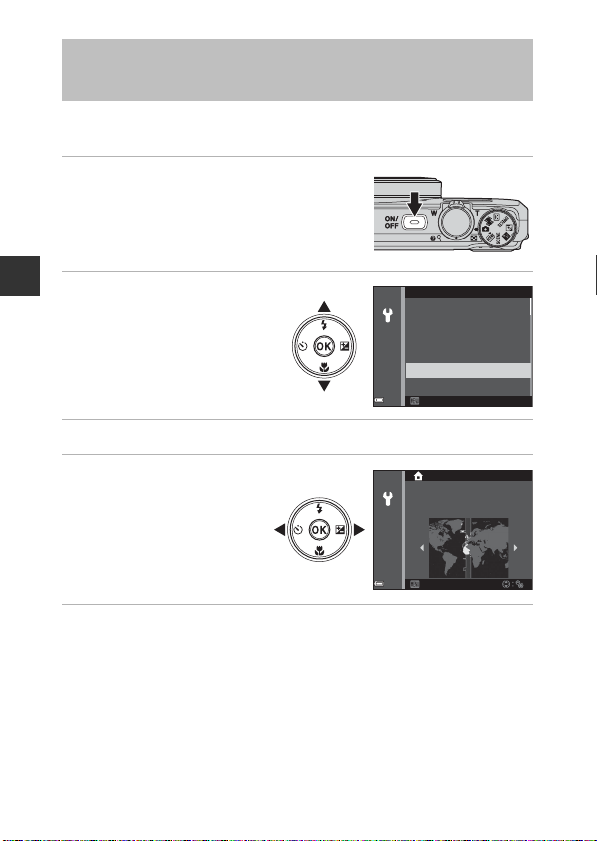
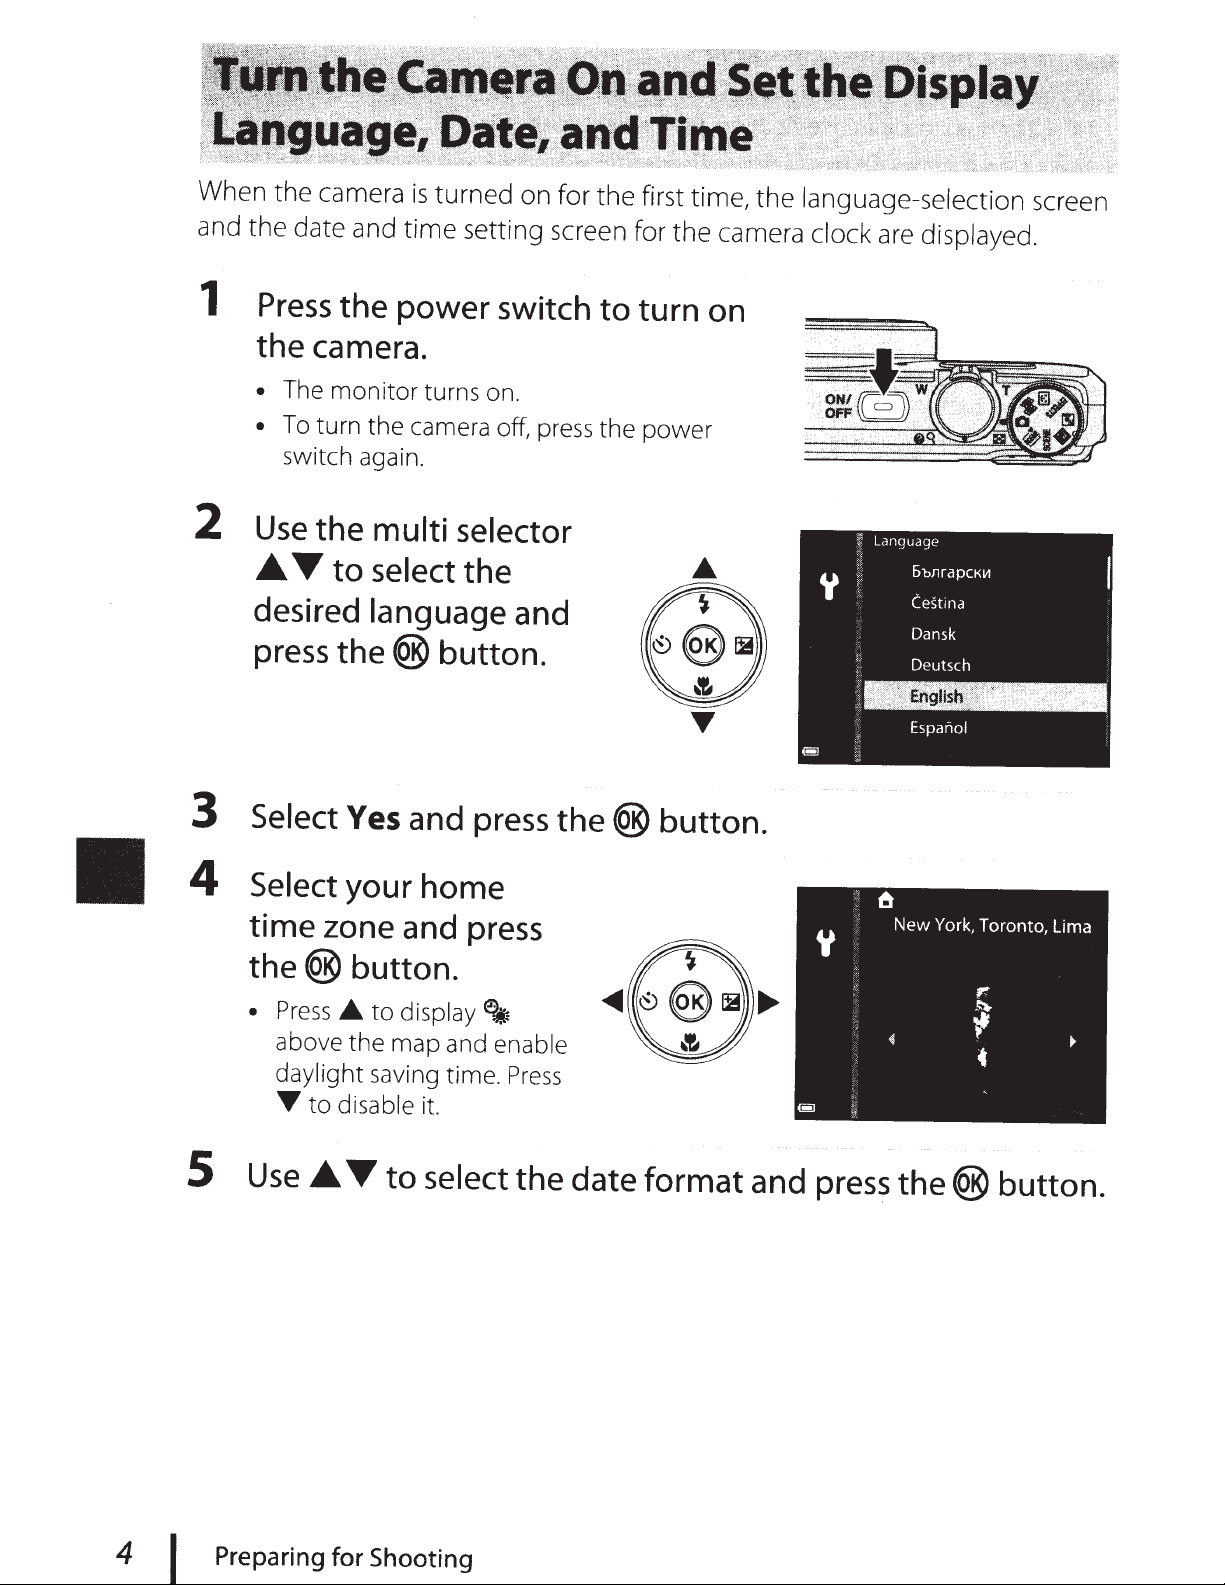
Turn the Camera On and Set the Display
London, Casablanca
Back
Language, Date, and Time
When the camera is turned on for the first time, the language-selection screen
and the date and time setting screen for the camera clock are displayed.
1 Press the power switch to turn on
the camera.
• The monitor turns on.
• To turn the camera off, press the power
switch again.
2 Use the multi selector
Preparing for Shooting
HI to select the
desired language and
press the k button.
Language
Cancel
Български
Čeština
Dansk
Deutsch
English
Español
3 Select Yes and press the k button.
4 Select your home
time zone and press
the k button.
• Press H to display W
above the map and enable
daylight saving time. Press
I to disable it.
5 Use HI to select the date format and press the k button.
10
Page 70
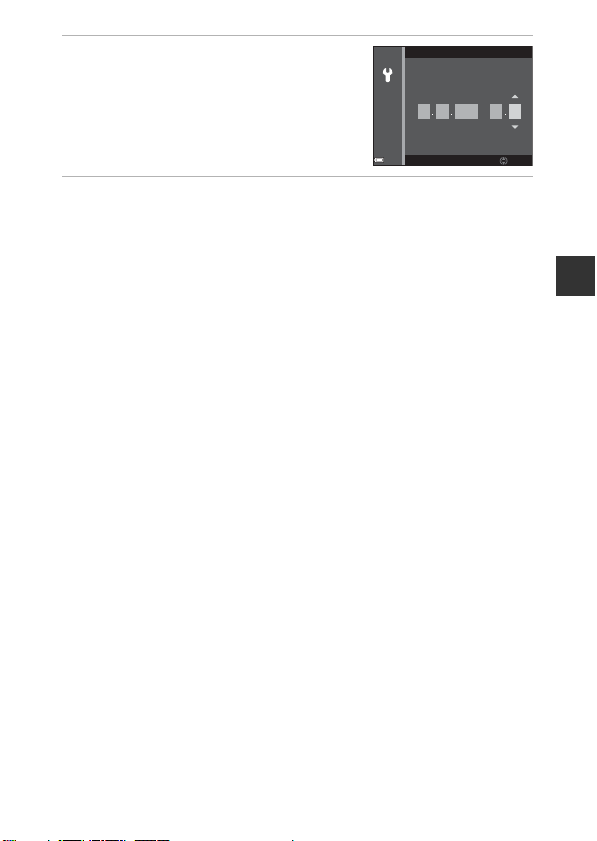
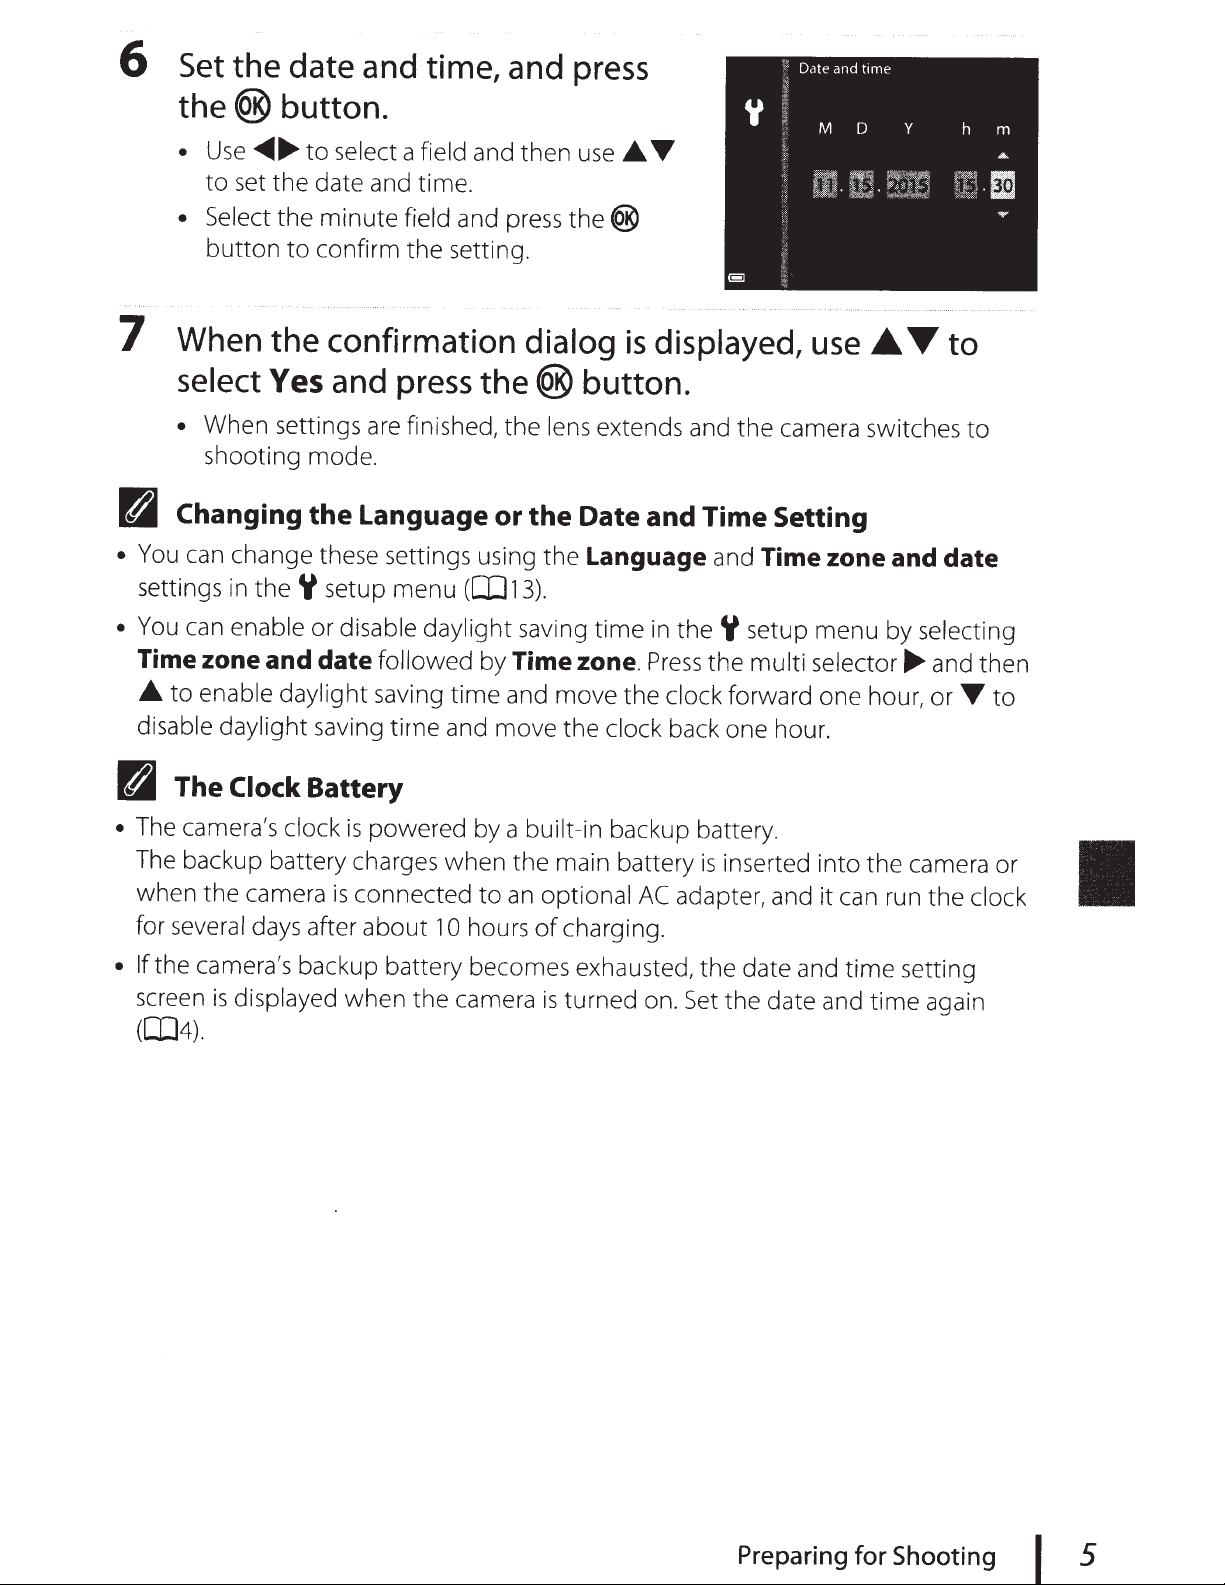
6 Set the date and time, and press
the k button.
• Use JK to select a field and then use HI
to set the date and time.
• Select the minute field and press the k
button to confirm the setting.
Date and time
11
15
2015
Y
30
15
Edit
7 When the confirmation dialog is displayed, use HI to
select Yes and press the k button.
• When settings are finished, the lens extends and the camera switches to
shooting mode.
C Changing the Language or the Date and Time Setting
• You can change these settings using the Language and Time zone and date
settings in the z setup menu (A76).
• You can enable or disable daylight saving time in the z setup menu by selecting
Time zone and date followed by Time zone. Press the multi selector K and then
H to enable daylight saving time and move the clock forward one hour, or I to
disable daylight saving time and move the clock back one hour.
C The Clock Battery
• The camera’s clock is powered by a built-in backup battery.
The backup battery charges when the main battery is inserted into the camera or
when the camera is connected to an optional AC adapter, and it can run the clock
for several days after about 10 hours of charging.
• If the camera’s backup battery becomes exhausted, the date and time setting
screen is displayed when the camera is turned on. Set the date and time again
(A10).
mhD M
Preparing for Shooting
11
Page 71
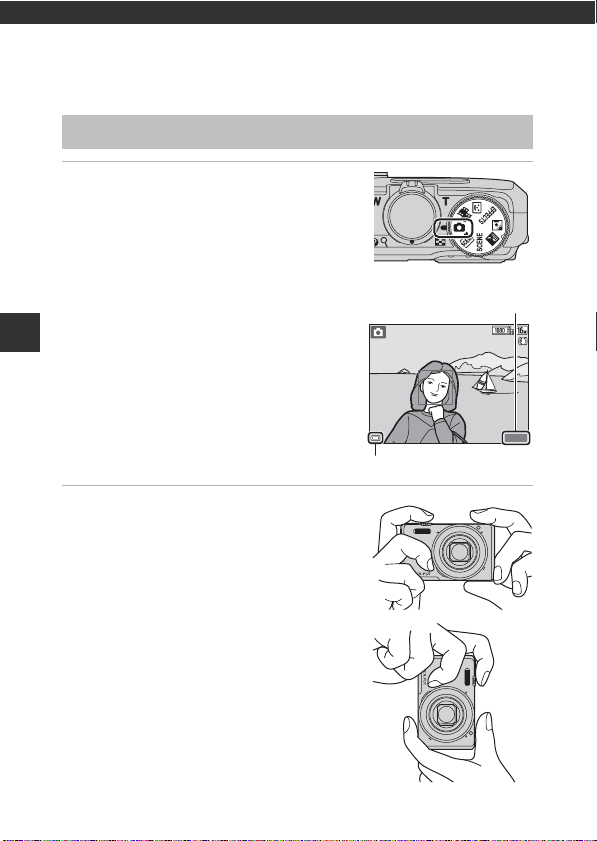
Basic Shooting and Playback
Battery level indicator
Number of exposures
remaining
Operations
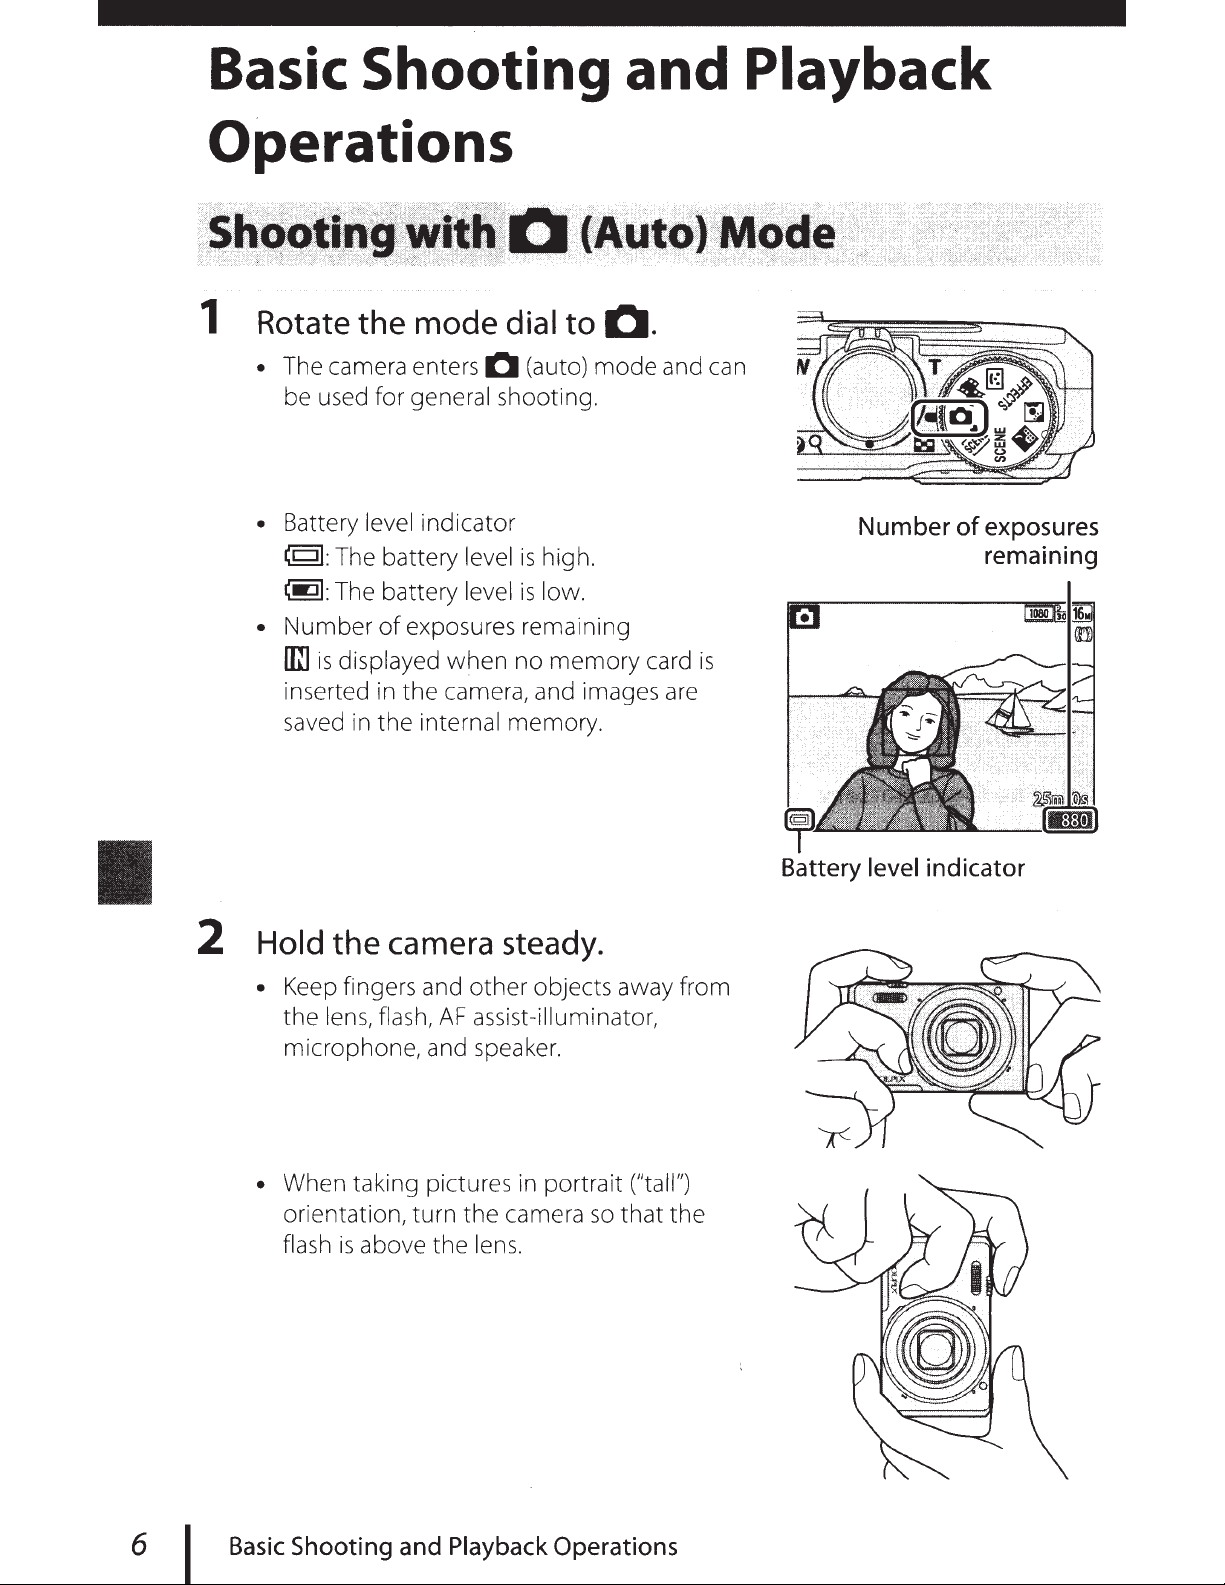
Shooting with A (Auto) Mode
1 Rotate the mode dial to A.
• The camera enters A (auto) mode and can
be used for general shooting.
• Battery level indicator
b: The battery level is high.
B: The battery level is low.
• Number of exposures remaining
Basic Shooting and Playback Operations
C is displayed when no memory card is
inserted in the camera, and images are
saved in the internal memory.
2 Hold the camera steady.
• Keep fingers and other objects away from
the lens, flash, AF assist-illuminator,
microphone, and speaker.
• When taking pictures in portrait (“tall”)
orientation, turn the camera so that the
flash is above the lens.
25m
880
0s
12
Page 72
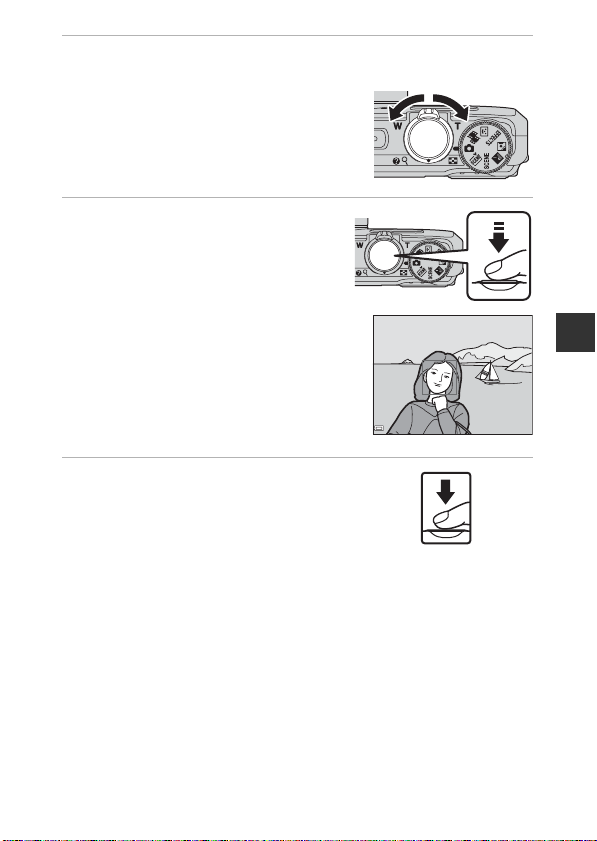
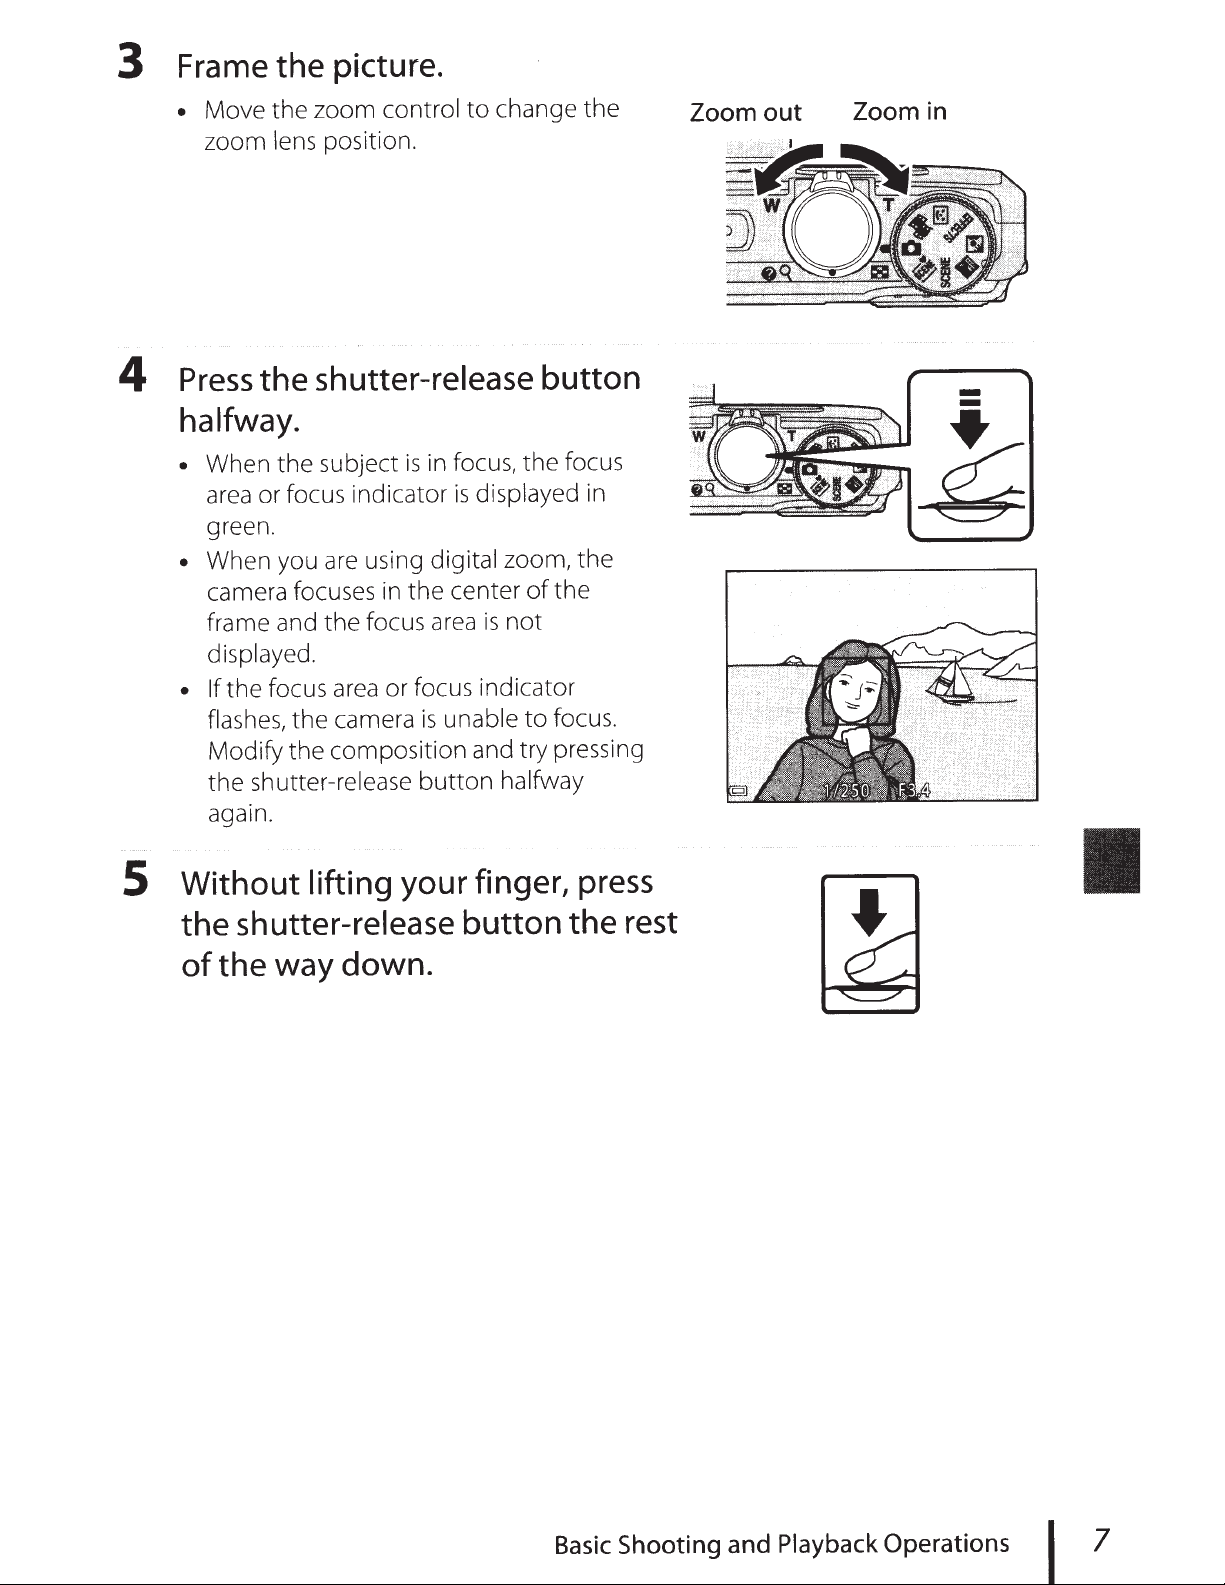
3 Frame the picture.
Zoom out Zoom in
• Move the zoom control to change the
zoom lens position.
4 Press the shutter-release button
halfway.
• When the subject is in focus, the focus
area or focus indicator is displayed in
green.
• When you are using digital zoom, the
camera focuses in the center of the
frame and the focus area is not
displayed.
• If the focus area or focus indicator
flashes, the camera is unable to focus.
Modify the composition and try pressing
the shutter-release button halfway
again.
5 Without lifting your finger, press
the shutter-release button the rest
of the way down.
Basic Shooting and Playback Operations
13
Page 73

B Notes About Saving Images or Movies
The indicator showing the number of exposures remaining or the indicator showing
the remaining recording time flashes while images or movies are being saved. Do
not open the battery-chamber/memory card slot cover or remove the
battery or memory card while an indicator is flashing. Doing this could result in
loss of data, or in damage to the camera or the memory card.
C The Auto Off Function
• When no operations are performed for about one minute, the monitor turns off,
the camera enters standby mode, and then the power-on lamp flashes. The
camera turns off after remaining in standby mode for about three minutes.
• To turn the monitor back on while the camera is in standby mode, perform an
operation such as pressing the power switch or shutter-release button.
C When Using a Tripod
• We recommend using a tripod to stabilize the camera in the following situations:
- When shooting in dim lighting with the flash mode (A20) set to W (off)
- When the zoom is at a telephoto position
Basic Shooting and Playback Operations
• When using a tripod to stabilize the camera during shooting, set Photo VR to Off
in the setup menu (A76) to prevent potential errors caused by this function.
14
Page 74
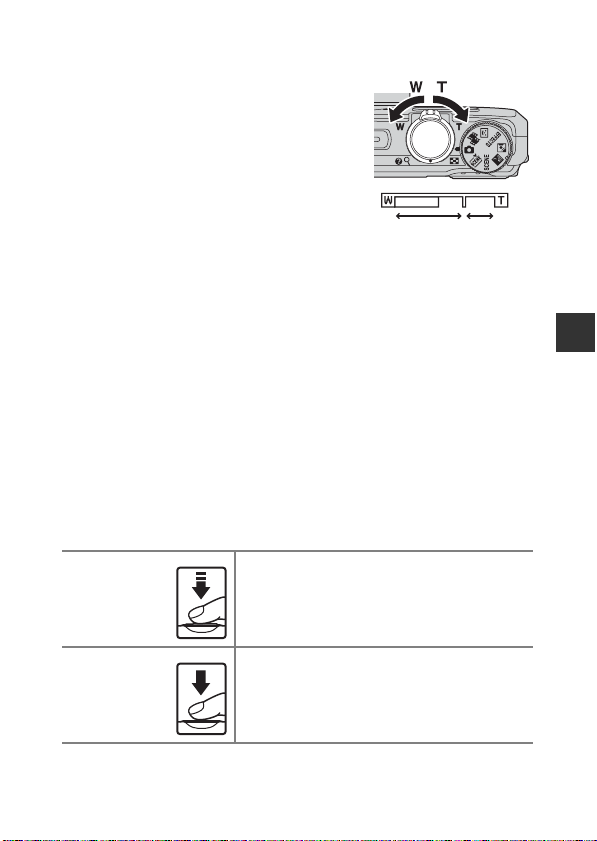
Using the Zoom
Wide-angle Telephoto
Optical
zoom
Digital
zoom
When you move the zoom control, the zoom
lens position changes.
• To zoom in: Move toward g
• To zoom out: Move toward f
When you turn the camera on, the zoom
moves to the maximum wide-angle
position.
• A zoom indicator is displayed on the
shooting screen when the zoom control is
moved.
• Digital zoom, which allows you to further
magnify the subject up to approximately 4×
the maximum optical zoom ratio, can be
activated by moving and holding the zoom control toward g when the
camera is zoomed in to the maximum optical zoom position.
C Digital Zoom
The zoom indicator changes to blue when the digital zoom is activated, and it
changes to yellow when the zoom magnification is increased further.
• Zoom indicator is blue: Image quality is not noticeably reduced by using the
Dynamic Fine Zoom.
• Zoom indicator is yellow: There may be cases in which image quality is noticeably
reduced.
• The indicator remains blue across a wider area when the image size is smaller.
• The zoom indicator may not change to blue when using certain continuous
shooting settings or other settings.
The Shutter-release Button
To set focus and exposure (shutter speed and
Press halfway
Press all the
way
aperture value), press the shutter-release button
lightly until you feel a slight resistance. Focus and
exposure remain locked while the shutter-release
button is pressed halfway.
Press the shutter-release button all the way to
release the shutter and take a picture.
Do not use force when pressing the shutter-release
button, as this may result in camera shake and
blurred images. Press the button gently.
Basic Shooting and Playback Operations
15
Page 75
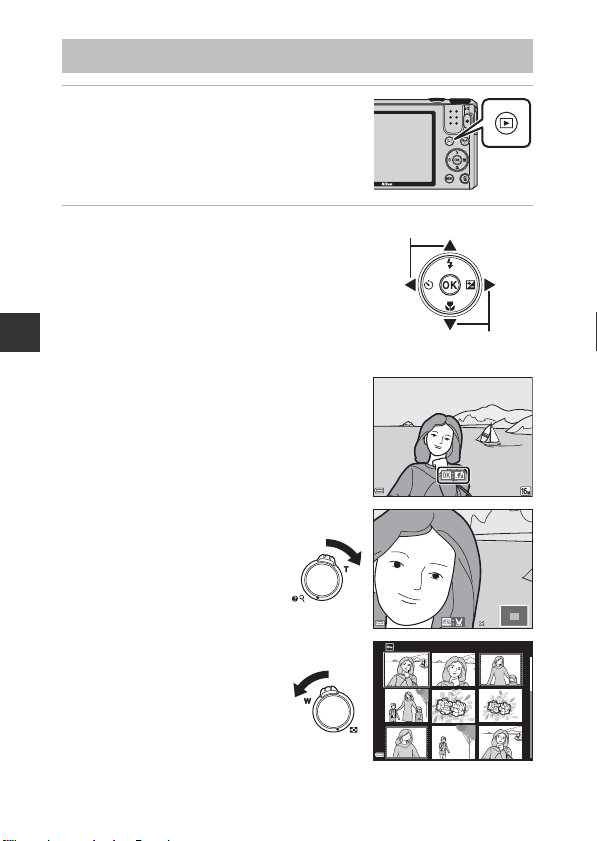
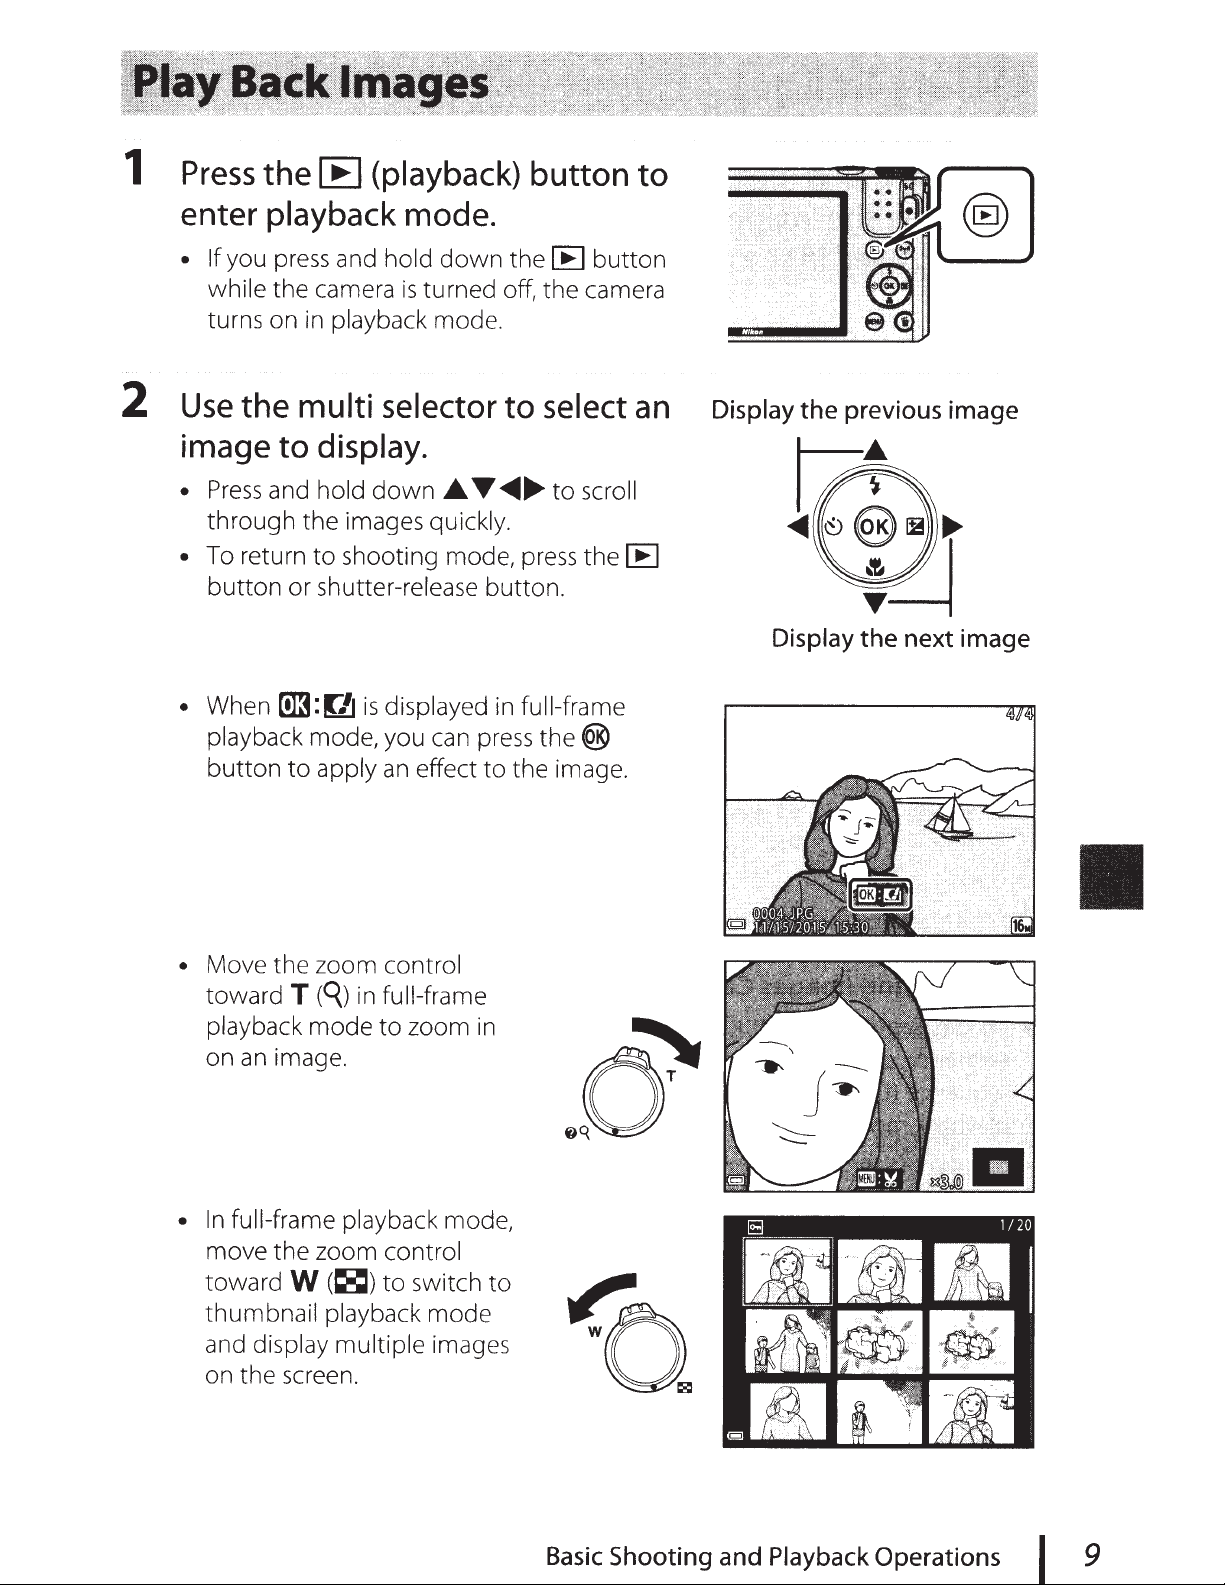
Play Back Images
Display the previous image
Display the next image
/
20
1 Press the c (playback) button to
enter playback mode.
• If you press and hold down the c button
while the camera is turned off, the camera
turns on in playback mode.
2 Use the multi selector to select an
image to display.
• Press and hold down HIJK to scroll
through the images quickly.
• To return to shooting mode, press the c
button or shutter-release button.
Basic Shooting and Playback Operations
16
• When e is displayed in full-frame
playback mode, you can press the k
button to apply an effect to the image.
• Move the zoom control
toward g (i) in full-frame
playback mode to zoom in
on an image.
• In full-frame playback mode,
move the zoom control
toward f (h) to switch to
thumbnail playback mode
and display multiple images
on the screen.
4 / 4
0004. JPG
15/11/2015 15:30
3.0
Page 76
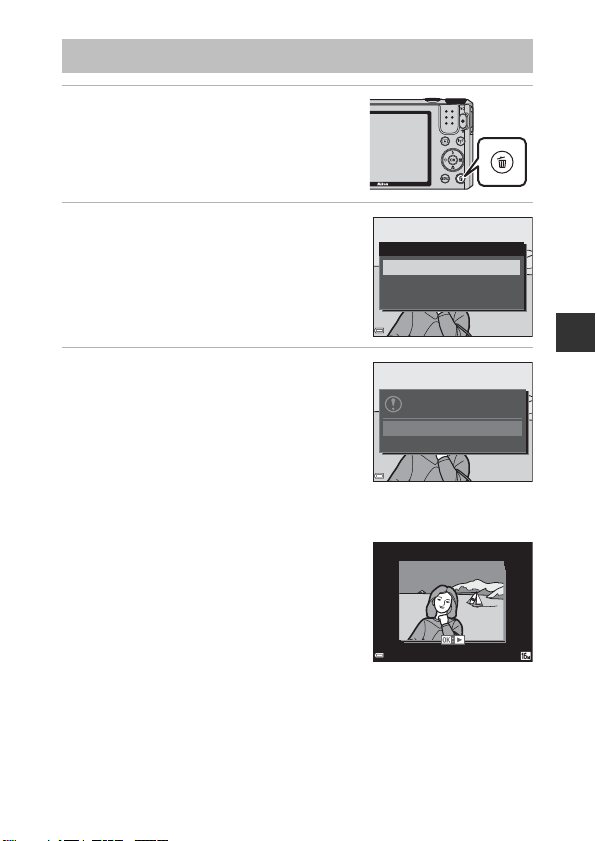
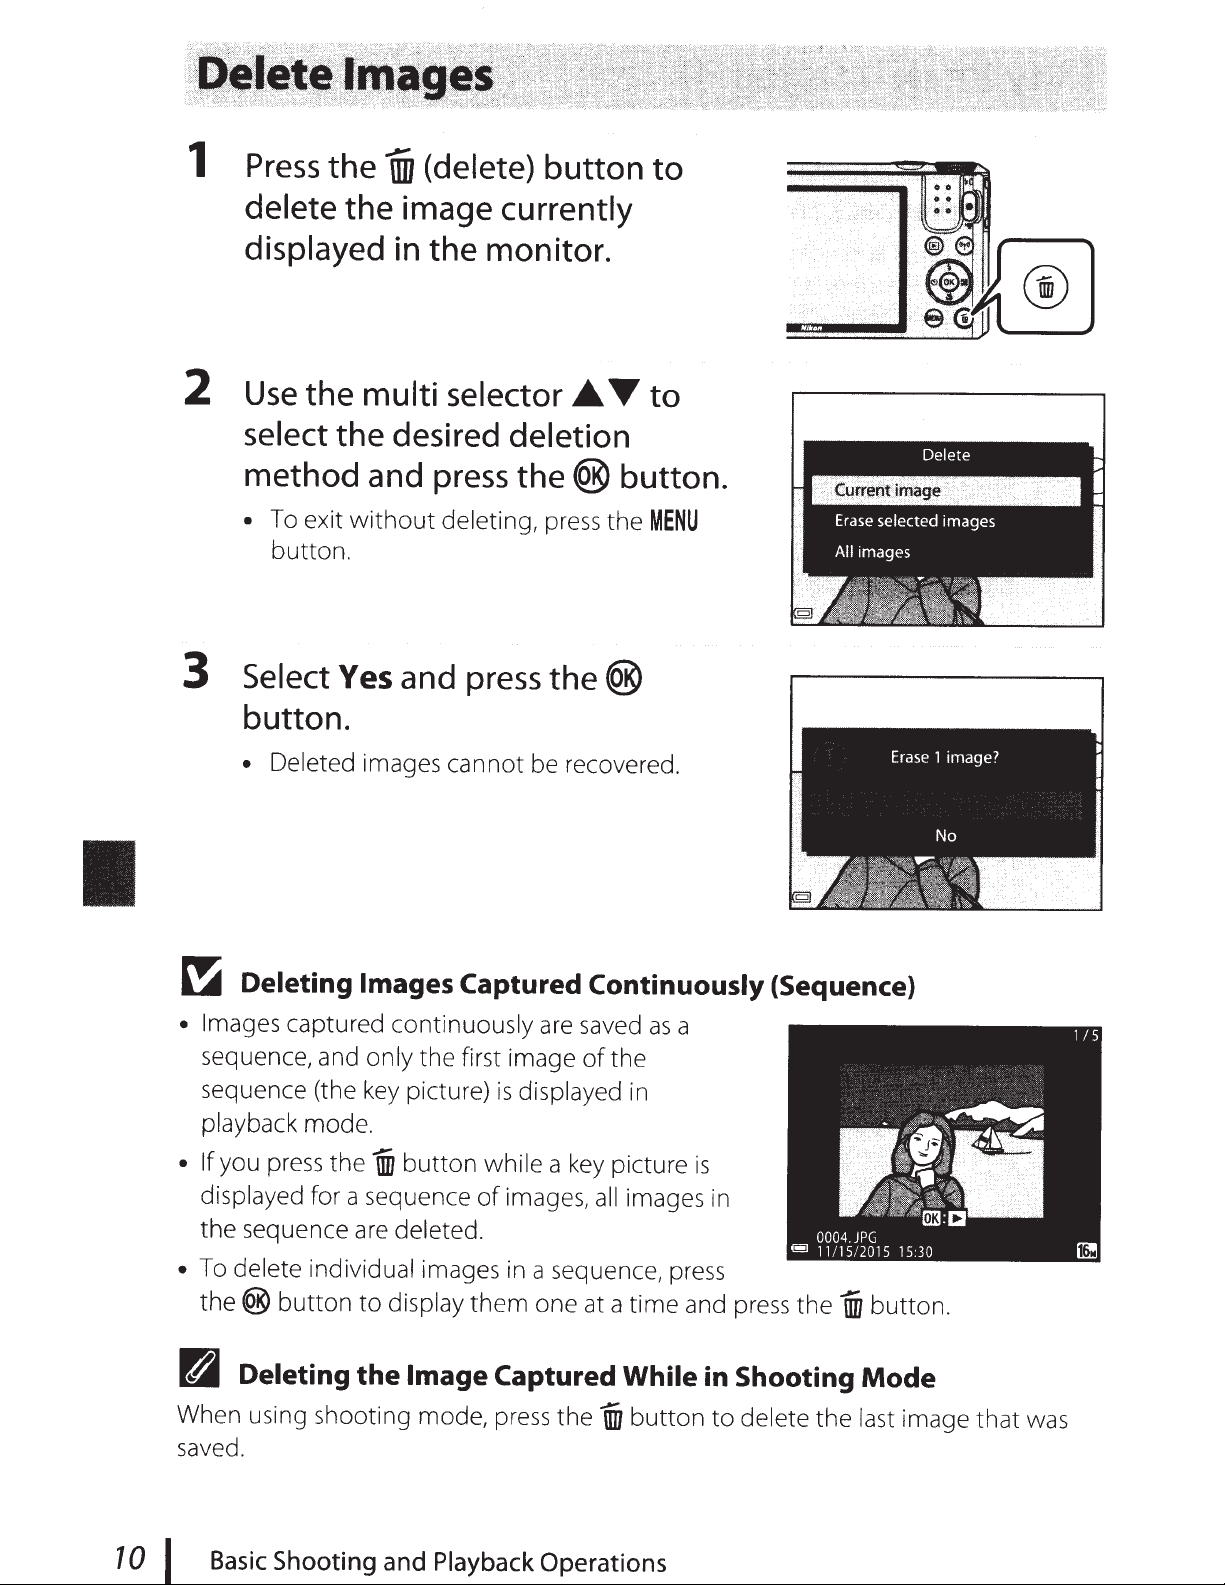
Delete Images
1 Press the l (delete) button to
delete the image currently
displayed in the monitor.
2 Use the multi selector HI to
select the desired deletion
method and press the k button.
• To exit without deleting, press the d
button.
Delete
Current image
Erase selected images
All images
3 Select Yes and press the k
button.
• Deleted images cannot be recovered.
B Deleting Images Captured Continuously (Sequence)
• Images captured continuously are saved as a
sequence, and only the first image of the
sequence (the key picture) is displayed in
playback mode.
• If you press the l button while a key picture is
displayed for a sequence of images, all images in
the sequence are deleted.
• To delete individual images in a sequence, press
the k button to display them one at a time and press the l button.
C Deleting the Image Captured While in Shooting Mode
When using shooting mode, press the l button to delete the last image that was
saved.
Erase 1 image?
Yes
No
Basic Shooting and Playback Operations
17
Page 77
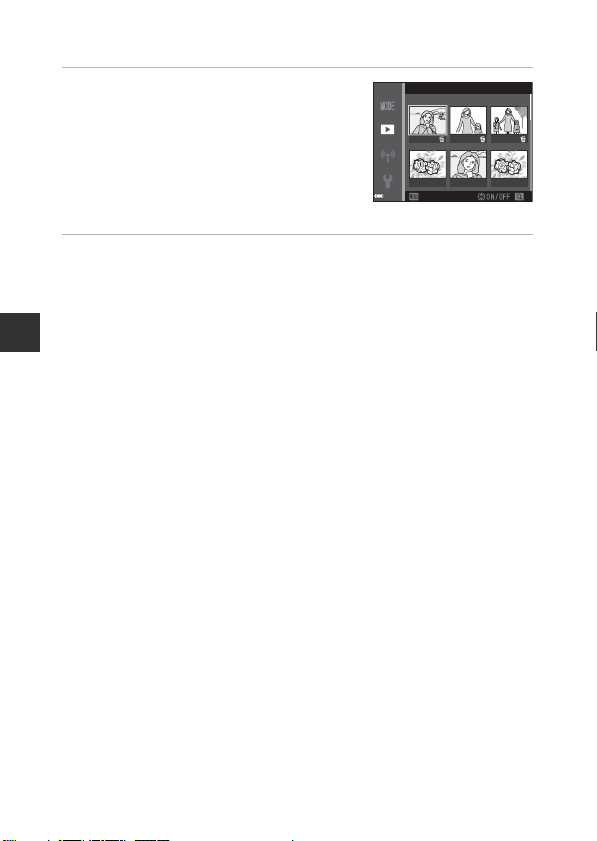
Operating the Erase Selected Images Screen
1 Use the multi selector JK to
• To undo the selection, press HI to
remove K.
• Move the zoom control (A1) toward g (i)
to switch to full-frame playback or f (h)
to switch to thumbnail playback.
Erase selected images
Back
2 Add K to all images that you want to delete and then press
• A confirmation dialog is displayed. Follow the on-screen instructions to
complete operations.
18
Page 78
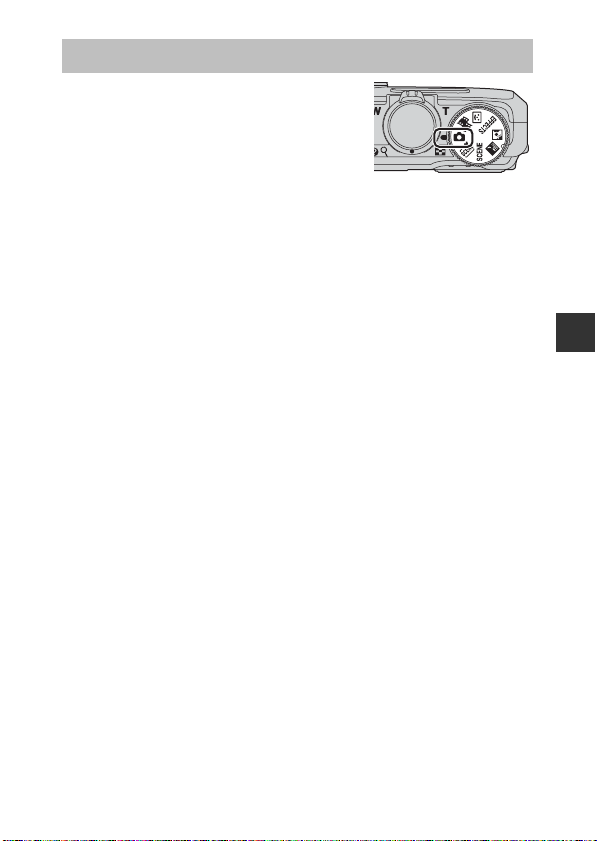
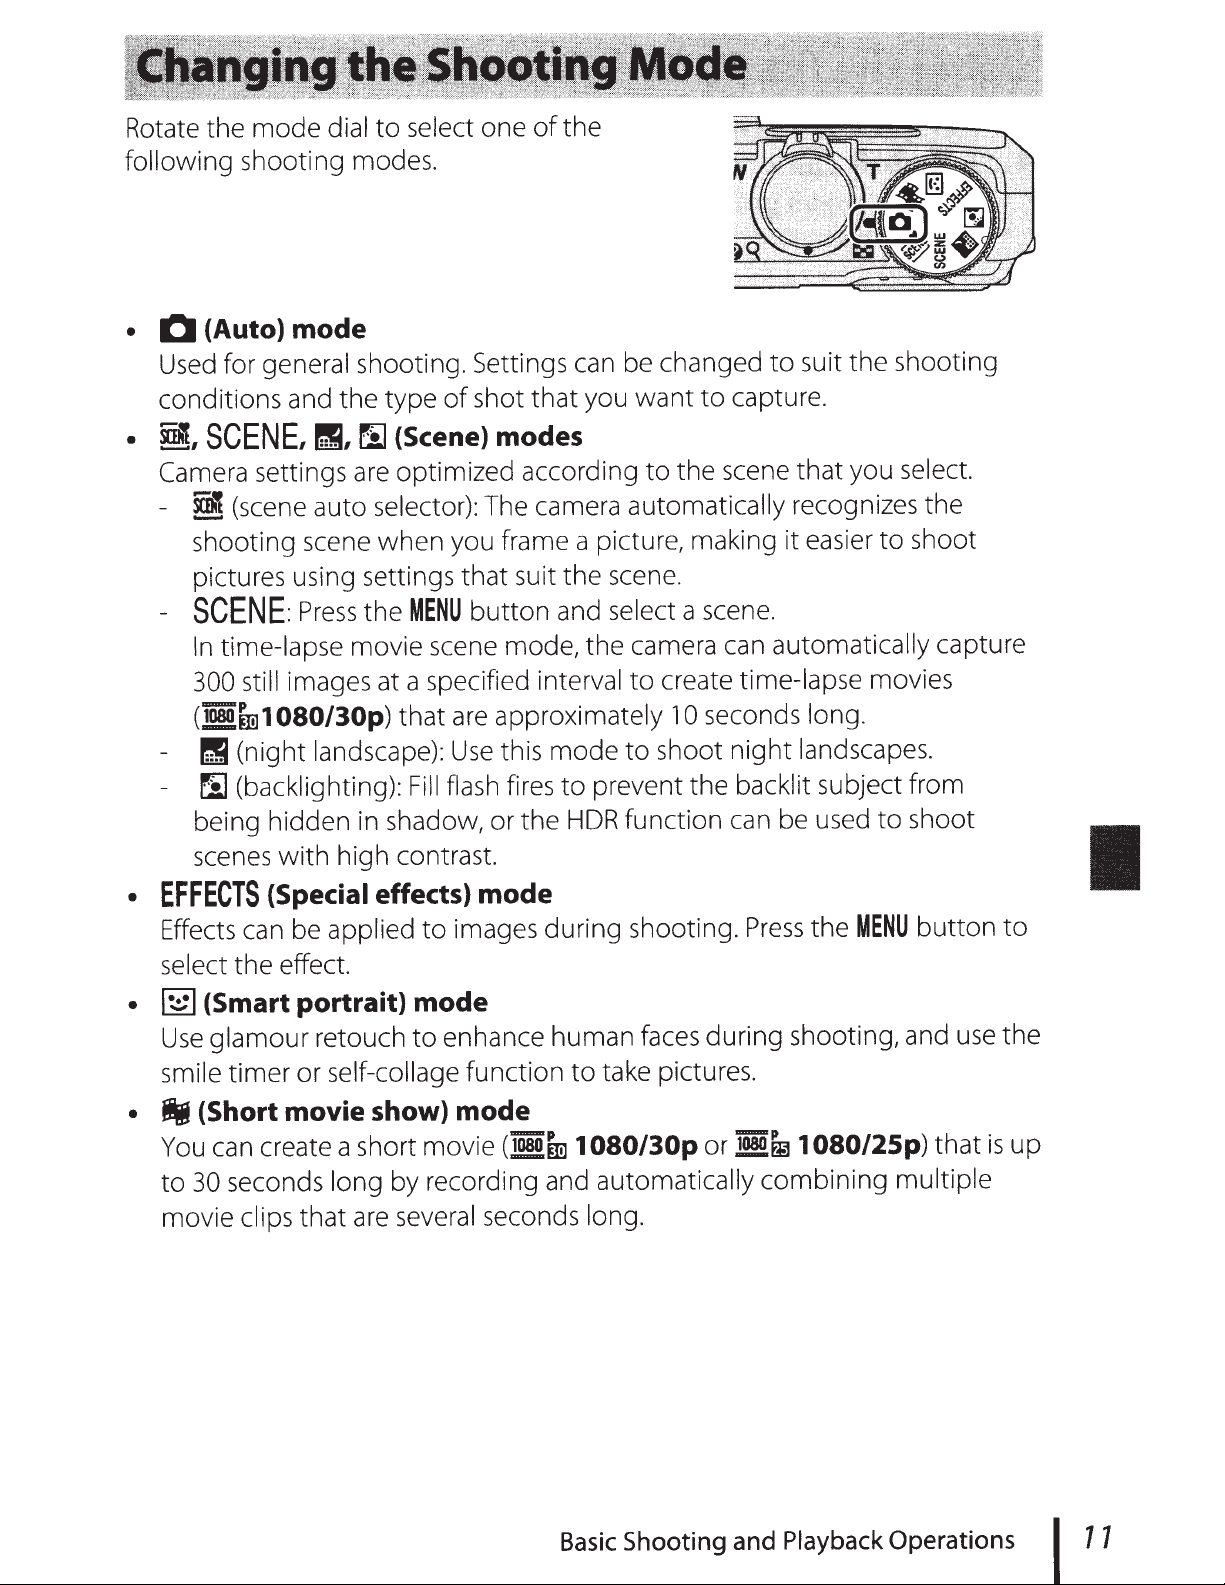
Changing the Shooting Mode
Rotate the mode dial to select one of the
following shooting modes.
• A (Auto) mode
Used for general shooting. Settings can be changed to suit the shooting
conditions and the type of shot that you want to capture.
• x, y, X, W (Scene) modes
Camera settings are optimized according to the scene that you select.
- x (scene auto selector): The camera automatically recognizes the
shooting scene when you frame a picture, making it easier to shoot
pictures using settings that suit the scene.
- y: Press the d button and select a scene.
In time-lapse movie scene mode, the camera can automatically capture
300 still images at a specified interval to create time-lapse movies
(e1080/30p) that are approximately 10 seconds long.
- X (night landscape): Use this mode to shoot night landscapes.
- W (backlighting): Fill flash fires to prevent the backlit subject from
being hidden in shadow, or the HDR function can be used to shoot
scenes with high contrast.
• u (Special effects) mode
Effects can be applied to images during shooting. Press the d button to
select the effect.
• F (Smart portrait) mode
Use glamour retouch to enhance human faces during shooting, and use the
smile timer or self-collage function to take pictures.
• n (Short movie show) mode
You can create a short movie (e 1080/30p or S 1080/25p) that is up
to 30 seconds long by recording and automatically combining multiple
movie clips that are several seconds long.
Basic Shooting and Playback Operations
19
Page 79
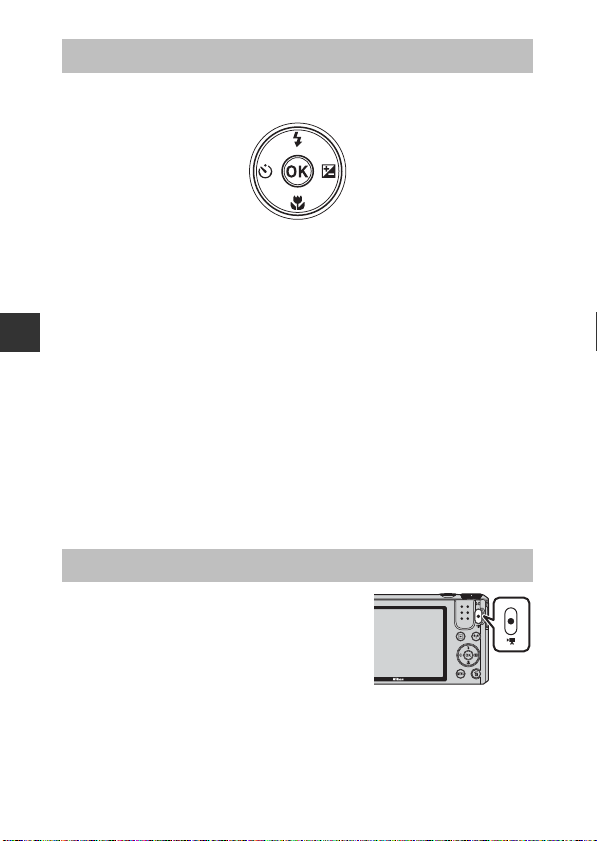
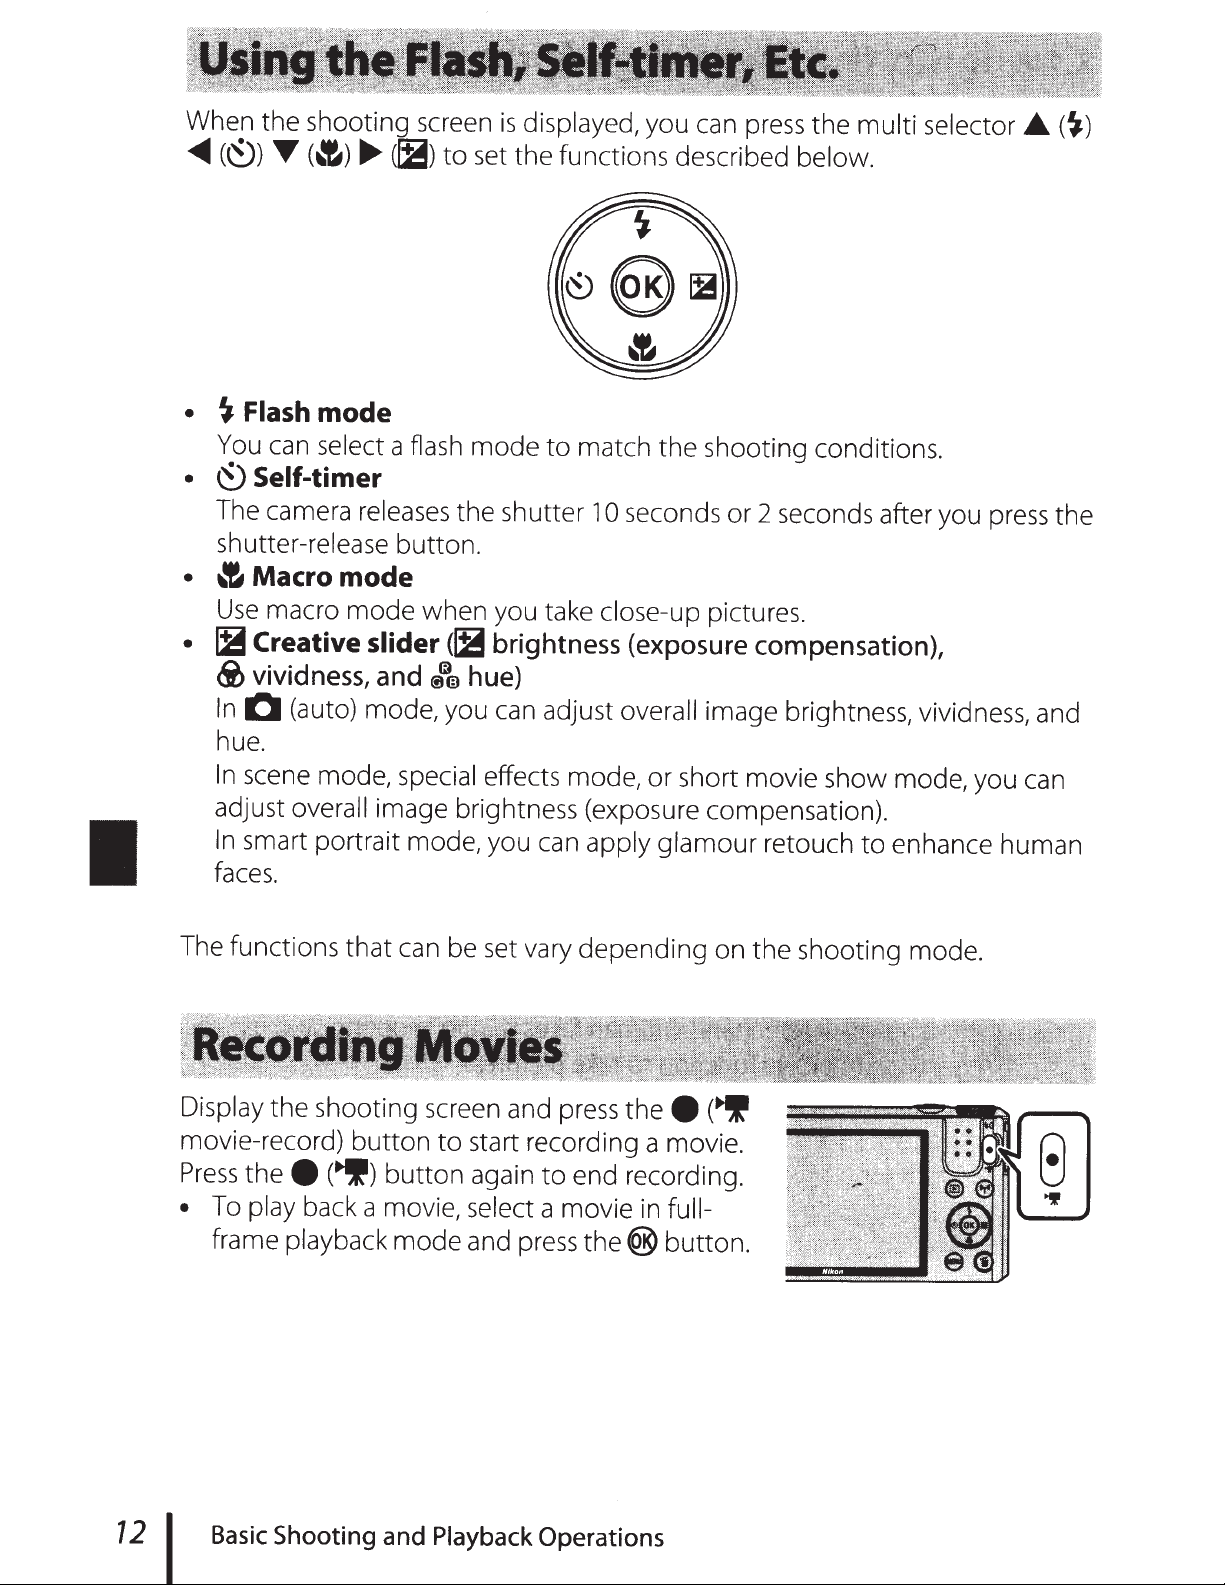
Using the Flash, Self-timer, Etc.
When the shooting screen is displayed, you can press the multi selector H (m)
J (n) I (p) K (o) to set the functions described below.
• m Flash mode
You can select a flash mode to match the shooting conditions.
• n Self-timer
The camera releases the shutter 10 seconds or 2 seconds after you press the
shutter-release button.
• p Macro mode
Use macro mode when you take close-up pictures.
• o Creative slider (o brightness (exposure compensation),
Basic Shooting and Playback Operations
G vividness, and F hue)
In A (auto) mode, you can adjust overall image brightness, vividness, and
hue.
In scene mode, special effects mode, or short movie show mode, you can
adjust overall image brightness (exposure compensation).
In smart portrait mode, you can apply glamour retouch to enhance human
faces.
The functions that can be set vary depending on the shooting mode.
Recording Movies
Display the shooting screen and press the b (e
movie-record) button to start recording a movie.
Press the b (e) button again to end recording.
• To play back a movie, select a movie in full-
frame playback mode and press the k button.
20
Page 80
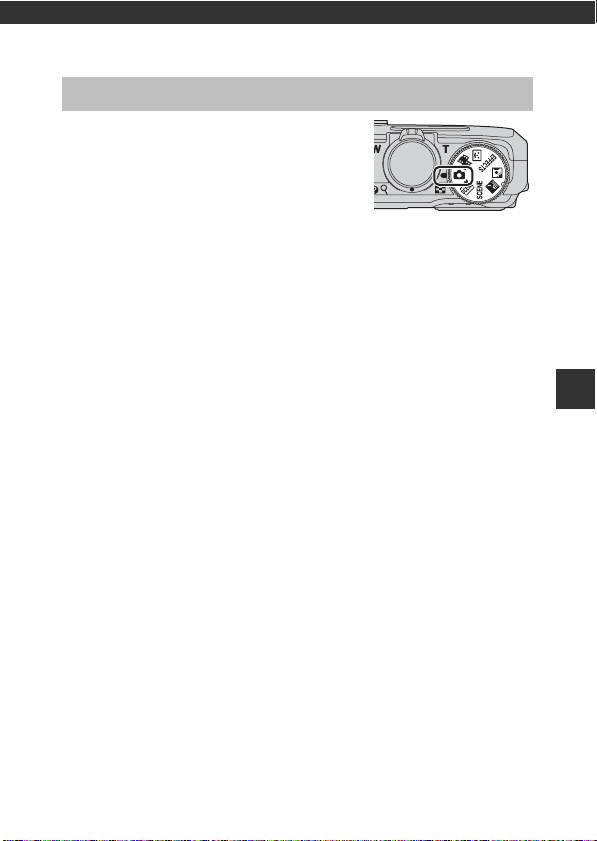
Shooting Features
A (Auto) Mode
Used for general shooting. Settings can be
adjusted to suit the shooting conditions and the
type of shot you want to capture.
• You can change how the camera selects the
area of the frame to focus on by changing the
AF area mode setting (A85).
The default setting is Target finding AF
(A52).
Functions Available in A (Auto) Mode
• Flash mode (A41)
• Self-timer (A43)
• Macro mode (A45)
• Creative slider (A46)
• Shooting menu (A78)
Shooting Features
21
Page 81
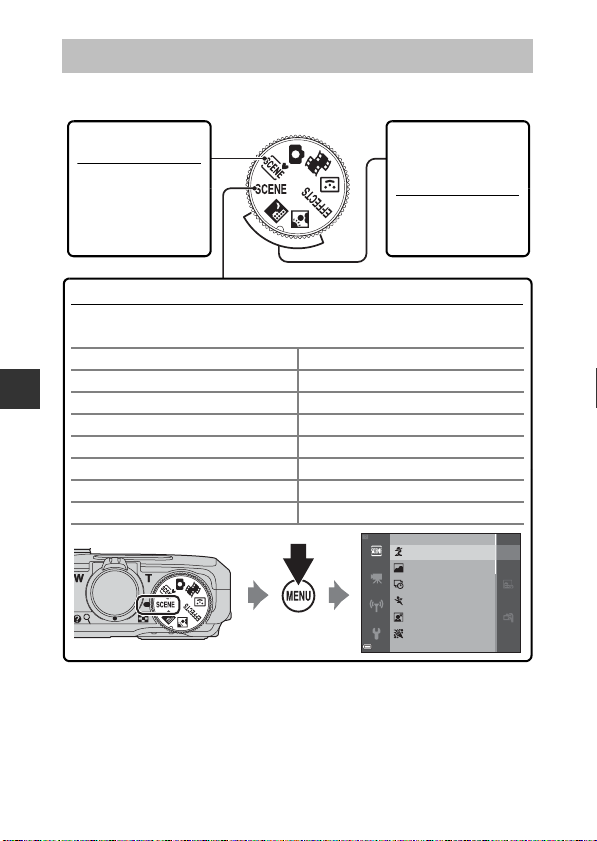
Scene Mode (Shooting Suited to Scenes)
x (Scene auto
selector) (A23)
When you frame a
picture, the camera
automatically selects
the optimum scene
for simpler shooting.
X (Night landscape)
(A24)
1,2
W (Backlighting)
(A24)
2
Rotate the mode dial
to X, or W and take
pictures.
y (Scene)
Press the d button to display the scene menu and select one of the following
shooting scenes.
b Portrait (default setting) h Sunset
2, 3
c Landscape
1, 2
i Dusk/dawn
1, 2, 3
N Time-lapse movie (A28) k Close-up (A26)
d Sports (A25)
2
u Food (A26)
e Night portrait (A25) m Fireworks show
(A26)
1, 3
f Party/indoor (A25)
2
p Easy panorama (A30)
Z Beach
2
O Pet portrait (A27)
z Snow
2
When a scene is selected, camera settings are automatically optimized for the
selected scene.
Shooting Features
1
The camera focuses at infinity.
2
The camera focuses on the area in the center of the frame.
3
Use of a tripod is recommended, because the shutter speed is slow. Set Photo VR
(A111) to Off in the setup menu when using a tripod to stabilize the camera
during shooting.
Portrait
Landscape
Time-lapse movie
Sports
Night portrait
Party/indoor
22
Page 82
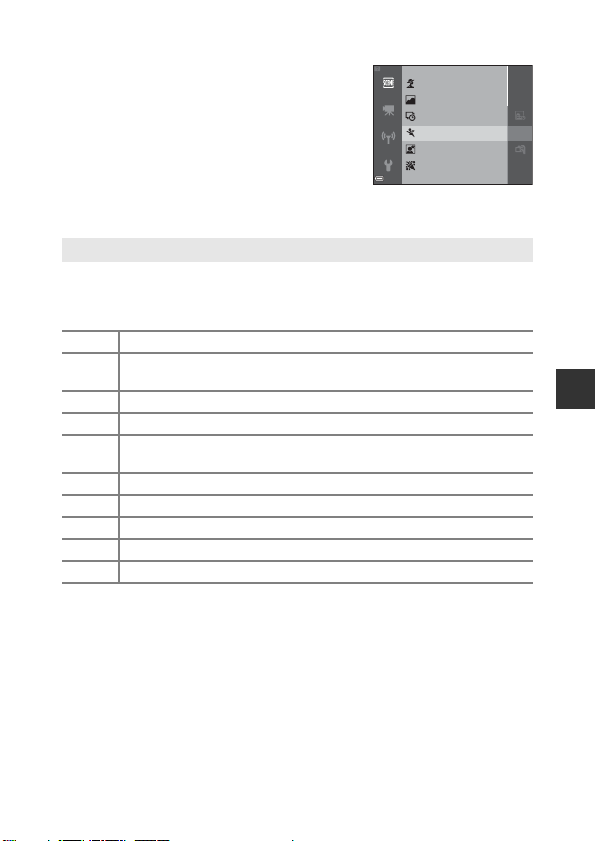
Displaying a Description of Each Scene Mode (Help Display)
Select a scene and move the zoom control
(A1) toward g (j) to view a description of
that scene. To return to the previous screen,
move the zoom control toward g (j) again.
Portrait
Landscape
Time-lapse movie
Sports
Night portrait
Party/indoor
Tips and Notes
x Scene auto selector
• When you point the camera at the subject, the camera automatically
recognizes the shooting scene mode from the list below and adjusts the
shooting settings accordingly.
e Portrait (for taking close-up portraits of one or two people)
Portrait (for taking portraits of large numbers of people, or images in
b
which the background takes up a large portion of the frame)
f Landscape
h Night portrait (for taking close-up portraits of one or two people)
Night portrait (for taking portraits of large numbers of people, or images
c
in which the background takes up a large portion of the frame)
g Night landscape
i Close-up
j Backlighting (for taking pictures of subjects other than people)
d Backlighting (for taking portrait pictures)
d Other scenes
• The focus area depends on the composition of the image. When the camera
detects a human face, it focuses on that face (A53).
• Depending on shooting conditions, the camera may not select the desired scene
mode. In this case, select another shooting mode (A19).
Shooting Features
23
Page 83
X Night landscape
• Press the d button, and select u Hand-held or w Tripod from Night
landscape.
• u Hand-held (default setting):
-While the j icon on the shooting screen is displayed in green, press the
shutter-release button all the way to capture a series of images which are
combined into a single image and saved.
- Once the shutter-release button is pressed all the way, hold the camera still until
a still image is displayed. After taking a picture, do not turn the camera off before
the monitor switches to the shooting screen.
- The angle of view (i.e., the area visible in the frame) seen in the saved image is
narrower than that seen in the monitor at the time of shooting.
• w Tripod:
- One image is captured at a slow shutter speed when the shutter-release button
is pressed all the way.
- Vibration redu ction is disabled even when Photo VR (A111) in the setup menu
is set to On.
W Backlighting
• Press the d button, and select On or Off to enable or disable HDR (high
Shooting Features
dynamic range) composition from Backlighting based on the type of image you
want to capture.
• Off (default setting): The flash fires to prevent the subject from being hidden in
shadow.
- When the shutter-release button is pressed all the way down, one image is
captured.
• On: Use when taking pictures with very bright and dark areas in the same frame.
- When the shutter-release button is pressed all the way, the camera shoots
images continuously at high speed, and saves the following two images:
- A non-HDR composite image
- An HDR composite image in which the loss of details in highlights or shadows
is minimized
- If there is only enough memory to save one image, an image processed by D-
Lighting (A64) at the time of shooting, in which dark areas of the image are
corrected, is the only image saved.
- Once the shutter-release button is pressed all the way, hold the camera still until
a still image is displayed. After taking a picture, do not turn the camera off before
the monitor switches to the shooting screen.
- The angle of view (i.e., the area visible in the frame) seen in the saved image is
narrower than that seen in the monitor at the time of shooting.
24
Page 84

y M d Sports
• While the shutter-release button is held all the way down, the camera shoots up to
about 7 images continuously at a rate of about 7.9 fps (when image mode is set to
P).
• The frame rate for continuous shooting may vary depending on the current image
mode setting, the memory card used, or shooting conditions.
• Focus, exposure, and hue are fixed at the values determined with the first image in
each series.
y M e Night portrait
• On the screen displayed when e Night portrait is selected, select u Hand-held
or w Tripod.
• u Hand-held (default setting):
-While the e icon on the shooting screen is displayed in green, press the
shutter-release button all the way to capture a series of images which are
combined into a single image and saved.
- Once the shutter-release button is pressed all the way, hold the camera still until
a still image is displayed. After taking a picture, do not turn the camera off before
the monitor switches to the shooting screen.
- If the subject moves while the camera is shooting continuously, the image may
be distorted, overlapped, or blurred.
• w Tripod:
- One image is captured at a slow shutter speed when the shutter-release button
is pressed all the way.
- Vibration redu ction is disabled even when Photo VR (A111) in the setup menu
is set to On.
y M f Party/indoor
• To avoid the effects of camera shake, hold the camera steady. Set Photo VR
(A111) to Off in the setup menu when using a tripod to stabilize the camera
during shooting.
Shooting Features
25
Page 85
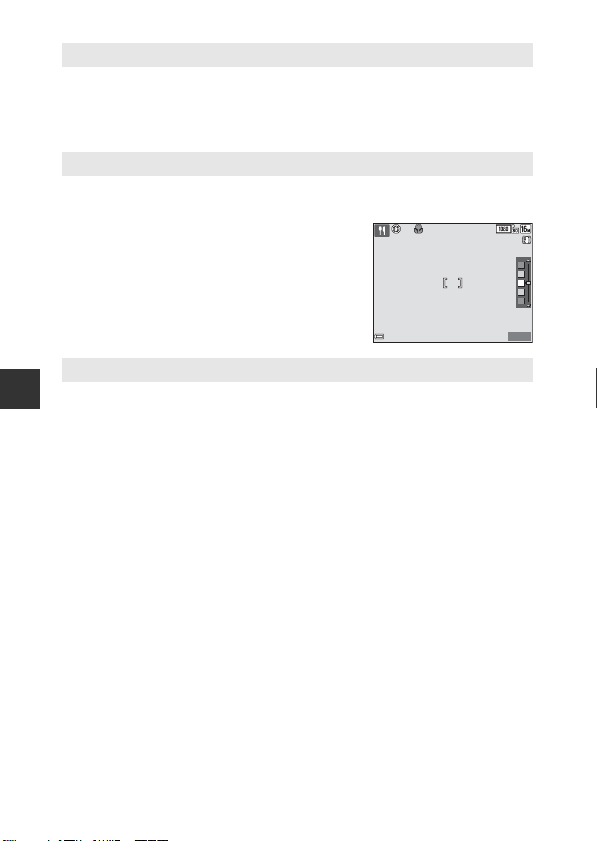
y M k Close-up
• Macro mode (A45) is enabled and the camera automatically zooms to the closest
position at which it can focus.
• You can move the focus area. Press the k button, use the multi selector HIJK
to move the focus area, and press the k button to apply the setting.
y M u Food
• Macro mode (A45) is enabled and the camera automatically zooms to the closest
position at which it can focus.
• You can adjust hue by using the multi selector
HI. The hue setting is saved in the camera’s
memory even after the camera is turned off.
• You can move the focus area. Press the k button,
use the multi selector HIJK to move the focus
area, and press the k button to apply the setting.
y M m Fireworks show
• The shutter speed is fixed at 4 seconds.
• The zoom is restricted to 4 fixed positions.
Shooting Features
25m
880
0s
26
Page 86
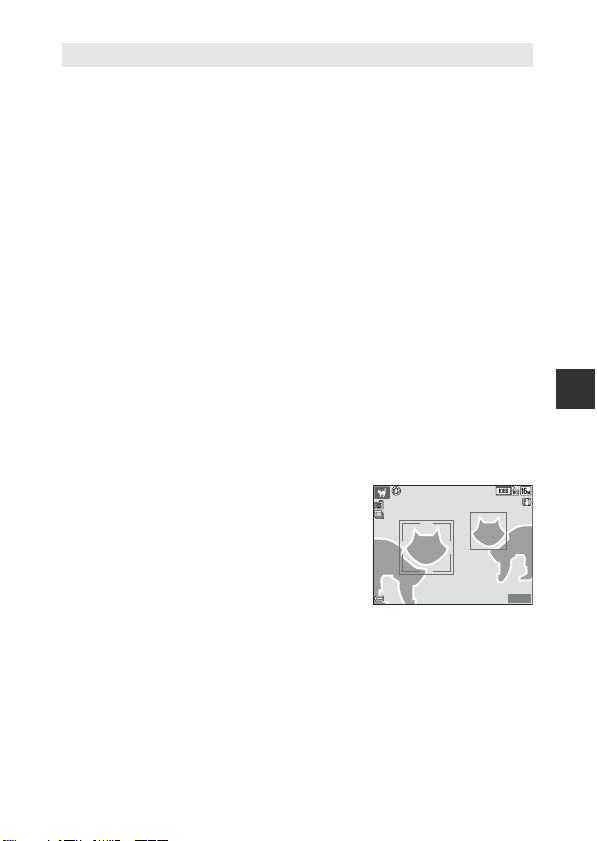
y M O Pet portrait
• When you point the camera at a dog or cat, the camera detects the pet’s face and
focuses on it. By default, the camera detects a dog or cat face and automatically
releases the shutter (pet portrait auto release).
• On the screen displayed when O Pet portrait is selected, select U Single or V
Continuous.
- U Single: The camera captures one image when a dog or cat face is detected.
- V Continuous: The camera captures three images continuously when a dog
or cat face is detected.
B Pet Portrait Auto Release
• Press the multi selector J (n) to change the Pet portrait auto release setting.
- Y: The camera detects a dog or cat face and automatically releases the shutter.
- k: The camera does not release the shutter automatically, even if a dog or cat
face is detected. Press the shutter-release button. The camera also detects
human faces when k is selected.
• Pet portrait auto release is set to k after 5 bursts have been taken.
• Shooting is also possible by pressing the shutter-release button, regardless of the
Pet portrait auto release setting.
When V Continuous is selected, you can take pictures continuously while
holding down the shutter-release button all the way.
B Focus Area
• When the camera detects a face, the face is
displayed inside a yellow border. When the
camera acquires focus on a face displayed inside a
double border (focus area), the double border
changes to green. If no faces are detected, the
camera focuses on the subject in the center of the
frame.
• Under some shooting conditions, the pet face
may not be detected and other subjects may be displayed inside a border.
25m
880
Shooting Features
0s
27
Page 87
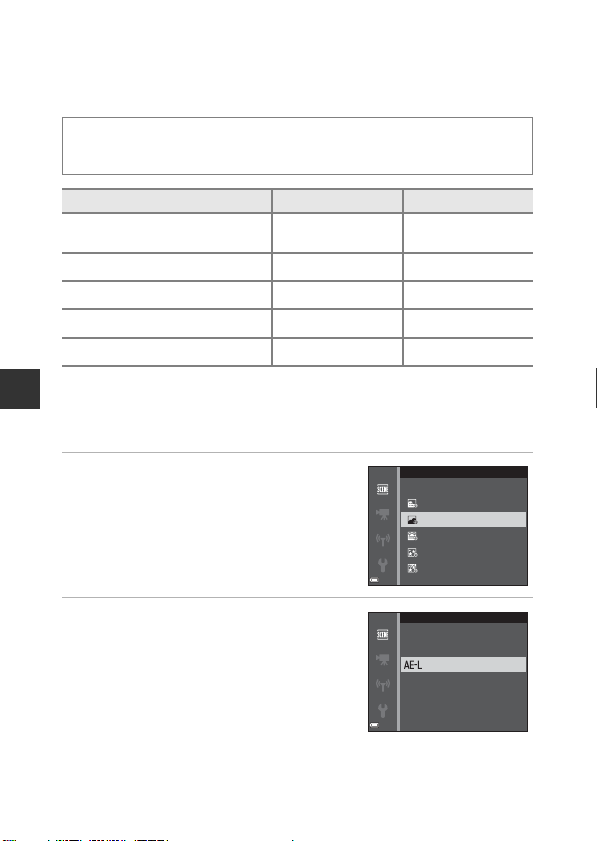
Shooting Time-lapse Movies
Star trails (150 minutes)
Night sky (150 minutes)
Sunset (50 minutes)
Landscape (25 minutes)
Cityscape (10 minutes)
Time-lapse movie
The camera can automatically capture 300 still images at a specified interval to
create time-lapse movies (e1080/30p) that are approximately 10 seconds
long.
Rotate the mode dial to y M d button M N Time-lapse movie M
k button
Type Interval time Recording time
Cityscape (10 minutes)
O
(default setting)
P Landscape (25 minutes) 5 s 25 min
Q Sunset (50 minutes) 10 s 50 min
R Night sky (150 minutes)
S Star trails (150 minutes)
1
Suited for recording the movement of stars. The focus is fixed at infinity.
2
The zoom is restricted to 4 fixed positions.
3
Star movement appears as lines of light due to image processing. The focus is
Shooting Features
fixed at infinity.
1, 2
2, 3
2 s 10 min
30 s 2 h 30 min
30 s 2 h 30 min
1 Use the multi selector HI to
select a type, and press the k
button.
2 Select whether or not to fix
exposure (brightness), and press
the k button (except Night sky
and Star trails).
• If AE-L on is selected, the exposure used for
28
the first image is used for all images. Use of
AE-L off is recommended when the
changes in brightness of the subject are
significant, such as in the twilight.
Time-lapse movie
AE-L on
AE-L o
Page 88
3 Stabilize the camera by using a tool such as a tripod.
4 Press the shutter-release button to
capture the first image.
• Set exposure compensation (A49) before
releasing the shutter for the first image.
Exposure compensation cannot be changed
after the first image is captured. Focus and
hue are fixed when the first image is
captured.
• The shutter is automatically released for the second and subsequent images.
• The monitor may turn off while the camera is not capturing images.
• Shooting ends automatically when 300 images are captured.
• To end shooting manually before 300 images are captured, press the k
button.
• Sound and still images cannot be saved.
AE-L
22m 5s
End recording
B Notes About Time-lapse Movie
• The camera cannot capture images if a memory card is not inserted. Do not
exchange the memory card until shooting is complete.
• Use a fully charged battery to prevent the camera from turning off unexpectedly.
• Time-lapse movies cannot be recorded by pressing the b (e) button.
• Do not rotate the mode dial until shooting is complete.
• Vibration reduction is disabled even when Photo VR (A111) in the setup menu is
set to On.
Shooting Features
29
Page 89
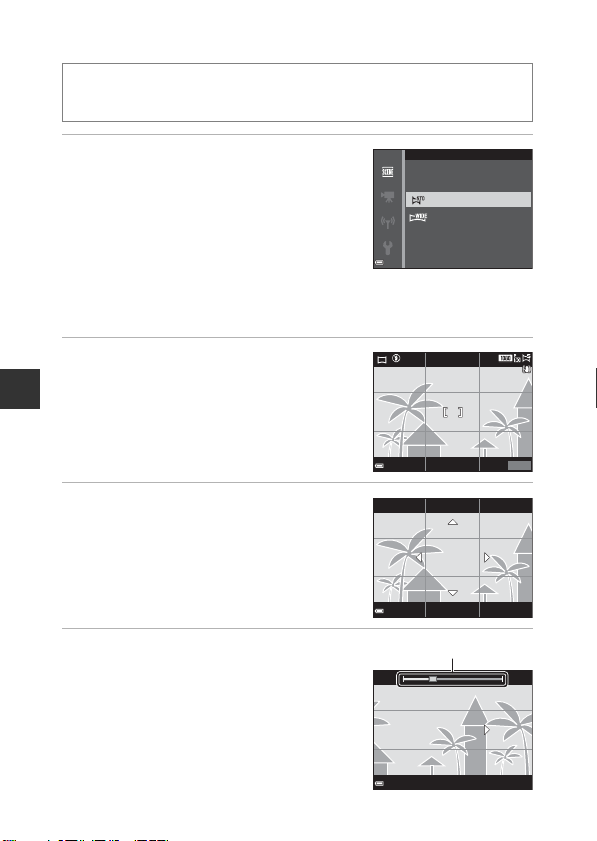
Shooting with Easy Panorama
Guide
Rotate the mode dial to y M d button M p Easy panorama M
k button
1 Select W Normal or X Wide
as the shooting range and press the
k button.
• When the camera is readied in the horizontal
position, the image size (width × height) is as
follows:
- W Normal: 4800 × 920 when moved
horizontally, 1536 × 4800 when moved
vertically
- X Wide: 9600 × 920 when moved horizontally, 1536 × 9600 when
moved vertically
2 Frame the first edge of the
panorama scene, and then press
the shutter-release button halfway
Shooting Features
to focus.
• The zoom position is fixed at wide-angle
position.
• The camera focuses in the center of the frame.
3 Press the shutter-release button all
the way, and then remove your
finger from the shutter-release
button.
• KLJI are displayed to indicate the
direction of camera movement.
4 Move the camera in one of the four
directions until the guide indicator
reaches the end.
• When the camera detects which direction it
is moving in, shooting begins.
• Shooting ends when the camera captures
the specified shooting range.
• Focus and exposure are locked until
shooting ends.
Easy panorama
Normal
Wide
25m
880
0s
30
Page 90

Example of camera movement
• Using your body as the axis of rotation, move the camera slowly in an arc, in
the direction of the marking (KLJI).
• Shooting stops if the guide does not reach the edge within about 15
seconds (when W Normal is selected) or within about 30 seconds (when
X Wide is selected) after shooting starts.
B Notes About Easy Panorama Shooting
• The range of the image seen in the saved image is narrower than that seen in the
monitor at the time of shooting.
• If the camera is moved too quickly or shaken too much, or if the subject is too
uniform (e.g. walls or darkness), an error may occur.
• If shooting is stopped before the camera reaches the half-way point in the
panorama range, a panorama image is not saved.
• If more than half of the panorama range is captured but shooting ends before
reaching the edge of the range, the range not captured is recorded and displayed
in gray.
Shooting Features
31
Page 91
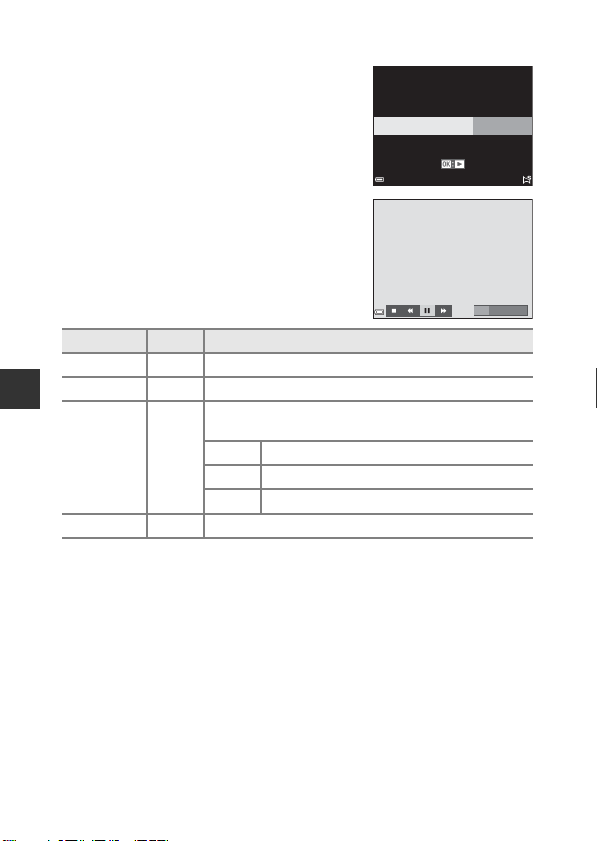
Playback with Easy Panorama
Switch to playback mode (A16), display an
image captured using easy panorama in fullframe playback mode, and then press the k
button to scroll the image in the direction that
was used when shooting.
0004. JPG
15/11/2015 15:30
Playback controls are displayed in the monitor
during playback.
Use the multi selector JK to select a control,
and then press the k button to perform the
operations described below.
Function Icon Description
Rewind A Hold down the k button to scroll backward quickly.
Advance B Hold down the k button to scroll forward quickly.
Shooting Features
Pause E
End G Switch to full-frame playback mode.
Pause playback. The operations listed below can be
performed while paused.
C Hold down the k button to rewind.
D Hold down the k button to scroll.
F Resume automatic scrolling.
B Notes About Easy Panorama Images
• The images cannot be edited on this camera.
• This camera may not be able to scroll the playback of, or zoom in on, easy
panorama images captured with another make or model of digital camera.
B Notes About Printing Panorama Images
The entire image may not be able to be printed depending on the printer’s settings.
Additionally, printing may not be possible depending on the printer.
4 / 4
32
Page 92
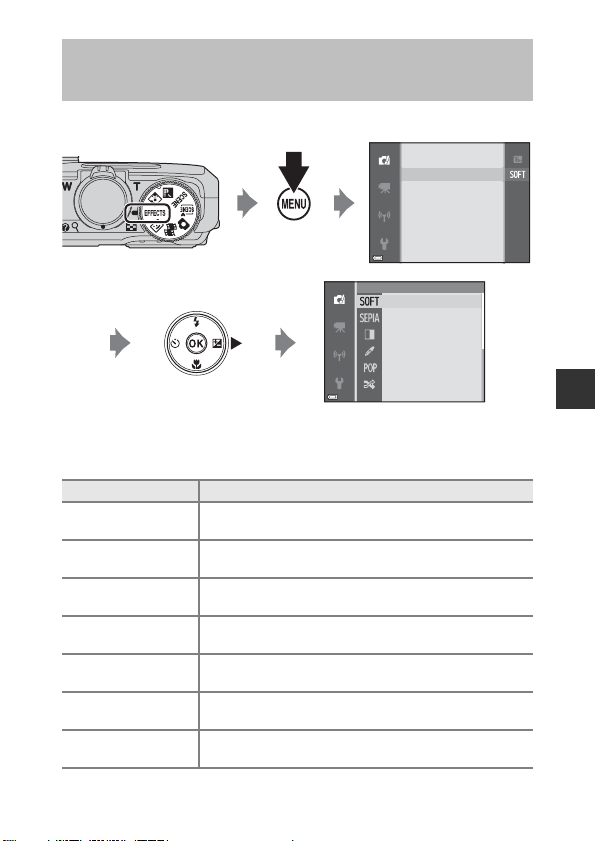
Special Effects Mode (Applying Effects
Press the d (menu) button to display the special effects menu and select an effect
using the multi selector.
When Shooting)
Effects can be applied to images during shooting.
Image mode
Special eects
Special eects
Soft
Nostalgic sepia
Nostalgic sepia
High-contrast mono.
High-contrast mono.
Selective color
Selective color
Pop
Pop
Cross process
Cross process
Type Description
O Soft*
(default setting)
P Nostalgic
sepia*
F High-contrast
mono.*
I Selective color
l Pop
o Cross process
m Toy camera
effect 1*
Softens the image by adding a slight blur to the entire
image.
Adds a sepia tone and reduces the contrast to simulate
the qualities of an old photograph.
Changes the image to black and white and gives it sharp
contrast.
Creates a black and white image in which only the
specified color remains.
Increases the color saturation of the entire image to create
a bright look.
Gives the image a mysterious appearance based on a
specific color.
Gives the entire image a yellowish hue and darkens the
image periphery.
Shooting Features
33
Page 93
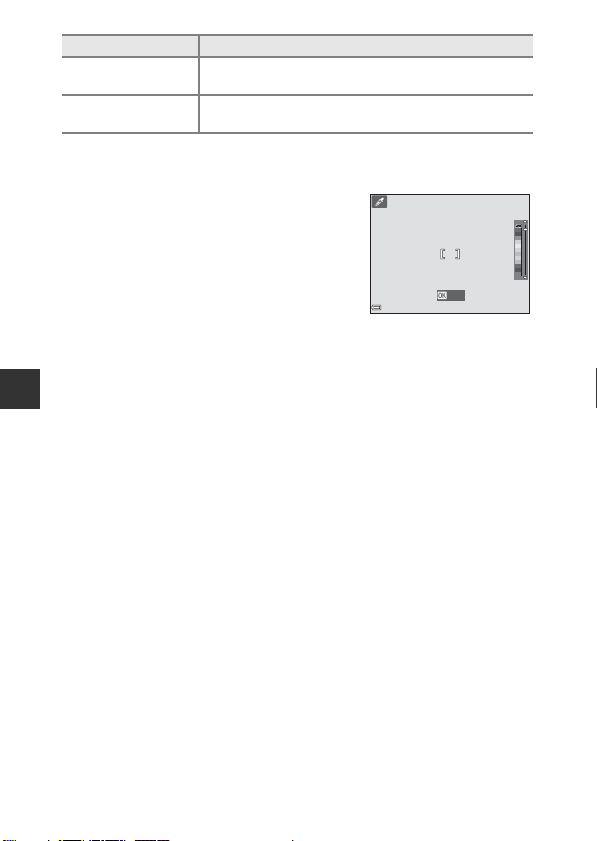
Type Description
n Toy camera
effect 2*
b Mirror*
*Certain Movie options (A97) are not available.
Decreases the color saturation of the entire image and
darkens the image periphery.
Creates a bilaterally symmetric image whose right half is
an inverted mirror image of the left half.
• The camera focuses on the area in the center of the frame.
• When Selective color or Cross process is
selected, use the multi selector HI to select
the desired color, and press the k button to
apply the color. To change the color
selection, press the k button again.
Shooting Features
Save
34
Page 94
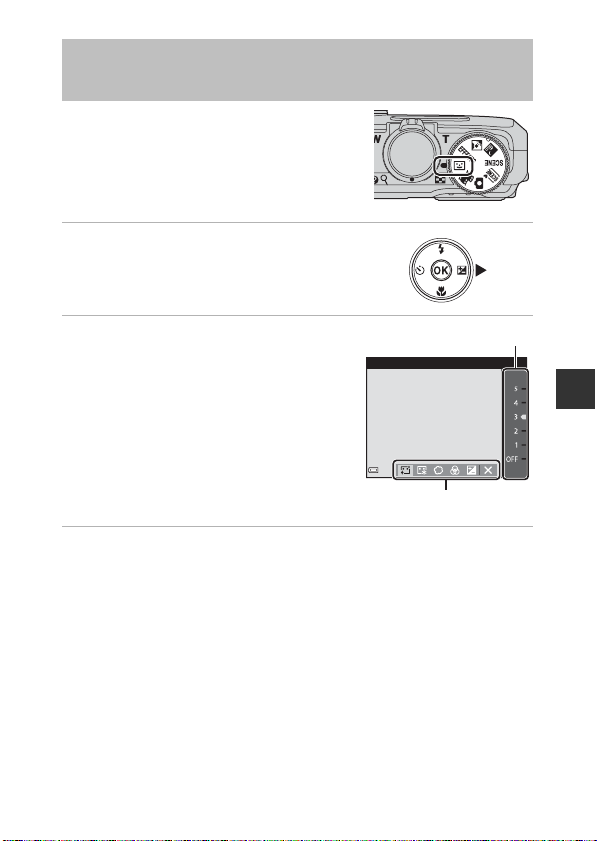
Smart Portrait Mode (Enhancing Human
Slider
Effects
Faces When Shooting)
You can take a picture with the glamour retouch
function to enhance human faces.
1 Press the multi selector K.
2 Apply an effect.
• Use JK to select the desired effect.
• Use HI to select the amount of effect.
• You can simultaneously apply multiple
effects.
B Skin softening, l Foundation
makeup, Q Soft, G Vividness, o
Brightness (Exp. +/-)
• Select f Exit to hide the slider.
• After configuring the desired effects, press
the k button to apply them.
Skin softening
3 Frame the picture and press the shutter-release button.
B Notes About Smart Portrait Mode
• The amount of effect may differ between the image on the shooting screen and
the saved image.
• When Soft is set, some Movie options (A97) are not available.
Shooting Features
35
Page 95
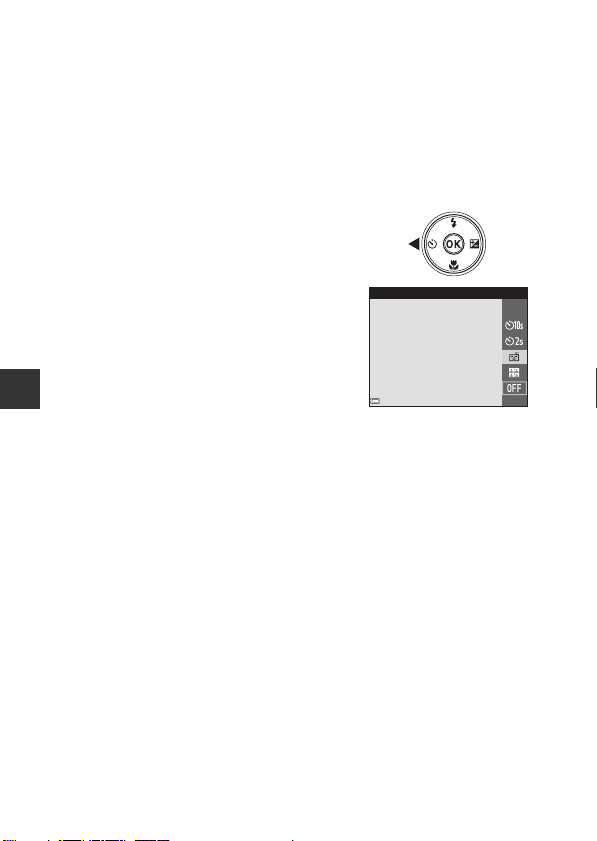
Functions Available in Smart Portrait Mode
• Glamour retouch (A35)
• Smile timer (A36)
• Self-Collage (A37)
• Flash mode (A41)
• Self-timer (A43)
• Smart portrait menu (A89)
Using Smile Timer
When you press the multi selector J to select
a Smile timer and press the k button, the
camera automatically releases the shutter
whenever a smiling face is detected.
• Set the glamour retouch function before
selecting smile timer (A35).
• When you press the shutter-release button to
take a picture, smile timer is terminated.
Shooting Features
Smile timer
B Notes About Smile Timer
• Under some shooting conditions, the camera may be unable to detect faces or
smiles (A53). The shutter-release button can also be used for shooting.
• This function may not be available to use in combination with other functions
(A56).
C When the Self-timer Lamp Flashes
When using smile timer, the self-timer lamp flashes when the camera detects a face
and flashes quickly immediately after the shutter is released.
36
Page 96
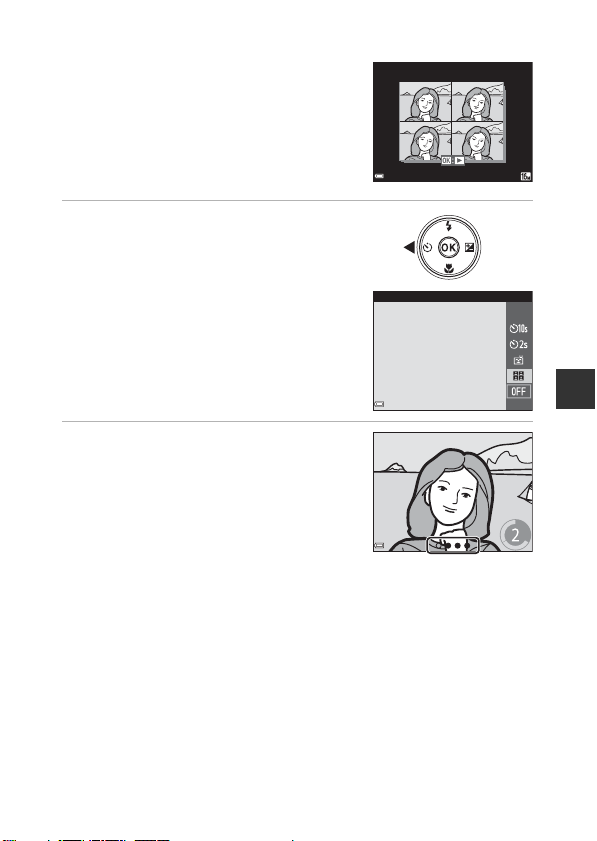
Using Self-Collage
The camera can capture a series of 4 or 9 images
at intervals and save them as a one-frame image
(a collage image).
0004. JPG
15/11/2015 15:30
1 Press the multi selector J to
select n Self-Collage, and press
the k button.
• A confirmation dialog is displayed.
• When you press the d button and select
Self-Collage before pressing J, you can
configure the settings for Number of
shots, Interval, and Shutter sound
(A89).
• If you want to apply glamour retouch when
shooting, set the effect before selecting
self-collage (A35).
Self-Collage
2 Take a picture.
• When you press the shutter-release button,
a countdown starts (about five seconds)
and the shutter is automatically released.
• The camera automatically releases the
shutter for the remaining pictures. A
countdown starts about three seconds
before shooting.
• The number of shots is indicated by U in
the monitor. It is displayed in green during
shooting and it changes to white after shooting.
• When the camera finishes taking the specified number of shots, the collage
image is saved.
• Each captured image is saved as an individual image separate from the
collage image.
B Notes About Self-Collage
• If you press the shutter-release button before the camera takes the specified
number of shots, shooting is canceled and the collage image is not saved. The
pictures that were taken before shooting was canceled are saved as individual
images.
• This function may not be available to use in combination with other functions
(A56).
1 / 5
Shooting Features
37
Page 97
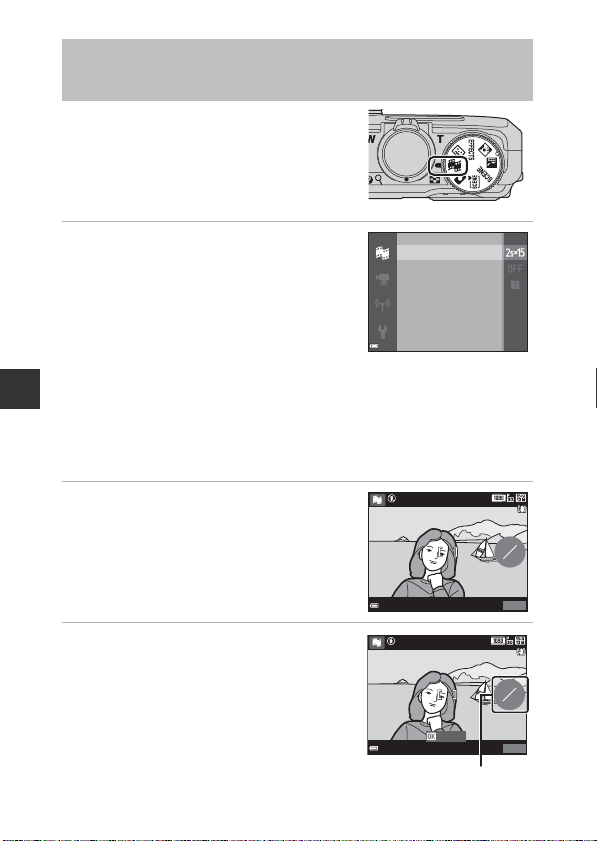
Short Movie Show Mode (Combining
Number of movie
clips recorded
Movie Clips to Create Short Movies)
You can create a short movie (e1080/30p or
S1080/25p) that is up to 30 seconds long
by recording and automatically combining
multiple movie clips that are several seconds
long.
1 Press the d (menu) button and
configure the settings for
recording movies.
• Number of s hots: Set the number of movie
clips that the camera records and the
recording time for each movie clip. By
default, the camera records 15 movie clips
that are 2 seconds each to create a 30second short movie.
• Special effects: Apply various effects to movies when shooting (A33).
Shooting Features
Effects can be changed for each movie clip.
• Background music: Select the background music. Move the zoom control
(A1) toward g (i) to preview it.
• After the settings are complete, press the d button or shutter-release
button to exit the menu.
2 Press the b (e movie-record)
button to record a movie clip.
• The camera stops recording the movie clip
when the time specified in step 1 elapses.
• Movie clip recording can be paused
temporarily.
See “Pausing Movie Recording” (A40).
3 Check the recorded movie clip, or
delete it.
• To check it, press the k button.
• To delete it, press the l button. The last
recorded movie clip or all movie clips can
be deleted.
• To continue recording movie clips, repeat
the operation in step 2.
• To change the effects, return to step 1.
38
Number of shots
Special eects
Background music
End recording
Preview
0
15
25m 0s
880
12
15
24m36s
880
Page 98
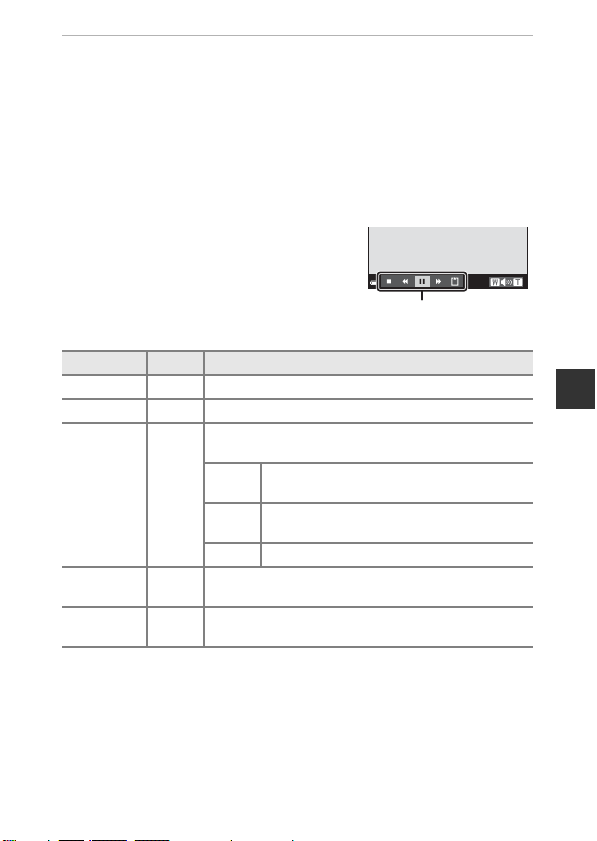
4 Save the short movie show.
Playback controls
• The short movie show is saved when the camera finishes recording the
specified number of movie clips.
• To save a short movie show before the camera finishes recording the
specified number of movie clips, press the d button on the shooting
screen while a movie clip is not being recorded, and then select End
recording.
• Movie clips are deleted when a short movie show is saved.
Operations During Movie Clip Playback
To adjust the volume, move the zoom control
while a movie clip is playing (A1).
Playback controls are displayed in the monitor.
The operations described below can be
performed by using the multi selector JK to
select a control and then pressing the k
button.
Function Icon Description
Rewind A Hold down the k button to rewind the movie.
Advance B Hold down the k button to advance the movie.
Pause playback. The operations listed below can be
performed while paused.
Rewind the movie one frame. Hold down the
C
Pause E
End
playback
End
recording
G Return to the shooting screen.
p
k button for continuous rewinding.
Advance the movie one frame. Hold down the
D
k button for continuous advancing.
F Resume playback.
Save the short movie show using the recorded movie
clips.
Shooting Features
B Notes About Recording a Short Movie Show
• The camera cannot record movies if a memory card is not inserted.
• Do not exchange the memory card until a short movie show is saved.
39
Page 99

C Pausing Movie Recording
• A still image (l 4608×2592) can be captured if you press the shutter-release
button on the shooting screen while a movie is not being recorded.
• You can pause movie recording and play back images or enter other shooting
modes to take pictures. Movie recording resumes when you enter n (short movie
show) mode again.
Functions Available in Short Movie Show Mode
• Self-timer (A43)
• Macro mode (A45)
• Exposure compensation (A49)
• Movie options menu (A97)
Shooting Features
40
Page 100
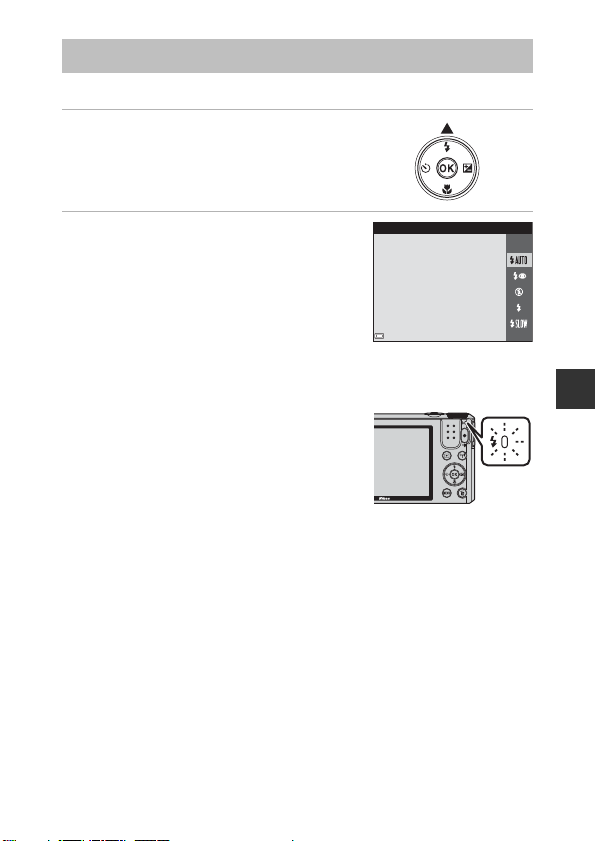
Flash Mode
You can select a flash mode to match the shooting conditions.
1 Press the multi selector H (m).
2 Select the desired flash mode
Auto
(A42) and press the k button.
• If the setting is not applied by pressing the
k button within a few seconds, the
selection will be canceled.
C The Flash Lamp
• The status of the flash can be confirmed by
pressing the shutter-release button halfway.
- On: The flash fires when you press the
shutter-release button all the way down.
- Flashing: The flash is charging. The camera
cannot shoot images.
- Off: The flash does not fire when a picture is
taken.
• If the battery level is low, the monitor turns off while the flash is charging.
Shooting Features
41
 Loading...