

Page 1
The Nikon Guide to Digital Photography
with the
DIGITAL CAMERA
En
Page 2
Overview
Thank you for your purchase of a COOLPIX4300 digital camera.
The documentation for this product includes the manuals listed below. Please be
sure to read all instructions thoroughly to get the most from your camera.
Quick-Start Guide
The Quick-Start Guide takes you through the process of unpacking and setting
up your Nikon digital camera, taking your first pictures, and transferring them to
your computer.
Guide to Digital Photography
The Guide to Digital Photography (this manual) provides complete operating
instructions for your camera.
Nikon View Reference Manual
The Nikon View Reference Manual can be found in electronic format on the
reference CD provided with your camera.
Symbols
To make it easier to find the information you need, the following symbols and
conventions are used in this manual:
This icon marks cautions,
information that you should
read before use to prevent
damage to your camera.
This icon marks notes,
information that you should
read before using your camera.
This icon marks tips, additional
information you may find helpful
when using your camera.
32
Page 3
For Your Safety
To prevent damage to your Nikon product or injury to yourself or to others, read the
following safety precautions in their entirety before using this equipment. Keep
these safety instructions where all those who use the product will read them.
The consequences that could result from failure to observe the precautions listed in
this section are indicated by the following symbols:
This icon marks warnings, information that should be read before using
your Nikon product to prevent possible injury.
WARNINGS
Do not look at the sun through
the viewfinder
Viewing the sun or other strong
light source through the viewfinder
could cause permanent visual
impairment.
Turn off immediately in the
event of malfunction
Should you notice smoke or an
unusual smell coming from the
equipment or from the AC adapter
(available separately), unplug the
AC adapter and remove the battery
immediately, taking care to avoid
burns. Continued operation could
result in injury. After removing the
battery, take the equipment to a
Nikon-authorized service center for
inspection.
Do not use in the presence of
flammable gas
Do not use electronic equipment in
the presence of flammable gas, as
this could result in explosion or fire.
Do not place strap around neck
Placing the camera strap around
your neck could result in
strangulation. Special care should
be taken to avoid placing the strap
around the neck of an infant or
child.
4
Do not disassemble
Touching the product’s internal
parts could result in injury. In the
event of a malfunction, the product
should be repaired only by a
qualified technician. Should the
product break open as the result of
a fall or other accident, remove the
battery and/or AC adapter and then
take the product to a Nikonauthorized service center for
inspection.
Observe proper precautions
when handling batteries
Batteries may leak or explode if
improperly handled. Observe the
following precautions when
handling batteries for use in this
product:
• Be sure the product is off before
replacing the battery. If you are
using an AC adapter, be sure it is
unplugged.
• Use only the Nikon EN-EL1
rechargeable lithium-ion battery
(supplied) or a six-volt 2CR5
(DL245) lithium battery (available
separately).
• The EN-EL-1 is for use only with
selected Nikon Digital cameras.
Do not use the EN-EL1 in
equipment not approved for use
with this battery.
• When inserting the battery, do not
attempt to insert it upside down
or backwards.
• Do not short or disassemble the
battery.
• Do not expose the battery to
flame or to excessive heat.
• Do not immerse in or expose to
water.
• Do not transport or store with
metal objects such as necklaces
or hairpins.
• Batteries are prone to leakage
when fully discharged. To avoid
damage to the product, be sure
to remove the battery when no
charge remains.
• When the battery is not in use,
attach the terminal cover and
store in a cool place.
• Immediately after use, or when
the product is used on battery
power for an extended period, the
battery may become hot. Before
removing the battery, turn the
camera off and allow the battery
to cool.
• When used with a 2CR5 (DL245)
lithium battery, the camera grip
may become noticeably warm,
but this does not indicate a
malfunction.
• Discontinue use immediately
should you notice any changes in
the battery, such as discoloration
or deformation.
Use appropriate cables
When connecting cables to the
input and output jacks, use only the
cables provided or sold by Nikon
for the purpose, to maintain
compliance with product
regulations.
Keep out of reach of children
Particular care should be taken to
prevent infants from putting the
battery or other small parts into
their mouths.
Removing memory cards
Memory cards may become hot
during use. Observe due caution
when removing memory cards from
the camera.
CD-ROMs
The CD-ROMs on which the
software and manuals are
distributed should not be played
back on audio CD equipment.
Playing CD-ROMs on an audio CD
player could cause hearing loss or
damage the equipment.
Observe caution when
operating the flash
Using the flash close to your
subject's eyes could cause
temporary visual impairment.
Particular care should be observed
if photographing infants, when the
flash should be no less than one
meter (3.3 ft.) from the subject.
When using the viewfinder
When operating the mode dial and
the zoom button with your eye to
the viewfinder, care should be taken
not to put your finger in your eye
accidentally.
Avoid contact with liquid crystal
Should the monitor break, care
should be taken to avoid injury due
to broken glass and to prevent
liquid crystal from the monitor
touching the skin or entering the
eyes or mouth.
5
Page 4

Notices
E4300
FOR HOME OR OFFICE USE
Tested To Comply
With FCC Standards
• No part of the manuals included with
this product may be reproduced,
transmitted, transcribed, stored in a
retrieval system, or translated into any
language in any form, by any means,
without Nikon’s prior written permission.
• Nikon reserves the right to change the
specifications of the hardware and
software described in these manuals at
any time and without prior notice.
Notice for customers in the U.S.A.
Federal Communications Commission (FCC) Radio Frequency Interference Statement
This equipment has been tested and found to
comply with the limits for a Class B digital
device, pursuant to Part 15 of the FCC rules.
These limits are designed to provide reasonable
protection against harmful interference in a
residential installation. This equipment
generates, uses, and can radiate radio
frequency energy and, if not installed and used
in accordance with the instructions, may cause
harmful interference to radio communications.
However, there is no guarantee that interference
will not occur in a particular installation. If this
equipment does cause harmful interference to
radio or television reception, which can be
determined by turning the equipment off and
on, the user is encouraged to try to correct the
interference by one or more of the following
measures:
• Reorient or relocate the receiving antenna.
• Increase the separation between the
equipment and receiver.
• Connect the equipment into an outlet on a
circuit different from that to which the receiver
is connected.
• Consult the dealer or an experienced
radio/television technician for help.
6 7
• Nikon will not be held liable for any
damages resulting from the use of this
product.
• While every effort has been made to
ensure that the information in these
manuals is accurate and complete, we
would appreciate it were you to bring
any errors or omissions to the attention
of the Nikon representative in your area
(address provided separately).
CAUTIONS
Modifications
The FCC requires the user to be
notified that any changes or
modifications made to this device
that are not expressly approved by
Nikon Corporation may void the
user's authority to operate the
equipment.
Interface Cables
Use the interface cables sold or
provided by Nikon for your
equipment. Using other interface
cables may exceed the limits of
Class B Part 15 of the FCC rules.
Nikon Inc.,
1300 Walt Whitman Road,
Melville, New York
11747-3064, U.S.A.
Tel.: 631-547-4200
Notice for customers in Canada
CAUTION
This class B digital apparatus meets all
requirements of the Canadian Interference
Causing Equipment Regulations.
ATTENTION
Cet appareil numérique de la classe B
respecte toutes les exigences du
Règlement sur le matériel brouilleur du
Canada.
Notice Concerning Prohibition of Copying or Reproduction
Note that simply being in possession of material that has been digitally copied or
reproduced by means of a scanner, digital camera or other device is punishable by law.
• Items prohibited by law from being
copied or reproduced
Do not copy or reproduce paper money,
coins, securities, government bonds, or
local government bonds, even if such
copies or reproductions are stamped
"Sample."
The copying or reproduction of paper
money, coins, or securities which are
circulated in a foreign country is
prohibited.
Unless the prior permission of the
government has been obtained, the
copying or reproduction of unused
postage stamps or post cards issued by
the government is prohibited.
The copying or reproduction of stamps
issued by the government and of
certified documents stipulated by law is
prohibited.
• Cautions on certain copies and
reproductions
The government has issued cautions on
copies or reproductions of securities
issued by private companies (shares, bills,
checks, gift certificates, etc.), commuter
passes, or coupon tickets, except when a
minimum of necessary copies are to be
provided for business use by a company.
Also, do not copy or reproduce passports
issued by the government, licenses
issued by public agencies and private
groups, ID cards, and tickets, such as
passes and meal coupons.
• Comply with copyright notices
The copying or reproduction of
copyrighted creative works such as
books, music, paintings, woodcut prints,
maps, drawings, movies, and
photographs is governed by national and
international copyright laws. Do not use
this product for the purpose of making
illegal copies or to infringe copyright laws.
Trademark Information
Apple, the Apple logo, Macintosh, Mac OS, Power Macintosh, PowerBook, and
QuickTime are registered trademarks of Apple Computer, Inc. Finder, Macintosh PC
Exchange, Power Mac, iMac, and iBook are trademarks of Apple Computer, Inc. IBM
and IBM PC/AT are registered trademarks of International Business Machines
Corporation. PowerPC is a trademark of International Business Machines Corporation,
used under license. Microsoft is a registered trademark, and Windows, MS-Windows
and Windows NT trademarks, of Microsoft Corporation. Internet Explorer is a product of
Microsoft Corporation. Pentium and i486 are trademarks of Intel Corporation. Internet is
a trademark of Digital Equipment Corporation. Netscape and Netscape Navigator are
registered trademarks of Netscape Communications Corporation. CompactFlash is a
trademark of SanDisk Corporation. Lexar Media is a trademark of Lexar Media
Corporation. Adobe and Acrobat are registered trademarks of Adobe Systems Inc. Zip is
a registered trademark of Iomega Corporation in the U.S. and other countries. All other
trade names mentioned in this manual or the other documentation provided with your
Nikon product are trademarks or registered trademarks of their respective holders.
Page 5

Table of Contents
Overview ............................................................................................................3
For Your Safety ...............................................................................................4-5
Notices ...........................................................................................................6-7
Introduction ................................................................................11-22
Parts of the COOLPIX4300.........................................................12-15
First Steps ...................................................................................16-22
1. Attach the Camera Strap and Lens Cap.................................................16
2. Insert the Battery...............................................................................16-18
3. Insert the Memory Card.....................................................................18-19
4. Choose a Language ...............................................................................20
5. Set the Date and Time ......................................................................21-22
Getting Started...........................................................................23-38
Taking Pictures............................................................................24-29
1. Ready the Camera............................................................................24-25
2. Compose the Picture........................................................................26-27
3. Focus and Shoot ...................................................................................28
4. Turn the Camera Off...............................................................................29
Reviewing Your Pictures.............................................................30-33
Quick Review ..............................................................................................31
Full-Screen Review......................................................................................32
Thumbnail Review .......................................................................................33
Getting Creative: Select Scene Mode........................................34-38
Beyond Point-and-Shoot: Camera Controls ...........................39-54
Shooting Mode Selection ................................................................40
Focus Mode: The 2 Button................................................41-45
Self-Timer ..............................................................................................42-43
Autofocus Mode (Continuous AF/Single AF)...........................................44-45
Digital Zoom: The yt Button ...............................................46-47
Flash Mode: The 3 Button .....................................................48-49
Making Movies .................................................................................50
Exposure Compensation: The 1 Button .....................................51
Keep or Delete: Picture Review.......................................................52
Sensitivity (ISO Equivalency) (å only) ........................................53
Manual Focus (å only) ................................................................54
Playing Pictures Back: Playback Options ...............................55-64
Full-Screen Playback .............................................................................56-57
Thumbnail Playback ....................................................................................58
Taking a Closer Look: Playback Zoom ........................................................59
Creating a Small Copy of Picture: Small Picture.....................................60-61
Movie Playback ...........................................................................................62
Photo Information ..................................................................................63-64
Connections: Connecting to External Devices .......................65-68
Connecting to a Computer..........................................................................66-67
Connecting to a Television or VCR ...................................................................68
Menu Guide: Camera Menu Options .....................................69-129
Index to Menu Options ...............................................................70-75
Using Camera Menus .................................................................76-78
Viewing the Menus ......................................................................................76
Making a Selection......................................................................................77
Accessing Multi-Page Menus ......................................................................78
The Set-Up Menu........................................................................79-95
To View the SET-UP Menu ..........................................................................79
Making Effective Use of Memory: The Image Size and Quality Menu .....80-82
Organizing Your Pictures: The Folders Menu .........................................83-86
Monitor Options ..........................................................................................87
Conserving Battery Power: Auto Off ...........................................................88
File Numbering: Seq. Number .....................................................................89
CF Card Format ..........................................................................................90
Storing Camera Settings: Controls .............................................................90
Confirming Shutter Release: Shot Confirm Lamp ........................................91
Photo Information and Transfer Setting: Pic Data/Transfer ....................91-92
Date ...........................................................................................................92
Interface ................................................................................................92-94
Language ...................................................................................................94
Restoring Default Settings: Reset All ...........................................................95
8
9
Page 6

The Shooting Menu...................................................................96-116
Keeping Colors True: White-Balance......................................................97-98
Measuring Light: Metering ...........................................................................99
Taking Pictures in a Sequence: Continuous .......................................100-101
Getting Sharper Pictures: BSS (Best-Shot Selector)..................................102
Adjusting Contrast and Brightness: Image Adjustment..............................103
Making Edges More Distinct: Image Sharpening .......................................104
Setting for Optional Lens Converters: Lens........................................105-106
Modifying Sensitivity from a Menu: Sensitivity............................................106
Exposure Options ..............................................................................106-110
Focus Options ...................................................................................111-113
Auto Bracketing .................................................................................114-115
Avoid “Grainy” Photographs: Noise Reduction ..........................................116
The Playback Menu ................................................................117-129
Deleting Pictures and Print Orders: Delete .........................................118-120
Selecting a Folder for Playback: Folders....................................................121
Automated Playback: Slide Show ......................................................122-123
Safeguarding Valuable Images: Protect .....................................................124
Hiding Images During Playback: Hide Image.............................................125
Ordering Prints: Print-Set ...................................................................126-127
Marking All Images for Transfer: Transfer...................................................128
Selecting Small Picture Size: Small Pic......................................................129
Technical Notes: Camera Care, Options and Resources ..131-146
Optional Accessories ..............................................................................132-133
Caring for the Camera and Battery .........................................................134-136
Web Resources..............................................................................................137
Troubleshooting.......................................................................................138-143
Specifications..........................................................................................144-146
Introduction
This chapter is divided into the following
sections:
Parts of the COOLPIX4300
Bookmark this section and refer to it as you read
through the manual for information on the names
and functions of camera parts.
First Steps
Before using your camera for the first time,
complete the steps on the following pages.
Step Page
Step 1
Step 2 Insert the Battery 16-18
Step 3 Insert the Memory Card 18-19
Step 4 Choose a Language 20
Attach the Camera Strap
and Lens Cap
16
Parts of the
COOLPIX4300
pp. 12-15
First Steps
pp. 16-22
Index ........................................................................................148-151
Step 5 Set the Date and Time 21-22
1110
Page 7
16
15
14
13
12
A
11
10
9
17
18
B
19
20
21
22
23
24
25
4
3
2
1
5
6
7
8
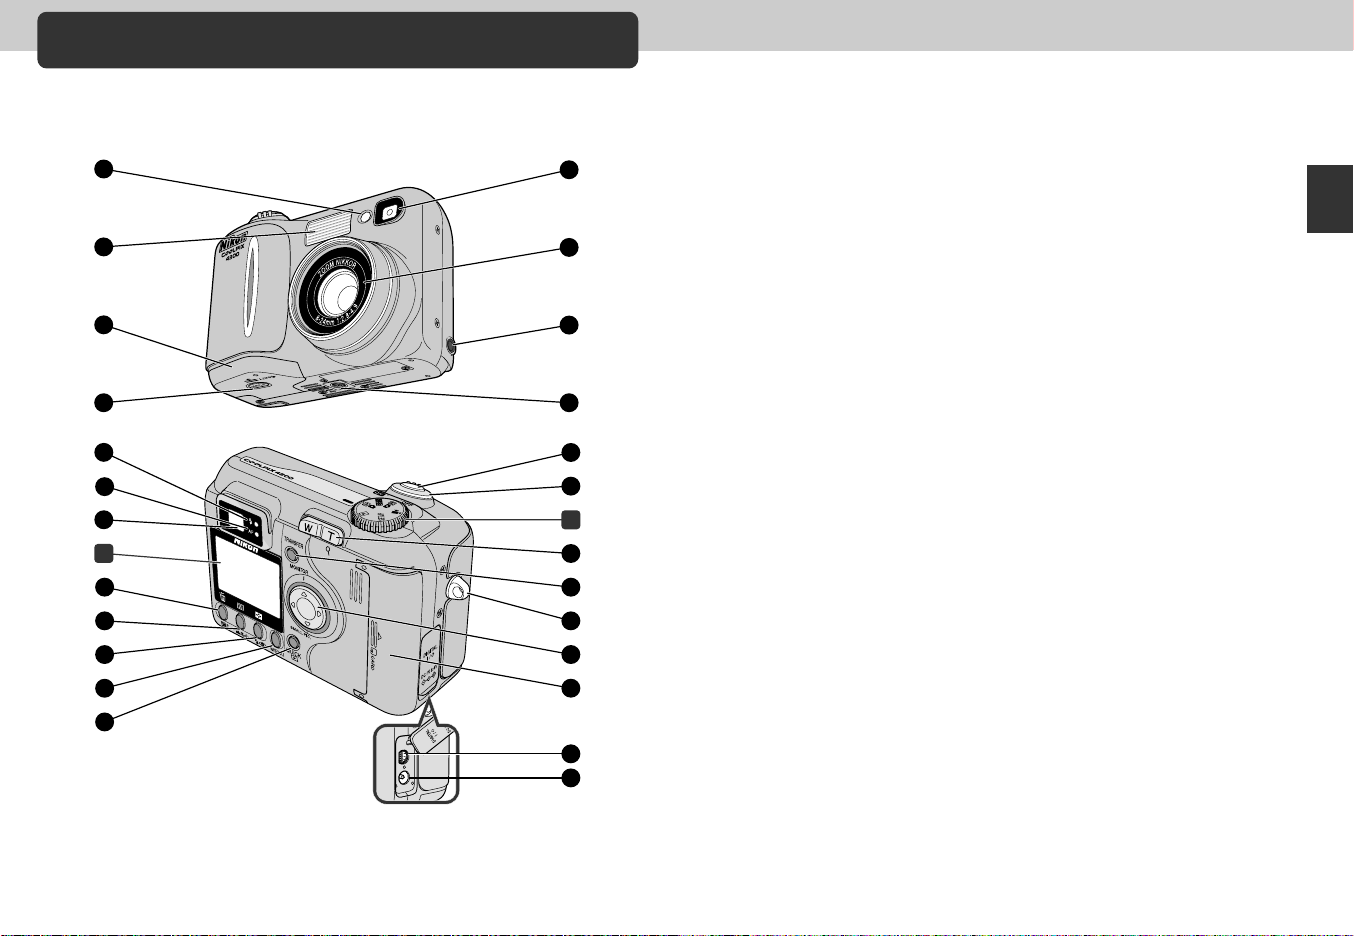
Parts of the COOLPIX4300
The parts of the camera are identified below. For more information on the function
of each part, refer to the page number that follows it.
1 Red-eye reduction/Self-timer lamp .............................p. 48/42
2 Built-in Speedlight ...........................................................p. 48
3 Battery chamber cover ....................................................p. 17
4 Battery chamber cover latch............................................p. 17
5 Viewfinder........................................................................p. 26
6 Lens ..............................................................................p. 144
7 Video output connector ...................................................p. 68
8 Tripod socket
9 Flash-ready lamp (red) .....................................................p. 28
10 Autofocus lamp (green)....................................................p. 28
11 Viewfinder ........................................................................p. 26
12 1 (exposure compensation/sensitivity)/5 button..................
.....................................................p. 51/53/32, 33, 52, 57, 58
13 2 (focus mode/manual focus)/6 button ......p. 41/54/63
14 3 (flash mode)/7 button ...................p. 49/32, 33, 57, 58
15 MENU button ............................................................p. 34, 76
16 QUICK p (quick review) button .....................................p. 30
17 Shutter release button .....................................................p. 28
18 Power switch.............................................................p. 24, 29
19 Zoom button .................................................p. 26, 46, 57, 59
20 TRANSFER button...........................................................p. 67
21 Camera strap eyelet ........................................................p. 16
22 Multi selector
23 Memory card slot cover ...................................................p. 19
24 USB connector (under cover) ..........................................p. 66
25 DC-in connector (under cover).........................................p. 18
A Monitor ...........................................................................p. 14
B Mode dial........................................................................p. 15
Introduction—Parts of the COOLPIX4300
1312
Page 8
15
16
1122 3 5 6 7
24 25 26 27 28 29 30
17
18
19
22
23
21
8
9
10
13
14
11
4
20
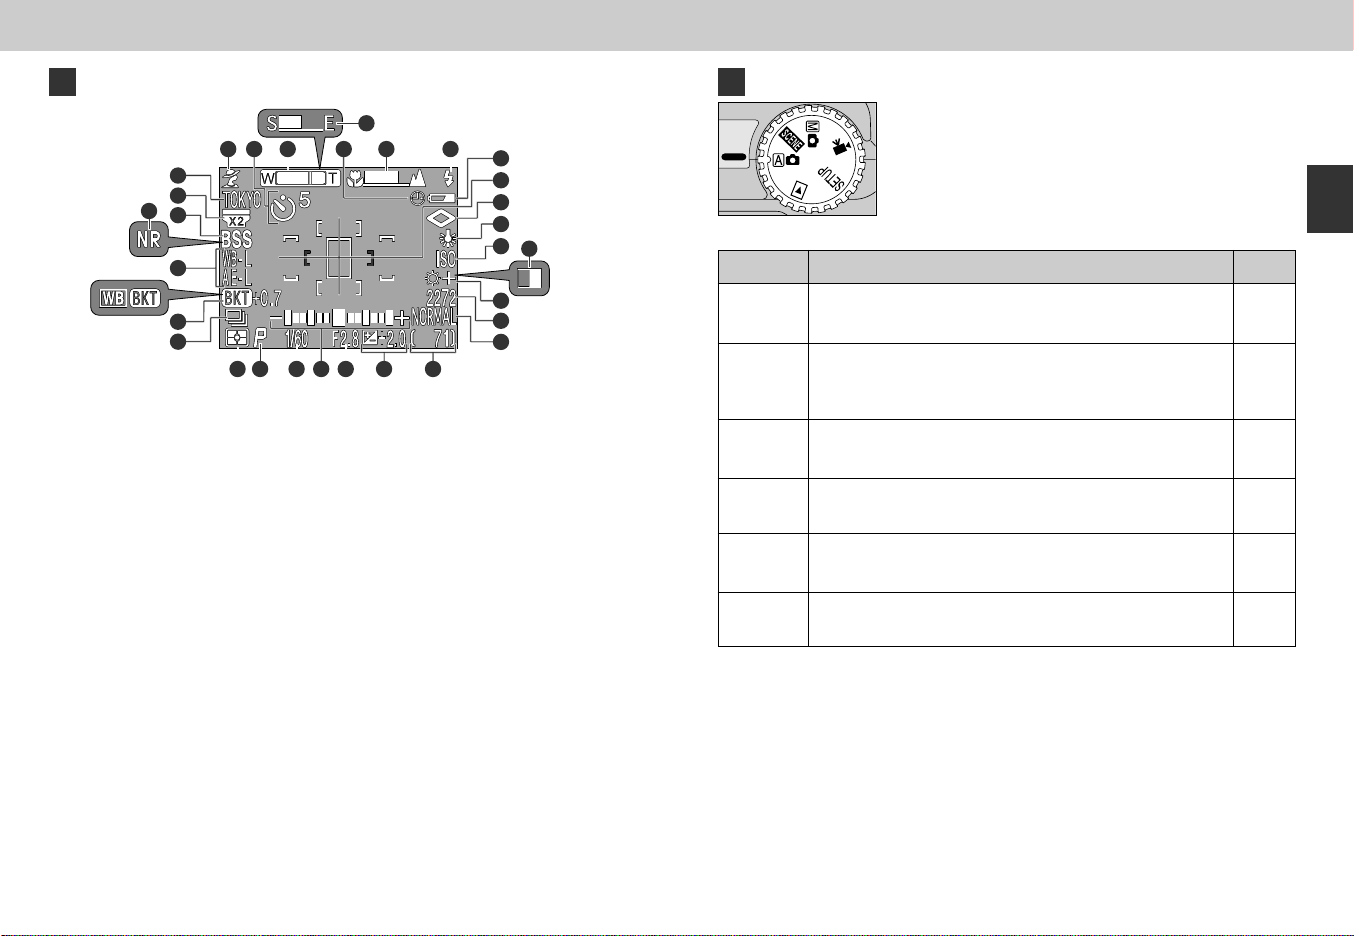
A Monitor
B The Mode dial
Mode
Description
Introduction—Parts of the COOLPIX4300
Page
In the shooting modes, the following indicators appear in the monitor.
1 Scene .......................................p. 34
2 Self-timer ..................................p. 42
3 Zoom indicator ....................p. 26/46
4 Progress bar (Ultra HS) ...........p. 100
5 “Date not set” icon*
1
.................p. 22
6 Manual focus indicator..............p. 54
7 Flash mode...............................p. 48
2
8 Current Folder name*
..............p. 86
9 Converter lens setting .............p. 105
10 Best Shot Selector .................p. 102
11 Noise reduction ......................p. 116
12 Exposure lock (Auto exposure lock/
White balance lock) ................p. 110
13 Bracketing/
White-balance bracketing .......p. 114
14 Continuous setting..................p. 100
15 Battery level indicator*
3
.............p. 25
*1 Blinks if date/time has not been set.
*2 Not displayed when folder name is set to NIKON.
*3 Only displayed when battery power drops below a certain level.
14
16 Spot metering target/
Focus area ........................p. 99/112
17 Image sharpening ...................p. 104
18 White balance...........................p. 97
19 Sensitivity (ISO equivalency)......p. 53
20 Black-and-white .....................p. 103
21 Image adjustment ...................p. 103
22 Image size ................................p. 82
23 Image quality ............................p. 81
24 Metering method ......................p. 99
25 Exposure mode ......................p. 107
26 Shutter speed.........................p. 108
27 Exposure display (manual exposure
mode) .....................................p. 107
28 Aperture .................................p. 107
29 Exposure Compensation ..........p. 51
30 Number of exposures remaining/
Length of movie ..................p. 25/50
a
(Auto)
i
(Scene)
å
(Manual)
m
(Movie)
SETUP
(Setup)
p
(Playback)
An automatic mode for simple, “point-and-shoot”
snapshot pictures.
This mode offers a choice of settings for specific scenes.
Each of the 12 modes optimizes the camera for scenes of
specific type, such as sunsets or portraits.
Gives you complete control of all settings, including
exposure mode.
In this mode, you can record silent movies up to forty
seconds in length.
This mode lets you configure the camera’s basic settings
such as date, time etc.
This mode is used to play back and delete pictures.
24
34
96
50
79
117
15
Page 9
First Steps
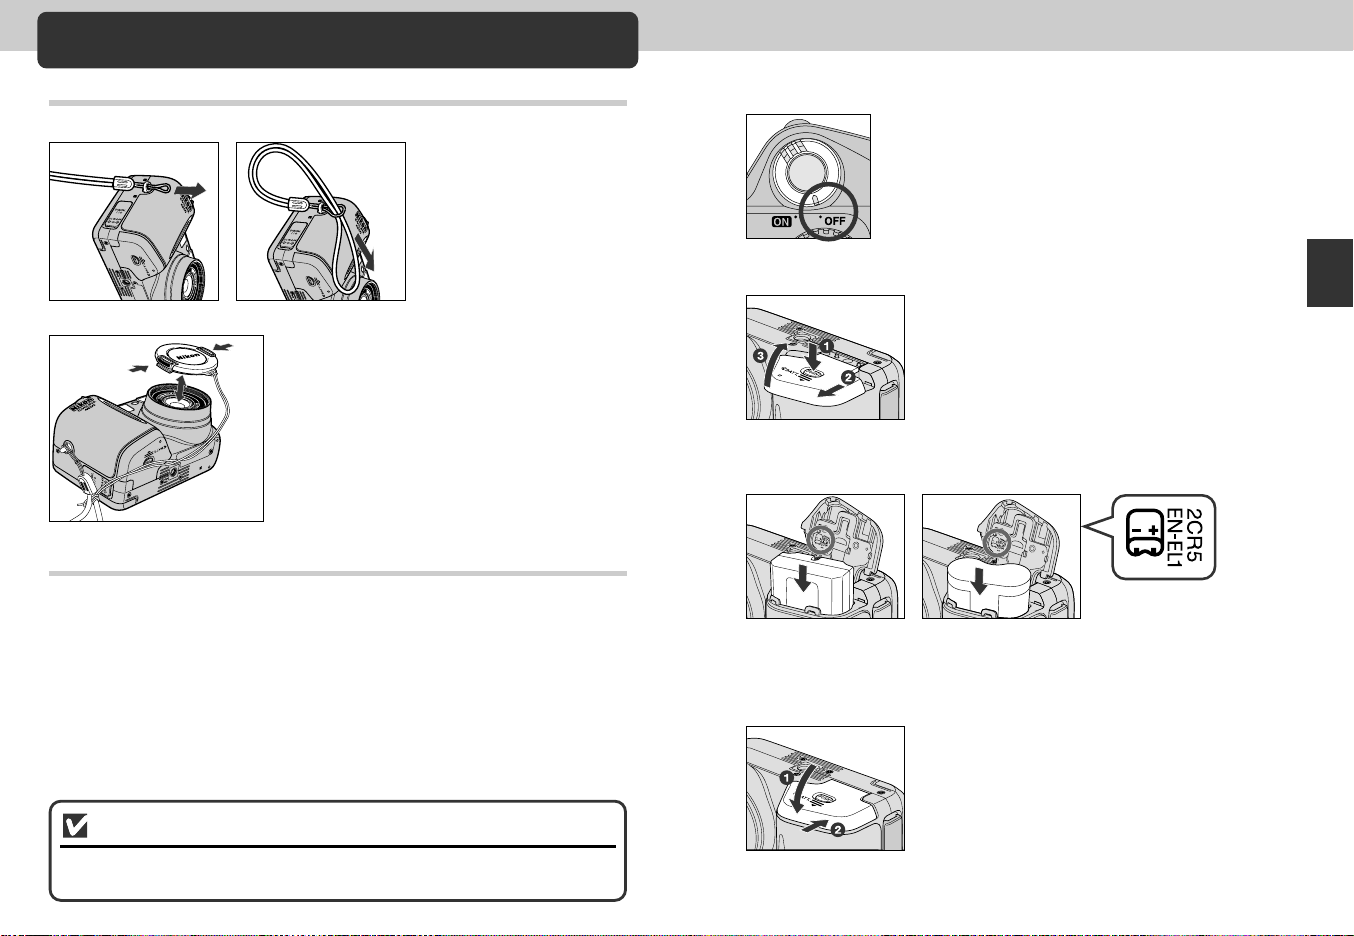
Step 1—Attach the Camera Strap and Lens Cap
Camera Strap
• Attach the strap as shown.
Lens cap
• Press the tabs on the lens cap to
attach/detach it.
• We recommend attaching the lens cap to the
strap loop with the supplied cord to prevent it
from being misplaced.
Step 2—Insert the Battery
Your camera is powered by a single rechargeable Nikon EN-EL1
lithium-ion battery or a non-rechargeable 2CR5 (DL245) lithium battery
(available separately).
Charge the battery
1
• The EN-EL1 is not fully charged at shipment. A battery charger is provided
with the camera; we recommend that you charge the battery before use.
Instructions for charging the battery may be found in the instruction manual
included with the charger.
Turn the camera off
2
Open the battery-chamber cover
3
• Pressing the battery-chamber cover latch ⁄, slide
the battery-chamber cover out ¤ and flip it open ‹.
Insert the battery
4
EN-EL1 2CR5 (DL245)
• Insert a fully charged EN-EL1 or new 2CR5 (DL245) battery as shown in the
label on the underside of the battery-chamber cover.
Close the battery-chamber cover
5
• Close the battery chamber cover ⁄ and slide it to
the closed position ¤. To prevent the battery being
dislodged during operation, be sure that the battery
chamber cover is properly latched.
Introduction—First Steps
Read Battery Warnings
Read and follow all warnings and instructions supplied by the battery
manufacturer.
1716
Page 10
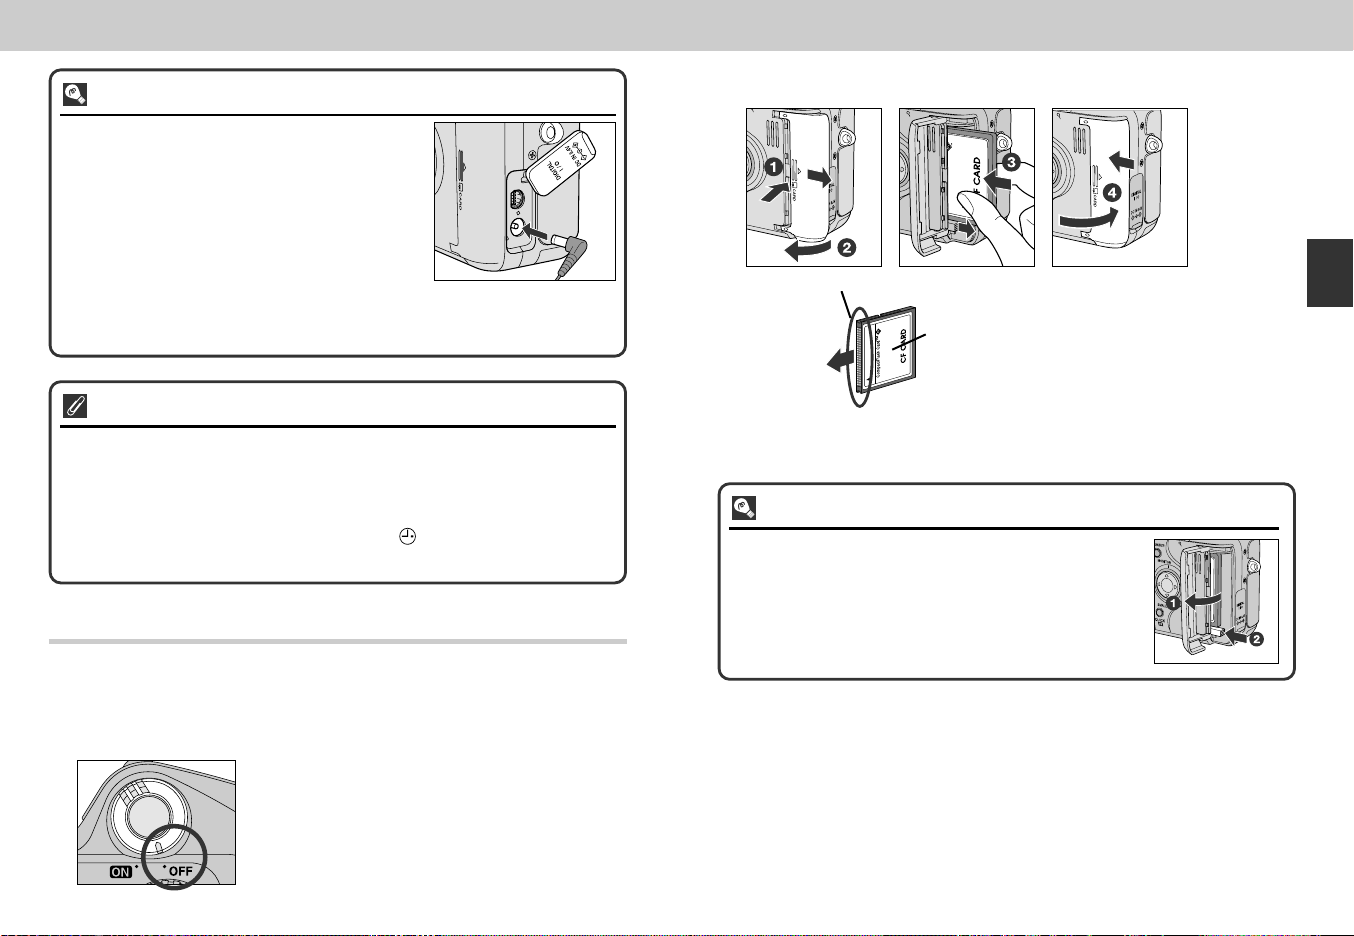
Alternative Power Sources
In addition to the rechargeable Nikon EN-EL1
Lithium-ion battery included with your camera, the
COOLPIX4300 can be used with non-rechargeable
2CR5 (DL245) lithium batteries, available at a variety
of retail outlets. To power your camera continuously
for extended periods, use an EH-21 AC
adapter/battery charger or EH-53 AC adapter (both
available separately).
Connecting AC adapter
to COOLPIX4300
DC-in connector
The Clock Battery
The camera’s internal clock-calendar is powered by a separate, rechargeable
power source, which is charged as necessary when the main battery is installed
or the camera powered by an AC adapter (available separately). After charging
for about ten hours, this power source can provide roughly ten hours of backup power. If the main battery has been removed for an extended period, or
removed before charging is complete, a flashing icon may appear in the
monitor, indicating that the clock needs to be reset.
Step 3—Insert the Memory Card
Your Nikon digital camera uses CompactFlash™ (CF) memory cards to
store pictures (p. 133).
Insert the memory card
2
Terminals
Front
Direction
of insertion
Insert card terminals first with
front label facing camera back
Removing Memory Cards
Memory cards can be removed without loss of data when
the camera is off. To remove memory cards, turn the camera
off and open the card-slot cover ⁄. Press the eject button
to partially eject the card ¤ and then remove the card by
hand.
label
• Slide the card-slot cover out ⁄ and
flip it open ¤. Hold the card with the
arrow (s) facing towards you and insert
it in the direction of the arrow ‹, sliding
it in until it is firmly in place and the
eject button pops up. Close the card
slot cover ›.
Introduction—First Steps
Turn the camera off
1
1918
Page 11
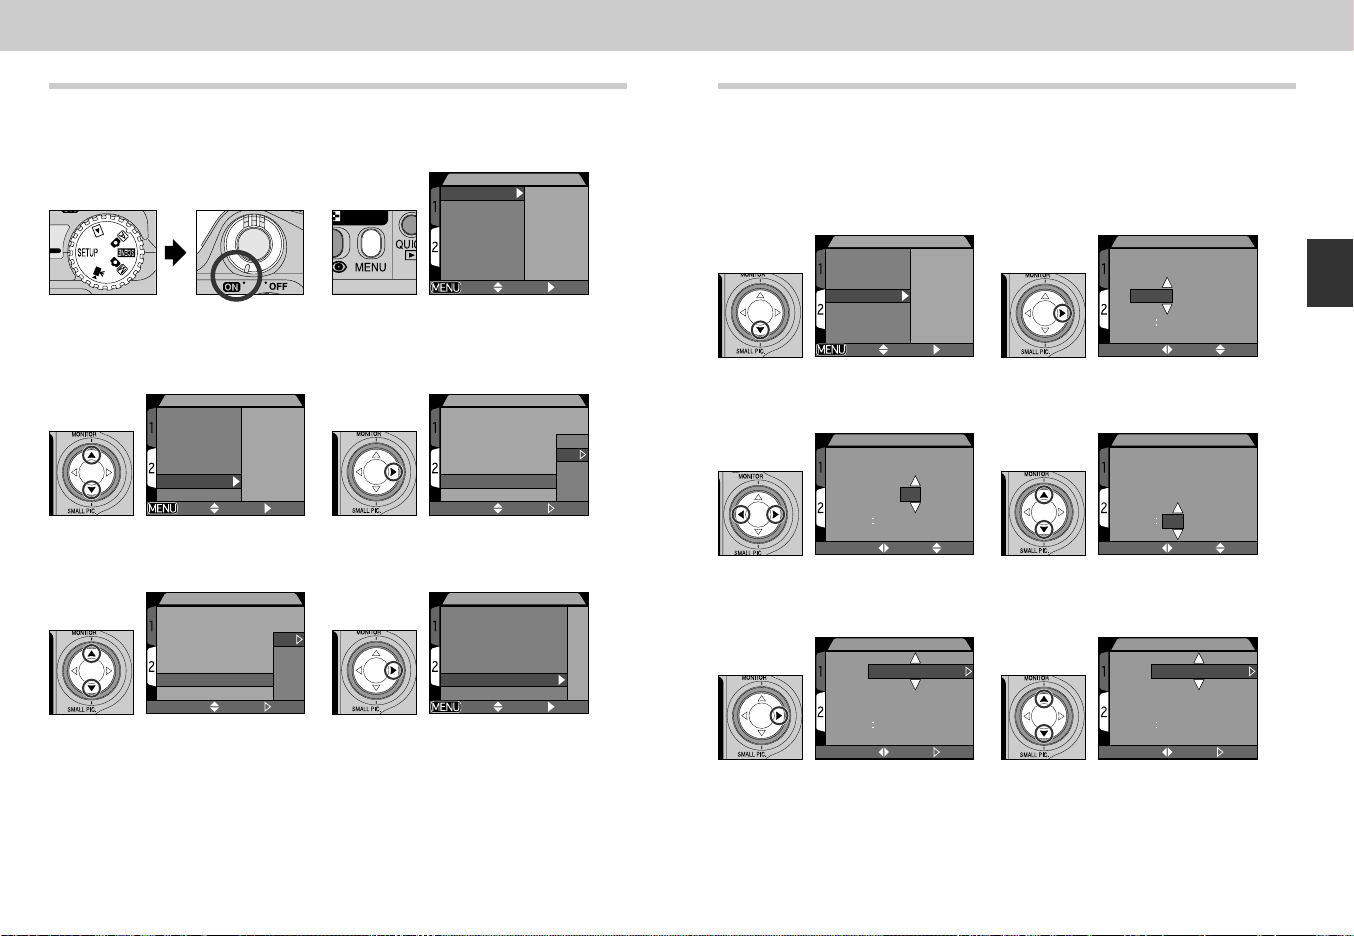
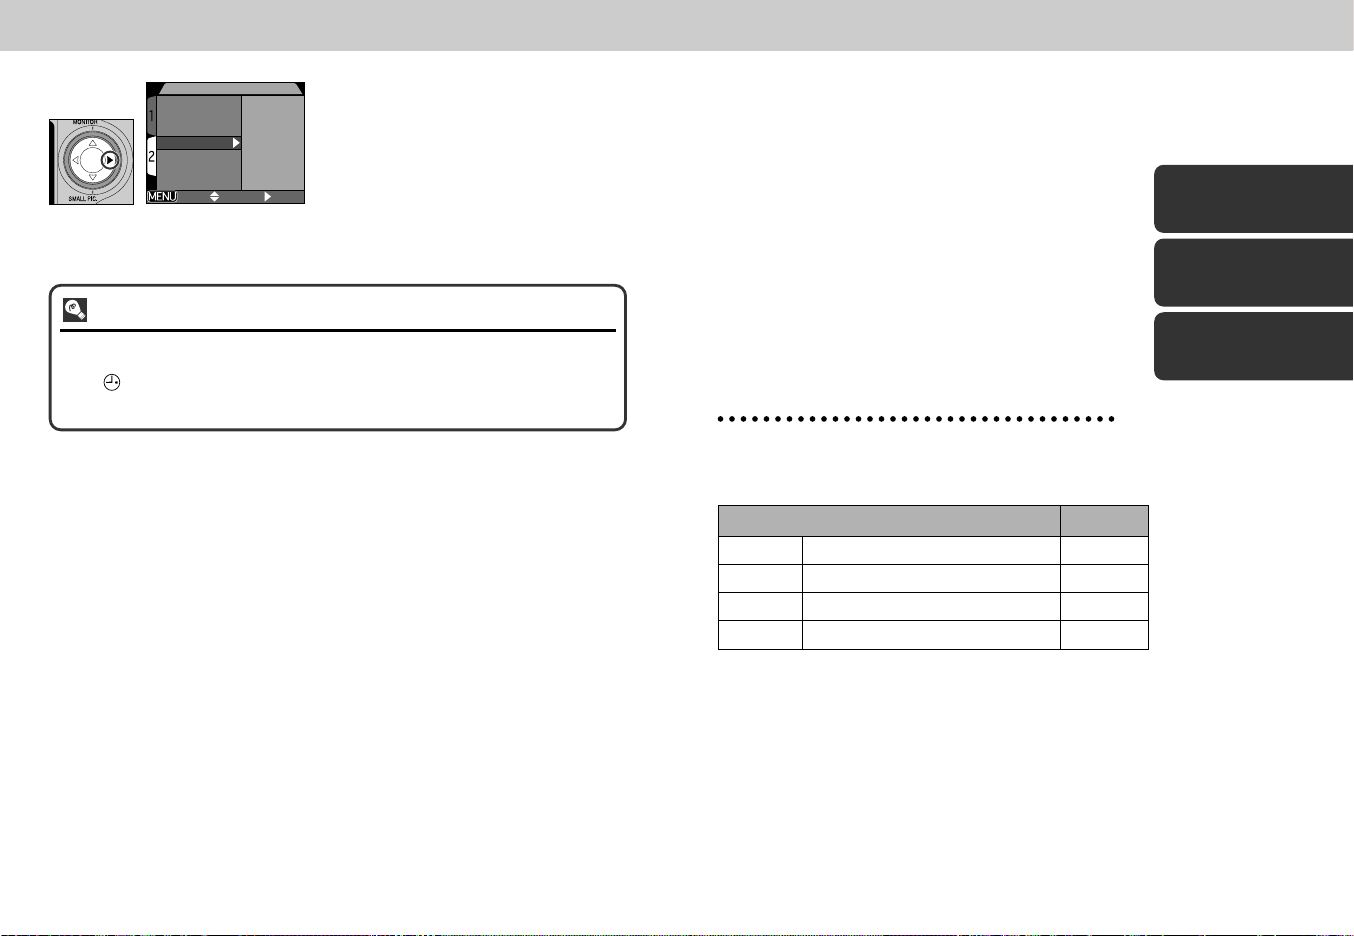
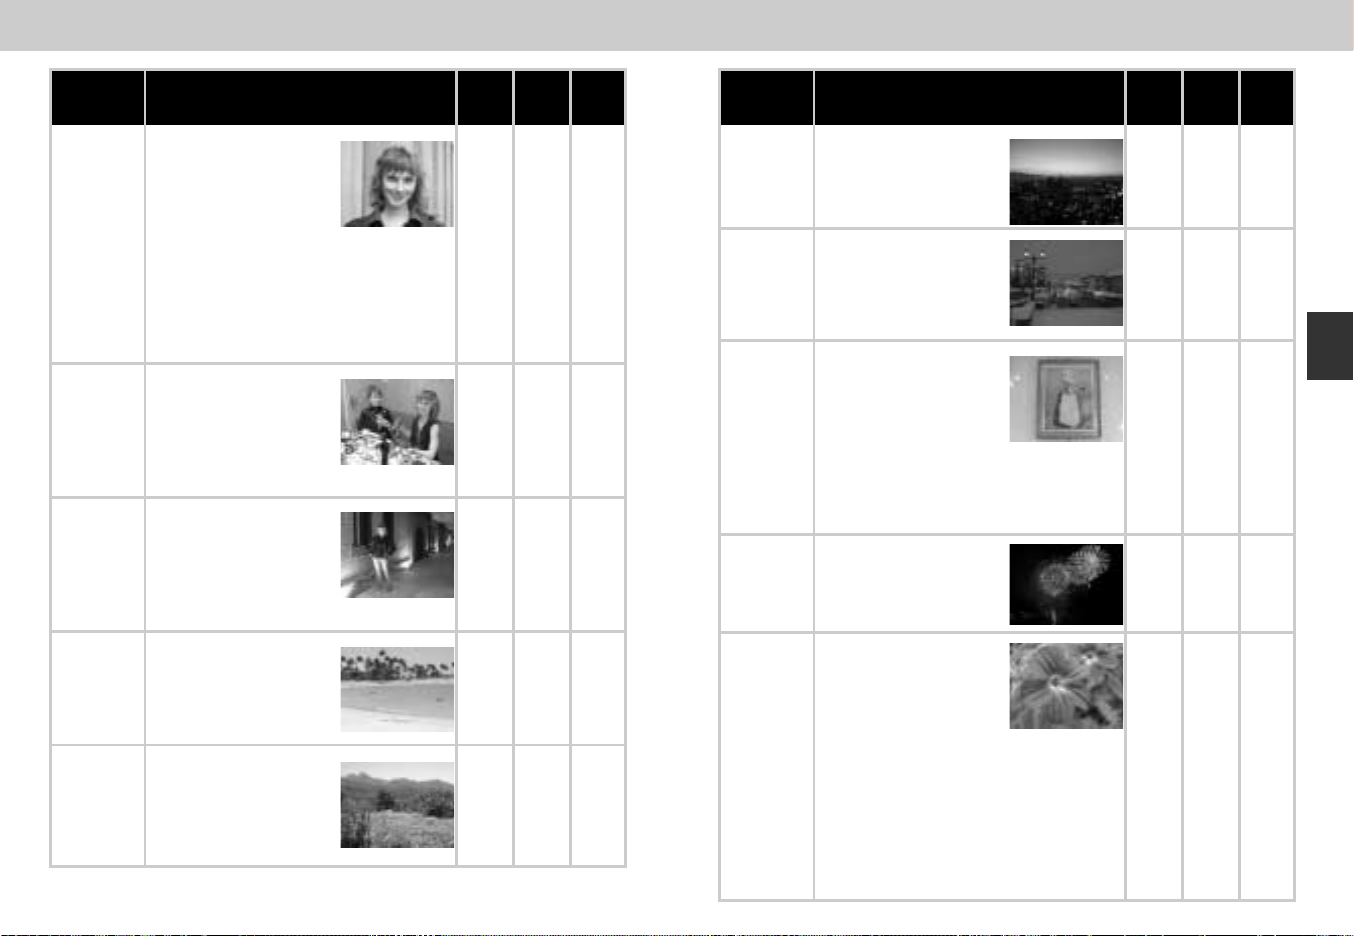
Step 4—Choose a Language
SET-UP2
Controls
Shot Confirm Lamp
Pic data/Transfer
Date
Interface
Language
Reset All
PAGE1 SELECT SET
SET-UP2
Controls
Shot Confirm Lamp
Pic data/Transfer
Date
Interface
Language
Reset All
PAGE1 SELECT SET
LANGUAGE
Controls
Shot Confirm Lamp
Pic data/Transfer
Date
Interface
Language
Reset All
SELECT SET
De
En
Fr
EI
Es
SET-UP2
Steuerung
LampeAufnahmebestätigung
Bilddaten/Transfer
Datum
Schnittstelle
Sprache
Wert löschen
SEITE1 AUSW STL
LANGUAGE
Controls
Shot Confirm Lamp
Pic Data/Transfer
Date
Interface
Language
Reset All
De
En
Fr
EI
Es
SELECT SET
SET-UP2
Controls
Shot Confirm Lamp
Pic data/Transfer
Date
Interface
Language
Reset All
PAGE1 SELECT SET
DATE
Y M D
2002
.
09. 01
00 00
SELECT SET
DATE
Y M D
2002
.
09
.
15
15 30
SELECT SET
DATE
Y M D
2002. 01. 01
00 00
SELECT SET
DATE
Y M D
2002
.
09. 15
15 30
SELECT SET
DATE
M D Y
09
.
15. 2002
15
30
SELECT SET
Camera menus and messages can be displayed in your choice of
German, English, French, Japanese or Spanish.
1
2
Step 5—Set the Date and Time
Information on the time and date of recording is included with all
pictures and movies taken with your Nikon digital camera. To set the
camera’s internal clock to the correct time and date, display the set-up
menu as described in steps 1-2 of “Choose a Language” and then
follow the steps below:
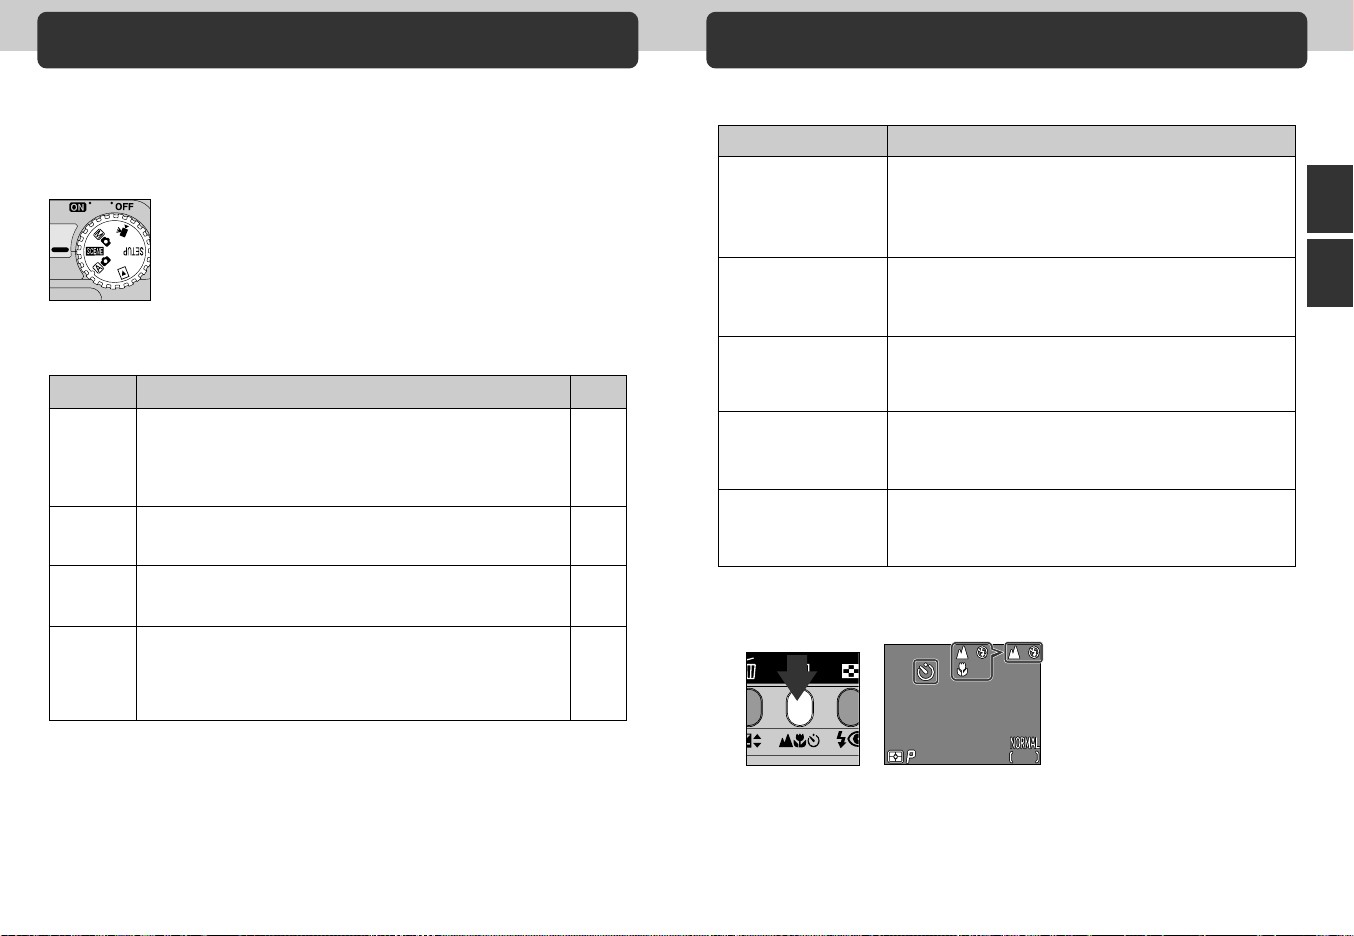
Set mode dial to SETUP
and turn camera on
3
Highlight “Language”
5
Choose a language from:
De: Deutsch (German)
En : English
Fr : Français (French)
EI : Japanese
Es : Español (Spanish)
1
Press MENU button to
2
Introduction—First Steps
display SET-UP 2 menu
Highlight “Date”
Display DATE menu
4
3
Display options
Highlight Year, Month, Day, hour or
minute
6
5
Press > to set
Highlight YMD
4
Edit selected item
• Repeat steps 5 and 6 until all
items have been set.
6
Choose order in which year, month
and day will be displayed
2120
Page 12
SET-UP2
Controls
Shot Confirm Lamp
Pic data/Transfer
Date
Interface
Language
Reset All
PAGE1 SELECT SET
7
Press > to save changes to
settings and return to SET-UP
menu.
Flashing Clock Icon
Any pictures taken before the time and date have been set will have a time
stamp of “0000.00.00 00:00.” If the time and date have not been set, a flashing
clock icon will be displayed in the top right corner of the monitor when the
camera is in shooting mode.
Getting Started
This chapter is divided into three sections:
Taking Pictures
Read this section for a step-by-step guide to the
basics of taking pictures with the COOLPIX4300.
Step Page
Step 1 Ready the Camera 24-25
Step 2 Compose the Picture 26-27
Step 3 Focus and Shoot 28
Step 4 Turn the Camera Off 29
Reviewing Your Pictures
Learn how to review and delete pictures while
setting up your new shot.
Taking Pictures
pp. 24-29
Reviewing Your
Pictures
pp. 30-33
Getting Creative:
Select Scene Mode
pp. 34-38
22
Getting Creative: Select Scene Mode
Explore the creative possibilities of scene mode.
23
Page 13
Taking Pictures
F2.8F2.8F2.81/2501/2501/250
227222722272
161616
A
B
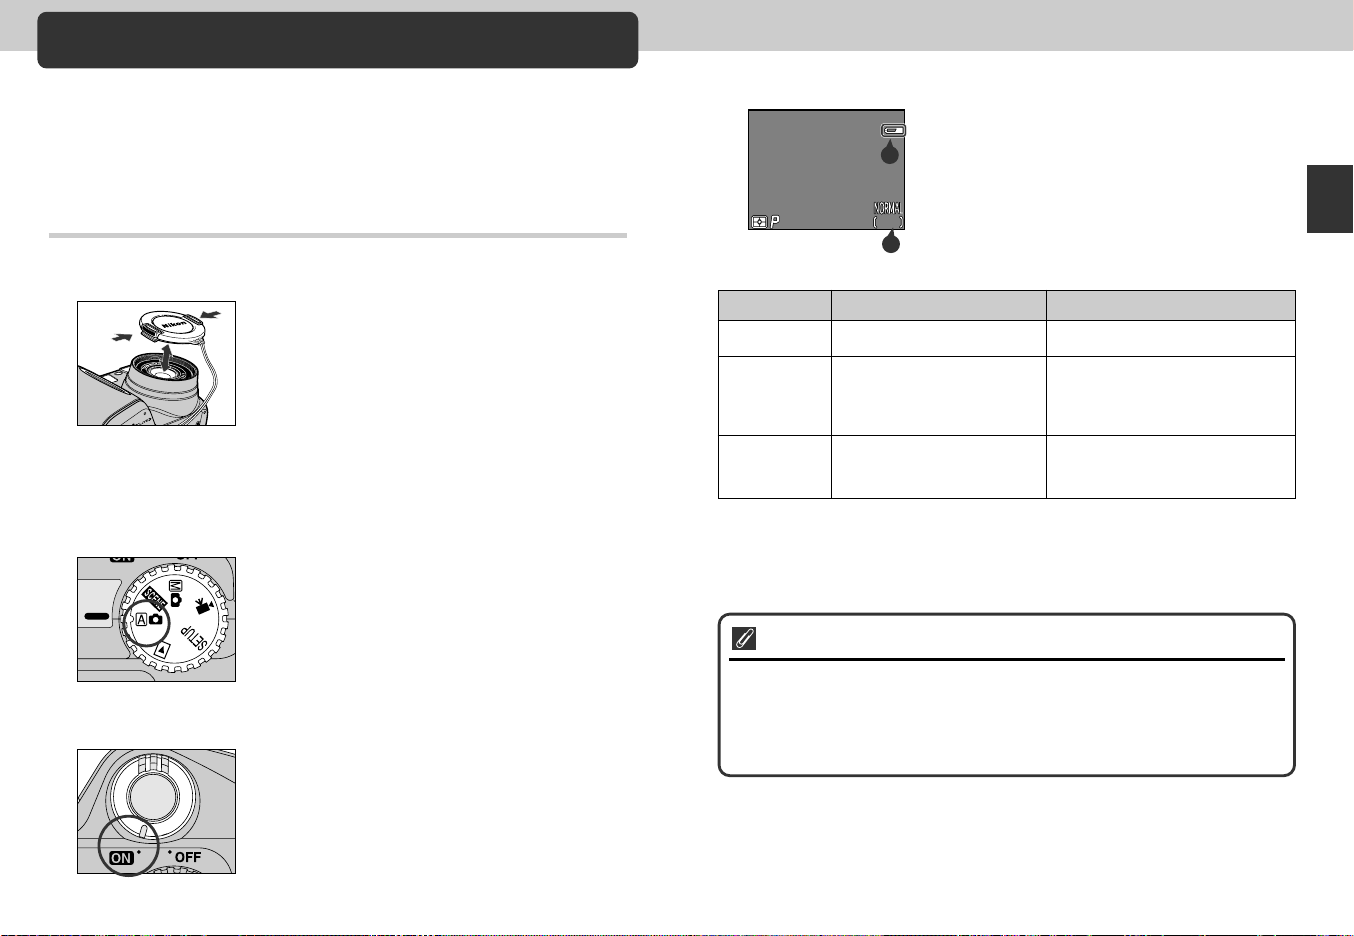
The Basics
This section details the basic steps involved in taking pictures in a
(auto) mode. In this automatic, “point-and-shoot” mode, the majority of
settings are controlled by the camera in response to lighting conditions
and focus distance, producing the best possible results in most
situations.
Check indicators in the monitor
4
• Before shooting, check the battery level (A) and the
number of exposures remaining (B).
Step 1—Ready the Camera (a Mode)
Remove the lens cap
1
• If you turn the camera on with the lens cap in place
and the mode dial set to a, i, å or m,
an error message will appear in the monitor. To clear
this message from the display, turn the camera off
and remove the lens cap.
Turn the mode dial to a
2
Turn the camera on
3
• The lens zooms out when the camera is turned on
and the green lamp next to the viewfinder will turn
on for a few seconds.
Battery level is displayed as follows:
Display
NO ICON
MM
Warning!!
Battery
exhausted
• If the message “Out of memory” appears in the monitor, the memory card is full.
Delete pictures (p. 118), use a new memory card, or choose a lower quality of
image size (p. 82).
Auto Power Off
To save power, the camera will enter “sleep” mode if no operations are
performed for the period of time specified in the Auto Off menu (default 30
seconds; p. 88). In sleep mode, the monitor turns off and all camera functions
are deactivated. The camera itself is effectively off. To reactivate the camera,
press the shutter release button halfway.
Battery fully charged.
Low battery. Charge ENEL1 as soon as possible or
ready new 2CR5 (DL245)
battery.
Battery exhausted. Charge
EN-EL1 and reinsert, or use
new 2CR5 (DL245) battery.
Meaning
Camera status
Camera functions normally.
As above, except that only a
limited number of shots can be
taken in Continuous mode
(p. 100).
Shutter release disabled.
Getting Started—Taking Pictures
2524
Page 14
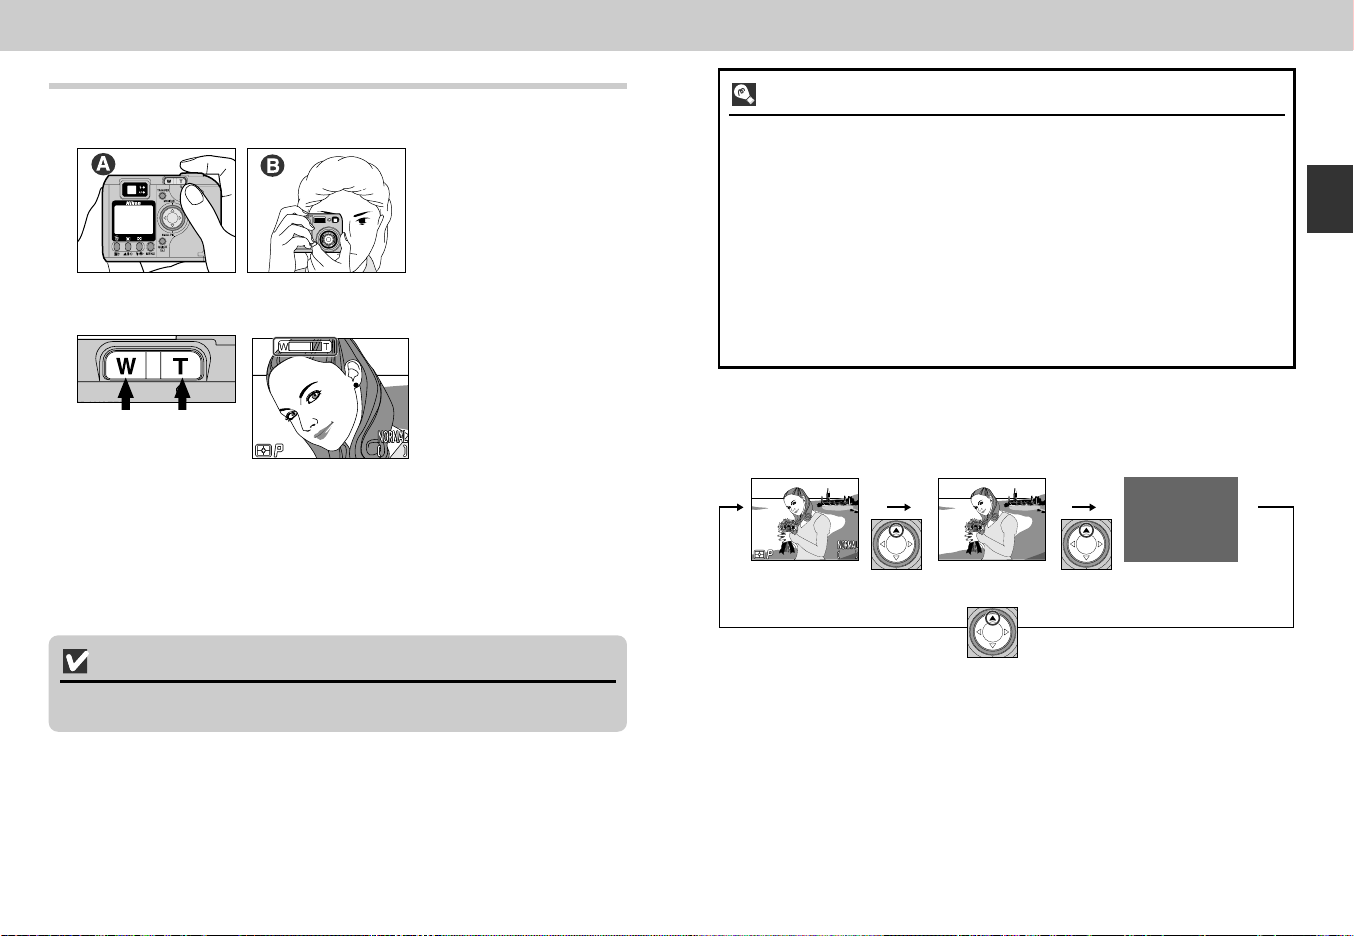
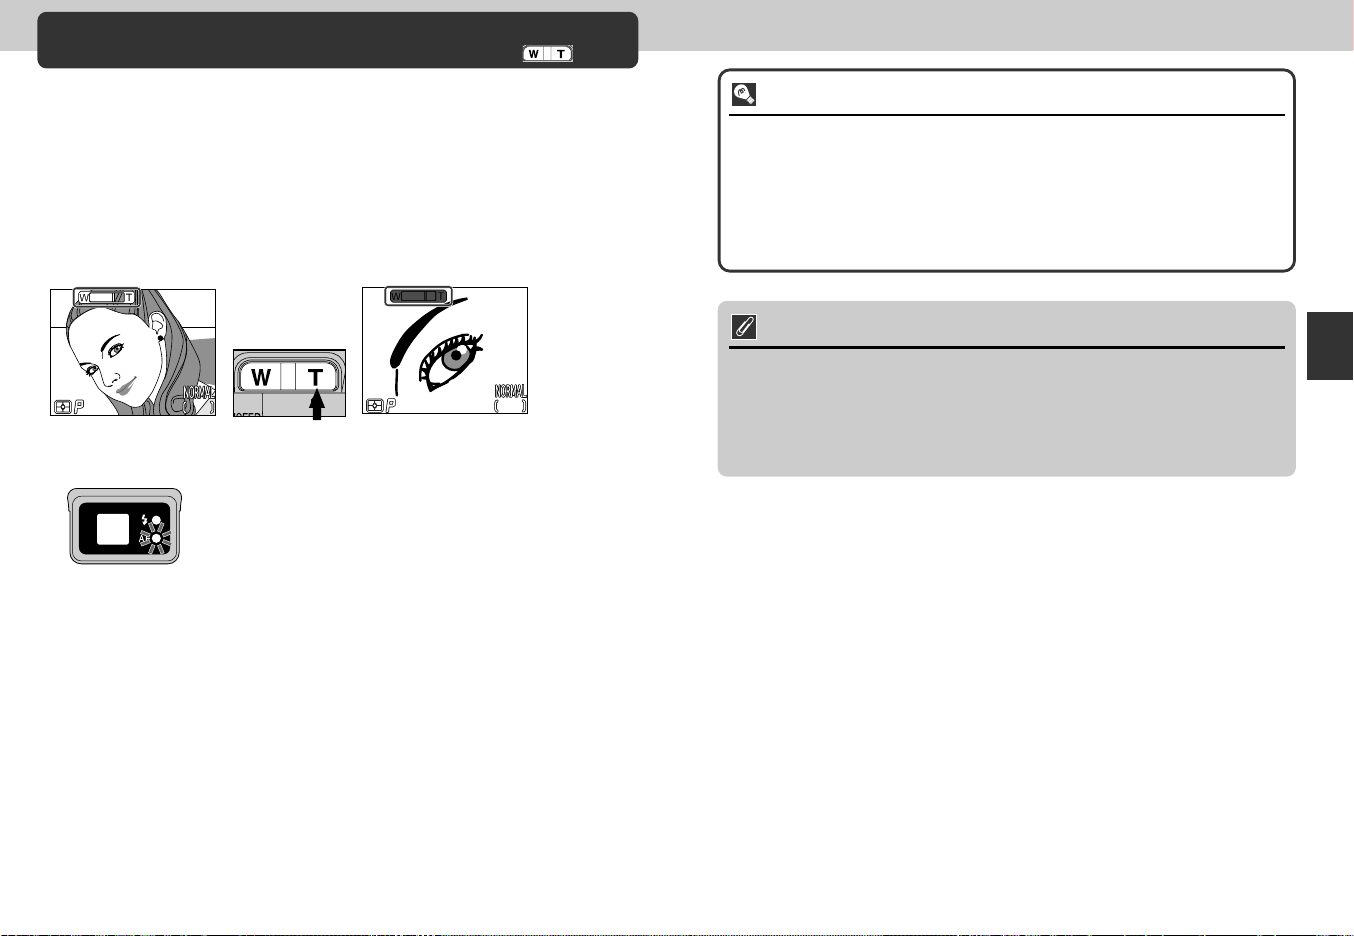
Step 2— Compose the Picture
F4.9
1/250
2272
F2.8F2.8F2.81/2501/2501/250
227222722272
161616
Ready the camera.
1
• Pictures can be framed in
the monitor (A) or viewfinder
(B).
• To prevent camera shake,
hold the camera steadily in
both hands.
Frame your subject.
2
Indicator in monitor displays
amount of zoom while either
W or T is pressed.
Zoom out Zoom in
F4.9
F4.91/250
1/250
• Frame your subject using the zoom button. Press the W to zoom out from
your subject. Press the T to zoom in on your subject.
• When the camera is zoomed all the way in, hold T down for about two
seconds to enlarge the image by a further four times using digital zoom (p.
46). When digital zoom is in effect, the autofocus lamp next to the viewfinder
will blink and the zoom indicator will turn yellow to warn you to frame pictures
in the monitor.
2272
2272
161616
Monitor or Viewfinder?
Use the monitor to confirm camera settings at a glance while at the same time
viewing an image that shows how the final picture will appear. This is particularly
important when the image in the viewfinder does not accurately reflect what will
appear in the final picture, for example when:
• macro close-up is used (p. 42)
• your subject is within 1.5 m (4.9 ft.) of the camera
• you are using digital zoom (p. 46)
• you are using an optional lens converter for wide-angle or telephoto
photography (p. 105)
Using the viewfinder allows you to save power by turning the monitor off (see
below). The viewfinder can also be used when bright ambient lighting conditions
make the display in the monitor difficult to see.
Controlling the Monitor
The ≤ on the Multi selector controls the monitor display in a and å mode.
Press ≤ to cycle through monitor settings as shown at below.
Indicators
displayed
Indicators
hidden
Monitor off
Getting Started—Taking Pictures
Don’t Block the Shot
To avoid dark or partially obscured pictures, keep your fingers and other objects
away from the lens and flash window.
2726
Page 15
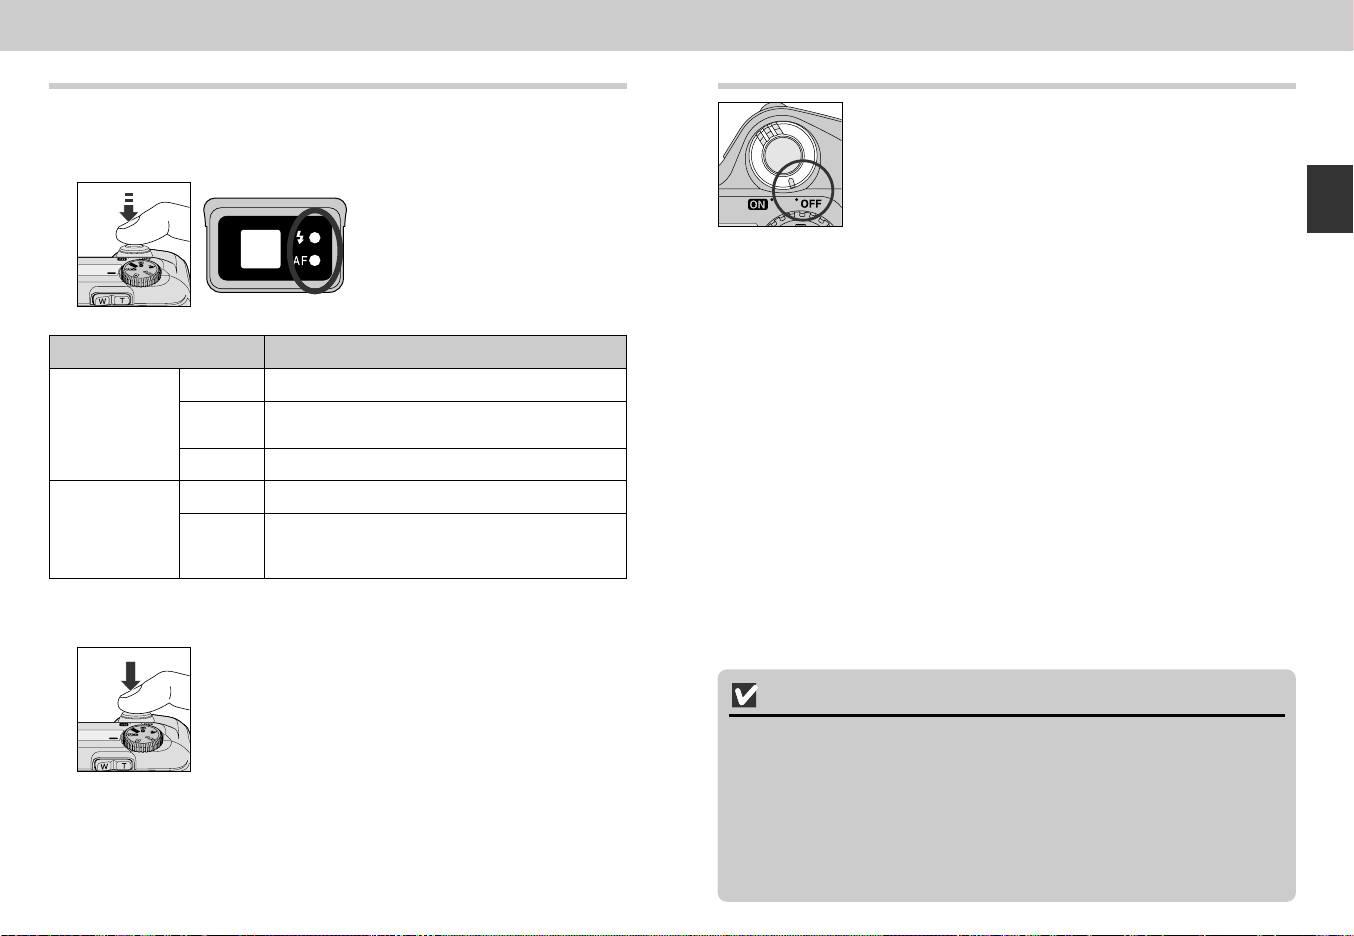
Step 3—Focus and Shoot
The COOLPIX4300 has a two-stage shutter release button.
Focus
1
• Press the shutter release button
halfway to set focus and exposure.
In a mode, the camera focuses
on the subject in the center of the
frame. Check the indicator lamps
(see table below).
Step 4—Turn the Camera Off
When you have finished using the camera, turn the
camera off to save battery power.
Getting Started—Taking Pictures
Lamp
Flash-ready Blinks
lamp (red) rapidly
Autofocus lamp
(green)
Take the picture
2
Meaning
On
Off
On
Flickers
• To take a picture, press the shutter release button all the
Flash will fire when picture is taken.
Flash charging. Remove finger briefly from shutter
release button, then try again.
Flash not required or flash set to “off”.
Subject in focus.
Camera unable to focus on subject. Use focus
lock to focus on another subject at the same
distance, then recompose your picture (p. 45).
way down.
During Recording
While pictures are being recorded to the memory card, the autofocus lamp
(green) will blink.
Pictures taken while earlier images are being recorded are stored in a temporary
memory buffer. When the buffer is full, an hourglass (W) icon will be displayed
and the shutter release will be disabled.
Do not turn the camera off, remove the memory card, or remove or disconnect
the power source while W is displayed or while the green autofocus lamp is
blinking.
2928
Page 16
Reviewing Your Pictures
F2.8
1/250
2272
15
F2.8
1/250
2272
15
100NINI
KON
000
JPG
2002.09.15
15:40
2272
F2.8F2.8F2.81/2501/2501/250
11
227222722272
151515
With a digital camera, you can view pictures immediately after they are
taken. You can view the results of earlier attempts while setting up your
next shot and use what you see to change camera settings or choose
a better angle.
2002.09.15
2002.09.15
15:40
15:40
1/250
11
F2.8
F2.81/250
2272
2272
2272
2272
15
15
Full-Screen Review
Last picture taken
displayed full screen
>
F2.8
F2.81/250
1/250
Shooting Mode Quick Review
• To end quick review or full-screen review and focus the camera for the next shot,
press the shutter release button halfway.
>>
2272
2272
16
15
Last picture taken
displayed in top left
corner of monitor
KON
100
100NIKON
000
1.JPG
1.JPG
000
1/ 1
1/ 1
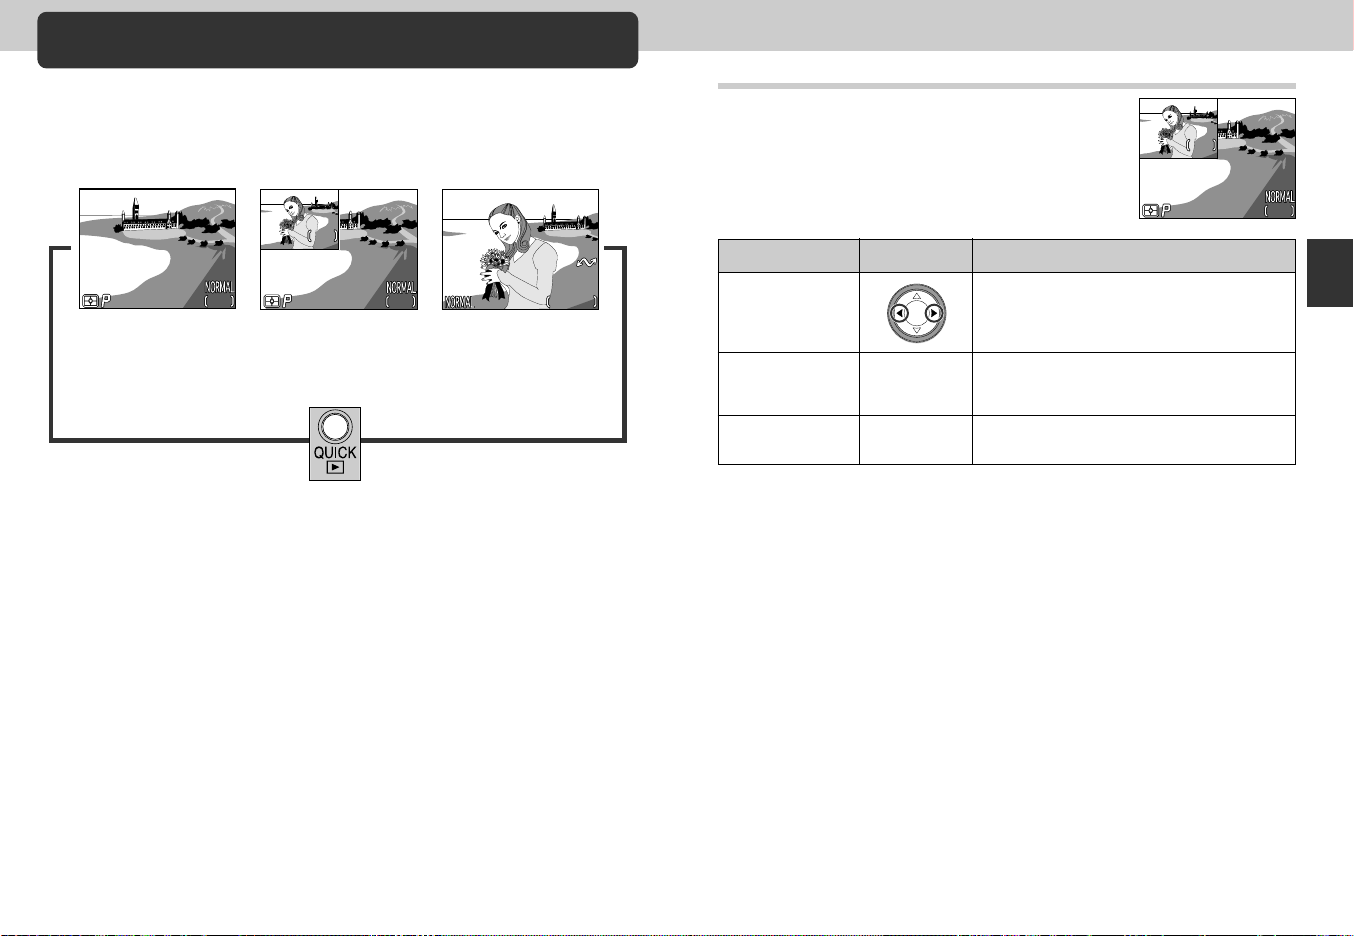
Quick Review
When you press the QUICK p button to enter
quick review mode, the most recent picture on the
memory card will be displayed at the top left
corner of the monitor.
The following operations can be performed:
To
View other
pictures
View current
picture full screen
Return to shooting
mode
Press
QUICK p
Shutter release
button
Press < to view images recorded before
the current picture or > for pictures
recorded after. Hold it down to scroll
rapidly to the desired picture.
Enter full-screen review (see next page)
with the current pictures displayed full
screen.
To return to shooting mode, press the
shutter release button.
Description
Getting Started—Reviewing Your Pictures
3130
Page 17
Full-Screen Review
1/ 1
100100NINIKONKON
0000001.
JPGJPG
1
/
1
100NIKON
000
1.JPG
2002.09.152002.09.15
15:4015:40
2002.09.15
15:40
227222722272
7 8 9
4 5 6
1 2 3
789
456
123
Erase 1 Image(s)
Yes/No?
Erase 1 Image(s)
Yes/No?
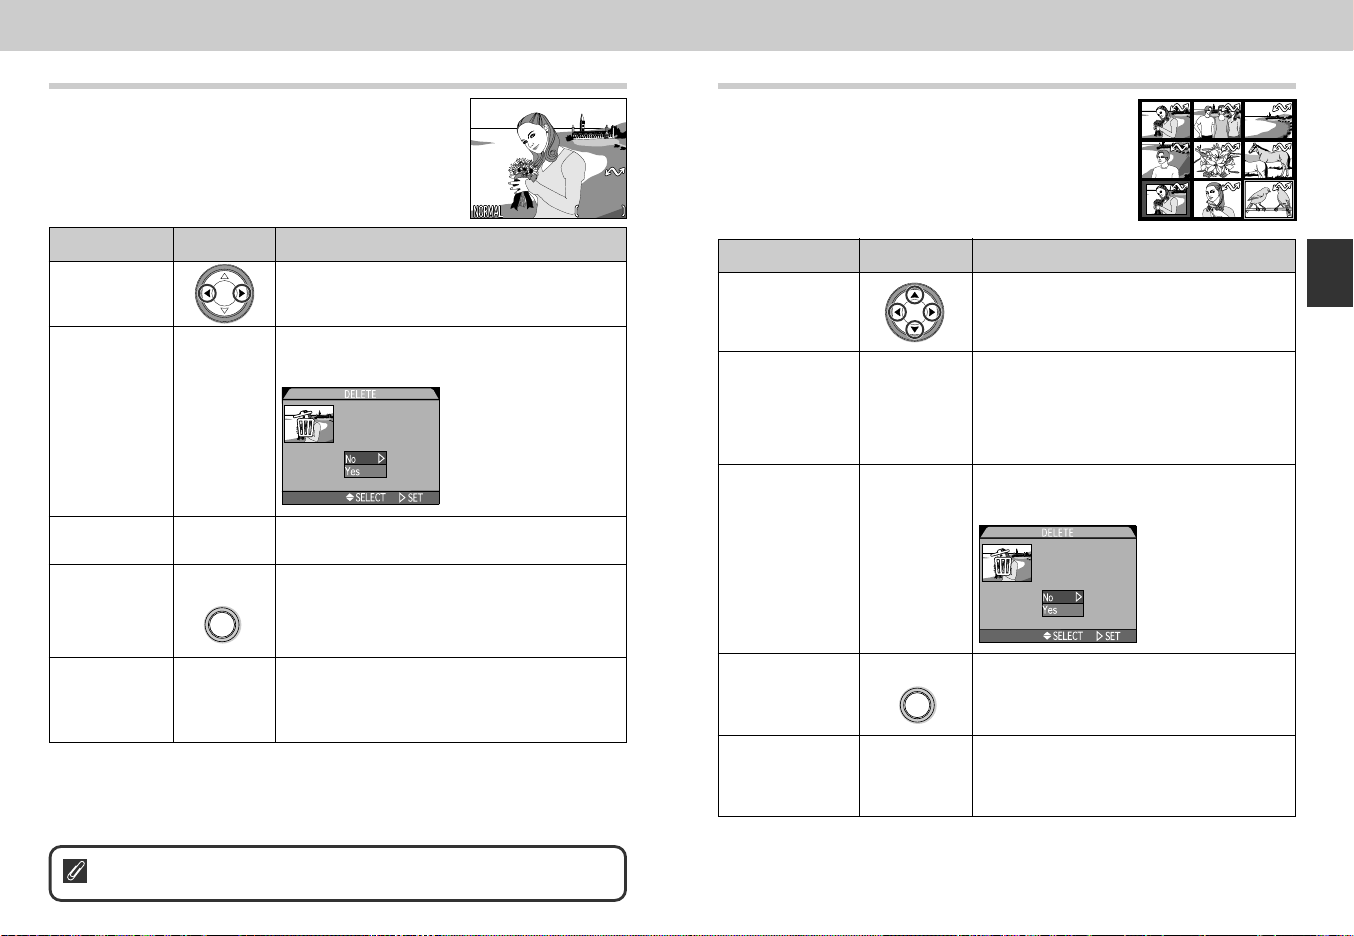
From quick review, press the QUICK p button to
enter full-screen review. The picture displayed in
quick-review mode will be displayed full screen.
The following operations can be performed:
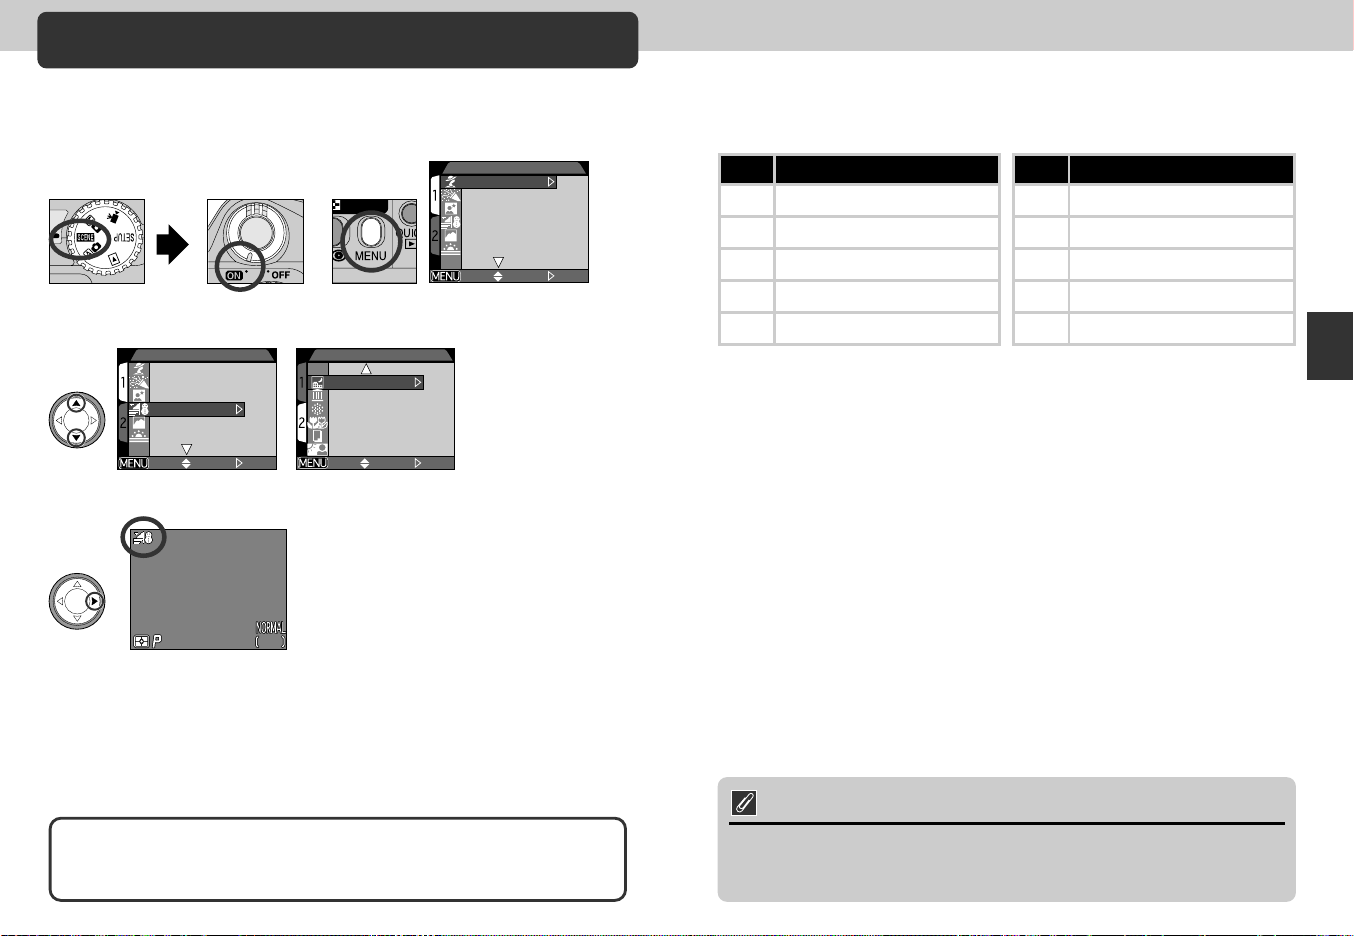
Thumbnail Review
Pressing the 7 button in full-screen review
displays a menu of nine thumbnail images. The
following operations can be performed while
thumbnails are displayed:
To
View other
pictures
Delete current
picture
View multiple
Pictures
Select current
picture for
transfer to a
computer
Return to
shooting mode
For more information on Playback: P. 55-64
Press
5
(1)
7
(3)
TRANSFER
Shutter
release/
QUICK p
button
Description
Press < to view images recorded before the
current picture, and > for images recorded after.
Hold it down to scroll rapidly to desired picture.
A confirmation dialog will be displayed. Press
≤/≥ on the Multi selector to highlight the
option and > to select.
• Select No to keep
picture
• Select Yes to delete
picture
Press the 7 button to display a set of up to
nine thumbnail pictures (see next page).
Pictures selected for transfer are marked with a
D icon. Turn this marking on or off to select
the pictures that will be transferred to a
computer at a later date.
Press the QUICK p button to end review and
return to shooting mode. To return to shooting
mode and focus, press shutter release button
halfway.
To
Highlight images
Change number
of pictures
displayed
Delete highlighted
picture
Select current
picture for
transfer to a
computer
Return to shooting
mode
Press
7/T (t)
5
TRANSFER
Shutter release/
QUICK p
button
Description
Press ≤/≥/</> on the Multi selector to
highlight a thumbnail
With nine thumbnails displayed, press the
7 button once to view four thumbnail
images. Press T (t) to “zoom in” from
nine thumbnails to a four-thumbnail view, or
when four thumbnails are displayed, to view
highlighted picture full size.
A confirmation dialog will be displayed.
Press ≤/≥ on the Multi selector to
highlight the option and > to select.
• Select No to
keep picture
• Select Yes to
delete picture
Pictures selected for transfer are marked
with a D icon. Turn this marking on or off
to select the pictures that will be transferred
to a computer at a later date.
Press the QUICK p button to end review
and return to shooting mode. To return to
shooting mode and focus, press shutter
release button halfway.
Getting Started—Reviewing Your Pictures
3332
Page 18
SCENE 1
OFF SELECT DONE
Party/IndoorParty/Indoor
Night PortraitNight Portrait
Beach/SnowBeach/Snow
LnadscapeLnadscape
SunsetSunset
Portrait
Party/Indoor
Night Portrait
Beach/Snow
Landscape
Sunset
SCENE 1
OFF SELECT DONE
PortraitPortrait
Party/IndoorParty/Indoor
Night Portrait Night Portrait
LandscapeLandscape
SunsetSunset
Portrait
Party/Indoor
Night Portrait
Beach/Snow
Landscape
Sunset
SELECT
OFF
DONE
SCENE 2
MuseumMuseum
Fireworks ShowFireworks Show
Close UpClose Up
CopyCopy
Back LightBack Light
Night Landscape
Museum
Fireworks Show
Close Up
Copy
Back Light
Getting Creative: Select Scene Mode
F2.8F2.8F2.81/2501/2501/250
227222722272
161616
The COOLPIX4300 offers a choice of twelve “scene” modes for
common subjects and shooting situations.
To choose a scene:
1 2
Set mode dial to SCENE and turn
camera on
Press the MENU button to display
the SCENE mode menu
3
Press ≤/≥ to highlight the desired composition type
4
Depending on the scene selected, restrictions may apply to flash (p. 48) and focus
mode (p. 41). The table of scene choices on the pages that follow lists the flash
and focus mode settings possible in each scene. If in doubt about the meanings
of the icons used, consult the following table:
Icon Flash mode (3)
None Auto
P Flash Cancel
# Auto with red-eye reduction
O Anytime Flash (fill flash)
SLOW Slow sync
Icon Focus mode (2)
None Autofocus (Auto)
0 Self-timer
@ Infinity
™ Macro Close-up
0™ Macro close-up+ self-timer
In scenes in which the flash turns off (P) automatically, shutter speeds slow and
pictures may be blurred by inadvertent camera movement (“camera shake”). While
use of a tripod is recommended, other methods that may be successful in
preventing blurring are indicated by the “camera shake” rating:
Support the camera steadily in both hands with your elbows against your
*
torso.
Use a tripod or place the camera on a flat, level surface such as a wall or table.
**
Getting Started—Getting Creative
Press > to make the selection
and return to shooting mode
• The selected scene mode icon is
displayed on the monitor.
• Image quality and size can be adjusted
from the SETUP menu (p. 80).
When you press the MENU button to display the SCENE mode menu, the
most-recently selected setting will be highlighted. Press the MENU button a
second time to exit the menu.
34 35
Note on SCENE mode
• Depending on the subject, SCENE mode setting may not always produce the
desired results. If you are dissatisfied with the results in SCENE mode, try
using a mode instead.
Page 19
Scene
Description
3
(p. 48)
2
(p. 41)
Camera
shake
Scene
Description
3
(p. 48)
2
(p. 41)
Camera
shake
s
Portrait
d
Party/
Indoor
f
Night
Portrait
g
Beach/
Snow
h
Landscape
Use for portraits. Main
subject stands out clearly
while background details
are softened, lending the
composition a sense of
depth.
• Degree to which background details are
softened depends on the amount of light
available
• Focus area can be selected manually
using multi selector (p. 112).
Use for shots that include
details of the background
behind the main subject,
or to capture the effects of
candlelight and other
indoor background lighting.
Use for shots that provide
a natural balance between
the main subject and the
background when
shooting portraits against
a backdrop of night scenery.
Vividly captures the
brightness of such
subjects as snowfields,
beaches, or sunlight
expanses of water.
Use for vivid landscape
shots that enhance
outlines, colors, and
contrast in such subjects
as skyscapes and forests.
Any
#
#
Any
P
Auto,
0
Auto,
0
Auto,
0
Any
0,
@
j
Sunset
—
k
Night
Landscape
v
*
Museum
l
*
—
—
Fireworks
Show
z
Close Up
Captures the beautiful
reds in sunsets or sunrises
exactly as you see them.
Use for pictures that
employ slow shutter
speeds to produce
stunning night landscape.
Use indoors where flash
photography is prohibited
(for example in museums
and art galleries) or in
other settings in which
you do not want to use the flash.
• Photography may be prohibited
altogether in some settings. Be sure to
obtain permission first.
Slow shutter speeds are
used to capture the
expanding burst of light
from a firework.
Use to take up-close
pictures of subjects such
as flowers or insects, with
an artistically blurred
background.
• Focus area can be selected manually
using multi selector (p. 112).
• Focus distance is 4cm (1.6 in.) to 20cm
(7.9 in.) from the lens.
• Minimum focus distance varies with zoom
position. When camera is zoomed in to
widest zoom position, focus mode
indicator (™) in monitor will turn yellow. At
this position, camera can focus on objects
as close as 4cm (1.6 in.) from the lens.
P
P
P
P
P
Auto,
0,
@
0,
@
Auto,
0, ™,
0™
@
™,
0™
*
**
Getting Started—Getting Creative
*
**
*
3736
Page 20
Scene
Description
3
(p. 48)
2
(p. 41)
Camera
shake
Use to obtain clear
pictures of text or
drawings on a white
board, business card, or
in printed matter. To shoot
a close subject, set the camera to Macro
close-up mode (p. 42).
x
Copy
c
Back Light
“Noise” in the form of randomly-spaced, brightly-colored pixels tends to appear
in pictures taken at slow shutter speeds. This effect is particularly noticeable in
dark areas of the picture. At a setting of Night Portrait and Night Landscape,
pictures taken at shutter speeds of 1/4 sec. or slower are processed to reduce
noise (note that this increases the time needed to process pictures before they
are saved to the memory card). NR is displayed when noise reduction is in
effect.
• In autofocus mode, minimum shooting
distance becomes approximately 70cm
(2.3 ft.) from the lens.
• Minimum focus distance varies with zoom
position. When Macro close-up mode is
selected and camera is zoomed in to
widest zoom position, focus mode
indicator (™) in monitor will turn yellow. At
this position, camera can focus on objects
as close as 4cm (1.6 in.) from the lens.
Use when light is coming
from behind your subject,
throwing their features into
shadow, or when your
subject is in the shade but
the background is brightly lit. The flash will
fire automatically to “fill in” (illuminate)
shadows.
Noise Reduction
Any
O
Any
Auto,
0
Camera Controls
Shooting-Mode
Beyond Point-
and-Shoot
—
Read this chapter for advice on the most
frequently-used shooting controls, including:
Selection
p. 40
Focus Mode
pp. 41-45
Digital Zoom
Shooting-Mode Selection
Focus Mode
pp. 46-47
Flash Mode
pp. 48-49
Digital Zoom
Flash Mode
Making Movies
—
Exposure Compensation
Keep or Delete
Sensitivity (ISO Equivalency)
Manual Focus
Making Movies
p. 50
Exposure
Compensation
p. 51
Keep or Delete
pp. 52
Sensitivity
(ISO Equivalency)
p. 53
Manual Focus
p. 54
38
39
Page 21
Shooting-Mode Selection
F2.8
1/250
2272
16
Focus Mode
The 2 Button
This section describes when to use each of the shooting modes. To
choose a shooting mode, turn the mode dial to the appropriate
position.
The table below illustrates when to use each of the shooting modes.
Mode
a
Auto
i
SCENE
å
Manual
m
Movie
When to Use It
An automatic mode for simple, “point-and-shoot”
photography. Use for snapshots. a mode is also
recommended for pictures that will later be retouched on a
computer.
In this mode, most camera settings are automatically
adjusted to suit the chosen scene.
Various setting can be adjusted one-by-one to suit the
composition.
Record silent movies 320 x 240 pixels in size (QVGA).
Recording starts at rate of about 15 fps when shutter
release button is pressed, ends after 40 sec. or when
shutter release button is pressed again.
Page
24
34
96
50
Choose a focus mode according to your subject and composition.
Setting
No icon
Autofocus
0
Autofocus +
self-timer
@
Infinity
™
Macro close-up
0™
Macro close-up +
self-timer
Camera automatically adjusts focus according to
distance to subject. Use with subjects 30 cm (1 ft.)
widest angle>, 60 cm (2 ft.) <at telephoto>or more from
lens.
Combines autofocus with self-timer duration of 10 or 3
sec. Use for self-portrait or prevent pictures from
blurring when shutter release button is pressed.
Focus is fixed at infinity, allowing camera to focus on
distant scenes through foreground objects such as a
window. Flash is disabled.
In widest zoom range, ™ icon in monitor turns yellow
and camera can focus on objects as close as 4 cm (1.6
in.), measured from the lens. Use for close-ups.
Combines macro close-up with shutter-release delay of
10 or 3 sec. Use for close-ups to prevent pictures from
blurring when shutter release button is pressed.
Description
<
at
To choose a focus mode, press the 2 button repeatedly until the
desired setting is displayed in the monitor
2272
2272
F2.8
F2.81/250
1/250
16
16
Beyond Point-and-Shoot—Shooting Mode Selection/Focus Mode
4140
Page 22
Macro Close-Up
F2.8F2.8F2.81/2501/2501/250
227222722272
161616
F2.8F2.8F2.81/2501/2501/250
227222722272
161616
At widest zoom position where ™ is displayed in yellow, you can focus as close
as 4cm (1.6 in.) from the lens.
• We recommend that you frame pictures in the monitor when using macro
close-up.
• While the flash can be used in macro close-up mode, it may sometimes be
unable to light the entire subject. Take a test picture and verify the results in
the monitor.
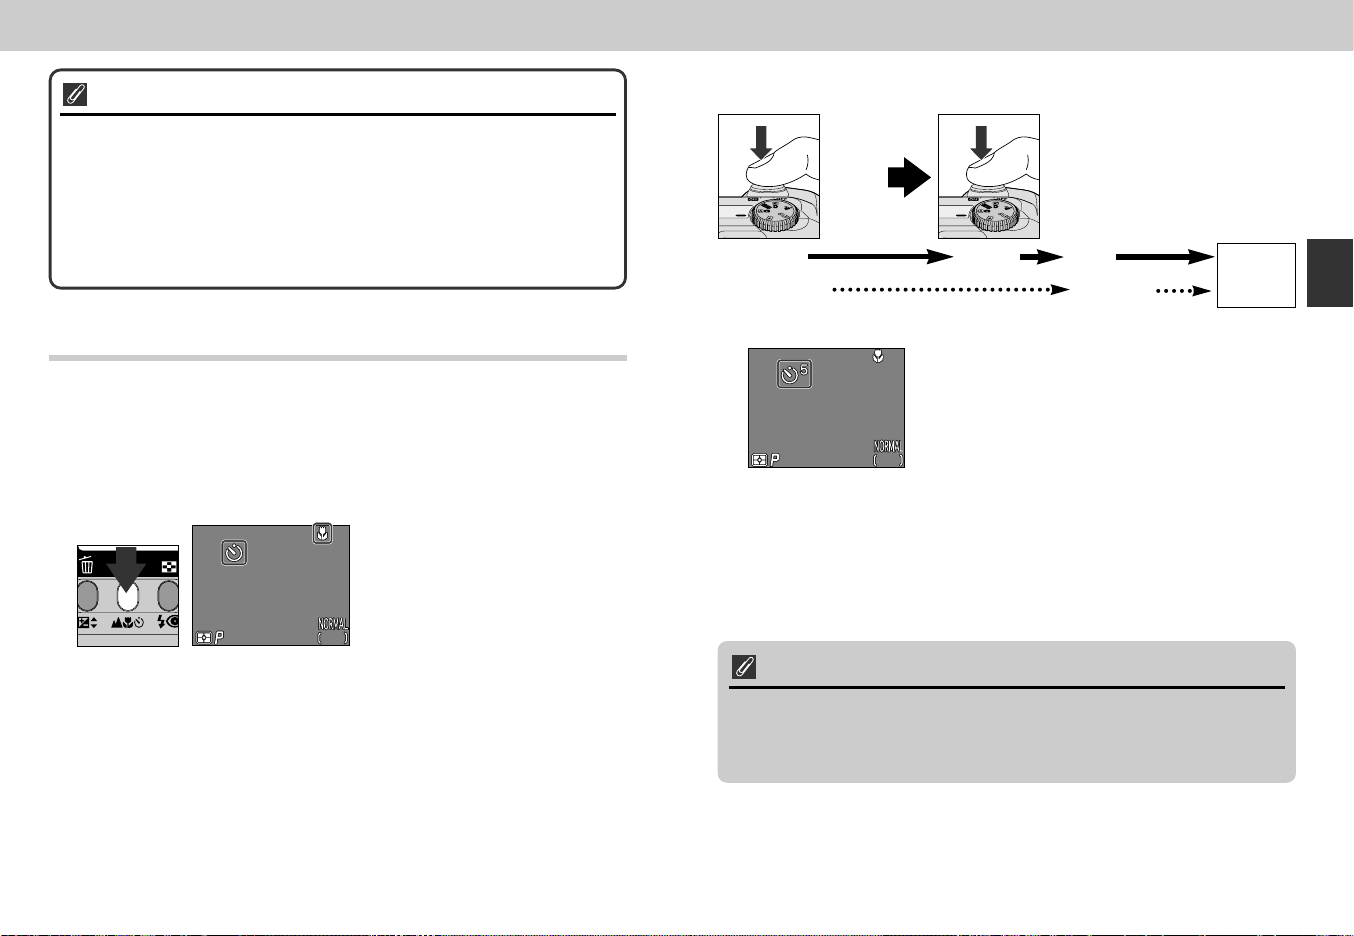
Start the timer
3
Press
shutter
release
once
10 sec. 3 sec. 1 sec.
Self-timer
lamp blinks
Press
shutter
release
twice
Self-timer
lamp lights
Shutter
releases
Beyond Point-and-Shoot—Focus Mode
Self-Timer
Position the camera
1
• Mount the camera on a tripod (recommended) or rest it on a flat, stable
surface.
Select a self-timer mode
2
Self-timer icon displayed in monitor.
Press the 2 button until either 0
or ™0 appears in the monitor.
Countdown timer in monitor shows
number of seconds remaining until
picture is taken
• Compose the picture so that your main subject is placed closest the camera.
• The self-timer lamp next to the flash window will start to blink when the
shutter release button is pressed, and continue to blink until one second
before the photo is taken. The self-timer lamp will stay lit during the final
second to warn that the shutter is about to be released.
• To stop the timer, press the shutter-release button twice with the 10-second
delay and once with the 3-second delay.
Note on using self-timer
When using the self-timer with off-center subject, select Manual option in
FOCUS OPTIONS: AF-Area Mode in å shooting mode (p. 111) and select
appropriate focus area, then set the self-timer. Or, select Close Up in scene
mode and select appropriate focus area, then set the self-timer.
4342
Page 23
Autofocus mode (Continuous AF/Single AF)
F2.8F2.8F2.81/2501/2501/250
227222722272
161616
F2.8F2.8F2.81/2501/2501/250
227222722272
161616
The autofocus system operates in one of two modes, depending on
whether the monitor is on or off. In a mode, scene mode or Movie
mode, the camera adjusts focus continuously while the monitor is on
(continuous autofocus; p. 113). When the monitor is off, the camera
does not focus until the shutter-release button is pressed halfway
(single autofocus; p. 113). In either case, focus locks when the shutter-
release button is pressed halfway, and remains locked as long as the
button is held in this position (focus lock; p. 45).
In å mode, single autofocus is used whether the monitor is on or
off, although the Focus Options: Auto-Focus Mode item in the
SHOOTING menu can be used to enable continuous autofocus when
the monitor is on (p. 113).
Getting Good Results with Autofocus
Autofocus performs best when:
• There is contrast between the subject and the background. For example,
autofocus may not perform well on subjects that are the same color as the
background.
• The subject is evenly lit.
Autofocus does not perform well when:
• You attempt to focus simultaneously on two or more objects at different
distances from the camera. For example, autofocus may not perform well
when photographing an object inside a cage, because the bars of the cage
will be closer to the camera than the main subject, and both the bars and the
main subject will be in focus area at the center of the frame.
• The subject is very dark (the subject should not, however, be too much
brighter than the background).
• The subject is moving rapidly.
If the camera is unable to focus using autofocus, use focus lock (p. 45) to focus
on another subject at the same distance.
Focus Lock
Depending on the effect you want to achieve, your subject may not be at the
center of the final composition. In a and all SCENE modes except Portrait
and Close Up (p. 36, 37), the camera automatically focuses on the subject at
the center of the frame. If your subject is not located at the center of the frame
when the shutter release button is pressed halfway, the camera will focus on the
background and the main subject may not be in focus. Focus lock is used to
focus first on your subject, then adjust the composition before taking the
picture.
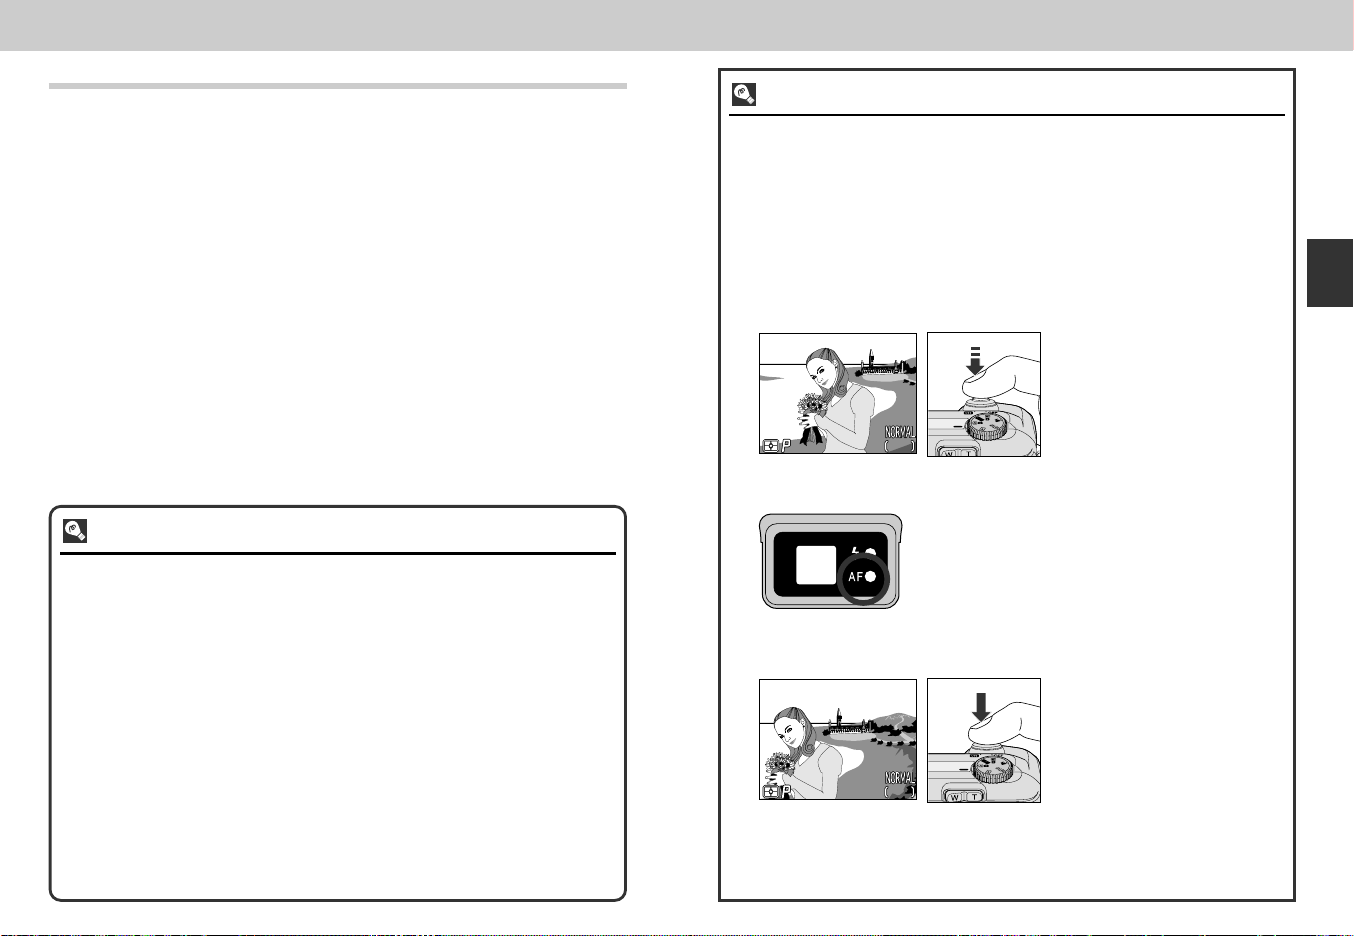
Focus
1
• Position the subject in the
center of the frame and press
the shutter release button
halfway.
Check the autofocus lamp
2
• With the shutter release button pressed halfway,
check that the autofocus (green) lamp next to the
viewfinder glows steadily, indicating that the
subject is in focus. Focus will remain locked while
the shutter release button is pressed halfway.
Recompose the picture and shoot
3
• Keeping the shutter release
button pressed halfway,
recompose your picture. Press
the shutter release button the
rest of the way down to shoot.
Do not change the distance between the camera and your subject while focus
lock is in effect. If your subject moves, remove your finger from the shutter
release button and focus again at the new distance.
Beyond Point-and-Shoot—Focus Mode
4544
Page 24
F4.9
1/250
2272
F4.9
1/250
2272
Digital Zoom
The Button
Your Nikon digital camera offers two kinds of zoom: optical zoom, in
which the camera’s telescoping lens can be used to magnify the
subject up to 3X, and digital zoom, in which digital processing is used
to further magnify the image up to 4X for a total magnification of up to
12X.
Digital Zoom
At the maximum zoom position, holding the T down for two seconds triggers digital
zoom.
2272
2272
2272
F4.9
F4.91/250
F4.9
F4.91/250
1/250
Maximum optical zoom
position
The camera can be zoomed in and out in the digital zoom range by pressing the W
and T. To cancel digital zoom, press W until the zoom indicator turns white or turn
the camera off.
161616
Hold for 2 sec.
Autofocus lamp blinks slowly to show that pictures
can not be accurately framed in viewfinder
1/250
Zoom indicator turns
yellow in digital zoom
range
2272
161616
Optical vs. Digital Zoom
In digital zoom, data from the camera’s image sensor are processed digitally,
enlarging the center portion of the image to fill the frame. Unlike optical zoom,
digital zoom does not increase the amount of detail visible in the picture.
Instead, details visible at maximum zoom are enlarged, producing a slightly
“grainy” image. Digital zoom also differs from optical zoom in that its effects are
visible only in the monitor, not the viewfinder, meaning that the monitor must be
on before digital zoom can be used.
Restrictions on Digital Zoom
Digital zoom can only be used when the monitor is on. Digital zoom is not
available when:
• The monitor is off
• Image quality is set to HI (p. 81)
• Black&White is selected in the Image Adjustment sub-menu (p.103)
• Multi-Shot 16 or Ultra HS is selected in the Continuous sub-menu (p. 100)
Beyond Point-and-Shoot—Digital Zoom
4746
Page 25

Flash Mode
F2.8
1/250
2272
16
The 3 Button
The flash mode can be chosen from the following five options.
The flash mode is controlled with the 3 button.
Setting
No icon
Auto
P
Flash Cancel
#
Auto with
red-eye
reduction
O
Anytime Flash
(fill-flash)
SLOW
Slow Sync
Flash fires when lighting is poor. Best choice in most
circumstances.
Flash will not fire even when lighting is poor.
Flash fires after a short delay.
Use for portraits (works best when subjects are well within
range of flash and looking at pre-flash lamp).
Flash fires whenever picture is taken.
Used to “fill-in” (illuminate) shadows and backlit subjects.
Auto flash combined with slow shutter speed.
Use to capture both subject and background at night or
under dim light.
Description
The Flash-Ready Lamp
A short pause is required between exposures for the flash system to charge. If
the shutter release button is pressed halfway while the flash is charging, the red
flash-ready lamp next to the viewfinder will blink. Remove your finger briefly from
the shutter release button and try again.
2272
2272
F2.8
F2.81/250
1/250
Press 3 button repeatedly until
desired mode is displayed in monitor
16
16
Keep the Flash Window Clear
Keep your fingers and other objects away from the flash window when using
the flash. If a shot seems dark even though the flash fired, this may indicate that
you accidentally blocked the flash window; check that the flash is unobstructed
and try again.
When Lighting Is Poor
When lighting is poor and the flash is off (P) or set to slow sync (SLOW),
pictures may be blurred. Use of a tripod is recommended in these
circumstances. At shutter speeds of below 1/4 sec., the shutter speed indicator
in the monitor will turn yellow. Pictures taken when this indicator appears may
be blurred or slightly mottled. At shutter speeds of below 1/4 sec., noise may
also appear in the dark part of the frame. This noise in the form randomly
spaced bright-colored pixels can be reduced with the Noise Reduction setting.
Note that the flash will turn off (P) automatically when:
• Autofocus is set to “@” (Infinity; p. 41)
• h (landscape), j (sunset), k (night landscape), v (museum), l
(fireworks show) or z (close up) is selected in scene mode (p. 36, 37) or
the mode dial is set to m (movie) (p. 50)
• BSS is on (p. 102) or a setting other than Single is selected for
CONTINUOUS (p. 100) in å mode
• You use lens converter (LENS) settings (p. 105)
• The AE Lock option in the Exposure Options sub-menu is on (p. 110)
Beyond Point-and-Shoot—Flash Mode
4948
Page 26

Making Movies
F2.8
40"
1/125
320
F2.8F2.8F2.81/2501/2501/250 2.02.02.0
227222722272
161616
In m (movie) mode, the COOLPIX4300 can record silent movies up to
forty seconds in length at a rate of about fifteen frames per second.
Set the mode dial to m (movie).
1
• The exposure count display
will show the length of the
movie that can be recorded.
• The movie mode icon
appears in the bottom left
320
320
corner of the monitor.
40"
40"1/125
Press to start recording.
F2.8
F2.81/125
2
Exposure Compensation
The 1 Button
Alter the exposure from the value set by the camera to make pictures
bright or darker.
Exposure compensation can be set to values between –2.0 EV
(underexposure) and +2.0 EV (overexposure) in increments of 1/3 EV.
Press ≤/≥ on the Multi selector while holding the 1 button.
1
Press ≤ to increase exposure
value, ≥ to decrease exposure
value while holding the 1 button.
2
Confirm exposure value in monitor.
Effects of compensation are visible
in monitor; adjust until desired result
is achieved.
! icon is displayed in monitor.
Beyond Point-and-Shoot—Making Movies/Exposure Compensation
Press again to end recording.
3
• Recording will end automatically forty seconds after
recording starts or if no more memory is available
on the memory card.
• The movie will be stored as a QuickTime movie file
with a file name ending in “.MOV”.
Notes on Movie mode
• Digital zoom is not available.
• Movies can not be recorded unless the monitor is on.
• The flash turns off automatically.
For more information on Playing movies back: P. 6 2
By default, the camera “remembers” the exposure-compensation value restoring
it the next time the mode dial is set to å. If desired, exposure compensation
can be set to return to ±0.0 EV when the mode dial is turned to a new setting
or the camera is turned off.
5150
Page 27

DELETE
No
Yes
SELECT SET
ERASE IMAGESERASE IMAGES
YES OR NO ?YES OR NO ?
ERASE IMAGES
YES OR NO ?
Keep or Delete: Picture Review
F2.8F2.8F2.81/2501/2501/250
400400400
227222722272
100100
200200
400400
AUTOAUTO
100
200
400
AUTO
161616
Sensitivity (ISO Equivalency) (å only)
After each shot, the picture you have just taken
will be displayed briefly in the monitor until being
recorded to the memory card. The following
operations can be performed while the picture is
displayed:
To Press Description
A confirmation dialog will be displayed. Press multi
selector ≤/≥ to highlight option, press > to select.
Delete %
picture
Pause $
display
(1)
(2)
recorded automatically if no operations are performed for
twenty seconds.
• Select No to save picture and
return to shooting mode
• Select Yes to delete picture
Display will be paused for twenty
seconds and pause icon ($) will
change to REC. During this time,
you can press 2 button to
record picture and return to
shooting mode, or press 1
button to delete photo as
described above. Picture will be
Adjusting Sensitivity
In a mode, the camera sets sensitivity automatically in response to
lighting conditions. When the mode dial is set to å, you can choose
a fixed value for sensitivity from four possible settings.
Setting Description
Equivalent to setting of 100 under normal conditions; when
AUTO lighting is poor, however, camera automatically raises sensitivity
(default) to compensate. ISO icon appears in monitor only when sensitivity
raised above 100.
100 Approximately equivalent to ISO rating of 100.
200 Approximately equivalent to ISO rating of 200.
400 Approximately equivalent to ISO rating of 400.
Sensitivity
displayed in
monitor
+
Sensitivity is set by pressing the zoom button while
holding down the 1 button.
100 200 400 AUTO
Beyond Point-and-Shoot—Keep or Delete/Sensitivity (ISO Equivalency)
Sensitivity can also be set using the “ISO” item in the å shooting menus
(p. 106).
• A slight amount of mottling (noise) may appear in pictures taken at settings
other than 100.
• Changes to sensitivity have no effect in a or SCENE operating modes.
5352
Page 28

Manual Focus (å only)
F2.8F2.8F2.81/2501/2501/250
227222722272
161616
In å mode, manual focus can be used in place of autofocus for
situations in which you are unable to achieve the desired results using
autofocus.
Press the zoom button while holding down the 2 button.
1
• Manual focus display shows
approximate focus distance from lens
+
Using this display as your guide, continue to press the zoom
2
button until your subject is in focus.
• The focus distance available depend on the focus
mode setting (p. 41). Note that the focus
distances of 4-30cm (1.6-12 in.) are only available
at ™ (macro close-up) and ™0 (macro close-up
+ self-timer) at widest angle.
between ™ (4cm/1.6 in.) at widest
angle) and @ infinity.
Playing Pictures
Back
This section details the operations that can be
performed when the mode dial is set to p.
Full-Screen Playback
Thumbnail Playback
Taking a Closer Look: Playback Zoom
Playback Options
Full-Screen
Playback
pp. 56-57
Thumbnail
Playback
p. 58
Taking a Closer Look:
Playback Zoom
p. 59
Creating a Small Copy of
a Picture: Small Picture
pp. 60-61
• Unless Off is selected for Focus Options: Focus Confirmation (p. 113), focus
confirmation will turn on automatically when manual focus is in effect, and objects
that are in focus will be outlined sharply in the monitor.
• Manual focus can be canceled by pressing the 2 button.
Notes on Manual Focus
• When using the self-timer, be sure that the self-timer is selected (p. 42) before
selecting a focus distance. Changing the focus mode after setting the focus
distance will cancel manual focus.
• Use autofocus (p. 44) when an optional converter lens is attached (p. 132). In
manual focus mode, the actual focus distance will differ from that shown in
the monitor.
• When manual focus is set to the ™ end of the manual focus indicator, the
camera may be unable to focus at some zoom positions. If the camera is
unable to focus at the current zoom position, the manual focus display in the
monitor will turn red. Zoom the camera in or out until the manual focus display
no longer appears in red.
54
Creating a Small Copy of a Picture: Small
Picture
Movie Playback
Photo Information
Movie Playback
p. 62
Photo Information
pp. 63-64
55
Page 29

100NINI
KON
000
JPG
2002.09.15
15:40
2272
Erase 1 Image(s)
Yes/No?
Full-Screen Playback
When the mode dial is turned to p, the camera enters playback
mode with the most recent picture displayed in the monitor.
2002.09.15
2002.09.15
15:40
15:40
2272
2272
The following operations can be performed in playback mode.
To Press Page
View other
pictures
Hide picture
information/turn —
monitor off
Create a Small
Picture 60
Play movie back QUICK p 62
KON
100
100NIKON
000
1.JPG
1.JPG
000
1/ 1
1/ 1
Description
Press < to view pictures recorded
before the current photo, > to view
pictures recorded after the current
photo. Keep multi selector pressed to
scroll rapidly to the desired frame
number.
Press ≤ to hide picture information.
Press again to turn off the monitor
display. Press yet again to display
picture information.
If the current picture is a photograph,
pressing the ≥ will create a small
copy for electronic distribution.
If the current image is marked with a
m icon to show that it is a movie,
pressing the QUICK p button starts
movie playback. Press again to pause
playback.
To Press Page
A confirmation dialog will be displayed.
Press ≤/≥ on the Multi selector to
highlight the option and > to select.
Delete current
picture
View multiple 7
images (3)
—
Zoom photo in
Display playback
menu
View photo
information
Select current
picture for
transfer to a
computer
5
Press the 7 button to display up to
nine pictures at a time as small
thumbnail previews.
T
(T)
MENU 117
6
(2)
TRANSFER
Press the T (T) button for an enlarged
view of the current photo.
Press the MENU button to display or
hide the playback menu.
Press the 6 button to display photo
information.
Pictures selected for transfer are
marked with a D icon. Turn this
marking on or off to select the pictures
that will be transferred to a computer at
a later date.
Description
• Select "No"
to keep
photo without
deleting
• Select "Yes"
to delete
photo
—
Playing Pictures Back—Full-Screen Playback
58
59
63
66
5756
Page 30

7 8 9
4 5 6
1 2 3
789
456
123
4.04.0
ZOOMZOOMSCROLL
SCROLL
Thumbnail Playback Taking a Closer Look: Playback Zoom
Erase 1 Image(s)
Yes/No?
Pressing the 7 button in full-screen playback
displays a menu of nine thumbnail images.
To P re s s
Highlight images
View highlighted
image at a larger 7
size
Delete highlighted
picture
Select highlighted
photo for transfer TRANSFER
to computer
5
Press ≤/≥/</> on the Multi selector to
highlight a thumbnail.
Press the 7 button once to view a menu
of four thumbnail images. Press again to
view highlighted thumbnail full screen.
Small pictures are displayed with a grey
frame.
A confirmation dialog will be displayed.
Press ≤/≥ on Multi selector to highlight
option, press > to select.
Pictures selected for transfer are marked
with a D icon. Turn this marking on or off
to select the pictures that will be transferred
to a computer at a later date.
Description
• Select “No” to
return to
thumbnail
playback screen
without deleting
the picture
• Select “Yes” to
delete picture
Use the T (T) button to zoom in on pictures
displayed in full-screen playback (zoom cannot
be used with movies and small picture files).
Operation
T (t)
Press
y
Press
Zoom picture in. Zoom increases each time button is pressed to
maximum of 6.0X. While image is zoomed in, T indicator and
zoom factor are displayed in monitor
Cancel zoom.
Scroll to another area of image.
Function
Notes on Playback Zoom
To view other pictures on the memory card, cancel zoom and use the multi
selector.
Additional time may be required to display pictures taken at an image quality
setting of HI.
Playback zoom cannot be used to view movies, copies created with small
picture function, or pictures taken at a setting of Ultra HS.
Playing Pictures Back—Thumbnail Playback/Taking a Closer Look: Playback Zoom
5958
Page 31

2/ 6 6
100100NINIKONKON
0000002.
JPGJPG
2002.09.152002.09.15
15:4515:45
227222722272
100NIKON
0002.
JPG
2002.09.15
15:45
2
/
6
1/ 6
100100NINIKONKON
0000001.
JPGJPG
100NIKON
0001.
JPG
2002.09.152002.09.15
15:4015:40
2002.09.15
15:40
227222722272
1
/
6
Small Pic
Creating small
picture file?
Yes
No
SELECT SET
2002.09.152002.09.15
15:4015:40
2002.09.15
15:40
7
/
7
SmSm
all
PicPic
640x480640x480
BASICBASIC
Sm
all
Pic
640x480
BASIC
100100NINIKONKON
0000007.
JPGJPG
7/ 7
100NIKON
000
7.JPG
Creating a Small Copy of Picture: Small Picture
Pressing the ≥ (SMALL PIC.) button in full-screen playback or review
creates a small copy of the current picture. Before creating a copy,
choose a size using the Small Pic. option in the playback menu.
Copies can be 640 x 480, 320 x 240, 160 x 120, 96 x 72 pixels in size
and automatically have an image quality of BASIC, making them ideal
for distribution by e-mail or for use in web pages.
To create a small copy of the picture currently displayed in full-screen
playback or full-screen review:
1
Display a picture in full frame
playback or full-screen review to
create a small picture file
3
Press ≥ (SMALL PIC. button)
5
2
Press </> to select a picture
4
Press ≤/≥ to highlight "Yes"
6
About Small Picture
Once created, copies are independent of the original: deleting a copy has no
effect on the original, deleting the original no effect on the copy. Copies are
stored on the memory card as independent files with names of the form
“SSCNnnnn.JPG,” where “nnnn” is a four-digit number assigned automatically
by the camera. Print and protect attributes for copies must be set separately
from the originals.
When displayed in full-screen playback, copies will occupy roughly one-quarter
of the monitor and are surrounded by a gray frame. In thumbnail playback,
copies are indicated by a gray border. Copies can not be viewed using playback
zoom (p. 59); pressing the T (t) button when a copy is displayed has no
effect.
Restrictions on a Small Picture
Small Pictures cannot be created in the following conditions:
• When a Small Picture is being displayed in the monitor
• With an image file of HI image quality
• With Ultra HS or movie files
• When there is insufficient memory in the memory card to create a Small
Picture
• In quick review, thumbnail review and thumbnail playback
Notes on Small Picture
• The COOLPIX4300 may not be able to create small copies from images taken
with another make of camera.
• Copies created with the small picture function may not display correctly when
viewed on other models of Nikon digital camera. You may also not be able to
transfer copies from other models of Nikon digital camera to a computer.
Playing Pictures Back—Creating a Small Copy of Pictures: Small Picture
Press > to create a copy of the
photograph at the designated
Small Picture size
Press > to confirm small picture
6160
Page 32

1/ 11/ 1
2002.09.152002.09.15
15:5515:55
100100NINIKONKON
0000001.
MOVMOV
100NIKON
0001.
MOV
2002.09.15
15:55
STARTSTARTSTART
2272
2002.09.16
11:35
25
/
40
100NIKON
0025.JPG
FINE
25
/
40
100NIKON
0025
.
JPG
2002.09.16
11:35
FINE
2272
Sm
alall
PicSm
all
Pic
CAMERA
FIRM VER
METERING
MODE
SHUTTER
APERTURE
EXP
+/FOCAL LENGTH
FOCUS
:
E4300
:
E4300V1.0
:
MATRIX
:
P
:
1/250
:
F2.8
:
0.0
:
f
8.2mm
:
AF
:
E4300
:
E4300V1.0
:
MATRIX
:
P
:
1/250
:
F2.8
:
0.0
:
f
8.2mm
:
AF
CAMERA
FIRM VER
METERING
MODE
SHUTTER
APERTURE
EXP
+/FOCAL LENGTH
FOCUS
SPEED LIGHGT
IMG ADJUST
SENSITIVITY
WHITEBAL
SHARPNESS
DIGITAL TELE
CONVERTER
FILE SIZE
:
ON
:
AUTO
:
AUTO
:
AUTO
:
AUTO
:
X1.00
:
OFF
:
713KB
SPEED LIGHGT
IMG ADJUST
SENSITIVITY
WHITEBAL
SHARPNESS
DIGITAL TELE
CONVERTER
FILE SIZE
:
ON
:
AUTO
:
AUTO
:
AUTO
:
AUTO
:
X1.00
:
OFF
:
713KB
Movie Playback Photo Information
In full-screen playback, movies are indicated by
a m icon in the lower left corner of the display.
Movie playback is controlled by the QUICK p
button.
Operation
QUICK p
Start movie. While movie is in progress, press to pause movie;
press again to resume movie playback. When movie ends, first
frame of movie will be displayed and normal playback will resume.
While movie is paused: rewind movie one frame.
While movie is paused: advance movie one frame.
Function
Photo information superimposed on pictures displayed in full-screen
playback or full screen review. There is a total of five pages of
information for each photo.
Press the 6 (2) button to cycle through picture information as
follows:
Page 1 Page 2 Page 3 Page 4 Page 5
Page 1
1
2
3
4
5
1 Date of recording
2 Time of recording
3 Small picture
4 Image size
5 Image quality
6 Folder
7 File number and type
8 Battery level indicator
9 Transfer icon
10 Print-order icon
11 Protect icon
12 Frame number/total
number of frames visible
in current folder
6
7
8
9
10
11
12
• Camera type
• Firmware version
• Metering method
• Exposure mode
• Shutter speed
• Aperture
• Exposure compensation
• Focal length
• Focus mode
Page 2
Page 3
• Flash status
• Image adjustment
• Sensitivity (ISO
equivalent)
• White balance
• Sharpening
• Digital zoom
• Lens-converter status
• File size
Playing Pictures Back—Movie Playback/Photo Information
6362
Page 33

Page 4 (histogram)
3
1
4
5
2
1 Thumbnail preview (flashing border
marks image highlights, or brightest
areas of image)
2 Histogram (shows distribution of tones
in image: horizontal axis gives pixel
brightness, with dark tones to left and
bright tones to right, while vertical axis
shows number of pixels of each
brightness in image)
3 File number and type
4 Metering method
5 Shutter speed
6 Aperture
7 Exposure compensation
8 Sensitivity (ISO equivalent)
6
7
8
Page 5 (focus confirmation)
1
2
3
4
5
6
1 File number and type
2 Focal length
3 Shutter speed
4 Aperture
5 Focus mode
6 Noise reduction
7 Focus confirmation
(portions of image in
focus sharply outlined;
active focus area shown
in red)
7
Connections
This chapter provides information on connecting
your camera to a computer and to a television or
videocassette recorder (VCR).
Connecting to a Computer
Connecting to a Television or VCR
Connecting to
External Devices
Connecting to a
Computer
p. 66-67
Connecting to a
Television or VCR
p. 68
64
65
Page 34

Connecting to a Computer
Before copying pictures to your computer, you will need to install Nikon
View, an application that allows you to transfer pictures from the
camera memory card to a computer hard disk and view them on the
computer monitor. Once you have installed Nikon View, you are ready
to transfer photographs and movies to your computer. Pictures can be
transferred via a direct USB connection between the camera and
computer. If your computer has built-in USB interface, you can connect
it to your camera using the UC-E1 cable provided.
Connect the UC-E1 USB cable as shown below.
• Use the flat connector for connection to the computer, and connect the other end
of the cable to the camera’s USB connector. See the Quick Start Guide for details
on connecting camera to a computer or transferring pictures to a computer.
The TRANSFER button
Pictures can also be transferred using the TRANSFER button on the
camera.
Connections—Connecting to a Computer
• When the TRANSFER button on the camera is pressed, pictures with D
markings are transferred to computer.
• The display in the camera monitor changes as follows:
66
PREPARING
TO TRANSFER
• When all marked pictures have been transferred, the message “TRANSFER
COMPLETED” will be displayed in the camera monitor.
TRANSFERRING
IMAGE TO
COMPUTER
TRANSFER COMPLETED
Mac OS X
Pictures can not be transferred using the camera TRANSFER button in Mac OS
X 10.1.2. Use the button in Nikon View to transfer pictures. Before using
the camera TRANSFER button to transfer pictures in Mac OS X version 10.1.3
or later, set the USB option in the camera SET-UP menu to PTP (p. 93)
67
Page 35

Connecting to a Television or VCR
Using the video cable provided with your camera, you can connect the
COOLPIX4300 to a television or VCR.
Connect the video cable to the camera
1
• Insert the black plug on the video cable into the camera’s video output connector.
Connect the video cable to the video device
2
• Connect the yellow plug to the video-in jack on the television or VCR.
Tune the television to the video channel
3
Turn the camera on
4
• The television will perform the functions normally performed by the camera
monitor, and the camera monitor will turn off.
Use an AC Adapter
To eliminate drain on the batteries during extended playback, connect the
camera to an optional EH-21 AC adapter/battery charger or EH-53 AC adapter.
Menu Guide
This chapter is divided into the following five
sections:
Index to Menu Options
An overview of the options available in the camera
menus.
Using Camera Menus
This section describes basic menu options.
The Set-Up Menu
This menu is used for basic camera setup.
The Shooting Menu
This menu contains a number of options for finetuning shooting settings.
The Playback Menu
The playback menu contains options for
managing images stored on memory cards.
Camera Menu
Options
Index to Menu
Options
pp. 70-75
Using Camera
Menus
pp. 76-78
The Set-Up Menu
pp. 79-95
The Shooting
Menu
pp. 96-116
The Playback
Menu
pp. 117-129
Choosing a Video Mode (p. 93)
The Video Mode item in the SETUP menu offers a choice of NTSC and PA L
standards for video output. Be sure that the standard selected matches that of
any video device to which you connect the camera.
6968
Page 36

SET-UP2
Controls
Shot Confirm Lamp
Pic Data/Transfer
Date
Interface
Language
Reset All
PAGE1 SELECT SET
CONTROLS
save
save
save
Digital Zoom
Done
SELECT SETBK
SHOT CONFIRM
Controls
Shot Confirm Lam
Pic Data/Transfer
Date
Interface
Language
Reset All
Off
On
SELECT SET
PIC DATA/TRANSFER
Controls
Shot Confirm Lam
Pic Data/Transfer
Date
Interface
Language
Reset All
info txt
Auto Transfer
SELECT SET
DATE
Y M D
2002. 01. 01
00 00
SELECT SET
INTERFACE
Controls
Shot Confirm Lamp
Pic Data/Transfer
Date
Interface
Language
Reset All
Video Mode
USB
SELECT SET
LANGUAGE
Controls
Shot Confirm Lamp
Pic Data/Transfer
Date
Interface
Language
Reset All
De
En
Fr
EI
Es
SELECT SET
OFF
RESET ALL
Reset all setting
to default values
No
Yes
SELECT SET
SET-UP
1
Image Quality
Image Size
Folders
Monitor Options
Auto Off
Seq. Numbers
CF Card Format
PAGE2 SELECT SET
IMAGE QUALITY
Image Quality
Image Size
Folders
Monitor Options
Auto Off
Seq. Numbers
CF Card Format
FINE
NORMAL
BASIC
SELECT SET
IMAGE SIZE
Image Quality
Image Size
Folders
Monitor Options
Auto Off
Seq. Numbers
CF Card Format
SELECT SET
FOLDERS
Image Quality
Image Size
Folders
Monitor Options
Auto Off
Seq. Numbers
CF Card Format
Options
N I K O N
SELECT SET
MONITOR OPTIONS
Image Quality
Image Size
Folders
Monitor Options
Auto Off
Seq. Numbers
CF Card Format
Display Mode
Brightness
SELECT SET
AUTO OFF
Image Quality
Image Size
Folders
Monitor Options
Auto Off
Seq. Numbers
CF Card Format
30S
1M
5M
30M
SELECT SET
SEQ. NUMBERS
Image Quality
Image Size
Folders
Monitor Options
Auto Off
Seq. Numbers
CF Card Format
On
Off
Reset
SELECT SET
CF CARD FORMAT
WARNING !
All images will
be deleted !
No
Format
SELECT SET
2272
2048
1600
1280
1024
640
Index to Menu Options
SET-UP 1
Set Mode dial to
SETUP.
SET-UP menu
contains two pages
of options.
SET-UP 2
Press the MENU button or
Multi selector to switch
between SET-UP menu 1
and 2.
Image Quality
Select the image quality
(except HI) used for all modes
(p. 81)
Image Size
Choose image size used for all
modes (p. 82)
Folders
Select folder for storage.
Create, rename, and delete
folders (p. 83)
FINE
NORMAL
BASIC
2272
2048
1600
Options
NIKON
1280
1024
640
New/Rename/
Delete
Controls
Set camera to “remember”
settings in effect when camera is turned off
Turn digital zoom on or off
(p. 90)
Shot Confirm Lamp
Control visual shutter release
confirmation lamp (p. 91)
Pic Data/Transfer
Save photo information in text
format; turn transfer marking
on or off (p. 91)
3 save
2 save
! save
Digital Zoom
Off
On
info. txt
Auto Transfer
On/Off
On/Off
On/Off
On/Off
On/Off
On/Off
Menu Guide—Index to Menu Options
(Folder name)
Monitor Options
Turn monitor and picture
review on and off, control
monitor display (p. 87)
Auto Off
Specify amount of time before
camera enters sleep mode to
save power (p. 88)
Display Mode
Brightness
30 S
1 M
5 M
Monitor On/Review Only/
Preview Only/Monitor Off
(5 levels)
30 M
Seq. Numbers
Control automatic file naming
(p. 89)
CF Card Format
Format memory cards for use
in the COOLPIX 4300 (p. 90)
On
Off
Reset
WARNING!
All images will
be deleted!
No
Format
Date
Set date and time (p. 92)
Interface
Choose USB protocol used
when camera is connected to
a computer or select the video
standard to use for playback
on TV (p. 92)
Language
Select language for menu and
message display (p. 94)
Reset All
Reset all settings to default
values (p. 95)
Year/Month/Day/Hour/ Minute
Display order
Video Mode
USB
NTSC/PAL
PTP/Mass Storage
De
En
Fr
EI
Es
No
Yes
7170
Page 37

IMAGE SIZE & QUALITY
OFF SELECT SET
IMAGE SIZE & QUALITY
Image Quality
Image Size
OFF SELECT SET
SENSITIVITY
AUTO
100
200
400
OFF SELECT SET
EXPOSURE OPTIONS
Exposure Mode
AE Lock
EXP. +/–
OFF SELECT SET
FOCUS OPTIONS
AF Area Mode
Auto-Focus Mode
Focus Confirmation
OFF SELECT SET
SELECT SET
AUTO BRACKETING
Off
On
WB Bracketing
OFF
SELECT SET
NOISE REDUCTION
On
Off
OFF
CF CARD FORMAT
WARNING !
All images will
be deleted !
No
Format
SELECT SET
OFF
WHITE BALANCE
PAGE2 SELECT SET
WHITE BALANCE
SELECT SETOFF
Auto
White Bal Preset
Fine
Incandescent
Fluorescent
Cloudy
Speedli ght
Auto
White Bal Preset
Fine
Incandescent
Fluorescent
Cloudy
Speedlight
METERING
OFF SELECT SET
Matrix
Spot
Center-Weighted
Spot AF Area
CONTINUOUS
Single
Continuous
Multi-shot 16
VGA Sequence
Ultra HS
OFF SELECT SET
BEST SHOT SELECTOR
Off
On
OFF SELECT SET
IMAGE ADJUSTMENT
Auto
Normal
More Contrast
Less Contrast
Lighten Image
Darken Image
Black&Whine
OFF SELECT SET
IMAGE SHARPENING
Auto
High
Normal
Low
Off
OFF SELECT SET
Normal
Wide Adapter
Telephoto 1
Telephoto 2
Fisheye
Slide Copy Adptr
LENS
OFF SELECT SET
Shooting Menu 1
White Balance
Select the white balance to
match lighting conditions
(p. 97)
Metering
Select metering mode (p. 99)
Continuous
Take pictures one at a time, in
sequence, or in a collage
(p. 100)
Best Shot Selector
Use when pictures could be
blurred by inadvertent camera
movement (p. 102)
Image Adjustment
Adjust brightness or contrast
of image (p. 103)
Image Sharpening
Heighten or reduce the sharpness of outlines in your pictures (p. 104)
Lens
Select type of optional lens
converter or Slide Copy
Adapter (p. 105)
Set Mode dial to
å.
Press the MENU
button to select.
A Auto
White Bal Preset
Fine
Incandescent
Matrix
Spot
Center-Weighted
Spot AF Area
Single
Continuous
Multi-shot 16
VGA Sequence
Off
BSS
On
AUTO
Normal
More Contrast
Less Contrast
Auto
High
Normal
Low
Normal
Wide Adapter
Telephoto 1
Telephoto 2
Shooting
menu
contains two
pages of
options.
Fluorescent
Cloudy
Speedlight
Ultra HS
Lighten Image
Darken Image
Black & White
Off
Fisheye 1
Slide Copy Adptr
Shooting Menu 2
Image Quality and Size
Set image quality and size
used for all modes (p. 81, 82)
Sensitivity
Increase sensitivity to take
pictures in low light without
flash
(p. 106)
Exposure Options
Set exposure mode, turn AE
Lock and Auto Bracketing on
or off, set exposure compensation (p. 106)
Focus Options
Select AF Area, change
Autofocus mode, confirm
focus, distance unit displayed
(p. 111)
Auto Bracketing
Automatically vary exposure or
white balance over a series of
pictures (p. 114)
Noise Reduction
Reduce “noise” in pictures
taken with slow shutter
speeds or high sensitivity settings (p. 116)
CF Card Format
Format memory cards for use
in the COOLPIX 4300 (p. 90)
Press the MENU
button or Multi selector
to switch between the
Shooting menus.
Image Quality
Image Size
AUTO
100
200
400
Exposure Mode
AE Lock
EXP. +/–
AF Area Mode
Auto-Focus Mode
Focus Confirmation
Off
On
WB Bracketing
On
Off
WARNING!
All images will be
deleted!
HI/FINE/NORMAL/
BASIC
2272/2048/1600/
1280/1024/640
P/M
Off/On/Reset
–2.0 to +2.0
Auto/Manual/Off
Continuous AF/Single AF
MF/On/Off
3, ±0.3/3, ±0.7/
3, ±1.0/5, ±0.3/
5, ±0.7/5, ±1.0
No
Format
7372
Menu Guide—Index to Menu Options
Page 38

PLAY BACK MENU2
Transfer
Small Pic.
Auto Off
6 4 0
30S
OFF SELECT SET
TRANSFER
Transfer
Small Pic.
Auto Off
6 4 0
30S
OFF SELECT SET
All ON
All OFF
SETSELECT
SMALL PIC.
OFF
Transfer
Small Pic.
Auto Off
6 4 0
30S
640X480
320
X
240
160
X
120
96X72
SETSELECT
AUTO OFF
OFF
Transfer
Small Pic.
Auto Off
6 4 0
30S
30 S
1 M
5 M
30 M
PRINT
DONESELECT SET
PLAY BACK MENU1
Delete
Folders
Slide Show
Protect
Hide Image
Print Set
OFF SELECT SET
OFF
DELETE
Selected Images
All images
Print Set
SELECT SET
OFF
FOLDERS
Options
All Folders
N I K O N
T
O K Y O
O
S A K A
SELECT SET
OFF
SLIDE SHOW
(
Pause
)
Start
Frame Intvl
SELECT SET
PROTECT
DONESELECT SET
DONESELECT SET
HIDE IMAGE
4 5 6
1 2 3
4 56
123
4 5 6
1 2 3
4 56
123
4 5 6
1
4 56
1
22333
11111133
Playback Menu 1
Set Mode dial to
p.
Press the MENU
Playback
menu
contains two
pages of
options.
button to select.
Delete
Delete selected images using
thumbnail display; delete all
images or the settings of
Print-order files (p. 118)
Folders
Select folder for storage.
Create, rename, and delete
folders (p. 121)
Selected Images
All Images
Print Set
Options
All Folders
NIKON
New/Rename/
Delete
(Folder name)
Slide Show
Start slide show for images in
the designated folder; set
frame interval from as 2, 3, 5
or 10 sec. (p. 122)
Protect
Protect selected images from
being erased (p. 124)
Hide Image
Hide pictures during playback
(p. 125)
Print Set
Select images for printing
from thumbnail display
(p. 126)
Start
Frame Intvl
(Pause –>7)
2S/3S/5S/10S
(Select image and set Protect)
(Select image and set Hide Image)
(Select image and set number of prints)
Playback Menu 2
Transfer
Mark all pictures for transfer
or remove marks from all pictures (p. 128)
Small Pic.
Set a Small Picture image size
suitable for e-mail and Web
distribution (p. 129)
Auto Off
Set time delay for Auto-Off
function (p. 88)
Press the MENU
button or Multi selector
to switch between the
Playback menus.
All ON
All OFF
640 x 480
320 x 240
160 x 120
96 x 72
30 S
1 M
5 M
30 M
Menu Guide—Index to Menu Options
7574
Page 39

Using Camera Menus
WHITE BALANCE
PAGE2 SELECT SET
WHITE BALANCE
PAGE2 SELECT SET
METERING
PAGE2 SELECT SET
METERING
OFF SELECT SET
Matrix
Spot
Center-Weighted
Spot AF Area
METERING
OFF SELECT SET
Matrix
Spot
Center-Weighted
Spot AF Area
METERING
PAGE2 SELECT SET
F2.8F2.8F2.81/2501/2501/250
227222722272
161616
Changes to some settings can be made with the help of menus that
appear in the monitor. The options available depend on the operating
mode. No menu is available in a and movie mode.
Mode Page
SETUP 79
å
i
p 117
Menu
SET-UP
SHOOTING
MENU
SCENE
PLAYBACK
MENU
Description
Basic camera setup (image quality
and size setting, formatting CF
memory cards, setting the time and
date, etc.)
Advanced shooting options (white
balance, metering, etc.)
Select the scene from a menu of 12
creative shooting situations.
Playback options such as deleting
selected pictures or selecting
images for transfer to your
computer, etc.
96
34
Viewing the Menus
When the camera is on, the menu for the current operating mode except a and
m movie can be displayed by pressing the MENU button.
Making a Selection
Use the Multi selector to make a selection.
1
Highlight menu item
3
Highlight option
2
4
5
Display options
Menu Guide—Using Camera Menus
Make selection
Press MENU
Menu for current
operating mode
displayed
If “ PAGE2” appears at the lower left corner of the
menu, pressing the MENU button again will display the
menu’s second page. When “ OFF” is displayed,
pressing the MENU button returns you to shooting or
playback mode.
Exit menu and return to shooting
mode
• To return to the previous menu after making a selection, press the Multi selector
to the left or right.
• The view through the lens is visible behind the å and SCENE menus. To take
pictures while the menu is displayed, press the shutter-release button.
7776
Page 40

WHITE BALANCE
PAGE2 SELECT SET
SHOOTING MENU1
PAGE2 SELECT SET
SHOOTING MENU2
OFF SELECT SET
IMAGE SIZE & QUALITY
OFF SELECT SET
The Set-Up Menu
SET-UP
1
Image Quality
Image Size
Folders
Monitor Options
Auto Off
Seq. Numbers
CF Card Format
PAGE2 SELECT SET
SET-UP2
Controls
Shot Confirm Lamp
Pic data/Transfer
Date
Interface
Language
Reset All
PAGE1 SELECT SET
Accessing Multi-Page Menus
To move between pages in a multi-page menu:
1
Position cursor in main menu
3
Highlight page number
• You can also jump from the first page to the second page of a multi-page menu
by pressing the MENU button once.
2
Highlight page tab
4
Display selected page
This section details the options available in the SET-UP menu, where
you make changes to basic camera settings. Some of the options in
the setup menu can also be accessed from the å and playback
menu.
The setup menu contains two pages of options:
SET-UP 1 menu
Image Quality P. 81
Image Size P. 82
Folders P. 83-86
Monitor Options P. 87
Auto Off P. 88
Seq. Number P. 89
CF Card Format P. 90
SET-UP 2 menu
Controls P. 90
Shot Confirm Lamp P. 91
Pic data/Transfer P. 91-92
Date P. 92
Interface P. 92-94
Language P. 94
Reset All P. 95
Menu Guide—Using Camera Menus/The Set-Up Menu
To View the SET-UP menu
The SET-UP menu is displayed automatically when the mode dial is
turned to SETUP.
To end display of the SET-UP menu, set the mode dial other than
SETUP or turn the camera off.
7978
Page 41

Making Effective Use of Memory:
IMAGE QUALITY
Image Quality
Image Size
Folders
Monitor Options
Auto Off
Seq. Numbers
CF Card Format
FINE
NORMAL
BASIC
SELECT SET
F2.8F2.8F2.81/2501/2501/250
227222722272
151516
The Image Size & Quality Menu
Together, image quality and size determine how much space each
picture occupies on the memory card. This in turn determines the total
number of pictures that can be stored. To get an idea of how different
settings for image size and quality affect the number of images that
can be stored on a memory card, view the following table, which
shows the approximate number of pictures that can be stored on 16
MB, 64 MB, and 128 MB cards at different combinations of image size
and quality.
16 MB Card
2272 2048 1600 1280 1024 640
HI 1 —————
FINE 8 1016243786
NORMAL 16 19 31 47 69 144
BASIC 32 37 59 86 121 229
64 MB Card
2272 2048 1600 1280 1024 640
HI 5 —————
FINE 33 40 65 100 151 347
NORMAL 65 78 125 190 278 578
BASIC 130 151 236 347 488 918
128 MB Card
2272 2048 1600 1280 1024 640
HI 10—————
FINE 66 80 130 200 303 695
NORMAL 132 158 252 381 558 1158
BASIC 260 303 474 695 997 1840
* Figures are approximate. The file size of JPEG-compressed images varies with
the scene recorded.
Image Quality
To reduce the amount of memory that each shot
occupies, pictures taken at settings other than HI
are compressed as they are saved to the memory
card. Compression selectively reduces the quality
of the image; the more the picture is compressed,
the more noticeable this loss of quality is likely to
be. The actual effect depends on the size of the
picture when printed or displayed and on the type of subject.
Option
HI No compression TIFF
FINE 1:4 JPEG
NORMAL 1:8 JPEG
BASIC 1:16 JPEG
You can control the amount of compression using the image quality sub-menu.
Image quality settings can be accessed from the SET-UP menu and the “Image Size
& Quality” sub-menu in the å shooting menu (p. 96). Changes to image quality in
any of these menus apply to all modes. Note, however, that image quality setting of
“HI” cannot be selected with the SETUP menu and “HI” becomes “FINE” in a
and SCENE modes, reverting to “HI” when the mode dial is turn to å.
The current image quality and size settings are displayed
in the monitor as shown at right.
Compression File
ratio (approx.) format
Description
Maximum image quality. Use when fidelity
is of paramount importance. Only
available at image size of 2272 x 1704.
Fine image quality, suitable for
enlargements or high-quality prints.
Normal image quality, suited to most
applications.
Basic image quality, suitable for pictures
that will be distributed by e-mail or used
in web pages.
Viewing the Current Image Quality and Size
8180
Menu Guide—The Set-Up Menu
Page 42

FOLDERS
Image Quality
Image Size
Folders
Monitor Options
Auto Off
Seq. Numbers
CF Card Format
Options
N I K O N
SELECT SET
Image Size
IMAGE SIZE
Image Quality
Image Size
Folders
Monitor Options
Auto Off
Seq. Numbers
CF Card Format
2272
2048
1600
1280
1024
640
SELECT SET
OPTIONS
New
Rename
Delete
SELECT SET
NEW
L
M
O
P
N
I K O N
SELECT SET
NEW
L
M
O
P
N
I K O N
SELECT SET
NEW
N
M
P
Q
T O K Y O
SELECT SET
Image size is measured in pixels. At a given image
quality setting, smaller image sizes require less
space to store, making them suitable for
electronic distribution. Consequently, the larger
the image, the larger prints can be made without
loss of detail.
Option Size (pixels) Print size
2272 2272 x 1704 19 x 14cm (7.5 x 5.5 in.)
2048 2048 x 1536 17 x 13cm (7 x 5 in.)
1600 1600 x 1200 14 x 10cm (5.5 x 4 in.)
1280 1280 x 960 11 x 8cm (4.5 x 3 in.)
1024 1024 x 768 9 x 7cm (3.5 x 3 in.)
640 640 x 480 5 x 4cm (2 x 1.5 in.)
Image size can be adjusted from the SET-UP menu and the “Image Size & Quality”
sub-menu in the å shooting menu (p. 96). Changes to image size in any of
these menus apply to all modes.
Organizing Your Pictures: The Folders Menu
By default, pictures are stored on the memory
card in a folder labeled NIKON. To make it easier
to locate pictures during playback, you can create
additional folders and organize pictures by theme.
The “Folders” sub-menu is used to create,
rename and delete folders and to select the folder
in which subsequent pictures will be stored or from which pictures are
played back.
Creating, Renaming and Deleting Folders: Options
The folder options menu can be used to create, rename or delete
folders.
— Creating New Folders —
1
2
Menu Guide—The Set-Up Menu
Print Size
The size of images when printed depends on the resolution of the printer (the
higher the resolution, the smaller the final print size). The approximate size given
above assume a resolution of around 300 dpi (dots per inch).
82
Highlight “New”
3
Press </> to highlight letter
Press >
4
Press ≤/≥ to edit selected letter
• Folder name can include
uppercase letters (“A”-“Z”),
numbers and spaces.
Repeat steps 3 and 4 to create
new five-letter folder name.
83
Page 43

OPTIONS
New
Rename
Delete
SELECT SET
RENAME
TOKYO
OSAKA
KOBE
SELECT SET
RENAME
TOKYO
OSAKA
KOBE
SELECT SET
M
N
P
Q
O S A K A
RENAME
SELECT SET
SET-UP
1
Image Quality
Image Size
Folders
Monitor Options
Auto Off
Seq. Numbers
CF Card Format
PAGE2 SELECT SET
5
OPTIONS
New
Rename
Delete
SELECT SET
ERASE FOLDER
TOKYO
OSAKA
KOBE
SELECT SET
ERASE FOLDER
TOKYO
OSAKA
KOBE
SELECT SET
SELECT SET
DELETE
OSAKA
Delete folder?
No
Yes
Highlight last letter and press > to
create new folder.
— Deleting Folders —
1
Highlight “Delete”
2
Press > to display list of folders
— Renaming Existing Folders —
1
Highlight “Rename”
3
Highlight folder name
2
Press > to display list of folders
4
Press >
• Edit name as described in steps
3-5 of “Creating New Folders” on
preceding page.
3
Highlight folder name
• Folder NIKON is not available for
deletion.
4
Press >
• Select “No” to return to SET-UP
menu without deleting folder
• Select “Yes” to delete selected
folder.
Hidden and Protected Images
If the selected folder contains hidden (p. 125) or protected (p. 124) images, the
folder will not be deleted. Any images it contains that are neither hidden nor
protected will, however, be deleted.
Menu Guide—The Set-Up Menu
8584
Page 44

— Choosing a Folder —
FOLDERS
Image Quality
Image Size
Folders
Monitor Options
Auto Off
Seq. Numbers
CF Card Format
SELECT SET
Options
N I K O N
T O K Y O
O S A K A
FOLDERS
Image Quality
Image Size
Folders
Monitor Options
Auto Off
Seq. Numbers
CF Card Format
SELECT SET
Options
N I K O N
T O K Y O
O S A K A
F2.8F2.8F2.81/2501/2501/250
227222722272
161616
SELECT SET
BRIGHTNESS
Once additional folders have been created, you can select the folder that will be
used for playback or to store pictures in all modes. The folder can be chosen using
the Folders sub-menu in SETUP mode or Folders item in the playback menu.
Until a new folder is selected, all subsequent images will be stored in this folder,
which will also be used for playback.
1
Highlight folder name.
2
Ultra HS
Press >
• Folder name is shown in monitor. (No folder name is
displayed when NIKON is selected.)
With each sequence of pictures taken at Ultra HS (p. 100), the camera creates
a new folder in which all pictures in the sequence are stored. Each folder will
have a name consisting of “N_” followed by a three-digit number assigned
automatically by the camera. Folders can be deleted or selected for playback
from the Folders menu, but folders created at a setting of Ultra HS cannot be
selected for storing additional images.
Monitor Options
The Monitor Options sub-menu is used to specify
when the monitor will turn on automatically and to
set monitor brightness.
Controlling the Monitor: Display Mode
This option is used to specify the conditions under which
the monitor will turn on automatically, and to specify
whether or not pictures are displayed in the monitor after
shooting.
Option Monitor on at startup Picture review
Monitor On Yes On
Review Only No On
Preview Only Yes Off
Monitor Off No Off
Adjusting Monitor Brightness: Brightness
This option controls monitor brightness. Press ≤/≥ on
the Multi selector to increase or decrease the brightness of
the monitor by moving the arrow at the right side of the
display up or down. Once you have adjusted brightness to
your satisfaction, press > on the Multi selector to put the
change into effect.
MONITOR OPTIONS
Image Quality
Image Size
Folders
Monitor Options
Auto Off
Seq. Numbers
CF Card Format
DISPLAY MODE
Monitor On
Review Only
Preview Only
Monitor Off
Display Mode
Brightness
SELECT SET
SELECT SET
Menu Guide—The Set-Up Menu
8786
Page 45

Conserving Battery Power: Auto Off
AUTO OFF
Image Quality
Image Size
Folders
Monitor Options
Auto Off
Seq. Numbers
CF Card Format
30S
1M
5M
30M
SELECT SET
When operated on battery power, the camera will
enter sleep mode if no operations are performed
for thirty seconds. The time limit for sleep mode
can be chosen from thirty seconds, one minute,
five minutes, and thirty minutes using the Auto Off
menu.
Sleep Mode
In sleep mode, all camera functions are deactivated and the camera itself is
effectively off, consuming almost no power. The camera can be reactivated by
pressing the Multi selector or any other buttons on the camera back (except
TRANSFER button), by rotating the mode dial, or by pressing the shutter release
button halfway.
Using an AC Adapter
When the camera is powered by the AC adapter (available separately), the
camera will remain on for thirty minutes if no operations are performed,
regardless of the setting in the Auto Off menu.
File Numbering: Seq. Number
The camera assigns each picture a file name
consisting of “DSCN” followed by a four-digit
number assigned automatically by the camera
(e.g., “DSCN0001.JPG”). This option controls how
files are numbered.
Option Description
When this option is selected, the camera assigns all subsequent file
On
numbers sequentially in ascending order, starting from the last number
used. If the memory card is formatted or a new card inserted in the
camera, file numbering will continue from the last number used.
The camera does not store the last file number used. When another
Off
memory card is inserted or a new file is created, numbering starts from
the lowest number available.
Clears the current file number from memory. Sequential file numbering
Reset
begins again from the lowest number available on the current memory
card.
File Numbering
File numbering starts over from 0001 if a picture is taken when the current
folder contains a file numbered 9999. The camera will create a new folder by
adding one to the current folder number (for example, if the current folder is
“100NIKON,” the new folder will be named “101NIKON”). Each folder can hold
up to 200 pictures. If file numbering reaches 9999 when the card contains a
folder numbered 999, no more pictures can be stored on the card, even if
sufficient memory remains. Insert a new memory card or format the current
card.
SEQ. NUMBERS
Image Quality
Image Size
Folders
Monitor Options
Auto Off
Seq. Numbers
CF Card Format
SELECT SET
On
Off
Reset
Menu Guide—The Set-Up Menu
Resetting File Numbering to 0001
To reset file numbering to 0001, insert an empty memory card or format the
current memory card before selecting Reset. Note that formatting the memory
card deletes all data it may contain, including hidden and protected images.
8988
Page 46

CF Card Format
CF CARD FORMAT
WARNING !
All images will
be deleted !
No
Format
SELECT SET
CONTROLS
Save
Save
Save
Digital
Zoom
Done
SELECT SETBK
SHOT CONFIRM LAMP
Controls
Shot Confirm Lam
Pic Data/Transfer
Date
Interface
Language
Reset All
Off
On
SELECT SET
PIC DATA/TRANSFER
Controls
Shot Confirm Lam
Pic Data/Transfer
Date
Interface
Language
Reset All
info. txt
Auto Transfer
SELECT SET
PIC DATA/TRANSFER
Controls
Shot Confirm Lam
Pic Data/Transfer
Date
Interface
Language
Reset All
info. txt
Auto Transfer
SELECT SET
Off
On
The memory card provided with your camera is
formatted at shipment. If you purchase additional
memory cards for added storage, you will
however need to format the cards before first use
to ensure that they work properly in your camera.
Formatting memory cards is also an effective way
of deleting all pictures on the card.
Storing Camera Settings: Controls
In å mode, the first three items in the
“Controls” menu determine what camera settings
remain in effect when the camera is turned off. If
an item is checked, the setting in effect at the
time the camera was turned off will be restored
the next time the camera is turned on. Any items
that are not checked will be restored to default settings when the
camera is turned on.
Option Setting Affected Default
3 Flash mode Auto
2 Focus mode Autofocus
! Exposure compensation ±0.0
Digital Zoom Digital zoom On
The fourth item, Digital Zoom, is used to turn digital zoom on and off in a,
SCENE and å mode. If it is checked, digital zoom functions normally (p. 46). If
this item is not checked, digital zoom cannot be used, and pressing the T zoom
button at the maximum optical-zoom position has no effect.
To check an item, or remove the checked mark from an item that has been already
been checked, highlight the item and press > on the Multi selector. Highlight Done
and press > on the Multi selector to put the changes into effect.
Confirming Shutter Release: Shot Confirm Lamp
If On is selected for this option, the red-eye
reduction lamp will light to confirm that the shutter
has been released. The red-eye reduction lamp
will not light if the flash has fired.
Photo Information and Transfer Setting:
Pic Data/Transfer
The “Pic Data/Transfer” sub-menu contains
options for storing information about the camera
status at the time when the picture was taken as
a text file and for turning on/off the transfer mark
associated with pictures and movies as they are
taken.
Recording Photo Information: info. txt
While On is selected in the info.txt menu, the following
information about each image recorded is stored in an
independent text file (“info.txt”):
• File number and type
• Camera type and firmware version
• Metering method
• Exposure mode
• Shutter speed
• Aperture
• Exposure compensation
• Focal length and digital zoom
• Image adjustment
• Sensitivity (ISO equivalency)
The info.txt file is stored in the same folder as the image. When the contents of the
memory card are viewed from a computer, this file can be read with a text browser
such as Notepad or SimpleText. Images are listed in the order recorded, separated
by a blank line.
• White balance
• Sharpening
• Date of recording
• Image size and quality
• Focus area
9190
Menu Guide—The Set-Up Menu
Page 47

Making Pictures for Transfer: Auto Transfer
PIC DATA/TRANSFER
Controls
Shot Confirm Lam
Pic Data/Transfer
Date
Interface
Language
Reset All
info. txt
Auto Transfer
SELECT SET
Off
On
DATE
Y M D
2002. 01. 01
00 00
SELECT SET
USB
Controls
Shot Confirm Lamp
Pic Data/Transfer
Date
Interface
Language
Reset All
PTP
Mass Storage
SELECT SET
USB
INTERFACE
Controls
Shot Confirm Lamp
Pic Data/Transfer
Date
Interface
Language
Reset All
Video Mode
USB
SELECT SET
When you connect the camera to a computer running
Nikon View and press the TRANSFER button, any images
that have been marked for transfer will automatically be
copied to the computer. The transfer menu controls
whether images are marked for transfer as they are taken.
The following options are available:
Choosing a video standard: Video Mode
The Video Mode menu is used to select the standard
used for video output. Adjust this setting to match the
standard used in any video device to which you connect
the camera.
VIDEO MODE
Controls
Shot Confirm Lamp
Pic Data/Transfer
Date
Interface
Language
Reset All
SELECT SET
NTSC
PAL
Video Mode
USB
Option Description
Off Pictures and movies are not marked for transfer.
On Pictures and movies are marked for transfer as they are
(Default setting) taken.
Transferring More than 999 pictures
No more than 999 pictures can be transferred at one time using the TRANSFER
button. To copy more pictures, use Nikon View. See the Nikon View Reference
Manual (on CD) for details.
Date
The Date option is used to set the camera to the
current date and time. For more information, see
“Introduction: First Steps: 5 Set the Date and
Time” (p. 21-22).
Interface
Choose standard for video output or USB
protocol used when camera is connected to a
computer.
Option Description
NTSC Use when connecting the camera to NTSC devices.
PAL Use when connecting the camera to PAL devices.
Readying the Camera for Transfer: USB
Before pictures can be copied to a computer via direct
USB connection, you will need to select a USB setting
according to your computer’s operating system and
whether pictures will be transferred using the camera
TRANSFER button or the button in Nikon View. The
following options are available: PTP (Picture Transfer
Protocol) and Mass Storage. The default setting is Mass
Storage.
Pictures transferred using:
Operating system
Windows XP Home Edition
Windows XP Professional
Mac OS X 10.1.3 or later Choose PTP.
Mac OS X 10.1.2 —*
Windows 2000 Professional
Windows Millennium Edition (Me) Choose Mass Storage.
Windows 98 Second Edition (SE)
* Pictures cannot be transferred using camera TRANSFER button in Mac OS X
10.1.2. Use Nikon View button to transfer pictures.
Camera Nikon View
TRANSFER button button
Choose Mass Storage or PTP.
Choose Mass
Storage or PTP.
Menu Guide—The Set-Up Menu
9392
Page 48

Windows 2000 Professional, Windows Millennium Edition (Me),
LANGUAGE
Controls
Shot Confirm Lamp
Pic Data/Transfer
Date
Interface
Language
Reset All
De
En
Fr
EI
Es
SELECT SET
Windows 98 Second Edition (SE), Mac OS 9
Do not select PTP when connecting the COOLPIX4300 to a computer running
one of the above operating systems (there is no need to change the USB
setting when using the camera for the first time, as Mass Storage is selected at
shipment).
If you have already changed the USB setting to PTP, be sure to select Mass
Storage before connecting the camera to your computer.
If you have connected the camera to a computer running one of the above
operating systems with PTP selected in the USB menu, disconnect the camera
as described below. Be sure to select Mass Storage in the USB menu before
reconnecting the camera.
Windows 2000 Professional
A dialog will be displayed welcoming you to the Found New Hardware Wizard.
Click Cancel to close the dialog, and then disconnect the camera.
Windows Millennium Edition (Me)
After displaying a message stating that the hardware information database is
being updated, the computer will start the Add New Hardware Wizard. Click
Cancel to exit the wizard, and then disconnect the camera.
Windows 98 Second Edition (SE)
The Add New Hardware Wizard will be displayed. Click Cancel to exit the
wizard, and then disconnect the camera.
Mac OS 9
A dialog will be displayed stating that the computer is unable to use the driver
needed for the Nikon Digital Camera E4300_PTP USB device. Click Cancel
to close the dialog, and then disconnect the camera.
Language
This option is used to choose the language in
which camera menus and messages are
displayed. For more information, see
“Introduction: First Steps: 4 Choose a Language”
(p. 20).
Restoring Default Settings: Reset All
The “Reset All” option in the SET-UP menu is
used to restore settings for all modes to their
default values.
Option Description
No Exist menu leaving settings unchanged.
Yes Restore settings to default values.
Choosing “Yes” restores the following options to their default values:
The shooting menu The SET-UP menu
Setting Default
White Balance Auto
Metering Matrix
Continuous Single
BSS Off
Image Adjustment Auto
Image Sharpening Auto
Lens Normal
Sensitivity Auto
AE Lock Off
Exposure
Compensation
0
AF Area Mode Auto
Auto-Focus Mode Single AF
Focus Confirmation MF
Auto Bracketing Off
Noise Reduction Off
All other settings are unaffected.
Setting Default
Folders NIKON
Display Mode On
Brightness Middle
Auto Off 30 S
Controls All options on
Shot Confirm Lamp Off
The Playback menu
Setting Default
Folders All Folders
Frame Interval
(Slide Show)
Auto Off 30 S
RESET ALL
Reset all settings
to default values
No
Yes
SELECT SET
3 S
Menu Guide—The Set-Up Menu
9594
Page 49

White Bal Preset
Cloudy
Speed
WHITE BALANCE
PAGE2 SELECT SET
IMAGE SIZE & QUALITY
OFF SELECT SET
The Shooting Menu
F L 1
F
L 2
F
L 3
OFF SELECT SET
WHITE BALANCE
AutoAuto
White Bal PresetWhite Bal Preset
Fine
Incandescent
Fluorescent
CloudyCloudy
SpeedSpeedlight
Auto
White Bal Preset
Fine
Incandescent
Fluorescent
Cloudy
Speedli ght
The shooting menu is available only in å mode, and only when the
camera is in shooting mode.
The Shooting menu contains two pages of advanced shooting options:
SHOOTING MENU 1
SHOOTING MENU 2
WHITE BALANCE P. 97-98
METERING P. 99
CONTINUOUS P. 100-101
BEST SHOT SELECTOR P. 102
IMAGE ADJUSTMENT P. 103
IMAGE SHARPENING P. 104
LENS P. 105-106
IMAGE SIZE & QUALITY P. 80-82
SENSITIVITY P. 106
EXPOSURE OPTIONS P. 106-110
FOCUS OPTIONS P. 111-113
AUTO BRACKETING P. 114-115
NOISE REDUCTION P. 116
CF CARD FORMAT P. 90
To view the å shooting menu:
1
Select å
(shooting menu).
2
Press MENU button to
display å shooting
menu.
Keeping Colors True: White-Balance
White Balance is used to preserve natural colors under different types
of lighting.
Choosing a White Balance Setting
In å shooting mode, white balance can be
chosen from the white-balance menu (in other
modes, white balance is adjusted automatically
according to the type of scene).
Option Description
A Auto
White Bal Preset
White balance automatically adjusted to suit lighting
conditions. Best choice in most circumstances.
White object used as reference to set white balance
under unusual lighting conditions.
Fine White balance adjusted for direct sunlight.
Incandescent
Use when taking pictures indoors under incandescent
light.
Fluorescent Use when taking pictures indoors under fluorescent light.
Cloudy Use for pictures taken outdoors under overcast skies.
Speedlight
White balance adjusted to match light produced by
flash.
Fine-Tuning White Balance
At settings other than A (auto) and (preset), white
balance can be “fine-tuned” by highlighting the desired
setting and selecting an adjustment from a sub-menu.
Adjustments range from –3 to +3 in increments of one;
raising white balance tends to give images a blue cast,
while lowering white balance generally makes photos
appear slightly yellow or red. In the case of
(Fluorescent), the sub-menu offers a choice of
bulb types (see table at right).
Option Description
FL1 White (W)
FL2
FL3 Daylight (D)
WHITE BALANCE
Auto
Auto
White Bal Preset
White Bal Preset
Fine
Fine
Incandescent
Incandescent
Fluorescent
Fluorescent
Cloudy
Cloudy
Speed
light
Speedli ght
SELECT SETOFF
Daylight White
(Neutral [N])
Menu Guide—The Shooting Menu
9796
Page 50

— Preset White Balance —
WHITE BALANCE PRESET
Cancel
Measure
OFF SELECT SET
METERING
OFF SELECT SET
Matrix
Spot
Center-Weighted
Spot AF Area
F2.8F2.8F2.81/601/601/60
227222722272
161616
F2.8F2.8F2.81/2501/2501/250
227222722272
161616
Preset white balance is used to adjust white balance when
shooting under mixed lighting or to compensate for light
sources with a strong color cast (for example, to make
pictures taken under a lamp with a red shade look as
though they had been taken under white light).
Measuring Light: Metering
The “metering method” is the method your
camera uses to measure light when determining
exposure. In å shooting mode, “METERING”
menu offers a choice of four metering methods:
Option Description
Cancel
Measure
Recalls the most recent setting for preset white balance from
memory and sets white balance to this value.
To measure a new value for white balance, place a white object,
such as a piece of paper, under the lighting that will be used in
the final picture. Frame this object so that it fills the square in the
center of the menu shown above. Highlight Measure and press
the Multi selector to the right to measure a new value for preset
white balance (camera will zoom out and shutter will be released,
but no picture will be recorded).
At setting other than Auto, the current whitebalance setting is indicated by an icon in the
monitor.
Method
q
Matrix
e
Spot
w
Center-Weighted
r
Spot AF Area
How It Works
Meters 256 areas of frame
producing optimal
exposure for whole image
Meters only area shown by
square in center of the
monitor (1/32 of total
frame).
Meters whole frame; but
central 1/4 has an 80%
weighting.
Camera measures light in
current focus area only
The current metering method is indicated by icons
in the monitor.
Spot metering target
When to Use It
Best choice in most
circumstances.
Ensures central subject will be
correctly exposed regardless
of background illumination.
Use for portraits; adjusts
exposure according to lighting
at the center of the frame, but
still preserves background
details.
Useful when you want to use
spot metering with manual or
automatic focus-area selection
(p. 112) to meter an off-center
subject.
Menu Guide—The Shooting Menu
9998
Page 51

Taking Pictures in a Sequence: Continuous
CONTINUOUS
Single
Continuous
Multi-shot 16
VGA Sequence
Ultra HS
OFF SELECT SET
F2.8F2.8F2.81/2501/2501/250
227222722272
320320
640640
320
640
161616
The “Continuous” menu determines whether the
camera takes one picture each time the shutter
release button is pressed, or records a continuous
sequence of pictures while the shutter release
button is held down.
Option
Camera records one picture each time the shutter release
Single
button is pressed all the way down.
Camera records pictures at a rate of about four frames
every three seconds (1.3 fps)* while shutter-release
Continuous
button is held down. Not available at HI image quality.
Each time the shutter-release button is pressed, the
camera takes sixteen consecutive “thumbnail” images
568 x 426 pixels in size and combines them into a
Multi-shot 16
collage measuring 2272 x 1704 pixels. This option is
available only at a size of 2272 x 1704 and FINE,
NORMAL, or BASIC image quality.
Camera takes series of pictures 640 x 480 pixels in size.
Image quality (p. 81) is set to NORMAL, allowing pictures
VGA Sequence
to be taken at approximately two frames per second while
shutter release button is held down.
Camera records up to seventy NORMAL-quality pictures
320 x 240 pixels in size (QVGA) at a rate of about thirty
frames per second while shutter-release button is held
Ultra HS
down. Each sequence of pictures is stored in its own
folder.
* Rate of 1.3 fps is for image size of 2272 x 1704. Shooting will slow when
memory buffer fills.
Description
Ultra HS
• Setting of Ultra HS only takes effect when the monitor is on. If the monitor is
turned off, the camera will revert to a setting of Single until the monitor is
turned on.
• At a setting of Ultra HS, the zoom indicator in the monitor moves from S
(start) to E (end) as recording progresses. The exposure-count display shows
the number of seventy-pictures sequences that can be recorded.
• With each sequence of pictures taken at Ultra HS, the camera creates a new
folder in which all pictures in the sequence are stored. Each folder will have a
name consisting of “N_” followed by a three-digit number assigned
automatically by the camera. Pictures can be played back by selecting the
appropriate folder or All Folders from the playback Folders menu.
• Ultra HS are only available when the monitor is on. If the monitor is off, the
camera will revert to Single until the monitor is turned on.
At settings other than Single, the current
Continuous setting is indicated by an icon in
the monitor.
Menu Guide—The Shooting Menu
• At settings other than Single, the flash is set to Off (P) and will not fire even
when lighting is poor (p. 48).
• At settings other than Single, the focus, exposure and white-balance settings
used for the first image apply to all other images in the same series.
101100
Page 52

Getting Sharper Pictures: BSS (Best-Shot Selector)
BEST SHOT SELECTOR
Off
On
OFF SELECT SET
F2.8F2.8F2.81/2501/2501/250
227222722272
161616
IMAGE ADJUSTMENT
Auto
Normal
More Contrast
Less Contrast
Lighten Image
Darken Image
Black&Whine
OFF SELECT SET
F2.8F2.8F2.81/2501/2501/250
227222722272
161616
The “Best Shot Selector” (BSS) is recommended
for situations in which inadvertent camera
movement can produce blurred pictures, for
example when:
• the camera is zoomed in or a teleconverter is
used for telephoto photography
• you are taking close-up shots at short range
• the flash can not be used although lighting is poor
BSS may not produce the desired results with a moving subject or if
you change the composition while the shutter release button is pressed
all the way down.
Option Description
Off BSS off; camera functions normally.
Camera takes photos as long as the shutter release button is held
down, to a maximum of ten. These images are then compared and
On
the sharpest photo (the photo with the highest level of detail) saved to
the memory card. The flash is turned off, and focus, exposure, and
white balance are determined by the first picture in the series.
Adjusting Contrast and Brightness: Image Adjustment
This option is used to adjust brightness and
contrast according to the shooting situation or
how the picture will be used.
Option
Auto
Normal
More Contrast
Less Contrast
Lighten Image
Camera automatically adjusts brightness and contrast
according to shooting conditions.
Same brightness and contrast adjustment on all images,
useful for images to be edited on computer.
Image contrast enhanced. Use when shooting
landscapes, low-contrast subjects, or under overcast
skies.
Image contrast reduced. Use when bright light creates
strong shadows on subject.
Lightens mid-tones in image, without affecting detail in
highlights and shadows. Use for printers or monitors that
tend to produce dark images.
Description
Menu Guide—The Shooting Menu
Restrictions on BSS
BSS can not be used in combination with bracketing, noise reduction, or
CONTINUOUS settings other than Single. The flash can not be used when BSS
is in effect.
When BSS is on, a BSS icon appears in the monitor.
Darken Image
Black & White
Darkens me-tones in image, without affecting detail in
highlights and shadows. Use for printers or monitors that
tend to produce light images.
Pictures recorded in black-and-white. Black-and-white
images require the same amount of memory as color
images, but show a higher level of detail. Monitor shows
view through lens in black-and-white.
An image-adjustment icon appears in the monitor
at settings other than Normal and Auto.
103102
Page 53

Making Edges More Distinct: Image Sharpening
F2.8
1/250
2272
16
IMAGE SHARPENING
Auto
High
Normal
Low
Off
OFF SELECT SET
Normal
Wide Adapter
Telephoto 1
Telephoto 2
Fisheye
Slide Copy Adptr
LENS
OFF SELECT SET
This option controls whether pictures are
processed for increased sharpness, and to what
degree. Because this processing takes place only
as the pictures are being saved to the memory
card, the effects of sharpening can not be
previewed in the monitor before shooting.
Option Description
Auto
High
Normal
Low Amount of sharpening reduced below normal level.
Off No sharpening performed.
When taking pictures that will later be retouched, choose settings of Normal or
Low.
F2.8
F2.81/250
1/250
104
Camera sharpens edges for optimal results; adjustment
performed differs from image to image.
Photos processed to increase sharpness, making edges more
distinct.
Camera performs same standard level of sharpening on all
photos.
At settings other than Auto, the current imagesharpening setting is shown by an icon in the
monitor.
2272
2272
16
16
Setting for Optional Lens Converters: Lens
The lens menu is used to select combinations of
settings suited to different converter lenses
(available separately). For complete information on
use and handling, see the documentation
provided with your converter lens.
Option
Normal
Wide Adapter
Use with
—
WC-E24*
WC-E63*
WC-E68*
No modifications are made to settings. Use this
option when no lens converter is attached.
• Camera zooms out to widest angle
1
(p. 26)
1
• Flash disabled (p. 48)
2
• Zooms in to maximum optical-zoom position,
adjustable after setting (p. 26)
• Camera zooms in to maximum optical-zoom
Telephoto 1
TC-E2*
1
• Optical zoom (p. 26) adjustable between
position (p. 26)
maximum to middle position.
• Flash disabled (p. 48)
• Zoom fixed at maximum optical zoom
Telephoto 2
TC-E3ED
1
position (p. 26)
*
• Flash disabled (p. 48)
• Zoom fixed at widest angle (p. 26)
• Focus fixed at infinity (p. 41)
Fisheye 1
FC-E8*
1
(p. 99)
• Metering method fixed at center-weighted
• Flash disabled (p. 48)
• Self-timer can be set (p. 42)
• Zoom set to 1.2X digital zoom and adjustable
between 1.2-4X (p. 46)
• Focus mode fixed at macro close-up
(p. 41)
Slide Copy Adptr
ES-E28*
1
• Image adjustment set to –Less Contrast
• Flash disabled (p. 48)
(p. 103)
• Exposure compensation set to +0.7 EV,
adjustable (p. 110)
• Self-timer can be set (p. 42)
• Take picture while the monitor is on
*1 UR-E4 step down ring lens adapter (available separately) required.
*2 UR-E4 and UR-E7 step down ring lens adapters (both available separately) required.
Description
Menu Guide—The Shooting Menu
105
Page 54

227222722272
F2.8F2.8F2.81/2501/2501/250
0.70.70.7 161616
Lens converter icon appears in the monitor at
SENSITIVITY
AUTO
100
200
400
OFF SELECT SET
P
M
SELECT SET
EXPOSURE MODE
Exposure Mode
AE Lock
EXP. +/–
OFF
F7.6F7.61/2501/2501/250
227222722272
161616F7.6
EXPOSURE OPTIONS
Exposure Mode
AE Lock
EXP. +/–
OFF SELECT SET
settings other than Normal.
Modifying Sensitivity from a Menu: Sensitivity
The sensitivity menu mirrors the sensitivity (ISO
equivalency) value set with the 1 button in
combination with the zoom button (p. 53). As with
the 1 button, sensitivity can be set to AUTO,
100, 200 or 400. Choosing a new sensitivity value
from the “Sensitivity” sub-menu changes the
value selected with the 1 and zoom button, while changing the
sensitivity value with the 1 button changes the value selected in the
“Sensitivity” sub-menu.
Exposure Options
The exposure options sub-menu provides control
over exposure.
— Exposure Mode —
When the mode dial is set to å, you can choose the
exposure mode, either P or M, from the Exposure Mode
sub-menu.
M: Manual
In manual exposure mode, you control both shutter speed and
aperture.
Choosing an Aperture
In manual exposure mode, aperture is chosen by pressing </> on the Multi
selector while holding down the 1 button.
+
Press < for maximum aperture (small f number), > for
minimum aperture (large f number).
Note on minimum aperture
Filter is applied to adjust the light entering the camera when the aperture is set
to its minimum with the COOLPIX4300. Because of this, the minimum aperture
setting may not yield wider depth-of-field as expected from the aperture value
displayed in the monitor.
Menu Guide—The Shooting Menu
If the aperture you have selected would result in the picture being over- or
under-exposed, the aperture value displayed in the monitor will flash when the
shutter release button is pressed halfway.
107106
Page 55

Choosing a Shutter Speed
2272
1/15
F7.6
F7.6
1/250
2272
16
F2.8F2.8F2.8
227222722272
161616
In manual exposure mode, shutter speed is chosen by pressing ≤/≥ on the Multi
selector while holding down the 1 button. Options range from 8 sec. to 1/1000
sec. in increments equivalent to 1 EV (one step). In addition, a shutter speed of
“BULB” up to 60 sec. is available for long-time exposures.
+
2272
2272
F7.6
F7.61/15 161616
1/15
Press ≤ for slower shutter speeds, ≥ for faster shutter
speeds.
In manual exposure mode, the amount the picture would be over- or underexposed at the selected combination of aperture and shutter speed is displayed in
the monitor.
Display shows values between –2 and +2 EV in
increments of 1/3 EV.
Underexposed Overexposed
–2 0 +2
–1 +1
(Values in EVs)
1/250
1/250
F7.6
2272
2272
16F7.6
16
Long-time exposure (up to 60 sec.)
• When the shutter speed is set to BULB (manual
exposure mode only), the shutter will remain open
while the shutter release button is pressed
(maximum exposure 60 sec.). To reduce blurring
caused by camera shake, we recommend that you
use a remote shutter release (the MC-EU1 Remote
Cord, available separately, functions as a remote
shutter-release cable) and a tripod.
Shutter speed limitations
• At a CONTINUOUS setting of Ultra HS (p. 100), the lowest available shutter
speed is 1/30 sec. At setting of m movie (p. 50), shutter speed cannot be set
to a value slower than 1/15 sec. BULB is only available at a setting of Single
(p. 100).
• Note that if the shutter is open for more than 1/4 sec. at any setting, mottling
(noise) may appear in the final picture. At speeds of 1/4 sec. Or slower, the
shutter speed indicator in the monitor turns yellow.
Menu Guide—The Shooting Menu
109108
Page 56

— Taking Multiple Pictures with the Same Exposure: AE Lock —
Off
On
Reset
SELECT SET
AE LOCK
Exposure Mode
AE Lock
EXP. +/–
OFF
SELECT SET
EXP. +/–
Exposure Mode
AE Lock
EXP. +/–
+0.3
0
–0.3
OFF
FOCUS OPTIONS
AF Area Mode
Auto-Focus Mode
Focus Confirmation
OFF SELECT SET
SELECT SET
AF AREA MODE
AF Area Mode
Auto-Focus Mode
Focus Confirmation
OFF
Auto
Manual
Off
This option is used to take a series of photographs with
the same exposure and white balance.
Focus Options
The focus options sub-menu provides control
over focus settings.
Option Description
Off Restores normal exposure, sensitivity and white balance.
First picture taken after On is selected sets exposure for all
On
subsequent pictures. If white balance is set to A (auto), white balance
for first picture applies to all other pictures in series. While AE lock is
in effect, flash will be set to Off (P).
Clears existing exposure, sensitivity and white balance settings. First
Reset
picture taken after this option is selected sets exposure, sensitivity
and auto white balance for all subsequent pictures.
While AE lock is in effect, AE-L (AE Lock) and WB-L (White-Balance Lock)
icons appear in the monitor. If Reset is chosen or white balance, focus mode,
shutter speed or aperture adjusted, these icons will turn yellow to indicated that
exposure will be reset with the next shot.
— Modifying Exposure Compensation from a Menu: Exp. +/– —
The Exp. +/– item in the EXPOSURE OPTIONS menu
mirrors the exposure compensation value set with the 1
button and Multi selector (p. 51). As with the 1 button,
exposure compensation can be set to values between
+2.0 EV and –2.0 EV in increments of 1/3 EV. Choosing a
new exposure compensation value from the Exp. +/– submenu changes the value selected with the 1 button,
while changing exposure compensation with the 1 button changes the value
selected in the Exp. +/– sub-menu.
— Focus-Area Selection: AF Area Mode —
This setting determines how the camera will choose the
focus area in å mode. The following options take effect
while the monitor is on (when the monitor is off or digital
zoom is activated, AF Area Mode is automatically set to
Off):
Option Description
Camera automatically selects focus area containing subject closest to
Auto
Manual
camera. Active focus area displayed in red when shutter release
button pressed halfway. This setting is useful when you have little time
to compose pictures.
User selects focus area manually. This option can be used in place of
focus lock when subject is not at center of final composition.
Center focus area is used. No focus areas appear in monitor. This
Off
option can be used in combination with focus lock to focus on offcenter subject (p. 45).
Menu Guide—The Shooting Menu
111110
Page 57

Manual Focus-Area Selection
F2.8F2.8F2.81/2501/2501/250
227222722272
161616
SELECT SET
AUTO-FOCUS MODE
AF Area Mode
Auto-Focus Mode
Focus Confirmation
OFF
Continuous AF
Single AF
SELECT SET
FOCUS CONFIRMATION
AF Area Mode
Auto-Focus Mode
Focus Confirmation
OFF
MF
On
Off
At SCENE-mode settings of Portrait and Close Up (p. 36, 37), or when
Manual is selected in the AF Area Mode sub-menu for å mode, the focus
target can be chosen from one of five focus areas. This makes it possible to
focus on an off-center subject without using focus lock.
The focus area can be selected using the Multi selector.
Center focus area
selected.
Use Multi selector to
select new focus area.
• Any of five focus areas can be selected.
— Auto-Focus Mode —
In å mode, you can choose the autofocus mode used
when the monitor is on (when the monitor is off, single
autofocus is used, regardless of the setting in the
autofocus mode sub-menu, p. 44).
Option Description
Camera adjusts focus continuously until shutter release button
Continuous AF
Single AF
(default setting)
is pressed halfway, minimizing time needed to focus before
photo is taken. Note, however, that photos can be taken even
when camera is not in focus; check autofocus lamp before
shooting.
Camera focuses when shutter release button is pressed
halfway. If monitor is off, photos can only be taken when
camera is in focus. Choose this setting to save batteries.
Menu Guide—The Shooting Menu
Spot AF Area Metering
Manual and auto focus-area selection can be used in combination with spot AFarea metering to meter exposure only in the selected focus area.
— Focus Confirmation —
Use focus confirmation when you want to know exactly
what areas of the frame will be in focus before you take
the final picture. Focus confirmation affects only the view
through the lens shown in the monitor; no indicators of
focus appear in the final picture.
Option Description
MF
On As above, but for all focus modes.
Off No indication of focus is given.
Areas in focus will be sharply outlined in the monitor when
manual focus is used (p. 54).
113112
Page 58

Auto Bracketing
SELECT SET
AUTO BRACKETING
Off
On
WB Bracketing
OFF
F2.8F2.8F2.81/2501/2501/250
0.30.30.3
227222722272
161616
F2.8F2.8F2.81/2501/2501/250
227222722272
161616
SELECT SET
AUTO BRACKETING
Off
On
WB Bracketing
OFF
SELECT SET
AUTO BRACKETING
Off
On
WB Bracketing
OFF
In situations where it might be difficult to obtain a
proper exposure, auto bracketing lets you shoot
the same subject at three or five different
exposures. In WB Bracketing, the white balance is
bracketed in three shots.
Option Description
Off Bracketing is off and normal exposure control is used.
On
Auto bracketing is performed with the selected number of
bracketing shots and with a compensated EV value offset from
the automatically metered exposure.
Number of shots, compensated EV value Bracketing order
3, ±0.3 0, +0.3, –0.3
3, ±0.7 0, +0.7, –0.7
3, ±1.0 0, +1.0, –1.0
5, ±0.3 0, +0.7, +0.3, –0.3, –0.7
5, ±0.7 0, +1.3, +0.7, –0.7, –1.3
5, ±1.0 0, +2.0, +1.0, –1.0, –2.0
To perform auto bracketing or white balance bracketing in Continuous or VGA
Sequence mode (p. 100), hold down the shutter release button fully. A selected
number of consecutive shots are taken, after which the sequence stops
automatically.
The white balance is bracketed when you press the shutter
release button fully giving three shots made up of one with the
WB Bracketing
selected white balance, a reddish image and a bluish image.
The time required to save bracketed images to the memory
card is three times that required for a normally recorded image.
Restrictions on Bracketing
Autoexposure bracketing can not be used when: BSS (p. 102), AE-Lock
(p. 110), or Noise Reduction (p. 116) is on, Multi-shot 16 or Ultra HS is
selected for Continuous (p. 100), or Movie (p. 50) is selected.
White-balance bracketing can not be used when: BSS or Noise Reduction is
on, image quality is set to HI (p. 81), or a setting other than Single is chosen for
Continuous.
— On —
Each time you press the shutter release button, either
three or five shots are taken ranging from over exposed EV
values to under exposed EV values. When photographing
a high-contrast image, the image with the desired
exposure can be selected from the set of bracketed shots.
The exposure compensation indication b along with
the compensated EV value for the next shot are
displayed in the monitor when the bracketing is set.
Menu Guide—The Shooting Menu
— WB Bracketing —
White balance is bracketed when you press the shutter
release button fully, giving three shots made up of one
shot with the selected white balance, one reddish image
and one bluish image.
When you select white balance bracketing, the nb
(White Balance Bracketing indication) appears in the
monitor.
115114
Page 59

SELECT SET
NOISE REDUCTION
On
Off
OFF
The Playback Menu
F2.8F2.8F2.8
227222722272
1616161/21/21/2
Avoiding “Grainy” Photographs: Noise Reduction
At shutter speeds slower than 1/4 sec., “noise” in
the form of randomly-space, brightly-colored
pixels may appear in pictures, particularly in
shadows. To reduce noise at slow shutter speeds,
select On from the noise reduction menu.
Option Description
On The effect of noise on the recorded image is minimized.
Off Noise reduction is canceled and normal exposure control is used.
Recording Time
Turning noise reduction on more than doubles the amount of time needed to
save pictures to the memory card.
Restrictions on Noise Reduction
Noise reduction cannot be used in combination with BSS (p. 102), Auto
Bracketing (p. 114), or Continuous setting other than Single (p. 100).
The playback menu contains the following two pages of options for
managing the pictures on the memory card:
Playback menu 1
PLAY BACK MENU1
Delete
Folders
Slide Show
Protect
Hide Image
Print Set
PAGE2 SELECT SET
Delete P. 118
Folders P. 121
Slide Show P. 122
Protect P. 124
Hide Image P. 125
Print Set P. 126
Playback menu 2
PLAY BACK MENU2
Transfer
6 4 0
Small Pic.
30S
Auto Off
OFF SELECT SET
Transfer P. 128
Small Picture P. 129
640
Auto Off P. 8 8
30S
To view the playback menu:
1
Select p
2
Press MENU button to
display playback menu
Menu Guides—The Shooting Menu/The Playback Menu
Confirming Noise Reduction
While Noise Reduction is in effect and the shutter
speed is below 1/4 sec., an NR icon appears in the
monitor.
See p. 69 for more information on using camera menus.
117116
Page 60

Deleting Pictures and Print Orders: Delete
OFF
DELETE
Selected Images
All images
Print Set
SELECT SET
OFF
DELETE
Selected Images
All images
Print Set
SELECT SET
4 5 6
1 2
456
12333
ERASE SELECTED IMAGES
SELECT SET
DONE
4 5 6
1 2
4 56
12333
ERASE SELECTED IMAGES
SELECT SET
DONE
4 5 6
1
4 56
1
22333
ERASE SELECTED IMAGES
SELECT SET
DONE
DELETE
No
Yes
OFF SELECT SET
Erase 4 Image(s)Erase 4 Image(s)
Yes/No ?Yes/No ?
Erase 4 Image(s)
Yes/No ?
OFF
DELETE
Selected Images
All images
Print Set
SELECT SET
OFF
ERASE ALL IMAGES
No
Yes
SELECT SET
Erasing all images
(
Exclude
)
The Delete menu contains the following options:
Option Description
Selected Images Delete selected photographs and
movies.
All Images Delete all pictures.
Print Set Cancel the current print order.
— Deleting Selected pictures and Movies: Selected Images —
To delete selected pictures and movies:
5
Press QUICK p button to
display a confirmation dialog.
• Press ≤/≥ on the Multi selector to highlight option, press > to put choice into
effect.
• Select “Yes” to delete all selected images.
• Select “No” to return to playback menu without deleting images.
1
Highlight “Selected Images”
3
Highlight image
2
Display menu of thumbnail
images
4
Press Multi selector to select
image for deletion
• Selected images are marked by 5 icon.
Repeat steps 3 and 4 to select
additional images for deletion. To
deselect image, highlight and press
≤/≥ on the Multi selector. To exit
without deleting images, press MENU
button.
— Deleting All Pictures and Movies: All Images —
To delete all pictures on the CF memory card:
1
Highlight “All Images”
• Confirmation dialog is displayed.
2
Press ≤/≥ to highlight option,
press > to put choice into effect:
• Select “Yes” to delete all images on
memory card (protected images will
not be deleted).
• Select No” to return to playback menu
without deleting images.
Before Deleting Pictures
Once deleted, pictures can not be recovered. Be sure that any pictures you
would like to keep have been transferred to your computer.
Menu Guides—The Playback Menu
119118
Page 61

OFF
DELETE
Selected Images
All images
Print Set
SELECT SET
DONE
OFF
FOLDERS
Options
All Folders
N I K O N
T
O K Y O
O
S A K A
SELECT SET
OFF
FOLDERS
Options
All Folders
N I K O N
T
O K Y O
O
S A K A
SELECT SET
1/ 1
100100NINIKONKON
0000001.
JPGJPG
1
/
1
100NIKON
000
1.JPG
2002.09.152002.09.15
15:4015:40
2002.09.15
15:40
227222722272
Hidden and Protected Pictures
Pictures marked with a F icon are protected and can not be selected for
deletion. Pictures hidden with the Hide Image (p. 125) option are not displayed
in the Delete: Selected Images menu and cannot be deleted.
— Deleting the Current Print Order: Print Set —
To delete print-order set in Print Set menu in the playback menu:
Selecting a Folder for Playback: Folders
The “Folders” item in the playback menu can be
used to select pictures in all folders for playback
or pictures in a selected folder.
Highlight desired folder
1
To view pictures in all folders, select
“All Folders”.
1
Highlight “Print Set”
2
Press >
Marking Movie Files for Transfer
Please note that the transfer icon will be removed from movie files marked for
transfer when the Print Set is deleted by selecting Print Set from the Delete
option within the playback menu. Transfer settings for movie files must then be
reset.
Press >
2
The most recent picture in the selected
folder is displayed.
Menu Guides—The Playback Menu
Each series of seventy pictures taken at a setting of Ultra HS is stored in a
separate folder with a name consisting of N_ followed by a three-digit number
assigned by the camera. To view pictures taken at this setting, select the
appropriate folder from the Folders menu.
See p. 83 for more information on Folder Options.
121120
Page 62

Automated Playback: Slide Show
OFF
SLIDE SHOW
(
Pause
)
Start
Frame Intvl
SELECT SET
OFF
SLIDE SHOW
(
Pause
)
Start
Frame Intvl
SELECT SET
1/ 1
100100NINIKONKON
0000001.
JPGJPG
1
/
1
100NIKON
000
1.JPG
2002.09.152002.09.15
15:4015:40
2002.09.15
15:40
227222722272
OFF SELECT SET
FRAME INTVL
2 S
3
S
5
S
10
S
OFF
PAUSE
Restart
Frame Intvl
SELECT SET
The slide-show option in the playback menu is
used for automated sequential playback. When
Start is selected in the slide-show menu, all
pictures in the current folder that have not been
hidden using the Hide Image option will be played
back one after the other in the order recorded,
with a pause between each picture.
Starting a Slide Show
Changing the Display Interval
The slide show menu shown opposite and the
pause dialog shown above both contain a Frame
Intvl option for changing the length of time each
image in the slide show is displayed. To change
display interval, highlight Frame Intvl and press >
on the Multi selector. The menu of interval
settings shown at right will be displayed; highlight
the desired setting and press > on the Multi selector.
1
Highlight “Start”
2
Press > to start slide show
• Images are displayed one-by-one in
order recorded, starting from oldest
picture on card. Movies will be played
back as still images of showing first
frame of movie.
The following operations can be performed while a slide show is in progress:
To P r es s
Description
Press the 7 button to
pause the slide show. The
dialog shown at right will
Pause slide show 7
be displayed. To restart
the slide show, highlight
Restart and press > on
the Multi selector.
End slide show MENU
Press the MENU button to end the slide show and
return to full-screen playback.
Frame Interval
Owing to differences in the file size of the pictures in the slide show and the
speed at which they can be read from the memory card, the actual interval may
differ from the value shown in the menu.
Small Pictures and hidden images are not displayed in a slide show.
Auto Off
If the slide show lasts for more than half an hour, Auto Off (p. 88) will take effect
after thirty minutes and the monitor will turn off automatically.
Menu Guides—The Playback Menu
123122
Page 63

Safeguarding Valuable Images: Protect
4 5 6
1 2
456
12333
PROTECT
DONESELECT SET
4 5 6
1 2 3
4 56
123
PROTECT
DONESELECT SET
4 5 6
1 2 3
4 56
123
PROTECT
DONESELECT SET
DONE
4 5 6
1 2
456
12333
DONESELECT SET
HIDE IMAGE
4 5 6
1 2 3
4 56
123
HIDE IMAGE
DONESELECT SET
4 5 6
1 2 3
4 56
123
HIDE IMAGE
DONESELECT SET
DONE
Selecting “Protect” from the playback menu
displays the menu shown at right, where you can
select pictures to protect from accidental deletion.
Protected files can not be deleted in review, fullscreen playback, or from the delete sub-menu.
Note, however, that protected pictures will be
deleted when a memory card is formatted.
Highlight image
1
Hiding Images During Playback: Hide Image
When creating a slide show or showing pictures
to an audience, you may want to use the Hide
Image option to hide some of the pictures in the
current folder. Hidden images are only visible in
the Hide Image menu. They cannot be deleted in
full-screen playback or from the Delete sub-menu.
Press </> to highlight desired thumbnail
1
Press ≤/≥ to select image
2
• Selected images are marked by F icon. Repeat steps 1 and 2 to select
additional images. To deselect image, highlight and press ≤/≥ on the Multi
selector.
Press QUICK p button to complete operation
3
• To exit “Protect” menu without changing protected status of images, press
MENU button.
Press ≤/≥ to select image to be hidden
2
• Selected images are marked by H icon. Repeat steps 1 and 2 to select
more images.
• To deselect, highlight and press ≤/≥ on the Multi selector.
Press QUICK p button to complete operation
3
• To exit Hide Image menu without changing protected status of images, press
MENU button.
Menu Guides—The Playback Menu
125124
Page 64

Ordering Prints: Print-Set
4 5 6
1 2
456
12333
PRINT SET
SELECT SET
DONE
4 5 6
1 2
4 56
12333
11
PRINT SET
SELECT SET
DONE
4 5 6
1 2
4 56
12333
11
PRINT SET
SELECT SET
DONE
4 5 6
1
4 56
1
22333
1111
11
33
PRINT SET
SELECT SET
DONE
OFF
PRINT SET
Info
Date
Done
SELECT SET
DONE
Selecting Print Set from the playback menu
displays the menu shown at right. Here you can
specify pictures to be printed, the number of
prints, and the information to be included on each
print. This information is stored on the memory
card in Digital Print Order Format (DPOF). Once a
print order has been created, the memory card can be removed from
the camera and inserted in any DPOF-compatible device—be it your
personal photo printer or a photofinisher’s print system—and images
printed directly from the card.
1
2
4
Press QUICK p button to complete
operation and display menu of print
options; to highlight option, press ≤/≥
• To print shutter speed and aperture on all selected pictures, highlight Info and
press >. Check will appear in box next to item.
• To print date of recording on all selected photographs, highlight Date and press
>. Check will appear in box next to item.
• To deselect a checked item, highlight and press >.
• To complete print order and return to playback, highlight Done and press >.
To exit without altering print order, press MENU button.
Highlight image
3
Use Multi selector to specify
number of prints
• Press ≤ to increase (maximum 9), ≥ to
decrease.
• To deselect image, press ≥ when number
of prints is 1.
• Repeat steps 1–3 to select additional
images.
• To exit without altering print order, press
MENU button.
Press ≤ to select image
• Selected images are marked by G
icon.
Deleting the Print Order
To delete the current print order when it is no longer needed, select Print Set
from the Delete menu (p. 118).
Menu Guides—The Playback Menu
127126
Page 65

Marking All Images for Transfer: Transfer
TRANSFER
Transfer
Small Pic.
Auto Off
6 4 0
30S
OFF SELECT SET
All ON
All OFF
SETSELECT
SMALL PIC.
OFF
Transfer
Small Pic.
Auto Off
6 4 0
30S
640X480
320
X
240
160
X
120
96X72
By default, photos and movies are automatically
marked for transfer when they are recorded. The
playback “Transfer” option is used when you want
to remove transfer marking from all images, or to
select all pictures for transfer after turning transfer
marking off.
Option Description
All ON Mark all pictures on the memory card for transfer to a computer.
All OFF Remove transfer marking from all pictures on the memory card.
Marking image files for transfer
Up to 999 images on a memory card can be marked for transfer. Image files of
any file number can be transferred. To transfer 1000 or more images, use the
Nikon View, not the TRANSFER button. See the Nikon View Reference Manual
(on CD) for details.
Selecting Small Picture Size: Small Pic.
Image size of the Small Pictures can be set to 640
x 480, 320 x 240, 160 x 120 or 96 x 72 pixels.
Choosing a new Small Picture size from the
“Small Pic.” sub-menu changes the size of the
small picture created by pressing the ≥ SMALL
PIC. button of the Multi selector, and the size of
small pictures created there after will be recorded in the newly selected
size.
Image size
Large
Small
• Smaller the image size, faster the time it takes to distribute the images by e-mail
and the web.
• The image quality of the Small Picture is set to BASIC.
Small Picture size (pixels)
640 x 480
320 x 240
160 x 120
96 x 72
Menu Guides—The Playback Menu
Marking Pictures for Transfer with Other Cameras
Pictures selected for transfer with another model of Nikon digital camera can
not be transferred when the memory card is inserted in the COOLPIX4300.Use
the COOLPIX4300 to reselect the images.
See p. 60 for more information on creating Small Pictures
129128
Page 66

Technical Notes
This section provides information on:
Camera Care, Options
and Resources
Optional
Accessories
pp. 132-133
Caring for the
Camera and Battery
p. 134-136
Optional Accessories
Learn what optional accessories are available for
the COOLPIX4300.
Caring for the Camera and Battery
Read this section for tips on cleaning and storing
your camera.
Web Resources
Where to get help on line.
Troubleshooting
Read this section for help when your camera does
not function as expected.
Specifications
Technical data for the COOLPIX4300.
Web Resources
p. 137
Troubleshooting
p. 138-143
Specifications
pp. 144-146
131130
Page 67

Optional Accessories
At the time of writing, the following optional accessories were available
for the COOLPIX4300. Contact your retailer or local Nikon
representative for details.
• EH-21 AC adapter/battery charger
AC adapters/
battery chargers
Rechargeable battery
Carrying case
CompactFlash memory
card adapter
Lens Adapter
Lens Converter and
Slide copying adapter
(UR-E4 step down ring
lens adapter required)
Remote release cable
Monitor hood
Macro light
Note on using remote release cable
The remote cord does not function when the camera is set to Movie,
Continuous or VGA Sequence.
• EH-53 AC adapter
• MH-53 battery charger
• MH-53C battery charger (plugs into vehicle
cigarette-lighter socket)
EN-EL1 rechargeable Li-ion battery
CS-E885 Soft Case
EC-AD1 PC-card adapter
• UR-E4 step down ring lens adapter
• UR-E7 step down ring lens adapter
• WC-E63 Wideangle converter
• WC-E68 (UR-E4 and UR-E7 required)
• TC-E2 (2x)/TC-E3ED (3x) Telephoto converter
• FC-E8 fisheye lens converter
• ES-E28 slide-copying adapter
MC-EU1 remote cord
HL-E885 LCD Hood
MACRO COOL-LIGHT SL-1 (UR-E4 required)
Use Only Nikon Brand Electronic Accessories
Your Nikon COOLPIX digital camera is designed to the highest standards and
includes complex electronic circuitry. Only Nikon brand electronic accessories
(including battery chargers, batteries, and AC adapters) certified by Nikon
specifically for use with your Nikon digital camera are engineered and proven to
operate within the operational and safety requirements of this electronic circuitry.
The use of non-Nikon electronic accessories could damage your camera and
may void your Nikon warranty.
For more information about Nikon brand accessories, contact your local
authorized Nikon dealer.
Approved Memory Cards
The following memory cards have been tested and approved for use in the
COOLPIX4300:
• SanDisk SDCFB series 16 MB, 32 MB, 48 MB, 64 MB, 96 MB, and 128 MB
• Lexar Media 4X USB series 8 MB, 16 MB, 32 MB, 48 MB, 64 MB, and 80 MB
• Lexar Media 8X USB series 8 MB, 16 MB, 32 MB, 48 MB, 64 MB, and 80 MB
• Lexar Media 10X USB series 128 MB and 160 MB
Operation is not guaranteed with other makes of memory card. For more details
on the above cards, please contact the manufacturer.
A Note on Electronically Controlled Cameras
In extremely rare instances, unusual characters may appear in the monitor and
the camera may stop functioning. In most cases, this phenomenon is caused by
a strong external static charge. Turn the camera off, remove and replace the
battery, and turn the camera on again. If you are using an AC adapter,
disconnect and reconnect the adapter, and turn the camera on again. If the
camera continues to malfunction after performing the above operation, contact
retailer or Nikon representative. Note that performing the above operation may
eliminate data not recorded to the CF memory card at the time the camera
stopped functioning. Data already recorded to the CF memory card will not be
affected.
Technical Notes—Optional Accessories
133132
Page 68

Caring for the Camera and Battery
To ensure continued enjoyment of your Nikon Product, observe the
following precautions when using or storing the device:
Keep dry
This product is not waterproof, and may malfunction if immersed in water or
exposed to high levels of humidity. Rusting of the internal mechanism can
cause irreparable damage.
Do not drop
The product may malfunction if subjected to strong shocks or vibration.
Handle all moving parts with care
Do not apply force to the lens or to the battery, card, or connector. These
parts are especially susceptible to damage.
Avoid sudden changes in temperature
Sudden changes in temperature, such as occur when entering or leaving a
heated building on a cold day, can cause condensation inside the device. To
prevent condensation, place the device in a carrying case or a plastic bag
before exposing it to sudden changes in temperature.
Turn the product off before removing or disconnecting the
power source
Do not unplug the product or remove the battery while the product is on, or
while images are being recorded or deleted from memory. Forcibly cutting
power to the product in these circumstances could result in loss of data or in
damage to the internal circuitry or memory. To prevent an accidental
interruption of power, avoid carrying the product from one location to another
while the AC adapter is connected.
Keep away from strong magnetic fields
Do not use or store this device in the vicinity of equipment that generates
strong electromagnetic radiation or magnetic fields. Strong static charges or
the magnetic fields produced by equipment such as radio transmitters could
interfere with the monitor, damage data stored on the memory card, or affect
the product’s internal circuitry.
Storage
When the camera will not be used for an extended period, return the lens section
to its original position and remove the battery and store it in a cool, dry place. To
prevent mold or mildew, store the camera in a dry, well-ventilated area. For longterm storage, place the camera in a plastic bag containing a desiccant (note that
desiccant gradually loses its capacity to absorb moisture and should be replaced at
regular intervals). Do not store your camera with naphtha or camphor moth balls or
in locations that:
• are poorly ventilated or damp
• are next to equipment that produces strong electromagnetic fields, such as
televisions or radios
• are exposed to temperatures above 50°C/122°F (for example, near a space
heater or in a closed vehicle on a hot day) or below –10°C (14°F)
• are subject to humidities of over 60%
To prevent mold or mildew, take the camera out of storage at least once a month.
Turn the camera on and release the shutter a few times before putting the camera
away again.
Hints and Tips for Handling Batteries
Some tips to ensure that your camera is always ready to shoot:
• When you turn the camera on, check the battery-level displayed in the monitor
to determine whether the battery needs to be replaced. A warning will be
displayed when the battery needs to be replaced.
• Ready a spare battery and keep it fully charged when taking photographs on
important occasions. Depending on your location, you may find it difficult to
purchase replacement batteries on short notice.
• On cold days, the capacity of batteries tends to decrease. Be sure the battery
is fully charged before taking photographs outside in cold weather. Keep a
spare battery in a warm place and exchange the two as necessary. Once
warmed, a cold battery may recover some of its charge.
• Should the battery terminals become dirty, wipe them off with a clean, dry
cloth before use.
Technical Notes—Caring for the Camera and Battery
135134
Page 69

Cleaning
Lens
Use a blower (typically a small device with a rubber bulb attached to one end that
you pump to produce a stream of air out the other) to remove dust or lint. To
remove fingerprints or other stains that can not be removed with a blower, wipe the
lens with a soft cloth, using a spiral motion that starts in the center of the lens and
works out to the edges.
Monitor
Do not apply pressure to the monitor, as this could cause damage or malfunction.
Dust or lint adhering to the monitor can be removed with a blower brush. Stains
can be removed by rubbing the surface lightly with a soft cloth or chamois leather.
Body
Use a blower to remove dust and lint, then wipe gently with a soft, dry cloth. After
using the camera at the beach or seaside, wipe off any sand or salt with a cloth
lightly dampened with fresh water, then dry thoroughly.
Do not use alcohol, thinner, or other volatile chemicals.
Avoid Contact with Liquid Crystal
Should the monitor break, care should be taken to avoid injury due to broken
glass and to prevent the liquid crystal from the monitor touching the skin or
entering the eyes or mouth.
Web Resources
At the time of writing, the following on-line resources were available for
users of Nikon digital imaging equipment:
For Product Information and Tips
• For users in the USA: http://www.nikonusa.com/
• For users in the Europe: http://www.nikon-euro.com/
• For users in the Asia, Oceania, the Middle East, and Africa:
http://www.nikon-asia.com/
For Contact Information
Contact information for the Nikon representative in your area may be
found at:
http://www.nikon-image.com/eng/
Technical Notes—Caring for the Camera and Battery/Web Resources
Notes on the Monitor
The monitor may contain a few pixels that are always lit or that do not light. This
is a characteristic common to all TFT LCD monitors and does not indicate a
malfunction. Images recorded with the product will not be affected.
When you frame bright subjects, vertical comet-like streaks that whiten toward
either end may appear in the monitor. This phenomenon, known as “smear,”
does not appear in the final photograph and does not indicate a malfunction.
Some smearing may appear in movies.
137136
Page 70

Troubleshooting
If your camera fails to function as expected, check the list of common
problems below before consulting your retailer or Nikon representative.
Refer to the page numbers listed in the rightmost column for
information on solving the problems listed here.
Problem
Monitor is blank
No indicators appear
in monitor
Monitor is hard to read
No picture is taken
when shutter release
button is fully pressed
• Camera is off.
• Battery is not correctly inserted or batterychamber cover is not fully closed.
• Battery is exhausted.
• AC adapter (available separately) is not properly
connected.
• Camera is in sleep mode. Press shutter release
button halfway.
• Monitor is off. Press ≤ on Multi selector to turn
monitor on.
• Camera is connected to television or VCR.
• Indicators are hidden. In shooting mode, press
≤ on Multi selector until indicators are
displayed.
• Slide show is in progress.
• Monitor brightness requires adjustment.
• Monitor is dirty.
• Camera is in playback or SETUP mode.
• Battery is exhausted.
• Number of exposures remaining is zero: not
enough memory remaining.
• Autofocus lamp flickers: camera unable to
focus.
• Flash-ready lamp bilnks rapidly: flash is
charging.
• Message “MEMORY CARD IS NOT
FORMATTED” appears in monitor: memory card
is not formatted for use in COOLPIX4300.
• Message “NO MEMORY CARD” appears in
monitor: no memory card in camera.
Possible Cause
Page
17
25
18
88
27
68
27
122
87
136
40
25
25
28
28
90
19
Problem
Pictures are too bright
(overexposed)
Pictures are too dark
(underexposed)
Pictures are out of
focus
Pictures are blurred
Flash does not fire
Possible Cause
• Exposure compensation is too high.
• Flash is off.
• Flash window blocked.
• Subject is outside range of flash.
• Exposure compensation is too low.
• Subject was not in focus area when shutter
release button pressed halfway.
• Autofocus lamp flikers: camera unable to
focus.
• Camera shook during shot.
• When lighting is poor:
– Use the flash
You do not want to or can not use the flash
when:
– Use Best-Shot Selector (BSS)
– Use the self-timer
– Use a tripod
• Flash is set to Flash Cancel.
• Flash is off. Note that flash turns off
automatically when:
– Camera is in h (landscape), j (sunset), k
(night landscape), v (museum), l (fireworks
show), z (close up) or m (movie) mode
– Focus is set to @ (infinity)
– Setting other than “Single” selected in
“Continuous” sub-menu
– Setting other than “Normal” selected in
“Lens” sub-menu
– “AE Lock” option in “Exposure Options” sub-
menu is on
• Best-Shot Selector (BSS) is on
• Battery level is low.
Page
51
49
26
145
51
28
28
26
48
Technical Notes—Troubleshooting
102
42
48
48
36-
38,
40
41
100
105
110
102
25
139138
Page 71

Problem
Pictures can not be
played back
Image does not
appear on the
television screen
Nikon View does not
start when camera
connected or memory
card inserted in card
reader or card slot
Possible Cause
• Picture has been overwritten or renamed by a
computer or another make of camera.
• Video cable not correctly connected.
• Television not tuned to video channel.
• Video Mode setting does not match video
device.
• Camera is off.
• AC adapter (available separately) is not properly
connected, or battery is dead.
• Interface cable not correctly connected, or card
not properly inserted in card reader, card
adapter, or card slot.
See Nikon View Reference Manual for further
information on troubleshooting Nikon View.
Page
—
68
68
93
18
66
Error Messages
The following table lists the error messages and other warnings that
appear in the monitor and how to deal with them.
Display
WARNING!!
Remove Lens Cap!
(Flashes)
WARNING!!
BATTERY
EXHAUSTED
WARNING!
Mode dial is not in
the proper position
Problem
Camera turned on with
lens cap in place.
Clock calendar not set.
Battery exhausted.
Mode dial is positioned
between two modes.
Solution
Turn camera off and
remove lens cap.
Set clock calendar to
current data and time.
Turn camera off and
replace battery.
Adjust mode dial to
select desired mode.
Page
24
22
25
15
140
WARNING!!
No menu in AUTO mode
Please use another mode
WARNING!!
No menu in m mode
W
WARNING!!
Please wait for camera
to finish recording
NO CARD
PRESENT
THIS CARD CANNOT
BE USED
MENU button pressed
in a mode.
MENU button pressed
in m mode.
Camera turned off or
new mode selected
while images are being
recorded to memory
card.
Camera cannot detect
memory card.
Error accessing
memory card.
Turn mode dial to setting
other than a or m
mode before using the
menus.
Message clears from
display automatically
when camera finishes
writing data to card.
Turn camera off and
confirm that memory
card is correctly inserted.
Use approved memory
card.
Technical Notes—Troubleshooting
15
29
18
133
141
Page 72

Display
WARNING!!
This CF card cannot
be read
MEMORY CARD
IS NOT
FORMATTED
Format
No >
OUT OF MEMORY
IMAGE CANNOT BE
SAVED
CARD CONTAINS
NO IMAGES
142
Problem
Error accessing memory
card.
Memory card has not
been formatted for use in
COOLPIX4300.
Error occurs during
shooting:
Insufficient memory to
record further pictures at
current settings.
Error appears when you
try to transfer images to
computer:
Not enough space on
memory card to record
information needed for
transfer.
• Memory card has not
been formatted for use
in COOLPIX4300.
• Error encountered while
saving picture.
• Camera has run out of
folder or file numbers.
• Small picture cannot be
created with the image.
memory card contains
no pictures.
Solution
Use approved memory
card.
Press ≤ on Multi selector
to highlight “Format” and
press > to format card,
or turn camera off and
replace card.
• Reduce image quality
or size.
• Delete pictures.
• Insert new card.
Disconnect camera,
delete unwanted pictures
and try again.
• Reformat memory card.
• Select “Off” or “Reset” in
“Seq. Numbers” menu.
• Select image other than
small picture or movie.
• Camera in review mode:
half-press shutter
release button to return
to shooting mode.
• Mode dial set to p
(playback mode): turn
mode dial to another
setting.
Page
133
90
81,
82
118
18
118
90
89
60
30
15
Display
ALL IMAGES ARE
HIDDEN
FILE CONTAINS NO
IMAGE DATA
THE FOLDER
CANNOT BE
DELETED
COMMUNICATIONS
ERROR
NO IMAGES ARE
MARKED FOR
TRANSFER
TRANSFER ERROR
SYSTEM ERROR
Problem
All images in current
folder are hidden.
File created by
computer or different
make of camera.
Folder contains hidden
or protected pictures.
USB cable
disconnected or
memory card removed
while pictures are being
transferred to
computer.
Protocol selected in
USB menu does not
match that used by
computer operating
system, causing error
when TRANSFER
button is pressed to
transfer pictures.
No images marked with
D icon when
TRANSFER button
pressed to transfer
images to computer.
Error has occurred
during image transfer.
Error has occurred in
camera’s internal
circuitry.
Solution
Select another folder or
use “Hide Image” to
change hidden status of
images in current folder.
• Delete file.
• Reformat memory card.
Folder can only be deleted
if all images it contains are
neither hidden nor
protected pictures.
If error message displayed
in computer monitor, click
OK to exit Nikon View.
Turn camera off, reconnect
cable or replace memory
card, then turn camera on.
Turn camera off and
disconnect USB cable,
then change USB selection
in camera setup menu and
reconnect camera. If error
reoccurs, use Nikon View
button to transfer
pictures.
Disconnect camera and
mark at least one image for
transfer before connecting
camera again.
Check that the camera is
properly connected and
that the battery is fully
charged.
Turn camera off, unplug
optional AC adapter (if
using), remove and reinsert battery. If error
persists, contact retailer or
Nikon representative.
Page
121,
125
118
90
121
66
Technical Notes—Troubleshooting
93
32,
57,
58,
128
67
17,
18
143
Page 73

Specifications
Type
Effective pixels
CCD
Image size (pixels)
Lens
Focal length
f/-number
Construction
Digital zoom
Autofocus (AF)
Focus range
measured from
lens)
Focus-area
selection
Viewfinder
Frame coverage
Monitor
Frame coverage
Storage
Media
File system
File format
E4300 digital camera
4.0 million
1/1.8-inch high-density CCD; total pixels: 4.13 million
• 2272 x 1704 • 1280 x 960
• 2048 x 1536 • 1024 x 768
• 1600 x 1200 • 640 x 480
Four Small Picture sizes selectable (640 x 480, 320 x
240, 160 x 120 or 96 x 72 pixels)
• 3x Zoom Nikkor
• F = 8-24 mm (35 mm [135] camera format equivalent:
38-114 mm)
• f/2.8-f/4.9
• Nine elements in eight groups
4.0x
Contrast-detect through-the-lens (TTL) AF
• 30 cm (1 ft.)-∞ at widest angle (W), 60 cm (2 ft.)-∞ at
telephoto (T)
• Macro mode (Autofocus): 4 cm (1.6 in.)-∞ at widest
angle (W), 30 cm (1 ft.)-∞ at telephoto (T)
Five-area multi AF and spot AF available
Real-image zoom optical viewfinder with LED indication
Approximately 80%
1.5-inch 110,000-dot, low-temperature polysilicon TFT
LCD with brightness adjustment
Approximately 97% vertical and 97% horizontal
Type I CompactFlash™ (CF) cards
Compliant with Design rule for Camera File systems
(DCF), Exif 2.2, Digital Print-Order Format (DPOF)
Compressed: JPEG-baseline-compliant; (FINE-,
NORMAL-, and BASIC-quality images)
Uncompresses: TIFF-RGB (HI-quality images)
Movies: QuickTime
Exposure
Metering
Exposure
control
Range
(ISO equivalent)
Shutter
Speed
Aperture
Range
Sensitivity
Self-timer
Built-in Speedlight
Range
Flash control
Interface
Video output
I/O terminals
Power sources
Battery life
(EN-EL1)
Four-mode through-the-lens (TTL) metering
• 256-segment Matrix • Center-Weighted
• Spot • AF Spot
Programmed auto, manual, exposure compensation
(–2.0 - +2.0 EV in steps of 1/3 EV), autoexposure
bracketing, AE lock
• W: EV –3 to +15
• T: EV –1.4 to +16.6
Mechanical and charge-coupled electronic shutter
8-1/1000 sec.; Bulb (up to 60 sec. in M mode)
Electronically controlled preset aperture
Two steps (f/2.8 and f/7.6 [W])
ISO equivalent approximately 100, 200, 400 or Auto
Ten- or three-second duration
W: 0.4 to 3.7 m (1.3 to 12.1 ft.)
T: 0.4 to 2.3 m (1.3 to 7.5 ft.)
Sensor flash system
USB
User can choose from NTSC and PAL
• DC input
• Data output (USB)
• Rechargeable Nikon EN-EL1 lithium-ion battery
(supplied) or six-volt 2CR5 (DL245) lithium battery
(available separately)
• EH-21 AC adapter/battery charger (available separately)
• EH-53 AC adapter (available separately)
Approximately 90 minutes (as measured at room
temperature [20°C/68°F] under standard Nikon test
conditions: zoom adjusted with each shot, flash used in
approximately one third of photographs, image quality set
to NORMAL, image size 2272 x 1704)
Technical Notes—Specifications
145144
Page 74

Tripod socket
1/4 (ISO1222)
Dimensions
(W x H x D)
Weight
Operating environment
Temperature
Humidity
95 x 69 x 52 mm (3.7 x 2.7 x 2.0 in.)
Approximately 230 g (8.1 oz.) without battery and
memory card
0 - 40°C (32 – 104°F)
Under 85% (no condensation)
Technical Notes—Specifications
147146
Page 75

Index
AE Lock...............................................................................P. 110
A
AF Area mode .....................................................................P. 111
Anytime Flash ........................................................................P. 48
Auto (White Balance) .............................................................P. 97
Auto Bracketing...................................................................P. 114
Auto (Flash mode) .................................................................P. 48
Autofocus lamp (green)....................................................P. 13, 28
Autofocus mode ....................................................................P. 44
Auto-Focus Mode................................................................P. 113
Auto a mode ..............................................................P. 24-33
Auto Off.................................................................................P. 88
AUTO (Sensitivity) ..........................................................P. 53, 106
Auto Transfer .........................................................................P. 92
Back Light mode (SCENE).....................................................P. 38
Battery .............................................................................P. 16-18
B
BASIC (image quality).......................................................P. 80-81
Beach/Snow mode (SCENE) .................................................P. 36
Best Shot Selector ..............................................................P. 102
Black-and-White..................................................................P. 103
Brightness ....................................................................P. 87, 103
Built-in Speedlight ...........................................................P. 48, 49
Exposure Compensation ...............................................P. 51, 110
E
Exposure mode ...................................................................P. 107
Exposure Options.........................................................P. 106-110
Fine (White Balance) ..............................................................P. 97
FINE mode (image quality)................................................P. 80-81
F
Fireworks Show mode (SCENE) ............................................P. 37
Fisheye (Lens)......................................................................P. 105
Flash Cancel..........................................................................P. 48
Flash mode............................................................................P. 48
Flash-ready lamp (red) .....................................................P. 13, 28
Fluorescent (White Balance)...................................................P. 97
Focus Confirmation .......................................................P. 64, 113
Focus mode.....................................................................P. 41-45
Focus Options..............................................................P. 111-113
Folders setting .........................................................P. 83-86, 121
Folders > Options > New...................................................P. 83
Folders > Options > Rename.............................................P. 84
Folders > Options > Delete................................................P. 85
Formatting CF memory card..................................................P. 90
Frame interval setting (Slide Show) ......................................P. 123
Full-Screen playback mode ..............................................P. 56-57
Full-Screen Review mode ......................................................P. 32
Center-Weighted metering.....................................................P. 99
Close Up mode (SCENE).......................................................P. 37
C
Cloudy (White Balance)..........................................................P. 97
CompactFlash™ memory card ..........................P. 18-19, 90, 133
Continuous AF...............................................................P. 44, 113
Continuous ..........................................................................P. 100
Contrast ..............................................................................P. 103
Controls.................................................................................P. 90
Copy mode (SCENE) .............................................................P. 38
Date/Time setting .............................................................P. 21-22
DCF (Design rule for Camera File System) ...........................P. 144
D
Delete...........................................................................P. 118-120
Delete (full-screen review/full-screen playback mode) ......P. 32, 57
Delete (thumbnail review/thumbnail playback mode)........P. 33, 58
Delete all images .................................................................P. 119
Delete selected image(s)...............................................P. 118-119
Digital zoom .....................................................................P. 46-47
Display mode.........................................................................P. 87
DPOF (Digital Print Order Format) ........................................P. 126
Hide Image ..........................................................................P. 125
H
HI mode (image quality)....................................................P. 80-81
Histogram display..................................................................P. 64
Image Adjustment ...............................................................P. 103
I
Image file name .....................................................................P. 89
Image Quality ...................................................................P. 80-81
Image Sharpening ...............................................................P. 104
Image Size.......................................................................P. 80, 82
Incandescent (White Balance)................................................P. 97
Infinity mode ..........................................................................P. 41
info.txt ...................................................................................P. 91
Landscape (SCENE) ..............................................................P. 36
L
Language ........................................................................P. 20, 94
Lens converter .............................................................P. 105-106
Long time exposure.............................................................P. 109
149148
Page 76

Macro Close-up mode...........................................................P. 41
M
Manual Exposure mode ...............................................P. 107-109
Manual Focus........................................................................P. 54
Manual å mode ...............................................................P. 40
Manual å shooting menu..........................................P. 96-116
Mass Storage ........................................................................P. 93
Matrix Metering......................................................................P. 99
Metering method ...................................................................P. 99
Multi-shot 16 (Continuous)...................................................P. 100
Movie ..............................................................................P. 50, 62
Museum mode (SCENE)........................................................P. 37
Night Landscape mode (SCENE)...........................................P. 37
N
Night Portrait (SCENE)...........................................................P. 36
Noise Reduction ..................................................................P. 116
NORMAL mode (image quality) ........................................P. 80-81
NTSC ....................................................................................P. 93
Number of exposures remaining............................................P. 25
PAL........................................................................................P. 93
P
Party/Indoor mode (SCENE) ..................................................P. 36
Playback menu ............................................................P. 117-129
Playback mode ................................................................P. 55-64
Portrait mode (SCENE) ..........................................................P. 36
Preset White Balance ............................................................P. 98
Print Set (DPOF)...........................................P. 118, 120, 126-127
P Exposure mode................................................................P. 107
Protect.................................................................................P. 124
Protocol.................................................................................P. 93
PTP .......................................................................................P. 93
Quick Review mode...............................................................P. 31
Q
Red-Eye Reduction ...............................................................P. 48
Red-Eye Reduction lamp.......................................................P. 48
R
Reset All ................................................................................P. 95
SCENE mode...................................................................P. 34-38
S
Self-timer..........................................................................P. 42-43
Sensitivity ......................................................................P. 53, 106
Seq. Numbers .......................................................................P. 89
SETUP menu ...................................................................P. 79-95
Shooting menu...............................................................P. 96-116
Single AF.......................................................................P. 44, 113
Single (Continuous)..............................................................P. 100
Slide show ...................................................................P. 122-123
Slow Sync Flash ....................................................................P. 48
Small picture ............................................................P. 60-61, 129
Speedlight (White Balance) ....................................................P. 97
Spot AF Area.......................................................................P. 112
Spot metering........................................................................P. 99
Sunset mode (SCENE) ..........................................................P. 37
Telephoto (Lens) ..................................................................P. 105
T
Television playback ................................................................P. 68
Thumbnail review/thumbnail playback mode ...................P. 33, 58
TIFF .......................................................................................P. 81
Transfer ..........................................................................P. 91 128
Ultra HS (Continuous) ..........................................................P. 100
U
USB.......................................................................................P. 93
VGA Sequence (Continuous) ...............................................P. 100
Video Mode ...........................................................................P. 93
V
White Balance .......................................................................P. 97
W
White Balance Bracketing....................................................P. 114
Wide Adapter (Lens) ............................................................P. 105
Zoom ...................................................................P. 26, 46-47, 59
Z
151150
Page 77

No reproduction in any form of this manual, in
whole or in part (except for brief quotation in
critical articles or reviews), may be made without
written authorisation from NIKON CORPORATION.
N
NIKON CORPORATION
FUJI BLDG., 2-3, MARUNOUCHI 3-CHOME,
CHIYODA-KU, TOKYO 100-8331, JAPAN
Printed in Japan K2K05000401 (11)
6MAA3411-03
 Loading...