

Page 1

AF-S VR Micro-Nikkor
105mm f/2.8
IF-ED Nano Crystal Coat
使用説明書
User’s Manual (PP. 16−29)
Benutzerhandbuch (S. 30−41)
Manuel d’utilisation (P. 42−53)
Manual del usuario
Manuale d’uso (PP. 66−77)
Εγχειρίδιο οδηγιών χρήσης
使用说明书
使用說明書
(P. 4−15)
(PP. 54−65)
(ΣΕΛ. 78−89)
(P. 90−101)
(P. 112−123)
p
J
En
De
Fr
Es
It
Gr
Sc
Tc
Page 2
2
Page 3
FULL
M/A
M
ON
OFF
0.5m
3
1.5
0.8
1
10
523
10
54
7
B
A
3
Page 4
Jp
ご使用の前に「安全上のご注意」をよくお読みのうえ、正しくお使いください。
この「安全上のご注意」は製品を安全に正しく使用していただき、あなたや他の
人々への危害や財産への損害を未然に防止するために、重要な内容を記載しています。
お読みになった後は、お使いになる方がいつでも見られる所に必ず保管してくだ
さい。
安全上のご注意
表示について
表示と意味は次のようになっています。
この表示を無視して、誤った取り扱いをすると、人が死亡または重傷を負
警告
う可能性が想定される内容を示しています。
この表示を無視して、誤った取り扱いをすると、人が傷害を負う可能性が
注意
想定される内容および物的損害の発生が想定される内容を示しています。
お守りいただく内容の種類を、次の絵表示で区分し、説明しています。
絵表示の例
△記号は、注意(警告を含む)を促す内容を告げるものです。図の中や近くに具
体的な注意内容(左図の場合は感電注意)が描かれています。
記号は、禁止の行為(してはいけないこと)を告げるものです。図の中や近く
に具体的な禁止内容(左図の場合は分解禁止)が描かれています。
●記号は、行為を強制すること(必ずすること)を告げるものです。図の中や近
くに具体的な強制内容(左図の場合は電池を取り出す)が描かれています。
警告
分解したり修理・改造をしないこと
感電したり、異常動作をしてケガの原因となります。
分解禁止
落下などによって破損し、内部が露出したときは、露出
部に手を触れないこと
接触禁止
感電したり、破損部でケガをする原因となります。
カメラの電池を抜いて、販売店またはニコンサービス機関に修理
すぐに修理依頼を
を依頼してください。
4
Page 5
電池を取る
すぐに修理依頼を
水かけ禁止
使用禁止
見ないこと
感電注意
放置禁止
使用注意
保管注意
移動注意
放置禁止
警告
熱くなる、煙が出る、こげ臭いなどの異常時は、速やか
にカメラの電池を取り出すこと
そのまま使用すると火災、やけどの原因となります。電池を取り
出す際、やけどに充分注意してください。電池を抜いて、販売店
またはニコンサービス機関に修理を依頼してください。
水につけたり水をかけたり、雨にぬらしたりしないこと
発火したり感電の原因となります。
引火・爆発のおそれのある場所では使用しないこと
プロパンガス・ガソリンなど引火性ガスや粉塵の発生する場所で
使用すると、爆発や火災の原因となります。
レンズまたはカメラで直接太陽や強い光を見ないこと
失明や視力障害の原因となります。
注意
ぬれた手でさわらないこと
感電の原因になることがあります。
製品は幼児の手の届かないところに置くこと
ケガの原因になることがあります。
逆光撮影では、太陽を画角から充分にずらすこと
太陽光がカメラ内部で焦点を結び、火災の原因になることがあり
ます。画角から太陽をわずかに外しても火災の原因になることが
あります。
使用しないときは、レンズにキャップをつけるか太陽光の
あたらない所に保管すること
太陽光が焦点を結び、火災の原因になることがあります。
三脚にカメラやレンズを取り付けたまま移動しないこと
転倒したりぶつけたりしてケガの原因になることがあります。
窓を閉め切った自動車の中や直射日光が当たる場所など、
異常に温度が高くなる場所に放置しないこと
内部の部品に悪い影響を与え、火災の原因となることがあります。
Jp
5
Page 6

:
○:使用可 ×:使用不可
カメラ
オート
フォーカス
露出モード
P
※1
SAM
FXフォーマット/DXフォーマットの
ニコンデジタル一眼レフカメラ
F6、F5、F100、F80シリーズ、
ニコンU2、ニコンU
プロネア600i、プロネアS
※2
F4シリーズ、F90Xシリーズ、
F90シリーズ、F70D
ニコンUs、F60D、F50D、
F-401シリーズ
F-801シリーズ、F-601M
F3AF、F-601、F-501、
MFカメラ(F-601Mを除く)
○ ○ ○ ○ ○
×
○ ○ ○ ○ ○
○ ○ ○ ○ ○
○ ○ ○ × ×
○ ○ ○ ○
× ○ ○ × ×
× × × × ×
機 能
○
×
○
×
×
×
×
手ブレ補正
各部の名称
Jp
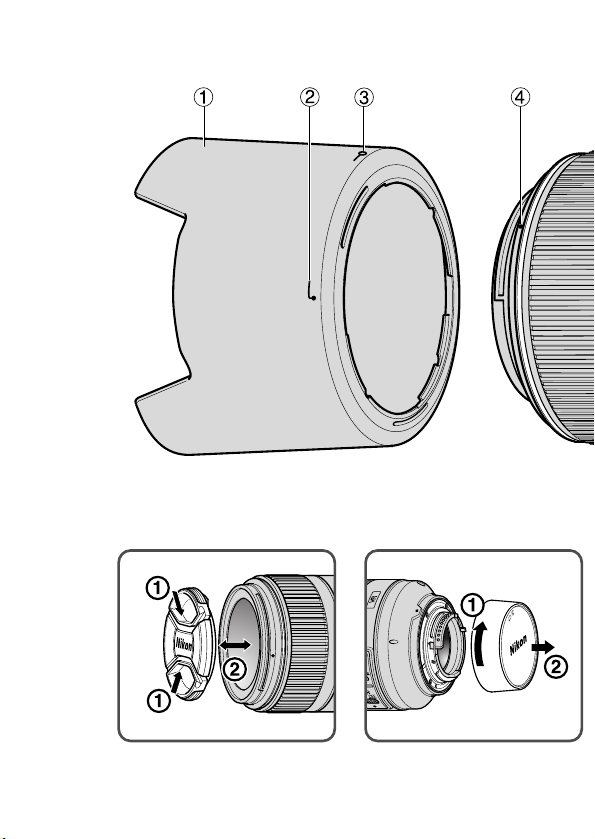
1 フード(P.12)
2 フード取り付け指標
(P.12)
3 フードセット指標(P.12)
4 フード着脱指標(P.12)
5 フォーカスリング(P.8)
6 距離目盛(P.10)
7 レンズ着脱指標
( )参照頁
8 レンズマウントゴムリング(P.8)
9 CPU信号接点(P.7)
! フォーカスモード切り換えスイッチ
(P.8)
" フォーカス制限切り換えスイッチ(P.9)
# 手ブレ補正スイッチ(P.9)
$ 倍率目盛(P.10)
% 被写界深度目盛(P.10)
& 距離目盛基準線(P.10)
カメラ別の使用可能機能表
使用できる機能には制限・制約がある場合があります。カメラの使用説明書もご
確認ください。
※1:PにはAUTO(オート)モード、イメージプログラムモードを含みます。
※2:Mモードの設定はありません。
●
手ブレ補正が使用できないカメラでは、必ず、手ブレ補正スイッチ# を
[OFF]にしてください。特にプロネア600iでは、このスイッチを[ON]に
したままにすると、電池を消耗することがあります。
6
Page 7

1.はじめに
このたびはニッコールレンズをお買い上げいただき、誠にありがとうございます。
このレンズは、手ブレ補正機能(VRⅡ)および、高速で静かなAF(オートフォ
ーカス)撮影を可能にするレンズ内超音波モーター(サイレント・ウェーブ・モ
ーター)駆動方式を採用した高性能なマイクロレンズです。
■ 主な特長
●
手ブレ補正機能(VRⅡ)を使用すると、使わないときと比べ∞〜1/30×
(撮影倍率)までの撮影では、約4段分
きるため、シャッタースピードの選択範囲が広がり、幅広い領域で手持ち撮影
が可能です。(*:当社測定条件によります。また、手ブレ補正効果は、撮影
者や撮影条件によって異なります。)
●
手ブレか流し撮りかを自動検出し、流し撮りでも手ブレ補正機能の威力を発揮
します。
●
AF(オートフォーカス)撮影およびMF(マニュアルフォーカス)撮影の切り
換えが簡単にできるフォーカスモード切り換えスイッチを装備しています。
●
AF撮影中にも瞬時にマニュアルフォーカスモードに切り換えることのできる
「マニュアル優先オートフォーカス」機能を装備しています。
●
被写体までの距離情報をカメラ側に伝達する機能を備え、3Dマルチパターン
測光機能を持ったカメラとの組み合わせでは、より的確な露出制御を実現しま
す。
●
ニコン独自のED(特殊低分散)ガラスによる色収差の補正とともに、良好な
ボケ味が得られる円形絞りの採用により優れた光学性能、描写性能を発揮しま
す。
●
ナノクリスタルコート(Nano Crystal Coat)を一部のレンズに施したこと
により、強い太陽光が当たる屋外撮影から、スポットライトのある室内撮影ま
で、あらゆる条件下で、クリアーで抜けの良い画像を提供します。
■ 注 記
●
レンズのCPU信号接点9は汚さないようにご注意ください。
*
シャッタースピードを遅くして撮影で
Jp
7
Page 8

●
レンズの設定モード
カメラ
M
M/A
マニュアル
フォーカス撮影
(
フォーカス
エイド可
)
マニュアルフォーカス撮影のみ
(
F-601Mを除きフォーカス
エイド可
)
マニュアルフォーカス撮影のみ
(フォーカスエイド可)
マニュアル優先
オートフォーカス
撮影
カメラの
フォーカス
モード
AF
AF
MF
MF
FXフォーマット/DXフォーマットの
ニコンデジタル一眼レフカメラ、
F6、F5、F4シリーズ、F100、
F90Xシリーズ、F90シリーズ、
F80シリーズ、F70D、ニコンU2、
ニコンU、プロネア600i、プロネアS
ニコンUs、F60D、F50D、
F-801シリーズ、F-401シリーズ、
F-601M
FULL
M/A
M
0.5m
指標
TC-20E/TC-20EⅡ/TC-20EⅢ装着時、最小絞りがF90以内になるように
Jp
制限しています。
●
ニコンDXフォーマットのニコンデジタル一眼レフカメラ(D300シリーズ、
D7000など)に装着すると、対角線画角は15°20′となり、35mm判換
算では焦点距離約157.5mm相当になります。
●
レンズマウントゴムリング8が破損した場合は、そのまま使用せず販売店ま
たはニコンサービス機関に修理を依頼してください。
●
ワイヤレスリモートスピードライト SB-R200は、レンズ先端に4個装着可能
です。
2.ピント合わせの方法
ご使用のカメラや撮影目的によって、下表のようなピント合わせが選択できます。
■M/A(マニュアル優先オートフォーカス)モードの使い方
1 フォーカスモード切り換えスイッチ!を[M/A]にセットします。
●
スイッチは、指標が合うようにセットしてください。
2 AF(オートフォーカス)撮影時、シャッターボタンを半
押ししたまま、あるいはカメラのAF作動ボタンを保持し
たまま、フォーカスリング5を手で回転させると、瞬時
にMF(マニュアルフォーカス)撮影が行えます。
3 シャッターボタンの半押しやAF作動ボタンを再度操作す
るとAFで撮影が可能となります。
8
Page 9
■ フォーカス制限切り換えスイッチ"の使い方
FULL
0.5m
指標
ON
OFF
指標
パンニング
(流し撮り)
手ブレ
大
高
周
波
数
振 幅
(AF-Sレンズを装着してAF使用可能なカメラのみ)
オートフォーカス撮影時で、撮影距離が常に0.5m以上に限
られている場合は、フォーカス制限切り換えスイッチ"を
[∞−0.5m]にセットすると、ピント合わせの時間を短縮
できます。
●
スイッチは、指標が合うようにセットしてください。
●
撮影距離が0.5m未満を含む場合は[FULL]にセットします。
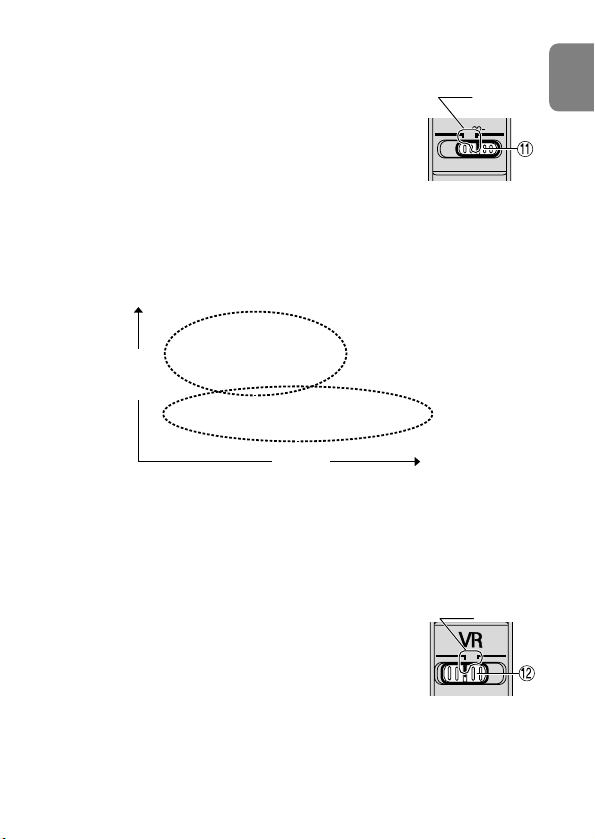
3.手ブレ補正機能(VRⅡ)
■ 手ブレ補正機能の概念図
■ 手ブレ補正の効果
●
∞〜約3m(撮影倍率:1/30×)までの撮影では、シャッタースピードで約
*
の手ブレを補正します。また、1/30×から撮影倍率が上がるに従い、
4段分
手ブレ補正効果は徐々に減少します。(*:当社測定条件によります。また、
手ブレ補正効果は、撮影者や撮影条件によって異なります。)
■ 手ブレ補正機能の使い方
1 手ブレ補正スイッチ#を[ON]にセットします。
●
スイッチは、指標が合うようにセットしてください。
2 シャッターボタンを半押しすると手ブレを補正します。
3 手ブレ補正スイッチ#を[OFF]にセットすると、手ブレを補正しません。
このときファインダー内の画像のブレも補正するため、
ピント合わせが容易で、フレーミングしやすくなります。
Jp
9
Page 10

■ 手ブレ補正機能使用時のご注意
Jp
●
シャッターボタンを半押し後、ファインダー像が安定してから撮影することを
おすすめします。
●
流し撮りなどでカメラの向きを大きく変えた場合、変えた方向の手ブレ補正は
機能しません。例えば、流し撮りで横方向にパンニングすると、縦方向の手ブ
レだけが補正され、流し撮りが行えます。
●
手ブレ補正の原理上、シャッターレリーズ後にファインダー像がわずかに動く
ことがありますが、異常ではありません。
●
手ブレ補正中にカメラの電源スイッチをOFFにしたり、レンズを取り外したり
しないでください。(その状態でレンズを振るとカタカタ音がすることがあり
ますが、故障ではありません。カメラの電源スイッチを再度ONにすれば、音
は消えます。)
●
内蔵フラッシュ搭載のカメラで、内蔵フラッシュ充電中は、手ブレ補正は行い
ません。
●
三脚を使用するときは、手ブレ補正スイッチ#を[OFF]にしてください。
ただし、三脚を使っても雲台を固定しないときや、一脚を使用するときには、
スイッチを[ON]にすることをおすすめします。
4.被写界深度
被写体の前後のどの範囲が鮮明に写るかという被写界深度の範囲は、鏡筒の距離
目盛基準線&の両側の被写界深度目盛%によって示されます。被写界深度は、
この2つの点が示す距離目盛6でおおよそ読むことができます。ただし、近距離
ではズレが生じるため被写界深度目盛は使用できませんので被写界深度表
(P.126)をご覧ください。被写界深度プレビュー(絞り込み)機構を持つカメ
ラは、絞り込みによりファインダー内で被写界深度を確認できます。
5.撮影倍率
撮影倍率とは、フィルム面上に写された像の大きさと被写体の実際の大きさとの
比率を示したものです。たとえば実際には5cmの長さの被写体がフィルム面上
に1cmに写ったときの撮影倍率は1/5倍(1:5)といいます。距離目盛6の
すぐ上に、倍率目盛$(オレンジ色)が記してあります。この目盛により、先
に倍率を決めてから撮影することもできます。たとえば1/5倍の倍率で撮影し
たいときは倍率目盛の5を距離目盛基準線&に合わせ、ピントを合わせます。
なお、各撮影距離での撮影倍率につきましては被写界深度表(P.126)をご参照
ください。
10
Page 11

6.接写、複写撮影
被写界面積(cm)
クローズアップレンズ
撮影距離(cm)
No.5T
No.6T
No.5T+6T
撮影倍率
1
/
6.3
―1.22 15.0×22.5―1.97×2.95 82.4―28.1
1
/
3.3
―1.44 8.0×12.0―1.67×2.5 49.8―26.1
1
/
2.2
―1.65 5.24×7.86―1.45×2.18 38.1―24.3
撮影の際は特にカメラブレに注意してください。カメラブレを防ぐ方法として、
しっかりとした三脚を用い、ケーブルレリーズ、またはリモートコードを併用す
ることをおすすめします。接写撮影では、一般に被写界深度が著しく浅くなりま
すので、奥行きのある被写体の撮影では、絞りを十分絞って、露出時間を長くす
るようにしてください。また、写したい部分をフィルム面と平行に置くことなど
の注意も必要です。
●
クローズアップレンズを使用する場合は、マニュアルフォーカスで撮影してく
ださい。
7.露出倍数について
レンズのF値は無限遠で被写体の像の明るさを表す値ですが、撮影倍率を上げて
撮影すると像の明るさは減少します。このときの実質的な明るさを有効F値(実
効F値ともいいます)と呼び、レンズの実質的な明るさが減少した分だけ増やす
露出の係数を露出倍数といいます。
8.有効F値の変化について(P.124の図参照)
このレンズは、撮影倍率が上がるに従いフィルム面上(撮像素子面)での像の明
るさは減少します。有効F値(実効F値ともいいます)は大きく(=暗く)なりま
す。この変化量はカメラが自動的に補正しますので、露出を決める際やTTL調光
によるフラッシュ撮影で露出倍数を考慮する必要はありません。
なお、カメラ側の外部表示パネルやファインダー内表示部で表示される絞り値は
露出倍数が自動的に補正されたF値です。
9.絞り値の設定
絞り値は、カメラ側で設定してください。カメラの露出(撮影)モードをA(絞
り優先オート)、M(マニュアル)で絞りをセットした場合でも撮影距離により有
効F値(実効F値ともいいます)が変化すると、カメラは設定したF値を保つよう
に、自動で絞りを調整(最大 約1.6段)します。
Jp
11
Page 12
10.バヨネットフードHB-38の取り付け、取り外し
スクリーン
カメラ
F5+DP-30
◎ ―
◎ ―
―
―
―
―
― ◎ ― ◎
― ◎ ― ◎
G1
G2
G4G3BCE
EC-B
EC-E
FJKLMPU
F4+DP-20
F4+DA-20
F5+DA-30
A
◎
◎
◎
◎
◎
◎
◎◎―
―
◎
◎
◎
◎
○
○
○
(+0.5)
◎
◎
◎
◎
F6
― ― ― ― ―◎ ◎ ◎◎ ― ― ― ◎
2 3 4
Jp
■取り付け方
レンズ先端のフード着脱指標4とフード取り付
け指標( 、2ヶ所のいずれか)2を合わせ
て、時計回りにカチッと音がするまでフード1
を回転させ、確実に取り付けます。
●
フード着脱指標4とフードセット指標( )
3が合っていることを確認してください。
●
フードが正しく取り付けられないと撮影画面
にケラレを生じますのでご注意ください。
●
フード先端を強くつかむと着脱が困難になり
ます。着脱の際は、フードの根元(フード取
り付け指標部分)付近を持って回転させてく
ださい。
●
収納時はフードを逆向きにしてレンズに取り
付けることができます。
■取り外し方
フードの根元(フード取り付け指標部分)付近を持ち、反時計回りにフードを回
転させて取り外します。
11.カメラ内蔵フラッシュ使用時のご注意
ケラレ(写真の一部に影ができる)を防止するため、レンズフード1は取り外
して使用してください。
12.ファインダースクリーンとの組み合わせ
12
Page 13

■構図の決定やピント合わせの目的には
◎: 好適です
○: 視野の一部が多少見にくくなりますが、撮影結果には全く影響がありません。
―: 各カメラに存在しないファインダースクリーンです。
(): 中央部重点測光時の補正値です。F6カメラの場合、測光値の補正は、カメラの
カスタムメニュー「b6:スクリーン補正」を「B orE以外」にセットして行いま
す。B型およびE型以外を使用する場合は、補正量が0でも、「B orE以外」にセ
ットしてください。F5カメラの場合は、カスタムセッティングNo.18の設定で
測光値の補正を行います。F4シリーズカメラの場合は、ファインダースクリー
ン露出補正ダイヤルを回して補正を行います。
詳しくはカメラの使用説明書をご覧ください。
空欄: 使用不適当です。ただし、Mスクリーンの場合、撮影倍率1/1倍以上の近接撮影
に用いられるため、この限りではありません。
注意
・F5カメラの場合、マルチパターン測光はEC-B、EC-E、B、E、J、A、Lスクリーン
のみ可能です。
・上記以外のカメラでB、Eスクリーンをご使用の場合は、それぞれB、Eスクリーンの
欄をご覧ください。
13.レンズのお手入れと取り扱い上のご注意
●
レンズ面の清掃は、ホコリを拭う程度にしてください。指紋がついたときは、
柔らかい清潔な木綿の布に無水アルコール(エタノール)または市販のレンズ
クリーナーを少量湿らせ、レンズの中心から外周へ渦巻状に、拭きムラ、拭き
残りのないように注意して拭いてください。
●
シンナーやベンジンなどの有機溶剤は絶対に使用しないでください。
●
レンズ表面の汚れや傷を防ぐためには、NCフィルターをお使いいただけます。
また、レンズフード1も役立ちます。
●
レンズをケースに入れるときは、必ず、レンズキャップを前後に取り付けてく
ださい。
●
レンズを長期間使用しないときは、カビやサビを防ぐために、高温多湿のとこ
ろを避けて風通しのよい場所に保管してください。また、直射日光のあたると
ころ、ナフタリンや樟脳のあるところも避けてください。
●
レンズを水に濡らすと、部品がサビつくなどして故障の原因となりますのでご
注意ください。
●
ストーブの前など、高温になるところに置かないでください。極端に温度が高
くなると、外観の一部に使用している強化プラスチックが変形することがあり
ます。
Jp
13
Page 14

14.付属アクセサリー
Jp
●
62mmスプリング式レンズキャップ LC-62●裏ぶた
●
バヨネットフード HB-38●ソフトケース CL-1020
15.別売アクセサリー
●
62mmネジ込み式フィルター
●
AF-Sテレコンバーター*(TC-14EⅡ/TC-17EⅡ/TC-20EⅢ)
*AF(オートフォーカス)撮影はできません(VR、AEは可能)。
16.使用できないアクセサリー
●
オート接写リング:PKリング全種類●Kリング:全種類
●
オートリング:BR-4●ベローズアタッチメント:全種類
※ その他のアクセサリーでも、使用できない場合があります。アクセサリーの使用説
明書でご確認ください。
14
Page 15

17.仕 様
型式: ニコンFマウントCPU内蔵Gタイプ、AF-Sマイクロレンズ
焦点距離: 105mm
最大口径比: 1:2.8
レンズ構成: 12群14枚(EDレンズ1枚、ナノクリスタルコート)
画角: 23°20′… 35mm判一眼レフカメラ
FXフォーマットのデジタル一眼レフカメラ
15°20′… DXフォーマットのデジタル一眼レフカメラ
18°40′… IX240カメラ
倍率目盛: 1:10〜1:1(等倍)
撮影距離情報: カメラへの撮影距離情報出力可能
ピント合わせ: IF(ニコン内焦)方式、超音波モーターによるオートフォーカ
ス、マニュアルフォーカス可能
フォーカス
制限スイッチ: FULL(∞〜0.314m)と∞〜0.5mの2段階切り換え
手ブレ補正: ボイスコイルモーター(VCM)によるレンズシフト方式
撮影距離目盛: ∞〜0.314m、1ft(併記)
最短撮影距離: 撮像面から0.314m(等倍)
絞り羽根枚数: 9枚(円形絞り)
絞り方式: 自動絞り
絞りの範囲: f2.8― 32
測光方式: 開放測光
アタッチメントサイズ
大きさ: 約83(最大径)×116mm(バヨネットマウント基準面から
質量: 約750g
●
仕様、外観の一部を、改善のため予告なく変更することがあります。
:62mm(P=0.75mm)
レンズ先端まで)
Jp
15
Page 16

Notes on Safety Operations
CAUTION
Do not disassemble
Touching the internal parts of the camera or lens could result in injury.
En
Repairs should be performed only by qualified technicians. Should the
camera or lens break open as the result of a fall or other accident, take the
product to a Nikon-authorized service representative for inspection after
unplugging the product and/or removing the battery.
Turn off immediately in the event of malfunction
Should you notice smoke or an unusual smell coming from the camera or
lens, remove the battery immediately, taking care to avoid burns. Continued
operation could result in injury. After removing or disconnecting the power
source, take the equipment to a Nikon-authorized service representative for
inspection.
Do not use the camera or lens in the presence of
flammable gas
If the electronic equipment is operated in the presence of flammable gas, it
could result in an explosion or a fire.
Do not look at the sun through the lens or viewfinder
Viewing the sun or other strong light sources through the lens or viewfinder
could cause permanent visual impairment.
Keep out of reach of children
Particular care should be taken to prevent infants from putting the batteries
or other small parts into their mouths.
Observe the following precautions when handling
the camera and lens
• Keep the camera or lens unit dry. Failure to do so could result in a fire or
electric shock.
• Do not handle or touch the unit with wet hands. Failure to do so could
result in electric shock.
• In backlit shooting, keep the sun well out of the frame.
The sunlight could focus into the lens body and cause a fire. When the sun
gets close to the frame, it can also cause a fire.
16
Page 17

• When the lens will not be used for a long time, attach both front and rear
Cameras
Vibration reduction Autofocus
Exposure mode
P
*1SAM
Nikon digital SLR
(Nikon FX/DX format) cameras
F6, F5, F100, F80-Series/N80-Series
*
,
F75-Series/N75-Series
*
,
F65-Series/N65-Series
*
Pronea 600i/6i*, Pronea S
*2
F4-Series, F90X/N90s
*
, F90-Series/
N90
*
, F70-Series/N70
*
F60-Series/N60*, F55-Series/
N55-Series
*
, F50-Series/N50*,
F-401x/N5005
*
, F-401s/N4004s*,
F-401/N4004
*
F-801s/N8008s*, F-801/N8008*,
F-601
M/N6000
*
F3AF, F-601/N6006*, F-501/
N2020
**
, Nikon MF cameras
(except F-601
M/N6000
*
)
○ ○ ○○○
× ×
○ ○ ○○○
×
○ ○○○
×
○ ○
××
○○○
× ×
○
××
× ×
○
○
○
○
○
○
××××
Function
○
: Possible ×: Impossible
lens caps and store the lens away from direct sunlight. Failure to do so
could result in a fire, as the lens might focus sunlight onto an object.
Nomenclature
1 Lens hood (p.24)
2 Lens hood attachment index (p.24)
3 Lens hood setting index (p.24)
4 Lens hood mounting index (p.24)
5 Focus ring (p.20)
6 Distance scale
7 Mounting index
8 Lens mount rubber gasket (p.19)
( )
: Reference page
9 CPU contacts (p.19)
! Focus mode switch (p.20)
" Focusing limit switch (p.20)
# Vibration reduction ON/OFF
switch (p.21)
$ Reproduction ratio scale (p.22)
% Depth-of-field indicators (p.22)
& Distance index line (p.22)
Usable cameras and available functions
There may be some restrictions or limitation for available functions. Refer to
your camera user’s manual for details.
En
17
Page 18

*Sold exclusively in the USA. **Sold exclusively in the USA and Canada.
*1 P includes AUTO (General-Purpose Program) and Vari-Program System.
*2 Manual (M) is not available.
• If this lens is used with cameras not compatible with vibration reduction, set
the vibration reduction ON/OFF switch # to [OFF]. With the Pronea
En
600i/6i camera, in particular, battery power may become quickly depleted
if this switch is left [ON].
1. Introduction
Thank you for purchasing the AF-S VR Micro-Nikkor 105mm f/2.8G IF-ED
lens. This is a high-performance Micro lens featuring special Vibration
Reduction (VR2) and high-speed Internal Focusing (IF) mechanisms. It also
employs a Silent (S) Wave Motor to drive the focusing mechanism.
■ Major features
•At infinity (∞) to 1/30x reproduction ratio, pictures can be taken at shutter speeds
approx. 4 stops* slower than is possible without using a VR2 lens, thus
expanding the range of usable shutter speed options and making shooting
without a tripod much easier. (*Under Nikon measurement conditions. The effects
of vibration reduction vary depending on individual and shooting conditions.)
•Panning is also possible, as the lens automatically distinguishes panning
from camera shake and vibration reduction works effectively.
•Autofocus (A) or manual (M) mode can easily be selected with the Focus
mode switch.
•Autofocusing with manual override is provided, allowing instant change
from autofocusing to manual focusing.
•More accurate exposure control is possible when this is mounted on a
Nikon camera having 3D Matrix Metering capability, because subject
distance information is transferred from the lens to the camera body.
•The use of an ED (extra-low dispersion) lens element ensures sharp pictures
virtually free of color fringing. Also, by utilizing a 9-blade diaphragm that
produces a nearly circular aperture, out-of-focus images in front of or
behind the subject are rendered as pleasing blurs.
•The Nano Crystal Coat deposited on some of the lens elements ensures
that fine, clear images can be reproduced under any shooting conditions,
from the sunny outdoors to spotlighted interior scenes.
18
Page 19

■ Important
Lens’ focus mode
Cameras
MM/A
Camera’s
focus mode
* Sold exclusively in the USA.
Nikon digital SLR (Nikon FX/DX format)
cameras, F6, F5, F4-Series, F100,
F90X/N90s
*
, F90-Series/N90*,
F80-Series/N80-Series
*
,
F75-Series/N75-Series
*
, F70-Series/N70*,
F65-Series/N65-Series
*
, Pronea 600i/6i*,
Pronea S
F55-Series/N55-Series
*
,
F60-Series/N60
*
, F50-Series/N50*,
F-801s/N8008s
*
, F-801/N8008*,
F-601
M/N6000
*
, F-401x/N5005*,
F-401s/N4004s
*
, F-401/N4004
*
AF
MF
AF
MF
Manual focus
(Focus assist is available,
except with the F-601
M/
N6000*.)
Autofocus with
manual priority
Manual focus
(Focus assist
is available.)
Manual focus
(Focus assist is available.)
•Be careful not to soil or damage the CPU contacts 9.
•With the TC-20E/TC-20EII/TC-20EIII attached, minimum aperture is limited
to within f/90.
•When mounted on Nikon digital SLR (Nikon DX format) cameras, such as
the D300-Series and D7000, the lens’ picture angle becomes 15°20’ and
its 35mm equivalent focal length is approx. 157.5mm.
•If the lens mount rubber gasket 8 is damaged, be sure to visit the nearest
Nikon authorized dealer or service center for repair.
•A total of four Wireless Remote Speedlights SB-R200 can be attached to
the front of the lens.
2. Focusing
Set your camera’s focus mode selector according to this chart.
En
19
Page 20

■ Autofocus with manual override (M/A mode)
Panning shots
Camera shake
Number of vibrations
Strength of vibration
1Set the Focus mode switch ! to [M/A].
Note: Be sure to set the switch so that the indicator
aligns with [M/A] precisely.
2Autofocus is provided, but you can manually override the
En
focus by operating the separate Focus ring 5 while lightly depressing the
shutter release button or the AF start (AF-ON) button on the camera.
3To cancel manual override, again lightly depress the shutter release button
or the AF start button on the camera. This will return the camera to
autofocus mode.
M/A
FULL
■ To limit the range of autofocus
(For AF cameras compatible with AF-S Nikkor lenses
only)
With AF operation, if the subject is always more than
0.5m (1.6 ft) away, set the focusing limit switch " to
[∞–0.5m] to reduce focusing time.
Note: Be sure to set the switch so that the indicator aligns with [∞–0.5m]
precisely.
•If the subject is sometimes 0.5 m (1.6 ft) or closer, set it to [FULL].
FULL
3. Vibration reduction mode (VR@)
■ Basic concept of vibration reduction
Indicator
M
0.5m
Indicator
0.5m
20
Page 21
■ The effects of vibration reduction
•When the subject is from infinity (∞) to approx. 3m (9.8 ft) away (at 1/30x
reproduction ratio), pictures can be taken at shutter speeds approx. 4
stops* slower than is possible without using a VR2 lens. As the
reproduction ratio increases from 1/30x, the effects of vibration reduction
gradually decrease. (*Under Nikon measurement conditions. The effects of
vibration reduction vary depending on individual and shooting conditions.)
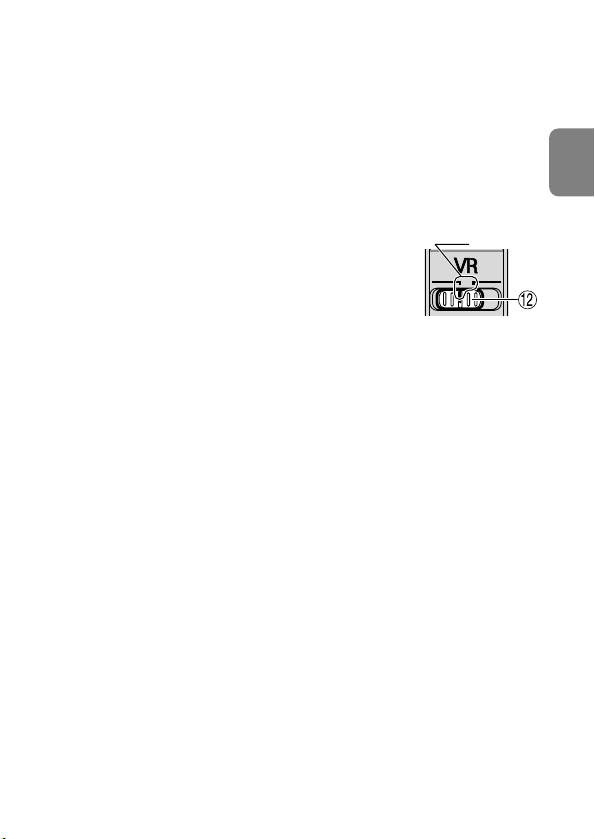
■ Setting the vibration reduction ON/OFF switch
1Set the Vibration reduction ON/OFF switch # to [ON].
Note: Be sure to set the switch so that the indicator
aligns with [ON] precisely.
2Vibration is reduced when the shutter release button is
lightly pressed. Because vibration is reduced in the
viewfinder, auto/manual focusing and exact framing of the subject are
made easier.
3To cancel the vibration reduction mode, set the Vibration reduction
ON/OFF switch # to [OFF].
ON
Indicator
OFF
■ Notes on using vibration reduction mode
•Wait until the image in the viewfinder stops vibrating before fully
depressing the shutter release button after you have lightly pressed the
shutter release button.
•If you move the camera in a wide arc when panning, vibration in the
direction of that movement is not affected. For example, if you pan the
camera horizontally, only vibration in the vertical direction is reduced,
making smooth pans much easier.
•Due to the characteristics of the vibration reduction mechanism, the image
in the viewfinder may become slightly blurred after releasing the shutter.
This is not a malfunction.
•Do not turn the camera power OFF or remove the lens from the camera
while the vibration reduction mode is in operation. (Otherwise, the lens
may emit a chattering noise if the camera is shaken. This is not a
malfunction. Turn the camera power ON again to correct this.)
•With cameras featuring a built-in flash, vibration reduction does not
function while the built-in flash is charging.
En
21
Page 22

•When the lens is mounted on a tripod, set the vibration reduction ON/OFF
switch # to [OFF]. However, set the switch to [ON] when using a tripod
without securing the tripod head, or when using a monopod.
4. Depth of field
The depth-of-field indicators % are engraved beside the distance index line
En
&. At close distances, however, so little is in focus that it may be better to
check the depth of field table (on page 126). If your camera has a depth of
field preview button or lever, use it to check the depth of field in the
viewfinder.
5. Focusing at a predetermined reproduction ratio
The reproduction ratio is the relation between the size of the image recorded
on film and the actual subject size. If, for example, the image on the
focusing screen is one-fifth the actual subject size, the reproduction ratio is
1:5.
To photograph at a predetermined reproduction ratio, use the following
procedure:
1Manually turn the focus ring until the desired reproduction ratio scale $
number is aligned with the distance index line &.
2Aim at the subject, then change your position, moving closer to or farther
away from the subject, until the image in the viewfinder sharpens.
To obtain the appropriate reproduction ratio for each focused distance, see
the table on page 126.
6. Notes on close-up photography and duplication
work
Camera shake
The AF-S VR Micro-Nikkor 105mm f/2.8G IF-ED provides such exceptionally
high image magnification that even the slightest movement during shooting
can cause the image to blur. Be sure to mount the camera on a tripod and
use a cable release or remote cord to release the shutter.
22
Page 23

Close working distance
Focused distance
(cm/inch)
No. 5T 1/6.3–1.22 15.0 × 22.5–1.97 × 2.95/ 82.4–28.1/32.4–11.1
5.9 × 8.9–0.8 × 1.2
No. 6T 1/3.3–1.44 8.0 × 12.0–1.67 × 2.5/ 49.8–26.1/19.6–10.3
3.1 × 4.7–0.7 × 1.0
No. 5T + 6T 1/2.2–1.65 5.24 × 7.86–1.45 × 2.18/ 38.1–24.3/15.0–9.6
2.1 × 3.1−0.6 × 0.9
Close-up
attachment
Reproduction
ratio
Subject field
(cm/inch)
At the high reproduction ratios used in close-up shooting, the depth of field
is very shallow. To ensure greater depth of field, stop down the lens, then
carefully position the camera to ensure the most important surface of the
subject is in the same zone of sharp focus.
•Use manual focus when using the close-up lens.
7. Exposure factor
The f-number of a lens indicates brightness of the image formed by the lens
set at “infinity” shooting distance. The higher the reproduction ratio is, the
more the brightness of the image will decrease. The actual brightness of the
image is called the “effective f-number,” and the exposure compensation
value for the change of the effective f-number is called the "exposure
factor.”
8. Effective f-number variation (P. 124)
With this lens, the higher the reproduction ratio is, the more the brightness
of the image on the film (image sensing device) will decrease and the
effective f-number will increase (the amount of light that comes through the
lens’ aperture will decrease). This variation is automatically compensated for
by the camera’s exposure meter, so the user can determine exposure or
operate TTL flash shooting without having to consider the exposure factor.
The f-number displayed in the camera’s LCD panel or viewfinder is the value
automatically compensated.
En
23
Page 24
9. Setting the aperture
23 4
Set the aperture on the camera body. When exposure (or shooting) mode is
set at “A” (Aperture Priority auto) or “M” (manual), the camera will control
to maintain the predetermined f-number (up to approx. 1.6 stops) as the
effective f-number varies with shooting distance.
En
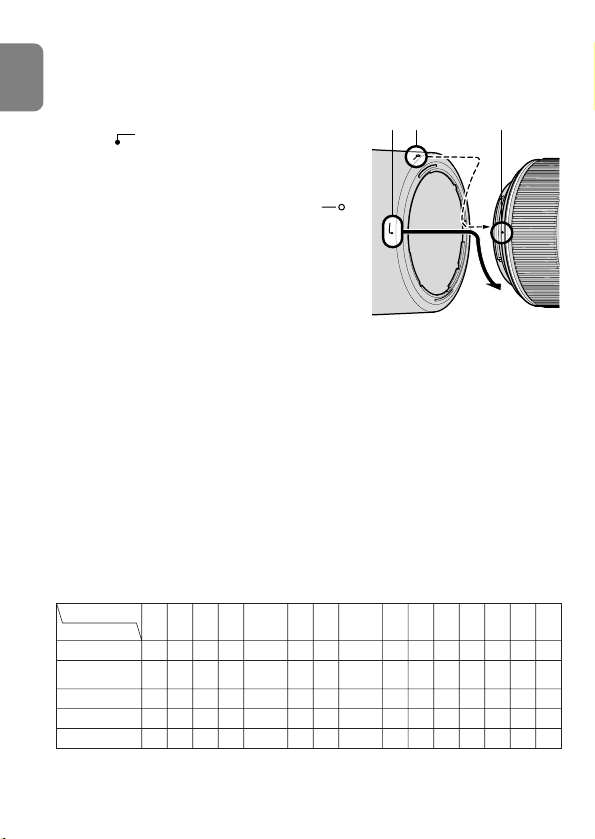
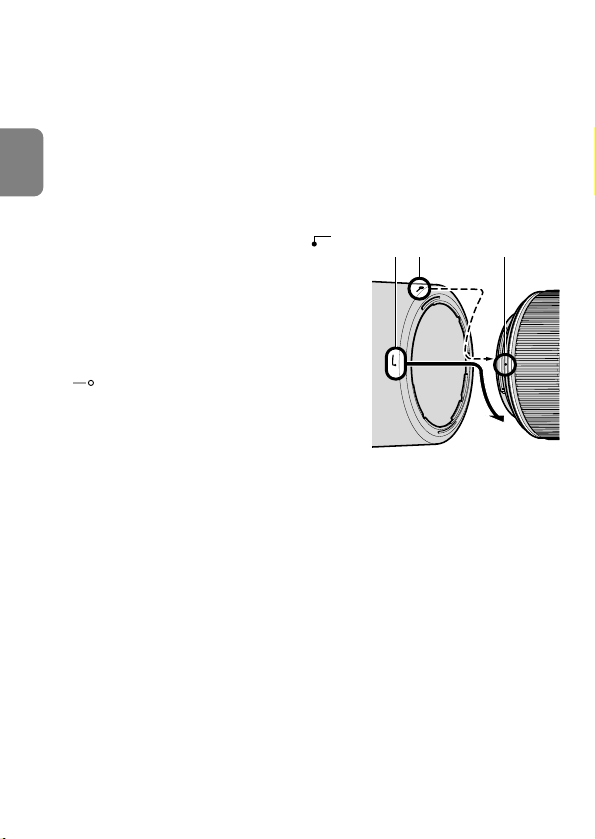
10. Using bayonet hood HB-38
■ Attaching the hood
Align the lens hood attachment index ( ) 2
on the hood (either one of the two indexes)
with the lens hood mounting index 4 on the
lens, and turn the lens hood 1 clockwise until
it click stops to secure.
•Make sure that the lens hood mounting index
4 aligns with the lens hood setting index
() 3.
•If the lens hood is not correctly attached,
vignetting can occur.
•To facilitate attachment or removal of the
hood, hold it by its base (around the lens hood attachment index) rather
than its outer edge.
•To store the lens hood, attach it in the reverse position.
■ Detaching the hood
While holding the base of the hood (near the lens hood attachment index)
rather than its outer edge, turn it counterclockwise to detach.
11. Flash pictures using cameras with a built-in flash
To prevent vignetting, do not use a lens hood 1.
24
Page 25

12. Recommended focusing screens
ABCE
EC-BFG1
G3 G4 J K L M P U
EC-E G2
F6
F5+DP-30
F5+DA-30
F4+DP-20
F4+DA-20
Screen
Camera
(+0.5)
−
− −
−
−
−
−
−
− − − −−
−
−
−
−
−
−
−
◎◎
◎◎
◎◎
◎
◎
◎
◎◎◎
◎
◎
◎
◎
◎
◎
◎
◎
◎
◎◎◎
◎
◎
◎
○
○
○
Various interchangeable focusing screens are available for certain Nikon SLR
cameras to suit any picture-taking situation. The ones recommended for use
with this lens are:
: Excellent focusing
: Acceptable focusing
Slight vignetting or moiré patterns appear in the viewfinder, but not on
the film.
—
: Not available.
( ): Indicates degree of exposure compensation needed (Center-Weighted
metering only). For F6 cameras, compensate by selecting “Other
screen” in Custom Setting “b6: Screen comp.” and setting the EV level
to -2.0 to +2.0 in 0.5 EV steps. When using screens other than type B
or E, “Other screen” must be selected even when the required
compensation value is “0” (no compensation required). For F5
cameras, compensate using Custom Setting #18 on the camera body.
For F4-Series cameras, compensate using the Exposure Compensation
Dial for the focusing screen.
See user’s manual of the camera body for more details.
Blank box means not applicable. Since type M screen can be used for both
macro photography at a magnification ratio of 1:1 or above and for
photomicrography, it has different applications than other screens.
En
25
Page 26

■ Important
•For F5 cameras, only EC-B, EC-E, B, E, J, A, L focusing screens are usable in
Matrix Metering.
•When using the B and E focusing screens in cameras other than those
listed above, refer to the columns for the B and E screens.
En
13. Lens care
•Clean the lens surfaces with a blower brush. To remove dirt and smudges,
use a soft, clean cotton cloth or lens tissue moistened with ethanol
(alcohol) or lens cleaner. Wipe in a circular motion from center to outer
edge, taking care not to leave traces or touch other parts of the lens.
•Never use thinner or benzene to clean the lens as this might damage it,
result in a fire, or cause health problems.
•To protect the front lens element, an NC filter is available. A lens hood 1
also helps protect the front of the lens.
•When storing the lens in its lens case, attach both front and rear caps.
•When the lens will not be used for a long time, store it in a cool, dry place
to prevent mold. Also store the lens away from direct sunlight or chemicals
such as camphor or naphthalene.
•Do not get water on the lens or drop it in water as this will cause it to rust
and malfunction.
•Reinforced plastic is used for certain parts of the lens. To avoid damage,
never leave the lens in an excessively hot place.
14. Standard accessories
•62mm snap-on front lens cap LC-62 • Rear lens cap
• Bayonet hood HB-38 • Flexible lens pouch CL-1020
15. Optional accessories
•62mm screw-in filters
•AF-S Teleconverters* TC-14EII/TC-17EII/TC-20EIII can be used.
*Autofocus operation is not possible. (VR and AE functions are available.)
26
Page 27

16. Incompatible accessories
• Auto Ring BR-4 and all models of Auto Extension Ring PK, K Ring and
Bellows focusing attachment.
Other accessories may not be suitable for use with this lens. For details,
carefully read your accessories user’s manual.
17. Specifications
Type of lens: G-type AF-S Micro-Nikkor lens with built-in CPU
Focal length: 105mm
Maximum aperture: f/2.8
Lens construction: 14 elements in 12 groups (1 ED and some Nano
Picture angle: 23°20’ with 35 mm (135) format Nikon film-SLR
Reproduction ratio scale
Distance information: Output to camera body
Focusing: Nikon Internal Focusing (IF) system (utilizing an
Focusing limit switch: Provided; two ranges available: Full (∞-0.314m)
Vibration reduction: Lens-shift method using voice coil motors (VCMs)
Shooting distance scale:
Closest focus distance:
No. of diaphragm blades:
Diaphragm: Fully automatic
Aperture range: f/2.8 to f/32
Exposure measurement:
Attachment size: 62mm (P = 0.75mm)
and Nikon bayonet mount
Crystal Coat-deposited lens elements)
cameras and Nikon FX format digital SLR cameras
15°20’ with Nikon DX format digital SLR cameras
18°40’ with IX240 system cameras
: 1:10 to 1:1 (life-size)
internal Silent Wave Motor); manually via
separate focus ring
or ∞-0.5m
Graduated in meters and feet from 0.314m (1 ft) to
infinity (∞)
0.314m (1 ft) from focal plane (life-size)
9 pcs. (rounded)
Via full-aperture method
En
27
Page 28

Dimensions: Approx. 83mm dia. x 116mm (extension from the
Weight: Approx. 750g (26.5 oz)
Specifications and designs are subject to change without any notice or
En
obligation on the part of the manufacturer.
camera’s lens mount flange)
28
Page 29

En
29
Page 30

Hinweise für sicheren Betrieb
ACHTUNG
Nehmen Sie das Objektiv nicht auseinander
Beim Berühren der Innenteile von Kamera oder Objektiv droht Verletzungsgefahr.
Überlassen Sie Reparaturen unbedingt ausschließlich qualifizierten Technikern. Kommt es
durch einen heftigen Stoß (z. B. Fall auf den Boden) zu einem Bruch von Kamera oder
Objektiv, so trennen Sie zunächst das Produkt vom Stromnetz bzw. entnehmen die
Batterie(n) und geben es dann an eine autorisierte Nikon-Servicestelle zur Überprüfung ab.
Schalten Sie die Kamera bei einer Fehlfunktion sofort aus
Entnehmen Sie bei Entwicklung von Rauch oder ungewöhnlichem Geruch durch Kamera
De
oder Objektiv sofort die Akkus/Batterien. Gehen Sie dabei vorsichtig vor, denn es
besteht Verbrennungsgefahr. Bei einem Weiterbetrieb unter diesen Umständen droht
Verletzungsgefahr. Geben Sie das Gerät nach Entnahme der Akkus/Batterien bzw. nach
Trennung vom Netzadapter an eine autorisierte Nikon-Servicestelle zur Überprüfung ab.
Verwenden Sie Kamera oder Objektiv nicht in der Nähe von
brennbarem Gas
In der Nähe von brennbarem Gas sollten Sie niemals elektronische Geräte in Betrieb
nehmen. Es besteht Explosions- und Brandgefahr.
Schauen Sie niemals durch Objektiv oder Sucher in die Sonne
Beim Betrachten der Sonne oder anderer starker Lichtquellen durch Objektiv oder
Sucher droht eine permanente Schädigung des Sehvermögens.
Achten Sie darauf, dass Kamera und Zubehör nicht in die Hände
von Kindern gelangen
Es ist unbedingt dafür zu sorgen, dass Kleinkinder keine Batterien oder andere kleine
Teile in den Mund nehmen können.
Beachten Sie beim Umgang mit Kamera und Objektiv unbedingt
die folgenden Vorsichtmaßnahmen:
• Halten Sie Kamera oder Objektiv stets trocken. Andernfalls droht Brand- oder
Stromschlaggefahr.
• Handhaben oder berühren Sie die Komponente keinesfalls mit nassen Händen.
Andernfalls droht Stromschlaggefahr.
• Achten Sie bei Gegenlichtaufnahmen darauf, dass sich die Sonne nicht im Bildfeld
befindet. Das Sonnenlicht könnte in gebündelter Form in das Objektivgehäuse
geleitet werden und einen Brand verursachen. Auch wenn sich die Sonne zu nahe
am Bildfeld befindet, kann es zu einem Brand kommen.
• Bringen Sie vor einem längeren Nichtgebrauch des Objektivs den vorderen und
hinteren Deckel an und bewahren das Objektiv geschützt vor direkter
Sonnenlichteinwirkung auf. Andernfalls droht Brandgefahr wegen möglicher
Fokussierung von Sonnenlicht auf Gegenstände.
30
Page 31

( )
Kameras
Bildstabilisator (VR)
Autofokus
Belichtungssteuerung
P*1SAM
Nikon Digital-SLR-Kameras (Nikon
FX/DX-Format)
F6, F5, F100, F80-Serie,
F75-Serie, F65-Serie
Pronea 600i, Pronea S*
2
F4-Serie, F90X, F90-Serie,
F70-Serie
F60-Serie, F55-Serie, F50-Serie,
F-401x, F-401s, F-401
F-801s, F-801,
F-601M
F3AF, F-601, F-501
Nikon MF Kameras
(außer F-601
M)
Funktion
: Möglich : Nicht möglich
Nomenklatur
1 Gegenlichtblende (S.37)
2 Montagemarkierung der
Gegenlichtblende (S.37)
3 Kontrollmarkierung der
Gegenlichtblende (S.37)
4 Montagemarkierung für
Gegenlichtblende (S.37)
5 Entfernungseinstellring (S.33)
6 Entfernungsskala
7 Montagemarkierung
: Seitennummer
9 CPU-Kontakte (S.32)
! Fokusschalter (S.33)
" Schalter für Fokusbegrenzung
(S.33)
# Schalter für Bildstabilisator (VR)
(S.34)
$ Skala für Abbildungsmaßstab (S.35)
% Tiefenschärfemarkierungen (S.35)
& Markierung für Entfernungsskala
(S.35)
8 Dichtungsmanschette (S.33)
Verwendbare Kameras und verfügbare Funktionen
Möglicherweise gibt es hinsichtlich der verfügbaren Funktionen Einschränkungen.
Informationen hierzu finden Sie im Benutzerhandbuch zu Ihrer Kamera.
De
*1 P schließt die Automatik (AUTO) und Motivprogramme mit ein.
*2 Manuelle Belichtungssteuerung (M) nicht möglich.
• Wenn Sie dieses Objektiv mit einer Kamera verwenden, die die Bildstabilisatorfunktion (VR)
nicht unterstützt, sollten Sie den Schalter für den Bildstabilisator # am Objektiv auf [OFF]
stellen. Insbesondere bei der Kamera Pronea 600i wird die Batterie u. U. schnell erschöpft,
wenn der Schalter sich in der [ON]-Stellung befindet.
31
Page 32

1. Einführung
Vielen Dank für das Vertrauen in Nikon-Technik. Das AF-S VR Micro-Nikkor 105mm
f/2,8G IF-ED ist ein Hochleistungs-Mikroobjektiv mit Bildstabilisator (VR2) und
schneller Innenfokussierung (IF). Außerdem verfügt es über einen Silent Wave Motor (S)
für einen leisen, präzisen Fokusantrieb.
■ Die wichtigsten Merkmale
• Bei Abbildungsverhältnis zwischen unendlich (∞) und 1:30 ermöglicht der
Bildstabilisator (VR2) verwacklungsfreie Aufnahmen mit um bis zu vier
Lichtwertstufen* längeren Verschlusszeiten als beim Fotografieren ohne VR-Technik,
was den Bereich der verfügbaren Verschlusszeitoptionen erweitert und Aufnahmen
De
ohne Stativ erheblich vereinfacht. (*unter Nikon-Testbedingungen; der Ausmaß des
Effekts des Bildstabilisators ist abhängig vom Fotografen und den
Aufnahmebedingungen.)
• Der Bildstabilisator unterscheidet automatisch zwischen Verwacklung und
absichtlichen Schwenkbewegungen, sodass das Objektiv bei Kameraschwenks
diesen nicht fälschlicherweise entgegenwirkt.
• Der Fokusschalter gestattet das Umschalten zwischen Autofokus (A) und manuellem
Fokus (M).
• Auch wenn der Autofokus aktiviert ist, können Sie jederzeit manuell eingreifen
(Priorität der manuellen Scharfeinstellung).
• Das Objektiv überträgt die eingestellte Entfernung an die Kamera und ermöglicht so
eine präzisere Belichtungssteuerung (3D-Matrixmessung).
• Eine ED-Glaslinse (Extra-low Dispersion) garantiert scharfe Bilder, die praktisch frei
von Farbsaumbildung sind. Die Irisblende mit 9 Lamellen und einer nahezu
kreisrunden Öffnung sorgt für eine natürlich wirkende Unschärfe in Vorder- und
Hintergrund.
• Die auf bestimmten Linsen angebrachte Nanokristallvergütung sorgt für klare,
brillante Bilder bei allen Bedingungen – von Außenaufnahmen bei Sonnenlicht bis
hin zu Innenaufnahmen mit Spitzlichtern.
■ Wichtige Hinweise
• Halten Sie die CPU-Kontakte 9 sauber und schützen Sie sie vor Beschädigung.
• Bei Verwendung des TC-20E/TC20EII/TC-20EIII ist der höchste verfügbare
Blendenwert (kleinste Blende) 90.
• Bei Verwendung des Objektivs mit einer digitalen Nikon-Spiegelreflexkamera
(DX-Format) beträgt der Bildwinkel 15°20’. Dies entspricht dem Bildwinkel eines
Objektivs mit einer Brennweite von ca. 157,5 mm an einer Kleinbildkamera.
• Bei einer Beschädigung der Dichtungsmanschette 8 sollten Sie das Objektiv beim
nächsten Nikon-Vertragshändler bzw.bei einer Nikon-Reparaturwerkstatt zur
Reparatur abgeben.
32
Page 33

• An der Vorderseite des Objektivs können bis zu vier Slave-Blitzgeräte vom Typ
Fokussteuerung (Objektiv)
Kameras
MM/A
Manueller Fokus
(mit elektronischer
Einstellhilfe)
Manueller Fokus
(mit elektronischer Einstellhilfe;
keine Einstellhilfe bei F-601
M)
Manueller Fokus
(mit elektronischer Einstellhilfe)
Autofokus mit
Priorität der man.
Scharfeinstellung
Fokussteuerung
(Kamera)
AF
MF
AF
MF
Nikon Digital-SLR-Kameras (Nikon FX/DXFormat), F6, F5, F4-Serie, F100, F90X,
F90-Serie, F80-Serie, F75-Serie, F70-Serie,
F65-Serie, Pronea 600i, Pronea S
F55-Serie, F60-Serie, F50-Serie,
F-801s, F-801, F-601
M, F-401x,
F-401s, F-401
SB-R200 angebracht werden.
2. Fokussteuerung
Wählen Sie anhand der folgenden Tabelle eine von der Kamera unterstützte
Fokussteuerung:
■ Autofokus mit Priorität der manuellen Scharfeinstellung (M/A-Modus)
1 Stellen Sie den Fokusschalter ! auf [M/A].
Hinweis: Dabei muss der Schalter so eingestellt sein, dass die
2 Bei dieser Einstellung ist der Autofokus-Modus zwar aktiviert, kann
Markierung genau mit der Aufschrift [M/A] fluchtet.
aber jederzeit durch Drehen des separaten Entfernungseinstellrings
5 und gleichzeitigem Antippen des Auslösers oder der AFStarttaste (AF-ON) an Kamera deaktiviert werden.
3 Drücken Sie den Auslöser bis zum ersten Druckpunkt oder die
AF-Start-Taste der Kamera, wenn Sie nicht mehr manuell in die
Fokussierung eingreifen wollen. Daraufhin schaltet die Kamera
auf Autofokus-Modus zurück.
■ Begrenzung des Autofokusbereichs
(Nur bei AF-Kameras, die mit AF-S-Nikkoren kompatibel sind.)
Bei Motiven, die mindestens 0,5 m entfernt sind, können Sie die für das automatische
Fokussieren benötigte Zeit verringern, indem Sie den Schalter für die Fokusbegrenzung
" auf [∞-0.5m] stellen.
Hinweis: Dabei muss der Schalter so eingestellt sein, dass die Markierung genau mit
der Aufschrift [∞–0.5m] fluchtet.
• Wählen Sie [FULL], wenn der Abstand zum Motiv geringer ist als 0,5 m.
M/A
FULL
FULL
De
Markierung
M
0.5m
Markierung
0.5m
33
Page 34

3. Bildstabilisator (VR@)
Kameraschwenks
Kameraverwacklungen
Stärke der Vibrationen
Anzahl der Vibrationen
■ Grundlagen des Vibrationsausgleichs
De
■ Die Effekte der Vibrationsreduktion
• Bei Entfernungen zwischen unendlich (∞) und ca. 3 m (Abbildungsmaßstab 1:30)
ermöglicht der Bildstabilisator (VR2) verwacklungsfreie Aufnahmen mit um bis zu
vier Lichtwertstufen* längeren Verschlusszeiten als beim Fotografieren ohne VRTechnik. Bei größeren Abbildungsmaßstäben als 1:30 wirkt sich der Bildstabilisator
weniger stark aus. (*unter Nikon-Testbedingungen; der Ausmaß des Effekts des
Bildstabilisators ist abhängig vom Fotografen und den Aufnahmebedingungen.)
■ Der Schalter für den Bildstabilisator (VR)
1 Stellen Sie den Schalter für den Bildstabilisator
Hinweis: Dabei muss der Schalter so eingestellt sein, dass die
Markierung genau mit der Aufschrift [ON] fluchtet.
2 Wenn der Auslöser bis zum ersten Druckpunkt gedrückt wird,
werden Verwacklungsbewegungen ausgeglichen. Da dies auch
für das Sucherbild gilt, wird die automatische oder manuelle
Fokussierung und die Ausrichtung auf das Motiv erleichtert.
3 Stellen Sie den Schalter # auf [OFF], um den Bildstabilisator zu deaktivieren.
■ Hinweise zur Verwendung des Bildstabilisators
• Warten Sie, bis sich das Bild im Sucher stabilisiert hat, bevor Sie den Auslöser nach
kurzem Antippen ganz herunterdrücken.
• Wenn Sie die Kamera in einem weiten Bogen bewegen (z. B. bei einem
Kameraschwenk), sind Vibrationen in die Richtung dieser Bewegung nicht betroffen.
Wenn Sie die Kamera z. B. horizontal schwenken, werden nur vertikale Vibrationen
reduziert, sodass gleichmäßige Kameraschwenks möglich werden.
• Aufgrund der Eigenschaften des Bildstabilisators kann das Sucherbild nach dem
Auslösen des Verschlusses leicht unscharf erscheinen. Dies ist kein Anzeichen für
eine Gerätestörung.
#
auf [ON].
ON
Markierung
OFF
34
Page 35

• Schalten Sie die Kamera nicht aus und nehmen Sie das Objektiv nicht ab, solange
der VR-Modus eingeschaltet ist. (Andernfalls erzeugt das Objektiv u. U. ein
klapperndes Geräusch, wenn es bewegt wird. Dies ist keine Fehlfunktion. Schalten
Sie die Kamera wieder ein und die VR-Funktion aus.)
• Bei Kameras mit integriertem Blitzgerät funktioniert der Bildstabilisator nicht,
solange das integrierte Blitzgerät geladen wird.
•Stellen Sie den Schalter
benutzen. Wenn Sie dagegen ein Stativ ohne verriegelten Stativkopf oder ein
Einbeinstativ verwenden, stellen Sie den Schalter auf [ON].
#
für den Bildstabilisator auf [OFF], wenn Sie ein Stativ
4. Tiefenschärfe
Neben der Markierung für die Entfernungsskala & sind Markierungen für die
Tiefenschärfe % eingraviert. Bei sehr kurzen Aufnahmeabständen ist die Tiefenschärfe
allerdings so gering, dass es sich empfiehlt, die Werte der Tiefenschärfetabelle (auf
Seite 126) zu entnehmen. Wenn lhre Kamera über eine Abblendtaste oder einen
Abblendhebel verfügt, können Sie die Tiefenschärfe im Sucher kontrollieren.
5. Voreinstellung des Abbildungsmaßstabs
Als Abbildungsmaßstab bezeichnet man das Verhältnis der Größe eines
aufgenommenen Objekts und der Größe dessen Bildes auf dem Film/Bildsensor. Ein
Abbildungsmaßstab von 1:5 bedeutet beispielsweise, dass die Abbildung ein Fünftel
der Größe des Motivs aufweist.
Um Aufnahmen mit einem vorbestimmten Abbildungsmaßstab zu erstellen, gehen sie
wie folgt vor:
1 Stellen sie den Scharfeinstellring per Hand so ein, dass der gewünschte
Abbildungsmaßstab $ der Markierung für die Entfernungseinstellung &
gegenübersteht.
2 Richten Sie die Kamera auf das Motiv, und bewegen Sie sich anschließend mitsamt
der Ausrüstung vom Motiv weg oder zu ihm hin, bis das Bild im Sucher scharf
erscheint.
Die Abbildungsmaßstäbe, die sich aus den jeweiligen Entfernungseinstellungen
ergeben, können sie der Tabelle auf Seite 126 entnehmen.
De
35
Page 36

6. Hinweise für Nahaufnahmen und Duplikationen
Vorsatzlinse Abbildungsmaßstab Motivfeld (cm) Eingestellte Entfernung (cm)
No. 5T 1:6,3 bis 1,22
15,0 × 22,5
bis
1,97 × 2,95
82,4 bis 28,1
No. 6T 1:3,3 bis 1,44
8,0 × 12,0
bis
1,67 × 2,5
49,8 bis 26,1
No. 5T + 6T 1:2,2 bis 1,65
5,24 × 7,86
bis
1,45 × 2,18
38,1 bis 24,3
Das AF-S VR Micro-Nikkor 105 mm f/2,8G IF-ED ermöglicht überdurchschnittlich große
Abbildungsmaßstäbe, sodass selbst geringste Bewegungen während der Aufnahme
Verwacklungsunschärfe verursachen könnten. Die Kamera sollte deshalb auf ein Stativ
gesetzt und mit einem Draht- oder Fernauslöser bedient werden.
Geringe Aufnahmeabstände
Bei der Makrofotografie mit ihren hohen Abbildungsmaßstäbe ist die Tiefenschärfe
besonders eng begrenzt. Blenden Sie ab, um eine größere Tiefenschärfe zu erreichen,
und richten Sie die Kamera sorgfältig so aus, dass die wichtigsten Motivdetails in einer
Schärfeebene liegen.
De
• Bei Einsatz einer Vorsatzlinse ist manuelle Scharfeinstellung erforderlich.
7. Belichtungsfaktor
Die Blendenzahl eines Objektivs gibt an, wie hell das vom Objektiv erzeugte Bild bei
Aufnahmeentfernung “unendlich” ist. Je größer das Abbildungsverhältnis, desto
geringer die Bildhelligkeit. Die tatsächliche Helligkeit des Bilds kennzeichnet die so
genannte “effektive Blendenzahl”, und die Belichtungskorrektur für die Änderung der
effektiven Blendenzahl wird als “Belichtungsfaktor” bezeichnet.
8. Variation der effektiven Blendenzahl (S. 124)
Bei diesem Objektiv nimmt die Bildhelligkeit in der Filmebene (oder an der
Bilderfassungskomponente) mit zunehmendem Abbildungsverhältnis ab, während die
effektive Blendenzahl (der Lichteinfall durch die Objektivöffnung nimmt ab) größer
wird. Diese Variation wird automatisch von dem Belichtungsmesser der Kamera
kompensiert, sodass der Benutzer die Belichtung bestimmen oder TTL-Blitzaufnahmen
ohne Berücksichtigung des Belichtungsfaktors machen kann.
Die auf dem LCD-Display oder Sucher der Kamera angezeigte Blendenzahl ist der
automatisch kompensierte Wert.
36
Page 37

9. Blendeneinstellung
Stellen Sie die Blende an der Kamera ein. Ist der Belichtungsmodus (oder
Aufnahmemodus) auf “A” eingestellt (Zeitautomatik) oder auf “M” (manuelle
Einstellung), stellt die Kamera die Öffnungsblende so ein, dass die gewählte
Blendezahl (bis zu etwa 1,6 Stufen) beibehalten wird, wobei sich die effektive
Blendenzahl mit der Aufnahmeentfernung ändert.
10. Verwenden der Bajonett-Gegenlichtblende HB-38
■ Anbringen der Gegenlichtblende
Richten Sie die Montagemarkierungen an Objektiv
und Gegenlichtblende ( ) 2 aneinander aus und
drehen Sie die Gegenlichtblende 1 im Uhrzeigersinn,
bis sie hörbar einrastet.
• Stellen Sie sicher, dass die Kontrollmarkierung ( ) 3
mit der Montagemarkierung am Objektiv 4 fluchtet.
• Wenn die Gegenlichtblende falsch angebracht ist, kann es
zu Vignettierung (Abschattungen an den Bildrändern)
kommen.
• Halten Sie die Gegenlichtblende zum Anbringen oder
Abnehmen an ihrer Basis fest, nicht am vorderen Rand.
• Die Gegenlichtblende kann zum Verstauen in umgekehrter
Position an das Objektiv angesetzt werden.
■ Abnehmen der Gegenlichtblende
Halten Sie die Gegenlichtblende an der Basis (nahe der Montagemarkierung) und
drehen Sie sie gegen den Uhrzeigersinn.
2 3 4
4
11. Blitzaufnahmen mit dem integrierten Blitzgerät
Verwenden Sie beim Fotografieren mit Einsatz des integrierten Blitzgeräts keine
Gegenlichtblende 1. Andernfalls kann es zu Abschattungen im unteren Bereich des
Bildes kommen.
De
37
Page 38

12. Empfohlene Einstellscheiben
AB CE
EC-BFG1
G3 G4 J K L M P U
EC-E G2
F6
F5+DP-30
F5+DA-30
F4+DP-20
F4+DA-20
Einstellscheibe
Kamera
Für bestimmte Nikon-Kameras stehen verschiedene auswechselbare Einstellscheiben
zur Verfügung, um jeder Aufnahmesituation gerecht zu werden. Die für dieses Objektiv
empfohlenen werden in der Tabelle aufgeführt.
De
: Hervorragende Scharfeinstellung
: Akzeptable Scharfeinstellung
Das Sucherbild vignettiert leicht. Die Aufnahme selbst bleibt hiervon unberührt.
—
: Nicht möglich
( )
: Zeigt den Betrag zusätzlich erforderlicher Belichtungskorrektur (Nur
mittenbetonte Belichtungsmessung). Wählen Sie bei der F6 für die
Individualfunktion »b6: Einstellscheibe« die Option »Andere«, um die
Belichtungskorrektur in halben Lichtwertschritten zwischen -2,0 und +2,0 LW
einzustellen. Bei Gebrauch von anderen Scheiben als B oder E, ist »Andere«
auch dann zu wählen, wenn keine Belichtungskorrektur erforderlich ist
(Korrekturwert »0«). Bei der F5 dient die Individualfunktion Nr. 18 zum
Einstellen des Korrekturwerts. Kameras der F4-Serie verfügen über eine
Belichtungskorrektur-Justierschraube für auswechselbare Sucherscheiben, die
denselben Zweck erfüllt. Näheres hierzu finden Sie im Benutzerhandbuch der
jeweiligen Kamera.
Ein Leerfeld bedeutet: unbrauchbar. Da die Einstellscheibe M sowohl für
Makrofotografie bis zum Abbildungsmaßstab 1:1 oder höher als auch für
Mikrofotografie eingesetzt werden kann, unterscheidet sich ihr Anwendungsbereich
von den anderen Einstellscheiben.
■ Wichtige Hinweise
• Bei F5-Kameras können die Einstellscheiben EC-B, EC-E, B, E, J, A, L nur mit
Matrixmessung verwendet werden.
• Die Spalten für die Scheiben B und E gelten auch bei Verwendung der Scheiben B
und E in anderen als den oben genannten Kameras.
38
Page 39

13. Pflege des Objektivs
• Säubern Sie Glasflächen mit einem Blasepinsel. Entfernen Sie Staub und Flecken mit
einem sauberen, weichen Baumwolltuch oder Optik-Reinigungstuch, das Sie mit
Ethanol (Alkohol) oder Optik-Reinigungsflüssigkeit anfeuchten. Wischen Sie in
kreisförmigen Bewegungen von der Mitte nach außen, ohne Wischspuren
zurückzulassen.
• Verwenden Sie niemals Verdünner oder Benzin zur Reinigung, da dieses zu
Beschädigungen führen, Gesundheitsschäden verursachen oder ein Feuer auslösen
könnte.
• Ein Klarglasfilter (NC) kann als Frontlinsenschutz verwendet werden. Die
Gegenlichtblende 1 wirkt als zusätzlicher Schutz.
• Bei Aufbewahrung des Objektivs in seinem Köcher sollten beide Objektivdeckel
aufgesetzt sein.
• Bei längerer Nichtbenutzung sollte das Objektiv an einem kühlen, trockenen Ort
aufbewahrt werden. Halten Sie das Objektiv von direkter Sonneneinstrahlung und
Chemikalien wie Kampfer oder Naphthalin (Mottenmittel) fern.
• Das Objektiv ist nicht wasserdicht und kann beschädigt werden, wenn es Nässe
ausgesetzt wird.
• Einige Teile des Objektivs bestehen aus verstärktem Kunststoff. Eine Lagerung an
übermäßig heißen Orten kann zur Beschädigung führen.
14. Im Lieferumfang enthaltenes Zubehör
• Aufsteckbarer 62-mm-Objektivfrontdeckel LC-62 • Objektivrückdeckel
• Bajonett-Gegenlichtblende HB-38 • Objektivbeutel CL-1020
15. Optionales Zubehör
• 62-mm-Schraubfilter
• AF-S-Telekonverter* TC-14EII/TC-17EII/TC-20EIII sind verwendbar.
*Autofokusbetrieb ist nicht möglich (VR- Funktion und Belichtungssteuerung werden
unterstützt).
De
16. Nicht kompatibles Zubehör
• Automatikring BR-4, Alle Automatikringe der PK-Reihe, K-Zwischenringe und
Balgengeräte. Anderes Zubehör ist möglicherweise für bestimmte Kameras nicht
geeignet. Lesen Sie sorgfältig das Benutzerhandbuch zu Ihrem Zubehör.
39
Page 40

17. Technische Daten
Objektivtyp: AF-S-Micro-Nikkor mit G-Charakteristik, eingebauter CPU
Brennweite: 105 mm
Lichtstärke: 1:2,8
Optischer Aufbau: 14 Linsen in 12 Gruppen (1 Linsenelement aus ED-Glas und
Bildwinkel: 23°20’ mit Nikon-Film-Spiegelreflexkameras im 35 mm-
De
Skala für den
Abbildungsmaßstab: von 1:10 bis 1:1 (Originalgröße)
Entfernungsdaten: Übermittlung an die Kamera
Fokussierung: Innenfokussierung nach dem Nikon-IF-System (mittels
Schalter für
Fokusbegrenzung: Zwei Wählbereiche: FULL (∞ bis 0,314 m) oder ∞ bis 0,5 m
Bildstabilisator (VR): Linsen-Versatzverfahren mittels Schwingspulenmotoren
Entfernungsskala: Unterteilt in Meter und Fuß, von 0,314 m bis unendlich (∞)
Naheinstellgrenze: 0,314 m von der Sensorebene gemessen
Blende: Irisblende mit 9 gerundeten Lamellen
Blendensteuerung: Vollautomatisch
Blendenbereich: 2,8 bis 32
Belichtungsmessung: Offenblendenmessung
Filtergewinde: 62 mm (P = 0,75 mm)
Abmessungen: ca. 83 x 116 mm (Durchmesser x Länge bis Flansch)
Gewicht: ca. 750 g
und Nikon-F-Bajonett.
einige Linsen mit Nanokristallvergütung)
Format (135) und Digital-Spiegelreflexkameras im NikonFX-Format
15°20’ mit Digital-Spiegelreflexkameras im Nikon-DX-Format
18°40’ mit IX240-Systemkameras
integriertem Silent-Wave-Motor); manuell über separaten
Fokussierring
(VCM)
(Abbildungsmaßstab 1:1)
Irrtümer und Änderungen vorbehalten.
40
Page 41

41
De
Page 42

Remarques concernant une utilisation en toute sécurité
ATTENTION
Ne démontez pas le matériel
Le fait de toucher aux pièces internes de l’appareil ou de l’objectif pourrait entraîner
des blessures. Les réparations doivent être effectuées uniquement par des techniciens
qualifiés. Si l’appareil ou l’objectif est cassé suite à une chute ou un autre accident,
apportez le produit dans un centre de service agréé Nikon pour le faire vérifier après
avoir débranché le produit et/ou retiré l'accumulateur ou les piles.
En cas de dysfonctionnement, éteignez immédiatement
Si vous remarquez de la fumée ou une odeur inhabituelle se dégageant de l’appareil
photo ou de l’objectif, retirez immédiatement l’accumulateur ou les piles, en prenant
soin de ne pas vous brûler. Continuer d’utiliser son matériel peut entraîner des
blessures. Après avoir retiré ou débranché la source d’alimentation, confiez votre
matériel à un centre de service agréé Nikon pour le faire vérifier.
Fr
N’utilisez pas l’appareil photo ou l’objectif en présence de gaz
inflammable
N’utilisez pas de matériel électronique en présence de gaz inflammable car cela risque
de provoquer une explosion ou un incendie.
Ne regardez pas le soleil dans l’objectif ou le viseur
Regarder le soleil ou tout autre source lumineuse violente dans l’objectif ou le viseur
peut provoquer de graves lésions oculaires irréversibles.
Tenez hors de portée des enfants
Faites extrêmement attention à ce que les enfants ne mettent pas à la bouche les
accumulateurs/piles ou d’autres petites pièces.
Observez les précautions suivantes lorsque vous manipulez
l’appareil et l’objectif
• Maintenez l’appareil et l’objectif au sec. Le non-respect de cette précaution peut
provoquer un incendie ou une électrocution.
• Ne manipulez pas et ne touchez pas le matériel avec les mains humides. Le nonrespect de cette précaution peut provoquer une électrocution.
• Lorsque vous photographiez à contre-jour, laissez le soleil hors du champ.
Les rayons du soleil peuvent se focaliser dans l'objectif et provoquer un incendie.
Lorsque le soleil est proche du centre de la vue, il peut également provoquer un
incendie.
• Lorsque vous n’utilisez pas l’objectif pendant une longue période, fixez les bouchons
avant et arrière et rangez l’objectif à l’abri de la lumière directe du soleil. Le nonrespect de cette précaution peut provoquer un incendie, car l’objectif peut
concentrer la lumière du soleil sur un objet.
42
Page 43

Nomenclature
Appareil
Mode d’exposition
P*1SAM
○ ○ ○ ○ ○ ○
× ×
○ ○ ○ ○ ○ ○
× ○ ○ ○ ○ ○
×
○
○ ○ × ×
○ ○ ○ ○
× × ○ ○ × ×
× × × × × ×
Fonction
: Possible : Impossible
Réduction de
vibration
Autofocus
Reflex numériques Nikon
(format Nikon FX/DX)
F6, F5, F100, série F80, série F75, série F65
Pronea 600i, Pronea S*
2
Série F4, F90X, série F90, série F70
Série F60, série F55, série F50, F-401x,
F-401s, F-401
F-801s, F-801, F-601
M
F3AF, F-601, F-501,
appareils MF Nikon (sauf F-601
M
)
1 Parasoleil (p.49)
2 Repère de fixation du parasoleil (p.49)
3 Repère de réglage du parasoleil (p.49)
4 Repère de montage du parasoleil (p.49)
5 Bague de mise au point (p.45)
6 Échelle des distances
7 Repère de montage
8 Joint en caoutchouc de l’objectif
(p.45)
9 Contacts électroniques (p.44)
( ): Page de référence
" Commutateur limiteur de mise au
point (p.45)
# Commutateur ON/OFF (MARCHE/
ARRÊT) de réduction de vibration
(p.46)
$ Échelle des rapports de reproduction
(p.47)
% Échelle de profondeur de champ
(p.47)
& Ligne de repère des distances (p.47)
! Commutateur de mode de mise
au point (p.45)
Appareils utilisables et fonctions disponibles
Il peut y avoir des restrictions et des limites pour les fonctions disponibles. Consultez le
manuel d’utilisation de l’appareil pour obtenir les détails.
Fr
*1 P inclut AUTO (Programme à usage général) et le système Vari-programme.
*2 Manuel (M) n’est pas disponible.
• Si vous utilisez cet objectif avec des appareils photo non compatibles avec la
réduction de vibration, mettez le commutateur ON/OFF (MARCHE/ARRÊT) # sur
[OFF]. Avec le Pronea 600i, en particulier, les piles peuvent se vider rapidement si le
commutateur est sur [ON].
43
Page 44

1. Introduction
Merci d’avoir acheté l’objectif AF-S VR Micro-Nikkor 105mm f/2.8G IF-ED. C'est un
objectif Micro de haute performance possédant un système de réduction de vibration
nouvelle génération (VR2) ainsi que des mécanismes de mise au point interne (IF) de
grande vitesse. Il utilise aussi un moteur silencieux SWM (Silent Wave Motor) pour piloter
le mécanisme de mise au point.
■ Principales caractéristiques
• Avec un rapport de l’infini (∞) à 1/30x, vous pouvez prendre des photos à des
vitesses d’obturation d’environ 4 valeurs* inférieures à cells normalement utilisées,
ce qui étend la plage des vitesses d’obturation disponibles et rend la prise de vue
sans trépied plus facile. (*Dans les conditions de mesures de Nikon. Les effets de la
réduction de vibration varient en fonction des personnes et des conditions de prise
de vue.)
• Le panoramique filé est également possible car l’objectif distingue automatiquement
le panoramique filé du bougé de l’appareil. La réduction de vibration fonctionne
Fr
donc de façon efficace.
• Les modes autofocus (A) et manuel (M) sont facilement sélectionnables avec le
commutateur de mode de mise au point.
• Un mode autofocus avec priorité manuelle est disponible et permet de passer
immédiatement de l’autofocus à la mise au point manuelle.
• Un contrôle d’exposition plus précis est possible quand cet objectif est monté sur un
appareil Nikon à mesure matricielle 3D, parce que l’information de distance au sujet
est transférée de l’objectif au boîtier.
• L’utilisation d’une lentille ED (dispersion extra faible) assure des images nettes
virtuellement exemptes d’aberration chromatique. De plus, en utilisant un
diaphragme à 9 lamelles qui produit une ouverture quasi circulaire, les objets non
mis au point à l’avant ou à l’arrière du sujet sont estompées agréablement.
• Le traitement nanocristal appliqué à certaines lentilles permet de reproduire des
images détaillées et nettes quelles que soient les conditions de prise de vue, des
scènes d'extérieur ensoleillées à celles d'intérieur en éclairage artificiel.
■ Important
• Veillez à ne pas salir ni endommager les contacts électroniques 9.
• Avec le TC-20E/TC-20EII/TC-20EIII monté, l’ouverture minimale est limitée à f/90.
• Lorsqu’il est monté sur les reflex numériques Nikon (format Nikon DX) telles les série
D300 et D7000, le champ angulaire de l’objectif devient 15°20’ et la focale
équivalente en 24 × 36 mm est d’environ 157,5 mm.
• Si le joint en caoutchouc de l’objectif 8 est endommagé, rendez-vous chez votre
revendeur ou dans le centre de réparations agréé Nikon le plus proche pour réaliser
les réparations nécessaires.
44
Page 45

• Au total, quatre flashes asservis sans câble SB-R200 peuvent être montés à l’avant
Mode de mise au point de l’objectif
Appareil
MM/A
Mise au point manuelle
(assistance à la mise
au point disponible)
Mise au point manuelle
(l’assistance à la mise au point est
disponible, sauf avec le F-601
M)
Mise au point manuelle
(assistance à la mise au point disponible)
Autofocus avec
priorité manuelle
Reflex numériques Nikon (format
Nikon FX/DX), F6, F5, série F4, F100,
F90X, série F90, série F80, série F75,
série F70, série F65, Pronea 600i,
Pronea S
Série F55, série F60, série F50,
F-801s, F-801, F-601
M, F-401x,
F-401s, F-401
Mode de mise au point
de l’appareil
AF
MF
AF
MF
de l’objectif.
2. Mise au point
Réglez le sélecteur du mode de mise au point de l’appareil conformément à ce tableau :
■ Autofocus avec priorité manuelle (Mode M/A)
1 Réglez le commutateur de mode de mise au point ! sur [M/A].
Remarque : Assurez-vous de régler le commutateur de sorte que
2 Cela permet la mise au point automatique, mais il est possible
d’utiliser la priorité manuelle en agissant sur la bague de mise au
point 5 manuelle séparée tout en appuyant légèrement sur le
déclencheur ou la commande d'activation de l’AF (AF-ON) sur l’appareil.
3 Pour annuler la commande manuelle, appuyez de nouveau légèrement sur le
déclencheur ou la commande d'activation de l’AF de l’appareil. Ceci remettra
l’appareil photo en mode autofocus.
■ Pour limiter la plage de l'autofocus
(Seulement pour les appareils AF compatibles avec les objectifs
AF-S Nikkor)
Avec le fonctionnement AF, si le sujet est toujours à plus de
0,5 m, placez le commutateur limiteur de mise au point " sur
[∞–0,5 m] pour réduire le délai de mise au point.
Remarque : Assurez-vous de régler le commutateur de sorte que l’indicateur s’aligne
• Si le sujet est parfois à 0,5 m ou moins, placez le commutateur sur [FULL] (PLEIN).
l’indicateur s’aligne précisément sur [M/A].
précisément sur [∞–0.5m].
M/A
FULL
FULL
Fr
Indicateur
M
0.5m
Indicateur
0.5m
45
Page 46

3. Mode réduction de vibration (VR@)
Panoramiques filés
Bougé de l’appareil
Nombre de vibrations
Force des vibrations
■ Concept de base du système de réduction de vibration
■ Les effets de la réduction de vibration
• Lorsque le sujet est situé de l’infini (∞) à environ 3m de distance (avec un rapport de
Fr
1/30x), et que vous utilisez un objectif VR2, vous pouvez prendre des photos à des
vitesses d’obturation d’environ 4 valeurs* inférieures à celles normalement utilisées.
Comme le rapport augmente depuis 1/30x, les effets de la réduction de vibration
diminuent graduellement. (*Dans les conditions de mesures de Nikon. Les effets de
la réduction de vibration varient en fonction des personnes et des conditions de prise
de vue.)
■ Réglage du commutateur ON/OFF de la réduction de vibration
1 Réglez le commutateur ON/OFF de réduction de vibration #
sur [ON].
Remarque : Assurez-vous de régler le commutateur de sorte que
l’indicateur s’aligne précisément sur [ON].
2 La vibration est réduite lorsque vous appuyez légèrement sur le
déclencheur. Comme la vibration est réduite dans le viseur, la mise au point
auto/manuelle et le cadrage précis du sujet sont facilités.
3 Pour annuler le mode de réduction de vibration, réglez le commutateur
ON/OFF de réduction de vibration # sur [OFF].
■ Remarques concernant la mode réduction de vibration
• Attendez que l’image se stabilise dans le viseur avant d’appuyer à fond sur le
déclencheur après l’avoir légèrement enfoncé.
• Si vous déplacez l’appareil en décrivant une courbe pendant le panoramique filé, la
vibration dans la direction du mouvement ne sera pas affectée. Si vous déplacez
latéralement et horizontalement l’appareil, seule la vibration verticale est réduite, ce
qui facilite la réalisation de panoramiques filés.
46
ON
Indicateur
OFF
Page 47

• En raison des caractéristiques du mécanisme de réduction de vibration, l’image dans
le viseur peut devenir légèrement floue une fois que le déclencheur est relâché. Il ne
s’agit pas d’un dysfonctionnement.
• Ne mettez pas l’appareil hors tension et n’ôtez pas l’objectif de l’appareil quand le
mode de réduction de vibration est activé. (Sinon, l’objectif risque d’émettre un
claquement si l’appareil est secoué. Il ne s’agit pas d’une anomalie. Remettez
l’appareil sous tension pour éliminer ce cliquetis.)
• Avec des appareils photo équipés d'un flash intégré, la réduction de vibration ne
fonctionne pas lorsque ce dernier se recharge.
• Lorsque l’objectif est monté sur un pied, placez le commutateur ON/OFF (MARCHE/ARRÊT)
de réduction de vibration # sur [OFF]. Néanmoins, lorsque vous utilisez un pied sans fixer
la tête ou lorsque vous utilisez un monopode, placez le commutateur sur [ON] (MARCHE).
4. Profondeur de champ
Les échelles de profondeur de champ % sont gravées à côté de ligne de repère des
distances &. Lors de prises de vue très rapprochées, Ia profondeur de champ est si faible
qu’il vaut mieux se reporter au tableau de profondeur de champ (page 126). Si votre boîtier
comporte la commande/ le poussoir de contrôle de profondeur de champ, ou le levier de
contrôle de profondeur de champ, vous pouvez tester la profondeur de champ dans le viseur.
5. Mise au point à un rapport prédéterminé
Le rapport de reproduction est le rapport entre la dimension de l’image enregistrée sur
le film et la dimension réelle du sujet. Si par exemple l’image de visée représente le
cinquiéme du sujet, on dit que le rapport de reproduction est de I :5.
Pour photographier à un rapport de reproduction donné, utilisez la procédure suivante :
1 Tournez la bague de mise au point jusqu’a ce que le nombre désiré sur l’échelle de
rapport de reproduction $ soit aligné avec la ligne de repère des distances &.
2 Visez le sujet, puis changez de place, s’en rapprocher ou s’en éloigner, jusqu’à ce
que l’image dans le viseur soit partaitement au point.
Pour obtenir le rapport de reproduction adapté à chaque distance de mise au point,
consultez le tableau de la page 126.
6. Conseils pour la macrophotographie et les travaux
de duplication
Le bougé
Le AF-S VR Micro-Nikkor 105 mm f/2.8G IF-ED a un tel grossissement de l’image que le
moindre rnouvement pendant la prise de vue donnera un cliché flou. Pour éviter ceci, placez
l’appareil photo sur un pied et utilisez un déclencheur souple ou un câble de télécommande.
Fr
47
Page 48

Les plans très rapprochés
Accessoires macro
Rapport de reproduction
Champ couvert (cm)
Distance de mise au point (cm)
No. 5T 1/6,3–1,22 15,0 × 22,5–1,97 × 2,95 82,4–28,1
No. 6T 1/3,3–1,44 8,0 × 12,0–1,67 × 2,5 49,8–26,1
No. 5T + 6T 1/2,2–1,65 5,24 × 7,86–1,45 × 2,18 38,1–24,3
Du fait des grossissements importants rencontrés en macrophotographie, on manque
énormément de profondeur de champ. On peut l’améliorer en diaphragmant, mais on
doit placer le boîtier de telle sorte que les plans les plus importants du sujet se
trouvent dans la même zone de netteté.
• Utilisez la mise au point manuelle lorsque vous utilisez un objectif macro.
7. Facteur d’exposition
Fr
La valeur f d’ouverture d’un objectif indique la luminosité de l’image résultant de
l’objectif réglé sur une distance de prise de vue “infinie”. Plus le taux de reproduction
est élevé, plus la luminosité de l’image diminue. La luminosité réelle de l’image est ce
qu’on appelle le “la valeur f efficace d’ouverture”, et la valeur de correction
d’exposition pour le changement de la valeur f efficace d’ouverture est appelée
“facteur d’exposition”.
8. Variation de la valeur f efficace d’ouverture (page 124)
Avec cet objectif, plus le taux de reproduction est élevé, plus la luminosité de l’image
sur le film (dispositif de capture d’image) diminue et la valeur f efficace d’ouverture
augmente (la quantité de lumière qui passe à travers l’ouverture de l’objectif diminue).
Cette variation est automatiquement compensée par le contrôleur d’exposition de
l’appareil photo, de sorte que l’utilisateur peut déterminer l’exposition et faire de la
prise de vue au FLASH TTL sans avoir à prendre en considération le facteur
d’exposition.
La valeur f d’ouverture affichée sur l’écran ACL de l’appareil photo ou dans le viseur
est la valeur corrigée automatiquement.
48
Page 49

9. Réglage de l’ouverture
2 3 4
Réglez l’ouverture sur le boîtier. Lorsque le mode d’exposition (ou de prise de vue) est
réglé sur “A” (Priorité d’ouverture automatique) ou “M” (manuel), l’appareil photo
effectue un contrôle pour maintenir la valeur f d’ouverture prédéterminée (jusqu’à env.
1,6 diaphragme) quand la valeur f efficace d’ouverture varie avec la distance de prise
de vue.
10. Utilisation d’un parasoleil à baïonnette HB-38
■ Fixation du parasoleil
Alignez le repère de fixation ( )
parasoleil (l’un des deux repères) avec le repère de
montage 4 situé sur l’objectif, puis tournez le
parasoleil 1 dans le sens horaire jusqu’au déclic
d’arrêt pour le bloquer.
• Vérifiez que le repère de montage
avec le repère de réglage du parasoleil ( ) 3.
• Si le parasoleil n’est pas correctement fixé, on
assiste à un effet de vignetage.
• Il vous sera plus facile de fixer ou de retirer le
parasoleil si vous le tenez par la base (aux environs
du repère de fixation) et non par le bord extérieur.
• Avant de ranger l’objectif, fixez le parasoleil
à l’envers.
■ Démontage du parasoleil
Tout en maintenant la base du parasoleil (aux environs du repère de fixation) plutôt
que le bord extérieur, tournez-le dans le sens anti-horaire pour le démonter.
2 situé sur le
4 est bien aligné
11. Photographie au flash avec des appareils ayant un
flash intégré
Pour éviter le vignetage, n’utilisez pas le parasoleil 1.
Fr
49
Page 50

12. Verres de visée recommandés
Verre
Appareil
F5+DP-30
◎
◎ ―
◎ ―
―
―
―
―
― ◎ ― ◎
― ◎ ― ◎
G1
G2
G4G3BCE
EC-B
EC-E
FJKLMPU
F4+DP-20
F4+DA-20
F5+DA-30
A
◎
◎
◎
◎
◎
◎
◎◎―
―
◎◎
◎
○
○
○
(+0,5)
◎
◎
◎
◎
F6
― ― ― ― ―◎ ◎ ◎◎ ― ― ― ◎
Divers verres de visée sont disponibles pour certains appareils photo reflex Nikon qui
s’adaptent à toutes les conditions de prise de vue. Les verres recommandés avec cet
objectif sont listés ci-dessous :
: Mise au point excellente
Fr
: Mise au point passable
Un vignetage ou un effet de moiré affecte l’image de visée. L’image sur le film
n’est cependant pas affectée par ces phénomènes.
―: Non disponible
( ): Indique la correction de l’exposition additionnelle requise ( Mesure pondérée
centrale uniquement). Pour les appareils F6, corrigez en sélectionnant “Activ.:
autre” dans le réglage personnalisé “b6: Plage visée” et en réglant le niveau IL
de -2,0 à +2,0 par incrément de 0,5 IL. Lorsque vous utilisez des verres autres
que ceux de type B ou E, il faut sélectionner “Activ.: autre” même lorsque la
valeur de correction est de “0” (pas de correction nécessaire). Pour les appareils
F5, compensez en utilisant le réglage personnalisé n° 18 sur l’appareil. Pour les
appareils de la série F4, compensez en utilisant le sélecteur de compensation de
l’exposition pour le verre de visée.
Consultez le manuel d’utilisation de l’appareil photo pour plus de détails.
Un blanc indique aucune application. Étant donné que le verre M peut être utilisé pour
la macrophotographie à un rapport d’agrandissement 1:1 ou plus et pour la
photomicrographie, il a des applications différentes de celles des autres verres.
■ Important
• Pour les appareils F5, seuls les verres de mise au point EC-B, EC-E, B, E, J, A, L
• Lors de l’utilisation de verres B et E dans des appareils autres que ceux indiqués
50
peuvent être utilisés avec la mesure matricielle.
ci-dessus, reportez-vous aux colonnes des verres B et E.
Page 51

13. Entretien de l’objectif
• Nettoyez la surface de l’objectif avec un pinceau soufflant. Pour enlever les
poussières ou les traces, utilisez de préférence un tissu de coton doux, ou un tissu
optique, légèrement humidifié avec de l’alcool éthylique (éthanol). Essuyez en
effectuant un mouvement circulaire en partant du centre.
• N’employez jamais de solvant ou de benzène qui pourrait endommager l’objectif,
prendre feu ou nuire à la santé.
• Pour protéger la lentille avant de l'objectif, un filtre NC est disponible. Un parasoleil
1 assure également une bonne protection contre les chocs.
• Lors du rangement de l’objectif dans son étui, pensez à remettre en place les
bouchons avant et arrière.
• En cas d’inutilisation pour une longue période, entreposez l’objectif dans un endroit
frais, sec et aéré pour éviter les moisissures. Tenez l'objectif éloigné des sources de
lumière, et des produits chimiques (camphre, naphtaline, etc.).
• Ne projetez pas de l'eau sur l'objectif et ne l'immergez pas : cela pourrait le rouiller
et provoquer des dommages irréparables.
• Divers matériaux de synthèse sont utilisés dans la fabrication. Pour éviter tout
problème, ne soumettez pas l’objectif à de fortes chaleurs.
14. Accessoires fournis
• Bouchon avant d’objectif diamètre 62 mm LC-62 • Bouchon arrière
• Parasoleil à baïonnette HB-38 • Étui souple pour objectif CL-1020
15. Accessoires en option
• Autres filtres à vis 62 mm
• Les téléconvertisseurs AF-S* TC-14EII/TC-17EII/TC-20EIII peuvent aussi être utilisés.
*L’utilisation de l’autofocus est impossible. (Les fonctions VR et AE sont disponibles.)
16. Accessoires incompatibles
• La bague auto BR-4 et tous les modèles de bague allonge auto PK, les bagues K et
les soufflets.
L’emploi d’autres accessoires peut ne pas être adapté avec cet objectif. Lisez
attentivement le manuel d’utilisation de l’accessoire pour les détails.
Fr
51
Page 52

17. Caractéristiques
Type d’objectif : Objectif Micro-Nikkor AF-S de type G avec
Focale : 105 mm
Ouverture maximale : f/2.8
Construction optique : 14 lentilles en 12 groupes (1 verre ED et plusieurs
Champ angulaire: 23°20’ avec les reflex argentiques 24x36 Nikon et reflex
Échelle des rapports de
reproduction : De 1 :10 à 1 :1 (grandeur nature)
Informations de
distance : Communiquée au boîtier de l'appareil photo
Mise au point : Système de mise au point interne (IF) Nikon (utilisant un
Fr
Commutateur limiteur
de mise au point : Fourni; deux plages disponibles: FULL (∞ – 0,314 m), ou
Réduction de
vibration : Par déplacement d'un bloc optique en utilisant des
Échelle des distances
de prise de vue : Graduée en mètres et pieds de 0,314 m à l’infini (∞)
Distance minimale
de mise au point : 0,314 m à partir du plan focal (grandeur nature)
Nb. de lamelles du
diaphragme : 9 (circulaires)
Diaphragme : Entièrement automatique
Plage des ouvertures : f/2.8 à f/32
Mesure de
l’exposition : Via méthode pleine ouverture
Diamètre de fixation
pour accessoires : 62 mm (P = 0,75 mm)
Dimensions : Env. 83 mm diam. x 116 mm (extension à partir de la
Poids : Env. 750 g
microprocesseur intégré et monture à baïonnette Nikon.
lentilles à couche déposée de nano cristal)
numériques Nikon au format FX
15°20’ avec les reflex numériques Nikon au format DX
18°40’ avec les appareils photo IX240
moteur silencieux SMW), manuelle par bague de mise au
point séparée
∞ – 0,5 m.
moteurs voice coil (VCM)
monture d’objectif située sur l’appareil photo)
Les caractéristiques et les schémas sont susceptibles d’être modifiés sans préavis ni
obligation de la part du constructeur.
52
Page 53

53
Fr
Page 54

Notas sobre un uso seguro
PRECAUCIÓN
No desarme el equipo
El contacto con las piezas internas de la cámara o del objetivo puede provocar
lesiones. Las reparaciones solamente deben ser ejecutadas por técnicos cualificados.
Si a causa de un golpe u otro tipo de accidente la cámara o el objetivo se rompen y
quedan abiertos, desenchufe el producto y/o retire la batería, y a continuación lleve el
producto a un centro de servicio técnico autorizado Nikon para su revisión.
Apague inmediatamente el equipo en caso de funcionamiento
defectuoso
Si observa que sale humo o que la cámara o el objetivo desprenden un olor extraño,
retire la batería inmediatamente, con cuidado de no quemarse. Si sigue utilizando el
equipo corre el riesgo de sufrir lesiones. Después que haya retirado o desconectado la
fuente de alimentación, lleve el equipo a un centro de servicio técnico autorizado
Nikon para su revisión.
No utilice la cámara ni el objetivo en presencia de gas inflamable
No utilice equipos electrónicos en presencia de gas inflamable, ya que podría
producirse una explosión o un incendio.
Es
No mire hacia el sol a través del objetivo ni del visor
Mirar hacia el sol u otra fuente de luz potente a través del objetivo o del visor podría
producirle daños permanentes en la vista.
Mantener fuera del alcance de los niños
Se debe tener especial cuidado en evitar que los niños se metan en la boca pilas u
otras piezas pequeñas.
Adopte las siguientes precauciones al manipular la cámara y el
objetivo
• Mantenga la cámara y el objetivo secos. De no hacer esto podría producirse un
incendio o una descarga eléctrica.
• No manipule ni toque la unidad con las manos húmedas. De hacer eso podría recibir
una descarga eléctrica.
• En fotografías a contraluz, procure que el sol no entre ni quede cerca del encuadre.
Podría producirse un efecto lente dentro del cuerpo del objetivo e incendiarse éste.
Esto también puede ocurrir cuando el sol queda cerca del encuadre.
• Cuando el objetivo no vaya a utilizarse por un período de tiempo prolongado,
colóquele las tapas frontal y trasera al objetivo y guárdelo alejado de la luz solar
directa. De no hacer esto podría producirse un incendio, ya que el objetivo pudiera
enfocar la luz solar directa sobre un objeto.
54
Page 55

Nomenclatura
Cámaras
Reducción de vibración
Enfoque automático
Modo de exposición
P*1SAM
Función
: Posible : Imposible
Cámaras SLR digitales Nikon (formato
Nikon FX/DX)
F6, F5, F100, Serie F80/Serie N80*,
Serie F75/Serie N75*,
Serie F65/Serie N65*
Pronea 600i/6i*, Pronea S*
2
Serie F4, F90X/N90s*, Serie F90/N90*,
Serie F70/N70*
Serie F60/N60*, Serie F55/Serie N55*,
Serie F50/N50*, F-401x/N5005*,
F-401s/ N4004s*, F-401/N4004*
F-801s/N8008s*, F-801/N8008*,
F-601
M/N6000*
F3AF, F-601/N6006*, F-501/N2020**,
Nikon MF cámaras
(excepto F-601
M/N6000*)
1 Visera del objetivo (p.61)
2 Indice de acoplamiento de la visera
del objetivo (p.61)
3 Indice de ajuste de la visera del
objetivo (p.61)
4 Indice de montura de la visera del
objetivo (p.61)
5 Anillo de enfoque (p.57)
6 Escala de distancias
7 Indice de monturas
8
Junta de goma de montaje del objetivo (p.57)
( )
: Página de referencia
9 Contactos CPU (p.56)
!
Interruptor de modo de enfoque (p.57)
"
Interruptor de límite de enfoque (p.57)
# Interruptor de ON/OFF de reducción
de vibración (p.58)
$ Escala de proporción de reproducción
(p.59)
%
Escala de profundidades de campo (p.59)
& Línea indicadora de distancias (p.59)
Cámaras que puede utilizar y funciones disponibles
Puede haber algunas restricciones o limitaciones para las funciones disponibles. Para
más detalles, consulte el manual del usuario de la cámara.
Es
*De venta exclusiva en los EE.UU. **De venta exclusiva en los EE.UU. y Canadá.
*1 P incluye AUTO (Programa para propósitos generales) y sistema de programa variable.
*2 No puede utilizar el manual (M).
• Si se utiliza este objetivo con cámaras no compatibles con reducción de vibración,
coloque el interruptor de ON/OFF de reducción de vibración # en [OFF]. En especial
con la cámara Pronea 600i/6i, si este interruptor se deja en [ON] puede agotarse
rápidamente la energía de la pila.
55
Page 56

1. Introducción
Muchas gracias por adquirir el objetivo AF-S VR Micro-Nikkor 105mm f/2,8G IF-ED.
Este es un objetivo macro de grandes prestaciones que presenta mecanismos
especiales de Reducción de vibraciones (VR2) y Enfoque interno de alta velocidad (IF).
Además para el movimiento del mecanismo de enfoque emplea un Motor de onda
silenciosa (S).
■ Principales funciones
• Con relación de reproducción de infinito (∞) a 1/30x, se puede realizar fotografías
con velocidades de obturación de aproximadamente 4 pasos* más lento de lo que
podría hacerlo sin usar un objetivo VR2, ampliando de esta forma la gama de
opciones de velocidades de obturación utilizables y haciendo que sea mucho más
fácil fotografiar sin trípode. (*Bajo condiciones de medición de Nikon. Los efectos de
la reducción de la vibración varían dependiendo de las condiciones individuales y de
fotografiado.)
• También es posible realizar panorámicas ya que el objetivo distingue la panorámica y
la vibración de la propia cámara y la reducción de la vibración funciona eficazmente.
• El modo de Enfoque automático (A) y el modo manual (M) pueden seleccionarse
mediante le interruptor de modo de enfoque.
• Se incluye enfoque automático con prioridad manual que proporciona cambio
automático de enfoque automático a enfoque manual.
Es
• Es posible un control de exposición más preciso cuando el objetivo está montado en
una cámara Nikon con posibilidad de medición matricial tridimensional porque la
información de distancia del sujeto se transfiere del objetivo a la cámara.
• El uso de un elemento de lente ED (dispersión extra-baja) garantiza imágenes
nítidas, prácticamente sin mezcla de colores. Además, con el uso de un diafragma
de 9 hojas que produce una abertura casi circular, las imágenes fuera de enfoque
delante o detrás del sujeto aparecen más borrosas para crear un hermoso efecto de
difuminado.
• El recubrimiento nanocristalino en algunos objetivos garantiza que sea posible
reproducir imágenes claras y nítidas bajo cualquier condición de fotografiado, desde
escenas en exteriores soleados hasta escenas con flash en interiores.
■ ¡Importante!
• Tenga cuidado de no manchar o dañar los contactos de la CPU 9.
• Con el TC-20E/TC-20EII/TC-20EIII acoplado, la abertura mínima está limitada a f/90.
• Cuando se monta en las cámaras SLR digitales Nikon (formato Nikon DX), como las
de la serie D300 y D7000, el ángulo de imagen del objetivo se vuelve de 15°20’ y su
distancia focal equivalente es de aproximadamente 157,5 mm.
56
Page 57

• Si la junta de goma de montaje del objetivo 8 se daña, asegúrese de ir a un
Modo de enfoque del objetivo
Cámaras
MM/A
Modo de enfoque
de la cámara
Cámaras SLR digitales Nikon (formato
Nikon FX/DX), F6, F5, Serie F4, F100,
F90X/N90s*, Serie F90/N90*,
Serie F80/Serie N80*,
Serie F75/Serie N75*, Serie F70/N70*,
Serie F65/Serie N65*, Pronea 600i/6i*,
Pronea S
Serie F60/N60*, Serie F55/Serie N55*,
Serie F50/N50*, F-801s/N8008s*,
F-801/N8008*, F-601
M/N6000*,
F-401x/N5005*, F-401s/N4004s*,
F-401/N4004*
AF
MF
AF
MF
Enfoque manual
(Con ayuda de enfoque,
excepto con la F-601
M/N6000*)
Enfoque
automático
con prioridad
manual
Enfoque manual
(Con ayuda
de enfoque)
Enfoque manual
(Con ayuda de enfoque)
*De venta exclusiva en los EE.UU.
distribuidor autorizado Nikon o a un centro de servicio para que lo reparen.
• En la parte frontal del objetivo puede acoplarse un total de 4 Flashes remotos
inalámbricos SB-R200.
2. Enfoque
Ajuste el selector de modo de enfoque de su cámara de acuerdo con este cuadro:
Es
■ Enfoque automático con prioridad manual (Modo M/A)
1 Ajuste el interruptor de modo de enfoque ! a [M/A].
Nota: Asegúrese de colocar el interruptor de forma que el
indicador quede perfectamente alineado con [M/A].
M/A
2 Se dispone de un enfoque automático pero puede dar prioridad
al enfoque manual con el anillo de enfoque 5 manual mientras
oprime ligeramente el obturador o el botón del inicio de AF
(AF-ON) en el cuerpo de la cámara.
3 Para cancelar la anulación manual, presione ligeramente otra vez
el disparador o el botón de inicio de enfoque automático en la
cámara. La cámara regresará al modo de enfoque automático.
■ Para limitar el rango del enfoque automático
(Solamente para cámaras AF compatibles con objetivos Nikkor AF-S)
En funcionamiento AF, si el objeto está alejado siempre más de 0,5 m, ajuste el
interruptor de límite de enfoque " en [∞–0,5 m] para reducir el tiempo de enfoque.
Nota: Asegúrese de colocar el interruptor de forma que el indicador quede
perfectamente alineado con [∞–0.5m].
• Si el objeto se encuentra a 0,5 m o más cerca, ajústelo a [FULL].
FULL
FULL
Indicador
M
0.5m
Indicador
0.5m
57
Page 58

3. Modo de reducción de vibración (VR@)
Vibración de la cámara
Número de vibraciones
Fotografías panorámicas
Fuerza de vibraciones
ON
OFF
Indicador
■ Concepto básico de la reducción de vibración
■ Los efectos de la reducción de la vibración
Cuando el sujeto está a una distancia desde infinito (∞) a aproximadamente 3m
•
(con una proporción de reproducción de 1/30x), se puede realizar fotografías con
velocidades de obturación de aproximadamente 4 pasos* más lento de lo que podría
hacerlo sin usar un objetivo VR2. A medida que la proporción de reproducción
aumenta desde 1/30x, disminuyen gradualmente los efectos de reducción de la
vibración. (*Bajo condiciones de medición de Nikon. Los efectos de la reducción de la
Es
vibración varían dependiendo de las condiciones individuales y de fotografiado.)
■Ajuste del interruptor de ON/OFF de reducción de vibración
1
Ajuste el interruptor de ON/OFF de reducción de vibración # a [ON].
Nota: Asegúrese de colocar el interruptor de forma que el
indicador quede perfectamente alineado con [ON].
2 La vibración se reduce en el momento en que se presiona
ligeramente el disparador. Como se reduce la vibración en el
visor, es más fácil de hacer el enfoque automático/manual y el
encuadre exacto del objeto.
3 Para cancelar el modo de reducción de la vibración, ajuste el interruptor
de ON/OFF de reducción de vibración # a [OFF].
■ Notas sobre el uso del modo de reducción de la vibración
• Espere hasta que la imagen en el visor deje de vibrar antes de presionar a fondo el
botón de liberación del obturador, habiendo presionado antes ligeramente dicho botón.
• Si mueve la cámara en un arco amplio como el de las panorámicas, la vibración en la
dirección de dicho movimiento no se verá afectada. Por ejemplo, si mueve
rápidamente la cámara en horizontal, únicamente se reducirá la vibración en la
dirección vertical, haciendo que la panorámica sea mucho más suave.
• Debido a las características del mecanismo de reducción de la vibración, la imagen
en el visor puede aparecer algo borrosa después de liberarse el obturador. Esto no
es una avería.
58
Page 59

• No desconecte el interruptor de la cámara a OFF ni extraiga el objetivo de la cámara
mientras está funcionando el modo de reducción de la vibración. (En caso contrario,
el objetivo puede emitir un ruido vibratorio si la cámara se mueve. Esto no es una
avería. Conecte nuevamente el interruptor principal de la cámara para corregirlo.)
• En cámaras con flash incorporado, la reducción de la vibración no funciona cuando
se está cargando el flash incorporado.
• Cuando el objetivo se instala en un trípode, ajuste el interruptor de ON/OFF de reducción
de vibración # en la posición [OFF]. Sin embargo, ajústelo en la posición [ON] si utiliza
un trípode sin asegurar el cabezal del mismo, o cuando utilice un pie de cámara.
4. Profundidad de campo
La escala de profundidades de campo % está grabada al lado de la línea del índice de
distancia &. A cortas distancias, sin embargo, queda tan poco dentro del foco que
puede ser más útil verificar el cuadro de profundidad de campo (página 126). Si su
cámara tiene un botón de previsualización de la de profundidad de campo o palanca
de previsualización de la de profundidad de campo, usted puede verificar la
profundidad de campo en el visor.
5.
Enfoque a una proporción de reproducción predeterminada
La proporción de reproducción es la relación entre el tamaño de la imagen (grabada
en la pelicula) y el tamaño real del sujeto. Si, por ejemplo, Ia imagen en la pantalla de
enfoque es una quinta parte del tamaño real del sujeto, Ia proporción de reproducción
será de I:5.
Al fotografiar en una proporción de reproducción predeterminada, utilice el siguiente
procedimiento:
1 Gire manualmente el anillo de enfoque hasta que el número de escala de
proporción de reproducción $ deseado esté alineado con la línea indicadora de
distancias &.
2 Apunte el sujeto, luego cambie su posición, acérquese o aléjese del sujeto hasta
que la imagen en el visor sea clara y nítida.
Para obtener la proporción de reproducción apropiada para cada distancia focal, vea
el cuadro de profundidad de campo (página 126).
6. Observaciones sobre fotografía de acercamiento y
trabajo de duplicación
Movimiento de la cámara
EI AF-S VR Micro-Nikkor 105mm f/2,8G IF-ED proporciona ampliación de imagen tan
grande que aún el movimlento más ligero durante la toma causa una imagen borrosa.
Monte la cámara en un trípode y utilice un cable de disparo o un cable de mando a
distancia para liberar el obturador.
Es
59
Page 60

Accesorio de acercamiento
Relación de reproduoción
Campo abarcado (cm/pulgada)
Distancia de enfoque (cm/
pulgada
)
No. 5T 1/6,3–1,22 15,0 × 22,5–1,97 × 2,95/ 82,4–28,1/32,4–11,1
5,9 × 8,9–0,8 × 1,2
No. 6T 1/3,3–1,44 8,0 × 12,0–1,67 × 2,5/ 49,8–26,1/19,6–10,3
3,1 × 4,7–0,7 × 1,0
No. 5T + 6T 1/2,2–1,65 5,24 × 7,86–1,45 × 2,18/ 38,1–24,3/15,0–9,6
2,1 × 3,1–0,6 × 0,9
Distancias de trabajo cercanas
Con altas proporciones de reproducción utilizadas durante tomas de primeros planos,
Ia profundidad de campo es muy baja. Disminuya la abertura del objetivo para
asegurar una profundidad de campo más grande, Iuego posicione cuidadosamente la
cámara para asegurarse de que la superficie más importante del sujeto está en la
misma zona de enfoque nítido.
• Al utilizar objetivo para acercamiento, utilice el enfoque manual.
7. Factor de exposición
El número f de un objetivo indica el brillo de la imagen formada por el objetivo
ajustado a distancia de fotografiado “infinito”. A mayor relación de reproducción,
mayor la disminución en el brillo de la imagen. El valor de brillo real de la imagen es el
Es
llamado “número f efectivo,” y al valor de compensación de la exposición para el
cambio del número f efectivo, se le llama "factor de exposición.”
8. Variación del número f efectivo (página 124)
Con este objetivo, a mayor relación de reproducción, más disminuirá el brillo de la
imagen en la película (dispositivo de detección de imagen) y aumentará el número f
efectivo (disminuirá la cantidad de luz que pasa a través de la abertura del objetivo).
Esta variación es compensada automáticamente por el medidor de exposición de la
cámara, por tanto el usuario puede determinar la exposición o realizar fotografía con
flash TTL sin tener que considerar el factor de exposición.
El número f visualizado en el panel LCD de la cámara o en el visor es el valor
compensado automáticamente
60
Page 61

9. Ajuste de abertura
Ajuste la abertura en la cámara. Cuando el modo de exposición (o fotografiado) se
ajusta en “A” (prioridad de abertura automática) o “M” (manual), la cámara
controlará para mantener el número f predeterminado (hasta aproximadamente 1,6
paradas) ya que el número f efectivo varía con la distancia de fotografiado.
10. Utilización de la visera de la bayoneta HB-38
■ Instalación de la visera
Alinee el índice de acoplamiento de la visera del
objetivo ( ) 2 de la visera (cualquiera de los dos
índices) con el índice de montaje de la visera del
objetivo 4 situado en éste, y gire la visera 1 en el
sentido de las agujas del reloj hasta que quede fijada
con un chasquido.
• Asegúrese de que el índice de montaje de la visera
del objetivo 4 se alinea con el índice de ajuste de
la visera del objetivo ( ) 3.
• Si la visera del objetivo no está instalada
correctamente, puede producirse efectos de
viñeteado.
• Para facilitar la colocación o desmontaje de la visera, sujétela por la base (alrededor
del índice de acoplamiento de la visera del objetivo) en lugar de por la parte
externa.
• Para guardar la visera del objetivo, instálela en la posición inversa.
■ Desmontaje de la visera
Mientras sujeta la base de la visera (alrededor del índice de acoplamiento de la visera
del objetivo) y no en su borde exterior, gire la visera en el sentido contrario al de las
agujas del reloj para extraerla.
2 3 4
11. Fotografía con flash utilizando cámaras con flash
incorporado
Para evitar el viñeteado, no utilice la visera del objetivo 1.
Es
61
Page 62

12. Pantallas de enfoque recomendadas
AB CE
EC-BFG1
G3 G4 J K L M P U
EC-E G2
F6
F5+DP-30
F5+DA-30
F4+DP-20
F4+DA-20
Pantalla
Cámara
Hay diferentes pantallas de enfoque intercambiables para algunas cámaras SLR de
Nikon apropiados para cualquier situación fotográfica. Las recomendadas para utilizar
con este objetivo son las que aparecen en la lista a continuación.
: Enfoque excelente
: Enfoque aceptable
Ligero viñeteo que afecta la imagen de la pantalla, pero la imagen de la película
no es afectada por esto.
—
: No existe
(): Indica la cantidad de compensación adicional necesaria (Solamente medición
Es
ponderada central). Para cámaras F6, compense seleccionando "Otra pantalla”
en el ajuste personal del usuario “b6: Compens pantalla” y ajustando el nivel EV
a -2,0 a +2,0 en pasos de 0,5 EV. Cuando se utilice una pantalla que no sea de
tipo B o E, debe seleccionarse “Otra pantalla” incluso cuando el valor de
compensación requerido sea “0” (no se requiere compensación). Para la cámara
F5 compense usando el ajuste personal del usuario No. 18 en el cuerpo de la
cámara. Para las cámaras de la serie F4, compense usando el dial de
compensación de exposición para las pantallas de enfoque.
Para más detalles, consulte el manual del usuario de la cámara.
Las celdas en blanco significan que no es aplicable. Como la pantalla de tipo M se usa
tanto para macrofotografía a una razón de aumento de 1:1 o más como para
microfotografía, sus aplicaciones son distintas a las de las demás pantallas.
■ ¡Importante!
• Para las cámaras F5, únicamente pueden utilizarse pantallas de enfoque EC-B, EC-E,
B, E, J, A, L en medición de matriz.
• Cuando se utilicen las pantallas de enfoque B y E en cámaras distintas de las
relacionadas arriba, ver las columnas correspondientes a las pantallas B y E.
62
Page 63

13. Forma de cuidar el objetivo
• Limpiar la superficie del objetivo con un cepillo soplador. Para eliminar la suciedad o
las huellas, utilizar un trapo de algodón suave y limpio o papel especial para
objetivos humedecido en etanol (alcohol) o limpiador de objetivos. Limpiar
describiendo un movimiento circular del centro hacia fuera, teniendo cuidado de no
dejar restos ni tocar otras partes.
• No usar en ningún caso disolvente o benceno para limpiar el objetivo ya que podría
dañarlo, provocar un incendio o causar problemas sanitarios.
• Para proteger al objetivo frontal, está disponible un filtro NC. También una visera 1
contribuirá a proteger la parte frontal del objetivo.
• Cuando se guarde el objetivo en su estuche, colocarle las dos tapas.
• Cuando no se vaya a utilizar el objetivo durante largo tiempo, guardarlo en un lugar
fresco y seco para evitar la formación de moho. Guardar el objetivo, además, lejos
de la luz solar directa o de productos químicos tales como alcanfor o naftalina.
• No mojar el objetivo ni dejarlo caer al agua, ya que se oxidaría y no funcionaría bien.
• Algunas partes del objetivo son de plástico reforzado. Para evitar daños, no dejarlo
nunca en un lugar excesivamente caliente.
14. Accesorios estándar
• Tapa frontal de presión a 62 mm LC-62 • Tapa trasera de objetivo
• Visera de bayoneta HB-38 • Bolsa de objetivo flexible CL-1020
15. Accesorios opcionales
• Otros filtros con rosca de 62 mm
• Puede utilizarse teleconvertidores* AF-S TC-14EII/TC-17EII/TC-20EIII.
*No es posible la operación del enfoque automático. (Están disponibles las funciones
VR y AE.)
16. Accesorios incompatibles
• Anillo auto BR-4 y todos los modelos de anillo de autoextensión PK, anillo K,
accesorio de enfoque de fuelle.
Hay otros accesorios que pueden ser inadecuados para utilizar con este objetivo. Para
más detalles, lea cuidadosamente el manual del usuario de su accesorios.
Es
63
Page 64

17. Especificaciones
Tipo de objetivo: AF-S Micro-Nikkor tipo G con CPU incorporado y montura de
Distancia focal: 105 mm
Abertura máxima: f/2,8
Estructura del objetivo:
Ángulo de imagen: 23°20’ para las cámaras SLR de película con formato de
Escala de proporción
de reproducción: 1:10-1:1 (tamaño natural)
Información de
distancia: Salida al cuerpo de la cámara
Enfoque: Sistema de enfoque interno de Nikon (IF) (con un motor
Es
Conmutador de límite
de enfoque:
Reducción de vibración:
Escala de distancias
de la toma: Calibrado en metros y pies desde 0,314 m a infinito (∞)
Distancia de
enfoque mínima: 0,314 m a partir del plano focal (tamaño natural)
No. de láminas del
diafragma: 9 piezas (redondeadas)
Diafragma: Totalmente automático
Gama de aperturas: f/2,8 a f/32
Medición de exposición:
Tamaño de accesorios:
Dimensiones: Aprox. 83 mm de diám. x 116 mm (desde la pestaña de
Peso: Aprox. 750 g
bayoneta Nikon.
14 elementos en 12 grupos (1 lente ED y algunas de cristal
con recubrimiento de nanocristal depositado)
35 mm (135) de Nikon y para las cámaras SLR digitales con
formato FX de Nikon
15°20’ para las cámaras SLR digitales con formato DX de
Nikon
18°40’ para las cámaras del sistema IX240
Silent Wave interno); manual por anillo de enfoque
independiente
Instalado; hay dos posiciones: FULL (∞ – 0,314 m) o ∞ – 0,5 m
Método de desplazamiento del objetivo utilizando motores
de bobina de voz (VCM)
Método de abertura total
62 mm (P = 0,75 mm)
montaje)
Las especificaciones y los diseños están sujetos a cambio sin previo aviso ni
obligación por parte del fabricante.
64
Page 65

65
Es
Page 66

Note sulle operazioni di sicurezza
ATTENZIONE
Non smontare
Toccando le parti interne della fotocamera o dell’obiettivo si potrebbero causare dei
guasti. Le riparazioni devono essere eseguite solamente da tecnici qualificati. Qualora,
in caso di caduta o di qualsiasi altro incidente, la fotocamera o l’obiettivo dovessero
rompersi, portare il prodotto presso un punto assistenza Nikon autorizzato per
l’ispezione, dopo averlo scollegato dalla presa e/o rimosso la batteria.
In caso di malfunzionamento, disattivare immediatamente la
fotocamera.
Qualora dalla fotocamera o dall’obiettivo dovesse uscire del fumo o un odore insolito,
rimuovere immediatamente la batteria, facendo attenzione a non ustionsarsi.
Continuando a utilizzare la fotocamera, sussiste il rischio di lesioni. Dopo aver rimosso
o scollegato la fonte di alimentazione, portare l’apparecchio presso un punto
assistenza Nikon autorizzato per l’ispezione.
Non usare la fotocamera o l’obiettivo in presenza di gas
infiammabili
In caso contrario, si potrebbe procurare un’esplosione o un incendio.
Non guardare il sole in modo diretto attraverso l’obiettivo o il
mirino
Guardando in modo diretto il sole o qualsiasi altra fonte intensa di luce, si è soggetti
al rischio di indebolimento permanente della vista.
Tenere lontano dalla portata dei bambini
It
Fare molta attenzione che i bambini non ingeriscano le batterie o altre piccole parti.
Nell’utilizzo della fotocamera e dell’obiettivo, osservare le seguenti
precauzioni
• Mantenere la fotocamera o l’obiettivo asciutti. In caso contrario, si potrebbe
verificare un incendio o scosse elettriche.
• Non maneggiare né toccare l’unità con le mani bagnate. In caso contrario, si
potrebbero verificare scosse elettriche.
• Negli scatti in controluce, escludete il sole dall'inquadratura.
La luce del sole potrebbe concentrarsi nel corpo dell'obiettivo e provocare un
incendio. Anche l'approssimarsi del sole all'inquadratura può provocare un incendio.
• Se si prevede di non utilizzare l’obiettivo per un periodo prolungato, montare
entrambi i tappi di protezione e riporlo lontano dalla luce diretta del sole. In caso
contrario, potrebbe verificarsi un incendio, poiché la lente potrebbe focalizzare la
luce del sole su un qualsiasi oggetto.
66
Page 67

Nomenclature
Fotocamere
Riduzione della vibrazione
Autofocus
Modo di esposizione
P*1SAM
Fotocamere reflex digitali Nikon
(formato FX/DX)
F6, F5, F100, serie F80,
serie F75, serie F65
Pronea 600i, Pronea S*2
Serie F4, F90X, serie F90, serie F70
Serie F60, serie F55, serie F50,
F-401x, F-401s, F-401
F-801s, F-801, F-601
M
F3AF, F-601, F-501
Nikon MF fotocamere
(tranne F-601
M)
Funzione
: Possibile : Impossibile
1 Paraluce (p.73)
2
Indice di collegamento del paraluce (p.73)
3
Indice di regolazione del paraluce (p.73)
4
Indice di montaggio del paraluce (p.73)
5 Anello di messa a fuoco (p.69)
6 Scala delle distanze
7 Indice di montaggio
8 Guarnizione in gomma della
( )
: Pagina di riferimento
9 Contatti CPU (p.68)
!
Interruttore del modo di messa a fuoco (p.69)
"
Interruttore di limite di messa a fuoco (p.70)
# Interruttore di ON/OFF della riduzione
delle vibrazioni (p.70)
$ Scala di riproduzione (p.71)
% Scala profondità di campo (p.71)
& Contrassegno distanza (p.71)
montatura dell’obiettivo (p.69)
Fotocamere utilizzabili e funzioni disponibili
Potrebbero esserci delle restrizioni o delle limitazioni nell’utilizzo delle funzioni
disponibili. Per informazioni dettagliate, fare riferimento al manuale d’uso della
fotocamera.
It
*1 P include AUTO (Programma d’uso generico) e il sistema Vari-Program.
*2 Manuale (M) non è disponibile.
• Se si utilizza questo obiettivo con fotocamere non compatibili con la stabilizzazione
ottica VR, impostare l’interruttore di ON/OFF della riduzione delle vibrazioni # su
[OFF]. Con la fotocamera Pronea 600i, in particolare, se si lascia l’interruttore su [ON]
si potrebbe scaricare rapidamente la batteria.
67
Page 68

1. Introduzione
La ringraziamo per aver acquistato l’obiettivo AF-S VR Micro-Nikkor 105mm f/2.8G
IF-ED. Si tratta di un obiettivo macro ad alte prestazioni con la funzione speciale di
riduzione delle vibrazioni (VR2) e meccanismi per la messa a fuoco interna (IF) ad
elevata velocità. Inoltre, il meccanismo di messa a fuoco è azionato da un motore
Silent (S) Wave.
■ Caratteristiche principali
• All’infinito (∞) fino a un rapporto di riproduzione pari a 1/30x, è possibile acquisire
immagini alla velocità di scatto circa 4 stop* più lenta rispetto al normale senza
utilizzare alcun obiettivo VR2, così da ampliare la gamma di velocità di scatto
utilizzabili e facilitare la ripresa senza uso di treppiedi. (*in base alle condizioni di
misurazione Nikon. Gli effetti della riduzione delle vibrazioni variano in base alle
condizioni generali e di ripresa).
•È inoltre possibile acquisire immagini in panning, poiché l’obiettivo le distingue
automaticamente dalle vibrazioni della fotocamera e la stabilizzazione ottica
funziona in modo efficace.
• La modalità di messa a fuoco automatica (A) o manuale (M) può essere facilmente
selezionata attraverso l’interruttore del modo di messa a fuoco.
•È prevista la funzione di messa a fuoco automatica con esclusione manuale, che
garantisce la commutazione immediata dalla modalità di messa a fuoco automatica
a quella manuale.
• Un controllo dell’esposizione più accurato è possibile quando questo obiettivo viene
montato su una macchina Nikon dotata della capacità di misurazione matrix 3D, in
It
quanto le informazioni relative a soggetto e distanza vengono trasferite
dall’obiettivo alla macchina fotografica.
• L’uso di un elemento in vetro ED (dispersione extra bassa) assicura fotografie
brillanti virtualmente prive di sfalsamenti colore. Inoltre, utilizzando un diaframma a
9 lamelle che produce un’apertura quasi circolare, le immagini non a fuoco davanti
o dietro al soggetto vengono rese come piacevoli immagini sfocate.
• Il rivestimento di nanocristalli su alcuni elementi dell’obiettivo garantisce la
riproduzione in qualsiasi condizione di ripresa di immagini precise e nitide, sia
all’aperto in una giornata serena, sia in ambienti interni illuminati.
■ Importante!
• Fate attenzione a non sporcare o danneggiare i contatti CPU 9.
• In caso di montaggio di TC-20E/TC-20EII/TC-20EIII, l’apertura minima è limitata a
un valore massimo di f/90.
• Se montato sulle fotocamere reflex digitali Nikon (formato Nikon DX), quali la serie
D300 e D7000, l’angolo di campo diventa di 15°20’ e la lunghezza focale pari a
35 mm di circa 157,5mm.
68
Page 69

• Nel caso in cui la guarnizione in gomma della montatura dell’obiettivo 8 sia
Modo di messa a fuoco dell’obiettivo
Fotocamere
MM/A
Messa a fuoco manuale
(Aiuto per la messa
fuoco disponibile)
Messa a fuoco manuale
(disponibile la funzione di messa a fuoco
assistita, ad eccezione del modello F-601
M).
Messa a fuoco manuale
(Aiuto per la messa fuoco disponibile)
Messa a fuoco
automatica con
precendenza manuale
Fotocamere reflex digitali Nikon
(formato FX/DX), F6, F5, serie F4, F100,
F90X, serie F90, serie F80, serie F75,
serie F70, serie F65, Pronea 600i,
Pronea S
Serie F55, serie F60, serie F50,
F-801s, F-801, F-601
M, F-401x,
F-401s, F-401
Modo di messa a fuoco della
fotocamera
AF
AF
MF
MF
danneggiata, provvedere alla relativa riparazione presso il rivenditore o il centro
assistenza autorizzato Nikon più vicino.
• Sulla parte anteriore dell’obiettivo, è possibile montare un massimo di quattro Flash
remoti wireless SB-R200.
2. Messa a fuoco
Posizionare il selettore del modo di messa a fuoco della fotocamera in conformità alla
seguente tabella:
■ Messa a fuoco automatica con esclusione per il funzionamento in
manuale (modalità M/A)
1 Posizionare l’interruttore del modo di messa a fuoco ! su [M/A].
Nota: impostare l’interruttore in modo tale che l’indicatore sia
allineato in modo preciso con il simbolo [M/A].
2 Cosí la messa a fuoco automatica funziona, ma è possibile
escludere manualmente la messa a fuoco agendo sull’anello di
messa a fuoco 5 manuale separato mentre si preme
leggermente il pulsante di rilascio dell’otturatore o il pulsante di
avvio AF (AF-ON) sul corpo della fotocamera.
3 Per annullare l’esclusione manuale, premere leggermente il
pulsante di scatto o il tasto di avvio AF della fotocamera. In tal
modo, si ritornerà in modalità di messa a fuoco automatica.
■ Come limitare il campo della messa a fuoco automatica
(Solo per fotocamere AF compatibili con obiettivi Nikkor AF-S)
In modalità di funzionamento AF, qualora il soggetto sia distante sempre più di 0,5 m,
impostare l’interruttore di limite di messa a fuoco " su [∞ – 0,5 m] in modo tale da
ridurre la durata di messa a fuoco.
Nota: impostare l’interruttore in modo tale che l’indicatore sia allineato in modo
preciso con il simbolo [∞–0.5m].
• Se talvolta il soggetto di trova a una distanza di 0,5 m o inferiore, impostarlo su [FULL].
M/A
FULL
FULL
Indicatore
0.5m
Indicatore
0.5m
M
It
69
Page 70

3. Modalità di riduzione delle vibrazioni (VR@)
Panning
Vibrazione della
fotocamera
Numero di vibrazioni
Intensità delle vibrazioni
■ Concetto di base della riduzione delle vibrazioni
■ Effetti della riduzione delle vibrazioni
• Quando il soggetto si trova dall’infinito (∞) fino a circa 3 m (rapporto di riproduzione
pari a 1/30x), è possibile acquisire immagini alla velocità di scatto circa 4 stop* più
lenta rispetto al normale senza utilizzare alcun obiettivo VR2. All’aumentare del
rapporto di riproduzione a partire da 1/30x, gli effetti della riduzione delle vibrazioni
diminuiscono gradualmente. (*in base alle condizioni di misurazione Nikon. Gli effetti
della riduzione delle vibrazioni variano in base alle condizioni generali e di ripresa).
■ Impostazione dell’interruttore di ON/OFF della riduzione delle vibrazioni
1 Impostare l’interruttore di ON/OFF della riduzione delle vibrazioni # su [ON].
Nota: impostare l’interruttore in modo tale che l’indicatore sia allineato in modo
It
preciso con il simbolo [ON].
2 Per ridurre le vibrazioni, premere leggermente il pulsante di
scatto. Siccome le vibrazioni sono ridotte nel mirino, risultano
semplificate sia la messa a fuoco automatica/manuale, sia
ON
l’esatta inquadratura del soggetto.
3 Per uscire dalla modalità di riduzione delle vibrazioni, impostare
l’interruttore di ON/OFF delle riduzione delle vibrazioni # su [OFF].
■ Note circa l’uso della modalità di riduzione delle vibrazioni
• Attendere finché l’immagine visualizzata nel mirino arresti le vibrazioni, premere
leggermente il pulsante di scatto, quindi premerlo a fondo.
Indicatore
OFF
70
Page 71

• Spostando la fotocamera ad ampio raggio come durante l’esecuzione ad inseguimento
panning, la vibrazione nella direzione del movimento non sarà influenzata. Ad
esempio, effettuando un panning con la fotocamera in orizzontale, si ridurrà
solamente la vibrazione in senso verticale, semplificandone quindi l’acquisizione.
• Per le caratteristiche del meccanismo di riduzione delle vibrazioni, dopo aver
rilasciato il pulsante di scatto, l’immagine nel mirino potrebbe apparire leggermente
sfocata. Non si tratta di un malfunzionamento.
• Non spegnere la fotocamera né rimuovere l’obiettivo dalla fotocamera mentre è in
funzione la modalità di riduzione della vibrazione. (In caso contrario, qualora la
fotocamera vibri, l’obiettivo potrebbe emettere un rumore battente. Questo non è
da vedere come malfunzionamento. Per rimediare a questo inconveniente,
riaccendere (ON) la macchina fotografica.)
• Sulle fotocamere dotate di flash incorporato, la funzione Riduzione Vibrazioni non
può essere utilizzata mentre il flash incorporato si sta ricaricando.
• Nel caso in cui l’obiettivo sia montato su un treppiede, impostare l’interruttore di
ON/OFF della riduzione delle vibrazioni su [OFF]. Tuttavia, qualora si utilizzi un
treppiede senza fissarne la parte superiore, o qualora si utilizzi un cavalletto
monopiede, impostare l’interruttore su [ON].
4. Profondità di campo
La scala profondità di campo % sono incise al Iato della linea dell'indice di distana &.
Tuttavia, a distanza ravvicinata è talmente poco quello che viene messo a fuoco che può
essere piu utile basarsi sulla tabella di profondità di campo (pagina 126). Se la fotocamera
usata è provvista di un tasto o di una leva di previsualizzazione della profondità di campo,
sarà possibile simulare gli effetti della profondità di campo nel mirino.
5.
Messa a fuoco a rapporto di riproduzione predeterminato
ll rapporto di riproduzione indica la relazione fra la grandezza dell’immagine
(registrata sulla pellicola) e la grandezza reale del soggetto. Se, per esempio,
l’immagine sullo schermo di messa a fuoco è un quinto della grandezza reale del
soggetto, il rapporto di riproduzione è 1:5.
Osservare la procedura seguente per fotografare ad un rapporto di riproduzione
predeterminato:
1 Far girare manualmente I’anello di messa a fuoco fino a quando il numero della scala
di riproduzione $ desiderato si allinea con I’indice del contrassegno distanza &.
It
71
Page 72

2 Mirare il soggetto, cambiare quindi la posizione avvicinandosi o allontanandosi dal
Distanza messa a fuoco (cm)
Campo del soggetto (cm)
Rapport di riproduzione
Dispositivi Close-up
No. 5T 1/6,3–1,22
15,0 × 22,5–1,97 × 2,95
82,4–28,1
No. 6T 1/3,3–1,44 8,0 × 12,0–1,67 × 2,5 49,8–26,1
No. 5T + 6T 1/2,2–1,65
5,24 × 7,86–1,45 × 2,18
38,1–24,3
soggetto da fotografare fino a quando l'immagine nel mirino diventa nitida.
Per ottenere un rapporto di riproduzione appropriato per ogni distanza focale, vedere
la tabella di profondità di campo (pagina 126).
6. Note relative alla fotografia close-up e di riproduzione
Scosse della fotocamera
L'obiettivo AF-S VR Micro-Nlkkor 105 mm f/2,8G IF-ED offre un ingrandimento di
immagine talmente elevato che la minima scossa durante la ripresa fotografica può
causare una immagine a scarsa definizione. Montare quindi la fotocamera su di un
treppiede e usare uno scatto a cavo o uno scatto a distanza per attivare I'otturatore.
Presa a distanza ravvicinata
La profondità di campo con rapporti di riproduzione molto elevati è molto scarsa. Per
assicurare maggiore profondità di campo, chiudere l'apertura del diaframma, quindi
posizionare la fotocamera in modo da assicurare che la superficie più importante del
soggetto sia localizzata nella stessa zona di messa a fuoco.
• Con lenti addizionali close-up, usare la messa a fuoco manuale.
7. Fattore di esposizione
It
Il valore f/ di un obiettivo indica la luminosità dell’immagine visualizzata con la
distanza di scatto dell’obiettivo impostata su “infinito”. Maggiore è il rapporto di
riproduzione, più la luminosità dell’immagine si riduce. La luminosità effettiva
dell’immagine è il cosiddetto “valore f/ reale” e il valore di compensazione
dell’esposizione al variare del valore f/ reale viene denominato “fattore di
esposizione”.
72
Page 73

8. Variazione del valore f/ reale (pagina 124)
2 3 4
Con questo obiettivo, maggiore è il rapporto di riproduzione, più la luminosità
dell’immagine sulla pellicola (sensore di immagini) si riduce all’aumentare del valore f/
reale (la quantità di luce che passa all’interno del diaframma dell’obiettivo si riduce).
Questa variazione viene compensata automaticamente dall’esposimetro della
fotocamera, pertanto l’utente può definire l’esposizione o eseguire foto con flash in
modalità TTL senza dover tener conto del fattore di esposizione.
Il valore f/ visualizzato sul pannello LCD della fotocamera o nel mirino rappresenta il
valore compensato automaticamente.
9. Impostazione del diaframma
Impostare l’apertura del diaframma dal corpo della fotocamera. Quando la modalità di
esposizione (o di scatto) è impostata su “A” (automatica a priorità diaframmi ) o su
“M” (manuale), la fotocamera cercherà di mantenere il valore f/ prestabilito (fino a
circa 1,6 stop) dal momento che il valore f/ reale varia in base alla distanza di messa a
fuoco.
10. Utilizzo del paraluce a baionetta HB-38
■ Collegamento del paraluce
Allineare l’indice di collegamento ( )
di montaggio del paraluce 4 sull’obiettivo, quindi
ruotare il paraluce 1 in senso orario finché si blocchi
in posizione.
• Verificare che l’indice di montaggio del
paraluce
4 sia allineato all’indice di regolazione
del paraluce ( ) 3.
• In caso di paraluce non adeguatamente collegato
potrebbe verificarsi una riduzione di luminosità ai
margini dell’immagine.
• Per semplificare l’innesto o la rimozione del
paraluce, afferrarlo dalla propria base (attorno
all’indice di collegamento del paraluce) e non dai
bordi esterni.
• Riporre il paraluce innestandolo in posizione invertita.
2 sul paraluce (uno dei due indici) all’indice
It
73
Page 74

■ Smontaggio del paraluce
AB CE
EC-BFG1
G3 G4 J K L M P U
EC-E G2
F6
F5+DP-30
F5+DA-30
F4+DP-20
F4+DA-20
Schermo
Fotocamera
Afferrando il paraluce dalla base (attorno all’indice di collegamento del paraluce) e
non dal bordo esterno, ruotarlo in senso antiorario in modo tale da rimuoverlo.
11. Fotografia con flash usando fotocamere con un
lampeggiatore incorporato
Per evitare la vignettatura (riduzione della luminosità ai margini dell'immagine), non
usare un paraluce 1.
12. Schermi di messa a fuoco consigliati
Per alcune fotocamere SLR Nikon sono disponibili vari schermi di messa a fuoco
intercambiabili adatti a ogni situazione di ripresa. Gli schermi consigliati per l’uso con
questo obiettivo sono elencati sotto.
:Messa a fuoco eccellente
It
: Messa a fuoco accettabile
L’immagine sullo schermo presenta una riduzione di luminosità o tracce di
fenomeno del moiré. Questo però non lascia tracce sulla pellicola.
—
: Non disponibile.
( ): Indica il valore della compensazione di esposizione aggiuntiva richiesto
(Solamente misurazione a prevalenza centrale). Con le fotocamere F6,
compensare selezionando “Other screen” nell’impostazione personalizzata
“b6:”, quindi impostando il valore EV tra -2.0 e +2.0 ad intervalli di 0,5 EV.
Quando si utilizzano schermi diversi dal tipo B o E, è necessario selezionare
“Other screen” anche quando il valore di compensazione richiesto è pari a “0”
(nessuna compensazione necessaria). Per la fotocamera F5, compensare
utilizzando l’impostazione personalizzata 18 sul corpo della fotocamera. Per gli
apparecchi della serie F4, compensare utilizzando il quadrante di compensazione
dell’esposizione previsto per i filtri di messa a fuoco.
Per ulteriori dettagli, fare riferimento al manuale d’uso della fotocamera.
74
Page 75

Il quadrato vuoto non è applicabile. Siccome lo schermo di tipo M può essere utilizzato
per macrofotografia con rapporto di ingrandimento di 1:1 o superiore e
fotomicrografia, esso presenta differenti applicazioni rispetto agli altri schermi.
■ Importante!
• Per quanto riguarda le fotocamere F5, in modalità di misurazione a matrice, è
possibile utilizzare solamente gli schermi di messa a fuoco EC-B, EC-E, B, E, J, A, L.
• Impiegando gli schermi B e E con fotocamere diverse da quelle elencate sopra, fate
riferimento alle rispettive colonne delle versioni B e E.
13. Cura e manutenzione dell’obiettivo
• Pulite la superficie delle lenti con un pennello a pompetta. Per rimuovere impronte e
macchie, fate uso di un fazzoletto di cotone, soffice e pulito, o di una cartina ottica
leggermente imbevuti con alcool o con l’apposito liquido “lens cleaner”. Strofinate
delicatamente con movimento circolare dal centro verso l’esterno, facendo attenzione a
non lasciare tracce o toccare altre parti. • Per la pulizia non utilizzate mai solventi o
benzina, che potrebbero danneggiare l’obiettivo, causare incendi o problemi di
intossicazione. • Il filtro NC è utile per proteggere la lente anteriore dell’obiettivo.
Anche il paraluce 1 contribuisce validamente a proteggere la parte anteriore
dell’obiettivo. • Prima di porre l’obiettivo nell’astuccio o in borsa, montate entrambi i
coperchi protettivi. • Se rimane a lungo inutilizzato, riponetelo in un ambiente fresco e
ventilato per prevenire la formazione di muffe. Tenetelo inoltre lontano dal sole o da
agenti chimici come canfora o naftalina. • Non bagnatelo e fate attenzione che non
cada in acqua. La formazione di ossidazioni potrebbe danneggiarlo in modo irreparabile.
• Alcune parti della montatura sono realizzate in materiale plastico rinforzato. Per
evitare danni non lasciate mai l’obiettivo in un luogo eccessivamente caldo.
14. Accessori in dotazione
• Tappo anteriore da 62mm dia. LC-62 • Tappo posteriore
• Paraluce a baionetta HB-38 • Portaobiettivo morbido CL-1020
15. Accessori opzionali
• Altri filtri a vite da 62 mm
•È possibile usare i teleconvertitori AF-S* TC-14EII/TC-17EII/TC-20EIII.
*Operazione di messa a fuoco automatica non disponibile. (Funzioni VR e AE
disponibili).
16. Accessori non utilizzabili
• L’Anello Auto BR-4, tutti i modelli di Anelli di Prolunga Automatica PK, gli anelli K e
i dispositivi di messa a fuoco a soffietto.
Gli altri accessori possono non essere adatti per l’uso con questo obiettivo. Per
ulteriori informazioni, leggere attentamente il manuale d’uso degli accessori.
75
It
Page 76

17. Caratteristiche tecniche
Tipo di obiettivo Obiettivo AF-S Micro-Nikkor tipo G con CPU incorporata e
Lunghezza focale: 105 mm
Apertura massima: f/2,8
Costruzione obiettivo
Angolo di campo: 23°20’ con fotocamere Reflex a pellicola Nikon formato
Scala di riproduzione
Dati distanze: Misurati sul riferimento del piano focale fotocamera
Messa a fuoco: Sistema di messa a fuoco interna (IF) Nikon (utilizza un
Interruttore di limite
di messa a fuoco: In dotazione; due gamme disponibili: FULL (∞ – 0,314 m)
Riduzione delle vibrazioni
Scala delle distanze
di ripresa: Graduata in metri e piedi da 0,314 m all’infinito (∞)
Distanza minima per
It
la messa fuoco: 0,314 m dal piano focale (grandezza naturale)
Nr. delle lamelle diaframma
Diaframma: Completamente automatico
Gamma di apertura: f/2,8 a f/32
Misurazione
dell’esposizione: Con metodo a tutta apertura
Misura dell’accessorio:
Dimensioni: Ca. 83 mm diam. x 116 mm (estensione della flangia)
Peso: Circa 750 g
attacco a baionetta Nikon.
: 14 elementi in 12 gruppi (1 ED e alcune lenti con
rivestimento di nanocristalli )
35 mm (135) e fotocamere Reflex digitali Nikon formato FX;
15°20’ con fotocamere Reflex digitali Nikon formato DX;
18°40’ con fotocamere sistema IX240
: 1 :10 a 1 :1 (grandezza naturale)
motore interno Silent Wave); manuale mediante anello di
messa a fuoco separato
oppure ∞ – 0,5 m
: Metodo di decentramento lenti utilizzando i motori a bobina
voice coil (VCMs)
: 9 pz. (arrotondati)
62 mm (P = 0.75 mm)
Le specifiche e i disegni sono soggetti a modifica senza preavviso o obblighi da parte
del produttore.
76
Page 77

77
It
Page 78

Σημειώσεις για τις λειτουργίες ασφάλειας
ΠΡΟΣΟΧΗ
Μην αποσυναρμολογείτε
Εάν αγγίξετε τα εσωτερικά εξαρτήματα της φωτογραφικής μηχανής ή του φακού μπορεί να προκληθεί
τραυματισμός. Οι επισκευές θα πρέπει να πραγματοποιούνται μόνο από ειδικευμένους τεχνικούς. Εάν η
φωτογραφική μηχανή ή ο φακός σπάσουν ως αποτέλεσμα πτώσης ή άλλου ατυχήματος, αποσυνδέστε το προϊόν
από την πρίζα ή/και αφαιρέστε την μπαταρία και απευθυνθείτε σε έναν εξουσιοδοτημένο αντιπρόσωπο σέρβις της
Nikon για επιθεώρηση.
Απενεργοποιήστε αμέσως σε περίπτωση δυσλειτουργίας
Εάν παρατηρήσετε καπνό ή ασυνήθιστη οσμή να προέρχεται από τη φωτογραφική μηχανή ή το φακό, αφαιρέστε
αμέσως την μπαταρία, προσέχοντας να μην καείτε. Η συνεχής λειτουργία μπορεί να προκαλέσει τραυματισμό.
Μετά την αφαίρεση ή την αποσύνδεση της πηγής τροφοδοσίας, πηγαίνετε το προϊόν σε εξουσιοδοτημένο
αντιπρόσωπο σέρβις της Nikon για επιθεώρηση.
Μην χρησιμοποιείτε τη φωτογραφική μηχανή ή το φακό παρουσία
εύφλεκτων αερίων
Αν ο ηλεκτρονικός εξοπλισμός τεθεί σε λειτουργία παρουσία εύφλεκτων αερίων, μπορεί να έχει ως αποτέλεσμα
έκρηξη ή πυρκαγιά.
Μην κοιτάτε τον ήλιο μέσω του φακού ή του σκοπεύτρου
Εάν κοιτάτε τον ήλιο ή άλλες πηγές δυνατού φωτός μέσω του φακού ή του σκοπεύτρου μπορεί να προκληθεί
μόνιμη οπτική βλάβη.
Φυλάσσετε μακριά από παιδιά
Απαιτείται ιδιαίτερη προσοχή ώστε να αποφευχθεί το ενδεχόμενο να βάλουν τα μωρά στο στόμα τους τις
μπαταρίες ή άλλα μικρά εξαρτήματα.
Τηρείτε τις παρακάτω προφυλάξεις κατά το χειρισμό της φωτογραφικής
μηχανής και του φακού
• Διατηρείτε τη φωτογραφική μηχανή και το φακό στεγνά. Η μη τήρηση αυτής της προφύλαξης ενέχει κίνδυνο
πυρκαγιάς ή ηλεκτροπληξίας.
• Μην χειρίζεστε και μην αγγίζετε τη μονάδα με βρεγμένα χέρια. Η μη τήρηση αυτής της προφύλαξης ενέχει
Gr
κίνδυνο ηλεκτροπληξίας.
• Σε λήψεις με φωτισμό από πίσω, να διατηρείτε τον ήλιο τελείως έξω από το καρέ.
Το φως του ήλιου μπορεί να εστιάσει στο σώμα του φακού και να προκαλέσει πυρκαγιά. Όταν ο ήλιος πλησιάσει
κοντά στο καρέ, μπορεί επίσης να προκαλέσει πυρκαγιά.
• Όταν ο φακός δεν θα χρησιμοποιηθεί για μεγάλο διάστημα, συνδέστε το μπροστινό και πίσω κάλυμμα φακού και
αποθηκεύστε το φακό μακριά από άμεσο ηλιακό φως. Η μη τήρηση αυτής της προφύλαξης μπορεί να
προκαλέσει πυρκαγιά, επειδή ο φακός μπορεί να εστιάσει το φως του ήλιου σε ένα αντικείμενο.
78
Page 79

Ονοματολογία
1 Σκίαστρο φακού (σελ.85)
2 Δείκτης προσαρτήματος σκιάστρου φακού
(σελ.85)
3 Δείκτης ρύθμισης σκιάστρου φακού (σελ.85)
4
Δείκτης θέσης σκιάστρου φακού (σελ.85)
5 Δακτύλιος εστίασης (σελ.81)
6 Κλίμακα απόστασης
7 Δείκτης θέσης
( ): Σελίδα αναφοράς
9 Επαφές CPU (σελ.80)
0 Διακόπτης λειτουργίας εσ τίασης (σελ.81)
! Διακόπτης περιορισμού εστίασης (σελ. 81)
@ Διακόπτης ON/OFF απόσβεσης κραδασμών
(σελ. 82)
# Κλίμακα λόγου αναπαραγωγής (σελ.83)
$ Ενδείξεις βάθους πεδίου (σελ.83)
% Γραμμή δείκτη απόστασης (σελ.83)
8 Ελαστικός μονωτικός σύνδεσμος μοντούρας
φακού (σελ.80)
Φωτογραφικές μηχανές με δυνατότητα χρήσης και διαθέσιμες λειτουργίες
Ενδέχεται να υπάρχουν μερικοί περιορισμοί ή όρια για τις διαθέσιμες λειτουργίες. Ανατρέξτε στο εγχειρίδιο
οδηγιών χρήστη της φωτογραφικής μηχανής σας για λεπτομέρειες.
Φωτογραφικές μηχανές
Ψηφιακές φωτογραφικές μηχανές SLR
(φορμά FX/DX της Nikon) της Nikon
F6, F5, F100, Σειρά F80, Σειρά F75, Σειρά F65
Pronea 600i, Pronea S*2
Σειρά F4, F90X, Σειρά F90, Σειρά F70
Σειρά F60, Σειρά F55, Σειρά F50, F-401x,
F-401s, F-401
F-801s, F-801, F-601M
F3AF, F-601, F-501, φωτογραφικές μηχανές
MF της Nikon (εκτός από F-601M)
*1 Το P περιλαμβάνει το σύστημα AUTO (Πρόγραμμα γενικού σκοπού) και το σύστημα πολυπρογραμμάτων.
*2 Η χειροκίνητη λειτουργία (M) δεν είναι διαθέσιμη.
• Εάν αυτός ο φακός χρησιμοποιείται με φωτογραφικές μηχανές που δεν είναι συμβατές με την απόσβεση κραδασμών, ρυθμίστε το
διακόπτη ON/OFF απόσβεσης κραδασμών @ στο [OFF]. Με τη φωτογραφική μηχανή Pronea 600i, συγκεκριμένα, μπορεί να
εξαντληθεί γρήγορα η ισχύς της μπαταρίας εάν ο διακόπτης παραμείνει στη θέση [ON].
Απόσβεση
κραδασμών
{ { {{{{
{ { {{{{
×
×
××
××
× × ××××
Αυτόματη
εστίαση
Λειτουργία
Λειτουργία έκθεσης
1
SAM
P*
{{{{{
{{{
××
{{{{
{{
××
{: Πιθανό ×: Απίθανο
79
Gr
Page 80

1. Εισαγωγή
Σας ευχαριστούμε που αγοράσατε το φακό AF-S VR Micro-Nikkor 105mm f/2.8G IF-ED. Αυτός είναι ένας φακός
Micro υψηλής απόδοσης που διαθέτει ειδικούς μηχανισμούς απόσβεσης κραδασμών (VR II) και μεσαίας εστίασης
(IF) υψηλής ταχύτητας. Χρησιμοποιεί επίσης αθόρυβο μοτέρ (S) για την κίνηση του μηχανισμού εστίασης.
■Κύρια χαρακτηριστικά
• Σε λόγο αναπαραγωγής από το άπειρο (∞) έως 1/30x, οι φωτογραφίες μπορούν να ληφθούν σε ταχύτητες
κλείστρου κατά περίπου 4 stop* πιο αργές από ότι είναι δυνατό χωρίς τη χρήση φακού VR
τρόπο, επεκτείνεται το εύρος επιλογών ταχύτητας κλείστρου με δυνατότητα χρήσης και καθίσταται η λήψη
χωρίς τρίποδο πολύ πιο εύκολη. (*Κάτω από συνθήκες μέτρησης Nikon. Οι επιδράσεις της απόσβεσης
κραδασμών διαφέρουν ανάλογα με το άτομο και τις συνθήκες λήψης.)
• Η εκτέλεση πανοραμικής λήψης είναι επίσης δυνατή, καθώς ο φακός διακρίνει αυτόματα την εκτέλεση
πανοραμικής λήψης από το κούνημα φωτογραφικής μηχανής και η απόσβεση κραδασμών λειτουργεί
αποτελεσματικά.
• Μπορείτε εύκολα να επιλέξετε τη λειτουργία αυτόματης εστίασης (A) ή τη χειροκίνητη (M) λειτουργία με το
διακόπτη λειτουργίας εστίασης.
• Παρέχεται αυτόματη εστίαση με χειροκίνητη παράκαμψη αυτοματισμού, που επιτρέπει την άμεση αλλαγή από
την αυτόματη εστίαση στη χειροκίνητη εστίαση.
• Πιο ακριβής έλεγχος έκθεσης είναι δυνατός όταν αυτός είναι στερεωμένος σε φωτογραφική μηχανή Nikon με
δυνατότητα μέτρησης 3D Matrix, επειδή πληροφορίες απόστασης θέματος μεταβιβάζονται από το φακό στο
σώμα της φωτογραφικής μηχανής.
• Η χρήση ενός στοιχείου φακού ED (εξαιρετικά χαμηλής διασποράς) διασφαλίζει ευκρινείς φωτογραφίες χωρίς
σχεδόν καθόλου χρωματικές αλλοιώσεις. Επίσης, με τη χρήση ενός διαφράγματος 9 λεπίδων που παράγει ένα
σχεδόν κυκλικό διάφραγμα, οι εικόνες εκτός εστίασης μπροστά και πίσω από το θέμα αποδίδονται ως όμορφα
θολώματα.
• Η Νανοκρυσταλλική επίστρωση που εναποτίθεται σε μερικά από τα στοιχεία φακού διασφαλίζει ότι μπορούν να
αναπαραχθούν εξαιρετικές και καθαρές εικόνες κάτω από οποιεσδήποτε συνθήκες λήψης, από ηλιόλουστους
εξωτερικούς χώρους έως εσωτερικά σκηνικά με φωτισμό προβολέα.
Gr
■Σημαντικό
• Προσέχετε να μην λερώσετε ούτε να προκαλέσετε βλάβη στις επαφές CPU 9.
• Με συνδεδεμένο το TC-20E/TC-20EII/TC-20EIII, το ελάχιστο διάφραγμα περιορίζεται σε εντός f/90.
• Όταν είναι τοποθετημένο σε ψηφιακές φωτογραφικές μηχανές SLR της Nikon (φορμά DX της Nikon), όπως της
σειράς D300 και D7000, η γωνία φωτογραφίας του φακού γίνεται 15°20’ και η ισοδύναμη εστιακή απόσταση
των 35mm του είναι περίπου 157,5mm.
• Εάν ο ελαστικός μονωτικός σύνδεσμος μοντούρας φακού 8 υποστεί ζημιά, φροντίστε να επισκεφτείτε το
πλησιέστερο εξουσιοδοτημένο αντιπρόσωπο ή κέντρο σέρβις της Nikon για επισκευή.
• Μπορούν να στερεωθούν συνολικά τέσσερα ασύρματα απομακρυσμένα φλας Speedlight SB-R200 στο
μπροστινό τμήμα του φακού.
80
II
. Με αυτόν τον
Page 81

2. Εστίαση
FULL
M/A
M
0.5m
Ένδειξη
FULL
0.5m
Ένδειξη
Ρυθμίστε τον επιλογέα λειτουργιών εστίασης της φωτογραφικής μηχανής σας σύμφωνα με αυτό το διάγραμμα.
Φωτογραφικές
μηχανές
Ψηφιακές φωτογραφικές
μηχανές SLR (φορμά FX/
DX της Nikon) της Nikon,
F6, F5, Σειρά F4, F100,
F90X, Σειρά F90,
Σειρά F80, Σειρά F75,
Σειρά F70, Σειρά F65,
Pronea 600i, Pronea S
Σειρά F55, Σειρά F60,
Σειρά F50, F-801s, F-801,
M, F-401x, F-401s,
F-601
F-401
■Αυτόματη εστίαση με χειροκίνητη παράκαμψη αυτοματισμού (Λειτουργία M/A)
1 Ρυθμίστε το διακόπτη λειτουργίας εστίασης 0 σε [M/A].
Σημείωση: Βεβαιωθείτε να ρυθμίσετε το διακόπτη ώστε η ένδειξη να
ευθυγραμμίζεται με το [M/A] με ακρίβεια.
2 Η αυτόματη εστίαση παρέχεται, αλλά μπορείτε να εκτελέσετε χειροκίνητη παράκαμψη
αυτοματισμού της εστίασης με τη λειτουργία του ξεχωριστού δακτυλίου εστίασης 5
ενώ πατάτε ελαφρά το κουμπί λήψης ή το κουμπί έναρξης AF (AF-ON) στη
φωτογραφική μηχανή.
3 Για να ακυρώσετε τη χειροκίνητη παράκαμψη, πατήστε ξανά ελαφρά το κουμπί λήψης ή το κουμπί έναρξης AF
στη φωτογραφική μηχανή. Αυτό θα επαναφέρει τη φωτογραφική μηχανή στη λειτουργία αυτόματης εστίασης.
■Για περιορισμό του εύρους αυτόματης εστίασης
(Για φωτογραφικές μηχανές AF συμβατές με φακούς AF-S Nikkor μόνο)
Με τη λειτουργία AF, εάν το θέμα βρίσκεται πάντα σε απόσταση μεγαλύτερη από
0,5 m, ρυθμίστε το διακόπτη περιορισμού εστίασης ! σε [∞–0,5m] για να μειώσετε
το χρόνο εστίασης.
Σημείωση: Βεβαιωθείτε να ρυθμίσετε το διακόπτη ώστε η ένδειξη να ευθυγραμμίζεται
με το [∞–0,5m] με ακρίβεια.
• Εάν το θέμα μερικές φορές βρίσκεται σε απόσταση 0,5 m ή πιο κοντά, ρυθμίστε το στο [FULL].
Λειτουργία εστίασης της
φωτογραφικής μηχανής
AF
MF
AF
MF
Λειτουργία εστίασης του φακού
M/A M
Αυτόματη εστίαση με
χειροκίνητη
προτεραιότητα
Χειροκίνητη εστίαση
(Διατίθεται λειτουργία
βοήθειας εστίασης.)
Χειροκίνητη εστίαση
(Διατίθεται λειτουργία βοήθειας εστίασης.)
Χειροκίνητη εστίαση
(Διατίθεται λειτουργία βοήθειας εστίασης, εκτός
M.)
με τη F-601
Gr
81
Page 82

3. Λειτουργία απόσβεσης κραδασμών (VR II)
ON
OFF
Ένδειξη
■Βασική αντίληψη της απόσβεσης κραδασμών
Κούνημα φωτογραφικής μηχανής
Εκτέλεση πανοραμικών λήψεων
Αριθμός κραδασμών
Ισχύς κραδασμών
■Οι επι δράσεις της απόσβεσης κ ραδασμών
• Όταν το θέμα βρίσκεται σε απόσταση από το άπειρο (∞) έως περίπου 3m (σε λόγο αναπαραγωγής 1/30x), οι
φωτογραφίες μπορούν να ληφθούν σε ταχύτητες κλείστρου κατά περίπου 4 stop* πιο αργές από ότι είναι δυνατό
χωρίς τη χρήση φακού VR II. Καθώς αυξάνεται ο λόγος αναπαραγωγής από 1/30x, οι επιδράσεις της απόσβεσης
κραδασμών μειώνονται σταδιακά. (*Κάτω από συνθήκες μέτρησης Nikon. Οι επιδράσεις της απόσβεσης
κραδασμών διαφέρουν ανάλογα με το άτομο και τις συνθήκες λήψης.)
■Ρύθμιση του διακόπτη ON/OFF απόσβεσης κραδασμών
1 Ρυθμίστε το διακόπτη ON/OFF απόσβεσης κραδασμών @ σε [ON].
Σημείωση: Βεβαιωθείτε να ρυθμίσετε το διακόπτη ώστε η ένδειξη να
2 Οι κραδασμοί μειώνονται όταν το κουμπί λήψης πατηθεί ελαφρά. Ε πειδή οι
Gr
3 Για να ακυρώσετε τη λειτουργία α πόσβεσης κραδασμών, ρυθμίστε το διακόπτη ON/OFF απόσβεσης κραδασμών
ευθυγραμμίζεται με το [ON] με ακρίβεια.
κραδασμοί μειώνονται στο σκόπευτρο, η αυτόματη/χειροκίνητη εστίαση και ο ακριβής καθορισμός καρέ του
θέματος είναι πιο εύκολα.
@
σε [OFF].
82
Page 83

■Σημειώσεις για τη χρήση της λειτουργίας απόσβεσης κραδασμών
• Περιμένετε μέχρι να σταματήσουν οι κραδασμοί της εικόνας στο σκόπευτρο πριν πατήσετε πλήρως το κουμπί
λήψης αφού έχετε πατήσει ελαφρά το κουμπί λήψης.
• Εάν κινήσετε τη φωτογραφική μηχανή σε ένα ευρύ τόξο κατά την εκτέλεση πανοραμικής λήψης, οι κραδασμοί
προς την κατεύθυνση αυτής της κίνησης δεν επηρεάζονται. Για παράδειγμα, εάν εκτελέσετε πανοραμική λήψη
με τη φωτογραφική μηχανή οριζόντια, μόνο οι κραδασμοί στην κατακόρυφη κατεύθυνση θα μειωθούν,
καθιστώντας πολύ πιο εύκολη την ομαλή εκτέλεση πανοραμικής λήψης.
• Εξαιτίας των χαρακτηριστικών του μηχανισμού απόσβεσης κραδασμών, η εικόνα στο σκόπευτρο μπορεί να γίνει
λίγο θολή μετά την απελευθέρωση του κλείστρου. Αυτό δεν αποτελεί δυσλειτουργία.
• Μην απενεργοποιήσετε τη φωτογραφική μηχανή και μην βγάλετε το φακό από τη φωτογραφική μηχανή ενώ η
απόσβεση κραδασμών βρίσκεται σε λειτουργία. (Διαφορετικά, ο φακός μπορεί να εκπέμπει ένα θόρυβο
κροταλίσματος εάν κουνηθεί η φωτογραφική μηχανή. Αυτό δεν αποτελεί δυσλειτουργία. Ενεργοποιήστε ξανά
τη φωτογραφική μηχανή για να διορθώσετε αυτή την κατάσταση.)
• Στις φωτογραφικές μηχανές που διαθέτουν ενσωματωμένο φλας, η απόσβεση κραδασμών δεν λειτουργεί ενώ
φορτίζεται το ενσωματωμένο φλας.
• Όταν ο φακός είναι στερεωμένος σε ένα τρίποδο, ρυθμίστε το διακόπτη ON/OFF απόσβεσης κραδασμών
[OFF]. Ωστόσο, ρυθμίστε το διακόπτη σε [ON] όταν χρησιμοποιείτε τρίποδο χωρίς να ασφαλίσετε την κεφαλή
τριπόδου ή όταν χρησιμοποιείτε μονόποδο στήριγμα.
@
σε
4. Βάθος πεδίου
Οι ενδείξεις βάθους πεδίου $ είναι χαραγμένες δίπλα στη γραμμή δείκτη απόστασης %. Ωστόσο, σε κοντινές
αποστάσεις, τόσα λίγα βρίσκονται εντός εστίασης που μπορεί να είναι καλύτερα να ελέγξετε τον πίνακα βάθους
πεδίου (στη σελίδα 126). Εάν η φωτογραφική μηχανή σας διαθέτει κουμπί ή μοχλό προεπισκόπησης βάθους
πεδίου, χρησιμοποιήστε το για να ελέγξετε το βάθος πεδίου στο σκόπευτρο.
5. Εστίαση σε προκαθορισμένο λόγο αναπαραγωγής
Ο λόγος αναπαραγωγής είναι η σχέση μεταξύ του μεγέθους της εικόνας που εγγράφηκε στο φιλμ και του
πραγματικού μεγέθους του θέματος. Εάν, για παράδειγμα, η εικόνα στην οθόνη εστίασης είναι το ένα πέμπτο του
πραγματικού μεγέθους του θέματος, ο λόγος αναπαραγωγής είναι 1:5.
Για να φωτογραφίσετε σε προκαθορισμένο λόγο αναπαραγωγής, χρησιμοποιήστε την ακόλουθη διαδικασία:
1 Περιστρέψτε χειροκίνητα το δακτύλιο εστίασης μέχρι ο επιθυμητός αριθμός της κλίμακας λόγου αναπαραγωγής
#
να είναι ευθυγραμμισμένος με τη γραμμή δείκτη απόστασης %.
2 Στοχεύστε στο θέμα και μετά αλλάξτε τη θέση σας, πηγαίνοντας πιο κοντά στο θέμα ή πιο μακριά από αυτό,
μέχρι η εικόνα στο σκόπευτρο να γίνει ευκρινής.
Για την επίτευξη του κατάλληλου λόγου αναπαραγωγής για κάθε απόσταση εσ τίασης, δείτε τον πίνακα στη
σελίδα 126.
Gr
83
Page 84

6. Σημειώσεις για τη φωτογράφηση κοντινών λήψεων και εργασιών
αντιγραφής
Κούνημα φωτογραφικής μηχανής
Ο φακός AF-S VR Micro-Nikkor 105mm f/2.8G IF-ED παρέχει τόσο εξαιρετικά υψηλή μεγέθυνση εικόνας που
ακόμα και η πιο μικρή κίνηση κατά τη διάρκεια λήψης μπορεί να προκαλέσει θόλωμα της εικόνας. Βεβαιωθείτε να
συναρμολογήσετε τη φωτογραφική μηχανή σε ένα τρίποδο και να χρησιμοποιήσετε ντεκλανσέρ ή καλώδιο
τηλεχειρισμού για την αποδέσμευση του κλείστρου.
Κοντινή απόσταση εργασίας
Στους υψηλούς λόγους αναπαραγωγής που χρησιμοποιούνται στις κοντινές λήψεις, το βάθος πεδίου είναι πολύ
ρηχό. Για να διασφαλίσετε μεγαλύτερο βάθος πεδίου, εκτελέστε “stop down” του φακού και μετά τοποθετήσετε
προσεκτικά τη φωτογραφική μηχανή για να διασφαλίσετε ότι η πιο σημαντική επιφάνεια του θέματος βρίσκεται
στην ίδια ζώνη ευκρινούς εστίασης.
• Χρησιμοποιήστε τη χειροκίνητη εστίαση όταν χρησιμοποιείτε το φακό κοντινών λήψεων.
Προσάρτημα κοντινών
λήψεων
Αρ. 5T 1:6,3–1,22 15,0 × 22,5–1,97 × 2,95 82,4–28,1
Αρ. 6T 1:3,3–1,44 8,0 × 12,0–1,67 × 2,5 49,8–26,1
Αρ. 5T + 6T 1:2,2–1,65 5,24 × 7,86–1,45 × 2,18 38,1–24,3
Λόγος αναπαραγωγής Πεδίο θέματος (cm) Απόσταση εστίασης (cm)
7. Συντελεστής έκθεσης
Ο αριθμός f ενός φακού υποδεικνύει τη φωτεινότητα της εικόνας που δημιουργήθηκε με το φακό ρυθμισμένο σε
απόσταση λήψης “απείρου”. Όσο πιο υψηλός είναι ο λόγος αναπαραγωγής, τόσο περισσότερο θα μειωθεί η
φωτεινότητα της εικόνας. Η πραγματική φωτεινότητα της εικόνας καλείται “ωφέλιμος αριθμός f ” και η τιμή
αντιστάθμισης έκθεσης για την αλλαγή του ωφέλιμου αριθμού f-καλείται “συντελεστής έκθεσης”.
Gr
8. Παραλλαγή ωφέλιμου αριθμού f (σελ. 124)
Με αυτό το φακό, όσο πιο υψηλός είναι ο λόγος αναπαραγωγής, τόσο περισσότερο θα μειωθεί η φωτεινότητα της
εικόνας στο φιλμ (συσκευή ανίχνευσης εικόνας) και θα αυξηθεί ο ωφέλιμος αριθμός f (η ποσότητα του φωτός που
περνάει διαμέσου του διαφράγματος φακού θα μειωθεί). Αυτή η παραλλαγή αντισταθμίζεται αυτόματα από το
φωτόμετρο της φωτογραφικής μηχανής, ώστε ο χρήστης να μπορεί να προσδιορίσει την έκθεση ή να
πραγματοποιήσει λήψη με φλας TTL χωρίς να πρέπει να λάβει υπόψη το συντελεστή έκθεσης.
Ο αριθμός f που εμφανίζεται στον πίνακα LCD ή στο σκόπευτρο της φωτογραφικής μηχανής είναι η τιμή που
αντισταθμίζεται αυτόματα.
84
Page 85

9. Ρύθμιση του διαφράγματος
Ρυθμίστε το διάφραγμα στο σώμα της φωτογραφικής μηχανής. Όταν η λειτουργία έκθεσης (ή λήψης) είναι
ρυθμισμένη σε “A” (αυτόματη προτεραιότητα διαφράγματος) ή “M” (χειροκίνητο), η φωτογραφική μηχανή θα έχει
τον έλεγχο για να διατηρήσει τον προκαθορισμένο αριθμό f (έως περίπου 1,6 stop) καθώς αλλάζει ο ωφέλιμος
αριθμός f με την απόσταση λήψης.
10. Χρήση σκιάστρου μπαγιονέτ HB-38
■Σύνδεση του σκιάστρου
Ευθυγραμμίστε το δείκτη προσαρτήματος σκιάστρου φακού ( )
2 στο σκίαστρο (οποιονδήποτε από τους δύο δείκτες) με το δείκτη
θέσης σκιάστρου φακού 4 στο φακό και περιστρέψτε το σκίαστρο
φακού 1 δεξιόστροφα μέχρι να ασφαλίσει τέρμα στη θέση του.
• Βεβαιωθείτε ότι το δείκτης θέσης σκιάστρου φακού 4 είναι
ευθυγραμμισμένο με το δείκτη ρύθμισης σκιάστρου φακού (
• Εάν το σκίαστρο φακού δεν είναι σωστά συνδεδεμένο, μπορεί να
δημιουργηθεί βινιέτα.
• Για τη διευκόλυνση της σύνδεσης ή της αφαίρεσης του σκιάστρου, κρατήστε
το από τη βάση του (γύρω από το δείκτη προσαρτήματος σκιάστρου φακού)
και όχι από το εξωτερικό άκρο του.
• Για να αποθηκεύσετε το σκίαστρο φακού, συνδέστε το σ την αντίστροφη
θέση.
■Αποσύνδεση του σκιάστρου
Ενώ κρατάτε τη βάση του σκιάστρου (κοντά στο δείκτη προσαρτήματος σκιάστρου φακού) και όχι το εξωτερικό
άκρο του, περιστρέψτε το αριστερόστροφα για να το αποσυνδέσετε.
) 3.
11. Φωτογραφίες με φλας χρησιμοποιώντας φωτογραφικές μηχανές
με ενσωματωμένο φλας
Για την αποφυγή δημιουργίας βινιέτας, μην χρησιμοποιείτε σκίαστρο φακού 1.
Gr
85
Page 86

12. Συνιστώμενες οθόνες εστίασης
Διατίθενται διάφορες εναλλάξιμες οθόνες εστίασης για ορισμένες φωτογραφικές μηχανές SLR της Nikon ώστε να
ανταποκρίνονται σε κάθε κατάσταση λήψης φωτογραφιών. Αυτές που συνιστώνται για χρήση με αυτό το φακό
είναι οι εξής:
Οθόνη
Φωτογραφική μηχανή
F6
F5+DP-30
F5+DA-30
F4+DP-20
F4+DA-20
◎ : Εξαιρετική εστίαση
○
: Αποδεκτή εστίαση
Στο σκόπευτρο εμφανίζεται ελαφριά δημιουργία βινιέτας ή μοτίβα παραμόρφωσης moiré, αλλά όχι στο
φιλμ.
—
: Δεν διατίθενται.
( )
: Υποδεικνύει το βαθμό αντιστάθμισης έκθεσης που απαιτείται (μόνο μέτρηση στο κέντρο). Για
φωτογραφικές μηχανές F6, εκτελέστε αντιστάθμιση επιλέγοντας “Άλλη οθόνη” στη Προσαρμοσμένη
Ρύθμιση “b6: Αντιστάθ. οθόνης” και ρυθμίζοντας το επίπεδο της τιμής λειτουργίας έκθεσης σε -2,0 έως
+2,0 σε βήματα των 0,5 EV. Όταν χρησιμοποιείτε οθόνες διαφορετικές από τύπου B ή E, πρέπει να είναι
επιλεγμένο το “Άλλη οθόνη” ακόμη και όταν η απαιτούμενη τιμή αντισ τάθμισης είναι “0” (δεν απαιτείται
αντιστάθμιση). Για φωτογραφικές μηχανές F5, εκτελέστε αντιστάθμιση χρησιμοποιώντας την
Προσαρμοσμένη Ρύθμιση #18 στο σώμα της φωτογραφικής μηχανής. Για φωτογραφικές μηχανές της
σειράς F4, εκτελέστε αντιστάθμιση χρησιμοποιώντας το Επιλογέα Αντιστάθμισης Έκθεσης για την οθόνη
εστίασης.
Β λ. το εγχειρίδιο οδηγιών χρήσης για το σώμα της φωτογραφικής μηχανής για περισσότερες λεπτομέρειες.
Το κενό πλαίσιο σημαίνει ότι δεν εφαρμόζεται. Επειδή η οθόνη τύπου M μπορεί να χρησιμοποιηθεί τόσο για
Gr
μακροφωτογραφία σε αναλογία μεγέθυνσης 1:1 και άνω όσο και για φωτομικρογραφία, έχει διαφορετικές
εφαρμογές σε σχέση με άλλες οθόνες.
■Σημαντικό
• Για φωτογραφικές μηχανές F5, μόνο οι οθόνες εστίασης EC-B, EC-E, B, E, J, A, L μπορούν να χρησιμοποιηθούν
στη μέτρηση Matrix.
• Όταν χρησιμοποιείτε τις οθόνες εστίασης B και E σε φωτογραφικές μηχανές διαφορετικές από αυτές που
παρατίθενται παραπάνω, ανατρέξτε στις στήλες για τις οθόνες B και E.
ABCE
◎◎
◎◎ ◎ ◎
◎◎ ◎ ◎
—
◎◎
—
◎◎
EC-B
G1
F
EC-E
—◎—————◎—
—
—
G3 G4 J K L M P U
G2
○
—
—
◎
(+0,5)
◎—◎
○ ◎◎
○ ◎◎
—
—
◎
—
◎
—
—
◎
—
◎
86
Page 87

13. Φροντίδα φακού
• Να καθαρίζετε τις επιφάνειες του φακού με μια βούρτσα με φυσητήρα. Για να αφαιρέσετε ακαθαρσίες και
κηλίδες, χρησιμοποιήστε ένα μαλακό, καθαρό βαμβακερό πανί ή μαντιλάκι φακού υγραμένο με αιθανόλη
(αλκοόλη) ή καθαριστικό φακών. Σκουπίστε με κυκλική κίνηση από το κέντρο προς το έξω άκρο, προσέχοντας
να μην αφήσετε ίχνη ή να μην αγγίξετε άλλα μέρη του φακού.
• Ποτέ μη χρησιμοποιείτε διαλυτικό ή βενζόλιο για να καθαρίστε το φακό επειδή αυτό μπορεί να προκαλέσει
βλάβη στο φακό, πυρκαγιά ή προβλήματα υγείας.
• Για να προστατεύσετε το μπροστινό στοιχείο φακού, διατίθεται φίλτρο NC. Επίσης το σκίαστρο φακού 1
βοηθάει στην προστασία του μπροστινού τμήματος του φακού.
• Κατά την αποθήκευση του φακού στη θήκη φακού του, συνδέστε το μπροστινό και το πίσω κάλυμμα.
• Όταν ο φακός δεν πρόκειται να χρησιμοποιηθεί για μεγάλο χρονικό διάστημα, αποθηκεύστε τον σε ένα δροσερό
μέρος χωρίς υγρασία για την αποφυγή δημιουργίας μούχλας. Επίσης αποθηκεύστε το φακό μακριά από την
άμεση ηλιοβολή ή χημικές ουσίες, όπως καμφορά ή ναφθαλίνη.
• Μην βρέξετε το φακό και μην τον ρίξετε σε νερό επειδή αυτό θα έχει ως αποτέλεσμα να σκουριάσει και να
προκληθεί δυσλειτουργία.
• Για μερικά μέρη του φακού χρησιμοποιείται ενισχυμένο πλαστικό. Για την αποφυγή πρόκλησης βλάβης, μην
αφήνετε ποτέ το φακό σε μέρος με υπερβολικά υψηλή θερμοκρασία.
14. Στάνταρ εξαρτήματα
• Προσαρτώμενο μπροστινό κάλυμμα φακού 62mm LC-62 • Πίσω κάλυμμα φακού
• Σκίαστρο μπαγιονέτ HB-38 • Ευέλικτη θήκη φακού CL-1020
15. Προαιρετικά εξαρτήματα
• Βιδωτά φίλτρα 62mm
• Μπορούν να χρησιμοποιηθούν τηλεμετατροπείς AF-S* TC-14EII/TC-17EII/TC-20EIII.
* Η λειτουργία αυτόματης εστίασης δεν είναι δυνατή. (Διατίθενται οι λειτουργίες VR και AE.)
16. Μη συμβατά εξαρτήματα
• Αυτόματος δακτύλιος BR-4 και όλα τα μοντέλα του δακτυλίου αυτόματης επέκτασης PK, του δακτυλίου K και
του πτυσσόμενου πρόσθετου εστίασης.
Άλλα εξαρτήματα μπορεί να μην είναι κατάλληλα για χρήση με αυτό το φακό. Για λεπτομέρειες, διαβάστε
προσεκτικά το εγχειρίδιο οδηγιών χρήστη των εξαρτημάτων.
Gr
87
Page 88

17. Τεχνικά χαρακτηριστικά
Τύπος φακού: φακός AF-S Micro-Nikkor τύπου G με ενσωματωμένο CPU και μοντούρα
Εστιακή απόσταση: 105mm
Μέγιστο διάφραγμα: f/2,8
Κατασκευή φακού: 14 στοιχεία σε 12 ομάδες (1 στοιχείο φακού ED και μερικά στοιχεία φακού με
Γωνία φωτογραφίας: 23°20’ με φωτογραφικές μηχανές SLR φιλμ της Nikon με φορμά 35mm (135)
15°20’ με ψηφιακές φωτογραφικές μηχανές SLR με φορμά DX της Nikon
18°40’ με φωτογραφικές μηχανές συστήματος IX240
Κλίμακα λόγου
αναπαραγωγής: 1:10 έως 1:1 (πραγματικό μέγεθος)
Πληροφορίες απόστασης: έξοδος στο σώμα της φωτογραφικής μηχανής
Εστίαση: σύσ τημα μεσαίας εστίασης (IF) της Nikon (που χρησιμοποιεί εσωτερικό Αθόρυβο
Διακόπτης περιορισμού
εστίασης: παρέχεται, διατίθενται δύο εύρη: FULL (∞–0,314 m) ή ∞–0,5 m
Απόσβεση κραδασμών: μέθοδος μετακίνησης φακού με τη χρήση μηχανοκίνησης VCM (Voice Coil
Κλίμακα απόστασης λήψης:
Πιο κοντινή απόσταση
εστίασης: 0,314 m από το εστιακό επίπεδο (πραγματικό μέγεθος)
Αρ. λεπίδων διαφράγματος:
Διάφραγμα: πλήρως αυτόματο
Εύρος διαφράγματος: f/2,8 έως f/32
Μέτρηση έκθεσης: μέσω της μεθόδου πλήρους διαφράγματος
Μέγεθος προσαρτήματος: 62mm (P = 0,75 mm)
Gr
Διαστάσεις: περίπου 83 mm διάμ. x 116 mm (επέκταση από το κολάρο μοντούρας φακού
Βάρος: περίπου 750 g
μπαγιονέτ Nikon
εναπόθεση Νανοκρυσταλλικής επίστρωσης)
και ψηφιακές φωτογραφικές μηχανές SLR με φορμά FX της Nikon
μοτέρ), χειροκίνητα μέσω ξεχωριστού δακτυλίου εστίασης
Motor)
βαθμονομημένη σε μέτρα και πόδια από 0,314 m έως το άπειρο (∞)
9 τεμάχια (στρογγυλεμένα)
της φωτογραφικής μηχανής)
Τα τεχνικά χαρακτηριστικά και οι σχεδιασμοί υπόκειται σε αλλαγή χωρίς
οποιαδήποτε ειδοποίηση ή υποχρέωση από μέρος του κατασκευασ τή.
88
Page 89

89
Gr
Page 90

Sc
90
Page 91

91
Sc
Page 92

Sc
92
Page 93

93
Sc
Page 94

Sc
FULL
M/A
M
ON
OFF
0.5m
3
1.5
0.8
1
10
523
10
54
7
B
A
94
Page 95

名稱 ():參考頁
1鏡頭遮光罩(P.105)
2
鏡頭遮光罩對齊標記(P.105)
3
鏡頭遮光罩鎖定標記(P.105)
4
鏡頭遮光罩安裝標記(P.105)
5對焦環(P.99)
6距離刻度
7鏡頭安裝標記
8鏡頭卡口橡膠墊圈(P.98)
9CPU接點(P.98)
!對焦模式切換器(P.99)
"對焦限制開關(P.100)
#減震ON/OFF開關(P.101)
$成像比率(P.102)
%景深指示(P.102)
&距離標線(P.102)
95
Sc
Page 96

適用的照相機及可用的功能
有些功能可能受到限制-詳情請參閱您的照相機使用說明
書-
照相機
尼康數碼單鏡反光
(尼康FX/DX格式)照相機
F6﹑F5﹑F100﹑F80系列﹑
F75系列﹑F65系列
Pronea 600i﹑Pronea S*2
F4系列﹑F90X﹑F90系列﹑
F70系列
F60系列﹑F55系列﹑F50系列﹑
F-401x﹑F-401s﹑F-401
F-801s﹑F-801﹑F-601M
F3AF﹑F-601﹑F-501﹑
尼康 MF 照相機
(除了F-601M外)
功 能
減震
自動對焦
○ ○ ○○○○
○ ○ ○○○○
×
×
× ×
○ ○○○○
○ ○○
× ×
× × ××××
○
*1:P包括AUTO(通用程序)及可變程序系統*2:無手動模式(M)可用-
• 如本鏡頭與無減震功能的照相機一起使用﹐請將減震
ON/OFF開關#置於〔OFF〕- 特別是與Pronea 600i照相
Sc
機一起使用時﹐如該開關置于〔ON〕﹐電池電量會很快
耗盡-
曝光模式
1
*
P
○○○○
○○
: 可能 ×: 不可能
SAM
××
××
96
Page 97

1. 簡介
感謝購買AF-S VR微距尼克爾105mm f/2.8G IF-ED鏡頭-該
高性能微型鏡頭具有特殊的減震(VRII)和高速內部對焦
(IF)系統-此外﹐該鏡頭採用寧靜波動馬達來驅動對焦
機構-
■ 主要特色
• 攝製比例為無窮遠(∞)至1/30x時﹐能夠比普通不用
VRII鏡頭大約慢四檔*的快門速度拍攝-如此﹐擴充了快
門速度的可用範圍﹐使得在不使用三腳架時進行拍攝更
為便利-(*處於尼康測試環境-減震效果視個體環境和
拍攝環境而異-)
• 還能進行搖鏡拍攝﹐因為鏡頭能從照相機的震動狀況自
動分辨出搖鏡拍攝的動作和減震功能有效地發揮作用-
• 用對焦模式切換器可方便地選擇自動對焦(A)和手動
對焦(M)模式-
• 手動優先的自動對焦﹐可以隨時從自動對焦換到手動對
焦-
• 當此鏡頭裝在有3D矩陣測光能力的尼康照相機身上時﹐
還可以進行更精確的曝光控制﹐因為這時鏡頭會將拍攝
對象距離信息傳送到照相機身上-
• 採用單片ED(超低色散)鏡片元件確保圖像清晰絕無彩
色干涉邊紋-同時﹐又利用9葉片光闡使形成一個近乎圓
形的光圈開孔﹐使拍攝對象前後的景物會形成逐漸模糊
的圖像-
97
Sc
Page 98

• 安裝在一些鏡頭元件上的納米結晶涂層確保了其性能更
加優越﹐在任何拍攝環境下(從陽光充足的室外到有聚
光燈的室內場景)都能再現清晰的圖像-
■ 注意事項
• 注意不要弄臟或損壞CPU接點9-
• 安裝TC-20E/TC-20EII/TC-20EIII後﹐最小光圈限制在f/90
以內-
• 本鏡頭裝在尼康數碼單鏡反光(尼康DX格式)照相機﹐
如D300系列和D7000上時﹐鏡頭畫面視角變成15°20’﹐與
其35mm相當的焦距約為157.5mm-
• 如果鏡頭卡口橡膠墊圈8損壞時﹐請務必讓附近的尼康
指定經銷商或尼康授權的維修服務中心修理-
• 鏡頭前方共計可以安裝四盞無線遙控閃光燈SB-R200-
Sc
98
Page 99

2. 對焦
鏡頭對焦模式
照相機
MM/A
手控對焦
(有輔助對
焦功能)
手控對焦(除了F-601
M外﹐
都有輔助對焦功能)
手控對焦(有輔助對焦功能)
手動優先的
自動對焦
照相機
對焦模式
AF
AF
MF
MF
尼康數碼單鏡反光(尼康FX/
DX格式)照相機﹑F6﹑F5﹑
F4系列﹑F100﹑F90X﹑F90系列﹑
F80系列﹑F75系列﹑F70系列﹑
F65系列﹑Pronea 600i﹑Pronea S
F55系列﹑F60系列﹑ F50系列﹑
F-801s﹑F-801﹑F-601
M﹑F-401x﹑
F-401s﹑F-401
按下表設定照相機對焦模式:
■ 手動優先的自動對焦(M/A模式)
1 將對焦模式切換器!設定在〔M/A〕-
注意:請務必按照指示器正好對準〔M/A〕
的原則設定開關-
2 在輕壓快門釋放按鈕或照相機上備有的
AF-ON按鈕時﹐仍有自動對焦但可通過操作獨立的手控
對焦環5﹐來手控補償對焦-
3 要取消手控補償時﹐再次輕按快門釋放按鈕或照相機上
的AF-ON按鈕-此時﹐照相機將回到自動對焦模式-
M/A
FULL
指示器
M
0.5m
Sc
99
Page 100

■ 限制自動對焦範圍(僅適用於兼容AF-S尼克爾鏡
頭的AF照相機)
用自動對焦模式操作時﹐如果拍攝對象總
在0.5米之外時﹐請將對焦限制開關"設定
在〔∞∼0.5米〕以減少對焦時間注意:請務必按照指示器正好對準
〔∞∼0.5米〕的原則設定開關-
• 如果拍攝對象有時在0.5米或更近的距離﹐請將其設定在
〔FULL〕-
FULL
指示器
0.5m
3. 減震模式(VR@)
■ 減震的基本概念
高
照相機震動
震
動
數
搖鏡拍攝
震動強度 強
■ 減震效果
Sc
• 拍攝對象處於無窮遠(∞)至約3米之間的距離時(攝製
比例為1/30x)﹐能夠比普通不用VRII鏡頭大約慢四檔*的
快門速度拍攝-隨a攝製比例從1/30x開始增加﹐減震效
100
 Loading...