

Page 1

Nikon
AC-2WE
Photo Secretary II for FI 00
(for Windows®)
Instruction manual
Page 2

CONTENTS
FOREWORD...................................................................................................................................P. 3
Configurations ........................................................................................................................... P. 4
System Requirements for Installing Nikon Photo Secretary II
Minimum PC System Requirements.......................................................................................P. 4
WELCOME TO NIKON PHOTO SECRETARY II ...........................................................................P.5
Before Installing Photo Secretary II on Your Personal Computer .............................................P. 5
Installing Nikon Photo Secretary II.........................................................................................P. 5-7
Deleting Nikon Photo Secretary II from Your Personal Computer
Contents of Photo Secretary II ....................................................................................................P. 9
Selecting a Communication Port...............................................................................................P.10
Connecting the Camera to a Personal Computer
With the FI 00......................................................................................................................... P. 11
With the F5 ............................................................................................................................ P. 12
With the F90/F90X (N90/N90s) .............................................................................................P. 13
Photo Secretary II Functions ....................................................................................................P. 14
Toolbar Icons ............................................................................................................................P. 15
Using the "One Point” Function ................................................................................................P. 16
Using the Guide Window ..........................................................................................................P. 16
Using the “Flelp” Function......................................................................................................... P. 16
STARTING AND USING PHOTO SECRETARY ..........................................................................P. 17
Configuration.............................................................................................................................P. 18
FIDO's Custom Setting .......................................................................................................P. 19-21
Shooting Data: ....................................................................................................................P. 22-31
With the FI 00...............................................................................................................................P. 22-25
With the F5...................................................................................................................................P. 26-28
With the F90/F90X (N90/N90s)...................................................................................................P. 29-31
Opening Shooting Data Files ..................................................................................................P. 32
Selecting Shooting Data File Views...................................................................................P. 32-35
Editing Shooting Data............................................................................................................... P. 36
Selecting “Frame Property” Options..........................................................................................P. 37
Linking Image Data to Frames...........................................................................................P. 38-39
Using the “Load Multiple Images” Command to Link Image Data to Shooting Data .. P. 40-41
Using the “Image List” Command to Link Image Data to Shooting Data
Searching Files Based on Keyword..........................................................................................P. 43
Saving the Shooting Data as Text Files..........................................................................................P. 44-45
Printing the Shooting Data..............................................................................................................P. 45-48
.............................................................
...................................................
............................................
P. 11-13
.................................
P.4
P. 8
P. 42
PHOTO FINDER ...........................................................................................................................P. 49
Usable Image Data Files with Photo Secretary II for FI00
KEYBOARD SHORTCUTS ...........................................................................................................P. 51
.......................................................
P. 50
Page 3

Nikon SERVICE FACILITIES (As of March 1999)
Argentina: Eduardo Udenio y Cia.
S.A.C.I.F.I.
Australia: Maxwell Optical
Industries Pty Ltd.
Belgium: N.V. H. de Beukelaer & Co. S.A.
Brazil; I. Tanaka & Cia. Ltda.
Canadá: Nikon Canada Inc.
Chile: Reitschneider Foto S.A.C. ei.
Czech Rep.: Nikon SRO
Denmark; Dansk Fotoagentur, A/S
Finland; Nikon Svenska AB
Finnish branch office
France: Nikon France S.A.
Greece: D. & J. Damkaiidis S.A.
Germany: Nikon GmbH
Hong Kong; Nikon Hong Kong Ltd.
Hungary: Nikon Kft
India: Mazda Camera Centre
Photo Vision
Capital Electronics
Indonesia: PT Alta Samaraya
PT Indonik Kandi
Ireland: Nikon U.K. Ltd.
Israel: Hadar Photo Supply Agencies
Ltd.
Italy; Nital S.p.A.
Kuwait: Ashraf & Co., Ltd.
Malaysia; Shriro (Malaysia)
Sdn. Bhd.
Mexico: Mayoristas Fotográficos,
S.A. de CV.
Netherlands: Inca Import B.V.
New Caledonia; Phocidis
New Zealand: T.A. Macalister Ltd.
Norway; Interfoto A.S
Poland: Camera Sp Z.0.0.
Reunion; Oimaciphot S.A.
Ayacucho 1235, Buenos Aires (1111)
Phone: +54-1-8150687
Unit 4 Northbank Industrial Park
20-36 Nancarrow Avenue, Meadowbank, NSW 2114
Phone: +61-2-9390-0200
Boomsesteenweg 77, B-2630 Aartselaar Phone: +32-3-8705900
Rua Martim Francisco, 438, 01226-000, Sâo Paulo-SP
Phone; +55-11-8252255
1366 Aerowood Drive. Mississauga, Ontario L4W ICI
Phone; +1-905-6259910
Jose Manuel Infante #1639, Casilla 4216, Providencia, Santiago
Phone: +56-2-2049030
Kodanska 46,100 10 Praha 10 Phone; +420-2-6715 4560
Lerso Parkalle 101, DK2100 Kobenhavn Phone: +45-39-162020
Ojahaanrinne 4,01600 Vantaa
Phone: +358-9-5660060
191, Rue du Marché Roilay, 94504 Champigny Sur Marne Cedex
Phone: +33-1-45164516
33 Xariton Street, 175 64 Paieo Faliro, Athens
Phone: +30-1-94 10 888
Tiefenbroicher Weg 25, 40472 Düsseldorf
Phone: +49-211-94140
Suite 1001,10F, Cityplaza One, 1111 King's Road,
Taikoo Shing Phone: +852-2902-9000
Devai Utca 26-28, H-1134 Budapest
Phone: +36-1-350-5525
306, Veena Kiliedar Bldg., Pais Street,
K. Khadye Marg, Bombay (Mumbai) 400 011 Phone: +91-22-3079284
223, Okhia Industrial Estate, New Delhi 110020
Phone: +91-11-6831936
12, J.LNehru Road, Calcutta-700 013
Phone: +91-33-2280091, 2285857
Arkade Belanja Dusit mangga Dua Ruko
No. 16, Jl. Arteri Mangga Dua Raya, Jakarta 10620
Phone; +62-21-6127654
Jl. Tomang Raya No. 49.B, Jakarta 11440 Phone: +62-21-5600974
380, Richmond Road, Kingston, Surrey KT2 5PR
Phone: +44-181-541-4440
P.O. Box 1686, Tel-Aviv 61016
Phone: +972-3-5603947
Via Tabacchi 33,10132 Torino Phone: +39-11-8996804
P.O. Box 3555, Safat, P, Code 13036-Safat, Kuwait
Phone:+965-5312960-8
Lots 22 & 24, Jalan 225, Section 51A, 46100 Petaling Jaya,
Selangor (P.O. Box 10571,50718 Kuala Lumpur) Phone: +60-3-7749842
Dr. Jimenez 159, Doctores, D.F. Mexico City,
Mexico 06720 Phone; +52-5-5887011,5884744
Rutherfordstraat 7, 2014 K.A. Haarlem Phone; +31-23-5101910
BP 661, 98845-Noumea Cedex Phone: +687-28-6670
65-73 Parnell Rise, Auckland Phone: +64-9-3034334
0. H. Bangsvei 51. N-1322 Hevik Phone: +47-67-534990
UL, Tamka 38, 00355 Warszawa Phone: +48-22-8281255
1, Rue Robert Shumann, Zi n 3, BP268, 97826 Le Port Cedex
Phone: +262-42-45-50
Saudi Arabia: Ahmed Abdulwahed
Singapore; Shriro (Singapore)
Spain: Finicon S.A.
Sweden: Nikon Svenska AB
Switzerland: Nikon AG
Taiwan: Yang Tai Trading Corp. Ltd.
Thailand: Niks (Thailand) Co., Ltd.
U.A.E.; Grand Stores
United Kingdom: Nikon U.K. Ltd.
Uruguay: Micro S.C.
U.S.A.; Nikon Inc.
Vietnam: Pham The Camera Repair
Yugoslavia: Refot В
Japan; NIKON CORPORATION
Abdullah Trading
Establishment
Re. Ltd.
Center
Ohi Service Sec.
Sapporo Service Center
Shinjuku Service Center
Nihonbashi Service Center
Yokohama Service Station
Nagoya Service Center
Osaka Camera Service Sec.
Osaka Umeda Service Station
Fukuoka Service Center
P.O. Box 3611 Jeddah 21481 (Postal Address)
Hail Commercial Centre, 3rd Floor, 1-5, Hail
Road, Beside Caravan Centre, Jeddah
Phone; +966-2-6425333/6425777
11 Chang Cham Road, #06-01 Shriro House
Singapore 159640 Phone:+65-4727777
Calle Laforja, 95, Pral. 3', 08021 Barcelona
Phone: +34-93-2402121
Calle Reina Marcedes, 7, Madrid-20
Phone: +34-91-5539392
Anton Tamms Vàg 3, Box 84,194 22 Upplands-Vasby
Phone: +46-8-59410900
Kaspar-Fenner-Strasse 6, CH-8700 Kusnacht/ZH
Phone:+41-1-9136111
6F, 90 Huai-Ning Street, Taipei 10037
Phone: +886-2-2311-7975, 2311-3480
166 Silom Road 12, Bangkok 10500
Phone: +66-2-235-2929
Saleh Mohammed Bin Lahej Bldg., Al Garhood, P.O. Box 2144,
Deira, Dubai Phone: +971-4-823700
380 Richmond Road, Kingston, .
Surrey KT2 5PR Phone:+44-181-541-4440
Casilla Correo 27, Avda. 18 de Julio 1202, Montevideo
Phone: +598-2-915516
1300 Walt Whitman Rd. Melville, NY 11747-3054
Phone: Repair Sen/ice; +1-800-645-6678,
General Questions (Consumer Relations): +1-800-NIKONUS,
Computer related technical support; +516-547-4311
11 Le Cong Kiue St. Dist. 1, Saigon City
Phone: +84-8-829-5888
Pcinjska BR. 12,11000 Beograd
Phone: +381-11-4448652
6-3, Nishiohi 1-chome, Shinagawa-ku, Tokyo 140-8601
Phone: +81-3-3773-2221
Ohdori Bldg., 2F, 1-13, Ohdorinishi, Chuo-ku, S«yDporo 060-0042
Phone: +81-11-231-7896
Shinjuku NS Bldg., 5F, 2-4-1, Nishi-Shinjuku, Shinjuku-ku, Tokyo 163-0805
Phone: +81-3-5321-4466
Nihonbashi First Bldg,, 9F, 2-19, Nihonbashi 1-chôme, Chuo-ku, Tokyo 103-0027
Phone: +81-3-3281-6810
TS Plaza Bldg., 4F, 2-23-2, Tsuruya-cho, Kanagawa-ku, Yokohama 221-0835
Phone: +81-45-312-1101
Chugai Tokyo Kaijo BkJg., 6F, 3-20-17, Marunouchi, Naka-ku, Nagoya 460-0002
Phone: +81-52-954-0122
Daisanshoho Bldg., 8F, 2-2-3, Nishishinsaibashi, Chuo-ku, Osaka 542-0086
Phone: +81-6-6212-7026
Shinsankei Bldg., IF, 2-5-2, Umeda, Kita-ku, Osaka 530-0001
Phone; +81-6-6348-9730
Hakata Ekimae Daiichi Seimei Bldg., IF, 1-4-1, Hakata Ekimae, Hakata-ku,
Fukuoka 812-0011 Phone: +81-92-415-6350
NIKON CORPORATION, Tokyo, Japan
Printed in Japan (99/3)
Page 4

IMPORTANT - READ CAREFULLY BEFORE OPENING
By opening the sealed storage media package, you indicate your acceptance of the following
Nikon
License Agreement
Nikon Corporation. License Agreement
You should carefully read the Nikon License Agreement contained herein before opening the storage media package or breaking the seal on the
storage media. BY OPENING THE STORAGE MEDIA PACKAGE, YOU INDICATE YOUR ACCEPTANCE OF THIS AGREEMENT AND ARE
AGREEING TO BECOME BOUND BY THE TERMS OF THIS AGREEMENT. If you do not agree to the terms of this agreement, do not open the
storage media package or break the seal on the storage media. Promptly return within fifteen (15) working days from the date of delivery this
unopened package to the store (the authorized Nikon Dealer in the U.S.) where you obtained it for a full refund. If you decide to retain and use the
enclosed computer program and related documentation (“Nikon Software”), in consideration of the payment of the license fee, Nikon grants to you
a non-exclusive license to use the Nikon Software only under the terms stated in this agreement. This license is not a sale of the Nikon Software
and you do not become the owner of it. Nikon retains ownership of Nikon Software and all copies of it and reserves all rights not expressively
granted to you under this agreement. You only own the storage media on which the Nikon Software is recorded. This agreement constitutes the
complete and exclusive agreement between you and Nikon and takes the place of any prior agreement, oral or written, between us relating to the
Nikon Software.
1. License: This license allows you to:
A. Use the Nikon Software only on a single compatible personal computer. You must obtain a supplementary license from Nikon before using the
Nikon Software in connection with systems, multiple central processing units, computer networks, or emulations on a main frame or mini comput
er.
B. Make one copy of the Nikon Software in machine-readable form solely for back-up purposes. The Nikon Software is protected by copyright law.
You must reproduce on each copy the Nikon copyright notice and any other proprietary legends that were on the original copy.
C. Transfer the Nikon Software and all rights under this license to another party together with a copy of this Agreement provided you give Nikon
written notice of conditions of this agreement.
2. Restrictions
Except as otherwise stated in this agreement, you may not make or distribute copies of the Nikon Software to others or electronically transfer the
Nikon Software from one computer to another over a network. The Nikon Software contains trade secrets and in order to protect them, you may
not decompile, reverse engineer, disassemble or otherwise reduce the Nikon Software to a human-perceivable form. YOU MAY NOT MODIFY,
CHANGE, ADAPT, TRANSLATE, RENT, LEASE, LOAN, RESELL FOR PROFIT, DISTRIBUTE, NETWORK OR CREATE DERIVATIVE WORKS
BASED UPON THE NIKON SOFTWARE OR ANY PART THEREOF.
3. Term
This license is effective until terminated. This license will terminate automatically without notice from Nikon if you fail to comply with any provisions
of this license. Upon termination, you must destroy the Nikon Software and all copies thereof. You may terminate this license at any time by
destroying the Nikon Software and all copies thereof.
4. Foreign Export
You agree and certify that neither the Nikon Software nor any related technical data is being or will be shipped, transferred, or re-exported directly
or indirectly, into any country in any violation of any applicable export control laws, including, without limitation, the International Traffic In Arms
Regulations and the Export Administration Act.
5. LIMITED WARRANTY AND LIMITATIONS OF WARRANTY AND LIABILITY
A. NIKON WARRANTS THAT THE STORAGE MEDIA ON WHICH THE NIKON SOFTWARE IS RECORDED IS FREE FROM DEFECTS IN MATE
RIAL AND WORKMANSHIP UNDER NORMAL USE AND CONDITIONS FOR A PERIOD OF NINETY (90) DAYS FROM DATE OF DELIVERY
TO THE ORIGINAL LICENSEE AS EVIDENCED BY THE ORIGINAL SHIPPING RECEIPT. DURING THIS PERIOD, IF THERE IS ANY
DEFECT IN MATERIAL OR WORKMANSHIP TO THE STORAGE MEDIA, RETURN IT TO THE STORE (THE AUTHORIZED NIKON DEALER
IN THE U.S.) WHERE YOU OBTAINED IT, TOGETHER WITH YOUR ORIGINAL SHIPPING RECEIPT, AND IT WILL BE REPAIRED OR
REPLACED FREE OF CHARGE.
B. THIS WARRANTY EXTENDS TO THE ORIGINAL LICENSEE ONLY AND IS NOT ASSIGNABLE OR TRANSFERABLE. THIS WARRANTY DOES
NOT APPLY TO ANY STORAGE MEDIA WHICH HAS BEEN SUBJECT TO MISUSE, ABUSE, NEGLIGENCE OR ACCIDENT. ANY REPAIRED
OR REPLACED STORAGE MEDIA SHALL BE WARRANTED FOR THE REMAINDER OF THE ORIGINAL LIMITED WARRANTY OR THIRTY
(30) DAYS, WHICHEVER IS LONGER. ALL WARRANTIES IMPLIED BY LAW ON THE STORAGE MEDIA, INCLUDING BUT NOT LIMITED TO
THE MERCHANT ABILITY OR FITNESS FOR A PARTICULAR PURPOSE, ARE LIMITED TO THE DURATION OF THE ABOVE WARRANTY.
NIKON'S ENTIRE LIABILITY AND YOUR EXCLUSIVE REMEDY HEREUNDER IS LIMITED SOLELY TO REPAIR OR REPLACEMENT OF THE
STORAGE MEDIA ON WHICH THE NIKON SOFTWARE IS RECORDED.
C. EXCEPT FOR THE LIMITED WARRANTY FOR THE STORAGE MEDIA ON WHICH THE NIKON SOFTWARE IS RECORDED AS SET FORTH
ABOVE, NIKON MAKES NO WARRANTIES, EITHER EXPRESSED OR IMPLIED. THE NIKON SOFTWARE IS PROVIDED “AS IS” WITHOUT
ANY WARRANTY OF ANY KIND, AND NIKON, ITS EMPLOYEES, DISTRIBUTORS, DEALERS AND AGENTS SPECIFICALLY DISCLAIM ANY
WARRANTY OF ANY KIND, EITHER EXPRESSED OR IMPLIED, INCLUDING BUT NOT LIMITED TO ANY IMPLIED WARRANTY OF MER
CHANT ABILITY OR FITNESS FOR A PARTICULAR PURPOSE. IN NO EVENT DOES NIKON, ITS EMPLOYEES, DISTRIBUTORS, DEALERS
OR AGENTS WARRANT THE PERFORMANCE OR THE RESULTS YOU MAY OBTAIN FROM THE NIKON SOFTWARE OR THAT THE NIKON
SOFTWARE WILL MEET YOUR REQUIREMENTS, OR THAT THE OPERATION OF THE NIKON SOFTWARE WILL BE UNINTERRUPTED AND
ERROR-FREE. IF THE NIKON SOFTWARE IS DEFECTIVE, YOU ASSUME ALL COSTS OF REPAIR OR SERVICING. IN NO EVENT SHALL
NIKON, ITS EMPLOYEES, DISTRIBUTORS, DEALERS, OR AGENTS BE LIABLE TO YOU FOR ANY DIRECT, INDIRECT, CONSEQUENTIAL
OR INCIDENTAL DAMAGES, LOSSES, OR EXPENSES OF ANY KIND, INCLUDING BUT NOT LIMITED TO THE LOSS OF PROFITS, BUSI
NESS INFORMATION, OR BUSINESS INTERRUPTION ARISING OUT OF OH RESULTING FROM THE NIKON SOFTWARE HOWEVER
CAUSED, EVEN IF NIKON HAS BEEN ADVISED OF THE POSSIBILITY OF SUCH DAMAGES, LOSSES, OR EXPENSES.
D. EXCEPT AS OTHERWISE PROVIDED IN THIS AGREEMENT, NIKON SHALL HAVE NO LIABILITY OR RESPONSIBILITY OF ANY KIND
(INCLUDING LIABILITY FOR NEGLIGENCE) TO YOU OR ANY OTHER PERSON OR ENTITY WITH RESPECT TO ANY LIABILITY, LOSS OR
DAMAGE CAUSED OR ALLEGED TO HAVE BEEN CAUSED, DIRECTLY OR INDIRECTLY BY THE NIKON SOFTWARE SOLD, LICENSED, OR
FURNISHED BY NIKON UNDER THIS AGREEMENT, NOTWITHSTANDING THE ABOVE LIMITATION, NIKON'S LIABILITY OF ANY CLAIM OF
ANY KIND (INCLUDING NEGLIGENCE) FROM THE DELIVERY, LICENSE, OR USE OF THE NIKON SOFTWARE FURNISHED UNDER THIS
AGREEMENT SHALL IN NO CASE EXCEED THE FEE YOU PAID FOR THE NIKON SOFTWARE.
SOME JURISDICTIONS DO NOT ALLOW (A) LIMITATIONS ON HOW LONG AN IMPLIED WARRANTY LASTS OR (B) THE EXCLUSION OR
LIMITATIONS OF INCIDENTAL OR CONSEQUENTIAL DAMAGES SQ THE ABOVE LIMITATIONS OR EXCLUSIONS MAY NOT APPLY TO
YOU. NIKON'S WARRANTY GIVES YOU SPECIFIC LEGAL RIGHTS AND YOU MAY ALSO HAVE OTHER RIGHTS WHICH VARY FROM
JURISDICTION TO JURISDICTION.
NIKON'S WARRANTY GIVES YOU SPECIFIC LEGAL RIGHTS AND YOU MAY ALSO HAVE OTHER RIGHTS WHICH VARY BY LOCAL
LAWS.
6. General
If any provision of this agreement shall be determined to be invalid for any reason, the remaining provisions shall not be invalidated and shall remain
in full force and effect.
------------------
--------------------------------------
-----
---------------------------------------------------------------------------------------------------------------
Page 5

Technical Support
Nikon strives to produce high quaiity software that is simple to install and operate. If you encounter a
problem installing or operating this software package, please take the following steps before contacting technical
support.
If you are unable to establish communication with your camera through the serial link, check the status of
your communication ports in the Windows® Device Manager, You can open the Device Manager by going to the
Control Panels Folder and Double Clicking on the “System” Icon. Find the “Ports" icon in the list of devices and
click on the “+” sign just to the left of the “Ports" Icon.
Your system may have only one or two Com ports shown. If Com 1 or Com 2 have a red “X” or a yellow
“!” attached, this indicates a system conflict is present. Click on the port icon that shows a conflict and then click
“Remove” at the bottom of the System Properties dialog. Shut the system down via the START menu and then
restart. Windows® will attempt to reinstall the ports using the default values. If the ports still show any conflict after
reinstallation, please contact your system vendor for assistance.
If your Ports appear to be operating properly (no conflicts shown) and you still cannot establish communi
cation with your camera, double click on each Com port in turn and check the settings located under the
“Resources” tab. The ports should be at the expected default settings.
The default setting for Communication ports One and Two;
Com Port
1
2
tion with your camera. Please make the appropriate adjustments to the port settings, then restart your PC.
■ ' ^ Please note that if your system supports Com Ports 3 and 4; devices attached to these ports will cause a
conflict with Com Ports 1 and 2 if you attempt to use the devices simultaneously. If you have a serial mouse
installed at Com 1 and an internal modem installed at Com 2, you will not be able to use Photo Secretary on Com
3 in any case, or on Com 4 while the modem is in use.
the same physical connection. Com 2 and Com 4 also share the same physical serial port. While an internal
modem will not share the same physical connection, the same principle applies. If your modem is set to Com 2,
while it is in use Com 4 devices cannot be used.
Photo Secretary from communicating with your camera. Please refer to your third party device documentation in
order to free a Com port for use by Photo Secretary.
tops with built in modems. Please check your system documentation in order to change the BIOS settings, or con
tact your PC supplier if you are still unable to establish communication with your camera.
If you are unable to resolve a problem, please contact the Nikon Service facility located in your area. Please print a
system summary from the device manager before placing the call, as the support engineer will require information
from this report in order to assist you.
IRQ
4
3
If your ports are not set to these parameters. Photo Secretary may not be able to establish communica
If your system supports two physical serial ports, the port assignments have Com 1 and Com 3 sharing
If you have a fax modem or Windows® CE device (PDA) installed on your system, this may prevent
Some new PC’s ship with the COM ports switched off in the system BIOS. This is most common in lap
I/O range
03F8-03FF
02F8-02FF
All printed material and electronic files provided are protected by Copyright. None of the supplied materials may be
reproduced in any form without the expressed written permission of Nikon Corporation.
© Nikon Corporation, 1995-1999 (Photo Secretary II for FI 00)
© Nikon Corporation, 1997 (Photo Secretary for F5)
© Nikon Corporation, 1995-1996 (Photo Secretary for F90X/F90)
Windows is a registered trademark of the Microsoft Corporation in the United States and / or other countries.
Page 6

Nikon
(F5*-X7ffl)
ZCOttfli. -=¡>7^^
EJ
E3
To T/c, U->_htClÍ5-0(D7 U T'
*SSÍiÁT*‘J, ÄiKi nTt'57í-*;^IU7
*'i»<«Sííi«/cíí>, 1i«{IÍSA''§:JgT-ro
4'í), EC-E7 7U->®fflB#«^«U>7'£i:roaT
!ÍHittiE«líEC-B77U->¿:PL;-?To
Type EC-E Focusing Screen (for F5)
Thank you for purchasing the type EC-E
focusing screen. The EC-E is a matte field
focusing screen with etched horizontai and
verticai iines added to a type EC-B focusing
screen to aid you when composing a picture.
Five focus brackets are provided and seiected
focus brackets are displayed darker for easy
confirmation. In combination with various
ienses, the EC-E screen has the same focusing
status and required degree of exposure
compensation as the EC-B focusing screen.
EC-E Einstellscheibe für F5
Die Ausstattung dieser Mattfeid Einsteilscheibe
entspricht der EC-B Scheibe. Darüberhinaus
bietet sie zur besseren Motivgestaltung
horizontale und vertikale Linien. Die fünf
zusätziichen Fokussierfelder erleichtern das
Fotografieren bei AF Betrieb. Das jeweils
angewählte AF Feld erscheint dunkler als die
anderen, dadurch wird leicht erkennbar, in
welchem Motivbereich der Autofokus aktiv ist.
Die für verschiedene Objektive erforderliche
Beiichtungskorrektur ist mit der Einstellscheibe
EC-B identisch.
#Îi*JÂ''i;9Îÿi-'îTo zny-r
Ec-BS(c:^ig
EC-ESS
Verre de visée de type EC-E
(pour F5)
Merci d’avoir porté votre choix sur le verre de
visée EC-E. Le EC-E est un verre de visée à
dépoli et lignes horizontales et verticales
gravées ajoutés à un verre de visée de type
EC-B pour vous aider à composer l’image.
Cinq repères de mise au point sont prévus et
les repères sélectionnés sont assombris pour
faciliter la confirmation. Combiné à différents
objectifs, le verre EC-E a le même statut de
mise au point et degré requis de compensation
d’exposition que le verre de visée EC-B.
Page 7

Nikon
Pantalla de enfoque de tipo EC-E
(para F5)
Muchas gracias por su compra de la pantalla
de enfoque de tipo EC-E. La EC-E es una
pantalla de enfoque con un campo mate con
líneas horizontales y verticales grabadas,
agregadas a una pantalla de enfoque de tipo
EC-B para ayudarle a componer una imagen.
Hay cinco niveles de enfoque y los niveles de
enfoque seleccionados aparecen más
oscuros para confirmarlos fácilmente. En
combinación con distintos objetivos, la
pantalla EC-E tiene el mismo estado de
enfoque y el grado de compensación de
exposición necesario que la pantalla de
enfoque EC-B.
EC-EMÍt*P
" immmw
«te««»■«
EC-EÍJ3ÍÍ1P (mF5+Sm)
Printed in Japan K9F0600101 (K636) 70
Page 8

g Nikon
B y-F'( t°-^DK-14/DK-15
Ц ZnkÜii, 7T<>íí'-7’-íf-^SíiWl,'±lfl'*
Я fè, ггог-ге-дивсшмх^йь/сжвл
П й'У^Дх-г- *><7<7377’'f >^^-ШЙВСШТ5
^tr-< fcUWSÆiEÏJhbSto
< fc UESihliWTOT J: 7 Ш1U S То
• Ääff'ttt'iSpÄT-roülicT, ,i,*¿;T'77’'f>íf-ic< fetjtf'ïusjsê
• ай^-аГОШрЯГОЯКСТ, ?|-;iCJ:5*äSÄ4-ifT< fcUtf'SUSíté
< if.т± ш ш -о гг№ ). cisMcitbTiiaisws-íü-Tfe'ííj <
С«(5М1ЙЩ»1:ЕЮгПГи*иШТЛС®Д«, «*ro)gBtíC‘JSTo
DK-14:F5. F4->M-X\ F3HP, F3T F3P
DK-15:F100, F90X->'J-7\ F90'>U-X. F-301S, F-80T D1
%ТУ=г<Уа'7 7r'í>íf'-T'f f-X(7)**í:^;í
1. ЛX 5(7)7 7'f>áí'-}íBSSBicteL;asnT@É:ínTHí#mTi'f-7
í^fUSTo
2. 7>T-f 7í-7 7 7'f>4í'-7’'r'f-7S#)ST-f
(!:fel;й^T'aÆ:ьíTo
• 77<>(?-=Г-Д h»*''*tT5i¿*'*U*T*',
}gfí^roSí»ttS>t7í'tiA,„
• Ш4'Т'7Д7-г 77«l3ffifti:tf'Ä4ft44'J;7l2bT</ic<i'o
• M^S(7)4=T'ffifflT5)i=i:li- РВв^**г:й''77Д74 7 7Й1:вйШ
7t e. 4ч ' J: 712 ;г íiE < if S Ио
• 75Дх-г ^Дв^ЦЧ'РТэи, ТК'Й. ТрТ
-T'i*sü7T<i;é4'o ^к-^л'-^отигв^йх-г 7->n#siî<âTT.
}§ е> f 127К-» S вйивг 7 г < f Í Ио
• Л-У7ДХ4 7 7«2íia4'¿;<7)>fn№'#»l.tüé-'f- Ш(7)Жт124:
и < fcU№‘?êïb*Jtêli, -Ь-Ат^(Т)|гИ*3‘е.*ч'11гШ<й#Щ7
T<ifSHo ?S<a< t«*>'-7<,Ii:№'S>iJiTi7)Tr;iÂ<ifÎHo
• Ш4'77Дх4 7 7«12«*'-#и*Яё, eì^mx№'fiTUST4'. <t>
>7 Й)ЬЙ*С «fi»* Ч *
• д h-7'4-ife»:S)t*''ei.'fc(7)l2Ä23«*U. *ist4'5*rt»l2tts
U fe и T s t ЙЯ^Т s Яёй'"* ‘J s TíT) T- r>iÄ < if éf Ио
• ass4-ffis, e;a#-a<7)Bs*TT'ii, +»4-<feuB5iham*''íse.n44'i
t *'■* 1) S То
• at®li7if«T'l±Æn*'lXti44'üâli, TEIC)Í*;UT7U-:2>7í:Ít
oT<fS(,'o
iS àie>44v;*3|?4-iìji;rfì|gi7)U>x'7'J-T-i'>fiae)tì. Л^ЛПТ'12
e<}ÄHT<fe?(-'o
i« h'7-f+-»l2J:iii)PSHËjt«ÎTt>44'T'< fiSi-'o
* Ш12й#1хи «íf 71 < fc ‘7№itîJ)Stf1üTT5 tЛ'"й ч í Tcfir-í
;íie<f:íi-'o
• ^ПЛТ*7 *«ШТ' fe < fc >7 |Й1ЬШ12 «fi»* U T -tí A,o
Page 9

Nikon
Oculare del Mirino Antiappannamento DK-14/DK-15
Vi ringraziamo per aver acquistato l’Oculare del Mirino Antiappannamento. Questo
mirino possiede una piastra di plastica trasparente con un rivestimento speciale della
superficie che riduce l'appannamento dell’oculare.
L'appannamento può essere ridotto nei casi seguenti:
• A basse temperature, quando il mirino si appanna a causa della condensazione del
respiro del fotografo o per altri motivi.
• Ad alte temperature ed in luoghi molto umidi, quando il mirino si appanna a causa di
vapori provenienti dal sudore del fotografo o per altri motivi.
Per mantenere l’efficacia di questo prodotto, assicuratevi di seguire attentamente le
note di cui sotto. L'utilizzo dell’oculare In casi al di fuori di quelli descritti nelle note
di cui sotto, può essere causa di guasti.
Macchine fotografiche utiiizzabiii
DK-14: F5, F4-series, F3HP, F3T, F3P
DK-15: FIGO, F90X, F90-series, F-801s, F-801, DI
Fissaggio deii’Ocuiare dei Mirino Antiappannamento
1. staccare l’oculare in dotazione dal corpo principale della macchina fotografica.
2. Fissare l’Oculare del Mirino Antiappannamento avvitandolo saldamente, nella stessa
maniera in cui era stato avvitato l’oculare in dotazione.
• In alcuni casi, l’immagine può apparire leggermente confusa, ma ciò non ha
ripercussioni sulla qualità finale dell’immagine fotografata.
Note
• Non toccare la piastra di plastica trasparente dell'oculare direttamente con le vostre dita.
• Fare attenzione affinché neve o pioggia non venga a contatto diretto con la piastra di
plastica.
• Utilizzare una spazzola a soffio per rimuovere polvere, gocce d’acqua o neve dalla
piastra di plastica. Se vi è un residuo di umidità sulla piastra di plastica, asciugare tale
residuo con un fazzoletto di carta. In tal caso, fare attenzione affinché il fazzoletto non
venga a contatto con la piastra di plastica.
• Se la piastra di plastica viene macchiata da impronte digitali o appannata da
eccessiva umidità atmosferica, pulirla leggermente con un panno di pelle
scamosciata. Fare attenzione a non strofinare fortemente la piastra di plastica in
quanto ciò potrebbe graffiarne la superficie.
• L’effetto antiappannamento non diminuisce con il tempo, ma l’immagine del mirino
può deteriorarsi in qualità, se la piastra di plastica viene graffiata.
• L’oculare può deformarsi se lasciato in luoghi a temperature estrememente alte; per
esempio vicino a riscaldatori d’aria o in una macchina sotto la luce solare diretta.
• In caso di temperature eccessivamente alte o umidità eccessiva, l’appannamento
dell’oculare non può essere prevenuto completamente.
• Se una smacchiatura sulla piastra di plastica non può essere rimossa strofinandoci
sopra, pulirla facendo attenzione ai punti seguenti:
* Pulire l’oculare gentìlmente, usando un panno soffice ed uno smacchiatore per obiettivi.
* Non asciugare l’oculare usando fonti di calore quali il fon.
* Lo strofinamento della piastra di plastica può occasionamlmente essere causa di
deterioramento nell’efficacia dell’effetto antiappannamento.
• Le smacchiature sulla piastra di plastica non hanno effetto sull’efficacia della capacità
antiappannamento dell’oculare.
Page 10

Nikon
Lentilla anti-vaho DK-14/DK-15
Muchas gracias por su compra del ocular del visor antiniebla de Nikon. Este ocular tiene
una placa de plástico transparente con un revestimiento de superficie especial que
reduce la niebla en el ocular.
Se puede reducir la niebla bajo las siguientes condiciones;
• A bajas temperaturas, cuando hay niebla en el visor por la condensación de la
respiración del fotógrafo, u otras causas.
• A altas temperaturas y humedad, cuando hay niebla en el visor por el vapor de la
transpiración del fotógrafo u otras causas.
Para mantener este producto en condiciones efectivas, respete las notas que se dan
a continuación. El uso del ocular de formas no descritas en estas notas puede
dañarlo.
Cámaras en las que puede utilizar
DK-14: E5, serie E4, E3HP, F3T, ESP
DK-15; F100, F90X/N90S*, serie F90/N90*, F-B01s/N8008s*, F-801/N8008*, D1
• tas Nikon N90s, N90, N8008S y N8008 se vende exclusivamente en el mercado de EE. UU.
Instalación del ocular del visor antiniebla
1. Desmonte el ocular suministrado con el cuerpo de la cámara.
2. Instale el ocular del visor antiniebla enroscando firmemente, de la misma forma que
el ocular suministrado.
• Bajo determinadas circunstancias, puede aparecer una imagen borrosa pero esto no
afectará la imagen real.
Notas
• No toque la placa de plástico transparente del ocular con sus dedos.
• Tenga cuidado de no permitir que la nieve o las gotas de lluvia caigan directamente
sobre la placa de plástico.
• Utilice un cepillo con soplador para limpiar el polvo, gotas de lluvia o nieve de la placa
de plástico. Si queda humedad en la placa de plástico, seque, tocando y empapando
la humedad con un pedazo de papel tisú. No frote la placa de plástico para secarlo.
• Si la placa de plástico tiene manchas de huellas dactilares o hay niebla debido a la
existencia de gran humedad, frote suavemente con un paño suave como de gamuza.
Frote suavemente ya que si lo hace con fuerza, la superficie de la placa de plástico
puede tener rayas.
• El efecto de antiniebla no desaparece con el tiempo pero la imagen del visor puede
verse peor si la placa de plástico está rayada.
• El ocupar puede deformarse si lo deja expuesto a temperaturas muy altas, por ejemplo
cerca de la calefacción o en el interior de un coche bajo los rayos directos del sol.
• Cuando se expone a extremos de temperatura o gran humedad, puede no eliminarse
completamente la niebla.
• SI no puede limpiar las manchas en la placa de plástico aunque lo frote, limpie
teniendo en cuenta los siguientes puntos:
* Frote suavemente el ocular con un paño suave limpio y un limpiador de lentes.
* No seque el ocular con calor, por ejemplo un secador de cabellos.
* Tenga en cuenta que cuando se frota la placa de plástico, a veces puede deteriorar
el efecto antiniebla.
• Las manchas en la placa de plástico no afectan la capacidad antiniebla del ocular.
Page 11

Nikon
Antifog Finder Eyepiece DK-14/DK-15
Thank you for purchasing the Nikon Antifog Finder Eyepiece. This eyepiece features a
transparent plastic plate with a special surface coating which reduces fogging on the
eyepiece.
Fogging can be reduced under the following conditions:
• In low temperatures, when the finder becomes foggy due to condensation from the
photographer’s breath or other causes.
• In high temperatures and humidity, when the finder becomes foggy due to steam from
the photographer's perspiration or other causes.
To maintain the effectiveness of this product, be sure to follow the notes below. Use
of the eyepiece In any way not described In these notes may cause damage.
Usable Cameras
DK-f4; F5, F4-series, F3HP, F3T, F3P
DK-15: FIDO, F90X/N90S*, F90-series/N90*, F-801 s/N8008s*, F-801/N8008*, D1
' The Nikon N90s, N90, N8008$, N8008 are sold exclusively in the Lt.S.A.
Attaching Antilog Finder Eyepiece
1. Detach the supplied eyepiece frem the camera body.
2. Attach the Antifog Finder Eyepiece by screwing it in firmly, in the same way as the
supplied eyepiece.
• Under some circumstances, image blur may occur but it does not affect the actual
picture image.
Notes
• Do not touch the transparent plastic plate of the eyepiece with your fingers.
• Be careful not to let snow or raindrops fall directly onto the plastic plate.
• Use a blower brush to clean any dust, raindrops or snow from the plastic plate. If
moisture remains on the plastic plate, dry it by touching the moisture with a piece of
tissue. When doing so, make sure not to wipe the plastic plate.
• If the plastic plate becomes stained with fingerprints or fogged from very high
humidity, wipe it gently with a soft cloth such as chamois. Make sure you wipe it
gently as strongly wiping the plastic plate may cause scratches on the surface.
• The anti-fogging effect does not deteriorate but the finder image somewhat
deteriorates if the plastic plate becomes scratched.
• The eyepiece may become deformed if it is left in extremely high temperatures such
as near a heater or inside a car in direct sunlight.
• In extreme temperatures or very high humidity, fogging may not be prevented
completely.
• If a stain on the plastic plate cannot be removed by wiping, clean it noting the
following points:
* Wipe the eyepiece gently using a clean soft cloth and a lens cleaner.
* Do not dry the eyepiece using heat, such as with a hairdryer.
* Note that wiping the plastic plate occasionally may cause the anti-fogging effect to
deteriorate.
• Stains on the plastic plate do not affect the anti-fogging capability of the eyepiece.
Page 12

Nikon
Beschlagfreies Sucherokular DK-14/DK-15
Durch die Verwendung eines spezieii beschichteten Kunststoffs wird bei diesen
Sucherokuiaren das Beschiagen reduziert.
Unter toigenden Bedingungen kommt dieser wichtige Vorteil zum Tragen:
• Bei niedrigen Temperaturen, wenn ein herkömmliches Okular durch den Atem des
Fotograten beschlägt und bei hohen Temperaturen und hoher Luftfeuchtigkeit.
Bitte lesen diese Anleitung, damit Sie das Okular optimal nutzen können. Bitte
beachten Sie die Reinigungshinweise.
Geeignete Kameras:
DK-14: FS, F4 Serie, F3HP, F3T, F3P
DK-15: Fl 00, F90X, F90 Serie, F-SOts, F-801, 01
Anbringen des Sucherokulars
Entfernen Sie bitte das mitgelieferte Okular von der Kamera und schrauben Sie das
Anti-Beschlag Okular sicher ein.
• Unter bestimmten Voraussetzungen kann das Sucherbild unscharf erscheinen; dies
hat jedoch keine Auswirkung auf die Aufnahme.
Wichtige Hinweise
• Berühren Sie nicht die transparente Oberfläche des Okulars.
• Vermeiden Sie möglichst Nässe auf dem Okular.
• Zum Reinigen gehen Sie bitte wie folgt vor;
Entfernen Sie Staub mit einem Blasepinsel und entfernen Sie Nässe durch Tupfen mit
einem weichen sauberen Tuch. Bitte gehen Sie behutsam vor, um die Oberfläche nicht
zu beschädigen.
• Wischen Sie bitte Fingerabdrücke und anderen Belag ebenfalls mit einem weichen
und sauberen Tuch ab. Vermeiden Sie dabei starken Druck, der zu Kratzern führen
kann.
• Bei Kratzern verschlechtert sich zwar das Sucherbild, die Antibeschlagwirkung bleibt
aber erhalten.
• Schützen Sie das Okular bitte vor zu hoher Temperatur. Denken Sie auch daran, daß
Temperaturen in einem in der Sonne abgesteiften Fahrzeug besonders stark anstelgen
können.
• Bei sehr hohen Temperaturen und sehr hoher Luftfeuchtigkeit ist keine vollständige
Antibeschlagwirkung möglich.
• Besonders hartnäckige Verschmutzungen beseitigen Sie bitte wie folgt:
* Reinigen Sie das Okular vorsichtig mit einem sauberen weichen Tuch und
Linsenreiniger.
* Lassen Sie das Okular an der Luft trocknen. Auf keinen Fall einen Haartrockner zum
Trocknen benutzen.
* Zu häufiges Reinigen kann die Antibeschlagwirkung einschränken.
• Verschnutzungen auf der Kunststoffplatte haben keinen Effekt auf die
Antibeschlagwirkung.
Printed in Japan K9F1200101 (K638) 60
Page 13

Nikon
Verre protecteur d’oculaire antibuée
DK-14/DK-15
Merci d’avoir porté votre choix sur i'ocuiaire de viseur anti-voiie Nikon. Cet oculaire se
présente sous forme de plaque en plastique transparent, à revêtement de surface
spécial réduisant le voile de l’oculaire.
Le voile peut être réduit dans les conditions suivantes:
• A basses températures, quand le viseur est voilé à cause de la condensation due à la
respiration du photographe ou à d’autres causes.
• A hautes température et humidité, quand le viseur est voilé par la vapeur due à la
respiration du photographe ou à d’autres causes.
Pour maintenir l'efficacité de ce produit, respectez les notes ci-dessous. L’emploi de
l’oculaire de toute autre manière risquerait de l’endommager.
Appareils sur lequel il est utilisable
DK-14: F5, série F4. F3HP, F3T, F3P
DK-15: Fl 00, F90X, série F90, F-SOIS, F-801, DI
Fixation de l’oculaire de viseur anti-voile
1. Retirez l’oculaire fourni avec l’appareil.
2. Montez l’oculaire de viseur anti-voile en le vissant fermement, comme l’oculaire
fourni.
' L’image peut parfois être floue, mais cela n’affecte pas l’image réelle.
Remarques
• Ne touchez pas la plaque en plastique transparent de l’oculaire avec les doigts.
• Evitez le contact direct de la plaque en plastique avec la neige ou la pluie.
• Utilisez une poire soufflante pour éliminer la poussière, les gouttes de pluie ou la
neige de la plaque en plastique. Si de l’humidité reste dessus, éliminez-la
complètemeht en appuyant un chiffon contre la plaque, mais sans l’essuyer.
• Si la plaque en plastique est tachée par des traces de doigt ou voilée par une très
forte humidité, essuyez-la doucement avec un chiffon doux, du chamois par exemple.
Essuyez doucement, sinon la surface de la plaque pourrait être rayée.
• L’effet anti-voile ne se détériore pas, mais l’image du viseur peut être légèrement
détériorée si la plaque en plastique est rayée.
• L’oculaire peut être déformé s’il est laissé à température très élevée, près d’un
appareil de chauffage ou dans une voiture en plein soleil par exemple.
• A températures extrêmes ou à très forte humidité, le voilage peut ne pas être
entièrement évité.
• Si les taches sur la plaque en plastique ne peuvent pas être éliminées en les essuyant,
nettoyez en notant les points suivants:
* Essuyez doucement l’oculaire avec un chiffon doux propre et du produit de
nettoyage pour lentille.
* Ne séchez pas l’oculaire à la chaleur, avec un séchoir à cheveux par exemple.
* Notez qu’essuyer la plaque eo plastique de temps à autre peut détériorer l’effet
anti-voile.
• Les taches sur la plaque en plastique n’affectent pas la capacité anti-voile de
l’oculaire.
Page 14

(Your address)
BUSINESS REPLY MAIL
NIKON PHOTO SECRETARY REGISTRATION
*ln this space, please write the address of your nearest Nikon service facility, listed on
the enclosed “NIKON SERVICE FACILITIES" page.
*
Page 15

Dear Nikon Customer:
Please take a moment to complete the following information and mail immediately. This will register your
Nikon Photo Secretary software and will allow us to contact you with any future announcements.
Thank you.
Nikon Corporation
Name:_____________________________________________________________________________
Address:.
City:
_____
Country:.
Postal code:
Telephone #:.
Cameras Owned:.
Photo Status: Pro:. Advanced: Amateur:. Beginner:.
Product name: (please tick the one you have)
Photo Secretary for □ F5 for Windows®
Photo Secretary for □ F5 for Macintosh®
Photo Secretary II for □ F100 for Windows®
Photo Secretary for □ F90X/F90 for Windows®
Serial #: DnC HDC
Version #:.
Mac:
_____
PC:.
(indicated on one of the enclosed floppy disks or the CD-ROM case)
_______
(included in Flelp menu)
Windows® is a registered trademark of Microsoft Corporation, USA.
Macintosh® is a registered trademark of Apple Computer Inc., USA.
Page 16

FOREWORD
Thank you for purchasing Nikon Photo Secretary II for FI 00 (AC-2WE). This software
is easy to use, but requires familiarity with basic Windows® operations and functions,
including: handling of folders, windows, menus, the clipboard, and general mouse and
keyboard techniques. If you are not familiar with these operations, please refer to your
“Microsoft Windows Help”.
Nikon Photo Secretary II is programmed to allow you to:
• Design customized settings on the Ft 00 camera.
• Download shooting data directly from the FIDO, F90/F90X (N90/N90S) or F5 cam
era to your personal computer.
• Edit shooting data downloaded from the camera to a personal computer, and link it
to image data loaded from a scanner or Photo CD.
• Use the extensive on-line help system.
Microsoft, Windows and Windows NT are registered trademarks or trademarks of
Microsoft Corporation in the USA and/or other countries.
Photo CD is a registered trademark of Eastman Kodak Company.
Nikon Corporation holds the copyrights of all sample image data appearing in this
software.
All other trademarks are the property of their respective owners.
Paste the provided serial
number seal here.
Page 17

FOREWORD
Configurations
Make sure the following items are provided:
• One CD-ROM with instalier
• Instruction manuai
• Registration card
• License agreement
• One sériai number seai; paste it on page 3 of this manuai.
System Requirements for Installing Nikon Photo Secretary II
Minimum PC System Requirements
To use Photo Secretary II, your computer system must be equipped with the follow
ing peripheral equipment and software:
Hardware:
• Personal computer compatible with Microsoft Windows® 95, Windows® 98,
Windows NT® Workstation
• 16 MB or more memory for Windows® 95/98 (32 MB or more recommended for
optimum performance); 24 MB or more memory for Windows NT® (48 MB or more
recommended for optimum performance)
• 10 MB or more free memory (100 MB or more recommended for optimum perfor
mance) on the hard disk
• CD-ROM drive (for installation)
• Availabie external RS-232C serial port (COM 1 -COM4)
• Nikon Personal Computer Connecting Cord MC-33 or MC-31 (optional)
• The MC-33 is for 9-pin serial port (Dsub-9); the MC-31 for 25-pin serial port
(Dsub-25).
• The MC-33 or MC-31 is always required to connect the FI 00 camera to a
personal computer,
• To connect the F90/F90X (N90/N90s) camera to a personal computer, use
the MC-31.
• To connect the F5 camera to a personal computer, use the MC-33.
• If the MC-33 or MC-31 does not match your computer's RS-232C serial port,
use the appropriate optional serial port convertible adapter.
Software:
• Microsoft Windows® 95, Windows® 98, or Windows NT® Workstation 4.0,
Page 18

WELCOME TO NIKON PHOTO SECRETARY II
Before Installing Photo Secretary II on Your Personal Computer
Check the distribution CD-ROM for any late-breaking news or additions to this
instruction manuai. if it contains updated information or corrections, the information
wiii appear in a file named “readme.txt”. The readme.txt file is an ASCII text file that
can be read using WordPad (select File Type ".txt” in WordPad) or Notepad.
Information in this file, will supersede or correct information contained in this instruc
tion manual.
Installing Nikon Photo Secretary II
1. With the desktop of Windows® 95, Windows®98 or Windows NT® Workstation 4.0
displayed, insert the CD-ROM in the CD-ROM drive,
2. With the Auto Run function, installation will automatically start. (Fig. 1)
Pholo Secretafy II for FIDO Setup is preparing the
InstanShieid® Wizard which will guide you through the rest
of the setup process. Please wait.
(Fig. 1)
If installation does not start, choose “Run” from the Start menu, specify file name
(“G:¥Setup.exe” is specified in the example with the Drive G as the CD-ROM
drive), then click “OK”. (Fig. 2)
Type the name of a program, folder, document, or internet
resource, and Windows wilt open it for you.
Qpen; jGASetup.exej
OK Csff^cei
(Fig. 2)
~3
grows©...
Installation will start.
• With Windows NT® Workstation 4.0, only users in the Administrator Group can
install this software. For details about user groups, see the instruction manual of
Windows NT® Workstation 4.0.
Page 19
3. The Choose Destination Location diaiog box lets you seiect the foider where Photo
Secretary II wiii be installed. If you want to change the folder, click “Browse" and
select the desired folder. Follow fhe instructions on your screen. Click “Next” to
continue the setup process.
Choose Destination Location
To mtaB to this foWei, ctick Next.
You can choose not to instalf Photo SecH^aiy li foi FT 00 tv
cSckHTfl Caned to e»t Sefua
'Destindion F(^
CX \N<tooSF^wto Seaetafj» 2
[) <£ack If Cancel |
Browse. }
(Fig. 3)
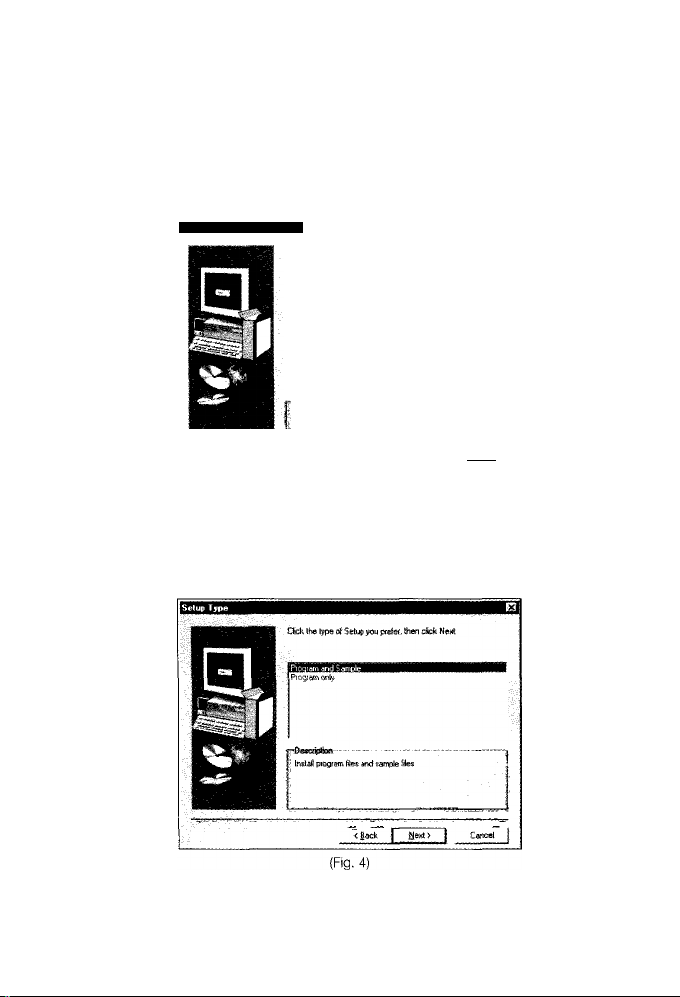
4. The Setup Type dialog box lets you select “Program and sample” or “Program
only”, then click “Next".
• You need 40 MB or more free memory on your hard disk for “Program and
sample” or 10 MB or more free memory for “Program only”.
Page 20

Select the program folder on the Select Program Folder dialog box (Fig. 5). Click
“Next” to start copying files. When all necessary files have been copied, the Setup
Complete dialog box will be displayed. Click “Finish” to complete the setup
process.
• If you have updated the system file, you may have to restart the system.
Select Progiam Foldei
Setup vwU add ptogian cons to the PicBiam Fddef feted birfow.
Vou mi®) type a new foW« name, or select ora from the ewsting
Foldetsfet, CtickNexttc continue.
(Fig. 5)
Page 21

Deleting Nikon Photo Secretary II from Your Personal Computer
1. From the Start menu, select “Settings”, then “Control Panel” to display the control
panel,
2. Double-click the “Add/Remove Program” icon to activate the Add/Remove
Program Properties dialog box, (Fig, 6)
3, On the dialog box, select “Nikon Photo Secretary II for FIDO" and click
“Add/Remove Program” to activate the Confirm File Deletion message box. Click
“Yes”,
4, Nikon Photo Secretary is then deleted from your personal computer. The Remove
Program dialog box indicates that deleting is in progress. After deleting is complet
ed, click “OK”,
Add/Remove Programs Properties
' InsfaH/Uninstall | Windows Setup | Startup Disk |
viil a new pfogram from a floppy disk or CD-ROM
drive, click install.
install...
The foBowing software can be automatically removed by
Windows, T 0 remove a program or to modify its installed
components, select it from the list and click
Add/Remove,
Nikon Photo Secretary II for FI 00
Add/Riwove...
OK Cancel
(Fig. 6)
A confirmation message box may ask you whether a share file (i.e., a file that may
be used for Photo Secretary II and another maker's application program) can be
deleted or not. Be careful when deleting a share file as doing so may affect other
application programs.
Page 22

Contents of Photo Secretary II
Nikon Photo Secretary II for FIDO contains the following applications (Fig, 7):
• Photo Secretary
This is the main application of Nikon Photo Secretary II for Ft 00. This manual uses
the term “Photo Secretary” for this application. Photo Secretary lets you download
shooting data from the camera to a personal computer, select Custom Settings
options, and edit shooting data.
Used with Photo Finder, an image loading application. Photo Finder allows you to
link the image data with the shooting data.
• Photo Finder
This is the image data loading application of Nikon Photo Secretary II for FI 00.
Photo Finder can be started up independently. Flowever, in most cases, it is acti
vated via Photo Secretary, Photo Finder allows you to load image data from a
scanner or other equipment, or photo CD. The loaded image data can be edited
and saved as files. (“Image List” and “Load Multiple Images” commands are avail
able in Photo Secretary.)
Photo Finder is started via the Photo Secretary when shooting data is linked to the
image data. It sends information about the image to the Photo Secretary,
• Nikon Photo Secretary II for FI 00 Help
Shows instructions for using Photo Secretary II for FIDO, including basic opera
tions.
• “readme” File
If the provided CD-ROM contains updated information or corrections, the informa
tion will appear in the readme file. The readme file can be read using WordPad
(select File Type “.txt” in WordPad) or Notepad,
.“T^Aecewones
,’7flnte(nelE>^ef
-*Tv Startup
MS-DOS Prompt
jj^Winciows EKplorer
USB
(Fig. 7)
^ Photo Finder
Photo Secretary li for FI 00 HeJp |
Photo Secretay
Page 23

!ips
Selecting a Communication Port
Select the RS-232C serial port to which you will connect the Personal Computer
Connecting Cord MC-33 or MC-31.
1. Start the Photo Secretary application in Photo Secretary II for FI 00.
2. Click “Tool” and “Configuration”.
3. Select the port to which you intend to connect the cord.
Photo Secretary supports COM1, COM2, COM3 and COM4 ports. Select a free COM
port supported by your computer. If you are using an internal modem on COM1, then
your serial port will be COM2, COM3 or COM4.
Fig. 8 shows Configuration dialog box.
• To confirm a free port, refer to your computer’s instruction manual.
10
(Fig. 8)
Page 24

Connecting the Camera to a Personal Computer with the FI 00
To connect the Nikon FI 00 camera to your personal computer, use only Nikon
Personal Computer Connecting Cord MC-33 or MC-31. A data link cannot be estab
lished with any other connecting cord.
Connecting
Turn off both the camera and personal computer.
Connect the MC-33 or MC-31 to the camera’s
10-pin remote terminal.
Insert the cord's plug into the terminal with the
“A” symbol pointing to the dot at the upper left
of the terminal, then turn the lock screw as far as
it will go. (Fig. 9)
Connect the MC-33 or MC-31 to the personal
3.
computer’s RS-232C serial port.
Match the shape of the cord’s connector with
the personal computer’s terminal, then push it in
and tighten the two screws on the plug.
4.
Turn the computer on, start Windows®, then
turn the camera on.
Disconnecting
1. Quit Windows®, then turn off both the camera
and personal computer.
2. Remove the cord's connector from the personal
computer.
Loosen the two screws on the connector, then
pull it out.
3. Remove the cord’s plug from the camera body.
Unscrew the lock ring, then unplug the cord.
(Fig. 10)
(Fig. 10)
11
Page 25

Connecting the Camera to a Personal Computer with the F5
To connect the Nikon F5 camera to your personal computer, use only Nikon Personal
Computer Connecting Cord MC-33. A data link cannot be established with any other
connecting cord.
Connecting
1. Turn off both the camera and personal computer.
2. Connect the MC-33 to the camera’s 10-pin
remote terminal.
Insert the cord's plug into the terminal with the
“A” symbol pointing to the right, then turn the
lock screw as far as it will go, (Fig. 11)
3. Connect the MC-33 to the personal computer’s
RS-232C serial port.
Match the shape of the cord’s connector with
the personal computer's terminal, then push it in
and tighten the two screws on the plug.
4. Turn the computer on, start Windows®, then
turn the camera on.
Disconnecting
1.
Quit Windows®, then switch off both the camera
and personal computer.
Remove the cord’s connector from the personal
2.
computer.
Loosen the two screws on the connector, then
pull it out.
Remove the cord's plug from the camera body.
Unscrew the lock ring, then unplug the cord.
(Fig. 12)
12
Page 26

Connecting the Camera to a Personal Computer with the F90/F90X (N90/N90s)
To connect the Nikon F90/F90X (N90/N90s) camera to your personal computer, you
must use Nikon Personal Computer Connecting Cord MC-31. You cannot establish a
data link with any other connecting cord.
Connecting
Turn the camera and personal computer otf.
Connect the MC-31 to the camera’s 10-pin
remote terminal.
Insert the cord’s plug into the terminal with the
“A” symbol pointing up, then turn the lock screw
as far as it will go. (Fig. 13)
Connect the MC-31 to the personal computer's
3.
RS-232C serial port.
Match the shape of the cord's connector with
the personal computer’s terminal, then push it in
and tighten the two screws on the plug.
4.
Turn the computer on, start Windows®, then
turn the camera on.
Disconnecting
1. Quit Windows®, then switch off both camera
and personal computer.
2. Remove the cord’s connector from the personal
computer.
Loosen the two screws on the connector, then
pull it out.
3. Remove the cord’s plug from the camera body.
Unscrew the lock ring, then unplug the cord.
(Fig. 14)
(Fig. 13)
13
Page 27

-ITCi'i'
Photo Secretary II Functions
• All functions can be accessed via puii-down menus. The Menu Bar and menu
options will change to match the active operation. Unavailable functions will appear
“dimmed” or not at aii. Most functions can aiso be accessed via the Toolbar but
tons.
• Most menu commands, options and functions can be found with the Help function
(Fig. 15)
14
(Fig. 15)
Page 28

Toolbar Icons
Toolbar icons in Photo Secretary main window
Open
■MJ
Save
M
Find
Print
M
Print Preview
Cut
M
Copy
Paste Data
Paste Image
Toolbar icons in Photo Finder main window
Open Zoom In
Save
El
Print
M
Copy Right Rotate
C5m|
.■rwrawwwirJ
ill
Previous View Style
M
Next View Style
M
Edit Image
a
nj
Data Property
Frame Property
Mi
FIDO Shooting Data
M
FI 00 Custom Setting
Flelp
Zoom Out
s
Left Rotate
Paste Help
.«j
15
Page 29

Using the “One Point” Function
For the factory-set default setting, Photo Secretary displays a One Point window after
startup. This window shows a brief explanation of Photo Secretary operations and
functions. Clicking the “Next” button displays the explanation for the next topic. When
the “Show at startup” box is checked, the One Point window is always displayed
when Photo Secretary is started. To cancel the One Point window, uncheck the
“Show at startup” box, quit the application and restart. To display the One Point win
dow again, select “Help” then click “One Point”.
• With the One Point window displayed, you cannot operate Photo Secretary on the
other windows. For other window operations, close the One Point window.
Using the Guide Window
The guide window shows brief instructions with icons on how to operate Photo
Secretary correctly.
1. From the Start menu, click [Programs]-[Nikon Photo Secretary II for Ft 00]-[Photo
Secretary] to start the Photo Secretary application.
2. To display the Guide window, click [View]-[Guide] so that a check mark is shown
at the left side of the “Guide” command.
3. Clicking the icons on the Guide window activate the window for corresponding
functions.
4. To hide the Guide window, click [View]-[Guide] so that a check mark beside the
“Guide” command disappears.
• Use the “Help” function to see how to operate or use the activated window.
Using the “Help” Function
To open Photo Secretary II Help, select “Programs” from the Start menu, select
“Nikon Photo Secretary II for FI 00” fhen click “Photo Secretary II for FI 00 Help”.
Photo Secretary II Help shows you the basic operations of Nikon Photo Seoretary II
for FI 00. The Help menu offers the help commands shown below. To see a help
message while the Photo Secretary is running, press the FI key.
The Help menu offers:
• Help Topics
• Contents; Displays contents of “Help”.
• Index: Searches informafion by category.
• Find: Finds items for which you want to see help messages (based on keywords
you specify).
• Abouf Photo Secretary
Displays the version number of your Phofo Secretary application.
16
Page 30

STARTING AND USING PHOTO SECRETARY
Photo Secretary allows you to select Custom Settings options, download shooting
data from the camera, and edit shooting data.
To start Photo Secretary, select “Programs” from the start menu, and click “Nikon
Photo Secretary II for FI 00" then “Photo Secretary”. (Fig. 16)
Photo Secielary
File iort Help
afU mt a
(Fig. 16)
17
Page 31

Configuration
With the Configuration dialog box, you can set default settings for Photo Secretary oper
ation. Configuration options can be set with the connected camera body turned oft.
1. Start the Photo Secretary application of Photo Secretary II for FI 00,
2. Click “Tool” and “Configuration” to activate the Configuration dialog box. (Fig. 17)
3. Select Configuration options as desired, then click “OK” to close the dialog box
with the settings updated.
Configuiation
Common | Texl/Fitm view | Thumbnaii view|
I Default view stifle
I Default number of frames
fai ^
- Background color-
[oefadt
OK
(Fig. 17)
For details, see the help message for the Configuration dialog box.
18
Cancel
Page 32

FIDO’s Custom Setting
You can set the Custom Setting gptions for the FI 00 camera via your personal com
puter. You can also create Custom Setting files and print the file contents.
Accessing the Custom Setting Dialog Box
1. Using the MC-33 or MC-31 cord, connect the Ft 00 camera to a personal com
puter.
2. Turn on both the camera and personal computer.
3. Start Photo Secretary, click “Tool” and “FI 00 Custom Setting” to activate the
Custom Setting dialog box, (Fig. 18)
Custom Setting
Diat/Buttons I Shooting | Film Operation j Autofocus | Exposure/flash photography j
AE-L/AF-L button options
Aperture setting with lens' aperture ring
Auto Exposure/Flash Exposure Bracketirrg options
Switching Command Dial operations
ilSimultaneous AEMF lock
jOisabled
|AE/SB Bracketing
1 Disabled
HB .1
jJ
J
J
Load j Set j File "1 Save 1
(Fig. 18)
Print j
Default Close 1
The Custom Setting dialog box allows you to:
• Load the Custom Setting options data from the FI 00 camera.
• Set Custom Setting options on the FI 00 camera,
• Save the Custom Setting options as a file, or read the Custom Setting options data
from an existing file,
• Print the contents of the Custom Setting options.
19
Page 33

Loading/Setting Custom Setting Options
1. On the Custom Setting dialog box, click “Load” to load the Custom Setting option
data from the Ft 00 camera body. The loaded data updates the dialog box con
tents.
2. Five tabs are provided with the Custom Setting dialog box: “Dial/Buttons",
“Shooting”, “Film Operation”, “Autofocus” and “Exposure/Flash photography”.
They can be selected by clicking on their respective tabs.
• For details see the help message for the Custom Setting dialog box,
• Click “Default” to reset the Custom Setting options in the dialog box to the
factory-set default status.
3. Select desired options on each tab, then click “Set" to set the Custom Setting
options you have selected on the FI 00 camera body.
• If the Custom Setting status is different from the factory-set default status, HH-ibm
appears in the FI 00 camera's LCD panel.
Saving the Custom Setting Options Data As a File
1. On the Custom Settings dialog box, click “Save” to activate the Save As dialog
box. (Fig. 19) ■
2. On the Save As dialog box, type the desired name to save a file in the File Name
column then select the file location.
3. Click “Save” to save the file with a specified name in a specified location.
Save in; |Photo Secretary 2
.1 Ptogtam
..
A Sample
defaultpcs
latil nighttime.pcs
Reports, pcs
Filename: [motorsports"^
Save as type: |f100 Custom Data ("‘.pcs)
(Fig. 19)
~3' [bT fil
Cancel
If you specify the existing file name and location, the new data will replace the old
data.
20
Page 34

Loading the Custom Setting Option Data from an Existing File
1.
On the Custom Setting dialog box, click “File” to activate the Open dialog box.
(Fig. 20)
2.
On the Open dialog box, select the drive or folder where the desired file is located
to display a list of files. Via the Photo Secretary, only Custom Setting options data
files with the extension name “*.pcs" can be opened.
3.
Select a file (or input file name) then cliok “Open” to open the file. You oan also
open the file by double-clicking the file name. Contents of the loaded data are
shown in the Custom Setting dialog box.
Open
Look jn; j ‘(¡á Photo Secretary 2
Program
^ Sample
^ defaultpcs
MiBBBBlfiBIB
nighttime^cs
if»] sports, pcs
BBfi
éJ(KE«l
FSeoame: jmotorsports
Fíes ol type: |F1 00 Custom Data (‘.pcs)
1
flpen 1
Cancel 1
(Fig. 20)
Printing the Custom Setting Option Data
1. On the Custom Setting dialog box, click “Print” to activate the Print dialog box.
(Fig. 21)
2. Select the printer, specify number of copies to be printed, then click “OK” to start
printing.
• For details, see the help message for the Print dialog box.
Printers
tlame.
Sfittus: Defaulf printei; Ready
Type Of Your Printw
; Type:
Where:
LPn-
; Cemment;
i: ^ é»
Ü -•[ Eiopwtiei j j
Copies«
Number (rf copies: I
■H
GR» f
(Fig. 21)
21
Page 35

Shooting Data
The Nikon F100, F5 and F90/F90X (or N90/N90s) cameras store shooting data in their
memory databanks. Photo Secretary II allows you to select shooting data loading
options, download shooting data from a camera to a personal computer, then display
and edit shooting data.
With the FI 00
1. Using the MC-33 or MC-31 cord, connect the Ft 00 camera to a personal computer.
2. Turn on both the camera and personal computer.
3. Start Photo Secretary, click “Tool” and “F100 Shooting Data” to activate the FI 00
Shooting Data dialog box. (Fig. 22)
FIDO Shooting Dota
‘Memofize oi not N
^ pemorize datá
f" Not m^ortze shootH^g data
Conftfm
Moáfv
p Memofy mode^i—
^ Simple mode
Í* Detailed mode
pOptions with full data-“
---------
Delete old data
^ Stop shooting
-
(Fig. 22)
The F100 Shooting Data dialog box allows you to:
• Confirm data loading options set on the F100 camera body.
• Modify data loading options as desired and set them on the camera body.
• Download shooting data from the FIDO’s memory.
• Delete shooting data from the F1 OO’s memory.
Confirming data loading options
You can confirm the data loading options set on the F100 camera body.
On the FI 00 Shooting Data dialog box, click "Confirm” so that the dialog box shows
data loading options set on the F100 camera body.
22
Page 36

Modifying data ioading options
Data loading options can be modified when no shooting data is stored in the camera’s
memory and the film counter displays “E”. The modified data loading options will be
applied when the next roll of film is loaded and advanced to the first frame.
1.
On the F100 Shooting Data dialog box, select “Memorize shooting data” to store
data or “Not memorize shooting data” to stop storing shooting data. (“Not memo
rize shooting data” is the default setting.)
2.
If you have selected “Memorize shooting data”, then select Simple mode or
Detailed mode .
You can choose to “Delete old data” or “Cancel shooting data memorization”
when the camera’s memory is full, (“Delete old data” is the default setting.)
Click “Modify” to modify the data loading options on the camera body, as selected
in the dialog box.
For details, see the help message for the FI 00 Shooting Data dialog box.
FI 00 shooting data to be stored and data storage capacity:
Type of data
to be stored
Simple mode
Detailed mode
Shooting data items
Shutter speed, aperture, focal length set on the lens,
frame counter, with or without Speedlight/
TTL auto flash, Multiple exposure
All Simple mode items plus: lens' focal length,
maximum aperture, metering system, exposure mode,
flash sync mode, deviation from the correct exposure
value and exposure compensation value in manual
mode, flash output level compensation value
Data storage capacity
(no. of rolls of film)
Approx. 70
Approx. 30
When using 36-exposure film. Data storage capacity varies according to the
number of frames shot.
23
Page 37

Downloading shooting data from the Ft 00 camera body.
1. On the F100 Shooting Data dialog box, click "Load” to activate the Data Loading
dialog box. (Fig. 23)
Data Loading
Folder
Browse... Cancel
Fite name
idata
(Fig. 23)
ÖK
On the Data Loading dialog box, input up to four letters for the first half of the file
name. Then click “OK” to start downloading the shooting data.
2. The loaded shooting data is saved with the specified name. The film number for
the last half of the file name and file name extension “.psh” is automatically added
to the file name. To open the saved shooting data file, click “File” and “Open”.
To view style options for the shooting data files, see page 32.
For details, see the help message for the FI 00 Shooting Data dialog box.
Deleting shooting data from the camera’s memory
1.2.On the FI00 Shooting Data dialog box, click “Delete” to activate the Data Deleting
Confirmation message box.
On the Data Deleting Confirmation message box, click “Yes” to delete shooting
data.
24
Page 38

Notes on memorizing and loading shooting data with the FI 00
• Shooting data cannot be memorized until the camera has been loaded with film.
• When shooting multiple exposures, the shooting data for the first exposure only will
be memorized.
• If the multiple exposure function is set, multiple exposures will be recorded even if
the multiple exposure function is canceled after the first exposure.
• To delete shooting data from the camera’s memory, execute “Delete" on the FI 00
Shooting Data dialog box (see page 22) or select “Delete old data” as an option
with full data.
• If you select “Delete old data" as an option with full data, memorizing new data
when the camera's memory is full deletes the old data. Note that in this case, new
data for one roll of film may delete old data for more than one roll of film. Depending
on the number of exposed frames and other factors, new data for one roll of film
may actually delete more than two rolls’ worth of old data.
• If you select “Stop shooting” as an option with full data, the shutter locks when the
camera’s memory is full. Also, a blinking “Full” indicator appears in place of the
shutter speed indication in the camera’s LCD panel. While in “Stop shooting”
mode, turning the camera’s power switch off, then on again, will make the fullmemory warning disappear, and you can continue shooting without memorizing
data. To memorize shooting data, delete old data. Note that data loading options
cannot be modified during shooting (they can be modified only when the frame
counter shows “E”). We recommended that you always download shooting data
from the camera’s memory. For data storage capacity, see page 23.
• The film speed set for the last exposed frame is memorized as shooting data. If you
have modified the film speed in mid-roll, the previously set film speed will not be
memorized.
• If you download shooting data from the FI 00 camera in mid-roll, the shooting data
for the film taken up to that point will also be downloaded. If you download the
shooting data again after taking more pictures with the same roll, the newly down
loaded shooting data is saved with the same name as the previously saved data.
This will replace the older data. To avoid this, input a different file name on the Data
Loading dialog box or modify the file name of the old data.
25
Page 39

With the F5
1. Using the MC-33 cord, connect the F5 camera to a personal computer.
2. Turn on both the camera and personal computer.
3. Start Photo Secretary, click “Tool” and “F5 Shooting Data” to activate the F5
Shooting Data dialog box. (Fig 24)
Shooting data to be stoiod
f r A
• r 9
, c
Í5
Options fun
: ^ Delete old data |
; Not deleting old data ■
■Titf memoii'" wacning-^--‘"a
Activate i,
C Not activate f
(Fig 24)
The F5 Shooting Data dialog box allows you to:
• Confirm data loading options set on the F5 camera body.
• Modify data loading options as desired and set them on the camera body
• Download shooting data from the F5's memory
• Delete shooting data from the F5's memory
Confirming data loading options
You can confirm data loading options set on the F5 camera body.
On the F5 Shooting Data dialog box, click “Confirm” so that the dialog box shows the
data loading options set on the F5 camera body.
Modifying data loading options
You can modify data loading options to suit your needs.
The modified data loading options will be activated after you load a new roll of film
and it advances to the first frame.
1 On the F5 Shooting Data dialog box, select the data to be stored from types A, B,
0 and D. (For details on the types of data to be stored, see page 27.)
Choose whether you want to delete old data or stop memorizing shooting data
when the camera's memory is full.
Choose whether you activate the full-memory warning or not.
Click “Modify” to modify the data loading options on the camera body, as selected
in the dialog box.
For details, see the help message for the F5 Shooting Data dialog box.
26
Page 40

F5 shooting data to be stored and data storage capacity:
Type of data
to be stored
A Shutter speed, aperture, focal length, film counter, lens
B
C Type B items plus: imprinted letters Approx. 12
D
Shooting data items
maximum aperture
Type A items plus: shooting date and time Approx. 36
Type C items plus: metering system, exposure mode,
sync mode, deviation from the correct exposure value
and exposure compensation value in manual mode
Data storage capacity
(no. of rolls of film)
Approx. 78
Approx. 10
(or approx. 39 rolls
without the MF-28)
* When using 36-exposure film. Data storage capacity varies according to the num
ber of frames shot and/or if multiple exposure shooting is conducted. Types B and
C items can be stored only when the Multi-Control Back MF-28 is attached.
Without the MF-28, you can only store type A items even if you select types B or C.
Downloading shooting data from the F5 camera body
You can download shooting data from the F5 camera body.
1. On the F5 Shooting Data dialog box, click "Load” to activate the Data Loading
dialog box. (Fig. 25)
Data Loading
Foictef
]c;\f5
Fite name
idata~*~”
Browse...
Cancel
(Fig. 25)
On the Data Loading dialog box, input up to four letters for the first half of the file
name. Then click "OK” to start downloading the shooting data,
2. The loaded shooting data is saved with the specified name. The film number for
the last half of the file name and file name extension ",psh” is automatically added
to the file name. To open the saved shooting data file, click “File” and "Open”.
• To view style options for shooting data files, see page 32.
• For details, see the help message for the F5 Shooting Data dialog box.
27
Page 41

Deleting shooting data from the camera's memory
1. On the F5 Shooting Data dialog box, click “Delete” to activate the Data Deleting
Confirmation message box.
2. On the Data Deleting Confirmation message box, click “Yes” to delete shooting
data.
Notes on memorizing, loading shooting data with the F5
• Shooting data cannot be memorized until the camera has been loaded with film.
• Month, day, hour, minute, second and imprinted letters items can be memorized
only when the Multi-Control Back MF-28 is attached.
• When shooting multiple exposures, the selected data items will be loaded for first
exposure,
• When the camera is loaded with film, shooting data is always memorized — even
for test shooting.
• To delete shooting data from the camera's memory, select “Delete” on the F5
Shooting Data dialog box (see page 26) or select “Delete old data” as an option
with full data.
• If the camera's memory becomes full after you have selected data loading options
that activates the full-memory warning, the personal computer connection symbol
blinks in the camera’s rear LCD panel.
• If you select “Delete old data” as an option with full data, memorizing new data
when the camera's memory is full deletes the old data.
(The personal computer symbol in the rear LCD panel blinks telling that some data
has been deleted.) Frequent downloading of shooting data is recommended. For
data storage capacity, see page 27.
• If you change the film speed with the frame counter showing “1 ” or higher, this will
not affect the shooting data. The previous set film speed will be memorized for the
shooting data download operation.
28
Page 42

With the F90/F90X (N90/N90s)
1. Using the MC-31 cord, connect the F90/F90X (N90/N90s) camera to a personal
computer.
2. Turn on both the camera and personal computer.
3. Start Photo Secretary, click “Tool” and “F90/F90X (N90/N90s) Shooting Data” to
activate the F90/F90X (N90/N90S) Shooting Data dialog box. (Fig. 26)
F90/F3ax (KS0/N90s} Shoolmg Data
p Memory rviode'—--■ "''-¡it?——=-»
^ Cancel storage oi shooltrMJ tiata
Store rywiimum sho£^ data
^ Store medium shodmg data
^ iStoremawrrajmshootrtpd^l
j Confirm f
HocHy I
pOpliOTrswShfuH' ■"--n ——
I TufnthepowefswitchbOFFthentoON
j <** Dowtload stored data
(Fig. 26)
The F90/F90X (N90/N90S) Shooting Data dialog box allows you to:
• Confirm data loading options set on the F90/F90X (N90/N90s) camera body.
• Modify data loading options as desired and set them on the camera body.
• Download shooting data from the F90/F90X (N90/N90s) camera’s memory.
• Delete shooting data from the F90/F90X (N90/N90s) camera's memory.
Confirming data loading options
You can confirm the data loading options set on the F90/F90X (N90/N90s) camera
body.
On the F90/F90X (N90/N90s) Shooting Data dialog box, click “Confirm” so that the
dialog box shows data loading options set on the F90/F90X (N90/N90s) camera
body.
Close
29
Page 43

■iiwwtatssiii
Modifying data loading options
Data loading options can be modified only when no shooting data is stored in the
camera's memory and the fiim counter shows “E”, The modified data ioading options
will be activated after you load a new roll of film and it advances to the first framp.
1. On the F90/F90X (N90/N90s) Shooting Data dialog box, select one of the four
memory modes: “Cancel storage of shooting data,” “Store minimum shooting
data”, “Store medium shooting data”, and “Store maximum shooting data”.
(“Cancel storage of shooting data” is the default setting.)
2. Select one of the following options: “Turn power switch OFF then ON” or
“Download stored data”. (“Turn power switch OFF then ON” is the default setting.)
3. Click “Modify" to modify the data loading options on the camera body, as selected
in the dialog box,
• For details, see the help message for the F90/F90X (N90/N90s) Shooting Data dia
log box.
F90/F90X (N90/N90S) shooting data to be stored and data storing capacity:
Type of data
to be stored
Minimum data Shutter speed, aperture
Medium data
Maximum data
Shooting data items
“Minimum data” items plus metering system,
exposure mode, flash sync mode, focal length set
on the lens
“Medium data” items plus exposure
compensation value, flash output level
compensation value
Data storing capacity
(no. of rolls of film)
F90/N90 F90X/N90S
Approx. 5 Approx. 99
Approx. 3 Approx, 50
Approx. 2 Approx. 34
* When using 36-exposure film. Data storage capacity varies according to the
number of frames shot and/or if multiple exposure shooting is conducted.
Downloading shooting data from the F90/F90X (N90/N90s) camera body
1. On the F90/F90X (N90/N90s) Shooting Data dialog box, click “Load” to activate
the Data Loading dialog box. (Fig. 27)
Data Loading
|cAf90
Fite name
(Fig. 27)
30
Page 44

On the Data Loading dialog box, input up to four letters for the first half of the file
name. Then click “OK” to start downloading the shooting data,
2. The loaded shooting data is saved with the specified name. The film number for
the last half of the file name and file name extension “*psh” is automatically added
to the file name. To open the saved shooting data file, click “File” and “Open”.
• To view style options for shooting data files, see page 32,
• For details, see the help message for the F90/F90X (N90/N90S) Shooting Data dia
log box.
Deleting shooting data from camera’s memory
1. Click “Delete” to activate the Data Deleting Confirmation message box.
2. On the Data Deleting Confirmation message box, click “Yes” to delete shooting
data.
Notes on memorizing, loading shooting data with F90/F90X (N90/N90s)
• Shooting data cannot be memorized until the camera has been loaded with film.
• When shooting multiple exposures, the shooting data for the first exposure only will
be memorized.
• To delete shooting data from the camera's memory, select “Delete” on the F90/
F90X (N90/N90S) Shooting Data dialog box (see page 29), or download shooting
data from the F90/F90X (N90/N90s) camera.
• if you download shooting data from the F90/F90X (N90/N90s) camera in mid-roll,
the shooting data for film taken up to that point is not downloaded. Only the previ
ously memorized data from other rolls is downloaded and then deleted.
• If you have modified Memory Mode option on the F90/F90X (N90/N90s) Shooting
Data dialog box, wiiawai appears in the camera’s LCD panel,
• The “Delete” command on the F90/F90X (N90/N90s) Shooting Data dialog box can
be executed even when the film is in mid-roll. In this case, ail shooting data except
for that of the film roll in use, will be deleted from the camera's memory.
• Option for “Data imprinted on frame #0” cannot be set.
31
Page 45

Opening Shooting Data Files
In the Photo Secretary application, click “File” and “Open” to activate the Open dialog
box (Fig. 28). Select your desired file and click “Open”, or double-click the icon for the
file, to display the shooting data. You can open a shooting data file when another file
is already open.
With Photo Secretary, you can open files with the following file name extensions;
• “.psh” (Photo Secretary II for F100 file format)
• “.F5” (Photo Seoretary for F5 file format)
• “.nkn” or “,f90” [Photo Secretary for F90/F90X (N90/N90s) file format]
With Photo Seoretary II for FI 00, the file name extension “.psh” is automatically
added to the file name of a newly created file. It cannot be changed.
Loo k in :
I^Asakusa psh^
^Autumn, psh
^Drive.psh
^Winter.psh
F^ e na m e:
Files of lype: lAII shooting data file (’‘.psh;*.f5;’'.nkn}
f
{Fig. 28)
fl pe n
Ca nc e l I
...
j
Selecting Shooting Data File Views
You can choose “List” (Fig. 39), “Text” (Fig. 30), “Film” (Fig. 31), “Thumbnail” (Fig. 32)
and “Thumbnail & List” (Fig. 33) as view styles for shooting data files. Select the
desired view style from the View menu. When two or more shooting data files are
open, first click on the shooting data display window to activate the file you want to
change, then follow the procedure below.
With any view style, the title, comment and film speed are displayed at the top of the
shooting data display window.
32
Page 46

Tit.la
1 Comnent FroB Chiba со
llu Speed
Bayside driving
'okohaioa
100
rene Spttd DaO« Octet Mode оЕчр ГЮгЬ
■ ■ ■ ■ ■■ ■ ■ ■ ■ ■■ i
{ III 1« 04
12] 10 04 02/1440 Center ceei9hted Apirtare priority riAo,1.0 Ь_.1
I*] 7S0 04
[<1 too 04
CO) «9 01
[0] 100 Of 02/1440 Multi
Cl) <1 04
i
02/1441 Haiti
1 no 10
-2Í1Í1_jE15lL--
02/1440 Multi Aperture priority rut«
[4] (1 01
•2/1440 Bulti
19:00 butterily
02/1440 Haiti
Г1.4 10
11:»0 butterily
02/1440 Multi
HI 10 01
rt. 0 10
12;00 buildiny
02/1440 Multi
20:00 The 3tr«ueo. Liberty 1
02/1441 Haiti ture priority iuto
Г0 и
^erturi priority ruto
Aperture priority rwo
“V
Aft tare priority outo0.0 Ifc^ol
(Fig. 29)
•0.7 *„шо1
0.0 вог«1
ture priority ruto
0.0 Иошг1
tar. priority ruto
0 0
-0.7 Sonool
ture priority «oto,0.1
■O' *•”“
List view
1
)iiv(; psh
lele Bayside driving
Г
CoBnent
Filh Speed
50600000 3CT5WWaOOQ-COOQ
11] {1 no
Haiti
^irtUTC prior. . .
pori( 1 *1«« 1 flZr 2 butterdly 1butte rtly 2pxrk 2
oocoisoOo
FroB Chiba CO
100
121 40 Гtenter eei^td
ooaoocoo OÜCO.OQCOсойооойо oüooQoaaOQQO-QOOO
Yokohana
m 00 ni
Apertare prior .
100ÜÜ0Ü0
101 700 Г0.3
letture prior.
обооооао
nOÜOQÜOO
If) 40 ni
poatitiüai paoséaüú am:üm,ú.Q.^piúito.kíii^ii bollitit)<S'pMti.tiaùB
OOOOaOOO 00000000 aQOOOOOO &OQ,OgflOO oooooqqo oooooqoo
(Fig. 30) Text view
FIR о
-
1
33
Page 47

Tit-le B«yside driving
Comnent. Fxoin Chiba со Yokohama
Film Speed 100
OQOOODOO OQOO'OOOQ QOOOOOOQ 00000 0 00 OOQOOOOO 00000000
,0 0000000 OOOOOOOO OOOOOOOO 00 00 0 ^0 0 0 0 0 0 0 0 0 000000 00
(Fig, 31 ) Film view
Tide Bayside driving
Commenc From Chiba со Yokohama
Film Speed 100
"'ЯГ
e
Ш n< Hultt
port 1
N
u
1*1 l<g n.s itaisi
buttirily i
шт
34
(Fig, 32) Thumbnail view
Page 48

You can edit the active shooting data file; you can also link image data to the active
shooting data file. (Pages 36-42).
The “Configurafion" command in fhe Tool menu allows you fo select the following
view style options:
a) You can set the default view style as you wish from the available view options.
b) You can select shooting data items to be displayed in Text, Film or Thumbnail
view. You can also set the number of frames per row and line space length.
c) You can choose a background color for the window. (Note: on printouts, the
background color will be white.)
For details, see the help message for the “Configuration” command.
Using the “Title Font" command in View menu, you can select a font for the title.
You can also select a font for frame data with the "Frame Font" command.
To execute the “Print” command, print the active window with the selected view
style. (Pages 45-48)
With Film, Thumbnail or Thumbnail List view, you can use the “Slide Show” com
mand to display the linked images, one by one, by frame number order. The “Slide
Show” command is in the Tool menu.
For details, see the help message for each view style.
35
Page 49

Editing Shooting Data
Photo Secretary allows you to edit shooting data and link image data to the shooting
data.
Selecting “Data Property” Options
You can specify general information about the shooting data,
1. Open the file (i.e,, click “File” and “Open” then select desired file). Or, if two or
more shooting data files are already open, click on the shooting data display win
dow you want, to activate it. Click “Tool” and “Data Property” to activate the Data
Property dialog box (Fig. 34). On the Data Property dialog box, you can select from
a range of options.
Data Property
Number of frames First frame
1
Title
jBayside driving
Comment
iFrom Chiba to Yokohama
Film speed
100
~3
(Fig. 34)
2. On the Data Property dialog box, input the title and comment you want. You modi
fy the title and comment later as desired.
For Film view, set the location of the first frame and change the number of frames,
3. Click “OK”.
• For details, see the help message for the Data Property dialog box.
I—
Cancel
36
Page 50

Selecting “Frame Property” Options
1. Open the file (i.e,, click “File” and “Open" then select desired file). With a view style
other than “Film” view: Click on the frame you want to edit to activate it, then click
“Tool” and “Frame Property" to activate the Frame Property dialog box (Fig. 35).
The Frame Property dialog box can also be activated by double-clicking on the
desired frame data.
With “Film” view: Click on the frame you want to edit to activate it, click on the
right-hand button on the mouse then click “Property" to activate the Frame
Property dialog box (Fig. 35).
1 Frame Properly
Frame Count ShuUer speed Aperture
Focal length Lens maxirrrum aperture
|i30(70-18CI)
Metering system Exposure mode
.jMulti
Rash sync mode Exposure Compensation value
jhlormal
EV Difference in Manual Exposure Rash exposure compensation
“3
jF4,5-F5.6
jAperture priority auto
1 0^ 1
1
-------
131
^
Cancel 1
“3
Speedlight setting
joif ^
Date Time
|09/0271998 jl0:13:00
Comment
jbutterfly 1
Data Imprinting
. —
~3
—
Multiple exposure
!_ ^
(Fig. 35)
2. On the Frame Property dialog box, edit the shooting data as desired then click “OK”.
37
Page 51

Linking Image Data to Frames
Open the shooting data file (i.e,, click “Fiie” and “Open” then select desired file) or
1.
create a new file (i.e., ciick “File” and “New”). Select “Film”, “Thumbnail” or
“Thumbnail List” view so that the thumbnail image will be displayed.
Click and activate the frame to which you want to link the image data.
Click “Tool" and “Edit Image” to open the Photo Finder (Fig. 36)
You can also open the Photo Finder by double clioking the thumbnail image area
(with or without the thumbnail image displayed) of the frame.
Eila £da ti«
(Fig. 36)
B-jglxl
4. Load the image data from a scanner or photo CD, or open other image data files.
• For compatible image data formats, see page 50.
38
Page 52

5. On the Photo Finder window, click “File” and “Exit” and return to file name. If you
have downloaded image data from a scanner or Photo CD, or if you have modified
an image data file, the Save Confirmation box (Fig. 37) wili appear. Select “Yes” to
quit the Photo Finder. The loaded image data is automatically linked to the select
ed frame of the shooting data.
Save changes to C:\Progfam FilesSNikonSPhoto Secfetaty 2\Safr^leSPS2_038.ipg fiie?
* •
^es
£¿0
(Fig. 37)
You can move the image data from one frame to another using drag-and-drop editing.
To see the original data of the pasted image, select the frame where the desired
image data is pasted, then click “Tool” and “Edit Image”.
• The image data downioaded from a scanner or other image-capturing device, or
moved from the clipboard, must be saved as an image data file.
• For information about compatible image data file formats, see page 50.
• For details, see the help message for each function.
39
Page 53

Using the “Load Multiple Images” Command
to Link Image Data to Shooting Data
You can load image data continuously from a scanner^i. The loaded image data is
automatically linked to frames of the shooting data and saved^f
1) Requires a scanner having a continuous loading function with auto feed.
Continuous loading of image data may not occur with some scanners, even if
they have a continuous loading function with auto feed.
2) A large-size image data file has a volume size of some MB. Make sure there is
sufficient disk memory before continuously loading image data.
To link image data to frames, select the Film view. Thumbnail view or Thumbnail List
view. With the List view or Text view, linking image data to frames cannot occur.
With two or more shooting data windows open, click on the one you want to activate
it, then select the frame to be linked with the image data.
1. Click “Load Multiple Images” in the Photo Secretary’s Tool menu to activate the
Load Multiple Images dialog box (Fig. 38).
40
Load Multiple Images
Foldef
CAProgram Files\Nikon\Photo Secretary 2\
Frame number for starting
Number of frames
; Heading Letter
■ Starting Number
Fite Format
j Bitmap 24bit color (’“.bmp)
|24
j_
"3
...tJ
(Fig. 38)
HI
Browse...
zl
JR
Cancel
Page 54

2.
On the Load Multiple Images dialog box, specify and select options for loading
image data.
• For details, see the help message for the Load Multiple Image dialog box.
3.
After setting options, click “OK” to activate the Select Source dialog box (Fig. 39).
The Select Source dialog box shows the list of available TWAIN equipment. If you
select JPEG, TIFF or FlashPix as a file format, the JPEG Option dialog box, the
TIFF Option dialog box or the FlashPix Option dialog box will be activated instead.
• For details, see the help message for each dialog box.
Select Source
Sources:
Nikon Scan 2.2
Select
* •
Cancel
(Fig. 39)
4. On the Select Source dialog box, select the scanner by clicking it, then click
“Select” to activate the TWAIN Input dialog box.
Methods of setting options on the TWAIN Input dialog box depend on the scanner
in use. For details, refer to your scanner operating manual.
• If your scanner lacks an auto feed function for continuous loading, an error
message informs you that continuous loading of images cannot be performed.
Then the “Load Multiple Image” command will be canceled.
5. Start scanning.
The image data is loaded, then linked to the shooting data frames continuously.
After multiple loading of image data is completed, the shooting data frames show
thumbnail images of the linked image data.
41
Page 55

Using the “Image List” Command to Link Image Data to
Shooting Data
You can display a list of thumbnail images of an existing image data file regardless of
where they are located. Any of the listed images can be linked to the shooting data
frame by drag-and-drop editing.
1. Click “Image List” in the Photo Secretary’s Tool menu to activate the Open dialog
box (Fig. 40).
2. Click the desired file icon to select it on the Open dialog box.
To select two or more files, click the file icon while pressing the Ctrl key or shift
key.
3. Click “Open” to display a list of thumbnail images of selected image data on the
image list window.
4. Drag-and-drop the desired thumbnail image to the frame on the shooting data
window to link the data to the frame.
?ïx|
Look in:
^PS2_001
^PS2_002
ÿPS2_003
|5’PS2_004
ÿPS2_005
¿■ps2_oœ
File îjame: | ' 'PS 2_023( ¡pg‘ ' "PS 2_008:|pg' ' "PS 2_00S jpg' " ’ j |
Fites of type: j ДН Image files ^ Cancel |
Sample
3 fsTej
(Fig. 40)
Note: displaying several large-sized images may take a lot of time.
42
Page 56

Searching Files Based on Keyword
You can search the shooting data files that contain the specified keywords without
actually opening the file. Shooting data files containing the specified keywords are
also searched.
1. Click “Find” in the File menu to activate the Find Data dialog box (Fig. 41).
2. On the Find Data dialog box, specify folder and keywords. Type in two or more
words with space to find files that contain all the words you specified.
3. Click “Find” to start searching. The searched shooting data files are listed in the
Find Result box on the Find File dialog box.
4. Double-click the desired file in the Find Result box to open it.
• Check “Whole Word” to search only for the words/characters that match the speci
fied keywords. (For example, “F50” and “Nikon-F5” will not be detected when you
input “F5" as the keyword).
• Check “Ignore Case” to ignore case (uppercase or lowercase letters) in the search
function.
• For details, see the help message for the Find Data dialog box.
43
Page 57

Saving the Shooting Data as Text Files
You can save the shooting data files as text files (having file name extension “*,txt”) to
see the file contents via the other applications. To save the shooting data files as text
files, use the “Save As” command.
In a text file converted from a shooting file, the first line shows the shooting data prop
erty and after the second line shows the frame property (Fig. 43). With the
“Configuration” command in the Tool menu, you can specify characters or marks to
separate shooting data columns and second/minute display style for shutter speed
indication. For details, see the help message for “Configuration”.
1.2.Open the file (i.e., click “File” and “Open” then select the desired file). Or, If two or
more shooting data files are already open, activate the desired one by clicking it.
Click “File” and “Save As” to activate the Save As dialog box (Fig. 42).
On the Save As dialog box, input file name, select “*.txt” as file type, then click
“Save” to save the file as a text file.
(Fig. 42)
Text files cannot be opened via Photo Secretary. Use WordPad or Notepad to con
firm contents of text files.
For details, see the help message.
44
Page 58

l-l'lwniMIffM
fis sa tw>
-.null.F—.Center uelgoted,Aperture priority auto.Homal.*1.0.O.O.O.O.Off,Off
1,1№ ,F2.8 .Multi .aperture priority auto .Nomai ,0.0,8.8.0.0.Off .Off ,89 / 02/1998
I«,7Se,F$.3,130(/0-180),
5.250,FS.6,160(70-180) ,Fii.S-FS .6 ,Nulti .Aperture priority auto,Normal.O. O.0.8, B. B,0ff
5.90.F11.28(28-70).F3.5-F9.5,Multi,Aperture priority auto.Normal.0.0.0.0,0.0,Off.Off
g,F5.6.300(70-300),F9-FS.6,Multi,Aperture priority auto.Normal.-0.7,0.0,0.0,Off.Off,09/02/1998.10:51:00..bird
I, 160. FI 0,1 A, F2.8, Multi, Aperture priority aut o. Nomai, 0.0,0.0.0.0, OFF .Off, 09/ 02/1998.1
). 80. F11.16. F2.8. Multi, Aperture priority auto .Nomai. *0.3.0.0,0.0.Off .Of f , 09/ 02/1998,1
tn,160.F8,ie5(28-20e),F3.S-F5.6.Multi,Aperture priority auto.Normal,-0.7,0.0.0.0.OFF,0
Liberty 2
II. 250.M6.28(28-70) ,F3.5-F9.5,Multi,Shutter priority auto .Normal, 0.0,0.0, >1.7, TU .Of f, 09/82/1998,12:53:80. .sea gull 1
12,90,F16.135(70-300).
13.6e,F16,135(70-300).F9-F5.6.Multi.Aperture priority auto,Normal,-0.7,0.0,0.0,Off.OfF.09/ 02/1998,13 : 09 : 00,.China town 2
19.125. F16.300(70-300).F9-F5.6.Center weighted,Aperture priority auto,Normal,-0.7,0.0.0.O.Off.Off,89/82/1998.13:09:00,.China
town 3
15,500,F5.6.95(28-70) .F3.5-F9.5,Multi,Aperture priority auto .Nomai,-0.7,0.0,0. O.Off .OFF, 09/02/1998.13:12:00. .China town 9
16.125, f11.112(70-300).F9-F5.6,Multi.Aperture priority auto,Normal,0.0.0.0.0.0,0ff.OfF,09/02/1998,13:13:00,.China town 5
17,250,F5.6,300(7e-300).F9-F5.6.Center weighted.Aperture priority auto.Normal.0.0.0.0.0.O.Off.Off,89/02/1998,16:35:00..sea
gull 2
18,125B,F5.6,300(70-300).F9-F5.6,Center weighted.Aperture priority auto.Normal,-1.0.0.0.0.O.Off.Off.09/02/1998.16:97:00,.sea
gull 3
19,25,F11.195(70-300),F9-F5.6,Multi,Aperture priority auto,Normal.-1.0.0.0,0.O.Off.Off,09/02/1998,18:10:0(
20,2.5.F11,16,F2.8.Multi,Aperture priority auto.Normal,-0.7.0.0.O.O.OfF.Off.09/02/1998,18:23:00,.setting s
21,6”,F8.52(28-70),F3.5-F9.5,Multi,Aperture priority auto.Normal.*0.7,0.0.*1.O.TTL.Off,89/02/1998,19:25:0(
22.15.FU.16,F2.8,Multi.Aperture priority auto.Normal,0.0,8.8.*0.7.TTL.OfF.09/02/1998,19:39:00,.illuminatior
23.60.F5.6,90(28-70),F3.5-F9.5,Multi,Aperture priority auto.Normal.0.0,0.0.*1.O.TTL.Off,09/02/1998,19:92:00,.landing piei
29,1".F5.6.90(28-7O),F3.5-F9.5,Multi.Aperture priority auto.Aed-Eye
Reductlon,e.0,B.0,*1.0,rTL,0ff.09/02/1998,19:93:00,.landing pier 3
F9-F5.6.Multi,Aperture priority auto.Normal,0.0,0.0.0.0.Off.Off.09/ 02/1998,13 : 08 : 00,.China town 1
•iwing
. ‘ priority auto.Nomai.-0.7,B.O.O.e,Off .Off,09/02/1998
F9.5-FS.«,Multi,Aperture priority auto,Normal.0.0,0.0,B.0,Off
10:02:00,.park 1
09/02/1998,10:08:00,.flower 1
18:18:88,,flower 2
Off,09/02/1998,10:13:00,.butterfly 1
OFF.09/02/1998,10:19:00,.butterfly 2
09/02/1998,10:21:00,.park 2
I.11:12:00..building
1,11:28:00,,The Statue oF Liberty 1
F,Off,09/02/1998,11:93:00,.The Statue of
■233:
. Fuji
,.landing pier 1
(Fig. 43)
Printing the Shooting Data
Performing the “Print” command prints the shooting data file as displayed in the win
dow. If necessary, change the view style of the shooting data with the command in
the View menu (“List”, “Text”, “Film”, “Thumbnail” or “Thumbnail List”).
With List view: You can select the number of displayed items of shooting data—
Simple List, Normal List or Detailed List.
C:\Ptogram Files\Nikon\Photo Secretary 2\Sample'\Drive.psh
Tide Sayside driving
Comment From Chiba to YoJiohama
Film Speed 100
rxim sp«eo Dai« n«tat Koda iExp Flash
Apcciacc !ia« CiwwWRt
Apercare priority a
;^rtura psiorlcy a
(Fig. 44)
45
Page 59

With Text view:
C:\Program Files\Nikon\Photo Secretary 2\Sample\Drive.psh
TitJe Bayside driving
CoirsnenC From Chiba to Yokoharna
Film Spaed 100
OOOCC3O0D
(Wlti j c.ne.t wi^nced ¡Multi Multi
aptrtor» ptloiit..,
Hocnil ■ HorMl 1 kora.1 MtiS.l
p.r» 1 , ilOK.t 1 1 llo-.r 2
DaOOOOQQ aOODGCiGD
DQDÜGQ00 n^GCGDDC GOGOGGOO
Multi ; Multi : Malti Kulei »mici
aptrtur« piloiit... |Ap.trut. prioiJt... ; Apeitui« prlotU..,
Nonul ! soca.1
fciM
"DODGCnCCiC 0 0 n "■ C‘ 0 '
Q 0 0 C 0 □ G □DJCCGÜDl ooooooon
Kuitl Cbit«i «eignr.íl ¡Multi «ulti
*p«rtut. priorit... ^p.кur. pciom... ; ftp«rtute pciPTit...
WotiMl Narm.1
Chin. Mvn 2 Clin. tv»c 3 Chira toan 4
OOOCDCOC G : c 0 c G a cOCCOCDOO u G G C 0 u 0 C□OGGoaaDoooGooao
OOCCGCGG
l^rtvr» prtoiit...
: (ef 'iü rió
; ùuiiaiha
GGG3CGQÜ
j Ap«cture prloclt,.. Apartur. piioxit...
eoo 0 00000 Q 0 0 0 G 0 0
) XorMl No real
Ch. St.tu. uf LI... Th, St.tu. of Li...
lWtra.1 HoiMl
OOOCGCOO OuGCCCCO
butt.tny 1
□ G 0 0 0 G C: C
Apctuc. ptiotlt... Shutt.r pclority...
0 0 C D Ù G Ü 0ÜOG2CGOCCOCDCOOO
GOuGOGGC
Aptrture prlotlt...
chiM torn 5
! Multi ;
OgCuuCjC
0 0 c 0 : 0 c
1 KOCMI
i B«i fuU 1
! {Ifi J54 rt'.'i'
i CtRt.z weighed
i .Lp.rtat» piioiit...
1 Bunul
1 ... «un
OCOOOQOO
Multi
lloiiul
pack 2
□ODOGOOO
DOOOOQOa
BOCn.1
OQQGGOaü
flMI liso r«.«
r«nt«r WBlghMd
aaraal
(Fig. 45)
With Film view: Thumbnail images are printed in film sleeve format. Frames not linked
with any image data show shooting data items.
Cs\Prograr> FlXes'.NikorAPhcto Secretary 7\SaTTipJ e\0rive .psh
Title Saysida driving
Comment rcon Chiba to Yokoharao
rilm Speed 100
46
(Fig. 46)
Page 60

With Thumbnail view:
C:\Progra.ii Files\Sl')con\Photo Secretary 2\Sampie\Drlve.psh
Title 6ay»l.a» arl’^lng
Ccamasnt fions Chiba tc-. Tokohamii
FUra Speed 100
(Fig. 47)
47
Page 61

With Thumbnail List view:
::\Program Files\Nikon\Photo Secretary 2\Sarople\Drive.psh
Title
COEstient:
Film Speed
Bayside driving
From Chiba to Yokohama
iOO
Date/TiB*
âp««id
Apeitaza nu
Focai ienvth 20
H*x ap«:tur* F2.t
0S/D2/199B ICîOïîOO
Hui.1
Speetlliglit
Flash
îFiaelî
Apertale prSC'tity aato
Aperture priarily 4
(Fig. 48)
Setting print options
1. Click “Print Setup” in the File menu to activate the Print Setup dialog box,
2. Select paper size, paper orientation and other print options on the Printer Setup
dialog box. if two or more printers are usable, select one printer.
For details, see the help message for the Printer Setup dialog box.
3. After setting options, click “OK”.
Confirming print results
1. Click “Print Preview” in the File menu to display print result of the active shooting
data file. For details, see the help message for the “Print Preview” command.
2. To close the Print Preview and return to the normal shooting data display window,
click the “Close” button on the Print Preview Toolbar.
Printing
1. Click “Print” in the File menu to activate the Print dialog box.
2. Specify the pages to be printed and the number of copies to be printed. Then click
“OK” to start printing.
For details, see the message for the Print dialog box.
48
Page 62

PHOTO FINDER
Photo Finder is an image data loading application of Nikon Photo Secretary II for
F100. Photo Finder can be started up independently. However, in most cases, it is
started up via Photo Secretary, Photo Finder allows you to load image data from a
scanner or other equipment, or Photo CD, The loaded image data can be edited and
saved as files. (“Image List” and “Load Multiple Images” commands are available in
Photo Secretary.)
Started via the Photo Secretary when shooting data is linked to the image data, the
Photo Finder sends information about image to the Photo Secretary.
£39 giA ^gw led tle^
(Fig. 49)
■ -IJlKl
Photo Finder offers the following functions:
• Opens image data files such as Bitmap, JPEG, TIFF and FlashPix files.
• Downloads image data from data input equipment such as a scanner, etc.
• Opens image data files from Photo CD.
• Rotates image 90 degrees to left or right.
• Changes display size of image,
• Changes picture size,
• Saves displayed image as an image data file such as Bitmap, JPEG or FlashPix file.
• Prints the displayed image and shooting data.
For details, see the help messages for Photo Finder.
49
Page 63

Usable Image Data Files with Photo Secretary II for FI 00
Following image data can be used:
• Bitmap files (having file name extension of “.bmp”)
• JPEG files (having file name extension of “.jpg” or “jpe”)
• TIFF files (having file name extension of “.tif”)
• Photo CD files (having file name extension of “.pod”)*
• FlashPix files (having file name extension of “.fpx”)
• Image data cannot be saved as Photo CD files.
50
Page 64

KEYBOARD SHORTCUTS
Nikon Photo Secretary 11 for FIDO offers the following keyboard shortcuts:
General Windows® keys
ALT+TAB Shift active window to the right or downward.
ALT+SHIFT+TAB Shift active window to the left or upward.
ALT+SPACE Display system menu bar for current window.
ALT+ designated character key
CTRL+ESC Activate start menu.
Selects the corresponding menu from the system menu bar of
the current window. (Press the underlined character key in the
system menu bar.)
For Photo Secretary II for FI 00 keys
<= Shift the menu selection to the left,
=> Shift the menu selection to the right,
it Shift the menu selection upward.
(I Shift the menu selection downward.
J Perform the selected command.
ESC Cancel the selected menu.
For dialog boxes
TAB
SHIFT+TAB
SPACE
RETURN
Move downward through options.
Move upward through options.
Confirm the selected control button.
Perform the operation using the default setting.
Shift the currently active item. When a tab on the dialog box is select
ed, open the page to left of the selected tab.
Shift the currently active item. When a tab on the dialog box is select
ed, open the page to right of the selected tab.
Shift the currently active item/numerical value upward.
Shift the currently active item/numerical value downward.
51
Page 65

No.reproduction in any form of this manugi, in whole
or in part (except for brief quotation in critical articles
or reviews), may be made without written authoriza
tion from NIKON CORPORATION.
Nikon
NIKON CORPORATION
FUJI BLDG., 2-3, MARUNOUCHI 3-CHOME,
CHIYODA-KU, TOKYO 100-8331, JAPAN
Printed in Japan K9E01 (11)
 Loading...