


Model JF94E
Owner’s Manual
APPROVALS:
FOR CE APPROVED AUTOMATIC BROILERS
Revision History: |
|
|
Date |
Notes |
REV |
|
|
|
1/13/2010 |
Released |
A |
|
|
|
2/4/2010 |
Wiring Diagram 20110 |
B |
|
|
|
8/15/2011 |
Updated wiring diagram to 20110-B, changed control instructions |
C |
|
|
|
10/25/2011 |
Added parts location drawings; parts replacement list |
D |
|
|
|
11/2/2011 |
Updated parts location drawings |
E |
|
|
|
12/20/2011 |
Updated wiring diagram/parts location drawings |
F |
|
|
|
2/9/2012 |
Updated Wiring diagram |
G |
|
|
|
|
|
|
|
|
|

!WARNING
1.Do not store or use gasoline or other flammable vapors or liquids in the vicinity of this or any other appliance.
2.Broiler area must be kept free of combustible materials, and the flow of combustion and ventilation air must not be obstructed. Operating personnel must not perform any maintenance or repair functions. Contact your Nieco Authorized Dealer.
3.Do not use this appliance in an area where a water jet could be used.
4.Do not clean the appliance with a water jet.
5.If the power supply cord is damaged, it must only be replaced by a repair shop appointed by the manufacturer.
6.A switch with an all-pole disconnection and a contact separation of at least 3mm shall be included in the fixed wiring.
7.It is recommended that walls, etcetera, in the proximity of the appliance be made of non-combustible material, if not, they must be clad with a suitable non-combustible heat-insulating material and that the closest attention be paid to fire-prevention regulations.
8.This appliance is not intended for use by persons (including children) with reduced physical, sensory or mental capabilities, or lack of experience and knowledge, unless they have been given supervision or instruction concerning use of the appliance by a person responsible for their safety. Children should be supervised to ensure that they do not play with the appliance.
IMPORTANT:
RETAIN THIS MANUAL IN A SAFE PLACE FOR FUTURE REFERENCE
2 |
Nieco Corporation - Model JF94E CE |

INSTALLER NOTES
1.This appliance is rated IP 20, Degree of Protection obtained from Enclosure.
2.Nominal Power Rating: 380-415V 3Ø 25A
Model |
kW |
Electrical Diagram |
JF94E |
19 |
20110 |
Calculated Average Consumption |
16 |
|
3.This appliance must be installed by a qualified installer, in compliance with all national, local regulations and institutions having jurisdiction.
4.This machine should be connected to the supply with a plug with proper grounding.
3 |
Nieco Corporation - Model JF94E CE |

TABLE OF CONTENTS
A. General Information . . . . . . . . . . . . . . . . . . . . . . . . . . . . . . . . . . . . . . . . . . .5
A.1 Description . . . . . . . . . . . . . . . . . . . . . . . . . . . . . . . . . . . . . . . . . . . . .5
A.2 Warranty Information . . . . . . . . . . . . . . . . . . . . . . . . . . . . . . . . . . . . .5
A.3 Service/Technical Assistance . . . . . . . . . . . . . . . . . . . . . . . . . . . . . . .6
A.4 Safety Information . . . . . . . . . . . . . . . . . . . . . . . . . . . . . . . . . . . . . . .6
B. Machine Installation . . . . . . . . . . . . . . . . . . . . . . . . . . . . . . . . . . . . . . . . . . .8
B.1 Pre-Installation . . . . . . . . . . . . . . . . . . . . . . . . . . . . . . . . . . . . . . . . . .8
B.2 Mounting . . . . . . . . . . . . . . . . . . . . . . . . . . . . . . . . . . . . . . . . . . . . . .8
B.3 Leveling . . . . . . . . . . . . . . . . . . . . . . . . . . . . . . . . . . . . . . . . . . . . . . .8
B.4 Hood Requirements . . . . . . . . . . . . . . . . . . . . . . . . . . . . . . . . . . . . . .8
B.5 Clearance . . . . . . . . . . . . . . . . . . . . . . . . . . . . . . . . . . . . . . . . . . . . . .8
B.6 Electrical Connection . . . . . . . . . . . . . . . . . . . . . . . . . . . . . . . . . . . . .8
B.7 Pre-Operation Check . . . . . . . . . . . . . . . . . . . . . . . . . . . . . . . . . . . . .8
C. Operation . . . . . . . . . . . . . . . . . . . . . . . . . . . . . . . . . . . . . . . . . . . . . . . . . . . .9
C.1 Controls and Indicators . . . . . . . . . . . . . . . . . . . . . . . . . . . . . . . . . . .9
C.2 Step-by-Step Lighting Procedure . . . . . . . . . . . . . . . . . . . . . . . . . . .11
C.3 Shutdown Procedure . . . . . . . . . . . . . . . . . . . . . . . . . . . . . . . . . . . .12
C.4 Control Operation . . . . . . . . . . . . . . . . . . . . . . . . . . . . . . . . . . . . . . .13
D. Assembly/Disassembly and Cleaning . . . . . . . . . . . . . . . . . . . . . . . . . . . .14
E. Troubleshooting Guide . . . . . . . . . . . . . . . . . . . . . . . . . . . . . . . . . . . . . . . .25
F. Wiring Diagram . . . . . . . . . . . . . . . . . . . . . . . . . . . . . . . . . . . . . . . . . . . . . .26
G. Specifications . . . . . . . . . . . . . . . . . . . . . . . . . . . . . . . . . . . . . . . . . . . . . . .29
4 |
Nieco Corporation - Model JF94E CE |
A. GENERAL INFORMATION
A.1 Description
The Nieco Model JF94E automatic broiler features patented Jet-Flow™ air technology which uses waste heat to help broil the product creating large energy savings. The JF94 also has easy cleaning and a simple and intuitive control package to help eliminate broiling problems and provide the operator with even greater control over the broiling environment.
This manual provides the safety, installation and operating procedures for the Nieco Automatic Broiler Model JF94E. We recommend that all information contained in this manual be read prior to installing and operating the broiler.
A.2 Warranty Information
Please read the full text of the limited Warranty in this manual.
If the unit arrives damaged, contact the carrier immediately and file a damage claim with them. Save all packing materials when filing a claim. Freight damage claims are the responsibility of the purchaser and ARE NOT covered under warranty.
The warranty does not extend to:
•Damages caused in shipment or damage as a result of improper use.
•Installation of electrical service.
•Normal maintenance as outlined in this manual.
•Malfunction resulting from improper maintenance not in accordance with the steps contained in this manual and any applicable training.
•Damage caused by abuse or careless handling outside of the normal operating procedures contained in this manual.
•Damage from moisture into electrical components.
•Damage from tampering with or removal of any safety device.
IMPORTANT!
Keep these instructions for future reference. If the unit changes ownership, be sure this manual accompanies the equipment.
IMPORTANT
The Nieco Corporation reserves the right to change specifications and product design in accordance with the general terms and conditions outlined in the BURGER KING®/Vendor agreement. Such revisions do not entitle the buyer to corresponding changes, improvements, additions or replacements for previously purchased equipment.
5 |
Nieco Corporation - Model JF94E CE |

A.3 Service/Technical Assistance
If you experience any problems with the installation or operation of your broiler, contact your local Authorized Nieco Distributor.
Fill in the information bellow and have it handy when calling your authorized service agency for assistance. The serial number is on the broiler rating plate on the side of the unit.
Purchased from:
Date of Purchase:
Model No.:
Serial No.:
For the name of your local Authorized Nieco Distributor, please call (800) 821-2141 (U.S. Only).
Use only genuine Nieco replacement parts in your broiler. Use of replacement parts other than those supplied by Authorized Nieco Distributors and Service Agencies will void the warranty and may significantly alter the performance of your broiler. Nieco and the Burger King Corporation have worked together to create a set of standards for broiler performance, food quality and food safety. The use of non-Nieco parts is capable of affecting these criteria, and may affect broiler performance, parts longevity and food safety. Your local Authorized Nieco Distributor and Service Agent has been factory trained and has a complete supply of parts for your Nieco Automatic Broiler.
You may contact the factory direct at +1-707-284-7100 if you have trouble locating your local Nieco Distributor.
A.4 Important Safety Information
Throughout this manual, you will find the following safety words and symbols that signify important safety issues with regards to operating or maintaining the equipment:
 WARNING
GENERAL WARNING. Indicates information important to the proper operation of the equipment. Failure to observe may result in damage to the equipment and/or severe bodily injury or death.
 WARNING
ELECTRICAL WARNING. Indicates information relating to possible shock hazard. Failure to observe may result in damage to the equipment and/or severe bodily injury or death.
CAUTION 
GENERAL CAUTION. Indicates information important to the proper operation of the equipment. Failure to observe may result in damage to the equipment.
 WARNING
HOT SURFACE WARNING. Indicates information important to the handling of equipment and parts. Failure to observe caution could result in personal injury.
6 |
Nieco Corporation - Model JF94E CE |

A.4 Important Safety Information (Continued.)
In addition to the warnings and cautions in this manual, use the following guidelines for safe operation of your Nieco Automatic Broiler:
•Read and follow all instructions before using this equipment.
•Install or locate broiler only for its intended use as described in this manual.
•Do not operate this equipment if it has a damaged cord or plug, if it is not working properly or if it has been otherwise damaged.
•This equipment should only be serviced by authorized personnel. Contact your local Nieco Distributor for adjustment or repair.
•Use only genuine Nieco replacement parts for your broiler. Failure to do so will void the warranty and may significantly alter the performance of your broiler. Nieco and the Burger King
Corporation have worked together to create a set of standards for broiler performance, food quality and food safety. The use of non-Nieco parts is capable of affecting these criteria, and may affect broiler performance, parts longevity and food safety.
The following warnings and cautions appear throughout the manual and should be carefully observed:
•Turn the broiler off and disconnect the plug before performing any service, maintenance or cleaning on the broiler.
•Always allow the broiler to fully cool before performing any service, maintenance or cleaning. Failure to wait for the broiler to cool fully may result in personal injury.
•The procedures in this manual may include reference to the use of chemical products. The Nieco Corporation does not endorse the use of any particular cleaning/degreasing agent. Use only those chemicals that are approved for use in the BURGER KING® SYSTEM.
•The broiler should be grounded according to local electrical codes to prevent the possibility of electrical shock. It requires a grounded receptacle with separate electrical lines, protected by fuses or circuit breakers of the proper rating.
•All electrical connections must be in accordance with local electrical codes and any other applicable codes.
•The use of adequate ventilation (as rated in this manual) with this broiler is mandatory. Failure to adequately ventilate this unit and provide safe operating distances (as specified in this manual) is a fire safety hazard. Follow the instructions for emergency broiler shutdown in the event of an emergency.
•No attempt should be made to operate this appliance in the event of a power failure.
WARNING ELECTRICAL SHOCK HAZARD. FAILURE TO FOLLOW THESE INSTRUCTIONS COULD RESULT IN SERIOUS INJURY OR DEATH:
_
_
_
Electrical ground is required on this appliance.
Check with a qualified electrician if you are in doubt as to whether the appliance is properly grounded.
Do not use water on or near the control box for risk of serious injury or death due to electrical shock.
WARNING, HIGH TEMPERATURES WITH HOT SURFACES. FAILURE TO FOLLOW THESE PROCEDURES COULD RESULT IN SERIOUS INJURY:
_ |
Do not attempt to clean, disassemble or perform maintenance on this broiler until it is fully |
|
|
|
cooled as per the instructions contained in this manual. |
7 |
Nieco Corporation - Model JF94E CE |

B. INSTALLATION
B.1 Pre-Installation
Uncrate the broiler and inspect for shipping damage. Remove the tape securing the machine parts, and install the parts in their proper location. If there are obvious or concealed damages to any part of the broiler, please contact your freight carrier. The factory warranty does not cover freight damage.
B.2 Mounting
Follow the mounting instructions if this function is not performed by the installer.
B.3 Leveling
The grease drain system is based on a gravity-flow design. Therefore, it is extremely important that the broiler be placed on a level surface.
B.4 Hood Requirements
This appliance must be installed under a ventilation hood of adequate size.
Do not obstruct the flow of combustion and ventilation air. An adequate air supply must be available for safe and proper operation.
B.5 Clearance
Keep appliance area free from combustibles.
To facilitate disassembly and service of the unit a minimum of 24” (610 mm) should be allowed on the control panel (feed end) of the broiler.
REQUIRED AND RECOMMENDED CLEARANCES
|
REQUIRED for |
REQUIRED for installa- |
RECOMMENDED by |
|
|
installation near |
tion near non-com- |
Nieco for proper disas- |
|
|
combustible walls |
bustible walls and |
sembly and service |
|
|
and construction |
construction |
|
|
|
|
|
|
|
Back of broiler |
12” (305 mm) |
0” (0 mm) |
0” (0 mm) |
|
|
|
|
|
|
Sides of broiler |
12” (305 mm) |
0” (0 mm) |
0” (0 mm) |
|
|
|
|
|
|
Front of broiler |
12” (305 mm) |
0” (0 mm) |
24” (610 mm) |
|
(Feed end) |
||||
|
|
|
||
|
|
|
|
B.6 Electrical Connection
Power requirements are stated on the unit nameplate and must be connected accordingly. Before starting broiler, tighten all electrical connections in control box. An electrical wiring diagram can be found inside the control box.
Note: Disconnect power before servicing.
B.7 Pre-Operation Check
Be sure that all parts are installed in the proper location.
8 |
Nieco Corporation - Model JF94E CE |
C. OPERATION
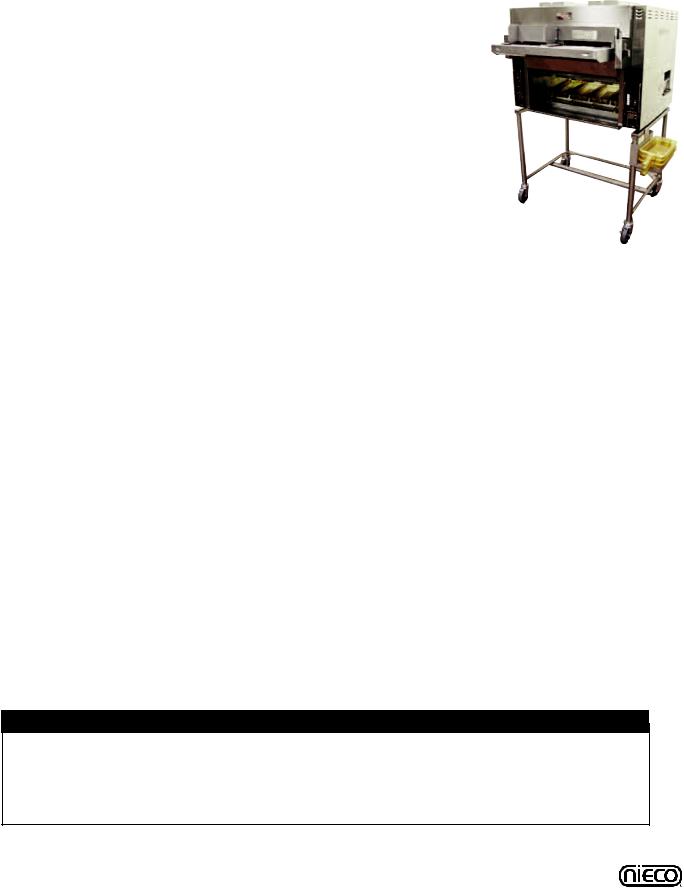
C.1 Controls and Indicators
ON THE MAIN SIDE
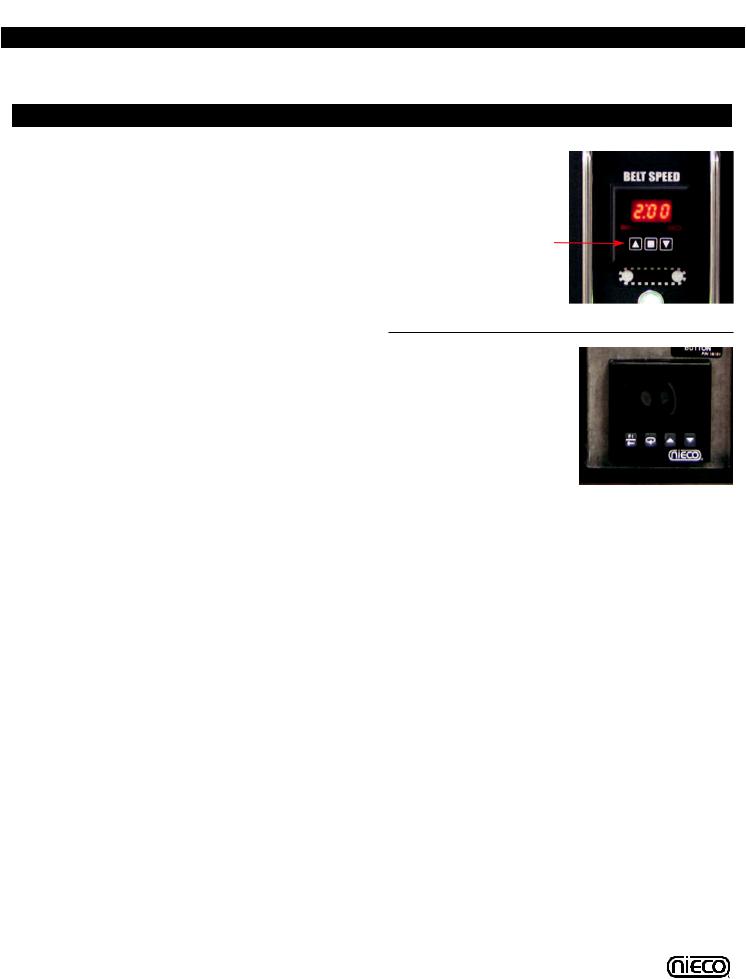
1.Belt Speed Control (P/N 13727-B) - Used to set the broil time on the meat belt.
2.On/Off Indicator Light (P/N 4402) - Glows when the broiler is on.
3.Main On/Off Switch (P/N 15480) - Used to turn the main power supply to the broiler on or off.
4.Belt Reverse Button (P/N 13579) - In the event of a belt jam, push and hold the belt reverse button in to help free anything that may be caught in the belt to help clear a jam.
5.Temperature Control (P/N 19235) - Helps keep the broiler temperature stable when the broiler is under heavy load.
1
2
3
4
5
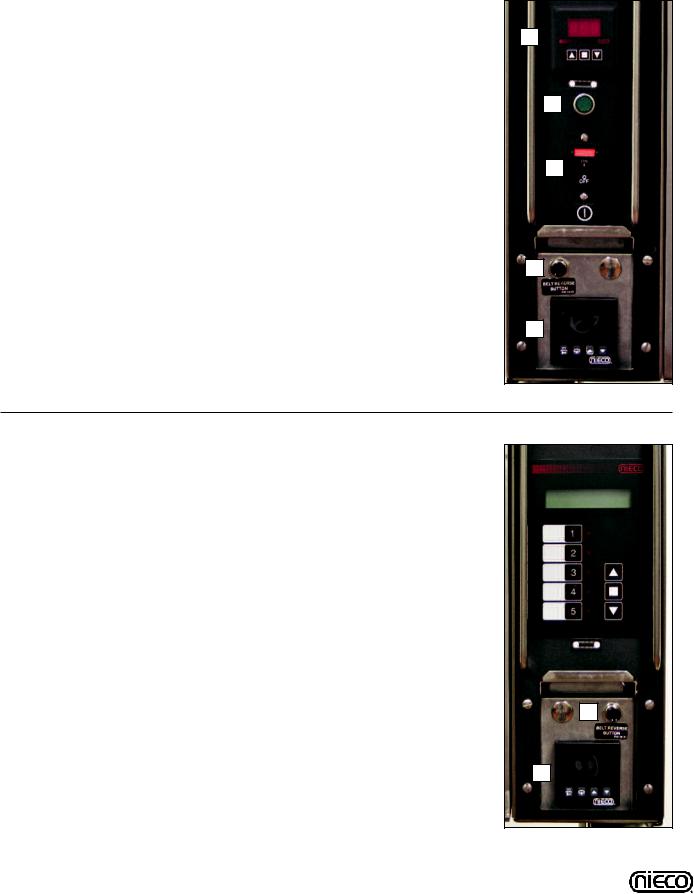
ON THE FLEX SIDE
1.Multi Product Control (P/N 15161-B) - Used to broil a variety of products that may require different settings (WHOPPERS®, Chicken, XT)
2.Belt Reverse Button (P/N 13579) - In the event of a
belt jam, push and hold the belt reverse button in to |
1 |
help free anything that may be caught in the belt to |
|
help clear a jam. |
|
3. Temperature Control (P/N 19235) - Helps keep the |
|
broiler temperature stable when the broiler is under |
|
heavy load. |
|
2
3
9 |
Nieco Corporation - Model JF94E CE |
C.1 Controls and Indicators (Continued.)
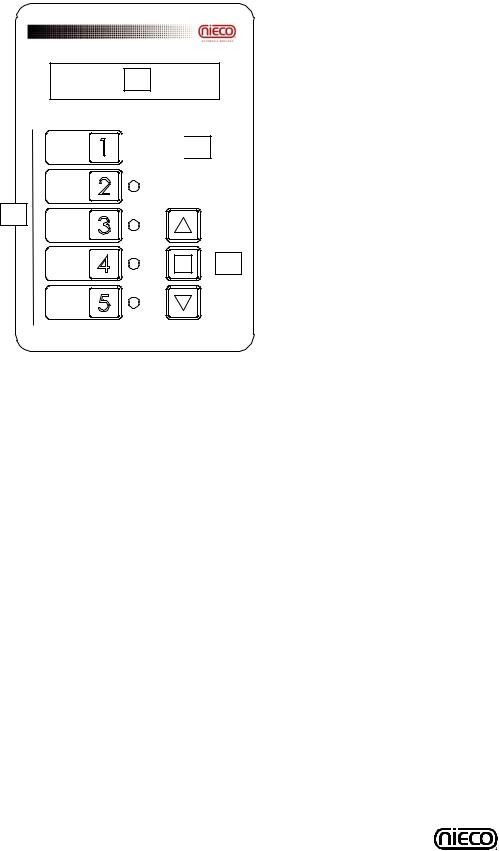
(1)


 (4)
(4)
(2)
(3)
Multi-speed control P/N 15161-B
(1)LED DISPLAY - Shows current product selection and cook time.
(2)PRODUCT SELECTION BUTTONS - Press to select different presets for different products.
(3)ADJUSTMENT BUTTONS - Use to adjust product cook times, element settings and product names.
(4)SELECTION INDICATOR LIGHT - Lights up to show which button is selected.
10 |
Nieco Corporation - Model JF94E CE |
C.2 Lighting Procedures
PRE-LIGHTING PREPARATION
1. Broiler is |
2. Turn ventilation |
centered under |
system on |
hood and |
|
plugged in |
|
 WARNING
THE VENTILATION SYSTEM MUST BE ON AT ALL TIMES DURING BROILER OPERATION. OPERATING BROILER WITHOUT PROPER VENTILATION IS A SEVERE FIRE HAZARD.
NORMAL IGNITION
1. Turn the MAIN POWER SWITCH on. |
1. |
2.Allow broiler to heat for 45 minutes before cooking. Do not cook during the warm up period.
C.3 Shutdown Procedures
PLANNED SHUTDOWN
1. Allow the broiler |
2. Turn off the |
|
3. Wait for 30 |
to run free of |
Main Power |
|
minutes |
any product for |
Switch. |
|
for the |
10 minutes. |
|
|
broiler to |
This will burn |
|
|
cool. |
the chain clean. |
|
|
|
|
|
|
|
EMERGENCY SHUTDOWN
1.Turn off the
MAIN POWER SWITCH.
CAUTION 
FOR YOUR SAFETY: Do not store or use gasoline or other flammable vapors or liquids in the vicinity of this or any other appliance.
CAUTION 
FOR YOUR SAFETY: In the event of a prolonged power failure, no attempt should be made to operate this appliance.
11 |
Nieco Corporation - Model JF94E CE |
C.4 Control Operation
IMPORTANT: THIS BROILER IS SHIPPED WITH FACTORY PRESETS THAT MUST BE CHANGED.
If this is the initial start-up for your broiler, ALL control settings must be made according to BURGER KING® specifications. Follow the steps outlined for calibration and changing preset times.
MAIN SIDE CONTROLS
1. SETTING BELT SPEEDS
Press up arrow to increase broil time; press the down arrow to decrease broil time. After you have set the control the display will be flashing. Press the center square to save your changes. NOTE: After making changes to the broil time, if you do not press the center square button, your changes will not be saved.
2. TEMPERATURE CONTROLS
Use the up and down arrows to set the time. Press the center square button to save your changes.
Electric broilers are equipped with a Broil Temperature Stabilizer Control that senses when the broiler is being used, and adjusts the temperature to keep the broiler hot during heavy use. The control consists of two parts - a temperature probe to sense the internal temperature of the broiler, and the control itself.
3. SETTING THE TEMPERATURE CONTROL
In order to assure proper operation, the Temperature Control must be set for operation in the restaurant. Follow these step by step instructions when the broiler is new, and once per month after.
Step 1: Be sure all pieces of the broiler are in place. Make sure the broiler is plugged in and the exhaust hood is turned on. Turn the broiler on.
Step 2: MAIN SIDE OF THE BROILER: Set the temperature (bottom number) to 380º C (716° F). Use the up or down arrows on the control to set the temperature. The bottom number is the set temperature and the top number is the actual temperature.
FLEX SIDE OF THE BROILER: Set the temperature (bottom number) to 275º C (527° F). Use the up or down arrows on the control to set the temperature. The bottom number is the set temperature and the top number is the actual temperature.
12 |
Nieco Corporation - Model JF94E CE |
C.4.5 FLEX SIDE CONTROLS
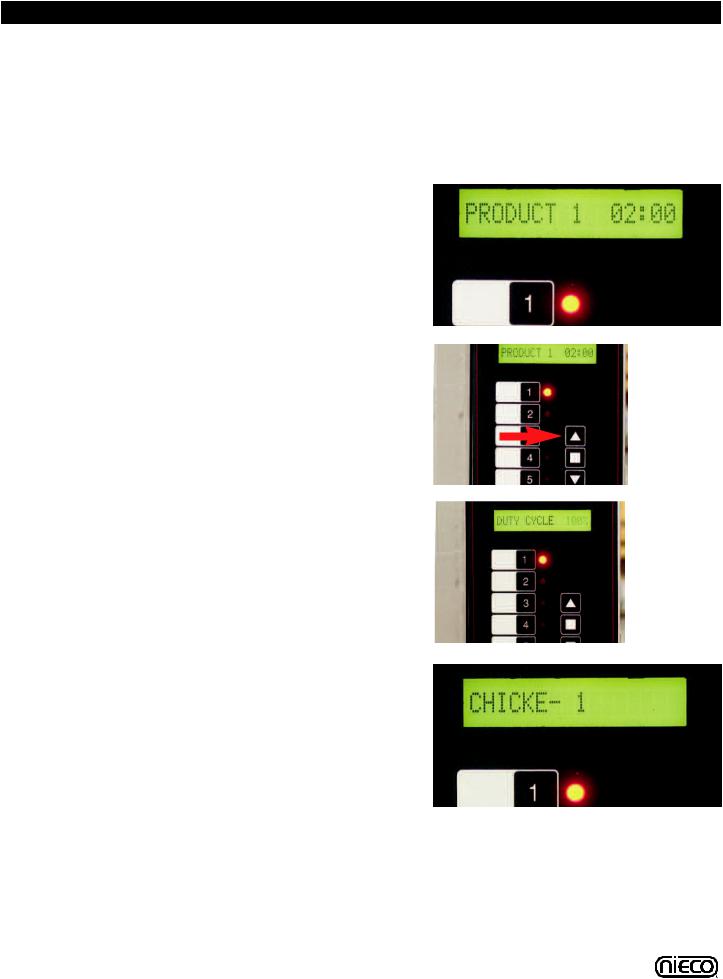
1. Multi-Product Control |
|
|
How it works: The multi-product control is |
|
|
designed to let you broil different products on the |
|
|
flex side of the broiler. The control allows you to |
|
|
have different broiler settings for each product |
|
|
selection button. Use a grease pen to mark the |
|
|
white area with the product name. |
|
|
2. Normal Operation |
2 |
|
Press the product selection button (number) for |
||
|
||
the product you wish to cook. The display will |
|
|
show the product name and cook time and the |
|
|
light next to the product selection button will be lit. |
|
|
NOTE: Be sure the belt is clear of any products |
|
|
before pressing a new product selection button. |
|
|
3. Changing Belt Speeds |
|
|
Push the product selection button you want to |
3 |
|
adjust then push the up and down arrows to |
|
|
make changes, then press the center square but- |
|
|
ton to save them. |
|
|
4. Changing Upper Heat Element Settings |
|
|
To adjust element settings press the product |
|
|
selection button you wish to change, then press |
|
|
the product selection button one more time. The |
|
|
screen will read Duty Cycle and show a percent- |
|
|
age. Press the up and down buttons to adjust the |
4 |
element power up or down (0 = off; 100% = Full |
|
|
on). Press the center square button after you are |
|
|
done adjusting the duty cycle to save your |
|
|
changes. |
|
|
5. Changing Product Names |
|
|
Push the product selection button which you want |
|
|
to assign a name to. Press and hold the center |
|
|
square button for 15 seconds. The control will |
|
|
enter the edit name screen for that button. Use |
|
|
5 |
||
the up and down buttons to change the charac- |
||
|
||
ters. Press the center square button once to move |
|
|
to the next character until you are finished editing |
|
|
the product name for that button (10 character |
|
|
limit). Press and hold the PRODUCT SELECTION |
|
|
BUTTON for 5 seconds to save the changes and |
|
|
return to normal operation. |
|
13 |
Nieco Corporation - Model JF94E CE |

D. CLEANING AND DISASSEMBLY
Turn broiler off. Disconnect the power supply to the broiler before cleaning or servicing. Allow to cool for 30 minutes prior to cleaning/disassembly. Leave the ventilation system on during cooling. Use only approved cleaning, degreasing and sanitizing solutions.
 WARNING
LEAVE THE VENTILATION HOOD ON DURING COOLING. FAILURE TO DO SO COULD POSE A FIRE SAFETY HAZARD.
CAUTION 
Follow the Disassembly and Reassembly steps to ensure proper operation of the broiler. Failure to do so may result in operational problems.
 WARNING
BROILER PARTS ARE HOT. DO NOT ATTEMPT TO DISASSEMBLE THE BROILER UNTIL IT IS FULLY COOL. FAILURE TO FOLLOW THIS INSTRUCTION MAY RESULT IN SEVERE INJURY.
ALL PARTS ARE CLEANED ON A DAILY BASIS UNLESS OTHERWISE NOTED
Follow the steps for proper disassembly. Reverse the order for reassembly.
How to read the cleaning section
The name of the part to be cleaned.
The location of the part. |
When to clean the part. |
|
|
|
|
|
|
|
|
|
|
|
|
|
|
|
|
|
|
|
Meat Guides |
|
|
|
Clean: Every 4 hours |
|
|
|
|
|
|
|
|
|
|||
|
|
|
|
|
|
|
|
|
Feed End
The tools needed to Tools clean the part
|
Scrub Pad |
|
|
3-Compartment Sink |
Picture of the part to be |
|
|
|
|
|
removed and cleaned. |
How to remove and |
Instructions |
|
clean the parts. |
|
|
1.Pull each meat guide out slightly from the bottom, then lift off.
2.Wash, rinse, and sanitize in the 3-compartment sink.
14 |
Nieco Corporation - Model JF94E CE |
 Loading...