

Page 1
Copyright 2007
www.nexusisr.com
Nexus Hawk™
User Manual
ANY NETWORK, ANYTIME, ANYWHERE
Page 2

Please read the complete User Manual before starting your Nexus Hawk.
Register your Nexus Hawk, and find other support information at www.nexusisr.com/support.php
Page 3

Table of Contents
INTRODUCTION 1
GETTING STARTED 1
LOGIN 2
SETUP|SERIAL 2
GPSD 2
SETUP|WIFI 3
AP 3
C
LIENT
3
SETUP|10/100 ETHERNET 4
ETH0 4
ETH1 4
SETUP|PCMCIA 5
C
ELLULAR
SECURITY|VPN CLIENT 6
O
PEN
APPLICATIONS|PORT FORWARDING 6
APPLICATIONS|DMZ HOST 7
WAN 5
VPN 6
ADMINISTRATION|MANAGEMENT 7
P
ASSWORD
DDNS 8
S
TATIC
R
EMOTE ACCESS
ADMINISTRATION|DEBUG FILE DOWNLOAD 9
ADMINISTRATION|RESET 9
R
ESTORE DEFAULTS
R
EBOOT SYSTEM
ADMINISTRATION|FIRMWARE UPGRADE 9
STATUS 10
WAN C
PCMCIA P
WIFI 10
TECHNICAL SPECIFICATIONS 11
TROUBLESHOOTING 13
INDEX 14
7
DHCP 8
8
9
9
ONNECTIVITY
ORTS
10
10
Page 4
Nexus Hawk™ User Manual
Introduction
Congratulations on your purchase of a Nexus Hawk™! This literature is intended as a primary reference for
normal configuration and operation of the Nexus Hawk™. The information presented within should allow most
users to easily configure the device to their preferences. As with any product from Nexus_iSR, should you
encounter any difficulties, technical support is standing by to help you.
What's Included with the Nexus Hawk™?
• Nexus Hawk™
• WiFi Antenna
• Ethernet Crossover Cable
• 12 volt Power Supply
• Nexus Hawk™ QuickStart Guide and QuickFix Guide
Getting Started
Connecting to Power
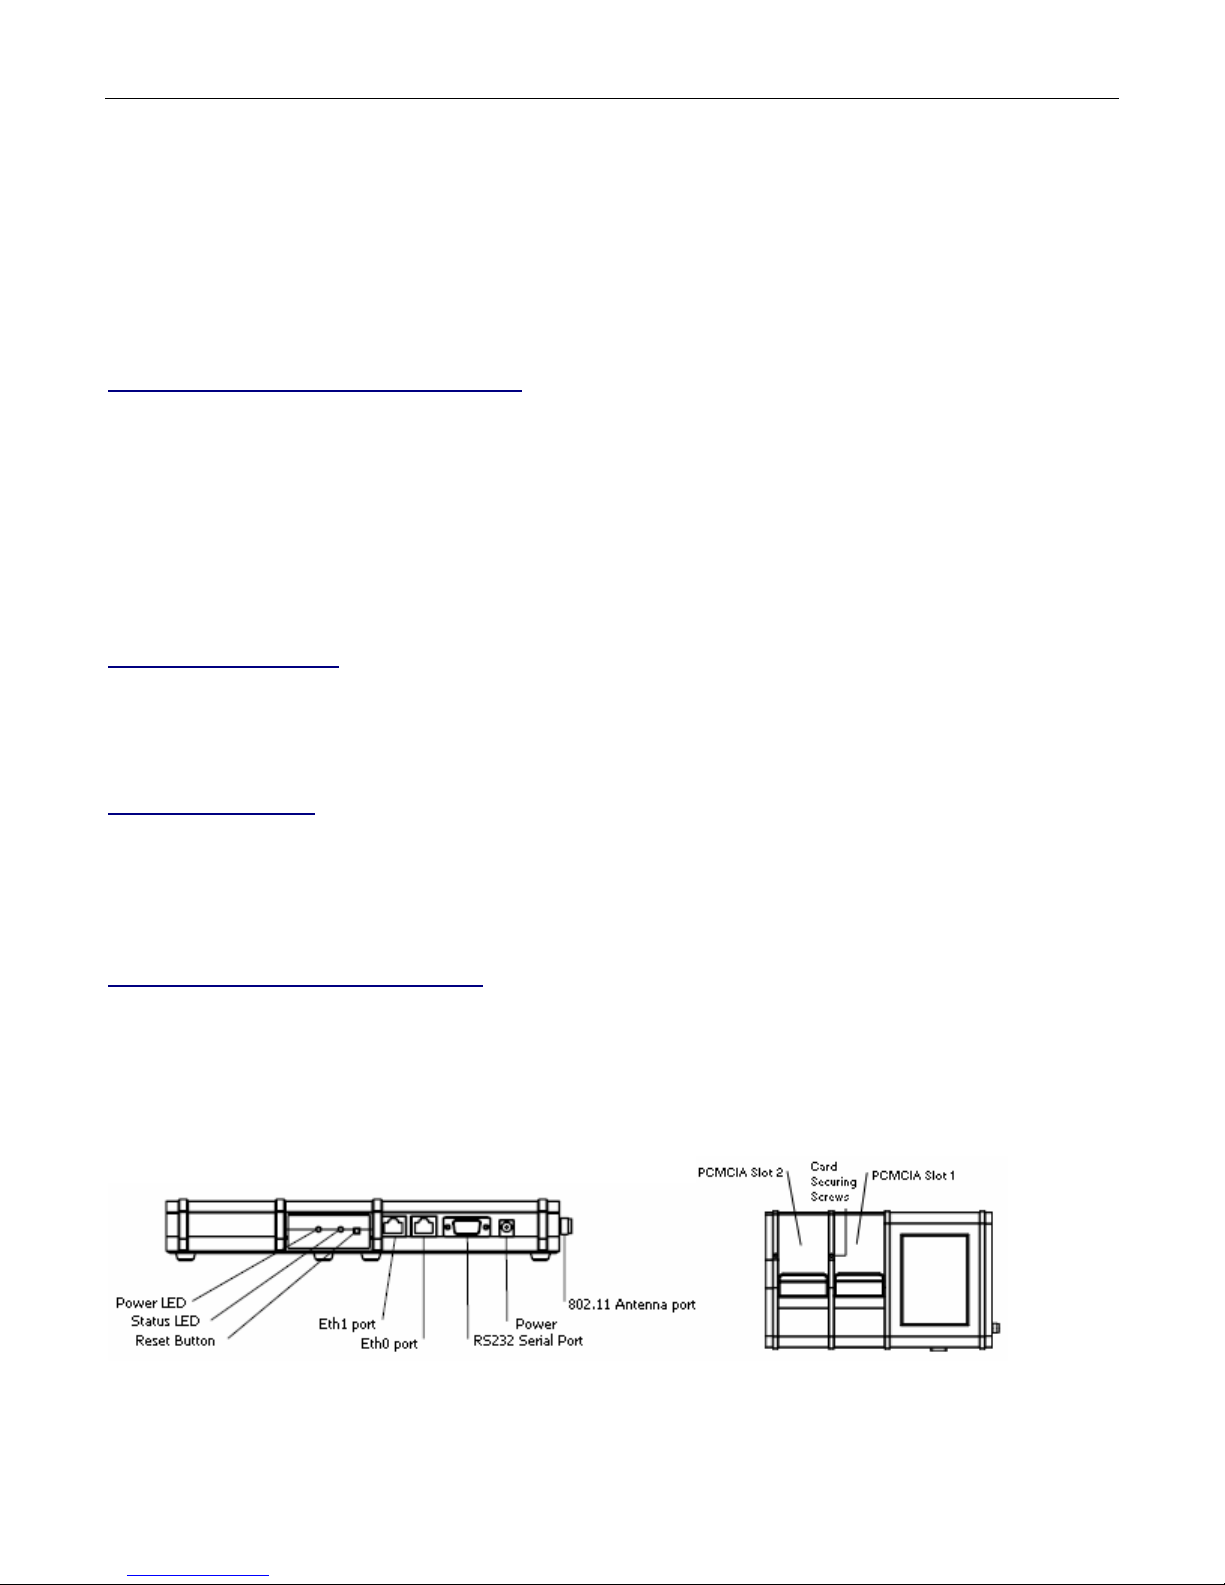
The Nexus Hawk™ accepts DC power input ranging from 11-48V. Upon power-up, both the green Power-LED
and the
sequence. During this time, it is performing a Power On Self Test (POST). When the
pulsing, your Nexus Hawk™ is fully powered up and ready!
Staying Connected
The Nexus Hawk™ has four possible paths to the Internet/WAN: 10/100 WAN (Eth0), WiFi Client (connected to a
WAN-connected WiFi Access Point), Cell phone Card 1 (Slot 1), Cell phone Card 2 (Slot 2). Connectivity is
prioritized in this order. If a higher priority connection is established, the data stream will automatically transfer
to it. If a connection is lost, the Nexus Hawk™ will attempt to transfer WAN functions to the next lowest priority
connection (if one exists).
10/100 Ethernet Data Connection
The Nexus Hawk's WiFi port is disabled by factory default to assure the highest possible security. In order to
perform initial configuration, you
cable (provided). The Eth1 jack is the one that is located farthest from the DC power jack.
Attach the crossover cable to a client PC configured for dynamic configuration (DHCP). Within several
seconds, the client PC should receive DHCP information from the Nexus Hawk™.
red Status-LED will illuminate. Allow the unit approximately 90 seconds to complete its startup
red Status-LED begins
must
connect to the Hawk's Eth1 10/100 Ethernet with an Ethernet crossover
1
Page 5
Nexus Hawk™ User Manual
Login
Accessing the Management Console
Launch a web browser (e.g. - Internet Explorer, Firefox, etc.) and enter the following address: 192.168.1.1 (the
factory default value). The "splash page" will give you the option of either viewing or changing the configuration
of your Nexus Hawk™.
You may view configuration without being authenticated.
To change the configuration, authentication is required. Factory defaults for authentication are:
Login: manager
Password: manager
Setup|Serial
GPSd
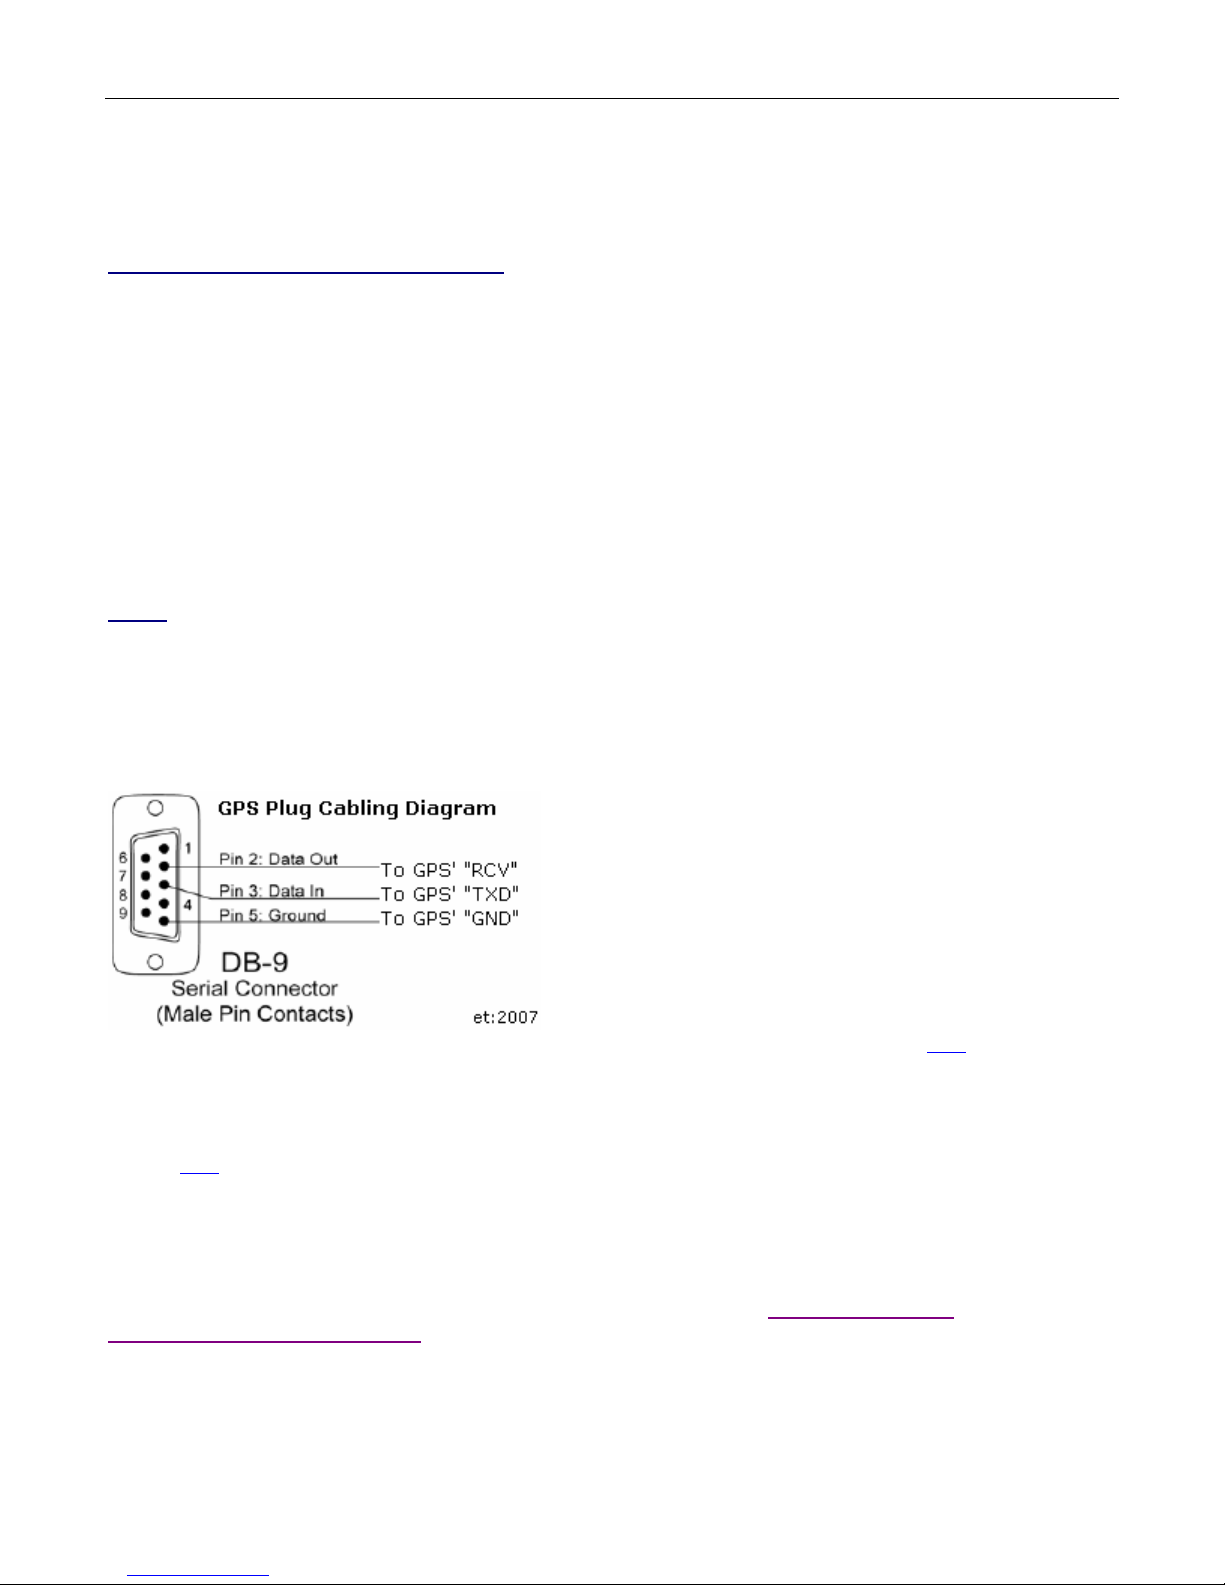
NOTE: The Serial Port supports only Global Positioning System (GPS) functionality in this firmware revision. The
GPS must be both serial (RS-232c) and capable of providing NMEA-0182, Rockwell or Garmin Binary data streams
(all of which are converted into NMEA-0812 on the selected port). The Nexus Hawk's™ firmware will auto-detect
the communication settings (baud rate, parity, etc.) of the connected GPS.
Only three wires are needed for data connectivity, TXData, RXData and Ground. The diagram below shows the
cabling from the perspective of a plug that is attached to the GPS.
Enable GPSd: Enables the described function. For more information on GPSd click
TCP Port: This is the TCP port that will interface with the GPS. Most simply, one may use TELNET to
attach to the port and manage the GPS (including the receipt of NMEA sentences, once the GPS is
commanded to send data). By default, this is 192.168.1.1:2947 though it may also be accessible
remotely by DNS if a dynamic DNS service has been subscribed to. For more information on TCP click
here
Save Configuration: Updates are applied only when this button is pressed.
Upon pressing Save Configuration, the Nexus Hawk™ will immediately open the designated port to/from the
GPS. Some GPS's may appear to sit idle until a user sends a command to activate their data stream. The most
often used code is simply "r", at which point the port will present raw NMEA strings. For more information on how
to use GPSd-presented data for mapping and navigation applications, visit
soft.com/penguin/man/1/gpsd.html.
here
http://www.penguin-
2
Page 6

Nexus Hawk™ User Manual
Setup|WiFi
AP
This selection will enable the Nexus Hawk™ to function as a WiFi Access Point (AP), sharing its connections with
others (Clients) who may connect to it. The Nexus Hawk™ may serve as either an AP or Client of another AP,
but not both at the same time
NOTE
: When in WiFi AP mode, the Nexus Hawk's™ WiFi port and LAN (Eth1) port are bridged together at the
physical layer as a single virtual device. This means that all IP information is the same (192.168.1.1, for
instance). As a result, all LAN clients share the same DHCP pool, subnet, and can access each other. Firewalling
and port forwarding may be done to any device on this shared virtual network. This occurs only in WiFi AP mode,
and not in WiFi Client mode.
SSID: This is the name of your wireless network. This option has a 32 alphanumeric character limit. For
more information click
Broadcast SSID: Check this option to broadcast the name of your AP's WiFi network to others. Doing
so makes discovery and attachment to your AP easier. Failing to broadcast it makes your AP somewhat
more secure, by requiring trusted clients (people who will attach to it) to know the SSID without being
prompted.
Channel: Select the channel on which your AP will operate. Channels 1-11 coincide with 802.11b/g (2.4
GHz) while channels 36 and up coincide with 802.11a (5.8GHz). Effort should be made to select a
channel that is not in use in the immediate vicinity of the Nexus Hawk™ in order to minimize interference
and maximize the WiFi efficiency.
Security: This specifies the security mode of the Nexus Hawk™'s WiFi AP.
• None: Selecting this option creates an "open" or unsecured AP.
• WEP:
• WPA-PSK, WPA2-PSK, WPA/WPA2-PSK: This stands for:
Pre-shared key: This is a passphrase that is used by the selected security mode. For WEP-level
security, this must be a hexadecimal value using the digits 0-9 and letters from A-F. For the 64-bit
option the value must be 10 characters. For 128-bit option the value must be 26 characters. For
WPA/WPA2-level security, the value must be alphanumeric and a minimum of 8 characters and may be a
maximum of 64 characters.
The AP's IP address is the same one that is specified for the 10/100 Ethernet LAN
example, if the 10/100 Ethernet LAN IP is set to the factory default of 192.168.1.1, this will also be the IP
address for the WiFi port of the Nexus Hawk™. They are considered "bridged".
Wireless Equivalent Privacy
(longer key). Selecting this option requires you to enter a private key that is known only to you
and trusted others that you want to allow to connect to your AP. For more information click
this option requires you to enter a pre-shared key to secure the AP connection. The WPA/WPA2PSK option allows for dual operation of both WPA and WPA2 for connected clients. For more
information on WPA click
Client
The Nexus Hawk™ may connect to an 802.11a/b/g compliant WiFi Access Point (AP). This function may be found
by navigating to the "Setup|WiFi" page. Check the "Client" box to enable the AP Client.
SSID: Enter the known SSID of the 802.11 a/b/g network that you wish to connect to. Once this option
is selected and applied, it remains active. The Nexus Hawk™ will continue to scan for an AP with the
entered SSID until it is able to locate it, at which point it will connect. If that AP disappears, the Nexus
Hawk™ will resume its scanning function in an attempt to connect when one appears. For more
information click
[Scan]: Select this link to view available APs in the area.
here
.
here
is available in two modes; 64-bit (shorter key) and 128-bit
WiFi Protected Access
here For more information on WPA2 click here
configuration (Eth1). For
here
. Selecting
3
Page 7

Nexus Hawk™ User Manual
Security: This is defined by the AP, not the Nexus Hawk™. Select the type of security set by the AP.
NOTE: Some AP's differentiate between WPA-PSK and WPA2-PSK. The Nexus Hawk™ does not. If the
AP uses either, simply select the WPA/WPA2-PSK option.
Pre-shared key: Enter the AP's pre-shared security key. This field is required if security is set to WEP or
WPA.
DHCP Client: This allows the Nexus Hawk™ to be automatically configured to function on a network
provided by another AP.
If Enabled the Nexus Hawk™ will attempt to obtain configuration information from a DHCP enabled AP.
If Disabled, the Nexus Hawk™ will require manual IP assignment (also known as "Static IP") and the
following console options will come into play:
• IP Address: Enter the manually assigned (static) IP address. For more information click
• Netmask: Select the desired netmask from the drop down list. For more information click
• Gateway: Enter the desired gateway. For more information click
• DNS1: Enter the desired primary Domain Name Server's address. For more information click
here
• DNS2: Enter the IP address for an optional (not required) Secondary DNS.
Settings may be verified by navigating to the Status page on the top navigation bar. The wireless client status
section will show a connection status, the SSID of the connected network, and a signal strength indicator.
here
here
here
Setup|10/100 Ethernet
Eth0
The Nexus Hawk™ has two Ethernet ports. The port that is closest to the DC power jack is ETH0 -- and is
exclusively reserved to allow the Nexus Hawk™ to connect to devices that provide Wide Area Network (WAN)
connectivity. Connection is by a standard RJ-45 Ethernet patch cable.
DHCP Client: This allows the Nexus Hawk™ to attempt to obtain configuration information from a DHCP
enabled WAN device. For more information click here
• Enabled: The Nexus Hawk™ automatically obtains configuration parameters from a DHCP server on
the WAN.
• Disabled: The Nexus Hawk™ will allow the Console Operator to manually configure networking
parameters as follows:
IP Address: Enter the assigned (static) IP address. For more information click
Netmask: Select the desired netmask from the drop down list. For more information click
Gateway: Enter the IP address of the desired gateway. For more information click
DNS1: Enter the IP address of the desired Primary Domain Name Server (DNS). For more information click
here
DNS2: Enter the IP address for an optional (not required) Secondary DNS.
Save Configuration: Saves the changes that were made.
Settings may be verified by navigating to the Status page on the top navigation bar. A well configured Eth0
status will display as "Connected" with a properly formatted IP address.
Eth1
The Nexus Hawk™ has two Ethernet ports. The port that is closest to the <RESET> button is ETH1 -- and is
exclusively reserved to allow local network (LAN) connection to the Nexus Hawk™ (such as used by a locally
connected computer). Direct-connection to a computer will require a Category-5 (minimally) Ethernet crossover
cable (a
information click
RED crossover cable is supplied with your purchase and is included in the packaging). For more
here.
here
here
here
4
Page 8

Nexus Hawk™ User Manual
Warning, if you are using this port to configure the Nexus Hawk™
connectivity to the Nexus Hawk™.
to recover, you may regain control by resetting the Nexus Hawk™ to factory defaults.
IP Address: The default address is 192.168.1.1 It may be manually changed here. Note
address, while connecting through this port will cause loss of connectivity. To regain connectivity,
perform a DHCP IP renewal on your client. From your computer's command prompt:
Windows2000/XP:
ipconfig /release <enter>
ipconfig /renew <enter>
Linux:
ifconfig /release <enter>
ifconfig /renew <enter>
Netmask: Select the desired netmask from the drop down list. For more information click
DHCP Server: For more information click
• Enabled: The Nexus Hawk™ will provide dynamic configuration parameters to LAN devices.
• Disabled: The Nexus Hawk™ will not
This will require that all LAN devices be manually configured, individually.
Save Configuration: Saves the changes that were made.
You may verify that the Nexus Hawk™ has been properly configured by navigating to the Status page on the top
navigation bar. A well configured Eth1 status will display as "Connected" with a properly formatted IP address.
Proceed with caution. If at any time, you lose connection and are unable
here
provide dynamic configuration parameters to LAN devices.
: Changes here can cause you to lose
: Changing this
here
Setup|PCMCIA
Cellular WAN
The Nexus Hawk™ card slot(s) support only Cellular Data Cards. The Cellular WAN option allows the Nexus
Hawk™ to provide access to the internet through the services of a major mobile telephone service carrier.
Insert your Nexus Hawk™ preferred cellular data card.
Preferred Wireless Cards
• Option GT Max from Cingular
• Kyocera KPC-650 for Verizon
• Novatel Wireless Merlin S720 from Sprint
Detected: This field will display the manufacturer's model name of the detected card.
Carrier: Choose the appropriate service provider for the inserted card.
selected the card may not function properly.
Connect: Pressing this button connects the inserted card to the cellular network.
Disconnect: You must either power-down, or press this button before removing your cellular data card
from the Nexus Hawk™. Failure to do so may cause malfunction.
After pressing the Connect button the Cellular WAN configuration page will briefly refresh and indicate with the
available button selections that a connection has been initiated.
Your selections may be verified by navigating to the Status page on the top navigation bar. Once a connection
has been established, the carrier, signal strength, and connection IP address will be displayed on the status page.
NOTE: For best results power down before removing card.
If the incorrect service provider is
5
Page 9

Nexus Hawk™ User Manual
Security|VPN Client
OpenVPN
For advanced users, the Nexus Hawk™ supports functioning as an OpenVPN endpoint. For more information on
OpenVPN click
Enabled: Enables VPN functionality.
Interface Type:
Server IP/Hostname: Enter the server IP address or hostname
Port: Enter the port number of the VPN tunnel
Protocol: Select which protocol you wish to use.
TUN MTU: Enter the maximum packet size that the VPN is capable of transmitting. For more information
click
TUN MTU Extra:
TCP MSS:
Public Server Certificate: Enter the public server certificate here. Please ensure that the certificate is
copy-pasted correctly.
Public Client Certificate: Enter the public client certificate here. Please ensure that the certificate is
copy-pasted correctly.
Private Client Key: Enter the client key here.
Save Configuration: No updates are applied unless this button is pressed. Once pressed, the
screen changes are saved.
Enable the OpenVPN Client by checking the "Enable" check box. Enter the appropriate configuration information
for the tunnel, including the full text of the public server and client certificates, as well as the private client
key. Press "Save Configuration" and the configuration will be applied to the Nexus Hawk™.
You can verify the connectivity status of the OpenVPN tunnel by navigating to the Status page and checking the
connectivity status for "Security|OpenVPN Client Tunnel." If the status is indicated as "Connected" and shows a
properly formatted IP address, the Nexus Hawk™ is acting as an OpenVPN client to the remote network.
here
• tap:
• tun:
• For more on tap and tun information click
• TCP: Select this option to use TCP. This option transfers packets and checks the packets for
errors. For more information click here
• UDP: Select this option to use UDP. This option is an alternative protocol to TCP, it is faster than
TCP because it does not use packets, and it also does not provide error checking. For more
information click
here
here
here
Applications|Port Forwarding
The Nexus Hawk™ supports forwarding of specific port ranges from the WAN to a client on the LAN.
Enabled: Enables the specified port
From: Enter the port number that you want to begin forwarding
To: Enter the port number that you want to end forwarding
TCP/UDP: Transmission Control Protocol/User Datagram Protocol Options
• Both: Select this option to use both TCP and UDP protocol
6
Page 10

Nexus Hawk™ User Manual
• TCP: Select this option to use TCP. This option transfers packets and checks the packets for
errors. For more information click
• UDP: Select this option to use UDP. This option is an alternative protocol to TCP, it is faster than
TCP because it does not use packets, and it also does not provide error checking. For more
information click
Internal Host: Enter the LAN client IP address of the host
Delete: Deletes the specified port
Save Configuration: Changes are applied only after pressing this button.
To input a single port, simply enter it as both the From and To port. If both the port forwarding and DMZ
options are enabled, port forwarding will take priority, with the remaining ports allocated to the DMZ IP address.
Do not enter overlapping port ranges for different IP addresses, as this configuration does not translate to a
logical port forwarding structure. Please note that some cellular carriers will firewall the connections to their
networks. As such, a public WAN IP address does not guarantee universal accessibility from the internet.
here
here
Applications|DMZ Host
The Nexus Hawk™ supports a LAN client which can be placed in the DMZ (de-militarized zone) to allow access
from the connected WAN.
Enabled: Enables the DMZ host option.
IP address: Enter the address of the client on the LAN which will accept the WAN connection.
Save Configuration: Updates are applied only upon pressing this button.
If port forwarding and DMZ values conflict, port forwarding will always be given priority. The DMZ host will
receive only the ports not allocated in the forwarding table. Caution: Forwarding all traffic to a specific
host may cause the undesired effect of losing Internet-based connectivity to the Management
Console. This is because all data will be forwarded to the host specified. The Management Console
will still be accessible to devices attached to the LAN (Eth1) and WiFi AP.
The LAN client will now be accessible from any connected WAN interface. Please note that some cellular carriers
firewall the connections to their networks, and a public WAN IP address does not guarantee universal accessibility
from the internet.
Administration|Management
Password
The Nexus Hawk™ uses the defaults of Login=manager, Password=manager. It does not follow the
Admin/Admin standard used by other manufacturers specifically to make unintended access more difficult. These
values may be changed here.
Login name: Displays the current login name. If you wish to change the login name enter the new
name.
Current password: Enter the current configuration password.
New password: Enter the new password
Re-enter new password: Enter the new password again for verification purposes
7
Page 11

Nexus Hawk™ User Manual
Password-protect status page: Normally, the Status page is viewable by anyone who attaches to
your Nexus Hawk™. Check this option if you wish to restrict that page, requiring login authentication
before being able to view its contents.
Save Configuration: Updates are applied only after pressing this button.
: Once saved, when you navigate to another configuration page you will be required to login with the new
NOTE
login information.
DDNS
The Nexus Hawk™ supports a dynamic DNS update with dyndns.org. If you have a dyndns.org account, this
function may be useful for finding the Nexus Hawk™ from the internet when it is connected to a WAN interface.
Contact your Network Administrator for system-specific settings. For more information click
Username: Enter your dyndns.org account username.
Password: Enter you dyndns.org account password
Hostname: Enter you hostname associated with dyndns.org user account. Currently, only hostnames
provided by dyndns.org are supported.
Save Configuration: No updates are applied unless this button is pressed. Once pressed, the
screen changes are saved.
Once saved, the Nexus Hawk™ will attempt to update the specified dyndns.org entry whenever it initiates a new
connection to a WAN interface. NOTE: Only dynamic hosting by DynDNS.org is supported at this time.
here
Static DHCP
The Nexus Hawk™ supports static DHCP leases and allows configuration of the router to provide the same IP
address to a specific client via DHCP upon every connection. For more information on DHCP click
MAC: Enter the media access control address of the client device. For more information click
Hostname: Enter the hostname of the client device. For more information click
LAN IP: Enter the IP address which will be provided to the client device by DHCP. For more information
here
click
Delete: Press this button to delete the specified entry(s)
Save Configuration: Updates are applied only when this button is pressed.
here
here
here
Remote Access
You may enable your Nexus Hawk™ to allow authenticated, remote access (through the Internet) to the
Management Console.
Remote web configuration
Enabled: This option enables remote access to your Nexus Hawk™ via Internet via Port 80. To gain
access to the login screen, a remote user must know either your Nexus Hawk's™ Internet IP address or
its DynDNS.org URL and attach to it via Port 80 (i.e. - 1.2.3.4:80 or MyHawk.dyndns.org:80).
Nexus_iSR remote diagnostics
Enabled: Providing delightful support to you is our top priority. This option enables Nexus_iSR technical
staff to gain remote access to your Nexus Hawk™ securely, via SSH. For more information click
here
8
Page 12

Nexus Hawk™ User Manual
Administration|Debug File Download
The Nexus Hawk™ allows the user to download a debug file to provide to technical support in the event of a
system malfunction. This will allow Nexus_iSR engineers to inspect the status of your problem and more quickly
determine its cause.
Press the "Download" button to save the "debug.bin" file. Simply e-mail it to the email address provided by your
administrator, along with as much detail about the issue as possible.
Administration|Reset
Restore Defaults
Select this option to restore your Nexus Hawk™ to Factory Default setting without the need to reboot. The
changes will take effect immediately, without delay.
WARNING: All settings will be reset to factory defaults, all custom settings will be lost including any
that are in effect to provide you with connectivity.
Reboot System
This is the equivalent to pressing the <Reset> button on the back panel of your Nexus Hawk™. You will be
presented with a warning. Press the "Reboot" button to reboot the Nexus Hawk™. Note: This operation will
take up to 2 minutes to complete.
Note: The system will be unavailable while rebooting!
Administration|Firmware Upgrade
The Nexus Hawk™ allows the user to upgrade to the latest firmware version. The current firmware version is
displayed at the top right corner of the Management Console.
Browse: Press this button to locate a locally stored firmware file to upload to the device. This firmware
file must come directly from
Upgrade: Press this button to upload the firmware file to the Nexus Hawk™. The Nexus Hawk™ will
attempt to apply the firmware upgrade and report on the success or failure of the operation. A successful
firmware upgrade will be immediately followed by a default settings restore and a reboot (which may
take up to 2 minutes to complete).
WARNING: All setting will be reset to factory defaults; all customized settings will be lost.
http://www.nexusisr.com.
9
Page 13

Nexus Hawk™ User Manual
Status
The status page displays the status of the Nexus Hawk™. The contents of this page are updated every 20
seconds (note the timer at the top of the page).
WAN Connectivity
This area displays how the Nexus Hawk™ is connected to the "outside world" (most often, the Internet).
PCMCIA Ports
This area displays the status of Cellular card(s) in the card slot(s).
Signal Strength: Displays the strength of the signal
Carrier: Displays the name of your cellular service carrier
WAN IP Address: Displays the IP that the carrier has assigned to the Nexus Hawk's™ cellular card(s)
WiFi
AP
This area displays the status of the Access Point.
SSID: Displays its SSID
Security: Displays the type of security in effect
Client
This area displays the status of the client.
Signal strength: Displays the signal strength of the connection
IP Address: Displays the IP Address assigned to the Nexus Hawk's™ WiFi port by the AP's DHCP server
SSID: Displays the SSID of the network that it is connected to (through the remote AP)
Security: Displays the security of the network that it is connected to (through the remote AP)
10/100 Ethernet
Eth0
This area displays the status of the Eth0 port.
IP Address: Displays the IP address either delivered from a WAN DHCP server or manually configured
through the Management Console.
Eth1
This area displays the status of the Eth1 port.
IP Address: Displays the IP address of the connection.
Serial
This area displays whether or not a GPS device is connected
Security
This area displays the connection state of the OpenVPN Client Tunnel.
10
Page 14
Nexus Hawk™ User Manual
TRX20
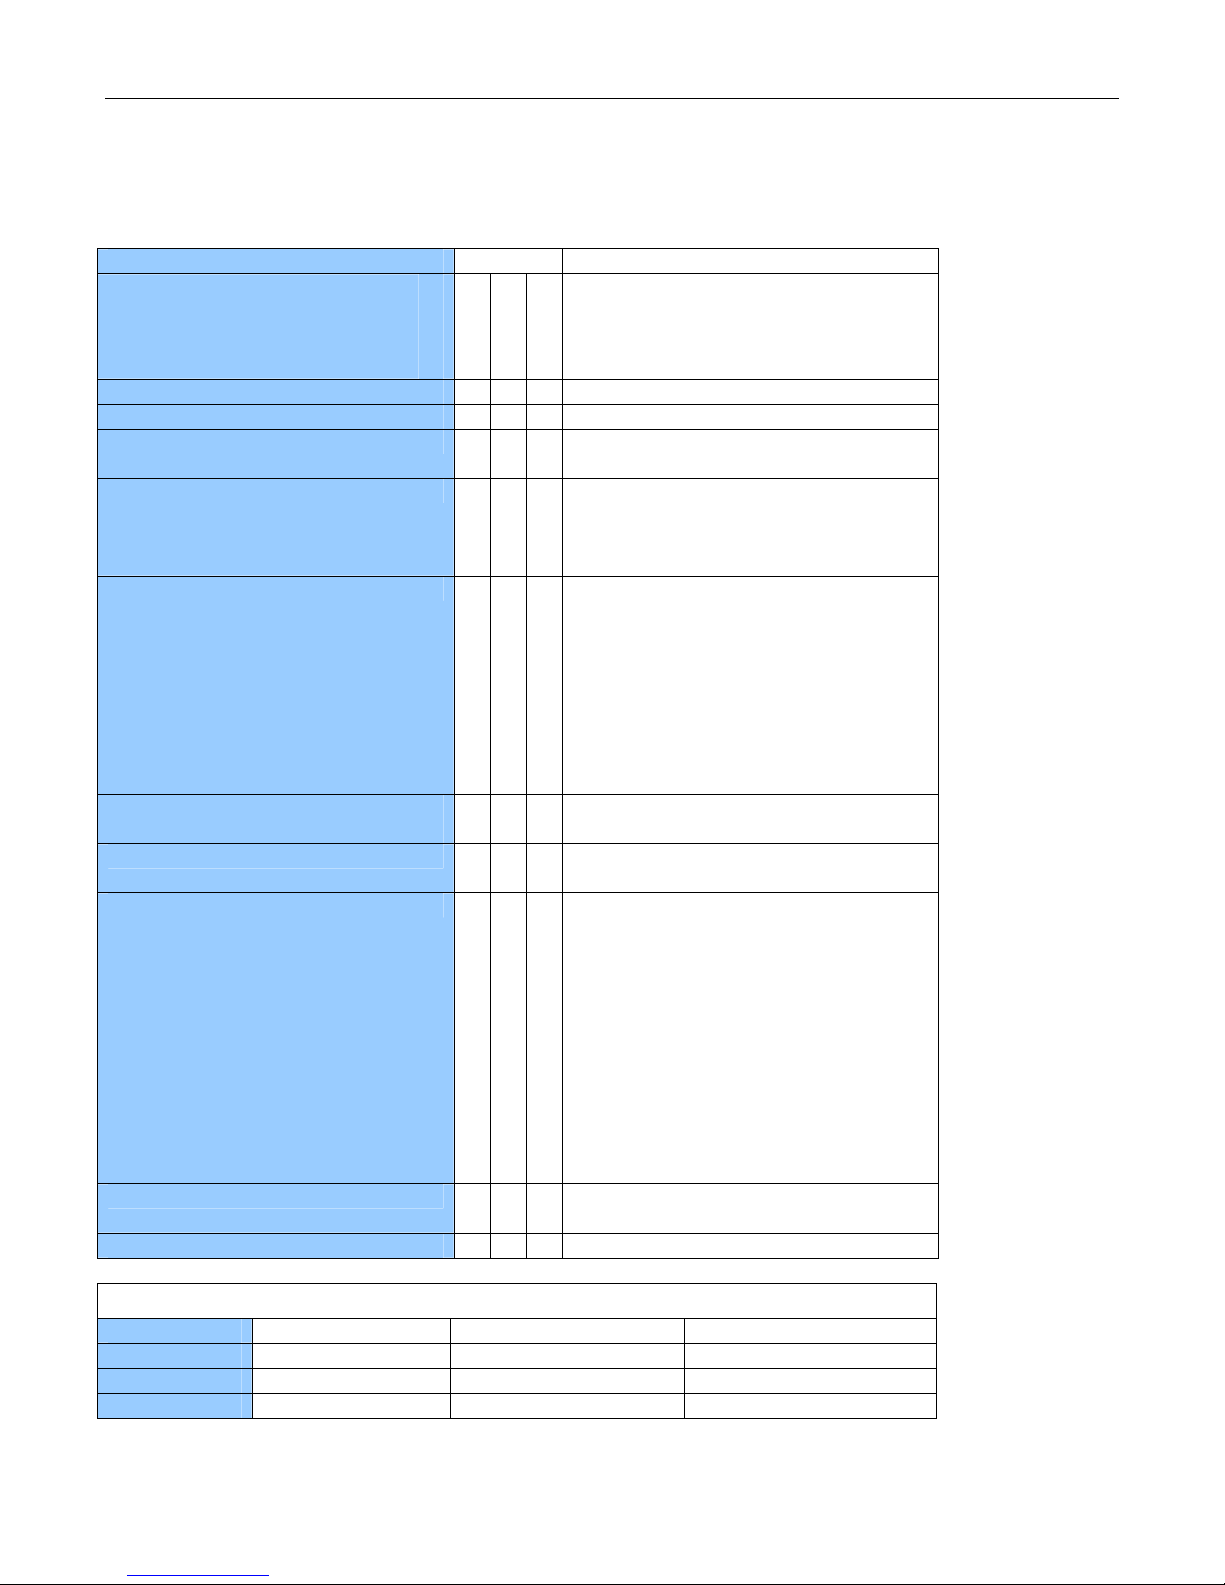
Technical Specifications
Model
TRX1000
TRX1010
WEIGHT · · · 15 oz without cards (425g)
POWER CONSUMPTION · · · 6W idle, 15W max @ 12VDC
INPUT POWER INTERFACE
INTERFACE PORTS
COMPATIBLE NETWORKS N
MANAGEMENT /
CONFIGURATION
802.11 ANTENNA
SUPPORTED DATA RATES
SECURITY N N Y Y Y Y Supports WEP, WPA, WPA2
WARRANTY · · · Three-year limited Warranty
· · ·
·
·
·
·
1
1
Y
·
·
·
·
·
·
·
·
· · ·
N Y Y
·
·
·
·
·
·
·
·
·
·
·
·
Y
N
Y
N
Y
N
*Feature Variations by model
Model 32Bit CardBus WiFi 802.11 a/b/g Dimensions L x W x D
TRX1000 1 No 7.62” 6.1” 1.54”
TRX1010 1 Yes 7.62” 6.1” 1.54”
TRX2010 2 Yes 10.12” 6.1” 1.54”
12 VDC ±10 percent
AC: 120 VAC 60 Hz power adapter
1 – DB9 EIA232 asynchronous
·
·
2
Y
·
·
·
·
·
·
·
·
·
·
Y
Y
Y
serial
2 – Fast Ethernet (100Mbps)
32-bit Cardbus/PCMCIA card slots
Integrated 802.11 a/b/g
CDMA EV-DO/1xRTT
GSM EDGE/GPRS/UMTS/HSDPA
Satellite via RJ-45 or PCMCIA
adapter
Future Cardbus/PCMCIA
Connectivity – 3G, 3.5G, 4G, IEEE
802.16 (WiMAX), IEEE 802.15.3a
(UWB)
Web-based Management Application
RP-TNC Port with tri-band omni
antenna included
CDMA EV-DO rev A: 2.4Mbs downlink
burst 1.8Mbps up.
CDMA EV-DO: 2.4Mbps downlink burst
0.15Mbps up.
CDMA 1xRTT: 155kbps
GSM UMTS/HSDPA: 2.0Mbps downlink
burst
GSM EDGE: 115kbps
Fast Ethernet: 100 Mbps
802.11g WiFi: 54Mbps
802.11b WiFi: 11Mbps
802.11a WiFi: 54Mbps
Supports IPSec pass-through
11
Page 15

Nexus Hawk™ User Manual
12
Page 16

Nexus Hawk™ User Manual
Troubleshooting
TROUBLESHOOTING Falcon Gateway
Error
Power light is not on
System Status page is reporting
"Connecting" to the Client for
more than 5 minutes
Status page displays 'load error:
Unknown'
Status light is not flashing at 1second intervals
Cause
Falcon Gateway is not
receiving power
The Falcon Gateway
cannot receive a valid
signal
Falcon Gateway is no
longer connected to the
PC or has no power
Falcon Gateway has not
finished booting or
doesn't have power
Solution
1.
Verify that the power supply is
plugged in
1. Move closer to AP
2. Verify that the AP is still on and
connected
1. Verify that the Crossover cable is
connected to the PC
2. Verify that the power source is
connected to the Falcon Gateway
1. Wait another 30-60 seconds for
Falcon Gateway to finish booting
2. Press and hold the "Reset"
button for no more than 5
seconds to reboot the Falcon
Gateway.
3. Falcon Gateway should come up
in a ready state.
Cannot view "System status" page
or are receiving the "The page
cannot be displayed" message
"System Status" is reporting
disconnected with the Cellular
card
System Status page is reporting
"Connecting" to the cellular card
There is no connection
between the Falcon
Gateway and the PC
There is no cellular
service
The Falcon Gateway
cannot receive a valid
1. Verify that the power source is
connected to the Falcon Gateway
2. Verify that the Crossover Cable is
connected to the "Eth1" port
3. Incorrect IP settings. Press and
hold the "Status Reset" button
for 5 on/off cycles to reset to
factory defaults
1. Verify that the cellular card is
plugged into Slot 1 or Slot 2
securely
2. Verify that the correct cellular
card is configured in the correct
slot on the Setup|Cellular
WAN page
3. Verify that the antenna is
securely connected to the 802.11
port
1. Verify that the cellular card is on
the verified list of cellular cards
13
Page 17

Nexus Hawk™ User Manual
ot connect to internet though
for more than 5 minutes
Green light on "Eth1" port is not
lit up
Can't connect to Falcon Gateway
using the "Comm" port
Can't connect to internet using
Client; able to connect to AP
No network connection on
computer
Cann
Eth0 (WAN) port
signal
Crossover cable is not
connected to PC/Laptop
GPS device is not
connected to the Falcon
AP is configured
incorrectly
Falcon Gateway is not
connected to PC
Conflict with IP address
or conflict within
network
2. Move the Falcon Gateway closer
to a window.
1. Verify that the Crossover Cable is
connected to both the Falcon
Gateway and the PC/Laptop
1. Verify that the serial cable is
connected to both the GPS
device and the Falcon Gateway's
Comm port
1. Verify that AP is configured to
access the internet correctly.
2. Verify that the AP can access the
internet
3. If connecting through Cellular
WAN verify that the card is
configured correctly
1. Verify that the Falcon Gateway has
power
2. Verify that the provided crossover
cable is being used
3. Verify that the crossover cable is
connected
1. Verify that there are no more than
2 switches and 3 hubs in the
network.
8
802.11, 6
A
Access Point, 6
AP, 6
B
Broadcast, 6
C
Cellular WAN, 8
Index
14
Page 18

Nexus Hawk™ User Manual
Channel, 6
Client, 6
Connection, 4
D
DDNS, 11
Debug File Download, 12
Default, 12
Default Settings, 5
DHCP, 7, 11
DMZ Host, 10
DNS, 7
E
Ethernet, 4
F
Fail over, 4
Firmware Upgrade, 12
G
GPS, 5
I
IP Address, 7
L
Login, 5, 10
O
OpenVPN, 9
P
Passphrase, 6
Password, 10
PCMCIA, 8
Port Forwarding, 9
Power, 4
Pre-shared key, 6
R
Reboot, 12
Remote Access, 11
Reset, 12
Reset Defaults, 12
RS-232, 5
S
Security, 6
15
Page 19

Nexus Hawk™ User Manual
Serial, 5
Specifications, 14
SSID, 6
Static DHCP, 11
Status, 13
T
Troubleshooting, 16
U
Upgrade, 12
V
VPN, 9
W
WAN, 8
WEP, 6
WiFi, 6
WPA, 6
WPA/WPA2, 6
16
 Loading...