

Netgear WNR612v3 Quick Start Manual
WNR612v3_IG.fm Page 1 Wednesday, February 29, 2012 12:29 PM
N150 2-Port Wireless Router
WNR612
Installation Guide
Step 1:
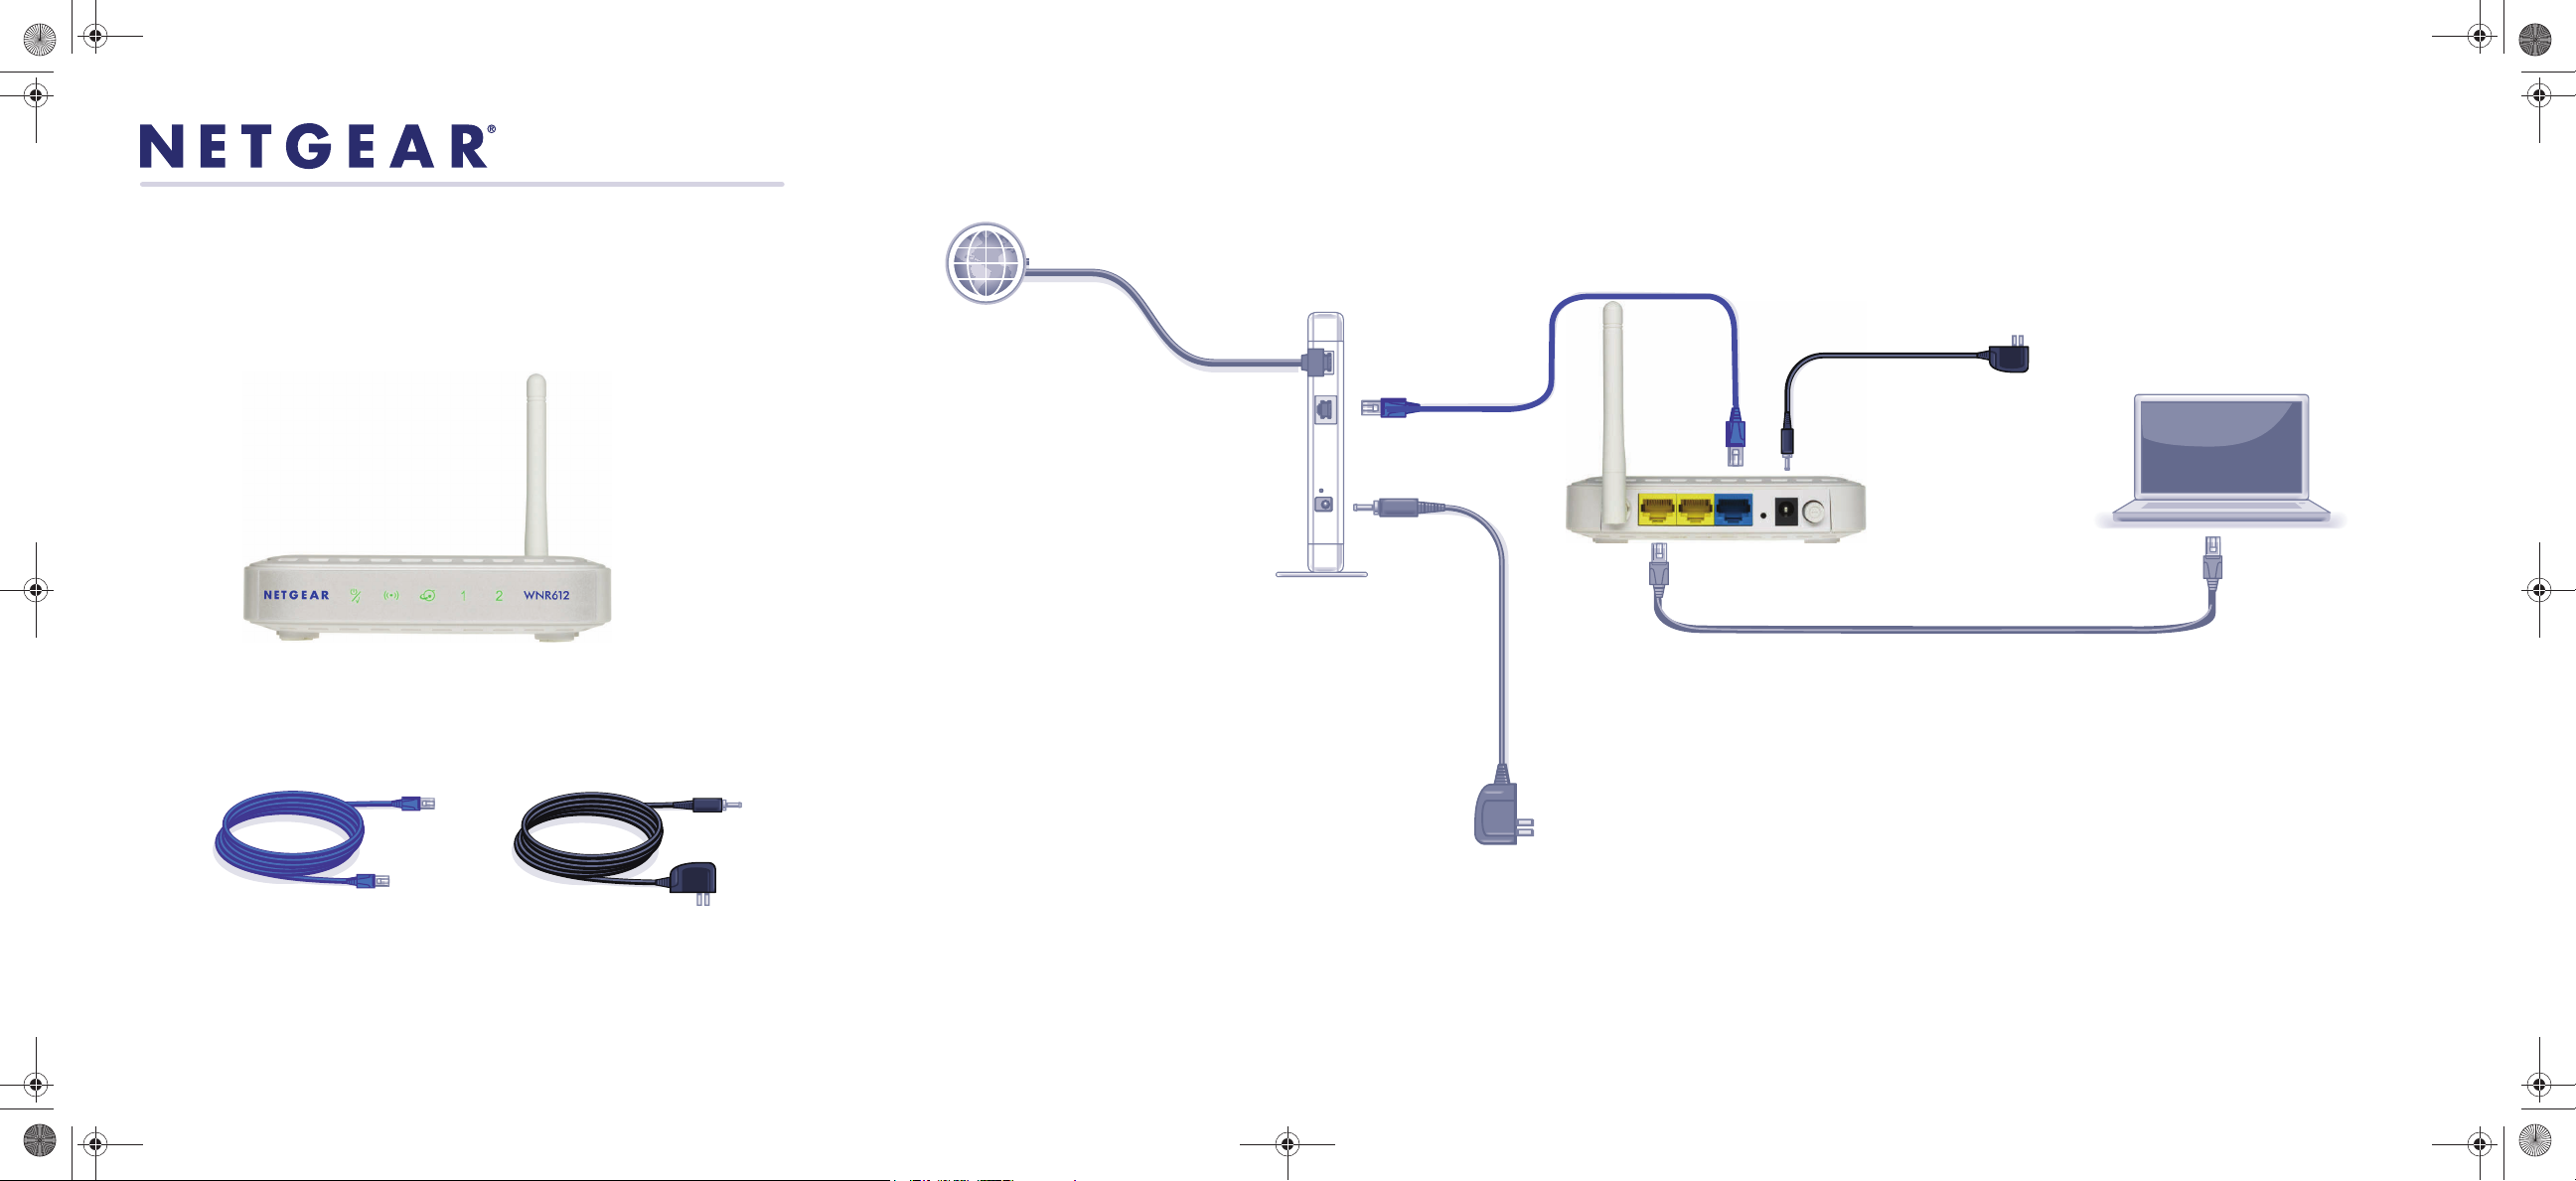
Connect your modem.
Step 2:
Connect your router.
Package Contents:
Ethernet Cable
WNR612
Power Adapter
(not included)
CAUTION:
MAKE SURE YOUR MODEM IS
TURNED OFF OR UNPLUGGED
BEFORE STARTING THE
INSTALLATION.
Step 4:
Power on your modem.
Wait until your modem cycles on
(approximately 2 minutes).
If you have a battery-backed modem,
Note:
press the reset button. In some cases, you may
need to remove, then re-insert, the battery to recycle
your modem.
DSL or Cable
Modem
Ethernet
cable
WNR612
(back)
Step 5:
Power on your router.
Wait until the power/test
LED turns solid green.
Step 3:
Connect your computer.
Power
Adapter
Laptop or
Desktop
Computer
(not included)
Step 6:
Configure settings.
Open a browser, such as
Internet Explorer, and enter
www.routerlogin.net
to complete the setup.
NETGEAR, the NETGEAR logo, and Connect with Innovation are trademarks or registered trademarks of
NETGEAR, Inc. and/or its subsidiaries in the United States and/or other countries. Information is subject to change
without notice. Other brand and product names are trademarks or registered trademarks of their respective holders.
© 2012 by NETGEAR, Inc. All rights reserved.
February 2012February 2012
This symbol was placed in accordance with the European Union Directive 2002/96 on the Waste
Electrical and Electronic Equipment (the WEEE Directive). If disposed of within the European
Union, this product should be treated and recycled in accordance with the laws of your jurisdiction
implementing the WEEE Directive.
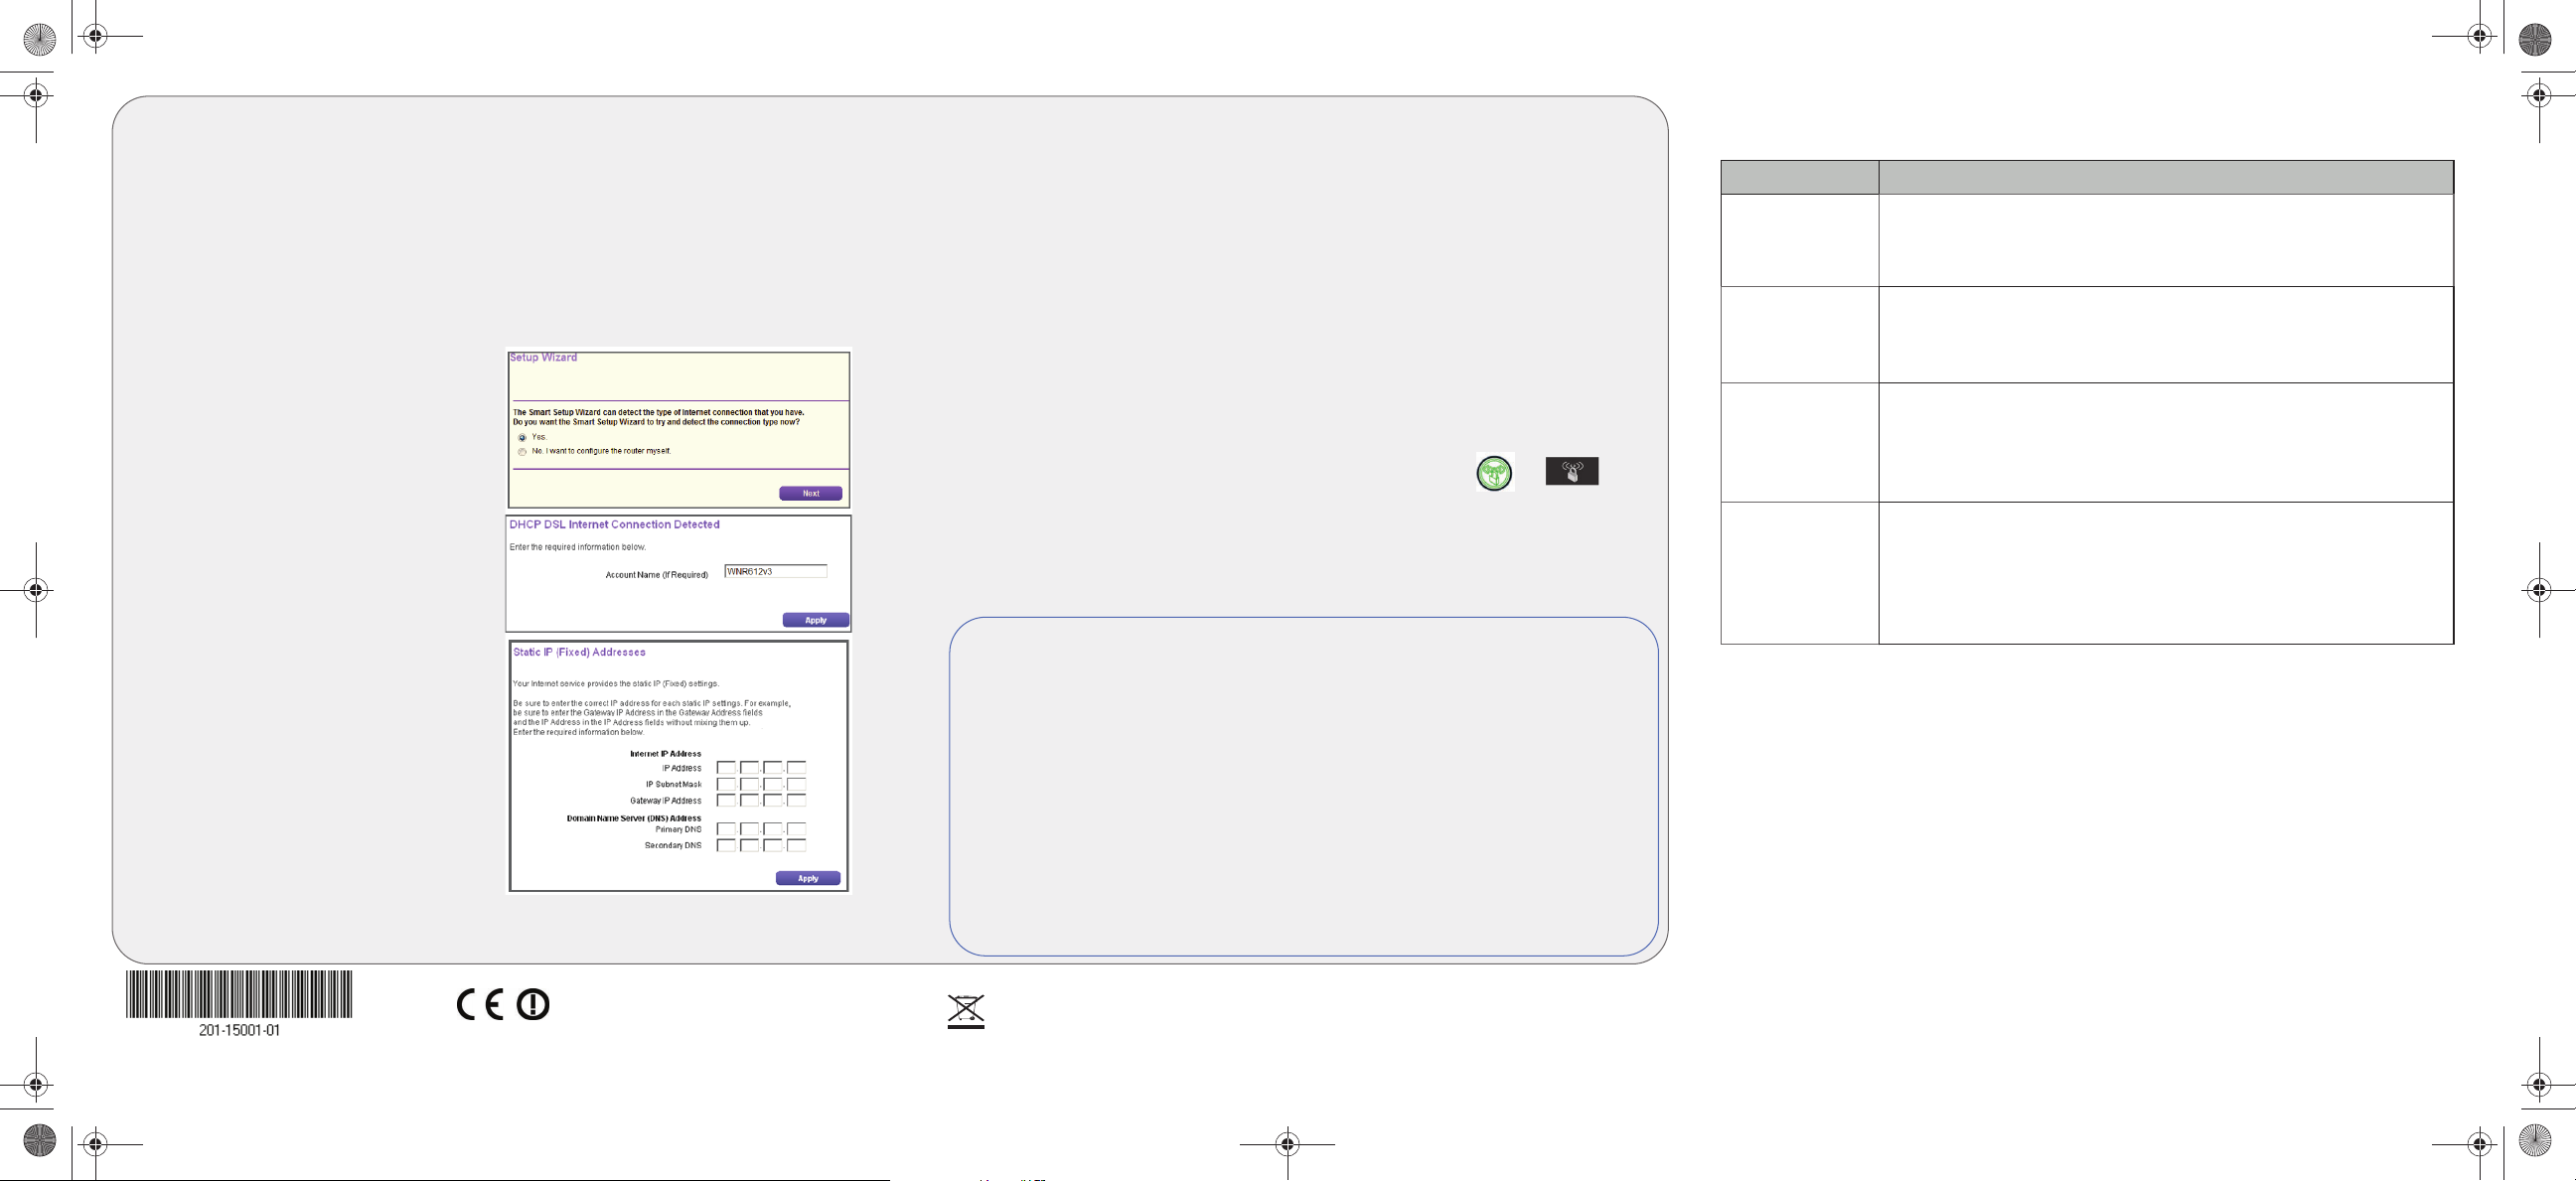
Router Configuration
Set up internet connection
1. In your browser address field, type http://www.routerlogin.net and click
Enter. Enter admin for the user name and password for the password.
2. The Setup Wizard detects your type of Internet connection. Follow the
prompts to complete your router Internet connection.
Set up wireless security
1. By default, the WAN (Internet) setting
for your router is set to DHCP. If your
Internet connection is DHCP, select
Yes on the Setup Wizard screen, and
then click Next.
If your Internet connection is
something other than DHCP (such as
PPPoE), select No on the Setup
Wizard screen and click Next. You
can either configure the Internet port
manually or click Setup Wizard on
the NETGEAR Smart Wizard screen
to set up the Internet port through the
wizard.
2. The Smart Wizard detects your
connection and displays it. Click
Next.
3. On the Static IP Address screen,
enter an account name, and click
Apply.
4. Review your network settings on the
summary page. You may want to
print this for your records. Click Next
to apply all settings and continue to
follow instructions in the next section.
Connect Wireless Devices to Your Router
1. Open the software that manages your wireless connections on the wireless
device that you want to connect to your router. (For example, on Windows XP,
go to Control Panel > Network Connections, right click the wireless device
and select View Available Wireless Networks).
2. The wireless software will scan for all wireless networks in your area. Look for
and select the network name that you chose when you set up your router.
3. If your network is secured, you will be prompted for a Passphrase or network
key. Enter the Passphrase you selected and click Connect. You are now
finished with the installation.
Note: If your wireless device supports WPS (WiFi Protected Setup)—
NETGEAR calls this method Push 'N' Connect—you might be prompted to press
a WPS button on the router instead of entering a Passphrase. If so, go to Step 4.
4. Press the WPS button on the router. It will look similar to or .
5. Within 2 minutes, follow the wireless software instructions on the wireless
device to complete the WPS process. The device will then be connected to
your router. Repeat this process to add other wireless devices.
Note: Your network name, security method and passphrase must be the same
on all wireless devices connected to your router.
Enter your wireless information here:
Wireless Network Name (SSID) ________________________________
Wireless Security Passphrase __________________________________
If you forget your Passphrase, connect a computer to the router using an
Ethernet cable and log in to http://www.routerlogin.net and enter the default
User Name (admin) and Password (password).
Restore Factory Default: For some routers, you may need to reset the
device to its factory default first, then reconfigure your Passphrase. To restore
factory defaults, use a paper clip to press the recessed reset button on the
back until the Power/Test light blinks. This takes about 10 seconds. Release
the button and wait for the router to reboot. Log in with the default username
(admin) and password (password). Note: Restoring factory defaults will erase
any customizations and you will lose any configurations saved to the device!
LED Activity
Technical Support
Thank you for selecting NETGEAR products.
After completing the setup and configuration, register your product at http://
www.NETGEAR.com/register. Registration is required before you can use our
telephone support service.
WARNING!! Do not install this device on top of any other electrical equipment or
install any other equipment on top of this device. Keep this device
away from any heat sources such as direct sunlight, heaters,
radiators, or other A/V receivers or devices that emit heat.
Item Description
Power /Test • Blinking green: Router is performing the power-on, self-
diagnostic test.
• Solid green: The router is ready.
Wireless • Solid green: Wireless connection is established.
• Blinking green: Data is being communicated.
• Off. The wireless interface is turned off.
Internet
(Blue RJ-45
connector)
• Solid green: Wireless router has a valid link on the internet or
WAN port.
• Blinking green: Data is being communicated.
• Off: There is no Ethernet cable connected to the modem.
LAN Ports
(Yellow RJ-45
connectors)
If a LAN light is off, be sure the Ethernet cable is securely attached
at both ends, and that the computer is turned on.
• Solid green: Local port is connected to a 10 or 100 Mbps
device.
• Blinking green: Data is being transmitted at 10 or 100 Mbps.
WNR612v3_IG.fm Page 2 Wednesday, February 29, 2012 12:29 PM
 Loading...