

Page 1
Installation Guide
T
WNHD3004/WNHDB3004
3DHD Home Theater Adapter &
3DHD Wireless Home Theater Networking Kit
Start Here
This guide describes installation for the WNHD3004 3DHD Home Theater Adapter or the
WNHDB3004 3DHD Wireless Home Theater Networking Kit. Learn more at http://
www.netgear.com/3DHD.
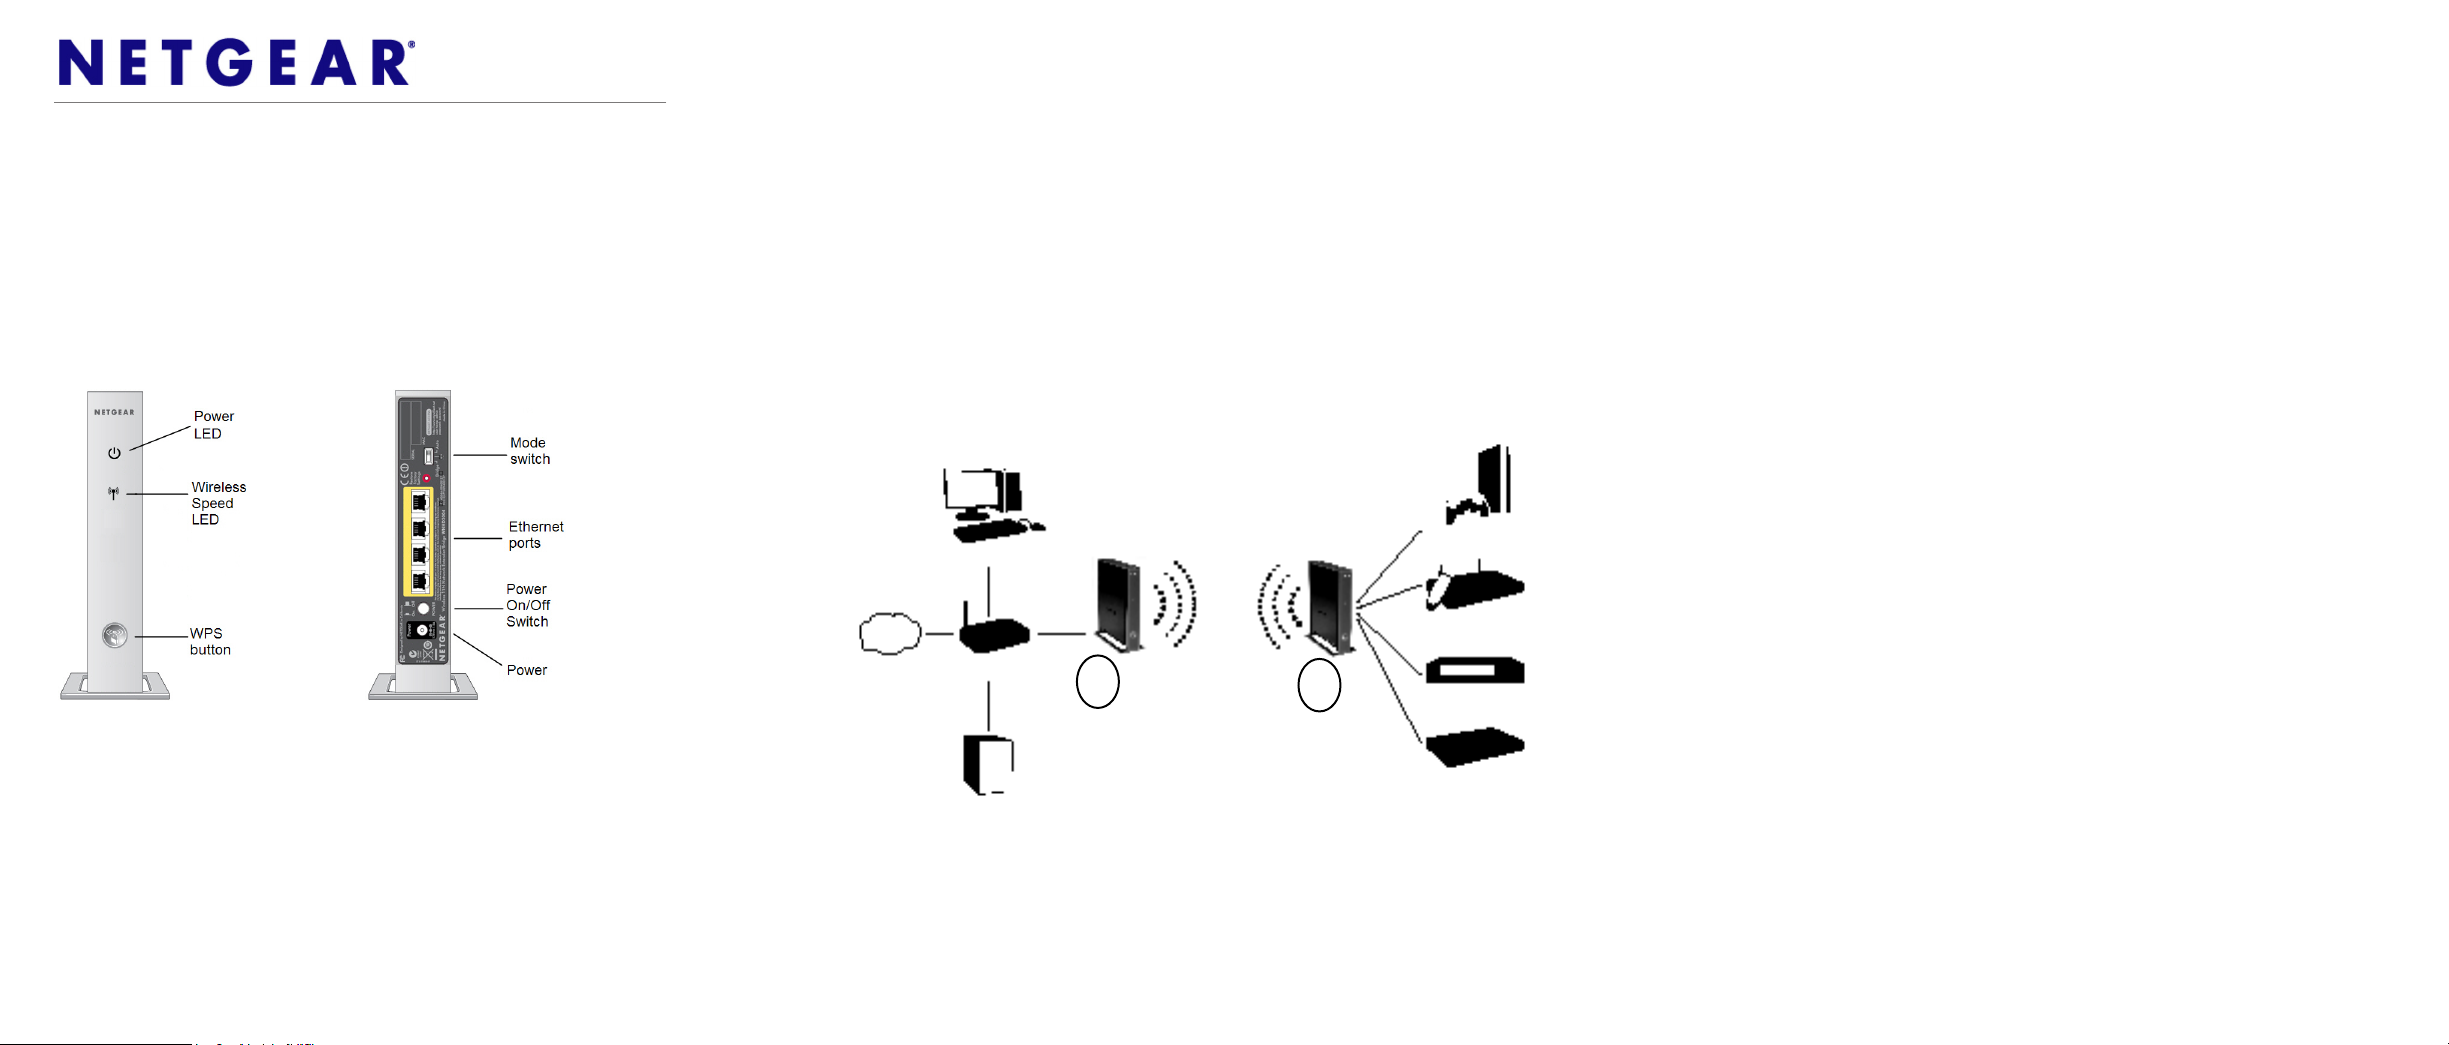
1. Familiarize yourself with the features of the Wireless-N Adapter.
The mode switch can be set to:
• Auto – In Auto mode, the Wireless-N Adapter will automatically sense and set its
own mode. It will run in AP mode if connected to a router or gateway. Otherwise, if
connected to any other wired device(s), it will run in Bridge mode. (The Wireless-N
Adapter is set to Auto mode from the factory.)
• AP – In AP (access point) mode, the Wireless-N Adapter will act as an access point.
In this mode, the Wireless-N Adapter should be connected to a router.
• Bridge – In Bridge mode, the Wireless-N Adapter is connected to your other wired
device(s) and will connect wirelessly to the Wireless-N Adapter being used as an
access point. NOTE: The unit running in Bridge mode can only connect to the
WNHD3004 Access Point.
2. Verify that:
• You have Broadband Internet access through a powered-on router or gateway.
• You are connecting Ethernet-enabled devices, such as a network-enabled game
console (an XBox 360 or Sony PS3), a digital media player (an Apple TV or
NETGEAR Digital Entertainer), an IPTV set-top box, or a personal computer.
Setting Up the WNHD3004/WNHDB3004 For Gaming or
Digital Media
1. Set the switch on the back of each Wireless-N Adapter to Auto mode.
Caution: Do not plug in the power adapter before step 2.
2. Connect the Ethernet cable from a LAN port in the router or gateway (A) to an Ethernet
port on one Wireless-N Adapter.
3. Place the other Wireless-N Adapter near the media player, game console, or set-top box
(B), and connect it with an Ethernet cable.
4. To complete installation, connect a power adapter to the Wireless-N Adapter(s). Allow
a few minutes for your devices to connect to the Internet. If you are not connected, see
“Troubleshooting” on page 2.
Note: By following the steps in this installation with both Wireless-N Adapter units set to
Auto mode, the Wireless-N Adapter connected to your router has set itself to AP mode,
while the second Wireless-N Adapter is set to Bridge mode.
To Add Another Wireless-N Adapter to a System
1. Make sure the 3DHD Home Theater Adapter you are adding is not set to AP mode,
place it near the devices that will work with it.
2. Connect a power adapter to the new Wireless-N Adapter.
The power light should blink in green.
3. On the new Wireless-N Adapter, press the WPS button once (located on the front
panel). Its WPS light should start to blink.
4. Within 2 minutes, press the WPS button on the Wireless Access Point (the one
connected to the router). Its WPS light should start to blink.
5. After 1-2 minutes the new Wireless-N Adapter in Bridge mode should be associated
with the Wireless Access Point. The power lights on both units will be solid green.
Configuring the Adapter
By default, the IP address is assigned dynamically by the router. Without a router, the IP
address of the Wireless-N Adapter in AP mode will default to 192.168.1.240 and the IP
address of the Wireless-N Adapter in bridge mode will default to 192.168.1.241.
Configuring the Wireless-N Adapter to use a fixed or dynamic IP address lets you access
the Wireless-N Adapter configuration from a Web browser.
1. Connect an Ethernet cable from your PC to an Ethernet port on the Wireless-N Adapter.
2. Browse to http://www.mywifiext.com. NOTE: If this does not work, you can get the
AP or Bridge’s IP from your router, and browse to its IP address.
3. Enter the username admin and the password password at the prompt to log in.
For more information on configuring, refer to the 3DHD Home Theater Adapter User
Manual. You can download it from http://netgear.com/support.
A
B
Digital set-top box
Network TV
viewer/DVR
DMA
Gaming console
WNHDB3004
Network storage
Router/gateway
Desktop PC
Internet
Page 2

August 2010
© 2010 by NETGEAR, Inc. All rights reserved. NETGEAR and the NETGEAR logo are registered trademarks of
NETGEAR, Inc. in the United States and/or other countries. Other brand and product names are trademarks or registered
trademarks of their respective holders. Information is subject to change without notice
.
Wireless Speed LED
The colors of the Wireless Speed LED on the front of your device indicate the
operating speed:
Troubleshooting
If you have trouble setting up your 3DHD Home Theater Adapters, check the tips below.
The Power light blinks in green. The Wireless-N Adapter in Bridge mode is not
connected to the Wireless-N Adapter in AP mode, or the Wireless-N Adapter in AP mode
does not have any wireless client device associated to it. See “To Add Another Wireless-N
Adapter to a System” on page 1.
You cannot connect to the Internet.
• Make sure that the Wireless-N Adapter in AP mode is connected to a router or gateway
through an Ethernet cable.
• Make sure that both the Wireless-N Adapter in AP mode and the Wireless-N Adapter in
Bridge mode show correct IP addresses within the router network.
• Power cycle both Wireless-N Adapters.
Attention: When you configure the wireless settings of this device,
please make sure to select the correct country settings. Due to EU law,
the country settings must be identical to the country where the device is
operating.
Green Best speed at which this device can operate.
Yellow Good speed, capable of doing one to two HD streams.
Red Not a good speed. You should move the bridge to get a better
speed.
Technical Support
Thank you for selecting NETGEAR products.
Register your product at http://www.netgear.com/register. Registration on the website or
over the phone is required before you can use our telephone support service. The phone
numbers for worldwide regional customer support centers are on the Warranty and Support
Information card that came with your product.
Go to http://netgear.com/support for product updates and Web support.
For EU Declaration of Conformity, please visit: http://kb.netgear.com/app/answers/
detail/a_id/11621/sno/0
 Loading...