

Page 1
N750 Wireless Dual Band Gigabit
Access Point WNDR4300-TN
User Manual
September 2013
202-11267-01
350 East Plumeria Drive
San Jose, CA 95134
USA
Page 2

N750 Wireless Dual Band Gigabit Access Point WNDR4300-TN
Support
Contact your Internet service provider for technical support.
For the current EU Declaration of Conformity, visit
http://support.netgear.com/app/answers/detail/a_id/11621/.
Trademarks
NETGEAR, the NETGEAR logo, and Connect with Innovation are trademarks and/or registered trademarks of
NETGEAR, Inc. and/or its subsidiaries in the United States and/or other countries. Information is subject to change
without notice. © NETGEAR, Inc. All rights reserved.
2
Page 3

Contents
Chapter 1 Hardware Setup
Chapter 2 NETGEAR genie Basic Settings
Unpack Your Access Point. . . . . . . . . . . . . . . . . . . . . . . . . . . . . . . . . . . . . .6
Hardware Features. . . . . . . . . . . . . . . . . . . . . . . . . . . . . . . . . . . . . . . . . . . .6
Front Panel. . . . . . . . . . . . . . . . . . . . . . . . . . . . . . . . . . . . . . . . . . . . . . . .6
Back Panel . . . . . . . . . . . . . . . . . . . . . . . . . . . . . . . . . . . . . . . . . . . . . . . .7
Label. . . . . . . . . . . . . . . . . . . . . . . . . . . . . . . . . . . . . . . . . . . . . . . . . . . . .8
Attach the Stand. . . . . . . . . . . . . . . . . . . . . . . . . . . . . . . . . . . . . . . . . . . . . .8
Position Your Access Point . . . . . . . . . . . . . . . . . . . . . . . . . . . . . . . . . . . . .9
Cable Your Access Point . . . . . . . . . . . . . . . . . . . . . . . . . . . . . . . . . . . . . .10
Verify the Cabling. . . . . . . . . . . . . . . . . . . . . . . . . . . . . . . . . . . . . . . . . . . .10
BASIC Home Screen . . . . . . . . . . . . . . . . . . . . . . . . . . . . . . . . . . . . . . . . .12
Join Your Wireless Network . . . . . . . . . . . . . . . . . . . . . . . . . . . . . . . . . . . .12
Manual Method. . . . . . . . . . . . . . . . . . . . . . . . . . . . . . . . . . . . . . . . . . . .12
Wi-Fi Protected Setup Method . . . . . . . . . . . . . . . . . . . . . . . . . . . . . . . .13
BASIC Wireless Settings . . . . . . . . . . . . . . . . . . . . . . . . . . . . . . . . . . . . . .13
Wireless Network . . . . . . . . . . . . . . . . . . . . . . . . . . . . . . . . . . . . . . . . . .14
Security Options Settings. . . . . . . . . . . . . . . . . . . . . . . . . . . . . . . . . . . .15
Attached Devices . . . . . . . . . . . . . . . . . . . . . . . . . . . . . . . . . . . . . . . . . . . .16
Chapter 3 NETGEAR genie ADVANCED Home
NETGEAR genie ADVANCED Home Screen . . . . . . . . . . . . . . . . . . . . . .19
WPS Wizard. . . . . . . . . . . . . . . . . . . . . . . . . . . . . . . . . . . . . . . . . . . . . . . .19
Setup Menu . . . . . . . . . . . . . . . . . . . . . . . . . . . . . . . . . . . . . . . . . . . . . . . .20
LAN Setup . . . . . . . . . . . . . . . . . . . . . . . . . . . . . . . . . . . . . . . . . . . . . . . . .20
Chapter 4 Security
Daylight Savings Time . . . . . . . . . . . . . . . . . . . . . . . . . . . . . . . . . . . . . . . .23
Security Event Email Notifications . . . . . . . . . . . . . . . . . . . . . . . . . . . . . . .23
Chapter 5 Administration
Upgrade the Firmware . . . . . . . . . . . . . . . . . . . . . . . . . . . . . . . . . . . . . . . .26
View Access Point Status. . . . . . . . . . . . . . . . . . . . . . . . . . . . . . . . . . . . . .26
Access Point Information . . . . . . . . . . . . . . . . . . . . . . . . . . . . . . . . . . . .27
LAN Port . . . . . . . . . . . . . . . . . . . . . . . . . . . . . . . . . . . . . . . . . . . . . . . .27
Wireless Settings . . . . . . . . . . . . . . . . . . . . . . . . . . . . . . . . . . . . . . . . . .29
3
Page 4

N750 Wireless Dual Band Gigabit Access Point WNDR4300-TN
View Logs of Web Access or Attempted Web Access. . . . . . . . . . . . . . . .30
Manage the Configuration File. . . . . . . . . . . . . . . . . . . . . . . . . . . . . . . . . .31
Back Up Settings . . . . . . . . . . . . . . . . . . . . . . . . . . . . . . . . . . . . . . . . . .31
Restore Configuration Settings. . . . . . . . . . . . . . . . . . . . . . . . . . . . . . . .31
Erase the Current Configuration Settings. . . . . . . . . . . . . . . . . . . . . . . .32
Set Password. . . . . . . . . . . . . . . . . . . . . . . . . . . . . . . . . . . . . . . . . . . . . . .32
Password Recovery . . . . . . . . . . . . . . . . . . . . . . . . . . . . . . . . . . . . . . . . . .33
Chapter 6 Advanced Settings
Advanced Wireless Settings. . . . . . . . . . . . . . . . . . . . . . . . . . . . . . . . . . . .35
Restrict Wireless Access by MAC Address . . . . . . . . . . . . . . . . . . . . . . . .36
Chapter 7 Troubleshooting
Quick Tips . . . . . . . . . . . . . . . . . . . . . . . . . . . . . . . . . . . . . . . . . . . . . . . . .38
Power LED . . . . . . . . . . . . . . . . . . . . . . . . . . . . . . . . . . . . . . . . . . . . . . .38
Check Ethernet Cable Connections . . . . . . . . . . . . . . . . . . . . . . . . . . . .38
Wireless Settings . . . . . . . . . . . . . . . . . . . . . . . . . . . . . . . . . . . . . . . . . .38
Network Settings . . . . . . . . . . . . . . . . . . . . . . . . . . . . . . . . . . . . . . . . . .38
Troubleshoot with the LEDs. . . . . . . . . . . . . . . . . . . . . . . . . . . . . . . . . . . .39
Power LED Is Off or Blinking . . . . . . . . . . . . . . . . . . . . . . . . . . . . . . . . .39
LEDs Never Turn Off . . . . . . . . . . . . . . . . . . . . . . . . . . . . . . . . . . . . . . .39
2.4 GHz and 5 GHz LEDs Are Off . . . . . . . . . . . . . . . . . . . . . . . . . . . . .39
Cannot Log In to the Access Point. . . . . . . . . . . . . . . . . . . . . . . . . . . . . . .40
Changes Not Saved. . . . . . . . . . . . . . . . . . . . . . . . . . . . . . . . . . . . . . . . . .40
Incorrect Date or Time . . . . . . . . . . . . . . . . . . . . . . . . . . . . . . . . . . . . . . . .40
Wireless Connectivity. . . . . . . . . . . . . . . . . . . . . . . . . . . . . . . . . . . . . . . . .41
Wireless Signal Strength . . . . . . . . . . . . . . . . . . . . . . . . . . . . . . . . . . . . . .41
Appendix A Supplemental Information
Factory Settings . . . . . . . . . . . . . . . . . . . . . . . . . . . . . . . . . . . . . . . . . . . . .43
Technical Specifications. . . . . . . . . . . . . . . . . . . . . . . . . . . . . . . . . . . . . . .44
Appendix B Notification of Compliance
4
Page 5

1. Hardware Setup
The N750 Wireless Dual Band Gigabit Access Point WNDR4300-TN provides an easy and
secure way to set up a wireless home network with fast access to the Internet through a
gateway.
If you have not already set up your new access point using the installation guide that comes in
the box, this chapter walks you through the hardware setup.
This chapter contains the following sections:
• Unpack Your Access Point
• Hardware Features
• Attach the Stand
• Position Your Access Point
• Cable Your Access Point
• Verify the Cabling
1
5
Page 6
N750 Wireless Dual Band Gigabit Access Point WNDR4300-TN
Unpack Your Access Point
Your box contains the following items:
• N750 Wireless Dual Band Gigabit
• Access point stand
• AC power adapter (plug varies by region)
• Category 5E (Cat 5E) Ethernet cable
• Resource CD
• Installation guide with cabling and access point setup instructions
If any parts are incorrect, missing, or damaged, contact your Internet service provider.
Access Point WNDR4300-TN
Hardware Features
Before you cable your access point, take a moment to become familiar with the label and the
front and back panels. Pay particular attention to the LEDs on the front panel.
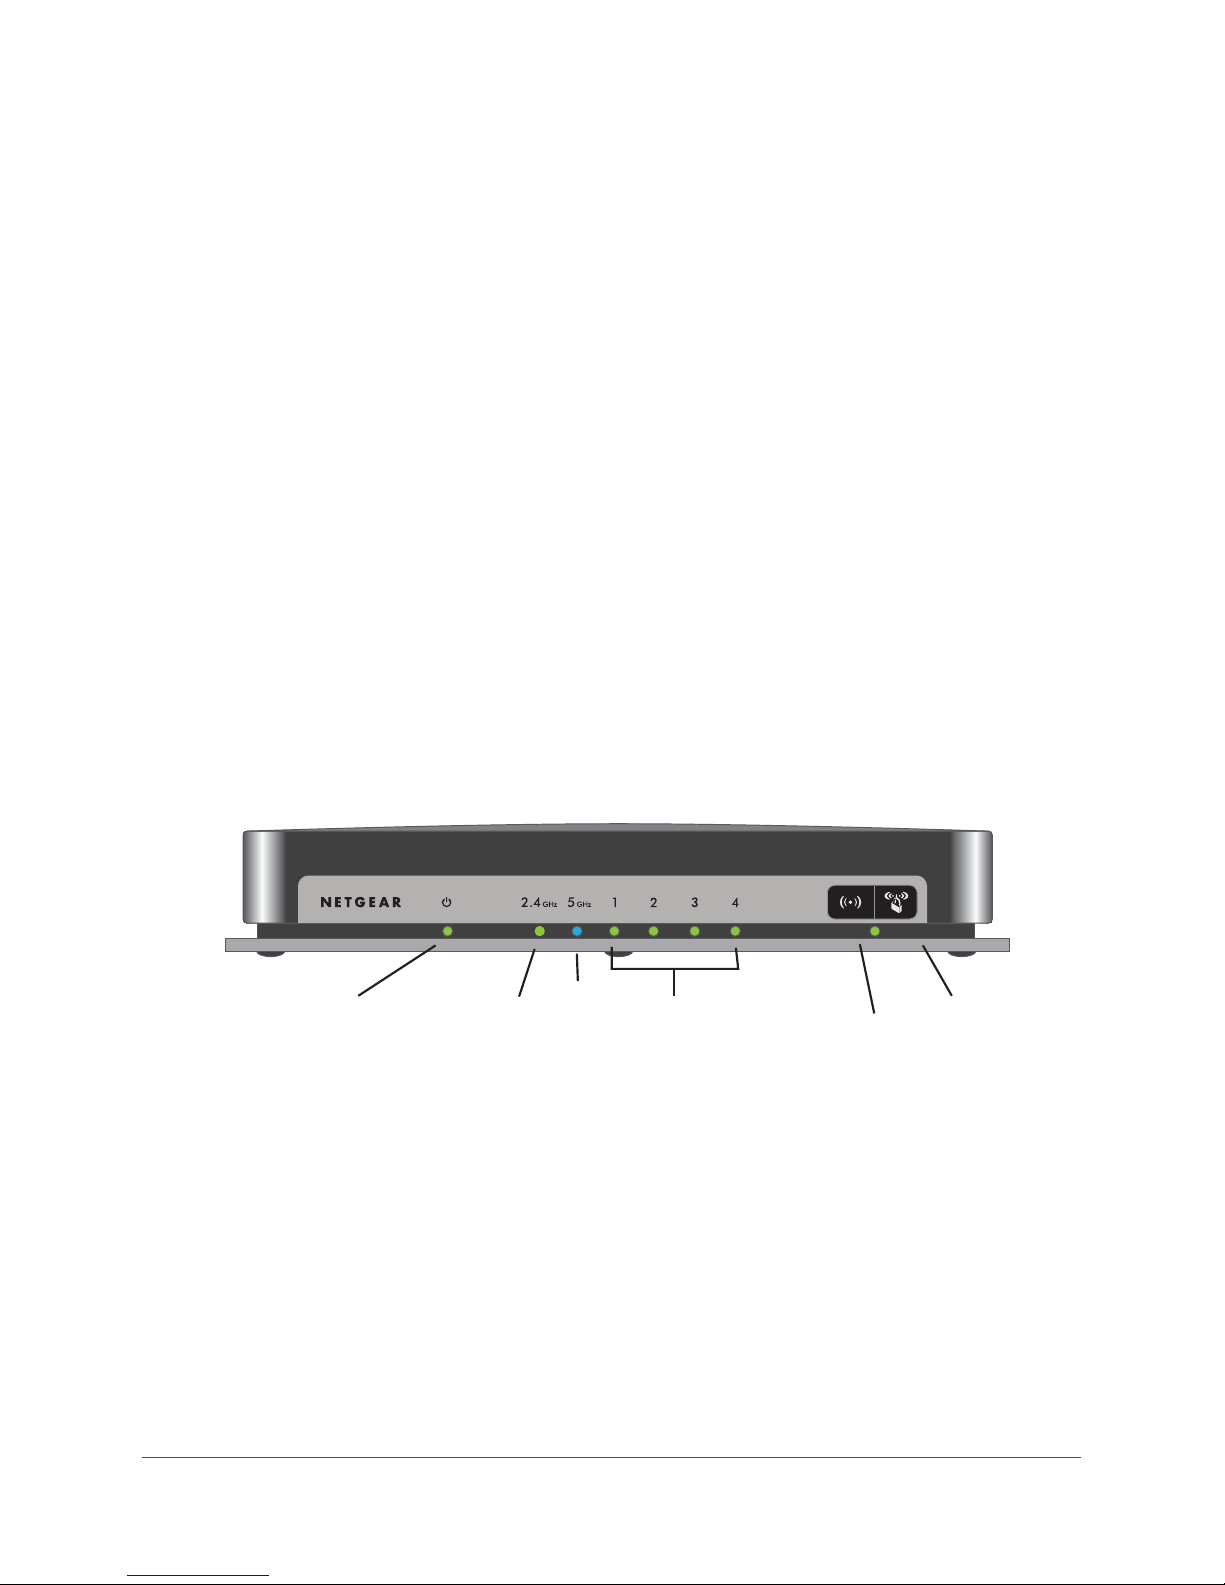
Front Panel
The access point front panel has the status LEDs and icons shown in the following figure.
The Wireless and WPS icons are buttons.
Power
Figure 1. Front panel LEDs and icons
2.4 GHz
Hardware Setup
5 GHz
LAN ports
6
(1–4)
Wireless
WPS
Page 7

N750 Wireless Dual Band Gigabit Access Point WNDR4300-TN
The following table describes the LEDs, icons, and buttons on the front panel from left to
right.
Item Description
Power
2.4 GHz
5 GHz
LAN 1 - 4
Wireless
button
• Solid amber. The access point is starting after being powered on.
• Solid green.
• Off.
• Blinking green. The
• Blinking amber.
• Solid green. The access point has 2.4 GHz wireless radio connectivity.
• Off. The
• Solid blue. The access point has 5 GHz wireless radio connectivity.
• Off. The
• Solid green. The LAN port detected a 1 Gbps link with an attached device.
• Solid amber.
• Off.
Pressing this button for more than one second turns the wireless radios on and off .
• On. The
• Off.
The access point does not have power.
Factory Settings button.
The gateway does not detect a link on this port.
The 2.4 GHz and 5 GHz wireless radios are off, and the 2.4 GHz and 5 GHz
LEDs are off.
The access point is ready to use.
firmware is corrupted.
The firmware is upgrading, or someone pressed the Restore
2.4 GHz wireless radio is off.
5 GHz wireless radio is off.
The LAN port detected a 10/100 Mbps link with an attached device.
2.4 GHz and 5 GHz wireless radios are on.
WPS button Pressing this button allows you to use Wi-Fi Protected Setup (WPS) to add a wireless
device or computer to your network (see Wi-Fi Protected Setup (WPS) Method on
page 12). The WPS LED blinks for two minutes during this process.
Back Panel
The back panel has the On/Off button and port connections as shown in the figure.
Ethernet PowerPower
LAN ports connetor on/of
Figure 2. Back panel
Hardware Setup
7
Page 8
N750 Wireless Dual Band Gigabit Access Point WNDR4300-TN
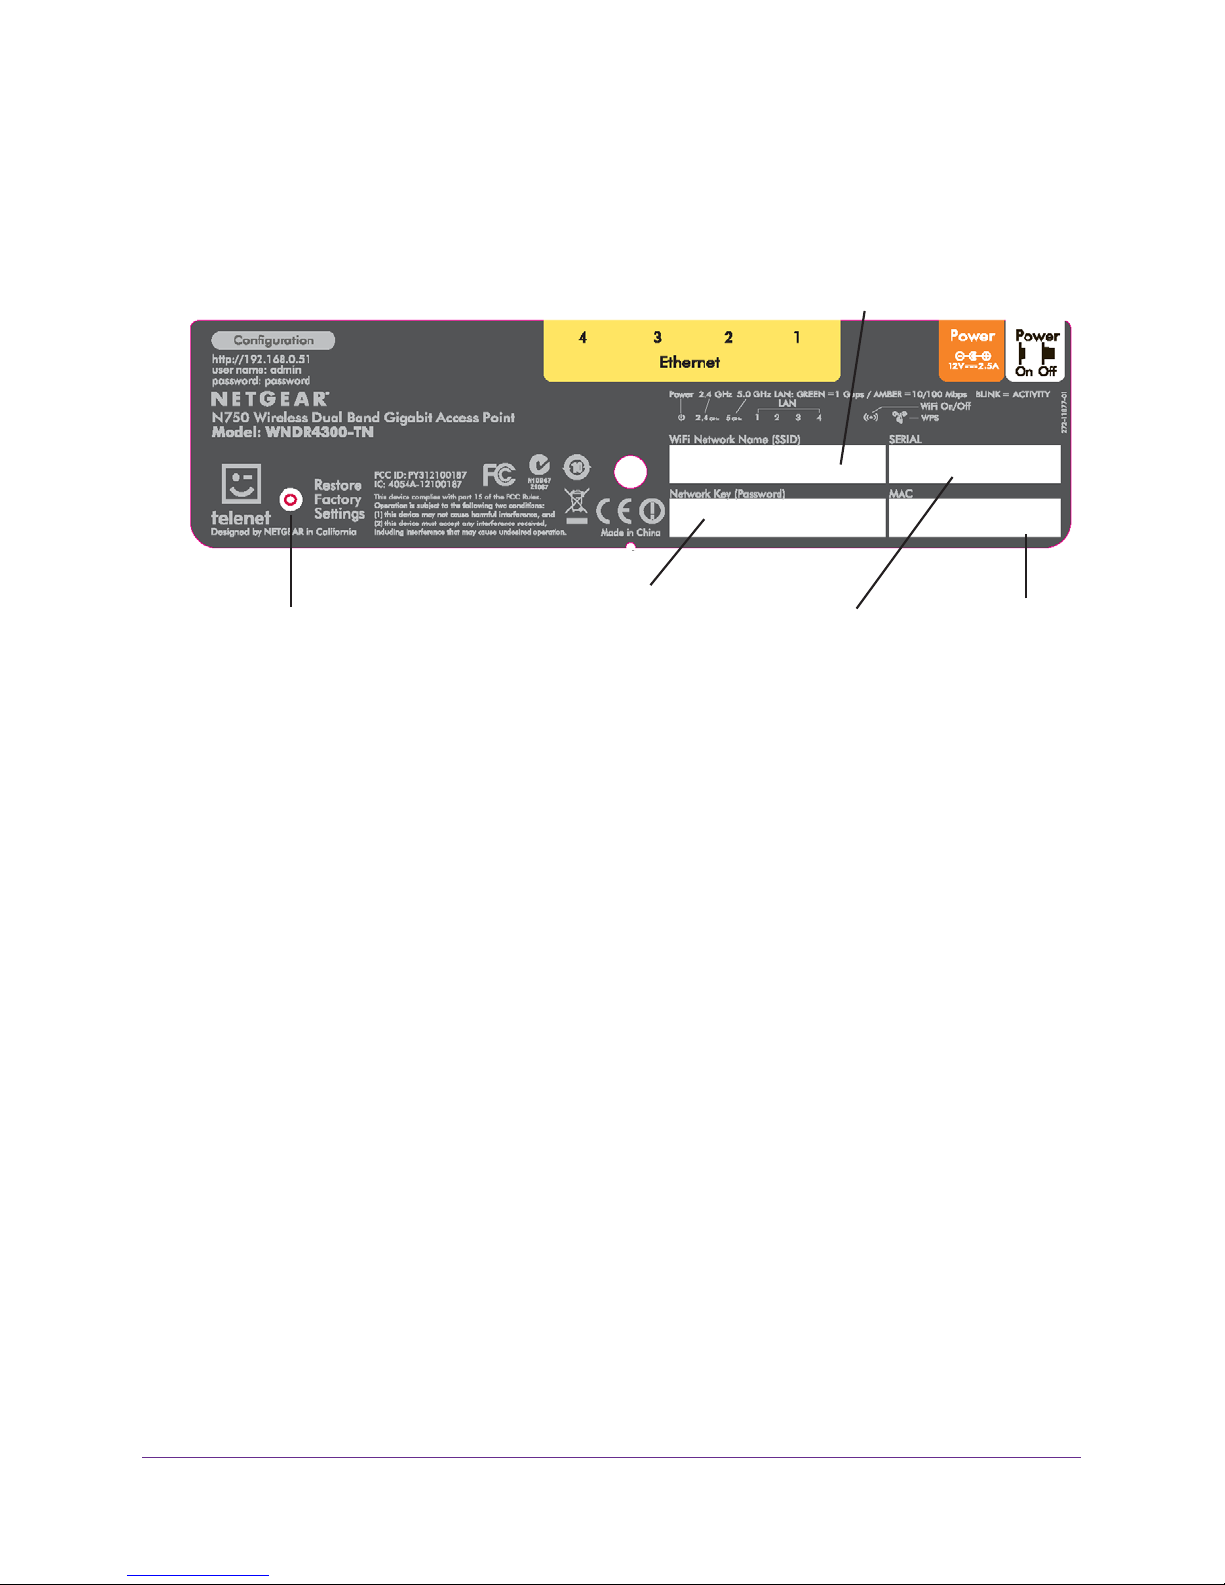
Label
The label on the access point shows the Restore Factory Settings button, login information,
MAC address, and serial number.
WiFi network name
Default password
Serial numberRestore Factory Settings
Figure 3. Label on access point
For information about restoring factory settings, see Factory Settings on page 43.
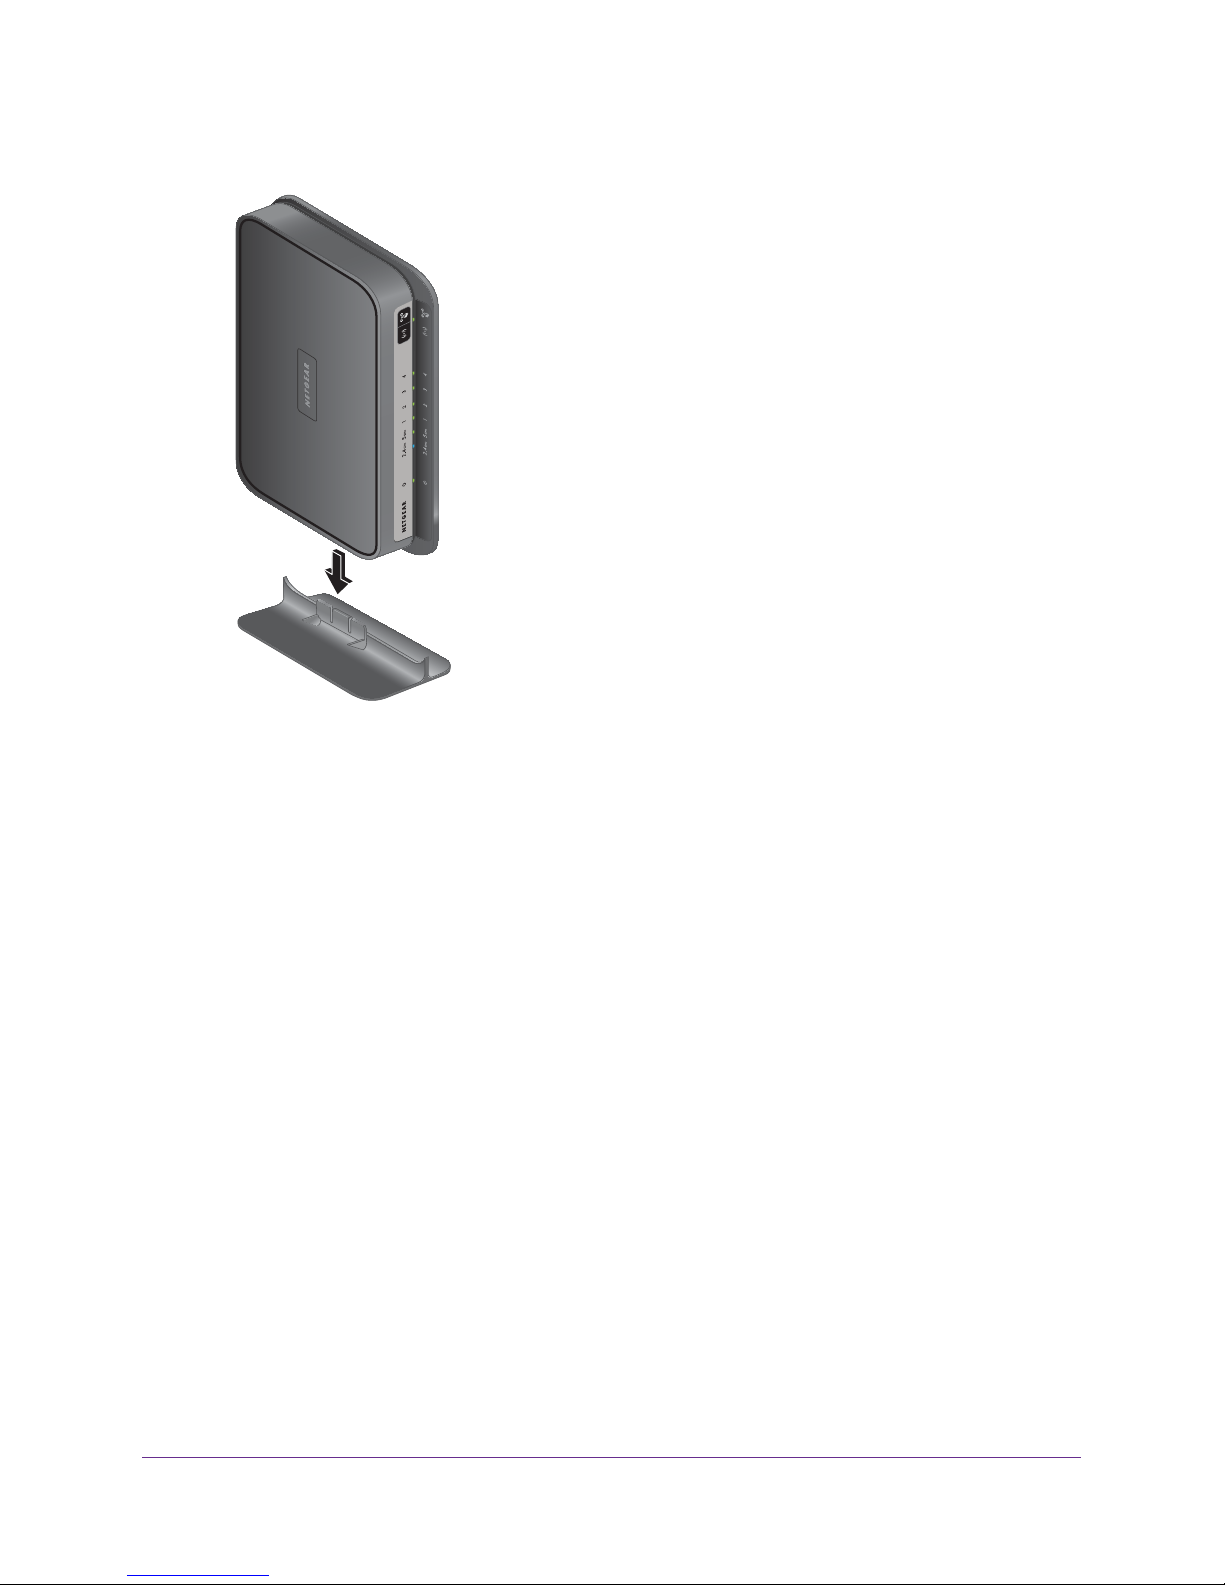
Attach the Stand
For optimal wireless network performance, use the stand (included in the package) to
position your access point upright.
To attach the stand:
1. Orient your access point vertically
.
MAC address
Hardware Setup
8
Page 9
N750 Wireless Dual Band Gigabit Access Point WNDR4300-TN
2. Insert the tabs of the stand into the slots on the bottom of your access point as shown.
Position Your Access Point
The access point lets you access your network from anywhere within the operating range of
your wireless network. However, the operating distance or range of your wireless connection
can vary significantly depending on the physical placement of your access point. For
example, the thickness and number of walls the wireless signal passes through can limit the
range. For best results, place your access point in a location that follows these guidelines:
• Near the center of the area where your computers and other devices operate, and
preferably within line of sight to your wireless devices.
• Accessible to an
• In an elevated location such as a high shelf, keeping the number of walls and ceilings
between the access point and your other devices to a minimum.
• A
way from electrical devices that are potential sources of interference, such as ceiling
fans, home security systems, microwaves, computers, or the base of a cordless phone or
2.4 GHz cordless phone.
• A
way from any large metal surfaces, such as a solid metal door or aluminum studs. Large
expanses of other materials such as glass, insulated walls, fish tanks, mirrors, brick, and
concrete can also affect your wireless signal.
AC power outlet and near Ethernet cables for wired computers.
Hardware Setup
9
Page 10

N750 Wireless Dual Band Gigabit Access Point WNDR4300-TN
Cable Your Access Point
To cable your access point:
1. Connect the Ethernet cable to your gateway
2. Connect the other end of the Ethernet cable to one of the LAN ports on the access point.
.
Internet
3. Plug the power adapter into an electrical outlet.
4. Plug the other end of the power cable into the access point.
Verify the Cabling
Verify that your access point is cabled correctly by checking the access point LEDs. Turn on
the access point by pressing the On/Off button on the back.
• The Power LED lights amber when the access point is turned on.
•
•
Verify that the LAN
point by an Ethernet cable.
The LAN port LEDs light green for each computer cabled to the access point.
The 2.4 GHz LED is lit, and the 5.0 GHz LED is lit.
LEDs (1 through 4) are lit for any computers cabled to the access
Note: The preset SSID (WiFi network name) and preset WiFi password for
your access point are unique. This information is on the label on
your access point.
Hardware Setup
10
Page 11

2. NETGEAR genie Basic Settings
This chapter contains the following sections:
• BASIC Home Screen
• Join Your Wireless Network
• BASIC Wireless Settings
• Attached Devices
2
11
Page 12
N750 Wireless Dual Band Gigabit Access Point WNDR4300-TN
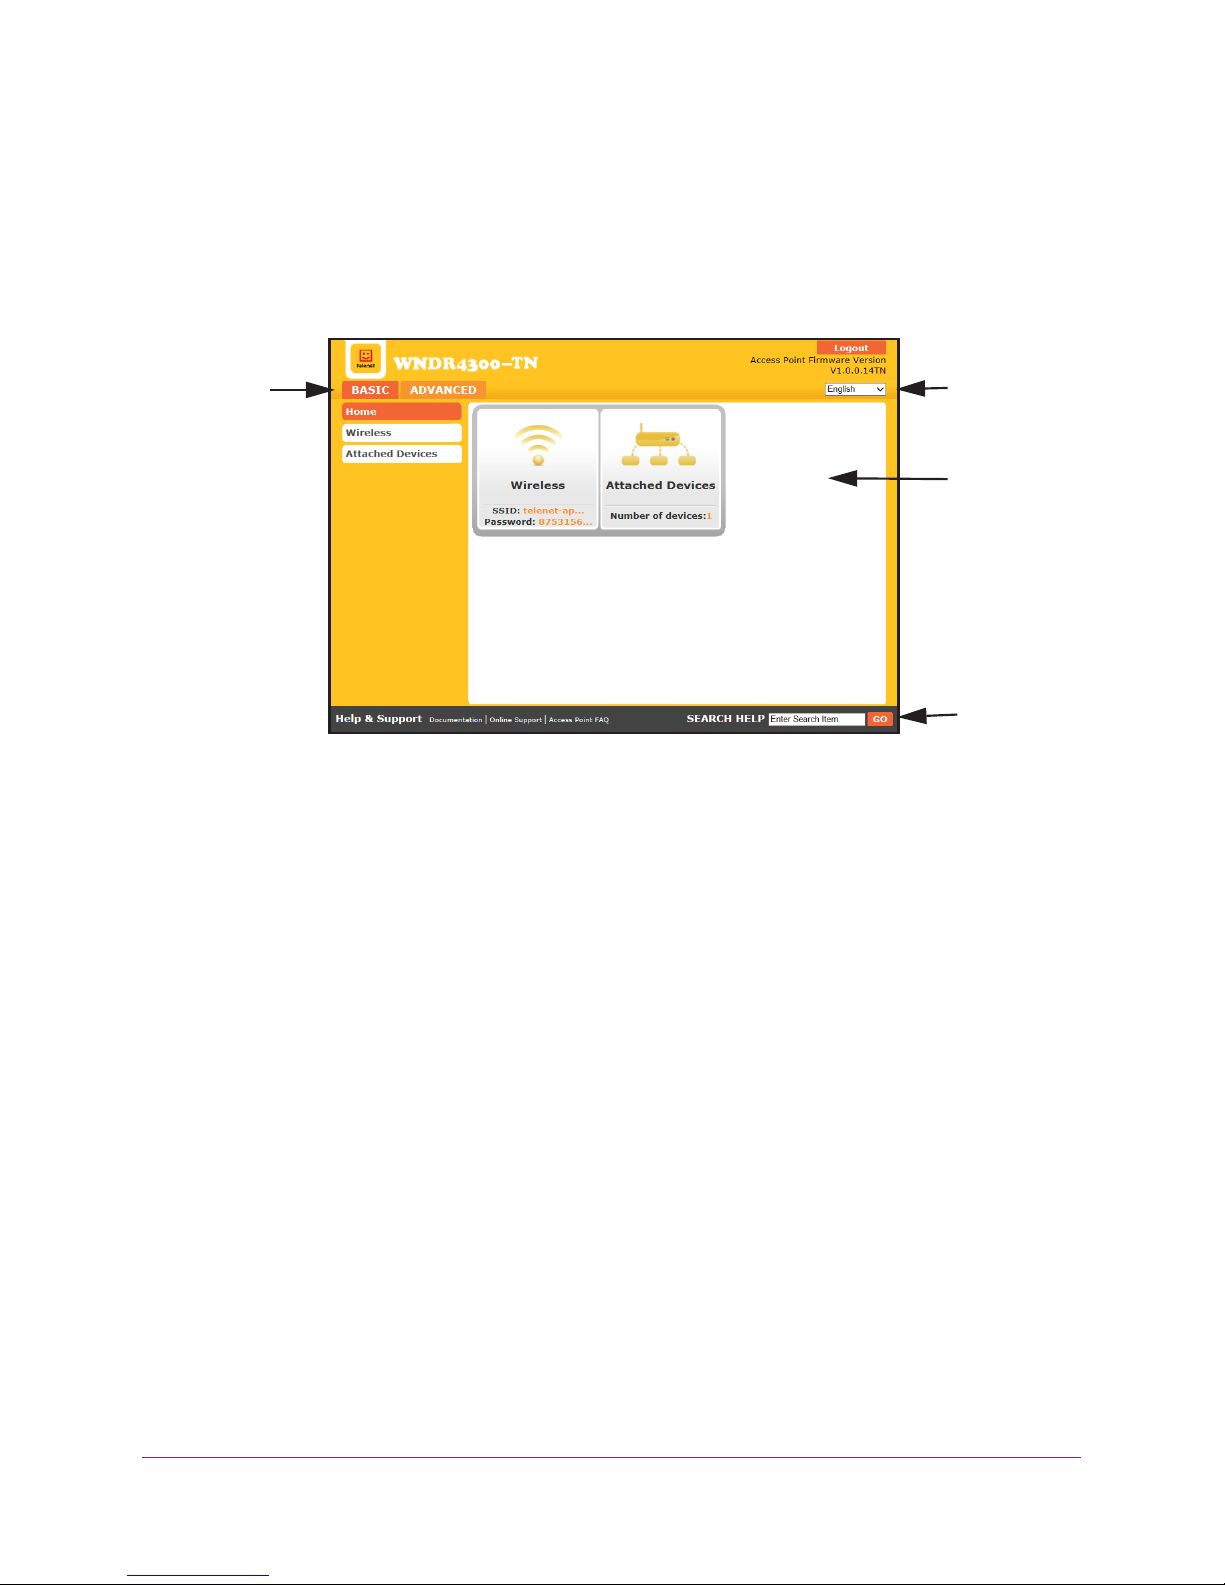
BASIC Home Screen
The BASIC Home screen has a dashboard that lets you see the status of your Internet
connection and network at a glance. You can click either of the two sections of the dashboard
to view more detailed information. The left column has both menus and tabs. Use the
ADVANCED tab to access more menus and screens.
Menus
(Click the
ADVANCED
tab to view
more)
Figure 4. BASIC Home screen with dashboard, language, and online help
Language
Dashboard
(Click to
view
details)
Help
The following selections are available on this screen:
• Home.
• W
• Attached Devices. V
• ADV
This dashboard screen displays when you log in to the access point.
ireless. View or change the wireless settings for your access point.
iew the devices connected to your network.
ANCED tab. Set the access point up for unique situations such as when you need
remote access by IP or by domain name from the Internet. See Chapter 3, NETGEAR
genie ADVANCED Home. You need a solid understanding of networking protocols to use
the options available on this tab.
Join Your Wireless Network
You can use either the manual or the WPS method to join your wireless network.
Manual Method
With the manual method, choose the network that you want and type its password to
connect.
NETGEAR genie Basic Settings
12
Page 13

N750 Wireless Dual Band Gigabit Access Point WNDR4300-TN
To connect manually:
1. On your computer or wireless device, open the software that manages your wireless
connections.
This software scans for all wireless networks in your area.
2. Look for your network and select it.
The unique WiFi network name (SSID) and password are on the access point label. If you
changed these settings, look for the network name that you used.
3. Enter the access point password and click the Connect button.
Wi-Fi Protected Setup Method
Wi-Fi Protected Setup (WPS) lets you connect to a secure WiFi network without typing its
password. Instead, press a button or enter a PIN.
Some older WiFi equipment is not compatible with WPS. WPS works only with WP A2 or WP A
wireless security.
To use WPS to join the wireless network:
1. Press the WPS button on the side of the access point.
2. Within two minutes, press the WPS button on your wireless device, or follow the WPS
instructions that came with the device.
The WPS process automatically sets up your wireless computer with the network
password and connects you to the wireless network.
BASIC Wireless Settings
You can view or configure the wireless network setup.
The access point comes with preset security . This means that the WiFi network name (SSID),
network key (password), and security option (encryption protocol) are preset in the factory.
You can find the preset SSID and password on the label of the access point.
Note: The preset SSID and password are uniquely generated for every
device to protect and maximize your wireless security.
Best practice is not to change your preset security settings. If you change your preset
security settings, make a note of the new settings and store it in a safe place where you can
easily find it.
If you use a wireless computer to change the SSID or other wireless security settings, you
are disconnected when you click the Apply button. To avoid this problem, use a computer
with a wired connection to access the access point.
NETGEAR genie Basic Settings
13
Page 14
N750 Wireless Dual Band Gigabit Access Point WNDR4300-TN
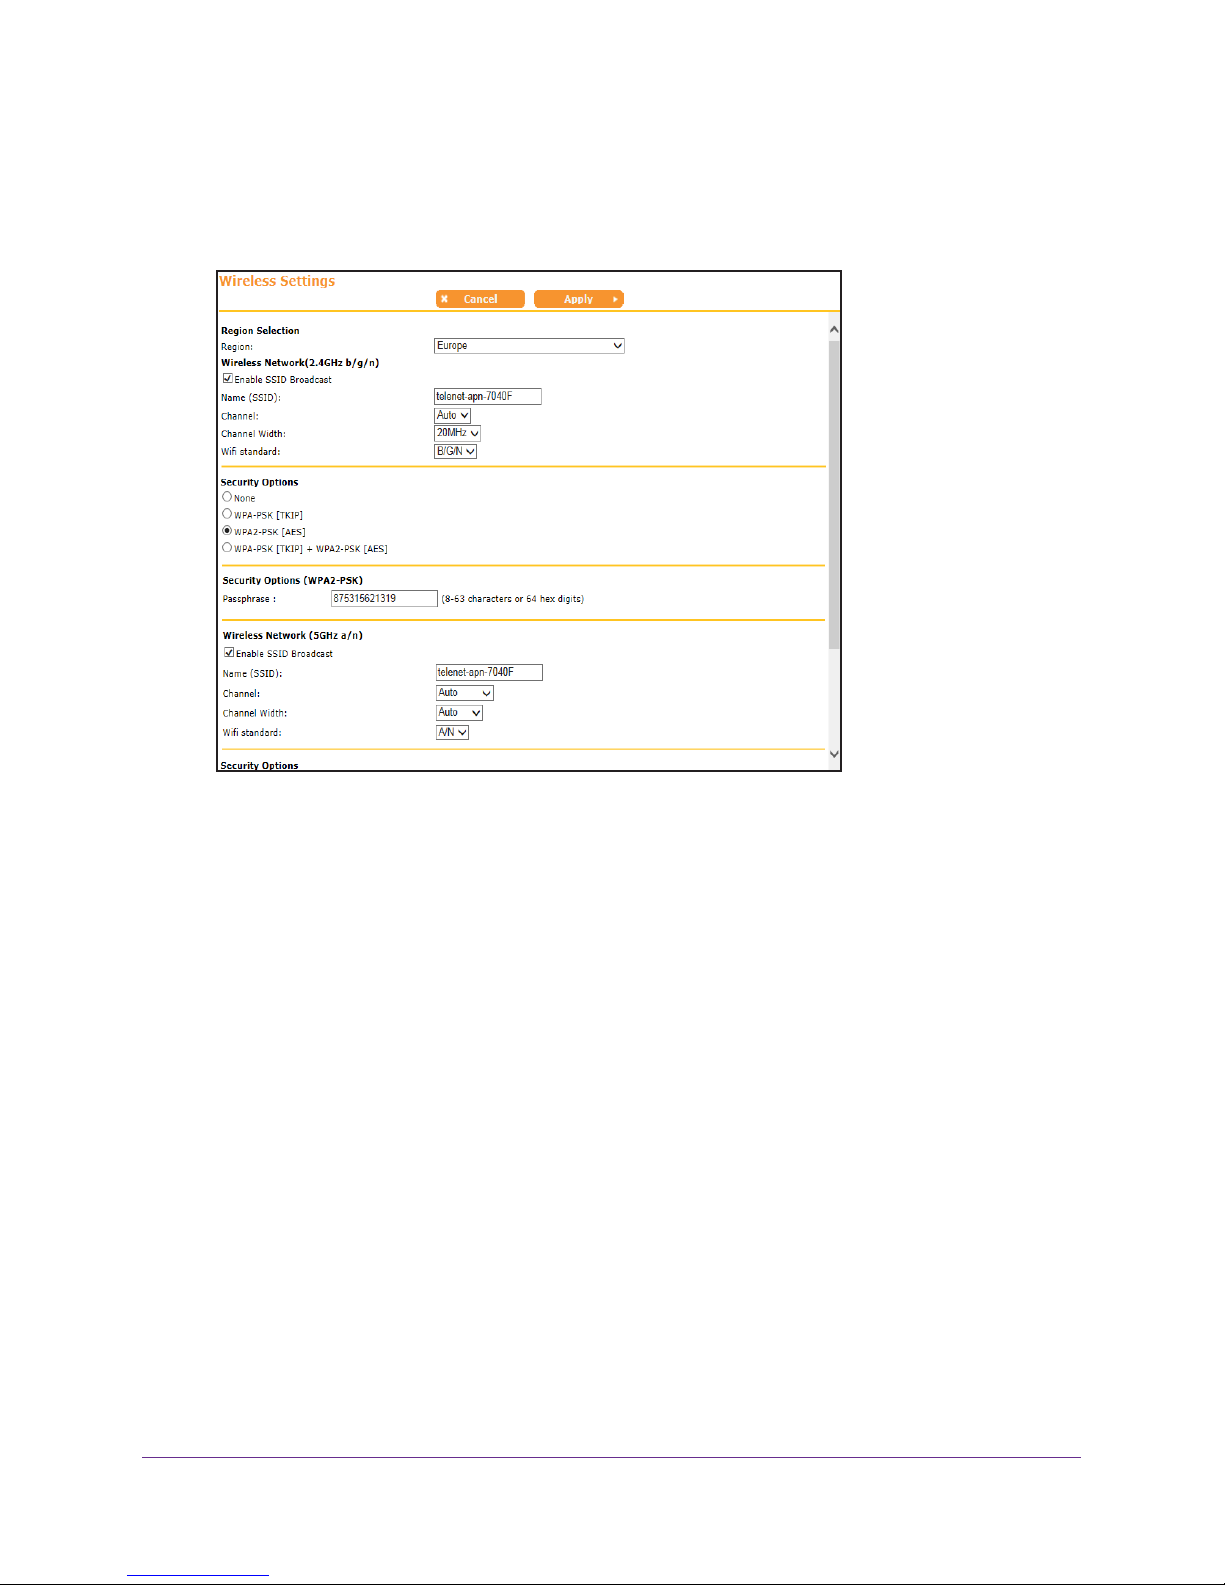
To view or change basic wireless settings:
1. Select BASIC > Wireless.
The Wireless Settings screen displays.
The screen sections, settings, and procedures are explained in the following sections.
2. Select the location where the access point is used.
In the United States, the region is fixed to United States and is not changeable.
3. Make any additional changes that are needed.
4. Click the Apply button.
Your settings are saved.
Set up and test your wireless devices and computers to make sure that they can connect
wirelessly
. If they do not, check the following:
• Is your wireless device or computer connected to your network or another wireless
network in your area? Some wireless devices automatically connect to the first open
network (without wireless security) that they discover.
• Does your wireless device or computer display on the
Attached Devices screen? If it
does, it is connected to the network.
• If you are not sure what the SSID or password is, look on the label on your access point.
Wireless Network
There is a separate section for each band, 2.4 GHz b/g/n and 5 GHz. The b/g/n notation
references the 802.11 standards of conformance for the 2.4 GHz radio frequency.
NETGEAR genie Basic Settings
14
Page 15

N750 Wireless Dual Band Gigabit Access Point WNDR4300-TN
The following fields appear on the Wireless Settings screen:
• Enable SSID Broadcast. This setting allows the access point to broadcast its SSID so
wireless stations can see this wireless name (SSID) in their scanned network lists. This
check box is selected by default. To turn off the SSID broadcast, clear the Enable SSID
Broadcast check box. You click the Apply button for any of these.
• Name (SSID). The SSID is also known as the wireless network name. Enter a
32-character (maximum) name in this field. This field is case-sensitive. The default SSID
is randomly generated, and best practice is not to change this setting.
• Channel. This setting is the wireless channel the access point uses. Enter a value from 1
through 13. For products in the North America market, only Channels 1 through 11 can be
operated. Do not change the channel unless you experience interference (shown by lost
connections or slow data transfers). If this happens, experiment with different channels to
see which is the best.
• Channel Width. Select either Auto or 20 MHz. If you select Auto, the access point works
at either 40 MHz or 20 MHz. For a channel width of either 40 MHz or 20 MHz, specify the
following parameters:
• Channel Width. Select Auto.
• WiFi Standard. Select N.
• 5 G to A/N or 2.4 G to B/G/N.
• If the WiFi standard is set to A in 5 GHz or B/G in 2.4 GHz the access point works at 20
MHz.
• WiFi Standard. The WiFi standard determines the link rate. You can set access points
with 2.4 GHz connectivity to the following values:
• B/G. Link rate of 54 Mbps
• B/G/N. Link rate of 130 Mbps–300 Mbps (depending on the channel width value)
• You can set access points with 5.0 GHz connectivity to these values:
• A. Link rate of 54 Mbps
• A/N. Link rate of 216 Mbps–450 Mbps (depending on the channel width value)
Security Options Settings
A security option is the type of security protocol applied to your wireless network. The
security protocol in force encrypts data transmissions and ensures that only trusted devices
receive authorization to connect to your network. Wi-Fi Protected Access (WPA) has several
options including pre-shared key (PSK) encryption.
WPA encryption is built into all hardware that has the Wi-Fi-certified seal. This seal means
that the product is authorized by the Wi-Fi Alliance (http://www.wi-fi.org/) because it complies
with the worldwide single standard for high-speed wireless local area networking.
WPA uses a passphrase for authentication and to generate the initial data encryption keys.
Then it dynamically varies the encryption key. WPA-PSK uses Temporal Key Integrity
Protocol (TKIP) data encryption, implements most of the IEEE 802.11i standard, and works
with all wireless network interface cards, but not all wireless access points.
NETGEAR genie Basic Settings
15
Page 16

N750 Wireless Dual Band Gigabit Access Point WNDR4300-TN
WP A2-PSK is stronger than WPA-PSK. It is advertised to be theoretically indecipherable due
to the greater degree of randomness in encryption keys that it generates. WPA2-PSK gets
higher speed because it is implemented through hardware, while WPA-PSK is usually
implemented through software. WP A2-PSK uses a passphrase to authenticate and generate
the initial data encryption keys. Then it dynamically varies the encryption key.
WPS-PSK + WPA2-PSK mixed mode can provide broader support for all wireless clients.
A2-PSK clients get higher speed and security, and WPA-PSK clients get decent speed
WP
and security. For help with WPA settings on your wireless computer or device, see the
instructions that came with your product.
You can change the security option and password. Best practice is not change the
security option or password. Do not disable security.
You can change the security settings for your access point. If you do so, write down the new
settings and store them in a secure place for future reference.
To change the WPA settings:
1. Select BASIC > W
ireless.
The Wireless Settings screen displays.
2. Under Security Options, select the WP
A option you want.
3. In the password field that displays when you select a WP A security option, enter the network
password that you want to use.
It is a text string from 8 to 63 characters.
4. Click the
Apply button.
Your settings are saved.
Attached Devices
The Attached Device screen shows all computers or devices that are currently connected to
your network.
NETGEAR genie Basic Settings
16
Page 17

N750 Wireless Dual Band Gigabit Access Point WNDR4300-TN
To view the Attached Devices screen:
1. From the BASIC Home screen, select Attached Devices.
Wired devices are connected to the access point with Ethernet cables. Wireless devices
have joined the wireless network.
The following fields provide information about connected devices:
• # (number).
• IP Address.
The order in which the device joined the network.
The IP address that the access point assigned to this device when it
joined the network. This number can change if a device is disconnected and rejoins
the network.
• MAC Address.
The unique MAC address for each device does not change. The MAC
address is typically shown on the product label.
• Device Name. If the device name is known, it is shown here.
2. T
o update this screen, click the Refresh button.
NETGEAR genie Basic Settings
17
Page 18

3. NETGEAR genie ADVANCED Home
This chapter contains the following sections:
• NETGEAR genie ADVANCED Home Screen
• WPS Wizard
• Setup Menu
• LAN Setup
Some selections on the ADVANCED Home screen are described in separate chapters:
• Security. See Chapter 4, Security.
• Administration. See Chapter 5, Administration.
• ADVANCED Setup. See Chapter 6, Advanced Settings.
3
18
Page 19

N750 Wireless Dual Band Gigabit Access Point WNDR4300-TN
NETGEAR genie ADVANCED Home Screen
The genie ADVANCED Home dashboard presents status information. The content is the
same as what is on the Access Point Status screen available from the Administration menu.
The genie ADVANCED Home screen is shown in the following figure:
This screen is also
displayed through
the Administration
menu.
WPS Wizard
The WPS Wizard helps you add a WPS-capable client device (a wireless device or
computer) to your network. On the client device, either press its WPS button or locate its
WPS PIN.
To use the WPS Wizard:
1. Select ADV
The following screen displays.
2. Click Next.
3. T
o add a WPS client (a wireless device or computer), select the Push Button radio button.
4. Either click the WPS button on this screen, or press the WPS button on the side of the
access point.
5. Within two minutes go to the wireless client and press its WPS button to join the network
without entering a password.
ANCED > WPS Wizard.
NETGEAR genie ADV ANCED Home
19
Page 20

N750 Wireless Dual Band Gigabit Access Point WNDR4300-TN
The access point attempts to add the WPS-capable device. The WPS LED on the
front of the access point blinks green. When the access point establishes a WPS
connection, the LED is solid green and the access point WPS screen displays a
confirmation message.
6. Repeat Step 2 and Step 3 to add another WPS client to your network.
Setup Menu
To modify wireless, LAN, and jumbo frames options:
Select ADV
The following selections are available:
• W
dashboard on the BASIC Home screen. See Join Your Wireless Network on page 12.
• LAN Setup. Local area network (LAN) setup. See LAN Setup on page 20.
• Jumbo frames Setup. Jumbo frames are Ethernet frames with more than 1500 bytes of
data.
ANCED > Setup to display the Setup menu.
ireless Setup. Go to the same Wireless Settings screen that you can access from the
The Jumbo frames feature is disabled by default.
LAN Setup
The access point is shipped preconfigured to use private IP addresses on the LAN side. The
access point has the following default LAN IP configuration:
• LAN IP address. 192.168.0.51
• Subnet mask. 255.255.255.0
If the default LAN IP address is used in the network, the access point selects the next
available address starting from 192.168.0.51 and ending at 192.168.0.59.
These addresses are part of the designated private address range for use in private networks
and are suitable for most applications. If your network requires a dif
scheme, you can change these settings in the LAN Setup screen.
ferent IP addressing
Note: If you change the LAN IP address of the access point, you are
disconnected. To use the access point menus, you must use a
browser to connect to the new IP address and log in again.
NETGEAR genie ADV ANCED Home
20
Page 21

N750 Wireless Dual Band Gigabit Access Point WNDR4300-TN
To change the LAN settings:
1. Select ADVANCED > Setup > LAN Setup to display the following screen:
2. Enter the settings that you want to customize:
• IP Address.
• IP Subnet Mask.
The LAN IP address of the access point.
The LAN subnet mask of the access point. Combined with the IP
address, the IP subnet mask allows a device to know which other addresses are local
to it, and which addresses must be reached through a gateway or access point.
3. Click the Apply button.
Your changes are saved.
NETGEAR genie ADV ANCED Home
21
Page 22

4. Security
This chapter explains how to use daylight saving time settings and security event email
notifications.
This chapter includes the following sections:
• Daylight Savings Time
• Security Event Email Notifications
4
22
Page 23

N750 Wireless Dual Band Gigabit Access Point WNDR4300-TN
Daylight Savings Time
You can specify the use of daylight saving time.
To specify the use of daylight saving time:
1. Select ADV
The following screen displays:
2. Check the Automatically adjust for daylight savings time check box.
3. Click the Apply button.
Your settings are saved.
ANCED > Security > Schedule.
Security Event Email Notifications
To receive logs and alerts by email, provide your email information in the E-mail screen, and
specify when you want to receive alerts.
To set up email notifications:
1. Select ADV
The following screen displays.
ANCED > Security > E-mail.
Security
23
Page 24

N750 Wireless Dual Band Gigabit Access Point WNDR4300-TN
2. To receive email logs and alerts from the access point, select the Turn E-mail Notification
On check box.
3. In the Your Outgoing Mail Server field, enter the name of your ISP outgoing (SMTP) mail
server (such as mail.myISP.com).
You might be able to find this information in the configuration screen of your email
program. If you leave this field blank, no log and alert messages are sent.
4. Enter the email address to which logs and alerts are sent in the Send to This E-mail Address
field.
This email address is also used for the From address. If you leave this field blank, log and
alert messages are not sent.
5. If your outgoing email server requires authentication, select the My mail server requires
authentication check box. Fill in the User Name and Password fields for the outgoing email
server.
6. Indicate when you want the gateway to send alerts.
If you select the Weekly, Daily, or Hourly option and the log fills up before the specified
period, the log is emailed to the specified email address. After the log is sent, the log is
cleared from the access point’s memory. If the access point cannot email the log file, the
log buffer might fill up. In this case, the access point overwrites the log and discards its
contents.
7. Click the Apply button.
Your settings are saved.
Security
24
Page 25

5. Administration
This chapter describes the settings for administering and maintaining your access point and
home network.
This chapter includes the following sections:
• Upgrade the Firmware
• View Access Point Status
• View Logs of Web Access or Attempted Web Access
• Manage the Configuration File
• Set Password
5
25
Page 26

N750 Wireless Dual Band Gigabit Access Point WNDR4300-TN
Upgrade the Firmware
The access point firmware (routing software) is stored in flash memory. You can update the
firmware from the Administration menu, which you access from the ADVANCED tab. You
might see a message at the top of the genie screens when new firmware is available for your
product.
To update your access point:
1. Select ADV
2. Click the Browse button.
Locate and select the firmware file you downloaded (the file ends in .img).
3. Click the Upload button.
The access point begins the update.
When the upload is complete, your access point restarts. The upgrade process typically
takes about one minute. Read the new firmware release notes to find out if you need to
reconfigure the access point after upgrading.
ANCED > Administration > Firmware upgrade.
WARNING:
To avoid the risk of corrupting the firmware, do not interrupt the
upgrade. For example, do not close the browser, click a link, or
load a new page. Do not turn off the access point.
View Access Point Status
To view access point status and usage information:
Select Administration >
Access Point Status.
Administration
26
Page 27

N750 Wireless Dual Band Gigabit Access Point WNDR4300-TN
The following screen displays:
Access Point Information
The following information displays:
• Hardware V
• Firmware Version.
the access point firmware.
• GUI Language V
• Operation Mode.
ersion. The access point model.
The version of the access point firmware. It changes if you upgrade
ersion. The localized language of the user interface.
The operation mode of this device. The device is an access point (AP).
LAN Port
The following information displays:
• MAC Address.
that the Ethernet (LAN) port of the access point uses.
• IP Address.
default is 192.168.0.51.
• IP Subnet Mask.
address, the IP subnet mask allows a device to know which other addresses are local to
it, and which addresses must be reached through a gateway or access point.
The Media Access Control address. This is the unique physical address
The IP address that the Ethernet (LAN) port of the access point uses. The
The LAN subnet mask of the access point. Combined with the IP
Administration
27
Page 28

N750 Wireless Dual Band Gigabit Access Point WNDR4300-TN
To view connection statistics:
1. Select Administration > Access Point Status.
2. Click the Show Statistics button.
The following screen displays:
The following information displays:
• System Up T
• Port.
The statistics for the LAN (Ethernet) ports. For each port, the screen displays:
• Status.
• TxPkts.
ime. The time elapsed since the access point was last restarted.
The link status of the port.
The number of packets transmitted on this port since reset or manual
clear.
• RxPkts.
• Collisions.
• Tx B/s.
The number of packets received on this port since reset or manual clear.
The number of collisions on this port since reset or manual clear.
The current transmission (outbound) bandwidth used on the WAN and
LAN ports.
• Rx B/s.
The current reception (inbound) bandwidth used on the WAN and LAN
ports.
• Up T
• Poll Interval.
3. T
o change the polling frequency, enter a time in seconds in the Poll Interval field, and click
ime. The time elapsed since this port acquired the link.
The interval at which the statistics are updated in this screen.
the Set Interval button.
4. T
o stop the polling entirely, click the Stop button.
Administration
28
Page 29

N750 Wireless Dual Band Gigabit Access Point WNDR4300-TN
Wireless Settings
The following information displays for the 2.4 GHz and 5 GHz bands:
• Name (SSID).
• Region.
The wireless network name (SSID) that the access point uses.
The geographic region where the access point is being used. It might be illegal
to use the wireless features of the access point in some parts of the world.
• Channel. Identifies the operating channel of the wireless port being used.
The default
channel is Auto. When Auto displays, the access point finds the best operating channel
available.
• W
iFi Standard. For 2.4 GHz, either B/G (54 Mpbs) or B/G/N (130–300 Mbps). For 5.0
GHz, either A (54 Mpbs) or A/N (216–450 Mbps).
• W
ireless AP. Indicates whether the radio feature of the access point is enabled. If this
feature is not enabled, the 2.4 GHz and 5 GHz LEDs on the front panel are off.
• Broadcast Name. Indicates whether the access point is broadcasting its SSID.
• W
ireless Isolation. Wireless clients cannot communicate directly with each other or see
each other’s private information.
• W
i-Fi Protected Setup. Indicates whether Wi-Fi Protected Setup is configured for this
network.
Administration
29
Page 30

N750 Wireless Dual Band Gigabit Access Point WNDR4300-TN
View Logs of Web Access or Attempted Web Access
The log is a detailed record of the websites you have accessed or attempted to access. Up to
256 entries are stored in the log.
To view and manage the log:
1. Select ADV
ANCED > Administration > Logs.
The Logs screen displays.
The Logs screen shows the following information:
• Date and time.
• Source IP.
The date and time the log entry was recorded.
The IP address of the initiating device for this log entry.
• Action. Whether the access was blocked or allowed.
2. Click the check boxes indicating the information you want the log to include.
• Connections to the W
eb-based interface of this Access Point
• Access Point operation (startup, get time etc)
3. T
o refresh the log screen, click the Refresh button.
4. T
o clear the log entries, click the Clear Log button.
5. T
o email the log immediately, click the Send Log button.
Administration
30
Page 31

N750 Wireless Dual Band Gigabit Access Point WNDR4300-TN
Manage the Configuration File
The configuration settings of the access point are stored within the access point in a
configuration file. You can back up (save) this file to your computer, restore it, or reset it to
the factory default settings.
Back Up Settings
To back up the access point’s configuration settings:
1. Select ADV
The following screen displays:
2. Click the Back Up Settings button.
3. Specify a
A copy of the current settings is saved.
ANCED > Administration > Backup Settings.
location to store the .cfg file that is on a computer on your network.
Restore Configuration Settings
To restore configuration settings that you backed up:
1. Select ADV
2. Click the Browse button to find and select the .cfg file.
3. Click the Restore button.
The file is uploaded to the access point and the access point reboots.
ANCED > Administration > Backup Settings.
WARNING:
Do not interrupt the reboot process.
Administration
31
Page 32

N750 Wireless Dual Band Gigabit Access Point WNDR4300-TN
Erase the Current Configuration Settings
You can use the Erase button to erase the configuration and restore the factory default
settings. You might want to do this if you move the access point to a different network or if
you changed the password and have forgotten what it is. (The default password is on the
product label.)
You can also use the Restore Factory Settings button on the back of the access point to
erase the configuration and restore the factory settings. (See Factory Settings on page 43).
To erase the configuration settings:
1. Select ADV
2. Click the Erase button.
The factory default settings are restored. The user name is admin, the password to
password, and the LAN IP address is 192.168.0.51. DHCP is enabled.
ANCED > Administration > Backup Settings.
Set Password
You can change the default password that is used to log in to the access point with the user
name admin.
This is not the same as changing the password for wireless access. The label on the bottom
of your access point shows your unique wireless network name (SSID) and password for
wireless access (see Label on page 8).
To set the password for the user name admin:
1. Select ADV
ANCED > Administration > Set Password.
2. Type the old password and type the new password twice.
3. If you want to be able to recover the password, select the Enable Password Recovery
check box.
4. Click the Apply button.
Your changes take effect.
Administration
32
Page 33

N750 Wireless Dual Band Gigabit Access Point WNDR4300-TN
Password Recovery
It is a good idea to enable password recovery if you change the password for the access
point’s user name of admin. Then if you forget the password, you can recover it. This
recovery process is supported in Internet Explorer, Firefox, and Chrome browsers, but not in
the Safari browser.
To set up password recovery:
1. Select ADVANCED > Administration > Set Password.
2. Select the Enable Password Recovery check box.
3. Select two security questions and provide answers to them.
4. Click the Apply button.
Your changes are saved.
To recover your password:
1. In the address field of your browser, type www.routerlogin.net.
A login window displays.
2. Click Cancel.
If password recovery is enabled, you are prompted to enter the serial number of the
access point. The serial number is on the product label.
3. Enter the serial number of the access point.
4. Click the Continue button.
A screen displays requesting the answers to two security questions.
5. Enter the saved answers to the security questions.
6. Click the Continue button.
A screen displays confirming a successful recovery of your password.
7. Click the Login again button.
A login screen displays.
8. With your recovered password, log in to the access point.
Administration
33
Page 34

6. Advanced Settings
This chapter describes the advanced features of your access point. The information is for users
with advanced networking knowledge who want to set the access point up for unique situations.
This chapter includes the following sections:
• Advanced Wireless Settings
• Restrict Wireless Access by MAC Address
6
34
Page 35

N750 Wireless Dual Band Gigabit Access Point WNDR4300-TN
Advanced Wireless Settings
To specify advanced wireless settings:
1. Select ADVANCED > Advanced Setup > Wireless Settings.
2. Specify the following settings:
• Enable W
ireless Access Point Radio. You can completely turn off the wireless
portion of the wireless access point by clearing this check box. Select this check box
again to enable the wireless portion of the access point. When the wireless radio is
disabled, other members of your household can use the access point by connecting
their computers to the access point with an Ethernet cable.
• Enable W
ireless Isolation. Enabling this feature prevents associated wireless
clients from communicating with each other. Clients in the same wireless network
cannot access other clients’ private information.
• Enable WMM (W
i-Fi Multimedia) Settings. Select this check box to enable 11n
performance.
Note: The Fragmentation Length, CTS/RTS Threshold, and Preamble
Mode options are reserved for wireless testing and advanced
configuration only. Do not change these settings.
Scroll to
view more
settings
Advanced Settings
35
Page 36

N750 Wireless Dual Band Gigabit Access Point WNDR4300-TN
Transmit Power Control. You can change the transmit power of each wireless radio. Lower
transmit power reduces the power consumption of the access point, but also reduces the
wireless coverage.
Turn off wireless signal by schedule. You can use this feature to turn off the wireless
signal from your access point at times when you do not need a wireless connection. For
example, you could turn it off for the weekend if you leave town.
Restrict Wireless Access by MAC Address
You can set up a list of computers and wireless devices that are allowed to join the wireless
network. This list is based on the unique MAC address of each computer and device.
Each network device has a MAC address, which is a unique 12-character physical address,
containing the hexadecimal characters 0–9, a–f, or A–F only, and separated by colons (for
example, 00:09:AB:CD:EF:01). Typically, the MAC address is on the label of the wireless
card or network interface device. If you do not have access to the label, you can display the
MAC address using the network configuration utilities of the computer. You might also find
the MAC addresses in the Attached Devices screen.
To restrict access based on MAC addresses:
1. Select ADVANCED > Advanced Setup > Wireless Settings.
2. Click the Setup Access List button to display the Wireless Card Access List screen.
3. Click the Add button to add a wireless device to the Wireless Access Control List.
The Wireless Card Access Setup screen opens and displays a list of currently active
wireless cards and their Ethernet MAC addresses.
4. If the computer or device you want is in the Available Wireless Cards list, select that radio
button; otherwise, type a name and the MAC address.
You can usually find the MAC address on the label of the wireless device.
Tip: You can copy and paste the MAC addresses from the Attached Devices
screen into the MAC Address field of this screen. To do this, use each
wireless computer to join the wireless network. The computer should
then appear in the Attached Devices screen.
5. Click the Add button to add this wireless device to the Wireless Card Access List.
The screen changes back to the list screen.
6. Add each computer or device you want to allow to connect wirelessly.
7. Select the Turn Access Control On check box.
8. Click the Apply button.
Advanced Settings
36
Page 37

7. Troubleshooting
This chapter provides information to help you diagnose and solve problems you might have with
your access point.
This chapter contains the following sections:
• Quick Tips
• Troubleshoot with the LEDs
• Cannot Log In to the Access Point
• Changes Not Saved
• Incorrect Date or Time
• Wireless Connectivity
• Wireless Signal Strength
7
37
Page 38

N750 Wireless Dual Band Gigabit Access Point WNDR4300-TN
Quick Tips
This section describes tips for troubleshooting some common problems.
Power LED
Check the Power LED to verify correct access point operation.
If the Power LED does not turn solid green within two minutes after you turn the access point
on, reset the access point according to the instructions in Factory Settings on page 43.
Check Ethernet Cable Connections
Make sure that the Ethernet cables are securely plugged in:
• The LAN port LED on the access point is lit if the Ethernet cable connecting the access
point and the gateway router is plugged in securely and the gateway router and access
point are turned on.
• For each powered-on computer connected to the access point by an Ethernet cable, the
corresponding numbered access point LAN port LED is lit.
Wireless Settings
Make sure that the wireless settings in the computer and access point match exactly:
• For a wirelessly connected computer
security settings of the access point and wireless computer must match exactly.
• If you set up an access list in the
wireless computer’s MAC address to the access point’s access list.
, the wireless network name (SSID) and wireless
Advanced Wireless Settings screen, you must add each
Network Settings
Make sure that the network settings of the computer are correct:
• Wired and wirelessly connected computers must have network (IP) addresses on the
same network as the access point.
computer to obtain an IP address automatically using DHCP.
• Some cable modem service providers require you to use the MAC address of the
computer initially registered on the account.
Attached Devices screen.
The simplest way to do this is to configure each
You can view the MAC address in the
Troubleshooting
38
Page 39

N750 Wireless Dual Band Gigabit Access Point WNDR4300-TN
Troubleshoot with the LEDs
After you turn on power to the access point, the following sequence of events occurs:
1. When power is first applied, verify that the Power LED
2. After two minutes, verify the following:
• The Power LED lights solid green.
• The LAN port LED lights.
• The 2.4 GHz and 5 GHz LEDs light.
You can use the LEDs on the front panel of the access point for troubleshooting.
lights.
Power LED Is Off or Blinking
• Make sure that the power cord is securely connected to your access point and that the
power adapter is securely connected to a functioning power outlet.
• Check that you are using the 12 V
this product.
• If the Power LED blinks slowly and continuously
can happen if a firmware upgrade is interrupted, or if the access point detects a problem with
the firmware. If the error persists, you have a hardware problem.
-DC, 2.5A power adapter that NETGEAR supplied for
, the access point firmware is corrupted. This
LEDs Never Turn Off
When the access point is turned on, the LEDs light for about 10 seconds and then turn off. If
all the LEDs stay on, there is a fault within the access point.
If all LEDs are still lit one minute after power-up, do the following:
• Cycle the power to see if the access point recovers.
• T
o return the access point to its factory settings, press and hold the Restore Factory
Settings button. For more information, see Factory Settings on page 43.
If the error persists, you might have a hardware problem.
2.4 GHz and 5 GHz LEDs Are Off
If these LEDs stay off, check to see if the wireless button on the access point has been
pressed. This button turns the wireless radios in the access point on and off. The 2.4 GHz
and 5 GHz LEDs are lit when the wireless radios are turned on.
Troubleshooting
39
Page 40

N750 Wireless Dual Band Gigabit Access Point WNDR4300-TN
Cannot Log In to the Access Point
If you are unable to log in to the access point from a computer on your local network, check
the following:
• If you are using an Ethernet-connected computer, check the Ethernet connection
between the computer and the access point. For more information, see
Cable Connections on page 38.
• Make sure that your computer’s IP address is on the same subnet as the access point.
• If your computer’s IP address is shown as 169.254.x.x, recent versions of Windows and
Mac OS generate and assign an IP address if the computer cannot reach a DHCP server.
These autogenerated addresses are in the range of 169.254.x.x. If your IP address is in
this range, check the connection from the computer to the access point, and reboot your
computer.
• If your access point’s IP address was changed and you do not know the current IP
address, clear the access point’s configuration to factory defaults. This sets the access
point’s IP address to 192.168.0.51. See
• Make sure that your browser has Java, JavaScript, or ActiveX enabled. If you are using
Internet Explorer, click the Refresh button to be sure that the Java applet is loaded.
Factory Settings on page 43.
Check Ethernet
• Try quitting the browser and launching it again.
• Make sure that you are using the correct login information. The factory default login name
is admin and the password is password. Make sure that Caps Lock is off when you enter
this information.
Changes Not Saved
If the access point does not save the changes you make in the access point interface, check
the following:
• When entering configuration settings, always click the Apply button before moving to
another screen or tab, or your changes are lost.
• Click the Refresh or Reload button in the web browser. The changes might have
occurred, but the old settings might be in the web browser’s cache.
Incorrect Date or Time
To display the current date and time, select ADVANCED > Security > Schedule. The
access point uses the Network Time Protocol (NTP) to obtain the current time from one of
several network time servers on the Internet. Each entry in the log is stamped with the date
and time of day. Problems with the date and time function can include the following:
• Date shown is January 1, 1970. This means the access point has not yet successfully
reached a network time server. Check that your Internet access is configured correctly.
Troubleshooting
40
Page 41

N750 Wireless Dual Band Gigabit Access Point WNDR4300-TN
• Time is off by one hour. The access point does not automatically sense daylight savings
time. In the Schedule screen, select the Automatically adjust for daylight savings
time check box.
Wireless Connectivity
If you are having trouble connecting wirelessly to the access point, try to isolate the problem:
• Does the wireless device or computer that you are using find your wireless network?
If not, check the 2.4 GHz and 5 GHz LEDs on the front of the access point. They should
be lit. If they are not, you can press the Wireless button on the front of the access point to
turn the access points wireless radios back on.
If you disabled the access point’s SSID broadcast, then your wireless network is hidden
and does not display in your wireless client’s scanning list. (By default, SSID broadcast is
enabled.)
• If your wireless device finds the network but you cannot join the network, check to make
sure that your wireless device is compatible with the network that you selected (2.4 GHz
or 5 GHz).
• Does your wireless device support the security that you are using for your wireless
network (WPA or WPA2)?
• If you want to check the wireless settings for the access point, use an Ethernet cable to
connect a computer to a LAN port on the access point. Then log in to the access point
and select Setup > Wireless Settings (see
Note: Note: Be sure to configure both sections (for 2.4 GHz b/g/n and
5
GHz a/n) on the Wireless Settings screen and to click the Apply
button if you make changes.
BASIC Wireless Settings on page 13).
Wireless Signal Strength
If your wireless device finds your network, but the signal strength is weak, check these
conditions:
• Is your access point too far from your computer, or too close? Place your computer near
the access point, but at least 6 feet (1.8 meters) away, and see if the signal strength
improves.
• Is your wireless signal blocked by objects between the access point and your computer?
Troubleshooting
41
Page 42

A. Supplemental Information
This appendix provides factory default settings and technical specifications for the N750
Wireless Dual Band Gigabit Access Point WNDR4300-TN.
The appendix includes the following sections:
• Factory Settings
• Technical Specifications
A
42
Page 43

N750 Wireless Dual Band Gigabit Access Point WNDR4300-TN
Factory Settings
You can return the access point to its factory settings. Use the end of a paper clip or a similar
object to press and hold the Restore Factory Settings button on the back of the access
point for at least five seconds. The access point resets and returns to the factory
configuration settings shown in the following table.
Feature Default behavior
Access point
login
Local network
(LAN)
Wireless Wireless communication Enabled
User name (case-sensitive) admin
Login password (case-sensitive) password
LAN IP address 192.168.0.51
Subnet mask 255.255.255.0
Time zone GMT +01:00
Time zone adjusted for daylight
saving time
Allow a registrar to configure this
router
SSID name See access point label
Network key See access point label
Channel width - 2.4 GHz 20 Mhz
Channel width - 5 GHz Auto
Security WPA-PSK(TKIP) + WPA2-PSK(AES)
Disabled
Enabled
Broadcast SSID Enabled
Transmission speed Auto
Country/region Europe
RF channel Auto
WiFi standard 2.4 GHz: b/g/n
* Maximum wireless signal rate derived from IEEE Standard 802.11 specifications. Actual throughput can vary. Network conditions and
environmental factors, including volume of network traffic, building materials and construction, and network overhead, lower actual data
throughput rate.
*
5 GHz: a/n
Supplemental Information
43
Page 44

N750 Wireless Dual Band Gigabit Access Point WNDR4300-TN
Technical Specifications
Table 1. WNDR4300-TN Router specifications
Feature Description
Power adapter Europe: 230V, 50 Hz, input
Dimensions 1.1 in. x 6.89 in. x 4.68 in. (28 mm x 175 mm x 119 mm)
Weight 0.5 kg (1.2 lb)
Operating temperature 0° to 40°C (32º to 104ºF)
Operating humidity 90% maximum relative humidity, noncondensing
Electromagnetic emissions FCC Part 15 Class B
VCCI Class B
EN 55 022 (CISPR 22), Class B C-Tick N10947
LAN 10BASE-T or 100BASE-Tx or 1000BASE-T, RJ-45
Wireless Maximum wireless signal rate complies with the IEEE 802.11 standard. See the
footnote for the previous table.
Radio data rates Auto Rate Sensing
Data encoding standards IEEE 802.11n
IEEE 802.11n, IEEE 802.11g, IEEE 802.11b 2.4 GHz
IEEE 802.11n, IEEE 802.11a 5.0 GHz
Maximum computers per
wireless network
Operating frequency range 2.4 GHz
802.11 security 40-bit (also called 64-bit) and 128-bit WEP, WPA-PSK, and WPA2-PSK.
Limited by the amount of wireless network traffic generated by each node
(typically 50–70 nodes).
2.412–2.462 GHz (US)
2.412–2.472 GHz (Japan)
2.412–2.472 GHz (Europe ETSI)
5 GHz
5.18–5.24 + 5.745–5.825 GHz (US)
5.18–5.24 GHz (Europe ETSI)
Supplemental Information
44
Page 45

B. Notification of Compliance
B
Regulatory Compliance Information
This section includes user requirements for operating this product in accordance with National laws for usage of radio
spectrum and operation of radio devices. Failure of the end-user to comply with the applicable requirements may
result in unlawful operation and adverse action against the end-user by the applicable National regulatory authority.
This product's firmware limits operation to only the channels allowed in a particular Region or Country. Therefore, all
options described in this user's guide may not be available in your version of the product.
Europe – EU Declaration of Conformity
Products bearing the marking comply with the following EU directives:
• EMC Directive 2004/108/EC
• Low V
If this product has telecommunications functionality, it also complies with the requirements of the following EU
Directive:
• R&TTE Directive 1999/5/EC
Compliance with these directives implies conformity to harmonized European standards that are noted in the EU
Declaration of Conformity
For indoor use only. Valid in all EU member states, EFTA states, and Switzerland.
This device may not be used for setting up outdoor radio links in France and in some areas the RF output power may
be limited to 10 mW EIRP in the frequency range of 2454 - 2483.5 MHz. For detailed information the end-user should
contact the national spectrum authority in France.
oltage Directive 2006/95/EC
.
FCC Requirements for Operation in the United States
FCC Information to User
This product does not contain any user serviceable components and is to be used with approved antennas only.
Any product changes or modifications will invalidate all applicable regulatory certifications and approvals.
FCC Guidelines for Human Exposure
This equipment complies with FCC radiation exposure limits set forth for an uncontrolled environment. This
equipment should be installed and operated with minimum distance of 20 cm between the radiator and your body.
This device and its antenna(s) must not be co-located or operating in conjunction with any other antenna or
transmitter except in accordance with FCC multi-transmitter product procedures.
FCC Declaration of Conformity
We, NETGEAR, Inc., 350 East Plumeria Drive, San Jose, CA 95134, declare under our sole responsibility that the
N750 Wireless Dual Band Gigabit Access Point WNDR4300-TN complies with Part 15 Subpart B of FCC CFR47
Rules. Operation is subject to the following two conditions:
• This device may not cause harmful interference, and
• This device must accept any interference received, including interference that may cause undesired operation.
45
Page 46

N750 Wireless Dual Band Gigabit Access Point WNDR4300-TN
FCC Radio Frequency Interference Warnings & Instructions
This equipment has been tested and found to comply with the limits for a Class B digital device, pursuant to Part 15
of the FCC Rules. These limits are designed to provide reasonable protection against harmful interference in a
residential installation. This equipment uses and can radiate radio frequency energy and, if not installed and used in
accordance with the instructions, may cause harmful interference to radio communications. However, there is no
guarantee that interference will not occur in a particular installation. If this equipment does cause harmful
interference to radio or television reception, which can be determined by turning the equipment off and on, the user
is encouraged to try to correct the interference by one or more of the following methods:
• Reorient or relocate the receiving antenna.
• Increase the separation between the equipment and the receiver.
• Connect the equipment into an electrical outlet on a circuit different from that which the radio receiver is
connected.
• Consult the dealer or an experienced radio/TV technician for help.
FCC Caution
• Any changes or modifications not expressly approved by the party responsible for compliance could void the
user's authority to operate this equipment.
• This device complies with Part 15 of the FCC Rules. Operation is subject to the following two conditions: (1) This
device may not cause harmful interference, and (2) this device must accept any interference received, including
interference that may cause undesired operation.
• For product available in the USA and Canada market, only channel 1~11 can be operated. Selection of other
channels is not possible.
• Pour les produits disponibles aux États-Unis / Canada du marché, seul le canal 1 à 11 peuvent être exploités.
Sélection d'autres canaux n'est pas possible.
• This device and its antenna(s) must not be co-located or operating in conjunction with any other antenna or
transmitter except in accordance with FCC multi-transmitter product procedures.
• Cet appareil et son antenne (s) ne doit pas être co-localisés ou fonctionnement en association avec une autre
antenne ou transmetteur.
• For operation within a 5.15 ~ 5.25 GHz/5.47 ~ 5.725 GHz frequency range, it is restricted to an indoor
environment. The band from 5600-5650 MHz will be disabled by the software during the manufacturing and
cannot be changed by the end user. This device meets all the other requirements specified in Part 15E, Section
15.407 of the FCC Rules.
• Devices will not permit operations on channels 120-132 for 11a and 11n/a which overlap the 5600 - 5650 MHz
band.
Canadian Department of Communications Radio Interference Regulations
This digital apparatus (N750 Wireless Dual Band Gigabit Access Point WNDR4300-TN) does not exceed the Class B
limits for radio-noise emissions from digital apparatus as set out in the Radio Interference Regulations of the Canadian
Department of Communications.
CAN ICES-3 (B)/NMB-3(B)
Industry Canada
This device complies with RSS-210 of the Industry Canada Rules. Operation is subject to the following two conditions:
(1) This device may not cause harmful interference, and (2) this device must accept any interference received,
including interference that may cause undesired operation.
Ce dispositif est conforme à la norme CNR-210 d'Industrie Canada applicable aux appareils radio exempts de licence.
Son fonctionnement est sujet aux deux conditions suivantes: (1) le dispositif ne doit pas produire de brouillage
préjudiciable, et (2) ce dispositif doit accepter tout brouillage reçu, y compris un brouillage susceptible de provoquer un
fonctionnement indésirable.
The device could automatically discontinue transmission in case of absence of information to transmit, or operational
failure. Note that this is not intended to prohibit transmission of control or signaling information or the use of repetitive
codes where required by the technology.
Le dispositif pourrait automatiquement cesser d'émettre en cas d'absence d'informations à transmettre, ou une
défaillance opérationnelle. Notez que ce n'est pas l'intention d'interdire la transmission des informations de contrôle ou
de signalisation ou l'utilisation de codes répétitifs lorsque requis par la technologie.
Notification of Compliance
46
Page 47

N750 Wireless Dual Band Gigabit Access Point WNDR4300-TN
Dynamic Frequency Selection (DFS) for devices operating in the bands 5250- 5350 MHz,5470-5600 MHz and
5650-5725 MHz.
Sélection dynamique de fréquences (DFS) pour les dispositifs fonctionnant dans les bandes 5250-5350 MHz,
5470-5600 MHz et 5650-5725 MHz.
The maximum antenna gain permitted (for devices in the bands 5250-5350 MHz and 5470-5725 MHz) to comply with
the e.i.r.p. limit.
Le gain maximal d'antenne permis pour les dispositifs utilisant les bandes 5250-5350 MHz et 5470-5725 MHz doit se
conformer à la limite de p.i.r.e.
Users should also be advised that high-power radars are allocated as primary users (i.e. priority users) of the bands
5250-5350 MHz and 5650-5850 MHz and that these radars could cause interference and/or damage to LE-LAN
devices.
De plus, les utilisateurs devraient aussi être avisés que les utilisateurs de radars de haute puissance sont désignés
utilisateurs principaux (c.-à-d., qu'ils ont la priorité) pour les bandes 5250-5350 MHz et 5650-5850 MHz et que ces
radars pourraient causer du brouillage et/ou des dommages aux dispositifs LAN-EL.
The device could automatically discontinue transmission in case of absence of information to transmit, or operational
failure. Note that this is not intended to prohibit transmission of control or signaling information or the use of repetitive
codes where required by the technology.
Le dispositif pourrait automatiquement cesser d'émettre en cas d'absence d'informations à transmettre, ou une
défaillance opérationnelle. Notez que ce n'est pas l'intention d'interdire la transmission des informations de contrôle ou
de signalisation ou l'utilisation de codes répétitifs lorsque requis par la technologie.
Caution:
The device for the band 5150-5250 MHz is only for indoor usage to reduce po-tential for harmful interference to
co-channel mobile satellite systems.
High power radars are allocated as primary users (meaning they have priority) of 5250-5350 MHz and 5650-5850 MHz
and these radars could cause interference and/or damage to LE-LAN devices.
Avertissement:
Le dispositif fonctionnant dans la bande 5150-5250 MHz est réservé uniquement pour une utili-sation à l'intérieur afin
de réduire les risques de brouillage préjudiciable aux systèmes de satellites mobiles utilisant les mêmes canaux.
Les utilisateurs de radars de haute puissance sont désignés utilisateurs principaux (c.-à-d., qu'ils ont la priorité) pour
les bandes 5250-5350 MHz et 5650-5850 MHz et que ces radars pourraient causer du brouillage et/ou des dommages
aux dispositifs LAN-EL.
IMPORTANT NOTE: Radiation Exposure Statement:
This equipment complies with IC radiation exposure limits set forth for an uncontrolled environment. This equipment
should be installed and operated with minimum distance 20cm between the radiator & your body.
NOTE IMPORTANTE: Déclaration d'exposition aux radiations:
Cet équipement est conforme aux limites d'exposition aux rayonnements IC établies pour un environnement non
contrôlé. Cet équipement doit être installé et utilisé avec un minimum de 20 cm de distance entre la source de
rayonnement et votre corps.
Notification of Compliance
47
Page 48

N750 Wireless Dual Band Gigabit Access Point WNDR4300-TN
Interference Reduction Table
The following table shows the recommended minimum distance between NETGEAR equipment and household
appliances to reduce interference (in feet and meters).
Household Appliance Recommended Minimum Distance
(in feet and meters)
Microwave ovens 30 feet / 9 meters
Baby monitor - analog 20 feet / 6 meters
Baby monitor - digital 40 feet / 12 meters
Cordless phone - analog 20 feet / 6 meters
Cordless phone - digital 30 feet / 9 meters
Bluetooth devices 20 feet / 6 meters
ZigBee 20 feet / 6 meters
Notification of Compliance
48
 Loading...