

Page 1
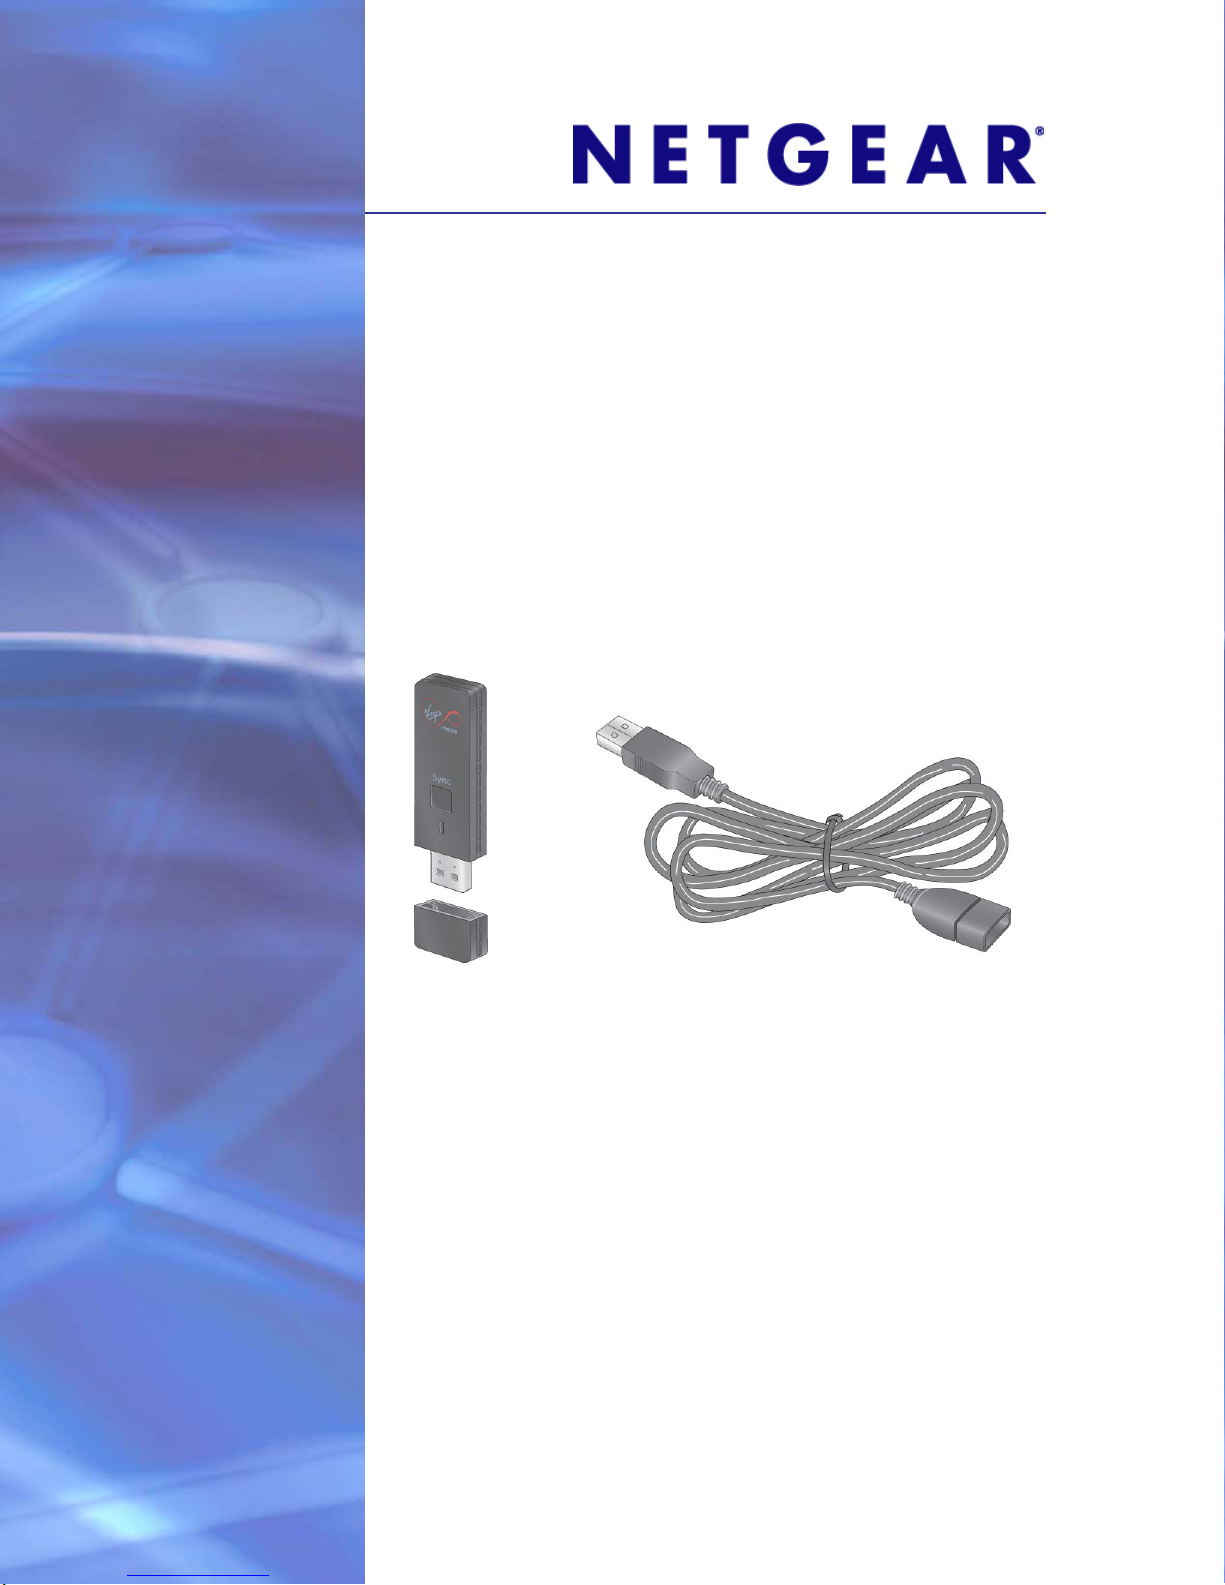
Virgin Media Wireless USB
Adapter WNDA3200
User Manual
350 East Plumeria Drive
San Jose, CA 95134
USA
January 2011
202-10701-01
v1.0
Page 2

Virgin Media Wireless USB Adapter WNDA3200
© 2011 NETGEAR, Inc. All rights reserved.
No part of this publication may be reproduced, transmitted, transcribed, stored in a retrieval system, or translated
into any language in any form or by any means without the written permission of NETGEAR, Inc.
Technical Support
Thank you for choosing NETGEAR. To register your product, get the latest product updates, or get support online,
visit us at http://support.netgear.com.
Phone (US & Canada only): 1-888-NETGEAR
Phone (Other Countries): See Support information card.
Trademarks
NETGEAR, the NETGEAR logo, ReadyNAS, ProSafe, Smart Wizard, Auto Uplink, X-RAID2, and NeoTV are
trademarks or registered trademarks of NETGEAR, Inc. Microsoft, Windows, Windows NT, and Vista are
registered trademarks of Microsoft Corporation. Other brand and product names are registered trademarks or
trademarks of their respective holders.
Statement of Conditions
To improve internal design, operational function, and/or reliability, NETGEAR reserves the right to make changes
to the products described in this document without notice. NETGEAR does not assume any liability that may occur
due to the use, or application of, the product(s) or circuit layout(s) described herein.
Revision History
Publication Part Number Version Publish Date Comments
202-10701-01 v1.0 January 2011 First publication
2 |
Page 3

Table of Contents
Chapter 1 Getting Started
What You Need Before You Begin . . . . . . . . . . . . . . . . . . . . . . . . . . . . . . . 4
Installing Your Adapter . . . . . . . . . . . . . . . . . . . . . . . . . . . . . . . . . . . . . . . . 4
Joining Wireless Networks . . . . . . . . . . . . . . . . . . . . . . . . . . . . . . . . . . . . . 5
Wireless-N USB Adapter LED. . . . . . . . . . . . . . . . . . . . . . . . . . . . . . . . . . . 7
Upgrading the Software. . . . . . . . . . . . . . . . . . . . . . . . . . . . . . . . . . . . . . . . 7
Removing the Software . . . . . . . . . . . . . . . . . . . . . . . . . . . . . . . . . . . . . . . . 7
Chapter 2 Wireless Network Performance
Optimizing Wireless Performance . . . . . . . . . . . . . . . . . . . . . . . . . . . . . . . . 8
Optimizing Your Network Bandwidth. . . . . . . . . . . . . . . . . . . . . . . . . . . . . . 8
Networking Technology and Connection Speed . . . . . . . . . . . . . . . . . . . 9
Assessing Your Network Speed Requirements. . . . . . . . . . . . . . . . . . . 10
Chapter 3 Troubleshooting
Frequently Asked Questions (FAQs). . . . . . . . . . . . . . . . . . . . . . . . . . . . . 12
Appendix A Technical Specifications and Factory Default Settings
Technical Specifications . . . . . . . . . . . . . . . . . . . . . . . . . . . . . . . . . . . . . . 14
Factory Default Settings . . . . . . . . . . . . . . . . . . . . . . . . . . . . . . . . . . . . . . 15
Appendix B Related Documents
Appendix C Notification of Compliance
Table of Contents | 3
Page 4

1. Getting Started
What You Need Before You Begin
Make sure your computer meets the system requirements. You should also know the name
of the wireless network you want to join and its wireless security settings (if used).
• PC with a Pentium 300 MHz or higher compatible processor with a USB 2.0 or 1.1 port.
The maximum speed of a USB v2.0 port is 480 Mbps. If your computer has a USB v1.1
port, the wireless-N USB adapter is limited to the port’s maximum speed of 14 Mbps.
• 5 Mbytes of free hard disk space.
• Vista, Windows XP Home, or Windows XP Professional. Some versions of Windows ask
for the original Windows operating system installation files to complete the installation of
the WNDA3200 software.
1
Note: Windows XP users must install SP2 or install the KB822603 hot fix
(update), which fixes the USB 2.0 host controller driver. Go to the
following link to install the hot fix:
http://www.microsoft.com/downloads/details.aspx?displaylang=
en&FamilyID=733dd867-56a0-4956-b7fe-e85b688b7f86
Installing Your Adapter
1. Make sure that your wireless network is up and running.
2. Insert your adapter into a USB port on your computer or connect it with the USB cable.
3. Your computer detects the adapter and automatically installs its software.
4. Follow the Found New Hardware wizard instructions, and click Finish to complete the
installation.
The NETGEAR wizard screen displays. Use the wizard to join a network.
Chapter 1. Getting Started | 4
Page 5
Virgin Media Wireless USB Adapter WNDA3200
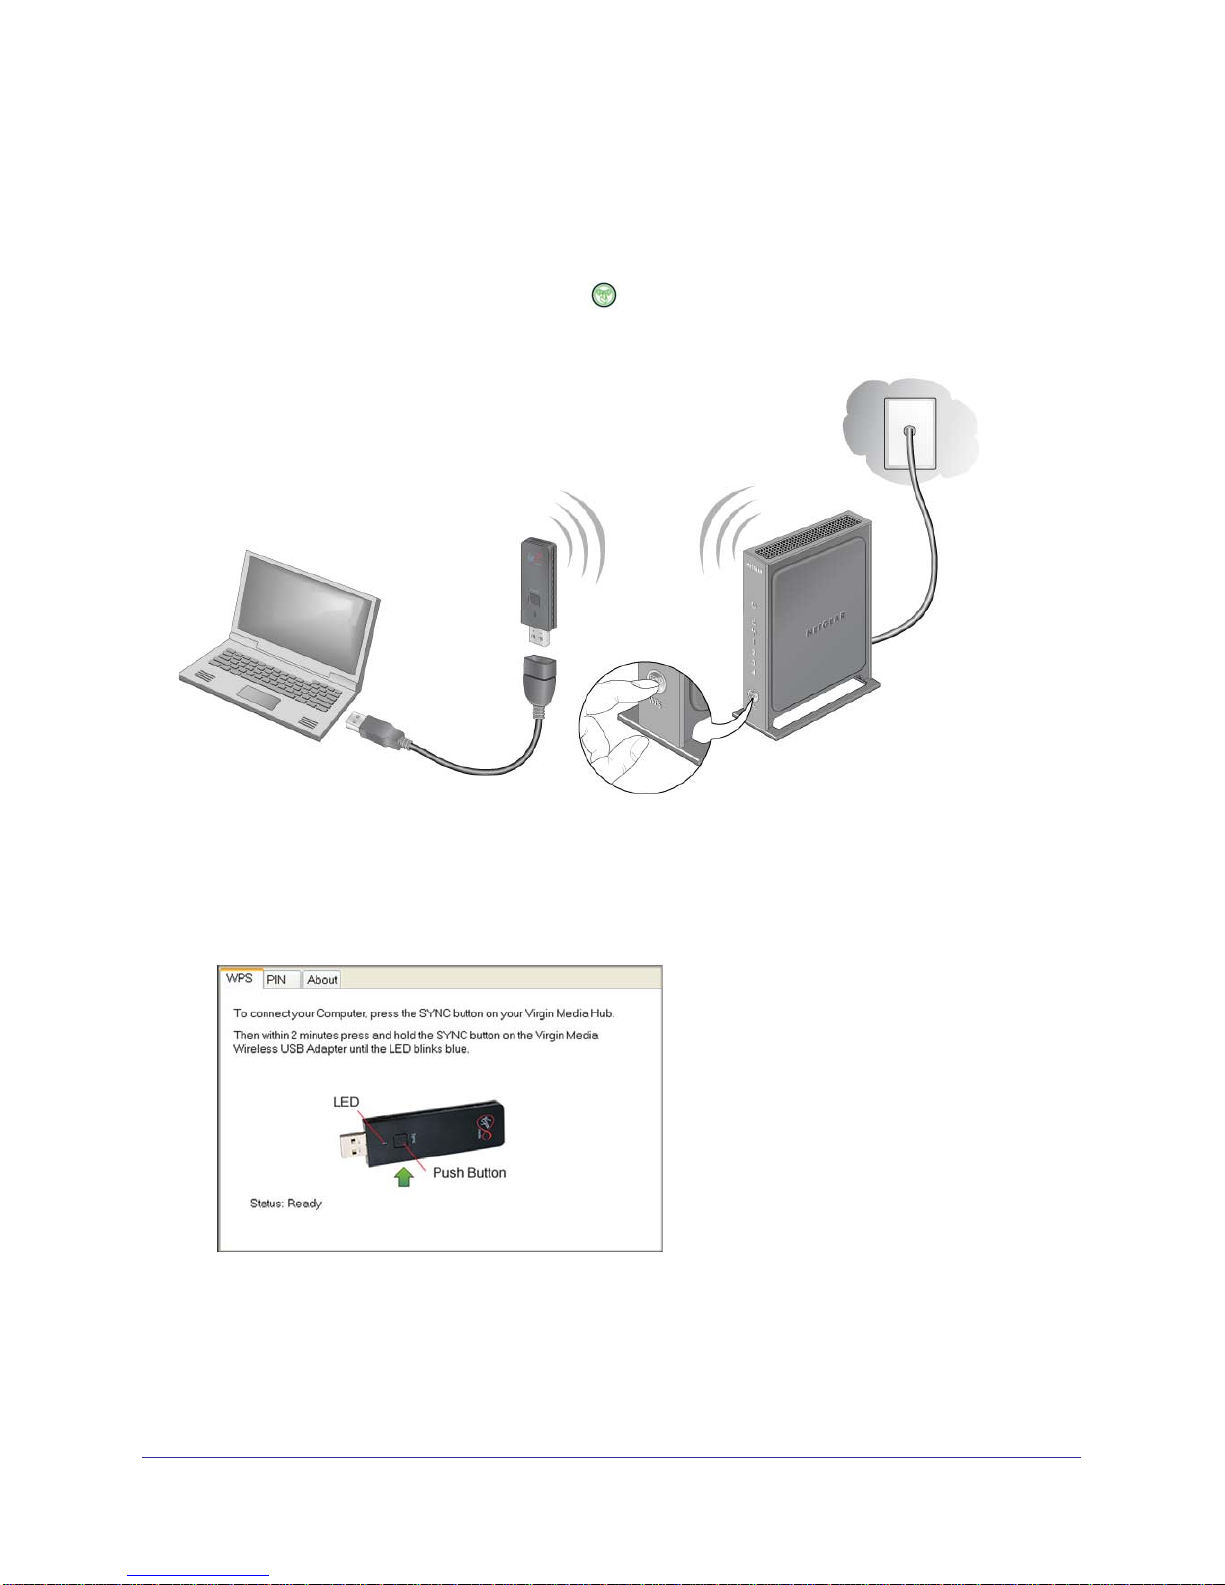
Joining Wireless Networks
If your gateway or router supports WPS (Wi-Fi Protected Setup) technology, also called Push
'N' Connect, you can use a WPS button or PIN to join the network. WPS-compatible
NETGEAR gateways and routers use the
the gateway, or displayed on a WPS screen when you have logged in to the gateway. You
can also opt out of the wizard to join a network that does not support WPS.
symbol. This symbol could be on a button on
Figure 1. Using the WPS button to join a wireless network
To join a network with a WPS button:
1. Follow the instructions on the WPS tab to push the SYNC button on your gateway and
on your Wireless-N USB Adapter.
2. Join a wireless network.
• A profile is written on the Windows system.
• The WPS and PIN tabs are removed from the display.
• If you want to return the WPS and PIN tabs, select the Enable WPS Pairing with my
router check box on the About tab and click Apply.
Chapter 1. Getting Started | 5
Page 6
Virgin Media Wireless USB Adapter WNDA3200
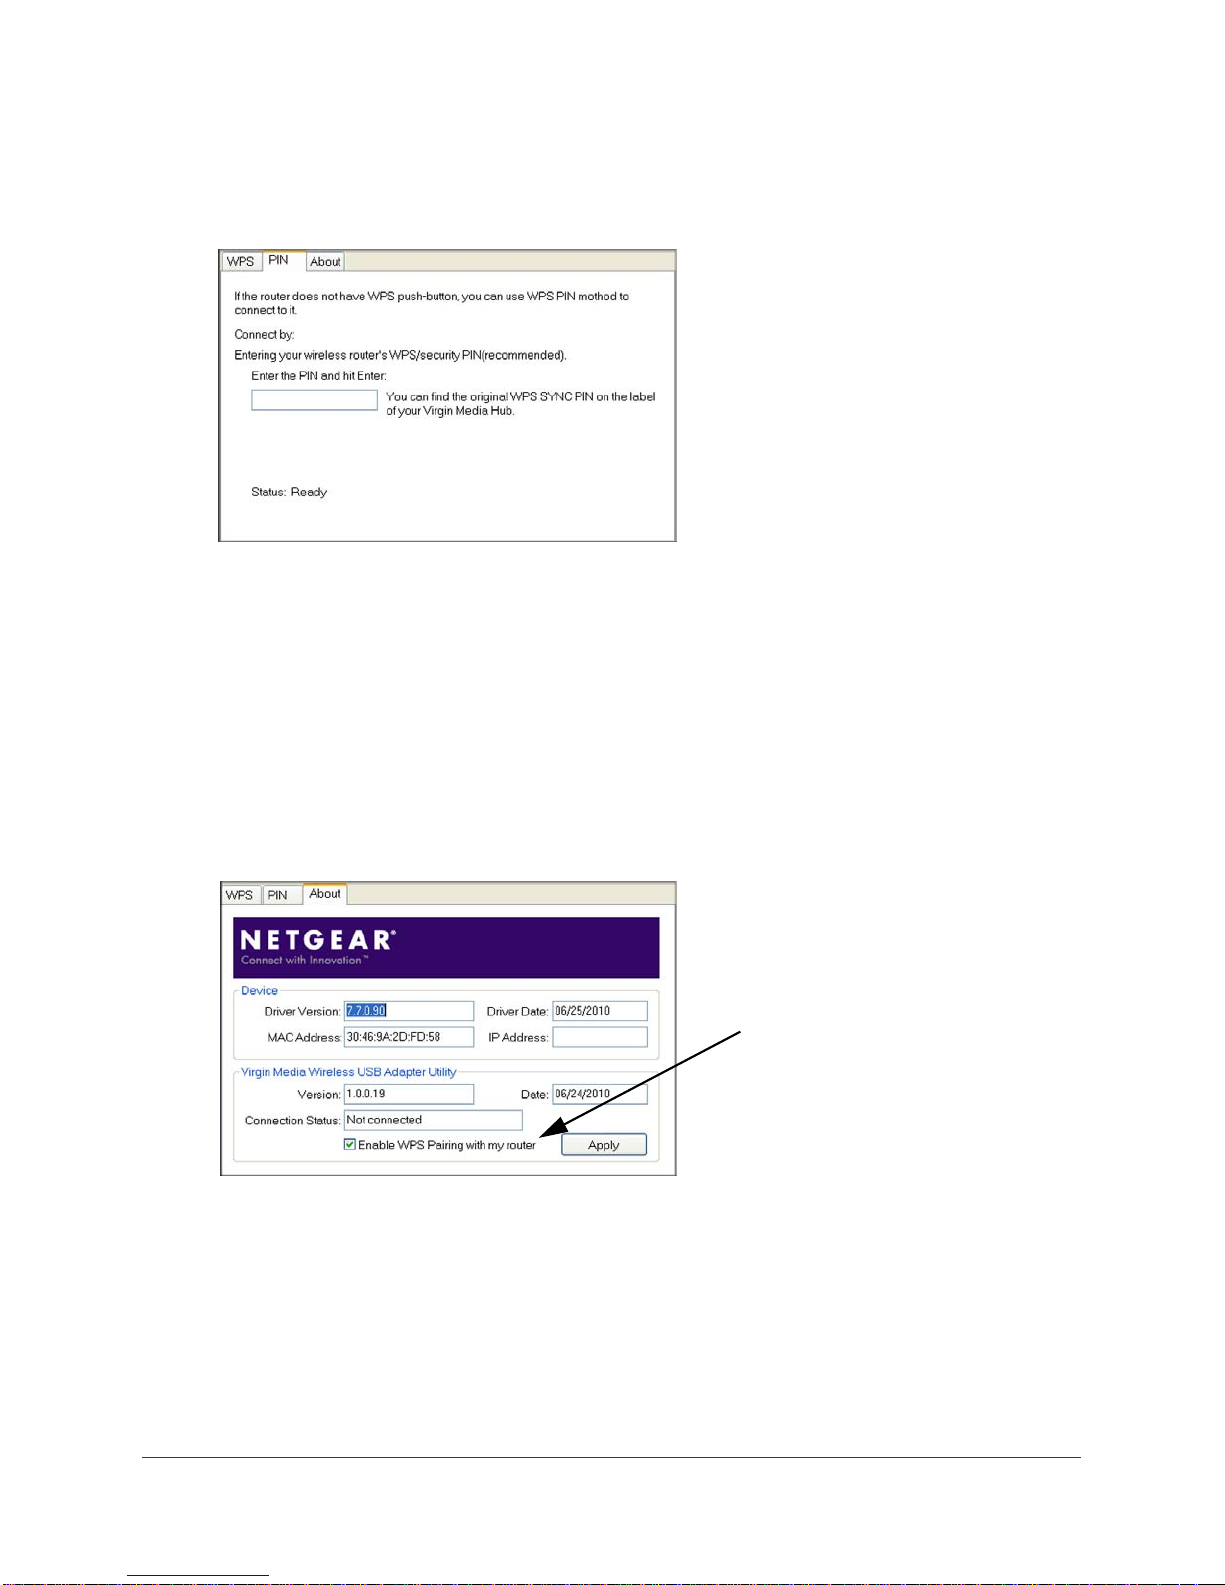
To join a network with a WPS PIN:
1. Click the PIN tab.
2. Log in to the gateway or hub and either locate its PIN or follow the gateway instructions to
generate a PIN.
3. Follow the instructions on the PIN tab to join a wireless network.
• A profile is written on the Windows system.
• The WPS and PIN tabs are removed from the display.
• If you want to return the WPS and PIN tabs, select the Enable WPS Pairing with my
router check box on the About tab and click Apply.
To join a network without WPS:
1. Click the About tab.
2. Clear the Enable WPS Pairing with my router check box, and click Apply.
3. Click the Windows wireless icon in the system tray to connect to your gateway or router.
6 | Chapter 1. Getting Started
Page 7

Virgin Media Wireless USB Adapter WNDA3200
Wireless-N USB Adapter LED
The LED shows the status of the wireless link as explained in the following table.
Wireless-N USB Adapter LED Meaning
The LED color changes
depending on the type of
network connection. Amber
indicates 2.4 GHz, and blue
indicates 5 GHz.
Off • The wireless-N USB adapter in not plugged in to the USB port.
• The wireless-N USB adapter is in power save mode (default from
power up or reset).
Slow
blinking
Blinking The wireless-N USB adapter is connected to a wireless network, and
Solid The wireless-N USB adapter is connected to a wireless network, but
• Alternating amber and blue. The wireless-N USB adapter is
scanning for a network.
• Amber. The wireless-N USB adapter is connecting to a network at
2.4 GHz.
• Blue. The wireless-N USB adapter is connecting to a network at 5
GHz.
is sending or receiving data.
it is not sending or receiving data.
Upgrading the Software
Upgrades might be available at the NETGEAR website. Follow the installer instructions, and
if prompted, restart your computer.
Removing the Software
You can remove the wireless adapter software through the Windows Program List or the
Windows Control Panel.
• Windows Program List: Select Windows Start > NETGEAR WNDA3200 Smart Wizard
> Uninstall NETGEAR WNDA3200 Software, and follow the screen prompts.
• Control Panel: How you do this depends on your Windows operating system:
- Windows 7: Select Windows Start >Control Panel > Programs and Features >
Wireless USB Adapter. Click Uninstall and follow the screen prompts.
- Windows Vista: Select Windows Start >Control Panel > Programs and Features >
Wireless USB Adapter. Click Uninstall/Change from the top menu and follow the
screen prompts.
- Windows XP: Select Windows Start > Control Panel > Add or Remove Program,
and then select Wireless USB Adapter.
Chapter 1. Getting Started | 7
Page 8

2. Wireless Network Performance
This chapter explains how to maximize the performance of your wireless-N USB adapter within
your network.
Optimizing Wireless Performance
The position of your wireless-N USB adapter and the local environment can affect its
wireless performance.
• Use the plastic cradle that came in the package with your adapter. This lets you place the
adapter in a better position for wireless communication.
• Make sure you do not have interference from other wireless equipment, especially those
in the 2400–2500 MHz frequency band. Common sources of interference are:
- Other computers and fax machines (no closer than 1 foot)
- Copying machines, elevators, and cell phones (no closer than 6 feet)
- Microwave ovens (no closer than 10 feet)
2
How the wireless router or access point is set up also affects wireless communication. For
best performance, try the following:
• For better throughput and a higher link rate, set your router or access point wireless
mode to Up to 300 Mbps, or HT 20/40 Mbps.
• For a faster connection, set the security for the router as WPA2 or WPA + WPA2 mixed
wireless security instead of WPA (TKIP). Wi-Fi regulations allow only the adapter to
connect at up to 54 Mbps when WPA (TKIP) security mode is set on the router.
• Avoid using the same wireless channel as your neighbor.
Optimizing Your Network Bandwidth
The speed of network connections depends on the type of equipment that you use. Try to
use high-speed technologies for network connections with the heaviest traffic to avoid
Chapter 2. Wireless Network Performance | 8
Page 9

Virgin Media Wireless USB Adapter WNDA3200
lower-speed bottlenecks. The following illustration shows a home network that includes many
different connection speeds.
Figure 2. Home Network
In this network, the two PCs with gigabit (1000 Mbps) Ethernet adapters have a gigabit
connection through the router to the storage server. With a high-speed router this connection
allows for extremely fast backups or quick access to large files on the server. The PC
connected through a pair of Powerline HD adapters is limited to the 200 Mbps speed of the
Powerline HD connection. Although any of the links in this example would work for high-traffic
applications such as streaming HD video, the use of older devices such as 10 Mbps Ethernet
or 802.11b wireless would create a bottleneck.
In planning your network, think about which tasks will have the heaviest traffic flow between
them. Examples are:
• A media center in one room streaming high-definition video from a server in another room
• A storage device that is used for backing up your computers
Networking Technology and Connection Speed
Common connection types and their speed and security considerations are:
• Broadband Internet
Your Internet connection speed depends on your modem type, such as ADSL or cable
modem, as well as the speed of the sites to which you connect, and general Internet
traffic. ADSL and cable modem connections have a lower data rate to the Internet
(upstream) than from the Internet (downstream). Keep in mind that when you connect to
someone else who also has an ADSL or cable modem connection, the data rate between
your sites is limited by each side’s upstream data rate. A typical residential ADSL or cable
Chapter 2. Wireless Network Performance | 9
Page 10

Virgin Media Wireless USB Adapter WNDA3200
modem connection provides a downstream throughput of about 1 to 3 megabits per
second (Mbps). Newer technologies such as ADSL2+ and Fiber to the Home (FTTH) l
increase the connection speed to tens of Mbps.
• Wireless
A high-speed wireless router can provide a wireless data throughput of up to 300 Mbps
with excellent range and coverage. WPA and WPA2 wireless security are extremely
strong.
To get the best performance, connect to networks that use newer routers. Your wireless-N
USB adapter will work with older 802.11b and 802.11g routers, but the use of these older
wireless technologies in your network can result in lower throughput overall. In addition,
many older wireless products do not support the latest security protocols, WPA and
WPA2.
• Powerline
You can use Powerline connections for rooms that are upstairs or too far from your router
for a good wireless connection. NETGEAR’s Powerline HD products deliver up to 200
Mbps to any outlet. Data transmissions are encrypted for security, and you can set up a
network password to prevent neighbors from connecting.
• Wired Ethernet
Wired Ethernet remains a good choice for speed, economy, and security. Gigabit Ethernet
can extend up to 100 meters.
Note: Actual data throughput will vary. Network conditions and
environmental factors, including volume of network traffic, building
materials and construction, and network overhead, can lower actual
data throughput rate.
Assessing Your Network Speed Requirements
Because your Internet connection is likely to operate at a much lower speed than your local
network, faster local networking technologies might not improve your Internet experience.
However, many emerging home applications require high data rates. For example:
• Streaming HD video requires 10 to 30 Mbps per stream. Because latency and packet loss
can disrupt your video, plan to provide at least twice the capacity you need.
• Streaming MP3 audio requires less than 1 Mbps per stream and does not strain most
modern networks. Like video, however, streaming audio is also sensitive to latency and
packet loss, so a congested network or a noisy link can cause problems.
10 | Chapter 2. Wireless Network Performance
Page 11

Virgin Media Wireless USB Adapter WNDA3200
• Backing up computers over the network has become popular due to the availability of
inexpensive mass storage. The following table shows the time to transfer 1 gigabyte (1
GB) of data using various networking technologies.
Network Connection Theoretical Raw Transfer Time
Gigabit Wired Ethernet 8 seconds
RangeMax Dual Band Wireless-N 26 seconds
Powerline HD 40 seconds
100 Mbps Wired Ethernet 80 seconds
802.11g wireless 150 seconds
802.11b wireless 700 seconds
10 Mbps Wired Ethernet 800 seconds
Cable Modem (3 Mbps) 2700 seconds
Analog Modem (56 kbps) 144,000 seconds (40 hours)
Chapter 2. Wireless Network Performance | 11
Page 12

3. Troubleshooting
This chapter provides information about troubleshooting your wireless-N USB adapter. You can
also refer to the Knowledge Base on the NETGEAR website at http://support.netgear.com.
Frequently Asked Questions (FAQs)
The wireless-N USB adapter LED is not lit.
The wireless-N USB adapter is not inserted securely in the USB port (or USB cable if used)
or the WNDA3200 software is not installed.
• Remove and reinsert the wireless-N USB adapter.
• Check the Windows device manager to see if the wireless-N USB adapter is recognized
and enabled. Re-install the WNDA3200 software, if necessary.
• Insert the wireless-N USB adapter in a different USB port on your computer if one is
available.
3
I cannot connect to a wireless network.
• Make sure that your wireless-N USB adapter is inserted securely into the USB port on
your computer or the USB cable if you are using it. The wireless-N USB adapter LED
should light up or blink (see Wireless-N USB Adapter LED on page 7 for details).
• Click the
networks in your area. Make sure the signal strength is strong and that you have selected
the correct wireless network.
• If the network uses wireless security, you need to either know the wireless security
settings or use Push 'N' Connect if the network supports WPS. Some networks also
restrict use to only computers or wireless devices with known MAC addresses. If that is
the case, use the Smart Wizard About tab to find the MAC address for your wireless-N
USB adapter and provide it to the network administrator.
When I connect to the network I cannot access shared resources such as printers.
• Check to make sure the router or access point is physically connected to the Ethernet
network.
icon to open the Smart Wizard and then click the Networks tab to view the
Chapter 3. Troubleshooting | 12
Page 13

Virgin Media Wireless USB Adapter WNDA3200
• Make sure that the IP addresses and the Windows networking settings are configured
correctly. See the link to
Internet Networking and TCP/IP Addressing: in Appendix B.
How can I improve the speed of my wireless connection?
You can use the USB cable and adapter that came in the package to position the wireless-N
USB adapter for better wireless communication.
The connection speed can vary depending on the type of USB port on your computer, the
capacity of the router or access point for the wireless network, and the type of Internet
connection. You can view the throughput in the status bar at the bottom of the Smart Wizard
screen.
• If the throughput is 54 Mbps you could be connected to an 802.11g network, or the
wireless-N network could be set with WPA (TKIP) security.
Wi-Fi regulations allow the wireless-N USB adapter to connect only at up to 54 Mbps
when WPA (TKIP) security mode is set on the router. For a faster connection, set the
security for the router as WPA2 or WPA + WPA2 mixed wireless security. Then the
wireless adapter can connect in 802.11n mode.
• If you do not have a USB 2.0 port on your computer, the throughput is limited to the 14
Mbps of the older USB 1.1 standard.
• For more information about connection speeds, see Optimizing Wireless Performance on
page 8.
Chapter 3. Troubleshooting | 13
Page 14

A. Technical Specifications and Factory
Default Settings
Technical Specifications
The following table provides technical specifications for the wireless-N USB adapter.
Feature Description
Antenna 2 integrated internal wireless antennas
Standards 802.11a, 802.11n, 802.11g, or 802.11b
Radio Data Rate 1, 2, 5.5, 6, 9, 11, 12, 18, 24, 36, 48, 54, 08, 140, 246, and 300 Mbps
(Auto Rate Sensing)
Frequency 2.4 GHz to 2.5 GHz CCK and OFDM Modulation); 5 GHz
Power 5V Bus powered
A
Emissions FCC, CE
Bus interface USB 2.0
Provided drivers Microsoft Windows 7, Vista, Windows XP
Operating Environment Operating temperature: 0 to 40° C
Encryption 40-bit (also called 64-bit) and 128-bit WEP data encryption, and
WPA-PSK
Warranty Limited 1-year warranty
Appendix A. Technical Specifications and Factory Default Settings | 14
Page 15

Virgin Media Wireless USB Adapter WNDA3200
Factory Default Settings
The following table lists the default settings of your wireless-N USB adapter.
Default Settings
Smart Wizard Enabled
Wireless Wireless communication Enabled
Wireless Network Name (SSID) Any (will connect to the first wireless network that responds.
Security Disabled
Network type Infrastructure
Transmission speed Auto
Country/Region United States (varies by region)
Operating mode 802.11a, 802.11n, 802.11g, 802.11b
Data rate Up to 300 Mbps
1. Maximum wireless signal rate (IEEE Standard 802.11). Actual throughput will vary. Network conditions and
environmental factors, including volume of network traffic, building materials and construction, and network
overhead, lower actual data throughput rate
1
Appendix A. Technical Specifications and Factory Default Settings | 15
Page 16

B. Related Documents
This appendix provides links to reference documents you can use to gain a more complete
understanding of the technologies used in your NETGEAR product.
Document Link
B
Windows XP and Vista
Wireless Configuration
Utilities Application Note
Internet Networking and
TCP/IP Addressing:
Wireless Communications: http://documentation.netgear.com/reference/enu/wireless/index.htm
Preparing a Computer for
Network Access:
http://documentation.netgear.com/reference/enu/winzerocfg/index.htm
http://documentation.netgear.com/reference/enu/tcpip/index.htm
http://documentation.netgear.com/reference/enu/wsdhcp/index.htm
Appendix B. Related Documents | 16
Page 17

C. Notification of Compliance
C
Maximum Wireless Signal Rate Derived from IEEE Standard 802.11 Specifications
Actual data throughput will vary. Network conditions and environmental factors, including volume of network traffic,
building materials and construction, and network overhead, lower actual data throughput rate.
Europe - EU Declaration of Conformity
A printed copy of the EU Declaration of Conformity certificate for this product is provided in the WNDA3200 product
package.
Èesky
[Czech]
Dansk
[Danish]
Deutsch
[German]
Eesti
[Estonian]
English Hereby, NETGEAR, Inc., declares that this Virgin Media Wireless USB Adapter
Español
[Spanish]
ЕллзнйкЮ
[Greek]
NETGEAR, Inc. tímto prohlašuje, že tento Virgin Media Wireless USB Adapter WNDA3200
je ve shodì se základními požadavky a dalšími pøíslušnými ustanoveními smìrnice
1999/5/ES.
Undertegnede NETGEAR, Inc. erklærer herved, at følgende udstyr Virgin Media Wireless
USB Adapter WNDA3200 overholder de væsentlige krav og øvrige relevante krav i direktiv
1999/5/EF.
Hiermit erklärt NETGEAR, Inc., dass sich das Gerät Virgin Media Wireless USB Adapter
WNDA3200 in Übereinstimmung mit den grundlegenden Anforderungen und den übrigen
einschlägigen Bestimmungen der Richtlinie 1999/5/EG befindet.
Käesolevaga kinnitab NETGEAR, Inc. seadme Virgin Media Wireless USB Adapter
WNDA3200 vastavust direktiivi 1999/5/EÜ põhinõuetele ja nimetatud direktiivist
tulenevatele teistele asjakohastele sätetele.
WNDA3200 is in compliance with the essential requirements and other relevant provisions
of Directive 1999/5/EC.
Por medio de la presente NETGEAR, Inc. declara que el Virgin Media Wireless USB
Adapter WNDA3200 cumple con los requisitos esenciales y cualesquiera otras
disposiciones aplicables o exigibles de la Directiva 1999/5/CE.
МЕ ФЗН РБСПХУБ NETGEAR, Inc. ДЗЛЩНЕЙ ПФЙ Virgin Media Wireless USB Adapter
WNDA3200 УХММПСЦЩНЕФБЙ РСПУ ФЙУ ПХУЙЩДЕЙУ БРБЙФЗУЕЙУ КБЙ ФЙУ
ЛПЙРЕУ УЧЕФЙКЕУ ДЙБФБОЕЙУ ФЗУ ПДЗГЙБУ 1999/5/ЕК.
Français
[French]
Italiano
[Italian]
Par la présente NETGEAR, Inc. déclare que l'appareil Virgin Media Wireless USB Adapter
WNDA3200 est conforme aux exigences essentielles et aux autres dispositions pertinentes
de la directive 1999/5/CE.
Con la presente NETGEAR, Inc. dichiara che questo Virgin Media Wireless USB Adapter
WNDA3200 è conforme ai requisiti essenziali ed alle altre disposizioni pertinenti stabilite
dalla direttiva 1999/5/CE.
Appendix C. Notification of Compliance | 17
Page 18

Virgin Media Wireless USB Adapter WNDA3200
Latviski
[Latvian]
Lietuviø
[Lithuanian]
Nederlands
[Dutch]
Malti
[Maltese]
Magyar
[Hungarian]
Polski [Polish] Niniejszym NETGEAR, Inc. oœwiadcza, ¿e Virgin Media Wireless USB Adapter
Português
[Portuguese]
Slovensko
[Slovenian]
Ar šo NETGEAR, Inc. deklarç, ka Virgin Media Wireless USB Adapter WNDA3200 atbilst
Direktîvas 1999/5/EK bûtiskajâm prasîbâm un citiem ar to saistîtajiem noteikumiem.
Šiuo NETGEAR, Inc. deklaruoja, kad šis Virgin Media Wireless USB Adapter WNDA3200
atitinka esminius reikalavimus ir kitas 1999/5/EB Direktyvos nuostatas.
Hierbij verklaart NETGEAR, Inc. dat het toestel Virgin Media Wireless USB Adapter
WNDA3200 in overeenstemming is met de essentiële eisen en de andere relevante
bepalingen van richtlijn 1999/5/EG.
Hawnhekk, NETGEAR, Inc., jiddikjara li dan Virgin Media Wireless USB Adapter
WNDA3200 jikkonforma mal-tiijiet essenzjali u ma provvedimenti orajn relevanti li hemm
fid-Dirrettiva 1999/5/EC.
Alulírott, NETGEAR, Inc. nyilatkozom, hogy a Virgin Media Wireless USB Adapter
WNDA3200 megfelel a vonatkozó alapvetõ követelményeknek és az 1999/5/EC irányelv
egyéb elõírásainak.
WNDA3200 jest zgodny z zasadniczymi wymogami oraz pozosta³ymi stosownymi
postanowieniami Dyrektywy 1999/5/EC.
NETGEAR, Inc. declara que este Virgin Media Wireless USB Adapter WNDA3200 está
conforme com os requisitos essenciais e outras disposições da Directiva 1999/5/CE.
NETGEAR, Inc. izjavlja, da je ta Virgin Media Wireless USB Adapter WNDA3200 v skladu z
bistvenimi zahtevami in ostalimi relevantnimi doloèili direktive 1999/5/ES.
Slovensky
[Slovak]
Suomi
[Finnish]
Svenska
[Swedish]
NETGEAR, Inc. týmto vyhlasuje, že Virgin Media Wireless USB Adapter WNDA3200
spåòa základné požiadavky a všetky príslušné ustanovenia Smernice 1999/5/ES.
NETGEAR, Inc. vakuuttaa täten että Virgin Media Wireless USB Adapter WNDA3200
tyyppinen laite on direktiivin 1999/5/EY oleellisten vaatimusten ja sitä koskevien direktiivin
muiden ehtojen mukainen.
Härmed intygar NETGEAR, Inc. att denna [utrustningstyp] står I överensstämmelse med
de väsentliga egenskapskrav och övriga relevanta bestämmelser som framgår av direktiv
1999/5/EG.
18 | Appendix C. Notification of Compliance
 Loading...