

NETGEAR PowerLine XWNB5602, Powerline 500 XAV5401, Powerline 500 XWN5001 Installation Manual
Page 1
Netgear PowerLine Range Extender Installation Guide
https://answers.alarm.com/Installation_and_Troubleshooting/Video_Devices/Netgear_PowerLine_Range_Extender/Netgear_PowerLine_Range_Extender_Installation_Guide
Updated: Mon, 11 Jun 2018 19:18:45 GMT
The XWNB5602 is Alarm.com’s latest solution for
installing cameras in a home with WiFi dead spots.
Designed in conjunction with Netgear, this system
extends the home’s WiFi network using existing power
lines, so there is no need to run wires or do any extra
configuration. Simply plug the PassThru adapter into an
open outlet near the home’s router, and plug the WiFi
Access Point into an outlet near the camera. Wireless
camera set-up is a breeze using the WPS button on the
WiFi Access Point.
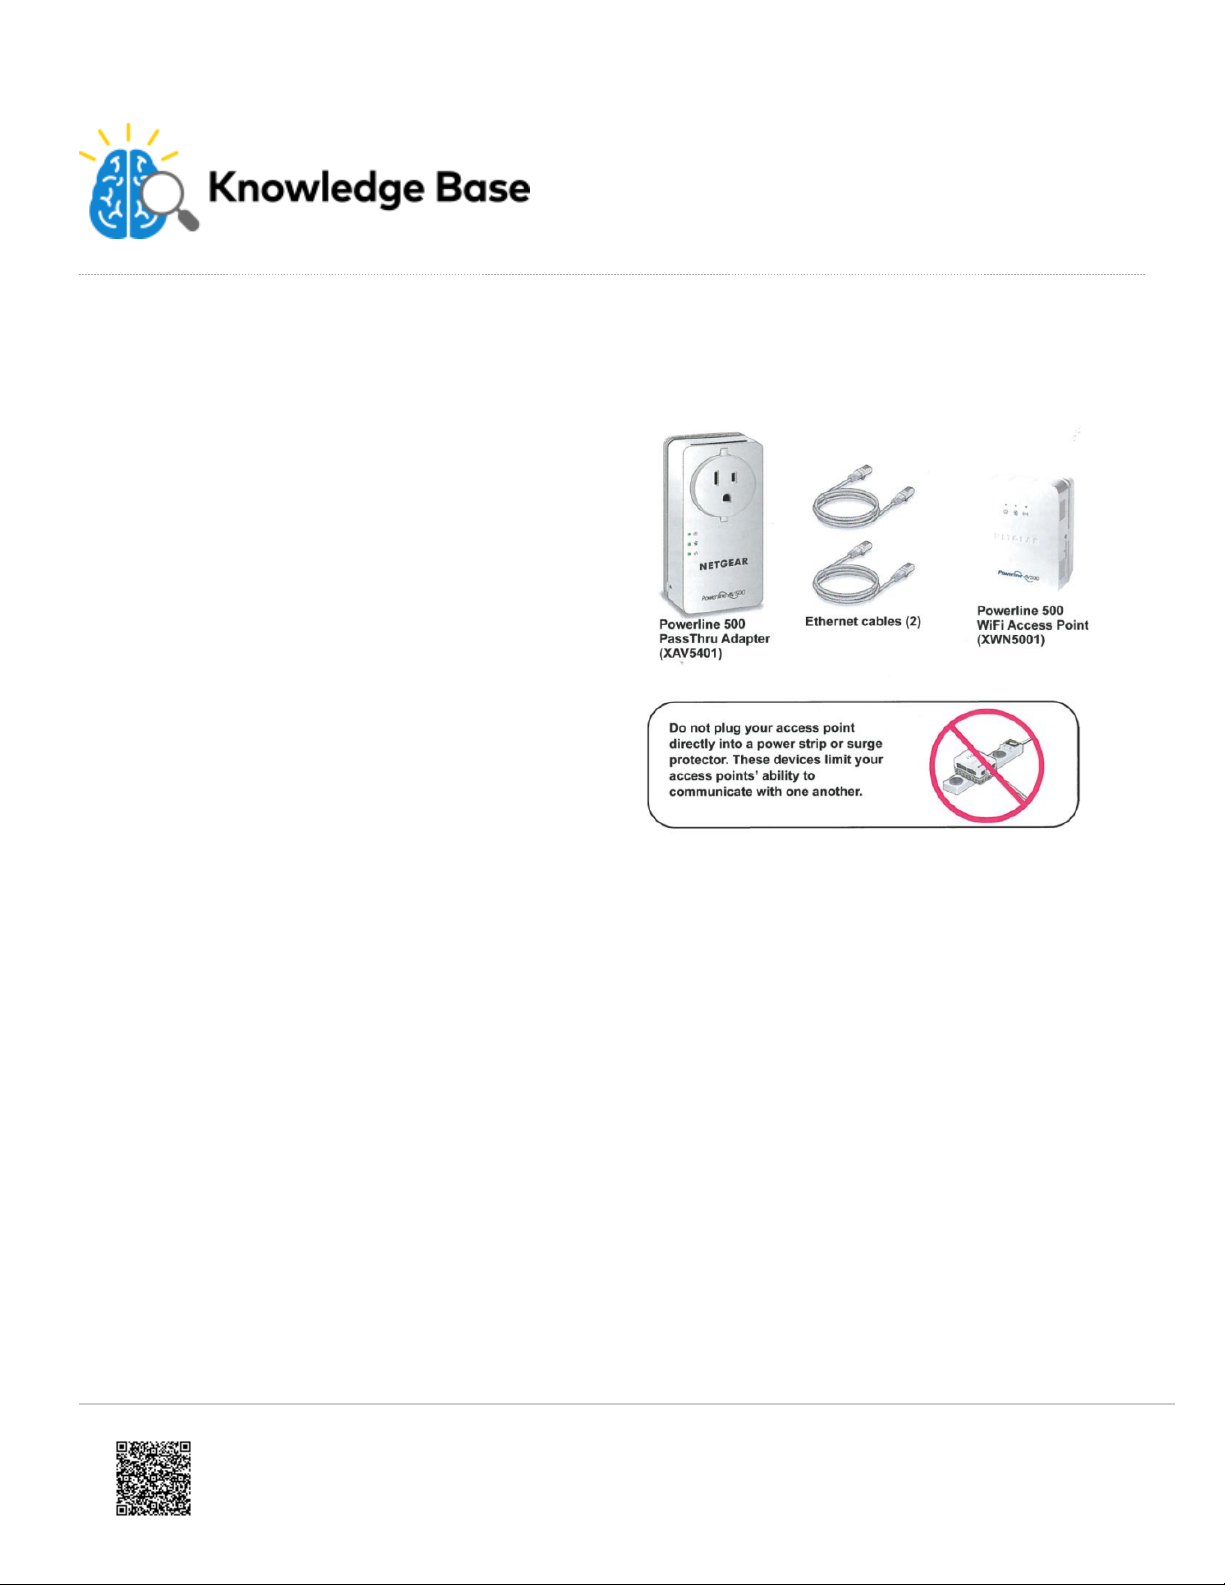
Package contents
• Powerline 500 PassThru Adapter
(XAV5401)
• Powerline 500 WiFi Access Point
(XWN5001)
• Ethernet Cables (2)
1
Page 2
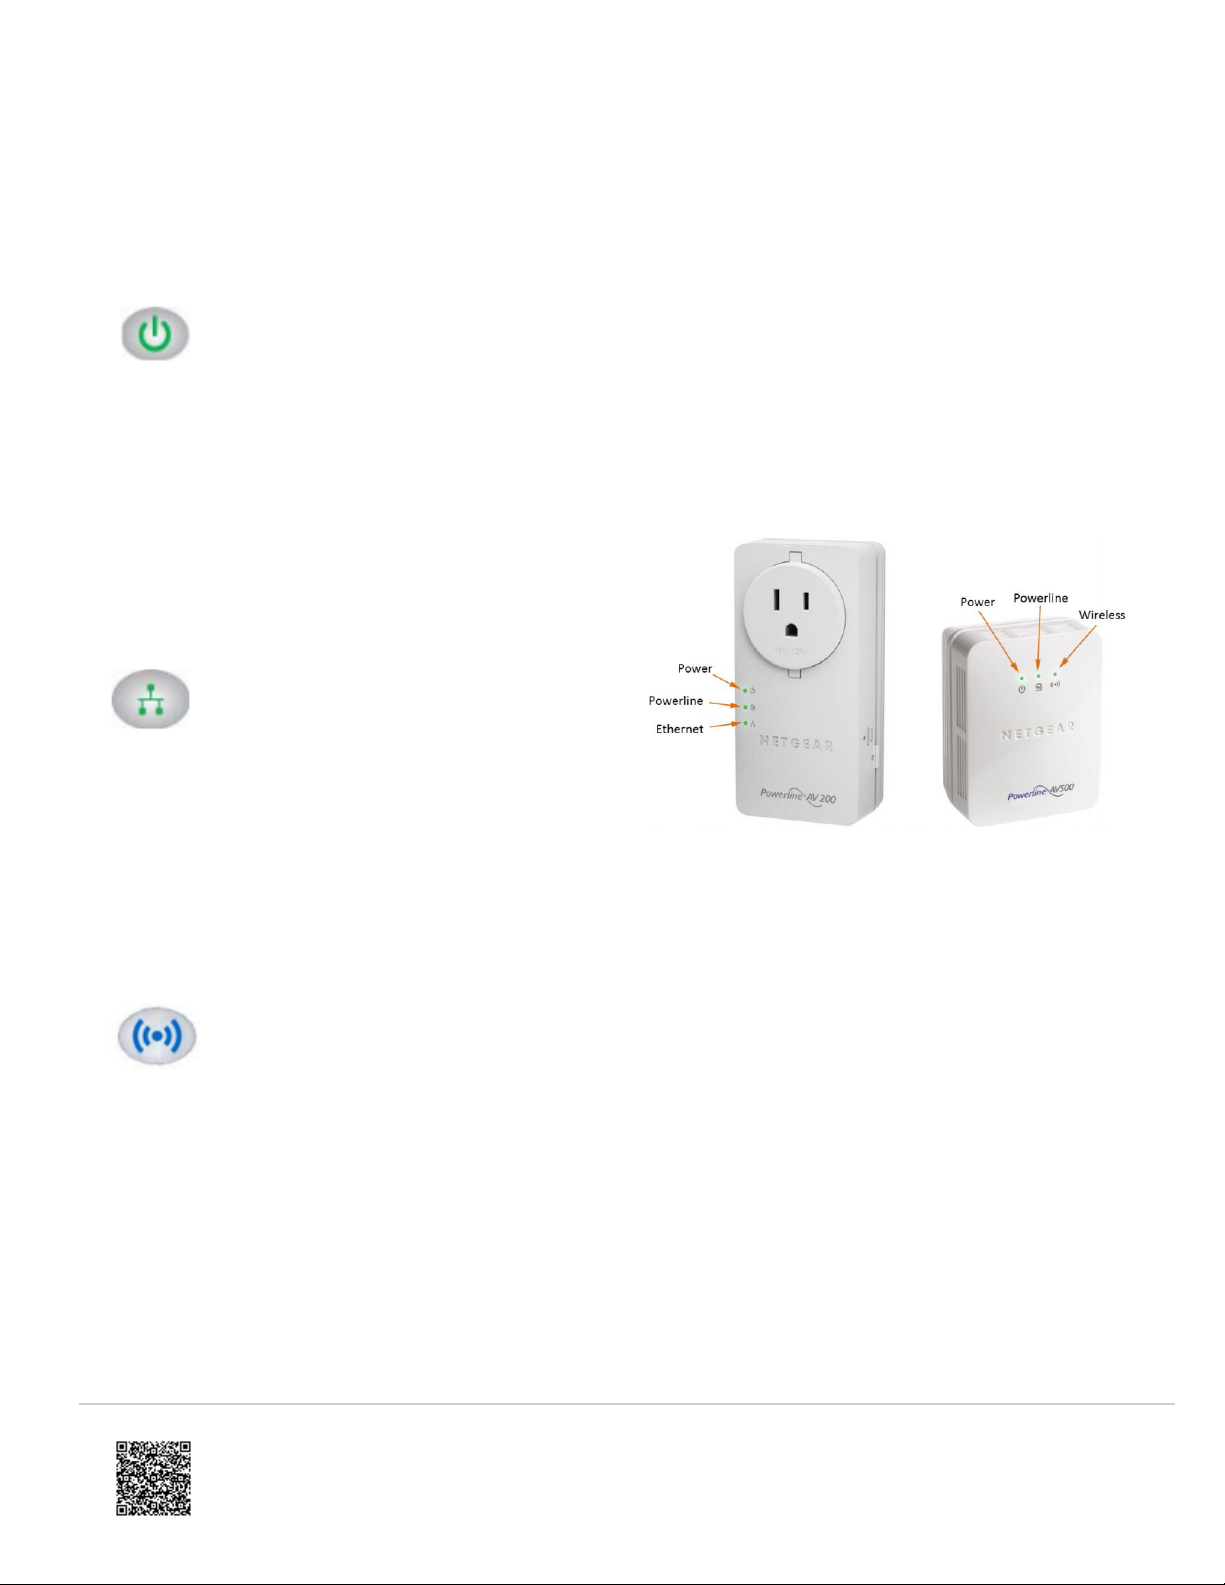
Power LED
https://answers.alarm.com/Installation_and_Troubleshooting/Video_Devices/Netgear_PowerLine_Range_Extender/Netgear_PowerLine_Range_Extender_Installation_Guide
Updated: Mon, 11 Jun 2018 19:18:45 GMT
• Solid Green.
The device is
powered on.
• Blinking Green.
The device is
creating a
protected
Powerline loop.
Ethernet LED.
• Solid Green.
The PassThru
Adapter is
connected to
the network
using Ethernet.
• Off. The device
is not connected
using Ethernet.
Wireless LED
• Solid Blue. WiFi
is active.
• Blinking Blue.
The WiFi
adapter is
attempting to
create a
protected WiFi
connection.
2
Page 3

Powerline LED.
https://answers.alarm.com/Installation_and_Troubleshooting/Video_Devices/Netgear_PowerLine_Range_Extender/Netgear_PowerLine_Range_Extender_Installation_Guide
Updated: Mon, 11 Jun 2018 19:18:45 GMT
• This LED indicates the strength of the
connection between the Powerline
devices:
Green.
A fast, strong connection
is detected between the
access points.
Amber.
A medium connection is
detected between the
Powerline devices. Try
moving the Powerline
device to a different AC
outlet.
Red.
A weak, slow, or no
connection is detected
between the access
points. Try moving the
Powerline device to a
different AC outlet.
3
Page 4

Set up
https://answers.alarm.com/Installation_and_Troubleshooting/Video_Devices/Netgear_PowerLine_Range_Extender/Netgear_PowerLine_Range_Extender_Installation_Guide
Updated: Mon, 11 Jun 2018 19:18:45 GMT
1. Plug the PassThru Adapter into an AC
outlet near the home’s Ethernet router.
◦ Do not plug the PassThru Adapter
into a power strip or surge protector.
◦ Do not plug the PassThru Adapter
into a switch-controlled outlet.
2. Connect an Ethernet cable between the
home’s Ethernet router and the PassThru
Adapter.
◦ After a few minutes, the Network
LED on the PassThru Adapter will
become green.
3. Plug the WiFi Access Point into an AC
outlet near the installation location for the
camera.
◦ Do not plug the WiFi Access Point
into a power strip or surge protector.
◦ Do not plug the WiFi Access Point
into a switch-controlled outlet.
4
Page 5

Pairing the Powerline devices
https://answers.alarm.com/Installation_and_Troubleshooting/Video_Devices/Netgear_PowerLine_Range_Extender/Netgear_PowerLine_Range_Extender_Installation_Guide
Updated: Mon, 11 Jun 2018 19:18:45 GMT
1. Verify both of the Powerline devices are
plugged into AC wall outlets.
◦ Verify that the Power and Powerline
LEDs on each device are lit solid
green.
2. Press the Security button on one of the
Powerline devices for two seconds.
◦ The Power and Wireless/Ethernet
LEDs begin blinking after you
release the button.
◦ The Powerline device automatically
creates a new, randomly generated
encryption key that all other
Powerline devices on the network
will use.
3. Within two minutes, press the Security
button on the other Powerline device for
two seconds. You must press both
security buttons within two minutes.
◦ The Power and Wireless/Ethernet
LEDs begin blinking after you
release the button.
◦ This process allows the second
Powerline device to use the same
private encryption key as the first
device so that they can
communicate.
4. When the Power LEDs stop blinking and
the Powerline LEDs are lit solid green,
the two devices can communicate over
the Powerline network in a secure way.
◦ An amber or red Powerline LED
indicates a poor connection between
Powerline devices. Try moving the
Powerline devices to different AC
outlets.
5
Page 6

Adding a video camera
https://answers.alarm.com/Installation_and_Troubleshooting/Video_Devices/Netgear_PowerLine_Range_Extender/Netgear_PowerLine_Range_Extender_Installation_Guide
Updated: Mon, 11 Jun 2018 19:18:45 GMT
1. Verify that the Power and Powerline
LEDs on both Powerline devices are lit
solid green.
2. Press the Security button on the WiFi
Access Point for two seconds.
◦ The Power and Wireless LEDs begin
blinking after you release the button.
3. Press the WPS button on your camera for
two seconds within two minutes.
◦ The LED on your camera will begin
blinking blue.
◦ You must press both the security
button on the access point and the
WPS button on the camera within
two minutes.
4. A connection is formed.
◦ The wireless LED on the WiFi
adapter will become solid blue
◦ The LED on the camera will begin
blinking green
◦ Within five minutes the camera
establishes an internet connection
and the LED will become solid green
6
Page 7

Safety Information
https://answers.alarm.com/Installation_and_Troubleshooting/Video_Devices/Netgear_PowerLine_Range_Extender/Netgear_PowerLine_Range_Extender_Installation_Guide
Updated: Mon, 11 Jun 2018 19:18:45 GMT
• For national approvals (approval schemes
other than CB), relevant national
standards for plug, socket-outlet, and
direct plug-in units (for example, US) shall
also be consulted while testing and
approving such products according to the
national standards.
• AC input rating: 100-125 VAC, 12A ? AC
output rating 125 VAC, 11.8A (maximum)
• Operating Temperature: 0-40?C
Notes & Troubleshooting
• These Powerline devices are specifically
designed for use with Alarm.com video
cameras. Use with other devices is not
recommended.
• Compatible with all WPS enabled
Alarm.com cameras. To see if a camera
is WPS enabled, find the camera's data
sheet in Installation and Troubleshooting.
• Amber or Red Powerline LEDs indicate
that the devices do not have a sufficient
Powerline connection for streaming video.
Try moving the Powerline device to a
different AC outlet.
• Check the electrical current for any device
plugged into the filtered AC socket. Do not
exceed home and product outlet ratings
and electrical requirements.
• The socket-outlet shall be installed near
the equipment and be easily accessible.
• Only power cords are allowed to be
inserted into the filtered AC socket; no
other equipment with a direct plug-in is
allowed. Power cords need to be a
maximum of 1m long and have a minimum
of 0.75 mm2 of cross-sectional area.
• Do not plug devices into the XAV5401
filtered AC outlet that exceed the product
ratings. The output voltage of the filtered
AC outlet is the same as the power outlet
that the XAV5401 is plugged into. To help
avoid damaging your system, be sure that
the attached devices are electrically rated
to operate with the power available in your
location.
• If the input AC voltage is less than 100 V
AC, the device plugged into the filtered AC
socket of the XAV5401 might not perform
as well as expected.
• DO NOT PLUG MAJOR HOME
APPLIANCES into the filtered AC socket
7
Page 8

or into an attached power strip. The device
https://answers.alarm.com/Installation_and_Troubleshooting/Video_Devices/Netgear_PowerLine_Range_Extender/Netgear_PowerLine_Range_Extender_Installation_Guide
Updated: Mon, 11 Jun 2018 19:18:45 GMT
is not intended to be used with home
appliances such as air conditioners, power
tools, space heaters, fans, hair dryers,
ovens or refrigerators.
8
 Loading...