

NETGEAR Nighthawk X6 Owner's Manual
Nighthawk X6
AC3200 TRI-BAND WiFi Router
Reviewer Guide
June 2014
1

Contents
Nighthawk X6 ................................................................................................................................................ 1
AC3200 TRI-BAND WiFi Router ..................................................................................................................... 1
Reviewer Guide ............................................................................................................................................. 1
1. Resources .................................................................................................................................................. 4
2. Introduction .............................................................................................................................................. 4
Tri-Band ................................................................................................................................................. 4
Smart Connect....................................................................................................................................... 5
Load Balancing ...................................................................................................................................... 5
TECHNICAL SPECIFICATIONS ................................................................................................................. 6
3. Getting Started .......................................................................................................................................... 7
4. Wireless Speed and Range ........................................................................................................................ 9
5. Advanced Features .................................................................................................................................... 9
ReadySHARE USB .................................................................................................................................. 9
ReadySHARE Vault .............................................................................................................................. 10
Beamforming+ .................................................................................................................................... 11
VPN Support ........................................................................................................................................ 11
iTunes Server ....................................................................................................................................... 11
ReadySHARE Printer ............................................................................................................................ 12
Guest Network .................................................................................................................................... 12
DLNA ................................................................................................................................................... 12
NETGEAR Live Parental Controls ......................................................................................................... 12
6. NETGEAR genie application .................................................................................................................... 13
7. Bridge Mode ........................................................................................................................................... 16
How to Set Up Bridge Mode on the NIGHTHAWK Router ...................................................................... 17
Appendix ............................................................................................................................................. 20
2

Technical Evaluation Recommendations ............................................................................................ 20
5 GHz Performance Test Using Bridge Mode ...................................................................................... 21
2.4 GHz Performance Test Using Bridge Mode ................................................................................... 24
Stress Test ........................................................................................................................................... 25
Smart Connect test using load balancing ............................................................................................ 29
3

1. Resources
NETGEAR’s public relations team is ready to assist if you have any questions or problems while reviewing
the NETGEAR NIGHTHAWK X6 WiFi Router. Please contact:
Jocelyn Shaw
Weber Shandwick
415.262.5904
JShaw2@webershandwick.com
Also included in the package is the Nighthawk X6 User manual, please refer to it for more detailed
product features and functionality.
For additional information, including the product fact sheet, visit http://www.netgear.com/NIGHTHAWK
X6.
2. Introduction
The Nighthawk X6 AC3200 Tri-Band WiFi Router with six high performance antennas and three network
bands, one 2.4GHz and two 5GHz delivers a combined WiFi connection speeds up to 3200 Mbps WiFi. It
is ideal for typical homes with increasing number of WiFi connected devices and provides double the
bandwidth of typical dual band routers.
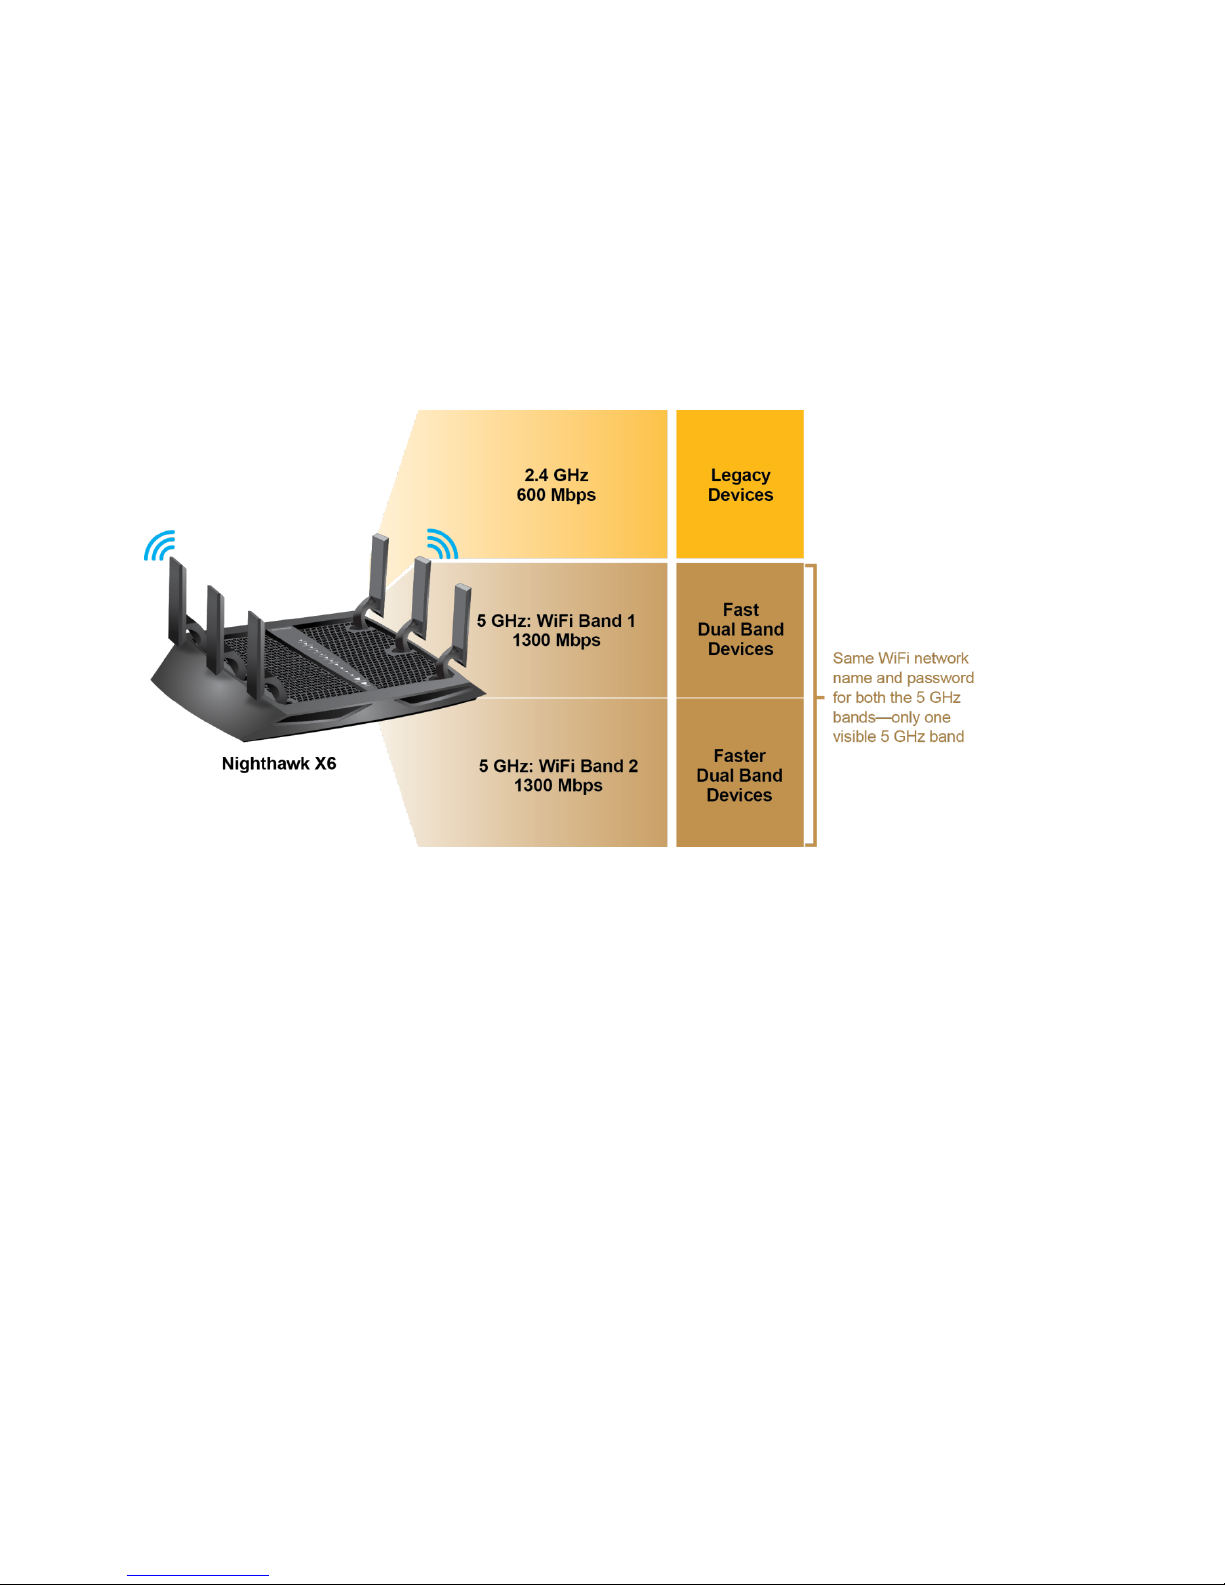
Tri-Band
The Nighthawk X6 AC3200 Router with breakthrough Tri-Band WiFi technology delivers a massive
combined wireless speed of up to 3.2Gbps with three WiFi Bands.
Band 1: 600 Mbps @2.4GHz-256QAM
Band 2: 1300 Mbps @5GHz
Band 3: 1300 Mbps @5GHz
This not only doubles the available 5GHz bandwidth but also allows for two bands to easily separate
slower and faster WiFi devices. X6 optimizes WiFi performance by using Smart Connect to intelligently
assign every device to the fastest WiFi band possible and doing so allows devices to connect at their
maximum speed. Even if everyone in the home that’s connected to the Internet is streaming video the
X6 has the capacity to handle it.
This would be especially helpful with the increasing number of WiFi devices in the home with individual
screens, and increasing video content on the internet. X6 provides real life benefits of more than 2x the
performance with multiple devices.
It is a much simpler implementation offering real-life benefits with current and future dual band devices.
4
Smart Connect
Your router comes with one 2.4 GHz WiFi band and two 5 GHz WiFi bands. The router automatically uses
Smart Connect to intelligently choose the best 5 GHz band for your dual-band device to give you the
best WiFi performance.
For Smart Connect to work, both 5 GHz bands must use the same wireless network name (SSID) and
network key (password). That means when you connect to the router with WiFi, you see only one 5 GHz
WiFi network name that connects to both 5 GHz bands.
To enable or disable Smart Connect, see the user manual.
Load Balancing
The router uses load balancing to distribute WiFi connections among all three WiFi bands.
Slower devices like printers, older computers, or an IP camera connect to the 2.4 GHz band. Having two
5 GH bands prevents overloading when many devices use WiFi at the same time.
For a new incoming wireless client:
1. Check for load balancing: If the difference between the number of connected clients on each band is
>= 3, we connect the new client to the band with less number of clients connected.
Otherwise,
2. Check Client Speed: If the client is an 11a, 1x1 11n, or 2x2 11n, we connect the new client to band 4.
Otherwise,
3. Check Signal Strength: We check the signal strength of the new client, if the signal strength is low,
we connect the client to band4, otherwise we connect the client to band1.
Band 1 refers to channel number: Channel 36 to channel 48
5

Band 4 refers to channel number: Channel 148 to channel 161
For example: Typically if load balancing does not kick in:
802.11ac and 3x3 802.11n devices at short range will be on Band 1
All other WiFi devices including 802.11ac and 3x3 802.11n devices at long range will be in
Band 4
TECHNICAL SPECIFICATIONS
AC3200 WiFi
o Band 1: 600 Mbps @2.4GHz-256QAM
o Band 2: 1300 Mbps @5GHz
o Band 3: 1300 Mbps @5GHz
Simultaneous Tri-Band WiFi
o Tx/Rx 3x3 (2.4GHz) + 3x3 (5GHz) + 3x3 (5GHz)
o IEEE® 802.11 b/g/n 2.4GHz-256QAM support
o IEEE® 802.11 a/n/ac 5.0 GHz
Smart Connect intelligently selects the fastest WiFi for every device
Six (6) high performance external antennas
High power amplifiers
Implicit & Explicit Beamforming for 2.4 & 5GHz
Powerful Dual-Core 1GHz processor with 3 offload processors
Five (5) 10/100/1000 Mbps Gigabit Ethernet ports
o 1 WAN & 4 LAN
Memory: 128 MB Flash and 256 MB RAM
Two (2) USB ports : 1 USB 3.0 & 1 USB 2.0 port
ReadySHARE® USB to share your USB hard drive & printer
ReadySHARE® Vault for automatic PC backup to a USB hard drive connected to the router
NETGEAR DNS service- free custom url. Customized free URL to set up personal FTP server
Find & play your media on DLNA TVs, game consoles and more
Use iTunes or Apple Remote™ to play music on any Airplay compatible device
IPv6 Support (Internet Protocol Version 6)
On/Off LED light switch
VPN support—secure remote access
Guest network access—separate & secure
WiFi Protected Access® (WPA/WPA2—PSK)
Double firewall protection (SPI and NAT)
Denial-of-service (DoS) attack prevention
Parental Controls: Easy cloud based parental controls with pre-configured or customized setup
with by-pass user support.
CD-Less Installation
6

Netgear genie app to easily monitor control and repair your WiFi Network
o Available for PC, MAC, Android, iOS
WiFi On/Off switch- convenient power savings or security for ex., when going on vacation
Setting up the NIGHTHAWK X6 is quick and easy with a simple browser-based interface for PCs, Macs,
smartphones, the iPad, and other tablets. NETGEAR Genie™ is a free application that you can use to
monitor, control, and repair home networks. Visit www.netgear.com/landing/en-us/netgear-genie.aspx.
3. Getting Started
This reviewer guide assumes you have received the NIGHTHAWK X6 package. The contents of the
package are:
The NIGHTHAWK X6 router
The power adapter and AC cable
An Ethernet cable
The Installation Guide
Please contact NETGEAR’s PR team if any of these pieces are missing.
The first step in setting up the NIGHTHAWK X6 is finding an appropriate location. For best results,
NETGEAR recommends placing the router:
Near the center of the area where computers and other wireless devices will operate.
Within easy reach of an AC power outlet, as well as the Ethernet cable that provides Internet
access – such as a home cable or DSL modem, or an office network.
At an elevated location, such as a high shelf, keeping the number of walls and ceiling between
the router and wireless devices to a minimum.
Away from any large metal surfaces, such as a solid metal door or aluminum studs. Large
expanses of other materials such as glass, insulated walls, fish tanks, mirrors, brick, and concrete
can also affect the wireless signal.
The second step is connecting the NIGHTHAWK X6 to the Ethernet cable that provides Internet access
and then to AC power. Make sure the NIGHTHAWK X6 is turned on – the power button is found on the
back of the router, at the bottom.
For more information on how to install the the Nighthawk X6, view the Nighthawk X6 installation video.
To view the installation video, visit http://www.netgear.com/R8000_vid1 or use this QR code:
7
The third step is connecting your PC, smartphone or tablet to the NIGHTHAWK X6. As noted above,
setting up the NIGHTHAWK X6 is quick and easy. The set up process can be managed from any wired or
wireless device on the network that runs a web browser, including PCs, Macs, smartphones, and tablets.
To use a wired connection, simply connect the Ethernet cable from the NIGHTHAWK X6 to your
computer.
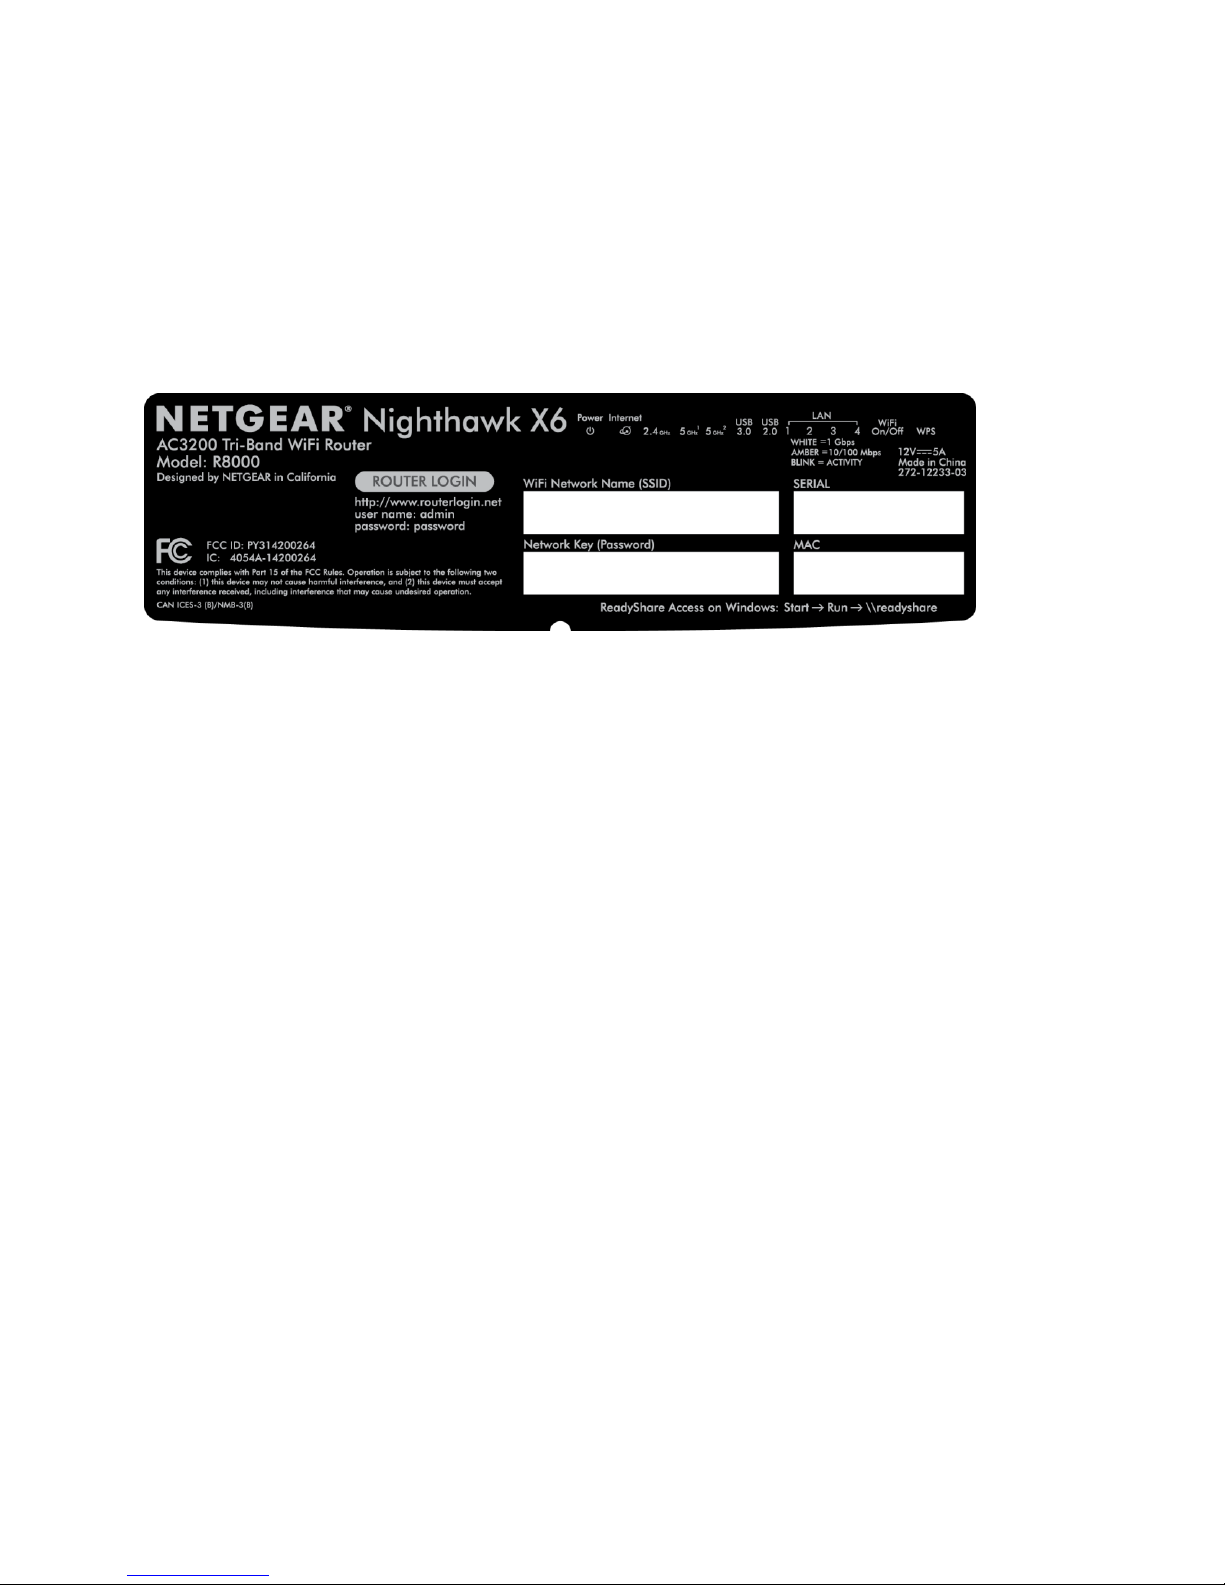
To use a wireless connection, connect to the NIGHTHAWK X6’s default WiFi network. The WiFi
network name (SSID) and network key (password) are shown on the router’s label.
The fourth step is configuring the NIGHTHAWK X6.
1. Open a web browser on any device connected to the router. The browser is hijacked to the
installation page. Please follow the installation steps.
2. If the browser is not hijacked, check connection to the router or alternatively login directly to
the router by going to http://routerlogin.net.
3. Enter the user name admin and the default password (the word password).
Follow the genie steps to connect to the Internet. During the installation process, genie prompts
you to download two free apps:
genie app. A personal dashboard that lets you monitor, control, and repair your home
network.
ReadySHARE Vault app. Enables automatic continuous backup of a Windows computer
to a USB drive that’s connected to your router.
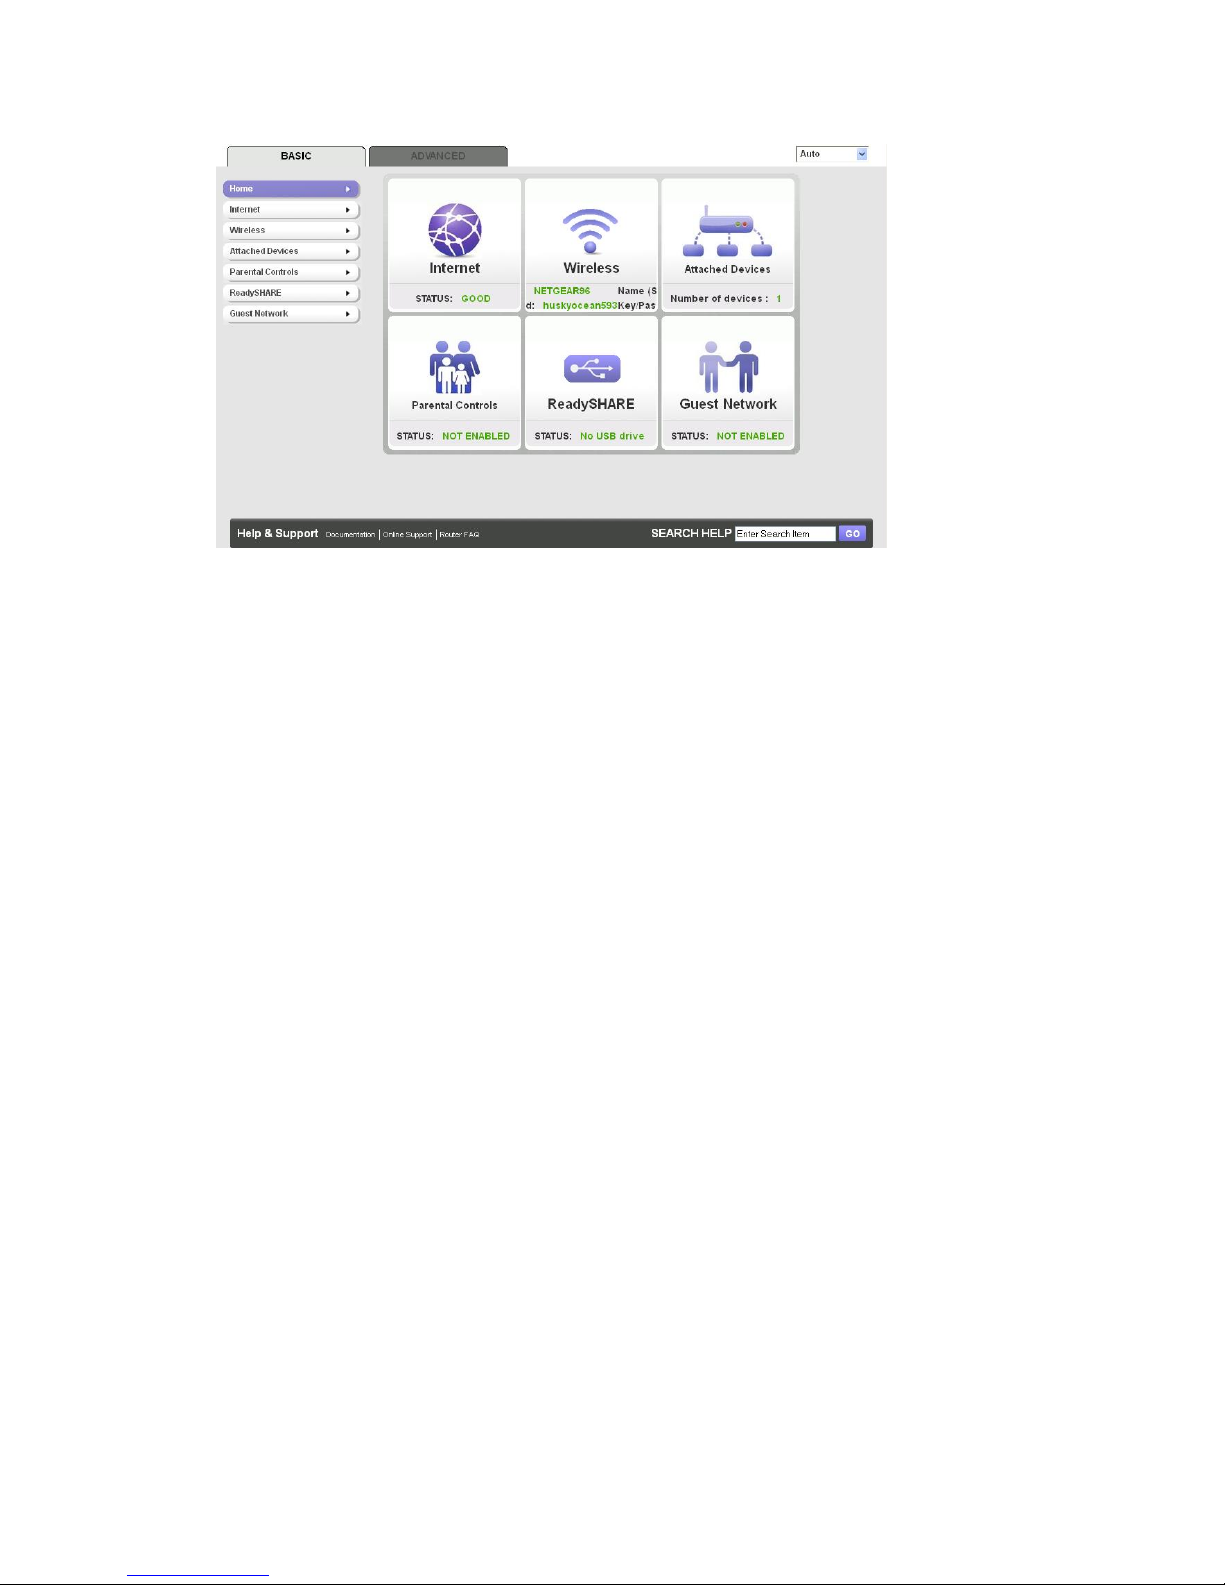
After genie connects you to the Internet, you’ll then see the BASIC home screen, from which you
can customize the NIGHTHAWK X6’s wireless networks and advanced features.
8
4. Wireless Speed and Range
The NIGHTHAWK X6 has six highly tuned external retractable antennas connected to the highest-power
radio amplifiers allowed by regulations: transmit power of +30 dBm in both the 2.4 GHz and 5 GHz
bands and receive sensitivity of -99 dBm at 1 Mbps in the 2.4 GHz band and -96 dBm at 6 Mbps in the
5GHz band.
Reviewers might receive two units—one Nighthawk X6 (R8000) to set up as a router, and the other
Nighthawk (R7000) to set up as a bridge. For reviewers, the units will be preconfigured. There is also a
separate note that explains how to configure the NIGHTHAWK (R7000) as a bridge. This feature is
accessed through the Advanced Wireless Settings page of the router GUI (Advanced tab > Advanced
Setup > Wireless Settings).
The result is more WiFi range – and more wireless speed at any given distance – than top-of-the-line
home routers available today.
To test this informally, start with your current router before setting up the NIGHTHAWK X6. Go to
remote corners of your test area with a laptop, smartphone or tablet and look for areas of low signal
strength. Then check the same locations again after installing the NIGHTHAWK X6. You should see
greater signal strength at many of these points.
For NETGEAR’s recommendations on technical evaluation of wireless performance, see the Appendix.
5. Advanced Features
This section highlights a few of the many advanced features available on the NIGHTHAWK X6.
ReadySHARE USB
The NIGHTHAWK X6 is ready for instant file sharing – just plug a USB hard drive or flash drive into either
of the router’s two USB ports. Files on the shared drive can then be accessed anywhere on the network,
9
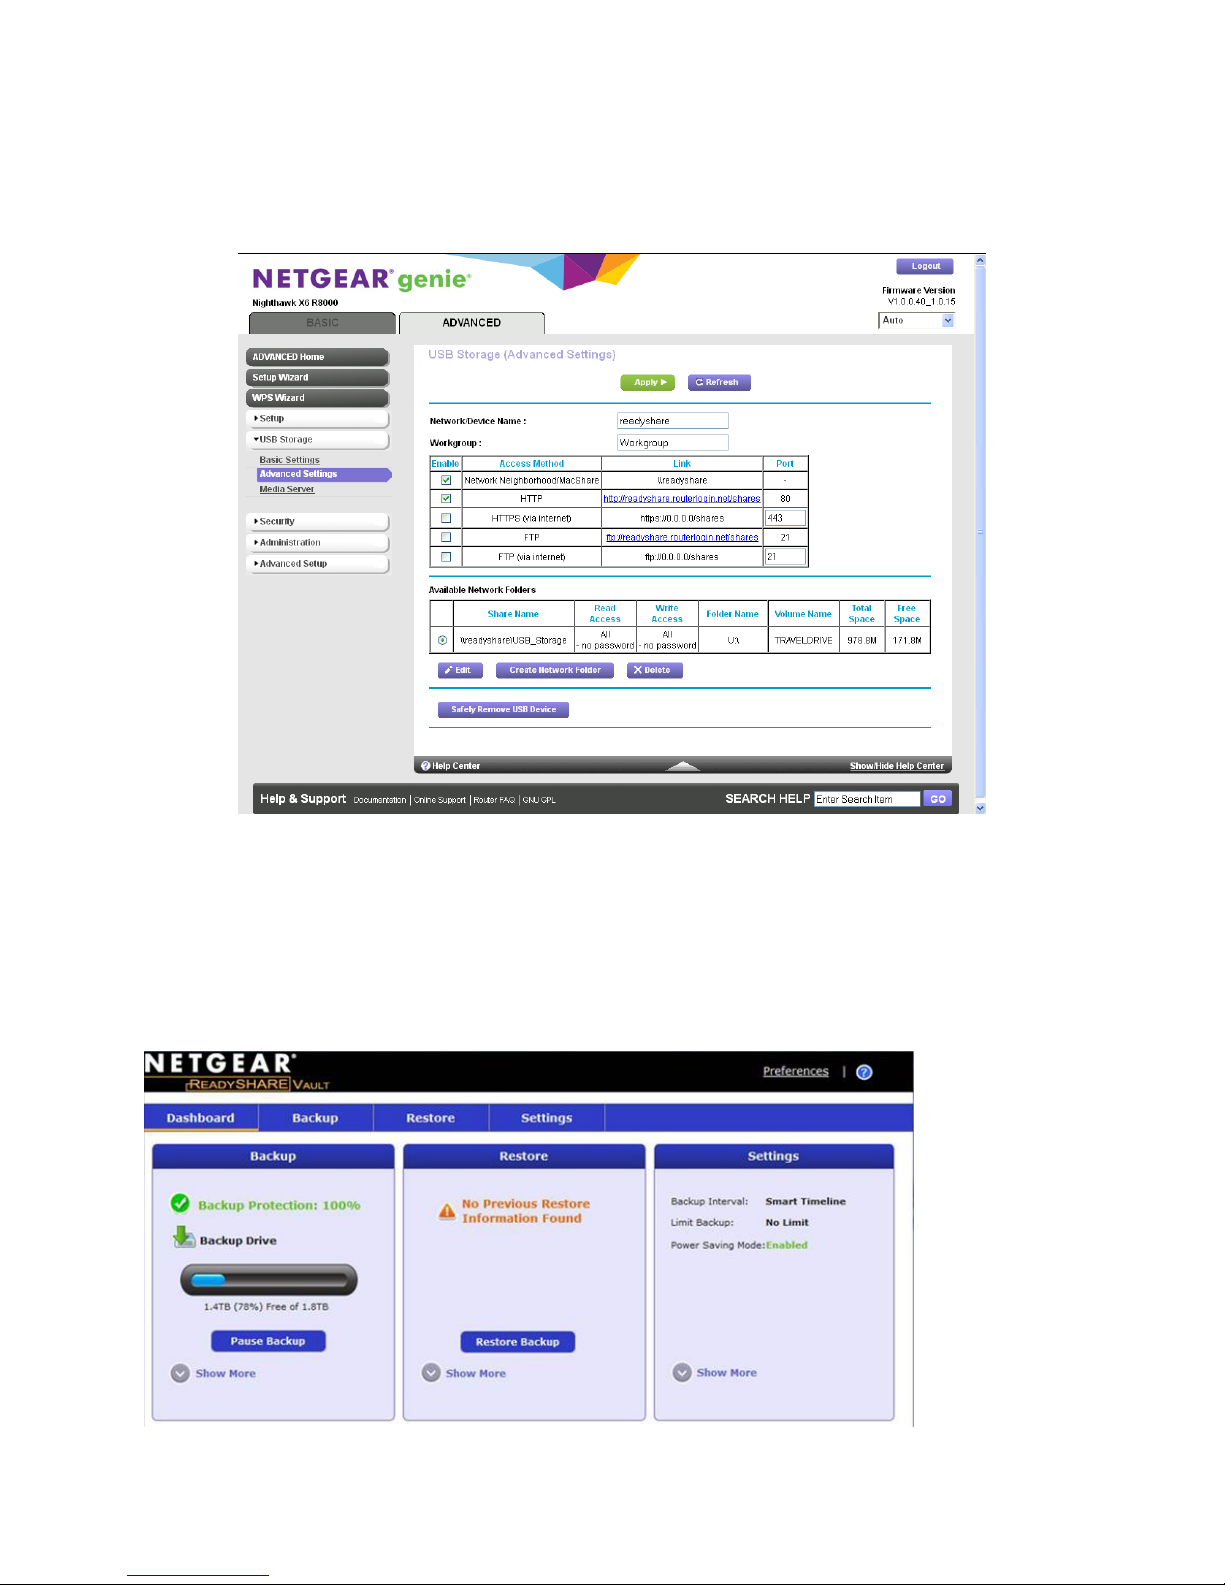
as well as outside the home through a web browser or via File Transfer Protocol (FTP.). By default only
Network Connection and HTTP are enabled.
ReadySHARE Vault
Your router comes with free backup software for all the Windows computers in your home. Connect a
USB hard disk drive (HDD) to the USB port on your router for centralized, continuous, and automatic
backup.
10

Easy single click setup to back up the Window PCs on the home network
Automatic, continuous incremental backup of all the changes
Easily restore deleted files by going back to older snapshots
Safeguard all your precious data, photos, videos
Beamforming+
Beamforming+ technology boosts speed, reliability and range of WiFi connections. The router
automatically uses NETGEAR Beamforming+ technology to enhance WiFi performance with 802.11ac
WiFi devices. Because it’s automatic, you don’t have to turn on Beamforming+ or configure it. When you
connect to the WiFi network, Beamforming+ focuses on your location for even better WiFi performance
and speed. Beamforming+ locks onto your laptop, tablet, or smartphone, and follows as you move from
place to place, so you keep your optimal WiFi connection.
VPN Support
VPN service allows remote access to your home network with a secure connection. After you set up VPN
service, you can use VPN to access the router’s USB drive and media and to access your Internet service
at home. To set up VPN service, follow these high-level steps:
1. Specify the VPN service.
2. Install OpenVPN software on your computer.
3. Use a VPN tunnel.
iTunes Server
iTunes Server lets you play music with your Windows or Mac iTunes app from a USB drive that is
connected to the router USB port. You can also use the Apple Remote app from an iPhone or iPad to
play music on any AirPlay devices, such as Apple TV or AirPlay-supported receivers.
To specify iTunes server settings:
1. On your iPhone or iPad, find and connect to the WiFi network.
2. Launch the Remote App.
3. Click the Add an iTunes Library button.
A passcode displays.
4. Specify the passcode in the router.
a. Launch an Internet browser from a computer or wireless device that is connected to the
network.
b. Type http://www.routerlogin.net or http://www.routerlogin.com.
A login screen displays.
c. Enter the router user name and password.
The user name is admin. The default password is password. The user name and
password are case-sensitive.
11
 Loading...