

NETGEAR Nighthawk X4SAC2600, D7800 Quick Start Manual
Quick Start
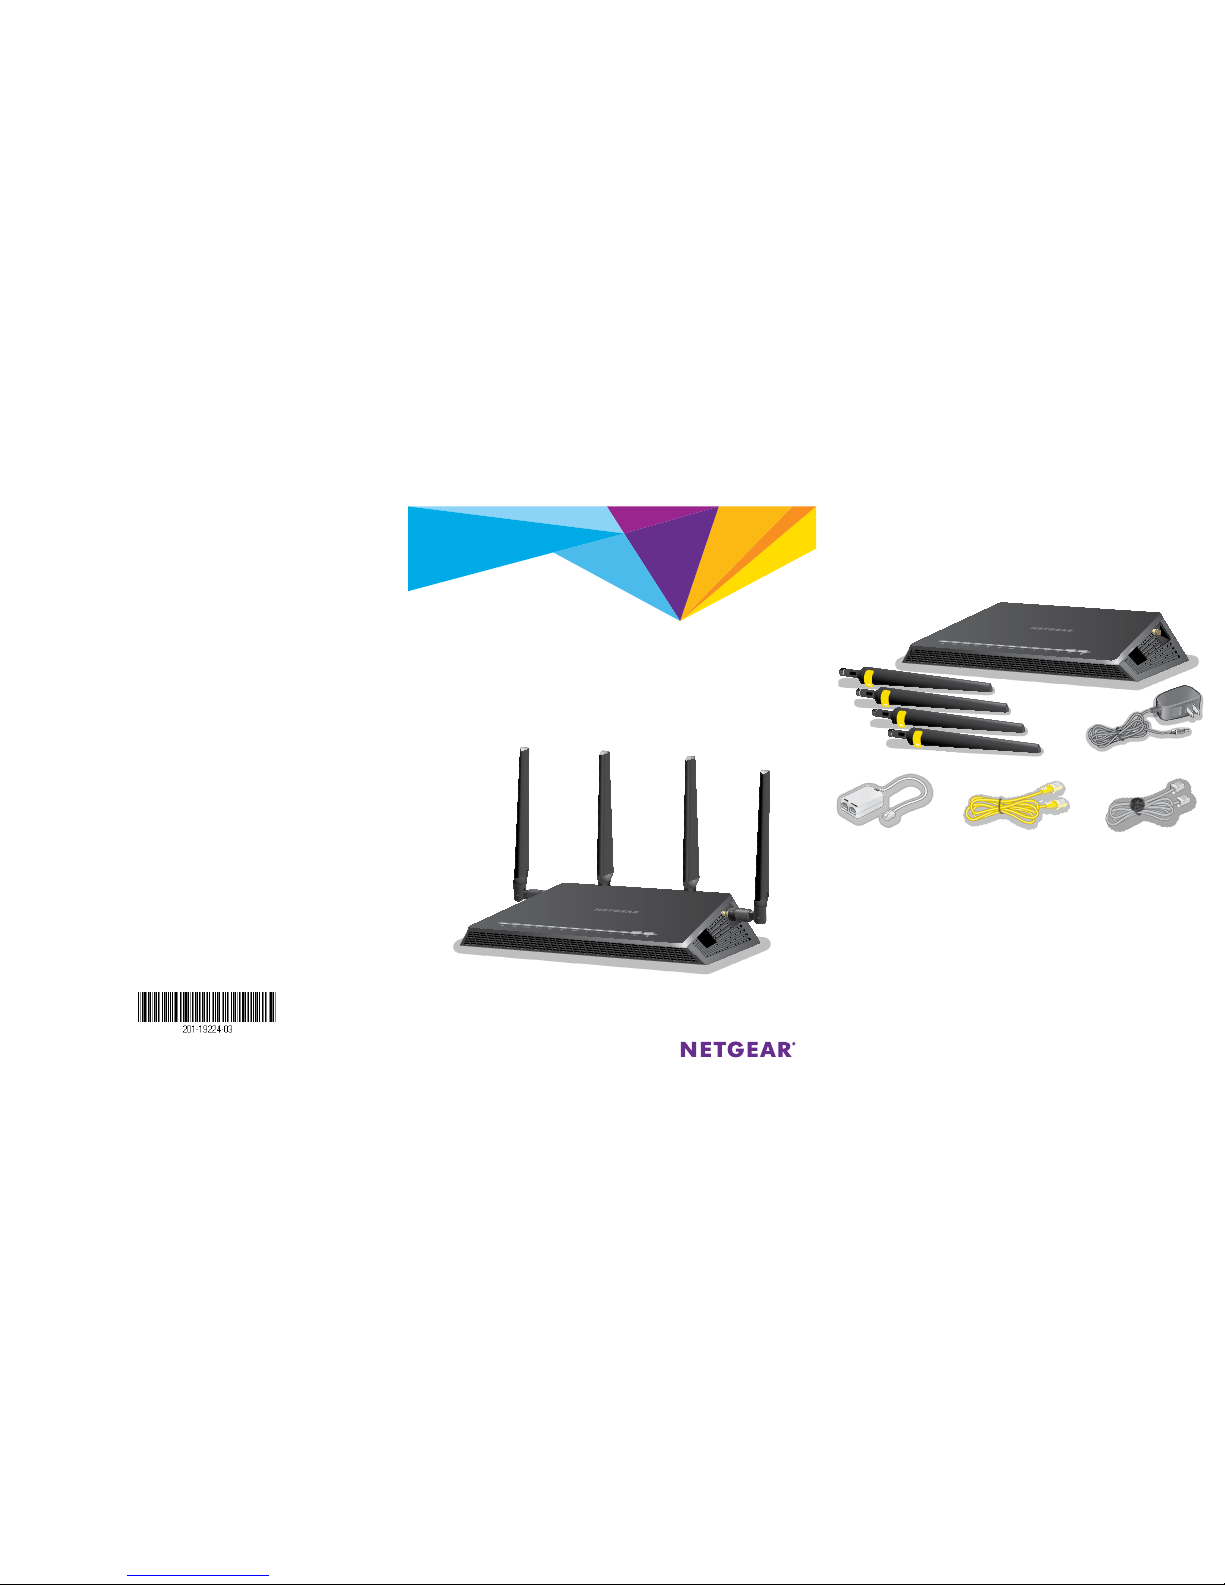
Package Contents
The package contents vary depending on the region.
Note: In some regions, a resource CD is included in the package.
Nighthawk X4S
AC2600 WiFi VDSL/ADSL Modem Router
Model D7800
Support
Thank you for purchasing this NETGEAR product.
After installing your device, locate the serial number on the label of your product and use it
to register your product at https://my.netgear.com.
You must register your product before you can use NETGEAR telephone support. NETGEAR
recommends registering your product through the NETGEAR website.
For product updates and web support, visit http://support.netgear.com.
NETGEAR recommends that you use only the official NETGEAR support resources.
You can get the user manual online at http://downloadcenter.netgear.com or through a link in
the product’s user interface.
Trademarks
© NETGEAR, Inc., NETGEAR and the NETGEAR Logo are trademarks of NETGEAR, Inc.
Any non‑NETGEAR trademarks are used for reference purposes only.
Compliance
For the current EU Declaration of Conformity, visit
http://support.netgear.com/app/answers/detail/a_id/11621/.
For regulatory compliance information, visit
http://www.netgear.com/about/regulatory/.
See the regulatory compliance document before connecting the power supply.
NETGEAR, Inc.
350 East Plumeria Drive
San Jose, CA 95134 USA
July 2015
Modem router
Power adapter
(varies by region)
Antennas (4)
DSL filter
(varies by region)
Phone cable
Ethernet cable
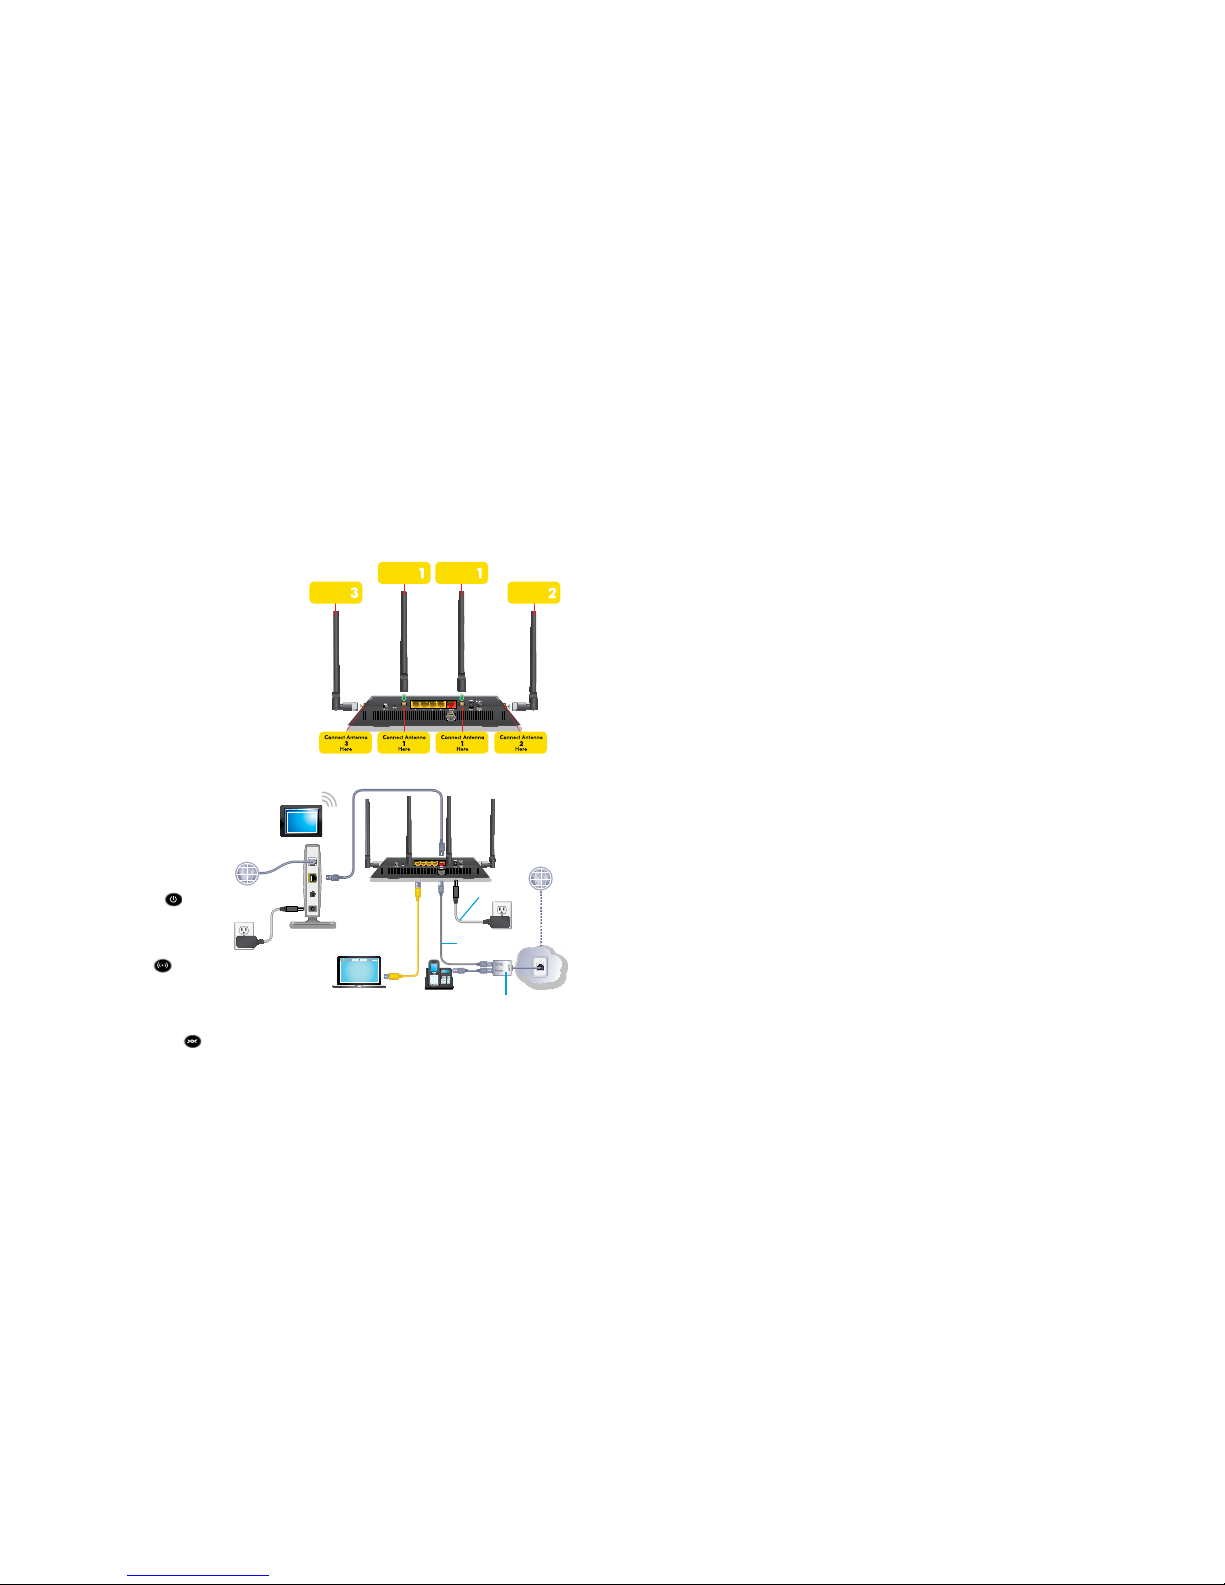
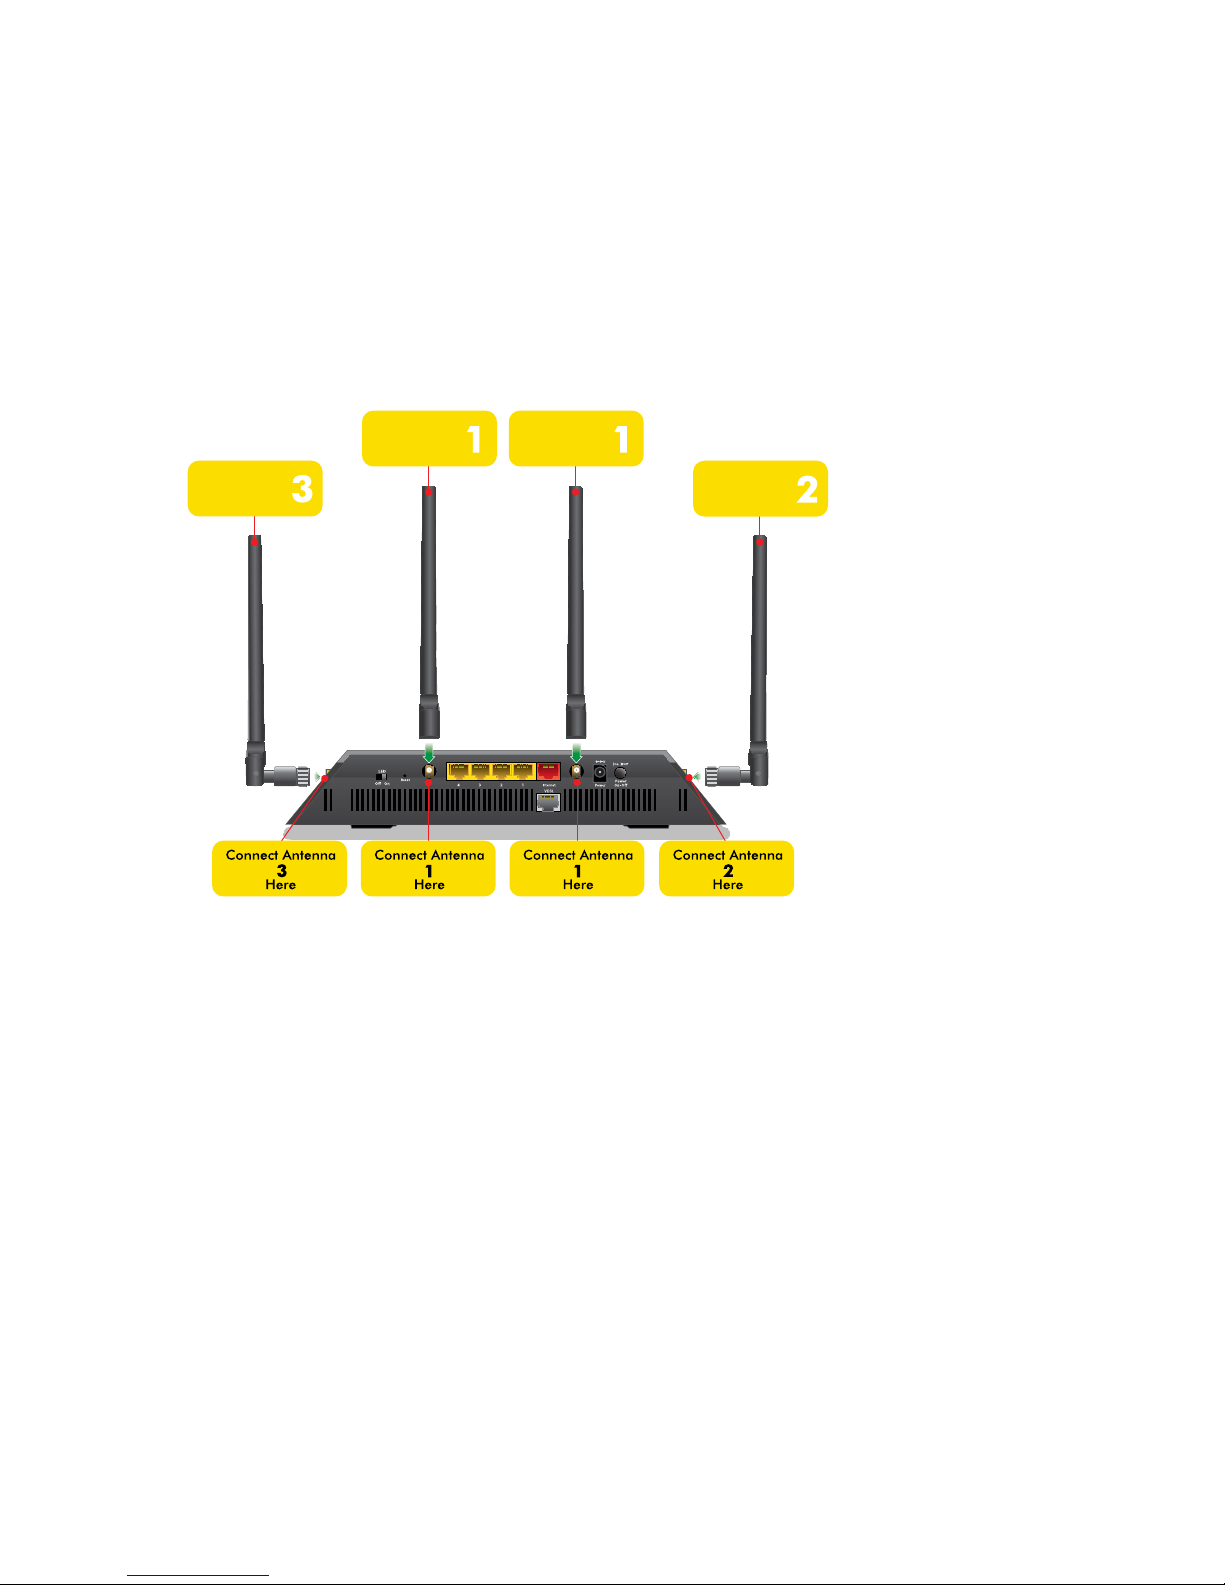
1. Attach and position the antennas.
To determine where to attach the antennas,
match the labels on the antennas with the labels
on the modem router.
Attach the antennas on the threaded antenna
posts. Position the antennas vertically for the
best WiFi performance.
2. Connect the modem router to an Internet
service.
To connect to a DSL service (ADSL or
VDSL):
Install a DSL filter and connect it to the VDSL
port on the modem router.
To connect to a cable or fiber modem:
Prepare your cable or fiber modem and
connect it to the red Internet port on the
modem router.
3. Power on the modem router.
Wait for the Power LED
to
light white. If the Power LED does
not light, press the Power On/Off
button.
Wait for the WiFi LED
to light
white.
4. Check the DSL LED.
If the modem router is connected to
a DSL service, the DSL LED
lights
white.
5. Connect a device.
You can use an Ethernet cable or
connect with WiFi.
To connect with WiFi, use the WiFi
network name and password on the
product label.
6. Log in to the modem router.
Launch a web browser.
NETGEAR genie displays.
If you do not see genie, enter
www.routerlogin.net in the address
field of the web browser. When
prompted, enter admin for the user
name and password for the password.
NETGEAR genie determines your
Internet connection.
7. Get the genie app.
Download the free genie app from
www.NETGEAR.com/genie.
Easily share media, files, and printers
on the network from your smartphone,
tablet, or laptop.
Ethernet cable
ADSL or VDSL
Internet
Cable or fib er
modem
Power adapter
You can use this diag ram to connect your modem ro uter or follow the detaile d instructions in th is booklet.
DSL filter
Ethernet
cable
Phone cable
Modem
router
Cable or fib er
Internet
Computer
8. Get the user manual.
You can get the user manual online at
http://downloadcenter.netgear.com
or through a link in the product’s user
interface.
WiFi device
1
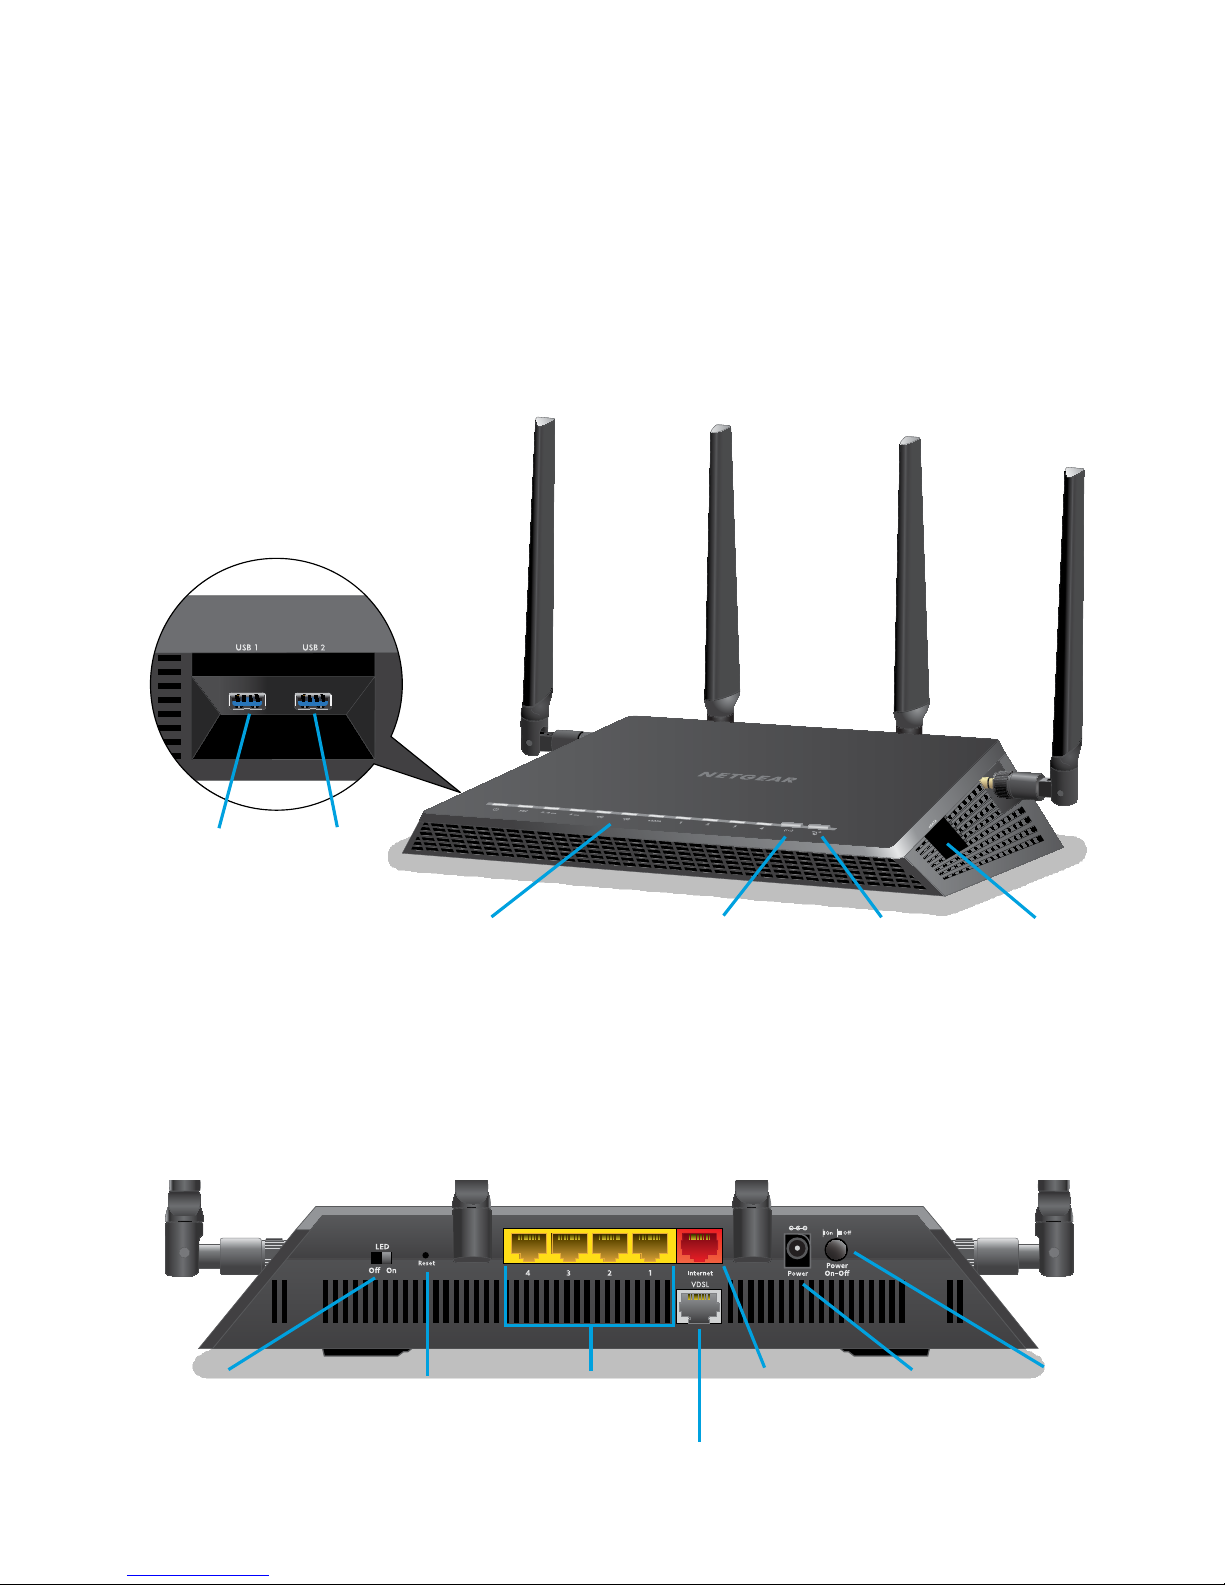
Hardware Features
Front Panel
The LEDs, buttons, and ports are shown in the following figure.
For more information about the LEDs and buttons, see LEDs on
page 2.
Rear Panel
The connections and buttons on the rear panel of the
modem router are shown in the following figure:
Internet
port
Reset
button
Power
On/Off
button
Power
connector
VDSL port
Ethernet
ports 1–4
LED Off/On
switch
LEDs
WPS button
with LED
WiFi On/Off
button with
LED
eSATA
port
USB 3.0
port 1
USB 3.0
port 2
2
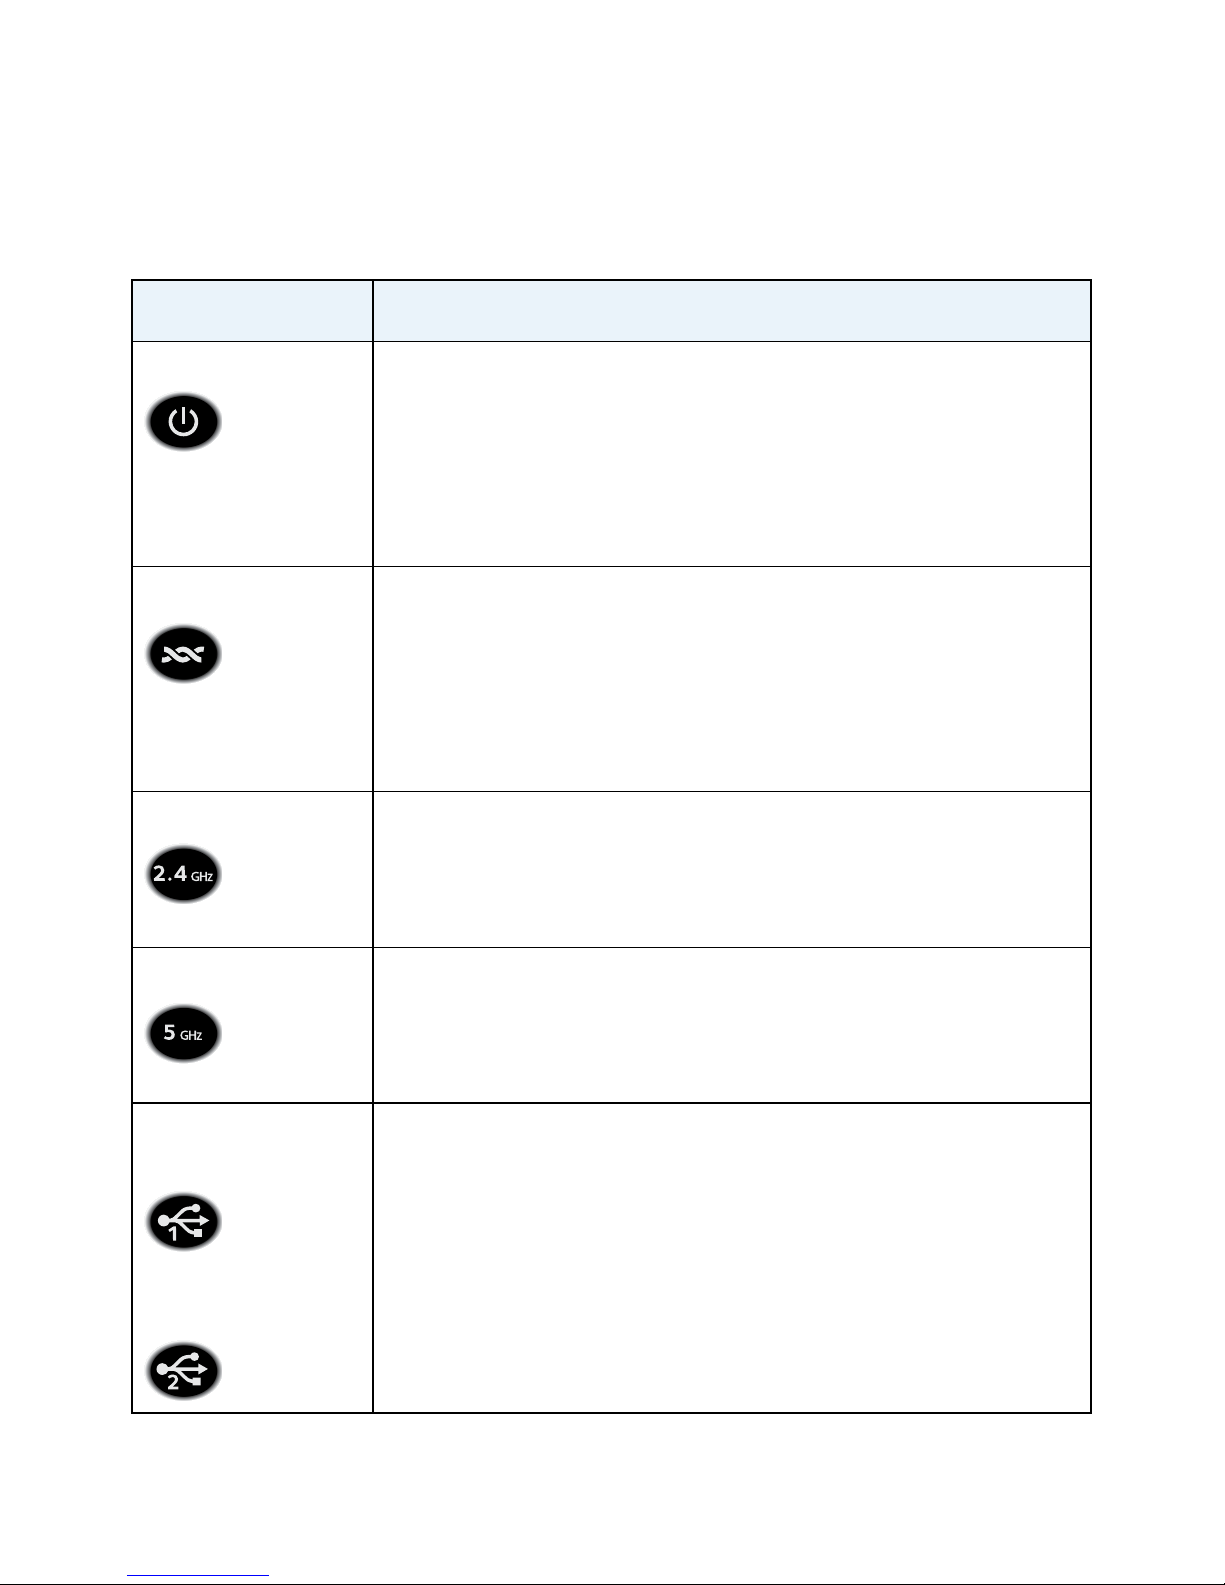
LEDs
The LEDs on the top of the modem router light to indicate
modem router activity:
LED Description
Power LED
• Solid white. The modem router is ready.
• Solid amber. The modem router is starting.
• Blinking amber. The firmware is upgrading, or the Reset
button was pressed.
• Blinking white. The firmware is corrupted.
• Off. Power is not supplied to the modem router.
DSL LED
• Solid white. The modem router is connected to a DSL
service and the DSL connection is ready.
• Blinking amber. The modem router is negotiating the
best possible speed on the DSL line.
• Off. The modem router is not connected to a DSL
service or a DSL connection is not established.
2.4 GHz WiFi LED
• Solid white. The 2.4 GHz WiFi radio is operating.
• Blinking white. The modem router is sending or
receiving WiFi traffic.
• Off. The 2.4 GHz WiFi radio is off.
5 GHz WiFi LED
• Solid white. The 5 GHz WiFi radio is operating.
• Blinking white. The modem router is sending or
receiving WiFi traffic.
• Off. The 5 GHz WiFi radio is off.
USB 3.0 port 1
LED
USB 3.0 port 2
LED
• Solid white. A USB storage device is connected and is
ready.
• Blinking white. A USB storage device is plugged in and is
trying to connect.
• Off. No USB storage device is connected, or someone
clicked the Safely Remove Hardware button and it is
now safe to remove the attached USB storage device.
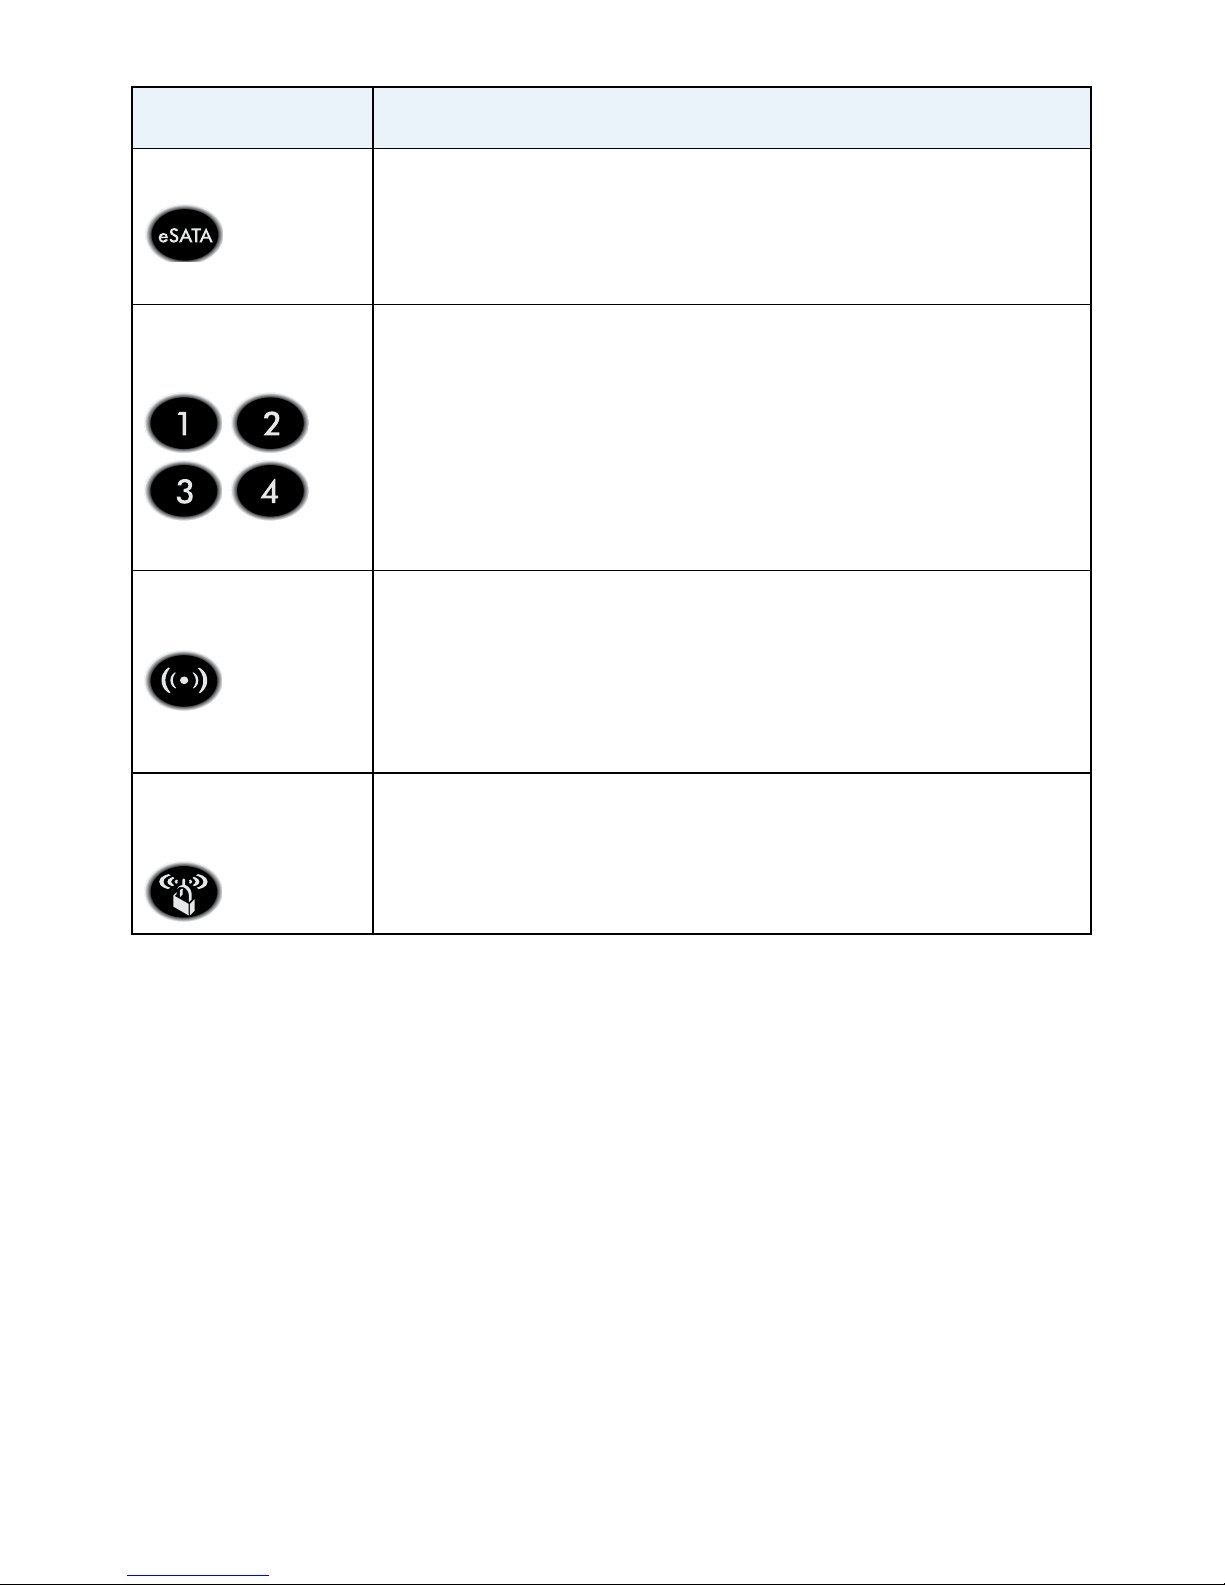
3
LED Description
eSATA LED
• Solid white. An eSATA device is connected and is ready.
• Blinking white. An eSATA device is plugged in and is
trying to connect.
• Off. No eSATA device is connected.
Ethernet ports
1–4 LEDs
The LED color indicates the speed: white for Gigabit
Ethernet connections and amber for 100 Mbps or 10 Mbps
Ethernet connections.
• Solid. A powered‑on device is connected to the Ethernet
port.
• Blinking. The port is sending or receiving traffic.
• Off. No device is connected to this Ethernet port.
WiFi On/Off
button with LED
Pressing this button for two seconds turns the 2.4 GHz and
5 GHz WiFi radios on and off.
If this LED is lit, the WiFi radios are on. If this LED is off,
the WiFi radios are turned off and you cannot use WiFi to
connect to the modem router.
WPS button with
LED
This button lets you use WPS to join the WiFi network
without typing the WiFi password. The WPS LED blinks
white during this process and then lights solid white.

4
Additional Information for DSL Service
Make sure that your DSL service (ADSL or VDSL) is active before
you install the modem router. You need the following information to
install your modem router and connect to the Internet:
• DSL user name and password. This information is included
in the welcome letter that your DSL Internet service provider
(ISP) sent you when you signed up for your service.
• Your telephone number or DSL account number. If you do
not use voice service, you can use your DSL account number
instead.
If you do not know or cannot locate your DSL user name and
password, call your DSL ISP.
Note: If your provider says that they do not support NETGEAR
services, tell them that you need only your DSL user name and
password. You do not need support.
5
Install Your Modem Router
Make sure that your Internet service is active before you install
your modem router.
¾ To install your modem router:
1. Attach and position the antennas:
a. To determine where to attach the antennas, match the
labels on the antennas with the labels on the modem router.
b. Align the antennas with the antenna posts on the
modem router.
c. Attach the antennas on the threaded antenna posts.
d. Position the antennas for the best WiFi performance.
NETGEAR recommends that you position all of the antennas
vertically, as shown.
 Loading...