

Page 1
c. Follow the on-screen instructions to install the driver for the
MA521 802.11b Wireless PC Card.
• For Windows 98/Me users, once the [Please insert the disk
labeled “Windows 98/Me CD-ROM,” and then click OK]
window appears, enter the path corresponding to the
appropriate drives and click OK. Usually these files can be
found at C:\Windows or C:\Windows\System.
• For Windows 2000 users, a Digital Signature Not Found
message may appear. Click Yes to proceed.
• For Windows XP users, a Windows Logo Testing Not Found
dialog box may appear. Click Continue Anyway to proceed.
d. Click Finish to complete the installation.
3
3
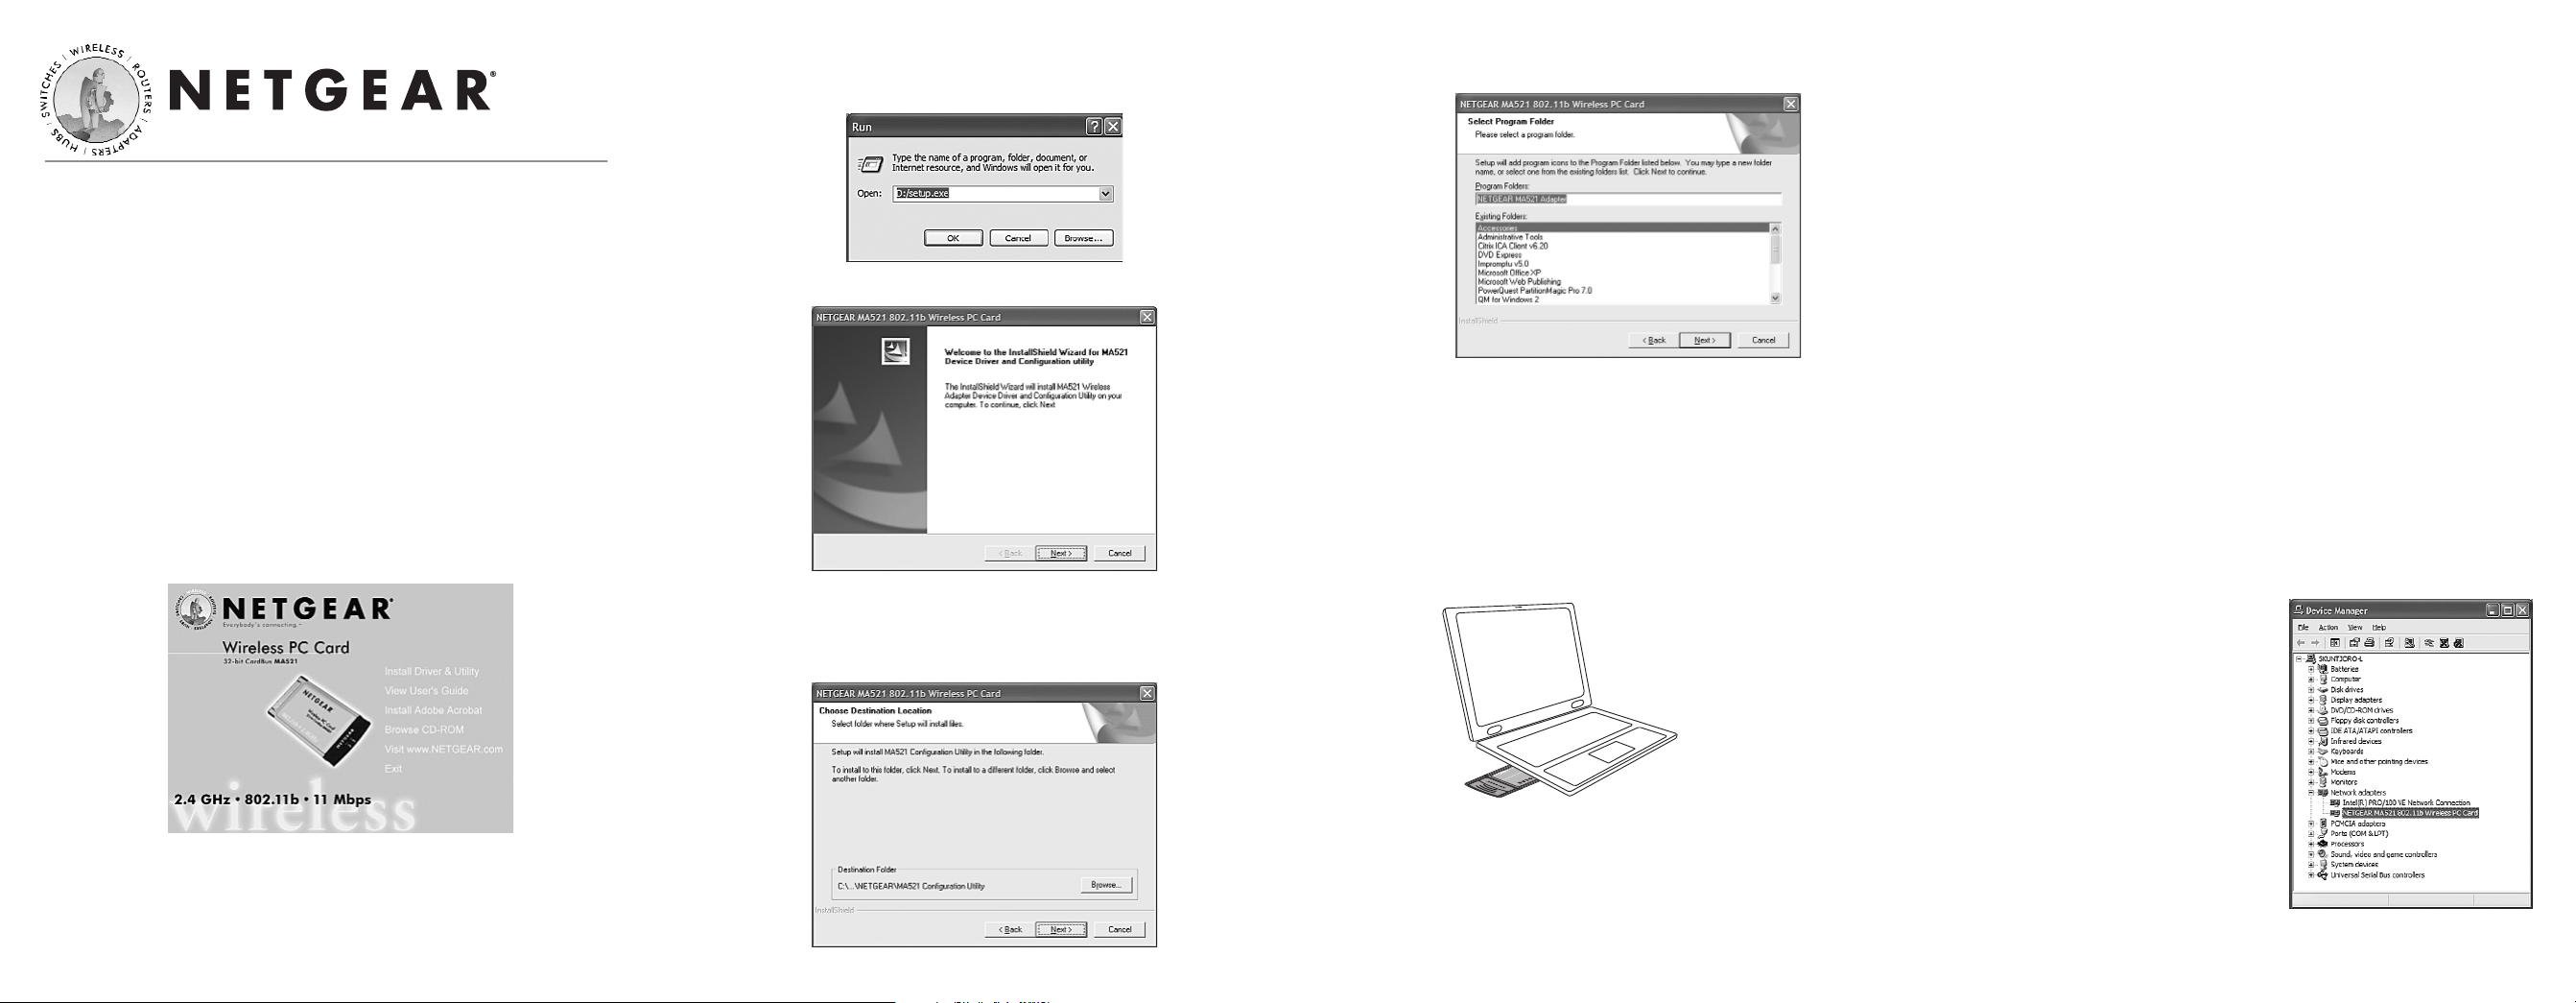
Verify the Driver Installation
a. From the Windows desktop, right-click My Computer.
b. Click Properties.
c. Open Device Manager:
• Windows 98/Me users – Select the Device Manager folder tab.
• Windows 2000/XP users – Select the Hardware folder tab,
and click on the Device Manager button.
d. Double-click Network
Adapters. There should be
no yellow exclamation mark
or red cross icon on the
NETGEAR MA521
802.11b Wireless PC Card
selection, as shown here.
Installation Guide
Follow these quick steps to install your PC Card.
Important Note: You must first install the software before you plug the
card into your computer.
Estimated Setup time: 10-15 minutes.
1
1
Install the MA521 Driver and Utility Software
a. Turn on your computer.
b. Insert the GearBox™CD for Wireless PC Card into the
CD-ROM drive.
c. The Autostart Wizard screen will appear, as shown here:
d. Click the Install Driver & Utility option.
e. If the Autorun wizard does not automatically start, go to your
Windows Start menu and choose Run, and type D:/Setup.exe
(“D” represents your CD-ROM drive letter), and click OK.
f. The InstallShield Wizard screen will appear. Click Next to continue.
g. The Choose Destination Location screen will display the default
Destination Folder. If you want to change the default folder,
click Browse and choose a different destination folder. Then,
click Next to continue to the next screen.
h. Modify the Program Folders field, if desired. Click Next to
continue. InstallShield will start copying files onto your system.
i. Click Finish to complete installing the Configuration Utility.
2
2
Install the MA521 Wireless PC Card
a. Insert the MA521 802.11b Wireless PC Card into available
CardBus slot on your computer as shown here.
b. Windows will automatically detect the MA521 802.11b
Wireless PC Card and the Found New Hardware Wizard
dialog box will appear.
MA521 802.11b Wireless PC Card
Notebook PC with MA521
802.11b Wireless PC Card
W
32-bit CardBus WG511
ire
le
ss PC
C
a
rd
Page 2
Technical Support
PLEASE REFER TO THE SUPPORT INFORMATION CARD
THAT SHIPPED WITH YOUR PRODUCT.
By registering your product at
www.NETGEAR.com/register, we can
provide you with faster expert technical support and timely notices of
product and software upgrades.
NETGEAR, INC.
Support Information
Phone: 1-888-NETGEAR (For US & Canada only) - 24 x 7 phone support
See Support information card for other countries.
E-mail: support@NETGEAR.com (24 x 7 online support)
www.NETGEAR.com
©2003 NETGEAR, Inc. NETGEAR, the Netgear logo, The Gear Guy, Everybody's
connecting, and Auto Uplink are trademarks or registered trademarks of Netgear, Inc. in the
United States and/or other countries. Other brand and product names are trademarks or
registered trademarks of their respective holders. Information is subject to change without
notice. All rights reserved.
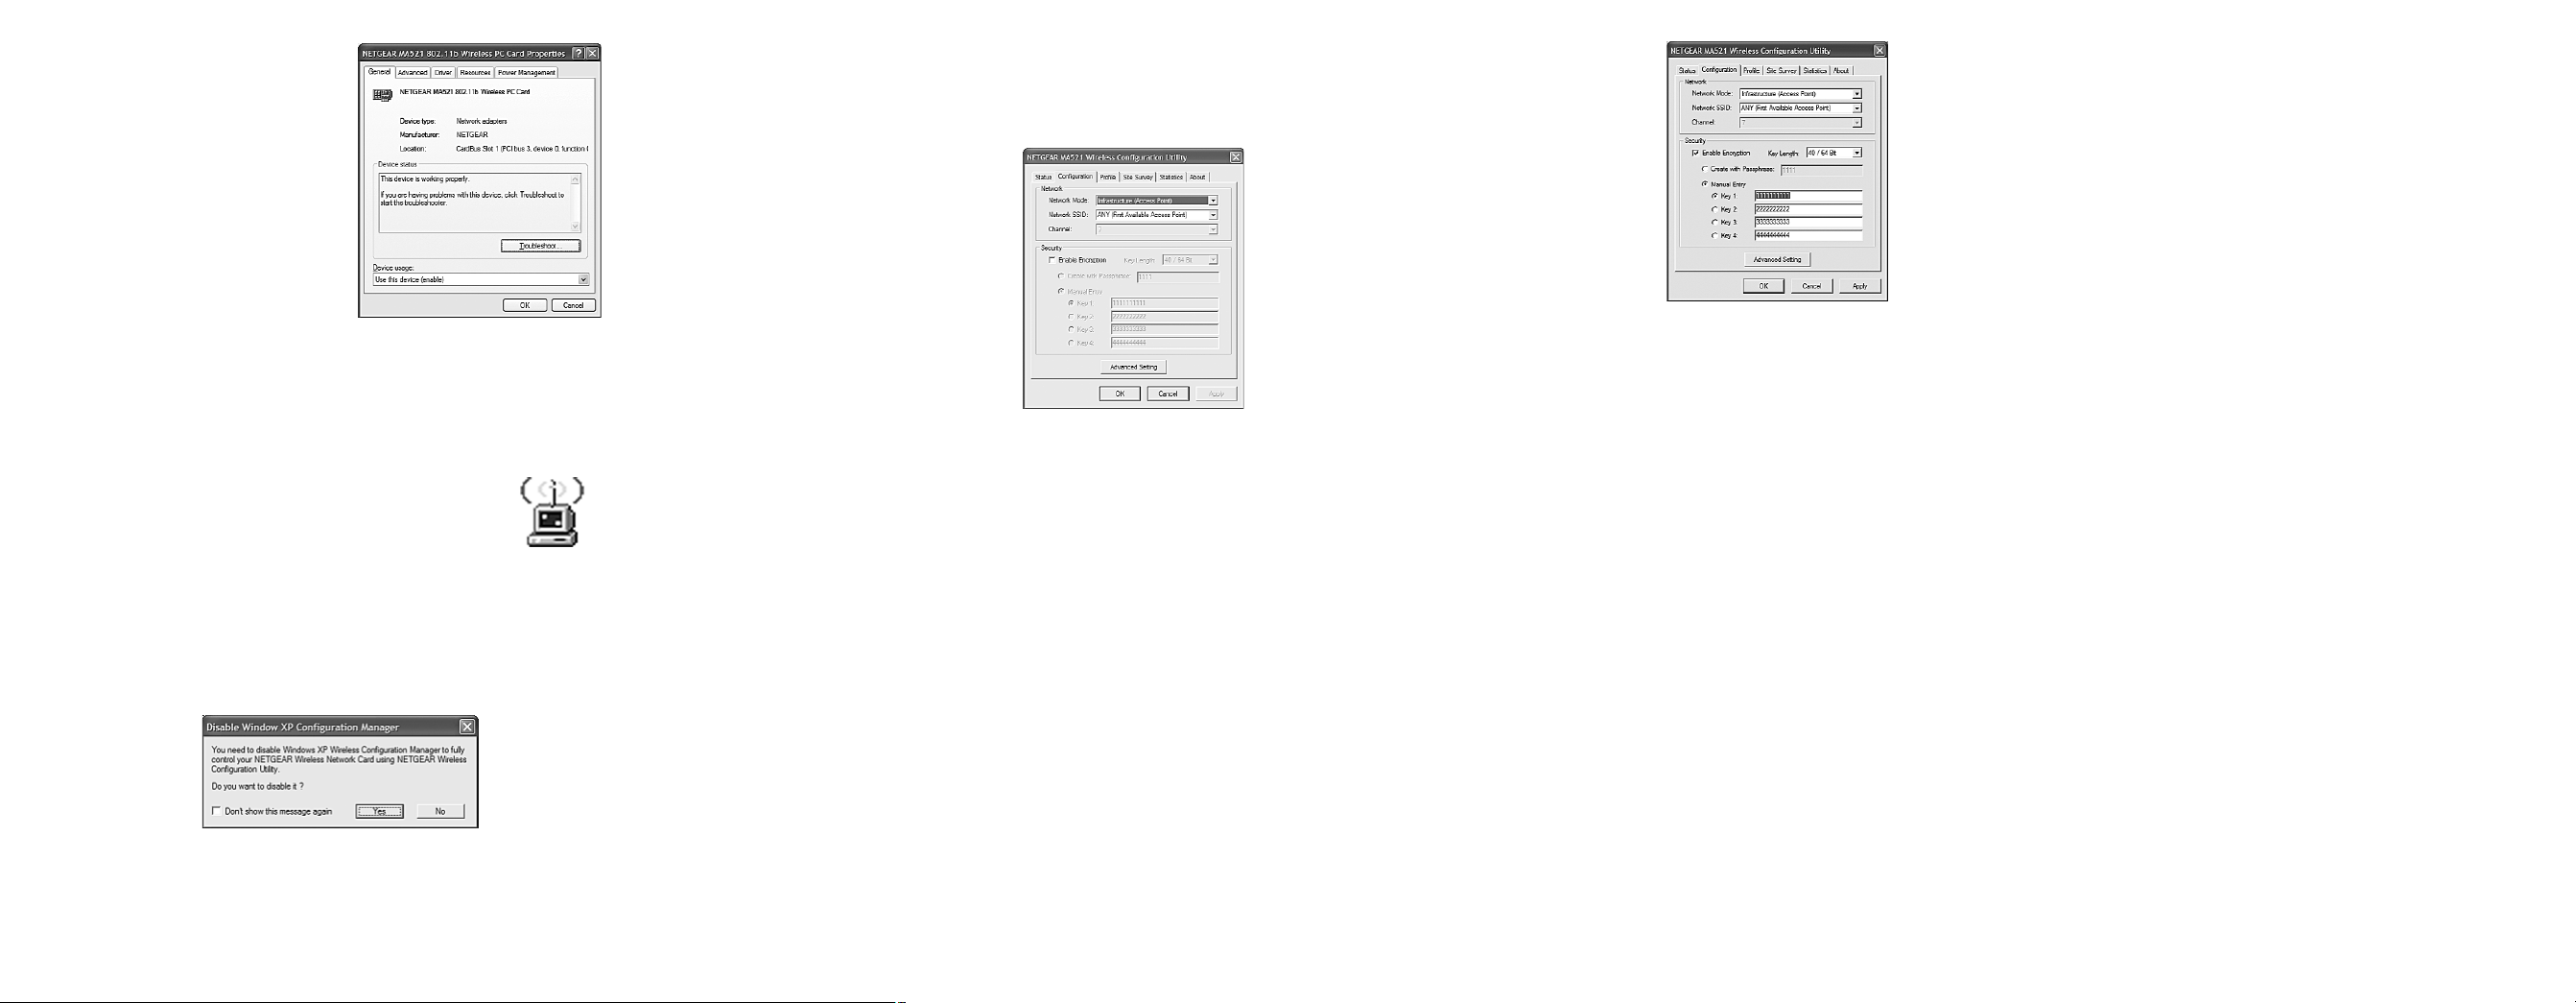
e. Double-click NETGEAR
MA521 802.11b Wireless
PC Card. On the General
folder tab, the Device Status
window should indicate that
the device is working
properly, as shown here.
The installation of the
MA521 Wireless PC Card
driver is now complete.
4
4
Configuring the MA521 Wireless PC Card
Now that the MA521 802.11b Wireless PC Card has been installed,
you can use the NETGEAR MA521 Wireless Configuration Utility
to view and customize configuration settings and features.
a. To display the NETGEAR MA521 Wireless
Configuration Utility, open the NETGEAR MA521
Adapter programs group or double-click the
MA521 icon that appears in the Windows System
Tray, as shown here:
Configuration Note for Windows XP Users
After installing the MA521 Wireless PC Card on the Windows
XP, it will display a Disable Windows XP Configuration
Manager message, similar to the one shown here:
*M-10078-01*
M-10078-01
March 2003
Click Ye s to disable the Windows XP configuration utility and
use the NETGEAR MA521 Wireless Configuration Utility, or
click No to use the Windows XP configuration utility to control
the MA521 802.11b Wireless PC Card.
b. After choosing item 2, the
Configuration section, you
should see this screen :
c. Select one of the two options
on the Network Mode:
Infrastructure (Access Point)
or 802.11 Ad-Hoc
(Computer-to-Computer).
Infrastructure mode will allow
you to connect to an Access
Point and your existing
network, while 802.11b
Ad-Hoc will allow you to
connect to other stations when you want to set up a network
without an Access Point.
d. In the Network SSID section, using a pull down menu button
to select a Network SSID (which is your network name) for
connecting to an Access Point or station that is listed.
e. For 802.11 Ad-Hoc (Computer-to-Computer) mode, please
select a Channel that you want to use.
f. Enter a correct Security setting that matches your Access Point.
5
5
Configuring the MA521 for Security
Important Note: The WEP keys must be set up exactly the same on
all wireless devices in order to communicate with each other.
To prevent unauthorized wireless stations from accessing data
transmitted over the network, the Security section of the
Configuration Utility offers secure data encryption, known as WEP,
to better protect your data transmissions.
To activate the WEP Encryption,
make sure the Enable Encryption
(WEP Key) box displays a
checkmark (as shown above).
WEP Encryption options will be
displayed. You may make changes,
as detailed here:
a. Select one of the two options:
Create with Passphrase or
Manual Entry. A Passphrase
makes it easier to enable WEP
because it automatically
generates the WEP hexadecimal numbers for the key. If the
wireless network Access Point uses a Passphrase, you can also use
that here. Otherwise, you will have to manually enter the
hexadecimal numbers.
b. Create with Passphrase option: pull down the Key Length options
and select the 64-bit or 128-bit, then type in your Passphrase.
c. Manual Entry option:
1. Pull down the Key Length options and select the 64-bit or
128-bit, encryption method.
2. In the Encryption Keys fields, specify the WEP keys:
For 64-bit encryption:
Hexadecimal: 10 hexadecimal digits in the range of “A-F”,
“a-f” and “0-9” (e.g. 11AA22BB33)
For 128-bit encryption:
Hexadecimal: 26 hexadecimal digits in the range of “A-F”,
“a-f” and “0-9” (e.g. 00112233445566778899AABBCC).
d. When you are done, click the Apply button and click OK for
the changes to take effect.
Note: For additional configuration information, please refer to the
User’s Guide on the GearBox CD for Wireless PC Card.
MA521 Wireless
Adapter
SysTray icon
 Loading...