

Netgear M4250-40G8F-PoE Installation Manual

Software Administration Manual
AV Line of Fully Managed Switches M4250 Series
Firmware version 13.0.0 and later versions
March 2021
202-12093-02
NETGEAR, Inc.
350 East Plumeria Drive
San Jose, CA 95134, USA

M4250 Series Switches
Support and Community
Visit netgear.com/support to get your questions answered and access the latest downloads.
You can also check out our NETGEAR Community for helpful advice at
community.netgear.com.
Regulatory and Legal
Si ce produit est vendu au Canada, vous pouvez accéder à ce document en français canadien à
https://www.netgear.com/support/download/.
(If this product is sold in Canada, you can access this document in Canadian French at
https://www.netgear.com/support/download/.)
For regulatory compliance information including the EU Declaration of Conformity, visit
https://www.netgear.com/about/regulatory/.
See the regulatory compliance document before connecting the power supply.
For NETGEAR's Privacy Policy, visit
By using this device, you are agreeing to NETGEAR's Terms and Conditions at
https://www.netgear.com/about/terms-and-conditions. If you do not agree, return the device to your place of
purchase within your return period.
Do not use this device outdoors. For products that support Power over Ethernet (PoE), the PoE source is intended
for intra building connection only
https://www.netgear.com/about/privacy-policy.
.
Trademarks
© NETGEAR, Inc., NETGEAR, and the NETGEAR Logo are trademarks of NETGEAR, Inc. Any non-NETGEAR
trademarks are used for reference purposes only.
Revision History
Publication
Part Number
202-12093-02 March 2021 We added
202-12093-01 September 2020 Initial publication.
Publication
Date
Comments
We added
Auto-Trunk.
Auto-LAG.
Software Administration Manual2

M4250 Series Switches
Chapter 1 Introduction and Documentation
Available Publications . . . . . . . . . . . . . . . . . . . . . . . . . . . . . . . . . . . . . . . . . . . .17
Interface Naming Conventions. . . . . . . . . . . . . . . . . . . . . . . . . . . . . . . . . . . . . 17
Chapter 2 VLANs
VLAN Concepts . . . . . . . . . . . . . . . . . . . . . . . . . . . . . . . . . . . . . . . . . . . . . . . . .19
Auto-Trunk . . . . . . . . . . . . . . . . . . . . . . . . . . . . . . . . . . . . . . . . . . . . . . . . . . . . . . 20
CLI: Enable the Auto-Trunk Feature . . . . . . . . . . . . . . . . . . . . . . . . . . . . . .21
Main UI: Enable the Auto-Trunk Feature . . . . . . . . . . . . . . . . . . . . . . . . . .21
Create Two VLANs . . . . . . . . . . . . . . . . . . . . . . . . . . . . . . . . . . . . . . . . . . . . . . .22
CLI: Create Two VLANs . . . . . . . . . . . . . . . . . . . . . . . . . . . . . . . . . . . . . . . . .22
Main UI: Create Two VLANs . . . . . . . . . . . . . . . . . . . . . . . . . . . . . . . . . . . . .22
Assign Ports to VLAN 2. . . . . . . . . . . . . . . . . . . . . . . . . . . . . . . . . . . . . . . . . . . .23
CLI: Assign Ports to VLAN 2 . . . . . . . . . . . . . . . . . . . . . . . . . . . . . . . . . . . . .23
Main UI: Assign Ports to VLAN 2 . . . . . . . . . . . . . . . . . . . . . . . . . . . . . . . . .24
Create Three VLANs . . . . . . . . . . . . . . . . . . . . . . . . . . . . . . . . . . . . . . . . . . . . . .25
CLI: Create Three VLANs . . . . . . . . . . . . . . . . . . . . . . . . . . . . . . . . . . . . . . .25
Main UI: Create Three VLANs . . . . . . . . . . . . . . . . . . . . . . . . . . . . . . . . . . .25
Assign Ports to VLAN 3. . . . . . . . . . . . . . . . . . . . . . . . . . . . . . . . . . . . . . . . . . . .27
CLI: Assign Ports to VLAN 3 . . . . . . . . . . . . . . . . . . . . . . . . . . . . . . . . . . . . .27
Main UI: Assign Ports to VLAN 3 . . . . . . . . . . . . . . . . . . . . . . . . . . . . . . . . .28
Assign VLAN 3 as the Default VLAN for Port 1/0/2 . . . . . . . . . . . . . . . . . . . . 29
CLI: Assign VLAN 3 as the Default VLAN for Port 1/0/2 . . . . . . . . . . . . .29
Main UI: Assign VLAN 3 as the Default
VLAN for Port 1/0/2 . . . . . . . . . . . . . . . . . . . . . . . . . . . . . . . . . . . . . . . . . . . .29
Create a MAC-Based VLAN. . . . . . . . . . . . . . . . . . . . . . . . . . . . . . . . . . . . . . . .30
CLI: Create a MAC-Based VLAN . . . . . . . . . . . . . . . . . . . . . . . . . . . . . . . . .30
Main UI: Assign a MAC-Based VLAN . . . . . . . . . . . . . . . . . . . . . . . . . . . . .31
Create a Protocol-Based VLAN. . . . . . . . . . . . . . . . . . . . . . . . . . . . . . . . . . . . .33
CLI: Create a Protocol-Based VLAN . . . . . . . . . . . . . . . . . . . . . . . . . . . . . .33
Main UI: Create a Protocol-Based VLAN . . . . . . . . . . . . . . . . . . . . . . . . . .34
Virtual VLANs: Create an IP Subnet–Based VLAN . . . . . . . . . . . . . . . . . . . . . 38
CLI: Create an IP Subnet–Based VLAN. . . . . . . . . . . . . . . . . . . . . . . . . . . .39
Main UI: Create an IP Subnet–Based VLAN. . . . . . . . . . . . . . . . . . . . . . . .40
Voice VLANs. . . . . . . . . . . . . . . . . . . . . . . . . . . . . . . . . . . . . . . . . . . . . . . . . . . . .41
Voice VLAN Interoperation with Auto-VoIP . . . . . . . . . . . . . . . . . . . . . . . .43
CLI: Configure Voice VLAN and Prioritize Voice Traffic . . . . . . . . . . . . . .46
Main UI: Configure Voice VLAN and
Prioritize Voice Traffic . . . . . . . . . . . . . . . . . . . . . . . . . . . . . . . . . . . . . . . . . .48
Configure GARP VLAN Registration Protocol . . . . . . . . . . . . . . . . . . . . . . . .54
CLI: Enable GVRP . . . . . . . . . . . . . . . . . . . . . . . . . . . . . . . . . . . . . . . . . . . . .54
Main UI: Configure GVRP on switch A . . . . . . . . . . . . . . . . . . . . . . . . . . . .56
Main UI: Configure GVRP on Switch B . . . . . . . . . . . . . . . . . . . . . . . . . . . .58
Private VLANs. . . . . . . . . . . . . . . . . . . . . . . . . . . . . . . . . . . . . . . . . . . . . . . . . . . . 59
Assign Private-VLAN Types (Primary, Isolated, Community) . . . . . . . . . . . .61
CLI: Assign Private-VLAN Type (Primary, Isolated, Community). . . . . . .61
Main UI: Assign Private-VLAN Type
Software Administration Manual3

M4250 Series Switches
(Primary, Isolated, Community) . . . . . . . . . . . . . . . . . . . . . . . . . . . . . . . . . .62
Configure Private-VLAN Association . . . . . . . . . . . . . . . . . . . . . . . . . . . . . . . . 64
CLI: Configure Private-VLAN Association . . . . . . . . . . . . . . . . . . . . . . . . .64
Main UI: Configure Private-VLAN Association . . . . . . . . . . . . . . . . . . . . .64
Configure Private-VLAN Port Mode (Promiscuous, Host). . . . . . . . . . . . . . . 65
CLI: Configure Private-VLAN Port Mode (Promiscuous, Host) . . . . . . . .65
Main UI: Configure Private-VLAN Port
Mode (Promiscuous, Host) . . . . . . . . . . . . . . . . . . . . . . . . . . . . . . . . . . . . . .65
Configure Private-VLAN Host Ports . . . . . . . . . . . . . . . . . . . . . . . . . . . . . . . . . 67
CLI: Configure Private-VLAN Host Ports. . . . . . . . . . . . . . . . . . . . . . . . . . .67
Main UI: Assign Private-VLAN Port Host Ports. . . . . . . . . . . . . . . . . . . . . .67
Map Private-VLAN Promiscuous Port . . . . . . . . . . . . . . . . . . . . . . . . . . . . . . .69
CLI: Map Private-VLAN Promiscuous Port . . . . . . . . . . . . . . . . . . . . . . . . .69
Main UI: Map Private-VLAN Promiscuous Port . . . . . . . . . . . . . . . . . . . . .69
VLAN Access Ports and Trunk Ports . . . . . . . . . . . . . . . . . . . . . . . . . . . . . . . . . 70
CLI: Configure a VLAN Trunk . . . . . . . . . . . . . . . . . . . . . . . . . . . . . . . . . . . .71
Main UI: Configure a VLAN Trunk . . . . . . . . . . . . . . . . . . . . . . . . . . . . . . . .72
Chapter 3 LAGs
Link Aggregation Concepts. . . . . . . . . . . . . . . . . . . . . . . . . . . . . . . . . . . . . . .77
Add Ports to LAGs. . . . . . . . . . . . . . . . . . . . . . . . . . . . . . . . . . . . . . . . . . . . . . . . 78
CLI: Add Ports to the LAGs. . . . . . . . . . . . . . . . . . . . . . . . . . . . . . . . . . . . . .78
Main UI: Add Ports to LAGs . . . . . . . . . . . . . . . . . . . . . . . . . . . . . . . . . . . . .78
Auto-LAG . . . . . . . . . . . . . . . . . . . . . . . . . . . . . . . . . . . . . . . . . . . . . . . . . . . . . .80
CLI: Enable the Auto-LAG Feature . . . . . . . . . . . . . . . . . . . . . . . . . . . . . . .81
Main UI: Enable the Auto-LAG Feature . . . . . . . . . . . . . . . . . . . . . . . . . . .81
Chapter 4 Port Routing
Port Routing Concepts . . . . . . . . . . . . . . . . . . . . . . . . . . . . . . . . . . . . . . . . . . .83
Port Routing Configuration . . . . . . . . . . . . . . . . . . . . . . . . . . . . . . . . . . . . . . . .83
Enable Routing for the Switch . . . . . . . . . . . . . . . . . . . . . . . . . . . . . . . . . . . . .84
CLI: Enable Routing for the Switch . . . . . . . . . . . . . . . . . . . . . . . . . . . . . . .84
Main UI: Enable Routing for the Switch . . . . . . . . . . . . . . . . . . . . . . . . . . .85
Enable Routing for Ports on the Switch. . . . . . . . . . . . . . . . . . . . . . . . . . . . . . 85
CLI: Enable Routing for Ports on the Switch . . . . . . . . . . . . . . . . . . . . . . .86
Main UI: Enable Routing for Ports on the Switch . . . . . . . . . . . . . . . . . . .86
Add a Default Route. . . . . . . . . . . . . . . . . . . . . . . . . . . . . . . . . . . . . . . . . . . . . . 88
CLI: Add a Default Route . . . . . . . . . . . . . . . . . . . . . . . . . . . . . . . . . . . . . . .89
Main UI: Add a Default Route . . . . . . . . . . . . . . . . . . . . . . . . . . . . . . . . . . .89
Add a Static Route . . . . . . . . . . . . . . . . . . . . . . . . . . . . . . . . . . . . . . . . . . . . . . .90
CLI: Show Routing Information . . . . . . . . . . . . . . . . . . . . . . . . . . . . . . . . . .90
Main UI: Add a Static Route . . . . . . . . . . . . . . . . . . . . . . . . . . . . . . . . . . . . .90
Chapter 5 VLAN Routing
VLAN Routing Concepts. . . . . . . . . . . . . . . . . . . . . . . . . . . . . . . . . . . . . . . . . .93
Create Two VLANs . . . . . . . . . . . . . . . . . . . . . . . . . . . . . . . . . . . . . . . . . . . . . . .93
Software Administration Manual4

M4250 Series Switches
CLI: Create Two VLANs . . . . . . . . . . . . . . . . . . . . . . . . . . . . . . . . . . . . . . . . .94
Main UI: Create Two VLANs . . . . . . . . . . . . . . . . . . . . . . . . . . . . . . . . . . . . .95
Set Up VLAN Routing for the VLANs and the Switch . . . . . . . . . . . . . . . . . . 98
CLI: Set Up VLAN Routing for the VLANs and the Switch . . . . . . . . . . . .98
Main UI: Set Up VLAN Routing for the
VLANs and the Switch. . . . . . . . . . . . . . . . . . . . . . . . . . . . . . . . . . . . . . . . . .99
Chapter 6 RIP
Routing Information Protocol Concepts. . . . . . . . . . . . . . . . . . . . . . . . . . . 102
Enable Routing for the Switch. . . . . . . . . . . . . . . . . . . . . . . . . . . . . . . . . . . . .103
CLI: Enable Routing for the Switch . . . . . . . . . . . . . . . . . . . . . . . . . . . . . 103
Main UI: Enable Routing for the Switch . . . . . . . . . . . . . . . . . . . . . . . . . 103
Enable Routing for Ports . . . . . . . . . . . . . . . . . . . . . . . . . . . . . . . . . . . . . . . . 104
CLI: Enable Routing and Assigning IP Addresses for Ports
1/0/2 and 1/0/3 . . . . . . . . . . . . . . . . . . . . . . . . . . . . . . . . . . . . . . . . . . . . . 104
Main UI: Enable Routing for the Ports . . . . . . . . . . . . . . . . . . . . . . . . . . 104
Enable RIP on the Switch . . . . . . . . . . . . . . . . . . . . . . . . . . . . . . . . . . . . . . . 106
CLI: Enable RIP on the Switch . . . . . . . . . . . . . . . . . . . . . . . . . . . . . . . . . 106
Main UI: Enable RIP on the Switch . . . . . . . . . . . . . . . . . . . . . . . . . . . . . 106
Enable RIP for Ports 1/0/2 and 1/0/3 . . . . . . . . . . . . . . . . . . . . . . . . . . . . . . .107
CLI: Enable RIP for Ports 1/0/2 and 1/0/3 . . . . . . . . . . . . . . . . . . . . . . . 107
Main UI: Enable RIP for Ports 1/0/2 and 1/0/3 . . . . . . . . . . . . . . . . . . . 107
Configure VLAN Routing with RIP Support. . . . . . . . . . . . . . . . . . . . . . . . . .108
CLI: Configure VLAN Routing with RIP Support . . . . . . . . . . . . . . . . . . 109
Main UI: Configure VLAN Routing with RIP Support . . . . . . . . . . . . . . 110
Chapter 7 PBR
Policy-Based Routing Concepts. . . . . . . . . . . . . . . . . . . . . . . . . . . . . . . . . . 114
Route-Map Statements . . . . . . . . . . . . . . . . . . . . . . . . . . . . . . . . . . . . . . . . . .114
PBR Processing Logic . . . . . . . . . . . . . . . . . . . . . . . . . . . . . . . . . . . . . . . . . . . .115
PBR Configurations . . . . . . . . . . . . . . . . . . . . . . . . . . . . . . . . . . . . . . . . . . . . 117
PBR Example . . . . . . . . . . . . . . . . . . . . . . . . . . . . . . . . . . . . . . . . . . . . . . . . . . .117
Chapter 8 ARP
Proxy ARP Concepts . . . . . . . . . . . . . . . . . . . . . . . . . . . . . . . . . . . . . . . . . . . 121
Proxy ARP Examples . . . . . . . . . . . . . . . . . . . . . . . . . . . . . . . . . . . . . . . . . . . . .121
CLI: show ip interface . . . . . . . . . . . . . . . . . . . . . . . . . . . . . . . . . . . . . . . . 121
CLI: ip proxy-arp . . . . . . . . . . . . . . . . . . . . . . . . . . . . . . . . . . . . . . . . . . . . 122
Main UI: Configure Proxy ARP on a Port. . . . . . . . . . . . . . . . . . . . . . . . . 122
Chapter 9 ACLs
Access Control List Concepts . . . . . . . . . . . . . . . . . . . . . . . . . . . . . . . . . . . 124
MAC ACLs. . . . . . . . . . . . . . . . . . . . . . . . . . . . . . . . . . . . . . . . . . . . . . . . . . 124
IP ACLs . . . . . . . . . . . . . . . . . . . . . . . . . . . . . . . . . . . . . . . . . . . . . . . . . . . . 125
ACL Configuration. . . . . . . . . . . . . . . . . . . . . . . . . . . . . . . . . . . . . . . . . . . 125
Set Up an IP ACL with Two Rules . . . . . . . . . . . . . . . . . . . . . . . . . . . . . . . . . .125
Software Administration Manual5

M4250 Series Switches
CLI: Set Up an IP ACL with Two Rules. . . . . . . . . . . . . . . . . . . . . . . . . . . 126
Main UI: Set Up an IP ACL with Two Rules. . . . . . . . . . . . . . . . . . . . . . . 127
One-Way Access Using a TCP Flag in an ACL . . . . . . . . . . . . . . . . . . . . . . .130
CLI: Configure One-Way Access Using a TCP Flag in an ACL . . . . . . 131
Main UI: Configure One-Way Access Using
a TCP Flag in an ACL. . . . . . . . . . . . . . . . . . . . . . . . . . . . . . . . . . . . . . . . . 134
Use ACLs to Configure Isolated VLANs on a Layer 3 Switch . . . . . . . . . 146
CLI: Configure One-Way Access Using a TCP Flag in ACL
Commands . . . . . . . . . . . . . . . . . . . . . . . . . . . . . . . . . . . . . . . . . . . . . . . . . 147
Main UI: Configure One-Way Access Using
a TCP Flag in an ACL. . . . . . . . . . . . . . . . . . . . . . . . . . . . . . . . . . . . . . . . . 149
Set up a MAC ACL with Two Rules . . . . . . . . . . . . . . . . . . . . . . . . . . . . . . . . .158
CLI: Set up a MAC ACL with Two Rules . . . . . . . . . . . . . . . . . . . . . . . . . 158
Main UI: Set up a MAC ACL with Two Rules . . . . . . . . . . . . . . . . . . . . . 159
Configure ACL Mirroring . . . . . . . . . . . . . . . . . . . . . . . . . . . . . . . . . . . . . . . . .161
CLI: Configure ACL Mirroring . . . . . . . . . . . . . . . . . . . . . . . . . . . . . . . . . 162
Main UI: Configure ACL Mirroring . . . . . . . . . . . . . . . . . . . . . . . . . . . . . 163
Configur
Add ACL Remarks. . . . . . . . . . . . . . . . . . . . . . . . . . . . . . . . . . . . . . . . . . . . . . .172
Change the Sequence of an ACL Rule . . . . . . . . . . . . . . . . . . . . . . . . . . . . .173
Configure a Management ACL. . . . . . . . . . . . . . . . . . . . . . . . . . . . . . . . . . . .176
Configure IPv6 ACLs. . . . . . . . . . . . . . . . . . . . . . . . . . . . . . . . . . . . . . . . . . . . .177
e ACL Redirection . . . . . . . . . . . . . . . . . . . . . . . . . . . . . . . . . . . . . 167
CLI: Redirect a Traffic Stream. . . . . . . . . . . . . . . . . . . . . . . . . . . . . . . . . . 167
Main UI: Redirect a Traffic Stream . . . . . . . . . . . . . . . . . . . . . . . . . . . . . . 168
Example 1: Permit Any Host to Access the Switch Through
Telnet or HTTP:. . . . . . . . . . . . . . . . . . . . . . . . . . . . . . . . . . . . . . . . . . . . . . 177
Example 2: Permit a Specific Host to Access the Switch
Through SSH Only. . . . . . . . . . . . . . . . . . . . . . . . . . . . . . . . . . . . . . . . . . . 177
CLI: Configure an IPv6 ACL . . . . . . . . . . . . . . . . . . . . . . . . . . . . . . . . . . . 179
Main UI: Configure an IPv6 ACL . . . . . . . . . . . . . . . . . . . . . . . . . . . . . . . 181
Chapter 10 CoS Queuing
CoS Queuing Concepts . . . . . . . . . . . . . . . . . . . . . . . . . . . . . . . . . . . . . . . . 187
CoS Queue Mapping. . . . . . . . . . . . . . . . . . . . . . . . . . . . . . . . . . . . . . . . . . . .187
Trusted Ports. . . . . . . . . . . . . . . . . . . . . . . . . . . . . . . . . . . . . . . . . . . . . . . . 187
Untrusted Ports . . . . . . . . . . . . . . . . . . . . . . . . . . . . . . . . . . . . . . . . . . . . . 188
CoS Queue Configuration. . . . . . . . . . . . . . . . . . . . . . . . . . . . . . . . . . . . . . . .188
Show the Trust Mode for a Class of Service. . . . . . . . . . . . . . . . . . . . . . . . 189
CLI: Show the Trust Mode for a Class of Service . . . . . . . . . . . . . . . . . 189
Main UI: Show the Trust Mode for a Class
of Service . . . . . . . . . . . . . . . . . . . . . . . . . . . . . . . . . . . . . . . . . . . . . . . . . . 189
Set the Trust Mode for a Class of Service. . . . . . . . . . . . . . . . . . . . . . . . . . 190
CLI: Set the Trust Mode for a Class of Service . . . . . . . . . . . . . . . . . . . 190
Main UI: Set the Trust Mode for a Class of
Service. . . . . . . . . . . . . . . . . . . . . . . . . . . . . . . . . . . . . . . . . . . . . . . . . . . . . 190
Configure Cos-queue Min-bandwidth and
Strict Priority Scheduler Mode. . . . . . . . . . . . . . . . . . . . . . . . . . . . . . . . . . . 191
CLI: Configure Cos-queue Min-bandwidth and Strict
Software Administration Manual6

M4250 Series Switches
Priority Scheduler Mode. . . . . . . . . . . . . . . . . . . . . . . . . . . . . . . . . . . . . . 191
Main UI: Configure CoS-queue
Min-bandwidth and Strict Priority Scheduler Mode. . . . . . . . . . . . . . . 191
Set the CoS Trust Mode for an Interface . . . . . . . . . . . . . . . . . . . . . . . . . . . .193
CLI: Set the CoS Trust Mode for an Interface . . . . . . . . . . . . . . . . . . . . 193
Main UI: Set the CoS Trust Mode for an
Interface . . . . . . . . . . . . . . . . . . . . . . . . . . . . . . . . . . . . . . . . . . . . . . . . . . . 193
Configure Traffic Shaping . . . . . . . . . . . . . . . . . . . . . . . . . . . . . . . . . . . . . . . .194
CLI: Configure Traffic Shaping. . . . . . . . . . . . . . . . . . . . . . . . . . . . . . . . . 194
Main UI: Configure Traffic Shaping. . . . . . . . . . . . . . . . . . . . . . . . . . . . . 195
Chapter 11 DiffServ
Differentiated Services Concepts . . . . . . . . . . . . . . . . . . . . . . . . . . . . . . . . 197
DiffServ . . . . . . . . . . . . . . . . . . . . . . . . . . . . . . . . . . . . . . . . . . . . . . . . . . . . . . . .198
CLI: Configure DiffServ . . . . . . . . . . . . . . . . . . . . . . . . . . . . . . . . . . . . . . . . . .198
Main UI: Configure DiffServ . . . . . . . . . . . . . . . . . . . . . . . . . . . . . . . . . . . 201
DiffServ for VoIP. . . . . . . . . . . . . . . . . . . . . . . . . . . . . . . . . . . . . . . . . . . . . . . . .214
CLI: Configure DiffServ for VoIP . . . . . . . . . . . . . . . . . . . . . . . . . . . . . . . 215
Main UI: Diffserv for VoIP . . . . . . . . . . . . . . . . . . . . . . . . . . . . . . . . . . . . . 216
Auto VoIP . . . . . . . . . . . . . . . . . . . . . . . . . . . . . . . . . . . . . . . . . . . . . . . . . . . . . .222
Protocol-Based Auto VoIP . . . . . . . . . . . . . . . . . . . . . . . . . . . . . . . . . . . . 222
OUI-Based Auto VoIP . . . . . . . . . . . . . . . . . . . . . . . . . . . . . . . . . . . . . . . . 222
Example 1: Enable Protocol-Based Auto VoIP . . . . . . . . . . . . . . . . . . . 223
Example 2: Change the Queue of Protocol-Based Auto VoIP . . . . . . 224
Example 3: Create an Auto VoIP VLAN . . . . . . . . . . . . . . . . . . . . . . . . . 226
DiffServ for IPv6. . . . . . . . . . . . . . . . . . . . . . . . . . . . . . . . . . . . . . . . . . . . . . . . .228
CLI: Configure DiffServ for IPv6. . . . . . . . . . . . . . . . . . . . . . . . . . . . . . . . 228
Main UI: Configure DiffServ for IPv6. . . . . . . . . . . . . . . . . . . . . . . . . . . . 229
Color Conform Policy . . . . . . . . . . . . . . . . . . . . . . . . . . . . . . . . . . . . . . . . . . . .235
CLI: Configure a Color Conform Policy . . . . . . . . . . . . . . . . . . . . . . . . . 236
Main UI: Configure a Color Conform Policy . . . . . . . . . . . . . . . . . . . . . 237
WRED Explicit Congestion Notification . . . . . . . . . . . . . . . . . . . . . . . . . . . .243
Chapter 12 IGMP Snooping and Querier
Internet Group Management Protocol Concepts. . . . . . . . . . . . . . . . . . . 247
IGMP Snooping. . . . . . . . . . . . . . . . . . . . . . . . . . . . . . . . . . . . . . . . . . . . . . . . .247
CLI: Enable IGMP Snooping . . . . . . . . . . . . . . . . . . . . . . . . . . . . . . . . . . 247
Main UI: Enable IGMP Snooping . . . . . . . . . . . . . . . . . . . . . . . . . . . . . . 248
Show igmpsnooping . . . . . . . . . . . . . . . . . . . . . . . . . . . . . . . . . . . . . . . . . . . .248
CLI: Show igmpsnooping. . . . . . . . . . . . . . . . . . . . . . . . . . . . . . . . . . . . . 248
Main UI: Show igmpsnooping. . . . . . . . . . . . . . . . . . . . . . . . . . . . . . . . . 249
Show mac-address-table igmpsnooping . . . . . . . . . . . . . . . . . . . . . . . . . . .249
CLI for IGMPv1 and IGMPv2: Show mac-address-table
igmpsnooping . . . . . . . . . . . . . . . . . . . . . . . . . . . . . . . . . . . . . . . . . . . . . . 249
CLI for IGMPv3: show igmpsnooping ssm entries . . . . . . . . . . . . . . . . 250
Main UI: Show mac-address-table igmpsnooping. . . . . . . . . . . . . . . . 250
External Multicast Router. . . . . . . . . . . . . . . . . . . . . . . . . . . . . . . . . . . . . . . . .250
Software Administration Manual7

M4250 Series Switches
CLI: Configure the Switch with an External Multicast Router . . . . . . . 250
Main UI: Configure the Switch with an
External Multicast Router . . . . . . . . . . . . . . . . . . . . . . . . . . . . . . . . . . . . . 251
Multicast Router Using VLAN . . . . . . . . . . . . . . . . . . . . . . . . . . . . . . . . . . . . .251
CLI: Configure the Switch with a Multicast Router Using VLAN. . . . . 251
Main UI: Configure the Switch with a
Multicast Router Using VLAN. . . . . . . . . . . . . . . . . . . . . . . . . . . . . . . . . . 252
IGMP Querier Concepts . . . . . . . . . . . . . . . . . . . . . . . . . . . . . . . . . . . . . . . . .252
Enable IGMP Querier. . . . . . . . . . . . . . . . . . . . . . . . . . . . . . . . . . . . . . . . . . . .253
CLI: Enable IGMP Querier . . . . . . . . . . . . . . . . . . . . . . . . . . . . . . . . . . . . 253
Main UI: Enable IGMP Querier . . . . . . . . . . . . . . . . . . . . . . . . . . . . . . . . 254
Show IGMP Querier Status . . . . . . . . . . . . . . . . . . . . . . . . . . . . . . . . . . . . . . .256
CLI: Show IGMP Querier Status. . . . . . . . . . . . . . . . . . . . . . . . . . . . . . . . 256
Main UI: Show IGMP Querier Status. . . . . . . . . . . . . . . . . . . . . . . . . . . . 256
Chapter 13 MVR
Multicast VLAN Registration. . . . . . . . . . . . . . . . . . . . . . . . . . . . . . . . . . . . . 258
Configure MVR in Compatible Mode . . . . . . . . . . . . . . . . . . . . . . . . . . . . . .259
CLI: Configure MVR in Compatible Mode. . . . . . . . . . . . . . . . . . . . . . . 260
Main UI: Configure MVR in Compatible Mode. . . . . . . . . . . . . . . . . . . 262
Configure MVR in Dynamic Mode . . . . . . . . . . . . . . . . . . . . . . . . . . . . . . . . .266
CLI: Configure MVR in Dynamic Mode . . . . . . . . . . . . . . . . . . . . . . . . . 266
Main UI: Configure MVR in Dynamic Mode . . . . . . . . . . . . . . . . . . . . . 268
Chapter 14 Security Management
Port Security Concepts . . . . . . . . . . . . . . . . . . . . . . . . . . . . . . . . . . . . . . . . . 274
Set the Dynamic and Static Limit on Port 1/0/1 . . . . . . . . . . . . . . . . . . . . 275
CLI: Set the Dynamic and Static Limit on Port 1/0/1 . . . . . . . . . . . . . . 275
Main UI: Set the Dynamic and Static Limit on Port 1/0/1 . . . . . . . . . . 275
Convert the Dynamic Address Learned
from 1/0/1 to a Static Address. . . . . . . . . . . . . . . . . . . . . . . . . . . . . . . . . . . 277
CLI: Convert the Dynamic Address Learned from 1/0/1 to
the Static Address . . . . . . . . . . . . . . . . . . . . . . . . . . . . . . . . . . . . . . . . . . . 277
Main UI: Convert the Dynamic Address
Learned from 1/0/1 to the Static Address . . . . . . . . . . . . . . . . . . . . . . . 277
Create a Static Address . . . . . . . . . . . . . . . . . . . . . . . . . . . . . . . . . . . . . . . . . .278
CLI: Create a Static Address . . . . . . . . . . . . . . . . . . . . . . . . . . . . . . . . . . 278
Main UI: Create a Static Address. . . . . . . . . . . . . . . . . . . . . . . . . . . . . . . 278
Protected Ports . . . . . . . . . . . . . . . . . . . . . . . . . . . . . . . . . . . . . . . . . . . . . . . . 279
CLI: Configure a Protected Port to Isolate Ports on the Switch. . . . . . 280
Main UI: Configure a Protected Port to
Isolate Ports on the Switch . . . . . . . . . . . . . . . . . . . . . . . . . . . . . . . . . . . . 282
802.1x Port Security . . . . . . . . . . . . . . . . . . . . . . . . . . . . . . . . . . . . . . . . . . . . .285
CLI: Authenticating dot1x Users by a RADIUS Server . . . . . . . . . . . . . 286
Main UI: Authenticating dot1x Users by a
RADIUS Server . . . . . . . . . . . . . . . . . . . . . . . . . . . . . . . . . . . . . . . . . . . . . . 287
Create a Guest VLAN . . . . . . . . . . . . . . . . . . . . . . . . . . . . . . . . . . . . . . . . . . . .292
Software Administration Manual8

M4250 Series Switches
CLI: Create a Guest VLAN . . . . . . . . . . . . . . . . . . . . . . . . . . . . . . . . . . . . 293
Main UI: Create a Guest VLAN. . . . . . . . . . . . . . . . . . . . . . . . . . . . . . . . . 294
Assign VLANs Using RADIUS . . . . . . . . . . . . . . . . . . . . . . . . . . . . . . . . . . . . .298
CLI: Assign VLANS Using RADIUS . . . . . . . . . . . . . . . . . . . . . . . . . . . . . 299
Main UI: Assign VLANS Using RADIUS. . . . . . . . . . . . . . . . . . . . . . . . . . 301
Dynamic ARP Inspection. . . . . . . . . . . . . . . . . . . . . . . . . . . . . . . . . . . . . . . . 304
CLI: Configure Dynamic ARP Inspection . . . . . . . . . . . . . . . . . . . . . . . . 305
Main UI: Configure Dynamic ARP Inspection . . . . . . . . . . . . . . . . . . . . 306
Static Mapping . . . . . . . . . . . . . . . . . . . . . . . . . . . . . . . . . . . . . . . . . . . . . . . . .310
CLI: Configure Static Mapping . . . . . . . . . . . . . . . . . . . . . . . . . . . . . . . . 310
Main UI: Configure Static Mapping . . . . . . . . . . . . . . . . . . . . . . . . . . . . 310
DHCP Snooping . . . . . . . . . . . . . . . . . . . . . . . . . . . . . . . . . . . . . . . . . . . . . . . .312
CLI: Configure DHCP Snooping . . . . . . . . . . . . . . . . . . . . . . . . . . . . . . . 312
Main UI: Configure DHCP Snooping . . . . . . . . . . . . . . . . . . . . . . . . . . . 313
Find a Rogue DHCP Server . . . . . . . . . . . . . . . . . . . . . . . . . . . . . . . . . . . . . 316
CLI: Find a Rogue DHCP server . . . . . . . . . . . . . . . . . . . . . . . . . . . . . . . 316
Main UI: Find a Rogue DHCP server. . . . . . . . . . . . . . . . . . . . . . . . . . . . 317
Enter Static Binding into the Binding Database . . . . . . . . . . . . . . . . . . . . .319
CLI: Enter Static Binding into the Binding Database . . . . . . . . . . . . . . 319
Main UI: Enter Static Binding into the
Binding Database . . . . . . . . . . . . . . . . . . . . . . . . . . . . . . . . . . . . . . . . . . . 319
Maximum Rate of DHCP Messages . . . . . . . . . . . . . . . . . . . . . . . . . . . . . . . .320
CLI: Configure the Maximum Rate of DHCP Messages. . . . . . . . . . . . 320
Main UI: Configure the Maximum Rate of
DHCP Messages . . . . . . . . . . . . . . . . . . . . . . . . . . . . . . . . . . . . . . . . . . . . 321
IP Source Guard . . . . . . . . . . . . . . . . . . . . . . . . . . . . . . . . . . . . . . . . . . . . . . . .321
CLI: Configure Dynamic ARP Inspection . . . . . . . . . . . . . . . . . . . . . . . . 322
Main UI: Configure Dynamic ARP Inspection . . . . . . . . . . . . . . . . . . . . 324
Command Authorization . . . . . . . . . . . . . . . . . . . . . . . . . . . . . . . . . . . . . . . . .327
CLI Example 1: Configure Command Authorization by a
TACACS+ Server . . . . . . . . . . . . . . . . . . . . . . . . . . . . . . . . . . . . . . . . . . . . 328
CLI Example 2: Configure Command Authorization by a
RADIUS Server . . . . . . . . . . . . . . . . . . . . . . . . . . . . . . . . . . . . . . . . . . . . . . 330
Privileged Exec Command Mode Authorization . . . . . . . . . . . . . . . . . . . . .333
CLI Example 1: Configure EXEC Authorization by a
TACACS+ Server . . . . . . . . . . . . . . . . . . . . . . . . . . . . . . . . . . . . . . . . . . . . 333
CLI Example 2: Configure EXEC Authorization by a RADIUS Server 336
Accounting. . . . . . . . . . . . . . . . . . . . . . . . . . . . . . . . . . . . . . . . . . . . . . . . . . . . .338
CLI: Configure Telnet Command Accounting by a
TACACS+ Server . . . . . . . . . . . . . . . . . . . . . . . . . . . . . . . . . . . . . . . . . . . . 338
Configure Telnet EXEC Accounting by RADIUS Server. . . . . . . . . . . . 339
Use the Authentication Manager to Set Up
an Authentication Method List. . . . . . . . . . . . . . . . . . . . . . . . . . . . . . . . . . . 340
Configure a Dot1x–MAB Authentication Method List with
Dot1x–MAB Priority . . . . . . . . . . . . . . . . . . . . . . . . . . . . . . . . . . . . . . . . . . 341
Configure a Dot1x–MAB Authentication Method List with
MAB–Dot1x Priority . . . . . . . . . . . . . . . . . . . . . . . . . . . . . . . . . . . . . . . . . . 342
Configure a Dot1x, MAB, and Captive Portal
Authentication Method List with Default Priority . . . . . . . . . . . . . . . . . 342
Software Administration Manual9

M4250 Series Switches
RADIUS Change of Authorization . . . . . . . . . . . . . . . . . . . . . . . . . . . . . . . . .344
IPv6 Stateless RA Guard. . . . . . . . . . . . . . . . . . . . . . . . . . . . . . . . . . . . . . . . . .346
Changing the SSH/Telnet Login Method to Radius . . . . . . . . . . . . . . . . . .347
CLI: Change the SSH/Telnet Login Method to Radius. . . . . . . . . . . . . 347
GUI: Change the SSH/Telnet Login Method to Radius . . . . . . . . . . . . 348
Chapter 15 MAB
MAC Authentication Bypass Concepts . . . . . . . . . . . . . . . . . . . . . . . . . . . 351
Configure MAC Authentication Bypass on a Switch . . . . . . . . . . . . . . . . . .353
Configure a Network Policy Server on a
Microsoft Windows Server 2008 R2 or Later Server . . . . . . . . . . . . . . . . . .357
Configure an Active Directory on a
Microsoft Windows Server 2008 R2 or Later Server . . . . . . . . . . . . . . . . . .365
Reduce the MAB Authentication Time . . . . . . . . . . . . . . . . . . . . . . . . . . . . 367
CLI: Reduce the Authentication Time for MAB. . . . . . . . . . . . . . . . . . . 367
Main UI: Reduce the Authentication Time for MAB . . . . . . . . . . . . . . . 367
Chapter 16 SNTP
Simple Network Time Protocol Concepts . . . . . . . . . . . . . . . . . . . . . . . . . 369
Show SNTP (CLI Only) . . . . . . . . . . . . . . . . . . . . . . . . . . . . . . . . . . . . . . . . . . .369
show sntp . . . . . . . . . . . . . . . . . . . . . . . . . . . . . . . . . . . . . . . . . . . . . . . . . . 369
show sntp client . . . . . . . . . . . . . . . . . . . . . . . . . . . . . . . . . . . . . . . . . . . . . 369
show sntp server . . . . . . . . . . . . . . . . . . . . . . . . . . . . . . . . . . . . . . . . . . . . 370
Configure SNTP . . . . . . . . . . . . . . . . . . . . . . . . . . . . . . . . . . . . . . . . . . . . . . . .370
CLI: Configure SNTP . . . . . . . . . . . . . . . . . . . . . . . . . . . . . . . . . . . . . . . . . 370
Main UI: Configure SNTP . . . . . . . . . . . . . . . . . . . . . . . . . . . . . . . . . . . . . 372
Set the Time Zone (CLI Only) . . . . . . . . . . . . . . . . . . . . . . . . . . . . . . . . . . . . . 373
Set the Named SNTP Server . . . . . . . . . . . . . . . . . . . . . . . . . . . . . . . . . . . . . .373
CLI: Set the Named SNTP Server . . . . . . . . . . . . . . . . . . . . . . . . . . . . . . 373
Main UI: Set the Named SNTP Server . . . . . . . . . . . . . . . . . . . . . . . . . . 374
Chapter 17 Tools
Traceroute. . . . . . . . . . . . . . . . . . . . . . . . . . . . . . . . . . . . . . . . . . . . . . . . . . . . 377
CLI: Traceroute. . . . . . . . . . . . . . . . . . . . . . . . . . . . . . . . . . . . . . . . . . . . . . 377
Main UI: Traceroute . . . . . . . . . . . . . . . . . . . . . . . . . . . . . . . . . . . . . . . . . . 378
Configuration Scripting . . . . . . . . . . . . . . . . . . . . . . . . . . . . . . . . . . . . . . . . . .378
script Command . . . . . . . . . . . . . . . . . . . . . . . . . . . . . . . . . . . . . . . . . . . . 379
script list Command and script delete Command. . . . . . . . . . . . . . . . 379
script apply running-config.scr Command . . . . . . . . . . . . . . . . . . . . . . 380
Create a Configuration Script . . . . . . . . . . . . . . . . . . . . . . . . . . . . . . . . . 380
Upload a Configuration Script. . . . . . . . . . . . . . . . . . . . . . . . . . . . . . . . . 380
Pre-Login Banner . . . . . . . . . . . . . . . . . . . . . . . . . . . . . . . . . . . . . . . . . . . . . . 381
Create a Pre-Login Banner. . . . . . . . . . . . . . . . . . . . . . . . . . . . . . . . . . . . 381
Port Mirroring. . . . . . . . . . . . . . . . . . . . . . . . . . . . . . . . . . . . . . . . . . . . . . . . . . .382
CLI: Specify the Source (Mirrored) Ports and Destination (Probe). . . 382
Main UI: Specify the Source (Mirrored)
Software Administration Manual10

M4250 Series Switches
Ports and Destination (Probe) . . . . . . . . . . . . . . . . . . . . . . . . . . . . . . . . . 383
Remote SPAN . . . . . . . . . . . . . . . . . . . . . . . . . . . . . . . . . . . . . . . . . . . . . . . . . .383
CLI: Enable RSPAN on a Switch. . . . . . . . . . . . . . . . . . . . . . . . . . . . . . . . 384
Dual Image. . . . . . . . . . . . . . . . . . . . . . . . . . . . . . . . . . . . . . . . . . . . . . . . . . . . .386
CLI: Download a Backup Image and Make It Active . . . . . . . . . . . . . . 387
Main UI: Download a Backup Image and
Make It Active. . . . . . . . . . . . . . . . . . . . . . . . . . . . . . . . . . . . . . . . . . . . . . . 388
Outbound Telnet. . . . . . . . . . . . . . . . . . . . . . . . . . . . . . . . . . . . . . . . . . . . . . . .389
CLI: show network . . . . . . . . . . . . . . . . . . . . . . . . . . . . . . . . . . . . . . . . . . . 390
CLI: show telnet . . . . . . . . . . . . . . . . . . . . . . . . . . . . . . . . . . . . . . . . . . . . . 390
CLI: transport output telnet . . . . . . . . . . . . . . . . . . . . . . . . . . . . . . . . . . . 391
Main UI: Configure Telnet . . . . . . . . . . . . . . . . . . . . . . . . . . . . . . . . . . . . 392
CLI: Configure the Session Limit and Session Time-out . . . . . . . . . . . 392
Main UI: Configure the Session Time-out . . . . . . . . . . . . . . . . . . . . . . . 393
Error Disablement and Automatic Error Recovery . . . . . . . . . . . . . . . . . . .393
Loop Protection. . . . . . . . . . . . . . . . . . . . . . . . . . . . . . . . . . . . . . . . . . . . . . . . .395
Nondisruptive Configuration Management. . . . . . . . . . . . . . . . . . . . . . . . .397
Full Memory Dump . . . . . . . . . . . . . . . . . . . . . . . . . . . . . . . . . . . . . . . . . . . . 398
Chapter 18 Syslog
Syslog Concepts . . . . . . . . . . . . . . . . . . . . . . . . . . . . . . . . . . . . . . . . . . . . . . 400
Show Logging . . . . . . . . . . . . . . . . . . . . . . . . . . . . . . . . . . . . . . . . . . . . . . . . . .400
CLI: Show Logging . . . . . . . . . . . . . . . . . . . . . . . . . . . . . . . . . . . . . . . . . . 400
Main UI: Show Logging . . . . . . . . . . . . . . . . . . . . . . . . . . . . . . . . . . . . . . 401
Show Logging Buffered . . . . . . . . . . . . . . . . . . . . . . . . . . . . . . . . . . . . . . . . 403
CLI: Show Logging Buffered . . . . . . . . . . . . . . . . . . . . . . . . . . . . . . . . . . 403
Main UI: Show Logging Buffered . . . . . . . . . . . . . . . . . . . . . . . . . . . . . . 404
Show Logging Traplogs . . . . . . . . . . . . . . . . . . . . . . . . . . . . . . . . . . . . . . . . . .404
CLI: Show Logging Traplogs . . . . . . . . . . . . . . . . . . . . . . . . . . . . . . . . . . 404
Main UI: Show Logging Trap Logs . . . . . . . . . . . . . . . . . . . . . . . . . . . . . 405
Show Logging Hosts . . . . . . . . . . . . . . . . . . . . . . . . . . . . . . . . . . . . . . . . . . . .405
CLI: Show Logging Hosts . . . . . . . . . . . . . . . . . . . . . . . . . . . . . . . . . . . . . 405
Main UI: Show Logging Hosts . . . . . . . . . . . . . . . . . . . . . . . . . . . . . . . . . 406
Configure Logging for a Port . . . . . . . . . . . . . . . . . . . . . . . . . . . . . . . . . . . . .406
CLI: Configure Logging for the Port . . . . . . . . . . . . . . . . . . . . . . . . . . . . 406
Main UI: Configure Logging for the Port . . . . . . . . . . . . . . . . . . . . . . . . 407
Email Alerting . . . . . . . . . . . . . . . . . . . . . . . . . . . . . . . . . . . . . . . . . . . . . . . . . .408
CLI: Send Log Messages to admin@switch.com Using
Account aaaa@netgear.com . . . . . . . . . . . . . . . . . . . . . . . . . . . . . . . . . . 409
Chapter 19 SNMP
Add a New Community . . . . . . . . . . . . . . . . . . . . . . . . . . . . . . . . . . . . . . . . 411
CLI: Add a New Community . . . . . . . . . . . . . . . . . . . . . . . . . . . . . . . . . . 411
Main UI: Add a New Community . . . . . . . . . . . . . . . . . . . . . . . . . . . . . . 411
Enable SNMP Trap . . . . . . . . . . . . . . . . . . . . . . . . . . . . . . . . . . . . . . . . . . . . . 412
CLI: Enable SNMP Trap. . . . . . . . . . . . . . . . . . . . . . . . . . . . . . . . . . . . . . . 412
Main UI: Enable SNMP Trap . . . . . . . . . . . . . . . . . . . . . . . . . . . . . . . . . . . 412
Software Administration Manual11

M4250 Series Switches
SNMP Version 3. . . . . . . . . . . . . . . . . . . . . . . . . . . . . . . . . . . . . . . . . . . . . . . . .413
CLI: Configure SNMPv3 . . . . . . . . . . . . . . . . . . . . . . . . . . . . . . . . . . . . . . 413
Main UI: Configure SNMPv3 . . . . . . . . . . . . . . . . . . . . . . . . . . . . . . . . . . 413
sFlow . . . . . . . . . . . . . . . . . . . . . . . . . . . . . . . . . . . . . . . . . . . . . . . . . . . . . . . . 415
CLI: Configure Statistical Packet-Based Sampling of Packet
Flows with sFlow . . . . . . . . . . . . . . . . . . . . . . . . . . . . . . . . . . . . . . . . . . . . 416
Main UI: Configure Statistical
Packet-based Sampling with sFlow . . . . . . . . . . . . . . . . . . . . . . . . . . . . 417
Time-Based Sampling of Counters with sFlow . . . . . . . . . . . . . . . . . . . . . .418
CLI: Configure Time-Based Sampling of Counters with sFlow . . . . . 418
Main UI: Configure Time-Based Sampling
of Counters with sFlow . . . . . . . . . . . . . . . . . . . . . . . . . . . . . . . . . . . . . . . 419
Chapter 20 DNS
Domain Name System Concepts . . . . . . . . . . . . . . . . . . . . . . . . . . . . . . . . 421
Specify Two DNS Servers. . . . . . . . . . . . . . . . . . . . . . . . . . . . . . . . . . . . . . . . .421
CLI: Specify Two DNS Servers . . . . . . . . . . . . . . . . . . . . . . . . . . . . . . . . . 421
Main UI: Specify Two DNS Servers . . . . . . . . . . . . . . . . . . . . . . . . . . . . . 422
Manually Add a Host Name and an IP Address. . . . . . . . . . . . . . . . . . . . . . 422
CLI: Manually Add a Host Name and an IP Address . . . . . . . . . . . . . . 422
Main UI: Manually Add a Host Name and
an IP Address . . . . . . . . . . . . . . . . . . . . . . . . . . . . . . . . . . . . . . . . . . . . . . . 423
Chapter 21 DHCP Server
Dynamic Host Configuration Protocol Concepts . . . . . . . . . . . . . . . . . . . 425
Configure a DHCP Server in Dynamic Mode. . . . . . . . . . . . . . . . . . . . . . . .425
CLI: Configure a DHCP Server in Dynamic Mode . . . . . . . . . . . . . . . . 425
Main UI: Configure a DHCP Server in
Dynamic Mode. . . . . . . . . . . . . . . . . . . . . . . . . . . . . . . . . . . . . . . . . . . . . . 426
Configure a DHCP Server that Assigns a Fixed IP Address . . . . . . . . . . . .428
CLI: Configure a DHCP Server that Assigns a Fixed IP Address . . . . 429
Main UI: Configure a DHCP Server that
Assigns a Fixed IP Address . . . . . . . . . . . . . . . . . . . . . . . . . . . . . . . . . . . 429
Chapter 22 DHCPv6 Server
Dynamic Host Configuration Protocol
Version 6 Concepts . . . . . . . . . . . . . . . . . . . . . . . . . . . . . . . . . . . . . . . . . . . . 432
CLI: Configure DHCPv6 Prefix Delegation . . . . . . . . . . . . . . . . . . . . . . . . . .433
Main UI: Configure DHCPv6 Prefix Delegation. . . . . . . . . . . . . . . . . . . . . 435
Configure a Stateless DHCPv6 Server. . . . . . . . . . . . . . . . . . . . . . . . . . . . . . 439
CLI: Configure a Stateless DHCPv6 Server . . . . . . . . . . . . . . . . . . . . . . 439
Main UI: Configure a Stateless DHCPv6 Server . . . . . . . . . . . . . . . . . . 440
Configure a Stateful DHCPv6 Server . . . . . . . . . . . . . . . . . . . . . . . . . . . . . . .443
CLI: Configure a Stateful DHCPv6 Server . . . . . . . . . . . . . . . . . . . . . . . 443
Main UI: Configure a Stateful DHCPv6 Server . . . . . . . . . . . . . . . . . . . 443
CLI: Set Up a Configuration With a DHCPv6 Server and DHCPv6 Relay.447
Software Administration Manual12

M4250 Series Switches
Configure the DHCPv6 Server. . . . . . . . . . . . . . . . . . . . . . . . . . . . . . . . . 448
Configure the DHCPv6 Relay. . . . . . . . . . . . . . . . . . . . . . . . . . . . . . . . . . 449
Chapter 23 DVLANs and Private VLANs
Double VLANs . . . . . . . . . . . . . . . . . . . . . . . . . . . . . . . . . . . . . . . . . . . . . . . . 452
CLI: Enable a Double VLAN. . . . . . . . . . . . . . . . . . . . . . . . . . . . . . . . . . . 453
Main UI: Enable a Double VLAN . . . . . . . . . . . . . . . . . . . . . . . . . . . . . . . 453
Private VLAN Groups. . . . . . . . . . . . . . . . . . . . . . . . . . . . . . . . . . . . . . . . . . . 456
CLI: Create a Private VLAN Group . . . . . . . . . . . . . . . . . . . . . . . . . . . . . 457
Main UI: Create a Private VLAN Group. . . . . . . . . . . . . . . . . . . . . . . . . . 458
Chapter 24 STP
Spanning Tree Protocol Concepts. . . . . . . . . . . . . . . . . . . . . . . . . . . . . . . . 463
Configure Classic STP (802.1d) . . . . . . . . . . . . . . . . . . . . . . . . . . . . . . . . . . .463
CLI: Configure Classic STP (802.1d). . . . . . . . . . . . . . . . . . . . . . . . . . . . 463
Main UI: Configure Classic STP (802.1d) . . . . . . . . . . . . . . . . . . . . . . . . 463
Configure Rapid STP (802.1w). . . . . . . . . . . . . . . . . . . . . . . . . . . . . . . . . . . 465
CLI: Configure Rapid STP (802.1w). . . . . . . . . . . . . . . . . . . . . . . . . . . . . 465
Main UI: Configure Rapid STP (802.1w). . . . . . . . . . . . . . . . . . . . . . . . . 465
Configure Multiple STP (802.1s). . . . . . . . . . . . . . . . . . . . . . . . . . . . . . . . . . .467
CLI: Configure Multiple STP (802.1s) . . . . . . . . . . . . . . . . . . . . . . . . . . . 467
Main UI: Configure Multiple STP (802.1s) . . . . . . . . . . . . . . . . . . . . . . . 468
Configure PVSTP and PVRSTP . . . . . . . . . . . . . . . . . . . . . . . . . . . . . . . . . . . 470
CLI: Configure PVSTP . . . . . . . . . . . . . . . . . . . . . . . . . . . . . . . . . . . . . . . . 471
Main UI: Configure PVSTP . . . . . . . . . . . . . . . . . . . . . . . . . . . . . . . . . . . . 473
Chapter 25 IPv6 Interface Configuration
Create an IPv6 Routing Interface. . . . . . . . . . . . . . . . . . . . . . . . . . . . . . . . . 479
CLI: Create an IPv6 Routing Interface. . . . . . . . . . . . . . . . . . . . . . . . . . . 479
Main UI: Create an IPv6 Routing Interface. . . . . . . . . . . . . . . . . . . . . . . 480
Create an IPv6 Routing VLAN . . . . . . . . . . . . . . . . . . . . . . . . . . . . . . . . . . . 482
CLI: Create an IPv6 Routing VLAN . . . . . . . . . . . . . . . . . . . . . . . . . . . . . 482
Main UI: Create an IPv6 VLAN Routing Interface . . . . . . . . . . . . . . . . . 484
Configure DHCPv6 Mode on the Routing Interface . . . . . . . . . . . . . . . . . .487
CLI: Configure DHCPv6 mode on the routing interface . . . . . . . . . . . 487
Main UI: Configure DHCPv6 mode on the routing interface . . . . . . . 488
Chapter 26 PIM
Protocol Independent Multicast Concepts . . . . . . . . . . . . . . . . . . . . . . . . 491
PIM-DM. . . . . . . . . . . . . . . . . . . . . . . . . . . . . . . . . . . . . . . . . . . . . . . . . . . . . . . .491
CLI: Configure PIM-DM. . . . . . . . . . . . . . . . . . . . . . . . . . . . . . . . . . . . . . . 493
Main UI: Configure PIM-DM. . . . . . . . . . . . . . . . . . . . . . . . . . . . . . . . . . . 497
PIM-SM . . . . . . . . . . . . . . . . . . . . . . . . . . . . . . . . . . . . . . . . . . . . . . . . . . . . . . . .516
CLI: Configure PIM-SM . . . . . . . . . . . . . . . . . . . . . . . . . . . . . . . . . . . . . . . 517
Main UI: Configure PIM-SM . . . . . . . . . . . . . . . . . . . . . . . . . . . . . . . . . . . 522
Software Administration Manual13

M4250 Series Switches
Chapter 27 DHCP L2 Relay and L3 Relay
DHCP L2 Relay . . . . . . . . . . . . . . . . . . . . . . . . . . . . . . . . . . . . . . . . . . . . . . . . 544
CLI: Enable DHCP L2 Relay . . . . . . . . . . . . . . . . . . . . . . . . . . . . . . . . . . . 544
Main UI: Enable DHCP L2 Relay . . . . . . . . . . . . . . . . . . . . . . . . . . . . . . . 546
DHCP L3 Relay . . . . . . . . . . . . . . . . . . . . . . . . . . . . . . . . . . . . . . . . . . . . . . . . 549
Configure the DHCP L3 Server in a Windows Server
Operating System . . . . . . . . . . . . . . . . . . . . . . . . . . . . . . . . . . . . . . . . . . . 549
Configure a DHCP L3 Switch. . . . . . . . . . . . . . . . . . . . . . . . . . . . . . . . . . 557
Chapter 28 MLD
Multicast Listener Discovery Concepts . . . . . . . . . . . . . . . . . . . . . . . . . . . 563
Configure MLD . . . . . . . . . . . . . . . . . . . . . . . . . . . . . . . . . . . . . . . . . . . . . . . . .563
CLI: Configure MLD . . . . . . . . . . . . . . . . . . . . . . . . . . . . . . . . . . . . . . . . . 564
Main UI: Configure MLD. . . . . . . . . . . . . . . . . . . . . . . . . . . . . . . . . . . . . . 566
MLD Snooping . . . . . . . . . . . . . . . . . . . . . . . . . . . . . . . . . . . . . . . . . . . . . . . . . 576
CLI: Configure MLD Snooping . . . . . . . . . . . . . . . . . . . . . . . . . . . . . . . . 577
Main UI: Configure MLD Snooping . . . . . . . . . . . . . . . . . . . . . . . . . . . . 577
Chapter 29 PTP End-to-End Transparent Clock
PTP Concepts . . . . . . . . . . . . . . . . . . . . . . . . . . . . . . . . . . . . . . . . . . . . . . . . . 581
PTP Time Stamp Operation . . . . . . . . . . . . . . . . . . . . . . . . . . . . . . . . . . . . . 582
PTP Transparent Clocks . . . . . . . . . . . . . . . . . . . . . . . . . . . . . . . . . . . . . . . . . .582
Manage the PTP End-to-End Transparent Clock . . . . . . . . . . . . . . . . . . . . .583
CLI: Globally Disable PTP End-to-End Transparent Clock . . . . . . . . . 583
CLI: Disable PTP End-to-End Transparent Clock for an Interface . . . 583
CLI: Globally Reenable PTP End-to-End Transparent Clock. . . . . . . . 584
CLI: Reenable PTP End-to-End Transparent Clock for an Interface. . 584
CLI: Display the PTP End-to-End Transparent Clock Status . . . . . . . . 584
Chapter 30 Audio Video Bridging
AVB Concepts . . . . . . . . . . . . . . . . . . . . . . . . . . . . . . . . . . . . . . . . . . . . . . . . 586
MRP . . . . . . . . . . . . . . . . . . . . . . . . . . . . . . . . . . . . . . . . . . . . . . . . . . . . . . . 586
MMRP . . . . . . . . . . . . . . . . . . . . . . . . . . . . . . . . . . . . . . . . . . . . . . . . . . . . . 587
MVRP . . . . . . . . . . . . . . . . . . . . . . . . . . . . . . . . . . . . . . . . . . . . . . . . . . . . . . 587
MSRP . . . . . . . . . . . . . . . . . . . . . . . . . . . . . . . . . . . . . . . . . . . . . . . . . . . . . . 587
802.1AS. . . . . . . . . . . . . . . . . . . . . . . . . . . . . . . . . . . . . . . . . . . . . . . . . . . . 588
Main UM: Enable AVB on the Switch and
Configure AVB on Interfaces 0/1 and 0/2. . . . . . . . . . . . . . . . . . . . . . . . . . .588
CLI: Enable AVB on the Switch and
Configure AVB on Interfaces 0/1 and 0/2. . . . . . . . . . . . . . . . . . . . . . . . . . .591
Chapter 31 Link Dependency
Link Dependency Concepts. . . . . . . . . . . . . . . . . . . . . . . . . . . . . . . . . . . . . 593
CLI: Create a Link State Group . . . . . . . . . . . . . . . . . . . . . . . . . . . . . . . . . . 594
Main UI: Create a Link State Group . . . . . . . . . . . . . . . . . . . . . . . . . . . . . . . .594
Software Administration Manual14

M4250 Series Switches
Chapter 32 Captive Portals
Captive Portal Concepts . . . . . . . . . . . . . . . . . . . . . . . . . . . . . . . . . . . . . . . . 598
Captive Portal Configuration Concepts. . . . . . . . . . . . . . . . . . . . . . . . . . . . .599
Enable a Captive Portal . . . . . . . . . . . . . . . . . . . . . . . . . . . . . . . . . . . . . . . . . .599
CLI: Enable a Captive Portal. . . . . . . . . . . . . . . . . . . . . . . . . . . . . . . . . . . 599
Main UI: Enable a Captive Portal. . . . . . . . . . . . . . . . . . . . . . . . . . . . . . . 600
Client Access, Authentication, and Control . . . . . . . . . . . . . . . . . . . . . . . . .601
Block a Captive Portal Instance. . . . . . . . . . . . . . . . . . . . . . . . . . . . . . . . . . . .601
CLI: Block a Captive Portal Instance . . . . . . . . . . . . . . . . . . . . . . . . . . . . 601
Main UI: Block a Captive Portal Instance . . . . . . . . . . . . . . . . . . . . . . . . 602
Local Authorization, Create Users and Groups . . . . . . . . . . . . . . . . . . . . . .602
CLI: Create Users and Groups. . . . . . . . . . . . . . . . . . . . . . . . . . . . . . . . . 602
Main UI: Create Users and Groups. . . . . . . . . . . . . . . . . . . . . . . . . . . . . 603
Remote Authorization (RADIUS) User Configuration . . . . . . . . . . . . . . . . .604
CLI: Configure RADIUS as the Verification Mode . . . . . . . . . . . . . . . . . 605
Main UI: Configure RADIUS as the Verification Mode . . . . . . . . . . . . . 606
SSL Certificates . . . . . . . . . . . . . . . . . . . . . . . . . . . . . . . . . . . . . . . . . . . . . . . . .606
Chapter 33 Override Factory Defaults
Override the Factory Default Configuration File . . . . . . . . . . . . . . . . . . . 608
CLI: Install Another Factory Defaults Configuration File . . . . . . . . . . . 608
CLI: Erase the Old Factory Default Configuration File. . . . . . . . . . . . . 609
Chapter 34 NETGEAR SFP
Connect with a NETGEAR AGM731F SFP . . . . . . . . . . . . . . . . . . . . . . . . . 611
Index
Software Administration Manual15

1
1Introduction and Documentation
This software administration manual is for the AV Line of Fully Managed Switches M4250 Series
and covers all M4250 switch models.
The manual provides selected configuration examples for the main local browser user interface
(main UI) and the command-line interface (CLI).
This chapter includes the following sections:
•
Available Publications
• Interface Naming Conventions
Note: For more information about the topics covered in this manual, visit the
support website at netgear.com/support.
Note: Firmware updates with new features and bug fixes are made available
from time to time at
products can regularly check the site and download new firmware, or
you can check for and download new firmware manually
features or behavior of your product does not match what is
described in this guide, you might need to update your firmware.
netgear.com/support/download/. Some
. If the
16

M4250 Series Switches
Available Publications
You can download the following guides and manuals for the AV Line of Fully Managed
Switches M4250 Series by visiting
netgear.com/support/download/.
• Installation Guide
• Hardware Installation Guide
• Main User Manual
• Audio V
ideo User Manual
• Software Administration Manual (this manual)
• CLI Command Reference Manual
Interface Naming Conventions
The switch supports physical and logical interfaces. Interfaces are identified by their type and
the interface number. The physical ports are Gigabit Ethernet or multispeed 10G Ethernet
interfaces and are numbered on the front panel. You configure the logical interfaces.
The following table describes the naming convention for all interfaces available
Table 1. Naming conventions for interfaces
Interface Description Example
Physical interfaces Depending on the model, the physical ports are 1G, 2.5G,or
10G Ethernet interfaces or 1G or 10G fiber interfaces. The
interface number consists of the switch number (always 0)
Link aggregation
group (LAG)
CPU management
interface
Routing VLAN
interfaces
followed by a forward slash and the port number
sequential number starting from 1.
LAG interfaces are logical interfaces that are used only for
bridging functions.
This is the internal switch interface responsible for the
switch
and is always listed in the MAC Address Table.
This is an interface used for routing functionality. VLAN 1, VLAN 2, VLAN 3,
MAC address. This interface is not configurable
base
, which is a
0/1, 0/2, 0/3, and so on
LAG 1, LAG 2, LAG 3, and
so on
5/1
and so on
on the switch.
IMPORTANT:
Most examples in this manual show the 1/0/x interface designation,
in which x is the interface number. However, the M4250 series
switch uses the 0/x designation, in which x is the interface number.
Introduction and Documentation Software Administration Manual17

2
2VLANs
Virtual LANs
This chapter includes the following sections:
•
VLAN Concepts
• Auto-Trunk
• Create Two VLANs
• Assign Ports to VLAN 2
• Create Three VLANs
• Assign Ports to VLAN 3
• Assign VLAN 3 as the Default VLAN for Port 1/0/2
• Create a MAC-Based VLAN
• Create a Protocol-Based VLAN
• Virtual VLANs: Create an IP Subnet–Based VLAN
•
Voice VLANs
• Configure GARP VLAN Registration Protocol
• Private VLANs
• Assign Private-VLAN Types (Primary, Isolated, Community)
• Configure Private-VLAN Association
• Configure Private-VLAN Port Mode (Promiscuous, Host)
• Configure Private-VLAN Host Ports
• Map Private-VLAN Promiscuous Port
• VLAN Access Ports and Trunk Ports
18
M4250 Series Switches
VLAN Concepts
Adding virtual LAN (VLAN) support to a Layer 2 switch offers some of the benefits of both
bridging and routing. Like a bridge, a VLAN switch forwards traffic based on the Layer 2
header, which is fast. Like a router, it partitions the network into logical segments, which
provides better administration, security, and management of multicast traffic.
A VLAN is a set of end stations and the switch ports that connect them. Y
ou can have
different reasons for the logical division, such as department or project membership. The only
physical requirement is that the end station and the port to which it is connected both belong
to the same VLAN.
Each VLAN in a network has an associated VLAN ID, which appears in
the IEEE 802.1Q tag
in the Layer 2 header of packets transmitted on a VLAN. An end station might omit the tag, or
the VLAN portion of the tag, in which case the first switch port to receive the packet can
either reject it or insert a tag using its default VLAN ID. A given port can handle traffic for
more than one VLAN, but it can support only one default VLAN ID.
The Private Edge VLAN feature lets you set protection between ports located on the switch.
This
means
that a protected port cannot forward traffic to another protected port on the same
switch. The feature does not provide protection between ports located on different switches.
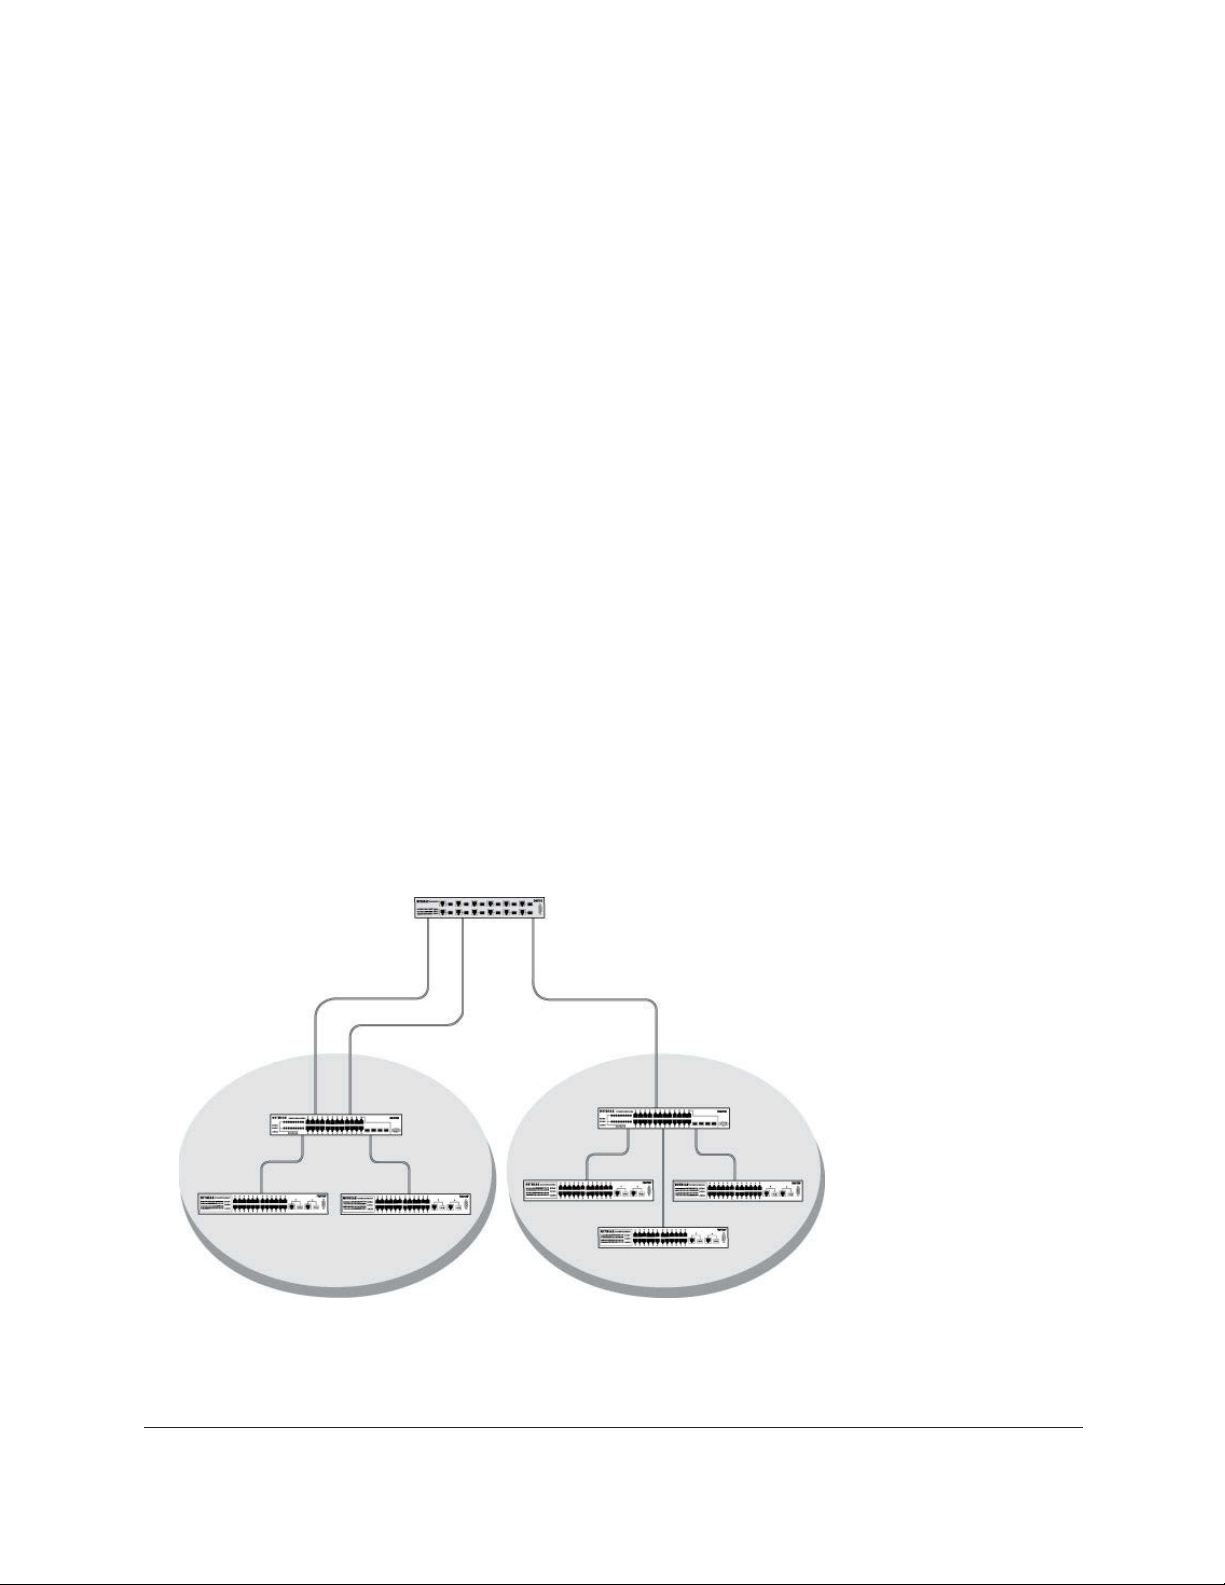
The diagram in this section shows a switch with four ports configured to handle
the traffic for
two VLANs. Port 1/0/2 handles traffic for both VLANs, while port 1/0/1 is a member of VLAN
2 only, and ports 1/0/3 and 1/0/4 are members of VLAN 3 only. The script following the
diagram shows the commands you would use to configure the switch as shown in the
diagram.
Layer 3 switch
Port 1/0/2 VLAN
Router Port 1/3/1
192.150.3.1
Port 1/0/3 VLAN
Router Port 1/3/2
192.150.4.1
Port 1/0/1
Layer 2
Switch
VLAN 10 VLAN 20
Figure 1. Switch with 4 ports configured for traffic from 2 VLANs
Layer 2
Switch
The following examples show how to create VLANs, assign ports to the VLANs, and assign a
VLAN as the default VLAN to a port.
VLANs Software Administration Manual19

M4250 Series Switches
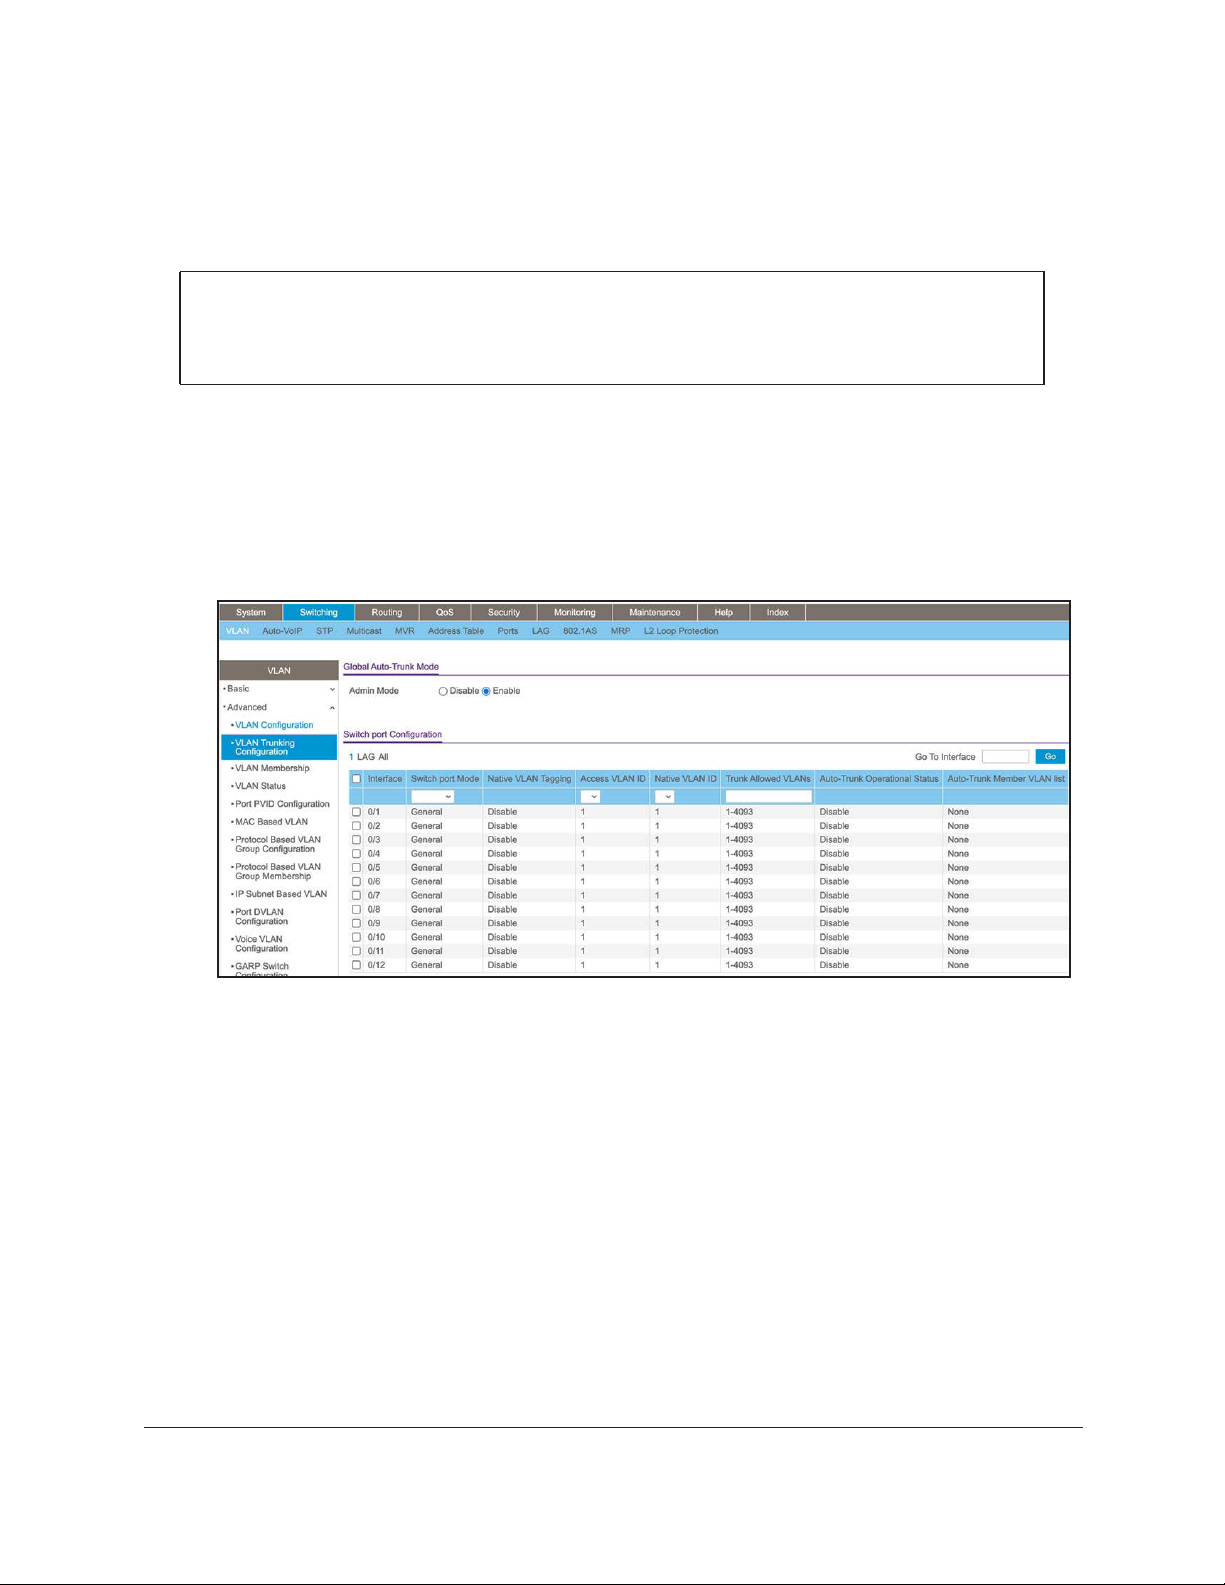
Auto-Trunk
Auto-trunk is a feature that lets the switch automatically enable Trunk mode on capable
physical links and LAG interfaces between partner devices. A trunk can carry all active
VLANs. By default, the Auto-Trunk feature is enabled on the switch.
If the switch automatically configures a port as a trunk (that is, an Auto-T
the switch become part of the trunk, allowing automatic configuration of all VLANs on the
switch and on the partner device with which the trunk is established.
Before the switch configures an Auto-Trunk, the switch first detects the
partner device that also supports the Auto-Trunk feature, and then automatically configures
the ports that are connected and capable of forming a trunk at both ends.
A trunk carries multiple VLANs and accepts both tagged and untagged packets. T
connection between the switch and a partner device such as a router, access point, or
another switch functions as a trunk.
For the switch to form an Auto-Trunk with a partner device, the following are required:
• The Auto-Trunk feature must be supported and globally enabled on the switch and the
partner device. (On all M4250 switch models, the Auto-Trunk feature is enabled by
default.)
• The interconnected ports on both the switch and the partner device must be enabled. (On
all M4250 switch models, all ports are enabled by default.)
• The PVID on the interconnected ports must be set to the managem
M4250 switch models, the management VLAN is VLAN 1 by default).
• LLDP must be enabled on the interconnected ports on both the switch and the partner
device. (On all M4250 switch models, LLDP is enabled by default on all ports.)
• The interconnected ports on the switch and the partner device must be in the default
switch port mode, which is the General mode. If the ports are in the
already in the
Trunk mode, an Auto-Trunk cannot be formed on an Auto-LAG.
runk), all VLANs on
physical links with the
ypically, a
ent VLAN. (On all
Access mode or
For an Auto-Trunk, the PVID is automatically set to the management VLAN. If you want to
change the PVID for an Auto-T
The Auto-Trunk feature functions together with the Auto-LAG feature (see Auto-LAG on
page 80). After an Auto-LAG is formed, the switch automatically applies trunk mode (that is,
an Auto-Trunk) to the LAG at both ends. In other words, after an Auto-LAG is formed, the
mode for the ports that participate in an
switch port mode to the trunk port mode, and the Auto-LAG then becomes an Auto-Trunk.
After a port or an Auto-LAG becomes an Auto-Trunk, all VLANs on the
the trunk, and all VLANs on the switch and the partner device can be configured
automatically.
VLANs Software Administration Manual20
runk, change the management VLAN.
Auto-LAG is automatically changed from the default
switch become part of
M4250 Series Switches
CLI: Enable the Auto-Trunk Feature
By default, the Auto-LAG feature is enabled. If you disable it, you can enable it again.
(Netgear Switch)#config
(Netgear Switch)(Config)#switchport mode auto
(Netgear Switch)(Config)#exit
(Netgear Switch)#
Main UI: Enable the Auto-Trunk Feature
By default, the Auto-Trunk feature is enabled. If you disable it, you can enable it again.
1. Select Switching >
A page similar to the following figure displays.
2. Select the Admin Mode Enable
By default, the Auto-Trunk feature is globally enabled.
3. Click Apply to
VLAN > Advanced > VLAN Trunking Configuration.
radio button.
save the settings.
VLANs Software Administration Manual21
M4250 Series Switches
Create Two VLANs
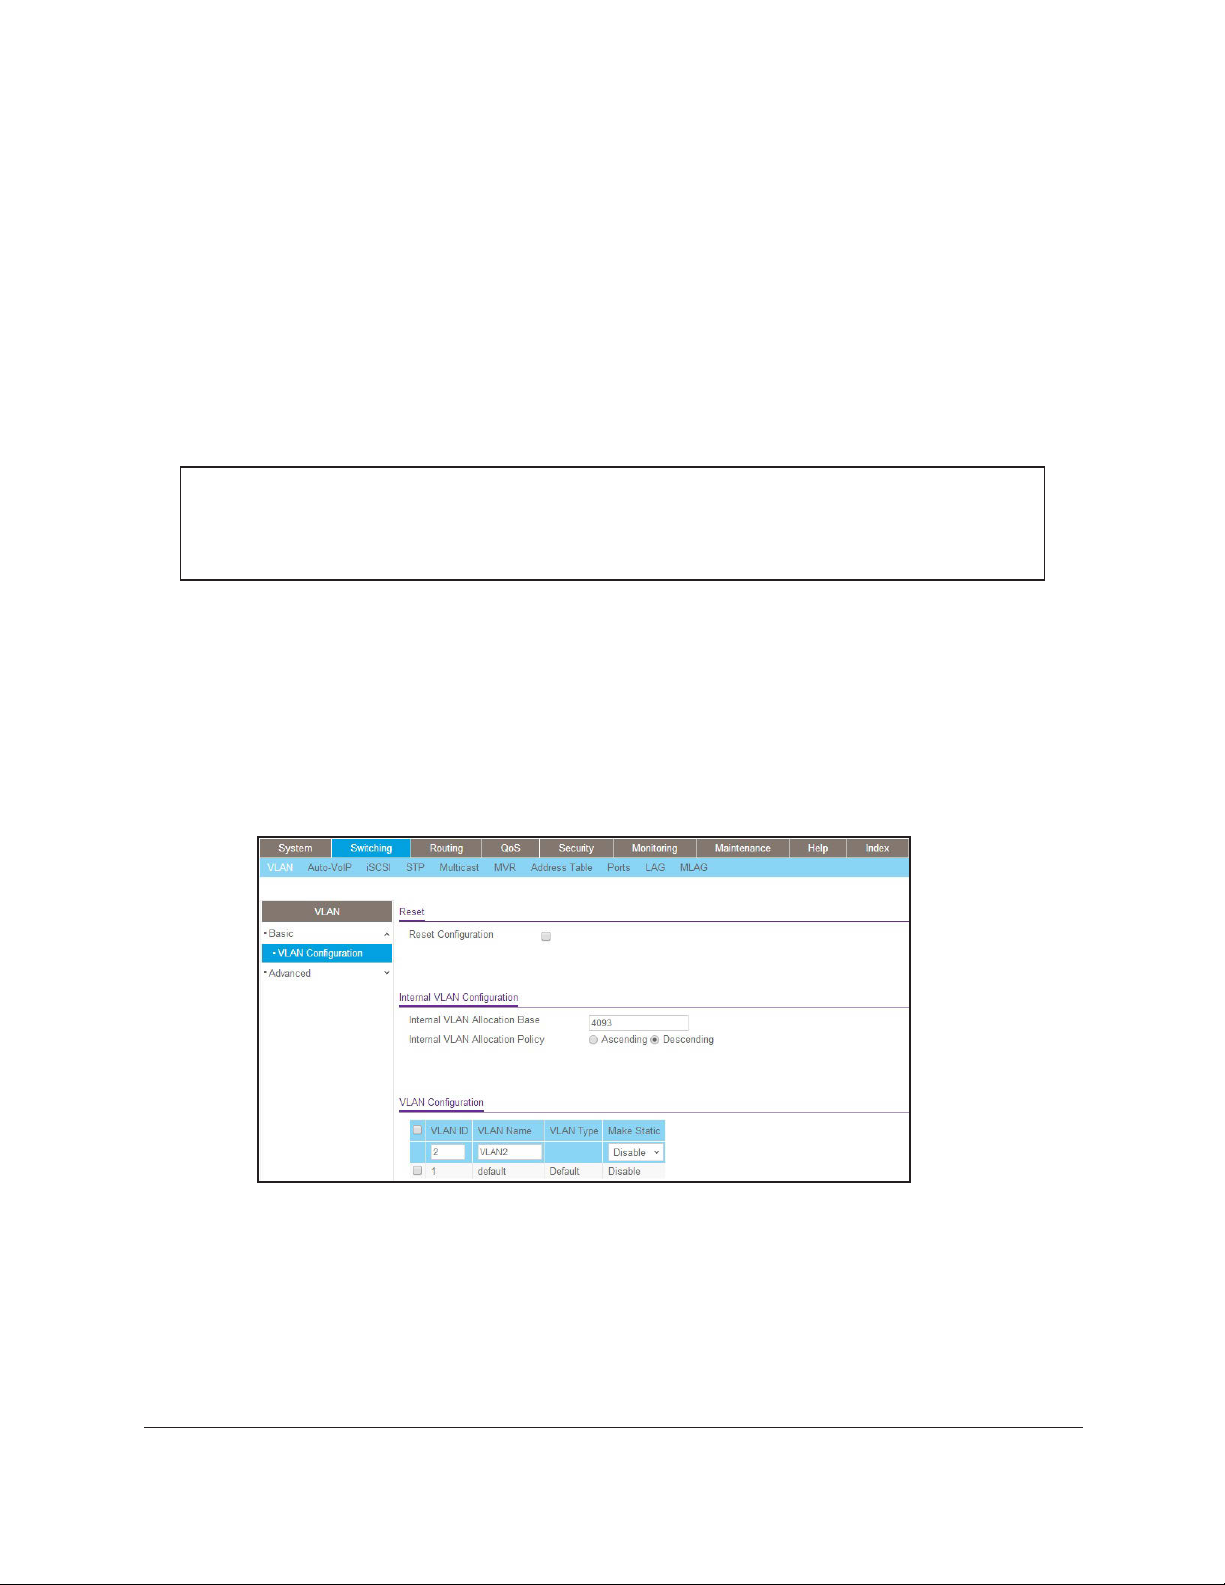
The example is shown as CLI commands and as a local browser interface procedure.
CLI: Create Two VLANs
Use the following commands to create two VLANs and to assign the VLAN IDs while leaving
the names blank.
(Netgear Switch) #vlan database
(Netgear Switch) (Vlan)#vlan 2
(Netgear Switch) (Vlan)#vlan 3
(Netgear Switch) (Vlan)#exit
Main UI: Create Two VLANs
1. Create VLAN2.
a. Select Switching > VLAN > Basic > VLAN Configuration.
A page similar to the following figure displays. Menu items, interface numbers, and
other information in the figure might dif
switch, but the example is valid.
b. Enter the following information:
• In the
• In the VLAN Name field, enter VLAN2.
• In the VLAN Type
VLAN ID field, enter 2.
list, select Static.
fer from the UI page o
n the M4250 series
c. Click Add.
2. Create
VLANs Software Administration Manual22
VLAN3.
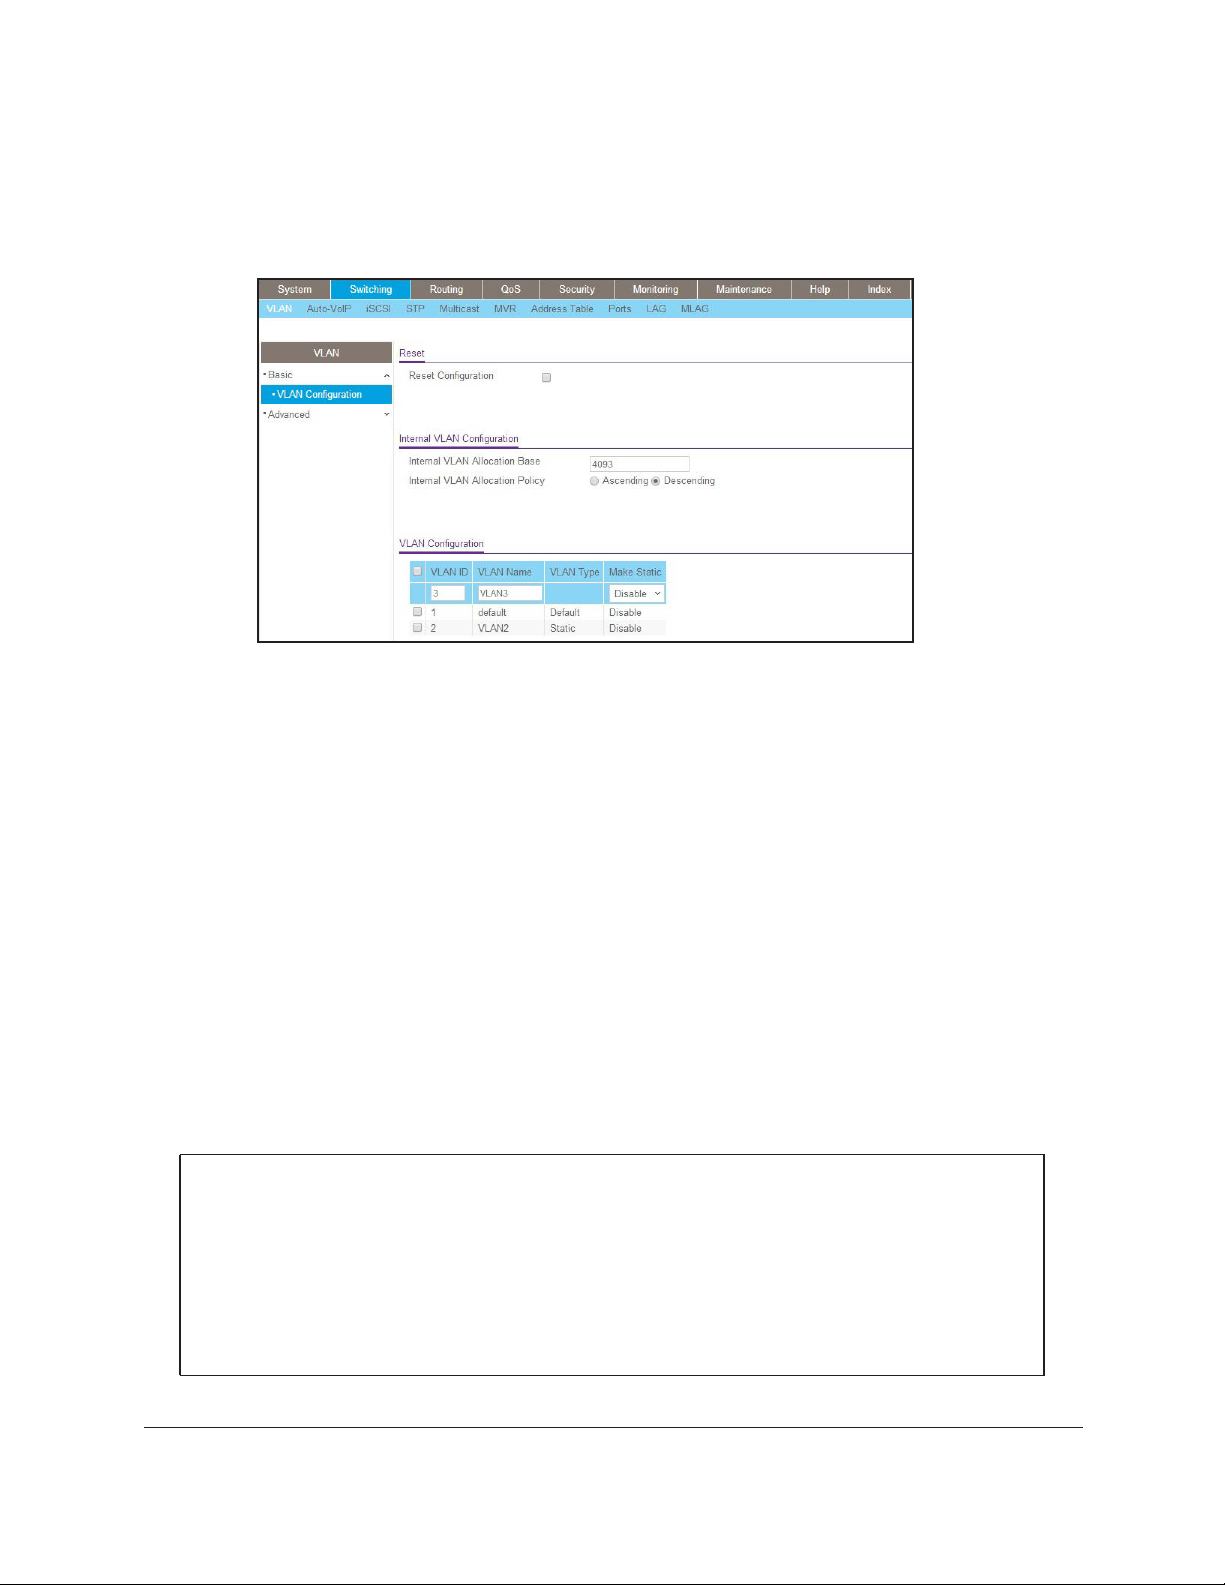
M4250 Series Switches
a. Select Switching > VLAN > Basic > VLAN Configuration.
A page similar to the following figure displays. Menu items, interface numbers, and
other information in the figure might differ from the UI page o
switch, but the example is valid.
n the M4250 series
b. Enter the following information:
• In the
• In the VLAN Name field, enter VLAN3.
• In the VLAN Type
c. Click Add.
VLAN ID field, enter 3.
list, select Static.
Assign Ports to VLAN 2
This sequence shows how to assign ports to VLAN2, and to specify that frames will always
be transmitted tagged from all member ports and that untagged frames will be rejected on
receipt.
CLI: Assign Ports to VLAN 2
(Netgear Switch) #config
(Netgear Switch) (Config)#interface range 1/0/1-1/0/2
(Netgear Switch) (conf-if-range-1/0/1-1/0/2)#vlan participation include 2
(Netgear Switch) (conf-if-range-1/0/1-1/0/2)#vlan acceptframe vlanonly
(Netgear Switch) (conf-if-range-1/0/1-1/0/2)#vlan pvid 2
(Netgear Switch) (conf-if-range-1/0/1-1/0/2)#exit
(Netgear Switch) (Config)#vlan port tagging all 2
(Netgear Switch) (Config)#
VLANs Software Administration Manual23

M4250 Series Switches
Main UI: Assign Ports to VLAN 2
1. Assign ports to VLAN2.
a. Select Switching > VLAN > Advanced > VLAN Membership.
A page similar to the following figure displays. Menu items, in
other information in the figure might differ from the UI page o
switch, but the example is valid.
b. In the VLAN
c. Click Unit 1
d. Click the gray boxes under ports 1
The T specifies that the egress packet is tagged for the ports.
e. Click Apply to
2. Specify that
a. Select Switching > VLAN > Advanced > Port PVID Configuration.
ID list, select 2.
. The ports display.
and 2 until T displays.
save the settings.
only tagged frames will be accepted on ports 1/0/1 and 1/0/2.
terface numbers, and
n the M4250 series
A page similar to the following figure displays. Menu items, in
other information in the figure might differ from the UI page o
switch, but the example is valid.
b. Under PVID Configuration, scroll down and select the check box for Interface 1/0/1
VLANs Software Administration Manual24
terface numbers, and
n the M4250 series
.

M4250 Series Switches
Then scroll down and select the Interface 1/0/2 check box.
c. Enter the following information:
• In the Acceptable Frame Type polyhedron list, select
• In the PVID (1 to 4093) field, enter 2.
VLAN Only.
d. Click Apply
save the settings.
to
Create Three VLANs
The example is shown as CLI commands and as a local browser interface procedure.
CLI: Create Three VLANs
Use the following commands to create three VLANs and to assign the VLAN IDs while
leaving the names blank.
(Netgear Switch) #vlan database
(Netgear Switch) (Vlan)#vlan 100
(Netgear Switch) (Vlan)#vlan 101
(Netgear Switch) (Vlan)#vlan 102
(Netgear Switch) (Vlan)#exit
Main UI: Create Three VLANs
1. Create VLAN100.
a. Select Switching > VLAN > Basic > VLAN Configuration.
VLANs Software Administration Manual25
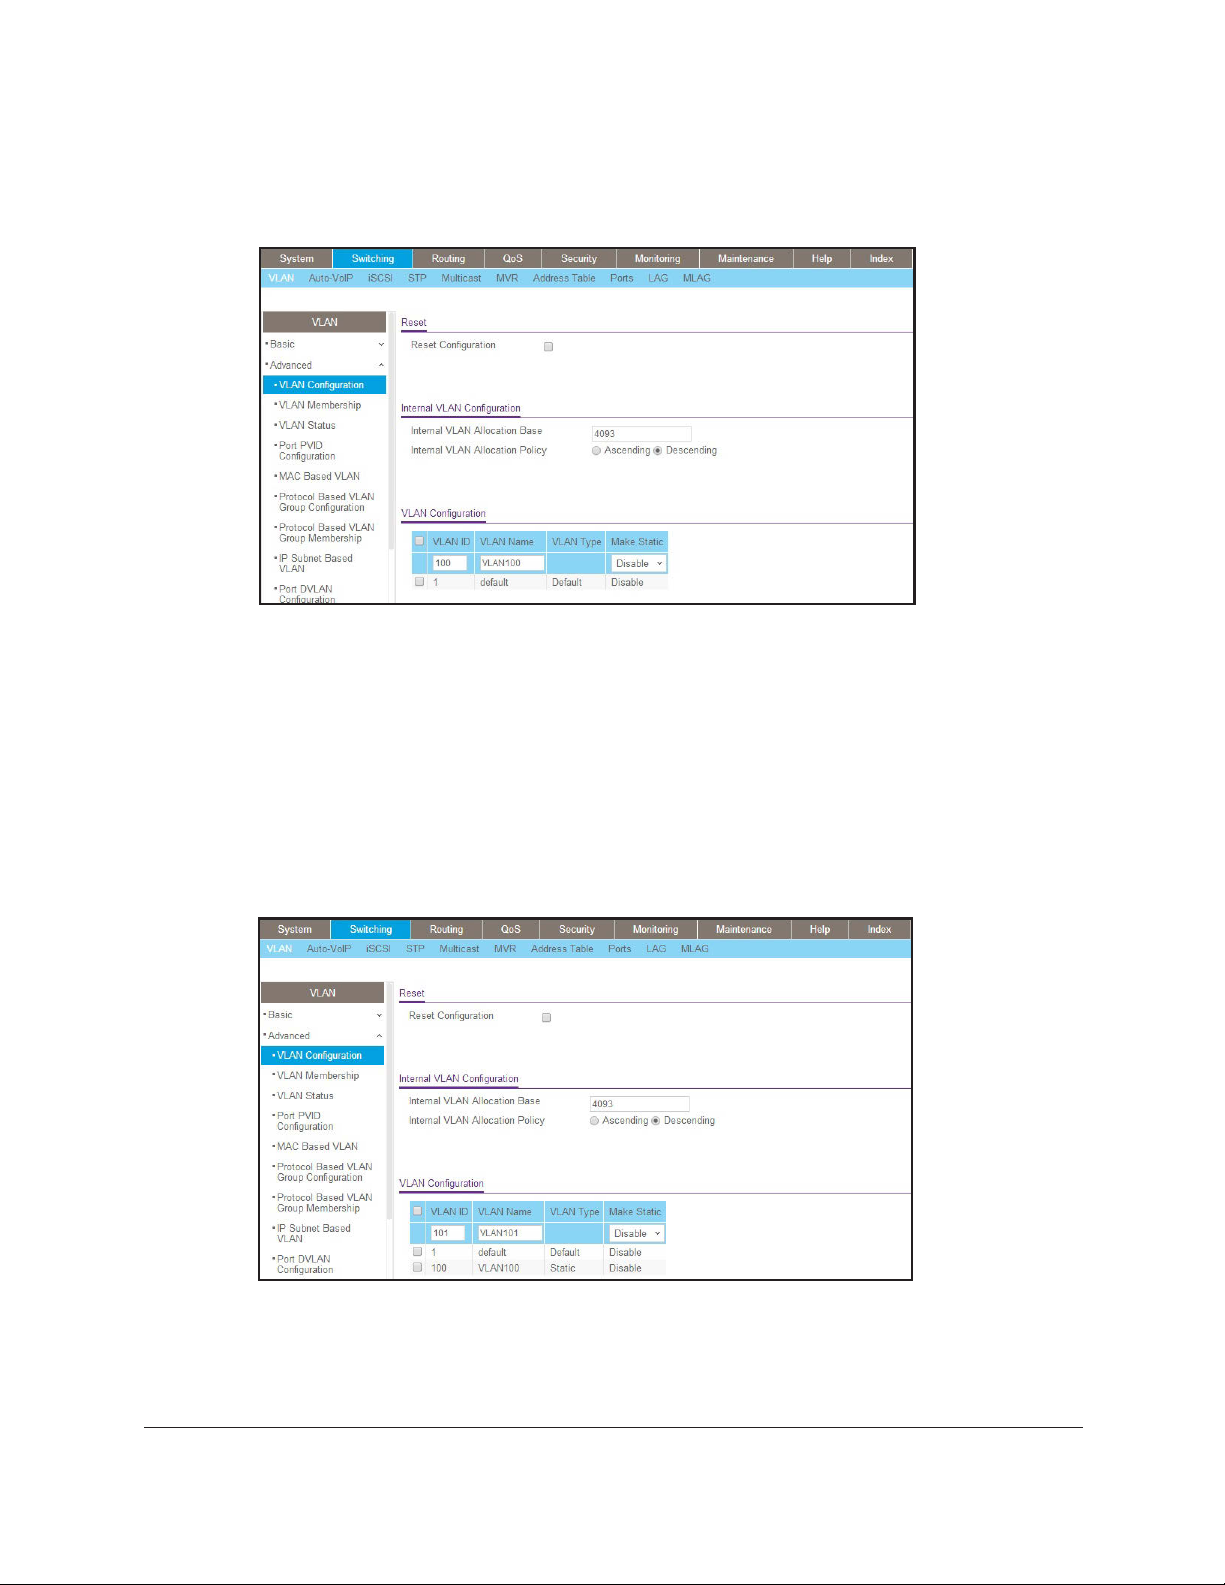
M4250 Series Switches
A page similar to the following figure displays. Menu items, interface numbers, and
other information in the figure might differ from the UI page on the M4250 series
switch, but the example is valid.
b. Enter the following information:
• In the
VLAN ID field, enter 100.
• In the VLAN Name field, enter VLAN100.
c. Click Add.
2. Create
a. Select
VLAN101.
Switching > VLAN > Basic > VLAN Configuration.
A page similar to the following figure displays. Menu items, interface numbers, and
other information in the figure might dif
switch, but the example is valid.
b. Enter the following information:
• In the
VLAN ID field, enter 101.
• In the VLAN Name field, enter VLAN101.
fer from the UI page o
n the M4250 series
VLANs Software Administration Manual26
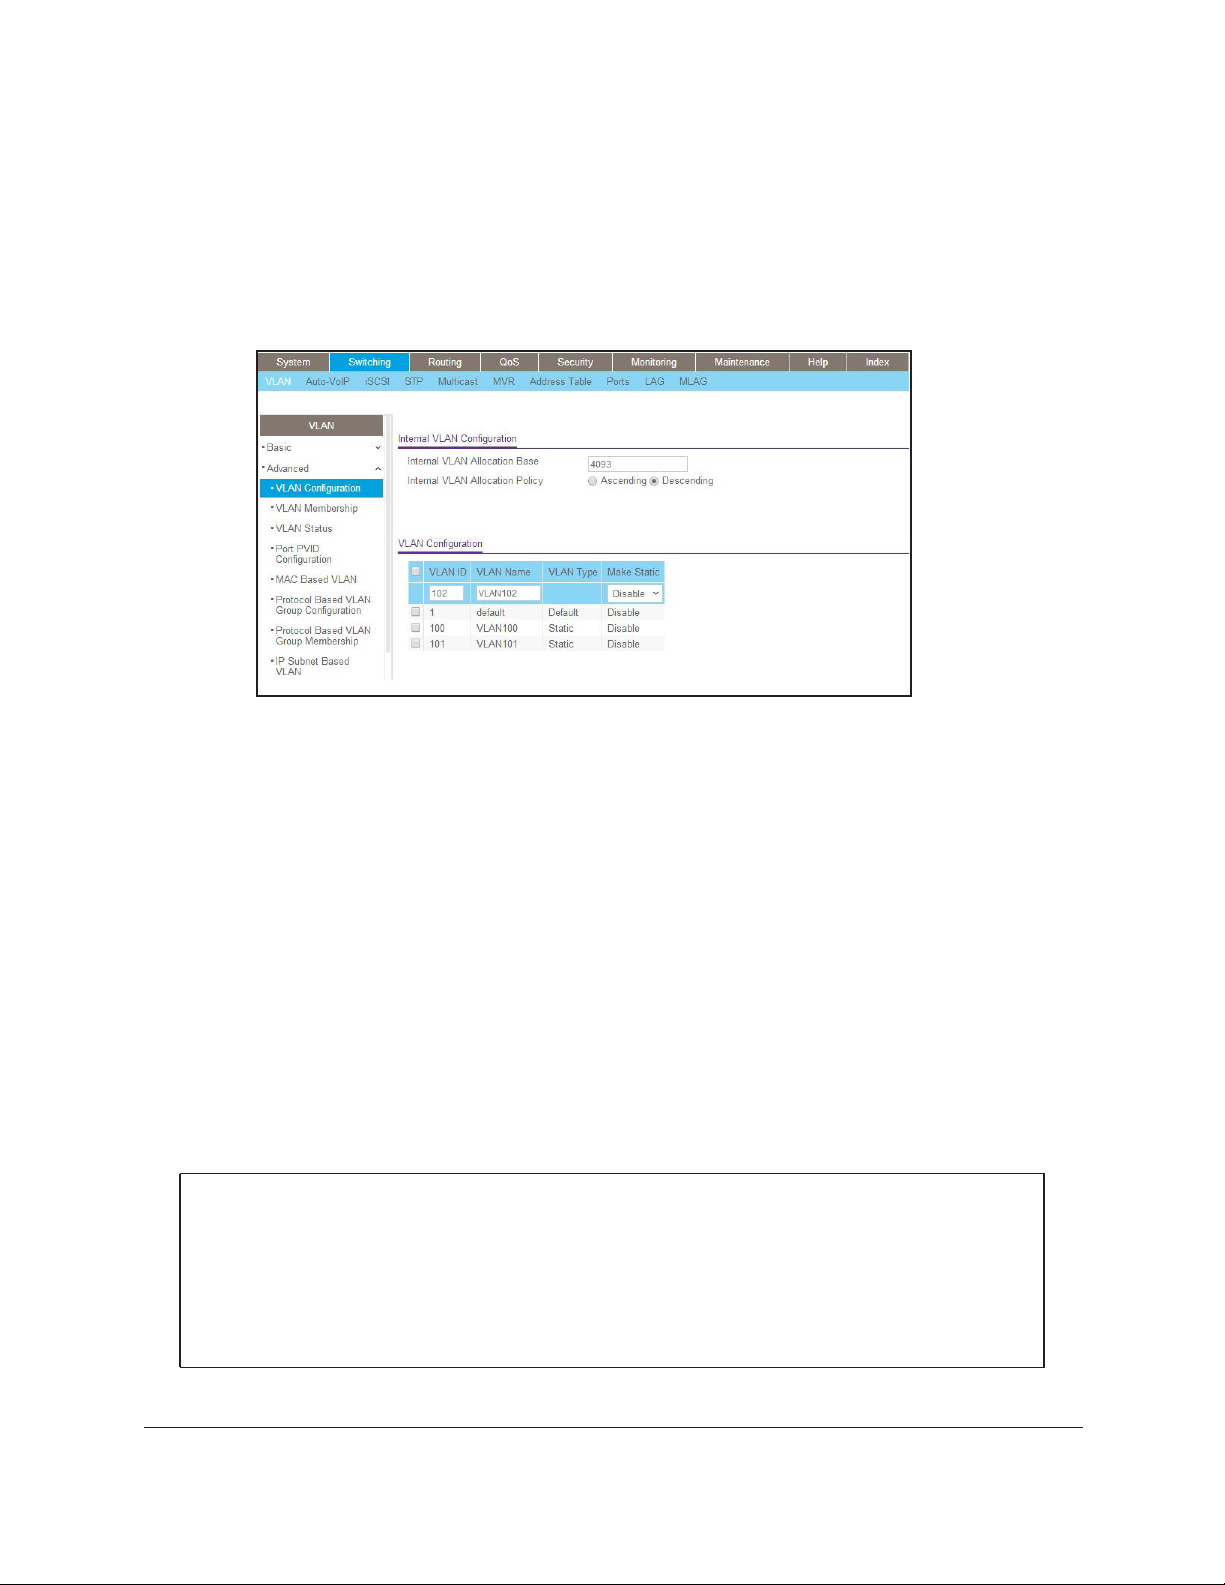
c. Click Add.
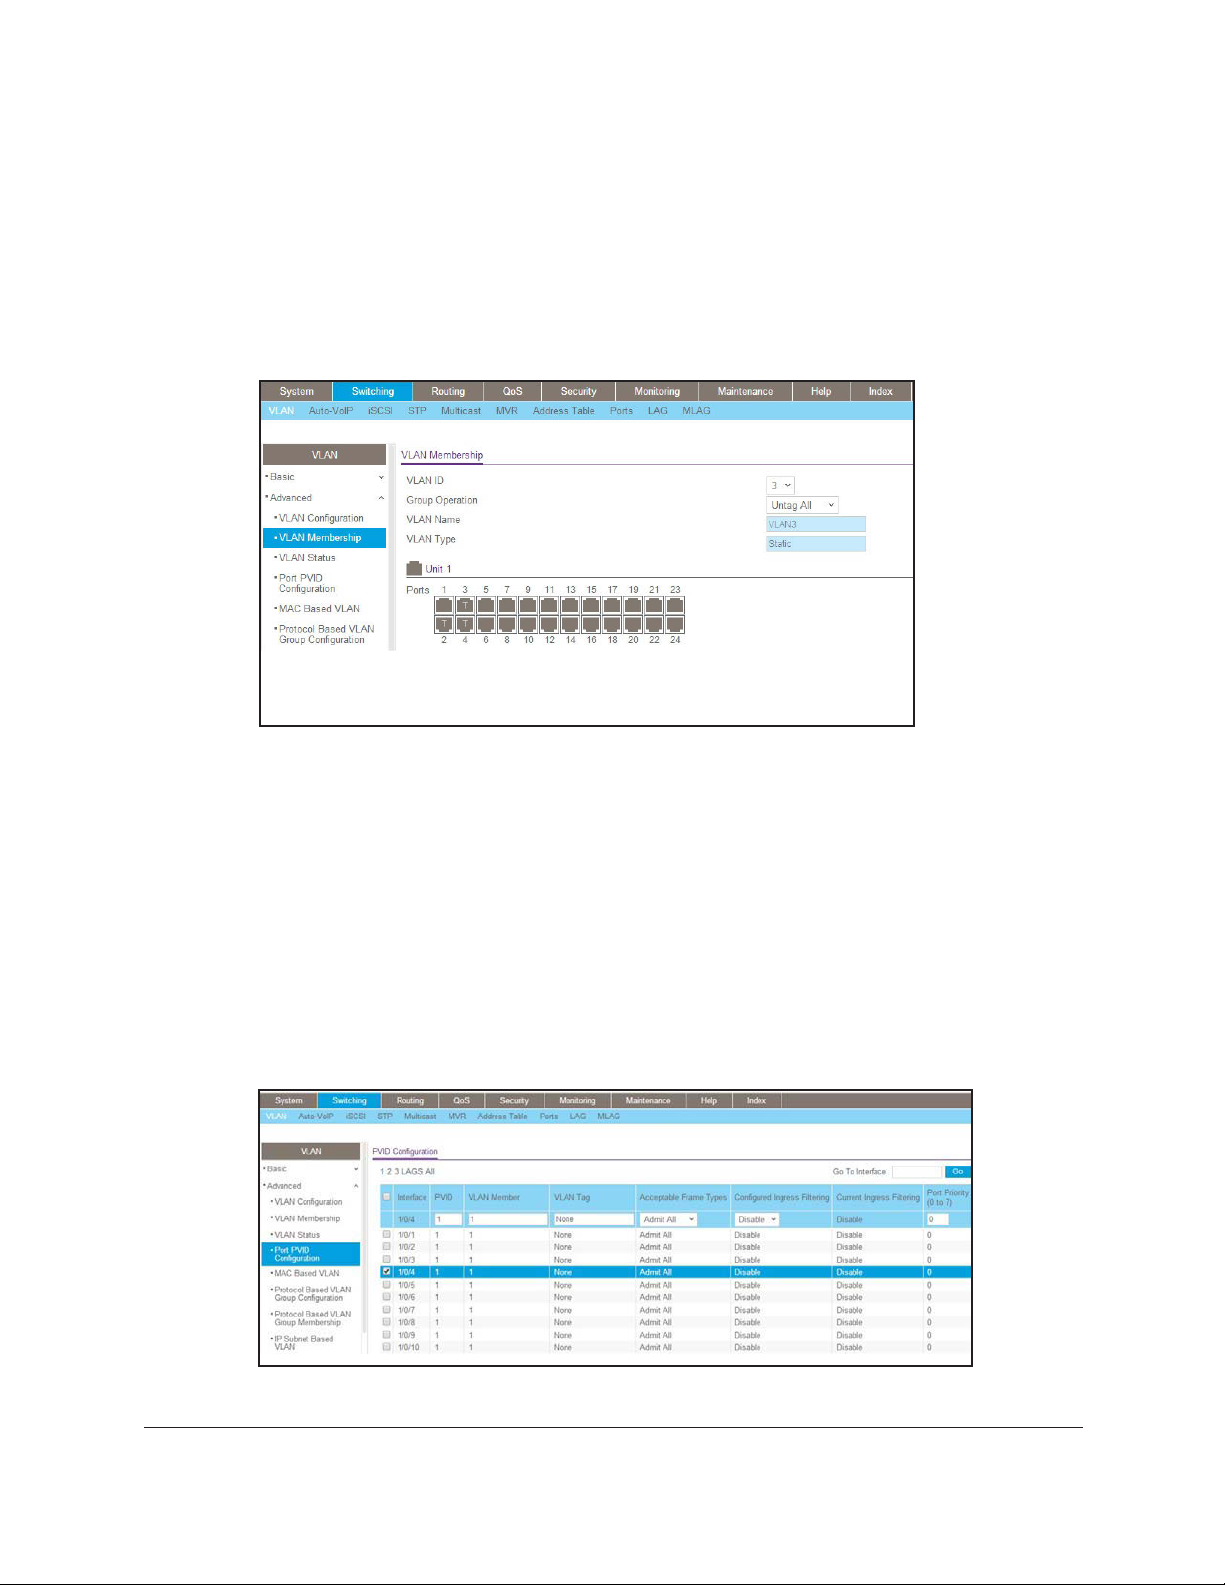
3. Create VLAN102.
a. Select
A page similar to the following figure displays. Menu items, interface numbers, and
other information in the figure might dif
switch, but the example is valid.
Switching > VLAN > Basic > VLAN Configuration.
M4250 Series Switches
fer from the UI page o
n the M4250 series
b. Enter the following information:
• In the
• In the VLAN Name field, enter VLAN102.
c. Click Add.
VLAN ID field, enter 102.
Assign Ports to VLAN 3
This example shows how to assign the ports that will belong to VLAN 3, and to specify that
untagged frames will be accepted on port 1/0/4. Note that port 1/0/2 belongs to both VLANs
and that port 1/0/1 can never belong to VLAN 3.
CLI: Assign Ports to VLAN 3
(Netgear Switch) (Config)#interface range 1/0/2-1/0/4
(Netgear Switch) (conf-if-range-1/0/2-1/0/4)#vlan participation include 3
(Netgear Switch) (conf-if-range-1/0/2-1/0/4)#exit
(Netgear Switch) (Config)#interface 1/0/4
(Netgear Switch) (Interface 1/0/4)#vlan acceptframe all
(Netgear Switch) (Interface 1/0/4)#exit
(Netgear Switch) (Config)#exit
VLANs Software Administration Manual27
M4250 Series Switches
Main UI: Assign Ports to VLAN 3
1. Assign ports to VLAN3.
a. Select Switching > VLAN > Advanced > VLAN Membership.
A page similar to the following figure displays. Menu items, in
other information in the figure might differ from the UI page o
switch, but the example is valid.
b. In the VLAN
c. Click Unit 1. The
d. Click the gray boxes under ports 2, 3, and 4 until T displays.
The
T specifies that the egress packet is tagged for the ports.
ID list, select 3.
ports display.
terface numbers, and
n the M4250 series
e. Click Apply to
2. Specify that
a. Select Switching > VLAN > Advanced > Port PVID Configuration.
A page similar to the following figure displays. Menu items, in
other information in the figure might differ from the UI page o
switch, but the example is valid.
b. Scroll down and select the Interface 1/0/4
VLANs Software Administration Manual28
untagged frames will be accepted on port 1/0/4.
save the settings.
terface numbers, and
n the M4250 series
check box.
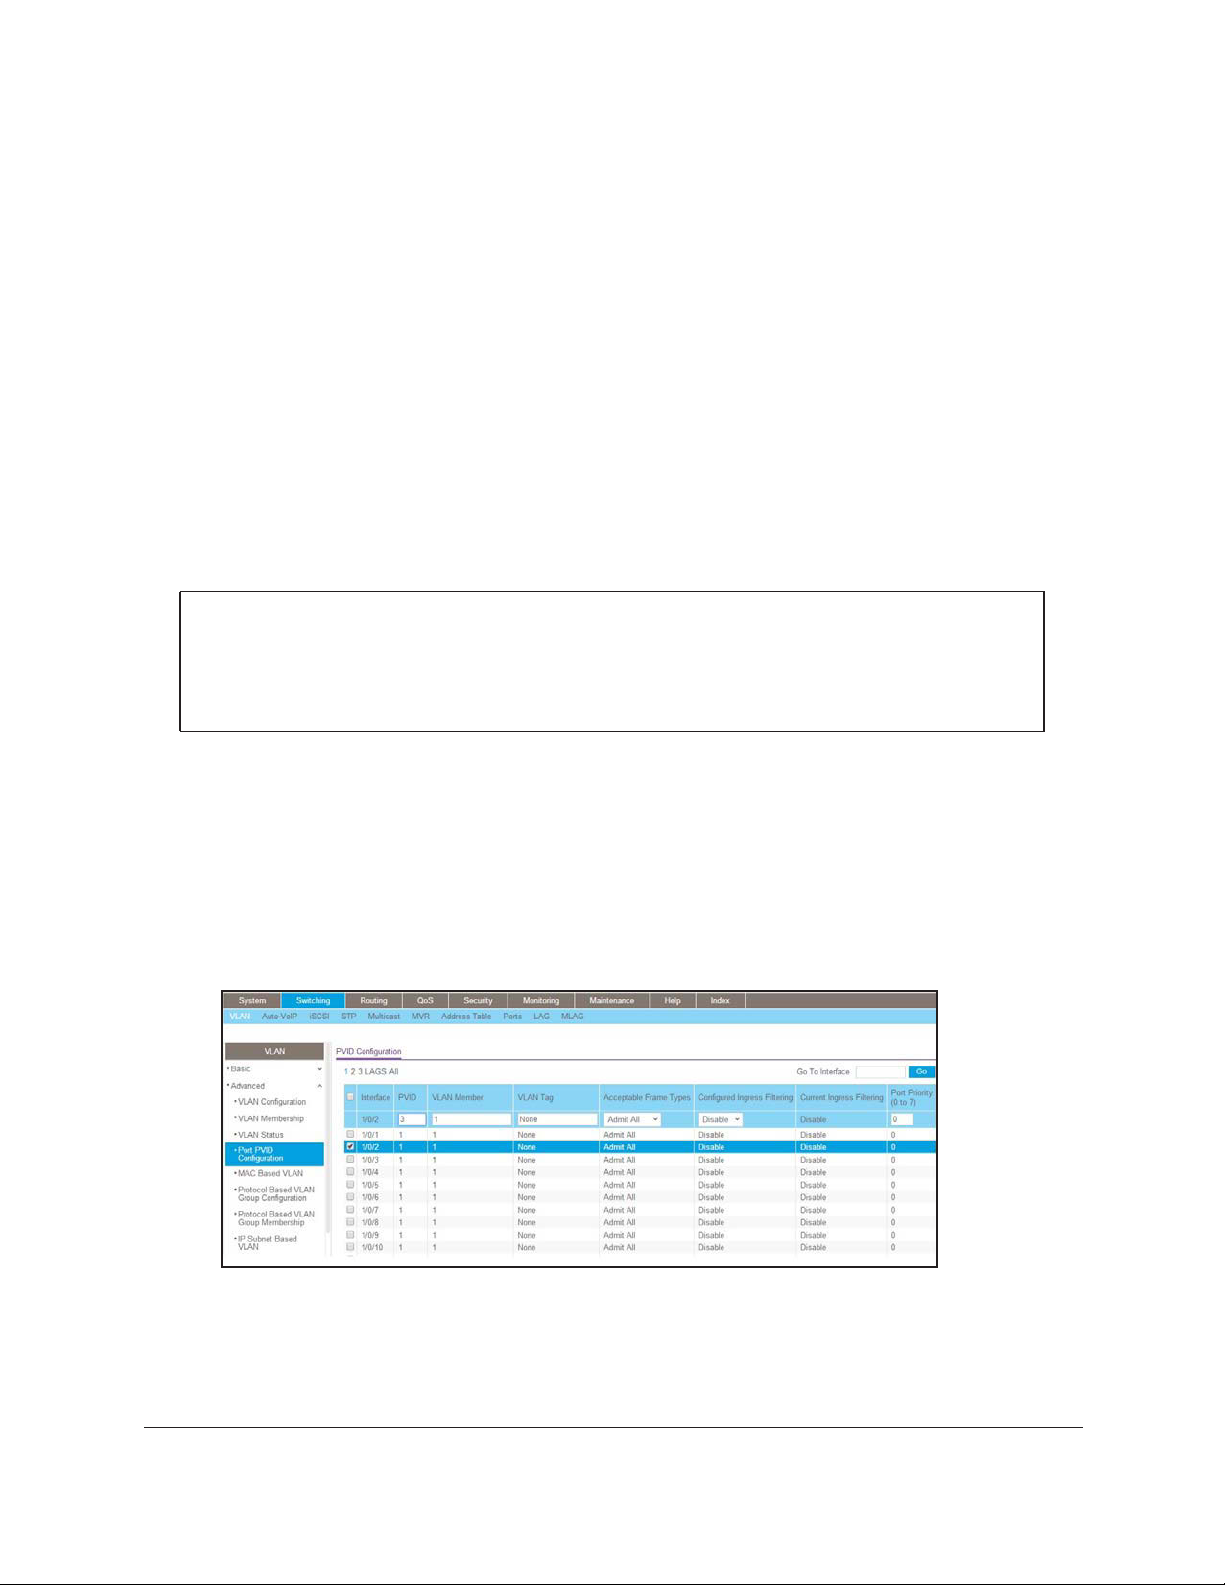
M4250 Series Switches
Now 1/0/4 appears in the Interface field at the top.
c. In the Acceptable
d. Click Apply to
Frame Types list, select Admit All.
save the settings.
Assign VLAN 3 as the Default VLAN for Port 1/0/2
This example shows how to assign VLAN 3 as the default VLAN for port 1/0/2.
CLI: Assign VLAN 3 as the Default VLAN for Port 1/0/2
(Netgear Switch) #config
(Netgear Switch) (Config)#interface 1/0/2
(Netgear Switch) (Interface 1/0/2)#vlan pvid 3
(Netgear Switch) (Interface 1/0/2)#exit
(Netgear Switch) (Config)#exit
Main UI: Assign VLAN 3 as the Default VLAN for Port 1/0/2
1. Select Switching > VLAN > Advanced > Port PVID Configuration.
A page similar to the following figure displays. Menu items, interface numbers,
information in the figure might differ from the UI page on the M4250 series switch, but the
example is valid.
2. Under PVID Configuration, scroll down and select the Interface 1/0/2
appears in the Interface field at the top.
3. In the PVID
4. Click Apply to
(1 to 4093) field, enter 3.
save the settings.
and other
check box. Now 1/0/2
VLANs Software Administration Manual29

M4250 Series Switches
Create a MAC-Based VLAN
The MAC-based VLAN feature allows incoming untagged packets to be assigned to a VLAN
and thus classify traffic based on the source MAC address of the packet.
You define a MAC to VLAN mapping by configuring an entry in the MAC to VLAN table. An
entry is specified using a source MAC address and the appropriate VLAN ID. The MAC to
VLAN configurations are shared across all ports of the device (i.e., there is a system-wide
table that has MAC address to VLAN ID mappings).
When untagged or priority tagged packets arrive at the switch and entries
exist in the MAC to
VLAN table, the source MAC address of the packet is looked up. If an entry is found, the
corresponding VLAN ID is assigned to the packet. If the packet is already priority tagged it
will maintain this value; otherwise, the priority will be set to 0 (zero). The assigned VLAN ID is
verified against the VLAN table. If the VLAN is valid, ingress processing on the packet
continues; otherwise, the packet is dropped. This implies that you can configure a MAC
address mapping to a VLAN that has not been created on the system.
CLI: Create a MAC-Based VLAN
1. Create VLAN3.
(Netgear Switch)#vlan database
(Netgear Switch)(Vlan)#vlan 3
(Netgear Switch)(Vlan)#exit
2. Add port 1/0/23 to VLAN3.
(Netgear Switch)#config
(Netgear Switch)(Config)#interface 1/0/23
(Netgear Switch)(Interface 1/0/23)#vlan participation include 3
(Netgear Switch)(Interface 1/0/23)#vlan pvid 3
(Netgear Switch)(Interface 1/0/23)#exit
3. Map MAC 00:00:0A:00:00:02 to VLAN3.
(Netgear Switch)(Config)#exit
(Netgear Switch)#vlan data
(Netgear Switch)(Vlan)#vlan association mac 00:00:00A:00:00:02 3
(Netgear Switch)(Vlan)#exit
VLANs Software Administration Manual30
 Loading...