

Page 1

LTE Modem
Models LB1110 and LB1111
User Manual
September 2016
202-11610-03
350 E. Plumeria Drive
San Jose, CA 95134
USA
Page 2

LTE Modem LB1110 and LB1111
Support
Thank you for purchasing this NETGEAR product.You can visit www.netgear.com/support to register your
product, get help, access the latest downloads and user manuals , and join our comm unity.We recommend that
you use only official NETGEAR support resources.
Conformity
For the current EU Declaration of Conformity, visit http://kb.netgear.com/app/answers/detail/a_id/11621.
Compliance
For regulatory compliance information, visit http://www.netgear.com/about/regulatory.
See the regulatory compliance document before connecting the power supply.
Trademarks
© NETGEAR, Inc., NETGEAR and the NETGEAR Logo are trademarks of NETGEAR, Inc. An y non-NETGEAR
trademarks are used for reference purposes only.
2
Page 3

Contents
Chapter 1 Introduction and Hardware Overview
Introduction............................................................................................................7
Supported Mobile Broadband Bands.....................................................................7
Package Contents..................................................................................................8
Install the Micro SIM Card......................................................................................8
Top Panel With Status LEDs................................................................................11
Back Panel With Connectors, Buttons, and a Port...............................................12
Product Label.......................................................................................................12
Position the Modem.............................................................................................13
Optional External Antenna...................................................................................14
Chapter 2 Get Started
Internet Connection Over Mobile Broadband.......................................................16
Connect a Computer, Switch, Hub, Router, or WiFi Router to the Modem..........16
Connect a Computer to the LAN Port of the Modem.......................................17
Connect a Router or WiFi Router to the LAN Port of the Modem....................17
Access the Modem’s Web Pages for the First Time.............................................17
Change the Language.........................................................................................19
Download the NETGEAR AirCard App for Smartphones and Tablets.................19
Chapter 3 Manage the Modem LAN Settings
Change the LAN Settings....................................................................................21
Manage Router Mode and Bridge Mode..............................................................22
Change the DHCP Server Settings......................................................................23
Disable the DHCP Server....................................................................................26
Enable the DMZ...................................................................................................26
Disable VPN Pass-Through.................................................................................27
Chapter 4 Manage the Mobile Broadband Connection
Manage Mobile Broadband Auto Connect Options..............................................30
Manually Connect to or Disconnect From the Mobile Broadband Network..........31
Manage APN Profiles for Mobile Broadband Connections..................................32
View APN Profiles or Add a Custom APN Profile............................................33
Select an APN Profile......................................................................................34
Change an APN Profile...................................................................................35
Remove an APN Profile..................................................................................36
Chapter 5 Secure Your Network
Change the Modem Password.............................................................................38
Manage Port Forwarding for Incoming Traffic.......................................................38
Enable Port Forwarding and Add a Service or Application.............................39
Remove a Service or Application for Port Forwarding.....................................40
3
Page 4

LTE Modem LB1110 and LB1111
Disable Por t Forwarding..................................................................................41
Manage Port Filtering for Outgoing Traffic............................................................41
Block Specific Services and Applications From Accessing the Internet and Allow
All Other Services and Applications................................................................42
Allow Specific Services and Applications to Access the Internet and Block All
Other Services and Applications.....................................................................43
View Services and Applications on the Blacklist and Remove a Service or
Application From the List.................................................................................44
View Services and Applications on the Whitelist and Remove a Service or
Application From the List.................................................................................45
Disable Por t Filtering.......................................................................................46
Manage SIM Card Security..................................................................................47
Enable SIM Card Security...............................................................................47
Enter the SIM PIN to Enable the Modem to Connect to the Internet..............49
Personalize the SIM PIN.................................................................................50
Disable SIM Card Security..............................................................................51
Unblock the SIM Card With a PUK..................................................................52
Chapter 6 Manage the Modem and Monitor Usage and the Network
Upgrade the Firmware of the Modem..................................................................56
Back Up and Restore the Modem Settings..........................................................57
Back Up the Settings.......................................................................................57
Restore the Settings........................................................................................58
Return the Modem to Its Factory Default Settings...............................................59
Use the Reset Button......................................................................................59
Use the Modem’s Web Pages to Reset the Modem to Factory Defaults.........60
View Monthly Data and Session Data Usage......................................................60
Set a Plan Limit for the Data Counter..................................................................61
Change the Billing Cycle Counter or Reset the Data Counter.............................62
View Service Provider, Type of Service, and Signal Strength..............................63
View Account Details and Other Details About Your Modem...............................64
View Information About the Mobile Broadband Connection.................................65
Set Up SMS Alert Messages...............................................................................67
Set the Data Limit for SMS Alert Messages.........................................................68
View Alerts...........................................................................................................69
Turn Off the LEDs................................................................................................70
Chapter 7 Manage SMS Messages
Manage Incoming SMS Messages......................................................................72
Send an SMS Message.......................................................................................73
Chapter 8 Frequently Asked Questions
What do I do when I can’t connect a device to the modem?................................75
What do I do when I can’t access the Internet?...................................................75
What do I do when the No Signal icon displays?.................................................75
Why does the Signal Strength LED show only a few bars?.................................75
Why is the download or upload speed slow?.......................................................75
Can I connect multiple LAN devices to the modem?...........................................76
4
Page 5

LTE Modem LB1110 and LB1111
How do I access the modem’s web pages?.........................................................76
What do I do if I forget my admin login password?..............................................76
How do I disconnect from the mobile broadband network?.................................76
How do I find my computer’s IP address?............................................................77
How do I find a device’s MAC address?...............................................................78
How do I find my mobile phone number?.............................................................80
Where can I find more information?.....................................................................80
Chapter 9 Alerts and Troubleshooting
Alert Messages....................................................................................................82
Quick Tips for Troubleshooting.............................................................................82
Ver ify Nor mal Behavior With the LED Bars..........................................................83
Troubleshoot With the LED Bars..........................................................................83
Power LED Bar Is Off......................................................................................84
Power LED Bar Blinks Amber Fast and an Individual Signal and Strength LED
Bar Lights Solid Green....................................................................................84
LAN LED Is Off................................................................................................85
You Cannot Log In to the Modem.........................................................................85
Troubleshoot the Mobile Broadband Internet Connection....................................86
Obtain an Internet IP Address From Your Service Provider............................86
Troubleshoot Internet Browsing.......................................................................87
Changes Not Saved on the Modem’s Web Pages...............................................87
TCP/IP Network Not Responding........................................................................87
Test the LAN Path to Your Modem...................................................................87
Test the Path From Your Computer to a Remote Device.................................88
Appendix A Default Settings and Specifications
Factory Default Settings.......................................................................................90
Technical and Environmental Specifications........................................................91
Appendix B Wall-Mount the Modem
Position Your Modem............................................................................................93
Mount Your Modem..............................................................................................94
5
Page 6

Introduction and Hardware Overview
This manual is for the following NETGEAR® LTE Modem LB1110 and LB1111 models:
• LB1110-100EUS. Data model with band support for the Europe region.
• LB1111-100EUS. Data model with Power over Ethernet (PoE) and band support for the Europe region.
This chapter provides an introduction and hardware overview of the LTE Modem LB1110 and LB111 models
and contains the following sections:
• Introduction on page 7
• Supported Mobile Broadband Bands on page 7
• Package Contents on page 8
• Install the Micro SIM Card on page 8
• Top Panel With Status LEDs on page 11
• Back Panel With Connectors, Buttons, and a Port on page 12
1
• Product Label on page 12
• Position the Modem on page 13
• Optional External Antenna on page 14
For more information about the topics that are cov ered in this manual, visit the support website
Note
at netgear.com/support.
Firmware updates with new features and bug fixes are made available from time to time at
Note
downloadcenter.netgear.com.You can check for and download new firmware manually. If
the features or behavior of y our product does not match what is described in this guide, you
might need to update your firmware.
6
Page 7

LTE Modem LB1110 and LB1111
Introduction
The NETGEAR LTE Modem LB1110 and LB1111 models, in this manual referred to as the modem, can
provide broadband data services to areas where wired Internet is not readily available or is difficult, costly,
or time-consuming to install.The modem uses existing 4G LTE mobile networks with automatic fallback to
3G and 2G mobile networks to provide broadband data services.
If you connect a WiFi router to the modem’ s Gigabit Ethernet port, the mobile network connection can provide
high-speed Internet access for multiple users and devices in homes and offices.
Alternatively, you can connect the modem to an existing DSL, cable, or fiber optics gateway that supplies
two WAN ports so that the modem can provide a backup Internet connection for your home or office to
achieve continuous connectivity.
Professional installation and configuration are not required. If a SIM card is installed and activ ated, by default,
the modem automatically searches for and connects to your network provider’s mobile broadband network.
For information about installing the modem, see the quick start guide, which you can download from
downloadcenter.netgear.com.
In the unlikely situation that the modem does not automatically connect to your network provider’s mobile
broadband network, you might need to add an access profile name (APN) profile. For information about
adding an APN profile, see View APN Profiles or Add a Custom APN Profile on page 33.
Supported Mobile Broadband Bands
The following table describes the mobile broadband bands that are supported for each modem model.
Table 1. Mobile broadband bands
2G GMS3G UMTSLTE Category 4Model
Quad bandBands 1 and 8Bands 3, 7, 8, 20, and 40LB1110-100EUS
Quad bandBands 1 and 8Bands 3, 7, 8, 20, and 40LB1111-100EUS
Introduction and Hardware Overview
7
Page 8

LTE Modem LB1110 and LB1111
Package Contents
Your package contains the following items. The power adapter is localized to the country of sale. For some
countries, a converter is included.
Figure 1. Package contents
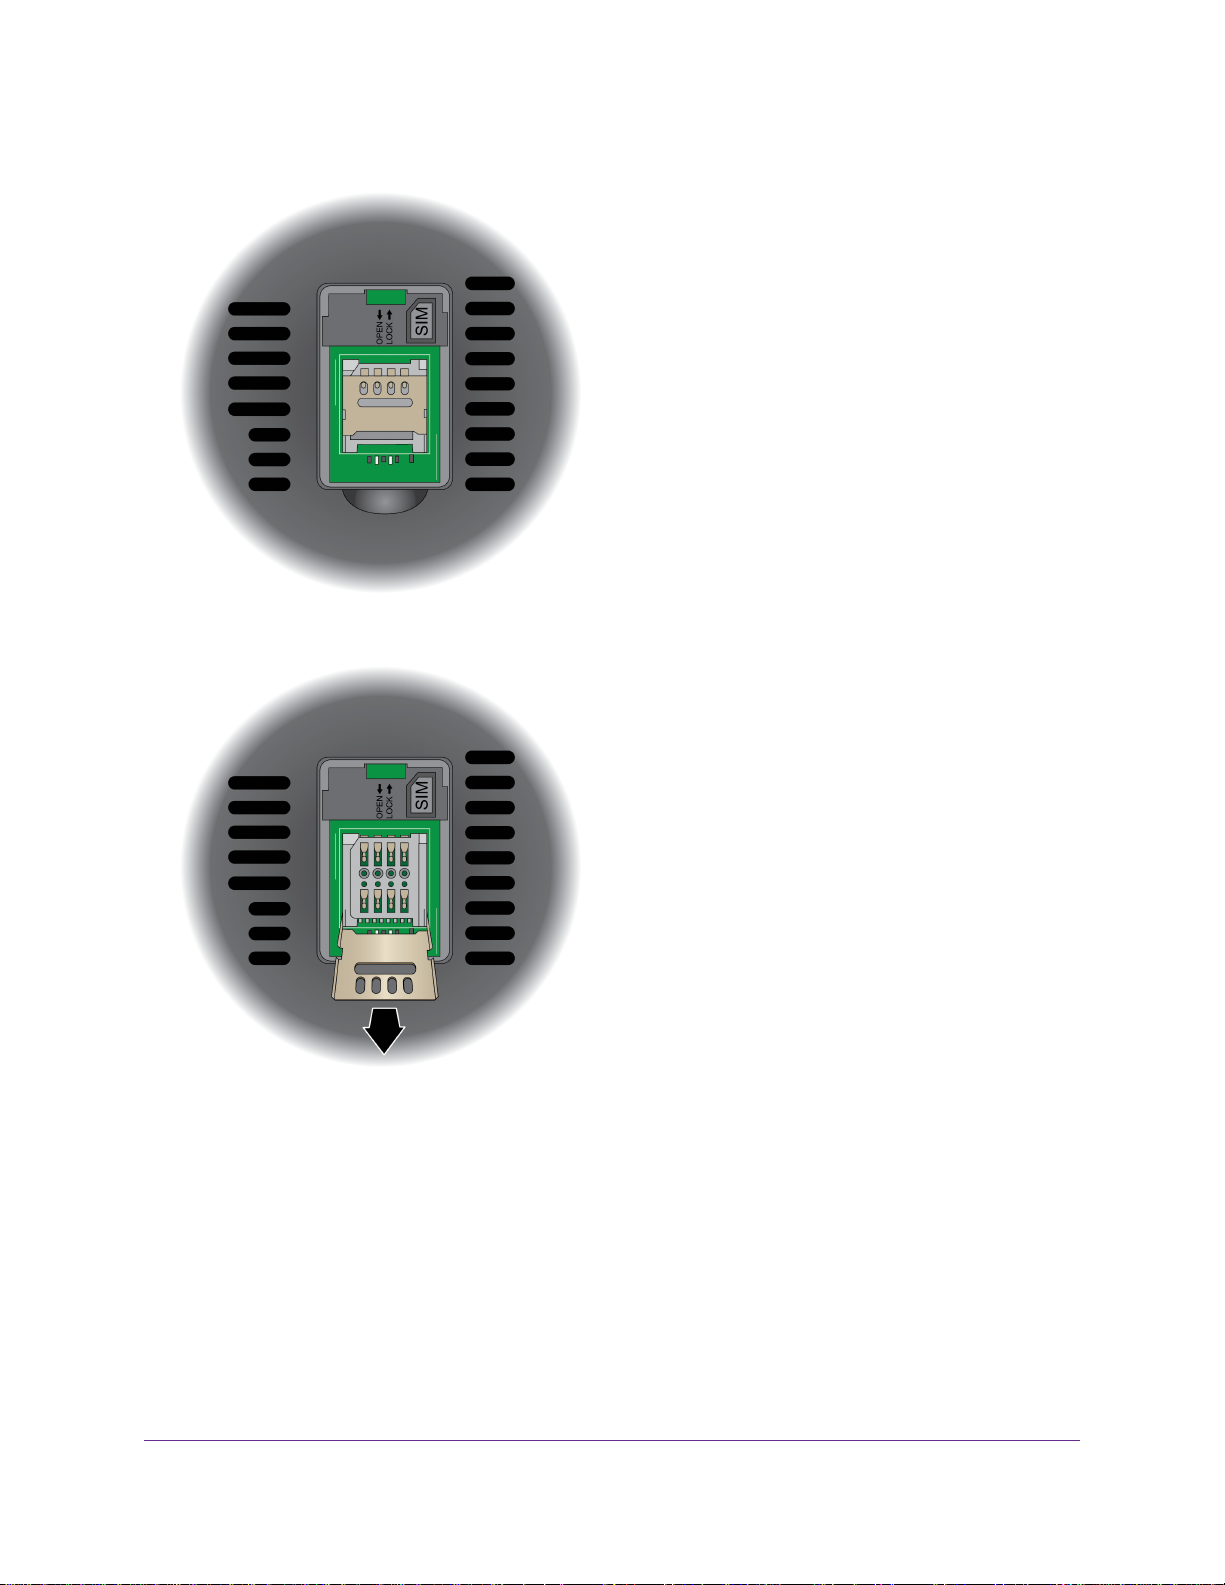
Install the Micro SIM Card
A micro SIM card (that is, a 3FF SIM card) might be preinstalled in the modem or you might need to obtain
a micro SIM card and install it yourself.To obtain a micro SIM card, contact your mobile broadband Internet
service provider.
Figure 2. Overview of installing the micro SIM card
To install the micro SIM card in the modem:
1. Ensure that power to the modem is off.
2. Place the modem horizontally with the bottom panel facing you.
Introduction and Hardware Overview
8
Page 9
LTE Modem LB1110 and LB1111
3. Remove the black plastic SIM slot cover so that you can access the metal SIM card slot.
4. Unlock the metal SIM card door.
Introduction and Hardware Overview
9
Page 10
LTE Modem LB1110 and LB1111
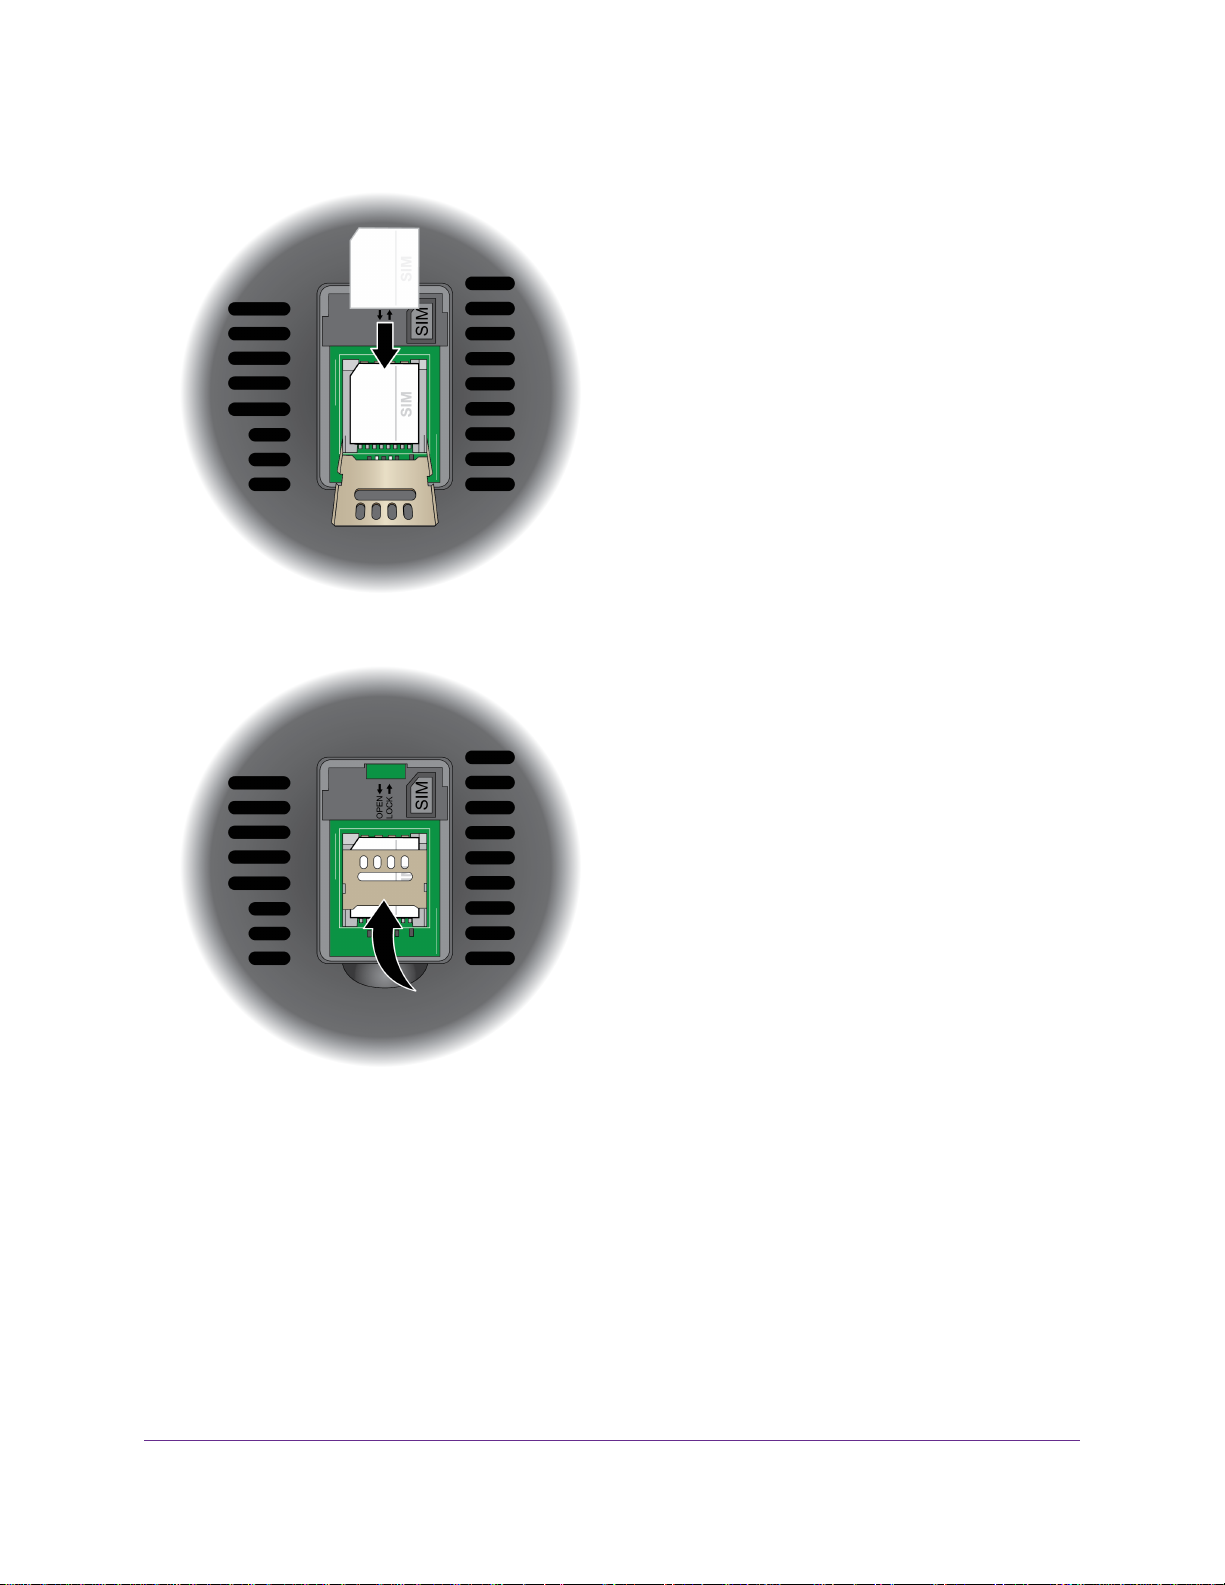
5. Carefully slide the micro SIM card into the metal slot.
6. Lock the metal SIM card door.
7. Close the black plastic SIM slot cover.
8. Turn on power to the modem.
Introduction and Hardware Overview
10
Page 11
LTE Modem LB1110 and LB1111
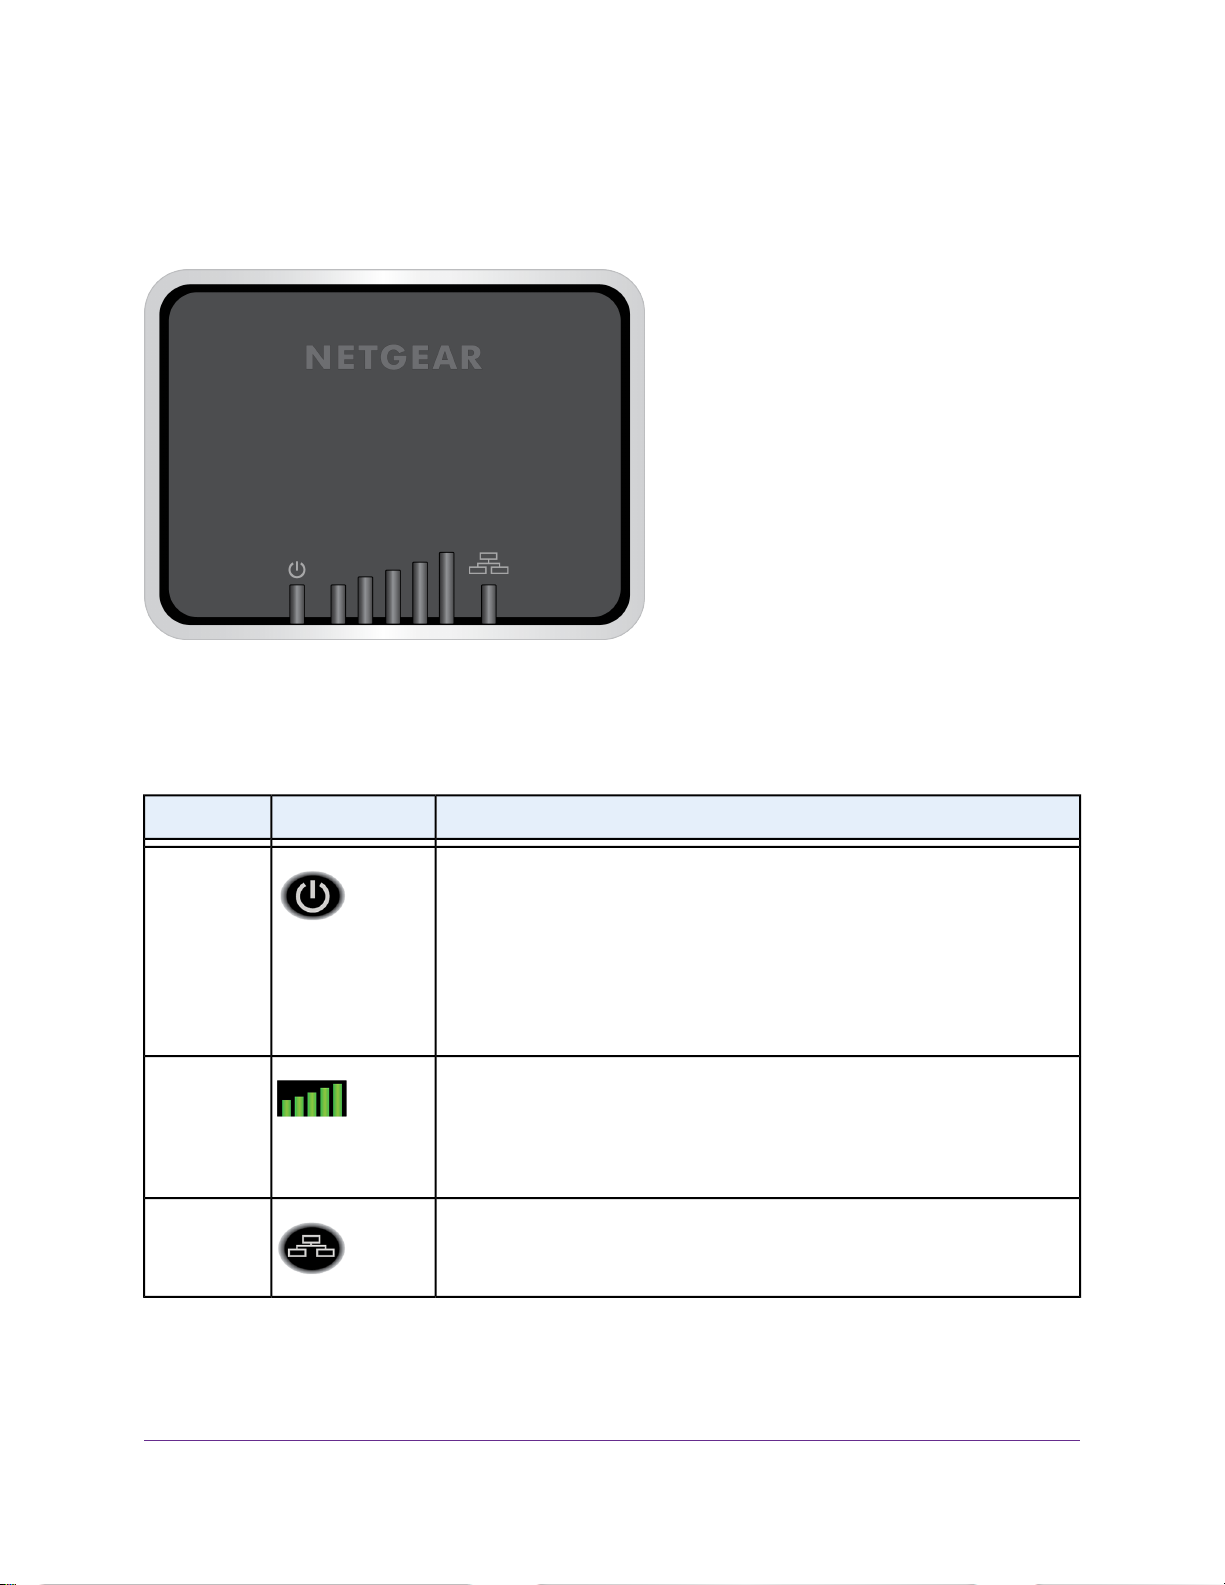
Top Panel With Status LEDs
The modem displays status LED bars on the top panel.
Figure 3. Modem top view with LED bars
The following table describes the LED bars and icons from left to right.
Table 2. LED descriptions (normal behavior)
DescriptionIcon or LED BarsDesignation
Power
Signal Strength
LAN
Solid green bar.The modem is receiving power and is connected to the mobile
broadband network and the Internet.
Solid amber bar.The modem is not connected to the Internet.
Blinking amber bar. A SIM card is not installed or not correctly installed or an
error occurred. For more information, see Troubleshoot With the LED Bars on
page 83.
Off.The modem is not receiving power.
Solid green bar or bars.The five LED bars indicate the signal strength of the
mobile broadband service that the modem is connected to. Fiv e green bars indicate
the strongest signal. One green bar (that is , the shortest bar) indicates the weakest
signal.
Off.The modem is not connected to a mobile broadband service.
Solid green bar.The Gigabit Ethernet port is connected to a powered-on LAN
device.
Off.The modem does not detect a powered-on LAN device.
Introduction and Hardware Overview
11
Page 12
LTE Modem LB1110 and LB1111
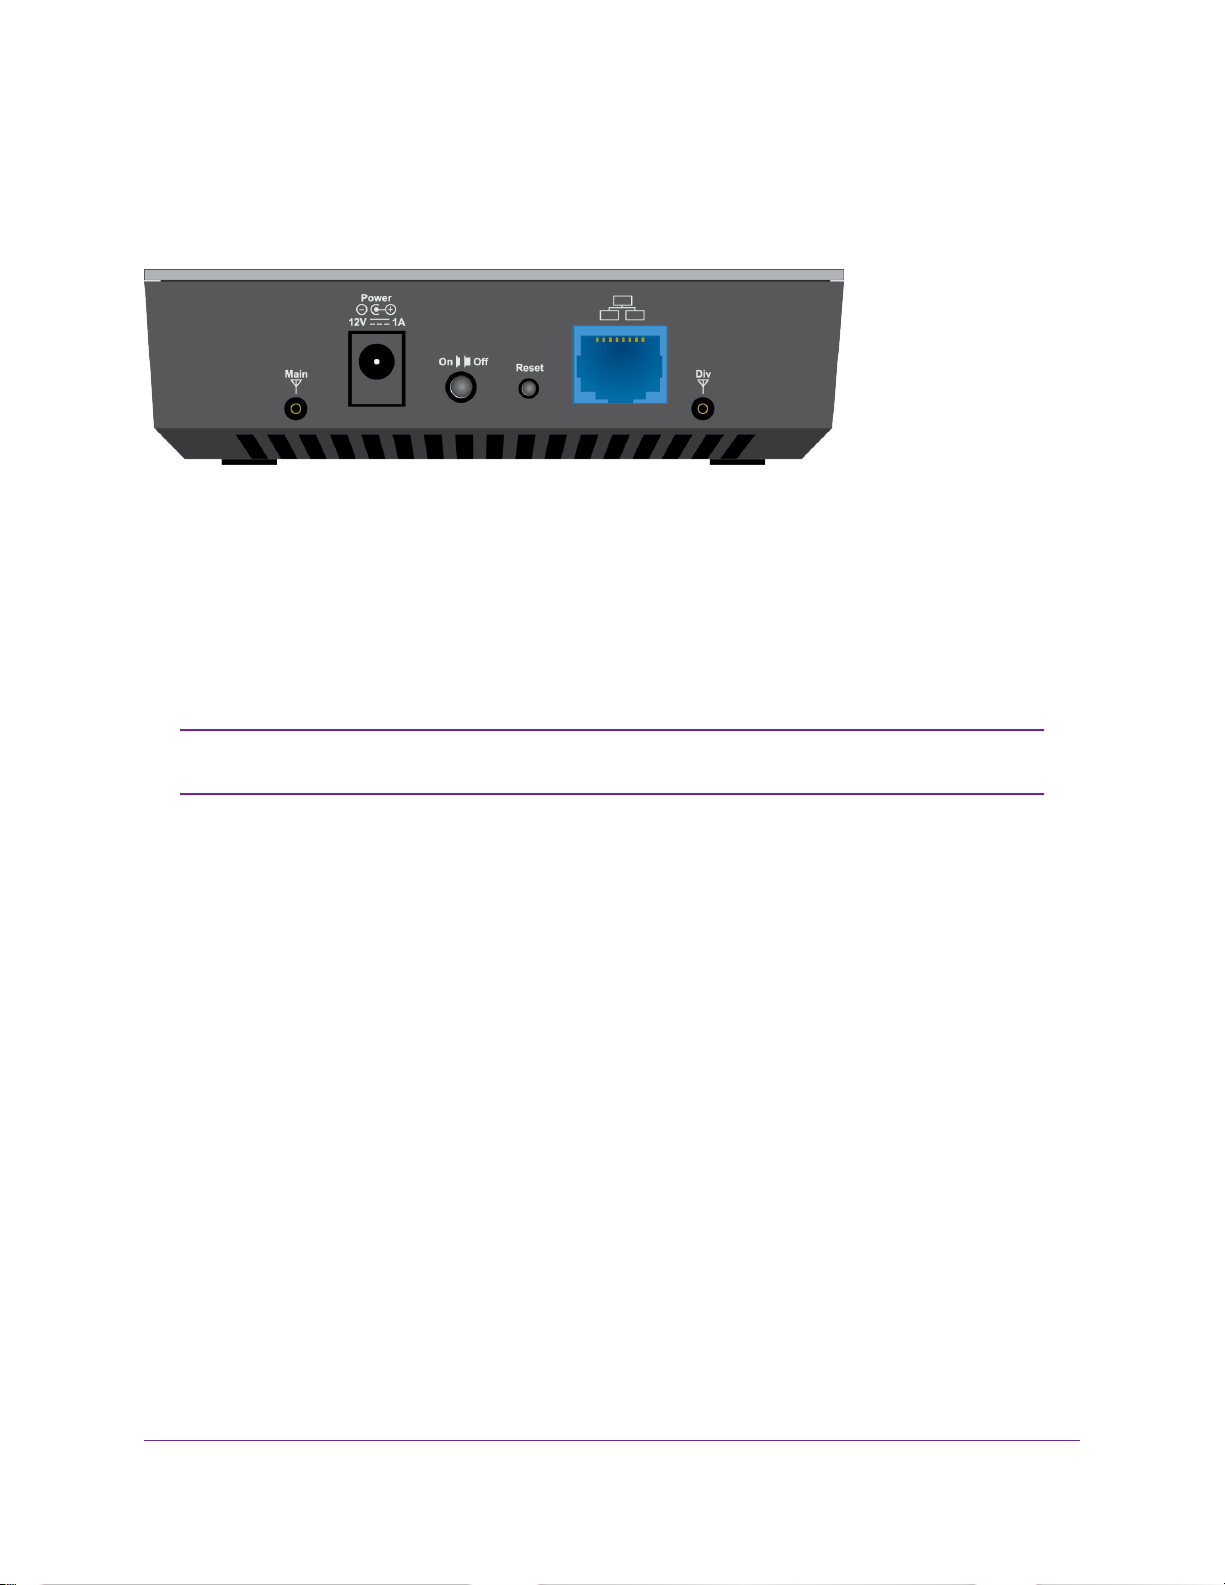
Back Panel With Connectors, Buttons, and a Port
The following figure shows the port, connectors, and buttons on the back panel of the modem.
Figure 4. Modem components on the back panel
From left to right, the back panel of the modem provides the following components:
• Connector for an external antenna. One switched RF connector for an optional external antenna (the
external antenna requires two inputs).
• DC connector. A DC connector to connect the AC power supply that is included in the package.
• On/Off button. An On/Off button to control power to the modem.
After you press the On/Off button, wait about 30 seconds f or the modem to complete
Note
the boot process.
• Reset button. A recessed Reset button to return the modem to factory default settings.
• Gigabit Ethernet port. One blue RJ-45 Gigabit Ethernet port to connect a router, WiFi router, Ethernet
switch or hub, or single computer.
• Connector for an external antenna. Another switched RF connector for an optional external antenna
(the external antenna requires two inputs).
Product Label
In addition to the default URL and password to access the modem’s web pages, the product label on the
bottom panel of modem shows the following information:
• Serial number (SN)
• Stockkeeping unit (SKU) number
• MAC address
• IMEI (International Mobile Station Equipment Identity)
Introduction and Hardware Overview
12
Page 13
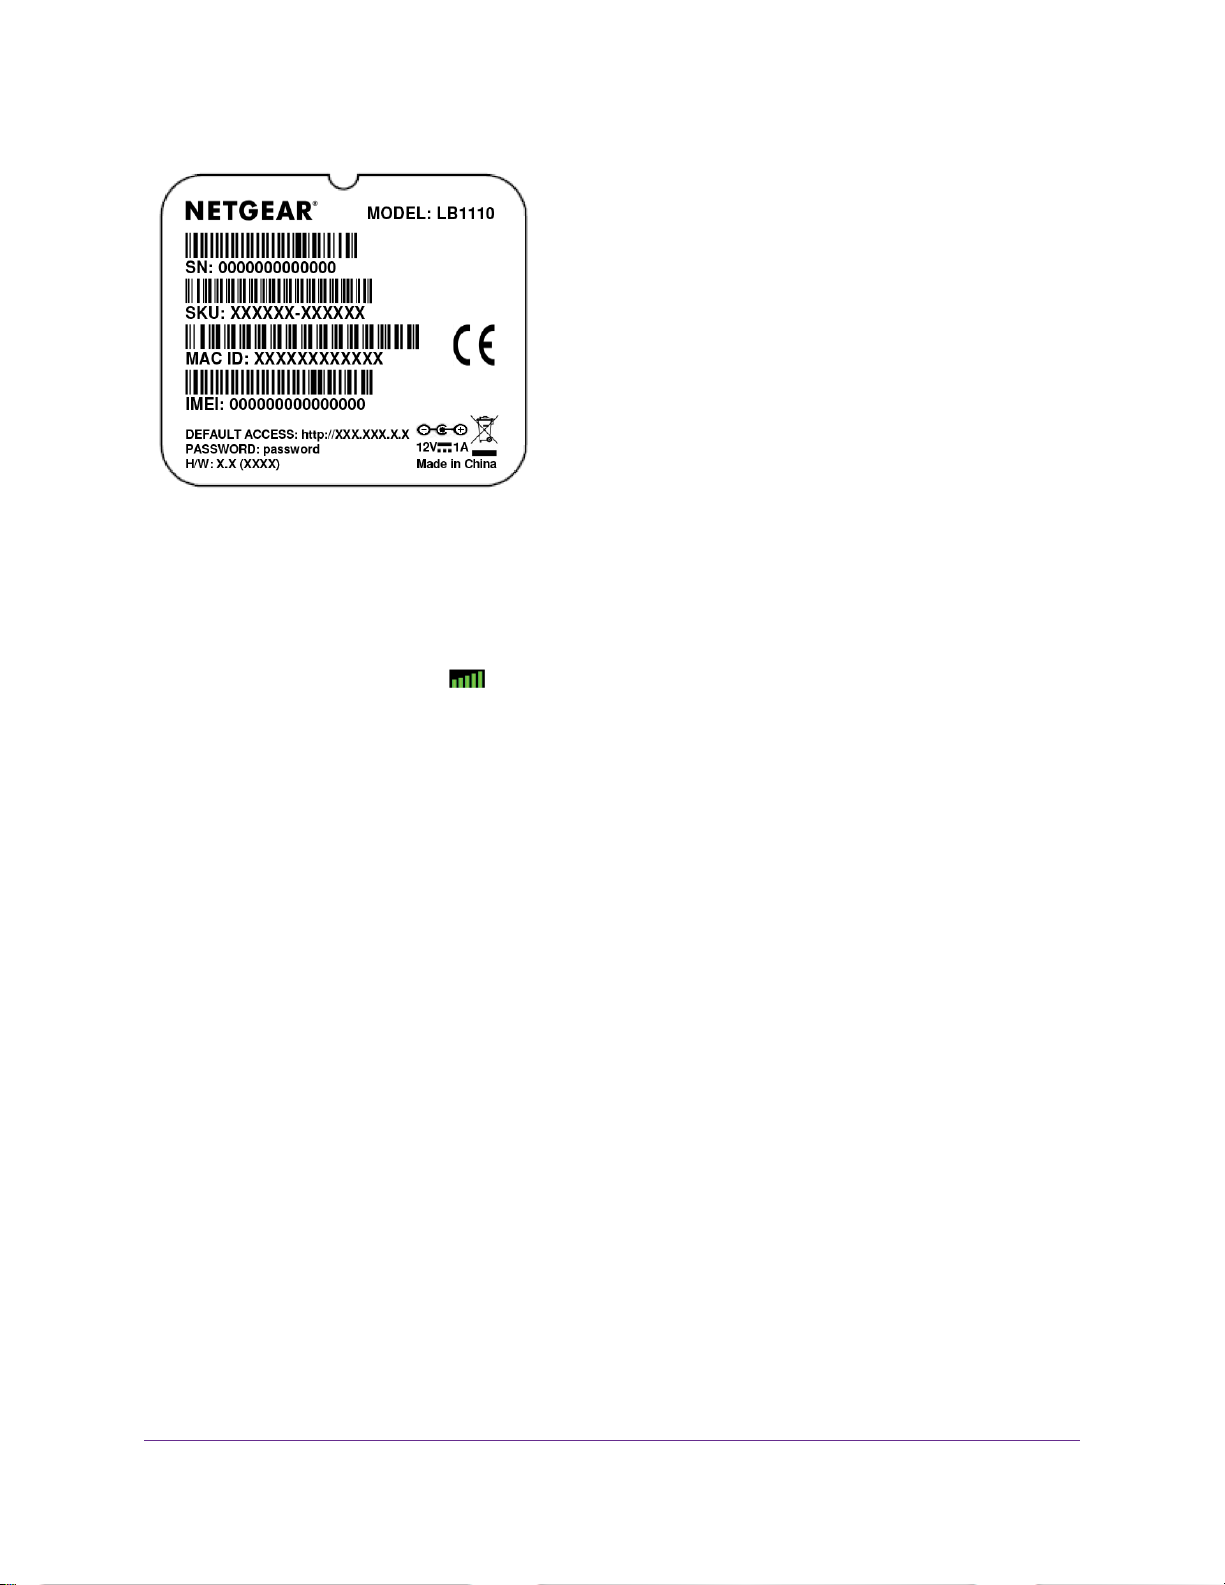
Figure 5. Product label
Position the Modem
LTE Modem LB1110 and LB1111
Use the Signal Strength LED bars on the top panel to position the modem for best signal strength in
relation to the mobile broadband network. Also f or best results, place y our modem according to the following
guidelines:
• Place your modem close to a window but avoiding direct sunlight. A window location gives the best
conditions for receiving a strong 4G LTE signal.
• Make sure that the modem is within reach of an AC power outlet and near Ethernet cables for wired
computers.
• Place the modem away from electrical devices such as the following:
- Ceiling fans
- Home security systems
- Microwaves
- Computers
- Base of a cordless phone
- 2.4 GHz cordless phone
- 5 GHz cordless phone
• Place the modem away from large metal surf aces , large glass surfaces , insulated walls , and items such
as the following:
- Solid metal doors
- Aluminum studs
- Fish tanks
- Mirrors
Introduction and Hardware Overview
13
Page 14

LTE Modem LB1110 and LB1111
- Brick walls or surfaces
- Concrete walls or surfaces
For information about wall-mounting the modem, see Wall-Mount the Modem on page 92.
Optional External Antenna
You can purchase an external multiple input, multiple output (MIMO) antenna for the modem to extend the
mobile broadband signal range indoors or in fringe network areas.
The external antenna plugs into the two antenna connectors on the modem to boost speeds and extend
coverage in buildings or vehicles, or in remote sites where network coverage is sparse.You could, for
example, attach the external antenna on a window with a suction cup.
Introduction and Hardware Overview
14
Page 15

Get Started
This chapter describes how to connect to the modem.To get started, you do not need to configure the mobile
broadband connection.
The chapter contains the following sections:
• Internet Connection Over Mobile Broadband on page 16
• Connect a Computer, Switch, Hub, Router, or WiFi Router to the Modem on page 16
• Access the Modem’s Web Pages for the First Time on page 17
• Change the Language on page 19
• Download the NETGEAR AirCard App for Smartphones and Tablets on page 19
2
15
Page 16

LTE Modem LB1110 and LB1111
Internet Connection Over Mobile Broadband
By default, when the modem powers up with a SIM card installed, it automatically searches f or and connects
to your network provider’s mobile broadband network. This process might take several minutes.The SIM
card that is installed determines the mobile broadband network to which the modem connects.
Even though the modem might connect to the mobile broadband network of the same
Note
service provider each time that you start the modem, the type of mobile broadband
service (LTE, 4G, 3G, 2G, or another type of service) to which the modem connects
might differ.
If the modem does not automatically connect to the mobile broadband network after 10 minutes, the P ow er
LED remains solid amber, and you might need to contact your mobile service provider to get the access
point name (APN) profile information and add (see View APN Profiles or Add a Custom APN Profile on page
33) and activate (see Select an APN Profile on page 34) a custom APN profile in the modem. If y our mobile
service provider informs you that your APN profile is correct but the modem still does not connect to the
mobile broadband network, see Troubleshoot the Mobile Broadband Internet Connection on page 86.
If you do not want the modem to connect automatically to the mobile broadband network, change the default
autoconnect option (see Manage Mobile Broadband Auto Connect Options on page 30).
For information about your mobile service provider and the broadband connection, see View Service Provider ,
Type of Service, and Signal Strength on page 63 and View Information About the Mobile Broadband
Connection on page 65.
Connect a Computer, Switch, Hub, Router, or WiFi Router to the Modem
By default, the modem functions in Router mode with the DHCP server enabled and IP pass-through (IPPT)
disabled.This means that you can connect multiple devices to the modem, f or example, through an Ethernet
switch or hub, and that each device can receive an IP address from the modem.
If you want to connect a router or WiFi router to the modem, change the operation mode of the modem to
Bridge mode, in which IP pass-through (IPPT) is enabled and only a single device can be connected to the
Internet through the modem. (The single device that is connected to the modemis the router or WiFi router,
but depending on the capabilities of the router or WiFi router, you can connect multiple devices to the router
or WiFi router.)
If you want to connect a computer only to the modem, the modem can function either in Router mode or in
Bridge mode.
For information about changing the operation mode of the modem, see Manage Router Mode and Bridge
Mode on page 22.
Get Started
16
Page 17

LTE Modem LB1110 and LB1111
Connect a Computer to the LAN Port of the Modem
You can add a single computer to the Ethernet local area network (LAN) of the modem.
To connect a computer to the Ethernet LAN of the modem:
1. Attach one end of the Ethernet cable that came in the product package to an Ethernet port on your
computer.
2. Attach the other end of the cable to the Gigabit Ethernet LAN port on the back panel of the modem.
Connect a Router or WiFi Router to the LAN P ort of the Modem
You can add a router or WiFi router to the Ethernet local area network (LAN) of the modem.
To connect a router or WiFi router to the Ethernet LAN of the modem:
1. Attach one end of the Ethernet cable that came in the product package to an Ethernet port on your
router or WiFi router.
2. Attach the other end of the cable to the Gigabit Ethernet LAN port on the back panel of the modem.
Access the Modem’s Web Pages for the First Time
The modem comes configured and ready to use.You can use the modem’s web pages to monitor data
usage and change basic settings.
You can log in to the modem’s web pages over an Ethernet cable (see Connect a Computer, Switch, Hub,
Router, or WiFi Router to the Modem on page 16).
The modem’s web pages run on any device with a web browser such as Google Chrome, Mozilla Firefox,
and Microsoft Internet Explorer.
To access the modem’s web pages:
1. Launch a web browser from a device that is connected to the modem.
The device can be a computer that is directly connected to the modem or a client from a router that is
connected to the modem.
2. In the address field of your browser, enter http://192.168.5.1.
The Dashboard page displays.
3. From the language menu in the upper right of the page, select a language.
The language adjusts.
4. To sign in to the web pages and access the full Dashboard page and other pages, do the following:
Get Started
17
Page 18

LTE Modem LB1110 and LB1111
a. In the Sign In field, enter the modem’s admin password.
The default password is password (case-sensitive).
b. If y ou do not want to enter your pass word each time that you access the modem’ s web pages, select
the Remember me check box.
c. Click the Sign In button.
The full Dashboard page displays.You are now ready to monitor the modem and manage the
settings.
If you cannot log in to the modem or your browser does not display the Dashboard page, check the following:
• Make sure that the computer, router, or WiFi router is connected to the LAN Gigabit Ethernet port of the
modem.
• Make sure that your browser does not cache the previous page by closing and reopening the browser.
• If your computer is set to a static or fixed IP address (this type of setting is uncommon), change the setting
to obtain an IP address automatically from the modem (see Change the LAN Settings on page 21).
For more troubleshooting information, see You Cannot Log In to the Modem on page 85.
Get Started
18
Page 19

LTE Modem LB1110 and LB1111
Change the Language
You can change the language of the modem’s web pages.
To change the language:
1. Launch a web browser from a device that is connected to the modem.
The device can be a computer that is directly connected to the modem or a client from a router that is
connected to the modem.
2. In the address field of your browser, enter http://192.168.5.1.
The Dashboard page displays.
If you did not select the Remember me check box when you logged in previously, a
Note
limited Dashboard page displays. In the Sign In field, enter the modem password
and click the Sign In button.The default password is password (case-sensitive).
3. Select Settings.
The page displays the general settings.
4. In the Language section, from the Default Language menu, select a language.
The Submit button displays after you select the language.
5. Click the Submit button.
Your settings are saved and the language changes.
Download the NETGEAR AirCard App for Smartphones and Tablets
Download and use the complimentary NETGEAR AirCard app to view your connection, settings, and data
usage from your smartphone or tablet. Search the app store for NETGEAR AirCard at
netgear.com/aircardapps.
To manage all modem settings, use the modem’s web pages at http://192.168.5.1.
Get Started
19
Page 20

Manage the Modem LAN Settings
This chapter describes how to manage the LAN settings that the modem provides.
The chapter contains the following sections:
• Change the LAN Settings on page 21
• Manage Router Mode and Bridge Mode on page 22
• Change the DHCP Server Settings on page 23
• Disable the DHCP Server on page 26
• Enable the DMZ on page 26
• Disable VPN Pass-Through on page 27
3
20
Page 21

LTE Modem LB1110 and LB1111
Change the LAN Settings
The modem is preconfigured to use private IP addresses on the LAN side.The modem’s default LAN IP
configuration is as follows:
• LAN IP address. 192.168.5.1
• Subnet mask. 255.255.255.0
This address and subnet mask are part of the designated private address range for use in private networks
and are suitable for most applications.The IP address and subnet mask identify which addresses are local
to a specific device and which must be reached through a gateway or router.
Although you can change the IP address of the modem, this is rarely necessary. However, if you establish
a VPN connection to a server that assigns IP addresses in the same range as the one that is used by the
modem, you must change the IP address of the modem to prevent network problems.
To change the LAN settings:
1. Launch a web browser from a device that is connected to the modem.
The device can be a computer that is directly connected to the modem or a client from a router that is
connected to the modem.
2. In the address field of your browser, enter http://192.168.5.1.
The Dashboard page displays.
If you did not select the Remember me check box when you logged in previously, a
Note
limited Dashboard page displays. In the Sign In field, enter the modem password
and click the Sign In button.The default password is password (case-sensitive).
Manage the Modem LAN Settings
21
Page 22

LTE Modem LB1110 and LB1111
3. Select Settings > Advanced > LAN.
4. In the IP address field, enter a new IP address.
The default IP address is 192.168.5.1.
The Submit button displays after you change the IP address.
5. In the Netmask field, enter a new network mask.
The default network mask is 255.255.255.0.
6. Click the Submit button.
Your settings are saved and the modem restarts. A device that is connected to the modem is disconnected
when the modem restarts.Y ou can reconnect the device to the modem using the new IP address of the
modem.
Manage Router Mode and Bridge Mode
By default, Router mode is enabled on the modem. By connecting the modem to an Ethernet switch or hub,
you can connect multiple Ethernet devices such as printers, credit card terminals, and computers to the
modem.
In Router mode, Network Address Translation (NAT) is enabled, the built-in Dynamic Host Configuration
Protocol (DHCP) server is enabled to assign a LAN IP address to each connected device, and IP pass-through
(IPPT) is disabled.
Manage the Modem LAN Settings
22
Page 23

LTE Modem LB1110 and LB1111
In Bridge mode, only a single device can be connected to the Internet through the modem.This device can
be a computer, router, or WiFi router. In Bridge mode, Network Address Translation (NAT) is disabled, the
DHCP server is disabled, and IPPT is enabled.
Because IPPT is enabled in Bridge mode, Bridge mode can be useful for implementing a virtual private
network (VPN), point-to-point, or remote management connection to a single device that is connected to
the modem. Such connections usually require that a public IP address is assigned to the modem’s WAN
port, and through IPPT, to the device that is connected to the modem.
To change the modem from Router mode to Bridge mode, or the other way around:
1. Launch a web browser from a device that is connected to the modem.
The device can be a computer that is directly connected to the modem or a client from a router that is
connected to the modem.
2. In the address field of your browser, enter http://192.168.5.1.
The Dashboard page displays.
If you did not select the Remember me check box when you logged in previously, a
Note
limited Dashboard page displays. In the Sign In field, enter the modem password
and click the Sign In button.The default password is password (case-sensitive).
3. Select Settings > Advanced > LAN.
The LAN page displays.
4. Do one of the following:
• To enable Bridge mode, select the Bridge radio button.
• To enable Router mode, select the Router radio button.
By default, the Router radio button is selected.
5. Click the Submit button.
Your settings are saved and the modem restarts. Any devices that are connected to the modem are
disconnected when the modem restarts.
Enabling Bridge mode automatically disables the modem’ s DHCP server .Y ou can connect only a single
device to the modem.
Enabling Router mode automatically enables the modem’s DHCP server, which assigns a LAN IP
address to each connected device.
Change the DHCP Server Settings
You can change the DHCP server settings only when the modem functions in Router
Note
mode (see Manage Router Mode and Bridge Mode on page 22).
The modem is preconfigured to function as a DHCP server when Router mode is enabled.The modem’s
default DHCP IP address range is 192.168.5.20–192.168.5.99.
Manage the Modem LAN Settings
23
Page 24

LTE Modem LB1110 and LB1111
Although you can change the DHCP address range of the modem, this is rarely necessary. However, if you
establish a VPN connection to a server that assigns IP addresses in the same range as the one that is used
by the modem, you must change the DHCP range of the modem to prevent network problems.
The modem’s DHCP server assigns IP, DNS server, and default gateway addresses to all computers
connected to the LAN.The assigned default gatewa y address is the LAN address of the modem.The modem
assigns IP addresses to the attached computers from a predefined pool of addresses. (You can change the
pool of addresses.) Each pool address is tested before it is assigned to avoid duplicate addresses on the
LAN. For most applications, the default DHCP and TCP/IP settings of the modem work well.
The modem delivers the following parameters to any LAN device that requests DHCP:
• An IP address from the range that you defined
• Subnet mask
• Gateway IP address (the modem’s LAN IP address)
• DNS server IP address (the modem’s LAN IP address)
To change the DHCP server settings when the modem functions in Router mode:
1. Launch a web browser from a device that is connected to the modem.
The device can be a computer that is directly connected to the modem or a client from a router that is
connected to the modem.
2. In the address field of your browser, enter http://192.168.5.1.
The Dashboard page displays.
If you did not select the Remember me check box when you logged in previously, a
Note
limited Dashboard page displays. In the Sign In field, enter the modem password
and click the Sign In button.The default password is password (case-sensitive).
Manage the Modem LAN Settings
24
Page 25

LTE Modem LB1110 and LB1111
3. Select Settings > Advanced > LAN.
4. Make sure that next to DHCP Server, the Enabled radio button is selected.
By default, when the modem functions in Router mode, the DHCP server is enabled.
5. In the DHCP IP Range fields, enter the start and end IP addresses for the DHCP pool.
The IP addresses must be in the same network as the LAN IP address of the modem. By default, the
DHCP pool consists of addresses in the 192.168.5.20–192.168.5.99 range.
The Submit button displays after you enter IP addresses for the DHCP pool.
6. To change the period that the leased DHCP address remains effective, in the DHCP lease time field,
enter a time in minutes.
By default, the lease time is 720 minutes (12 hours).
7. To change the DNS settings, next to DNS mode, select the Manual radio button.
The DNS 1 and DNS 2 fields display.
By default, the Auto radio button is selected and the modem uses the DNS servers that are specified
by the mobile broadband service provider.
8. If you select the Manual radio button next to DNS mode, in the DNS 1 and DNS 2 fields, enter the IP
addresses of the custom DNS servers.
9. Click the Submit button.
Your settings are saved.
Manage the Modem LAN Settings
25
Page 26

LTE Modem LB1110 and LB1111
When you change the DHCP server settings, the modem resets. Any devices that are connected to the
modem are disconnected when the modem resets and must obtain a new IP address when they reconnect
to the modem.
Disable the DHCP Server
You can disable the DHCP server only when the modem functions in Router mode
Note
(see Manage Router Mode and Bridge Mode on page 22).
If you do not need the modem to issue IP addresses to connected devices through its DHCP server, you
can disable the DHCP server.
To disable the modem’s DHCP server when the modem functions in Router mode:
1. Launch a web browser from a device that is connected to the modem.
The device can be a computer that is directly connected to the modem or a client from a router that is
connected to the modem.
2. In the address field of your browser, enter http://192.168.5.1.
The Dashboard page displays.
If you did not select the Remember me check box when you logged in previously, a
Note
limited Dashboard page displays. In the Sign In field, enter the modem password
and click the Sign In button.The default password is password (case-sensitive).
3. Select Settings > Advanced > LAN.
The LAN page displays.
4. Next to DHCP Server, select the Disable radio button.
The Submit button displays after you select the radio button.
By default, the Enable radio b utton is selected and the DHCP server issues IP addresses to connected
devices.
5. Click the Submit button.
Your settings are saved.
Enable the DMZ
You can enable the DMZ settings only when the modem functions in Router mode
Note
(see Manage Router Mode and Bridge Mode on page 22).
In a demilitarized zone (DMZ) network configuration, a designated computer runs outside the firewall in the
DMZ.This computer intercepts incoming Internet traffic, providing an extra layer of protection for the rest
of the network, and sending all incoming data to a particular IP address.
Manage the Modem LAN Settings
26
Page 27

LTE Modem LB1110 and LB1111
T o enable the DMZ when the modem functions in Router mode and to designate a computer
to receive incoming traffic:
1. Launch a web browser from a device that is connected to the modem.
The device can be a computer that is directly connected to the modem or a client from a router that is
connected to the modem.
2. In the address field of your browser, enter http://192.168.5.1.
The Dashboard page displays.
If you did not select the Remember me check box when you logged in previously, a
Note
limited Dashboard page displays. In the Sign In field, enter the modem password
and click the Sign In button.The default password is password (case-sensitive).
3. Select Settings > Advanced > LAN.
The LAN page displays.
4. Scroll down to the bottom of the page.
5. In the DMZ section, next to DMZ Enabled, select the On radio button.
The Submit button and the IP Address field display after you select the radio button.
By default, the Off radio button is selected and the DMZ server is disabled.
6. In the DMZ Address field, enter the IP address of the computer to which you want all data sent.
By default, the IP address for the DMZ computer is 192.168.5.4.
7. Click the Submit button.
Your settings are saved and the modem restarts.
Disable VPN Pass-Through
You can disable VPN pass-through only when the modem functions in Router mode
Note
(see Manage Router Mode and Bridge Mode on page 22).
If a device that is connected to the modem functions as a VPN client for a VPN endpoint on the Internet,
encrypted VPN packets are sent to the modem. Because the modem filters the encrypted packets through
Network Address Translation (NAT), the packets become invalid if you do not enable VPN pass-through.
By default, when the modem functions in Router mode, VPN pass-through is enabled.
Situations might occur in which you want to disable VPN pass-through.
To disable VPN pass-through when the modem functions in Router mode:
1. Launch a web browser from a device that is connected to the modem.
The device can be a computer that is directly connected to the modem or a client from a router that is
connected to the modem.
2. In the address field of your browser, enter http://192.168.5.1.
Manage the Modem LAN Settings
27
Page 28

LTE Modem LB1110 and LB1111
The Dashboard page displays.
If you did not select the Remember me check box when you logged in previously, a
Note
limited Dashboard page displays. In the Sign In field, enter the modem password
and click the Sign In button.The default password is password (case-sensitive).
3. Select Settings > Advanced > LAN.
The LAN page displays.
4. Next to VPN Passthrough, select the Off radio button.
The Submit button displays after you select the radio button.
By default, the On radio button is selected and VPN pass-through is enabled.
5. Click the Submit button.
Your settings are saved and the modem restarts. Any devices that are connected to the modem are
disconnected when the modem restarts.
Manage the Modem LAN Settings
28
Page 29

Manage the Mobile Broadband Connection
This chapter describes how to manage the mobile broadband connection of the modem.
The chapter contains the following sections:
• Manage Mobile Broadband Auto Connect Options on page 30
• Manually Connect to or Disconnect From the Mobile Broadband Network on page 31
• Manage APN Profiles for Mobile Broadband Connections on page 32
4
29
Page 30

LTE Modem LB1110 and LB1111
Manage Mobile Broadband Auto Connect Options
By default, the modem automatically connects to your service provider’s mobile broadband network.You
can change this setting so that the modem automatically connects to another type of network when you are
roaming or never autoconnects.
We recommend that you leave the default Auto Connect setting and change this setting only if a specific
reason exists.With the Auto Connect setting, the modem connects to the fastest service that is available.
If you change the setting to a specific type of network, the modem cannot connect if that type of network is
not available. For example, if you select the modem to connect only to an LTE network and you are in an
area without an LTE network, the modem cannot connect to a mobile broadband network until you change
the setting.
To specify the Auto Connect options for the mobile broadband network:
1. Launch a web browser from a device that is connected to the modem.
The device can be a computer that is directly connected to the modem or a client from a router that is
connected to the modem.
2. In the address field of your browser, enter http://192.168.5.1.
The Dashboard page displays.
If you did not select the Remember me check box when you logged in previously, a
Note
limited Dashboard page displays. In the Sign In field, enter the modem password
and click the Sign In button.The default password is password (case-sensitive).
3. Select Settings > Mobile > Preferences.
4. From the Network Mode menu, select the type of mobile broadband network:
• All Bands.The modem connects automatically to the type of mobile broadband network that is
made available by your mobile broadband service provider.This is the default setting.
• 2G only.The modem functions in Global System for Mobile communications (GSM) mode only and
does not fall back to another type of service if 2G service is not available.
Manage the Mobile Broadband Connection
30
Page 31

LTE Modem LB1110 and LB1111
• 3G only.The modem functions in Wideband Code Division Multiple Access (WCDMA) mode only
and does not fall back to another type of service if 3G service is not available.
• LTE only.The modem functions in 4G LTE mode only and does not fall back to another type of
service if 4G LTE service is not available.
• None.The modem does not connect to any type of mobile broadband service.This setting disables
the mobile broadband connection.
The Submit button displays after you change a selection.
If you did not install a micro SIM card in the modem or if you are roaming, a Scan
Note
button might display.You can click the Scan button to scan for available mobile
broadband networks.
5. Select an Auto Connect option:
• Never (connect manually each use).The modem does not attempt to automatically connect to
the mobile broadband network when powered on.
For information about how to connect to the network manually, see Manually Connect to or Disconnect
From the Mobile Broadband Network on page 31.
• Always except when r oaming.The modem automatically attempts to connect only to your network
provider’s mobile broadband network when powered on.When roaming, the modem does not
attempt to automatically connect.
• Always.The modem automatically attempts to connect to the mobile broadband network when
powered on.This is the default setting.
You might incur roaming charges if you are outside your network provider’s coverage
Note
area.
6. Click the Submit button.
Your settings are saved.
Manually Connect to or Disconnect From the Mobile Broadband Network
If you do not want to let the modem autoconnect to the mobile broadband network, you can disab le the Auto
Connect option (see Manage Mobile Broadband Auto Connect Options on page 30) and connect the modem
to the mobile broadband network.
To manually connect the modem to or disconnect it from the mobile broadband network:
1. Launch a web browser from a device that is connected to the modem.
The device can be a computer that is directly connected to the modem or a client from a router that is
connected to the modem.
2. In the address field of your browser, enter http://192.168.5.1.
Manage the Mobile Broadband Connection
31
Page 32

LTE Modem LB1110 and LB1111
The Dashboard page displays.
If you did not select the Remember me check box when you logged in previously, a
Note
limited Dashboard page displays. In the Sign In field, enter the modem password
and click the Sign In button.The default password is password (case-sensitive).
On the left, under the main menu, a link lets you connect to or disconnect from the mobile broadband
network.
3. Take one of the following actions:
• To connect the modem to the mobile broadband network, click the Connect link.
The modem attempts to connect to the mobile broadband network.
• To disconnect the modem from the mobile broadband network, click the Disconnect link.
The modem disconnects from the mobile broadband network.
Manage APN Profiles for Mobile Broadband Connections
The access point name (APN) is the name of the service provider’s server that provides access to the mobile
broadband network.When you access a mobile broadband network, an APN profile is automatically
downloaded from the service provider and configured on your modem. If you connect to different mobile
broadband networks, the modem includes various APN profiles.
Although rarely required, you can create a custom APN profile manually, using information that your mobile
broadband service provider gave you, and select the custom APN profile manually. The modem uses the
selected APN profile to establish a connection with the mobile broadband network of the service provider.
The following sections provide information about managing APN profiles:
• View APN Profiles or Add a Custom APN Profile on page 33
• Select an APN Profile on page 34
• Change an APN Profile on page 35
• Remove an APN Profile on page 36
Manage the Mobile Broadband Connection
32
Page 33

LTE Modem LB1110 and LB1111
View APN Profiles or Add a Custom APN Profile
To add a custom APN profile manually, use the information that your mobile broadband service provider
gave you.
To view APN profiles or add a custom APN profile for a service provider network:
1. Launch a web browser from a device that is connected to the modem.
The device can be a computer that is directly connected to the modem or a client from a router that is
connected to the modem.
2. In the address field of your browser, enter http://192.168.5.1.
The Dashboard page displays.
If you did not select the Remember me check box when you logged in previously, a
Note
limited Dashboard page displays. In the Sign In field, enter the modem password
and click the Sign In button.The default password is password (case-sensitive).
3. Select Settings > Mobile > APN.
The APN page displays.
4. To see details about the active APN profile, click the Details button.
If you did not yet add a custom APN profile, the default profile is the active APN profile.
5. To add a custom APN profile, click the Add button.
6. Enter the settings for the new APN profile as described in the following table.
Manage the Mobile Broadband Connection
33
Page 34

LTE Modem LB1110 and LB1111
DescriptionField
Name
APN
Authentication
PDP
Enter the name or acronym of the mobile broadband service provider or any other information
that might help you to identify the APN profile.
Enter the APN that provides access to the mobile broadband network. Use the information that
your mobile broadband service provider gave you.
From the menu, select the authentication mode to access the mobile broadband network:
• None.The service provider does not require authentication.This setting is the default setting.
• PAP.The service provider uses Password Authentication Protocol (PAP).
• CHAP.The service provider uses Challenge Handshake Authentication Protocol (CHAP).
• PAP or CHAP.The service provider uses either PAP or CHAP.
If you select an authentication mode, enter the user name to access the mobile broadband network.Username
If you select an authentication mode, enter the passw ord to access the mobile broadband network.Password
From the menu, select the packet data protocol (PDP):
• IPV4.The mobile broadband network uses IPv4 only.This is the default setting.
• IPV6.The mobile broadband network uses IPv6 only.
• IPV4V6.The mobile broadband network uses either IPv4 or IPv6.
PDP Roaming
From the menu, select the PDP that is used for roaming:
• None.The modem does not use the specified PDP for roaming.This is the default setting.
• IPV4.The mobile broadband network uses IPv4 only for roaming.
• IPV6.The mobile broadband network uses IPv6 only for roaming.
• IPV4V6.The mobile broadband network uses either IPv6 or IPv6 for roaming.
7. Click the Save button.
The new APN profile displays on the page but is not the active profile until you select it as such (see
Select an APN Profile on page 34).
Select an APN Profile
Although rarely required, you can select an APN profile manually.The modem uses the selected APN profile
to establish a connection with the mobile broadband network of the service provider.
To select an APN profile as the active profile:
1. Launch a web browser from a device that is connected to the modem.
The device can be a computer that is directly connected to the modem or a client from a router that is
connected to the modem.
2. In the address field of your browser, enter http://192.168.5.1.
Manage the Mobile Broadband Connection
34
Page 35

LTE Modem LB1110 and LB1111
The Dashboard page displays.
If you did not select the Remember me check box when you logged in previously, a
Note
limited Dashboard page displays. In the Sign In field, enter the modem password
and click the Sign In button.The default password is password (case-sensitive).
3. Select Settings > Mobile > APN.
The APN page displays the available APN profiles.
If you did not yet add a custom APN profile, the default profile is the active APN profile and you cannot
select another profile until you add a custom profile (see View APN Profiles or Add a Custom APN Profile
on page 33).
4. To see details about the active APN profile, click the Details button.
If you did not yet add a custom APN profile, the default profile is the active APN profile.
5. Select the radio button next to the APN profile that must become the active profile.
The APN profile is selected.The modem uses the selected APN profile to establish a connection with
the mobile broadband network of the service provider.
Change an APN Profile
You can change an existing APN profile.
To change an APN profile:
1. Launch a web browser from a device that is connected to the modem.
The device can be a computer that is directly connected to the modem or a client from a router that is
connected to the modem.
2. In the address field of your browser, enter http://192.168.5.1.
The Dashboard page displays.
If you did not select the Remember me check box when you logged in previously, a
Note
limited Dashboard page displays. In the Sign In field, enter the modem password
and click the Sign In button.The default password is password (case-sensitive).
3. Select Settings > Mobile > APN.
The APN page displays the available APN profiles.
4. Click the Details button for the APN profile.
The settings for the APN profile display, along with the Edit and Delete buttons.
5. Click the Edit button.
The fields and menus become accessible, and the Save and Cancel buttons display.
6. Change the settings as needed.
Manage the Mobile Broadband Connection
35
Page 36

LTE Modem LB1110 and LB1111
For more information about the APN profile settings, see View APN Profiles or Add a Custom APN
Profile on page 33.
7. Click the Save button.
Your settings are saved.
Remove an APN Profile
You can remove an APN profile f or a service provider that you no longer use.You cannot remove the default
APN profile.
WARNING:
Do not remove an APN profile for an active broadband session. If you do, the
session is disconnected and you must either select another APN profile and
establish another broadband session or restart the modem to reinstate the
APN profile that you removed.
To remove an APN profile:
1. Launch a web browser from a device that is connected to the modem.
The device can be a computer that is directly connected to the modem or a client from a router that is
connected to the modem.
2. In the address field of your browser, enter http://192.168.5.1.
The Dashboard page displays.
If you did not select the Remember me check box when you logged in previously, a
Note
limited Dashboard page displays. In the Sign In field, enter the modem password
and click the Sign In button.The default password is password (case-sensitive).
3. Select Settings > Mobile > APN.
The APN page displays the available APN profiles.
4. Click the Details button for the APN profile.
The settings for the APN profile display, along with the Edit and Delete buttons.
5. Click the Delete button.
The APN profile is removed.
Manage the Mobile Broadband Connection
36
Page 37

Secure Your Network
This chapter describes how to make your network more secure.
The chapter contains the following sections:
• Change the Modem Password on page 38
• Manage Port Forwarding for Incoming Traffic on page 38
• Manage Port Filtering for Outgoing Traffic on page 41
• Manage SIM Card Security on page 47
5
37
Page 38

LTE Modem LB1110 and LB1111
Change the Modem Password
We recommend that you change the default password that you use to access the modem’s web pages to
a more secure password.The default password is password (case-sensitive).
To change the password for the modem’s web pages:
1. Launch a web browser from a device that is connected to the modem.
The device can be a computer that is directly connected to the modem or a client from a router that is
connected to the modem.
2. In the address field of your browser, enter http://192.168.5.1.
The Dashboard page displays.
If you did not select the Remember me check box when you logged in previously, a
Note
limited Dashboard page displays. In the Sign In field, enter the modem password
and click the Sign In button.The default password is password (case-sensitive).
3. Select Settings.
The page displays the general settings.
4. In the Homepage section, in the Admin login field, enter a new password.
Enter a maximum of 31 characters.
The Submit button displays after you enter a password.
5. Click the Submit button.
Your settings are saved.
6. Write down your new pass word and store it in a safe place or use a password management application
to store your new password.
Manage Port Forwarding for Incoming Traffic
You can enable and manage port forwarding only when the modem functions in Router
Note
mode (see Manage Router Mode and Bridge Mode on page 22).
By default, the modem blocks inbound traffic from the Internet to your computers except for replies to your
outbound traffic.To allow remote computers on the Internet to access a computer on your local network,
you might need to create exceptions to this rule.
Port forwarding is an advanced feature that affects the behavior of the firewall in the modem. By enabling
port forwarding, you can make local computers or servers available to the Internet for different services.
Port forwarding is designed for FTP servers, HTTP web servers, and other server-based applications and
services. After you set up port forwarding, requests from the Internet are forwarded to the specified server.
Before you start, determine which type of service or application you want to provide and the local IP address
of the computer that must provide the service.
Secure Your Network
38
Page 39

LTE Modem LB1110 and LB1111
The following sections provide information about managing port forwarding for incoming traffic:
• Enable Port Forwarding and Add a Service or Application on page 39
• Remove a Service or Application for Port Forwarding on page 40
• Disable Port Forwarding on page 41
Enable Port Forwarding and Add a Service or Application
Before you add a service or application, first determine which port number and protocol the service or
application uses.Y ou can usually find this information by contacting the pub lisher of the service or application
or searching the Internet.
WARNING:
Enabling port forwarding creates a security risk. If you do not need port
forwarding, keep it disabled, which is the default setting.
To enable port forwarding and add a service or application for port forwarding:
1. Launch a web browser from a device that is connected to the modem.
The device can be a computer that is directly connected to the modem or a client from a router that is
connected to the modem.
2. In the address field of your browser, enter http://192.168.5.1.
The Dashboard page displays.
If you did not select the Remember me check box when you logged in previously, a
Note
limited Dashboard page displays. In the Sign In field, enter the modem password
and click the Sign In button.The default password is password (case-sensitive).
3. Select Settings > Advanced > Port Forwarding.
The page displays the Port Forwarding radio buttons.
4. Select the Enable radio button.
The Port Forwarding table displays.
Secure Your Network
39
Page 40

LTE Modem LB1110 and LB1111
5. Add a service or application for port forwarding:
a. In the Label field, enter a name for the service or application.
b. In the IP field, enter the IP address f or the computer that provides the service or runs the application.
c. In the Port field, enter the port number that is associated with the service or application.
d. From the Protocol menu, select the protocol (TCP or UDP) that is associated with the service or
application.
e. Click the + button.
Your settings are saved and the service or application is added to the Port Forwarding table.
6. To add another service or application for port forwarding, repeat Step 5.
7. Click the Submit button.
The modem resets to activate the new settings. Any devices that are connected to the modem are
disconnected when the modem resets.
Remove a Service or Application for Port Forwarding
You can remove a service or application that you no longer need for port forwarding.
To remove a a service or application for port forwarding:
1. Launch a web browser from a device that is connected to the modem.
The device can be a computer that is directly connected to the modem or a client from a router that is
connected to the modem.
2. In the address field of your browser, enter http://192.168.5.1.
The Dashboard page displays.
If you did not select the Remember me check box when you logged in previously, a
Note
limited Dashboard page displays. In the Sign In field, enter the modem password
and click the Sign In button.The default password is password (case-sensitive).
3. Select Settings > Advanced > Port Forwarding.
The Port Forwarding table displays.
4. To the right of the service or application that you want to remove from the Port Forwarding table, click
the x button.
The service or application is removed from the Port Forwarding table.
To remove a service or application from the Port Forwarding table, you do not need
Note
to click the Submit button.
Secure Your Network
40
Page 41

LTE Modem LB1110 and LB1111
Disable Port Forwarding
You can disable port forwarding. If you do so, the entries in the Port Forwarding table become hidden but
are not removed. For information about removing entries, see Remove a Service or Application for Port
Forwarding on page 40.
To disable port forwarding:
1. Launch a web browser from a device that is connected to the modem.
The device can be a computer that is directly connected to the modem or a client from a router that is
connected to the modem.
2. In the address field of your browser, enter http://192.168.5.1.
The Dashboard page displays.
If you did not select the Remember me check box when you logged in previously, a
Note
limited Dashboard page displays. In the Sign In field, enter the modem password
and click the Sign In button.The default password is password (case-sensitive).
3. Select Settings > Advanced > Port Forwarding.
The Port Forwarding table displays.
4. Select the Disable radio button.
5. Click the Submit button.
The modem resets to activate the new settings. Any devices that are connected to the modem are
disconnected when the modem resets.
Manage Port Filtering for Outgoing Traffic
You can enable and manage port filtering only when the modem functions in Router
Note
mode (see Manage Router Mode and Bridge Mode on page 22).
As an added security measure, you can specify which services and applications (for example, HTTP, FTP,
an email server) can access or are blocked from the Internet.
Before you add a service or application, first determine which port number and protocol the service or
application uses.Y ou can usually find this information by contacting the pub lisher of the service or application
or searching the Internet.
The following sections provide information about managing port filtering for outgoing traffic:
• Block Specific Services and Applications From Accessing the Internet and Allow All Other Services and
Applications on page 42
• Allow Specific Services and Applications to Access the Internet and Block All Other Services and
Applications on page 43
• View Services and Applications on the Blacklist and Remove a Service or Application From the List on
page 44
Secure Your Network
41
Page 42

LTE Modem LB1110 and LB1111
• View Services and Applications on the Whitelist and Remov e a Service or Application F rom the List on
page 45
• Disable Port Forwarding on page 41
Block Specific Services and Applications From Accessing the Internet and Allow All Other Services and Applications
You can set up a blacklist of services and applications that are block ed from accessing the Internet. All other
services and applications are allowed to access the Internet.
The blacklist and whitelist are mutually exclusive.You can enable either one or the
Note
other.
IMPORTANT:
For you to be able to set up a blacklist, the modem must be connected to the
Internet. If the modem is not connected to the Internet, the configuration fails.
To set up a blacklist of applications and services:
1. Launch a web browser from a device that is connected to the modem.
The device can be a computer that is directly connected to the modem or a client from a router that is
connected to the modem.
2. In the address field of your browser, enter http://192.168.5.1.
The Dashboard page displays.
If you did not select the Remember me check box when you logged in previously, a
Note
limited Dashboard page displays. In the Sign In field, enter the modem password
and click the Sign In button.The default password is password (case-sensitive).
3. Select Settings > Advanced > Port Filtering.
The Port Filtering page displays.
4. From the Port Filtering menu, select Black List.
Secure Your Network
42
Page 43

LTE Modem LB1110 and LB1111
If this is the first time that you set up the blacklist, the table is empty.
5. Add a service or application to the blacklist:
a. In the Label field, enter a name for the service or application.
b. In the Port field, enter the port number that is associated with the service or application.
c. From the Protocol menu, select the protocol (TCP or UDP) that is associated with the service or
application.
d. Click the + button.
The device is added to the Black List table.
6. To add another service or application to the Black List table, repeat Step 5.
7. Click the Submit button.
Your settings are saved.The modem resets to activate the new settings. Any WiFi devices that are
connected to the modem are disconnected when the modem resets.
Any services and applications that are in the blacklist are blocked from accessing the Internet. Any
services and applications that are not on the blacklist are allowed to access the Internet.
Allow Specific Services and Applications to Access the Internet and Block All Other Services and Applications
You can set up a whitelist of services and applications that are allowed to access the Internet. All other
services and applications are blocked from accessing the Internet.
The blacklist and whitelist are mutually exclusive.You can enable either one or the
Note
other.
IMPORTANT:
For you to be able to set up a whitelist, the modem must be connected to the
Internet. If the modem is not connected to the Internet, the configuration fails.
To set up a whitelist of applications and services:
1. Launch a web browser from a device that is connected to the modem.
The device can be a computer that is directly connected to the modem or a client from a router that is
connected to the modem.
2. In the address field of your browser, enter http://192.168.5.1.
The Dashboard page displays.
If you did not select the Remember me check box when you logged in previously, a
Note
limited Dashboard page displays. In the Sign In field, enter the modem password
and click the Sign In button.The default password is password (case-sensitive).
3. Select Settings > Advanced > Port Filtering.
Secure Your Network
43
Page 44

LTE Modem LB1110 and LB1111
The Port Filtering page displays.
4. From the Port Filtering menu, select White List.
If this is the first time that you set up the whitelist, the table is empty.
5. Add a service or application to the whitelist:
a. In the Label field, enter a name for the service or application.
b. In the Port field, enter the port number that is associated with the service or application.
c. From the Protocol menu, select the protocol (TCP or UDP) that is associated with the service or
application.
d. Click the + button.
The device is added to the White List table.
6. To add another service or application to the White List table, repeat Step 5.
7. Click the Submit button.
Your settings are saved.The modem resets to activate the new settings. Any WiFi devices that are
connected to the modem are disconnected when the modem resets.
Any services and applications that are on the whitelist are allowed to access the Internet. Any services
and applications that are not on the whitelist are blocked from accessing the Internet.
View Services and Applications on the Blacklist and Remove a Service or Application From the List
If you enabled the blacklist, you can view services and applications on the blacklist and remove a service
or application from the blacklist.
To view services and applications on the blacklist or remove a service or application from
the blacklist:
1. Launch a web browser from a device that is connected to the modem.
The device can be a computer that is directly connected to the modem or a client from a router that is
connected to the modem.
2. In the address field of your browser, enter http://192.168.5.1.
Secure Your Network
44
Page 45

LTE Modem LB1110 and LB1111
The Dashboard page displays.
If you did not select the Remember me check box when you logged in previously, a
Note
limited Dashboard page displays. In the Sign In field, enter the modem password
and click the Sign In button.The default password is password (case-sensitive).
3. Select Settings > Advanced > Port Filtering.
The Port Filtering page displays.
4. From the Port Filtering menu, select Black List.
5. To remove a service or application from the table, to the right of the entry, click the x button.
Your settings are saved and the modem resets to activate the new settings. Any WiFi devices that are
connected to the modem are disconnected when the modem resets.The service or application that you
removed from the blacklist is once again allowed to access the Internet.
View Services and Applications on the Whitelist and Remove a Service or Application From the List
If you enabled the whitelist, you can view services and applications on the whitelist and remove a service
or application from the whitelist.
To view services and applications on the whitelist or remove a service or application from
the whitelist:
1. Launch a web browser from a device that is connected to the modem.
The device can be a computer that is directly connected to the modem or a client from a router that is
connected to the modem.
2. In the address field of your browser, enter http://192.168.5.1.
The Dashboard page displays.
Secure Your Network
45
Page 46

LTE Modem LB1110 and LB1111
If you did not select the Remember me check box when you logged in previously, a
Note
limited Dashboard page displays. In the Sign In field, enter the modem password
and click the Sign In button.The default password is password (case-sensitive).
3. Select Settings > Advanced > Port Filtering.
The Port Filtering page displays.
4. From the Port Filtering menu, select White List.
5. To remove a service or application from the table, to the right of the entry, click the x button.
Your settings are saved and the modem resets to activate the new settings. Any WiFi devices that are
connected to the modem are disconnected when the modem resets.The service or application that you
removed from the whitelist is now blocked from accessing the Internet.
Disable Port Filtering
You can disable port filtering. If you do so, the entries on the blacklist and whitelist become hidden but are
not removed. For information about removing entries, see View Services and Applications on the Blacklist
and Remove a Service or Application From the List on page 44 or View Services and Applications on the
Whitelist and Remove a Service or Application From the List on page 45.
To disable port filtering:
1. Launch a web browser from a device that is connected to the modem.
The device can be a computer that is directly connected to the modem or a client from a router that is
connected to the modem.
2. In the address field of your browser, enter http://192.168.5.1.
The Dashboard page displays.
Secure Your Network
46
Page 47

LTE Modem LB1110 and LB1111
If you did not select the Remember me check box when you logged in previously, a
Note
limited Dashboard page displays. In the Sign In field, enter the modem password
and click the Sign In button.The default password is password (case-sensitive).
3. Select Settings > Advanced > Port Filtering.
Depending on the list that you enabled, the page displays either the Black List table or the White List
table.
4. From the Port Filtering menu, select None.
5. Click the Submit button.
Your settings are saved and the modem resets to activate the new settings. Any WiFi devices that are
connected to the modem are disconnected when the modem resets. No services or applications are
blocked from accessing the Internet.
Manage SIM Card Security
You can create another level of security by estab lishing a PIN that you must enter bef ore modem can access
the mobile broadband connection and before you can make changes to the mobile broadband connection.
If you enable SIM card security, you must enter the SIM PIN each time that you turn
Note
on the modem before the modem can access the mobile broadband network.
The following sections provide information about managing SIM card security:
• Enable SIM Card Security on page 47
• Enter the SIM PIN to Enable the Modem to Connect to the Internet on page 49
• Personalize the SIM PIN on page 50
• Disable SIM Card Security on page 51
• Unblock the SIM Card With a PUK on page 52
Enable SIM Card Security
Before you can use the PIN to enable SIM card security, you must obtain the default SIM PIN from your
mobile broadband service provider. If you do not know your SIM PIN or your SIM card did not come with a
PIN, you can try any of the following PINs:
• 0000
• 1111
• 1234
• Last four digits of the phone number that is associated with the SIM card
Secure Your Network
47
Page 48

LTE Modem LB1110 and LB1111
WARNING:
Be careful entering the SIM PIN multiple times because you can enter only a
limited number of incorrect PINs before the SIM card is blocked.The number
of allowed attempts depends on the SIM card. If the SIM card is blocked, you
must obtain a PIN unlock key (PUK) from your mobile broadband service
provider to unblock the PIN (see Unblock the SIM Card With a PUK on page
52).
To enable SIM card security:
1. Launch a web browser from a device that is connected to the modem.
The device can be a computer that is directly connected to the modem or a client from a router that is
connected to the modem.
2. In the address field of your browser, enter http://192.168.5.1.
The Dashboard page displays.
If you did not select the Remember me check box when you logged in previously, a
Note
limited Dashboard page displays. In the Sign In field, enter the modem password
and click the Sign In button.The default password is password (case-sensitive).
3. Select Settings > Mobile > SIM Security.
The page displays the SIM security options.
4. Click the Activate button.
5. In the SIM PIN field, enter the PIN.
The Submit button displays after you enter the PIN.
You are allowed only a limited number of attempts to enter the correct PIN.The number of allowed
attempts depends on the SIM card. If you run out of available attempts, the SIM card is blocked. If the
SIM card is blocked, contact y our mobile broadband service provider to receive a PIN unloc k ke y (PUK)
to unblock the PIN.
6. Click the Submit button.
Your settings are saved. Now, when you turn on the modem, you must enter the SIM PIN before the
modem can access the mobile broadband network.
Secure Your Network
48
Page 49

LTE Modem LB1110 and LB1111
Enter the SIM PIN to Enable the Modem to Connect to the Internet
If you enable SIM card security, you must enter the SIM PIN each time that you turn on the modem before
the modem can access the mobile broadband network.
WARNING:
Be careful entering the SIM PIN multiple times because you can enter only a
limited number of incorrect PINs before the SIM card is blocked.The number
of allowed attempts depends on the SIM card. If the SIM card is blocked, you
must obtain a PIN unlock key (PUK) from your mobile broadband service
provider to unblock the PIN (see Unblock the SIM Card With a PUK on page
52).
To enter the SIM PIN:
1. Launch a web browser from a device that is connected to the modem.
The device can be a computer that is directly connected to the modem or a client from a router that is
connected to the modem.
2. In the address field of your browser, enter http://192.168.5.1.
The Dashboard page displays.
If you did not select the Remember me check box when you logged in previously, a
Note
limited Dashboard page displays. In the Sign In field, enter the modem password
and click the Sign In button.The default password is password (case-sensitive).
The Alerts section of the Dashboard page displays a message about the SIM card being locked (not
blocked) with a link to a pop-up window.
3. Click the Enter PIN link.
Secure Your Network
49
Page 50

LTE Modem LB1110 and LB1111
A pop-up window similar to the following one displays.
4. In the Enter SIM PIN field, enter the PIN.
You are allowed only a limited number of attempts to enter the correct PIN. If you run out of available
attempts, the SIM card is blocked. The number of allowed attempts depends on the SIM card. If the
SIM card is blocked, contact y our mobile broadband service provider to receive a PIN unlock code (PUK)
to unblock the PIN.
The Submit button displays after you enter the PIN.
5. Click the Submit button.
The modem can now access the mobile broadband network. However, it might take several minutes
before the modem detects the mobile broadband network.
Personalize the SIM PIN
If SIM security is enabled, you can change the SIM PIN to a personalized code.This code is not limited to
four digits. If SIM security is disabled, you cannot change the SIM PIN.
To personalize SIM card security:
1. Launch a web browser from a device that is connected to the modem.
The device can be a computer that is directly connected to the modem or a client from a router that is
connected to the modem.
2. In the address field of your browser, enter http://192.168.5.1.
The Dashboard page displays.
If you did not select the Remember me check box when you logged in previously, a
Note
limited Dashboard page displays. In the Sign In field, enter the modem password
and click the Sign In button.The default password is password (case-sensitive).
Secure Your Network
50
Page 51

LTE Modem LB1110 and LB1111
3. Select Settings > Mobile > SIM Security.
4. Click the Update SIM PIN link.
5. In the Current SIM PIN field, enter the old PIN.
6. In the New SIM PIN field and Verify SIM PIN fields, enter the new PIN.
7. Click the Submit button.
8. Click the OK button.
Your settings are saved. Make sure that you write down your new PIN and store it in a safe place.
Disable SIM Card Security
If you no longer need SIM card security, you can disable it.
WARNING:
Be careful entering the SIM PIN multiple times because you can enter only a
limited number of incorrect PINs before the SIM card is blocked.The number
of allowed attempts depends on the SIM card. If the SIM card is blocked, you
must obtain a PIN unlock key (PUK) from your mobile broadband service
provider to unblock the PIN (see Unblock the SIM Card With a PUK on page
52).
To disable SIM card security:
1. Launch a web browser from a device that is connected to the modem.
The device can be a computer that is directly connected to the modem or a client from a router that is
connected to the modem.
2. In the address field of your browser, enter http://192.168.5.1.
The Dashboard page displays.
Secure Your Network
51
Page 52
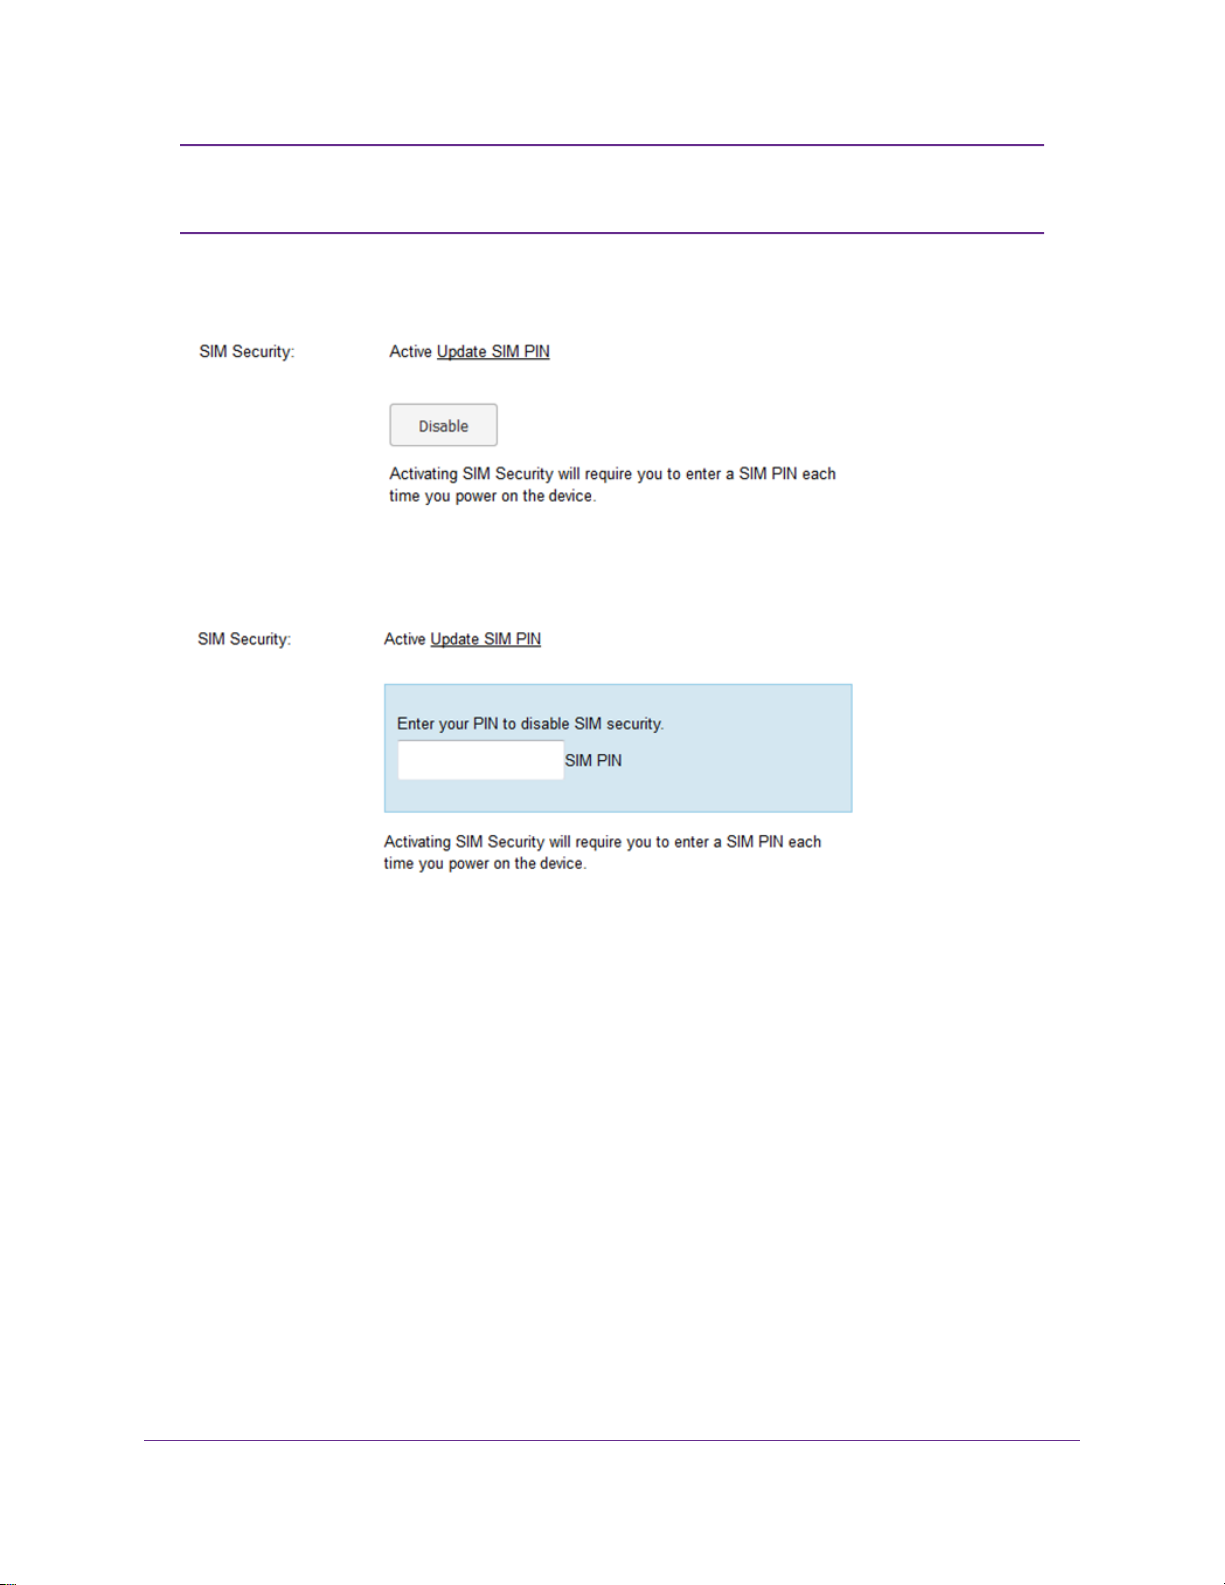
LTE Modem LB1110 and LB1111
If you did not select the Remember me check box when you logged in previously, a
Note
limited Dashboard page displays. In the Sign In field, enter the modem password
and click the Sign In button.The default password is password (case-sensitive).
3. Select Settings > Mobile > SIM Security.
4. Click the Disable button.
5. In the SIM PIN field, enter the PIN.
You are allowed only a limited number of attempts to enter the correct PIN. If you run out of available
attempts, the SIM card is blocked. The number of allowed attempts depends on the SIM card. If the
SIM card is blocked, contact y our mobile broadband service provider to receive a PIN unloc k ke y (PUK)
to unblock the PIN.
6. Click the Submit button.
You settings are saved. Now when you turn on the modem, you no longer need to enter the SIM PIN
before the modem can access the mobile broadband network.
Unblock the SIM Card With a PUK
Before you start the following procedure, contact your mobile service provider to receive a PIN unlock key
(PUK) that lets you unblock the SIM card.
Secure Your Network
52
Page 53

LTE Modem LB1110 and LB1111
WARNING:
Be careful entering the PUK multiple times because you can enter only a
limited number of incorrect PUKs.The number of allowed attempts depends
on the SIM card. If y ou run out of available attempts, you might need to contact
your mobile broadband service provider again.
To unblock the SIM card with a PUK:
1. Launch a web browser from a device that is connected to the modem.
The device can be a computer that is directly connected to the modem or a client from a router that is
connected to the modem.
2. In the address field of your browser, enter http://192.168.5.1.
The Dashboard page displays.
If you did not select the Remember me check box when you logged in previously, a
Note
limited Dashboard page displays. In the Sign In field, enter the modem password
and click the Sign In button.The default password is password (case-sensitive).
The Alerts section of the Dashboard page displays a message about the SIM card being blocked and
a link to a pop-up window.
3. Click the link.
A pop-up window similar to the following one displays.
4. In the Enter SIM PUK field, enter the PUK that you obtained from your mobile service provider.
You are allowed a limited number of attempts to enter the correct PUK.The number of attempts depends
on the SIM card. If you run out of availab le attempts , y ou might need to contact your mobile broadband
service provider again.
The Submit button displays after you enter the PUK.
5. Take one of the following actions:
Secure Your Network
53
Page 54

LTE Modem LB1110 and LB1111
• If your mobile service provider provided you with a new SIM code, enter it in both the Enter New
SIM PIN and Verify SIM PIN fields.
• If your mobile broadband service provider did not provide you with a SIM code, enter a custom SIM
code (you can make up your own code) in both the Enter New SIM PIN field and Verify SIM PIN
fields.
Make sure that you write down your new PIN and store it in a safe place.
6. Click the Submit button.
7. Click the OK button.
The SIM card is unblocked.
If you experience problems unblocking the SIM card, contact your mobile broadband service provider.
Secure Your Network
54
Page 55

Manage the Modem and Monitor Usage and the Network
This chapter describes how to manage the firmware and configuration file of the modem and monitor data usage
and the network.
The chapter contains the following sections:
• Upgrade the Firmware of the Modem on page 56
• Back Up and Restore the Modem Settings on page 57
• Return the Modem to Its Factory Default Settings on page 59
• View Monthly Data and Session Data Usage on page 60
• Set a Plan Limit for the Data Counter on page 61
• Change the Billing Cycle Counter or Reset the Data Counter on page 62
• View Service Provider, Type of Service, and Signal Strength on page 63
• View Account Details and Other Details About Your Modem on page 64
6
• View Information About the Mobile Broadband Connection on page 65
• Set Up SMS Alert Messages on page 67
• Set the Data Limit for SMS Alert Messages on page 68
• View Alerts on page 69
• Turn Off the LEDs on page 70
55
Page 56

LTE Modem LB1110 and LB1111
Upgrade the Firmware of the Modem
The modem’s firmware (also referred to as software) is stored in flash memory.
The modem automatically checks for new firmware once a week. Firmware updates generally comprise
enhancements and fixes to the functionality of the modem and modem’s web pages. If the modem detects
new firmware, the modem’s web page displays an alert and options to download the update the firmware.
You can also manually check to see if new firmware is av ailable and update the modem to the ne w firmware.
To manually check for new firmware and update your modem:
1. Launch a web browser from a device that is connected to the modem.
The device can be a computer that is directly connected to the modem or a client from a router that is
connected to the modem.
2. In the address field of your browser, enter http://192.168.5.1.
The Dashboard page displays.
If you did not select the Remember me check box when you logged in previously, a
Note
limited Dashboard page displays. In the Sign In field, enter the modem password
and click the Sign In button.The default password is password (case-sensitive).
3. Select Settings > General > Software and Reset.
To detect new firmware, the modem must be connected to the Internet.
4. In the Software Update section, click the Check for update button.
The modem checks for ne w firmware.This process might take sever al seconds. If an update is av ailable,
the page adjusts to display the Start download button.
5. Click the Start download button.
The firmware downloads.When the download is complete, the page adjusts to display the Start update
button.
6. Click the Start update button.
The modem installs the firmware.
Manage the Modem and Monitor Usage and the Network
56
Page 57

LTE Modem LB1110 and LB1111
WARNING:
To avoid the risk of corrupting the firmware, do not interrupt the update. For
example, do not turn off the modem.
The page shows the progress of the firmware upload in percentage completed.The firmware update
process takes sev eral minutes.When the update is complete, the modem restarts. After se veral minutes ,
the modem becomes available again.
7. Verify that the modem runs the new firmware:
a. Log back in to the modem.
The Dashboard page displays.
b. In the upper right corner, click the About link.
The page displays details about the modem.The Firmware section displays the firmware version
of the modem.
Back Up and Restore the Modem Settings
You can back up (save) the configuration settings of the modem to a file on your computer and restore the
configuration settings from a file. (You can maintain several backup files.)
Back Up the Settings
You can save a copy of the configuration settings.
To back up the modem’s configuration settings:
1. Launch a web browser from a device that is connected to the modem.
The device can be a computer that is directly connected to the modem or a client from a router that is
connected to the modem.
2. In the address field of your browser, enter http://192.168.5.1.
The Dashboard page displays.
If you did not select the Remember me check box when you logged in previously, a
Note
limited Dashboard page displays. In the Sign In field, enter the modem password
and click the Sign In button.The default password is password (case-sensitive).
Manage the Modem and Monitor Usage and the Network
57
Page 58

LTE Modem LB1110 and LB1111
3. Select Settings > General > Software and Reset.
4. In the Download / Backup Settings section, click the Save button.
5. Choose a location to store the file on your computer.
The default name of the backup file is export.cfg.
6. Follow the directions of your browser to save the file.
Restore the Settings
If you backed up the configur ation settings, you can restore the settings from a file. (You can maintain several
backup files.)
To restore configuration settings that you backed up:
1. Launch a web browser from a device that is connected to the modem.
The device can be a computer that is directly connected to the modem or a client from a router that is
connected to the modem.
2. In the address field of your browser, enter http://192.168.5.1.
The Dashboard page displays.
If you did not select the Remember me check box when you logged in previously, a
Note
limited Dashboard page displays. In the Sign In field, enter the modem password
and click the Sign In button.The default password is password (case-sensitive).
3. Select Settings > General > Software and Reset.
4. In the Restore Settings section, click the Browse button.
The default name of the backup file from which you can restore the configuration is export.cfg.
Manage the Modem and Monitor Usage and the Network
58
Page 59

LTE Modem LB1110 and LB1111
5. Follow the directions of your browser to locate and select the file.
6. Click the Submit button.
The configuration is uploaded to the modem.When the restoration is complete, the modem restarts.
Return the Modem to Its Factory Default Settings
Under some circumstances (for example, if you lost track of the changes that you made to the modem
settings or you move the modem to a diff erent location), y ou might want to erase the configuration and reset
the modem to factory default settings.
To reset the modem to factory default settings, you can use either the Reset button on the back of the
modem or the modem’s web pages. However, if you cannot find the IP address or lost the password to
access the modem, you must use the Reset button.
After you reset the modem to factory default settings, the password is password, the LAN IP address is
192.168.5.1, and Router mode is enabled. For a list of factory default settings, see Factory Default Settings
on page 90.
Use the Reset Button
CAUTION:
This process erases all settings that you configured in the modem.
To reset the modem to factory default settings with the Reset button:
1. On the back of the modem, locate the recessed Reset button.
2. Insert a straightened paper clip into the hole and press for at least five seconds.
If you press the button f or less than five seconds , the modem might just restart rather
Note
than resetting to factory default settings.
3. Release the button.
The modem resets and restarts.This process takes about one minute.
Manage the Modem and Monitor Usage and the Network
59
Page 60

LTE Modem LB1110 and LB1111
Use the Modem’s Web Pages to Reset the Modem to Factory Defaults
CAUTION:
This process erases all settings that you configured in the modem.
To reset the modem to factory default settings with the modem’s web pages:
1. Launch a web browser from a device that is connected to the modem.
The device can be a computer that is directly connected to the modem or a client from a router that is
connected to the modem.
2. In the address field of your browser, enter http://192.168.5.1.
The Dashboard page displays.
If you did not select the Remember me check box when you logged in previously, a
Note
limited Dashboard page displays. In the Sign In field, enter the modem password
and click the Sign In button.The default password is password (case-sensitive).
3. Select Settings > General > Software and Reset.
4. In the Factory Reset section, click the Reset button.
The configuration is reset to factory default settings.When the restoration is complete, the modem
restarts.
WARNING:
To avoid the risk of corrupting the firmware, do not interrupt the restoration.
For example, do not close the browser, click a link, or load a new page. Do
not turn off the modem.
View Monthly Data and Session Data Usage
You can view an estimate of your data usage since the start of the billing cycle as well as the data usage
and time that passed since the modem connected to the mobile broadband network in the current session.
The plan data counter resets automatically when the next billing cycle starts, and the session data counter
resets automatically for each session.You can also change the billing start date for display only or reset
the data counter (see Change the Billing Cycle Counter or Reset the Data Counter on page 62).
Manage the Modem and Monitor Usage and the Network
60
Page 61

LTE Modem LB1110 and LB1111
To view detailed data usage:
1. Launch a web browser from a device that is connected to the modem.
The device can be a computer that is directly connected to the modem or a client from a router that is
connected to the modem.
2. In the address field of your browser, enter http://192.168.5.1.
The Dashboard page displays.
If you did not select the Remember me check box when you logged in previously, a
Note
limited Dashboard page displays. In the Sign In field, enter the modem password
and click the Sign In button.The default password is password (case-sensitive).
The Monthly Usage section displays the data usage for the current billing cycle and the n umber of da ys
left in the billing cycle.The Session section displays the data usage and time for the current session.
The Session section displays only if the modem is connected to the mobile broadband network.
By default, the billing cycle starts on the first day of the month.You can change when the monthly data
counter resets by changing the billing cycle start date and you can reset the data counter manually. For
more information, see Change the Billing Cycle Counter or Reset the Data Counter on page 62.
Set a Plan Limit for the Data Counter
You can set a plan limit for the modem’s data counter. A plan limit enables the modem to generate SMS
alert messages to warn you about your data usage (see Set Up SMS Alert Messages on page 67). The
amount of data that you enter is for tracking only and does not affect the actual data that is billed by your
mobile broadband provider.
To set a plan limit for the data counter:
1. Launch a web browser from a device that is connected to the modem.
The device can be a computer that is directly connected to the modem or a client from a router that is
connected to the modem.
2. In the address field of your browser, enter http://192.168.5.1.
The Dashboard page displays.
Manage the Modem and Monitor Usage and the Network
61
Page 62

LTE Modem LB1110 and LB1111
If you did not select the Remember me check box when you logged in previously, a
Note
limited Dashboard page displays. In the Sign In field, enter the modem password
and click the Sign In button.The default password is password (case-sensitive).
3. In the Monthly Usage section, in the Plan Limit field, enter the amount of data that you want to track.
The Submit button displays after you enter an amount.
4. From the menu, select MB or GB.
5. Click the Submit button.
Your settings are saved.The Enable Data Alerts check box and slider display. For information about
how to set a data limit for SMS alert messages, see Set the Data Limit for SMS Alert Messages on page
68.
Change the Billing Cycle Counter or Reset the Data Counter
You can change the start date of the billing cycle counter to a day other than the first day of the month and
you can reset the data counter.The start date of the billing cycle counter is for display only and changing it
does not change the actual billing cycle of your mobile broadband provider.
To change the start date of the billing cycle counter or to reset the data counter:
1. Launch a web browser from a device that is connected to the modem.
The device can be a computer that is directly connected to the modem or a client from a router that is
connected to the modem.
2. In the address field of your browser, enter http://192.168.5.1.
The Dashboard page displays.
If you did not select the Remember me check box when you logged in previously, a
Note
limited Dashboard page displays. In the Sign In field, enter the modem password
and click the Sign In button.The default password is password (case-sensitive).
Manage the Modem and Monitor Usage and the Network
62
Page 63

LTE Modem LB1110 and LB1111
3. In the Monthly Usage section, from the Billing start date menu, select a new start date.
The Submit button displays after you make a selection.
4. To reset the data counter for data usage, click the Reset button.
5. Click the Submit button.
Your settings are saved.
View Service Provider,Type of Service, and Signal Strength
You can view the service provider, the type of network, and the signal strength of the mobile broadband
network at your location. If the modem is not connected to the network, you can view some of this inf ormation
for the most recent connection.
To view the service provider, type of network, signal strength, and other information:
1. Launch a web browser from a device that is connected to the modem.
The device can be a computer that is directly connected to the modem or a client from a router that is
connected to the modem.
2. In the address field of your browser, enter http://192.168.5.1.
The Dashboard page displays.
If you did not select the Remember me check box when you logged in previously, a
Note
limited Dashboard page displays. In the Sign In field, enter the modem password
and click the Sign In button.The default password is password (case-sensitive).
On the left, below the menu, the following information displays:
• Signal strength. Five bars indicate the strongest signal. One bar indicates the weakest signal.
• Service provider.The name of the mobile broadband service provider (or operator).
• Type of service.The type of service is indicated by icons that are described in the following table.
Different service providers can use different icons.The following figure shows an example of 4G
service.The following table shows the types of mobile broadband services.
• Connection state.The Internet connection state (Internet Connected or Internet Disconnected).
• Roaming state. If the modem is roaming, a roaming icon and notification might display.
Manage the Modem and Monitor Usage and the Network
63
Page 64

LTE Modem LB1110 and LB1111
Table 3.Types of mobile broadband service
Type of Mobile Broadband ServiceIcon
4GLong Term Evolution (LTE)4G
H+
H
2G
HSPA Plus
HSPA
HSUPA
HSDPA
UMTS3G
GPRS
3GDual Carrier HSPA Plus
2GEDGE
View Account Details and Other Details About Y our Modem
You can view details about your modem such as the mobile number, IMEI (International Mobile Station
Equipment Identity), firmware version and related information, and so on.
To view details about your modem:
1. Launch a web browser from a device that is connected to the modem.
The device can be a computer that is directly connected to the modem or a client from a router that is
connected to the modem.
2. In the address field of your browser, enter http://192.168.5.1.
The Dashboard page displays.
If you did not select the Remember me check box when you logged in previously, a
Note
limited Dashboard page displays. In the Sign In field, enter the modem password
and click the Sign In button.The default password is password (case-sensitive).
3. In the upper right corner, click the About link.
Manage the Modem and Monitor Usage and the Network
64
Page 65

LTE Modem LB1110 and LB1111
The page displays details about the modem and its configuration.
The displayed details are self-explanatory, except for the following information in the Account Details
section, all of which is associated with the SIM card that is installed in the modem:
• IMEI. International Mobile Station Equipment Identity (IMEI), used to allow or block access to the
mobile broadband network.
• IMSI. International Mobile Subscriber Identity (IMSI), used to identify the SIM card in relation to
other mobile broadband networks.
• FSN. Factory serial number (FSN).This is the serial number of the SIM card.
• ICCID. Integrated Circuit Card Identifier (ICCID), used to identify the SIM card.
4. To view details about the network, in the Network Status section, click the View Details link.
For more information, see View Information About the Mobile Broadband Connection on page 65.
5. To save the information to a file, do the following:
a. Scroll down to the bottom of the page and click the Save to File button.
The default name of the backup file is about.txt.
b. Follow the directions of your browser to save the file.
View Information About the Mobile Br oadband Connection
You can view details about your modem such as the mobile number, IMEI (International Mobile Station
Equipment Identity), firmware version and related information, and so on.
Manage the Modem and Monitor Usage and the Network
65
Page 66

LTE Modem LB1110 and LB1111
To view details about your modem:
1. Launch a web browser from a device that is connected to the modem.
The device can be a computer that is directly connected to the modem or a client from a router that is
connected to the modem.
2. In the address field of your browser, enter http://192.168.5.1.
The Dashboard page displays.
If you did not select the Remember me check box when you logged in previously, a
Note
limited Dashboard page displays. In the Sign In field, enter the modem password
and click the Sign In button.The default password is password (case-sensitive).
3. Select Settings > Mobile > Status Details.
The information that is displayed on this page is not described in this manual. If you experience mobile
broadband service problems, this information might be requested by NETGEAR support or by the support
team of your mobile broadband service provider.
For more information about your modem and the broadband network connection, see the following
sections:
• View Service Provider, Type of Service, and Signal Strength on page 63
• View Account Details and Other Details About Your Modem on page 64
Manage the Modem and Monitor Usage and the Network
66
Page 67

LTE Modem LB1110 and LB1111
Set Up SMS Alert Messages
You can set up the modem to automatically send SMS alert messages (or in short, alerts) if particular
conditions occur.The modem can send such messages to up to three devices. SMS charges might apply.
The format of an SMS alert message is as follows: [XXX] [YYYYYY] [ZZZZZZZZZZZZZ] [Text]
• [XXX] is a message ID with a number from 0 to 999. For example, 003.
• [YYYYYY] is the model number, which consists of 6 characters. For example, LB1110.
• [ZZZZZZZZZZZZZ] is the factory serial number (FSN), which consists of 13 characters. For example,
4PX123AB1234C.
• [Text] is the actual message content. For example, software update is available.
An example of an SMS alerts message is: 003 LB1110 4PX123AB1234C software update is available.
To set up SMS alerts:
1. Launch a web browser from a device that is connected to the modem.
The device can be a computer that is directly connected to the modem or a client from a router that is
connected to the modem.
2. In the address field of your browser, enter http://192.168.5.1.
The Dashboard page displays.
If you did not select the Remember me check box when you logged in previously, a
Note
limited Dashboard page displays. In the Sign In field, enter the modem password
and click the Sign In button.The default password is password (case-sensitive).
3. Select Settings > General > Alerts.
By default, the On radio button is selected and the capability to send SMS alerts is enabled.
Manage the Modem and Monitor Usage and the Network
67
Page 68

LTE Modem LB1110 and LB1111
4. In the Device Phone #s fields, enter the phone numbers to which the modem must send alerts.
The Submit button displays after you enter a phone number.
5. Select one or more check boxes for the alerts that the modem must send:
• Software Update Available.The modem detects that new firmware is available.
• 3G/4G LTE Data Limit Warning.The configured mobile broadband data limit is about to be
exceeded.
• 3G/4G LTE Data Limit Exceeded. The configured mobile broadband data limit was exceeded.
For information about setting data limits, see Set a Plan Limit for the Data Counter
Note
on page 61. For information about resetting the data counter, see Change the Billing
Cycle Counter or Reset the Data Counter on page 62.
6. Click the Submit button.
Your settings are saved.
Set the Data Limit for SMS Alert Messages
After you specify a plan limit for the data counter (see Set a Plan Limit for the Data Counter on page 61),
you can set the data limit for SMS alert messages as a percentage of the data that is still available on your
plan limit. For example, if you set the plan limit for the data counter at 1 GB and the data limit for SMS alert
messages at 10 percent, the modem can generate data limit warnings for SMS alert messages if the data
counter falls below 100 MB. For information about setting up SMS alert messages, see Set Up SMS Alert
Messages on page 67.
To set the data limit for SMS alert messages:
1. Launch a web browser from a device that is connected to the modem.
The device can be a computer that is directly connected to the modem or a client from a router that is
connected to the modem.
2. In the address field of your browser, enter http://192.168.5.1.
The Dashboard page displays.
Manage the Modem and Monitor Usage and the Network
68
Page 69

LTE Modem LB1110 and LB1111
If you did not select the Remember me check box when you logged in previously, a
Note
limited Dashboard page displays. In the Sign In field, enter the modem password
and click the Sign In button.The default password is password (case-sensitive).
The Enable Data Alerts check box and slider display only after you specify a plan limit for the data
counter.
3. Make sure that the Enable Data Alerts check box is selected.
By default, the Enable Data Alerts check box is selected.
4. Move the slider to set the percentage of the data that is still available on your plan limit.
The percentage displays next to the Enable Data Alerts check box.
Your settings are saved. (You do not need to click a Submit button.)
If you set up SMS alerts messages, the modem generates data limit warnings for SMS alert messages
if the data counter falls below the specified percentage.
View Alerts
Your modem displays alerts to advise you of device status changes.
Alerts remain displayed as long as the issues that cause them are active.When the
Note
issues are resolved, the alerts are removed automatically.
To view alerts:
1. Launch a web browser from a device that is connected to the modem.
The device can be a computer that is directly connected to the modem or a client from a router that is
connected to the modem.
2. In the address field of your browser, enter http://192.168.5.1.
Manage the Modem and Monitor Usage and the Network
69
Page 70

LTE Modem LB1110 and LB1111
The Dashboard page displays.
If you did not select the Remember me check box when you logged in previously, a
Note
limited Dashboard page displays. In the Sign In field, enter the modem password
and click the Sign In button.The default password is password (case-sensitive).
Alerts display in the Alerts section at the top of the page.
3. Follow the instructions in each alert to address the conditions that caused it to display.
Turn Off the LEDs
By default, the LED bars on the top panel of the modem are enabled to indicate the status of the modem
and the mobile broadband connection.There might be situations in which you want to turn off the LED bars.
However, the LAN LED bar cannot be turned off.
To turn off the LED bars except for the LAN LED bar:
1. Launch a web browser from a device that is connected to the modem.
The device can be a computer that is directly connected to the modem or a client from a router that is
connected to the modem.
2. In the address field of your browser, enter http://192.168.5.1.
The Dashboard page displays.
If you did not select the Remember me check box when you logged in previously, a
Note
limited Dashboard page displays. In the Sign In field, enter the modem password
and click the Sign In button.The default password is password (case-sensitive).
3. Select Settings.
The page displays the general settings.
4. In the Device LED section, select the Off radio button.
By default, the On radio button is selected.
The Submit button displays after you change the selection.
5. Click the Submit button.
Your settings are saved and the LED bars except for the LAN LED bar turn off.
Manage the Modem and Monitor Usage and the Network
70
Page 71

Manage SMS Messages
This chapter describes how to manage SMS messages.
The chapter contains the following sections:
• Manage Incoming SMS Messages on page 72
• Send an SMS Message on page 73
7
71
Page 72
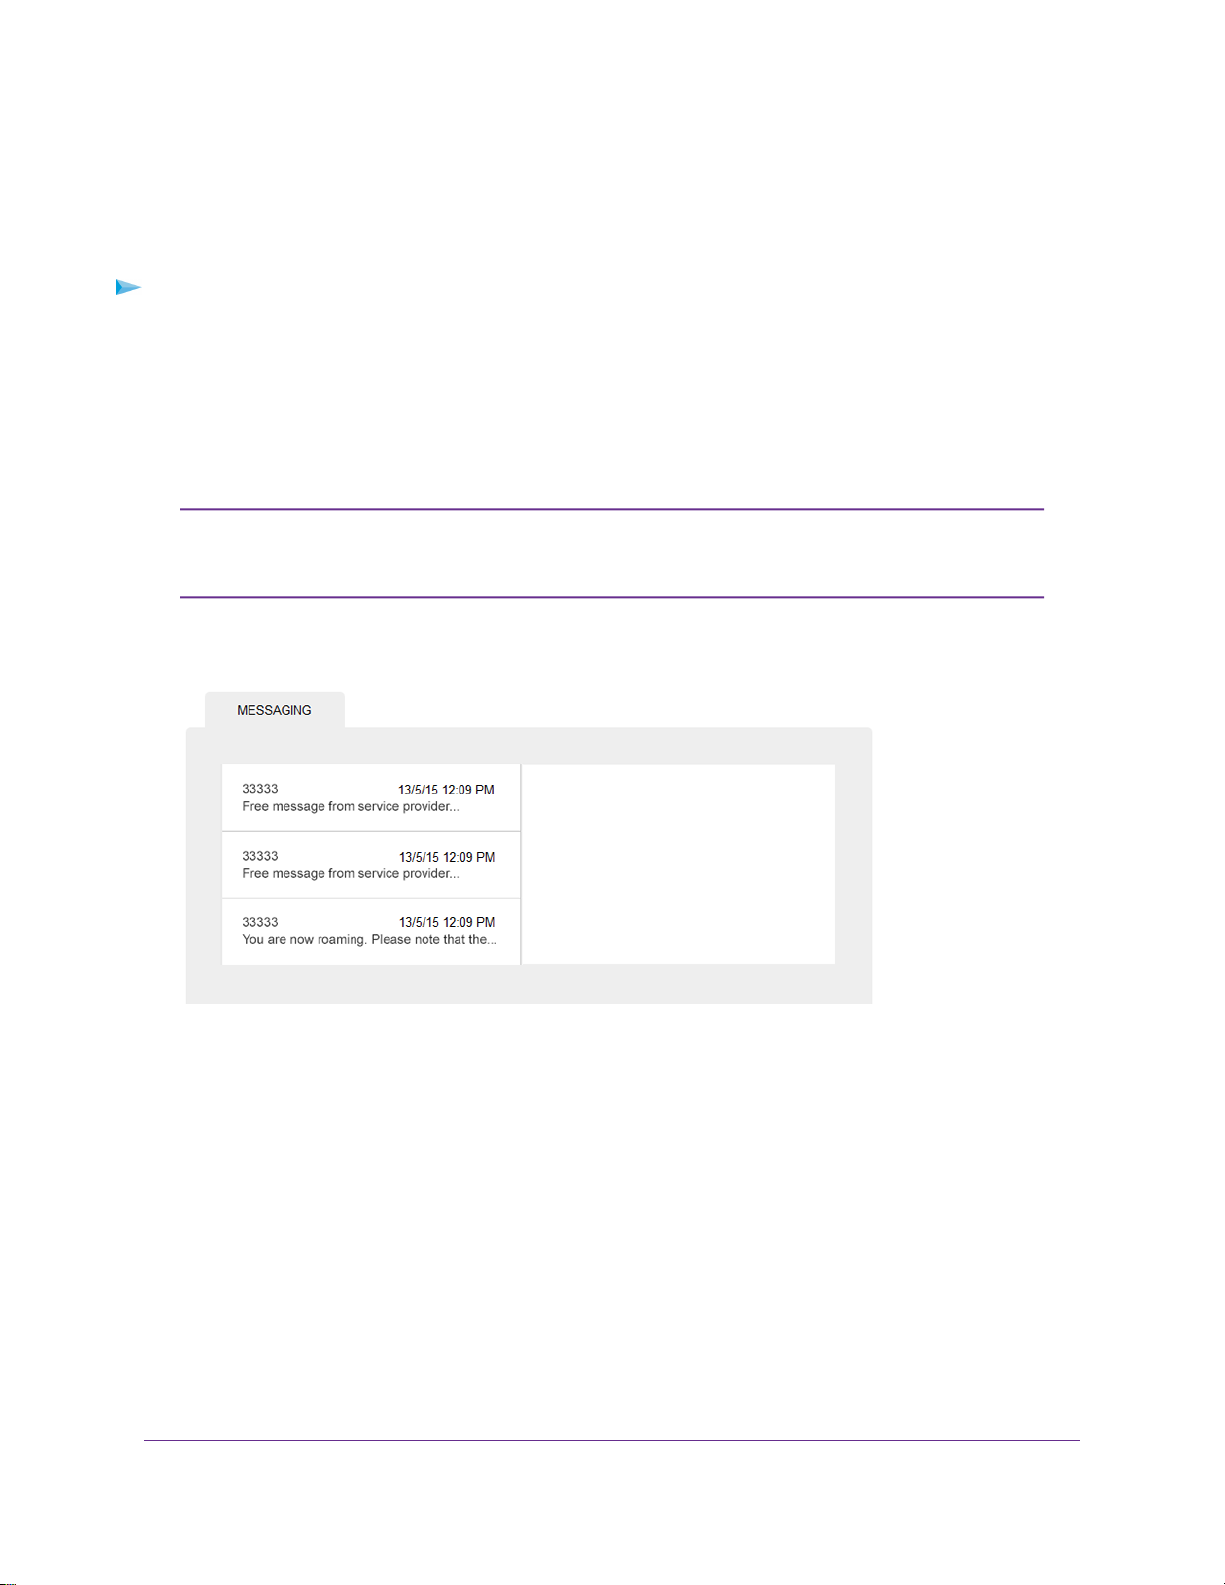
LTE Modem LB1110 and LB1111
Manage Incoming SMS Messages
The modem notifies you of unread SMS messages by showing a number ne xt to the Messa ging link on the
main menu.You can view these messages and delete messages that you no longer need.
To view and delete a message:
1. Launch a web browser from a device that is connected to the modem.
The device can be a computer that is directly connected to the modem or a client from a router that is
connected to the modem.
2. In the address field of your browser, enter http://192.168.5.1.
The Dashboard page displays.
If you did not select the Remember me check box when you logged in previously, a
Note
limited Dashboard page displays. In the Sign In field, enter the modem password
and click the Sign In button.The default password is password (case-sensitive).
3. Select Messaging.
4. To view details about a message, click the message.
The message details display on the right, along with the Delete button.
5. To delete the message, do the following:
a. Click the Delete button.
b. Confirm your decision by clicking the Delete button again.
The message is deleted.
Manage SMS Messages
72
Page 73

LTE Modem LB1110 and LB1111
Send an SMS Message
You can send a short SMS message of up to 70 characters directly from the modem.
To send an SMS message:
1. Launch a web browser from a device that is connected to the modem.
The device can be a computer that is directly connected to the modem or a client from a router that is
connected to the modem.
2. In the address field of your browser, enter http://192.168.5.1.
The Dashboard page displays.
If you did not select the Remember me check box when you logged in previously, a
Note
limited Dashboard page displays. In the Sign In field, enter the modem password
and click the Sign In button.The default password is password (case-sensitive).
3. Select Messaging.
The Messaging page displays.
4. Click the New button.
The To and Message fields display.
5. In the To field, enter the phone number to which you want to send the message.
The Discard button and Envelope icon display.
6. In the Message field, enter the message text.
The number of characters is limited to 70.
7. Click the Envelope icon.
The message is queued for sending. After the message is sent, a confirmation pop-up window displa ys.
Manage SMS Messages
73
Page 74

Frequently Asked Questions
This chapter provides answers to questions that might come up about your modem.
The chapter contains the following sections:
• What do I do when I can’t connect a device to the modem? on page 75
• What do I do when I can’t access the Internet? on page 75
• What do I do when the No Signal icon displays? on page 75
• Why does the Signal Strength LED show only a few bars? on page 75
• Why is the download or upload speed slow? on page 75
• Can I connect multiple LAN devices to the modem? on page 76
• How do I access the modem’s web pages? on page 76
• What do I do if I forget my admin login password? on page 76
• How do I disconnect from the mobile broadband network? on page 76
• How do I find my computer’s IP address? on page 77
8
• How do I find a device’s MAC address? on page 78
• How do I find my mobile phone number? on page 80
• Where can I find more information? on page 80
If the information in this chapter does not help you, see Alerts and Troubleshooting on
Note
page 81.
74
Page 75

LTE Modem LB1110 and LB1111
What do I do when I can’t connect a device to the modem?
If you are experiencing problems connecting to the modem, try the following suggestions:
• Disconnect your device from the modem.
• Turn off your modem, wait 10 seconds, and turn on your modem.
• Restart your device.
• Wait for the modem to connect to the network before you connect the Ethernet cable to your device.
• Turn off or temporarily disable any security programs or firewalls on your device.
• If possible, try using another device to connect to your modem. If you can, then the problem is with the
device that cannot connect, not the modem.
What do I do when I can’t access the Internet?
If you are connected to the modem but cannot connect to the Internet, try the following suggestions:
• Make sure that network coverage is available in your area.
• Make sure that your micro SIM card is active and enabled with data services.
• Confirm that your account is activated and that no other Internet connections are active.
• Switch your modem off and on and restart your computer.
• Verify that an access profile name (APN) profile exists for the service provider. For more information,
see View APN Profiles or Add a Custom APN Profile on page 33.
What do I do when the No Signal icon displays?
If the No Signal icon displays on the modem’ s web page, make sure that y ou are in your network provider’ s
coverage area.
Why does the Signal Strength LED show onl y a fe w bars?
Reception on your modem is poor .Try moving it to a location with a clear view of the sky (f or example, near
a window).
If the reception does not improve, consider purchasing an e xternal antenna (see Optional External Antenna
on page 14).
Why is the download or upload speed slow?
Data transfer speed depends on signal strength and interf ering radio sources such as electrical generators
or WiFi devices.
Check your signal strength and network type (for example, LTE 4G is generally faster than 3G).
Frequently Asked Questions
75
Page 76

LTE Modem LB1110 and LB1111
Can I connect multiple LAN devices to the modem?
By connecting the modem to an Ethernet switch or hub, you can connect m ultiple Ethernet devices such as
printers, credit card terminals, and computers to the modem.
In such a configuration, the modem must function in Router mode (which it does by def ault) so that Network
Address Translation (NAT) is enabled and the built-in Dynamic Host Configuration Protocol (DHCP) server
can assign a LAN IP address to each Ethernet device.
For more information, see Manage Router Mode and Bridge Mode on page 22.
How do I access the modem’s web pages?
For information about accessing the modem’s web pages, see Access the Modem’s Web Pages for the
First Time on page 17.
What do I do if I forget my admin login password?
The default admin login password is password, and the modem web page URL is http://192.168.5.1.
If you changed the admin login password and cannot remember the password that you created, you must
set the modem back to factory default settings. For more information, see Return the Modem to Its Factory
Default Settings on page 59.
How do I disconnect from the mobile br oadband network?
To disconnect from the network:
1. Launch a web browser from a device that is connected to the modem.
The device can be a computer that is directly connected to the modem or a client from a router that is
connected to the modem.
2. In the address field of your browser, enter http://192.168.5.1.
The Dashboard page displays.
If you did not select the Remember me check box when you logged in previously, a
Note
limited Dashboard page displays. In the Sign In field, enter the modem password
and click the Sign In button.The default password is password (case-sensitive).
On the left, under the main menu, a link lets you connect to or disconnect from the mobile broadband
network.
3. On the left, under the main menu, click the Disconnect button.
Frequently Asked Questions
76
Page 77

LTE Modem LB1110 and LB1111
How do I find my computer’s IP address?
The steps for finding your computer’s IP address depend on the operating system. If your device runs an
operating system that is not listed here, see the appropriate operating system documentation.
Table 4. Find your computer’s IP address
Task DescriptionOperating System
Windows 7
Windows 8
Windows 10
To find the IP address on a Windows 7 device:
1. Select Start > Run.
The Run window opens.
2. Enter cmd or command and click the OK button.
The Command Prompt window opens.
3. At the command prompt, enter ipconfig and press Enter.
For an Ethernet connection, the IP address might be listed in the Ethernet adapter Local Area
Connection section.
4. Write down the IP address for the entry that relates to the Ethernet network connection.
To find the IP address on a Windows 8 device:
1. In the Charms bar, click the Search icon.
2. Enter Command Prompt.
3. In the search results, click Command Prompt.
The Command Prompt window opens.
4. At the command prompt, enter ipconfig and press Enter.
For an Ethernet connection, the IP address might be listed in the Ethernet adapter Local Area
Connection section.
5. Write down the IP address for the entry that relates to the Ethernet network connection.
To find the IP address on a Windows 10 device:
1. In the Task bar, click the Search field.
2. Enter Command Prompt.
3. In the search results, click Command Prompt.
The Command Prompt window opens.
4. At the command prompt, enter ipconfig and press Enter.
For an Ethernet connection, the IP address might be listed in the Ethernet adapter Local Area
Connection section.
5. Write down the IP address for the entry that relates to the Ethernet network connection.
Frequently Asked Questions
77
Page 78

LTE Modem LB1110 and LB1111
Table 4. Find your computer’s IP address (Continued)
Task DescriptionOperating System
MAC
Other
To find the IP address on a Mac OS X device:
1. From the Apple menu, select System Preferences > Network.
The network settings display.
2. Select the Ethernet adapter.
The IP address is displayed in the right pane.
To find the IP address on devices running other operating systems, refer to the user documentation
for your operating system or computer.
How do I find a device’s MAC address?
You must know the MAC address for a device when you allow or deny the device access to your WiFi
network (MAC filtering).
The steps for finding a device’s MAC address depend on the operating system. If your device runs an
operating system that is not listed here, see the appropriate operating system documentation.
Frequently Asked Questions
78
Page 79

LTE Modem LB1110 and LB1111
Table 5. Find a device’s MAC address
Task DescriptionOperating System
Windows 7
Windows 8
To find the MAC address on a Windows 7 device:
1. Select Start > Run.
The Run window opens.
2. Enter cmd or command and click the OK button.
The Command Prompt window opens.
3. At the command prompt, enter ipconfig /all and press Enter.
For an Ethernet connection, the MAC address (physical address) might be listed in the Ethernet
adapter Local Area Connection section.
4. Write down the physical address for the entry that relates to the WiFi network connection.
This address displays as a series of numbers and letters.This is the MAC address of your
Ethernet adapter.
To find the MAC address on a Windows 8 device:
1. In the Charms bar, click the Search icon.
2. Enter Command Prompt.
3. In the search results, click Command Prompt.
The Command Prompt window opens.
4. At the command prompt, enter ipconfig /all and press Enter.
For an Ethernet connection, the MAC address (physical address) might be listed in the Ethernet
adapter Local Area Connection section.
5. Write down the physical address for the entry that relates to the WiFi network connection.
This address displays as a series of numbers and letters.This is the MAC address of your
Ethernet adapter.
Frequently Asked Questions
79
Page 80

LTE Modem LB1110 and LB1111
Table 5. Find a device’s MAC address (Continued)
Task DescriptionOperating System
Windows 10
MAC
To find the MAC address on a Windows 10 device:
1. In the Task bar, click the Search field.
2. Enter Command Prompt.
3. In the search results, click Command Prompt.
The Command Prompt window opens.
4. At the command prompt, enter ipconfig /all and press Enter.
For an Ethernet connection, the MAC address (physical address) might be listed in the Ethernet
adapter Local Area Connection section.
5. Write down the physical address for the entry that relates to the WiFi network connection.
This address displays as a series of numbers and letters.This is the MAC address of your
Ethernet adapter.
To find the MAC address on a Mac OS X device:
1. From the Apple menu, select System Preferences > Network.
The network settings display.
2. Select the Ethernet adapter that is connected to the routing hardware.
3. Select Advanced.
4. Select Ethernet.
The Ethernet ID is displayed.This is the same thing as the MAC address.
How do I find my mobile phone number?
For information about finding your mobile phone number , see Vie w Account Details and Other Details About
Your Modem on page 64.
Where can I find more information?
Review the following:
• Read the installation guide that came with your modem.
• Learn tips and tricks at netgear.com/learningcenter/mobile to get the most from your modem.
Frequently Asked Questions
80
Page 81

Alerts and Troubleshooting
This chapter provides suggestions for troubleshooting prob lems that might arise when you are using your modem.
If you do not find the solution here, check the NETGEAR support site at netgear.com/support for more product
information and contact information.
The chapter contains the following sections:
• Alert Messages on page 82
• Quick Tips for Troubleshooting on page 82
• Verify Normal Behavior With the LED Bars on page 83
• Troubleshoot With the LED Bars on page 83
• You Cannot Log In to the Modem on page 85
• Troubleshoot the Mobile Broadband Internet Connection on page 86
• Changes Not Saved on the Modem’s Web Pages on page 87
• TCP/IP Network Not Responding on page 87
9
81
Page 82

LTE Modem LB1110 and LB1111
Alert Messages
The modem can display alerts to advise you of device status changes.The following table describes alerts
that might display. For information about how to view alerts, see View Alerts on page 69.
Table 6. Alert messages
Description or SolutionAlert Message or Code
SIM card alerts
SIM Not Installed
SIM Error — Check SIM
SIM Locked
Temperature Alerts
The modem is designed to work over a wide temperature range. (For more information, see Technical and Environmental
Specifications on page 91.) The modem shuts down automatically if it goes out of the supported temperature range.
If this situation occurs, move the modem to an area where the temperature is more suitable. If the modem is too warm,
make sure that the area is well ventilated and air can circulate around the modem.
Ensure that the micro SIM card is installed correctly . See Install the Micro SIM Card on page
8.
Ensure that your network service provider’s micro SIM card is inserted in the modem. If a
problem still exists, contact your service provider’s customer service.The micro SIM card
might be damaged and need replacing.
The micro SIM card is locked. For information about unlocking the SIM card, see Unblock
the SIM Card With a PUK on page 52.
Quick Tips for Troubleshooting
The following table includes tips for troubleshooting some common problems.
Table 7. Quick tips for troubleshooting
You cannot connect to the
Internet over the mobile
broadband connection.
See also T roub leshoot the Mobile
Broadband Internet Connection
on page 86.
Possible SolutionProblem
Check with your mobile broadband service provider to ensure that good cover age exists
in the area.
Make sure that your mobile broadband account is active.
Make sure that the SIM card is inserted correctly into the modem (see Install the Micro
SIM Card on page 8).
If SIM security is enabled, make sure that you entered the PIN correctly to unlock the
SIM card (see Enter the SIM PIN to Enable the Modem to Connect to the Internet on
page 49). A locked SIM card prevents the modem from connecting to the mobile
broadband network.
Alerts and Troubleshooting
82
Page 83

LTE Modem LB1110 and LB1111
Table 7. Quick tips for troubleshooting (Continued)
Possible SolutionProblem
Make sure that the Ethernet cable is securely plugged in.You cannot connect over an
Ethernet cable to the modem.
Make sure that your computer or device does not use a static IP address but is
configured to receive an IP address automatically with DHCP.
Verify Normal Behavior With the LED Bars
When you turn on the power on the modem, the Power LED bar, Signal Strength LED bars, and LAN LED
bar light as described here:
1.
When power is first applied, the Power LED bar lights solid amber.
2.
After approximately 12 seconds, the LAN LED bar lights solid green and then goes off again.
3. After approximately 15 seconds, the following occurs:
• If the Gigabit Ethernet port is connected to a device over an Ethernet cable, the LAN LED bar lights
solid green.
•
If the modem detects mobile broadband coverage, the Signal Strength LED bars indicate the
quality of the coverage when the modem is connected to a LTE, 4G, 3G, or 2G mobile broadband
service. Five green bars indicate the strongest signal. One green bar (that is, the shortest bar)
indicates the weakest signal.
• The Power LED bar lights solid green.
Troubleshoot With the LED Bars
The following table describes error conditions that are indicated by the LED bars.
Alerts and Troubleshooting
83
Page 84

LTE Modem LB1110 and LB1111
Table 8. LED descriptions (error conditions)
DescriptionIcon or LED BarsDesignation
Power
Signal
Strength
Power LED bar blinks amber fast and individual Signal Strength LED bar s light solid
green. For information, see Power LED Bar Blinks Amber Fast and an Individual Signal
and Strength LED Bar Lights Solid Green on page 84.
Off.The modem is not connected to and is not searching for a mobile broadband service.
Individual Signal Strength LED bar lights solid green, other Signal Strength LED
bars are off. For information, see Power LED Bar Blinks Amber Fast and an Individual
Signal and Strength LED Bar Lights Solid Green on page 84.
Power LED Bar Is Off
If the Pow er LED bar is off and other LED bars are also off when you turn on the modem, do the following:
• Check that the power On/Off button on the back is in the On position, that is, it is pressed in.
• Check that the power cord is correctly connected to your modem and that the power supply adapter is
correctly connected to a functioning power outlet.
• Check that you are using the 12 VDC 1.0A power adapter that NETGEAR supplied for this product.
If the error persists, most likely a hardware problem occurred. For recovery instructions or help with a
hardware problem, contact technical support at netgear.com/support.
Po wer LED Bar Blinks Amber Fast and an Individual Signal and Strength LED Bar Lights Solid Green
If the Power LED bar blinks amber fast and an individual signal strength bar lights solid green while
others are off, one of the conditions that is described in the following table occurred. Bar 1 is the shortest
and leftmost bar. Bar 5 is the tallest and rightmost bar.
Table 9. Error conditions indicated by the Signal Strength LED bars
Possible SolutionBar 5Bar 4Bar 3Bar 2Bar 1Condition
GreenOffOffOffOffSystem too hot
OffGreenOffOffOffSystem over voltage
not correctly installed
Turn off the modem for a while and move the modem to
a location with a moderate temperature.
Make sure that you use the power adapter that came in
the product package.
Turn off the modem for a while, and then turn it back on.
If the condition does not improve, contact technical support
at netgear.com/support.
Install or reinstall the micro SIM card.OffOffGreenOffOffMicro SIM card out or
Alerts and Troubleshooting
84
Page 85

LTE Modem LB1110 and LB1111
Table 9. Error conditions indicated by the Signal Strength LED bars (Continued)
Possible SolutionBar 5Bar 4Bar 3Bar 2Bar 1Condition
OffOffOffOffOffUnknown error
Turn the power off, wait 10 seconds, and turn on the
modem to see if it recovers. If the Power LED bar is still
blinking red fast but no individual Signal Strength bar lights
solid green one minute after power-up, do the following:
• Turn the power off one more time, wait 10 seconds,
and turn on the modem to see if it finally recovers.
• Clear the modem’s configuration to factory defaults
(see Return the Modem to Its Factory Default Settings
on page 59).
If the error persists, most likely a hardware problem
occurred. F or recovery instructions or help with a hardware
problem, contact technical support at netgear.com/support.
LAN LED Is Off
If the LAN LED bar is off when you connect a device to the Gigabit Ethernet port of the modem, check
the following:
• The Ethernet cable connections are secured at the modem and at the device at the other end of the
cable.
• The power of the device at the other end of the cable is turned on.
• You are using the correct cable.
You Cannot Log In to the Modem
If you are unable to log in to the modem’s web pages from a device that is connected to the modem, check
the following:
• If you are using an Ethernet-connected computer, check the Ethernet connection between the computer
and the modem (see LAN LED Is Off on page 85).
• Make sure that Jav a, Ja vaScript, or ActiveX is enab led in your browser . If you are using Internet Explorer ,
click the Refresh button to be sure that the Java applet is loaded.
• Try quitting the browser and launching it again.
• Make sure that you are using the correct login information.The default password is password. Make
sure that Caps Lock is off when you enter this information.
• Make sure that your computer does not use a static IP address but is configured to receiv e an IP address
automatically with DHCP.
Alerts and Troubleshooting
85
Page 86

LTE Modem LB1110 and LB1111
• Turn off and on both the modem and the device that is connected to the modem.
• If your modem’ s IP address was changed and you do not know the current IP address , clear the modem’s
configuration to factory defaults.This sets the modem’s IP address to 192.168.5.1. For more information,
see Return the Modem to Its Factory Default Settings on page 59.
Troubleshoot the Mobile Broadband Internet Connection
If your modem cannot access the Internet, check the mobile broadband connection:
• Make sure that a micro SIM card is installed in the modem. Micro SIM cards from other devices do not
function in the modem and this SIM card does not function in other devices. For information about
inserting the SIM cards, see Install the Micro SIM Card on page 8.
• If SIM security is enabled, make sure that you entered the PIN correctly to unlock the SIM card (see
Enter the SIM PIN to Enable the Modem to Connect to the Internet on page 49). A locked SIM card
prevents the modem from connecting to the mobile broadband network.
• Make sure that your mobile broadband account is active.
• Check with your Internet service provider to ensure that coverage exists in the area. If no mobile
broadband coverage exists, all Signal Strength bars are off.
• If only one or two Signal Quality LED bars light, move the modem closer to a window for better access
to the mobile broadband signal.
• Check to see if your mobile service provider is experiencing network problems. It might not be that the
modem cannot connect to the Internet, but rather that your service provider cannot provide an Internet
connection.
• You might need to add a custom APN profile (see Manage APN Profiles for Mobile Broadband
Connections on page 32). Contact your mobile broadband service provider.
For more information about Internet connection problems, see TCP/IP Network Not Responding on page
87.
Obtain an Internet IP Address From Your Service Provider
If your modem cannot access the Internet but one or more Signal Strength LED bars light green, see if the
modem can obtain an Internet IP address from the mobile broadband service provider.
Unless the modem was assigned a static IP address, the modem requests an IP address from the mobile
broadband service provider.You can determine whether the request was successful (see View Account
Details and Other Details About Your Modem on page 64).
If the IP address is shown as 0.0.0.0, the modem did not obtain an IP address from the mobile broadband
service provider. If this situation occurs, do the following:
• Make sure that an APN profile exists for your mobile broadband service provider (see Manage APN
Profiles for Mobile Broadband Connections on page 32).
• Turn off the modem and then turn it back on.
If you still cannot obtain an Internet IP address, contact your mobile broadband service provider.
Alerts and Troubleshooting
86
Page 87

LTE Modem LB1110 and LB1111
Troubleshoot Internet Browsing
If the modem can obtain an IP address but your computer is unable to load an y web pages from the Internet,
it might be for one of the following reasons:
• The monthly data limit for your mobile broadband account might be reached.
For information about checking your usage, see View Monthly Data and Session Data Usage on page
60.
• Your computer might not recognize any DNS server addresses.
A DNS server is a host on the Internet that translates Internet names (such as www addresses) to
numeric IP addresses.Typically your mobile broadband service provider assigns the addresses of one
or two DNS servers for your use. If you entered a DNS address when you set up the modem, reboot
your computer and verify the DNS address. Alternatively, you can configure your computer manually
with DNS addresses, as explained in your operating system documentation.
• Your computer might not use the modem as its TCP/IP bridge.
If your computer obtains its information from the modem by DHCP, reboot the computer and verify the
modem address.
For information about TCP/IP problems, see TCP/IP Network Not Responding on page 87.
Changes Not Saved on the Modem’s Web Pages
If the modem does not save the changes you make in the modem’s web pages, do the following:
• When entering configuration settings, always click the Submit button before moving to another page
or tab, or your changes are lost.
• Click the Refresh or Reload button in the web browser. It is possible that the changes occurred, but
the old settings might be in the web browser’s cache.
TCP/IP Network Not Responding
Most TCP/IP terminal devices and routers include a ping utility for sending an echo request packet to the
designated device.The device responds with an echo reply to tell whether a TCP/IP network is responding
to requests.
Test the LAN Path to Your Modem
You can ping the modem from your computer to verify that the LAN path to your modem is set up correctly.
To ping the modem from a Windows computer:
1. From the Windows taskbar, click the Start button and select Run.
2. In the field provided, enter ping followed by the IP address of the modem, as in this example:
ping 192.168.5.1
3. Click the OK button.
A message such as the following one displays:
Pinging <IP address> with 32 bytes of data
Alerts and Troubleshooting
87
Page 88

LTE Modem LB1110 and LB1111
If the path is working, you see this message:
Reply from < IP address >: bytes=32 time=NN ms TTL=xxx
If the path is not working, you see this message:
Request timed out
If the path is not functioning correctly , you might be using an incorrect netw ork configuration. Do the following:
• Verify that the Ethernet card driver software and TCP/IP software are both installed and configured on
your computer or workstation.
• Verify that the IP address for your modem and your computer are correct and that the addresses are
on the same subnet.
Test the Path From Your Computer to a Remote Device
After you verify that the LAN path works correctly, test the path from your computer to a remote device.
To test the path from your computer to a remote device:
1. From the Windows toolbar, click the Start button and select Run.
2. In the field provided, enter ping -n 10 IP address.
IP address is the IP address of a remote device such as your mobile broadband service provider’ s DNS
server.
If the path is functioning correctly, replies as described in Test the LAN Path to Your Modem on page 87
display. If you do not receive replies, do the following:
• Check to see that your computer lists the IP address of your modem as the default router. If the IP
configuration of your computer is assigned by DHCP, this information is not visible in your computer’s
Network Control Panel.
• Check to see that the network address of your computer (the portion of the IP address specified by the
netmask) is different from the network address of the remote device.
Many mobile broadband service providers restrict access by allowing traffic only from the MAC address
of your modem, but some additionally restrict access to the MAC address of a single computer connected
to the modem. In this case , inf orm your service provider that you bought a new netw ork device , and ask
them to use the modem’s MAC address.
Alerts and Troubleshooting
88
Page 89

Default Settings and Specifications
The appendix contains the following sections:
• Factory Default Settings on page 90
• Technical and Environmental Specifications on page 91
A
89
Page 90

LTE Modem LB1110 and LB1111
Factory Default Settings
You can reset the modem to the factory default settings, which are shown in the following table.
For more information about resetting the modem to its factory default settings , see Return the Modem to Its
Factory Default Settings on page 59.
Table 10. LB1110 and LB1111 modem factory default settings
Default SettingsFeature
Login
http://192.168.5.1User login URL
The modem does not require an admin user name.Admin user name
passwordLogin password (case-sensitive)
Local area network (LAN)
DHCP server
DMZ
Mobile broadband and security
Auto Connect mode
Network Selection mode
192.168.5.1LAN IP address
255.255.255.0Subnet mask
Router mode enabled; Bridge mode disabledOperation mode
Disabled in Router mode; enabled in Bridge modeIP pass-through (IPPT)
Enabled with the following address range:
192.168.5.20 to 192.168.5.99
AutoDNS mode
Disabled.
If enabled, the default DMZ IP address is 192.168.5.4
All bandsNetwork mode
Always e xcept when roaming (The modem automatically attempts to connect
to the mobile broadband network when powered on, except when roaming.)
Automatic (The modem connects automatically to the type of mobile broadband
network that is made available by your mobile broadband service provider.)
1430 (nonconfigurable)MTU size
Disabled in Router mode; enabled in Bridge modeIP pass-through (IPPT)
EnabledNAT
EnabledVPN pass-through
DisabledSIM card security
Default Settings and Specifications
90
Page 91

LTE Modem LB1110 and LB1111
Table 10. LB1110 and LB1111 modem factory default settings (Continued)
Default SettingsFeature
Messaging
EnabledIncoming SMS messaging
Technical and Environmental Specifications
Table 11. LB1110 and LB1111 modem specifications
DescriptionFeature
TCP/IP, DNS relay, NAT (many-to-one), TFTP client, VPN pass-through, DNSData and routing protocols
Power adapter
Dimensions (width by depth by
height) and weight
Model LB1110-100EUS:
Input 200–240V, 50/60 Hz
Output: 12 VDC @ 1.0A
Model LB1111-100EUS:
Input 200–240V, 50/60 Hz
Output: 12 VDC @ 1.0A
Model LB1110-100EUS:
120 x 99 x 31 mm (4.7 x 3.9 x 1.2 in.)
150 g (0.33 lb)
Model LB1111-100EUS:
120 x 99 x 31 mm (4.7 x 3.9 x 1.2 in.)
200 g (0.44 lb)
One 10/100/1000BASE-T, RJ-45 autosensing portGigabit Ethernet port
0° to 40°C (32° to 104°F)Operating temperature
–25° to 55°C (–13° to 131°F)Storage temperature
90% maximum relative humidity, noncondensingOperating humidity
5–95% maximum relative humidity, noncondensingStorage humidity
Default Settings and Specifications
91
Page 92

Wall-Mount the Modem
This appendix describes how to wall-mount the modem.
The appendix contains the following sections:
• Position Your Modem on page 93
• Mount Your Modem on page 94
B
92
Page 93

LTE Modem LB1110 and LB1111
Position Your Modem
Use the Signal Strength LED bars on the top panel to position the modem for best signal strength in
relation to the mobile broadband network. Also f or best results, place y our modem according to the following
guidelines:
• Place your modem close to a window but avoiding direct sunlight. A window location gives the best
conditions for receiving a strong 4G LTE signal.
• Make sure that the modem is within reach of an AC power outlet and near Ethernet cables for wired
computers.
• Place the modem away from electrical devices such as the following:
- Ceiling fans
- Home security systems
- Microwaves
- Computers
- Base of a cordless phone
- 2.4 GHz cordless phone
- 5 GHz cordless phone
• Place the modem away from large metal surf aces , large glass surfaces , insulated walls , and items such
as the following:
- Solid metal doors
- Aluminum studs
- Fish tanks
- Mirrors
- Brick walls or surfaces
- Concrete walls or surfaces
Wall-Mount the Modem
93
Page 94
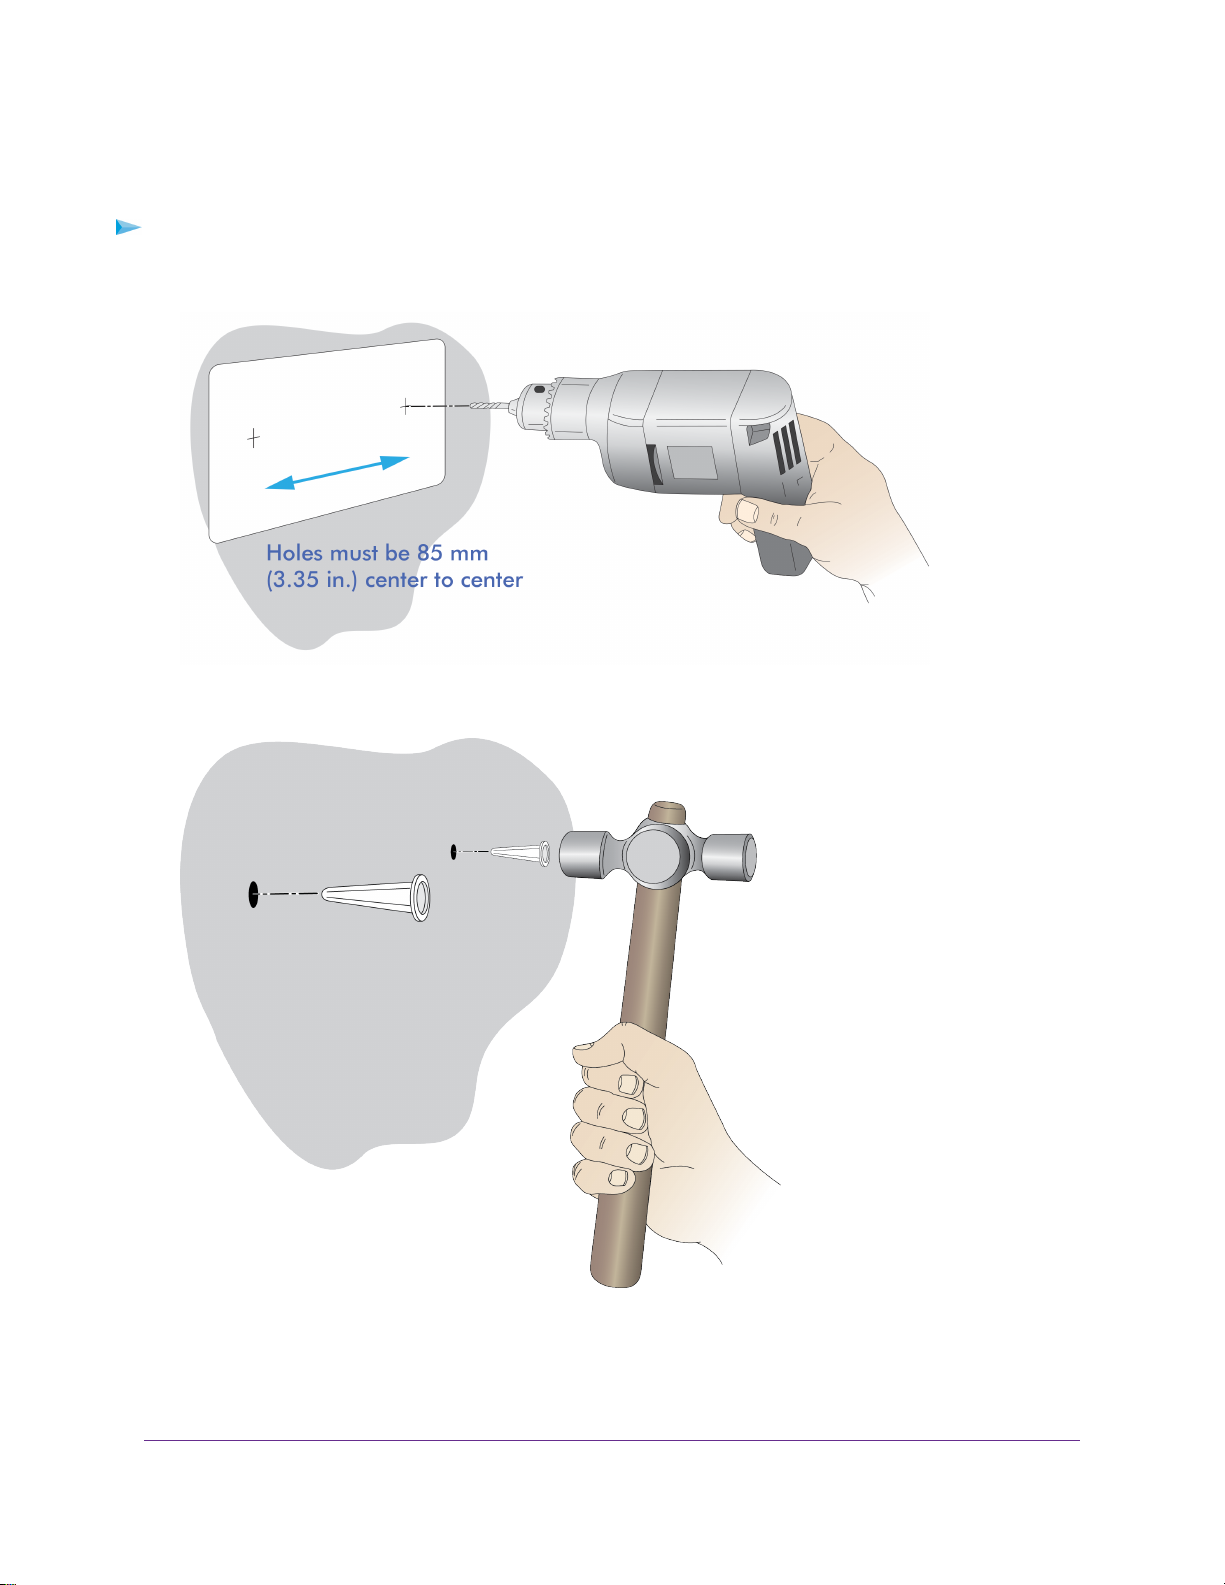
LTE Modem LB1110 and LB1111
Mount Your Modem
To wall-mount the modem:
1. Drill holes in the wall where you want to wall-mount the modem.
2. Install wall anchors in the holes.
3. Use pan head Phillips wood screws, 3.5 x 20 mm (diameter x length, European) or No. 6 type screws,
1 inch long (U.S.).
Wall-Mount the Modem
94
Page 95

LTE Modem LB1110 and LB1111
4. Insert screws into the wall anchors, leaving 1/8 inch (3 mm) of each screw exposed.
5. Attach the modem to the screws and secure it into place.
Wall-Mount the Modem
95
 Loading...