

Page 1
)NSTALLATION'UIDE
ProSafe 24-port 10/100Mbps Unmanaged Plus Switch JFS524E
Start Here
Estimated Installation Time: 5–10 minutes
Unpack the Box and Verify the Contents
When you open the box, verify that you received everything. The package includes:
• ProSafe 24-port 10/100Mbps Unmanaged Plus Switch JFS524E
• AC power cord
• Rack-mounting screws
• Installation Guide (this document)
• Resource CD (contains switch configuration software)
If you do not have everything listed above, see the support information card for contact
information. If you are missing the support information card, get contact information at
http://www.NETGEAR.com in the Technical Support section.
Prepare to Install the Switch
Decide where you want to place the switch. Find a flat horizontal surface such as a table,
desk or shelf. The switch comes with rack-mounting screws. You can use the screws if
you want to mount the switch in an equipment rack. Make sure the selected location is:
• Not in direct sunlight or near a heater or heating vent.
• Not cluttered or crowded. There should be at least 2 inches (5 cm) of clear space on
all sides of the switch.
• Well ventilated (especially if it is in a closet).
Also, you will need one Category 5e (Cat 5e) Ethernet cable with RJ-45 connectors for
each device you want to connect to the switch. Each Ethernet cable must be less than 328
feet (100 meters).
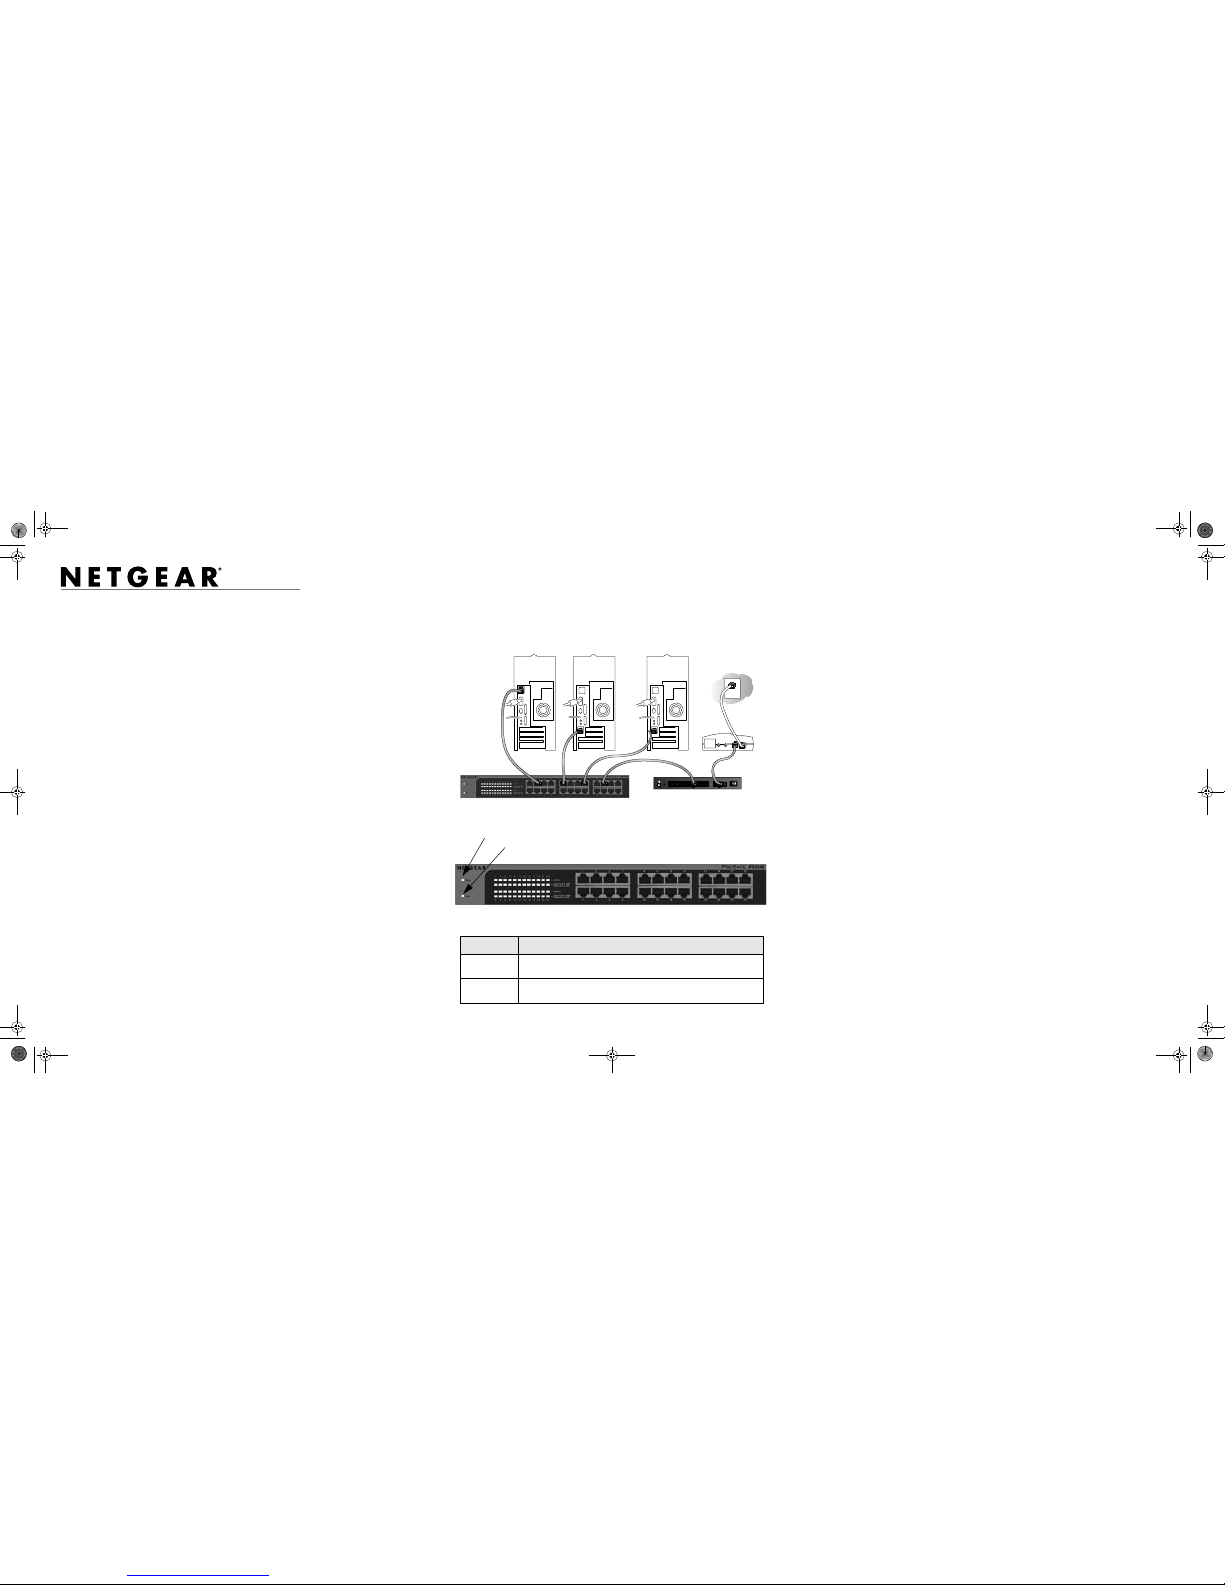
Install the Switch and Connect the
Other Devices
1. Place the switch on a flat surface or mount in a rack.
2. For each device, insert one end of an Ethernet cable into the port in the device and
insert the other end into one of the Ethernet ports on the switch.
3. Connect the power cord into the back of the switch and then plug the cord to an AC
power source (such as a wall socket or power strip). The Power light should light up.
4. Check the LEDs to confirm that all connections are correct.
LED Activity
Power • On: 24-port Unmanaged Plus Switch has power.
• Off: No power.
RJ-45 ports • Top LED on/Blink: Link/Activity
• Bottom LED Off/Green: 10 Mbps/100Mbps.
12VDC 1.2A
87654321
LOCAL
10/100M
INTERNET
OFF ON
Power
Reset
Set Up the Switch Configuration Utility
In order to make use of the switch’s enhanced features you can install and use a switch
configuration utility. This utility is on the Resource CD shipped with the switch.
Note: The configuration utility is installed on your PC and is only supported on MS
Windows.
Install the Configuration Utility
To install the Unmanaged Plus Switch Configuration Utility:
1. Insert the Resource CD into a PC connected to the switch.
2. Click on Install NETGEAR UM+ Utility and follow the prompts to install the
program. The switch configuration utility will be installed in the program directory of
your PC and a NETGEAR UM+ Utility icon will be placed on your desktop.
Configure the Switch
To configure the switch to use enhanced features:
1. Double click the NETGEAR UM+ Utility icon. The configuration home screen
displays.
2. The configuration utility displays a list of enhanced switches it discovers on the local
network. Select the switch you want to configure.
3. You will be asked to enter a password. The default is “password”.
4. Enter the desired switch configuration. Refer to the Unmanaged Plus Switch
Configuration Utility User Guide for a description of enhanced features. The user
guide can be accessed by links on the Help tab of the utility or on the Resource CD.
JFS524E_IG_12Aug09.fm Page 1 Wednesday, August 12, 2009 10:08 AM
Page 2

July 2009
This symbol was placed in accordance with the European Union Directive 2002/96 on the Waste
Electrical and Electronic Equipment (the WEEE Directive). If disposed of within the European Union,
this product should be treated and recycled in accordance with the laws of your jurisdiction
implementing the WEEE Directive.
© 2009 by NETGEAR, Inc. All rights reserved. NETGEAR and the NETGEAR logo are registered trademarks
of NETGEAR, Inc. in the United States and/or other countries. Other brand and product names are trademarks or
registered trademarks of their respective holders. Information is subject to change without notice.
Specifications
Technical Specifications
Standards compatibility IEEE 802.3i 10BASE-T Ethernet, IEEE 802.3u 100BASE-TX
Fast Ethernet, IEEE 802.3x Flow Control, IEEE 802.1p and TOS
priority, WRR queuing with two queues
Network interface RJ-45 connector for 10BASE-T or 100BASE-TX
Power Consumption 5.9W max
AC POwer 100-240VAC 50-60Hz, 1.2A max.
Weight 1.43 Kg (3.15 lbs)
Dimensions
(W x D x H)
330 mm x 173 mm x 43 mm
13 in x 6.8 in x 1.7 in
Operating temperature 0 to 50° C (32 to 122° F)
Operating humidity 10% t0 90% relative humidity, non-condensing
Electromagnetic
compliance
CE Class A, included EN55022 (CISPR 22) and EN55024,
FCC part 15 Class A, VCCI Class A, C-Tick Class A, CCC
Safety agency
approvals
CE mark, Commercial UL listed (UL 60950-1), C-Tick, CCC, CB
Performance Specifications
Frame filter rate 14,880 frames/sec max for 10M port; 148,800 frames/sec max
for 100M;
Frame forward rate 14,880 frames/sec max for 10M port; 148,800 frames/sec max
for 100M;
Network latency
(using 64-byte packets)
100 Mbps to 100 Mbps: 10 μs max
Address database size up to 8K MAC addresses
MAC Address Learning Automatically updated
Queue buffer 1.25Mb
NETGEAR Green
features
• Auto power-down mode saves energy when ports are unused
• Power-saving per port if the cable length is less than 32.8 feet
(10 meters)
Troubleshooting Tips
Problem Action
Power light is not lit The switch has no power. Make sure that:
• The power cord is properly connected to the switch.
• The power cord is properly connected to a functioning power
outlet. If it is in a power strip, make sure the power strip is turned
on. If the socket is controlled by a light switch, make sure the
switch is in the on position.
Port number light is
not lit for a connected
device, or stays on
continuously
There is a hardware connection problem.
• Make sure the cable connectors are securely plugged in at the
switch and the device.
• Make sure the connected device is turned on.
• If the Ethernet cable is connected to a NIC or other Ethernet
adapter, make sure the card or adapter is installed correctly and
is working.
• Make sure the cable is less than 328 feet (100 meters).
Technical Support
Thank you for selecting NETGEAR products.
After installing your device, locate the serial number on the label of your product and use
it to register your product at http://www.NETGEAR.com/register. Registration is required
before you can use our telephone support service. Registration via our website is strongly
recommended.
Go to http://kbserver.netgear.com for product updates and Web support. For Warranty and
Regional Customer Support information, see the Resource CD that came with your
product.
JFS524E_IG_12Aug09.fm Page 2 Wednesday, August 12, 2009 10:08 AM
 Loading...