

Page 1
Getting Started
Page 2

Thank you for selecting NETGEAR products.
After installing your device, locate the serial number on the label and use it to register your product
at https://my.netgear.com. You must register before you can use NETGEAR telephone support.
NETGEAR recommends registering your product through the NETGEAR website.
Phone (US only): 1-888-NETGEAR
Phone (Other Countries): See http://support.netgear.com/app/answers/detail/a_id/984.
User Manual
You can get the user manual online at http://downloadcenter.netgear.com.
Trademarks
NETGEAR, the NETGEAR logo, and Connect with Innovation are trademarks and/or registered
trademarks of NETGEAR, Inc. and/or its subsidiaries in the United States and/or other countries.
Information is subject to change without notice. Other brand and product names are registered
trademarks or trademarks of their respective holders. © NETGEAR, Inc. All rights reserved.
HDMI, the HDMI Logo, and HighDefinition Multimedia Interface are trademarks or registered
trademarks of HDMI Licensing LLC in the United States and other countries.
Manufactured under license from Dolby laboratories. Dolby and the double-D symbol are
trademarks of Dolby Laboratories.
Statement of Conditions
In the interest of improving internal design, operational function, and/or reliability, NETGEAR
reserves the right to make changes to the products described in this document without notice.
NETGEAR does not assume any liability that may occur due to the use or application of the
product(s) or circuit layout(s) described herein.
Compliance
For indoor use only in all EU countries and in SwitzerlandFor the complete EU Declaration of
Conformity, visit: http://support.netgear.com/app/answers/detail/a_id/11621/.
This symbol appears in accordance with the European Union Directive 2002/96 on the
Waste Electrical and Electronic Equipment (the WEEE directive). If you dispose of this
product in the European Union, treat and recycle it in accordance with your jurisdiction’s
laws that implement the WEEE directive.
Page 3

Contents
Package Contents . . . . . . . . . . . . . . . . . . . . . . . . . . . . . . . . . . . . . . . . . . . . . . . . . . . . . . . . 2
You Will Need. . . . . . . . . . . . . . . . . . . . . . . . . . . . . . . . . . . . . . . . . . . . . . . . . . . . . . . . . . . . 3
Also Recommended . . . . . . . . . . . . . . . . . . . . . . . . . . . . . . . . . . . . . . . . . . . . . . . . . . . . . . . 3
Getting to Know Your NeoTV . . . . . . . . . . . . . . . . . . . . . . . . . . . . . . . . . . . . . . . . . . . . . . . . 4
How to Install . . . . . . . . . . . . . . . . . . . . . . . . . . . . . . . . . . . . . . . . . . . . . . . . . . . . . . . . . . . . 5
1. Connect the TV . . . . . . . . . . . . . . . . . . . . . . . . . . . . . . . . . . . . . . . . . . . . . . . . . . . . . 5
2. Connect Your Cable or Satellite Box . . . . . . . . . . . . . . . . . . . . . . . . . . . . . . . . . . . . . 6
3. Apply Power . . . . . . . . . . . . . . . . . . . . . . . . . . . . . . . . . . . . . . . . . . . . . . . . . . . . . . . 7
4. Connect to Your Network . . . . . . . . . . . . . . . . . . . . . . . . . . . . . . . . . . . . . . . . . . . . . 8
5. Install the Remote Control Batteries . . . . . . . . . . . . . . . . . . . . . . . . . . . . . . . . . . . . . 9
6. Onscreen Setup. . . . . . . . . . . . . . . . . . . . . . . . . . . . . . . . . . . . . . . . . . . . . . . . . . . . . 9
Remote Control . . . . . . . . . . . . . . . . . . . . . . . . . . . . . . . . . . . . . . . . . . . . . . . . . . . . . . . . . 10
Remote Control Buttons . . . . . . . . . . . . . . . . . . . . . . . . . . . . . . . . . . . . . . . . . . . . . . . 11
Using the Remote. . . . . . . . . . . . . . . . . . . . . . . . . . . . . . . . . . . . . . . . . . . . . . . . . . . . . . . . 12
Directional Navigation . . . . . . . . . . . . . . . . . . . . . . . . . . . . . . . . . . . . . . . . . . . . . . . . . 12
Touchpad Navigation. . . . . . . . . . . . . . . . . . . . . . . . . . . . . . . . . . . . . . . . . . . . . . . . . . 13
Remote Control Keyboard . . . . . . . . . . . . . . . . . . . . . . . . . . . . . . . . . . . . . . . . . . . . . . 14
Remote Control Pairing . . . . . . . . . . . . . . . . . . . . . . . . . . . . . . . . . . . . . . . . . . . . . . . . 15
Tips and Troubleshooting. . . . . . . . . . . . . . . . . . . . . . . . . . . . . . . . . . . . . . . . . . . . . . . . . . 16
Tips for Wireless Network Connections. . . . . . . . . . . . . . . . . . . . . . . . . . . . . . . . . . . . 16
I See the Picture but I Do Not Hear Any Sound . . . . . . . . . . . . . . . . . . . . . . . . . . . . . 16
My Remote Is Not Working . . . . . . . . . . . . . . . . . . . . . . . . . . . . . . . . . . . . . . . . . . . . . 16
Learn about Google TV . . . . . . . . . . . . . . . . . . . . . . . . . . . . . . . . . . . . . . . . . . . . . . . . . . . 17
1
Page 4
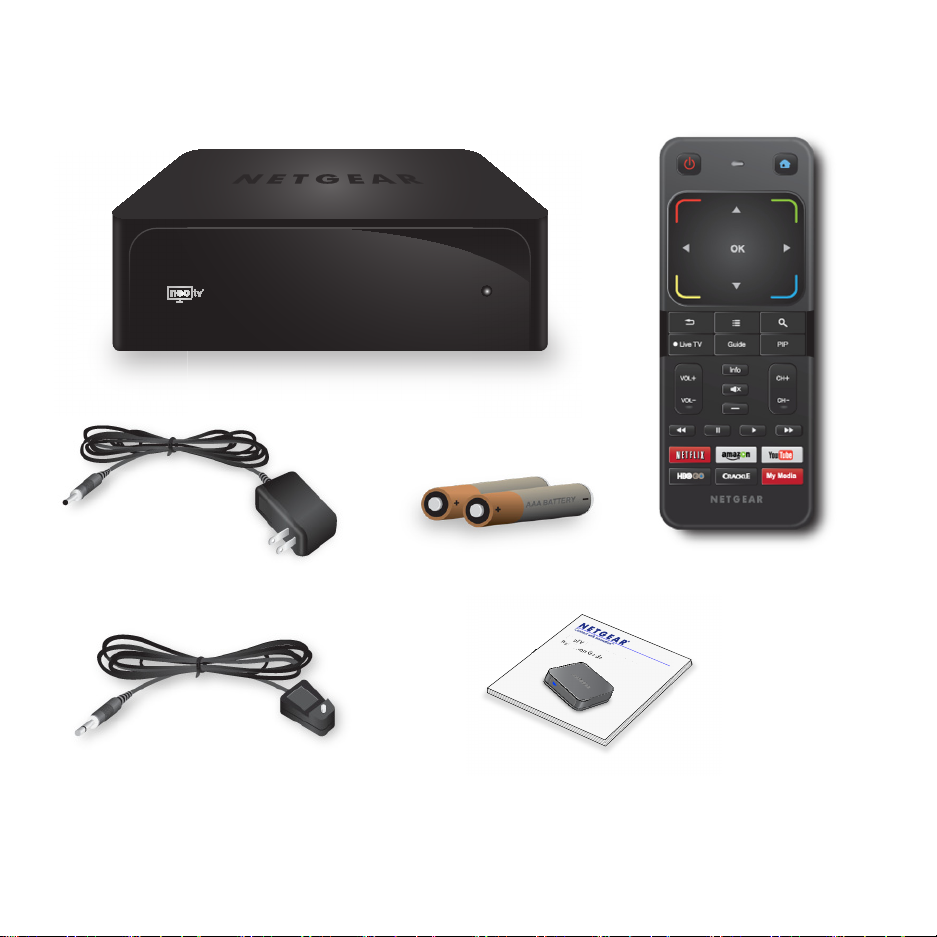
Package Contents
Power adapter
NeoTV Prime
IR blaster cable
NeoTV Prime with Google TV
Installation Guide
Ne
o
T
V
Prime with Goog
le TV
In
s
t
allat
i
u
i
d
e
Installation guide
AAA batteries (2)
Remote control
2
Page 5
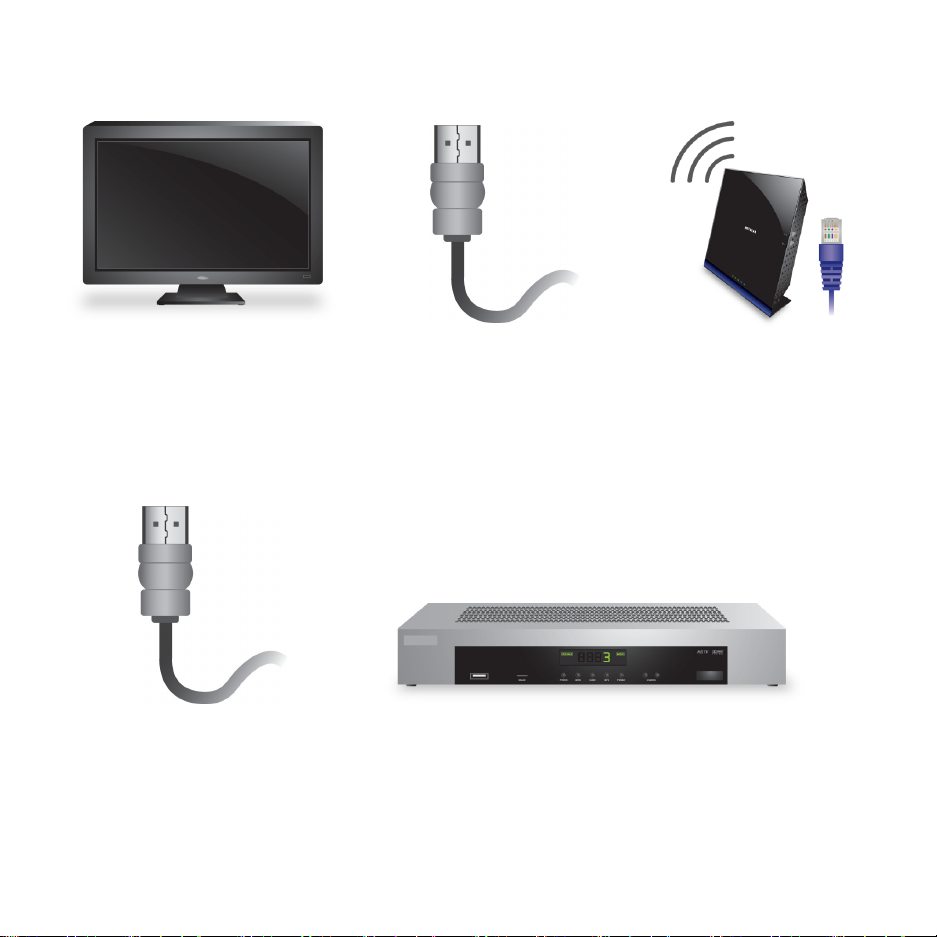
You Will Need
TV with HDMI port HDMI cable Internet connection
(wired or wireless)
HDMI cable
Cable or satellite box
Also Recommended
3
Page 6
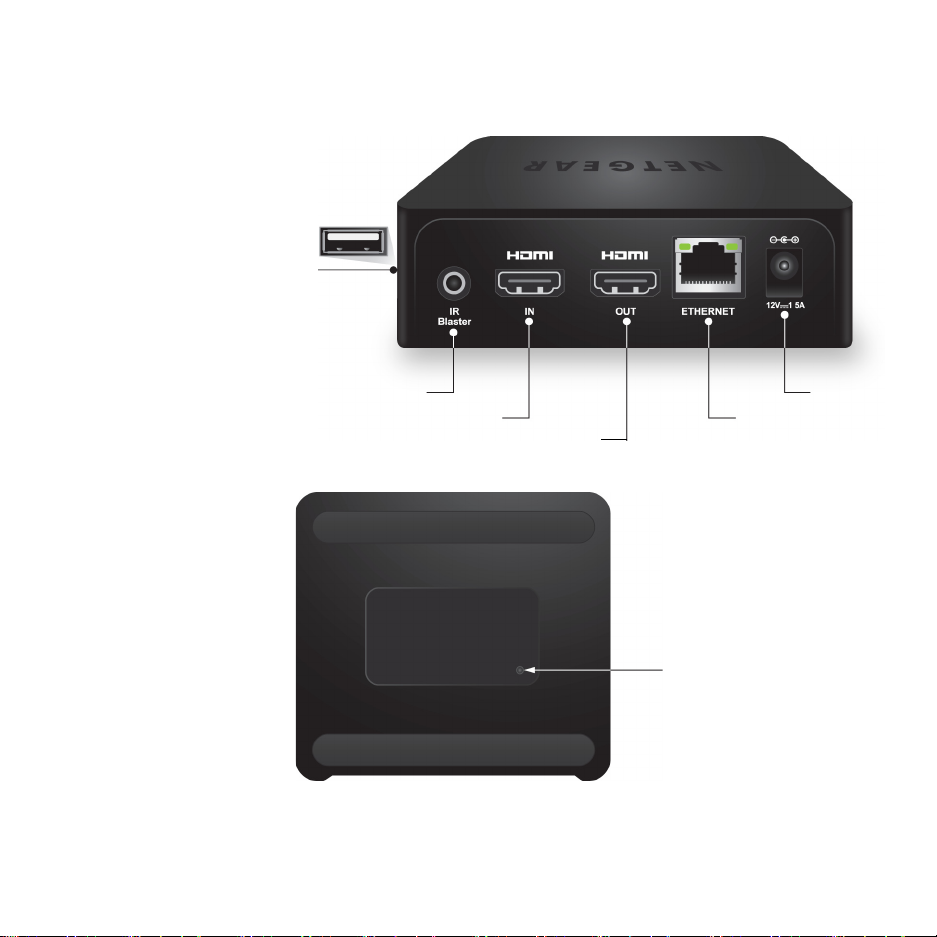
Getting to Know Your NeoTV
HDMI IN
HDMI OUT
Ethernet
Power
IR blaster
USB
port
The Reset button is
on the bottom.
Tip: The NeoTV is compatible
with most keyboards and
mouse devices, which can
connect to the USB port on
the NeoTV.
4
Page 7

How to Install
HDMI IN
HDMI OUT
1. Connect the TV
Connect an HDMI cable (sold separately) to the HDMI OUT port on your player and to the HDMI IN
port on your TV.
5
Page 8

2. Connect Your Cable or Satellite Box
a. Connect the IR blaster
cable to the NeoTV, and
position the other end by
the sensor on your cable or
satellite box.
b. Connect an HDMI cable
(sold separately) to the
HDMI IN port on the player
and your set-top box.
IR sensor
ba
6
Page 9

3. Apply Power
7
Page 10

4. Connect to Your Network
Tip: Do not place anything on top of
your NeoTV. Placing objects on top
of it can interfere with the wireless
signal.
You can connect the NeoTV using a wireless or a wired connection. The initial setup on the
screen helps you connect your NeoTV to your network.
8
Page 11

5. Install the Remote Control Batteries
Slide the battery compartment doors open.
Before using the remote control, install the two AAA batteries that came in the package.
6. Onscreen Setup
On your TV, use the remote control to follow the onscreen setup instructions, including how to:
• Adjust your screen area.
• Connect to a network.
• Log in to your Google account.
• Configure your cable or satellite box.
• Your player might download software updates or restart during setup.
• Once you complete setup, you are ready to enjoy your entertainment with NeoTV PRIME.
9
Page 12

Remote Control
10
Page 13

Remote Control Buttons
1. Power. Turn the NeoTV on or off.
2. Color Shortcut. Depending on application, use as directed on the TV screen.
3. Arrows. Use to navigate onscreen menus.
4. OK. Press to select the highlighted option.
5. Back. Navigate to the previous step.
6. Menu. Open the menu for more selections.
7. Live TV. Watch TV from your cable or satellite box.
8. Guide. Displays the guide for live TV.
9. Info. Display additional information.
10. Vol ume. Increase or decrease the loudness of the sound (audio).
11. Mute. Mute the audio.
12. Dash. Mouse click for touchpad.
13. Playback controls. Press to play, pause, fast forward or rewind.
14. Quick Start buttons. Shortcuts to launch Netflix, Amazon Instant Video, HBOGo, and so on.
15. Home. Return to the Home screen.
16. Search. Open the search bar.
17. PIP. Opens a small picture in the picture window.
18. Channel. Change the channel.
11
Page 14

Using the Remote
Navigate with the directional arrows. Press OK to select the highlighted option.
You can use the NeoTV remote to navigate the screen selections by directional pad or by
using a cursor with the touchpad navigation as shown in the following sections.
Directional Navigation
You can use the remote directional buttons.
12
Page 15

Touchpad Navigation
To drag and drop, press
the Dash button and
swipe across the
touchpad to move.
Slide your finger to
move the cursor.
Tap or double-tap
the touchpad to
select.
To exit directional navigation and activate the touchpad, swipe diagonally across the touchpad
until you see the cursor on the screen.
13
Page 16

Remote Control Keyboard
1. Lock. To lock the keyboard, press the Lock key. When the keyboard is locked, the LED lights. Press
the Lock key again to unlock the keyboard.
2. Fn (Function). Press to enter the orange characters on the keyboard. For example, you can press
Fn + 2 to enter the @ symbol.
14
Page 17

Remote Control Pairing
The first time you turn on the NeoTV player, the Bluetooth remote control should automatically
pair with your NeoTV. In case the remote control does not pair automatically, you can use the
following steps to pair the NeoTV and remote manually.
To perform Bluetooth pairing:
1. Press the Reset button on the bottom of the NeoTV player for 2 seconds.
A pairing notification displays on the TV screen.
2. Press
and hold both the Rewind and Fast forward buttons for 5 seconds.
A successful pairing message displays on the TV and the LED on the remote stops
flashing.
15
Page 18

Tips and Troubleshooting
Tips for Wireless Network Connections
1. Place your player within range of your wireless network.
For best wireless reception, avoid enclosing your player in a cabinet.
You can use Wi-Fi Protected Setup (WPS), or you can select your network and enter its
password using the onscreen setup guide.
2. If you do not receive a strong signal during the onscreen setup, rotate your player or move it
closer to your router.
I See the Picture but I Do Not Hear Any Sound
1. Make sure that your NeoTV and your TV are not muted.
2. Increase the volume on the TV.
3. Increase the volume on the cable or satellite box if you are using one.
My Remote Is Not Working
1. Check to see if the batteries are installed correctly.
2. Replace the batteries.
3. Try pairing the remote by following steps in Remote Control Pairing on page 15.
16
Page 19

Learn about Google TV
Google TV™ Search – Fastest path from thinking to watching
• Find whatever entertainment you want from a single place
• In
tegrated results from live TV, streaming sites, and the web
Google TV Discover – Your personal guide to what’s on
• Single place to browse what’s on TV and the web
• Sma
Chrome for Google TV – Internet as it was intended, on TV
• Best web browser on any connected TV
• W
YouTube for Google TV – YouTube is better on the big screen
• Best YouTube experience on TV, because it actually feels like TV
• L
Google Play Store– More content coming all the time
rt way to find new entertainment – recommendations that work
atch video, live-stream, check the traffic or just surf the web
ean back with channels, live-stream, Google Play movies, and more
• Movies, music, apps, always synced with your Google TV
• Connected
TV with Google Play means limitless content
17
Page 20

N E T G E A R , Inc.
350 E. Plumeria Drive
San Jose, CA 95134-1911 USA
October 2012
 Loading...