

Page 1
NeoTV Prime with Google TV GTV100
User Manual
350 East Plumeria Drive
San Jose, CA 95134
USA
January 2013
202-11067-01
v1
Page 2

NeoTV Prime with Google TV GTV100
Support
Thank you for choosing NETGEAR.
After installing your device, locate the serial number on the label of your product and use it to register your product
at
https://my.netgear.com. You must register your product before you can use NETGEAR telephone support.
NETGEAR recommends registering your product through the NETGEAR website. For product updates and web
support, visit
Phone (US & Canada only): 1-888-NETGEAR.
Phone (Other Countries): Check the list of phone numbers at
http://support.netgear.com/general/contact/default.aspx.
NETGEAR recommends that you use only the official NETGEAR support resources.
http://support.netgear.com.
Trademarks
NETGEAR, the NETGEAR logo, and Connect with Innovation are trademarks and/or registered trademarks of
NETGEAR, Inc. and/or its subsidiaries in the United States and/or other countries. Information is subject to change
without notice. © NETGEAR, Inc. All rights reserved.
2
Page 3

NeoTV Prime with Google TV GTV100
Chapter 1 Getting Started
Package Contents . . . . . . . . . . . . . . . . . . . . . . . . . . . . . . . . . . . . . . . . . . . . 6
Getting to Know Your NeoTV Prime . . . . . . . . . . . . . . . . . . . . . . . . . . . . . . 6
Restore Factory Settings . . . . . . . . . . . . . . . . . . . . . . . . . . . . . . . . . . . . . . . 7
Connect the NeoTV Prime to Your Audio System . . . . . . . . . . . . . . . . . . . . 7
Remote Control . . . . . . . . . . . . . . . . . . . . . . . . . . . . . . . . . . . . . . . . . . . . . . 8
LED Indicator . . . . . . . . . . . . . . . . . . . . . . . . . . . . . . . . . . . . . . . . . . . . . . 8
Directional Navigation . . . . . . . . . . . . . . . . . . . . . . . . . . . . . . . . . . . . . . . 9
Activate and Exit the Touchpad . . . . . . . . . . . . . . . . . . . . . . . . . . . . . . . . 9
Touchpad Navigation. . . . . . . . . . . . . . . . . . . . . . . . . . . . . . . . . . . . . . . 10
Remote Control Keyboard . . . . . . . . . . . . . . . . . . . . . . . . . . . . . . . . . . . 11
Remote Control Pairing . . . . . . . . . . . . . . . . . . . . . . . . . . . . . . . . . . . . . 11
Replace the Remote Control Batteries . . . . . . . . . . . . . . . . . . . . . . . . . 12
Accessories . . . . . . . . . . . . . . . . . . . . . . . . . . . . . . . . . . . . . . . . . . . . . . . . 12
Chapter 2 Onscreen Guided Setup
Guided Setup. . . . . . . . . . . . . . . . . . . . . . . . . . . . . . . . . . . . . . . . . . . . . . . 14
Tips and Troubleshooting . . . . . . . . . . . . . . . . . . . . . . . . . . . . . . . . . . . . . 17
Tips for Wireless Network Connections. . . . . . . . . . . . . . . . . . . . . . . . . 17
I See the Picture but I Do Not Hear Any Sound. . . . . . . . . . . . . . . . . . . 17
My Remote Is Not Working . . . . . . . . . . . . . . . . . . . . . . . . . . . . . . . . . . 17
How to Exit Netflix or LiveTV . . . . . . . . . . . . . . . . . . . . . . . . . . . . . . . . . 17
How to Deactivate Netflix. . . . . . . . . . . . . . . . . . . . . . . . . . . . . . . . . . . . 17
Chapter 3 Play Media and More
Home Screen. . . . . . . . . . . . . . . . . . . . . . . . . . . . . . . . . . . . . . . . . . . . . . . 19
All Apps . . . . . . . . . . . . . . . . . . . . . . . . . . . . . . . . . . . . . . . . . . . . . . . . . . . 19
Search . . . . . . . . . . . . . . . . . . . . . . . . . . . . . . . . . . . . . . . . . . . . . . . . . . . . 20
Watch TV & Movies . . . . . . . . . . . . . . . . . . . . . . . . . . . . . . . . . . . . . . . . . . 21
Selection Icons . . . . . . . . . . . . . . . . . . . . . . . . . . . . . . . . . . . . . . . . . . . 21
Favorites . . . . . . . . . . . . . . . . . . . . . . . . . . . . . . . . . . . . . . . . . . . . . . . . . . 22
Surf the Web with Chrome. . . . . . . . . . . . . . . . . . . . . . . . . . . . . . . . . . . . . 23
View Photos. . . . . . . . . . . . . . . . . . . . . . . . . . . . . . . . . . . . . . . . . . . . . . . . 23
Play Music . . . . . . . . . . . . . . . . . . . . . . . . . . . . . . . . . . . . . . . . . . . . . . . . . 24
Chapter 4 Settings
Settings Screen . . . . . . . . . . . . . . . . . . . . . . . . . . . . . . . . . . . . . . . . . . . . . 26
Network Settings . . . . . . . . . . . . . . . . . . . . . . . . . . . . . . . . . . . . . . . . . . . . 27
Wi-Fi Internet Connection . . . . . . . . . . . . . . . . . . . . . . . . . . . . . . . . . . . 27
Ethernet Internet Connection. . . . . . . . . . . . . . . . . . . . . . . . . . . . . . . . . 28
Bluetooth Settings . . . . . . . . . . . . . . . . . . . . . . . . . . . . . . . . . . . . . . . . . 28
Standby . . . . . . . . . . . . . . . . . . . . . . . . . . . . . . . . . . . . . . . . . . . . . . . . . . . 29
Picture & Sound. . . . . . . . . . . . . . . . . . . . . . . . . . . . . . . . . . . . . . . . . . . . . 29
Adjust the Picture Display . . . . . . . . . . . . . . . . . . . . . . . . . . . . . . . . . . . 29
Filter Your Searches and Manage Shortcuts. . . . . . . . . . . . . . . . . . . . . . . 30
3
Page 4

NeoTV Prime with Google TV GTV100
Video Input. . . . . . . . . . . . . . . . . . . . . . . . . . . . . . . . . . . . . . . . . . . . . . . . . 30
TV . . . . . . . . . . . . . . . . . . . . . . . . . . . . . . . . . . . . . . . . . . . . . . . . . . . . . . . 32
Applications . . . . . . . . . . . . . . . . . . . . . . . . . . . . . . . . . . . . . . . . . . . . . . . . 33
Date, Time, & Location . . . . . . . . . . . . . . . . . . . . . . . . . . . . . . . . . . . . . . . 33
Language & Input . . . . . . . . . . . . . . . . . . . . . . . . . . . . . . . . . . . . . . . . . . . 34
Accounts & Sync . . . . . . . . . . . . . . . . . . . . . . . . . . . . . . . . . . . . . . . . . . . . 34
About . . . . . . . . . . . . . . . . . . . . . . . . . . . . . . . . . . . . . . . . . . . . . . . . . . . . . 34
Update Firmware . . . . . . . . . . . . . . . . . . . . . . . . . . . . . . . . . . . . . . . . . . 34
Appendix A Technical Specifications
Appendix B Notification of Compliance
4
Page 5

1. Getting Started
The NeoTV Prime uses Google TV to offer you an integrated way to play media, use apps, and
interact with the Internet from your TV.
This chapter covers the following topics:
• Package Contents
• Getting to Know Your NeoTV Prime
• Restore Factory Settings
• Connect the NeoTV Prime to Your Audio System
• Remote Control
• Accessories
For help with installation, see the installation guide that came in the package.
For more information about the topics covered in this manual, visit the support website at
http://support.netgear.com.
1
5
Page 6
NeoTV Prime with Google TV GTV100
Power adapter
NeoTV Prime
IR blaster cable
NeoTV Prime with Google TV
Installation Guide
Ne
o
T
V
Prime with Goog
le TV
In
s
t
allat
i
u
i
d
e
Installation guide
AAA batteries (2)
Remote control
HDMI IN
HDMI OUT
Ethernet
Power
IR blaster
USB
port
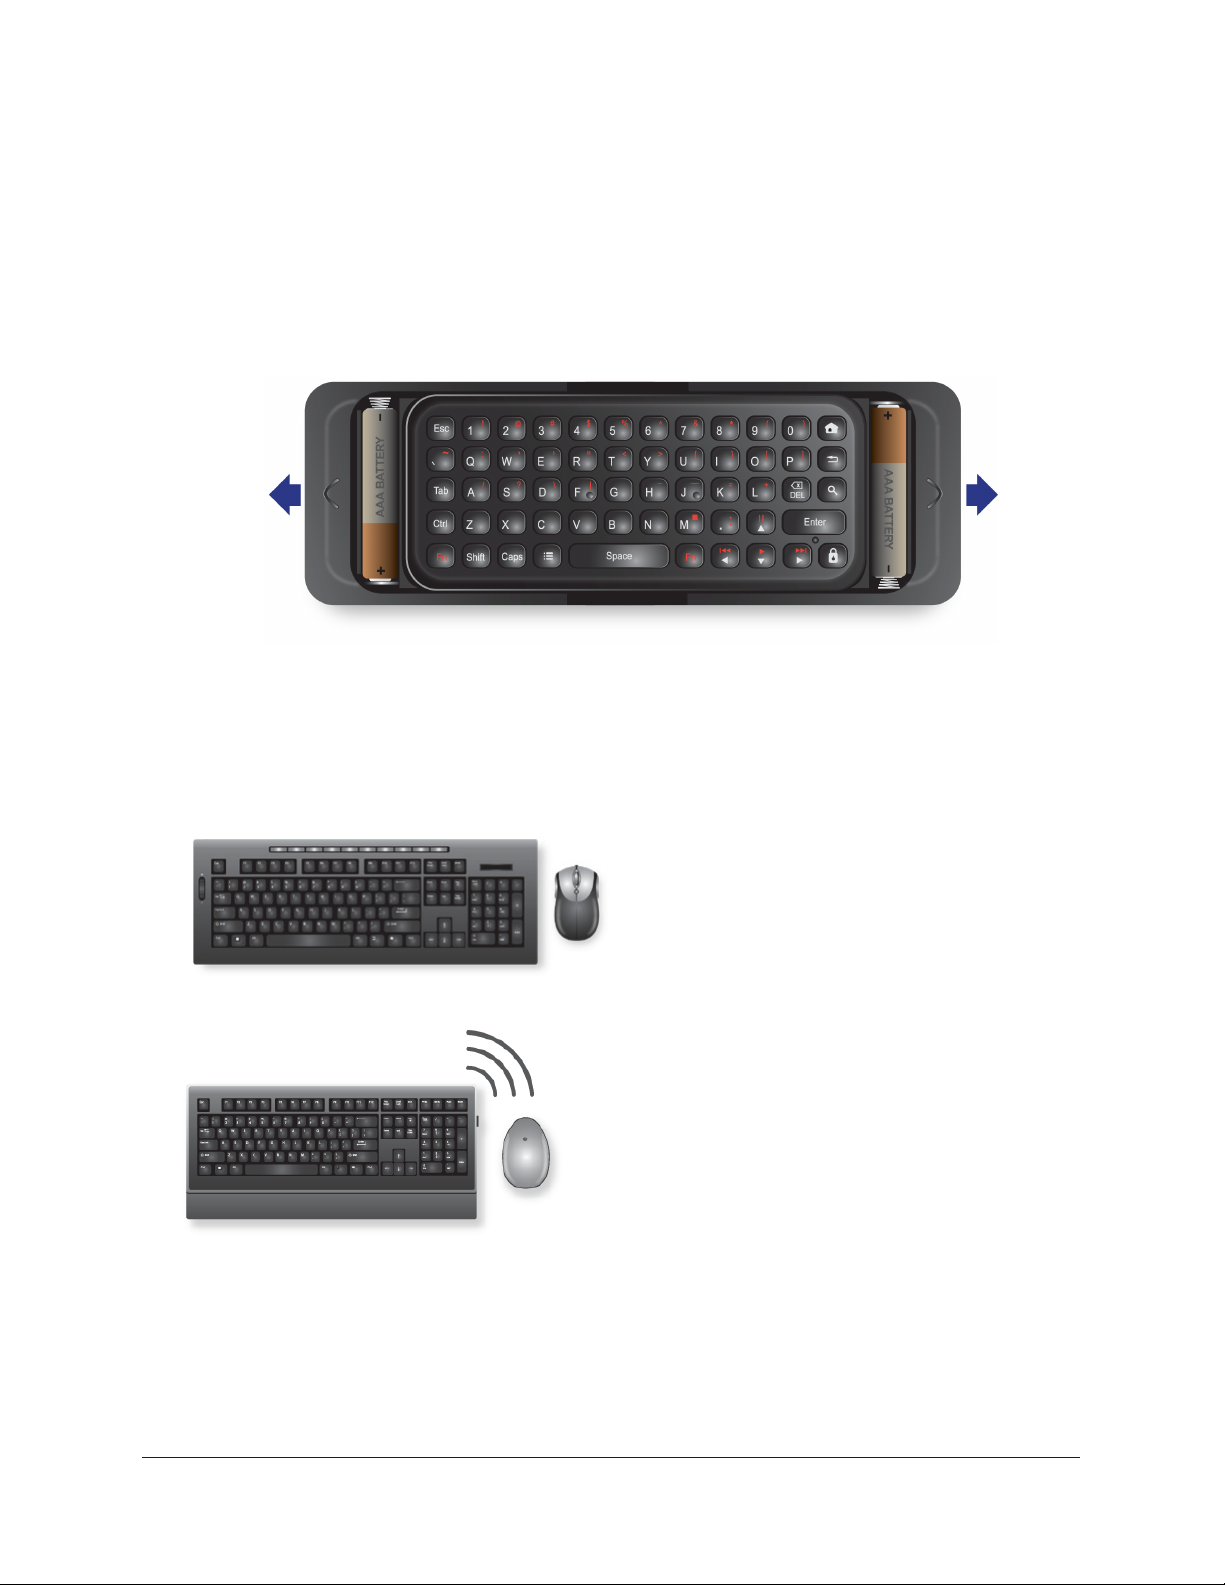
Tip: The NeoTV is compatible
with most keyboards and
mouse devices, which can
connect to the USB port on
the NeoTV.
Package Contents
The following items are in the package.
Getting to Know Your NeoTV Prime
Getting Started
6
Page 7
NeoTV Prime with Google TV GTV100
The Reset button is
on the bottom.
Set top box
Set top box
NeoTV Prime
NeoTV Prime
TV display
TV display
Audio system
Audio system
Restore Factory Settings
You can restore the NeoTV Prime to its factory settings.
To restore factory settings:
Press and hold the Reset bu
tton for at least 9 seconds.
Connect the NeoTV Prime to Your Audio System
The following figures show how you can connect the NeoTV Prime to your audio system.
Getting Started
7
Page 8
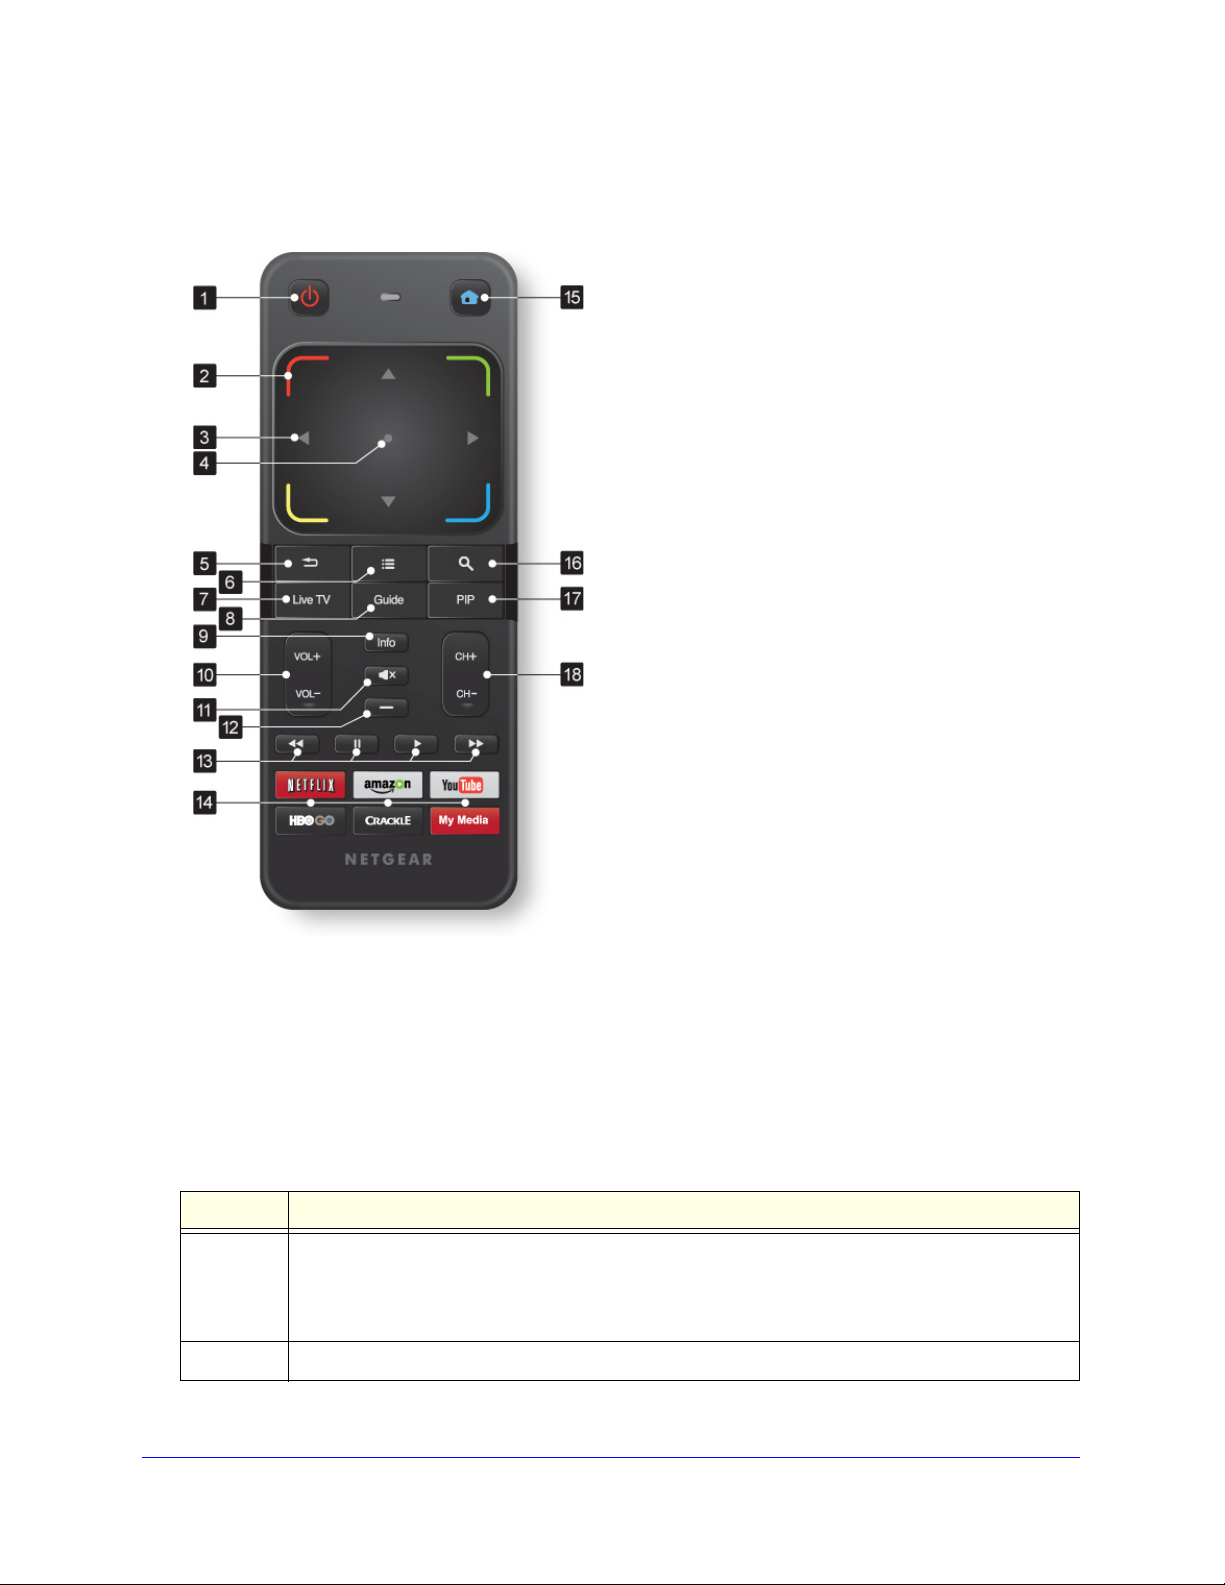
Remote Control
NeoTV Prime with Google TV GTV100
1 Power. Turn the NeoTV on or off (standby).
2 Color Shortcut. De
as directed on the TV screen.
rows. Use to navigate onscreen menus.
3 Ar
pending on the application, use
4 OK. Press
ck. Navigate to the previous step.
5 Ba
6 Menu. Op
7 Li
ve TV. Watch TV from your cable or satellite box.
ide. Displays the guide for live TV.
8 Gu
fo. Display additional information.
9 In
10 Vo
lu me. Increase or decrease the loudness of the
sound (audio).
11 Mute. Mute th
12 Da
sh. Mouse-click for touchpad.
13 Playb
forward or rewind.
14 Quick S
Amazon Instant Video, HBOGo, and so on.
15 Home. Return to t
16 Se
arch. Open the search bar.
17 PIP. Op
18 Channe
to select the highlighted option.
en the menu for more selections.
e audio.
ack controls. Press to play, pause, fast
tart buttons. Shortcuts to launch Netflix,
he Home screen.
ens a small picture in the picture window.
l. Change the channel.
You can use the NeoTV remote to navigate the screen selections by directional pad or by
using a cursor with the touchpad navigation as shown in the following sections.
LED Indicator
The LED indicator on the front of the remote control lights when the remote control is pairing
or connecting with the NeoTV and when the battery is low.
LED color Description
Blue • Slo
Orange Low battery. Please change the battery.
w blinking (1 blink per second). The remote control is in the process of pairing with the
NeoTV.
ast blinking (2 blinks per second). The remote control is paired with the NeoTV and is in
• F
the process of connecting to the NeoTV.
Getting Started
8
Page 9
NeoTV Prime with Google TV GTV100
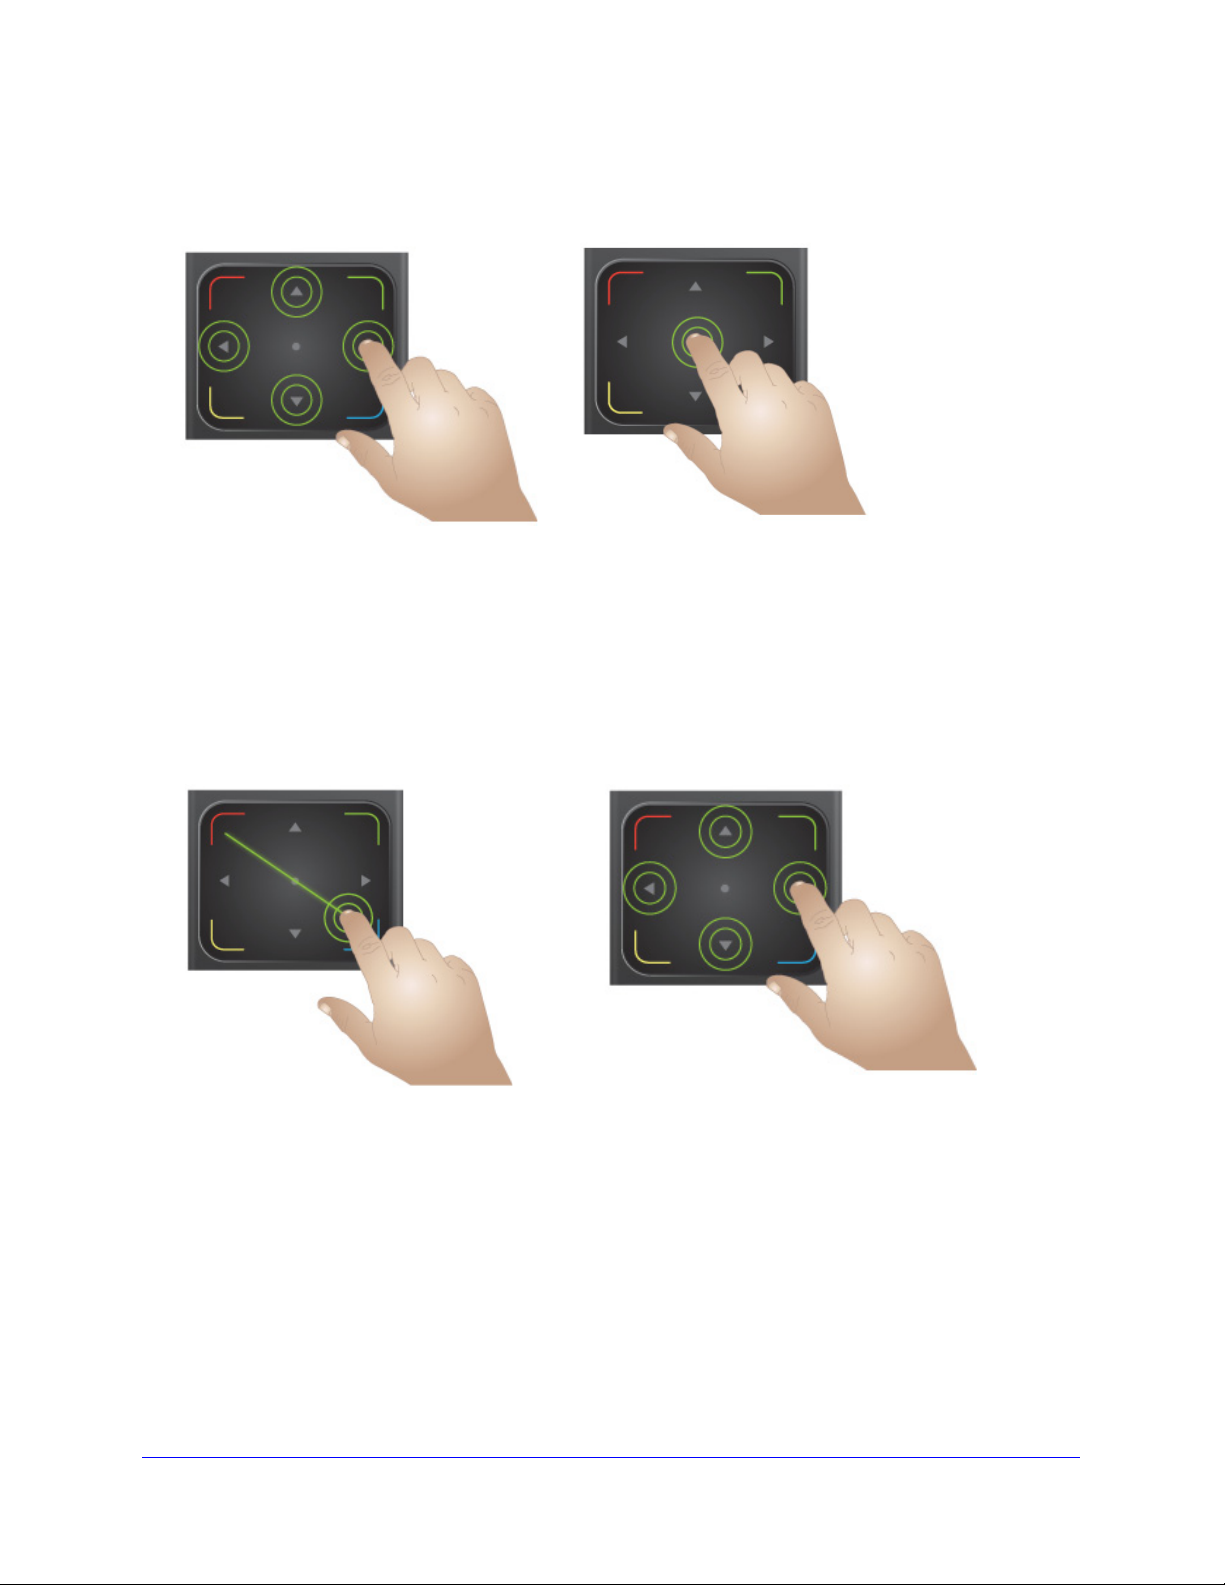
Navigate with the arrow buttons. Press the dot in the center to select
the highlighted option.
To activate the touchpad, swipe your
finger across the touchpad.
To exit the touchpad, tap any of the
four directional buttons.
Directional Navigation
You can use the remote directional buttons.
Activate and Exit the Touchpad
To activate the touchpad, swipe your finger across the touchpad until you see the cursor on
the screen. To exit the touchpad and return to directional navigation, tap any of the four
directional buttons.
Getting Started
9
Page 10
NeoTV Prime with Google TV GTV100
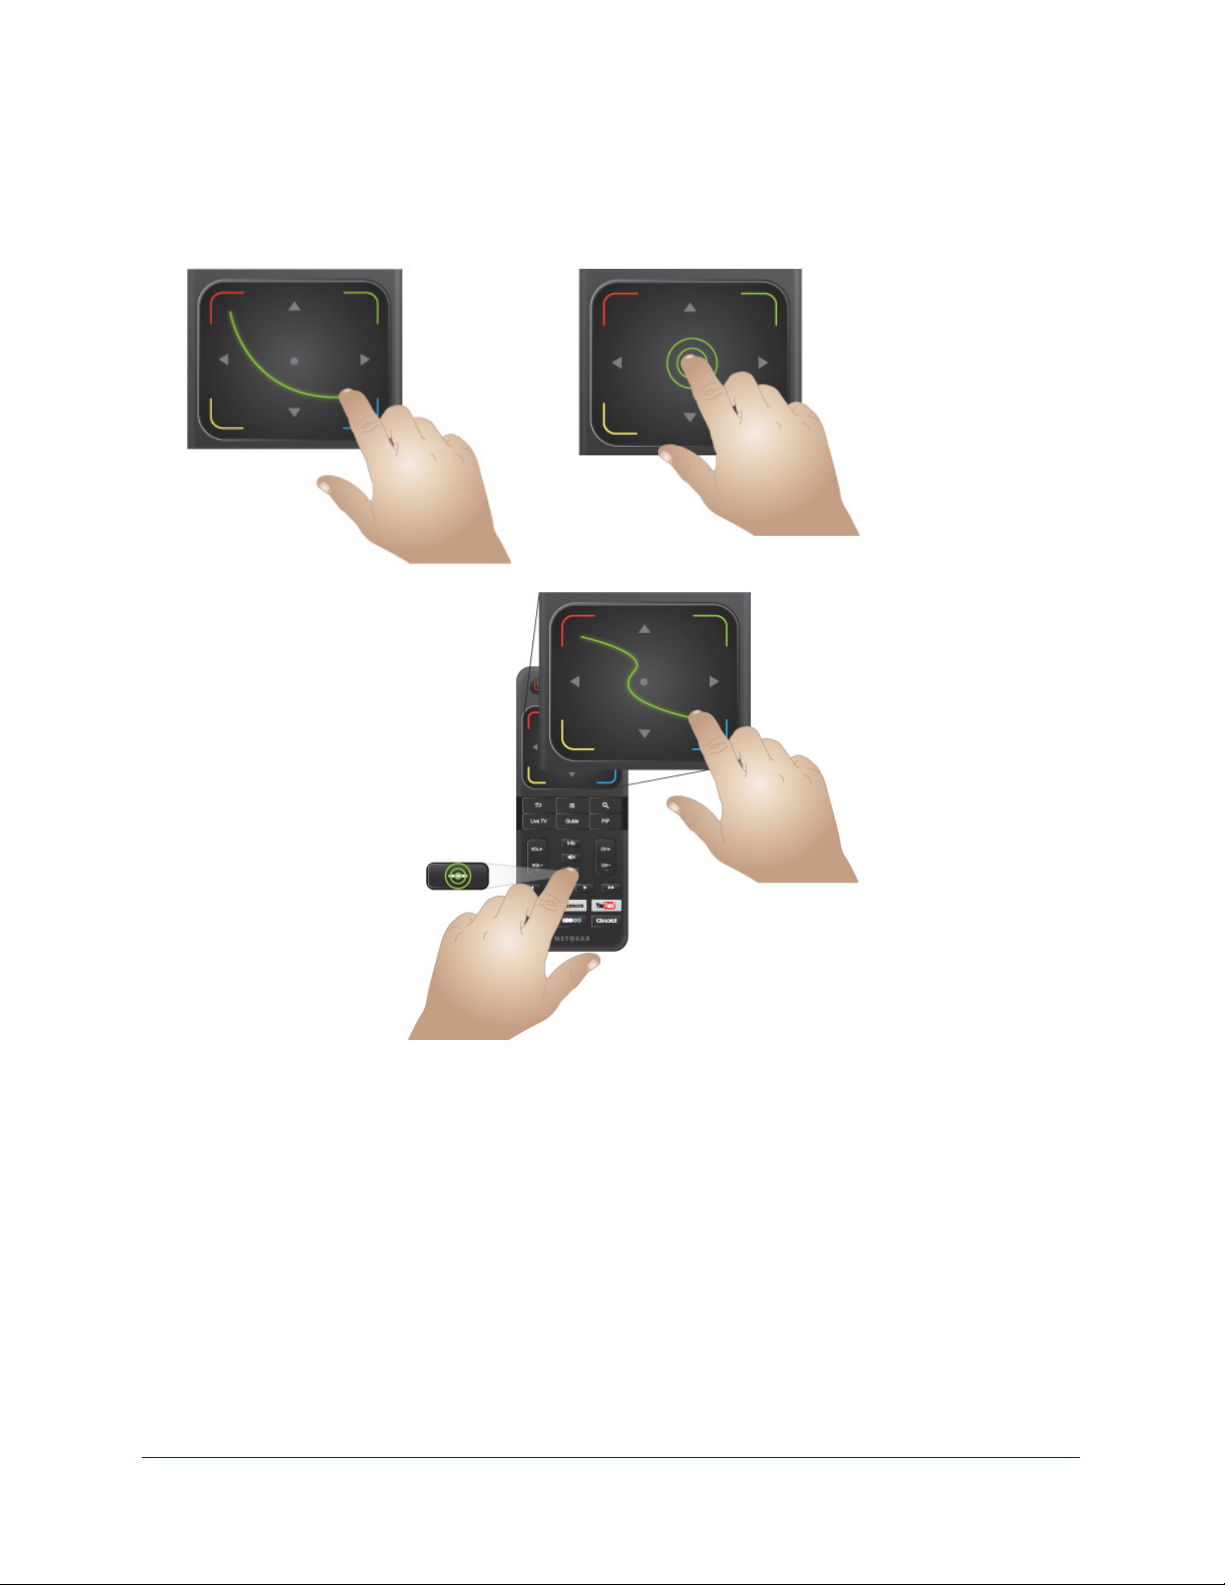
To drag and drop, swipe
across the touchpad while
you press and hold the
Dash button.
To select the
highlighted option, tap
or double-tap the
touchpad, or press the
dot in the center.
To move t h e
cursor, slide your
finger.
Touchpad Navigation
When the touchpad is active, you can use it like a mouse to control the cursor on the screen.
Getting Started
10
Page 11

NeoTV Prime with Google TV GTV100
Remote Control Keyboard
1. Lock. To lock the keyboard, press the Lock key. When the keyboard is locked, the LED lights and the keyboard is
disabled. Press the Lock key again to unlock the keyboard.
2. Fn (Function). To enter one of the orange characters on the keyboard, press and hold the Fn key while pressing a
key with an orange character. For example, you can press Fn + 2 to enter the @ symbol.
Remote Control Pairing
The first time you turn on the NeoTV player, the Bluetooth remote control automatically pairs
with your NeoTV. Automatic Bluetooth pairing also occurs when you restore the factory
settings (see Restore Factory Settings on p
automatically, you can use the following steps to pair the NeoTV and remote manually.
To perform Bluetooth pairing:
1 Pre
ss the Reset button on the bottom of the NeoTV player for 1 to 5 seconds.
A pairing notification displays on the TV screen.
2 Press and hold
both the Rewind and Fast forward buttons for 5 seconds.
age 7). In case the remote control does not pair
The blue LED blinks slowly (once per second) while the remote control is pairing with the
Neo TV.
Getting Started
11
Page 12
NeoTV Prime with Google TV GTV100
Slide the battery compartment doors open.
USB keyboard or mouse
Bluetooth keyboard or mouse
A successful pairing message displays on the TV and the LED on the remote stops
blinking.
Replace the Remote Control Batteries
The remote control uses two AAA batteries that came in the package. To replace them, open
the remote control battery compartment doors as shown.
When the battery is low, the LED indicator on the front of the remote lights and turns orange.
Accessories
The NeoTV Prime is compatible with the following accessories.
Getting Started
12
Page 13

2. Onscreen Guided Setup
This chapter covers the following topics:
• Guided Setup
• Tips and Troubleshooting
2
13
Page 14

NeoTV Prime with Google TV GTV100
Guided Setup
When you install the NeoTV Prime, the Onscreen Guided Setup automatically displays. If you
want to change the settings after installation, use the Settings menu. See Chapter 4,
Settings.
To use guided set up for your NeoTV Prime:
Select Next to advance through the setup.
1
2 Maximize your screen area.
On the remote control, press up, down, left, and right, selecting Next as you ad
screen in each direction..
3 Connect to the Internet.
just the
Onscreen Guided Setup
14
Page 15

NeoTV Prime with Google TV GTV100
Select the type of network connection that you want to use, Ethernet or wireless, and
follow the onscreen instructions to connect.
4 Sign in to your Google account, or create a new one.
Onscreen Guided Setup
15
Page 16

NeoTV Prime with Google TV GTV100
5 If you want to send information to Google, select the check box.
6 Enter the ZIP code for your location so that you receive accurate programming information.
7 Set up your TV
service.
If you have a satellite or other TV service, follow the onscreen instructions to specify
which equipment you use. For more information about configuring your TV or set top box,
see Video Input on p
age 30.
Onscreen Guided Setup
16
Page 17

NeoTV Prime with Google TV GTV100
Tips and Troubleshooting
Tips for Wireless Network Connections
1 Place your player within range of your wireless network.
For best wireless reception, avoid enclosing your player in a cabinet.
2 Make sure that the NeoTV Wi-Fi is turned on and connected to your wireless network. See
Wi-Fi Internet Connection on page 27.
If you do not receive a strong signal during the onscreen setup, rotate your player or
move it closer to your router.
I See the Picture but I Do Not Hear Any Sound
1 Make sure that your NeoTV and your TV are not muted.
2 Increase the volume on the TV.
3 Increase the volume on the cable or satellite box if you are using one.
My Remote Is Not Working
1 Check to see if the batteries are installed correctly.
2 Replace the batteries.
3 Try pairing the remote by following steps in Remote Control Pairing on page 11.
How to Exit Netflix or LiveTV
Press and hold the Back button on the remote control. An exit screen displays and asks you
to confirm that you want to exit.
How to Deactivate Netflix
1 Select the All Apps icon on the Home screen.
2 Use the directional navigation buttons on the remote control to select the Netflix app.
3 Press and hold the OK button on the remote control. An application information screen
displays.
4 Select Clear Data on the application information screen.
Onscreen Guided Setup
17
Page 18

3. Play Media and More
This chapter covers the following topics:
• Home Screen
• All Apps
• Search
• Watch TV & Movies
• Favorites
• Surf the Web with Chrome
• View Photos
• Play Music
3
18
Page 19

NeoTV Prime with Google TV GTV100
All Apps
TV & Movies YouTube Chrome
Search
Live TV Netflix Play Store
Home Screen
Pressing the Home button on the remote control displays the Home screen, which has
application and menu icons at the bottom.
In this example, the All Apps icon is selected.
All Apps
Display icons for all apps and NeoTV Prime menu selections.
The apps displayed on your screen might differ from the ones shown here. The following
icons are commonly shown:
• Clock. V
• Download
• Photos. V
• Pla
• Pl
ay Music. Visit the Play Store music selections.
iew the time and set an alarm.
s. Access files that you downloaded from the Internet.
iew photos. See View Photos on page 23.
y Movies & TV. Visit the Play Store movies and TV selections.
Play Media and More
19
Page 20

NeoTV Prime with Google TV GTV100
• Play Store. Visit the Play Store.
• Search. Sea
rch for content, as described in the following section.
• Settings.
• SlingPlaye
• S
potlight. Visit Google TV optimized websites.
uneIn. Visit Tunein.
• T
• Y
ouTube. Visit YouTube.
Display the Settings menu. See Chapter 4, Settings.
r. Access your SlingPlayer.
Search
You can search for content that is both local and on the Internet.
To search for content:
1 Select the
ype the word that you want to search for.
2 T
Search icon.
3 Press Enter.
You can specify the scope of the search in the Settings menu. For instance, you can search
for on
ly Internet content, or you can exclude Internet content from your search. See Filter
Your Searches and Manage Shortcuts on
Play Media and More
page 30.
20
Page 21

NeoTV Prime with Google TV GTV100
PrimeTime
On TV
Shows
Movies
Watch TV & Movies
You can watch TV and movies from a variety of sources. Use the selection icons to narrow
down your choices.
Selection Icons
When you select TV & Movies, icons display in the upper left corner of the TV screen.
You can use these icons to narrow down the kind of movies and TV that you want to watch.
You can also use the two fields at the top of the screen to specify the price and quality.
• Price. Free & Paid, or F
• Qualit
To use PrimeTime:
Select the
y. HD & SD, HD, or SD.
PrimeTime icon.
ree.
You are prompted to specify your viewing preferences. If you do so, then your responses
are used to create recommendations.
To watch live TV:
1 Use the IR blaster cable to con
nect the NeoTV Prime to your set top box as described
in the installation guide that came in the package.
2 Select th
3 Browse and select the show that you wa
To watch a show:
1 Select
2 Browse and select the show that you wa
To watch movies:
1 Select
e On TV icon.
nt to watch.
the Shows icon.
nt to watch.
the Movies icon.
2 Browse and select the movie that
you want to watch.
Play Media and More
21
Page 22

NeoTV Prime with Google TV GTV100
Favorites
You can add favorites for PrimeTime, On TV, Shows, and Movies.
To add a favorite:
1 Select the show or mo
2 Press the Menu butt
The menu that displays depends on your selection.
Show, Movie Queue, or Favorite Channel.
3 Select Save (or Save to queue) to save your favorite.
To remove a favorite:
1 Select the item th
2 Press the Menu butt
3 Select Rem
ove.
vie that you like.
on on the remote control.
at is displayed in Favorites.
on on the remote control.
For instance, you might see Favorite
Play Media and More
22
Page 23

NeoTV Prime with Google TV GTV100
Surf the Web with Chrome
You can use Chrome from your TV.
To use Chrome:
1 Select
2 Use Chrome to browse the Internet.
the Chrome icon.
View Photos
You can add your photo accounts at Picassa or Flicker, or switch to local media.
To view photos:
1 Select All App
2 Select th
e Photos icon.
s.
3 Select the source for your photos.
You can add your accounts or switch to local media.
Play Media and More
23
Page 24

NeoTV Prime with Google TV GTV100
Play Music
Use this icon to access Google Music at the Play Store. You can access your account or play
music.
You can use the categories on the left to narrow your search.
Note: To access local media, use My Media.
Play Media and More
24
Page 25

4. Settings
This chapter covers the following topics:
• Settings Screen
• Network Settings
• Standby
• Picture & Sound
• Filter Your Searches and Manage Shortcuts
• Video Input
• TV
• Applications
• Date, Time, & Location
• Language & Input
• Accounts & Sync
4
• About
25
Page 26

NeoTV Prime with Google TV GTV100
Settings Screen
View and change the NeoTV Prime settings.
To display the settings screen:
Select H
The following settings are available on the Settings menu:
Network.
Standby. Customize
HDMI CEC.
control HDMI-connected devices.
Netflix.
Video input. Select a
source. See Video Input on p
ome > All Apps > Settings.
Configure your network settings. See Network Settings on page 27.
the standby settings. See Standby on page 29.
Enable or disable CEC. CEC allows the GTV100 remote control to automatically
Check the ESN.
n available source, add a device manually, or use a generic video
age 30.
TV. If yo
connection. See TV on p
Picture & sound. Adju
Search. Adjust
page 30.
Applications. Manage
Language & input devices. Custo
Prime. See Language & Input on p
Accounts & sync.
NeoTV Prime. See Accounts & Sync on p
About. V
page 34.
u have a satellite box or cable TV device, specify the settings for the IR blaster cable
age 32.
st the picture and sound settings. See Picture & Sound on page 29.
the search results. See Filter Your Searches and Manage Shortcuts on
your applications. See Applications on page 33.
mize the language and input settings for the NeoTV
age 34.
Enter your accounts and synchronize your online information with the
iew information about your NeoTV Prime and update the firmware. See About on
age 34.
Settings
26
Page 27

NeoTV Prime with Google TV GTV100
Network Settings
When you install the NeoTV Prime, the onscreen setup prompts you to specify your network
settings. You can use the Network screen to view these settings and to change them.
The following settings are available on the Network menu:
Ethernet. Shows
Wi-Fi. Shows if the Neo
Bluetooth settings. Customize
Status. Displa
P address
• I
• Eth
• W
• L
• I
ernet MAC address
i-Fi MAC address
ocal network
nternet
if the NeoTV Prime is connected to a network with an Ethernet cable.
TV Prime has joined a network with a Wi-Fi connection.
the Bluetooth settings. See Bluetooth Settings on page 28.
ys the following:
Wi-Fi Internet Connection
You can connect the NeoTV Prime to your Wi-Fi home network to access the Internet.
To set up a Wi-Fi network connection.
1 On the
Settings menu, select Network > Wi-Fi.
2 Select Turn on Wi-Fi.
The check box is now selected to show that Wi-Fi is turned on, and the Wi-Fi networks in
your a
3 If you do not see your Wi-F
name.
4 Select your
The IP setting is displayed. By default, the NeoTV Prime is se
dynamically, which works for most networks.
5 If you
and type the IP address.
rea are displayed.
i network, select Add Wi-Fi network, and type in the network
Wi-Fi network and type the password.
t to get IP settings
want to use a static IP address (this is an advanced feature), select Static IP address
Settings
27
Page 28

NeoTV Prime with Google TV GTV100
6 Select Connect.
The NeoTV Prime joins the Wi-Fi network.
Ethernet Internet Connection
You can use an Ethernet cable to connect the NeoTV Prime to your home network to access
the Internet.
To set up a wired network connection:
1 Use an
Ethernet port on your router.
2 O
The screen displays the status as Connected.
Ethernet cable to connect the Ethernet port on the NeoTV Prime to a LAN
n the NeoTV Prime Settings menu, select Network > Ethernet.
Bluetooth Settings
By default, the NeoTV Prime is set up to communicate with Bluetooth devices.
To view or change the Bluetooth settings:
Select Settings
> Network Settings > Bluetooth Settings.
The following settings are available:
Bluetooth.
Device name. By defa
Turn Bluetooth on and off. It is on by default.
ult this shows the NeoTV Prime model, which is GTV100.
Settings
28
Page 29

NeoTV Prime with Google TV GTV100
Discoverable. Allow the GTV100 to be discovered by other Bluetooth devices for pairing.
Discoverable timeout. Specify the length of time the GTV100 is discoverable.
Show received files. View a list of received files.
Paired devices. This should show Netgear NeoTV Prime Connected.
Find nearby devices. Locate nearby Bluetooth devices.
Standby
Standby mode conserves energy while the NeoTV Prime is not in use. Specify the standby
settings to prioritize wake time or energy conservation.
Suspend. Allows the NeoTV Prime to wake faster, but conserves less energy than passive
mode.
Passive. Conserves more energy than suspend mode, but takes longer to wake the NeoTV
Prime.
The NeoTV Prime enters standby mode when you press the Power button.To turn on and
wake the NeoTV Prime, press the Power button again.
Picture & Sound
Specify the picture and sound settings.
Resolution. Specify the resolution. The options are Auto, 720p, 1080i, and 1080p.
Picture size. Adjust the NeoTV Prime display to fit the dimensions of your TV screen.
Screen saver. Customize the screen saver.
Screen off timeout. Specify how long the screen continues displays when no media is being
played and no one is using the remote control.
Sound. Adjust the volume.
Adjust the Picture Display
You can adjust the NeoTV Prime picture display to match the size of your TV.
To adjust the picture display:
1 On the Picture & Sound menu, select Picture size.
2 When prompted, return the picture size to its factory settings.
3 Follow the onscreen instructions to use the up, down, left, and right arrow buttons on the
remote control to set the dimensions of the display.
Settings
29
Page 30

NeoTV Prime with Google TV GTV100
Filter Your Searches and Manage Shortcuts
Control the search results and display.
Searchable items. Select or remove the items in
Apps, aVia, Browser, and Play Movies & TV.
Clear shortcuts. Remo
ve the shortcuts from the display.
cluded in search results, such as Web,
Video Input
You can select the source that the NeoTV Prime uses to receive video input.
The NeoTV Prime detects and displays a list of available sou
display in the list or if you use a satellite box or cable TV device, you must add your device
manually.
To add a video input device manually:
1 On
the Video input menu, select Add device manually.
rces. If your device does not
The NeoTV Prime attempts to display the video signal from your device. You might need
to use your device’s remote control to display video.
2 Wh
en you see your device’s video signal playing on the TV screen, select Next.
Settings
30
Page 31

NeoTV Prime with Google TV GTV100
3 Select your device type from the list.
• If you use a satellite box or cable TV device, you must enter information about your
device, including the brand (manufacturer) and model number. (The Command set
field should be filled in automatically after you enter the brand and model number.)
• I
f the model of your device does not appear in the list of selections after you enter the
brand, update the firmware on the NeoTV Prime. See Update Firmware on p
When the firmware update is complete, repeat Steps 1-3. Firmware updates
sometimes a
dd more devices and model numbers to the list of selections.
age 34.
4 Select Next and follo
w the onscreen instructions to complete video input setup.
Settings
31
Page 32

NeoTV Prime with Google TV GTV100
IR blaster cable
Position this end of the
cable near your TV.
TV
You can use the IR blaster and GTV100 remote control to adjust your TV settings such as the
channel and volume.
To set up the GTV100 remote control for your TV:
1 Connect the IR blaster cable to the NeoT
V Prime and position the IR blaster near your
TV.
2 On the TV menu, select TV setting.
• If you use a satellite box or cable TV device, enter the brand (manufacturer) and
model number of your device. (The Command set field should be filled in
automatically after you enter the brand and model number.)
3 Select Next and follow the onscreen instructions to complete the setup process.
• If the model
of your device does not appear in the list of selections after you enter the
brand, try entering your service provider in the top field instead.
Settings
32
Page 33

NeoTV Prime with Google TV GTV100
WARNING:
Applications
Control which applications you can access through the NeoTV Prime.
The Applications settings are for advanced users. Changing these
settings can prevent your NeoTV Prime from working correctly or
reduce performance.
Unknown sources. Allow applications from sources other than Google.
Manage applications. Manage the applications that you use.
Running services. View which services are currently running.
Development. Work with applications that you are developing.
For more information, visit https://developers.google.com/tv/.
Date, Time, & Location
Specify how you want to control the date and time, and specify your location so that TV
information is accurate.
Date & Time
Automatic. If you select this option, the date and time are automatically updated from the
Internet based on your location. NETGEAR highly recommends that you select this option
since certain services require the correct date and time.
Set date. Manually set the date.
Set time. Manually set the time.
Select the time zone. Manually select the time zone.
Use 24-hour format. Specify a 24-hour time display. For instance, display 13:00 instead of
1:00 pm.
Select date format. Select the date format that you prefer.
Location
Select country. Select the country where you are located.
Set location. Specify the local ZIP code.
Settings
33
Page 34

NeoTV Prime with Google TV GTV100
Language & Input
Customize the language and input settings for the NeoTV Prime.
Manage IP remotes. If you use an IP remote, you can specify the setup here.
Chrome to TV. Download your Chrome settings to the TV so that they are available when
you use NeoTV Prime.
Pointer speed. Adjust the speed of the cursor on the TV display.
Select language. Select the language for the TV display.
Current keyboard. Specify details about a keyboard currently connected to the USB port on
the side of the NeoTV Prime.
Accounts & Sync
Enter your accounts and synchronize your online information with the NeoTV Prime.
Background data. Selected by default.
Auto-sync. Automatically synchronize your online accounts with the NeoTV Prime. This is
selected by default.
Manage accounts. Enter your accounts for services such as Netflix so that you can access
them through the NeoTV Prime.
Privacy. Specify settings for reporting, reset the data, or enable video history.
Storage. View available storage on a USB storage device connected to the USB port of the
NeoTV Prime, or unnmount the device.
Accessibility. Set up accessibility features such as TalkBack and allow accessibility scripts
to be downloaded.
About
View information about your NeoTV Prime, including the firmware version, build number, and
serial number. You can also update the NeoTV Prime firmware and access the system
tutorial.
Update Firmware
To update the NeoTV Prime firmware:
Select System updates to check whether a firmware update is available. If a firmware
update is available, follow the onscreen instructions to install the new firmware on your
NeoTV Prime.
Settings
34
Page 35

A. Technical Specifications
The following table includes technical specifications for the NeoTV Prime.
Feature
Data and routing protocol TCP/IP, DHCP
Power adapter 12V, 1.5A
Dimensions 113 mm x 113 mm x 24 mm
Weight 138 g
Interface LAN: 10BASE-T or 100BASE-Tx, RJ-45
WLAN: 802.11.n/g/b
A
35
Page 36

B. Notification of Compliance
NeoTV Prime with Google TV GTV100
Regulatory Compliance Information
Note: This section includes user requirements for operating this product in accordance with National laws for usage
of radio spectrum and operation of radio devices. Failure of the end-user to comply with the applicable
requirements may result in unlawful operation and adverse action against the end-user by the applicable National
regulatory authority.
Note: This product's firmware limits operation to only the channels allowed in a particular Region or Country.
Therefore, all options described in this user's guide may not be available in your version of the product.
FCC Requirements for Operation in the United States
FCC Information to User
This product does not contain any user serviceable components and is to be used with approved antennas only.
Any product changes or modifications will invalidate all applicable regulatory certifications and approvals.
FCC Guidelines for Human Exposure
This equipment complies with FCC radiation exposure limits set forth for an uncontrolled environment. This
equipment should be installed and operated with minimum distance of 20 cm between the radiator and your body.
This transmitter must not be co-located or operating in conjunction with any other antenna or transmitter.
FCC Declaration of Conformity
We, NETGEAR, Inc., 350 East Plumeria Drive, San Jose, CA 95134, declare under our sole responsibility that the
NeoTV Prime with Google TV GTV100 complies with Part 15 Subpart B of FCC CFR47 Rules. Operation is subject
to the following two conditions:
• This device may not cause harmful interference, and
• This device must accept any interference received, including interference that may cause undesired operation.
B
FCC Radio Frequency Interference Warnings & Instructions
This equipment has been tested and found to comply with the limits for a Class B digital device, pursuant to Part 15
of the FCC Rules. These limits are designed to provide reasonable protection against harmful interference in a
residential installation. This equipment uses and can radiate radio frequency energy and, if not installed and used in
accordance with the instructions, may cause harmful interference to radio communications. However, there is no
guarantee that interference will not occur in a particular installation. If this equipment does cause harmful
interference to radio or television reception, which can be determined by turning the equipment off and on, the user
is encouraged to try to correct the interference by one or more of the following methods:
• Reorient or relocate the receiving antenna.
• Increase the separation between the equipment and the receiver.
• Connect the equipment into an electrical outlet on a circuit different from that which the radio receiver is
connected.
• Consult the dealer or an experienced radio/TV technician for help.
36
Page 37

NeoTV Prime with Google TV GTV100
FCC Caution
• Any changes or modifications not expressly approved by the party responsible for compliance could void the
user’s authority to operate this equipment.
• This device complies with Part 15 of the FCC Rules. Operation is subject to the following two conditions: (1) This
device may not cause harmful interference, and (2) this device must accept any interference received, including
interference that may cause undesired operation.
• For product available in the USA market, only channel 1~11 can be operated. Selection of other channels is not
possible.
• This device and its antenna(s) must not be co-located or operation in conjunction with any other antenna or
transmitter.
IMPORTANT NOTE: Radiation Exposure Statement:
This equipment complies with IC radiation exposure limits set forth for an uncontrolled environment. This equipment
should be installed and operated with minimum distance 20cm between the radiator & your body.
Caution:
Ce dispositif est conforme à la norme CNR-210 d'Industrie Canada applicable aux appareils radio exempts de licence.
Son fonctionnement est sujet aux deux conditions suivantes: (1) le dispositif ne doit pas produire de brouillage
préjudiciable, et (2) ce dispositif doit accepter tout brouillage reçu, y compris un brouillage susceptible de provoquer un
fonctionnement indésirable.
NOTE IMPORTANTE: Déclaration d'exposition aux radiations:
Cet équipement est conforme aux limites d'exposition aux rayonnements IC établies pour un environnement non
contrôlé. Cet équipement doit être installé et utilisé avec un minimum de 20 cm de distance entre la source de
rayonnement et votre corps.
Interference Reduction Table
The table below shows the recommended minimum distance between NETGEAR equipment and household
appliances to reduce interference (in feet and meters).
Household Appliance Recommended Minimum Distance
(in feet and meters)
Microwave ovens 30 feet / 9 meters
Baby Monitor - Analog 20 feet / 6 meters
Baby Monitor - Digital 40 feet / 12 meters
Cordless phone - Analog 20 feet / 6 meters
Cordless phone - Digital 30 feet / 9 meters
Bluetooth devices 20 feet / 6 meters
ZigBee 20 feet / 6 meters
Notification of Compliance
37
 Loading...