

Page 1
Page 2
Start Here
Instructions in this guide are for users of Windows® who are installing the
Model FA510 Network Card. For instructions on installing and verifying the
Windows network driver, refer to “Install the Windows Network Driver” on the
other side of this guide.
These four easy steps provide information for installing your Model FA510
Network Card:
1. Verify Package Contents
2. Install the Network Card
3. Connect the Network Cables
4. Install the Network Driver
As a last step, be sure to fill out and send in your warranty card.
To register online, direct your Web browser to the Web page at:
http://www.gearguy.com/pub/registration
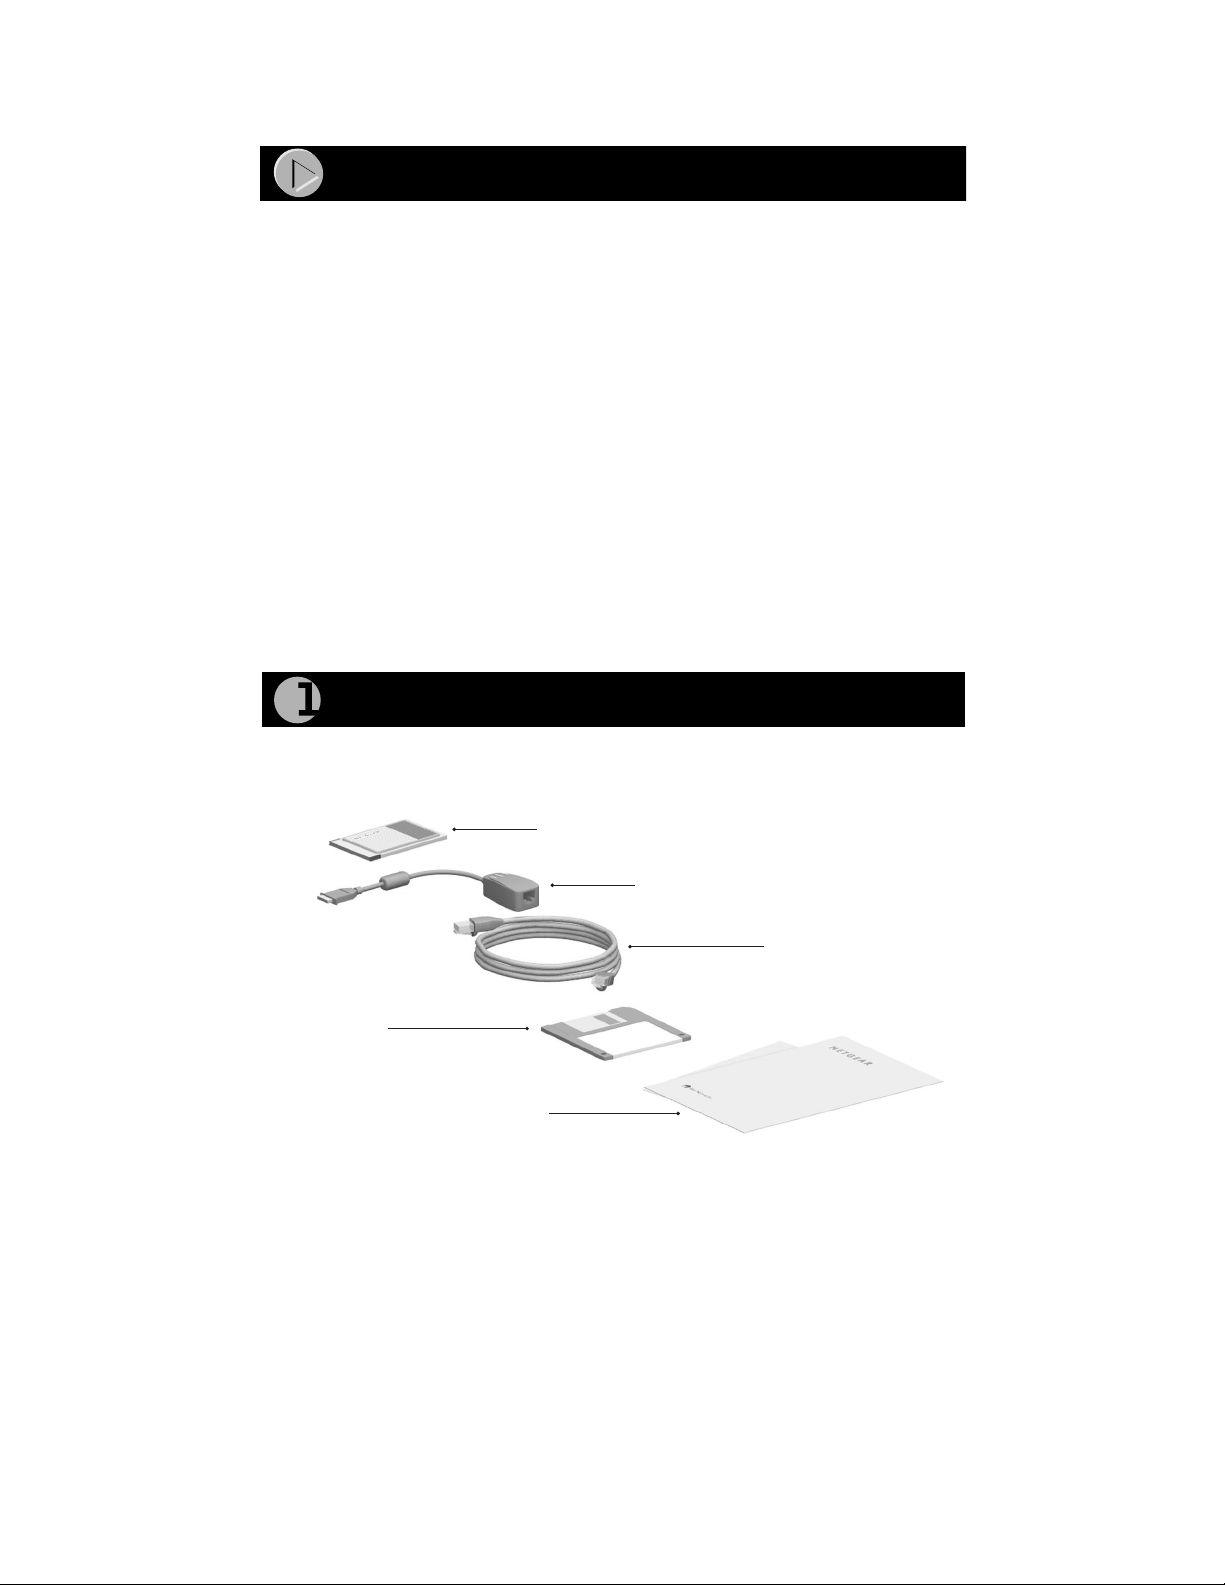
Verify Package Contents
Unpack the contents of the package and make sure that you have everything.
Model FA510
Network Card
RJ-45 adapter cable
Category 5 10/100 Mbps
UTP cable (provided with
Model FA510C Network
Card)
Drivers and
Diagnostics Disk
Installation
guide, Warranty &
Owner Registration Card,
and Support Information Card
Verify PC Requirements
The instructions given in this guide are for using the NETGEAR
FA510 Network Card in a PC that has a Microsoft
®
Windows operating system.
9034FA
™
Model
Model FA510 Network Card Installation Guide
Page 3
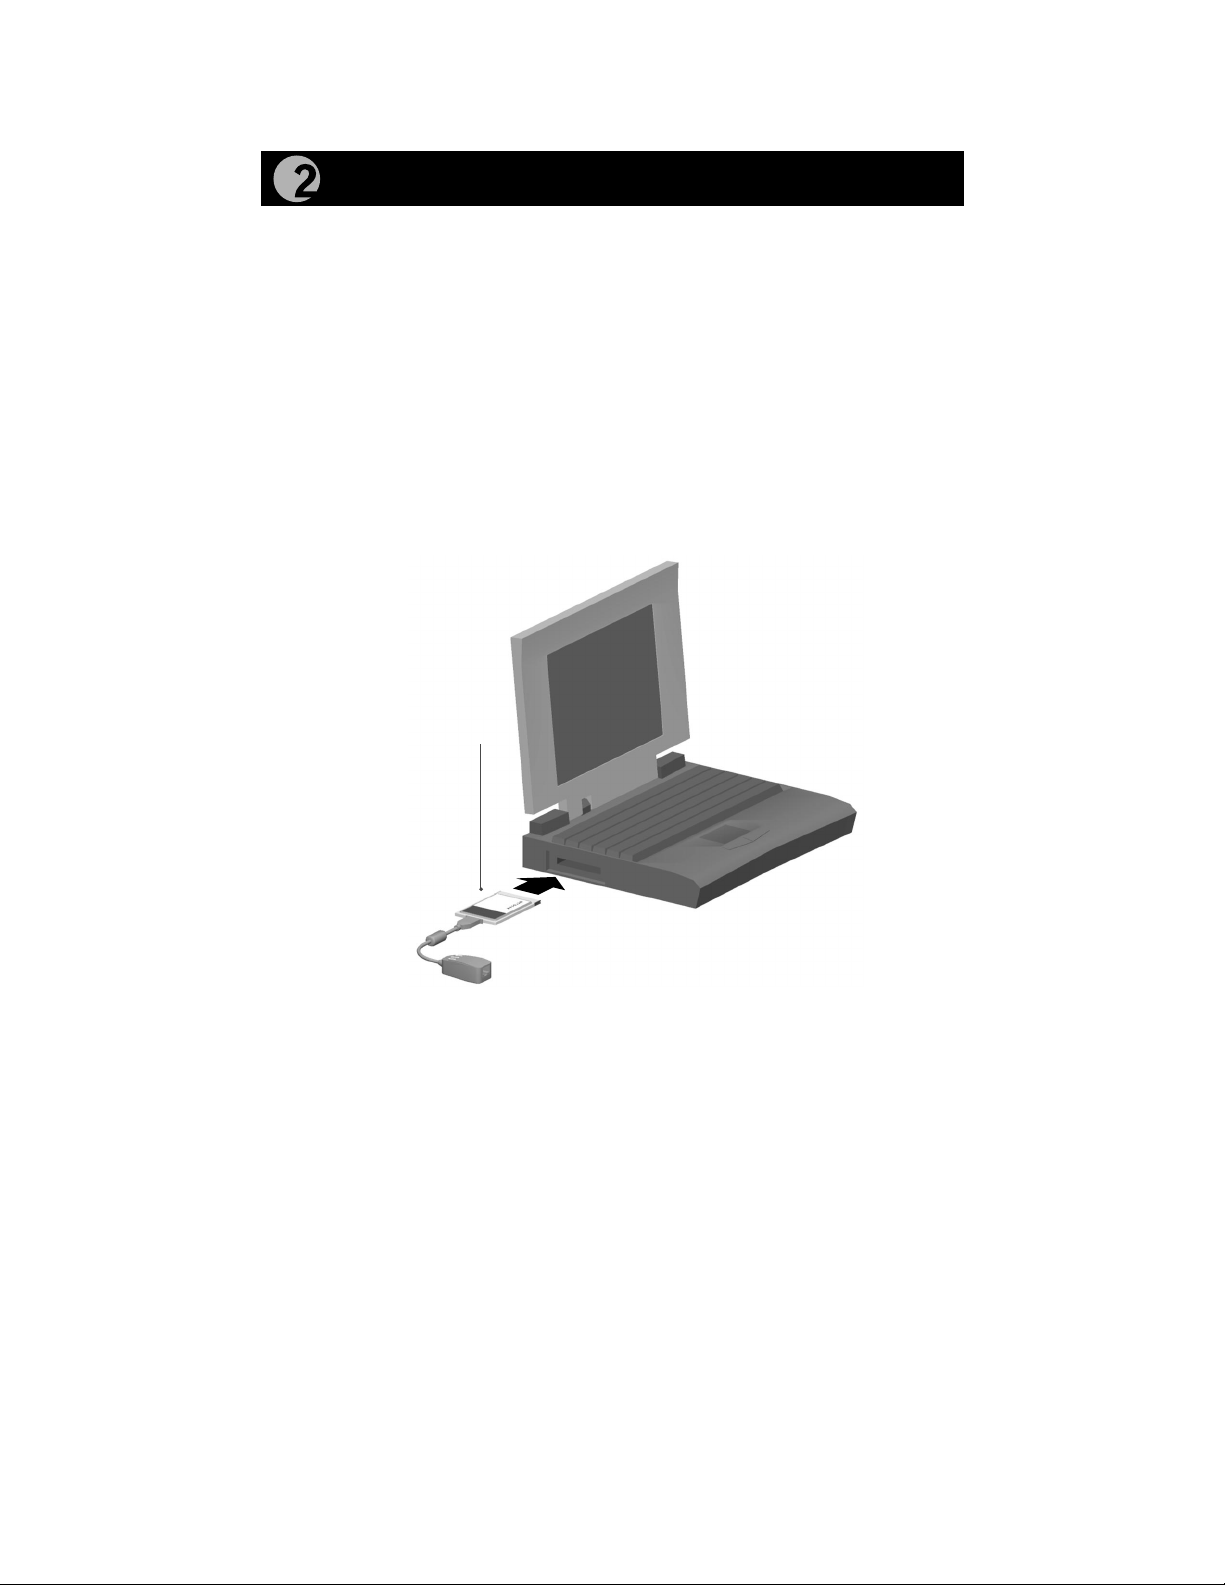
Install the Network Card
The Model FA510 Network Card is hot swappable, which means it can be
inserted in to a PC that is either turned off or powered on.
1. Insert the Model FA510 Network Card into the CardBus slot as
illustrate d in the figure.
Some PCs have two CardBus slots. The Model FA510 Network Card can
be inserted into either slot.
2. Insert the RJ-45 adapter cable into the connector on the edge of the
network card.
3. Insert the Category 5 10/100 Mbps UTP cable into the RJ-45 adapter
cable.
Model FA510
Network Card and
RJ-45 adapter
cable
9025FA
4. If you ha ve chos en to inst all th e card with the po wer tur ned of f, tur n on
the power to the PC.
Model FA510 Network Card Installation Guide
Page 4
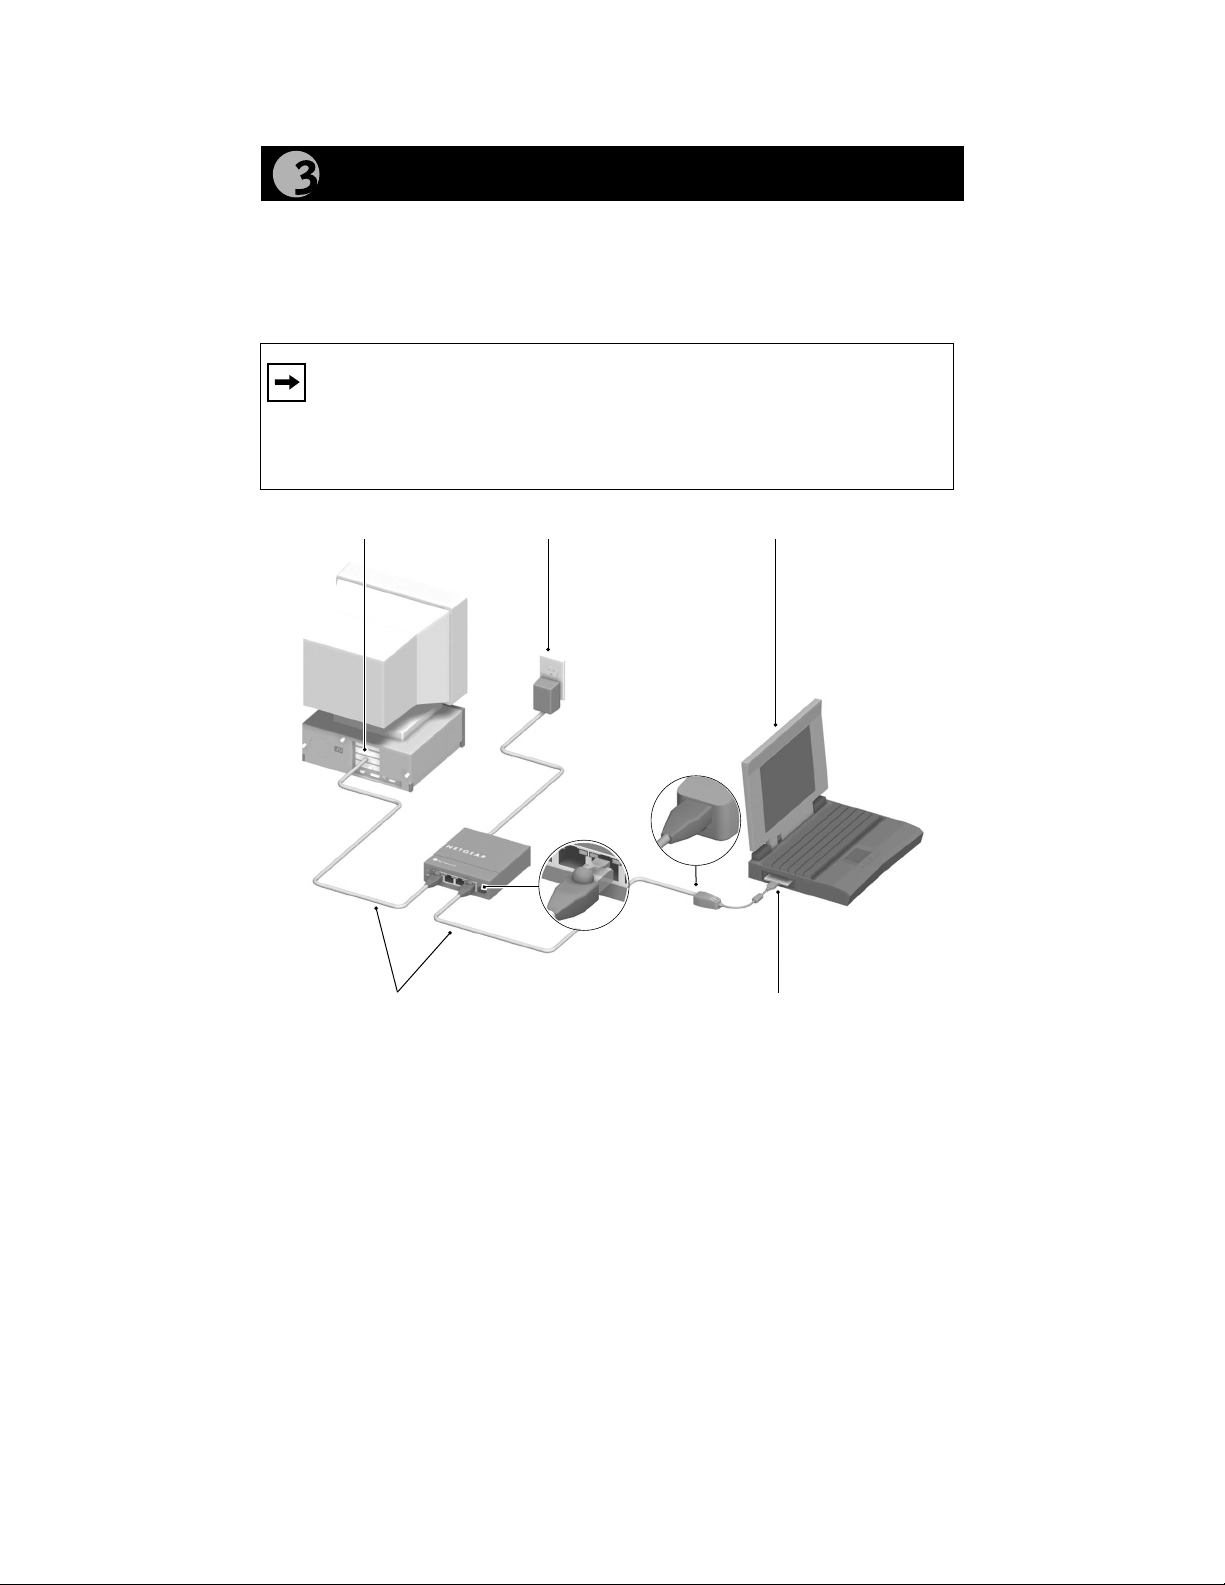
Connect the Network Cables
1. Using a UTP cable, connect any port on the hub to the port on the RJ45 adapter cable.
2. To connect the network cables, follow the illustration below.
Note: One of the ports on NETGEAR hubs is switchable between
Normal (MDI-X) and Uplink (MDI) with a Normal/Uplink push
button. If you are using this switchable port on a NETGEAR hub to
connect to a PC or the network card, make sure the Normal/Uplink
push button is set to Normal.
PC with network
card installed
Hub
Category 5 10/100 Mbps UTP cables*
*Use the cable provided or any Category 5 UTP cable.
Maximum length = 100 meters (300 feet)
Power adapter
RJ-45
connectors
Notebook PC
Model FA510
Network Card with
RJ-45 adapter cable
9026FA
Model FA510 Network Card Installation Guide
Page 5
Install the Network Driver
This guide provides you with instructions for installing the Windows Network
Driver. The steps given in these instructions are for users of Windows 98.
If you are using Windo ws 95, read t hese i nstruc tions thoro ughl y for a n overv iew
of the steps that are necessary for the installation of the software driver. If you
are installing network cards and drivers on more than one computer operating
with Windows 95, you might find that all versions of Windows 95 do not
respond with the same screens, and windows might open in a different order.
Note: You must install the network card (instructions on other side of
this guide) before installing the network driver.
Before you proceed with the installation steps, decide on a name for your
network and for each PC (each name must be only one word). You also need to
have the Windows CD-ROM and t he FA510 Driv ers and Diagnostics Disk re ady
to use in the installation process.
Note: If th e “Insert Di sk” windo w opens and th e “Please ins ert the di sk
labeled Windows 98...” message appears at any time during the
following process, insert the Windows 98 CD-ROM in Drive D (the
CD-ROM drive) and click on “OK.” Then follow the next step in the
instructions.
1. Turn on the power to the computer and start Windows 98.
The new hardware is found.
2.
Add New Hardware Wizard
This wizard searches for new drivers for:
PCI Ethernet Controller
A device driver is a software program that
makes a hardware device work.
< Back Next> Cancel
Click on “Next.”
Model FA510 Network Card Installation Guide
Page 6

3.
Add New Hardware Wizard
What do you want windows to do?
Search for the best driver for your device
(Recommended).
Display a list of all the drivers in a specific
location, so you can select the driver you want.
< Back Next> Cancel
Select “Search for the best driver.....”
Click on “Next.”
4.
Add New Hardware Wizard
Windows will search for new drivers in its driver database
on your harddrive, and in any of the following
selected locations. Click Next to start the
search.
Floppy disk drives
CD-ROM drive
Microsoft Windows Update
Specify a Location:
A:\
Browse...
< Back Next> Cancel
Select “Floppy disk drives.”
Select “Specify a Location” and make sure the location is “A:\.”
Insert the Drivers and Diagnostics Disk into the floppy drive, and click
on “Next.”
Model FA510 Network Card Installation Guide
Page 7

5.
Add New Hardware Wizard
Windows has found an updated driver for this
device, and also some other drivers that
should work with this device.
What do you want to install?
The updated driver (Recommended)
NETGEAR FA510 Fast Ethernet CardBus Card
One of the other drivers
< Back Next> Cancel
View List...
Click on “The updated driver....” and click on “Next.”
6.
Add New Hardware Wizard
Windows driver file search for the device:
NETGEAR FA510 Fast Ethernet CardBus Card
Windows is now ready to install the best driver
for this device. Click Back to select a different
driver, or click Next to continue.
Location of driver:
A:\NETFA510.INF
< Back Next> Cancel
Make sure that the location and the correct driver are displayed (for
example, A:\NETFA510.INF).
Click on “Next.”
7.
Insert Disk
Please insert the the disk labeled
'NETGEAR FA510 Fast Ethernet CardBus Card Drivers Disk'
and click OK.
OK
Click on “OK.”
Model FA510 Network Card Installation Guide
Page 8

8.
Copying Files...
The file 'NDIS2DOS\FA510.DOS' on
NETGEAR FA510 Fast Ethernet CardBus Card
Drivers disk cannot be found.
Insert NETGEAR FA510 Fast Ethernet CardBus
Card Drivers disk in the selected drive,
and click OK.
Copy files from:
A:\
OK
Cancel
Skip File
Details...
Browse...
Insert the Drivers and Diagnostics Disk and click on “OK.”
Note: If you copied the Windows 98 CD-ROM to your hard drive, the
next two screens may not appear.
9.
Insert Disk
Please insert the the disk labeled
'Windows 98 CD-ROM' and then click OK.
OK
Click on “OK.”
10.
Copying Files...
The file 'choosusr.dll' on Windows 98
CD-ROM could not be found.
Insert Windows 98 CD-ROM into the drive
selected below, and click OK.
Copy files from:
D:\WIN98
OK
Cancel
Skip File
Details...
Browse...
Insert the Windows 98 CD-ROM.
Make sure the d esignated path to the Windows 98 CD-ROM is
displayed in the “copy files from” prompt line (for example,
D:\WIN98).
Click on “OK.”
Model FA510 Network Card Installation Guide
Page 9

11.
Update Device Driver Wizard
Click on “Finish.”
12.
Network
To finish setting up your new hardware, you must restart
?
your computer.
Do you want to resatrt your computer now?
NETGEAR FA510 Fast Ethernet CardBus Card
Windows has finished installing the software that your new
hardware device requires.
< Back Finish Cancel
Yes No
Be sure to remove the Drivers and Diagnostics Disk and the Windows
98 CD-ROM before restarting your computer.
Click on “Yes” to restart your computer.
13. Proceed to “Verify Installation.”
Model FA510 Network Card Installation Guide
Page 10

Verify Installation
1.
Double-click on “My Computer” on your desktop, double-click on
“Control Panel,” and then double-click on “System.”
2.
Click on “Device Manager.”
Model FA510 Network Card Installation Guide
Page 11

3.
Double-click on “Network adapters” and then double-click on
“NETGEAR FA510 Fast Ethernet CardBus Card.”
If there is a problem with the installation of the driver, an exclamation
point appears next to “NETGEAR FA510 Fast Ethernet PCI Adapter.”
If there is an exclamation point, double-click on “NETGEAR FA510
Fast Ethernet PCI Adapter.”
Model FA510 Network Card Installation Guide
Page 12

4.
The “Properties” window opens, and a message regarding the status of
the device is displayed in the window.
Continue to click on “OK” or cli ck on the “X” in the right- hand c orner
to close any open windows and return to the Windows 98 desktop.
Model FA510 Network Card Installation Guide
Page 13

Technical Specifications
Model FA510 Network Card
Standards Compatibility
Interface Options
IRQ Options
Power Consumption 2.0 W
Physical Specifications
Dimensions 3.37 by 2.13 in.
Weight 0.14 lb (63 g)
Environmental
Specifications
Operating temperature 0° to 45° C
Operating humidity 10% to 90% noncondensing
Agency Compliance
NetWare tested and approved
Microsoft
compatible
IEEE 802.3i, 10BASE-T Ethernet
IEEE 802.3u 100BASE-TX Fast Ether net
RJ-45 connector
Assigned by Plug-and-Play system
8.56 by 5.40 cm
CE mark, commercial
FCC, Part 15, Class B
EN 55 022 (CISPR 22), Class B
Canada ICES-003, Class B
VCCI Class B
®
Windows 95, Windows 98, Windows NT®
Model FA510 Network Card Installation Guide
Page 14

© 1999 by NETGEAR, Inc. All rights reserved.
Declaration of Conformity
NETGEAR Model FA510 Network Card
FOR HOME OR OFFICE USE
Tested to comply
with FCC Standards
Trademarks
Bay Networks is a registered trademark o f Bay Net works, Inc. NETGE AR is a trade mark of Bay
Networks, Inc.
Microsoft, Windows, and Windows NT are registered trademarks of Microsoft Corporation.
All other trademarks and registered trademarks are the property of their respective owners.
Statement of Conditions
In the interest of improving internal design, operational function, and/or reliability, NETGEAR
reserves the right to make changes to the products described in this document without notice.
NETGEAR does not assume any liability that may occur due to the use or application of the
product(s) or circuit layout(s) described herein.
Certificate of the Manufacturer/Importer
It is hereby certified that the Model FA510 Network Card has been suppressed in accordance with
the conditions set out in the BM PT-AmtsblVfg 243/1991 and Vfg 4 6/199 2 . Th e op era ti on of som e
equipment (for example, test transmitters) in accordance wi th the regulations may, however, be
subject to certain restrictions. Please refer to the notes in the operating instructions.
Federal Office for Telecommunications Approvals has been notified of the placing of this
equipment on the market and has been granted the right to test t he series for compl iance with t he
regulations.
Federal Communications Commission (FCC) Compliance Notice:
Radio Frequency Notice
This device complies with part 15 of the FCC Rules. Operation
is subject to the following two conditions:
1. This device may not cause harmful interfer e nce.
2. This device must accept any interference received, including
interference tha t may cause undesired operat ion.
Note: This equipment has been tested and found to comply with
the limits for a Class B digital device, pursuant to part 15 of the FCC Rules. These limits are
designed to provide re a son a ble p rot ectio n a gain s t ha rmful interference in a residen tial in sta lla tion.
This equipment generates, uses, and can radiate radio frequency energy and, if not installed and
used in accordance with the instructions, may cause harmful interference to radio
communications. However, there is no guarantee that interference will not occur in a particular
installation. If this equipment does cause harmful interference to radio or television reception,
which can be de termined by turning the equipment off and on, the user is encouraged to try to
correct the interference by one or more of the following measures: (1) Reorient or relocate the
receiving antenna, (2) Increase the separation between the equipment and receiver, (3) Connect the
equipment into an outlet on a circuit different from that to which the receiver is connected, (4 )
Consult the dealer or an experienced radio /TV technician for help.
EN 55 022 Statement
This is to certify that the Model FA510 Network Card is shielded against the generation of radio
interference in accordance with the application of Council Directive 89/336/EEC, Article 4a.
Conformity is decl ared by the application of E N 55 022 Class B (CISPR 22).
Compliance is dependent upon the use of shielded data cables.
Canadian Department of Communications Radio Interference Regulations
This digital apparatus (Model FA510 Network Card) does not exceed the Class B limits for radionoise emissions from digital apparatus as set out in the Radio Interference Regulations of the
Canadian Department of Communications.
Règlement sur le brouillage radioélectrique du ministère des Communications
Cet appareil numérique (Model FA510 Network Card) respecte les limites de bruits
radioélectriques visant les appareils numér iques de classe B prescr ites dans le Règlement su r le
brouillage radioélectrique du ministère des Communications du Canada.
Model FA510 Network Card Installation Guide
Page 15

NETGEAR, Inc.
A Bay Networks Company
4401 Great America Parkway
Santa Clara, CA 95054 USA
Phone: 888-NETGEAR
http://WWW.NETGEARinc.com
*m-FA510NA-0*
Model FA510 Network Card Installation Guide
 Loading...