

Page 1
ReadyNAS OS 6.0
Software Manual
Models:
104
312
314
350 East Plumeria Drive
San Jose, CA 95134
USA
March 2013
202-11207-01
Page 2

ReadyNAS OS 6.0
Support
Thank you for selecting NETGEAR products.
After installing your device, locate the serial number on the label of your product and use it to register your
product at https://my.netgear.com. You must register your product be
support. NETGEAR recommends registering your product
and web support, visit http://support.netgear.com.
Phone (US & Canada only): 1-888-NETGEAR.
Phone (Other Countries): Check the list of phone numbers at
http://support.netgear.com/general/con
tact/default.aspx.
through the NETGEAR website. For product updates
fore you can use NETGEAR telephone
Trademarks
NETGEAR, the NETGEAR logo, and Connect with Innovation are trademarks and/or registered trademarks of
NETGEAR, Inc. and/or its subsidiaries in the United States and/or other countries. Information is subject to
change without notice. © NETGEAR, Inc. All rights reserved.
Revision History
Publication Part Number Publish Date Comments
202-11207-01 March 2013 First publication
2
Page 3

Table of Contents
Chapter 1 Getting Started
Quick-start Guide . . . . . . . . . . . . . . . . . . . . . . . . . . . . . . . . . . . . . . . . . . . . .8
Additional Documentation. . . . . . . . . . . . . . . . . . . . . . . . . . . . . . . . . . . . . . .8
Supported Operating Systems . . . . . . . . . . . . . . . . . . . . . . . . . . . . . . . . . . .9
Supported Browsers. . . . . . . . . . . . . . . . . . . . . . . . . . . . . . . . . . . . . . . . . . .9
Diskless Systems . . . . . . . . . . . . . . . . . . . . . . . . . . . . . . . . . . . . . . . . . . . . .9
ReadyCLOUD. . . . . . . . . . . . . . . . . . . . . . . . . . . . . . . . . . . . . . . . . . . . . . .10
Setup Modes . . . . . . . . . . . . . . . . . . . . . . . . . . . . . . . . . . . . . . . . . . . . .10
Discover and Set Up Your ReadyNAS . . . . . . . . . . . . . . . . . . . . . . . . . .10
Local Setup Wizard . . . . . . . . . . . . . . . . . . . . . . . . . . . . . . . . . . . . . . . . . .12
The Local Admin Page. . . . . . . . . . . . . . . . . . . . . . . . . . . . . . . . . . . . . . . .13
Access the Local Admin Page . . . . . . . . . . . . . . . . . . . . . . . . . . . . . . . .14
Register Your System. . . . . . . . . . . . . . . . . . . . . . . . . . . . . . . . . . . . . . . . .15
Chapter 2 Volume Configuration
Basic Volume and RAID Concepts. . . . . . . . . . . . . . . . . . . . . . . . . . . . . . .17
Volumes . . . . . . . . . . . . . . . . . . . . . . . . . . . . . . . . . . . . . . . . . . . . . . . . .17
RAID. . . . . . . . . . . . . . . . . . . . . . . . . . . . . . . . . . . . . . . . . . . . . . . . . . . .17
Manage Volumes . . . . . . . . . . . . . . . . . . . . . . . . . . . . . . . . . . . . . . . . . . . .21
Change RAID Mode . . . . . . . . . . . . . . . . . . . . . . . . . . . . . . . . . . . . . . . .21
View the Status of a Volume . . . . . . . . . . . . . . . . . . . . . . . . . . . . . . . . .23
Configure the Checksum Function . . . . . . . . . . . . . . . . . . . . . . . . . . . . .26
Create a Volume. . . . . . . . . . . . . . . . . . . . . . . . . . . . . . . . . . . . . . . . . . .27
Delete a Volume. . . . . . . . . . . . . . . . . . . . . . . . . . . . . . . . . . . . . . . . . . .28
Expand Storage Capacity. . . . . . . . . . . . . . . . . . . . . . . . . . . . . . . . . . . .29
Add Protection to a Volume . . . . . . . . . . . . . . . . . . . . . . . . . . . . . . . . . .32
Maintain Volumes. . . . . . . . . . . . . . . . . . . . . . . . . . . . . . . . . . . . . . . . . .34
Chapter 3 Shared Folders
Basic Shared Folder Concepts. . . . . . . . . . . . . . . . . . . . . . . . . . . . . . . . . .37
Data Organization. . . . . . . . . . . . . . . . . . . . . . . . . . . . . . . . . . . . . . . . . .37
Shared Folder Defaults. . . . . . . . . . . . . . . . . . . . . . . . . . . . . . . . . . . . . .38
File and Folder Names. . . . . . . . . . . . . . . . . . . . . . . . . . . . . . . . . . . . . .38
File-Sharing Protocols . . . . . . . . . . . . . . . . . . . . . . . . . . . . . . . . . . . . . .38
Access Rights. . . . . . . . . . . . . . . . . . . . . . . . . . . . . . . . . . . . . . . . . . . . .40
Manage Shared Folders. . . . . . . . . . . . . . . . . . . . . . . . . . . . . . . . . . . . . . .41
Create a Shared Folder . . . . . . . . . . . . . . . . . . . . . . . . . . . . . . . . . . . . .41
View and Change the Properties of a Shared Folder. . . . . . . . . . . . . . .43
Delete a Shared Folder . . . . . . . . . . . . . . . . . . . . . . . . . . . . . . . . . . . . .45
3
Page 4

ReadyNAS OS 6.0
Browse a Shared Folder. . . . . . . . . . . . . . . . . . . . . . . . . . . . . . . . . . . . .46
Shared Folder Access Rights. . . . . . . . . . . . . . . . . . . . . . . . . . . . . . . . . . .47
Access Rights to Shared Folders . . . . . . . . . . . . . . . . . . . . . . . . . . . . . .47
User and Group Authentication . . . . . . . . . . . . . . . . . . . . . . . . . . . . . . .47
Set Network Access Rights to Shared Folders. . . . . . . . . . . . . . . . . . . .48
Set Up Access Rights to Files and Folders . . . . . . . . . . . . . . . . . . . . . .57
Access Shared Folders from a Network-Attached Device . . . . . . . . . . . . .60
Use a Web Browser . . . . . . . . . . . . . . . . . . . . . . . . . . . . . . . . . . . . . . . .60
Use a Windows Device. . . . . . . . . . . . . . . . . . . . . . . . . . . . . . . . . . . . . .61
Use a Mac OS X Device. . . . . . . . . . . . . . . . . . . . . . . . . . . . . . . . . . . . .62
Use a Linux or Unix Device . . . . . . . . . . . . . . . . . . . . . . . . . . . . . . . . . .64
Use FTP and FTPS . . . . . . . . . . . . . . . . . . . . . . . . . . . . . . . . . . . . . . . .65
Use Rsync . . . . . . . . . . . . . . . . . . . . . . . . . . . . . . . . . . . . . . . . . . . . . . .65
Access Shared Folders Using Cloud Services. . . . . . . . . . . . . . . . . . . . . .66
Use ReadyCLOUD . . . . . . . . . . . . . . . . . . . . . . . . . . . . . . . . . . . . . . . . .66
Use ReadyNAS Remote. . . . . . . . . . . . . . . . . . . . . . . . . . . . . . . . . . . . .69
Use ReadyDROP . . . . . . . . . . . . . . . . . . . . . . . . . . . . . . . . . . . . . . . . . .74
Chapter 4 LUNs
Basic LUN Concepts . . . . . . . . . . . . . . . . . . . . . . . . . . . . . . . . . . . . . . . . .82
Thin vs. Thick Provisioning. . . . . . . . . . . . . . . . . . . . . . . . . . . . . . . . . . .82
Default LUN Settings . . . . . . . . . . . . . . . . . . . . . . . . . . . . . . . . . . . . . . .83
Manage LUNs. . . . . . . . . . . . . . . . . . . . . . . . . . . . . . . . . . . . . . . . . . . . . . .84
Create a LUN . . . . . . . . . . . . . . . . . . . . . . . . . . . . . . . . . . . . . . . . . . . . .84
View and Change the Properties of a LUN. . . . . . . . . . . . . . . . . . . . . . .86
Delete a LUN . . . . . . . . . . . . . . . . . . . . . . . . . . . . . . . . . . . . . . . . . . . . .90
LUN Groups and Access Rights. . . . . . . . . . . . . . . . . . . . . . . . . . . . . . . . .91
Create a LUN Group. . . . . . . . . . . . . . . . . . . . . . . . . . . . . . . . . . . . . . . .91
Assign a LUN to a LUN Group . . . . . . . . . . . . . . . . . . . . . . . . . . . . . . . .92
Remove a LUN from a LUN Group. . . . . . . . . . . . . . . . . . . . . . . . . . . . .94
Delete a LUN Group. . . . . . . . . . . . . . . . . . . . . . . . . . . . . . . . . . . . . . . .95
Manage Access Rights for LUN Groups. . . . . . . . . . . . . . . . . . . . . . . . .96
Access LUN Groups from an iSCSI-Attached Device . . . . . . . . . . . . . . .103
Access LUN Groups Using Microsoft iSCSI Software Initiator. . . . . . .104
Chapter 5 Snapshots
Basic Snapshot Concepts . . . . . . . . . . . . . . . . . . . . . . . . . . . . . . . . . . . .112
Rolling back . . . . . . . . . . . . . . . . . . . . . . . . . . . . . . . . . . . . . . . . . . . . .113
Clones. . . . . . . . . . . . . . . . . . . . . . . . . . . . . . . . . . . . . . . . . . . . . . . . . .113
Manually Take a Snapshot. . . . . . . . . . . . . . . . . . . . . . . . . . . . . . . . . . . .114
Browse Snapshots Using Recovery Mode. . . . . . . . . . . . . . . . . . . . . . . .115
Roll Back to a Snapshot . . . . . . . . . . . . . . . . . . . . . . . . . . . . . . . . . . . . . .118
Roll Back to a Snapshot Using Recovery Mode. . . . . . . . . . . . . . . . . .118
Roll Back to a Snapshot Using the Timeline. . . . . . . . . . . . . . . . . . . . .121
Clone Snapshots . . . . . . . . . . . . . . . . . . . . . . . . . . . . . . . . . . . . . . . . . . .125
Delete Snapshots. . . . . . . . . . . . . . . . . . . . . . . . . . . . . . . . . . . . . . . . . . .129
Delete Snapshots Using Recovery Mode. . . . . . . . . . . . . . . . . . . . . . .129
4
Page 5

ReadyNAS OS 6.0
Delete Snapshots Using the Timeline. . . . . . . . . . . . . . . . . . . . . . . . . .131
Recover Data from a Snapshot . . . . . . . . . . . . . . . . . . . . . . . . . . . . . . . .134
Recover Data from a Snapshot to a Network-Attached Device . . . . . .134
Recover Data from a Snapshot to an iSCSI-Attached Device . . . . . . .134
Chapter 6 Users and Groups
Basic User and Group Concepts . . . . . . . . . . . . . . . . . . . . . . . . . . . . . . .137
User and Group Account Limitations . . . . . . . . . . . . . . . . . . . . . . . . . . . .137
User and Group Management Modes . . . . . . . . . . . . . . . . . . . . . . . . . . .137
User Accounts . . . . . . . . . . . . . . . . . . . . . . . . . . . . . . . . . . . . . . . . . . . . .140
Create User Accounts. . . . . . . . . . . . . . . . . . . . . . . . . . . . . . . . . . . . . .140
Edit User Accounts. . . . . . . . . . . . . . . . . . . . . . . . . . . . . . . . . . . . . . . .142
Delete User Accounts. . . . . . . . . . . . . . . . . . . . . . . . . . . . . . . . . . . . . .143
Group Accounts . . . . . . . . . . . . . . . . . . . . . . . . . . . . . . . . . . . . . . . . . . . .144
Create Groups . . . . . . . . . . . . . . . . . . . . . . . . . . . . . . . . . . . . . . . . . . .144
Edit Groups. . . . . . . . . . . . . . . . . . . . . . . . . . . . . . . . . . . . . . . . . . . . . .145
Delete Groups. . . . . . . . . . . . . . . . . . . . . . . . . . . . . . . . . . . . . . . . . . . .147
Cloud Users . . . . . . . . . . . . . . . . . . . . . . . . . . . . . . . . . . . . . . . . . . . . . . .148
Add Cloud Users. . . . . . . . . . . . . . . . . . . . . . . . . . . . . . . . . . . . . . . . . .148
Remove Cloud Users . . . . . . . . . . . . . . . . . . . . . . . . . . . . . . . . . . . . . .150
Chapter 7 System Settings
Customize the Basic System Settings . . . . . . . . . . . . . . . . . . . . . . . . . . .152
Set the Clock . . . . . . . . . . . . . . . . . . . . . . . . . . . . . . . . . . . . . . . . . . . .152
Select the Language. . . . . . . . . . . . . . . . . . . . . . . . . . . . . . . . . . . . . . .153
Set the Administrator Password . . . . . . . . . . . . . . . . . . . . . . . . . . . . . .154
Configure System Alerts. . . . . . . . . . . . . . . . . . . . . . . . . . . . . . . . . . . .155
Configure the Hostname. . . . . . . . . . . . . . . . . . . . . . . . . . . . . . . . . . . .158
Enable Antivirus . . . . . . . . . . . . . . . . . . . . . . . . . . . . . . . . . . . . . . . . . .159
Configure the Network Settings . . . . . . . . . . . . . . . . . . . . . . . . . . . . . . . .160
Network Basic Concepts. . . . . . . . . . . . . . . . . . . . . . . . . . . . . . . . . . . .160
Configure the Ethernet Interfaces. . . . . . . . . . . . . . . . . . . . . . . . . . . . .162
Configure Bonded Adapters . . . . . . . . . . . . . . . . . . . . . . . . . . . . . . . . .168
Configure Global Settings for File-Sharing Protocols. . . . . . . . . . . . . . . .179
Basic File-Sharing Concepts . . . . . . . . . . . . . . . . . . . . . . . . . . . . . . . .179
Supported File-Sharing Protocols. . . . . . . . . . . . . . . . . . . . . . . . . . . . .180
Configure File-Sharing Protocols . . . . . . . . . . . . . . . . . . . . . . . . . . . . .181
Configure Media Services . . . . . . . . . . . . . . . . . . . . . . . . . . . . . . . . . . . .186
ReadyDLNA . . . . . . . . . . . . . . . . . . . . . . . . . . . . . . . . . . . . . . . . . . . . .186
iTunes Streaming Server . . . . . . . . . . . . . . . . . . . . . . . . . . . . . . . . . . .189
Manage genie Apps . . . . . . . . . . . . . . . . . . . . . . . . . . . . . . . . . . . . . . . . .191
Enable the NETGEAR genie Service . . . . . . . . . . . . . . . . . . . . . . . . . .191
Create a NETGEAR genie+ Marketplace Account. . . . . . . . . . . . . . . .192
Manage genie Apps . . . . . . . . . . . . . . . . . . . . . . . . . . . . . . . . . . . . . . .193
Discovery Services. . . . . . . . . . . . . . . . . . . . . . . . . . . . . . . . . . . . . . . . . .195
Chapter 8 System Maintenance
5
Page 6

ReadyNAS OS 6.0
System Monitoring . . . . . . . . . . . . . . . . . . . . . . . . . . . . . . . . . . . . . . . . . .197
System and Disk Health Information . . . . . . . . . . . . . . . . . . . . . . . . . .197
System Real-Time and Historical Monitoring . . . . . . . . . . . . . . . . . . . .198
System Logs. . . . . . . . . . . . . . . . . . . . . . . . . . . . . . . . . . . . . . . . . . . . .201
SNMP Monitoring . . . . . . . . . . . . . . . . . . . . . . . . . . . . . . . . . . . . . . . . .203
System Maintenance . . . . . . . . . . . . . . . . . . . . . . . . . . . . . . . . . . . . . . . .205
Update Firmware . . . . . . . . . . . . . . . . . . . . . . . . . . . . . . . . . . . . . . . . .205
Reset the Firmware to Factory Defaults. . . . . . . . . . . . . . . . . . . . . . . .208
Recover the Administrator Password . . . . . . . . . . . . . . . . . . . . . . . . . .209
Shut Down or Restart the System . . . . . . . . . . . . . . . . . . . . . . . . . . . .210
Manage Power Usage . . . . . . . . . . . . . . . . . . . . . . . . . . . . . . . . . . . . .210
Optional Uninterruptible Power Supplies . . . . . . . . . . . . . . . . . . . . . . . . .213
Uninterruptible Power Supplies . . . . . . . . . . . . . . . . . . . . . . . . . . . . . .213
UPS Configurations . . . . . . . . . . . . . . . . . . . . . . . . . . . . . . . . . . . . . . .213
Manage UPS Devices. . . . . . . . . . . . . . . . . . . . . . . . . . . . . . . . . . . . . .214
Chapter 9 Backup and Recovery
Back Up or Restore System Configuration. . . . . . . . . . . . . . . . . . . . . . . .220
Basic Data Backup and Recovery Concepts . . . . . . . . . . . . . . . . . . . . . .221
Backup Concepts . . . . . . . . . . . . . . . . . . . . . . . . . . . . . . . . . . . . . . . . .221
Recovery Concepts . . . . . . . . . . . . . . . . . . . . . . . . . . . . . . . . . . . . . . .223
Secure Cloud Backups. . . . . . . . . . . . . . . . . . . . . . . . . . . . . . . . . . . . .224
Backup Protocols . . . . . . . . . . . . . . . . . . . . . . . . . . . . . . . . . . . . . . . . .224
Backup Job Recommendations . . . . . . . . . . . . . . . . . . . . . . . . . . . . . .225
Manage Backup and Recovery Jobs . . . . . . . . . . . . . . . . . . . . . . . . . . . .226
Create a Backup Job . . . . . . . . . . . . . . . . . . . . . . . . . . . . . . . . . . . . . .226
Create a Recovery Job. . . . . . . . . . . . . . . . . . . . . . . . . . . . . . . . . . . . .227
Configure a Backup or Recovery Job. . . . . . . . . . . . . . . . . . . . . . . . . .230
Manually Start a Backup or Recovery Job . . . . . . . . . . . . . . . . . . . . . .239
Delete a Backup or Recovery Job . . . . . . . . . . . . . . . . . . . . . . . . . . . .239
View or Clear a Job Log . . . . . . . . . . . . . . . . . . . . . . . . . . . . . . . . . . . .240
Configure the Backup Button . . . . . . . . . . . . . . . . . . . . . . . . . . . . . . . . . .241
Time Machine. . . . . . . . . . . . . . . . . . . . . . . . . . . . . . . . . . . . . . . . . . . . . .243
ReadyNAS Vault. . . . . . . . . . . . . . . . . . . . . . . . . . . . . . . . . . . . . . . . . . . .245
Dropbox . . . . . . . . . . . . . . . . . . . . . . . . . . . . . . . . . . . . . . . . . . . . . . . . . .247
Appendix A Notification of Compliance
6
Page 7

1. Getting Started
This manual describes how to configure and manage your ReadyNAS® storage system.
Your ReadyNAS storage system relies on the following applications:
• ReadyCLOUD. Use this online service to discover your ReadyNAS system on your local
area network and access the local admin page.
• Local admin page. Use this browser-based interface to configure and manage your
ReadyNAS system.
This chapter includes the following sections:
• Quick-start Guide
• Additional Documentation
• Supported Operating Systems
• Supported Browsers
• Diskless Systems
• ReadyCLOUD
1
• Local Setup Wizard
• The Local Admin Page
• Register Your System
7
Page 8

ReadyNAS OS 6.0
Quick-start Guide
This manual provides conceptual information about storage systems, detailed instructions
about using your system, and NETGEAR’s recommendations about configuring, managing,
and backing up your system. NETGEAR recommends that you read this manual to make the
best use of your storage system.
To quickly start using your system, review the following sections in this order:
1. Discover and Set Up Your ReadyNAS on page 10. You use ReadyCLOUD to discover
your storage system on your network.
2. Create a Sh ared Folder on page 41. Shared folders are the way you organize the data you
store on your ReadyNAS system.
3. Create a LUN on page 84. LUNs are SAN data sets that allow data transfer and storage
over iSCSI.
4. Basic Snapshot Concepts on page 112. Protect the data that is stored in folders and LUNs
by creating snapshots.
5. Create User Accounts on page 140. You create a user account for each person that you
want to allow to access your ReadyNAS system.
6. Configure Global Settings for File-Sh aring Protocols on page 179. File-sharing protocols
enable you to transfer files across a network.
7. Basic Data Backup and Recovery Concepts on page 221. You can back up the data that
you store on your ReadyNAS system and you can use your ReadyNAS system to back up
data that you store on other devices.
Additional Documentation
NETGEAR maintains a community website that supports ReadyNAS products. Visit
http://www.netgear.com/readynas for reviews, tutorials, comparison charts, software
updates, documentation, an active user forum, and much more.
For information about your system’s hardware, see the hardware manual for your system,
which is available at
http://support.netgear.com/product/ReadyNAS-OS6.
8
Page 9

ReadyNAS OS 6.0
Supported Operating Systems
The ReadyNAS supports the following operating systems:
• Microsoft Windows 8
• Microsoft Windows 7
• Microsoft Windows Vista
• Apple Macintosh OS X
• Linux, Unix, Solaris
• Apple iOS
• Google Android
Supported Browsers
The ReadyNAS local admin page supports the following browsers:
• Microsoft Internet Explorer 9.0+
• Apple Safari 5.0+
• Google Chrome 20+
• Mozilla Firefox 14+
If you have difficulty accessing the local admin p age or if you notice unexpected behavior, try
using another browser.
Diskless Systems
If you have a diskless ReadyNAS storage system, you must first install and format at least
one disk before you can use ReadyCLOUD or the local admin page. For more information,
see the hardware manual for your system, which is available at
http://support.netgear.com/product/ReadyNAS-OS6.
You must use supported disks in your ReadyNAS system. For a list of supported disks, visit
http://www.netgear.com/readynas-hcl.
9
Page 10
ReadyNAS OS 6.0
ReadyCLOUD
ReadyCLOUD is an online service that you use to discover and set up ReadyNAS storage
systems on your network. You can also use ReadyCLOUD to access and manage data on
your ReadyNAS systems. In order to use ReadyCLOUD, your computer and storage system
must have Internet access.
Note: If your computer and storage system do not have Internet access, install
nd run the RAIDar utility instead. RAIDar is on the resource CD that came with
a
your system. It includes versions for Windows, Mac, and Linux operating
systems. It is also available at http://www.netgear.com/raidar.
Setup Modes
After you discover your device using ReadyCLOUD, you can choose between two setup
modes: ReadyCLOUD Mode and Offline Mode.
• Re
• Offl
adyCLOUD Mode. This setup mode allows you to securely access and manage your
ReadyNAS system from anywhere that has an Internet connection. If you select
ReadyCLOUD mode, you must create a free ReadyCLOUD account or sign in using your
existing ReadyCLOUD account.
ine Mode. This setup mode makes your ReadyNAS data available only inside your
home or office network. Selecting this setup mode takes you directly to the local admin
page for your ReadyNAS system.
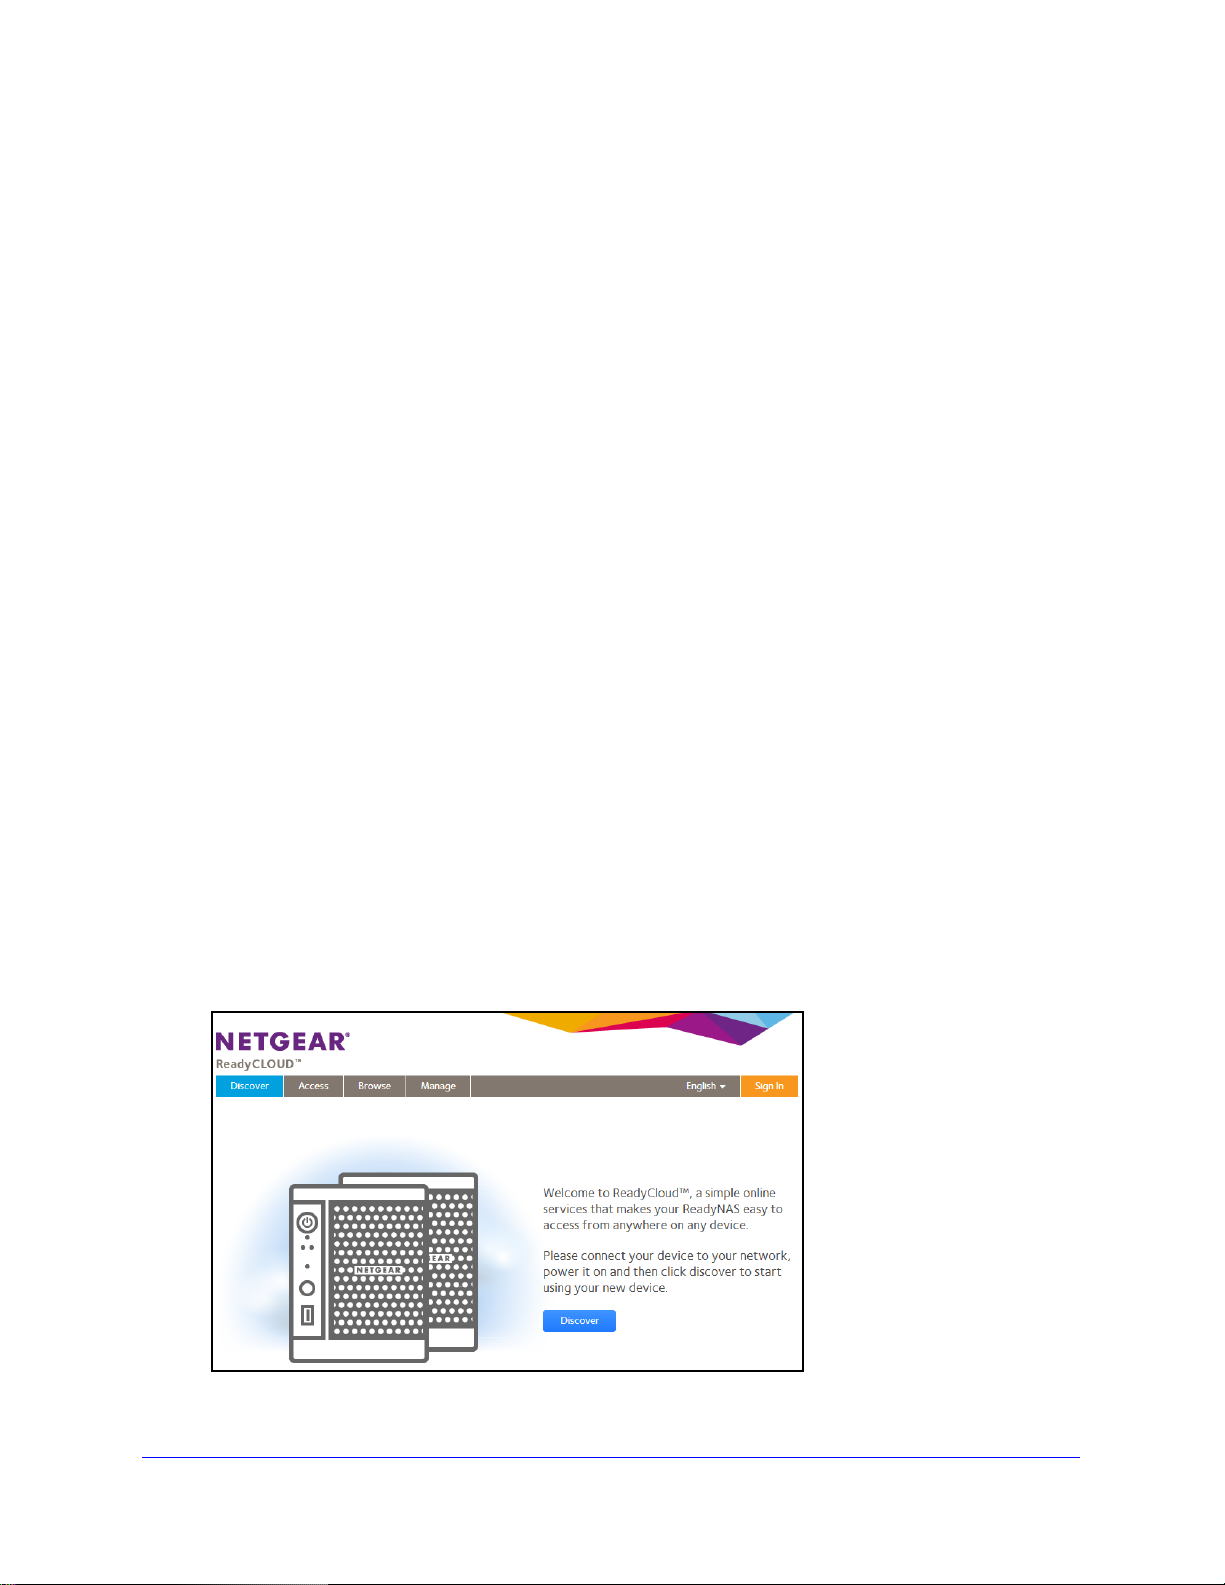
Discover and Set Up Your ReadyNAS
To discover and set up your ReadyNAS system:
sit http://readycloud.netgear.com on a computer that uses the same LAN and Internet
1. Vi
connection as your ReadyNAS system.
2. Click the Discover button to a utomatically detect your ReadyNAS system on the network.
10
Page 11
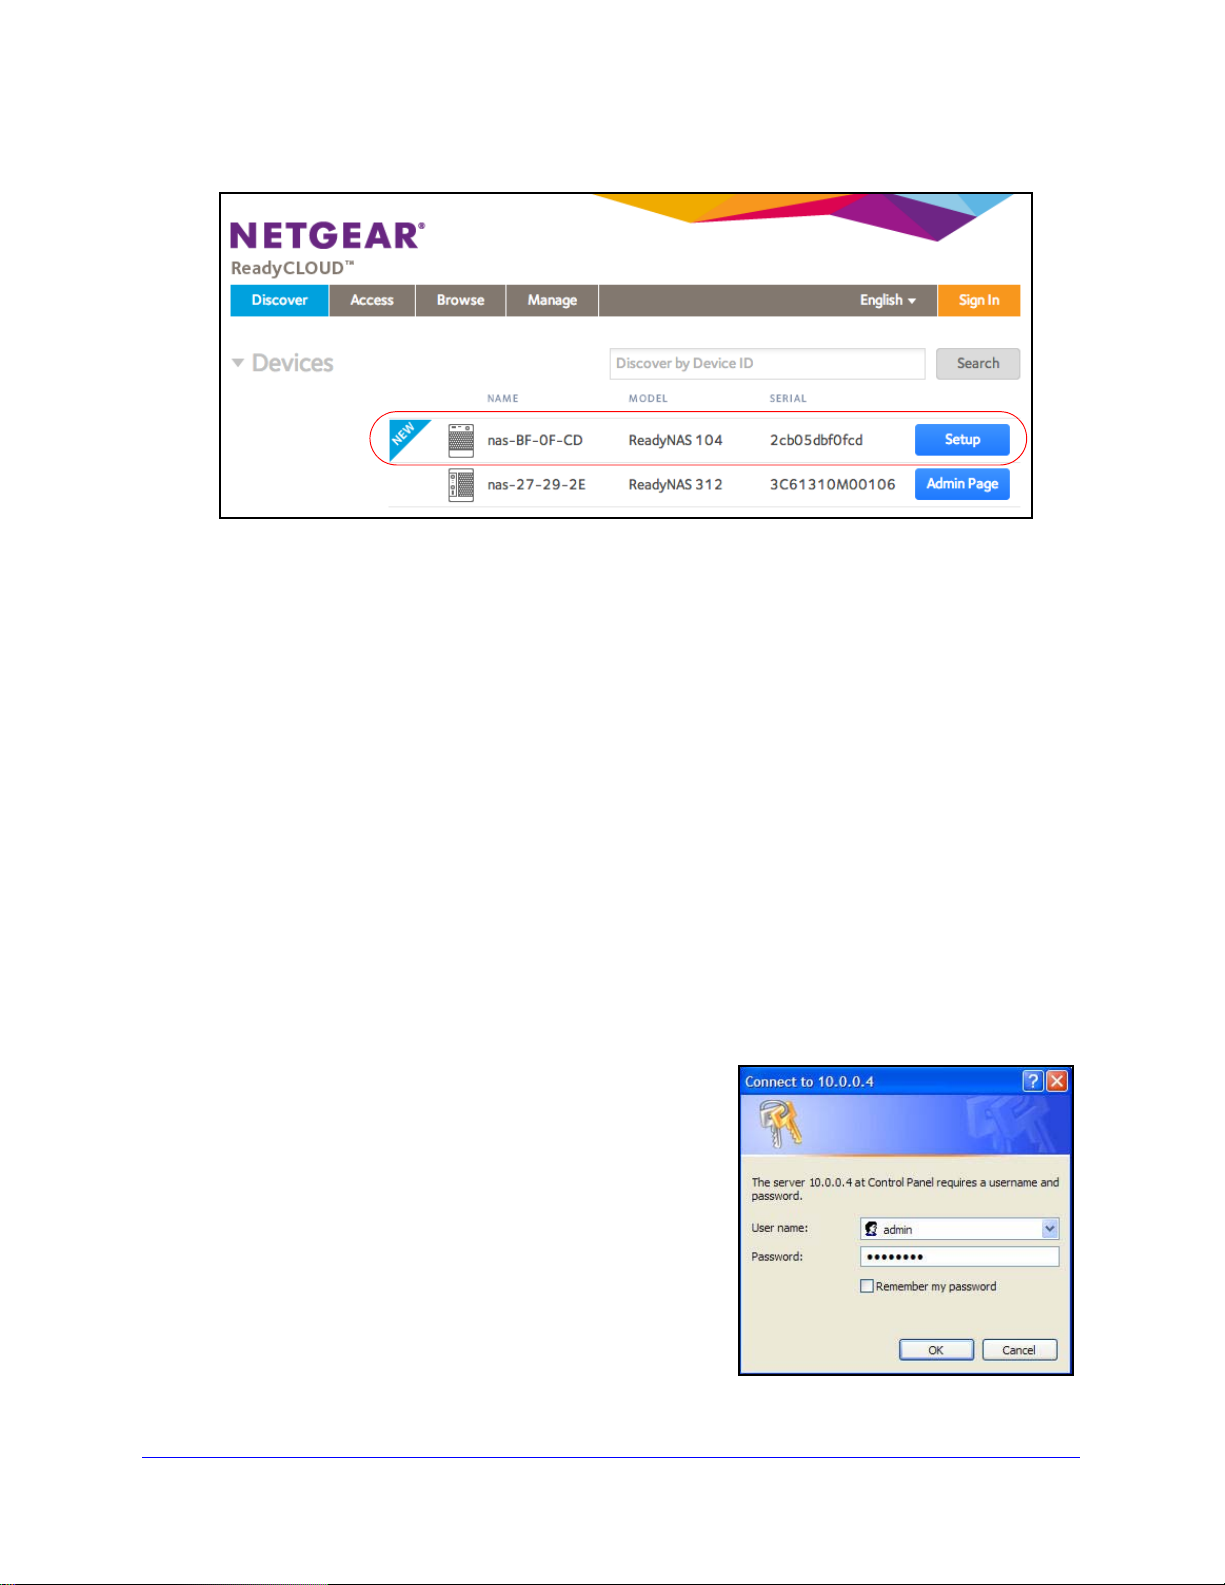
ReadyNAS OS 6.0
Your new ReadyNAS system is marked with a NEW label.
3. Click the Setup button.
4. Select
• Opt
the mode that you want to use to set up your system.
ion 1. Select ReadyCLOUD Mode.
a. Sign in to
Tip: If
you have a ReadyNAS Remote account, you can sign in to
ReadyCLOUD or create a user account.
ReadyCLOUD using your ReadyNAS Remote credentials.
ollow the prompts to set up your ReadyNAS system.
b. F
The ReadyCLOUD login page displays when setup is complete. You can access
he local admin page for your system by signing in to ReadyCLOUD.
t
For more information about ReadyCLOUD, see Use ReadyCLOUD on p
• Opt
ion 2. Select Offline Mode.
age 66.
An SSL certificate security warning displays. This warning ensures an encrypted
uthentication and secure access to the ReadyNAS local admin page for your storage
a
system.
a. Accep
t the certificate.
A login prompt displays.
b. Enter admin fo
r the user name, enter
password for the password, and click the
OK button.
Both user name and password are
ase-sensitive.
c
You can change these cred entials when you
configure your system. NETGEAR
recommends that you change your
password as soon as possible.
11
Page 12
ReadyNAS OS 6.0
c. Follow the prompts of the setup wizard that launches in your browser.
When you complete the setup wizard, the local admin page displays.
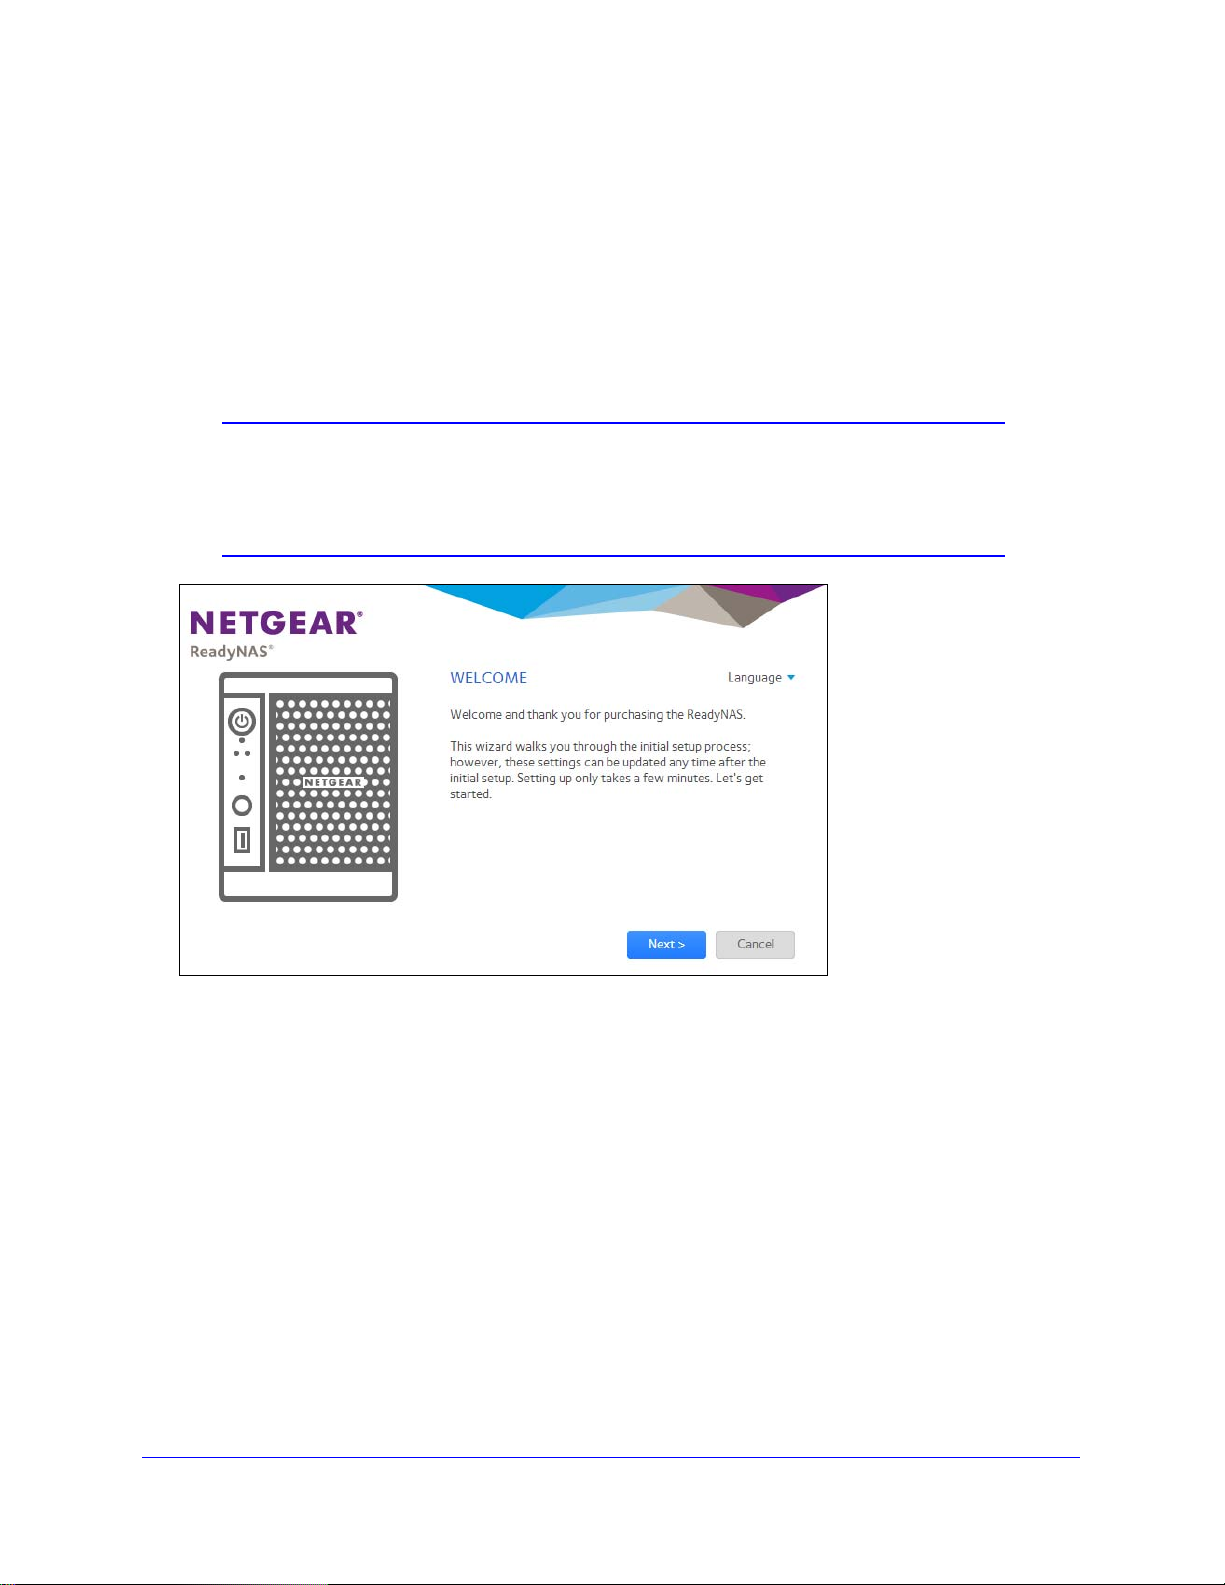
Local Setup Wizard
The first time you access the local admin page, a setup wizard prompts you to configure the
basic settings of your ReadyNAS storage system.
Note: The local setup wizard is for users who choose to set up their
ReadyNAS system using Offline mode. If you set up your system
using ReadyCLOUD mode and the ReadyCLOUD setup wizard, the
local setup wizard does not display.
Figure 1. Setup wizard (Welcome screen)
You can change the language setting for the setup wizard by clicking Language at the top
left corner of the screen and selecting a language from the drop-down list.
The setup wizard guides you through the initial configuration process to help you quickly
integra
prompts to configure the following settings:
• T
• Alert Cont
• Host nam
• Administrato
When you complete the setup wizard, the local admin page displays.
te your ReadyNAS storage system into your network. Follow the setup wizard’s
ime and date. For more information, see Set the Clock on page 152.
act. For more information, see Configure System Alerts on page 155.
e. For more information, see Configure the Hostname on page 158.
r password and password recovery. For more information, see Set the
Administrator Password on
page 154.
12
Page 13
ReadyNAS OS 6.0
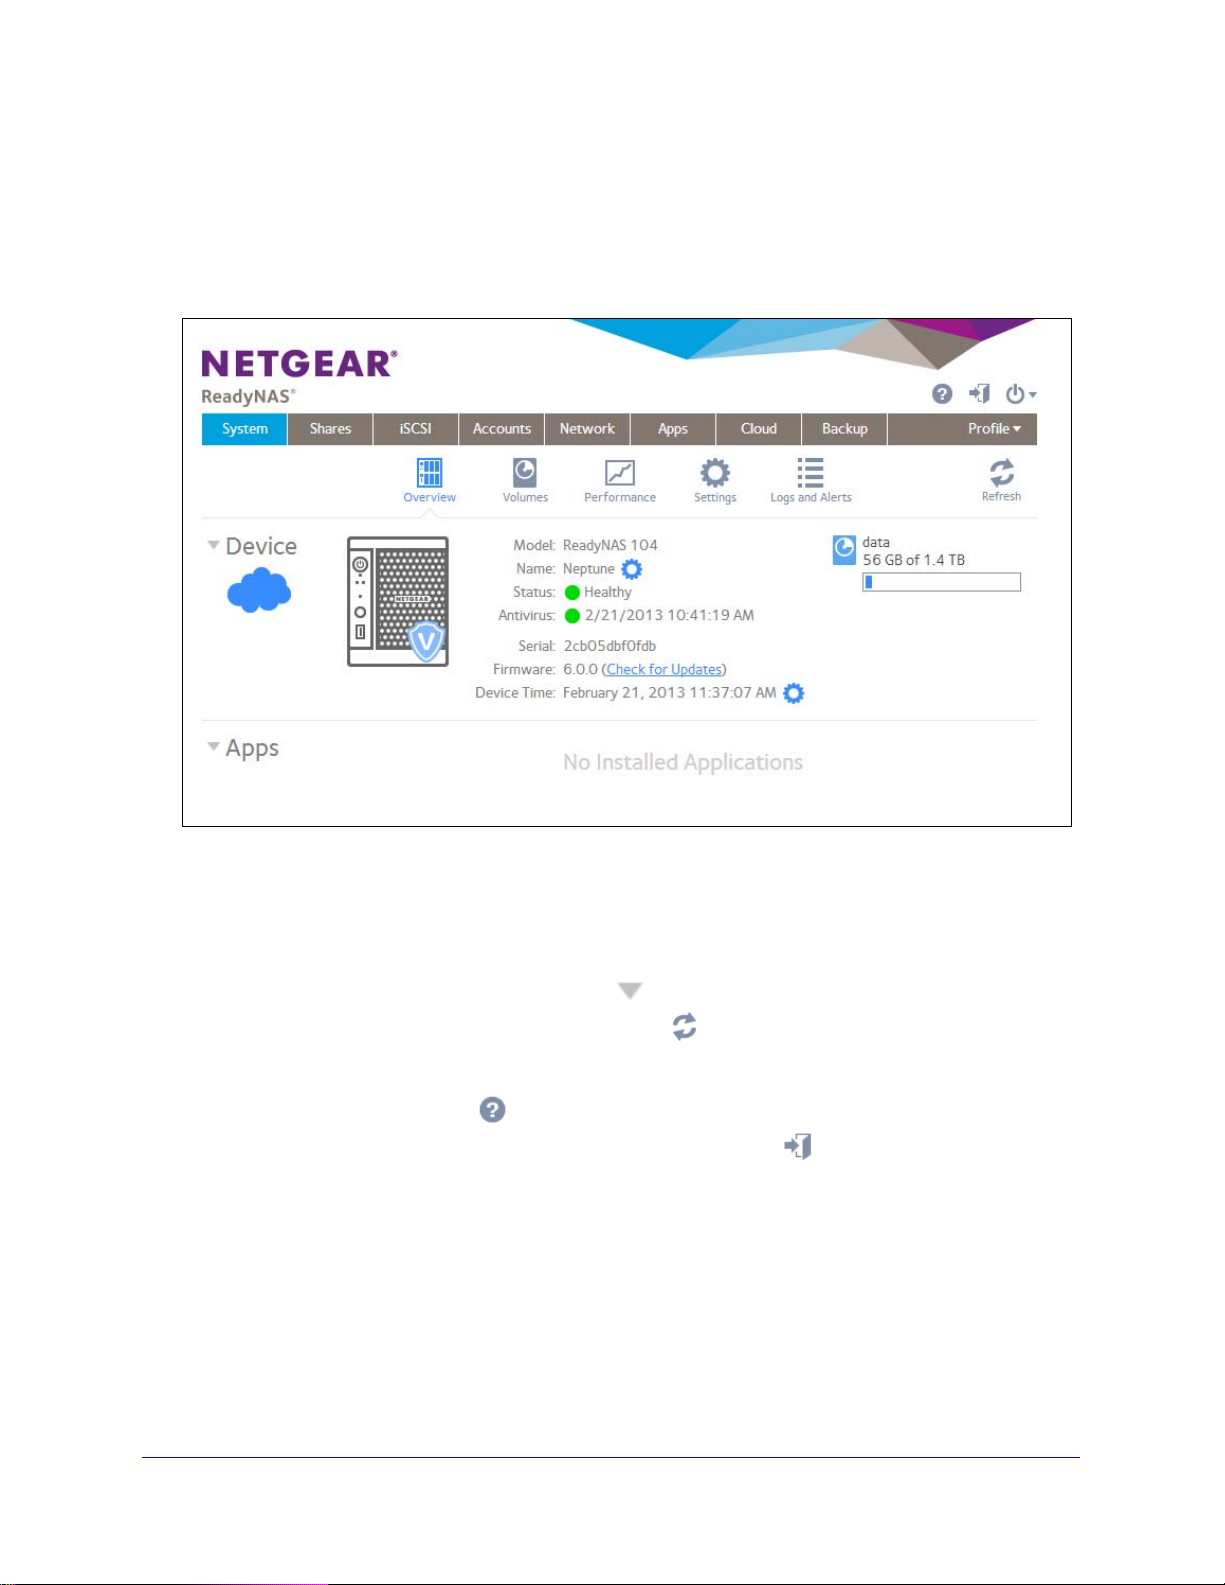
The Local Admin Page
The local admin page is a browser-based interface that you use to configure and manage
your ReadyNAS system. When you visit the local admin page, the Overview screen displays,
as shown in the following figure.
Figure 2. Local admin page (Overview screen)
• To navigate through the local admin page, use the navigation bar across the top of the
screen and the navigation icons below it.
• Some scre
the screen by clicking the triangle icons (
• T
o refresh the screen, click the Refresh icon ( ) in the top right corner below the
navigation bar.
• Fore more informatio
clicking the Support icon (
• T
o log out of the local admin page, click the Logout icon ( ) in the top right corner of
the screen.
Other features of the local admin page are described in the following chapters.
In this manual, instructions for navigating through the local admin page begin by specifying
he selection from the navigation bar and then, if necessary, specifying the selections from
t
the row of navigation icons and section headings. For example, to configure the global
file-sharing protocols, select System > Settings > Services. System is th
the navigation bar. Settings is the selection from the row of navigation icons. Services is the
selection from the section headings on the Settings screen.
ens are divided into multiple sections. You can collapse or expand sections of
) next to each section heading.
n about your product, visit an official NETGEAR support page by
) in the top right corner of the screen.
e selection from
13
Page 14

ReadyNAS OS 6.0
Access the Local Admin Page
You can access the local admin page at any time by launching a web browser and visiting
https://<hostname>. <hostname> is the name that you assigned to your ReadyNAS system
or the default hostname if you did not change it. You can also access the local admin page
from ReadyCLOUD (see
ReadyCLOUD on page 66).
The default credentials to log in to the local admin page are:
• User name: admin
• Password: password
Both user name and password are case-sensitive.
Note: If you cannot access the local admin page using its hostname, try
entering https://<ReadyNAS IP address> instead, where <ReadyNAS IP
address> is the IP address of the ReadyNAS.
Discover and Set Up Your ReadyNAS on page 10 and Use
14
Page 15
ReadyNAS OS 6.0
Register Your System
You must register your product before you can use NETGEAR telephone support. Register
your ReadyNAS system at the NETGEAR Product Registration website.
To register your ReadyNAS system:
1. L
ocate the serial number of the system.
You can find the serial number on the Overview screen of local admin page or on the
chassis la
bel of your product.
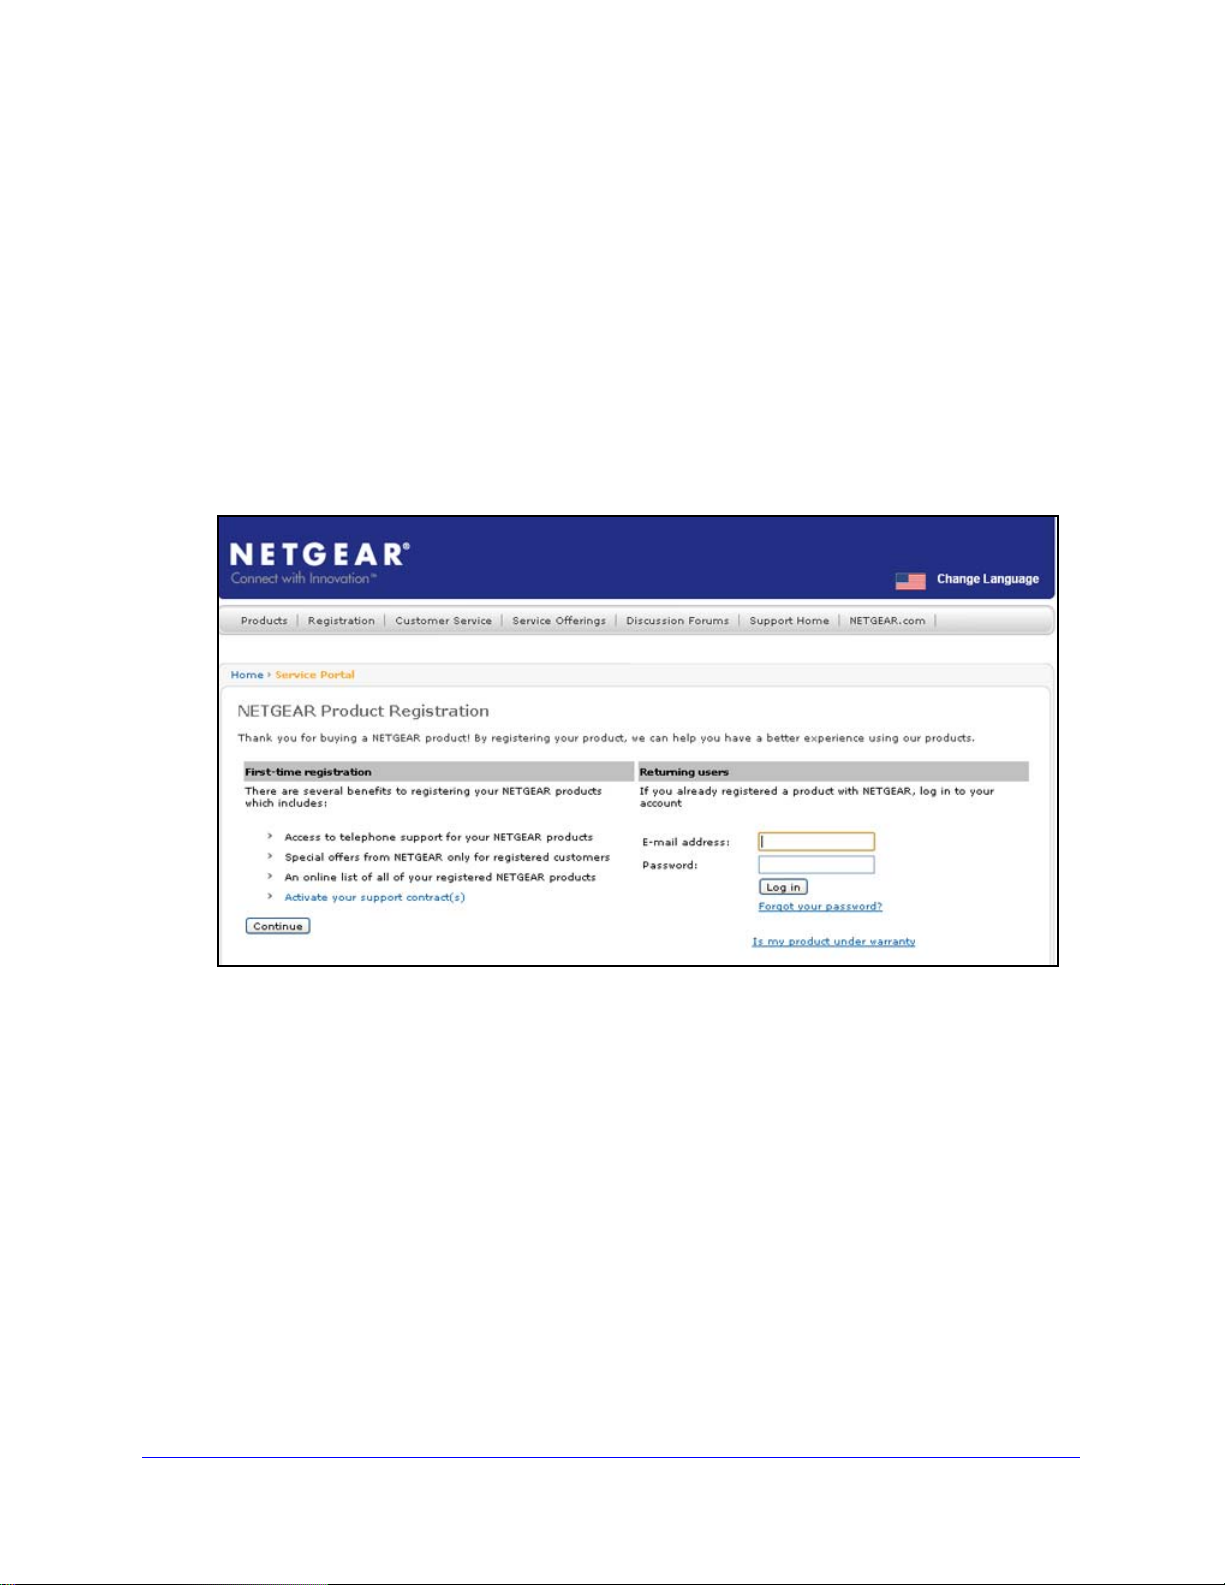
2. Ope
3. Take one of the following actions:
n a web browser and visit http://www.netgear .com/register.
The product registration web page displays.
• I
f you have never registered a NETGEAR product, click the Continue button.
• I
f you have registered a NETGEAR product in the past, enter your email address and
password and click the Log in button.
4. Follow t
The ReadyNAS is registered.
he prompts.
15
Page 16

2. Volume Configuration
This chapter describes how to configure and manage the volumes in your ReadyNAS storage
system. It includes the following sections:
• Basic Volume and RAID Concepts
• Manage Volumes
2
16
Page 17

ReadyNAS OS 6.0
Basic Volume and RAID Concepts
To get the most out of your ReadyNAS storage system, it is helpful to understand the basics
of volumes and RAID. Understanding these concepts is the first step to making good
decisions about how to configure, manage, and use your ReadyNAS storage system.
Volumes
In the most general sense, volumes are data storage devices. Your computer treats an
internal hard drive as a volume. It also treats a portable USB thumb drive as a volume.
Volumes can be either physical or logical. Usually, the term physical volume refers to a hard
disk drive. When this term is used in this way, a two-bay storage system can have up to two
physical volumes (hard disk drives). A four-bay storage system can have up to four physical
volumes (hard disk drives). A six-bay storage system can have up to six physical volumes.
The term logical volume refers to the way that you divide, or partition, your storage space.
For example:
• Each logical volume can correspond to a hard disk drive.
• A logical volume can be made up of more than one hard disk drive.
In this manual, the term volume refers to a logical volume. The terms hard disk drive and disk
refer to a physical volume.
RAID
Your ReadyNAS storage system allows you to configure your hard disks using one of the
many RAID technologies.
RAID is short for redundant array of independent disks. RAID is a storage technology that
balances data protection, system performance, and storage space by determining how the
storage system distributes data. Many different ways of distributing data have been
standardized into various RAID levels. Each RAID level offers a tradeoff of data protection,
system performance, and storage space. For example, one RAID level might improve data
protection but reduce storage space. Another RAID level might increase storage space but
also reduce system performance.
Your ReadyNAS storage system supports X-RAID2TM mode, a proprietary single-volume
RAID architecture that is easy to administer, and Flex-RAID mode, which allows you to
format your disks in a variety of industry-standard RAID levels. Both RAID modes allow you
to hot-swap disks without powering down and automatically expand your volumes to
accommodate larger-capacity disks when you replace smaller-capacity disks.
When you power on your system for the first time or if you reset your system to its factory
default settings, the optimal RAID mode and level are automatically selected for you based
on the number of disks that are installed. You can also configure the RAID settings manually
(see
Change RAID Mode on page 21).
17
Page 18

ReadyNAS OS 6.0
X-RAID2
X-RAID2 is an auto-expandable RAID technology that is available only on ReadyNAS
systems. With X-RAID2, you do not need to know intricate details about RAID to administer
your system. X-RAID2 allows you to add storage space without reformatting your drives or
moving your data to another location. Because the expansion happens online, you can
continue to use your ReadyNAS system while the volume capacity increases.
Because X-RAID2 is a single-volume architecture, if you configure your hard disk drives to
use X-RAID2, your storage system has only one volume that is made up of all installed hard
disk drives. X-RAID2’s single-volume architecture has two major advantages:
• Easy system management
• Auto-expansion
With Flex-RAID formatting, if you want to add disks to expand your storage capacity, you
must back up the data to another system, add a disk, reformat the RAID volume, and restore
the data to the new RAID volume. With X-RAID2, none of those administrative tasks are
required. Instead, with X-RAID2, your volume automatically expands to accommodate
additional disks or larger-capacity disks.
With X-RAID2, you can start out with one hard disk, add a second disk for data protection,
and add more disks for additional storage capacity. X-RAID2 accommodates the new disks
automatically. You can replace existing disks with larger-capacity disks and X-RAID2
automatically accommodates the new disks.
X-RAID2 requires a minimum of two hard disks to provide protection against disk failure. If
you have a one-disk ReadyNAS storage system and want protection from disk failure, you
need to add a second disk that is at least as large as the first. It can be added while the
system is running.
X-RAID2 uses the capacity of one disk for data storage and reserves the capacity of a
second disk for data protection, which allows the volume to recreate data if a disk fails. In a
two-disk system, the usable storage space is one disk. In a three-disk system, the usable
storage space is two disks. In general, the total capacity of your storage system equals the
capacity of all your disks minus the capacity of one disk.
18
Page 19
ReadyNAS OS 6.0
a
b
c
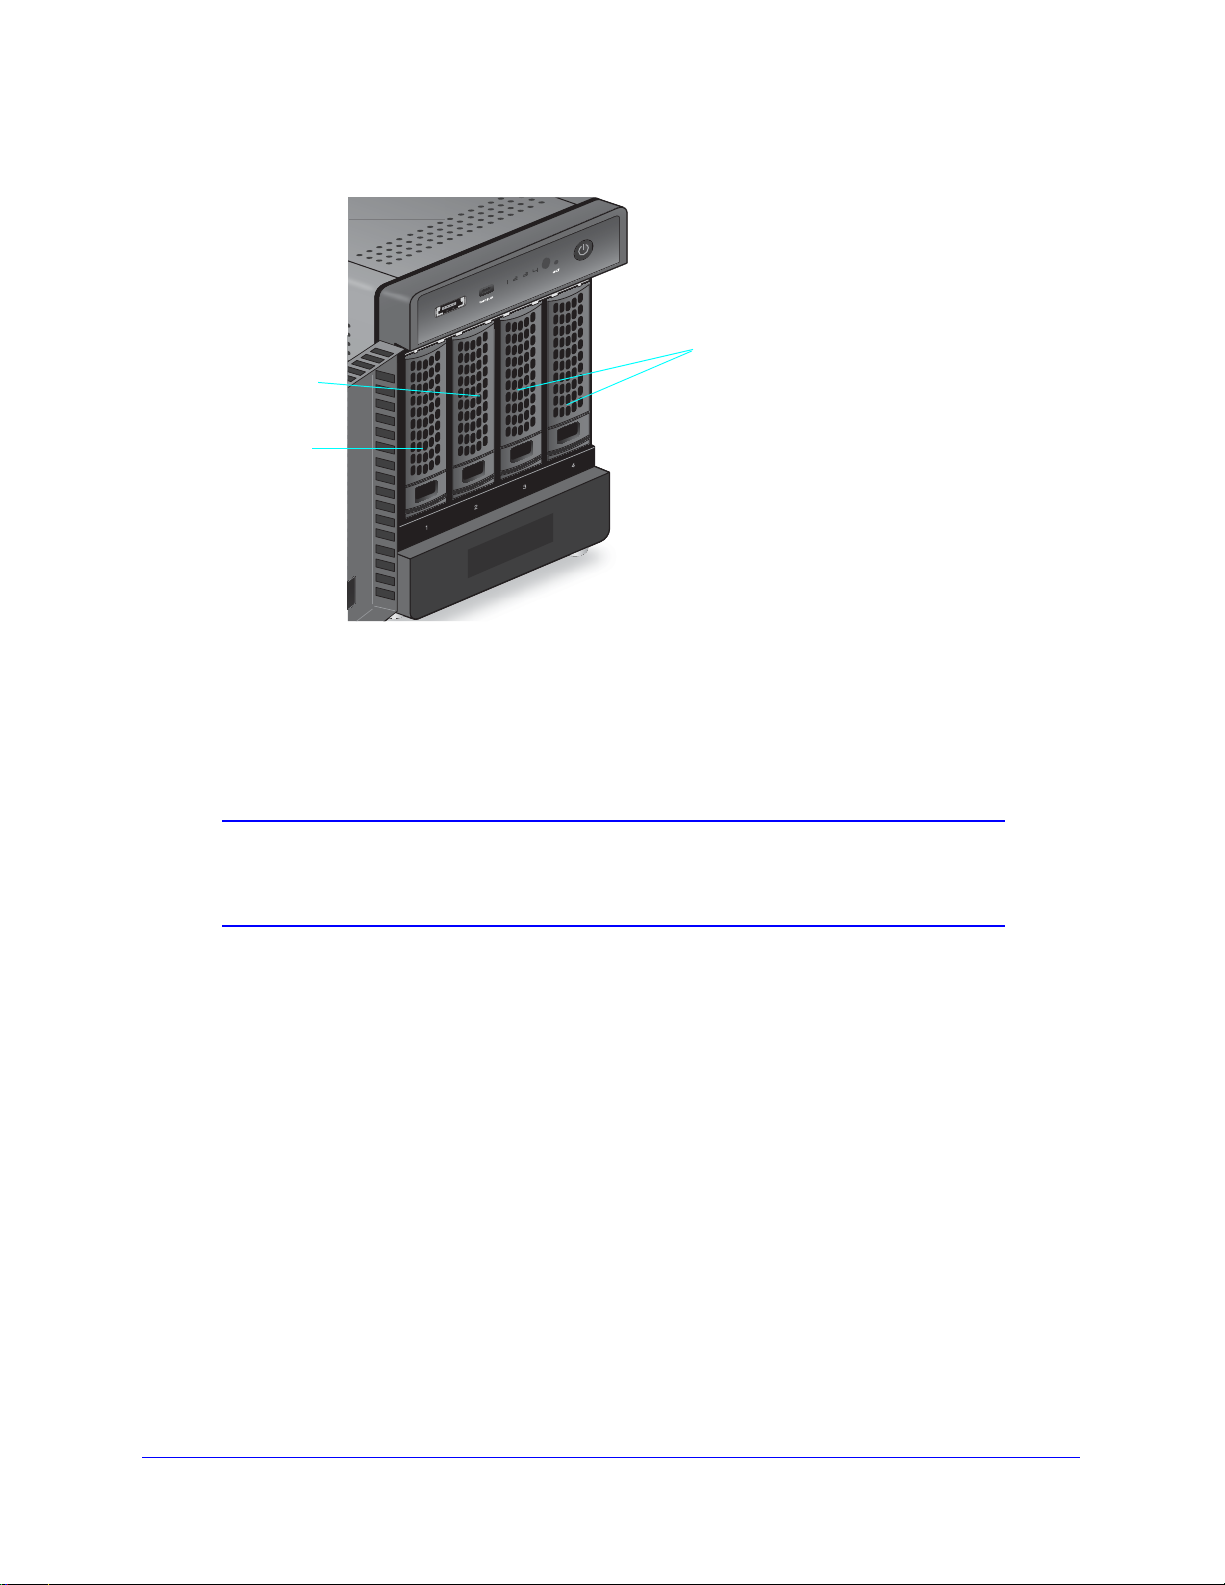
The following figure illustrates how X-RAID2 uses new disks.
Figure 3. X-RAID2 disk usage
a. The first disk that you install is used for initial (unprotected) storage space.
b. T
he second disk that you install is reserved for data protection (parity information).
c. I
nstalling additional disks increases your storage space.
Note: X-RAID2 reserves the capacity of one disk for data protection. The
actual space reserved for data protection is distributed across all
disks.
Flex-RAID
NETGEAR’s Flex-RAID technology allows you to choose from among several
industry-standard RAID levels:
• RA
ID 0. This most basic RAID level does not protect your data from loss in the event that
one of your drives fails. RAID 0 distributes data across multiple disks, resulting in
improved disk performance compared to systems that do not use RAID formatting. The
total capacity of your storage system equals the capacity of all of your disk drives.
Note: After you create a RAID 0 volume, you cannot expand the volume,
e the RAID level, or switch RAID modes.
chang
across multiple disks. Exactly the same data is stored on two or more disks at all times.
• RAID 1.
This RAID level provides full redundancy of your data, because it duplicates data
RAID 1 protects your data from loss if one disk fails. The total capacity of your storage
system equals the capacity of your smallest disk.
19
Page 20
ReadyNAS OS 6.0
• RAID 5. This RAID level also provides data redundancy, but it requires at least three
disks. RAID 5 uses the capacity of one disk to protect you from data loss if one disk fails.
Your data is distributed across multiple disks to improve disk performance. The total
capacity of your storage system equals the capacity of all your disks minus the capacity
of one disk. It is supported on systems with at least four drive bays.
• RAID 6. This RAID level can recove
r from the loss of two disks. Your data is distributed
across multiple disks to improve disk performance. The total capacity of your storage
system equals the capacity of all your disks minus the capacity of two disks. It is
supported on systems with at least four drive bays.
• RAID 10
(or 1+0). This RAID level uses both RAID 1 and RAID 0 technology. First, your
data is duplicated so that exactly the same data is stored on two or more disks. Then, the
data is distributed across additional disks to improve disk performance. It is supported on
systems with at least four drive bays.
The Flex-RAID levels that you can select depend o
n the number of disks included in the
volume. The following table describes the Flex-RAID levels that are available for a given
number of disks. It also indicates whether adding a disk for data protection is possible for
each configuration.
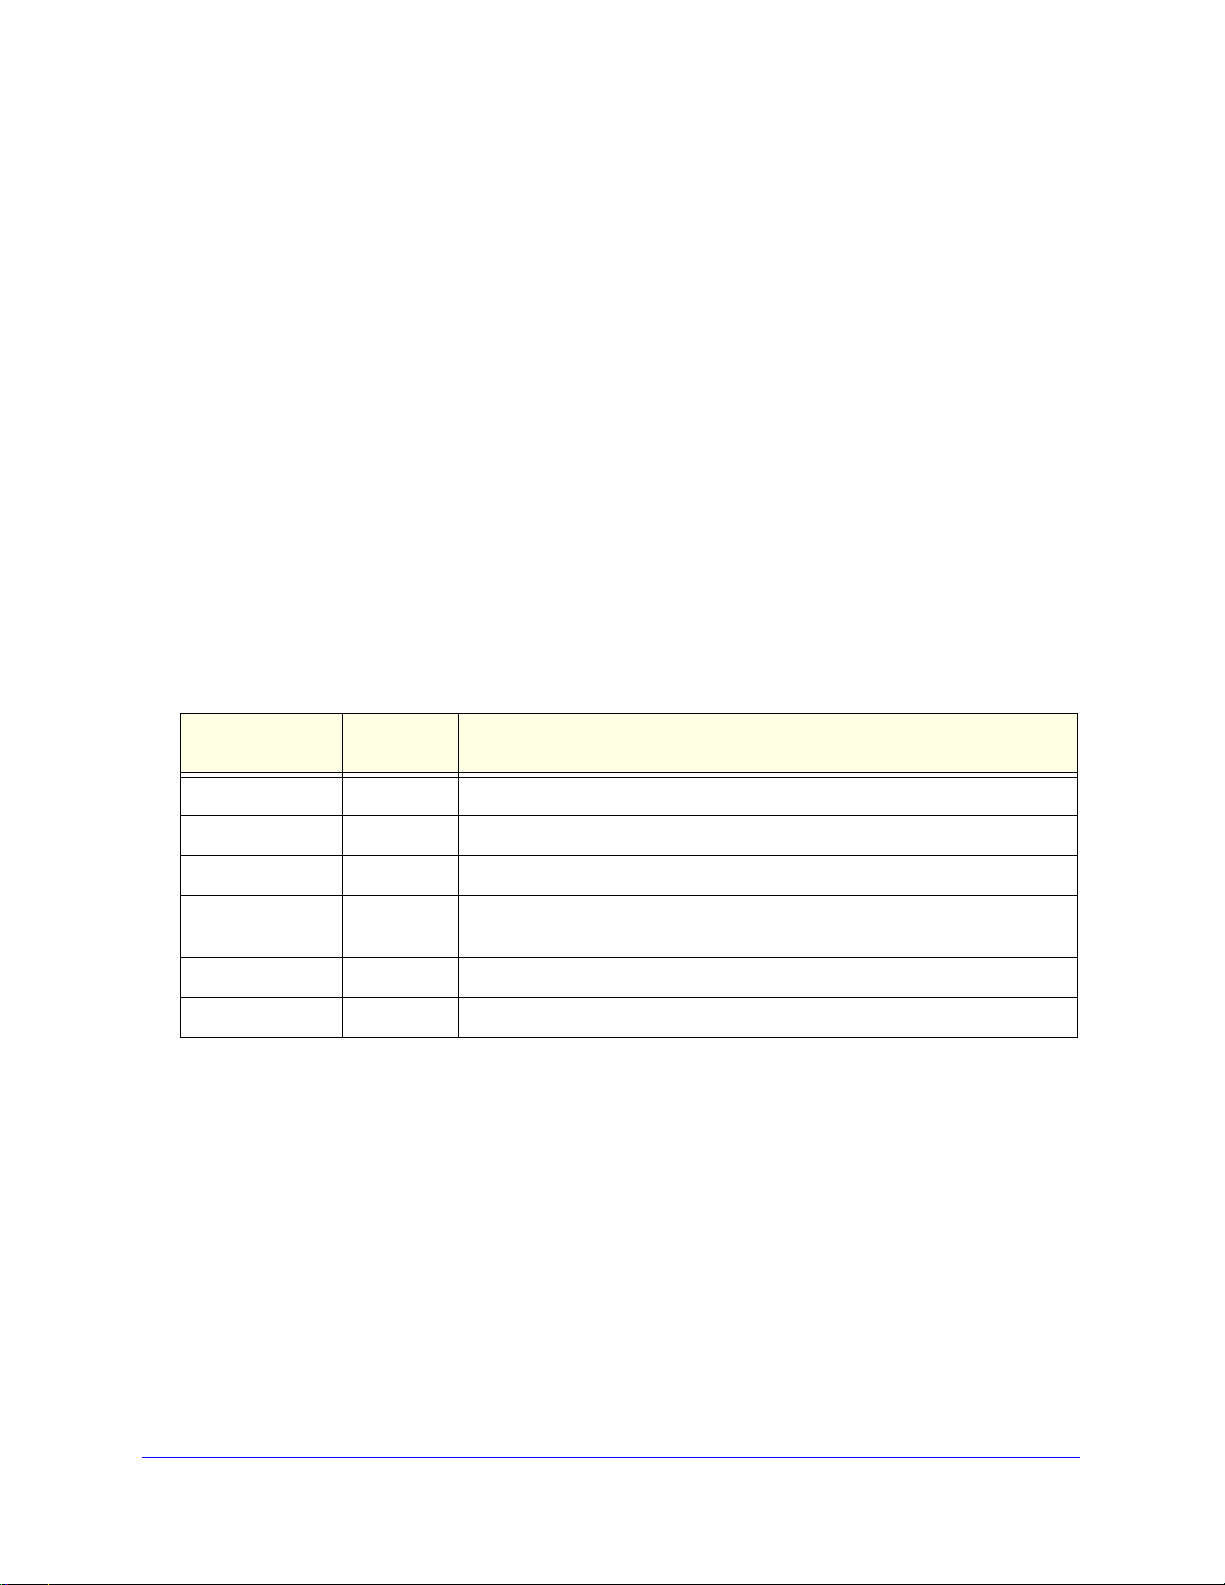
Table 1. Flex-RAID levels and data protection
Number of Disks
per Volume
1 RAID 1 Yes. (Additional disk provides redundancy.)
2 RAID 1 No. (Volume protection is already redundant.)
2 or more RAID 0 No. (RAID 0 does not offer protection.)
3 or more RAID 5 Yes. (Additional disk provides dual redundancy and converts the volume to
4 RAID 10 No. (Volume protection is already redundant.)
RAID Level Can I add a disk to for data protection?
.)
RAID 6
4 or more RAID 6 No. (Volume is already protected with dual redundancy.)
20
Page 21
ReadyNAS OS 6.0
Manage Volumes
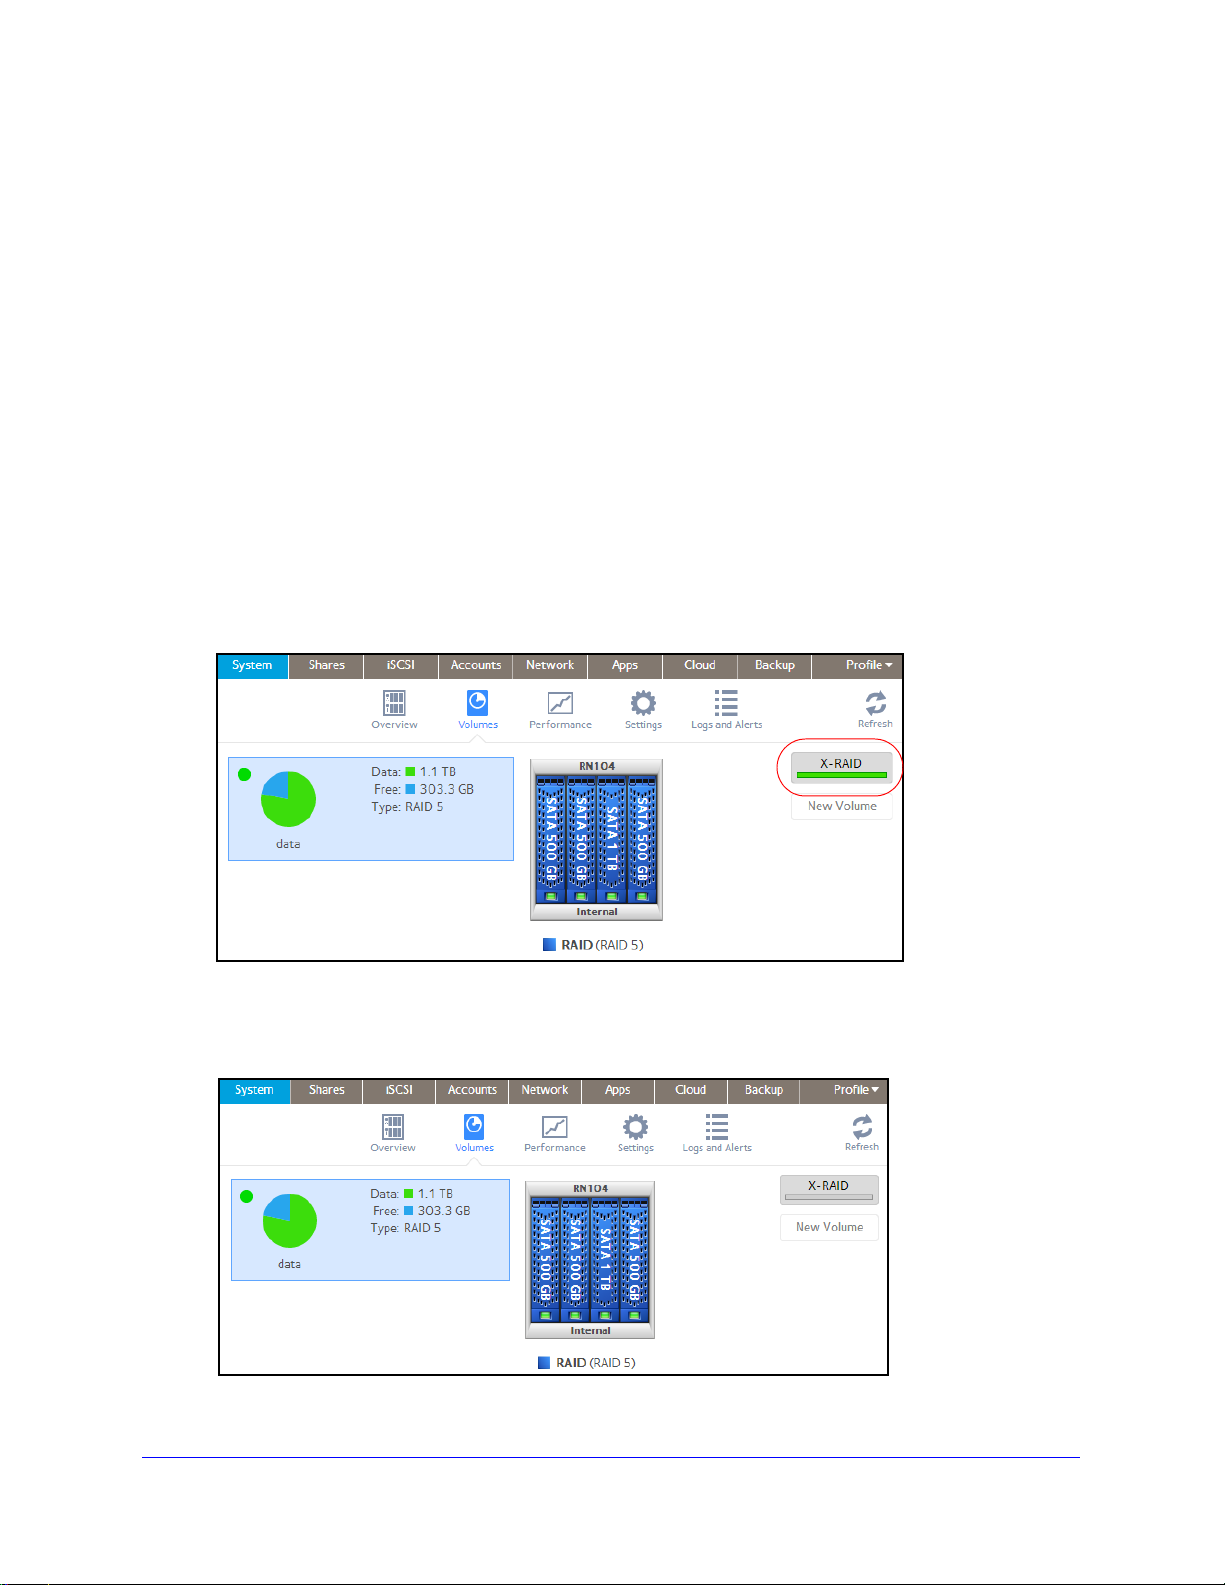
Change RAID Mode
You can change the RAID mode that your ReadyNAS storage system uses. By default, your
system’s hard disks are configured into a single X-RAID2 volume.
Change from X-RAID2 to Flex-RAID
Y our ReadyNAS system can e asily change a volume from X-RAID2 to Flex-RAID mode. Data
on the X-RAID2 volume is preserved when you switch to Flex-RAID. The RAID level of the
resulting Flex-RAID volume is automatically assigned based on the number of disks that are
installed.
To change from X-RAID2 to Flex-RAID:
1. Select Sy
2. Click the X-
3. Confirm that you want to switch from X-RAID2 to Flex-RAID.
The volume switches from X-RAID2 mode to Flex-RAID mode and the indicator on the
X-RAID butt
stem > Volumes.
RAID button at the right side of the screen.
on turns gray.
The RAID level is automatically assigned based o
21
n the number of disks that are installed.
Page 22

ReadyNAS OS 6.0
Change from Flex-RAID to X-RAID2
If your system contains only one volume, you can easily switch from Flex-RAID to X-RAID2.
Data on the Flex-RAID volume is preserved when you switch to X-RAID2.
If your system contains multiple volumes, you must first reconfigure your disks into a single
e.
volum
Note: When you switch to X-RAID2 mode, any extra disks installed in your
system are automatically reformatted and used for storage
expansion.
You cannot change the RAID mode of a RAID 0 or RAID 10 volume.
To change from Flex-RAID to X-RAID2 on a single-volume system:
1. Select Sy
stem > Volumes.
2. Click the X-RAID button at the rig ht side of the screen.
3. Confirm that you want to switch from X-RAID2 to Flex-RAID.
The volume switches from Flex-RAID mode to X-RAID2 mode and the indicator on the
X-RAID butt
on turns green.
Any available drives are automatically used for storage expansion.
22
Page 23
ReadyNAS OS 6.0
Change to a Different RAID Level
In Flex-RAID mode, you assign one of several RAID levels to your volume. Available RAID
levels depend on the number of disks that you want the volume to include. For more
information, see Flex-RAID on p
RAID level.
Note: Changing the RAID level of a volume erases all data. If data is
stored on your system, you must back up the data to another
storage device before changing the RAID level.
You cannot change the RAID level of a RAID 0 volume.
To change to RAID levels:
f any data is stored on the volumes that you want to reconfigure, back up your data.
1. I
2. Delet
e the volumes that you want to reconfigure (see Delete a Volume on page 28).
age 19. You can reconfigure your volumes to use a different
The disks that were part of the volumes become available
color of the disks turns black).
3. Create a new volume from
Volume on
The volume is formatted according to your specification
while, depending on the size of your hard disk drives.
page 27).
the available disks and select the RAID level (see Create a
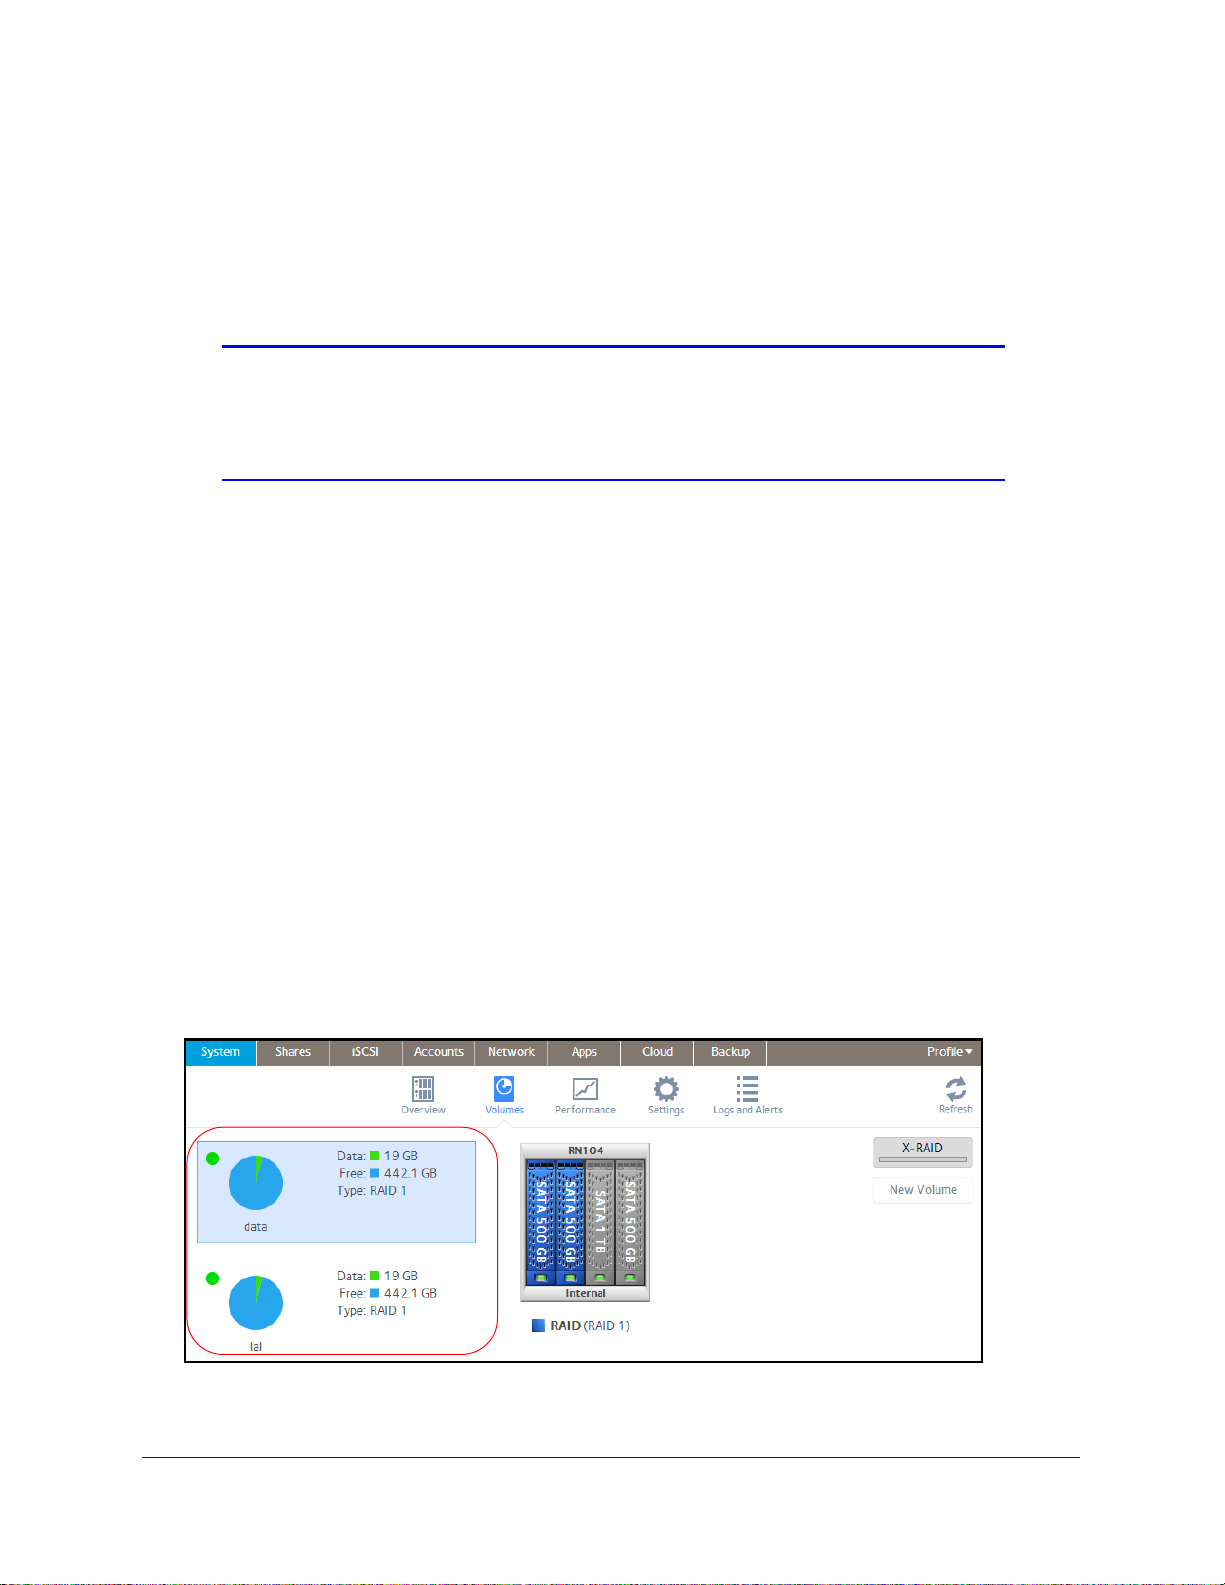
View the Status of a Volume
To view a summary of the volume status:
Select System >
The volumes are listed at the left side of the screen.
Volumes.
again for other purposes (the
s. Formatting can take quite a
23
Page 24
ReadyNAS OS 6.0
The following summary information is displayed next to each volume.
Item Description
Data The storage space that is consumed by data in MB, GB, or TB.
Free The storage space that is available in MB, GB, or TB.
Type The configured RAID level.
Health indicator The color of the indicator to the right of the vo
• Green. T
• Ye
• Red. The volu me is bad or faulty.
he volume is healthy.
llow. The volume is degraded.
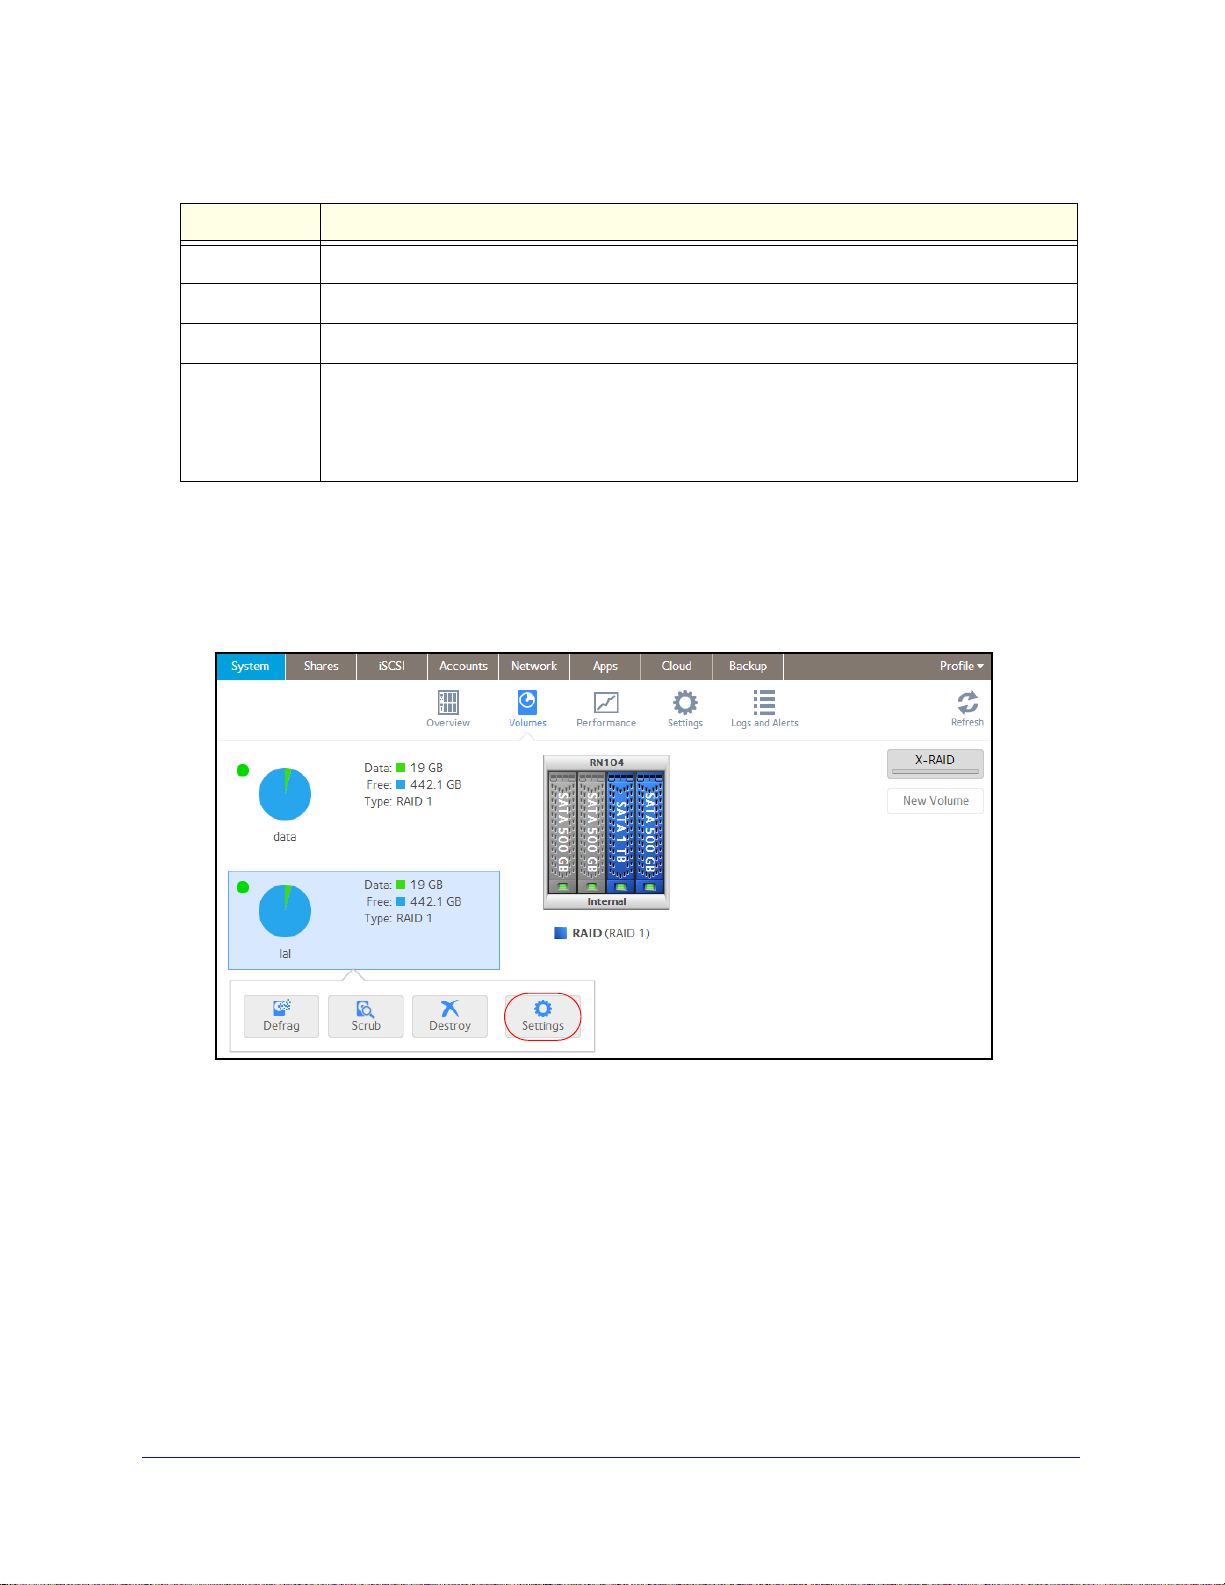
To view the I/O stats and disk status:
1. Select Sy
2. Select
3. From the pop-up menu that
stem > Volumes.
the volume from the list on the left.
displays, select Settings.
lume icon indicates the health of the volume.
24
Page 25

ReadyNAS OS 6.0
A pop-up screen displays the I/O stats in the Summary tab.
4. Select the Disks tab.
5. F
rom the Disk drop-down list, select one of the disks in the volume to view its status.
Note: The disks are listed by their position in the enclosure: <column>x<row>.
For example, Disk 3X1 is the third disk from the left in the top row of the
enclosure.
25
Page 26
ReadyNAS OS 6.0
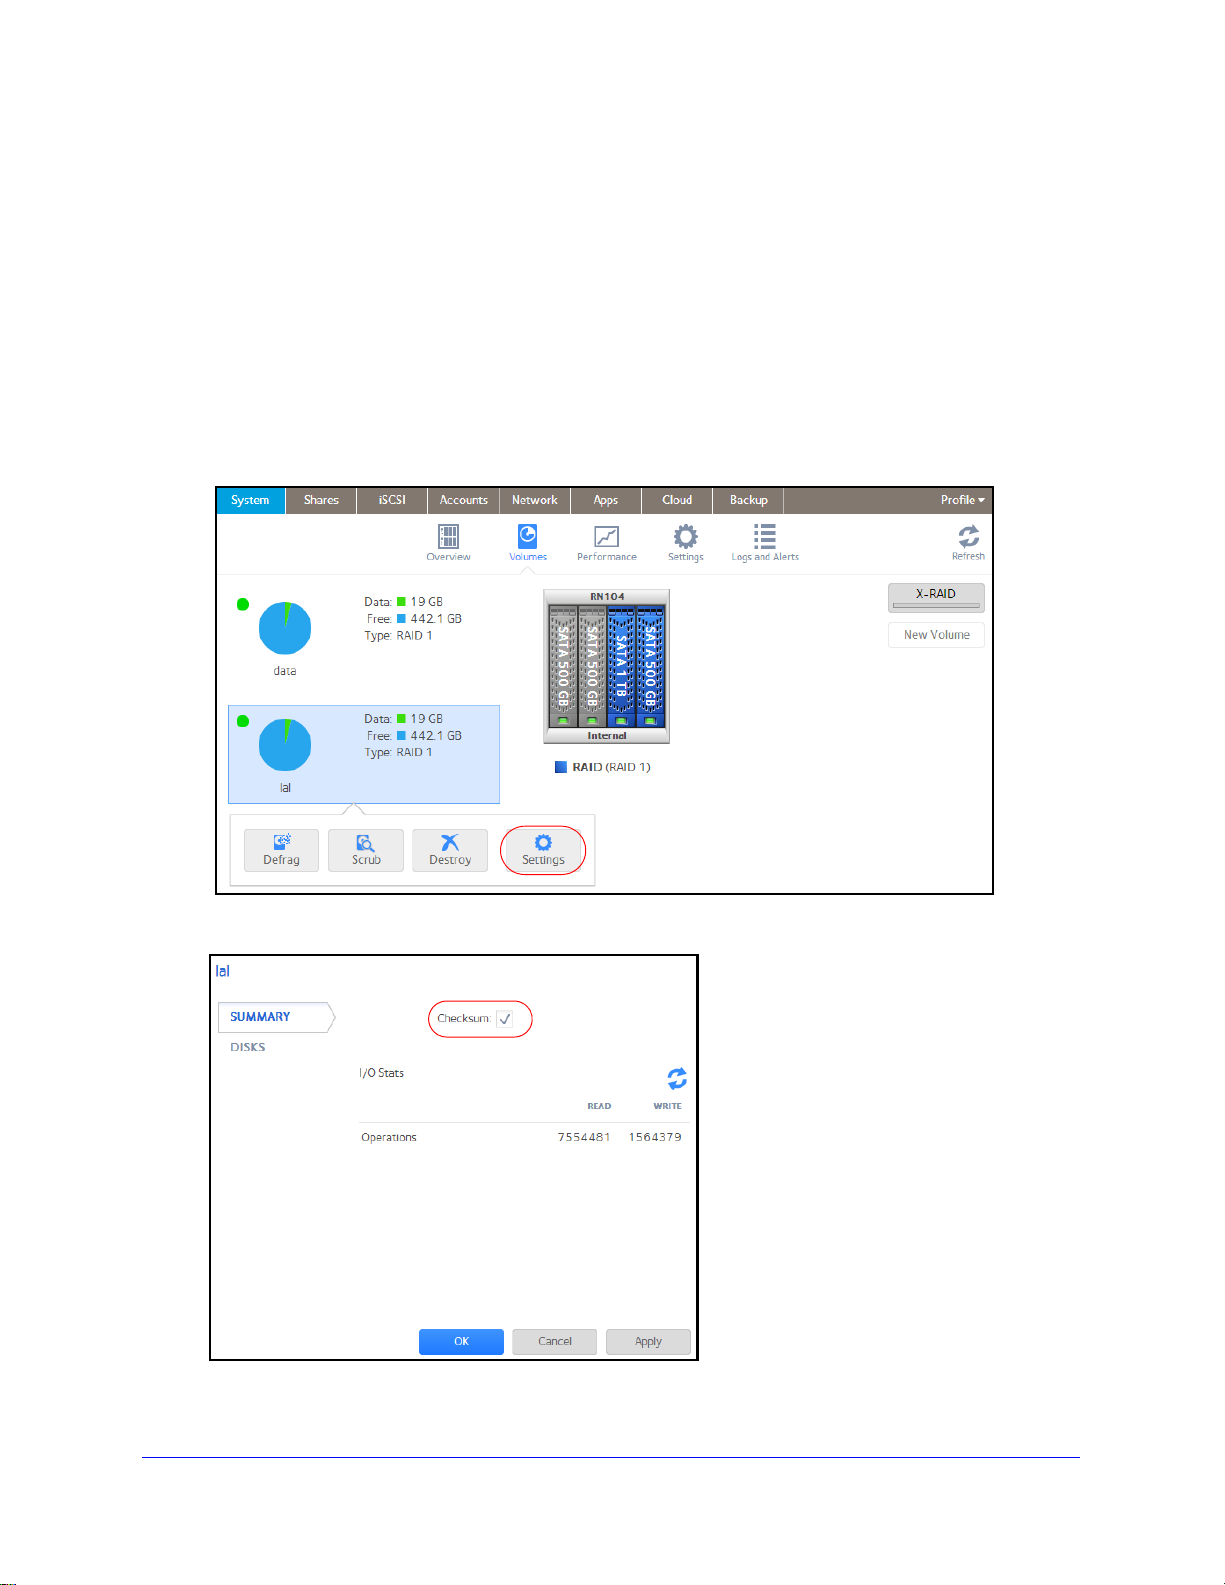
Configure the Checksum Function
Checksum functions help detect data transmission errors. The ReadyNAS uses a checksum
function to improve accuracy and consistency when writing data to a volume. You can enable
or disable the checksum function on each volume. Enabling the checksum function improves
the integrity of your data but reduces performance speeds.
Enable or disable the checksum function:
1. Select Sy
2. Select
3. From the pop-up menu that
A pop-up screen displays.
stem > Volumes.
one of the volumes listed on the left side of the screen.
displays, select Settings.
4. In the Summary tab, select or clear the Checksum check box.
26
Page 27
ReadyNAS OS 6.0
5. Click Apply.
6. Click OK.
Your changes are saved.
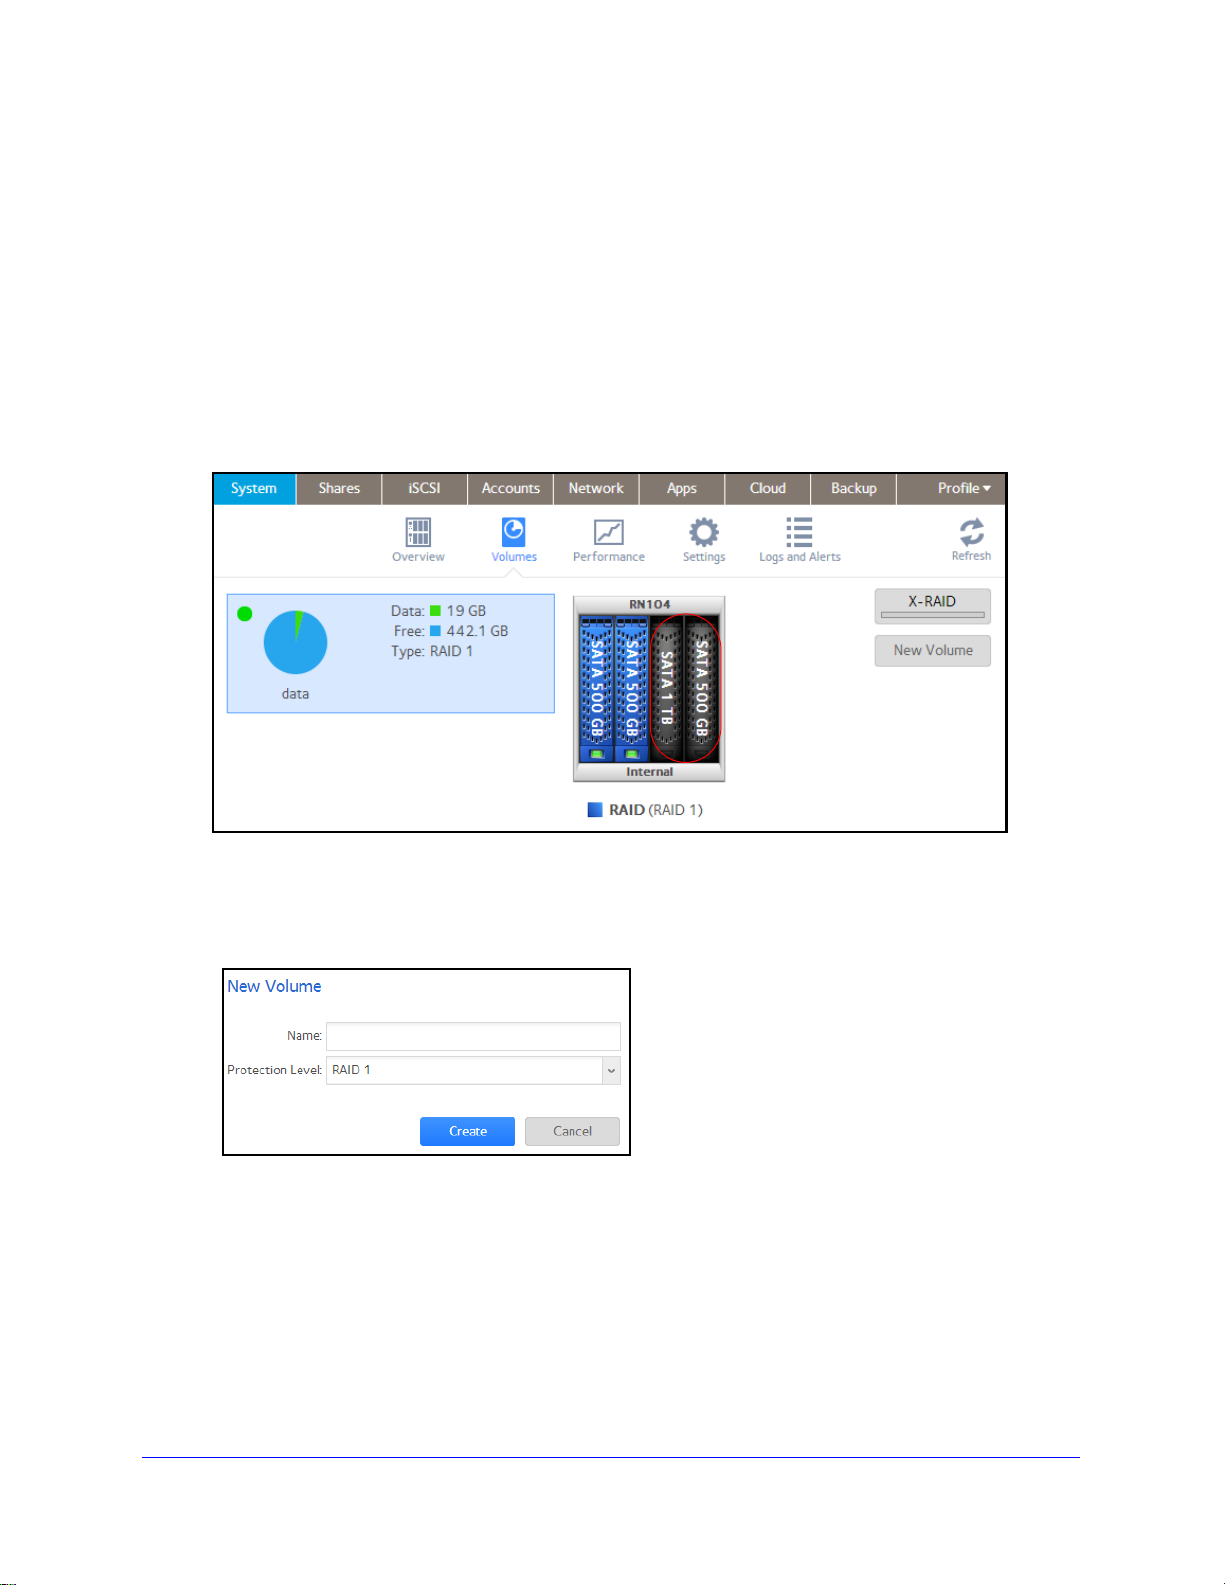
Create a Volume
To create a volume and select the RAID level:
1. Select Sy
2. From the enclosure graphic,
Available disks are colored black.
3. Click the New V
The New Volume pop-up screen displays.
stem > Volumes.
select the disks that you want to include in the new volume.
olume button at the right of the screen.
4. Configure the following settings:
• Name. Ent
folder in the root folder system. The volume names home, apps, and job_ are
reserved and cannot be used.
• Protec
available options depend on the number of disks that you selected in step 2.
5. Click Create.
The new volume is created and appears in the list of volumes at the left of the screen.
er a name for the volume. The volume must not have the same name as a
tion Level. From the drop-down list, select the RAID mode or RAID level. The
27
Page 28
ReadyNAS OS 6.0
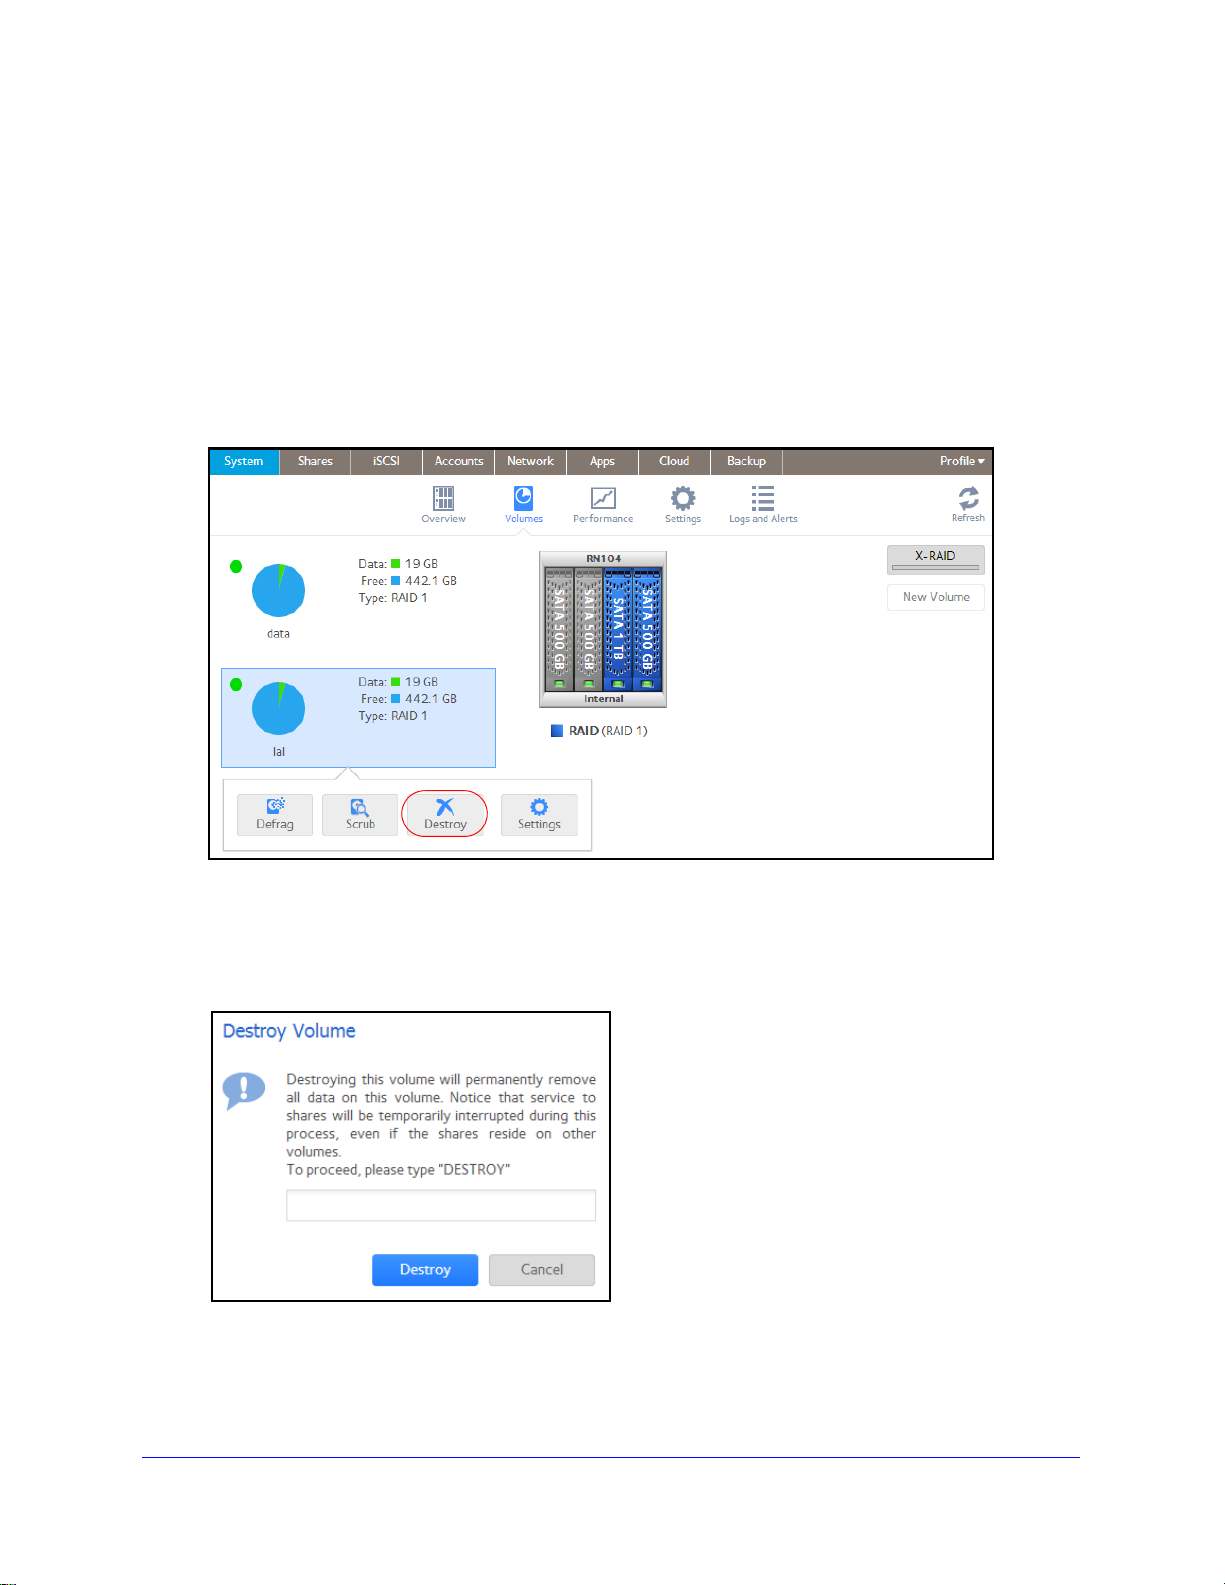
Delete a Volume
Before you delete a volume, make sure that you back up any data (folders and LUNs) that
you want to save to another volume or another storage device.
To delete a volume:
1. Select Sy
2. Select
3. From the pop-up menu that
Note: The Destroy option is not available when the ReadyNAS has a single
volume only. The Destroy option is available if you have at least two volumes.
stem > Volumes.
the volume that you want to delete.
displays, select Destroy .
A pop-up screen displays.
4. Type DESTROY to confirm your decision.
5. Click Destroy.
28
Page 29

ReadyNAS OS 6.0
The volume is deleted. The disks that were part of the volume become available ag ain for
other purposes (the color of the disks turns black).
Expand Storage Capacity
You can expand the storage capacity of an existing volume in two ways:
• Horizontal expansion. Expand the volume by adding more disks to the volume.
• Vertical expansion. Expand the volume by replacing disks in the volume with
larger-capacity disks.
X-RAID2 makes horizontal volume expansion easy. If your X-RAID2 volume includes two or
more disks, the volume expands automatically when you add disks.
If you want to horizontally expand a Flex-RAID volume, you must switch to X-RAID2 mo de or
manually reformat the volume. Switching to X-RAID2 mode is only possible on single-volume
systems.
Vertical expansion is available for X-RAID2 and Flex-RAID volumes.
You can continue to use your ReadyNAS system while the new disks are incorporated in the
background. The process of volume expansion can take several hours. If you set up email
notifications for your system, you receive an email message when the process finishes. For
more information about alert notifications, see
Configure System Alerts on page 155.
Horizontally Expand an X-RAID2 Volume
Horizontal expansion is available for X-RAID2 volumes only.
To horizontally expand an X-RAID2 volume:
Add a disk to an X-RAID2 volume that includes two or more disks.
For more information about how to add a disk to your ReadyNAS system, see the hardware
manual for your system, which is available at
http://support.netgear.com/product/ReadyNAS-OS6.
The system automatically determines whether the new disk is used for protection or storage.
When you add a second disk, the new disk is used for data protection. When you add a third
or fourth disk, the new disk is used to increase your storage capacity. For more information,
see
X-RAID2 on page 18. New disks are incorporated in the background while you continue
to use your storage system.
29
Page 30
ReadyNAS OS 6.0
IMPORTANT:
Vertically Expand a Volume
Both X-RAID2 and Flex-RAID volumes support vertical expansion.
When you vertically expand a Flex-RAID volume, you must re
place all disks in the volume
with larger-capacity disks.
Note: Vertical expansion is not available for RAID 0 volumes.
When you vertically expand an X-RAID2 volume, you must replace disks in the volume
according to the following table.
Table 2.
RAID Level Disk Replacements Required for Vertical Expansion
RAID 1 Replace 2 or more disks with larger-capacity disks.
RAID 5 Replace 2 or more disks with larger-capacity disks.
RAID 6 Replace 4 or more disks with lar
X-RAID2 vertical expansion requirements
ger-capacity disks.
If you replace fewer disks than required for vertical expansion, the disks are reserved for dat a
protection. Your available storage capacity does not increase to accommodate the reserved
disks until you replace the required number of disks.
To reduce the risk of data loss, NETGEAR recommends that you
back up your data before vertically expanding a volume.
To vertically expand an X-RAID2 volume:
1. Rep
lace one disk in the volume with a larger-capacity disk.
For more information about how to add a disk to
for your system, which is available at
http://support.netgear.com/product/ReadyNAS-OS6.
Note: You must use supported disks in your ReadyNAS system. For a list
of supported disks, visit http://www.netgear.com/readynas-hcl.
2. W
ait for the volume to resync your data.
your system, see the hardware manual
30
Page 31

ReadyNAS OS 6.0
You can continue to use your ReadyNAS system while the volume is resyncing.
Resyncing can take several hours. The start and completion of the resyncing process is
recorded in the system log (see
System Logs on page 201).
If you set up email notifications for your system, you receive an ema il messag e when the
process finishes. For more information about alert notifications, see
Configure System
Alerts on page 155.
3. Repeat step 1-step 2 until you have replaced the required number of disks with
larger-capacity disks.
For more information about X-RAID2 vertical expansion requirements, see Table 2 on
page 30.
To vertically expand a Flex-RAID volume:
1. Replace one disk in the volume with a larger-capacity disk.
For more information about how to add a disk to your system, see the hardware manual
for your system, which is available at
http://support.netgear.com/product/ReadyNAS-OS6.
Note: You must use supported disks in your ReadyNAS system. For a list
of supported disks, visit http://www.netgear.com/readynas-hcl.
2. Wait for the volume to resync your data.
You can continue to use your ReadyNAS system while the volume is resyncing.
Resyncing can take several hours. The start and completion of the resyncing process is
recorded in the system log (see
System Logs on page 201).
If you set up email notifications for your system, you receive an ema il messag e when the
process finishes. For more information about alert notifications, see
Configure System
Alerts on page 155.
3. Repeat step 1-step 2 until you have replaced each disk in the volume with a larger-capacity
disk.
31
Page 32

ReadyNAS OS 6.0
Add Protection to a Volume
Add Protection to an X-RAID2 Volume
X-RAID2 requires a minimum of two hard disks to provide protection against disk failure. If
you have a one-disk ReadyNAS storage system and want protection from disk failure, you
need to add a second disk that is at least as large as the first. It can be added while the
system is running. For more information about how to add a disk to your system, see the
hardware manual for your system, which is available at
http://support.netgear.com/product/ReadyNAS-OS6.
An X-RAID2 volume that includes two or more disks is automatically formatted to protect
gainst the failure of one disk. If you want to protect your data against the failure of two disks,
a
you must switch to Flex-RAID and select RAID 6. To use RAID 6, you must install four or
more disks. For more information about how to switch to Flex-RAID, see Change from
X-RAID2 to Flex-RAID on
Add Protection to a Flex-RAID Volume
page 21.
In certain cases, you can add a disk to a Flex-RAID volume to increase data protection. The
following table indicates whether adding a disk for data protection is possible for each
Flex-RAID configuration.
Table 3.
Number of Disks
per Volume
1 RAID 1 Yes. (Additional disk provides redundancy.)
2 RAID 1 No. (Volume protection is already redundant.)
2 or more RAID 0 No. (RAID 0 does not offer protection.)
3 or more RAID 5 Yes. (Additional disk provides dual redundancy and converts the volume to
4 RAID 10 No. (Volume protection is already redundant.)
4 or more RAID 6 No. (Volume is already protected with dual redundancy.)
Flex-RAID levels and data protection
RAID
Level
Can I add a disk to for data protection?
.)
RAID 6
Disks added to a Flex-RAID volume can only be used for protection. They cannot be used for
storage (horizontal expansion). If you want to add a disk for increased storage capacity, you
must do one of the following:
• Create a
• Change
• Switch
To add a protection to a Flex-RAID volume:
1. Add
volume using the added disks (see Create a Volume on page 27).
the RAID level (see Change to a Different RAID Level on page 23).
to X-RAID2 (see Change from Flex-RAID to X-RAID2 on page 22).
a disk to your ReadyNAS storage system.
32
Page 33

ReadyNAS OS 6.0
For more information about how to add a disk to your system, see the hardware manual
for your system, which is available at
http://support.netgear.com/product/ReadyNAS-OS6.
2. Select System > V
The new disk is displayed in the enclosu
3. Select th
e new disk from the enclosure graphic.
4. Select Add Parity n
olumes.
re graphic and is colored black.
ext to a volume that allows or requires additional protection.
A pop-up screen appears and asks you to confirm your decision.
5. Click Ye
s.
Your data protection is increased in the background while you continue to use your
storag
You can continue to use your ReadyNAS system while t
e system.
he extra disks are incorporated in
the background. The process of increasing data protection can take several hours. If you
set up email notifications for your system, you receive an email message when the
process finishes. For more information about alert notifications, see Configure System
Alerts on p
age 155.
33
Page 34

ReadyNAS OS 6.0
Maintain Volumes
Scrub a Volume
Scrubbing cleans and validates all data on a volume and checks the volume for errors. No
data is deleted. Folders, LUNs, and snapshots on the volume remain intact.
Note: Scrubbing is not an erase function.
To scrub a volume:
1. Select Sy
2. Select
3. From the pop-up menu that
stem > Volumes.
the volume that you want to scrub.
displays, select Scrub.
The scrubbing process starts.
The start and completion of the volume scrub is recorded in the system log (see System
Logs on p
If you set up email notifications for your system, you receive an ema il messag e when the
rocess finishes. For more information about alert notifications, see Configure System
p
Alerts on p
age 201).
age 155.
34
Page 35

ReadyNAS OS 6.0
Defragment a Volume
Over time, deletion, creation, and modification of files can fragment your data. Defragmentin g
a volume improves disk performance and reduces data fragmentation.
To defragment a volume:
1. Select Sy
2. Select
stem > Volumes.
the volume that you want to defragme nt.
3. From the pop-up menu that
displays, select Defrag.
The defragmentation process starts.
The start and completion of the volume defragmentation is recorded in the system log
(see System Logs on p
age 201).
If you set up email notifications for your system, you receive an ema il messag e when the
rocess finishes. For more information about alert notifications, see Configure System
p
Alerts on p
age 155.
35
Page 36

3. Shared Folders
This chapter describes how to create, manage, and access shared folders on the ReadyNAS. It
includes the following sections:
• Basic Shared Folder Concepts
• Manage Shared Folders
• Shared Folder Access Rights
• Access Shared Folders from a Network-Attached Device
• Access Shared Folders Using Cloud Services
Note: Without a volume, you cannot configure any shared folders. For
information about how to create volumes, see
page 27.
Create a Volume on
3
36
Page 37

ReadyNAS OS 6.0
Basic Shared Folder Concepts
The volumes on your ReadyNAS can be divided into shared folders an d logical unit numbe rs
(LUNs), both of which are logical entities on one or more disks. Shared folders and LUNs
enable you to organize data in a volume by type, group, user, department, and so on. A
single volume can contain multiple shared folders and LUNs.
Shared folders are NAS data sets that allow data transfer and storage over a network. You
can create
displays shared folders in the following way:
Figure 4. Shared folder with file-sharing protocols enabled
a maximum of 1,024 shared folders on the ReadyNAS. The local admin page
Figure 5. Shared folder with file-sharing protocols disabled
Shared folders are configured independently of one another, even though multiple shared
folders may reside on the same volume. You can configure properties of a shared folder,
including compression, protection, file-sharing protocols, and access rights. You can also
specify whether and how often a snapshot is created. These properties are explained in this
chapter.
Data Organization
Shared folders are the way that you group your data. You might want to group your data by
type, for example:
• Document
• Mus
• Pictures
• V
ideos
Another option is to group your data by user:
• To
• Rick
• Mary
m
s
ic
Organizations might choose to group data by department:
• Accounting
Shared Folders
37
Page 38

ReadyNAS OS 6.0
• Sales
• Personnel
You can combine these schemes or come up with your own scheme.
Shared Folder Defaults
If you used the Setup Wizard (see Local Setup Wizard on page 12) to configure your ReadyNAS
storage system, the following shared folders are created for you:
• Backup
• Documents
• Music
• Pictures
• readydrop
• Videos
If you want, you can delete or rename these shared folders. You can create other shared
folders to organize your data.
File and Folder Names
A shared folder can contain subfolders to help you organize your data and files that contain
your data. If all characters in the file or folder name are alphanumeric, the maximum length of
the name is 255 characters. If you use other kinds of characters, the maximum length might
be reduced. For example, if a file or folder name uses Kanji or Hanzi characters, the
maximum length of the name might be 83 characters.
File-Sharing Protocols
Shared folders can be accessed over a LAN or W AN network. Network access to dat a stored
on your ReadyNAS system is managed by file-sharing protocols, which handle the transfer of
data. You can access a shared folder on your ReadyNAS from other network-attached
devices (for example, a laptop or a tablet) if the shared folder is enabled for a file-sharing
protocol that the network-attached device supports. You can enable multiple protocols for an
individual shared folder, allowin g users to access the shared folder through various me thods.
For information about how to configure and enable file-sharing protocols for shared folders,
Set Network Access Rights to Shared Folders on page 48.
see
Shared Folders
38
Page 39

ReadyNAS OS 6.0
The following table lists the file-sharing protocols that your ReadyNAS storage system
supports.
Table 4. Supported file-sharing protocols
Protocol Description Recommendation
SMB
(Server Message Block)
NFS
(Network File Service)
AFP
(Apple File Protocol)
FTP
(File Transfer Protocol)
TPS (FTP with SSL
and F
encryption)
Used mainly by Microsoft Windows
computers and sometimes by Mac OS
computers, this protocol is enabled by
default. It is sometimes referred to as the
CIFS (Common Internet File Service)
file-sharing protocol. SMB uses TCP/IP.
Linux and Unix computers use NFS. Mac
OS
X users can access NFS shared
folders through console shell access.
Your ReadyNAS system supports NFS
v3 over UDP and TCP and NFS v4 over
TCP.
Mac OS X computers use AFP. Your
ReadyNAS system support
Many public file upload and download
sites us
anonymous or user access for FTP
clients. You can elect to set up port
forwarding to nonstandard ports for
passive FTP, allowing clients to initiate a
connection to the ReadyNAS.
e FTP. The ReadyNAS supports
s AFP 3.3.
X
If Windows users access your
storage system, enable this protocol.
If Linux or Unix users access your
ge system, enable this protocol.
stora
If only Mac OS X users access your
storage system, enable this protocol.
However, in a mixed Windows and
Mac environment, NETGEAR
recommends using SMB only.
If users access your storage system
FTP, enable this protocol.
using
Rsync Fast file-transfer protocol that uses a
delta-transfer algorithm that sends only
the differences between the source file
and the existing file.
HTTP
(Hypertext Transfer
rotocol and HTTPS
P
(HTTP with SSL
encryption
)
Used on the World Wide Web. If users access your storage system
Shared Folders
39
If users access your storage system
from a device that supports Rsync,
enable this protocol.
from
a device with a web browser,
including a smartphone or tablet
computer, enable this protocol.
Page 40

ReadyNAS OS 6.0
Access Rights
For each shared folder you create, you can specify the access right to that shared folder for
each user. The following table lists access right options available to you.
Table 5. Access right options
Access Right Description
Read-only The user with this permission can read files on this
create files on this shared folder.
Read/write A user with this permission can read, edit, and create files on this shared folder.
Read-only for everyone
with exception
Read/write for everyone
with exception
Disabled with exceptions Access to this shared folder is disabled for all users except for one or more users
s
s
Access to this shared folder is read-only for all users except for one or more users
who are granted read/write permission.
Access to this shared folder is read/write for all users except for one or more users
who are granted read-only permission.
who are granted either read-only or read/write permission.
shared folder, but cannot edit or
Shared Folders
40
Page 41

ReadyNAS OS 6.0
Manage Shared Folders
Create a Shared Folder
After you create a volume (see Create a Volume on page 27), you can create shared folders
on that volume.
To create a shared folder:
1. Select Sha
A list of shared folders and LUNs on each volume displays.
2. Click the New Fol
folder.
The New Folder pop-up screen displays:
res > Shares.
der button to the right of the volume to which you want to add a shared
Shared Folders
41
Page 42

ReadyNAS OS 6.0
3. Configure the settings as explained in the following table:
Item Description
Name A unique name to identify the shared folder. Do not include spaces in the name.
Description An optional description to help identify the shared folder.
Compression Select the Com
storage space and increases the speed of data transfers, but the compression and
decompression processes require additional resources. By default, the Compression
check box is cleared.
Continuous
rotection
P
Protocol Select the check box next to each file-sharing protocol that you want to enable on the
Select the Continuous Protection check box to enable data protection through
snapshots and configure how often snapshots are taken. By default, the Continuous
Protection check box is selected. For more information about snapshots, see Chapter 5,
Snapshots.
Interval The interval specifies how often a snapsho
shared folder:
• SMB
• NFS
• AFP
P
• FT
• RSYNC
• HTTP
For information about these protocols, see File-Sharing Protocols on p
pression check box to enable data compression. Compression saves
t is taken. Make a selection from
the drop-down list:
• Hourly. A
• Daily. A snapshot is taken every day at midnight.
eekly. A snapshot is taken every week on Friday at midnight.
• W
snapshot is taken every hour on the hour.
age 38.
4. Click Create.
The ReadyNAS confirms the creation of a shared folder with the message “Folder or LUN
successfully creat
ed.”
5. Click OK.
The new shared folder is added to the Shares screen. Basic infor
mation is displayed to
the right of the shared folder.
Shared Folders
42
Page 43

ReadyNAS OS 6.0
View and Change the Properties of a Shared Folder
To view and change the properties of a shared folder:
1. Select Shares > Shares.
A list of shared folders and LUNs on each volume displays.
2. Select th
3. From the pop-up menu that
e shared folder that you want to configure.
displays, select Settings.
The folder settings display in a pop-up screen.
Shared Folders
43
Page 44

ReadyNAS OS 6.0
4. Change the settings as explained in the following table.
Item Description
Properties
Name A unique name to identify the shared folder. Do not include spaces in the name. All
cters must be alphanumeric.
chara
Description An optional description to help identify the shared folder.
Compression Select the Com
storage space and increases the speed of data transfers, but the compression and
decompression processes require additional resources.
Continuous
rotection
P
Allow Snapshot
Access
ReadyDLNA Select the Rea
Select the Continuous Protection check box to enable data protection through
snapshots and configure how often snapshots are taken. By default, the Continuous
Protection check box is selected. For more information about snapshots, see Chapter 5,
Snapshots.
Interval The interval specifies how often a snapshot is t
the drop-down list:
• Hour
• Da
• W
Select the Allow Snapshot Access check box to allow snapshot access to anyone who
has permission to access the shared folder. The default snapshot access folder displays
in the Snapshot folder field.
When you allow snapshot access, a subfolder with the name sn
shared folder to allow users access to data from past snapshots. Users can then access
older versions of their files or recover files that were deleted.
more information about ReadyDLNA, see ReadyDLNA on p
Media
Type
Specify the type of media that you want to stream from the folder. Make a
selection from the drop-down list:
• All
• Video
• Audio
• Images
pression check box to enable data compression. Compression saves
aken. Make a selection from
ly. A snapshot is taken every hour on the hour.
ily. A snapshot is taken every day at midnight.
eekly. A snapshot is taken every week on Friday at midnight.
apshot is created on the
dyDLNA Service check box to enable ReadyDLNA for the folder. For
age 186.
Access
For information about how to provide folder access to users and groups, see Set Network Access Rights to
Shared Folders on
Security
For information about how to configure access rights for files and folders, see Set Up Access Rights to Files
and Folders on
page 48.
page 57.
5. Click Apply.
6. Click OK.
Your changes are saved and the pop-up screen closes.
Shared Folders
44
Page 45

ReadyNAS OS 6.0
WARNING:
Delete a Shared Folder
Deleting a shared folder permanently removes the data within that
shared folder, including its snapshots.
To delete a shared folder from a volume:
1. Select Sha
res > Shares.
A list of shared folders and LUNs on each volume displays.
2. Select th
From the pop-up menu that displays, select Delete.
3.
4. Conf
e shared folder that you want to delete.
irm the deletion.
Shared Folders
45
Page 46

ReadyNAS OS 6.0
Browse a Shared Folder
You can browse the contents of a shared folder from the local admin page.
To browse a shared folder:
1. Select Sh
ares > Browse.
A list of shared folders on each volume displays.
2. Select the shared folder that you want to browse.
The contents of the shared folder display.
Tip: Use the forward and back ( ) arrows to browse through folders.
You can view files and folders as a list with det
large icons. To change views, select one of the view icons (
ails, as small icons, or as
) at
the right side of the screen.
Shared Folders
46
Page 47

ReadyNAS OS 6.0
Shared Folder Access Rights
Access Rights to Shared Folders
Access rights apply to individual shared folders. For each shared folder, you control the
file-sharing protocols that can be used to access the shared folder and the access rights
granted to each user, group, and host. For example, you might want to grant a user
read/write permission on one shared folder, read-only permission on another shared folder,
and no access rights at all on a third shared folder. By default, all users and groups have
read/write access
The following table lists access right options available to you
Table 6. Access right options
Access Right Description
Read-only The user with this permission can read files on this shared folder, but cannot edit or
create files on this shared folder.
Read/write A user with this permission can read, edit,
Read-only for everyone
with exceptions
Read/write for everyone
with exception
Disabled with exceptions Access to this shared folder is disabled for all users except for one or more users
s
Access to this shared folder is read-only for all users except for one or more users
who are granted read/write permission.
Access to this shared folder is read/write for all users except for one or more users
who are granted read-only permission.
are granted either read-only or read/write permission.
who
.
and create files on this shared folder.
User and Group Authentication
The way that users and groups are authenticated depends on the user and group
management mode that you selected (see User and Group Management Modes on
page 137):
ocal user database. If you use the local database, create group and user accounts
• L
before you set up shared folder access rights. For more information about creating and
managing groups and user accounts, see Chapter 6, Users and Groups.
• Acti
ve Directory. If you use an external Active Directory, the user and group information
is downloaded into the ReadyNAS. User and group access rights are listed when you
select the Access tab in the shared folder settings pop-up screen.
Shared Folders
47
Page 48

ReadyNAS OS 6.0
Set Network Access Rights to Shared Folders
To set the network access rights to an individual shared folder, you configure the network
access settings for each file-sharing protocol used to access the shared folder on your
storage system.
To set the network access rights for a shared folder:
1. Select Sha
res > Shares.
A list of shared folders and LUNs on each volume displays.
2. Select th
3. From the pop-up menu that
e shared folder that you want to configure.
displays, select Settings.
The shared folder settings display in a pop-up screen.
4. Select th
e Access tab.
Shared Folders
48
Page 49

ReadyNAS OS 6.0
5. Click one of the file-sharing protocol buttons:
• SMB
• NFS
• AFP
• FTP
• RSYNC
• HTTP
The screen adjusts to display the access properties for the selected protocol.
6. Configure the network access settings for the selected protocol.
For more information, see the following sections (not all sections apply to all protocols):
• Configure User and Group Settings on page 50.
• Configure Host Settings on page 52.
• Configure Rsync Credentials on page 53.
• Manage Access to Remote Shared Folders on page 54
• Hide a Shared Folder on page 56.
7. Set the On-Off slider for the selected protocol:
• To enable the protocol for the selected folder, set the On-Of f slider so the slider shows
the On position.
The indicator on the protocol button turns green.
Note: When you enable a file-sharing protocol for an individual shared folder,
the protocol is also enabled globally. For more information about global
settings, see
Configure Global Settings for File-Sharing Protocols on page 179.
• To save the configured access settings but prevent them from taking effect, set the
On-Off slider so the slider shows the Off position.
The indicator on the protocol button turns gray.
Note: When you disable a file-sharing protocol for an individual shared folder,
the protocol remains enabled globally so that you can still access other folders
that might be using the protocol. For more information about global settings,
see
Configure Global Settings for File-Sharing Protocols on page 179.
8. Click Apply.
9. Click OK.
Your changes are saved and the pop-up screen closes.
Shared Folders
49
Page 50

ReadyNAS OS 6.0
Configure User and Group Settings
For SMB, AFP, FTP, and HTTP, you can configure access rights to an individual shared folde r
for users and groups. User and group settings do not apply to NFS and Rsync.
To configure user and group network access settings:
1. On the
2. Select one
folder settings pop-up screen, select the Access tab.
of the file-sharing protocol buttons:
• SMB
• AFP
• FT
P
• HTTP
The screen adjusts to display the access properties for the selected protocol.
3. Select th
e Security tab on the left side of the pop-up screen.
4. From the drop-down list, make one of the following selections to specify the information that
you want to view:
• All.
The default group Everyone and all groups that you configured on the local
database or that were downloaded from the Active Directory server are displayed.
This is the default setting.
• User
s. Only the individual users that you configured on the local database or that
were downloaded from the Active Directory server are displayed.
• Group
s. Only the groups that you configured on the local database or that were
downloaded from the Active Directory server are displayed.
For information about using the local database or an Active Directory, see User and
Group Management Modes on p
age 137.
Shared Folders
50
Page 51

ReadyNAS OS 6.0
Tip: To search for a particular user or group, use the search field next to the
Search icon (
To update the user and group information, click the Re
).
fresh icon ( ).
5. For each gro
up and individual user to which you want to grant access to the shared folder,
select one of the following check boxes:
• Read Only. The
selected user or group is only permitted to read files on the shared
folder.
• Read/W
rite. The selected user or group is permitted to read, edit, create, and delete
files on the shared folder.
Note: If the ReadyNAS uses the local database, you can select the default
roup Everyone and set read-only or read/write access for everyone.
g
6. (Optional fo
r SMB and AFP) Allow anonymous access to the shared folder.
If the ReadyNAS uses the local database and you have granted the default group
Everyo
ne access, you can select the Allow anonymous access check box to allow
anonymous access to the shared folder . In this situation, users are not required to provide
access credentials.
7. Click App
ly .
8. Click OK.
Your changes are saved and the pop-up screen closes.
Shared Folders
51
Page 52

ReadyNAS OS 6.0
Configure Host Settings
For SMB, NFS, FTP, Rsync, and HTTP, you can configure access rights for users on hosts.
Host settings do not apply to AFP. The access rights that you configure for one host apply to
all users on the host. For NFS, you can also configure the access rights that apply to any
host, and, for individual hosts, you can configure whether root access is granted.
To add a host and configure host access settings:
1. On the
2. Click one of the file-sharing protocol butt
folder settings pop-up screen, select the Access tab.
ons:
• SMB
• NFS
• FT
P
• Rsync
• HTTP
The screen adjusts to display the access properties for the selected protocol.
3. Select th
e Hosts tab on the left side of the pop-up screen.
Note: If the host access list is empty, any host is allowed to access the
shared folder.
If you add at least one host to the list, access to the shared folder is
restricted to hosts on the list only.
4. Click the + button ( ).
Shared Folders
52
Page 53

ReadyNAS OS 6.0
The Add Host pop-up screen displays.
5. Enter the host IP address in the IP address field.
6. Click Add.
The host is added to the host access list.
Note: For SMB, the access rights for each host depend on the access rights
o
f the user.
7. (Optional fo
r Rsync) Set the default access rights for users on the listed hosts by selecting
one of the following options from the drop-down list:
• Read Only. T
he users on the listed hosts are only permitted to read files on the
shared folder.
• Read/W
rite. The users on the listed hosts are permitted to read, edit, create, and
delete files on the shared folder.
8. (Optional f
or NFS, FTP, and HTTP) For each host on the host access list, select one of the
following check boxes:
• Read Only. T
he users on the selected host are only permitted to read files on the
shared folder.
• Read/W
rite. The users on the selected host are permitted to read, edit, create, and
delete files on the shared folder.
Note: For NFS only, you can set access rights for
AnyHost, which is a default
entry in the host access list. You cannot grant root access to AnyHost.
9. (Optional fo
r NFS) For each host for which you want to grant the users root access, select
the Root Acc ess check box.
10. Click Apply to
save your changes.
11. Click OK.
Your changes are saved and the pop-up screen closes.
Configure Rsync Credentials
You can require users to enter Rsync credentials when accessing your storage system using
Rsync.
Shared Folders
53
Page 54

ReadyNAS OS 6.0
To require credentials for Rsync sessions:
1. On the folder settings pop-up screen, select the Access tab.
2. Click the RS
3. Select th
YNC file-sharing protocol button.
e Security tab on the left side of the pop-up screen.
4. Select the Enable Password Protection check box.
5. Click the + button (
) and create at least one Rsync user account and password.
Note: Rsync credentials are completely separate from your ReadyNAS
storag
e system’s user accounts.
6. Click App
ly .
7. Click OK.
Your changes are saved and the pop-up screen closes.
Manage Access to Remote Shared Folders
The SMB protocol allows you to access remote shared folders on other network-attached
devices and treat them as if they resided locally on your ReadyNAS system.
To enable access to a remote shared folder:
1. On the
folder settings pop-up screen, select the Access tab.
Shared Folders
54
Page 55

ReadyNAS OS 6.0
2. Click the SMB file-sharing protocol button.
3. Select th
e DFS tab on the left side of the pop-up screen.
4. Select the Enable DFS Root check box.
5. Click the + button (
) above the list of remote shared folders.
6. In the pop-up screen that displays, enter the following information:
• Name. The
name of the remote shared folder, as you want it to appear on your
ReadyNAS.
• Addres
s. The IP address of the network-attached device where the remote shared
folder resides.
• Rem
ote share. The name of the remote shared folder, as it appears on the
network-attached device.
7. Click Add.
The new remote shared folder appears on the list.
8. Click App
ly .
Shared Folders
55
Page 56

ReadyNAS OS 6.0
9. Click OK.
Your changes are saved and the pop-up screen closes.
10. Make sure tha
t the remote shared folder on the network-attached device is configured for
file sharing.
You can now access the remote shared folder fro
m your ReadyNAS system using the
SMB protocol. For information about how to access your system using the SMB protocol,
see Use a Windows Device on p
age 61 or Use a Mac OS X Device on page 62.
Hide a Shared Folder
This feature is available for SMB only. Hiding a folder prevents users from discovering the
folder unless they explicitly specify the folder name in the browse path.
To configure advanced settings for SMB:
1. On the
2. Click the SMB f
3. Select th
folder settings pop-up screen, select the Access tab.
ile-sharing protocol button.
e Advanced tab on the left side of the pop-up screen.
4. Select the Hide this folder check box.
Shared Folders
56
Page 57

ReadyNAS OS 6.0
Set Up Access Rights to Files and Folders
For each individual shared folder, you can configure the default access rights to files and
folders.
Change Default Access Rights to Files and Folders
By default, owners, groups, and anyone else with access to the shared folder has read/write
access to all files and folders on the shared folder.
To change the default access rights to files and folders on an individual shared folder:
1. Select Sha
A list of shared folders and LUNs on each volume displays.
2. Select th
3. From the pop-up menu that
The shared folder settings display in a pop-up screen.
res > Shares.
e shared folder that you want to configure.
displays, select Settings.
Shared Folders
57
Page 58

ReadyNAS OS 6.0
4. Select the Security tab on the pop-up screen.
5. Configure the file and folder access rights as explained in the following table:
Item Setting
Folder Owner You can assign a single user or the administrator as the folder owner. By default,
the folder owner is set to guest.
Folder Group You can assign a single group, a single user, or the administrator as the folder
up. By default, the folder group is set to guest.
gro
Folder Owner Rights Permissions granted to the folder owner. Make a selection from the drop-down
list:
• Disab
• Read Only. The folder owner has read-only access to the folder.
• Read
Folder Group Rights Permissions granted to members of the same group
group. Make a selection from the drop-down list:
• Disab
• Read
• Re
led. The folder owner does not have access rights to the folder.
/Write. The folder owner has read/write access to the folder. This is the
default setting.
as the owner’s primary
led. Members of the group have no access to folders tha t are owned by
a member of the group.
Only. Members of the group have read-only access to folders that are
owned by a member of the group.
ad/Write. Members of the group have read/write access to folders that a re
owned by a member of the group. This is the default setting.
Folder Everyone Rights Permissions granted to users who are not the folder owner and not members of
folder group. Make a selection from the drop-down list:
the
• Disab
• Read On
• Rea
led. No one outside the folder group has access rights to the folder.
ly. Anyone outside folder group has read-only access to the folder.
d/Write. Anyone outside the folder group has read/write access to the
folder. This is the default setting.
Shared Folders
58
Page 59

ReadyNAS OS 6.0
To restore the default file and folder access rights on an individual shared folder:
1. Select Shares > Shares.
A list of shared folders and LUNs on each volume displays.
2. Select th
3. From the pop-up menu that
e shared folder that you want to configure
displays, select Settings.
The shared folder settings display in a pop-up screen.
4. Select th
e Security tab on the pop-up screen.
5. Click Reset perm issions.
The default access rights are restored. Owners, groups, and anyone else with access to
he shared folder gains read/write access to all files and folders on the shared folder.
t
Shared Folders
59
Page 60

ReadyNAS OS 6.0
Access Shared Folders from a Network-Attached Device
You can remotely access shared folders and snapshots on your storage system using other
network-attached devices, such as a laptop or tablet. The network-attached device must
support one of the enabled file-sharing protocols. How a shared folder is accessed depends
on the OS of the network-attached device, the file-sharing protocols that you enabled for
shared folder access, and the access rights that you granted (see
Rights on page 47).
Note: For snapshots to be accessible to users from their network-attached
devices, you need to select the Allow snapshot access check box
on the shared folder settings pop-up screen. For more information,
see View and Change the Properties of a Shared Folde r on page 43.
Use a Web Browser
Shared Folder Access
You can use a web browser to access files that are stored on your ReadyNAS system.
Note: If you are accessing your files from a network that is outside your
LAN, you must configure port forwarding on your router. For more
information, see your router user manual.
To access a shared folder using a web browser:
1. Ensure that the HTTP file-sharing protocol is enabled on your ReadyNAS system.
For more information, see Set Network Access Rights to Shared Folders on page 48.
2. Launch a web browser.
3. Navigate to the ReadyNAS system and shared folder you want to access using the following
syntax:
http://<hostname>/<shared folder>
• <hostname> is the name that you assigned to your ReadyNAS system or the default
hostname if you did not change it.
• <shared folder> is the name of the shared folder that you want to access.
Note: If you cannot access the ReadyNAS using its host name, try entering
http://<ReadyNAS IP address> in the Windows Explore address bar instead.
<ReadyNAS IP address> is the IP address of the ReadyNAS.
4. (Optional) For a secure encrypted connection, replace http with https.
Shared Folders
60
Page 61

ReadyNAS OS 6.0
You are prompted to log in to your ReadyNAS system.
Enter a user ID and password.
Y ou can log in with administrator or user credentials.
limited by the settings configured by the ReadyNAS system administrator.
Your shared folders are displayed in a web page.
If you log in as a user, your access is
Use a Windows Device
You can access shared folders on your ReadyNAS system using a network-attached
Windows-based device.
To access a shared folder using a network-attached Windows device:
1. Ensure th
For more information, see Set Network Access Rights to Shared Folders o
2. Ente
<hostname> is the name that you assigned to your ReadyNAS system or the default
hostname if you did not change it.
at the SMB file-sharing protocol is enabled on your ReadyNAS system.
r \\<hostname> in the Windows Explorer address bar.
n page 48.
Note: If you cannot access the ReadyNAS using its host name, try entering
\<ReadyNAS IP address> in the Windows Explore address bar instead.
\
<ReadyNAS IP address> is the IP address of the ReadyNAS.
You are prompted to log in to your ReadyNAS system.
3. Ente
r a user ID and password.
Y ou can log in with administrator or user credentials.
limited by the settings configured by the ReadyNAS system administrator.
Windows Explorer displays the contents of a
ReadyNAS system.
ll available shared folders on your
If you log in as a user, your access is
Shared Folders
61
Page 62

ReadyNAS OS 6.0
Use a Mac OS X Device
You can access shared folders on your ReadyNAS system using a network-attached OS X
device.
To access a shared folder using a network-attached OS X device:
1. Ensure
For more information, see Set Network Access Rights to Shared Folders o
2. In Finder
The Connect to Server dialog box displays.
3. Conn
• If you are
that the AFP or SMB file-sharing protocol is enabled on your ReadyNAS system.
, select Go > Connect to Server.
ect to your ReadyNAS system as follows:
using the AFP file-sharing protocol, enter the following command in the
Server Address field:
n page 48.
afp://<hos
• If you are
Server Address field:
smb://<hos
In both cases, <hostn
or the default hostname if you did not change it.
Note: If you cannot access the ReadyNAS using its host name, try entering
fp://<ReadyNAS IP address> or smb://<ReadyNAS IP address> instead.
a
<ReadyNAS IP address> is the IP address of the ReadyNAS.
4. Click the Co
You are prompted to log in to your ReadyNAS system.
5. Ente
r a user ID and password.
tname>
using the SMB file-sharing protocol, enter the following command in the
tname>
ame> is the name that you assigned to your ReadyNAS system
nnect button.
Shared Folders
62
Page 63

ReadyNAS OS 6.0
Y ou can log in with administrator or user credentials. If you log in as a user , your access is
limited by the settings configured by the ReadyNAS system administrator.
You are prompted to select a volume. Mac OS X calls your ReadyNAS shared folders
.
es
volum
6. Select
the volume or volumes (shared folder or folders) you want to access and click the OK
button.
Finder displays the volume contents.
Shared Folders
63
Page 64

ReadyNAS OS 6.0
Use a Linux or Unix Device
Y ou can access shared folders on your ReadyNAS system using a network-attached Linux or
Unix device.
Note: Your ReadyNAS system does not support NIS because it is unable
to correlate NIS information with SMB user accounts. In mixed
environments where you want SMB and NFS integration, manually
specify the user ID and group ID of the user and group accounts to
match your NIS or other Linux or Unix server setting.
To access an SMB shared folder using a network-attached Linux or Unix device:
1. Ensure that the SMB file-sharing protocol is enabled on your ReadyNAS system.
For more information, see Set Network Access Rights to Shared Folders on page 48.
2. Using a terminal program, enter the following command:
mount [-t smb -o username=<user name>,password=<password>]
//<ReadyNAS IP address>/<shared folder name> <mount point>
• <user name> and <password> match the user name and password on the
ReadyNAS.
• <ReadyNAS IP address> is the IP address of the ReadyNAS.
• <shared folder name> is the name of the shared folder that you want to access.
• <mount point> is the name of an empty folder on the Linux or Unix device.
To access an NFS shared folder using a network-attached Linux or Unix device:
1. Ensure that the NFS file-sharing protocol is enabled on your ReadyNAS system.
For more information, see Set Network Access Rights to Shared Folders on page 48.
2. Using a terminal program, enter the following command:
mount [-t nfs] <ReadyNAS IP address>:/<volume name>/<shared folder
name> <mount point>
• <ReadyNAS IP address> is the IP address of the ReadyNAS.
• <volume name> is the name of the volume on which the shared folder resides.
• <shared folder name> is the name of the shared folder that you want to access.
• <mount point> is the name of an empty folder on the Linux or Unix device.
Shared Folders
64
Page 65

ReadyNAS OS 6.0
Use FTP and FTPS
You can use FTP and FTPS to access any shared folders that are enabled for the FTP and
FTPS file-sharing protocols.
For better security, use an FTPS client to connect to your ReadyNAS using the FTP
file-sharing protocol. With FTPS, your password and data are encrypted.
If you are using FTPS, you must use explicit mode (also known as FTPES or AUTH TLS) in
your FTP client.
To access a shared folder using FTP:
1. Ensure that the FTP file-sharing protocol is enabled on your ReadyNAS system.
For more information, see Set Network Access Rights to Shared Folders on page 48.
2. Launch an FTP client or a terminal program.
3. Log in to your ReadyNAS system, as follows:
• If you required user FTP access when you enabled the FTP-file sharing protocol, log
in using user or administrator credentials for your ReadyNAS system. If you log in as
a user, your access is limited by the settings configured by the ReadyNAS system
administrator.
• If you allowed anonymous access when you enabled the FTP-file sharing protocol,
log in as anonymous and use your email address for the password.
Use Rsync
You can use Rsync to access any shared folders that are enabled for the Rsync file-sharing
protocol. Instead of browsing shared folders as you do with some other file-sharing protocols,
with Rsync, you copy files from your ReadyNAS system to another computer that supports
the Rsync file-sharing protocol. If you previously copied these files, Rsync copies only the
differences between the source files and the destination files, making the transfer much
quicker than using other file-sharing protocols. The first time you copy files using the Rsync
file-sharing protocol, you see no performance difference.
To access shared folders using Rsync:
1. Ensure that the Rsync file-sharing protocol is enabled on your ReadyNAS storage
system.
For more information, see Set Network Access Rights to Shared Folders on page 48.
2. On a network-attached device that supports the Rsync file-sharing protocol, launch a
terminal program or an Rsync client.
3. Enter any required credentials for the shared folder.
For more information about Rsync shared folder access credentials, see Configure Rsync
Credentials on page 53. For more information about Rsync terminal program commands,
visit http://rsync.samba.org. For more information about using an Rsync client application,
see the documentation that accompanies the application.
Shared Folders
65
Page 66

ReadyNAS OS 6.0
Access Shared Folders Using Cloud Services
Several cloud-based services are preinstalled on your ReadyNAS system, including
ReadyCLOUD, ReadyNAS Remote, and ReadyDROP. You can use these services to
remotely access your storage system.
Use ReadyCLOUD
ReadyCLOUD is an online service that you use to discover and set up ReadyNAS storage
systems on your network. After you discover your ReadyNAS system using ReadyCLOUD,
you can use ReadyCLOUD to securely access and manage your system from anywhere that
has an Internet connection.
For more information about discovering your de
ReadyCLOUD account, see ReadyCLOUD on
Using ReadyCLOUD involves these high-level steps:
1. Add
2. (Optional) Grant
3. Access
your ReadyNAS system to your ReadyCLOUD account. (See Join ReadyCLOUD
on page 66.)
access to Cloud users. (See Add Cloud Users on page 148.)
your data and manage your ReadyNAS system using ReadyCLOUD. (See Access
Your System Using ReadyCLOUD on p
vice using ReadyCLOUD or creating a
page 10.
age 68.)
Join ReadyCLOUD
The ReadyCLOUD service is preinstalled on your ReadyNAS storage system. Before you
can access your system using ReadyCLOUD, you must add your system to your
ReadyCLOUD account.
To add your ReadyNAS system to ReadyCLOUD:
1. On the
2.
Select the check box next to the ReadyCLOUD icon.
local admin page, select Cloud > Cloud Services.
Shared Folders
66
Page 67

ReadyNAS OS 6.0
3. On the pop-up screen that displays, enter your ReadyCLOUD account credentials.
4. Click Join.
Your system is added to your ReadyCLOUD accou
nt.
Note: If you decide to remove your system from your ReadyCLOUD
account, any Cloud users that you added will lose access to the
system. For more information about Cloud users, see
Cloud Users
on page 148.
Shared Folders
67
Page 68

ReadyNAS OS 6.0
Access Your System Using ReadyCLOUD
To access your data and manage your ReadyNAS using ReadyCLOUD:
1. Open
a web browser and visit http://readycloud.netgear.com.
2. Click Sign I n near the top right corner of the screen.
3. In the pop-up screen that
displays, enter your ReadyCLOUD account credentials.
You are logged in to ReadyCLOUD. You can now use the ReadyCLOUD web interface to
access your data and manage any systems that you added to your ReadyCLOUD
account.
Shared Folders
68
Page 69

ReadyNAS OS 6.0
Use ReadyNAS Remote
ReadyNAS Remote is a web-based service that allows you to drag and drop files between
your ReadyNAS system and your Windows or Mac computer using the SMB file-sharing
protocol. All file permissions and shared folder security settings are retained as if you were
on your LAN. All data is encrypted so that it is transmitted securely.
ReadyNAS Remote uses preinstalled software o
software program for your Windows or Mac computer.
Using ReadyDROP involves these high-level steps:
1. Ena
2. Grant access
3. Install ReadyNAS Remote client software on your computer. (See Inst
4. Access
ble ReadyNAS Remote on your ReadyNAS storage system. (See Enable
ReadyNAS Remote on p
to Cloud users. (See Add Cloud Users on page 148.)
Remote Client on Remote Devices on p
your shared folders. (See Access Shared Folders Using ReadyNAS Remote on
page 72.)
age 69.)
n your ReadyNAS system and a small
all the ReadyNAS
age 71.)
Enable ReadyNAS Remote
The ReadyNAS Remote service is preinstalled on your ReadyNAS storage system. Before
you can access shared folders using ReadyNAS Remote, you must enable it on your
ReadyNAS system.
To enable ReadyNAS Remote:
1. On the
2.
Select the check box next to the ReadyNAS Remote icon.
local admin page, select Cloud > Cloud Services.
The ReadyNAS Remote service verifies that your Intern
your device is online.
Shared Folders
69
et connection is working and that
Page 70

ReadyNAS Remote is enabled.
ReadyNAS OS 6.0
3. (Optional) Conf
a. Click the ReadyNAS
b. Select Settings from the pop
igure advanced settings for the ReadyNAS Remote service.
Remote icon.
-up menu that displays.
c. Configure the options in the pop-up screen that displays.
d. Click Apply.
Your changes are saved and the pop-up screen closes.
Shared Folders
70
Page 71

ReadyNAS OS 6.0
Mac system tray
Windows system tray
Install the ReadyNAS Remote Client on Remote Devices
Before you can access shared folders using ReadyNAS Remote, you must install the
ReadyNAS Remote client software on your Windows or Mac computer.
To install ReadyNAS Remote client on remote devices:
1. Using th
e device from which you want to remotely access a ReadyNAS system, visit
http://www.netgear.com/ReadyNAS-remote.
2. Download the
appropriate client software for your operating system and install it according to
your operating system’s instructions.
3. Launch the ReadyNAS Remote client.
4. Log in to yo
ur ReadyNAS Remote account or create a free ReadyNAS Remote account.
Tip: If you created
a ReadyCLOUD account, you can use your ReadyCLOUD
credentials to log in to ReadyNAS Remote. For more information about
ReadyCLOUD, see ReadyCLOUD o
n page 10.
The ReadyNAS Remote icon displays in your system tray.
The ReadyNAS Remote client is installed on your device.
Shared Folders
71
Page 72

ReadyNAS OS 6.0
Access Shared Folders Using ReadyNAS Remote
You can use ReadyNAS Remote to drag and drop files between your computer and your
ReadyNAS system, even when your computer is not on the same LAN as your ReadyNAS
system.
To access shared folders using ReadyNAS Remote on a Windows computer:
1. Launch the ReadyNAS Remote client sof
2. Right
-click the ReadyNAS Remote icon in the system tray.
tware on your computer.
3. From the pop-up menu that displays, select Log In.
The ReadyNAS Remote icon blinks while the d
evice is connecting and displays as blue
when it is connected.
4. Click the Rea
5. A list of yo
dyNAS Remote icon in the system tray.
ur ReadyNAS Remote devices displays.
6. Click the device that you want to access.
7. Ente
r user or admin credentials to access the device.
Your shared folders open in Windows Explorer.
You can now drag and drop files betwe en your co mputer and your Rea dyNAS system as
hough you were on the ReadyNAS LAN.
t
Shared Folders
72
Page 73

ReadyNAS OS 6.0
To access shared folders using ReadyNAS Remote on a Mac computer:
1. Launch the ReadyNAS Remote client software on your computer.
2. Click the Rea
dyNAS Remote icon in the system tray.
3. From the drop-down menu that displays, select Shares.
4. From
the menu that displays, select the ReadyNAS Remote device that you wan t to access.
A list of shared folders on the selected device displays.
5. Select the shared folders you want to access and click OK.
Your shared folders open in Finder.
You can now drag and drop files between your Mac and your ReadyNAS system as
hough you were on the ReadyNAS LAN.
t
Shared Folders
73
Page 74

ReadyNAS OS 6.0
Use ReadyDROP
ReadyDROP allows you to synchronize files in real time between your ReadyNAS storage
system and ReadyDROP-enabled remote devices. Any files that you put in a ReadyDROP
folder on your ReadyNAS system or on ReadyDROP-enabled remote devices are
synchronized automatically, in the background, as long as the devices have Internet access.
Changes are synchronized to all of your ReadyDROP folders in the background, in real time.
Using ReadyDROP involves these high-level steps:
1. Enab l e Re a dy N AS R e mo t e on your ReadyNAS storage system. (See Enable ReadyNAS
Remote on page 69.)
2. Enable ReadyDROP on your ReadyNAS storage system. (See Enable ReadyDROP on
page 75.)
3. Grant access to Cloud users. (See Add Cloud Users on page 148.)
4. Install ReadyNAS Remote on your remote devices. (See Install the ReadyNAS Remote
Client on Remote Devices on page 71.)
5. Manage your ReadyDROP folder using the ReadyDROP portal or from a
ReadyDROP-enabled device. (See
and Manage ReadyDROP Files from a ReadyDROP-Enabled Device on page 79.)
Manage Files Using the ReadyDROP Portal on page 76
After you follow these steps, your ReadyNAS system and your remote devices have
ReadyDROP folders that begin to sync immediately in real time as long as the devices have
Internet access. When you add, delete, or edit files in the ReadyDROP folder on your
ReadyNAS system, the changes are made in the ReadyDROP folder on all remote devices.
When you add, delete, or edit files in the ReadyDROP folder on a remote device, the
changes are made in the ReadyDROP folder on your ReadyNAS system and any other
remote devices.
Shared Folders
74
Page 75

ReadyNAS OS 6.0
Enable ReadyDROP
ReadyDROP uses ReadyNAS Remote technology. To use ReadyDROP, you must first set up
ReadyNAS Remote (see Use ReadyNAS Remote on p
To enable ReadyDROP:
age 69.)
1. Select Clou
2. Select th
d > Cloud Services.
e check box next to the ReadyDROP icon.
3. (Optional) If you have more than one volume on your ReadyNAS system, specify the
volume on which you want to create the ReadyDROP folder.
a. Click the ReadyNAS
b. Select Settings from the pop
Remote icon.
-up menu that displays.
c. In the pop-up screen that displays, select a volume for the ReadyDROP folder.
A ReadyDROP folder is created on that volume.
Shared Folders
75
Page 76

ReadyNAS OS 6.0
WARNING:
Manage Files Using the ReadyDROP Portal
The ReadyDROP portal is a web-based management interface for all of your synchronized
ReadyDROP files.
If you add, create, or rename a file with the same name as an
existing file, your browser cannot warn you of the overwrite risk.
The existing file is immediately overwritten.
To manage files using the ReadyDROP portal:
1. V
isit the ReadyDROP portal at https://readydrop.netgear.com/.
2. Enter your ReadyNAS Remote user name and password and click the Log in button.
Tip: If you created
a ReadyCLOUD account, you can use your ReadyCLOUD
credentials to log in to ReadyDROP and ReadyNAS Remote. For more
information about ReadyCLOUD, see ReadyCLOUD on p
Shared Folders
76
age 10.
Page 77

ReadyNAS OS 6.0
The ReadyDROP portal displays. Your ReadyDROP-enabled devices are listed on the
left.
3. (Optional) Do one of the following:
• Crea
te a folder.
a. Click the + icon(
) near the top right corner of the screen.
The New Folder pop-up screen displays.
b. Ent
• Delete a
er a folder name and click the Create button.
folder.
a. Right-click a file or folder icon.
b. F
rom the menu that displays, select Delete.
A pop-up screen displays asking you to confirm the delete command.
c. Click the Ye
s button.
The file is deleted.
• Cop
y a file or folder from your computer by dragging a file to the portal window and
dropping it.
Note: Your browser must support drag-and-drop capability.
Shared Folders
77
Page 78

• Upload files.
ReadyNAS OS 6.0
a. Click the Upload ic
on( ) near the top right corner of the screen.
The Upload file pop-up screen displays.
b. Click the Browse button
upload.
c. Click Upload.
The file is added to the ReadyDROP folder.
• Download f
iles.
a. Right-click a file or folder icon.
b. F
rom the menu that displays, select Download.
The file or folder is downloaded to your device.
and navigate to the file or folder that you want to
Shared Folders
78
Page 79

ReadyNAS OS 6.0
Manage ReadyDROP Files from a ReadyDROP-Enabled Device
You can use your ReadyDROP-enabled device’s native interface to manage ReadyDROP
files.
To manage ReadyDROP files from a Windows device:
1. Launch the ReadyNAS Remote client sof
2. Right
-click the ReadyNAS Remote icon in the system tray.
tware on your computer.
3. From the pop-up menu that displays, select Log In.
The ReadyNAS Remote icon blinks while the d
evice is connecting and displays as blue
when it is connected.
4. Right
5. From the pop-up menu that
6. From
-click the ReadyNAS Remote icon in the system tray.
displays, select Open ReadyDROP.
the drop-down menu that displays, select the device that contains the Rea dyDROP
folder that you want to access.
ReadyDROP launches and the ReadyDROP icon displays in the system tray.
7. Click the ReadyDROP icon.
8. From the dro
The contents of your ReadyDROP fold
You can now add, delete, or edit files in th
p-down menu that displays, select Open ReadyDROP Folder.
er displays in Windows Explorer.
e ReadyDROP folder using the standard
interface on your Windows device. Changes are synchronized with your ReadyNAS
system and all other ReadyDROP-enabled devices.
Shared Folders
79
Page 80

ReadyNAS OS 6.0
To manage ReadyDROP files from a Mac device:
1. Launch the ReadyNAS Remote client software on your computer.
2. Click the Rea
dyNAS Remote icon in the system tray.
3. From the drop-down menu that displays, select ReadyDROP.
4. From the
drop-down menu, select the device that contains the ReadyDROP folder that you
want to access.
ReadyDROP launches and a ReadyDROP icon displays in the system tray.
5. Click the ReadyDROP icon in the system tray.
6. From the dro
p-down menu that displays, select Open ReadyDROP Folder.
The contents of your ReadyDROP folder displays in Finder.
You can now add, delete, or edit files in th
e ReadyDROP folder using the standard
interface on your Mac device. Changes are synchronized with your ReadyNAS system
and all other ReadyDROP-enabled devices.
Shared Folders
80
Page 81

4. LUNs
This chapter describes how to create, manage, and access LUNs on the ReadyNAS. It includes
the following sections:
• Basic LUN Concepts
• Manage LUNs
• LUN Groups and Access Rights
• Access LUN Groups from an iSCSI-Attached Device
Note: Without a volume, you cannot configure any LUNs. For information
about how to create volumes, see Create a Volume on page 27.
4
81
Page 82

ReadyNAS OS 6.0
Basic LUN Concepts
The volumes on your ReadyNAS can be divided into shares and logical unit numbers
(LUNs), both of which are logical entities on one or more disks. Shares and LUNs enable you
to organize data in a volume by type, group, user, department, and so on. A single volume
can contain multiple shares and LUNs.
LUNs are SAN (storage area network) data sets that allow data transfer and storage over
iSCSI
ReadyNAS system supports up to 256 LUNs. The local admin page displays LUNs in the
following way:
Figure 6. Thin LUN
and Fibre Channel devices. The ReadyNAS supports iSCSI devices only. Each
Figure 7. Thick LUN
Each LUN is configured independently of other LUNs that reside on the same volume. You
can configure settings such as compression, protection, provisioning, LUN size, and access
rights. You can also specify whether and how often a snapshot is created. These settings are
explained in the following sections.
Thin vs. Thick Provisioning
You can specify the size of a LUN in two ways:
• Th
in. A thin LUN lets you overallocate its size. That is, you can assig n a L UN size that is
larger than the size of the volume. Even though you specify the size of a thin LUN when
you create it, storage space is assigned on demand instead of up front. This method
greatly improves the utilization rate of the LUN because storage space is assigned only
as data is written to the LUN. However, the size of the LUN is reported as the total
storage space that you specify when you create the LUN.
You can expand a volume as needed (if necessary, adding disks in the process) without
xpanding the size of the LUN and therefore, without disconnectin g users. Make sure that
e
you watch the volume capacity of the volume on which the overallocated LUN resides so
you do not run out of storage space unexpectedly.
Note: NETGEAR recommends that you do not use an overallocated LUN for
e of critical data. Instead, use a thick LUN.
storag
LUNs
82
Page 83

ReadyNAS OS 6.0
• Thick. All storage space that you specify when you create a thick LUN is allocated up
front and the storage space is reserved on the volume. Snapshots, other LUNs, and
shared folders on the volume cannot consume storage space that is reserved. The size of
the LUN is reported as the total storage space that you specify when you create the LUN.
You cannot assign more storage sp ace than the available non-reserved stora ge space on
the volume.
Default LUN Settings
The following table explains the default settings of a LUN. Y ou can change these settings when
you create or change the LUN.
Table 7. LUN default settings
Item Default State
Compression Disabled
Continuous Protection Enabled
Interval Daily
Provision Thick
Access Denied until you set permissions
LUNs
83
Page 84

ReadyNAS OS 6.0
Manage LUNs
Create a LUN
After you create a volume (see Create a Volume on page 27), you can create LUNs on that
volume. The following procedure describes how to create a L
you can also create a LUN from the iSCSI screen.
To create a LUN:
UN from the Shares screen, but
1. Select Sha
A list of shared folders and LUNs on each volume displays.
2. Click the New LU
The New LUN pop-up screen displays.
res > Shares.
N button to the right of the volume to which you want to add a LUN.
LUNs
84
Page 85

ReadyNAS OS 6.0
3. Configure the settings as explained in the following table:
Item Description
Name A unique name to identify the LUN. Do not include
be alphanumeric.
Description An optional description to help identify the LUN.
Compression Select the Com
storage space and increases the speed of data transfers, but the compression and
decompression processes require additional resources. By default, the Compression check
box is cleared.
Continuous
rotection
P
Provision Select how storage space is provisioned. Ma
Select the Continuous Protection check box to enable data protection through snapshots
and configure how often snapshots are taken. By default, the Continuous Protection check
box is selected. For more information about snapshots, see Chapter 5, Snapshots.
Interval The interval specifies how often a snapshot
• Thin. Even though you specify the size of the LUN when you create it, storage space is
assigned on demand instead of up front. The size of the LUN is repo rted as the total
storage space that you specify when you create the LUN.
ick. All storage space that you specify when you create the LUN is also allocated
• Th
up front. The size of the LUN is reported as the total storage space that you specify when
you create the LUN. This is the default method.
pression check box to enable data compression. Compression saves
drop-down list:
urly. A snapshot is taken every hour on the hour.
• Ho
• Daily. A snap
• Weekly. A snapshot is taken every week on Friday at midnight.
shot is taken every day at midnight. This is the default setting.
ke a selection from the drop-down list:
spaces in the name. All characters must
is made. Make a selection from the
Note: Make sure that you watch the volume capacity of the volume on which the
overallocated LUN resides so you do not run out of storage space unexpectedly.
Note: NETGEAR recommends that you do not use an overallocated thin LUN for storage
of critical data. Instead, use a thick LUN.
Size Specify the size of the LUN. The maximum size tha
the bottom of the screen.
Unit Select the unit of measurement from the drop-down list:
• MB.
• GB. T
• TB.
his is the default unit of measurement.
t you can allocate to the LUN is stated at
4. Click Create.
The ReadyNAS confirms the creation of a LUN with the
message “Folder or LUN
successfully created.”
5. Click OK.
The new LUN is added to the Shares screen. Basic information is displayed to the right of
he LUN.
t
LUNs
85
Page 86

ReadyNAS OS 6.0
View and Change the Properties of a LUN
To view and change the properties of a LUN:
1. Select Sha
res > Shares.
A list of shared folders and LUNs on each volume displays.
2. Select
3. From the pop-up menu that
the LUN that you want to configure.
displays, select Settings.
The LUN settings display in a pop-up screen.
LUNs
86
Page 87

ReadyNAS OS 6.0
4. Change the settings as explained in the following table.
Item Description
Name A unique name to identify the LUN. Do not include spaces in the name.
Description An optional description to help identify the LUN.
Compression Select the Com
storage space and increases the speed of data transfers, but the compression and
decompression processes require additional resources. By default, the Compression check
box is cleared.
Continuous
rotection
P
Provision The provision setting is provided for information only. You cannot change the provision
Size For information about how to expand the size of an existing LUN, see Expand the Size of a
Select the Continuous Protection check box to enable data protection through snapshots
and configure how often snapshots are taken. By default, the Continuous Protection check
box is selected. For more information about snapshots, see Chapter 5, Snapshots.
Interval The interval specifies how often a snapshot
setting of an existing LUN.
n page 88.
LUN o
pression check box to enable data compression. Compression saves
is made. Make a selection from the
drop-down list:
urly. A snapshot is taken every hour on the hour.
• Ho
• Daily. A snap
ekly. A snapshot is taken every week on Friday at midnight.
• We
shot is taken every day at midnight. This is the default setting.
5. Click the Apply.
6. Click OK.
Your changes are saved and the pop-up screen closes.
For information about how to set access right for a LUN, see LUN Groups and Access Rights
on page 91.
LUNs
87
Page 88

ReadyNAS OS 6.0
Expand the Size of a LUN
After you create a LUN, you cannot change the provision setting (thin or thick), but you can
expand the size of the LUN.
Expansion is instant, regardless of the data size,
but you first need to disconnect all users
that are connected to the LUN. Disconnect access to the LUN by removing the LUN from the
LUN group to which the users have access (see Create a LUN Group on p
To expand the size of a LUN:
1. Select Sha
res > Shares.
age 91).
A list of shared folders and LUNs on each volume displays.
2. Select
3. From the pop-up menu that
the LUN that you want to expand.
displays, select Settings.
The LUN settings display in a pop-up screen.
LUNs
88
Page 89

4. Select Expand Size.
The size expansion options display:
ReadyNAS OS 6.0
5. Enter the following settings:
• New Size. S
pecify the new size of the LUN. The maximum size that you can allocate
to a thick LUN is stated above the New Size field.
• Unit.
6. Click App
Select the unit of measurement from the drop-down list (MB, GB, or TB).
ly .
The new LUN size takes effect.
7. Click OK.
Your changes are saved and the pop-up screen closes.
8. (Optional)
See Create a LUN Group on p
Add the LUN to the LUN group to which it belonged before the expansion.
age 91.
User access to the LUN is restored.
LUNs
89
Page 90

Delete a LUN
WARNING:
Deleting a LUN permanently removes the data within that LUN.
To delete a LUN from a volume:
ReadyNAS OS 6.0
1. Select Sha
res > Shares.
A list of shared folders and LUNs on each volume displays.
2. Select
3. From the pop-up menu that
the LUN that you want to delete.
displays, select Delete.
4. Confirm the deletion.
LUNs
90
Page 91

ReadyNAS OS 6.0
LUN Groups and Access Rights
When you create a LUN, the LUN is unassigned. To access your storage system from an
iSCSI-attached device, you need to create a LUN group and assign one or more LUNs to the
LUN group.
LUN groups allow you to organize LUNs and manage access rig
rights are either open or granted through internal CHAP authentication. Access rights apply
to LUN groups, not to individual LUNs. You can easily assign a LUN to a LUN group or move
a LUN from one LUN group to another LUN group.
Each LUN group has an iSCSI target address (for example,
iqn.19
more information, see Manage Access Rights for LUN Groups on p
supports a maximum of 256 iSCSI targets.
94-11.com.netgear:f2f2fdd4) that allows iSCSI clients to access the LUN group. For
hts to LUN groups. Access
age 96. Each ReadyNAS
Create a LUN Group
To create a LUN group:
1. Select iS
The iSCSI screen displays the LUNs and LUN groups that you created.
To create a LUN group, click the New Group button in the upper right of the screen.
2.
CSI.
The New LUN Group pop-up screen displays.
3. In the Name field, enter a name for the LUN group.
LUNs
91
Page 92

ReadyNAS OS 6.0
The default name is groupX, where X is a number in sequential and ascending order.
The Target field is automatically populated. The target is the string that an iSCSI client
n
eeds to be able to connect to the LUN.
4. Click Create.
The New LUN group is added to the iSCSI screen.
By default, CHAP is disabled and no client is allowed to
Access Rights for LUN Groups on p
age 96).
Assign a LUN to a LUN Group
To assign a LUN to a LUN group:
1. Select iS
The iSCSI screen displays the LUNs and LUN groups that you created (see Create a
LUN o
2. Select th
Tip: Y
3. From the pop-up menu that
CSI.
n page 84).
e unassigned LUN that you want to assign to a group.
ou can also create a LUN by clicking the New LUN button to the right of
the unassigned LUNs. By default, news LUNs are unassigned.
displays, select Assign.
access the LUN group (see Manage
LUNs
92
Page 93

ReadyNAS OS 6.0
A pop-up screen displays.
4. From the drop-down list, select the LUN group to which you want to assign the LUN.
5. Click App
ly .
The LUN is assigned to the selected LUN group:
LUNs
93
Page 94

ReadyNAS OS 6.0
Remove a LUN from a LUN Group
To remove a LUN from a LUN group:
1. Select iSCSI.
The iSCSI screen displays the LUNs and LUN groups that you created.
2. Select th
3. From the pop-up menu that
e assigned LUN that you want to remove from the group.
displays, select Unassign.
4. Confirm that you want to remove the LUN from the group.
The LUN is returned to the unassigned state.
LUNs
94
Page 95

Delete a LUN Group
To delete a LUN group:
1. Select iSCSI.
The iSCSI screen displays the LUNs and LUN groups that you created.
ReadyNAS OS 6.0
2. Click the Des
troy button to the right of the LUN group that you want to delete.
3. Confirm that you want to delete the LUN group.
If any LUNs were assigned to the group, they a
re returned to the unassigned state.
LUNs
95
Page 96

ReadyNAS OS 6.0
Manage Access Rights for LUN Groups
Configure Access to a LUN Group
To configure client access to a LUN group:
1. Select iS
The iSCSI screen displays the LUNs and LUN groups that you created.
2. Click the Propertie
A pop-up screen displays.
CSI.
s button to the right of the LUN group that you want to manage.
LUNs
96
Page 97

ReadyNAS OS 6.0
3. Configure the settings as explained in the following table:
Item Description
Name The name is provided for information only and cannot be changed.
Target The target is the address that an iSCSI client (tha
LUN group. The Target field is automatically populated, but you can delete the content
and then replace the content with a custom target address.
Require initiators
entify
to id
themselves using
CHAP
Allowed Initiators Select one of the following radio buttons:
Password for
bidirectional CHAP
authentication
Select this check box to enable CHAP authentication and to allow only authenticated
initiators access to the LUN group. By default, access to the LUN group is open to the
initiators that you add to list of initiators (see Add an iSCSI Initiator on page 98).
• Any. Acce
the target address. (If CHAP authentication is enabled, access is dependent on
CHAP authentication.)
lected. Access to the LUN group is granted to iSCSI qualified names (IQNs) only.
• Se
(If CHAP authentication is enabled, access is dependent on CHAP authentication.)
For more information about configuring iSCSI initia
• Add an iSCSI Initiator on p
• Remove an iSCSI Initiator on p
• Edit the CHAP Password on page 101
By default, access to an initiator by a LUN in the LUN group is open. To require a LUN
in the LUN group to be authenticated before accessing an initiator, set a password for
bidirectional CHAP authentication.
Password Enter a CHAP password with a length of at least
ss to the LUN group is granted to all initiators that have information about
age 98
age 100
12 characters. Maximum length is 16 characters.
t is, an initiator) needs to access the
tors, see the following sections:
Confirm Password Confirm the CHAP password.
4. Click Apply.
The new LUN group properties take effect immediately.
For information about how to set up and access a LUN from a clie
Groups from an iSCSI-Attached Device o
n page 103.
nt device, see Access LUN
LUNs
97
Page 98

ReadyNAS OS 6.0
Add an iSCSI Initiator
To add an iSCSI initiator and allow access to the LUN group:
1. Select iS
CSI.
The iSCSI screen displays the LUNs and LUN groups that you created.
2. Click the Propertie
s button to the right of the LUN group that you want to manage.
A pop-up screen displays.
3. Select the Selected radio button next to Allowed Initiators.
4. Click the + icon (
) to the right of the list of initiators.
LUNs
98
Page 99
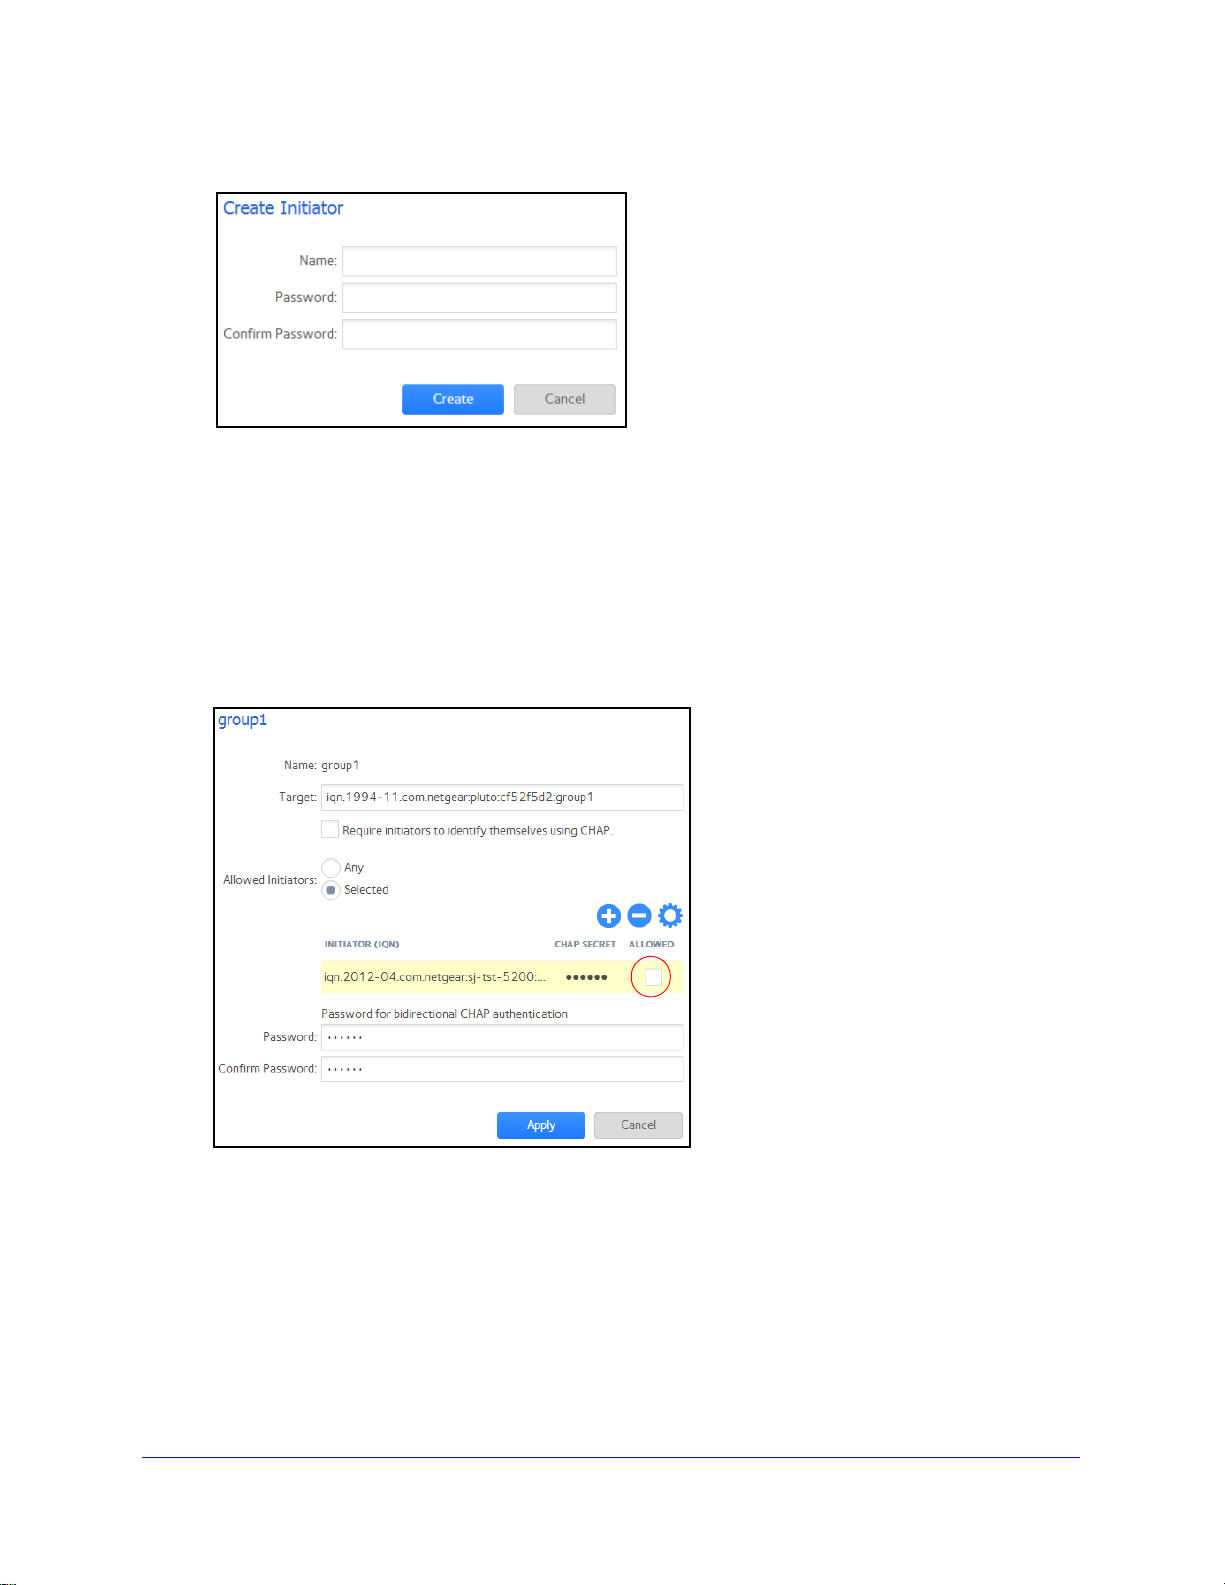
ReadyNAS OS 6.0
The Create Initiator pop-up screen displays.
5. In the Name field, enter an IQN in the format as defined by RFC3720.
For example, iqn.2012-04.com.netgear:sj-tst-5200:a123b456 is a valid IQN.
6. Ente
7. Conf
r a CHAP password that is between 12 and 16 characters long.
irm the CHAP password.
8. Click Create.
The IQN is added to the list of initiators on the LUN Group Properties pop-up screen.
9. In the Allowed column, select the
check box to allow the initiator access to the LUN group.
10. Click Apply.
The new LUN group properties take effect immediately.
LUNs
99
Page 100

ReadyNAS OS 6.0
Remove an iSCSI Initiator
To remove an iSCSI initiator from the LUN group:
1. Select iS
CSI.
The iSCSI screen displays the LUNs and LUN groups that you created.
2. Click the Propertie
s button to the right of the LUN group that you want to manage.
A pop-up screen displays.
3. Select the Selected radio button next to Allowed Initiators.
4. Select th
e initiator that you want to remove from the list.
LUNs
100
 Loading...