

Nespresso Maestria EF 285, Gran Maestria EF 287 Service Manual
SERVICE MANUAL
MAESTRIA /GRAN MAESTRIA
COFFEE MACHINES
Maestria EF 285
Gran Maestria EF 287
Version 0.1 en

Maestria / Gran Maestria service manual
2
CONTENTS
1 General Safety Notes ........................................................................................6
2 Model Range........................................................................................................7
2.1 Maestria ............................................................................................................. 7
2.2 Gran Maestria .................................................................................................... 7
3 Main Components..............................................................................................8
3.1 Main components - Maestria.............................................................................. 8
3.1.1 Overview - Maestria.................................................................................8
3.1.2 Operating elements - Maestria.................................................................9
3.1.3 Interior view 1 - Maestria......................... ... ... ... ......................................10
3.1.4 Interior view 2 - Maestria......................... ... ... ... ...................................... 11
3.1.5 Interior view 3 - Maestria......................... ... ... ... ......................................12
3.2 Main components - Gran Maestria................................................................... 13
3.2.1 Overview - Gran Maestria......................................................................13
3.2.2 Overview - milk frother...........................................................................14
3.2.3 Operating elements - Gran Maestria......................................................15
3.2.4 Interior view 1 - Gran Maestria...............................................................16
3.2.5 Interior view 2 - Gran Maestria...............................................................17
3.2.6 Interior view 3 - Gran Maestria...............................................................18
3.3 Fluid System .................................................................................................... 19
3.3.1 Water circuit diagram - Maestria............................................................19
3.3.2 Water circuit diagram - Gran Maestria...................................................20
4 Technical Data...................................................................................................21
4.1 Rating plates.................................................................................................... 21
4.1.1 Nespresso specific rating plates ............................................................21
4.1.2 Rating plate details ................................................................................21
4.1.3 Rating plate of milk frother.....................................................................22
4.2 Summary of technical data.................... ... ... .... ......................................... .... ... . 23
4.2.1 Technical data of coffee machines.........................................................23
4.2.2 Technical data of milk frother .................................................................24
4.2.3 Dimensions and weight - Maestria.......................................... ... ... .........25
4.2.4 Dimensions and weight - Gran Maestria................................................25
4.2.5 Dimensions and weight - milk frother.....................................................26
5 Machine settings and modes........................................................................27
5.1 General information..................... ... .... ... ... ... .... ......................................... .... ... . 27
5.2 Machine settings............... .... .......................................... ... ... ... ........................ 27
5.2.1 Coffee level setting .......................................... .... ... ... ............................27
5.2.2 Steam handle setting (Maestria).......................................... ... ... ... .... ... ..27
5.2.3 Milk frother setting (Gran Maestria) ........................................ ... ... .... ... ..28
5.2.4 Special settings......................................................................................28
5.3 Status indication............................................................................................... 29
5.3.1 Explanation of LED symbols..................................................................29
5.3.2 General status indication .......................................................................30
5.3.3 Descaling status indication - Maestria ...................................................31
5.3.4 Descaling status indication - Gran Maestria ..........................................32

Maestria / Gran Maestria service manual
3
5.3.5 Status indication of milk frother.............................................................. 33
6 Troubleshooting...............................................................................................34
6.1 Check list for Maestria coffee machine........... ... ... .... ... ... ... .... .......................... 34
6.2 Check list for Gran Maestria coffee machine......................................... ... ... ... . 37
7Repairs................................................................................................................ 40
7.1 Safety instructions ........................................................................................... 40
7.2 Repair and mounting tips................................................................................. 40
7.3 Tools and accessories ..................................................................................... 42
7.4 Repair instructions - Maestria.......................................................................... 42
7.4.1 General disassembly - Maestria............................................................ 42
7.4.2 Replacing water tank connector ............................................................47
7.4.3 Replacing power cord....................... ... ... ... .... ... ... ... ............................... 48
7.4.4 Replacing electronic mainboard (Maestria)...........................................49
7.4.5 Replacing changeover (outlet) valve ..................................................... 51
7.4.6 Replacing steam valve .................................. ... ... .................................. 53
7.4.7 Replacing thermoblocks and NTC temperature sensors.......................54
7.4.8 Replacing coffee pump and flow meter .................................................55
7.4.9 Replacing steam pump..................... ... ... .......................................... ... .. 59
7.4.10 Replacing Espresso / Lungo push/turn controls....................................60
7.4.11 Replacing On/Off button assembly........................................................ 62
7.4.12 Replacing brewing unit ..... ... ... ... .... ... ... .......................................... ... ... .. 63
7.4.13 Replacing steam pipe.......................................... ... .... ... ........................ 64
7.4.14 Replacing support for cup holder...........................................................66
7.4.15 Reassembly and wiring instructions - Maestria ..................................... 66
7.5 Repair instructions - Gran Maestria................................................................. 73
7.5.1 General disassembly - Gran Maestria................................................... 73
7.5.2 Replacing milk frother connector................................ ... ... ... .... ... ... ... ... .. 80
7.5.3 Replacing cup heater........... ... ... .... ... ... ... ... .......................................... .. 81
7.5.4 Replacing electronic mainboard (Gran Maestria)..................................82
7.5.5 Replacing milk regulator assembly........................................................83
7.5.6 Reassembly and wiring instructions - Gran Maestria ............................ 83
8 Wiring diagrams...............................................................................................91
8.1 Wiring diagram versions .................................................................................. 91
8.2 Wiring diagrams - Maestria EF 285 .......................................... ... ... .... ... ... ... .... 92
8.2.1 Wiring diagram Maestria 220 - 240 V, 50 - 60 Hz (IEC) ........................92
8.2.2 Wiring diagram Maestria 220 - 240 V, 50 - 60 Hz (IEC) ULKA.............. 94
8.2.3 Wiring diagram Maestria 120 V, 50 - 60 Hz (UL)...................................96
8.2.4 Wiring diagram Maestria 120 V, 50 - 60 Hz (UL) ULKA......................... 98
8.2.5 Wiring diagram Maestria 100 - 127 V, 50 - 60 Hz (IEC) ......................100
8.2.6 Wiring diagram Maestria 100 - 127 V, 50 - 60 Hz (IEC) ULKA............ 102
8.3 Wiring diagrams - Gran Maestria EF 287 ...................................................... 104
8.3.1 Wiring diagram Gran Maestria 220 - 240 V / 50 - 60 Hz (IEC) ............104
8.3.2 Wiring diagram Gran Maestria 220 - 240 V / 50 - 60 Hz (IEC) ULKA..106
8.3.3 Wiring diagram Gran Maestria 120 V / 50 - 60 Hz (UL)....................... 108
8.3.4 Wiring diagram Gran Maestria 120 V / 50 - 60 Hz (UL) ULKA ............ 110
8.3.5 Wiring diagram Gran Maestria 100 - 127 V, 50 - 60 Hz (IEC) ............. 112
8.3.6 Wiring diagram Gran Maestria 100 - 127 V, 50 - 60 Hz (IEC) ULKA... 114

Maestria / Gran Maestria service manual
4
9 Function tests................................................................................................. 116
9.1 Safety instructions.......................................................................................... 116
9.2 Required equipment....................................................................................... 116
9.2.1 Overview..............................................................................................116
9.2.2 Pressure gauge adaptor ......................................................................117
9.2.3 Mounting pressure gauge adapter.......................................................118
9.3 Measure flow rate........................................................................................... 119
9.4 Pressure and leakage checks............................................ ... ... .... ... ... ... ... .... .. 120
9.4.1 Preparations.........................................................................................121
9.4.2 Test run................................................................................................122
9.5 Measure coffee temperature.......................................................................... 123
9.6 Milk frother tests (Gran Maestria)................................................................... 125
9.6.1 Basic tests............................................................................................125
9.6.2 Measure hot milk temperature................... ..........................................125
9.7 Function test for cup heater (Gran Maestria) ................................................. 126
9.8 Function test for steam pipe (Maestria).......................................................... 128
9.9 Protective earth (PE) continuity test............................................................... 130
9.9.1 What coffee machine has to be tested and when?..............................130
9.9.2 General................................................................................................130
9.9.3 Test sequence......................................................................................131
9.9.4 What to do if the protective earth continuity test fails...........................133
9.10 Protective insulation test............................. .... ... ... ... ...................................... 134
9.10.1 What coffee machines have to be tested and when? ..........................134
9.10.2 General................................................................................................134
9.10.3 Test sequence......................................................................................135
9.10.4 What to do if the insulation test fails ....................................................136
10 Exploded Drawings........................................................................................137
10.1 Exploded drawings for Maestria EF 285........................................................ 137
10.2 Exploded drawings for Gran Maestria EF 287............................................... 147
11 Spare parts Lists.............................................................................................155
11.1 Spare part selection criteria............................................................................ 155
11.2 Spare parts list - Maestria EF 285.................................................................. 155
11.3 Spare parts list - Gran Maestria EF 287......................................................... 158
12 Notes.................................................................................................................161

Maestria / Gran Maestria service manual
5
PREFACE
The purpose of this service manual is to provide the service personnel with all necessary
information with regards to correct handling, maintenance and repair of the Maestria
coffee machine type EF 285 and the Gran Maestria coffee machine type EF 287. The
user manuals are necessary to conduct proper operation, cleaning and descaling of
these coffee machines.
This manual should be used by the technicians as a valuable aid to guarantee the
permanent readiness for use of the machines. In order to t ake full advantage of all the
functions, it is absolutely necessary to follow the instructions in this manual.
Spare parts lists and exploded drawings are subject to change. To obtain the last
version, please contact your official spare parts supplier.
Visit the Nespresso technical website periodically to check for upgrades, technical
modifications, counter measures etc. for these coffee machines:
https://business.nespresso.com
CONTENT UPDATES
Version 1.0
• First released service manual version, in English only.
Please keep this
manual together with
the corresponding
service documentation.
This way you are assured
to have the necessary
information.
Access is restricted
and can be obtained
by asking your
Nespresso technical contact person.
The version number
of this service manual
is printed on the lower
right corner of the front
page.

Maestria / Gran Maestria service manual
6
GENERAL SAFETY NOTES
1 GENERAL SAFETY NOTES
As an additional safety measure, the use of a residual current device (RCD), also called
the ground fault circuit interrupter (GFCI), in the repair centre is highly recommende d.
Risk of fatal electrical shock and fire!
Mains voltage inside the coffee machine.
• Unplug appliance before cleaning.
• Never clean wet or immerse plug, cord or appliance in any fluid.
• Disconnect the mains plug before disassembly - the appliance must
be free of voltage.
This device does
not protect against
electrical shock due
to contact with both circuit conductors.
Example illustrations
of typical devices.
Use a GFCI with a trip
level of 4 - 6 mA (USA)
resp. a RCD with a trip
level of 15 - 30 mA (Europe).
A trip level above 30 mA
provides only very limited
protection against harm
from an electric shock.
1) RCD protected socket-outlet
2) Plug-in RCD unit
3) GFCI socket
4) Plug-in GFCI
Danger of burns!
Hot parts and water under pressure inside the coffee machine
(particularly in the two thermoblocks).
• Let coffee machine cool down before cleaning or disassembly.
1
2
RESET
TEST
RESET
TEST
3
4
Maestria / Gran Maestria service manual
7
MODEL RANGE
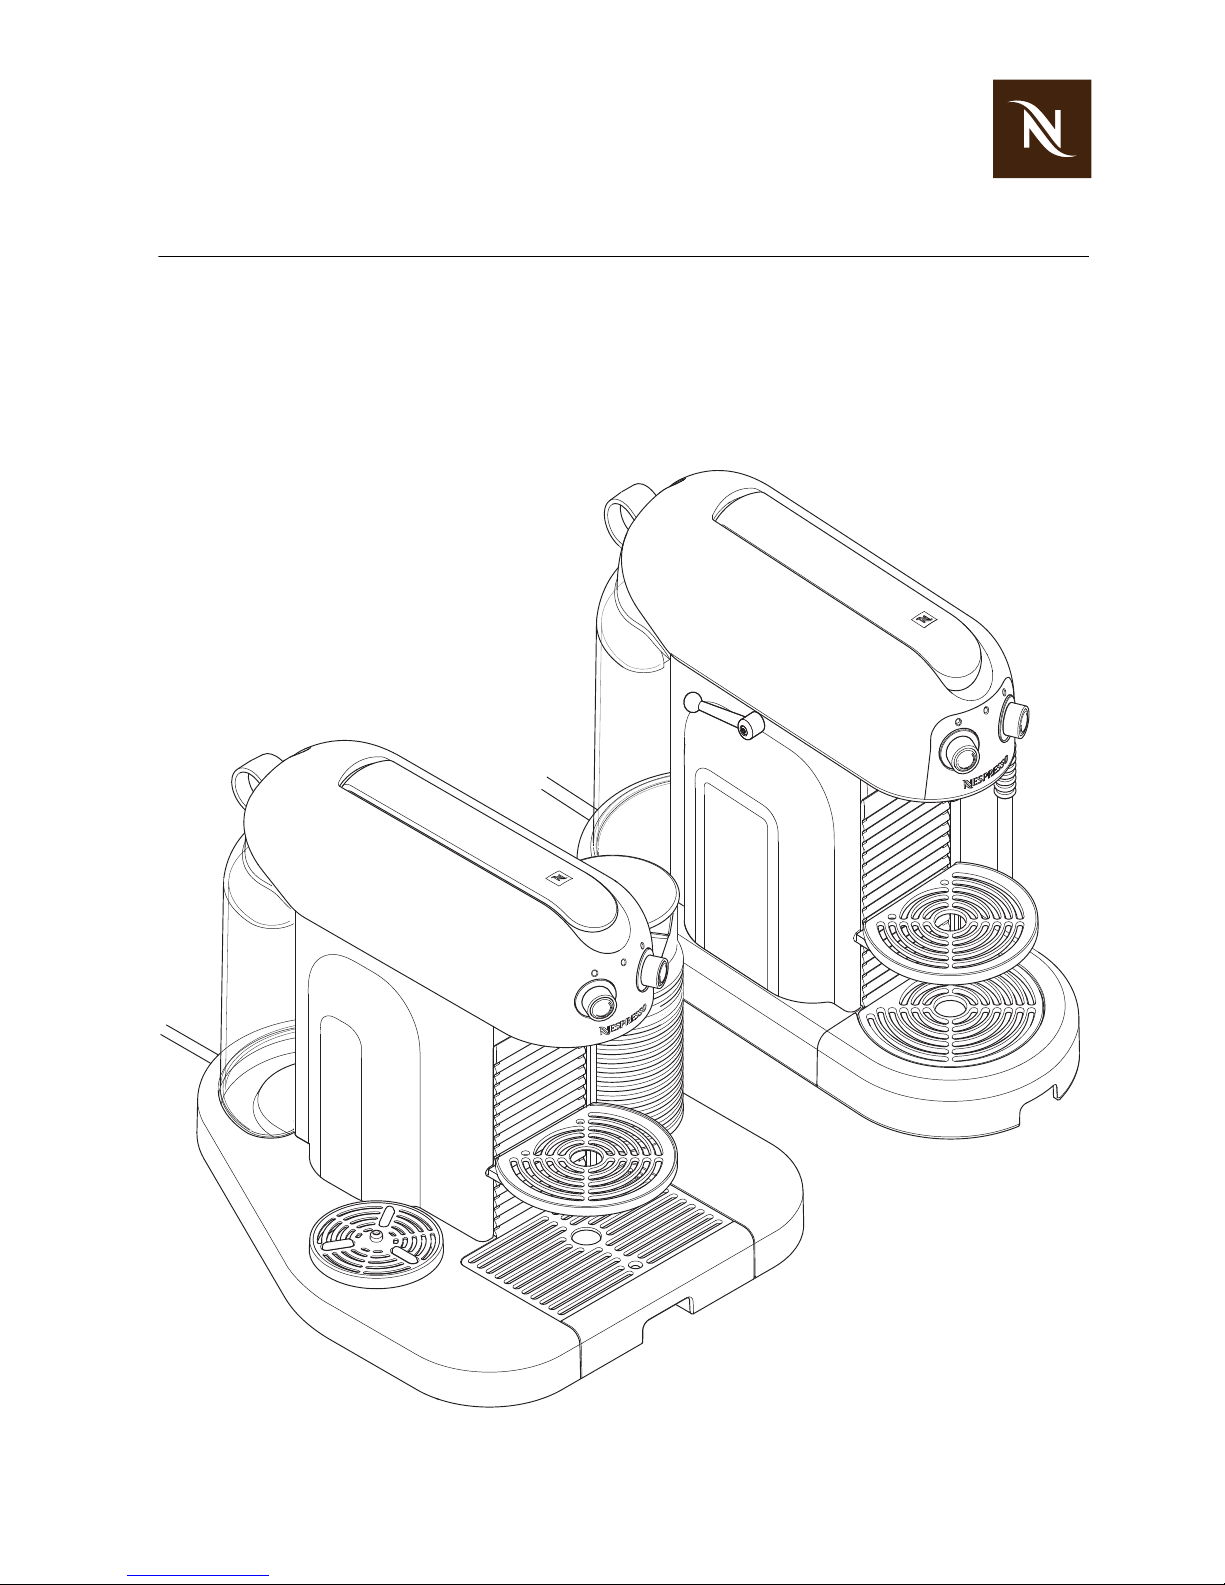
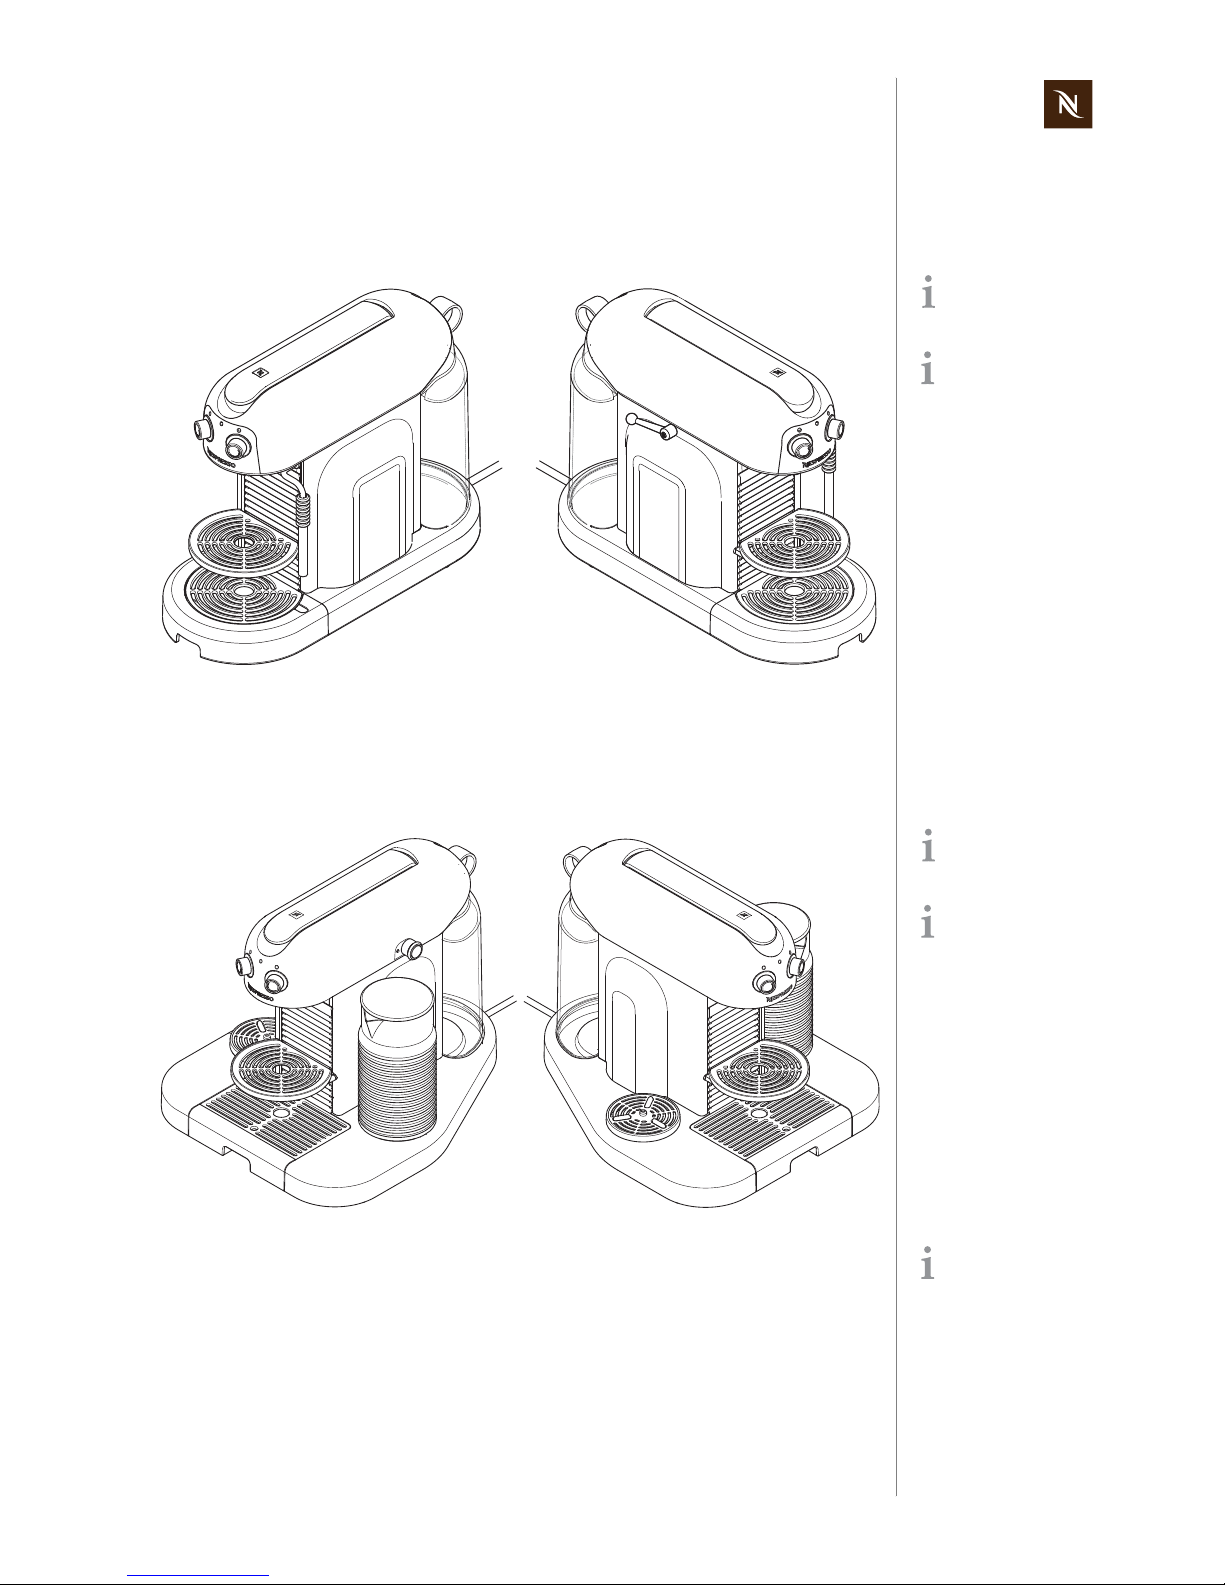
2 MODEL RANGE
2.1 Maestria
This basic model is equipped with a steam pipe. The two functions - cof fee prep a ration
and steam generation - cannot be used simultaneously.
2.2 Gran Maestria
This high-end model is equipped with a cup heater and a detachable milk frother. Out of
three possible functions - coffee preparation, cup heating and milk frothing - two functions can be carried out simultaneously.
Front view, right and
left side.
Simultaneous heat-up
of both thermoblocks
is only possible with
220 - 240 V versions.
Front view, right and
left side.
Simultaneous heat-up
of both thermoblocks
is only possible with
220 - 240 V versions.
Coffee preparation is
on hold until cup
heating operation is
finished.

Maestria / Gran Maestria service manual
8
MAIN COMPONENTS
3 MAIN COMPONENTS
3.1 Main components - Maestria
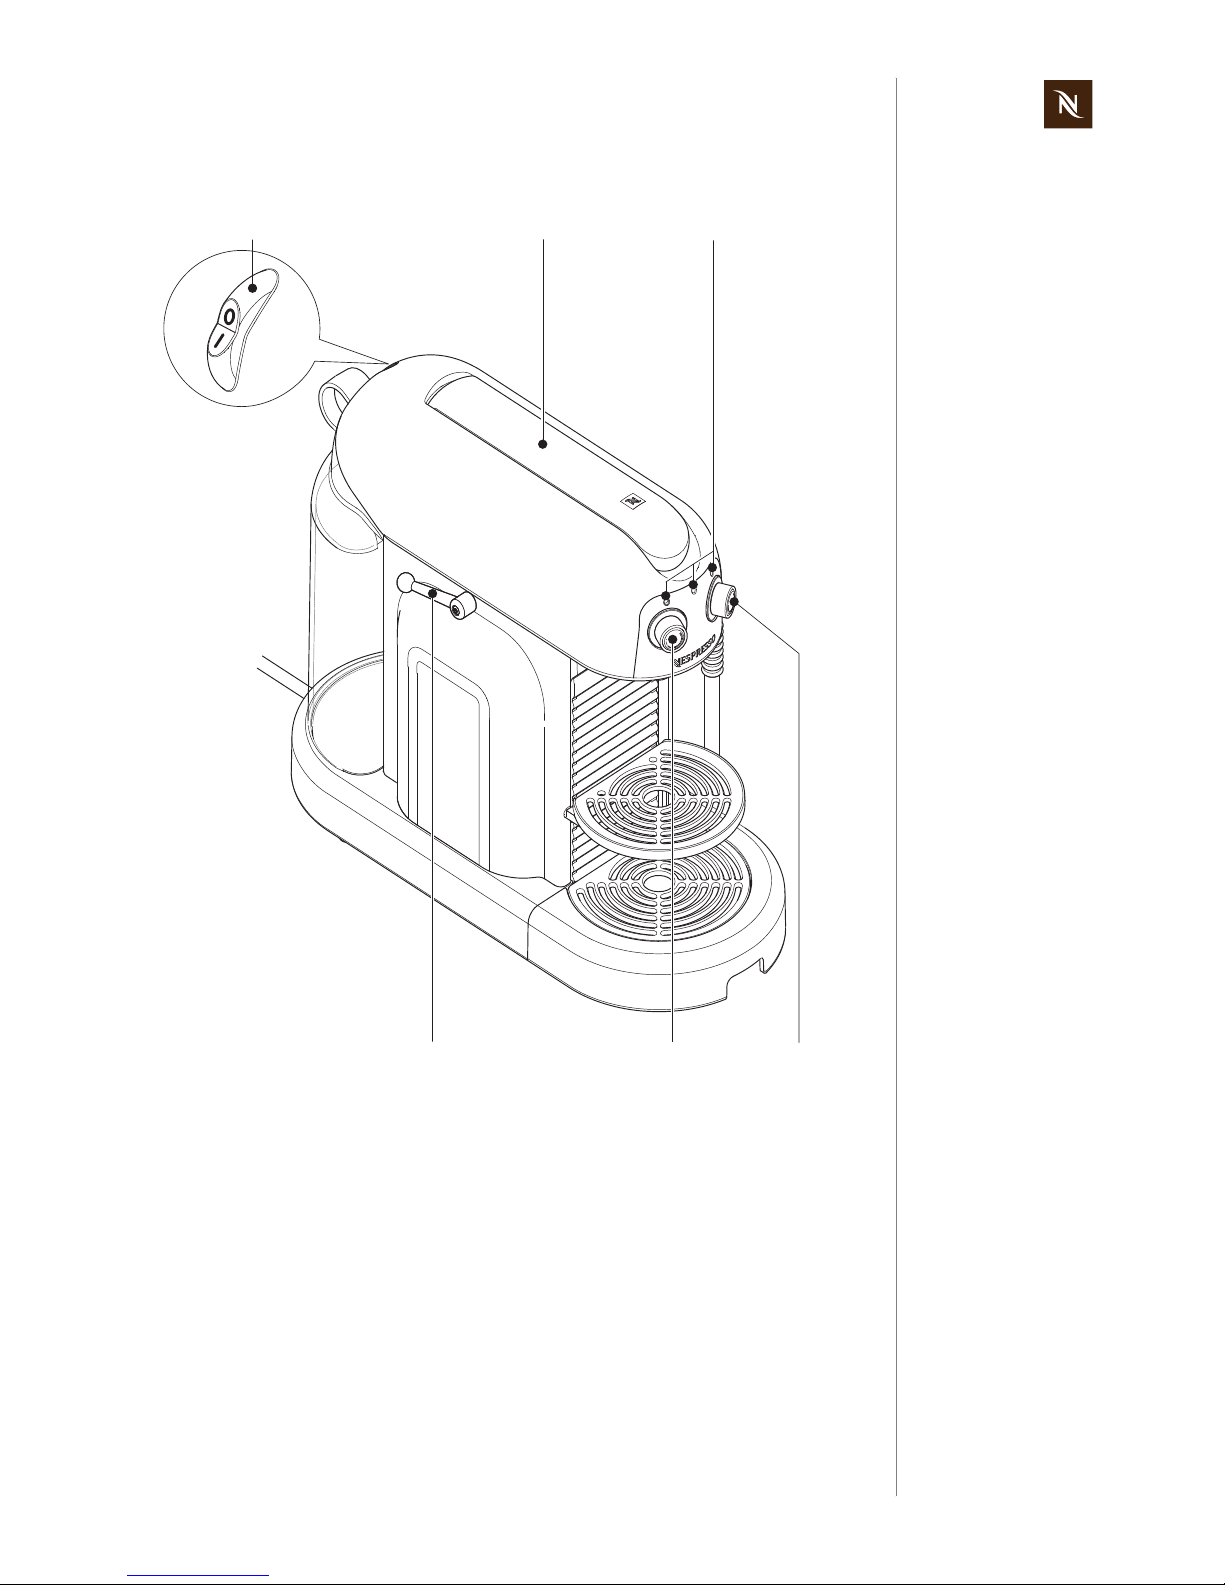
3.1.1 Overview - Maestria
The maintenance unit (10)
- consists of capsule container (8), drip grid (4) drip tray (5) and tray cover (7),
- can only be removed or inserted if the cup support (3) is tilted up,
- is locked in place by a permanent magnet in the coffee machine and a small metal
plate at the rear side of the drip tray (6).
The tray cover (7) can be removed for cleaning.
1) Water tank
2) Steam pipe (pivotable, with steam
nozzle and frothing sleeve)
3) Cup support (pivotable)
4) Drip grid
5) Drip tray
6) Metal plate for magnetic contact
7) Tray cover
8) Capsule container (for used capsules,
backlighted)
9) Coffee outlet
10) Maintenance unit cpl.
11) Power cord
1
23
11 9 8 7 5
4
610
Maestria / Gran Maestria service manual
9
MAIN COMPONENTS
3.1.2 Operating elements - Maestria
The On/Off button (1) automatically switches off the coffee machine after a preset time
of non-use (factory setting 9 min). For setting the auto shut time see “Special settings”
on page 28.
The lever (2) opens and closes the brewing unit and gives access to the feed opening
for the coffee capsule.
For all possible settings of the steam handle (6) and push/turn controls (4, 5) see
“Machine settings” on page 27.
1) On/Off button
2) Lever
3) Indication lights (3x)
4) Push/turn control (Lungo)
5) Push/turn control (Espresso)
6) Steam handle
12
65
4
3

Maestria / Gran Maestria service manual
10
MAIN COMPONENTS
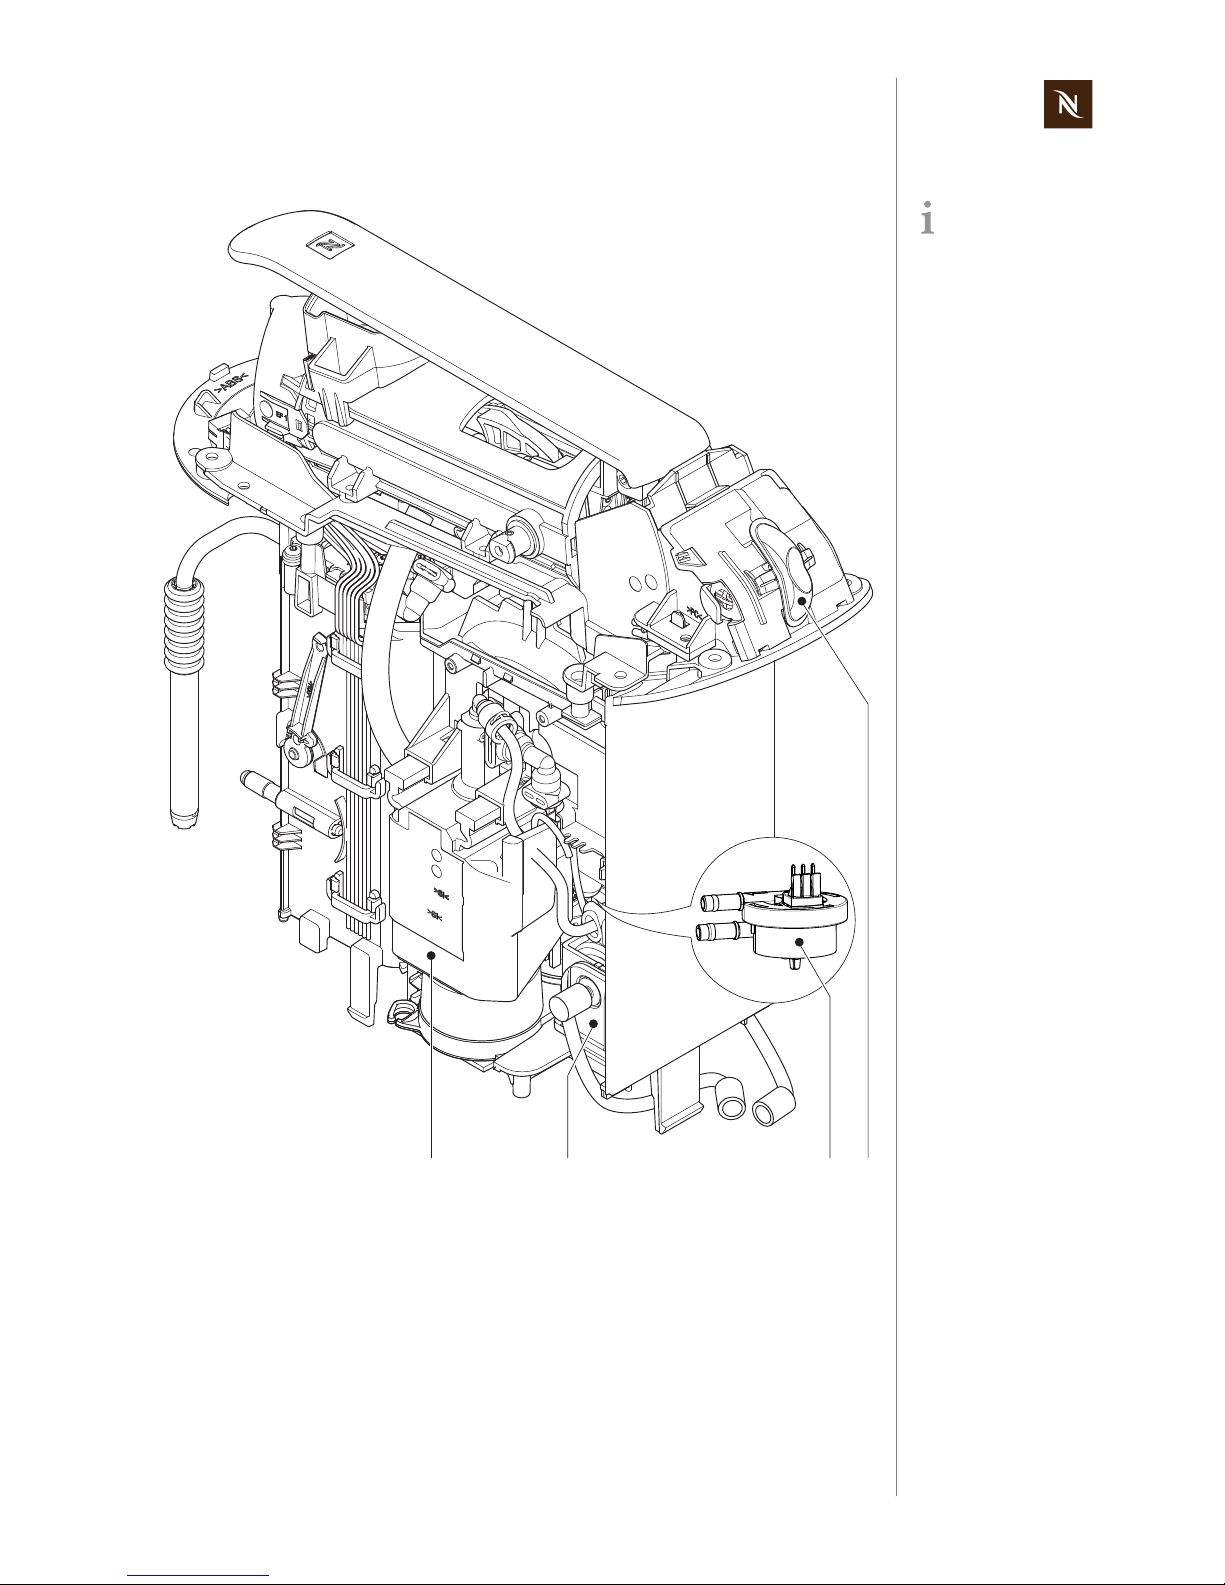
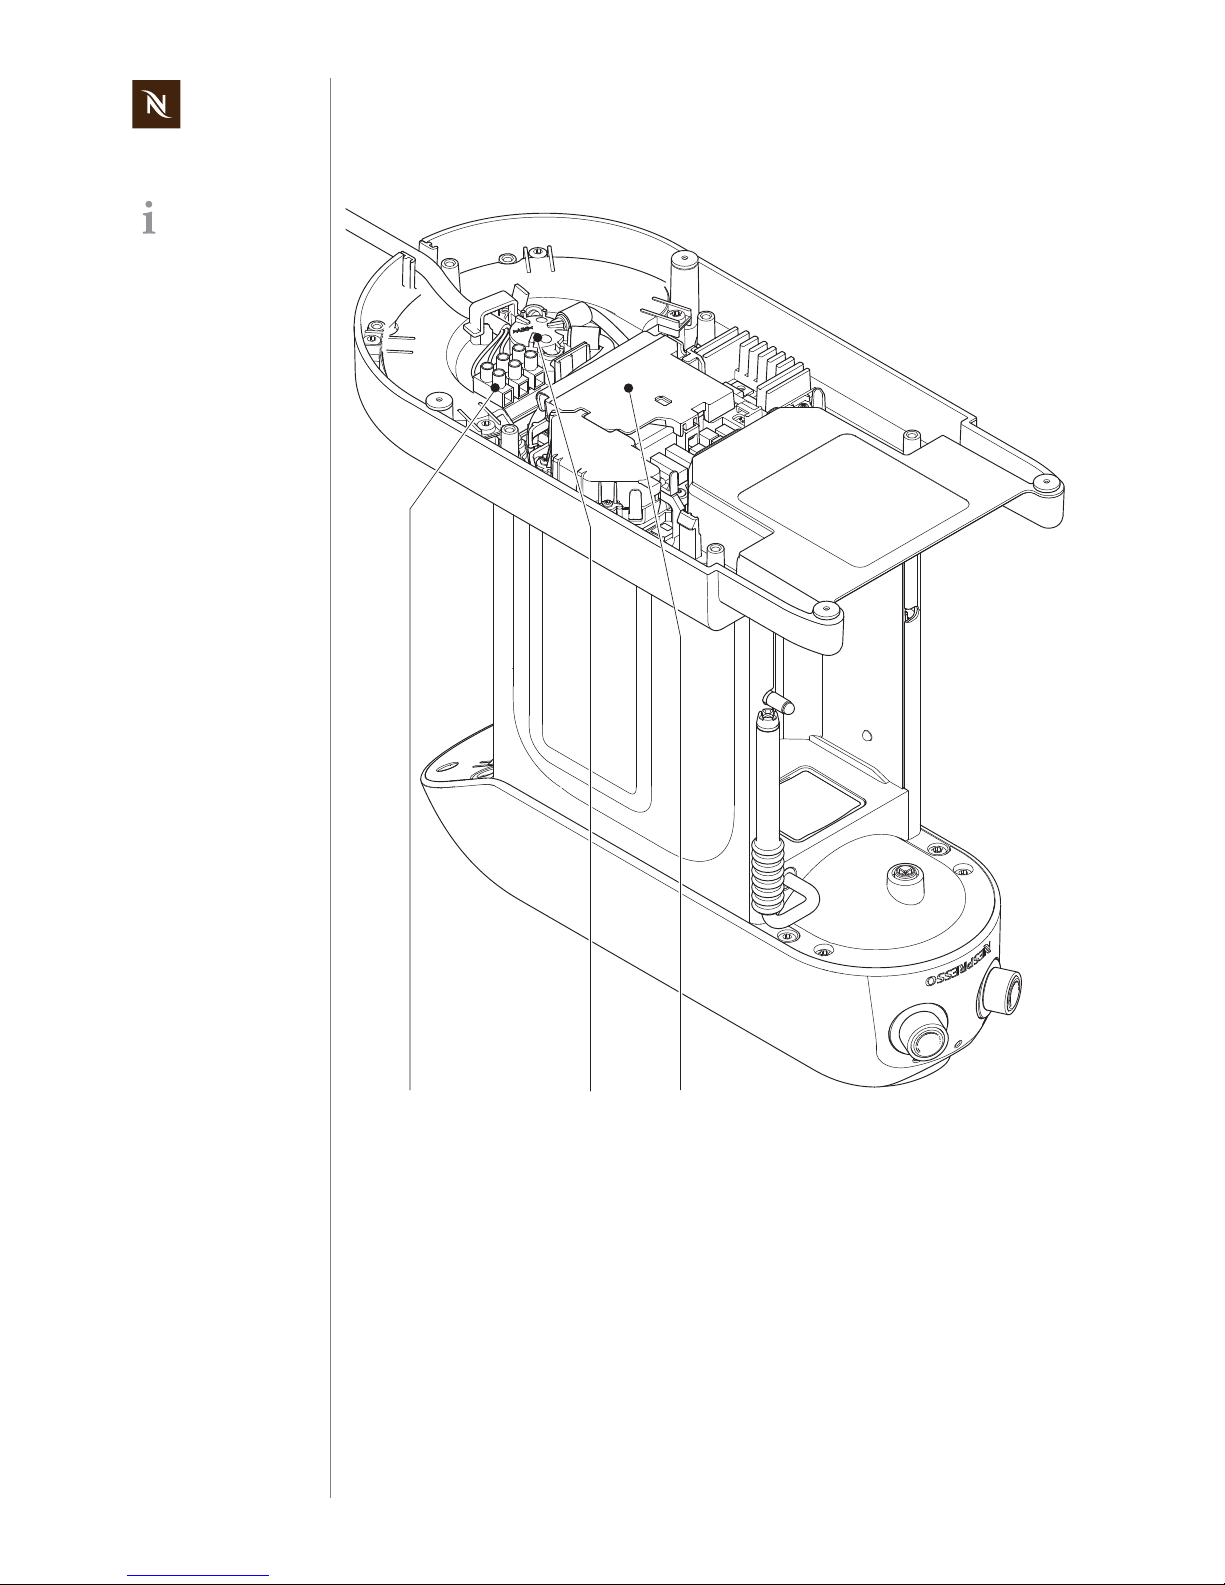
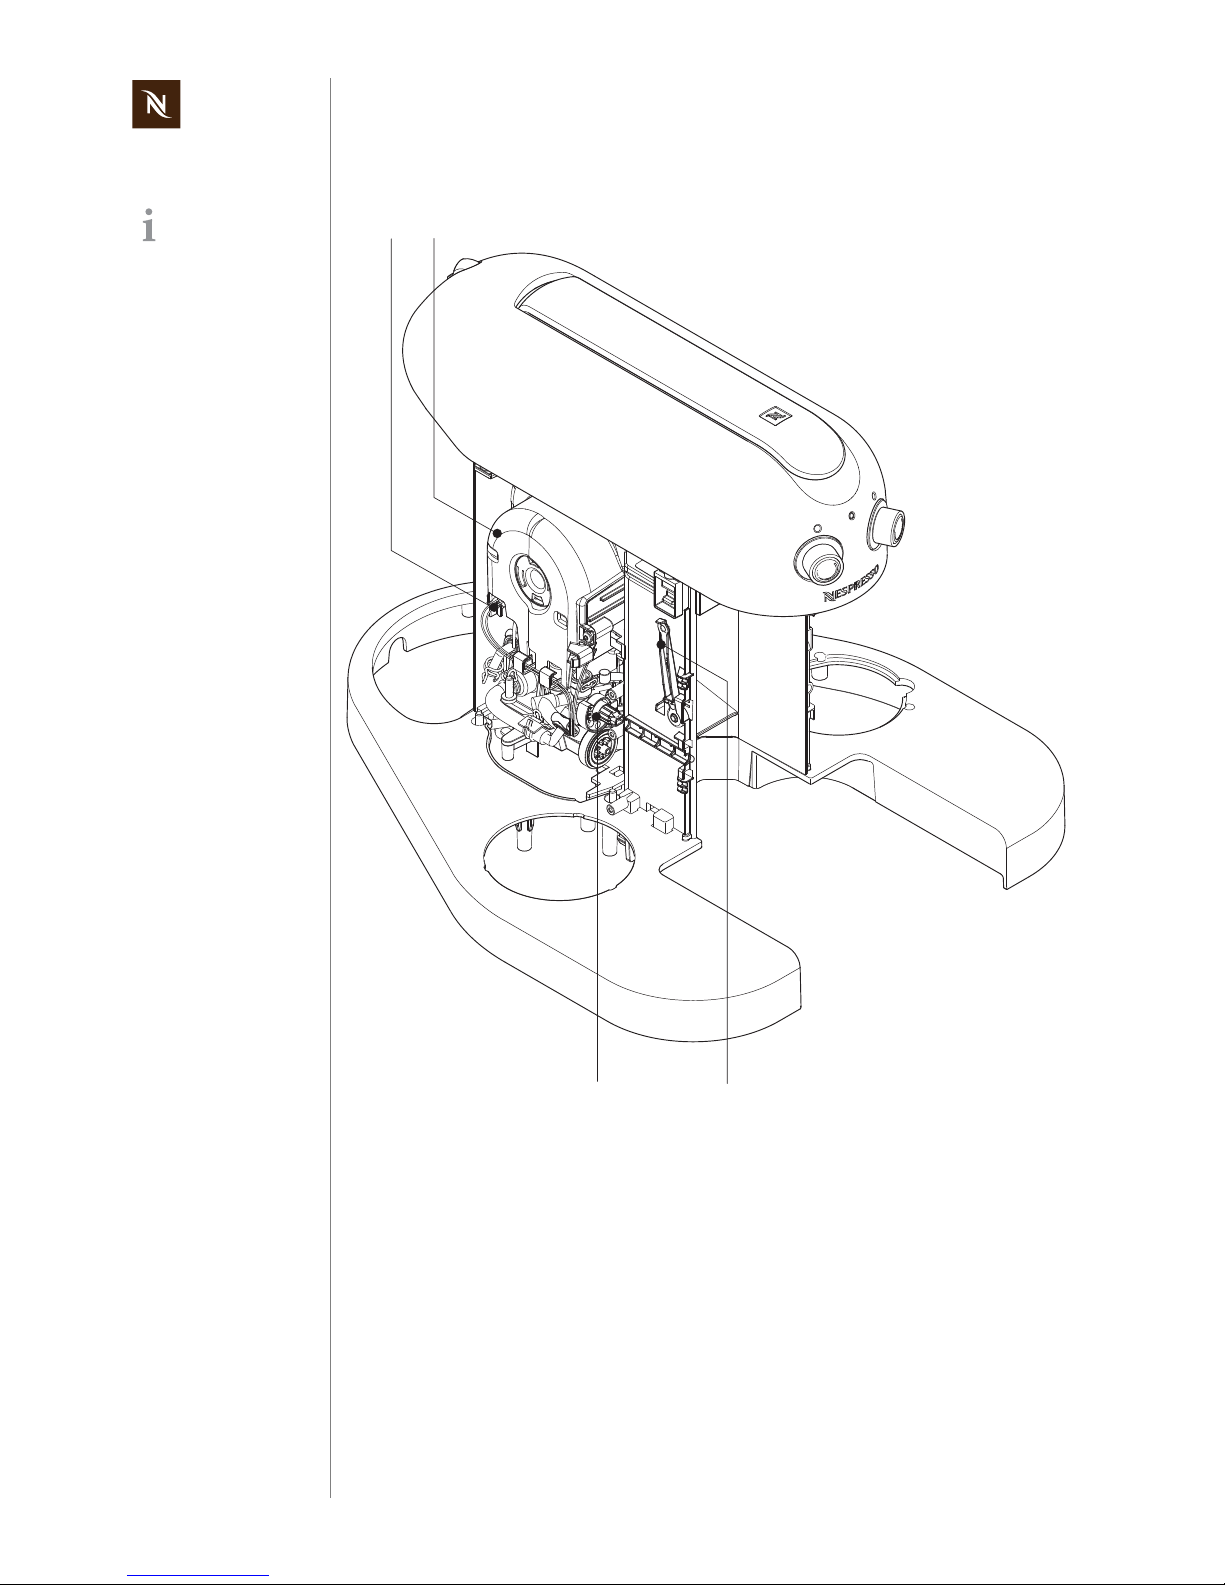
3.1.3 Interior view 1 - Maestria
The micro switches (2) detect the position of the manual steam valve (3).
After using the steam pipe and turning the steam handle back from steam position to
ready mode position, the remaining steam is led into the relief tank (7). From there the
condensed water drips into the drip tray.
Left side view, front
side.
Top cover, side panels and bottom part
removed.
1) Micro switches (2x)
2) Steam va lve
3) Brewing unit (TCBU)
4) Relief tank for steam
5) Thermoblock types 2010 (coffee) and
2011 (steam) arranged behind one
another
6) NTC temperature sensor
7) Outlet valve of thermoblock
76 5 4
12 3
Maestria / Gran Maestria service manual
11
MAIN COMPONENTS
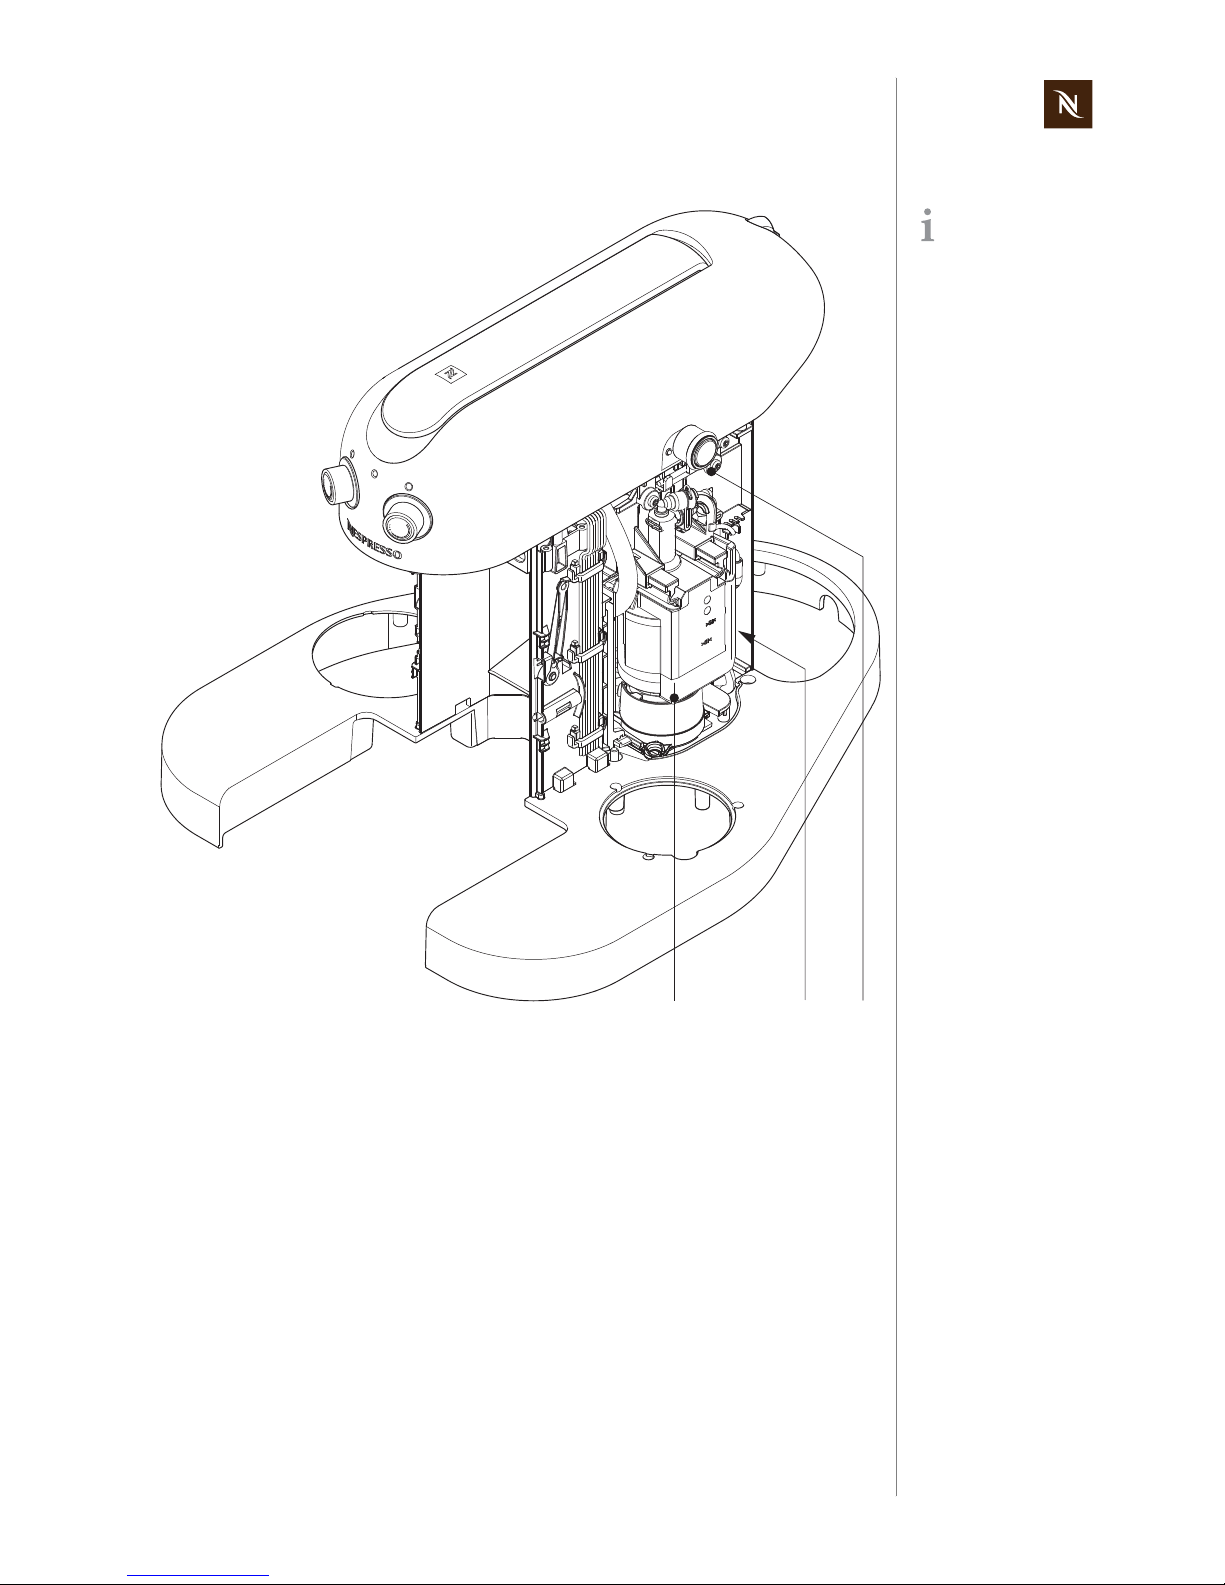
3.1.4 Interior view 2 - Maestria
Right side view, rear
side.
Top cover, side panels and bottom part
removed.
1) Pump for coffee preparation
2) Pump for steam preparation
3) Flow meter
4) ON/OFF switch assembly
12 34
Maestria / Gran Maestria service manual
12
MAIN COMPONENTS
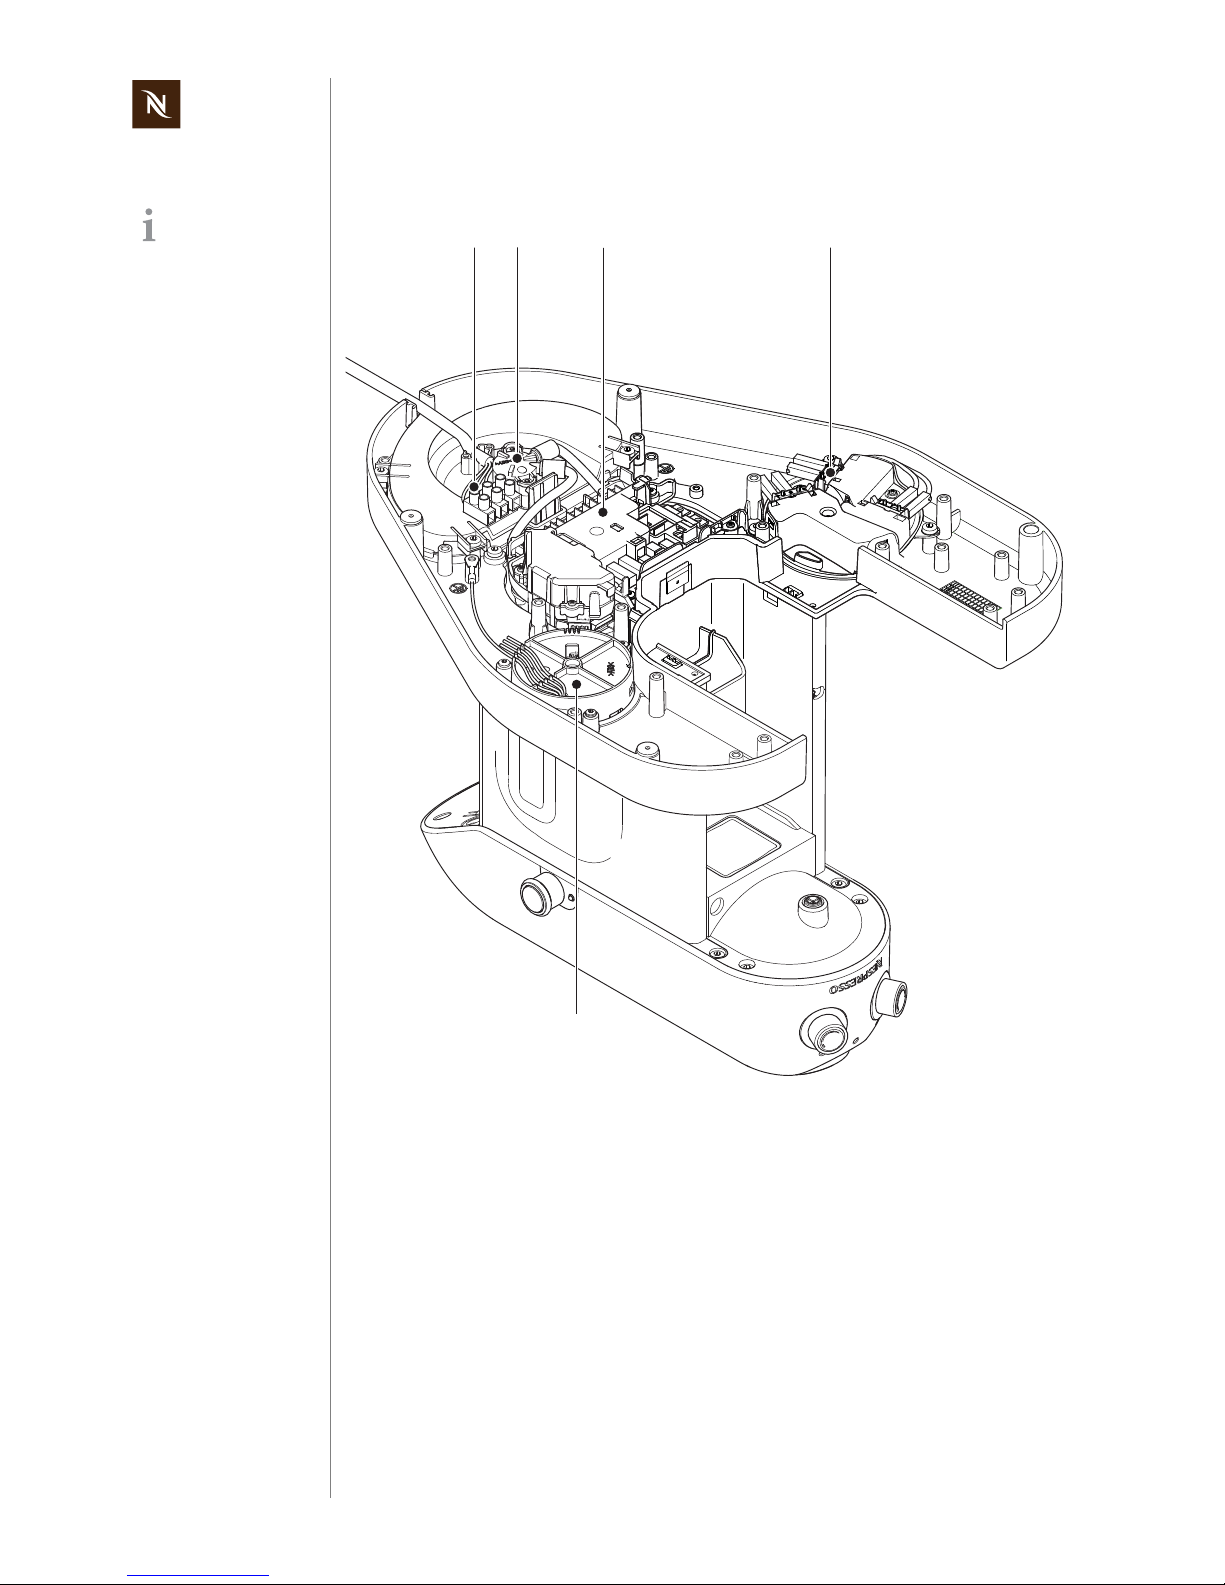
3.1.5 Interior view 3 - Maestria
View from below. Bottom cover removed.
1) Terminal block
(power cord connection)
2) Water tank connector
3) Electronic main board assembly
123
Maestria / Gran Maestria service manual
13
MAIN COMPONENTS
3.2 Main components - Gran Maestria
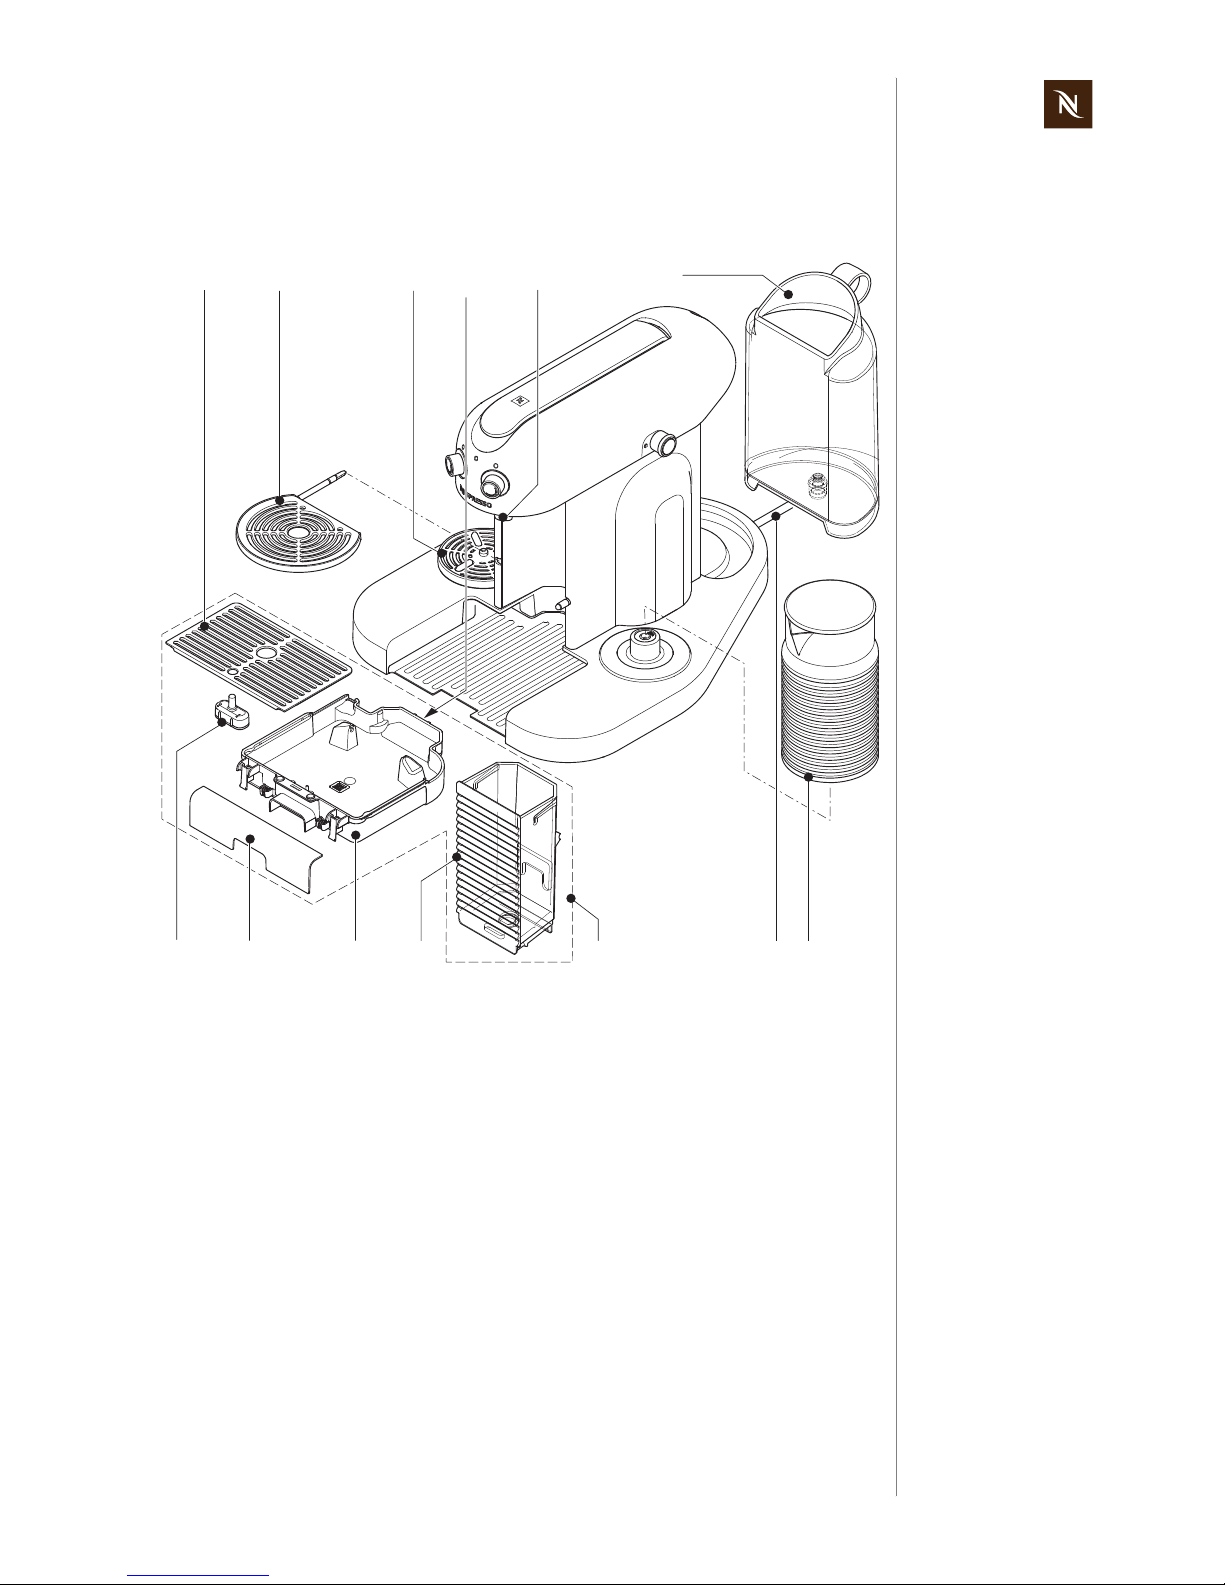
3.2.1 Overview - Gran Maestria
The maintenance unit (9)
- consists of capsule container (10), drip grid (1), drip tray (11) with floater (13) and
tray cover (12),
- can only be removed or inserted if the cup support (2) is tilted up,
- is locked in place by a permanent magnet in the coffee machine and a small metal
plate at the rear side of the drip tray (4).
The tray cover (12) can be removed for cleaning .
The drip tray (11) has a floater (13) that signals a high waste water level.
1) Drip grid
2) Cup support (pivotable)
3) Cup heater
4) Metal plate for magnetic contact
5) Coffee outlet
6) Water tank
7) Milk frother
8) Power cord
9) Maintenance unit cpl.
10) Capsule contain er (for u sed cap sules,
backlighted)
11) Drip tray
12) Tray cover
13) Floater
11
9
234 6
7810111213
5
Maestria / Gran Maestria service manual
14
MAIN COMPONENTS
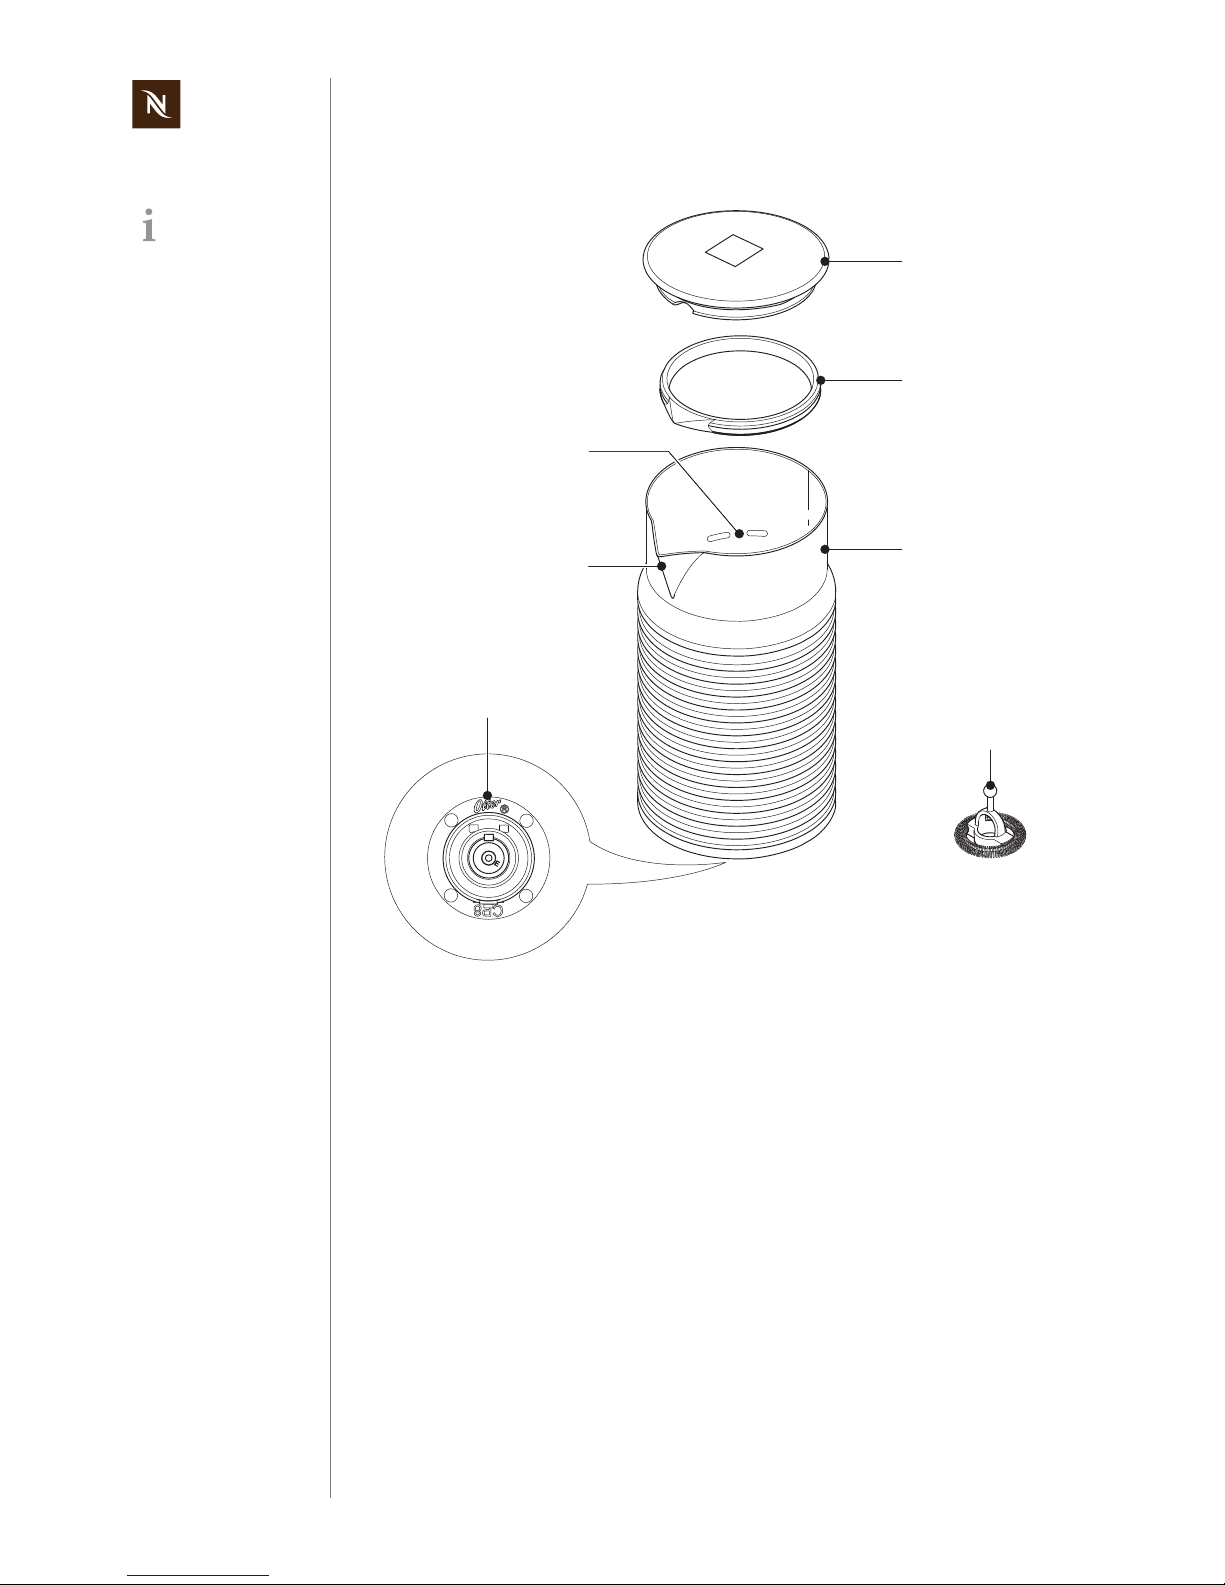
3.2.2 Overview - milk frother
The inside of the jug (4)
- has level marks (3),
- is surface-coated for easy cleaning.
The milk frother is controlled by the coffee machine solel y and has no contro l or display
elements itself.
The power socket (6)
- connects the milk frother to the mains voltage input of the coffee machine.
- includes emitters and receivers for light signal transmission.
The whisk (7) contains two magnets and is driven by a magnetic coupling.
The milk frother is
part of the Gran
Maestria coffee
machine.
1) Lid
2) Seal
3) Indication of max. milk and foam level
4) Jug
5) Spout
6) Power socket
7) Whisk
4
11
2
3
4
7
6
5
Maestria / Gran Maestria service manual
15
MAIN COMPONENTS
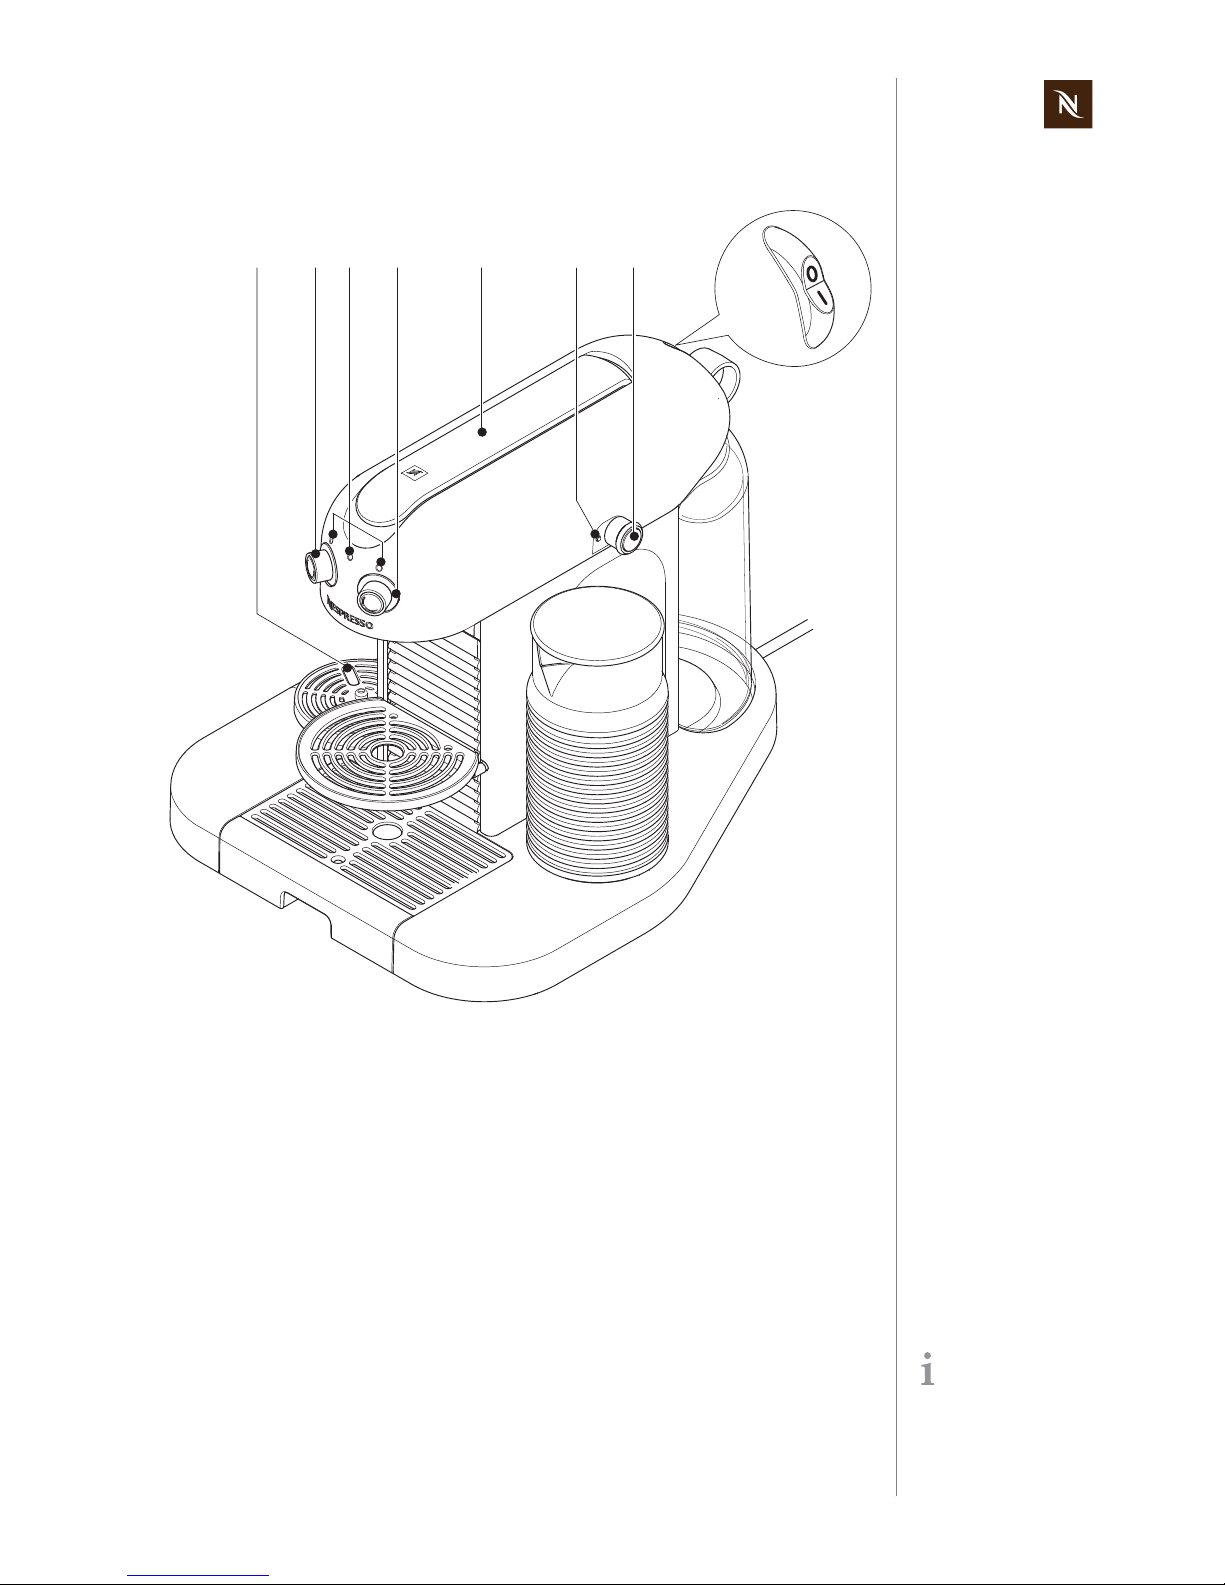
3.2.3 Operating elements - Gran Maestria
The On/Off button (1) automatically switches off the coffee machine after a preset time
of non-use. For the auto shut off setting see “Special settings” on page 28.
The lever (2) opens and closes the brewing unit and gives access to the feed opening
for the coffee capsule.
For possible settings of the push/turn controls (4, 5, 6) see “Machine settings” on
page 27.
The cup heater is activated by pressing down its three rips (4) with the rim of a cup.
1) Rips (3x) on cup heater
2) Push/turn control (Espresso)
3) Indication lights (3x)
4) Push/turn control (Lungo)
5) Lever
6) Indication light for milk frother
7) Push/turn control (milk frother)
8) On/Off button
8
1234 5 67
The cup heater is
designed for the size
of Nespresso’s
espresso cups.
Maestria / Gran Maestria service manual
16
MAIN COMPONENTS
3.2.4 Interior view 1 - Gran Maestria
Left side view. Side
panels removed.
1) Thermoblock types 2010 (coffee) and
2011 (cup heating) arranged behind
one another
2) NTC temperature sensor
3) Pivoting mechanism for cup support
4) Snap lock for capsule container
1
2
3
4
Maestria / Gran Maestria service manual
17
MAIN COMPONENTS
3.2.5 Interior view 2 - Gran Maestria
Right side view. Side
panels removed.
1) Pump for coffee preparation
2) Pump for cup heating and flow meter
(not visible)
3) Milk regulator
1
3
2
Maestria / Gran Maestria service manual
18
MAIN COMPONENTS
3.2.6 Interior view 3 - Gran Maestria
View from below. Bottom cover removed.
1) Terminal block (power cord
connection)
2) Water tank connector
3) Electronic main board assembly
4) Micro switches (3x) of cup heater
5) Milk frother connector
12 3 4
5
Maestria / Gran Maestria service manual
19
MAIN COMPONENTS
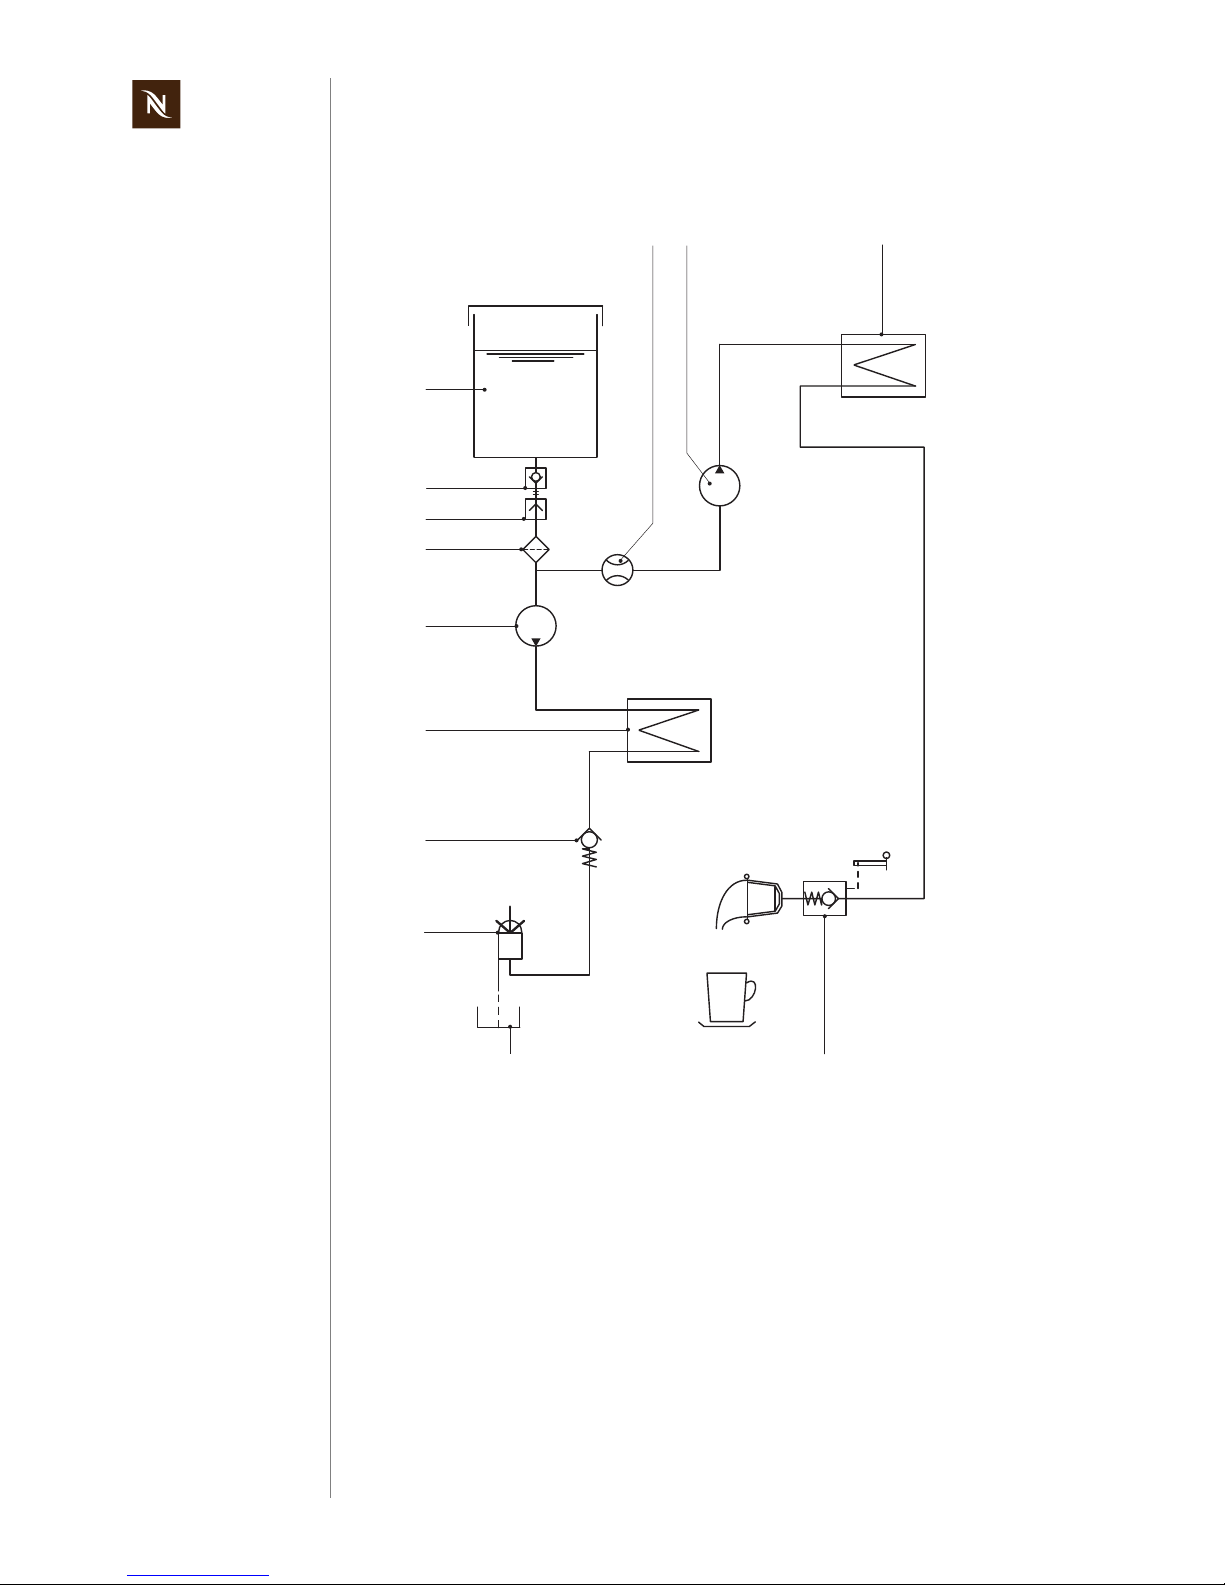
3.3 Fluid System
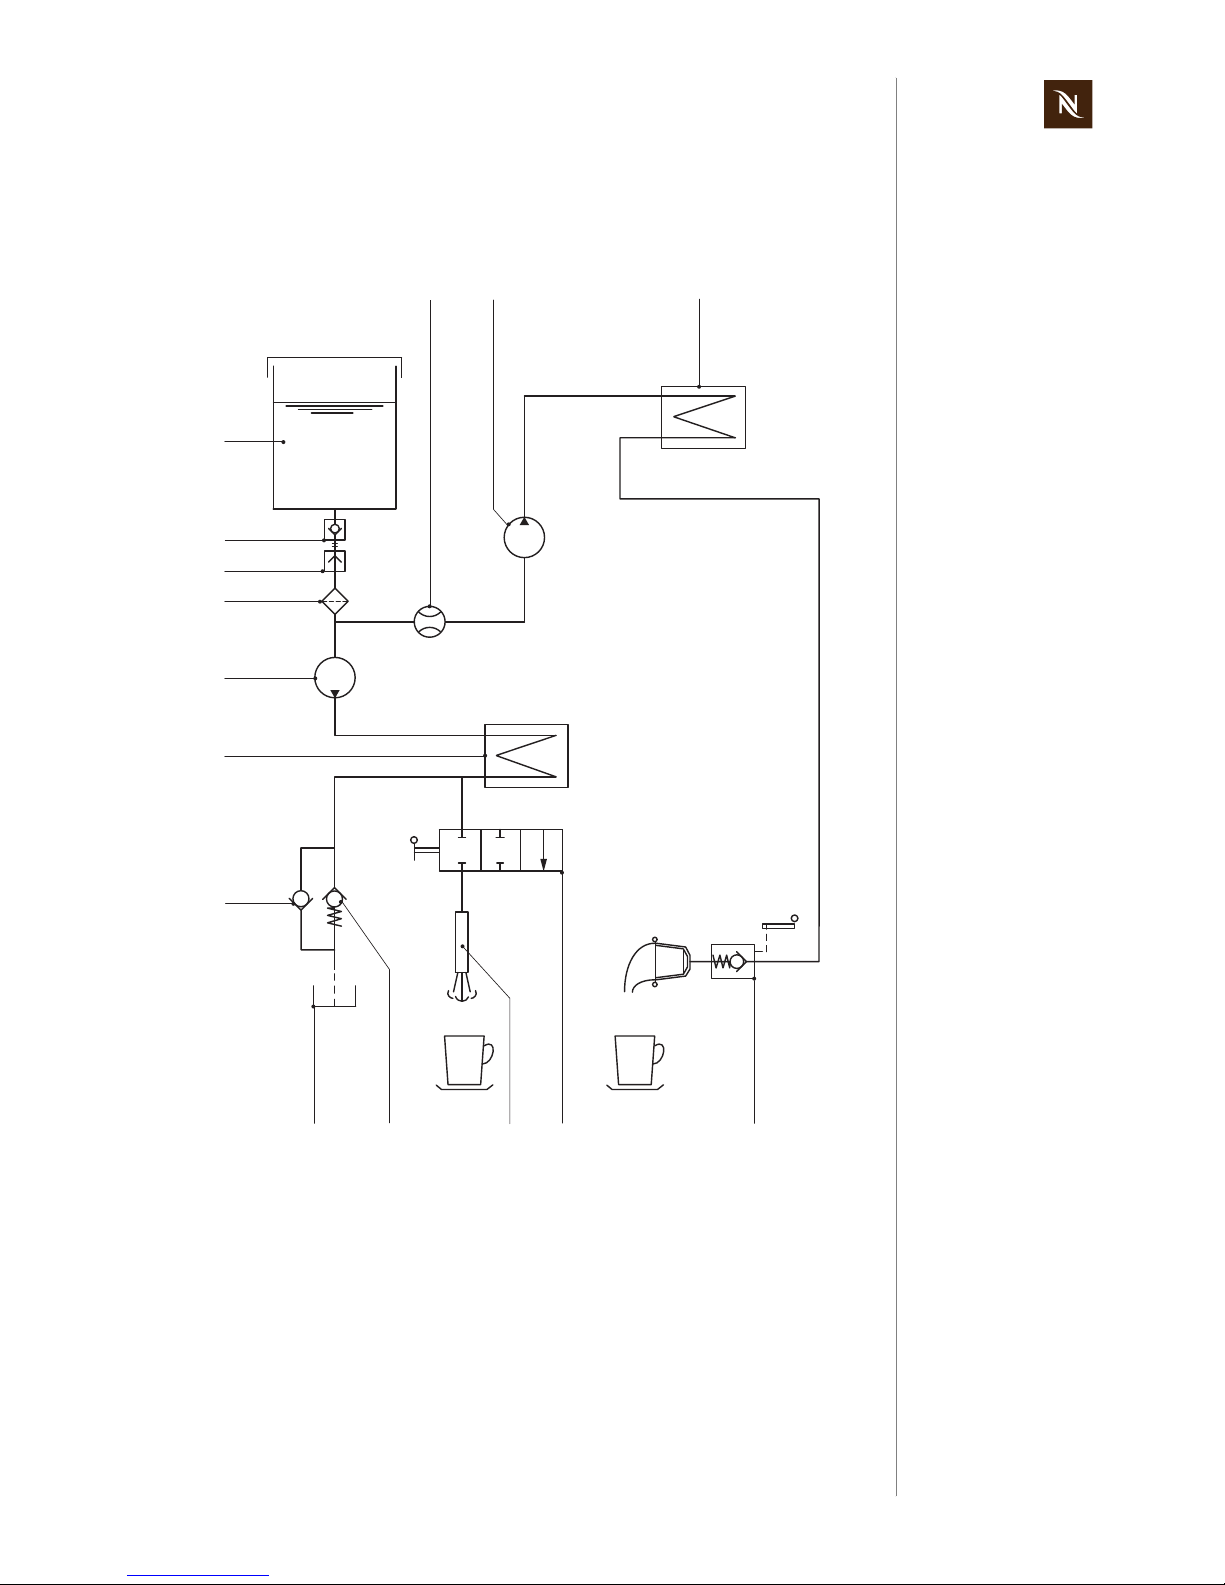
3.3.1 Water circuit diagram - Maestria
1) Flow meter
2) Pump
3) Thermoblock (2010)
4) Water tank
5) Water tank valve
6) Water tank connector
7) Filter
8) Pump
9) Thermoblock (2011)
10) Vent valve (optional)
11) Drip tray
12) Vent valve
13) Steam pipe
14) Steam valve
15) Brewing unit (TCBU) with check valve
4
5
6
7
2
9
3
1513
12 14
1
8
10
11
TB 2010
TB 2011
TCBU
Maestria / Gran Maestria service manual
20
MAIN COMPONENTS
3.3.2 Water circuit diagram - Gran Maestria
1) Flow meter
2) Pump
3) Thermoblock (2010)
4) Water tank
5) Water tank valve
6) Water tank connector
7) Filter
8) Pump
9) Thermoblock (2011)
10) Outlet valve (optional)
11) Cup warmer
12) Drip tray
13) Brewing unit (TCBU) with check valve
21
11
13
4
5
6
7
9
3
8
TB 2010
TB 2011
10
12
TCBU

Maestria / Gran Maestria service manual
21
TECHNICAL DATA
4 TECHNICAL DATA
4.1 Rating plates
4.1.1 Nespresso specific rating plates
Maestria, EU-version Gran Maestria, EU-version
4.1.2 Rating plate details
The rating plate can
be found at the bottom of each coffee
machine.
Maestria EF 285 Gran Maestria EF 287
1) Brand name
2) Voltage and power rating
3) Place of manufacture
4) National approval sign of Russia
(GOST R)
5) National approval sign of Germany
(VDE)
6) Barcode
7) Serial number
8) Machine type
9) Sign of conformity (CE)
10) Spe cial disposal icon
(do not dispose with ordinary waste)
11) Russian protection class conformity
12) Conformity with RoHS guidelines
(lead free solder, etc.)
13) Article number of the rating plate
1
2
3
4
6
7
8
10
11
13
5
9
12
Maestria / Gran Maestria service manual
22
TECHNICAL DATA
Decoding the alphanumeric serial number
Example:
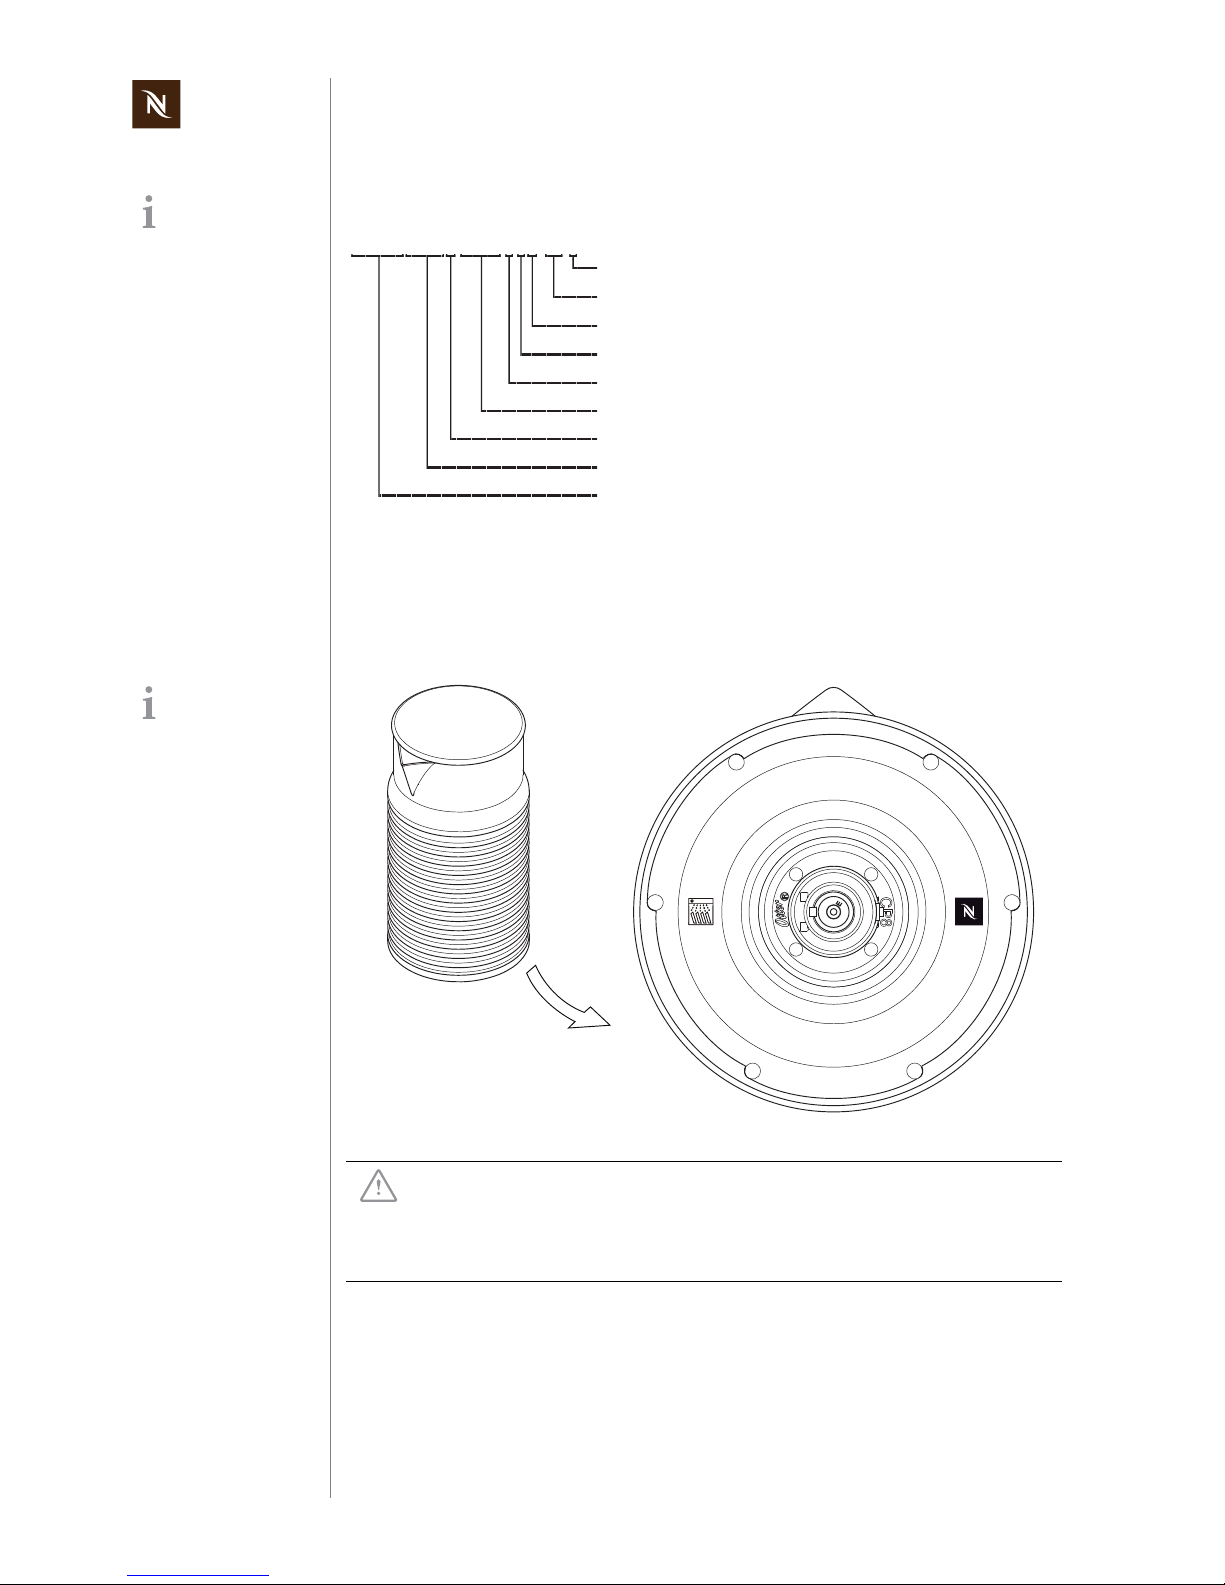
4.1.3 Rating plate of milk frother
The example below shows a milk frother for 220 - 240 V mains voltage.
By decoding the date
of production and
machine type, the
coffee machine can be
identified exactly.
Checksum (if available)
Colour version
Type of mains plug
Mains voltage
Distributing partner
Incremental number per production day
Manufacturing plant
Manufacturer designation of the machine type (EF 287)
12019... Date of production
(12 = year 2012, 019 = 19th day of the year)
120 19 2 871 0007 782 1JG
The milk frother is
part of the Gran
Maestria coffee
machine.
Risk of damage!
The milk frother can be destroyed if connected to a wrong mains
voltage.
Check the mains voltage range on the rat ing plate whenever replacing a
defect milk frother.
A
r
t
i
c
l
e
9
2
9
4
8
2
2
0
-
2
4
0
V
5
0
/
6
0
H
z
D
E
S
I
G
N
B
Y
A
D
N
M
A
X
.
6
0
°
C
M
o
d
.
3
1
9
5
4
1
0
-
4
9
0
W
I
N
S
W
I
T
Z
E
R
L
A
N
D
Maestria / Gran Maestria service manual
23
TECHNICAL DATA
4.2 Summary of technical data
4.2.1 Technical data of coffee machines
Mains voltage ranges
Mains voltage
- Europe, RU, AU, CN, KR, SG, HK, ME, ZA, IL, BR, AR ........... 220-240 V / 50-60 Hz
- USA, Canada, BR, MX .............................................................. 120-127 V / 50-60 Hz
- Japan, Taiwan (only for Maestria)...............................................100-110 V / 50-60 Hz
Power rating
for 220-240 V ................................................................................................. < 2’300 W
for 120-127 V ................................................................................................. < 1’900 W
for 100-110 V.................................................................................................. < 1’500 W
Energy efficiency
Energy efficiency class level (Maestria & Gran Maestria)..................................A - 40%
Daily energy consumption (Maestria)................................................................... 81 Wh
Daily energy consumption (Gran Maestria).......................................................... 79 Wh
Annual energy consumption (Maestria & Gran Maestria).................................. 29 kWh
Capacities
Water tank...................................................................................................approx. 1.4 l
Drip tray ...............................................................................................................250 ml
Capsule container................................................................................ 10 - 14 capsules
Milk frother (Gran Maestria).............................................240 ml hot milk / 120 ml foam
Temperatures
Operating temperature................................................................... + 5 °C up to + 45 °C
Storage temperature..................................................................... - 25 °C up to + 60 °C
Safety temperature (thermal cut-off)....................................................................167 °C
Coffee temperature at outlet .......................................................................86 °C ± 3 °C
Various data
Preheating time....................................................................................... approx. 25 sec
Pump pressure.............................................................................................max. 19 bar
Technical data are
valid for both models,
Maestria and Gran
Maestria, unless explicitly
stated otherwise.
Advised water tank
capacities to avoid
spilling.

Maestria / Gran Maestria service manual
24
TECHNICAL DATA
4.2.2 Technical data of milk frother
Mains voltage
Version 92948:
Europe, RU, AU, CN, KR, SG, HK, ME, ZA, IL, BR, AR.............. 220-240 V / 50-60 Hz
Version 92947:
USA, Canada, BR, MX..................................................................120V / 127 V / 60 Hz
The milk frother
- is available in 2 different models, depending on above mains voltage ranges,
- has to match the mains voltage range of the associate d coffee machine.
Power consumption
Version 92948............................................................................................ 410 - 490 W
Version 92947 / 120 V..........................................................................................450 W
Version 92947 / 127 V..........................................................................................505 W
Capacity
Hot milk ...................................................................................................... max. 240 ml
Hot/cold milk for milk froth...........................................................................max. 120 ml
Performance data
Preparation times
(with full, semi-skimmed or skimmed milk at 6 °- 8 °C fridge temperature)
Cold milk froth (120 ml) .................................................................................60 - 90 sec
Hot velvety or dense milk froth (120 ml)........................................................60 - 90 sec
Hot milk (240 ml) .......................................................................................120 - 180 sec
Temperature
Hot milk, hot milk foam............................................................................ + 64 °C ± 4 °C
Maestria / Gran Maestria service manual
25
TECHNICAL DATA
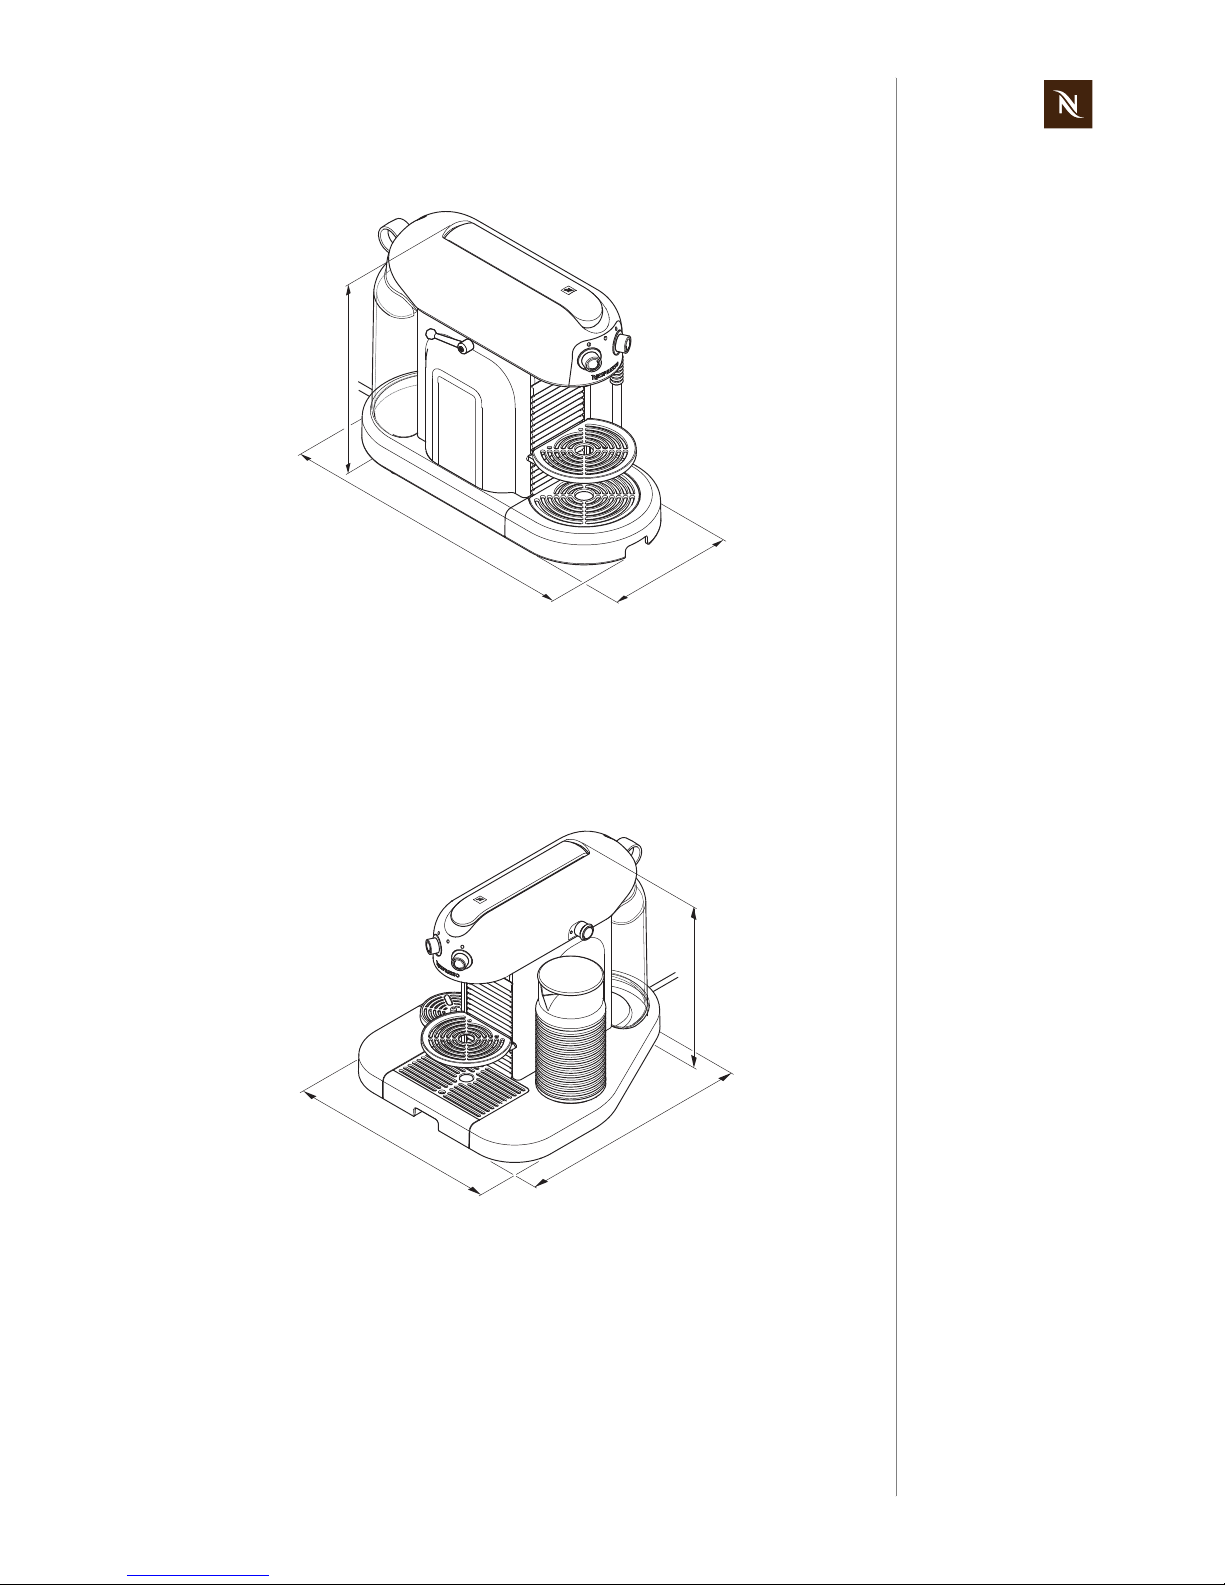
4.2.3 Dimensions and weight - Maestria
Dimensions (A x B x C)..................................................................385 x 302 x 170 mm
Power cord length.................................. ... ... ... .... .........................................approx. 1 m
Weight (without water) .... ... ... .............................................. ... ... ...............approx. 5.3 kg
4.2.4 Dimensions and weight - Gran Maestria
Dimensions (A x B x C)................................................................ 385 x 302 x 320 mm
Power cord length.................................. ... ... ... .... .........................................approx. 1 m
Weight (without water, milk frother included)..............................................approx. 7 kg
A
B
C
C
B
A
Maestria / Gran Maestria service manual
26
TECHNICAL DATA
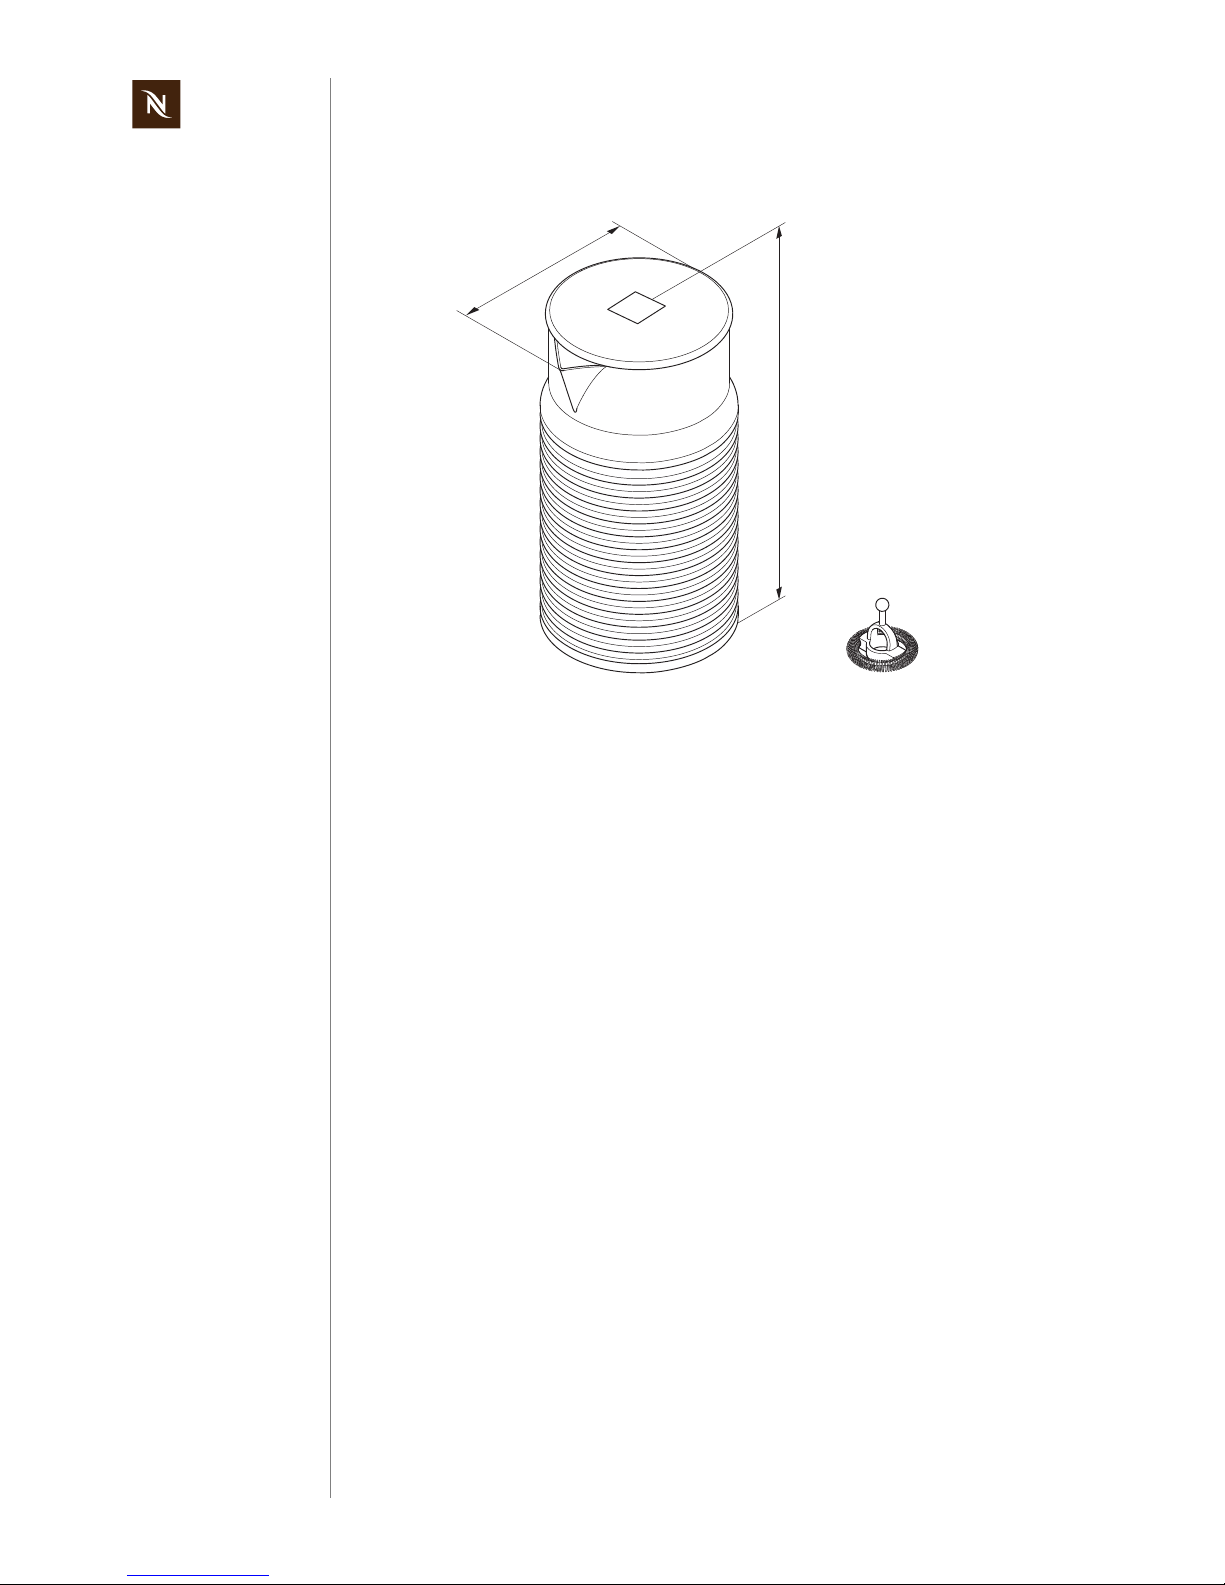
4.2.5 Dimensions and weight - milk frother
Jug diameter (D)......................................................................................... max. 95 mm
Jug height (H)................................................approx. 170 mm (jug without lid 165 mm)
Dimensions of whisk (diameter x height).................. ... ... ... ... .... ... ... .............33 x 32 mm
Weight (with spring whisk)......................................................................approx. 0.75 kg
D
H
Maestria / Gran Maestria service manual
27
MACHINE SETTINGS AND MODES
5 MACHINE SETTINGS AND
MODES
5.1 General information
For an overview of operational controls see “Main Components” on page 8.
For basic operation of the coffee machines such as prep aring a coffee and other related
information, refer to the user manual.
5.2 Machine settings
5.2.1 Coffee level setting
The two push/turn controls at the front sid e of the coffee machine set the volume of water
used for coffee preparation or rinsing according to the following table:
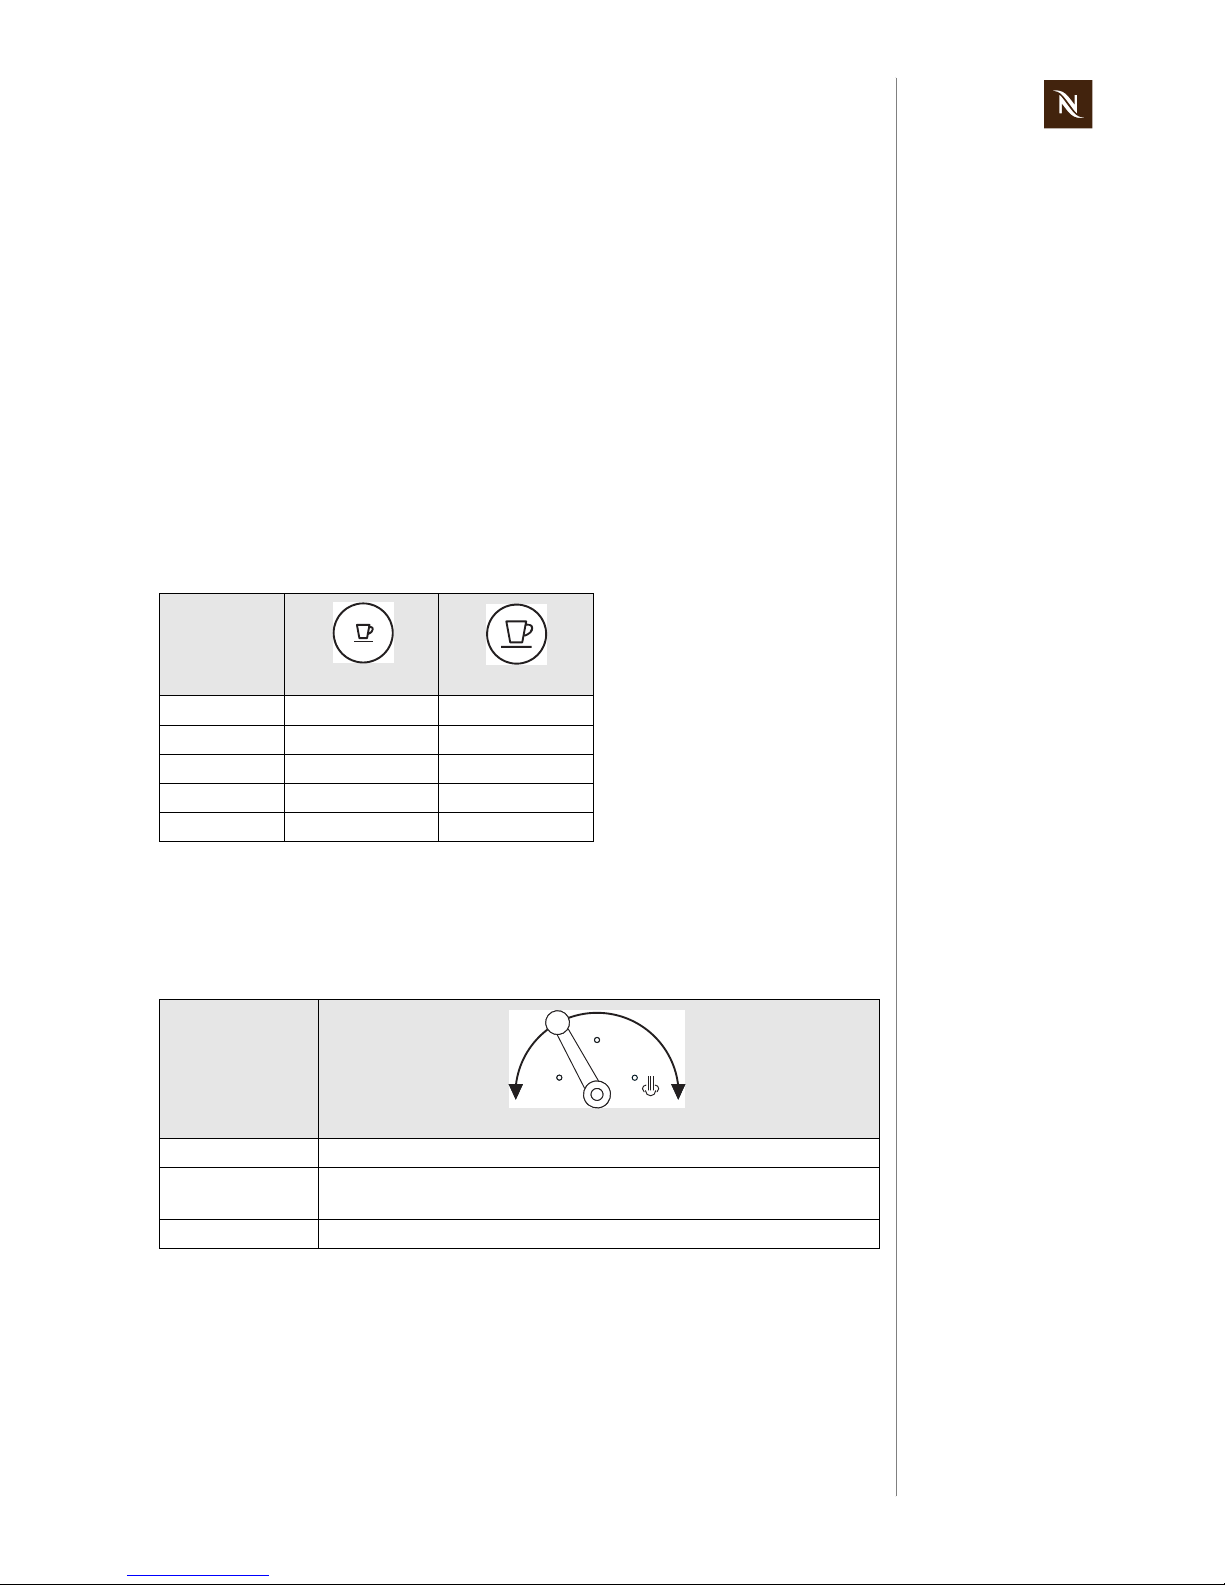
5.2.2 Steam handle setting (Maestria)
The handle at the left side of the Maestria coff ee machine determines the operation of
the steam pipe according to the following table:
Dial setting Espresso Lungo
1 25 ml 70 ml
2 30 ml 90 ml
3 40 ml 110 ml
4 50 ml 130 ml
5 60 ml 150 ml
Handle setting Operating mode
OFF Steam circuit (thermoblock) switched off.
ON Thermoblock for steam generation heats up and stays heated
(standby mode).
STEAM Steam generation.
ON
OFF
STEAM

Maestria / Gran Maestria service manual
28
MACHINE SETTINGS AND MODES
5.2.3 Milk frother setting (Gran Maestria)
The push/turn control at the right side of the Gran Maestria cof fee machine determine s
the operation mode of the milk frother according to the following table:
5.2.4 Special settings
In the menu mode special settings and functions are accessible.
Procedure:
1. Switch off coffee machine.
2. Press the espresso button while turning the machine on.
3. Set dials to the required settings (see table).
4. Press Lungo button to confirm setting or start procedure.
5. Press Espresso button for 5 seconds to exit menu mode any time.
Dial setting Operating mode
1 cold milk froth preparation - velvety soft consistency
2 warm milk froth preparation -velvety soft consistency
3 warm milk froth preparation - dense consistency
4 warm milk preparation only
Espresso push/turn control Lungo push/turn control
Dial setting Menu / Function Dial setting Setting / Value
1 Auto shut off
19 minutes
2 30 minutes
3 60 minutes
4 2 hours
5 8 hours
2 Water hardness
1hard
2medium
3soft
3
Emptying
(evaporate residual water)
-
Press Lungo button to
start emptying procedure.
4 Descaling 1
Descaling procedure
depending on coffee
machine.
Maestria / Gran Maestria service manual
29
MACHINE SETTINGS AND MODES
5.3 Status indication
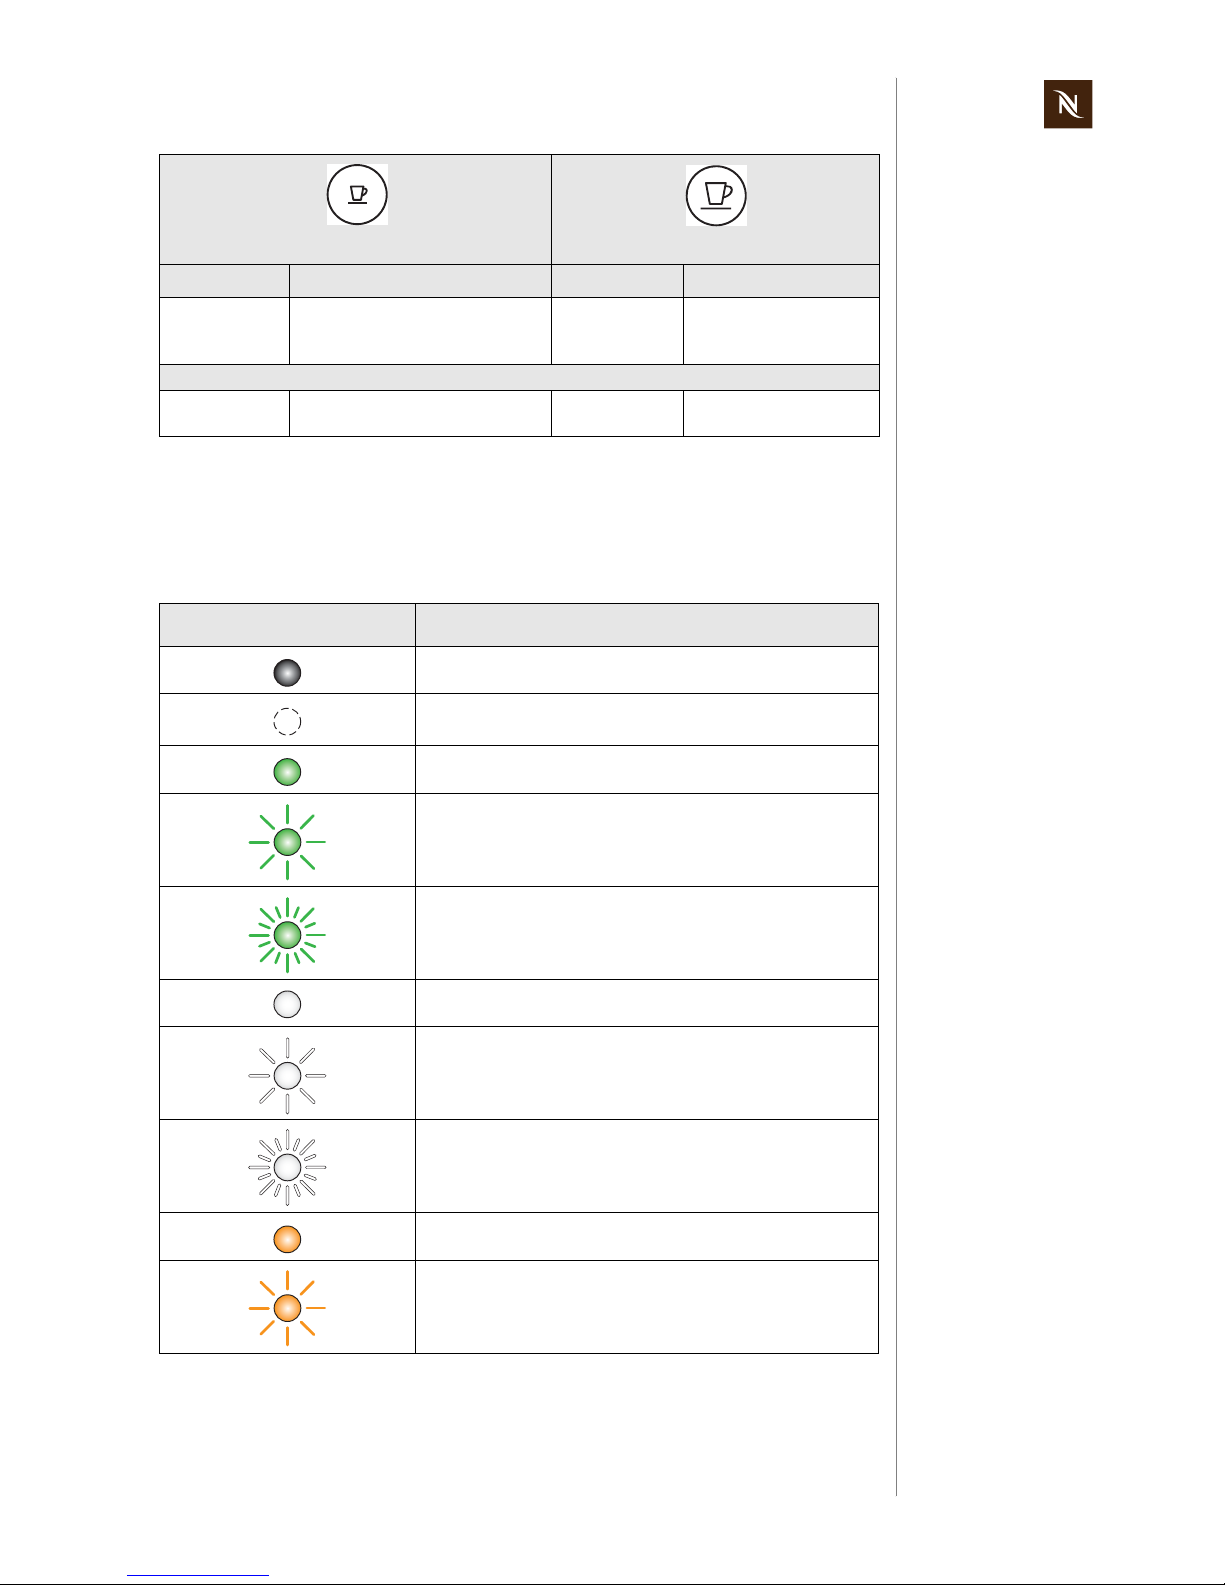
5.3.1 Explanation of LED symbols
5 Reset to factory setting 1 / 2 / 3 / 4
Press Lungo button:
• Auto shut off: 9 min
• Water hardness: hard
5 Auto shut off test 5
Function test of On/Off
button
LED symbol Description
LED off
LED status not defined, i.e. not important to show a certain
machine status.
Left / right LED on
Left / right LED blinking with 1 Hz (0.5 s on, 0.5 s off)
Left / right LED blinking with 2 Hz (0.25 s on, 0.25 s off)
Middle LED on, white
Middle LED blinking white with 1 Hz (0.5 s on, 0.5 s off)
Middle LED blinking white with 2 Hz (0.25 s on, 0.25 s off)
Middle LED on, orange
Middle LED blinking orange with 1 Hz (0.5 s on, 0.5 s off)
Espresso push/turn control Lungo push/turn control
Dial setting Menu / Function Dial setting Setting / Value

Maestria / Gran Maestria service manual
30
MACHINE SETTINGS AND MODES
5.3.2 General status indication
The left and right LEDs on the fron t side show the status of the co ffee machine while the
middle LED shows the status of the steam pipe (Maestria) or cup heater (Gran Maestria).
The middle LED is
bicoloured (white /
orange).
Machine status etc.
Left
LED
Middle
LED
Right
LED
LED signal
Off (ON/OFF switch) All LEDs off
Steam Off (steam lever) Middle LED off
Self test (heating up phase)
Left / right LEDs
blinking with 1 Hz
(0.5 s on, 0.5 s off)
Heating up - coffee
Left / right LEDs
blinking with 1 Hz
(0.5 s on, 0.5 s off)
Heating up - steam / cup
heater
Middle LED
blinking white with 1 Hz
(0.5 s on, 0.5 s off)
Ready for coffee preparation Left / right LEDs on
Ready for steam
preparation / cup heating
Middle LED on, white
Brewing or rinsing small cup
Left LED blinking with
1 Hz (0.5 s on, 0.5 s off)
Right LED on
Brewing or rinsing big cup
Right LED blinking with
1 Hz (0.5 s on, 0.5 s off)
Left LED on
Steam preparation / cup
heating
Middle LED
blinking white with 1 Hz
(0.5 s on, 0.5 s off)
Descaling necessary Middle LED on, orange
Emptying (evaporating)
water circuit for coffee
All LEDs
blinking with 2 Hz
(0.25 s on, 0.25 s off)
Water circuit for coffee emptied
Middle LED
blinking with 2 Hz
(0.25 s on, 0.25 s off)
Left / right LEDs on
 Loading...