

Page 1

Nero LiquidTV™ | TiVo
®
PC
Manual
Page 2

Copyright and Trademark Information
This document, like the software described therein, is provided as a license and may only be used or reproduced in
accordance with the licensing agreement. The contents of this document, as well as the associated software, is
subject to change without prior notice. Nero AG rejects any responsibility for the correctness of the contents of this
document and rejects any claims that transcend the clauses of the guarantee agreement.
This document and all of its contents are protected by copyright and are the property of Nero AG. All rights
reserved. In addition, this document contains material that is protected by internationally valid copyright. This
document may not be reproduced, transmitted, or transcribed in whole or in part without the express written
permission of Nero AG.
Unless you own the copyright, have permission from the copyright owner or your actions fall under the "fair use"
provisions of copyright law, you may be violating national or international copyright laws. The transcribing, reformation, modification or publication of copyright-protected material may lead to claims for damages and the
enforcement of other legal measures against you. If you are unsure of your rights, you should contact your legal
advisor.
Copyright © 2006-2008 Nero AG and its licensors. All rights reserved.
All graphic elements belonging to the TiVo service and all TiVo licensed codes are copyrighted materials of TiVo
Inc. © 2008. All rights reserved.
Nero, the Nero logo, and Nero LiquidTV are trademarks or registered trademarks of Nero AG.
TiVo, the TiVo logo, TiVo Central, Season Pass, WishList, TrickPlay, the Jump logo, the Instant Replay logo, the
Thumbs-up logo, the Thumbs-down logo, and the sounds used by the TiVo service are trademarks or registered
trademarks of TiVo Inc. or of TiVo Inc. subsidiaries worldwide and are used under license.
Apple, iPhoto, iPod, iTunes, iPhone, FireWire, and Mac are trademarks or registered trade names of Apple, Inc.
Dolby, Pro Logic and the double-D symbol are trademarks or registered trademarks of Dolby Laboratories, Inc.
Manufactured under license from Dolby Laboratories.
DirectX, DirectShow, Internet Explorer, Microsoft, Windows, Windows Vista, Windows Media, the Start button of
Windows Vista, and the Windows logos are trademarks or registered trademarks of Microsoft Corporation.in the
United States of America and/or in other countries.
MPEG Layer-3 audio compression technology licensed from Fraunhofer IIS and Thomson.
The Name TwinVQ is a trademark of Nippon Telegraph and Telephone Corporation.
The brands mentioned here are named for information purposes only. All brand names and trademarks are
properties of their respective owners.
Nero AG, Im Stoeckmaedle 13-15, D-76307 Karlsbad, Germany
Nero LiquidTV™ | TiVo® PC
Page 3

Contents
1 Getting Started 5
1.1 About the Manual 5
1.2 About Nero LiquidTV™ 5
1.3 Starting Nero LiquidTV™ 6
1.4 Navigating in Nero LiquidTV 7
1.4.1 TiVo® PC Remote Control Overview 8
1.4.2 Keyboard Layout Overview 9
2 Nero LiquidTV™ Start Screen 10
Contents
3 Now Playing List 12
3.1 Using Multiroom Viewing 14
4 Watch Live TV 15
4.1 Channel Banner 16
4.2 TrickPlay™ Bar 17
4.3 Button Bar 18
5 Guide 19
5.1 Defining Display Options 20
5.2 Program Screens 22
5.3 Options Screens 24
6 DVD 25
6.1 Burning Recordings to DVD 25
6.2 Converting Recordings for Portable Playback Devices 26
6.3 Saving Disc Space 27
7 Find Programs 28
7.1 Find Programs 29
7.2 Creating a WishList® Search 29
7.3 The Season Pass® feature 30
7.3.1 Creating a Season Pass® recording 31
7.4 Recording by Time or Channel 32
8 Messages & Settings 33
8.1 General Settings for Nero LiquidTV™ 34
Nero LiquidTV™ | TiVo® PC 3
Page 4

Contents
8.2 Creating a Channel List 35
8.3 Display Settings 36
8.3.1 Defining Display Settings 37
8.4 Recording Settings 38
8.5 Remote Control 39
9 Parental Controls 41
9.1 Parental Control/KidZone Default Settings 42
9.1.1 Setting Up Parental Controls and KidZone 42
9.2 Individual Parental Control /KidZone Settings 44
9.2.1 Editing the Parental Control /KidZone Setup 45
10 Index 48
11 Contact 51
Nero LiquidTV™ | TiVo® PC 4
Page 5
Getting Started
1 Getting Started
1.1 About the Manual
This manual is intended for all users who wish to learn how to use Nero LiquidTV™. It is
process-based and explains how to achieve a specific objective on a step-by-step basis.
In order to make best use of this manual, please note the following conventions:
Symbol Meaning
1. Start …
OK
Chapter
[…] Indicates keyboard shortcuts for entering commands.
{…} Indicates TiVo® PC remote control buttons for entering commands.
Indicates warnings or instructions that have to be followed strictly.
Indicates additional information or advice.
A number at the beginning of a line indicates a request for action.
Carry out these actions in the order specified.
Indicates an intermediate result.
Indicates a result.
Indicates text passages or buttons that appear in the program interface. They are displayed in bold face.
Indicates references to other chapters. They are executed as links and
are displayed in red and underlined.
1.2 About Nero LiquidTV™
The Nero LiquidTV™ | TiVo PC® lets you create your own TV schedule. You can define
which programs, actors, directors, and series you are interested in, and your own individual
schedule will be ready at the push of a button. Whenever you want, wherever you are.
You will never miss your favorite show again!
Nero LiquidTV™ records every single episode automatically – even if the broadcast times
are changed. Reruns can be recognized and skipped. Simply create a Season Pass
cording for the TV series.
Video tapes are finally a thing of the past!
Nero LiquidTV™ records everything in digital on your hard drive. You can even start
w
atching a
Never miss a part of your favorite show again when the telephone starts ringing!
Nero LiquidTV™ allows you to use all the features that were previously limited to video
recordings during live TV
at the tip of your finger.
No more endless channel surfing just to find something interesting!
Nero LiquidTV™ will always show the exact TV schedule that you would be interested in.
You can even create a WishList
cord the right programs for you. This way, you will never miss a movie with your favorite
actors!!
Nero LiquidTV™ | TiVo® PC 5
show from the beginni
shows: Re
ng while it is still being recorded.
winding, slow motion, pauses of up to 90 minutes - all
®
search. With it, Nero LiquidTV™ will automatically re-
®
re-
Page 6

Getting Started
®
Since Nero LiquidTV™ includes TiVo
how, and which progr
ams you would like to see from the very start. The updated integrated
service for a whole year, you can freely define where,
electronic program guide (EPG) is available on a daily basis for any location within the USA,
Canada, or Mexico.
The user-friendly interface makes it easy to choose between the different available options:
Watching live TV programs, scheduling recordings, or finding interesting programs. You
rate programs quick
Nero Liq
uidTV™ will create a user profile for you and eventually suggest programs that
ly and easily with the TiVo PC remote control. Based on your ratings,
®
can
could interest you.
1.3 Start
1. Double-click the start icon.
And there's still more: Your individual TV schedule can go anywhere, just like you - burn
programs to DVDs, export them to your iPod/PSP, or send them to other devices (TiVo
boxes or
Nero LiquidTV™ | TiVo
®
PC s
tations) on your local network. Or convert them to a
®
space-saving format and experience outstanding audio and video quality while using a
surprisingly small amount of memory.
e
In order to protect children, Nero LiquidTV™ provid
s a special area for children (KidZone),
as well as detailed parental control features that parents can use to easily and reliably define
the programs that their children
can access.
ing Nero LiquidTV™
After the installation process an
described in detail in the corresponding uide, the Nero LiquidTV™ start icon
will be automatically available.
To start Nero LiquidTV™, p
The
TiVo Central
screen is displayed.
d the wizard-based configuration process, both of which are
Quick Start G
roceed as follows:
Nero LiquidTV™ | TiVo® PC 6
Page 7

Getting Started
1.4 Navigating in Nero LiquidTV
The Nero LiquidTV™ user interface provides several different buttons for navigation and
selection bars for selecting and choosing options.
These buttons and selection bars can be operated with the mouse, the keyboard, or the
®
PC remote control.
TiVo
Keyboard:
You can move the selection bar with the arrow keys in order to select an option. The
selected option is chosen with the [
to control the white arrows that are displayed in the selection bar. They will either take you to
the next area of the same screen, featuring further options; take you to the next screen; or
display the various different options, one after the other.
Mouse:
Click the desired button or desired option with the left mouse button.
®
TiVo
PC remote control:
The selection bar can be moved with the up and down arrow keys in order to select an
option. The selected option is chosen with the Select (TiVo
Other control options available with the TiVo
screens on the bottom margin. You can find an overview of the most important options under
TiVo® PC Remote Control Overview
] Enter button. You can use the right and left arrow keys
®
®
PC remote control are displayed on different
and Keyboard Layout Overview.
PC remote control) button.
Examples:
The "Use the Select button" instruction can mean one of the following:
If you are using the keyboard:
Use the arrow keys to move the selection bar to the Select button and press the Enter
key.
If you are using the mouse:
Left-click the Select button that is shown on the
If you are using the TiVo® PC remote control:
Press the Select button on the TiVo PC remote control.
or:
s to move the selec
Use the arro
screen and press the Select button.
The "Ch
o
If you are using the keyboard:
Use the arrow keys to move h
If you are using the mouse:
Left-click the option.
If you are usi
Use the arrow keys to move the selection bar to the option shown and press the Select
button.
w key
ose <an option>" instruction m a
t
ng the TiVo
®
PC remote control:
®
tion ba
e ns:
e selection bar to the option and press the Enter key.
scre
en.
r to the Select button that is shown on the
Nero LiquidTV™ | TiVo® PC 7
Page 8
Getting Started
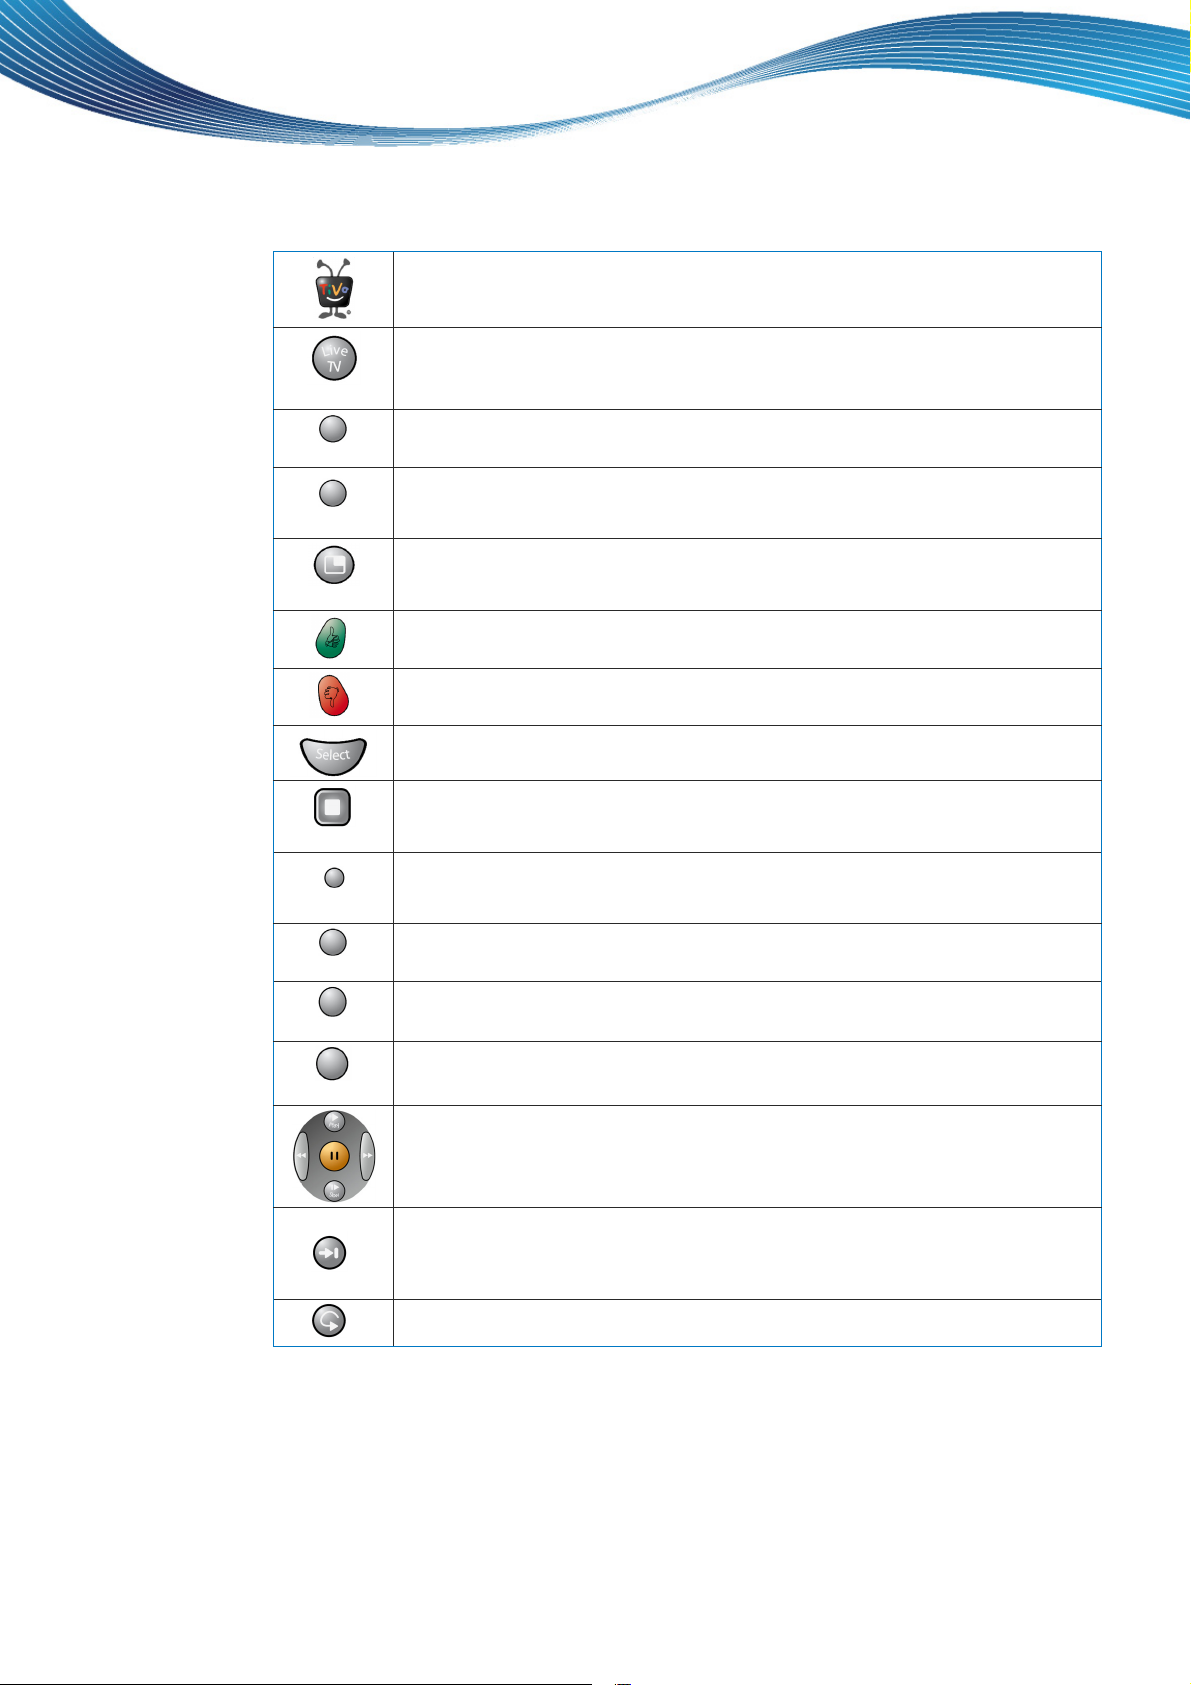
1.4.1 TiVo® PC Remote Control Overview
Swap
Info
Guide
Window
®
®
Displays the TiVo Central® screen, from which you can access all TiVo® service features. If the TiVo Central
screen ois displayed, where all available recordings are made available for selection.
Displays the TV screen and thereby the current TV program of the channel that was
selected last. If the TV screen is already displayed then you can switch to the next
tuner's live TV program with this button (if another tuner is available).
Displays information about the current TV schedule, the recording, or the DVD.
Displays the Guide screen, which features the electronic program guide. You can
schedule and start recordings, or show a program that is currently being broadcast, on
this screen.
Switches from the small preview window displaying the TV schedule to the full view.
Gives a positive rating (one thumb) for the currently selected/shown recording every
time that the button is pushed. Best rating: Three positive points.
Gives a negative rating (one thumb) for the currently selected/shown recording every
time that the button is pushed. Worst rating: Three negative points.
®
screen is already being displayed, the Now Playing List
Stop
Aspect
DVDMenu
Clear
Enter
Confirms the selection made on the screen and triggers the corresponding action.
Ends a running recording of the current TV schedule if it is currently running in full
screen or preview screen mode. If a captured file is currently being displayed in preview mode then the program screen is displayed.
Makes it possible to adjust the screen aspect ratio while the TV program is being
played. The following setting options are available: Full, Panel (the picture is displayed
in its full original aspect ratio), and Zoom.
Displays the DVD-Menu screen, where you can compile and burn your own DVDs from
your recordings.
Closes all additional information windows that are displayed.
Enables the direct selection of a TV channel through its channel number. First, enter the
desired number and then press the Enter button.
Controls Live TV. Pause for up to 90 minutes, rewind and fast forward at three speeds,
slow-motion and instant replay – all at the touch of a button.
Jumps to the end or beginning of the live TV program sequence that is saved automatically - the so-called live cache - if the current TV program is being shown in full
®
screen mode. Otherwise, you can use this button to jump to the beginning or to the
end of lists.
®
Replays the last sequence.
Nero LiquidTV™ | TiVo® PC 8
Page 9

Getting Started
1.4.2 Keyboard Layout Overview
[T]
[L]
[I]
[G]
[X]
[-]
[+]
[ ]
[S]
[Z]
[V]
[Delete]
[E]
[P]
space
[[]
[]]
[O]
[>]
[<]
[Picture
]
[Picture
]
Displays the TiVo Central® screen, from which you can access all TiVo® service features. If
the TiVo Central
played, where all available recordings are made available for selection.
Displays the TV screen and thereby the current TV program of the channel that
was selected last. If the TV screen is already displayed then you can switch to the
next tuner's live TV program with this button (if another tuner is available).
Displays information about the current TV schedule, the recording, or the DVD.
Displays the Guide screen, which features the electronic program guide. You can schedule
and start recordings, or show a program that is currently being broadcast, on this screen.
Switches from the small preview window displaying the TV schedule to the full view.
Corresponds to the
(one thumb) for the currently selected/shown recording every time that the button is pushed.
Worst rating: Three negative points.
Corresponds to the
(one thumb) for the currently selected/shown recording every time that the button is pushed.
Best rating: Three positive points.
Corresponds to the TiVo
Confirms the selection made on the screen and triggers the corresponding action.
Ends a running recording of the current TV program if it is currently running in full screen or
preview screen mode. If a captured file is currently being displayed in preview mode then
the program screen is displayed.
Enables the adaptation of the screen display during the playback of the TV program. Setup
options are Full (complete), Panel (picture is fully displayed in the original aspect ratio), and
Zoom (enlarge).
Displays the DVD-Menu screen, where you can compile and burn your own DVDs from
your recordings.
Closes all additional information windows that are displayed.
Corresponds to the TiVo
Makes it possible to directly select a TV channel with its channel number: First enter the
desired number and then press the Enter button.
Corresponds to the TiVo
Corresponds to the TiVo
mum of 90 minutes.
Corresponds to the TiVo
Corresponds to the TiVo
Corresponds to the TiVo
Corresponds to the TiVo
ning of the live TV program sequence that is saved automatically - the so-called live cache -
if the current TV program is being shown in full screen mode. Otherwise, you can use this
button to jump to the beginning or to the end of lists.
Corresponds to the TiVo® PC remote control ® Replay button.
Replays the last sequence.
Corresponds to the TiVo® PC remote control Channel Up button. Switches to the next channel.
Corresponds to the TiVo
vious channel.
®
screen is already being displayed, the Now Playing List screen ois dis-
®
button on the TiVo® PC remote control. Gives a negative rating
®
button on the TiVo® PC remote control. Gives a positive rating
®
PC remote control Select button
®
PC remote control Enter button.
®
PC remote control Play button. Starts playback.
®
PC remote control Pause button. Pauses playback for a maxi-
®
PC remote control double left arrow button. Rewinds.
®
PC remote control double right arrow button. Fast forwards,
®
PC remote control Slow button. Starts slow-motion.
®
PC remote control jump button. Jumps to the end or begin-
®
PC remote control Channel Down button. Switches to the pre-
Nero LiquidTV™ | TiVo® PC 9
Page 10
Nero LiquidTV™ Start Screen
2 Nero LiquidTV™ Start Screen
Almost everything that you can do with Nero LiquidTV™ and with the TiVo® service starts at
the Nero LiquidTV™ start screen TiVo Central.
From here, you can schedule recordings, watch TV programs that are currently being
broadcast or programs that you recorded, play DVDs, burn DVDs, and much more.
You can enter the TiVo Central
control. The screen includes buttons that allow access to your recordings, the current TV
schedule, your DVD drives, the electronic program guide, and the available settings. It also
features a preview screen, where you can show the TV program that is currently being
broadcast on the channel you selected or the DVD that is currently running.
®
screen with the TiVo® button on your TiVo® PC remote
The following buttons and access options are available with a keyboard [in square brackets]
or with the TiVo
®
PC remote control {in braces}:
Displays the Now Playing List screen. This screen provides access
Now Playing List
to all the TV programs that you have already recorded and that are
currently being recorded (see Now Playing List).
Watch TV
[L], {Live TV}
Displays the current TV program on the last selected channel (see
Watch Live TV
).
Displays the electronic program guide. The programs broadcast on
Guide
[G], {Guide}
all your TV channels are listed with the corresponding date, channel,
and time. You can schedule and start recordings or show a program
that is currently being broadcast here (see Guide
).
Displays the DVD screen. This screen provides access to all the
DVDs inside your computer drives. If you have only inserted one
DVD, it will be played automatically if it has the same region code as
DVD
[V], {DVD}
your drive.
Moreover, you can also burn locally stored recordings to a DVD from
this screen (see DVD
).
Please bear in mind that there is no CD support for playback or
burning - only DVDs are supported.
Nero LiquidTV™ | TiVo® PC 10
Page 11
Nero LiquidTV™ Start Screen
Find
Programs
[3], [8]
{3}, {8}
Displays the Find Programs screen. This screen lets you choose
the TV programs that Nero LiquidTV™ should record. The features
WishList
®
search, Season Pass®, and TiVo® Suggestions are also
available on this screen (see Find Programs
Displays the Messages & Settings screen. You can check and
Messages &
Settings
modify all settings - including wizard-based configuration settings - in
this screen. This screen also provides access to system messages,
system information, a Help link, and the option of resetting the system (see Messages & Settings
).
Other access options available through keyboard and TiVo
[1], {1}
Displays the Season Pass Priority screen, where each WishList
Season Pass
®
recording is listed. You can change their order and their priority
as a result.
[2], {2}
Displays the To Do List screen, where Nero LiquidTV™ shows a clear overview of pending recordings, transfers, and conversions.
Displays the Search screen. You can use this screen to search for TV programs in the electronic program guide, based on their title. The results are
listed and can be selected in order to display the corresponding program
screen (see Program Screens
).
You can use this screen to record either the corresponding program or one or
[4], {4}
more episodes from a TV series, or to create a Season Pass
der to automatically record every single episode in a TV series (see Find Pro-
grams).
If the search feature does not find any corresponding programs, the Create a
WishList button is displayed - you can use this button to create a WishList
search (see Creating a WishList® Search
).
Displays the Browse by Channel screen. You can use this screen to list the
programs that are broadcast on a certain channel and on a certain day. The
[5], {5}
list shows the name of the program and the time when the broadcast begins.
You can use [
the selected program (see Program Screens
], {Select}, and [R], {Record} to display the program screen for
).
Displays the Browse by Time screen. You can use this screen to list the programs that are broadcast on a certain day, at a certain time, and on the available channels listed. The list shows the name of the program and the channel
[6], {6}
number for the channel on which it is broadcast.
You can use [
the selected program (see Program Screens
], {Select}, and [R], {Record} to display the program screen for
).
Displays the Record by Time or Channel screen. You can use this screen to
[7], {7}
schedule recordings in advance by specifying the days on which recordings
should take place, in addition to the respective channel and the start and stop
times (e.g. "Every Monday," see Recording by Time or Channel
[W],
{
Switches from the small preview window displaying the TV schedule to the full
screen.
}
).
®
PC remote control:
®
recording in or-
).
®
search and
®
Nero LiquidTV™ | TiVo® PC 11
Page 12
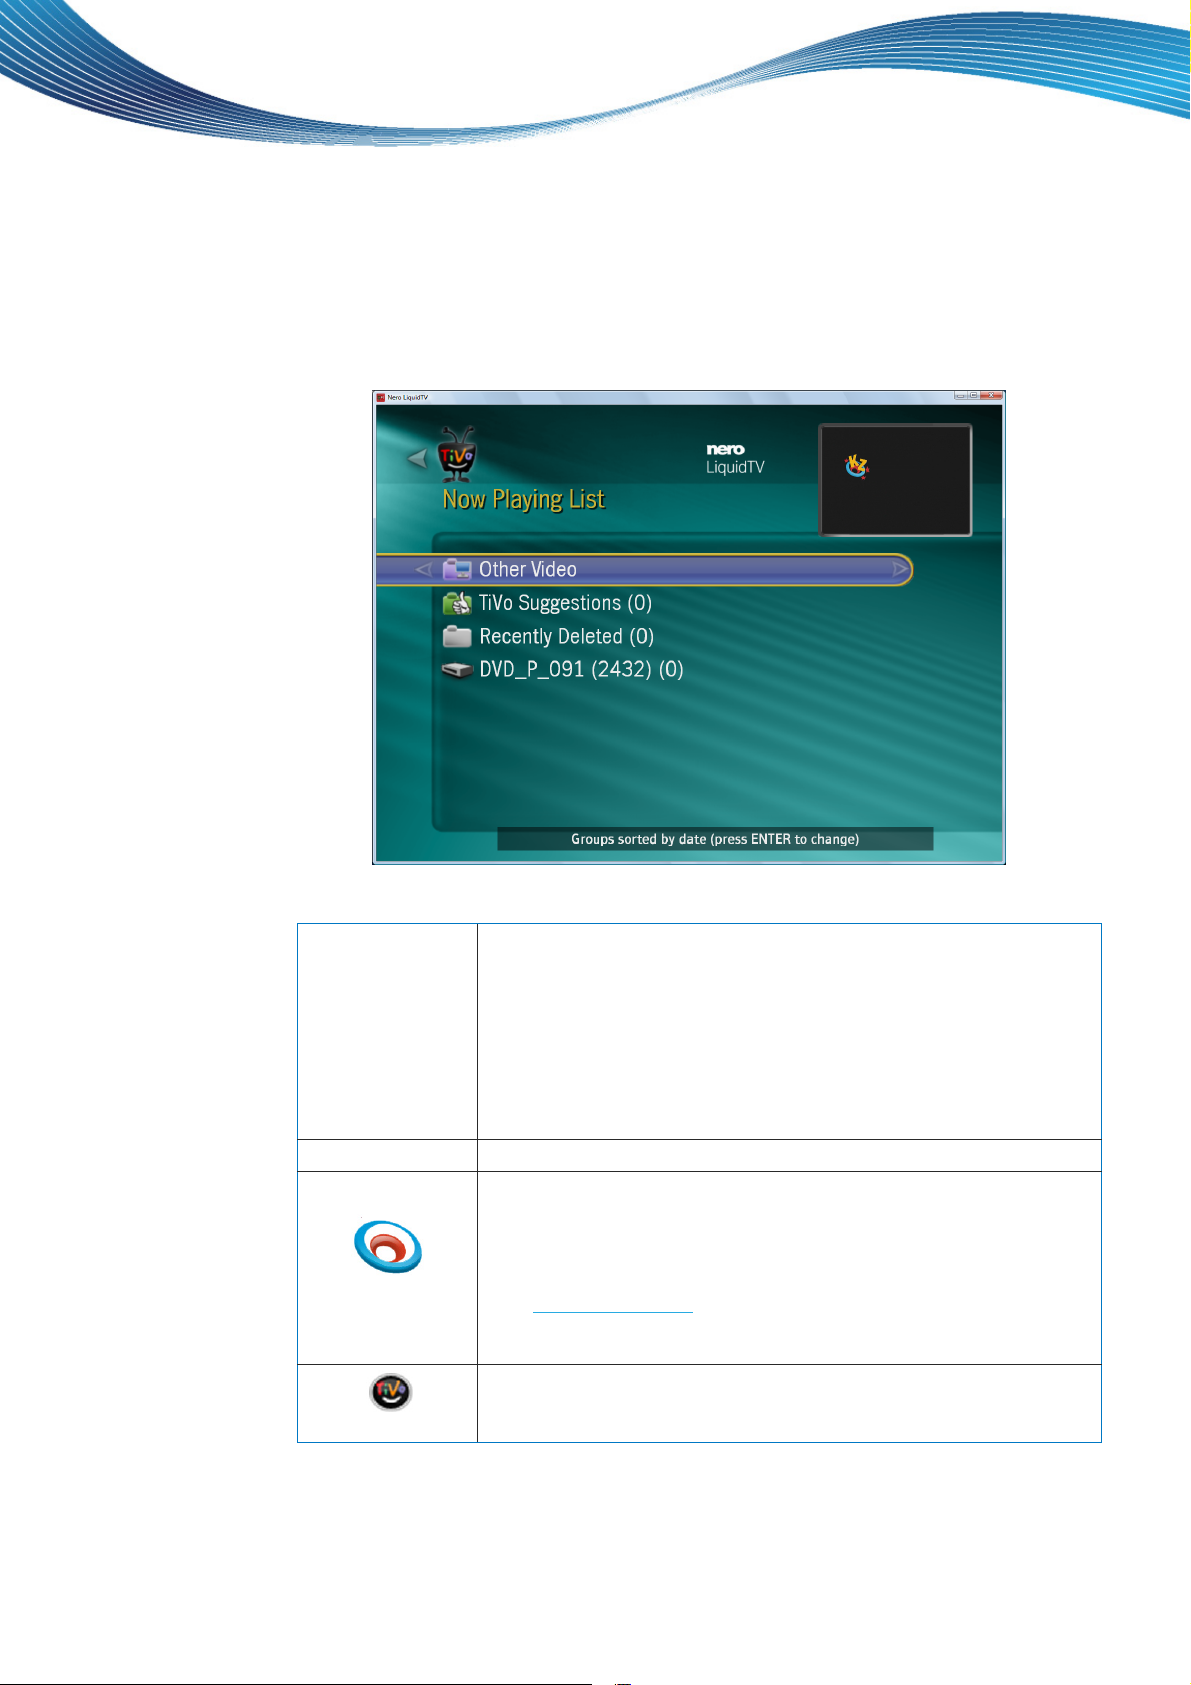
Now Playing List
3 Now Playing List
The Now Playing List screen lists all the TV programs that you have already recorded or
that are currently being recorded, including the day on which they were recorded. If you start
a new recording, it will be displayed first on the list.
In addition, Nero LiquidTV™ automatically compiles recordings with common criteria into
groups that are labeled with folder icons and with the number of recordings contained - these
groups are also listed on this screen.
The following input and selection options are available:
Displays the Now Playing List Options screen. You can use this
screen to choose the criteria that will be used to sort the list on the
Now Playing List screen, to enable group display, and to decide
whether or not the available storage space should be shown.
[E] {Enter}
By default, the list is sorted by the recording date, group display is
turned on, and the available storage space is not shown.
By using [1], {1}, you can switch between sorting by recording date
and sorting by date. By using [2], {2}, you can turn group display on
or off.
[P], {Play} Plays the selected recording in full screen mode.
Displays the KidZone: Now Playing List screen. This screen provides access to recorded programs, programs currently being
broadcast, and DVDs that you have authorized for the KidZone area.
Enter
TiVo KidZone
You can also use this screen to change the default password (0000)
for the KidZone area and/or authorize other programs or recordings
(see Parental Controls
).
The Enter TiVo KidZone button is only available if the parental con-
trol feature is turned on.
Displays the program screen with information on the recording <TV
<TV broadcast>
broadcast>, and uses an icon to show that the recording is a TiVo
suggestion.
®
Nero LiquidTV™ | TiVo® PC 12
Page 13

Now Playing List
Displays the program screen with information on the recording <TV
<TV broadcast>
broadcast>, and uses an icon to show that the recording will be
automatically deleted as soon as storage space is required for new
recordings.
Displays the program screen with information on the recording <TV
<TV broadcast>
broadcast>, and uses an icon to show that the recording can never
be deleted automatically (i.e. that only you can delete it).
Displays the program screen with information on the TV program,
<TV broadcast>
and uses an icon to show that the program is currently being recorded.
<Series>
<WishList
<WishList
<WishList
®
>
®
>
®
>
, , ,
,
<Category>
Compressed
Shows
Other Video
TiVo Suggestions
Contains a series with several episodes that were recorded with a
Season Pass
Contains recordings that were made with a WishList
group is named with the WishList
Shows that a program is currently being recorded for this WishList
®
recording. The group is named with the series' name.
®
®
search’s name.
search. The
®
search group.
Shows that a recording from a remote source is currently active or
that a transfer is being made to a remote target for this WishList
®
search group.
Contain recordings to which Nero LiquidTV™ can assign defined
categories, such as "Sport," "Film," "Children's show," "HD" (HighDefinition broadcast), etc. Each group is assigned the name of its
category.
Contains recordings that were converted with the special Nero
LiquidTV™ space-saving format. This format creates very small files
while keeping a very high level of playback quality.
Contains video files that are stored in a special folder on your PC.
You can define this folder according to your own preferences under
the Recording Settings screen (see Recording Settings
).
The MPEG-2, MPEG-4 (H.264), AVI, WMV, and tivo formats are
supported.
Contains recordings that Nero LiquidTV™ makes independently if
the corresponding setting is configured. The programs that you have
already recorded and/or rated are used as criteria for selecting programs that should be recorded (see Recording Settings
)
To be deleted soon
Recently Deleted
<Remote
system>
Contains recordings that will possibly be deleted soon (automatically).
Contains recordings that have just been deleted recently. It might be
possible to restore these deleted recordings.
Lists all available recordings on a remote Nero LiquidTV™ station or
®
a TiVo
DVR on a dedicated screen. If you have entered the corresponding MAK (Media Access Key), the remote systems' recordings
can be selected (see Using Multiroom Viewing
).
A context menu for the selected recording can be displayed by right-clicking. You can use
this menu to watch the recording, delete it directly, store it on portable media, or specify
whether or not it should be deleted if storage space is required. It also allows you to protect
the recording with the parental control password or to hide it so that it isn't shown in the
KidZone area.
Nero LiquidTV™ | TiVo® PC 13
Page 14
Now Playing List
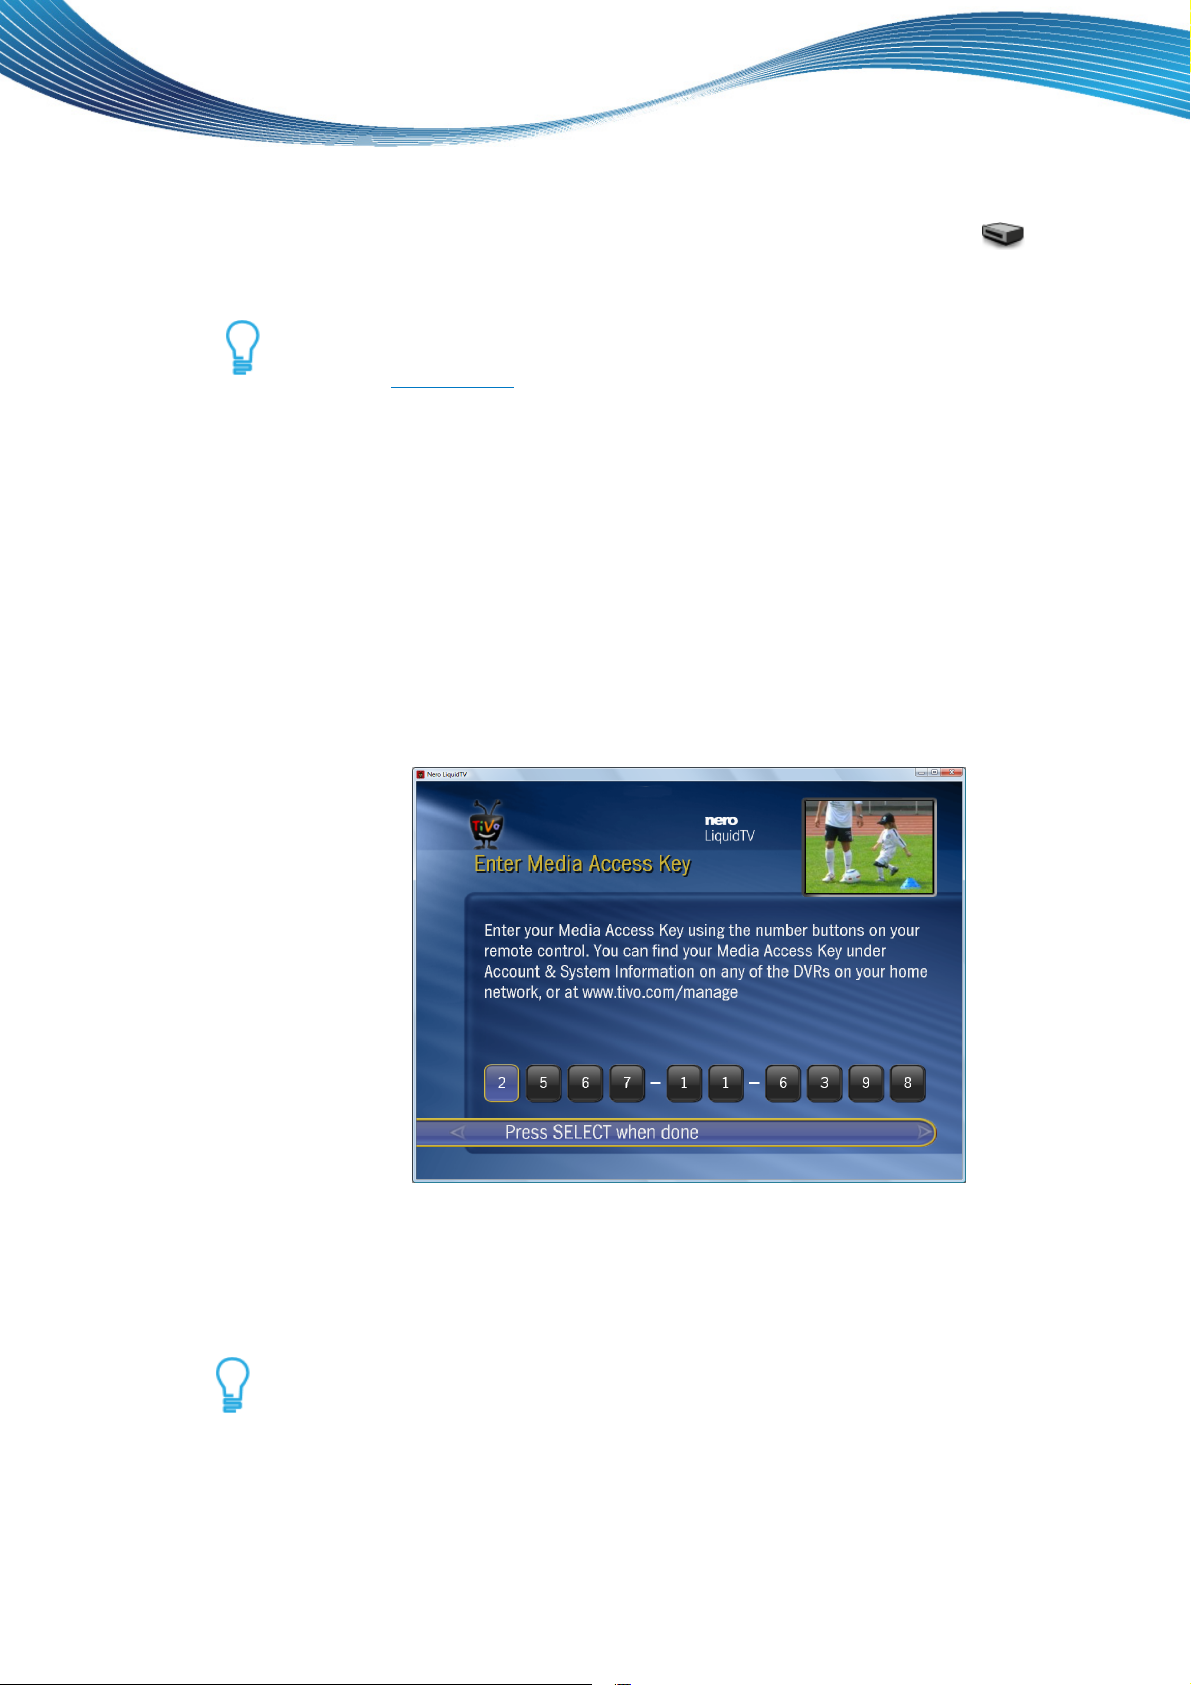
3.1 Using Multiroom Viewing
Your Nero LiquidTV™ station will automatically detect all TiVo® boxes that are connected to
your home network and display them on the Now Playing List screen with the
order to be able to access the recordings on these TiVo
®
boxes, you must enter their respec-
tive Media Access Key.
You can find the Media Access Keys for your TiVo
Information" for each TiVo
can get it at www.tivo.com
®
box. If you still can't find the respective Media Access Key, you
. All TiVo® boxes featuring the same user account should also
®
boxes under the "Account and System
have the same Media Access Key.
Proceed as follows:
1. Use the Messages & Settings button on the TiVo Central screen.
The Messages & Settings screen is displayed.
2. Use the Account & System Information button.
The Account & System Information screen is displayed.
3. Use the Media Access Key button.
The Media Access Key screen is displayed.
icon. In
4. Use the Enter a Media Access Key button.
The Enter a Media Access Key screen is displayed.
5. Enter the ten-digit Media
Access Key.
6. Use the Select button.
You have entered the Media Access Key for you
recordings from your Nero LiquidTV™ station.
r TiVo
®
boxes and can now access their
t
Other Nero LiquidTV™ s
ations in your home network are also detected automatically. In order
to access their recordings, you must first define your own 10-digit Media Access Key and enter
it as described above. The following also applies in this case: If several Nero LiquidT
tions are connected to the network, they must all feature the same Media Access Key.
Nero LiquidTV™ | TiVo® PC 14
V™ sta-
Page 15
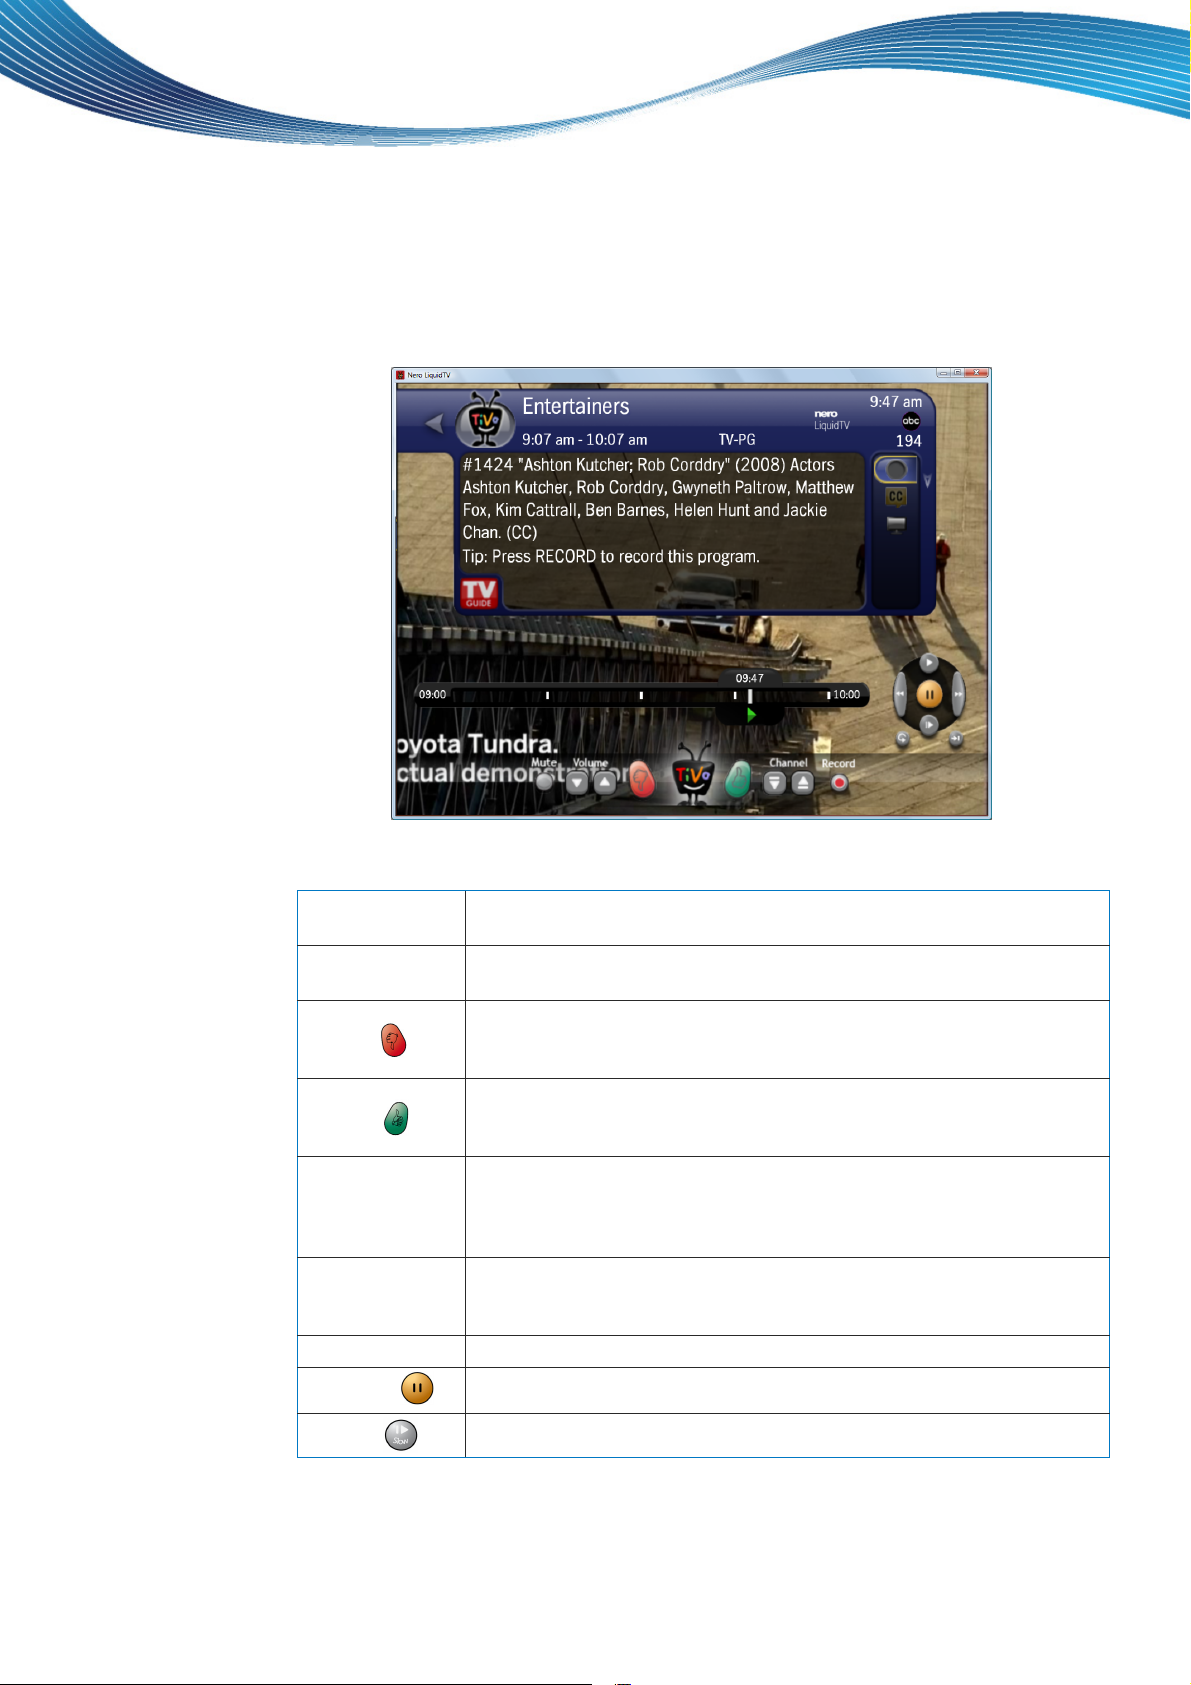
Watch Live TV
4 Watch Live TV
You can use the Watch TV button on the TiVo Central® screen to display the TV program
currently being broadcast on the current channel.
If you turned on the parental control feature and a program that is locked by the parental
control settings is currently running, you will be asked to enter the corresponding password
before the program is displayed.
The following input options are available with a keyboard [in brackets] or with the TiVo® PC
remote control {in braces}:
[L]
[I] {Info}
Switches to the next tuner's TV program if more than one tuner is
available.
Displays and hides information regarding the TV program currently
running, the recording, or the DVD.
Gives a negative rating (one thumb) for the currently selected/shown
[-] { }
TV program or recording every time that the button is pushed. Worst
rating: Three negative points.
Gives a positive rating (one thumb) for the currently selected/shown
[+] { }
TV program or recording every time that the button is pushed. Best
rating: Three positive points.
Stops the recording process for the TV program that is currently run-
[S], {Stop}
ning if the program is being run in full screen or preview screen mode.
If a recording is currently being displayed in the preview screen, a program screen is displayed.
Makes it possible to adjust the image aspect ratio during TV program
[Z], {Aspect}
playback. The following setting options are available: Full, Panel (the
picture is displayed in its full original aspect ratio), and Zoom.
[Delete], {Clear} Closes all additional information windows that are displayed.
Space, { }
Pauses playback for a maximum of 90 minutes and continues it.
[O], { }
Nero LiquidTV™ | TiVo® PC 15
Starts slow motion.
Page 16
Watch Live TV
[Picture], { }
[Picture], { }
Additionally, information and control elements are displayed. These include the channel
banner, the TrickPlay™ bar, and a button bar.
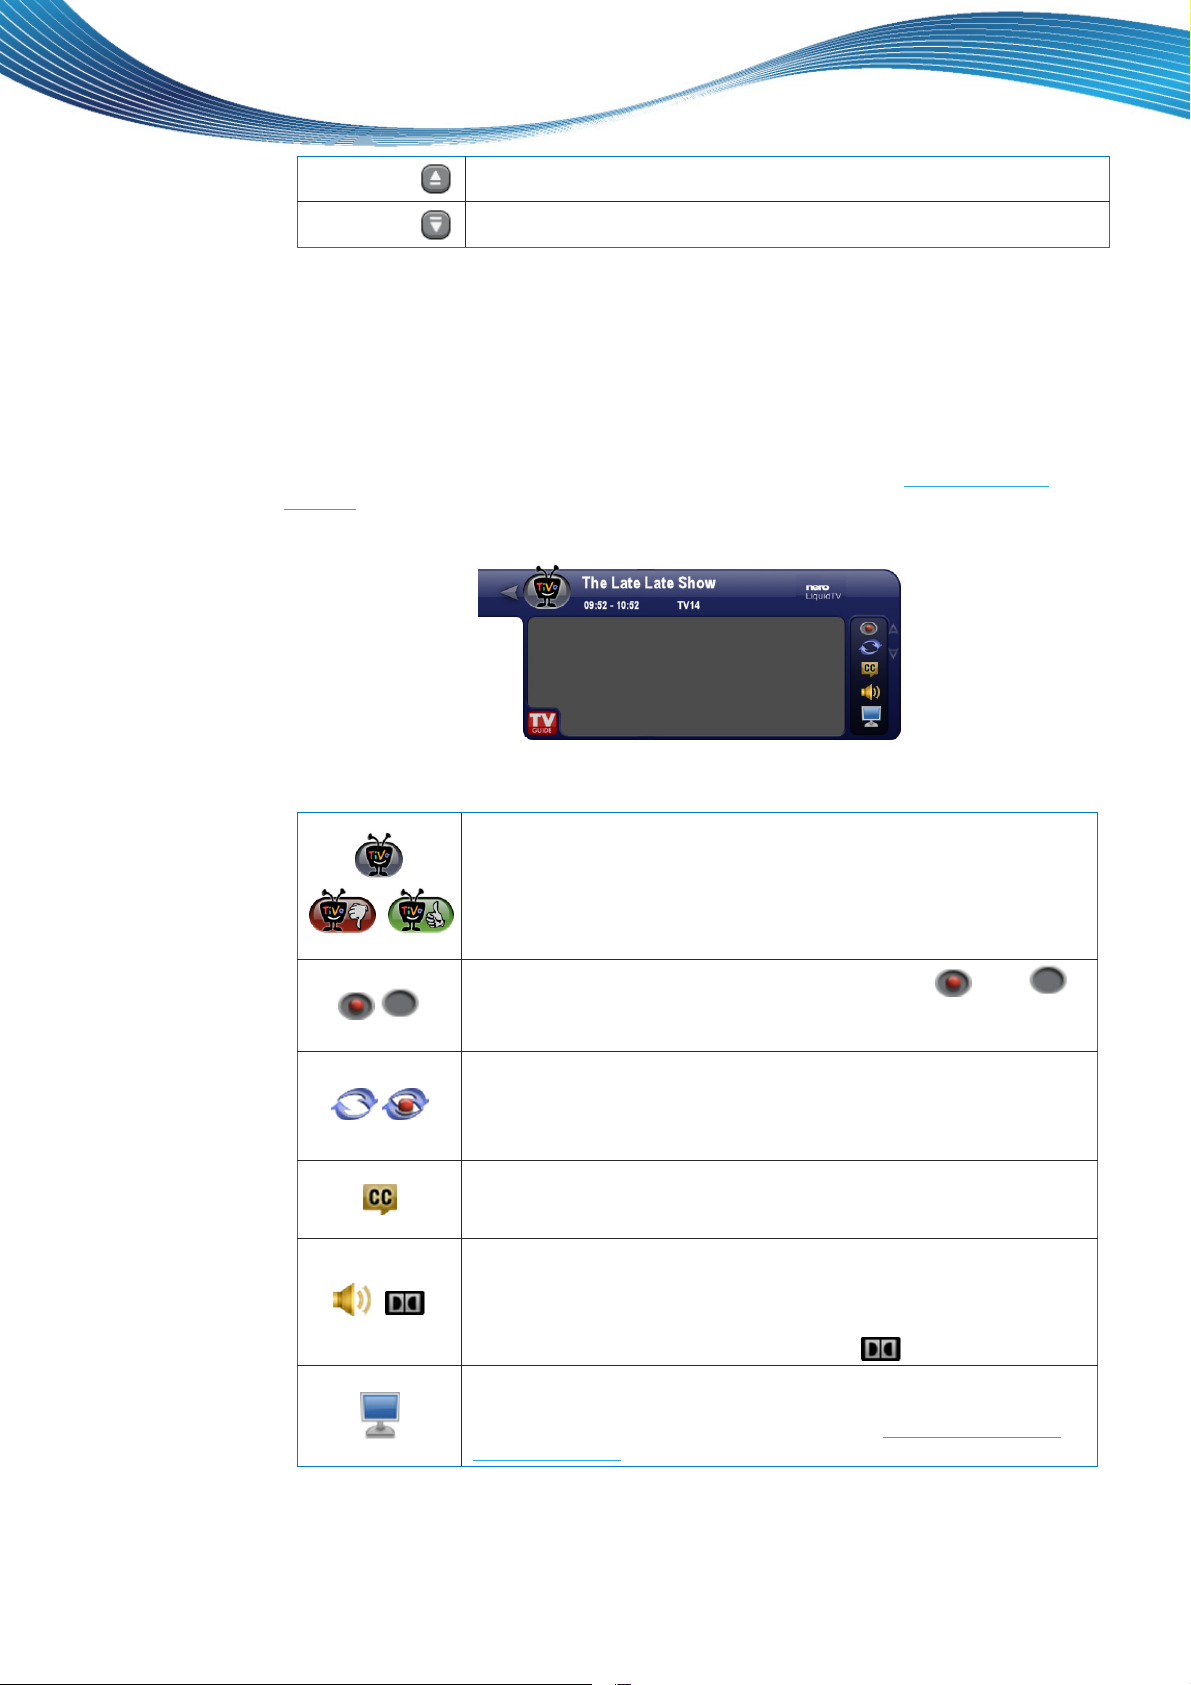
4.1 Channel Banner
The channel banner provides information on the channel and program, and is briefly
displayed whenever the channel is changed. It can also be displayed on purpose with {Info}
or [I] and hidden again with {Clear} or [I]. You can define the size of the banner and the
amount of time that it will be displayed under the display settings (see Defining Display
Settings
This banner is used both for programs that are currently being broadcast and for recordings.
).
Switches to the next channel.
Switches to the previous channel.
In addition to the program's title, the channel's name, and the broadcast or recording time,
various information and tips are shown on the gray area:
Shows whether or not the TV program currently running or the recording has already been rated. Gray indicates that it has not been
/
rated yet. Green indicates that it was rated positively - up to three
times, depending on the number of thumbs. Red indicates that it was
/
/
rated negatively - up to three times, depending on the number of
thumbs.
Shows whether a recording is taking place currently
or not . If
the icon is selected, the Select button displays information on the
program.
Shows whether or not the background tuner is currently recording If
the icon is selected, the Select button switches between both tuners
/
in a dual tuner card.
This icon is only shown if you are using a dual-tuner card.
Indicates that subtitles are available for the program or recording that
is currently running. If the icon is selected, the Select button displays
or hides the subtitles.
If the icon is selected, opens the Select Audio Track screen with the
Select button - you can use this screen to find out if there is an addi-
,
tional audio track available. If there is more than one audio track (i.e.
language) available, you can select the language you want here.
If the audio track delivers Dolby quality, the
icon is displayed.
Makes it possible to access the Screen Settings when the icon is
selected and the Select button is used - you can configure the resolution and picture format here, for example (see General Settings for
Nero LiquidTV™
).
Nero LiquidTV™ | TiVo® PC 16
Page 17

Watch Live TV
4.2 TrickPlay™ Bar
The TrickPlay™ bar is available while watching a TV program that is currently being
broadcast, as well as while watching a recording (in a modified form). It consists of a
progress bar and a slider. If you move the mouse over the playback screen, an extended
TrickPlay™ bar is displayed.
When watching a TV program that is currently being broadcast, the outer time indicators
display a duration of up to two hours, while the slider indicator shows the current time. A
green bar indicates the part of the TV program that has already been recorded and that is
now available as a time buffer. You can use this time buffer for pausing the TV program that
is currently being broadcast while watching it.
When watching a recording, this green bar extends across the entire TrickPlay™ bar; the
time indicators show the duration of the entire recording, as well as the elapsed time on the
slider.
You can use the the TrickPlay™ bar slider to rewind and fast-forward a recording
continuously while watching it.
If you're watching a TV program that is currently being broadcast, you can use the slider to
rewind and fast-forward within the time buffer marked in green.
The icon on the lower area of the slider shows that the program or recording is currently
being played at normal speed.
The following icons can also be displayed:
Shows that the program or recording is currently being rewound. There
are two speeds available, and are indicated with two or three green arrows. The
Shows that playback has been paused.
Shows that playback has been slowed down.
Shows that the program or recording is being rewound slowly.
Shows that the program or recording is being rewound.
Shows that the program or recording is being rewound quickly.
buttons can be used to increase or decrease the speed.
Shows that recording is currently taking place: The icon is also displayed on the bottom part of the slider.
Shows that a transfer from a remote system is currently taking place.
Is displayed as an additional TrickPlay™ bar extension when you move
your mouse over the playback screen and shows the following TiVo PC
remote control buttons:
Playback can be paused with the
rewound or fast-forwarded with three different speeds with the
pause button for up to 90 minutes,
and
double-arrow buttons, resumed with the play button, or shown in
slow-motion with the
to jump, e.g. to the end or beginning of a recording, while the
slow button. The ® jump button allows you
®
replay
button makes it possible to replay the previous sequence.
Nero LiquidTV™ | TiVo® PC 17
Page 18

Watch Live TV
4.3 Button Bar
If you move your mouse over the playback screen, the button bar is displayed as well - some
important TiVo
®
PC remote control features are available through this bar:
The following features are available:
Displays the TiVo Central screen.
Gives a positive/negative rating (one thumb) for the currently selected/shown TV program or recording every time that the button is pushed.
Maximum rating: Three positive/negative points.
Increases or decreases the volume.
Volume
Switches to the next channel or to the previous channel every time the but-
Channel
ton is clicked.
Displays a program screen that contains information about the corresponding
Record
Mute
TV program, and which allows you, among other things, to start a recording
(see Program Screens
Turns the sound to mute or back on again.
).
Nero LiquidTV™ | TiVo® PC 18
Page 19

Guide
5 Guide
The electronic program guide provides an overview of your TV schedule for up to 2 weeks.
From here, you can display programs that are currently being broadcast on the fly, schedule
Recordings, create Season Pass
grams.
The Guide screen is divided into four areas:
Information area
Preview screen
The prog
screen.
Channel list
All available channels are listed
broadcast on the bottom left.
Program list
The schedule for the channel selected on the left and for the following hours is displayed
on the bottom right together with the bro
blue to provid
ram
ing the program that is currently selected is displayed on the top left. Information regard
or recording that is currently running is shown on the top right preview
e a clearer view.
®
recordings, or even get suggestions on interesting pro-
with their numb
adcast time. Both of them are hi
ers and the programs currently being
ghlighted in dark
The ec
following sel
Cha st
nnel li
entry
Program list
entry
Nero LiquidTV™ | TiVo® PC 19
tion options are available:
Displays the current schedule for the selected channel in the Program
list area.
Displays the running TV program, or a program screen in case that you
selected a program that will not be broadcast until later (see Program
Screens
Makes it possible to "browse" through channels with the double-arrow
buttons: Switches to the next channel or to the previous channel every
time you click one of the double-arrow buttons.
The double-arro
nel is selected.
).
w buttons are only available when a program list chan-
Page 20

n
Guide
Makes it possible to choose the starting date and time for displaying
the selected channel's schedule with the double-arrow buttons. Moves
half an hour forward or half an hour back every time you click one of
the double-arrow buttons.
The double-arrow buttons are only available if a channel list row is selected.
Displays the Guide Display Options screen. Among other things, you
[E] {Enter}
can use this screen to specify ,if you want all channels and programs to
be shown or only certain program categories and certain channels (see
Defining Display Options
).
If you are using the mouse, a context menu will be displayed by right-clicking the selected
program. You can use this menu to watch the corresponding program on the fly, record it on
the fly, set up a Season Pass
®
recording, or show when future episodes will be broadcast. It
also allows you to protect the program with the parental control password or to hide it so that
it isn't shown in the KidZone area.
5.1 Defining Display Options
You can use the Guide Display Options screen to specify which electronic program guide
information should be displayed on the Guide screen and how it should be displayed.
Proceed as follows:
1. On the Guide screen, press the TiVo
key.
The Guide Display Options screen is displayed.
®
PC remote control {Enter} button or the keyboard's [E]
2. If you do not want the TV guide to be shown with all programs:
1. Select the settings for programs (default setting: All).
The Select Category screen is displayed.
2. Select the category that you want and confirm with the Select button.
The Select Subcategory screen is displayed.
3. Select a subcategory that you want and confirm with the Select button.
The Guide Display Options screen is displayed again and shows the new setting for
the Programs option.
3. receive displayed: If you do not want to have the schedule for all the channels that you can
1. Select the settings for Channels (default setting: All).
There are small arrow buttons displayed at the end of the sele
2. Use the TiVo
®
PC remote control double-arrow buttons, or the keyboard arrow buttons, to
ction bar.
choose the option you want from the following available settings - All, Favorites, and
Received only.
The All option refers to all the channels that you can receive physically. The Favorites optio
only includes the channels that you have marked as your favorites, and the Received only
option includes all the channels for which the check box has been enabled in the channel list
ee (s Creating a Channel List
).
4. If you want to change to sorting criterion for the display of guide information:
1. Select the settings for Sort (default setting: Channel number).
There are small arrow buttons displayed at the end of the selection bar.
Nero LiquidTV™ | TiVo® PC 20
Page 21

Guide
2. Use the arrow button
s to choose the option you want from the following s
ettings - Chan-
nel name and Channel number.
5. If you want to specify the day for which the TV schedules should be shown:
Cu
1. Select the settings for Go to Date (default setting:
There are small arrow buttons displayed at the end of the selection
rrent date).
bar.
2. Use the arrow buttons to select the day you want.
6. If you want to change the time on which the guide starts when displayed:
1. Select the settings for Go to Time (default setting: Current time).
Th
ere are small arrow buttons displayed at the end of the sele
2. Use these arrow buttons in order to adjust the time
half an hour forward or half an hour
ction bar.
back.
7. If you want the guide to be displayed in large letters:
1. Select the settings for Text Size (default setting: Small).
There are small ar
row buttons displayed at the end of the sele
ction bar.
2. Use the arrow buttons to choose the option you want from the following settings - Small,
Medium, and Large.
heT text size can only be changed for guides that have been previously filtered, with a cate-
gory, for example. The text size for the full guide cannot be changed.
8. Once you have set up all the options according to your preferences, use the Save changes
and go back button.
The guide screen is displayed again and provides electronic program guide information
according to the settings that you selected.
Nero LiquidTV™ | TiVo® PC 21
Page 22

Guide
5.2 Program Screens
The program screens are always based on the TV program or recording that is currently
selected. Basic information, such as broadcast time, channel, duration, and rating is
displayed to the right, on the screens' margin. You can get further information by means of
the INFO button on your TiVo
®
PC remote control.
Depending on whether you have selected a recording, a TV program currently being
broadcast, or a TV program that will be broadcast in the future, the following setting options
will be available on the corresponding program screen, for example:
Records the selected program.
If a recording is already scheduled on the same tuner at the same
time, the Overlapping Recordings screen is displayed. You can use
Record
this episode
this screen to specify which of the overlapping recordings should take
place.
If you selected a program for recording that may last longer than expected (e.g. live sports event broadcasts) and have selected the corresponding settings, you will receive a suggestion asking you to increase the recording time as a precaution (see Display Settings
®
Creates a Season Pass
recording for the series to which the selected
episode belongs (see Creating a Season Pass® recording
).
)
If a recording is already scheduled at the same time, the Overlapping
Set up a
Season Pass
Recordings screen is displayed. You can use this screen to specify
which of the overlapping recordings should take place.
If you selected a program for recording that may last longer than expected (e.g. live sports event broadcasts), you will receive a suggestion asking you to increase the recording time as a precaution.
Displays the Options screen. You can use this screen to specify
whether or not the recording should be deleted when more disk space
Options
is required, whether or not you want the recording to start a little earlier and end a little later as a precaution, and/or whether or not the
recording should be converted automatically.
Nero LiquidTV™ | TiVo® PC 22
Page 23

Guide
If you are setting up a Season Pass® recording or a WishList® search,
you can also specify which channels should be included, whether or
not reruns should also be recorded, and how many episodes you want
to keep.
Show upcoming
episodes
Show upcoming
broadcasts
If you like this...
Play
Return to
Program
Lists all future episodes for the corresponding series, and provides
information on the corresponding channel and broadcast time.
Lists all other broadcast times for the corresponding program and provides information on the corresponding channel and broadcast time.
Gives suggestions for other programs that you could find interesting
for recording, based on the selected program.
Plays the selected recording.
Displays the playback screen again.
Allows you to specify whether the recording is automatically deleted
Keep until
when more disk space is required for new recordings or whether it is
only deleted if you delete it personally.
Delete now
Save to DVD or
Portable
Lock program
Unlock program
Deletes the selected recording. It is first stored in the Recently deleted group, where you can probably restore it.
Displays the Save or Convert screen, where you can have the recording be converted for portable playback devices, or compressed to
save storage space, or burned to DVD.
Makes this program unavailable in the KidZone area - moreover, the
program can only be seen after entering the corresponding password.
Makes a program that was previously locked in the KidZone area
available. It can be seen without a password.
Nero LiquidTV™ | TiVo® PC 23
Page 24

Guide
5.3 Options Screens
Depending on whether you want to create Season Pass® recordings or WishList® searches,
convert recordings, or burn to a DVD, the following setting options are available on the
Options screen (for example):
Show types
Keep for a
maximum of
Keep until
Start/Stop
recording
Auto-
convert
Specifies if only broadcast premieres are recorded, or if reruns are
also recorded.
Defines the maximum number of episodes belonging to a series that
should be recorded before the old episodes are deleted when new
ones are recorded.
Specifies whether the selected programs should remain stored until
you delete them explicitly or whether they should be deleted automatically when more disk space is required.
Displays the Start/Stop Recording screen. You can use this screen
to specify whether or not the recording for the selected program
should be started earlier and ended later. This period of time can be
one minute or up to three hours.
Displays the Options for Auto-Conversion screen. You can use
this screen to select the conversion format and specify whether the
original recording should be kept or deleted. You can also choose to
have the corresponding recordings converted automatically.
Nero LiquidTV™ | TiVo® PC 24
Page 25

DVD
6 DVD
You can watch DVDs in any connected drive and burn recordings to DVD on the DVD
screens.
If you have inserted pre-recorded DVDs into the connected drives, the DVDs are listed
together with their titles.
The following input options are available:
Save pro-
grams to
DVD
Plays a DVD.
Displays the Select Programs screen, where all available recordings
are shown for selection. Further screens will guide you step by step until
you have a complete burnt disc (see Burning Recordings to DVD
6.1 Burning Recordings to DVD
You can burn all programs that you have recorded with Nero LiquidTV™ to DVD. Proceed as
follows:
1. Insert the DVD into a drive that is connected to your Nero LiquidTV™ | TiVo
can also be a rewritable DVD with data already written on it - the original content will be deleted. No new content can be added to old content.
2. Use the DVD: Empty disc inserted button on the TiVo Centra screen. l
The DVDs screen is displayed.
3. e Save programs to DVD button. Us the
If more than one empty or rewritable DVD is available, the Use which disc? screen is
displayed.
4. Use the button for the DVD to which you want to burn the program(s).
If you select a rewritable DVD that already has data on it, the Use this disc? screen is
displayed and informs you that if you burn programs onto the DVD, the existing content
will be overwritten.
).
®
PC. The DVD
Nero LiquidTV™ | TiVo® PC 25
Page 26

n
A
y
DVD
5. If you don't want this to happen, use the No, do not u
se this disc button.
The Insert disc screen is displayed.
6. Insert a different disc into your computer's drive and u
se the Disc inserted button.
7. The Use which disc? screen is displayed again.
8. Use the button for the DVD to which you want to burn the program(s).
The Choose Programs screen is displayed, and lists all the available
you can burn to the disc. Programs that have not been recorded completely yet are also
shown. They are marked with the
icon, and cannot be selected.
Enable the check box for the programs that you want to burn to the disc. Pay attention to
the order in which you do this: The recordings are burnt to the disc in the order that you
enable their check boxes.
A disc icon and a percent number are used on the top right of the Select Programs screen i
order to indicate how much space the recordings that have been selected take up.
A red x is displayed inside the check box if the corresponding recording does not fit (anymore) on the disc.
red "forbidden" icon is used to identify recordings that cannot be burnt, either because the
come from a recording device with incompati
shorter than two minutes.
ble audio or video formats or because they are
cordings that
re
9. Use the Done choosing programs button.
If your selection includes programs that are locked due to your p
the Enter your password screen is di
splayed.
arental co
ntrol settings,
10. nter the password that you chose for the parental control feature.
E
The Enter Name screen is displayed.
If you also selected recordings that are locked due to your parental control settings, you will
hav
e to enter the co
rresponding password in ord
er to continue.
11. Enter the name for the disc in the text box.
12. Use the button.
The Save to DVD screen is displayed and informs
Done
entering Name
u of the progress of the the burning
yo
process. Once the process has ended, the Saving complete button is displayed.
You have burnt the desired recordings to a DVD.
6.2 Converting Recordings for Portable Playback Devices
You can convert all programs that you have recorded
portable playback devices (iPods
Proceed as follows:
®
or PSPs®).
1. In the Now Playing List screen, select a recording that you want to conve
A Program screen is displayed.
with Nero LiquidTV™ fo
r use in
rt.
2. Select the Save to DVD or portable media option
Nero LiquidTV™ | TiVo® PC 26
under Mor
e Options.
Page 27

DVD
The Save or Convert screen is displayed.
3. Use the Convert for portable playback devices button.
The Only this program? screen is displayed.
4. If you want to convert additional recordings, use the corresponding button.
The Select Programs for Conversion screen is displayed and lists all available re-
cordings. This includ
programs are marked with the
s programs that have not been recorded completely yet. These
e
icon and cannot be selected.
6.3
Enable the check boxes for the programs that yo
order in which you do this as the recordings are converted in the order that you enable
their check boxes.
u want to convert. Pay attention to the
5. Use the Select programs done button.
The Conversion Options screen is displayed.
6. Use the Portable Player field to choose whether you want to convert for iPods
7. Use the Dele
te field to ch
oose whether the original recording should be deleted or kept.
8. Use the Convert with these options button.
The Conversion Confirmed screen is displayed. The recordings to be converted are
listed in the To Do List under Currently being converted, and the converted files are
finally stored
screen.
in the My Recordings group and displayed on the Now Playin
You have converted the desired recordings for use with a portable playback device.
ram
s with a length of under two minutes cannot be recorded or converted.
Prog
Saving Disc Space
®
or for PSPs
g List
®
.
You can convert pro
LiquidTV™ format, which is designed to save disk space without significan
Proceed as follows:
grams that you have recorded with Nero LiquidTV™ into a special Nero
t quality losses.
1. Select a recording from the Now Playing List screen that you wish to convert.
The Program screen is displayed.
v
1. dia option under More Options
Select the Sa
e to DVD or portable me .
The Save or Convert screen is displayed.
2. Use the Convert format button. The Only this program? screen is displayed.
3. If you want to convert additional recordings, use the corresponding button.
The Conversion Options screen is displayed.
4. Confirm the conversion task with the Convert with these options button.
5. The Conversion Confirmed screen is displayed. The recordings to be compressed are
listed in the To Do List under Currently being converted, and the converted files are finally
stored in the Compressed Shows group and displayed on the Now Playing List screen.
Nero LiquidTV™ | TiVo® PC 27
Page 28

Find Programs
7 Find Programs
You can use the Find Programs screen to search for and display TV programs according to
various criteria. You can also create WishList
®
searches and Season Pass® recordings, or
edit already existing ones, in this screen.
The following input options are available:
Provides a list of all available categories for selection on the right area of
the screen. If you have selected a category and then a subcategory, the
titles of the programs found are listed. If you select a program, the Up-
Categories
coming Programs program screen is displayed - you can, for example,
have the program be recorded on this screen (see Program Screens
You also have the option of creating a WishList
Screens
).
®
search (see Program
).
Among other things, gives you the option of finding programs according
Search
WishList
Search
TiVo Sugges-
tions
to their title or according to keywords in their description from the electronic program guide, as well as creating a WishList
®
recording (see Find Programs).
Pass
®
Creates a WishList
search that you can use to indicate, in detail, the TV
®
search or a Season
programs that Nero LiquidTV™ should record automatically for you (see
Creating a WishList® Search
).
Enables or disables the automatic recording of programs that Nero
LiquidTV™ can carry out based on your ratings for programs and recordings (see Recording Settings
).
Makes it possible to display the TV schedules for all channels sorted
Time & Chan-
nel
Recording
Schedule
according to date and time (Time) or according to date and channel
(Channel). You can also schedule recordings here by entering the date,
time, and channel directly (see Recording by Time or Channel
Makes it possible to establish priorities for existing Season Pass
).
®
re-
cording tasks, provides access to the To Do List used by Nero LiquidTV™ to show pending recordings, transfers, and conversions in a
clear manner, and provides access to the Recording Logs, where you
can find out why a recording, conversion, or transfer was not carried out.
Nero LiquidTV™ | TiVo® PC 28
Page 29

Find Programs
Displays the Guide Display Options screen for the TV schedule.
[E] {Enter}
Among other things, you can specify if you want all channels and programs to be shown or if you want only certain program categories and
only certain channels to be shown (see Defining Display Options
).
7.1 Find Programs
Proceed as follows:
1. Select the Search button on the Find Programs screen.
2. Use the Select button.
The Search screen, which includes a letter field, is displayed.
3. Enter at least the first three letters of the program you want to search for into the text box
above the letter field.
To do this, use either the mouse (by clicking the desired letters), the arrow keys followed by
the Enter key, or the TiVo
The titles for the programs found are listed on the righ
4.
Select the program you want and use the Select button.
®
PC remote control arrow keys followed by the Select button.
t area of the screen.
The Upcoming Program program screen is displayed. It provides a brief description o
the program and various different buttons that you can use to record the selected program, create a Season Pass
of future programs belonging to this series, or get suggestions for p
be interesting to you, among other things (see Program Screens
®
recording for the corresponding series, obtain an overview
7.2 Creating a WishList® Search
When carrying out a WishList® search, you can specify the exact criteria that should be us
for the search. For instance, you can carry out the search according to a certain actor, a
certain director, and a certain category. As long as you do not delete the WishList
Nero LiquidTV™ will automatically search for m
automatically, according to your preferences.
®
In order to create a WishList
1. Use the WishList search button on the Find Programs scre
2. Use the Create a WishList search button that is displa
The Create WishList Search screen is displayed.
3. Enter the desired keywords for one or more of the listed criteria:
1. To do this, select the desired criterion and use the Selec
A screen with a letter field or a list box is displaye
2. Enter a keyword.
If you want to enter further 3. keywords for the selected criterion, use the Save this key-
word and add a new one button.
4. If you have entered all the keywords you want for the selected
tering keyword button.
The Create WishList Search sc
5. Select another criterion, e.g. actor.
The Select Actor According to Last Name
field that you can use to enter the desired na
search, proceed as follows:
atc
hing programs and record them
yed.
d.
reen is displayed a
en i
scre
me.
rograms that could
).
®
search,
en.
t button.
crite
rion, use the Done en-
gain.
s displayed and provides a letter
f
ed
Nero LiquidTV™ | TiVo® PC 29
Page 30

Find Programs
6. Enter at least
A list box
screen.
7. Select the desired name from the list.
The Create WishList Search screen is displayed again. You can enter keywords
other categories or create the WishList
4. Once you have enter
List search button.
The Done Editing WishList Search scree
If you want to see if
5. there are matching programs in the schedule soon, use the View up-
coming programs button.
®
search are displayed here together.
List
the first three
with the matching names (if any) is displayed on the right area of the
d the keywords for all the categori
e
letters of the name.
®
search based on the entered keywords.
n is displ
for
es you want, use the Create Wish-
ayed. The keywords for the Wish-
6. If you want to record matching programs automatically, use the Auto-record WishList pro-
grams button.
The Done Editing WishList Search screen is displayed again and now
tional buttons.
rovides addi-
p
7. If you want to change the recording options, use the corresponding button.
i
An Options screen
should start a little earlier and end a little later as a precaution, among other things (s
Options Screens
1. Once you have configured the desired options, use the Auto-record matching pro-
grams w
The Done Editing WishList Search screen is displayed again.
8. If the WishList
button.
ith the following options button.
®
search matches your preferences, use the Done Creating WishList Search
The Find Programs screen is displayed again; the WishList
own on the right.
sh
s displayed - you can use this screen to specify if the recording
).
®
search you just created is
ee
7.3 The S
Nero LiquidTV™ | TiVo® PC 30
eason Pass® feature
A series subscription, the Season Pass feature, automatically records all the episodes of a
TV series. You can create Season Pass
With an episode
You can find an episode for the TV series you are searching for in the guide and then
display the corresponding program screen (see Creating a Season Pass® recording
With a WishList® search
The desired TV series is currently not in the schedule, i.e. create a corresponding Wish-
®
List
search that will become a Season Pass recording as soon as the episodes show
up on the schedule. The individual episodes can then be recorded automatically (see
Creating a WishList® Search
With the broadcast time
If the TV series to be recorded is always broadcast on the same weekday and at the
same time, you can create a repeated recording for the broadcast time that is always the
same. A Season Pass
You can find each Season Pass
can modify their order, and their priority as a result, on this screen. Priority plays a role when
recordings overlap time-wise (for example) and a decision must be made between two
recording tasks.
®
).
recording will be created automatically from this.
®
®
®
recordings from various starting points:
).
®
recording listed on the Season Pass Priority screen. You
Page 31

Find Programs
7.3.1 Creating a Season Pass® recording
The easiest solution is to create a Season Pass® recording for a TV series with one of the
series' episodes that is listed on the guide.
Proceed as follows:
1. Open the Guide screen.
2. Select, in the right area of the Guide screen, an episode from the TV series for which you
want to create a Season Pass
®
recording.
A program screen is displayed.
3. Select the button. Set up a Season Pass
The Options button is displayed.
®
4.
If you want to edit the settings for the new Season Pa
ss recording use the Options button.
The Season Pass Options screen is displayed.
5. Configure these options according to your preferences:
1. For the Channel option, choose whether you prefer
channels should be taken into account.
2. For the Show types option, choose whether only broadcast premieres or also reruns
should be recorded. If you select the All (with reruns) sho
that are broadcast at different times will also be recorded.
3. For the Keep for a maximum of option, choose how many episodes should be recorded
before the first recording is deleted in order to create more space for more recordings. If
you select All here, nothing will be deleted - however, please bear in mind
lead to disk space problems on your computer in the case of long series.
4. For the Keep until option, choose whether the recordings should be kept st
Disk space is required or whether you alone should decide: I will delete.
5. For the Start/end recording option, choose whether or not the r
earlier/later and end earlier/later, as well as the time difference.
6. For the Auto-convert option, choose whether or not the recordings should be converte
automatically. You can store them for portable playback devices or compress them to
save storage spa
the conversion.
ce. Also specify whether the original file should be kept or deleted after
cular channel or whether all
a parti
w type, any identical episodes
that this could
ecording should start
ored until
d
6. Once you have configured all the options ac
Season Pass with these options button.
ng to your preferences, use the Create a
cordi
The Options Confirmed screen is displayed.
You have created the desired Season Pass
on the Season Pass Priority screen and a
change its options again there if required.
Nero LiquidTV™ | TiVo® PC 31
®
recording. It is added at the end of the list
lso liste
d on the To Do List screen. You can
Page 32

Find Programs
7.4 Recording by Time or Channel
This option allows you to create a comprehensive recording schedule by entering the
broadcast information manually.
You can configure every value on this screen by using the left and right arrow keys to enable
the desired values and to adjust them up and down with the arrow keys.
Proceed as follows:
1. Use the Time & Channel button on the Find Programs screen.
The Record by Time & Channel screen is displayed.
2. Specify whether a recording should take place One Time or Repeating in the Frequency
field.
The value range in the Day field is adjusted accordingly.
3. Set the desired weekday or time interval in the Day field.
4. Set the time when the recording should start or end in the Start and Stop fields.
5. Once you have configured everything according to your preferences, use the Select button.
In case of single recordings, the Confirm Time/Cahnnel Recording screen, in case of
repreating recordings, the Recording Confirmed screen is displayed. The information is
ted at certain time intervals, then
shown together. If this is a recording that is to be repe
a Season Pass recording is created automatically.
®
a
Nero LiquidTV™ | TiVo® PC 32
Page 33

Messages & Settings
8 Messages & Settings
In addition to important information regarding all the features of Nero LiquidTV™, you can
also find messages with interesting tips here, as well as the option of accessing all settings
and options.
The following options are available:
5HQHZ
TiVo Service
Opens the Renew your TiVo Service s
kn
ow how to subscribe to TiVo
Opens the Messages screen, where all messages are listed with
Messages
their date of receipt. The envelope icon indicates that you have
not read the corresponding message yet. You can open a selected message by using the Select button.
Displays the Settings screen, which provides access to the
various different available options (see General Settings for
Settings
Nero LiquidTV™).
If you have turned on the pare
and/or parental controls) you will first be asked to enter the corresponding password.
Account & System
Information
Help
Displays the Account and System Information screen, which
offers the option of entering a Media Access Key, among other
options (see Using Multiroom Viewing
Displays the Internet link for Nero LiquidTV™ Help pages.
Displays the Reset System screen, where you can delete rat-
Reset System
ings and suggestions and reset all settings. You can also set the
initial configuration - you can find help on how to do this in the
Nero LiquidTV™ QuickStart Guide.
®
service.
creen, which lets you
ntal control feature (KidZone
).
Nero LiquidTV™ | TiVo® PC 33
Page 34

Messages & Settings
8.1 General Settings for Nero LiquidTV™
You can use the Settings screen to adjust Nero LiquidTV™ in a detailed manner according
to your preferences.
The following setting options are available:
Displays the Audio Settings screen, where you can specify
Audio
the preferred audio language and the sound effects volume.
You can also choose between the main audio channel and the
two-channel sound.
Displays the Channel Settings screen, where you can start a
Channels
transmitter channel scan for each connected tuner or display
the channel list (see Creating a Channel List
Displays the Display Settings screen, where you can choose
to display any existing subtitles, define the language for Nero
Display
LiquidTV™, and specify whether or not the preview window
should be displayed on the top right or not, among other things
(see Display Settings
Displays information regarding the system's previous and
Network
scheduled accesses to the TiVo
lish a connection to the TiVo service from here in order to
download new program guides, for instance.
Parental Controls
& KidZone
Provides access to the basic parental control and KidZone
settings (see Parental Controls
Displays the Recording Settings screen, where you can, in
addition to other options, specify whether or not the recording
of all programs should start two minutes before the beginning
Recording
and stop two minutes after the end automatically, as well as
how much buffer time should be created by Nero LiquidTV™
for all TV programs currently being broadcast. You can also
modify the recording space and storage location for the various
different recordings.
).
).
®
service. You can also estab-
).
Nero LiquidTV™ | TiVo® PC 34
Page 35

Messages & Settings
Remote Control
Video
8.2 Creating a Channel List
If you don't want to use some of the channels that you can receive, you can specify so on
the Channel List screen. You can also select your favorite channels here in order to only
have the schedule for these favorite channels be shown on the Guide screen (for example).
Proceed as follows:
1. Choose the Settings option on the Messages & Settings screen.
If you have turned on the parental control or KidZone features, you will first be asked to
enter the corresponding password. Once you have done this, the Settings screen is displayed.
Offers the option of configuring your TiVo
such a way that you can also control televisions (see Remote
Control
Displays the Screen Settings screen. You can use this screen
to specify how the image aspect ratio of a program or recording
should be adjusted to fit your screen, which colors should be
applied to any required bars, and whether 16:9 or 4:3 should
be the default aspect ratio for playback. Additionally, you can
check this screen to see how you can set the resolution for
your monitor.
).
®
PC remote control in
2. Select the Channel option.
The Channel Settings screen is displayed.
3. Select the Channel List option.
The Caution screen is displayed, since running recordings must be interrupted while the
channel list is being configured.
4. If important programs are being currently recorded, use the Back button and wait until the
recordings
5. If no important recordings are running, use t
The Channel List screen is displayed.
are complete before configuring the channel list.
he Ok, access this se
tting button.
6. Disable the check boxes for all the channels that you do not want to use.
7. Select your favorite channels by pressi
or the [+] key on your keyboard once.
The corresponding
channels are marked with the
ng the {
®
} button on your TiVo® PC remote control
®
icon.
8. Use the Done button.
The disabled channels are not available on Nero LiquidTV™ anymore; the ones selected
rou
as favorites form a g
guide screen.
p, and you can show the schedule for this group in the Program
Nero LiquidTV™ | TiVo® PC 35
Page 36

Messages & Settings
8.3 Display Settings
You can use the n should be
displayed by Ne licable
values are sh
Th ee following options can b configured:
Closed Captionings
Display video window
in menus?
Channel Banner Speed
Cha ize
nnel Banner S
Screen Saver
Language
System Tray
Notifications
Nero LiquidTV
Window on Top
Display Settings screen to specify in detail which informatio
ro LiquidTV™ and how it should be displayed. The currently app
own in square brackets next to their corresponding options.
Displays the Subtitles screen, where you can display and
hide subtitles, configure font types, colors, and sizes, and
select which channel should be used for analog or digital subtitles by default.
Makes it possible to turn th
top right corner of many Nero LiquidTV™ screens on or off.
Displays a screen where you can specify how long the program information that Nero LiquidTV™ shows every time th
channel is changed should be displayed.
Displays a screen where you can specify whether the field
containing program information should be Large, Medium,
Small.
Please bear in mind that a brief description of the program
can only be shown on large information fields.
Displays the Screensaver Settings screen, where you can
turn the screensaver on and off. You can also specify how
long the waiting time for the screensaver to be displayed
should be, as well as whether or not the s
automatically be turned off after four hour
trol is used again.
Makes it possible to select the language that Nero LiquidTV™
should use for the user interface.
Turns system tray notifications on or off.
Offers the option of always displaying the Nero LiquidTV™
window on top of other application window
feature off.
e small preview windows on the
creensaver should
s if the remote con-
s or off turning this
e
or
Nero LiquidTV™ | TiVo® PC 36
Page 37

Messages & Settings
8.3.1
Defining Display Settings
If you want to configure the basic display settings, proceed as follows:
1. Select the Settings option on the
If you have turned on the parental control or KidZone features, you will first be asked to
enter the corresponding password. Once you have done this, the Settings screen is displayed.
2. Select the Display option.
The Display Settings screen is displayed and lists all configurable options, with their
current setting in brackets.
3.
If you want to display subtitles:
1. Select the Closed Captioning option.
The Closed Captioning screen is displayed and lists the respective configurable op-
tions with their current values. You can change these settings by using the TiVo
remote control's double-arrow buttons, the keyboard's arrow keys, or by clicking the
arrows displayed on the selection bar.
Choose the Closed Captioning2. and turn it on.
3. If you are receiving digital subtitles, select the Digital Subtitles option and change to the
channel in which you are receiving digital subtitles.
4. If you want to change the Text Size of the subtitles,
turn on the desired setting.
5. Once you have configured all the settings you want for the subtitles, use the Save
changes and go back button.
The Display Settings window is displayed again.
Messages & Settings screen.
lect the corresponding options and
se
®
PC
4. If you want to hide or display the small preview window found on several Nero LiquidTV™
screens, choose the Display video window in menus? option and use the Yes or No but-
ton on the screen that is displayed, depending on your preferences.
The Display Settings window is displayed again.
5. Information on the running program is displayed every time that the channel is changed. If
you want to shorten the display time or you want to extend it back to the default value,
y or Clear
choose the Channel Banner Speed option and use the Display banner no
banner quickly buttons on the screen that is displayed according to your prefe
6. If you want to change the size of the
of field with program information option and use the Large, Medium, or Small buttons
the screen that is displayed according to your preferences. Please bear in mind that the
short program description will only be displayed in large information fields.
7. If you want to turn the scre
1. Select the Screen Saver option.
The Screen Saver Settings screen is displayed and lists the co
with their current values.
2. Choose the Screen Saver option and turn it On or Off with the white arrows that are dis-
played.
3. If the screensaver is turned on, you can also use the Start option to select the waiting
time after which the screensa
4. Use the Display option to choose whether or not th
automatically after 4 hours and the current TV schedule should be displayed again
the screensaver should be hidden as soon as the remote control is used.
ensaver on or off or chan
display field for prog
ver is displayed (1 minute to 1 hour).
ram information, choose the Size
ge
the display conditions:
e screensaver should be turned off
rmall
rences.
n
figurable options
, or if
on
Nero LiquidTV™ | TiVo® PC 37
Page 38

Messages & Settings
5. Once you have configu
changes and return button.
The Display Settings screen is displayed again.
8. If you want to change the language that Nero LiquidTV™ uses for the user interface:
1. Choose the Language option and use the button for the language yo
screen that is displayed according to your preferences.
The Confirm Language Selection screen is displayed.
2. Before 10 seconds elapse, press the Select button three times in order to confirm the
language selection.
The Display Settings screen is displayed in the chosen language.
9. If you want to enable or disable system tray notifications, choose the corresponding
and use the Yes or No button on the screen that is displayed according to your preferences.
10. If you want to make sure that the Nero Liqui
application windows or you want to turn this feature off, choose the Nero LiquidTV Window
in Foreground option. Ac
foreground or Normal w
The Display Settings screen is displayed again. You have configured th
tings according to your preferences.
8.4 Recording
Settings
red all the desired settings for the screensaver, use the Save
u want on t
dTV™ win
cording to your preferences, use the Nero LiquidTV always in
indow behavior buttons on the screen that is displayed.
dow is always shown on top of other
e displa
he
option
y set-
You can sp
The f be
ecify the basic settings for all Nero LiquidTV™ recordings here.
ollowing options can
Automatic
Padding
configured:
Displays a screen where you can specify whether or not you
recordings should always start two minutes early and
minutes later than is required according to the program guide.
end two
r
Nero LiquidTV™ | TiVo® PC 38
Page 39

Messages & Settings
8.5 R
Clip Ov
erlapping
Programs
Extend Live
Recordings
Displays a screen where you can specify if, in the event of a
overlap of less that five m
inutes, the recording with a lower
priority level should be clipped but still be recorded.
Displays a screen where you can specify whether or not Nero
LiquidTV™ should automatically
suggest adding a recording
time if a live broadcast should be recorded.
Displays a screen where you can specify whether the record
Live TV Buffer
buffer should be 30, 60, or 90 minutes for TV programs currently being broadcast.
Displays a window where you can specify the available disk
Recording
Space & Locations
space for recordings, the standa
and for converted files, and the folder that Nero LiquidTV™
rd storage folder for recordings
accesses for more video files.
Turns the TiVo Suggestions feature on or off. If this feature is
turned on, Nero LiquidTV™ uses your watching habits and
TiVo Suggestio
ns
your thumb-based ratings to determine a profile, and then
automatically records programs that could interest you. These
recordings are available in th
e TiVo Suggestions group on the
ng List screen. Now Playi
emote Control
You can configure the TiVo® PC remote control here in such a way that it can also be used
to control televisions.
n
ing
Proceed as follows:
1. Use the Remote control button on the Settings screen.
The Remote Control Setup screen is displayed.
Three remote control configuration parts are shown here:
The first part configures the TiVo
tons in such a way that you can also control
You will only need the second part if the sound for your telev
e MUTE and VOL buttons on your TiVoreceiver. In this case, th
nfigu
be co
red in such a way that they can be used to control the A/V receiver.
You can use the third part to configure the TV INPUT button on your TiVo
control in such a way that you can
sources (e.g. a connected g console or a connected videocamera).
2. If you want to run the first section, u
The Television Brand screen is displaye
1. Select your television's brand from the list that is displayed.
2. Use the Select button.
The Remote Con
of four-digit numeric
Press the TV POWER a
3.
e
time for five s
conds.
4. Enter one of the numerical codes shown.
k if the TiVo PC remote control is now abl
rol Codes for Televisions screen is displayed, and lists a series
t
al codes.
d
n
®
®
PC remote control TV POWER, VOL, and MUTE b
a television with them.
al
so switch the television to other picture signal
gamin
se the Part 1: TV
POWER, VO
d.
buttons on your TiVo® PC remote control at the same
e to turn the television on and 5. Chec
ut-
ision is connected to an A/V
®
PC remote control can
®
PC remote
L, and MUTE button.
off.
Nero LiquidTV™ | TiVo® PC 39
Page 40

Messages & Settings
6. If it can't, repeat the step
s above with a different numerical code from
til the button works.
7. Use the Select button.
The End of First Part screen is di
splaye
d.
8. Use the Select button.
The Remote Control Setup screen is displayed again.
3. If you want to run the seco
nd part, use the Part 2
VOL and MUTE for A/V button.
:
The A/V Receiver Brand screen is displayed.
1. Select the brand of your A/V receiver from the list that is displayed.
2. Use the Select button.
The Remote Con
ries of four-digit num
3. Press the MUTE and
ve seconds.
fi
4. Enter one of the numerical codes shown.
k if the TiVo PC remote control VOL bu
A/V rece
iver.
6. If it can't, repeat the steps above with a different numerical code fr
til the button works.
7. Use the Select button.
The End of Second Part scre
8. Use the Select button.
The Remote Control Setup screen is displayed again.
rol Codes for A/V Receivers screen is displayed, and lists a se-
t
erical codes.
buttons on your TiVo PC remote control at the same time for
®
displayed.
en is
®
tton is now able to adju5. Chec
the ones shown un-
st the volume of your
om the one
s shown un-
4. If you want to run the third part, use the Part 3
: TV INPUT button.
The Television Brand screen is displayed.
1. Select the b
rand for your
2. Use the Select button.
The Remote Con
of four-digit numeric
3. Press the TV INPUT an buttons on your TiVo
e
for five s
conds.
4. Enter one of the numerical codes shown.
®
5. Check if the TiV
o PC remote control TV INPUT button is now able to turn the televis
on and off.
6. If it can't, repeat the steps above with a different numerical code from the ones shown un-
til the button works.
7. Use the Select button.
The End of Third Part screen is displayed.
8. Use the Select button.
The Remote Control Setup screen is displayed again.
You have configured the TiVo
A/V receiver.
television from the list that is displayed.
rol Codes for Televisions screen is displayed, and lists a series
t
al codes.
d
®
PC remote control for controlling a television and/or an
®
PC remote control at the same time
ion
Nero LiquidTV™ | TiVo® PC 40
Page 41

e
l
Parental Controls
9 Parental Controls
Nero LiquidTV™ bases its parental control features on classifications based on the age and
content ratings of TV programs and films in order to protect children. The following options
are available:
Parental Controls
You can use parental controls to classify TV programs being broadcast, recordings, and
DVD videos according to detailed and configurable criteria and to make them inaccessible to your children by means of a password according to your preferences. These criteria
include content characteristics in addition to age limits. You can also lock individual programs and/or entire channels explicitly. This will block these programs and channels for
anyone who does not know the password. They are, however, listed on the Now Playing
List screen. This means that children can see that the program exists, but cannot watch it
if they don't know the password. They have full access to all features otherwise - i.e. they
can watch or record any programs or channels that are not locked.
KidZone
Based on parental controls, you can use KidZone to create a separate area for your children in which only the programs, recordings, and DVD videos that you have authorized
hi
for your children are offered. KidZone settings are password-protected, w
that your children can only use Nero LiquidTV™ in this protected area.
If you turn on the KidZone feature for parental control purposes, Nero LiquidTV™ will
automatically offer all programs and recordings that correspond to the age group selected
by you in the KidZone area. Additionally, you always have the option of editing the default
settings for Nero LiquidTV™ parental controls (see Parental Control/KidZone Default Set-
tings.) in a detailed manner and to modify them completely according to your preferences.
If you have authorized at least one channel for use in the KidZone area, your children will
also be able to see and record TV programs that are currently being broadcast, provided
that these programs comply with the relevant parental control criteria. Likewise, they will
only have access to DVD videos when their content complies with parental control criteria
as well.
In the KidZone area, you can only access contents in the folder in which Nero LiquidTV™
stores all recordings. By default, this is the "My TV Recordings" folder. However, it is possibl
that you specified a different name for this folder during the installation process. As a result,
e (/Other Videos) group is not available in the KidZone area. th
Please keep in mind that your children could access "forbidden" programs or recordings outside of Nero LiquidTV™ - through the Windows f
feature only applies inside Nero LiquidTV™.
ile system, for instance. The parental contro
ch ensures
Nero LiquidTV™ | TiVo® PC 41
Page 42

Parental Controls
9.1 Parental Control/KidZone Default Settings
Nero LiquidTV™ works with the following country-specific default settings for the parental
control feature:
USA and Canada
Age
categories
1
(under 6 years
old)
2
(6-9 years old)
3
(9-12 years old)
4
(12-16 years
old)
Authorized ratings
TV Movie DVD
TV-Y G 1 All blocked All blocked Yes
TV-Y, TV-Y7 G 1 All blocked All blocked Yes
TV-Y, TV-Y7,
TV-YG
TV-Y, TV-Y7,
TV-YG, TV-PG
G, PG 3 All blocked All blocked Yes
G, PG,
PG-13
4 All blocked All blocked No
Mexico
Age
categories
1 (under 6 years old) AA 1 All blocked All blocked Yes
2
(6-9 years old)
3
(9-12 years old)
4
(12-16 years old)
Authorized ratings
TV/Film DVD
AA, A 1 All blocked All blocked Yes
AA, A, B 3 All blocked All blocked Yes
AA, A,
B, B-15
4 All blocked All blocked No
Authorized
according to
content-based
characteristics
Authorized
according to
content-based
characteristics
Non-rated
programs
Non-rated
programs
KidZone
enabled
by default
Enable
KidZone?
If you set up parental controls for ratings 1-3, a KidZone is created automatically. By default,
no KidZone is set up if you set up parental controls for rating 4, although you can turn it on.
9.1.1 Setting Up Parental Controls and KidZone
The parental controls and TiVo® KidZone provide detailed parental control features that
parents can use to define the programs that their children can access in a simple and
reliable manner. By default, neither one of these two parental control features is enabled.
However, you can very easily set up parental controls based on the known ratings. A
KidZone is set up automatically for the lower ratings (1-3).
Proceed as follows:
1. Use the Messages & Settings button on the TiVo Central screen.
The Messages & Settings screen is displayed.
2. Use the Settings button .
The Settings screen is displayed.
3. Use the Parental Controls and KidZone button.
The Parental Controls - Introduction screen is displayed.
Nero LiquidTV™ | TiVo® PC 42
Page 43

Parental Controls
4. Use the Select button.
The Specify Age Group screen is displayed.
5. Select the desired age group.
6. Use the Select button.
The Select Windows Users screen is displayed and lists all users that are configured
on your PC. The check boxes for all users are enabled by default.
7. Disable the check boxes for the users
KidZone area with the Select button.
for whom Nero LiquidTV™ should not start in the -
The check boxes for the users to whom parental controls and any automatically created
KidZone should apply remain enabled. If these
the KidZone area will be
shown automatically.
open Nero LiquidTV™ in the future,
users
8. Use the Done button.
d
The Select a Passwor
screen is displayed.
9. Enter a 4-digit password.
The Confirm Password screen is displayed.
10. Enter the 4-digit password again for confirmatio
s scre
The Congratulation
en is displayed.
n.
11. Use the Select button.
If you set up parental controls for ratings 1-3, a KidZone was set up automatically. Ac-
cordingly, the Now
recordings displayed there is now found the access to the KidZone area, the Enter TiVo
¬KidZone entry.
ing List screen is displayed. At the top of the list of all available
Play
If you set up parental controls for rating 4, no KidZone was set up automatically. The Pa
rental Controls and KidZ
control and KidZone settings here (see Individual Parental Control /KidZone Settings
one screen is displayed. You can keep adjusting the parental
-
).
Nero LiquidTV™ | TiVo® PC 43
Page 44

Parental Controls
9.2 Individual Parental Control /KidZone Settings
All the input options that you can use to configure parental controls in a detailed and fully
individual manner are available on the Parental Controls in the KidZone screen.
The following input options are available:
Turns the KidZone feature on or off, depending on whether it is
enabled or not. If the KidZone feature is turned off, parental con-
Use
KidZone
trol settings remain enabled. As a result, all Nero LiquidTV™ users can see all contents, but can only access those for which they
know the password or which are not password-protected.
The button is only available if parental controls are enabled .
Ratings
Channels
Allow
and hide programs
Change Password
Clear all settings
and start over
Displays the Lock for rating screen, where you can specify, in
detail, which age or content restrictions should apply.
Displays the Lock Channel screen, where your channels are
listed and can be authorized or blocked individually.
Shows the Allow and Hide Programs screen, where you can
allow or prohibit individual programs or recordings explicitly..
Makes it possible to enter a new 4-digit password.
Makes it possible to enter completely new settings for the KidZone and parental control features.
Turns off parental controls temporarily or permanently. If it was
turned off temporarily, it is turned on again automatically when
the remote control has not been used for four hours or Nero
Turn off parental
controls
LiquidTV™ is restarted.
The parental control settings cannot be modified as long as parental controls are turned off.
The button is only available if parental controls are turned on.
Turn on parental
controls again
Turns parental controls on again with the old settings.
The button is only available if parental controls are turned off.
-
Nero LiquidTV™ | TiVo® PC 44
Page 45

g
Parental Controls
9.2.1 Editing the Parental Control /KidZone Setup
You can configure parental controls in a completely customized manner on the Parental
Controls and KidZone screen. Proceed as follows:
1. If you want your children to use Nero LiquidTV™ only in the KidZone area and only see the
titles for allowed content:
1. Use the Use KidZone button.
The Turn On KidZone screen is displayed
2. Use the Yes, turn on KidZone button.
The Congratulations screen is displayed and lets you know that the KidZone feature
is now set up.
3. Use the Back to parental controls button .
The Parental Controls and KidZone screen is displayed again.
2. If you want to edit the filter settings according to ratings that were used automatically when
setting up the KidZone and/or parental control features:
1. Use the Ratings button.
The Lock According to Rating screen is displayed.
Films and TV programs are rated very differently depending on the specific country. Sometimes there is only an age rating for films in the movies, but no ratings for TV programs. A
content-based rating can also be very different if it even exists. As a result, not all the filterin
options mentioned here are available in every country or for every program,.
2. Use the Film Ratings button .
The Film Ratings screen is displayed.
3. Select the rating in which access for your children should start to be locked.
4. Use the Select button.
The Lock According to Rating screen is displayed again; the films are locked for the
selected age group and for all lower age groups.
5. Follow the setup process described above for film ratings in order to set up parental con-
trols for TV and DVD ratings.
The TV programs and the DVD video are locked for the selected age group and for all
lower age groups.
6. Use the TV Content Tags button if it is available.
The TV Content Tags with Age Description screen is displayed. All identifiers are
selected by default (
), and as a result, the corresponding TV programs are locked.
7. Select the check boxes for the identifiers that you want to unlock one after the other and
apply the selection with the Select button.
The check boxes for the unlocked identifiers are disabled.
8. Use the Done button.
The Lock According to Rating screen is displayed again.
9. Use the Non-rated TV programs button.
The Non-Rated TV Programs screen is displayed.
10. Use the Yes button if you want to lock unrated TV programs from being used by your
children; No if you want to authorize them.
The Lock According to Rating screen is displayed again.
11. Follow the same steps used in locking/unlocking non-rated TV programs for non-rated
films.
The Lock According to Rating screen is displayed again.
Nero LiquidTV™ | TiVo® PC 45
Page 46

d
e
Parental Controls
You have specified which films and TV programs will be locked from being used by your
children.
3. Use the button in order to display the Parental Controls and KidZone screen again.
4. If you want to lock certain channels from being used by your children:
1. Use the Channel button.
The Lock Channel screen is displayed.
2. Enable the check boxes for the channels that you want to lock and disable the check
boxes for those that you want to unlock.
3. Use the Done button.
You have locked the selected channels from being used by your children.
The Parental Controls and KidZone screen is displayed again.
If the parental control and KidZone features are turned on, all channels are locked by default;
in this case, you must explicitly authorize the channels that your children should be able to
access.
If parental controls are turned on, but the KidZone feature isn't, all channels can be accesse
by default, i.e. you must explicitly lock the channels that should only be accessed with a
password.
5. If you want to authorize certain programs: ..
1. Use the Authorize or hide programs button.
en is di
2. Use the Authorize programs button.
s for the programs that you want to authorize. 3. Enable the check boxe
4. Use the Done button.
You have authorized additional individual programs.
The Parental Controls and KidZone screen is displayed again.
splayed. The Authorize or Hide Programs scre
l
e programs. The Authorize Programs screen is displayed and lists all availab
6. If you want an overview of which programs you have locked explicitly already:
1. Use the Auth
The Authorize or Hide Progr
2. Use the Hide programs button .
The Hide Programs screen is displayed and lists all p
assigned directly with the Lock this program option.
3. If you want to make one of these programs
sponding entry and use the Done button.
The Parental Controls and KidZone screen is displayed again; if you made
more programs accessible, they are now available to your children as well.
You ca
¬KidZone features in one of the program screens. You can select the locking option there un-
n lock
der More Options. The program that you block will not be shown in the KidZone area, and
can only be seen af
Program Screens)
7. If you want to change the password for K
1. Use the Change password button.
The Enter Your Password screen is displayed.
Nero LiquidTV™ | TiVo® PC 46
orize or hide programs button.
ams scre
en is displayed.
r
ograms that you have already
accessible to your children, select the corre-
e or
on
any recording individually. This is done outside the Parental Controls and
ter the
password has been entered if parental controls are turned on. (se
idZone and for parental controls:
Page 47

Parental Controls
2. First enter
The Change Password screen is displayed.
your currently valid password into the t
3. Now, enter the new password (four digits) into the
di
The Confirm Password screen is
4. Enter the new password again here
splayed.
.
ext boxes.
te
st fields.
You have changed the password.
The Parental Controls and KidZone screen is displayed again.
8. If you want to turn on parental controls again, use the Turn on parental controls again but-
ton.
e
The Turn on parental controls again button is hidd
button is displayed. Parental controls
are turned on.
n; the Turn off parental controls
9. If you want to turn off parental controls:
1. U
se the Turn
The Turn Off for How
2. S
elect the desired optio
The Enter Your Password screen is
3. Enter your pa
The Parental controls turned off temporarily/permanently screen is displayed. If you
turned off parental controls temporarily, they are turned on again automatically if the re
mote control is not used for over 4 hours or Nero LiquidTV™ is restarted.
off parental controls button.
ng screen is displayed.
Lo
n.
di
ssword into the text boxes.
splayed.
-
t
10. If you want to reconfigure the settings for the KidZone and parental con
rol features:
ettings and start again button. 1. Use the Delete all s
art
The Delete All Settings and St
Again screen is displayed.
2. Enter the following:
Keyboard: [-], [-], [-], [E]
®
PC remote control :
TiVo
®
®
,
®
, {Enter}
,
The Parental Controls - Introduction screen is displayed.
You can reconfigure parental controls again.
You have configured the parental control/KidZone features according to your prefer-
ences.
Nero LiquidTV™ | TiVo® PC 47
Page 48

Index
10 Index
Season Pass recording 31
A
About
Nero LiquidTV™ 5
Age categories 42
Age group 42
Allow programs 44, 46
Audio settings 34
Audio Track 16
Authorize programs 46
Automatic padding 38
B
Buffer 39
Burning
recordings to DVD 25
Button bar 18
C
Captioning 36, 37
Change password 44, 46
Channel
lock 44, 46
Channel 10, 11, 16, 20, 35
list 19, 20, 21, 34, 35
name 21
next 16
number 21
previous 16
recording 32
settings 34, 35
Channel banner 16
size 36
speed 36, 37
Channel list 34
Conventions 5
Convertinging
recording 26
Creating
channel list 35
WishList Search 11, 29
D
Default setting
all 20
Default settings
KidZone 42
parental control 42
Disc space
saving 27
Display
options 20
settings 16, 34, 36, 37
video window 36
Dolby quality 16
DVD 8, 9, 10, 15, 25
burning recordings to 25
DVD-Menu 8, 9
E
Electronic program guide 6, 8, 9, 10, 19, 20
EPG 6, 8, 9, 10, 19, 20
Extend live recordings 39
F
Find Program 11, 28
G
Guide 10, 19
Guide display options 20
H
Hide programs 44, 46
Hide the recording 13, 20
I
iPod 26
K
Keyboard layout 9
Nero LiquidTV™ | TiVo® PC 48
Page 49

KidZone 12, 13, 20, 33, 34, 37, 41
default settings 42
individual settings 44
setup 45
L
Language 36, 38
Live TV Buffer 39
Lock Channel 44, 46
Recording 8, 9, 10, 11, 12, 22, 24, 26, 28
by channel 32
by time 32
converting for portable playback devices 26
hide 13, 20
live 39
location 39
settings 28, 34, 38
space 39
Remote control 39
M
Media Access Key 14
Messages 11, 33, 37
Multiroom Viewing 14
N
Now playing list 39
Now Playing List 10, 12
O
Options 24
Overlapping programms 39
P
Parental control 12, 13, 20, 33, 34, 37, 41
default settings 42
edit 45
individual settings 44
turn off 44, 47
turn on 44, 47
Password 44, 46
Preview 19
Program 8, 9, 10, 11, 15, 16, 19, 20, 22
allow 44, 46
authorize 46
hide 44, 46
information 37
list 19
overlapping 39
PSP 26
R
Ratings 42, 44, 45
S
Saving disc space 27
Schedule 19
Screen
saver 36, 37
settings 16, 35
Season Pass 11, 13, 19, 20, 30
Priority 11
recording 22, 31
Settings 10, 11, 33
audio 34
channels 34, 35
display 34, 36, 37
general 34
individual KidZone 44
individual parental control 44
recording 34, 38
remote control 35
screen 16, 35
video 35
Show types 24
Starting 6
Subtitles 16, 36, 37
Symbols 5
System tray notifications 36
T
Target group 5
Time
recording 32
TiVo Central 6, 8, 9, 10, 15, 18, 25
Nero LiquidTV™ | TiVo® PC 49
Page 50

TiVo KidZone
Enter 12
TiVo PC remote control 5, 7, 8, 9, 10, 15, 17, 18, 20
TiVo Suggestions 11, 13, 39
To Do List 11
TrickPlay™ bar 17
TV 8, 9, 10, 15
TV broadcast 12
display 36
W
Watch TV 10, 15
Window in foreground 38
Window on Top 36
WishList 11, 13, 29
WishList Search
creating 11, 29
V
Video window in menus
Nero LiquidTV™ | TiVo® PC 50
Page 51

Contact
11 Contact
Nero LiquidTV™ is a Nero AG product.
Nero Inc.
330 N. Brand Blvd., Ste 800 Internet: www.nero.com
Glendale, CA 91203-2335 Help: http://support.nero.com
USA Fax: (818) 956 7094
E-mail: US-CustomerSupport@nero.com
Copyright TiVo Inc. © 2008. All rights reserved.
Copyright © 2008 Nero AG and its licensors. All rights reserved.
Nero LiquidTV™ | TiVo® PC 51
 Loading...