

Page 1
Quick start
NeroLINUX
Nero AG
Page 2

Information on copyright and trade marks
The NeroLINUX user manual and all its contents are protected by copyright and
are the property of Nero. All rights reserved. This user manual contains material
that is protected by internationally valid copyright. This manual may not - in whole
or in part - be copied, transmitted or otherwise reproduced without the express
written permission of Nero AG.
All trade names and trademarks are the property of the respective owners.
Nero rejects any claims that transcend the legal guarantee rights. Nero AG does
not undertake any liability for the correctness of the content of the NeroLINUX
user manual. The contents of the software supplied as well as of the NeroLINUX
user manual may be changed without prior warning.
The trademarks mentioned here are only named for information purposes.
Copyright © 2002-2005 Nero AG
REV 2.01
Page 3

Table of Contents
1 Preparing to use of NeroLINUX ........................................................ 5
1.1 Software Requirements ................................................................... 5
1.2 Hardware requirements ................................................................... 5
1.3 Installing NeroLINUX........................................................................ 6
2 System configuration ........................................................................ 7
2.1 Linux kernel version ........................................................................ 7
2.1.1 Linux kernel version explanations ...................................................... 7
2.1.2 NeroLINUX requirements................................................................... 8
2.2 Devices configuration...................................................................... 8
2.2.1 Device filenames under Linux ............................................................ 8
2.2.2 IDE Devices configuration with 2.4 kernels ........................................ 9
2.2.3 IDE Devices configuration with 2.6 kernels ...................................... 10
2.2.4 Setting correct permissions on the devices files .............................. 10
2.2.5 Setting up DMA acceleration on IDE devices................................... 11
2.3 3rd Party System Tools Configuration .......................................... 12
2.3.1 SuSE Plugger / SuSE Watcher ........................................................ 12
2.3.2 GNOME CD Player Applet ............................................................... 12
2.3.3 KDE CD Player................................................................................. 13
2.3.4 Magicdev.......................................................................................... 13
2.3.5 KDE Autorun daemon ...................................................................... 14
2.4 Configuring NeroLINUX ................................................................. 15
2.4.1 Initial Setup and Quick Start............................................................. 15
2.4.2 Audio Setup...................................................................................... 15
3 Basic functionality and Interface concept ..................................... 16
3.1 Making a CD or DVD from files stored on your computer's hard
drive................................................................................................. 20
3.2 Burning images .............................................................................. 21
3.3 Making an image bootable ............................................................ 21
3.4 Audio CD recording (Creating CDs playable on your Home
Stereo from other CDs, MP3, WAV etc.)....................................... 22
3.5 Recording Modes in NeroLINUX : How to use NeroLINUX for
Disc-At-Once recording ................................................................. 24
3.6 Creating a CD EXTRA or a Mixed Mode CD ................................. 24
3.7 How to copy a CD or a DVD........................................................... 26
3.8 Working with rewritable media ..................................................... 26
3.9 Managing multisession discs ....................................................... 28
NeroLINUX Table of Contents •••• 3
Page 4

3.9.1 A introduction to how Multisession is done in general...................... 28
3.9.2 How to start a Multisession disc....................................................... 28
3.9.3 How do I append to a multisession disc? ......................................... 28
4 Advanced functions......................................................................... 31
4.1 Creating a bootable CD or DVD .................................................... 31
4.2 The concept of Precaching ........................................................... 32
4.3 Track to file conversion ................................................................. 32
4.4 Adding a new file type to the NeroLINUX file types registry ...... 33
4.4.1 Specifying the decoder..................................................................... 34
4.4.2 Calculating the track size ................................................................. 34
5 Frequently asked Questions........................................................... 37
5.1 Audio CDs created with NeroLINUX are playing fine on my
computer but are not recognized by my stereo .......................... 37
5.2 When writing audio files, I get a lot of silence at the end of the
track or I get tracks that consist of nothing but silence............. 37
5.3 When copying audio tracks from other CDs, I get nothing but
silence or the tracks seem to be incomplete............................... 38
5.4 I can't write multisession discs .................................................... 38
5.5 I can't hear anything when dragging an audio file or a track to
the preview player but recording works perfectly well............... 38
5.6 NeroLINUX is making awful noises instead of playing tracks ... 38
5.7 NeroLINUX keeps recording a 2 seconds pregap between tracks
which is inappropriate for the type of content I'm recording..... 38
5.8 NeroLINUX seems to be notoriously trying to open a network
connection to some server. Does it have some sort of built-in
Trojan transmitting my data to some remote database? ........... 39
5.9 I tried to burn a disc with a few files on it. When I clicked on
record, NeroLINUX went through all the files and recorded them
onto the disc. However, I cannot mount the result. What went
wrong? ............................................................................................ 39
5.10 NeroLINUX is running fine on my root account but it only
causes error messages if run from my normal user account or it
doesn't display any tracks for my CD-ROM drives. Aren't Linux
users supposed to do their daily work as a normal user? ......... 39
5.11 Burning a DVD takes too much time ............................................ 39
5.12 My external USB/FireWire recorder hangs when recording a disc40
5.13 My USB recorder hides another device when it is plugged in ... 40
5.14 I get the error message “HDIO_SET_DMA: failed: Operation not
permitted” when I try to enable DMA acceleration ..................... 40
6 Support ............................................................................................. 41
7 Glossary............................................................................................ 42
NeroLINUX Table of Contents •••• 4
Page 5

1 Preparing to use of NeroLINUX
1.1 Software Requirements
NeroLINUX has all the necessary functionality for recording CDs and DVDs built-
in. However, for some special features NeroLINUX relies on some additional
programs and packages installed on your system:
The mpg123 software MPEG1-LayerIII decoder is used to allow recording of
MP3 files on CD as regular audio tracks. Additionally, Gogo’n’Coda can be
used to encode MP3 files.
The ogg123 command line ogg-vorbis decoder as well as the oggtst package
(available from the GnomeToaster Homepage: http://gnometoaster.rulez.org)
is needed to be able to play and record ogg-vorbis files. Additionally, oggenc
can be used to encode ogg-vorbis files.
NeroLINUX has dependency test functionality built-in and will tell you when it
needs a program and cannot find it. A message will pop up in this case telling
you the name of the package, the URL where it can be obtained and what
purpose it has within NeroLINUX.
1.2 Hardware requirements
Recording CD-R/RW or DVD/RW puts a high load on your system's components.
Although most state of the art systems should easily be capable of recording CDR/RW or DVD/RW media perfectly well, the hardware requirements for CD
recording should not be underestimated. Your CD/DVD-Recorder needs a
continuous stream of data with interruptions only as small as can easily be
handled by the onboard buffer provided by your recorder which is usually about
512kb to 2048kb. Depending on the recording speed, this can take less than a
second to exceed.
For the graphical user interface of NeroLINUX you will need about 64MB of
system RAM to record a CD-R/RW or DVD/RW. In fact, this amount of memory is
too little as your X server also uses a lot of RAM.
Your CPU should be at least a Pentium III class 500Mhz CPU. Such a CPU is
required to safely record .mp3 files on the fly for example.
If your CPU or the medium your data is coming from is not fast enough to provide
the content you want to store on a disc in real-time, NeroLINUX can cache data
NeroLINUX Preparing to use of NeroLINUX •••• 5
Page 6

on your hard drive. To make this possible, you need at least 700MB of free hard
drive space.
1.3 Installing NeroLINUX
NeroLINUX is packaged in the RPM and Debian format. These formats are used
by the majority of the Linux distributions. Please make sure you have
administrative rights on your system before installing NeroLINUX.
To install NeroLINUX, open a terminal, go where your package is located and
type the following command:
rpm -i nerolinux-<version>-<machine>.rpm (RPM package)
dpkg -i nerolinux-<version>-<machine>.deb (Debian package)
You can also use your distribution's software installer tool to install NeroLINUX.
These packages come with a post-installation script that is run automatically after
all the files are successfully copied onto your system. This script will detect the
Linux distribution you are currently using, and if the distribution is supported, it
will add some shortcuts in the KDE and GNOME programs menu. With the
Debian package, it will also add a shortcut to NeroLINUX in the debian-menu
subsystem repository.
NeroLINUX Preparing to use of NeroLINUX •••• 6
Page 7

2 System configuration
Before using NeroLINUX you need to make sure that your system is correctly
configured. Please read the following instructions very carefully to make sure that
the first disc you record will be successful.
This chapter provides also some information about the way the Linux kernel
internally handles CD and DVD recorders, and how NeroLINUX handles them.
Some sections of this chapter are a little bit technical but we have tried to make
them easy to understand, even if you are not familiar with Linux environments.
Please note that all the examples and commands that are shown can
compromise your system security policy, especially when setting up the
permission on the device files.
2.1 Linux kernel version
2.1.1 Linux kernel version explanations
The kernel is the heart of your Linux system. It provides for example the low-level
drivers used to access your devices.
In order to identify your devices filenames clearly, you need to first know the
version of the Linux kernel you are currently using. To get it, open a terminal and
type the following command:
uname –r
The output of this command should give you three numbers separated by periods
(full stops), for example 2.6.7.
The first number is the kernel version (2 in our example).
The second number is the kernel major number (6 in our example). All
kernels that are considered “stable” have even major number. The kernels
with odd major number are development kernels.
The last number is the kernel release number (7 in out example).
The Linux kernel version is often identified by the first two numbers, as there is
no significant change between two releases of the same kernel. So when you see
for example 2.4 kernel, it means a kernel with a version number of 2 and a major
number of 4.
NeroLINUX System configuration •••• 7
Page 8

2.1.2 NeroLINUX requirements
In order to use NeroLINUX you will need at least a 2.4 kernel. To be plainly
usable, especially with high-speed recorders like DVD recorders, a 2.6 kernel is
highly recommended.
2.2 Devices configuration
Under Linux, all the devices are associated to one or more specific file(s) called
device file. All the device files that are available on your machine are located
inside the /dev directory.
But, depending on the version of the Linux kernel you are using, your recorder
device filename may differ, due to the low-level driver it is using. In this chapter
you will find some explanations about discovering your device filenames and how
to set access on them.
If you have enough technical competences, you can safely skip this section. In
any case, if NeroLINUX detects that something is misconfigured on your system,
it will warn you when starting.
2.2.1 Device filenames under Linux
Currently, you can have many different interfaces on a recorder: IDE, SCSI, USB
or FireWire (IEEE 1394).
2.2.1.1 IDE devices
Actually, most internal recorders are connected to the IDE bus. Linux assign
them a device file according to their position on this bus (bus number and
master/slave settings). Basically, you should have the following naming
convention:
/dev/hda : Primary Master device
/dev/hdb : Primary Slave device
/dev/hdc : Secondary Master device
/dev/hdd : Secondary Slave device
2.2.1.2 SCSI devices
SCSI recording devices are handled by two different drivers under Linux, and so
two different device files are created to handle one physical device:
/dev/srX or /dev/scdX : Used only to read data from media
/dev/sgX : Used by NeroLINUX to communicate with the device
(X is a number identifying your device)
If your recorder is correctly recognized by the Linux kernel it should appear in the
file /proc/scsi/scsi. Unfortunately, there is no way to determine the X number from
the SCSI coordinates of your recorder. But usually, the numbers are used
incrementally, starting from 0, corresponding to the position of the device in the
/proc/scsi/scsi file.
NeroLINUX System configuration •••• 8
Page 9

Sometimes, depending on your kernel configuration, one of these files can be
unavailable. In order to have both, you should make sure that your kernel is
configured with the following options:
CONFIG_SCSI (SCSI support)
CONFIG_BLK_DEV_SR (SCSI CD-ROM support : provides /dev/scdX)
CONFIG_CHR_DEV_SG (SCSI generic support : provides /dev/sgX)
Usually all distributions are shipping a kernel configured with these options, so no
need to worry. For more information about how to configure your kernel for
recording CD or DVD, you can have a look to the generic Linux HOWTOs:
CD-Writing HOWTO
CDROM-HOWTO
2.2.1.3 External devices
As all external devices are associated with a virtual SCSI device, the filename
scheme is the same as for real SCSI devices.
If you do not see your external device in the /proc/scsi/scsi file after you plugged
it in, make sure that the kernel is correctly configured. For more information you
can have a look to your Linux distribution documentation.
2.2.2 IDE Devices configuration with 2.4 kernels
2.2.2.1 ‘ide-scsi’ driver
With 2.4 kernels, all IDE devices that you want to be available in NeroLINUX
must use the ide-scsi driver (even CD/DVD readers). This driver associates a
virtual SCSI device with a standard IDE device.
Usually, Linux distributions automatically configure everything so that only
recorders use this driver. In such a case, you will not be able to use your CD or
DVD readers inside NeroLINUX. In such a case, the next session is useful.
How to make a device use the ‘ide-scsi’ driver
Before trying to configure a device, make sure that you have configured your
kernel with the following options:
CONFIG_BLK_DEV_IDESCSI (SCSI emulation support)
CONFIG_SCSI (SCSI support)
CONFIG_BLK_DEV_SG (SCSI generic support)
Configuring a device, so that it will use the ide-scsi driver, is done by providing a
specific argument hdx=scsi to the kernel command line. For example, if the
device file corresponding to your recorder is /dev/hdb, you will have to provide
hdb=scsi to the kernel command line.
If you do not know how to do this, please have a look to your distribution
documentation about how to pass options to the kernel at boot time. Please also
note that most of the actual distributions provide some graphical fontends to
modify the boot loader parameters:
NeroLINUX System configuration •••• 9
Page 10

For Red Hat Linux run ksconfig (This application is called ‘Kickstart
Configurator’). When the application is running, click on ‘Boot Loader Options’
and fill the ‘Kernel Parameters’ field.
For SuSE Linux, run YaST2, select System in the left pane and then double
click on Boot Loader Configuration. Once the module is launched, click on Edit
Configuration Files to set up the device parameters.
2.2.3 IDE Devices configuration with 2.6 kernels
2.2.3.1 Major changes in the device drivers
With 2.6 kernels, the native IDE CD-ROM driver, called ide-cdrom, has been
completely rewritten to use the latest technologies available and permit CD and
DVD recording. This driver includes DMA acceleration that let you use highspeed devices (like DVD recorders) without any kind of problems.
One other important point is that in this version of the Linux kernel, the ide-scsi
driver that has been used with old kernels has been deprecated. If you continue
using this driver with a 2.6 kernel, your devices will not be available with
NeroLINUX (Note that you will also have a warning from the kernel at boot time).
2.2.3.2 NeroLINUX requirements
In order to use an IDE device with NeroLINUX under a 2.6 kernel, you must
associate it with the ide-cdrom driver. In order to do this, you must check the
kernel command line to be sure that no device is associated with the old ide-scsi
driver (no hdXX=ide-scsi parameter).
If you do not know how to do this, please have a look to your boot loader
documentation.
2.2.4 Setting correct permissions on the devices files
2.2.4.1 Static /dev support
You need to allow user accounts to have access to all your disc devices. This is
done under Linux by setting correct permission on the corresponding device
filenames. In this section we will give you a way to correctly configure the
permission on the devices filenames for all users of the system. If you are
experienced with user rights management, you can skip this section.
To setup correct permissions on your device files, first make sure you have
enough privileges to do so. Then, open a terminal and type the following
command:
chmod o+r+w /dev/sg*
chmod o+r+w /dev/hdX
(where X is the letter corresponding to the IDE device)
You can run the last command more that one time if you have multiple IDE
devices.
These commands will allow users to have read and write permission on all your
SCSI generic devices (CD-ROM for example) and your IDE disc devices.
NeroLINUX System configuration •••• 10
Page 11

Another possibility, if you only want to give access to some users, is to create a
new group called for example nero and change the group of the device files
corresponding to your CD/DVD devices with it. Then give read/write permission
to the group on these device files and finally, just add all the users that are
allowed to use NeroLINUX to the new-created group.
2.2.4.2 Udev support
NeroLINUX supports udev, the new /dev file system implementation that are
used in SuSE Linux 9.2 and Fedora Core 3 for example. The only thing that can
appear is that a hot plug device that gets plugged in when NeroLINUX is already
started is not recognized. In that case, just restart NeroLINUX.
With this file system, all permissions are set during boot time using some specific
configuration files. So to make your modifications permanent, you have to change
the files located in /etc/udev/. For more details, you can have a look to udev FAQ.
2.2.5 Setting up DMA acceleration on IDE devices
DMA acceleration provides an improvement in throughput for the disc drives, and
let you safely use all your recording devices. Depending on your Linux kernel and
distribution configuration, you might have DMA acceleration that is automatically
enabled on startup.
If your hardware supports it, it is generally a good idea to enable DMA
acceleration not only for IDE hard disk drives, but also for disc drives such as
CD/DVD readers and recorders. Please note that if one of your devices has no
DMA acceleration, NeroLINUX will warn you when starting the application.
To enable DMA acceleration on one of your device, you can run the following
command (as root):
hdparm –d1 /dev/hdX
(where X is the letter corresponding to the IDE device)
This settings is not permanent. If you want to enable DMA at boot time, you can
add the command above in one of your startup scripts. As these scripts are
distribution dependant, please check your distribution documentation to find out
how to do this. Please note that most of the distribution have some graphical
fontends to configure this.
For example, with SuSE Linux distributions, you can use YaST2 to setup the
DMA mode of your IDE devices. To do this, launch YaST2 and select the
Hardware item in the left pane and then double-click on IDE-DMA Mode. Once
the module is launched, make sure that all your disc drives DMA mode is set to
‘On’.
NeroLINUX System configuration •••• 11
Page 12
2.3 3rd Party System Tools Configuration
Some 3rd party system tools, like automounter utilities or new hardware detection
daemons, can cause side effects when using NeroLINUX. As you have no way
under Linux to lock a disc drive, these utilities can send commands to a drive
when NeroLINUX is burning. In that case it can make your recording process fail.
Before using NeroLINUX, you must make sure that no other application is
accessing the drive you plan to use for recording.
In this chapter, we give you a list of applications that can cause problems. Please
pay attention that there might be some other utilities interfering with NeroLINUX:
it is impossible to list all applications that bring errors!
2.3.1 SuSE Plugger / SuSE Watcher
This utility is shipped with SuSE Linux distributions. It automatically detects if new
medium are inserted in a drive. If it is the case, it launches a specific utility,
depending on the media type.
This utility can cause error during burn processes, especially when burning in
Track-At-Once mode. So make sure that it is not configured to use your recorder.
To do this, please check the SuSE Plugger documentation.
Note that you can easily disable these utilities. To do this, right-click on their
icons and select ‘Quit’. Those icons are located just beside the clock, on the righthand side of the KDE panel.
2.3.2 GNOME CD Player Applet
As this applet is polling the drive it is connected to every second to see if it
contains a playable disc, you should make sure that it is not configured to use
your recorder.
To do this, right-click on the applet and select the ‘Preferences’ item and make
sure that the ‘Device path’ is not the device path of your recorder.
NeroLINUX System configuration •••• 12
Page 13
2.3.3 KDE CD Player
The KDE CD Player applet (also known as kscd) is also polling the drive it is
connected to. Make sure that this utility is not configured to use your recorder.
To do this, open the configuration dialog and check that the CD-ROM device
prompted is not your recorder.
2.3.4 Magicdev
Magicdev is an automounter utility included in the GNOME desktop utilities, that
polls every disc drives to see if they contain a useable medium. If it is the case, it
will automatically be mounted. In order to avoid risks, make sure that this utility is
not running when burning with NeroLINUX.
To configure magicdev, click on ‘Start here’ icon on your desktop, and select
‘Preferences/Peripherals/CD Properties’ or ‘Desktop Preferences/CD and DVD’
(It depends on the GNOME version you are using). Make sure that everything is
unchecked, so that magicdev will never try to mount automatically a disc, or start
a CD player application.
NeroLINUX System configuration •••• 13
Page 14
In some case, the magicdev process can still be running even if everything above
is unchecked. In that case, you can safely ignore NeroLINUX warning message.
2.3.5 KDE Autorun daemon
Autorun is a daemon that is sometimes included in KDE. Make sure that it is not
configured to run with your active recorder before burning with NeroLINUX
otherwise you could get into troubles when burning discs.
To completely remove this daemon, just delete the ‘Autorun.desktop’ file in your
‘.kde/Autostart’ directory. The autorun daemon will not be loaded the next time
you log in.
NeroLINUX System configuration •••• 14
Page 15

2.4 Configuring NeroLINUX
2.4.1 Initial Setup and Quick Start
Start NeroLINUX from the account you are planning to run it in the future by
typing nero on a terminal. If you have not set up your system for write access of
users to the CD-Recorder device, you will have to use the root account. Please
be aware that this is a potential security problem on your system. Please, see the
previous sections and the FAQ for ideas on how to make your CD-Recorder
accessible to normal users.
You will be prompted to enter your NeroLINUX serial number. Once the serial
number has been correctly entered, you will be prompted to restart NeroLINUX.
NeroLINUX performs a drive auto detection at startup. Check that all your drives
are listed in the ‘Disc Drives’ section on the bottom of the tree located in the top
left part of NeroLINUX’s main window. If one or more drive is missing, have a
look to the previous sections of this chapter to see if your system is correctly
configured.
To select the recorder you want to use, select Recorder/Choose Recorder or click
on the toolbar icon. Select the line corresponding to your recorder and click on
‘OK’. The name of the recorder you selected should now appear in the right side
of the status bar. Please note that when you double-click on the name of the
active recorder a dialog pops up to allow you to choose another recorder.
For most configurations, this is all you have to do to get NeroLINUX up to date.
The following sections will deal with some special cases.
2.4.2 Audio Setup
NeroLINUX has abilities to play audio streams with its preview player. You
should also select the audio driver that NeroLINUX should use when previewing
audio files. To do so, enter NeroLINUX’s Preferences window by choosing
File/Preferences, and select ‘Audio System’ pane. A list of available drivers is
presented, depending on the sound libraries installed on your system.
The sound libraries supported by NeroLINUX are:
Open Sound System (OSS)
Enlightenment Sound Daemon (esd)
If you do not know which sound server you are using, have a look at the process
list. If you see a process called esd you are using esd. If esd is not present, you
should select OSS to be able to preview some sounds.
If you are using a sound card driver coming from the ALSA project, make sure
that you have loaded the OSS compatibility driver. For more details about the
ALSA sound drivers, you can have a look to the ALSA homepage.
NeroLINUX System configuration •••• 15
Page 16

3 Basic functionality and Interface
concept
Once you have setup NeroLINUX and the system it is running on, you will be
able to record your first CD-R/RW or DVD/RW with NeroLINUX. However you
should first test if everything is working. If you are using NeroLINUX with a CDR/RW recorder, insert a blank rewriteable media and select 'Erase Rewritable
Disc' in the ‘Recorder’ menu.
The following window should pops up.
After selecting the clear mode you want and clicking on ‘Erase’, NeroLINUX
should now show a dialog keeping you up-to-date about the blanking process
which should disappear after a few minutes. Notice the recording terminal. It
shows the output while blanking. If you see an error message there please check
your configuration and consult the troubleshooting section of this document if you
find something unusual.
NeroLINUX Basic functionality and Interface concept •••• 16
Page 17
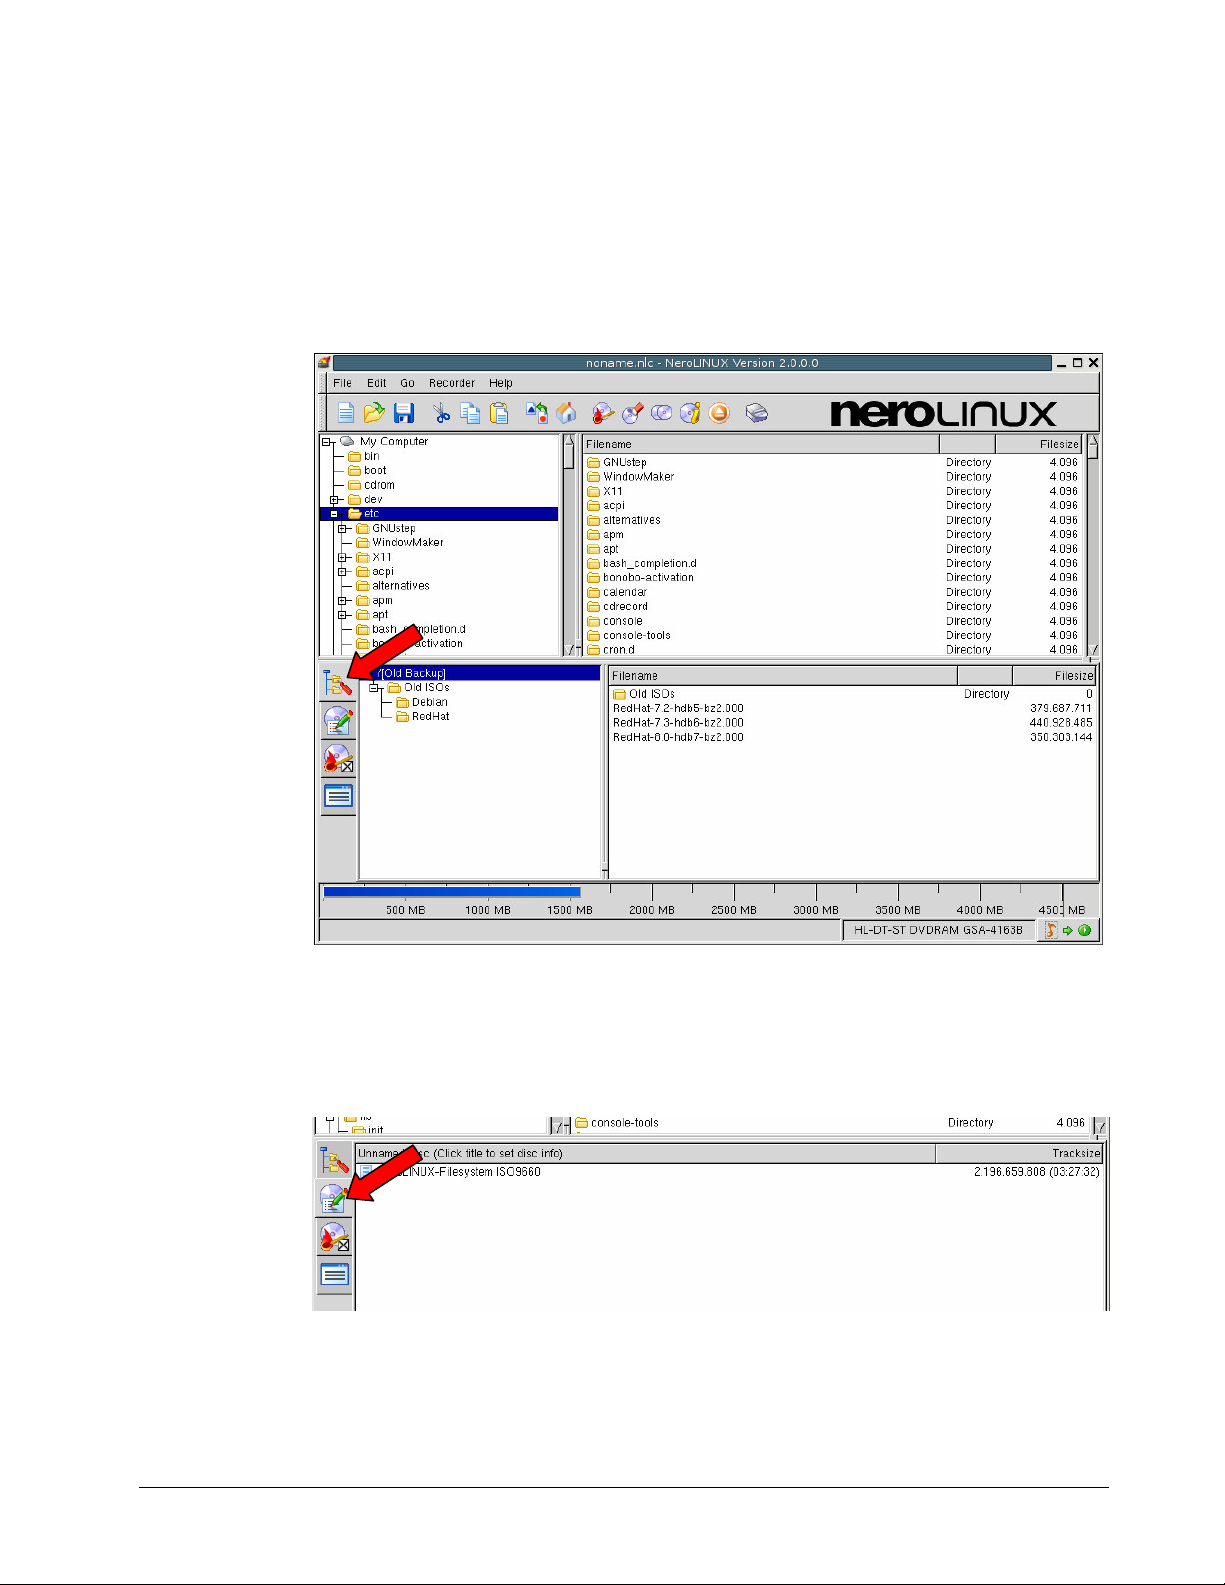
The following is a guide to the lower section of NeroLINUX's main window.
The first icon leads to a file manager which displays a virtual file system. Editing
this file system (e.g. adding files, deleting files, creating directories) will not affect
any file system or directory of your computer directly. What you are editing in
NeroLINUX's File system editor is just a prototype of a hypothetical data track on
the disc you want to create.
The second icon brings up NeroLINUX's track editor. As with the file system
editor, this is just a virtual list of tracks. It will become 'real' as soon as you press
NeroLINUX's record button.
NeroLINUX Basic functionality and Interface concept •••• 17
Page 18

By clicking the second last icon you can reach a page with various recorder
settings. You can use this page to adjust your recording settings to your needs,
e.g. you can set the recorder speed, the type of lead-out you want to write,
whether or not your CD should be bootable.
With the last icon you can reach the recording terminal page. This page contains
a list of all messages coming from your devices, in order to keep you informed of
what they are actually doing and their result.
The upper half of the NeroLINUX window shows a list of data sources, notably
an item called 'My Computer', one called 'Disc Drives' and one called
"Filesystems'. Clicking the 'My Computer' item will make it expand into your
directory structure starting at your system's root directory. Click a directory to
make its contents appear to the right of the file system tree.
NeroLINUX Basic functionality and Interface concept •••• 18
Page 19

Expanding 'Disc Drives' will show a list representing the disc based units
installed on your system. Clicking one of the drives will show a list of tracks of the
medium in that particular drive.
Clicking 'Filesystems' will show the available file systems available for recording
to the CD/DVD.
NeroLINUX Basic functionality and Interface concept •••• 19
Page 20

Generally, you can drag and drop any item showing up in the upper half of the
NeroLINUX window into both the track editor and the file system editor of the
lower half, with different results of course. That is also how you will create your
CD-R/RW or DVD/RW.
Everything that is to appear as a separate track when the disc is inserted into
your home stereo must be dragged into the track list, everything that should
appear in the file system of NeroLINUX must be dragged and dropped into the
file system editor.
If you right click on your mouse button NeroLINUX will automatically create a
copy of the data you added on your hard drive. This can be useful when working
with multiple removable media. Additionally to the source section, files may also
be dragged into NeroLINUX from external sources like your favorite file manager.
The following features can be found on the bottom side of NeroLINUX's main
window.
This part contains the compilation size status bar display. This bar is similar to
the one in Nero Burning ROM. Some small differences are present:
Tracks that are already on a CD are printed in light blue
To change the units (Megabytes to minutes or visa versa) just double-click on
the area.
Please note that if you are currently creating an audio CD, the compilation size
status bar bar units will be automatically set to minutes.
Below the compilation size status bar bar, is the status bar. This bar will provide
some help messages if you pass the mouse over an item on the screen e.g. a
menu item. At the right side of this status bar, is the active recorder name, and
the preview player. To use this player to preview an audio file, just drag and drop
it over the player It will automatically be played if the external player for its type is
available. (See NeroLINUX’s filetypes section for more details)
3.1 Making a CD or DVD from files stored on your
computer's hard drive
This section describes how to record files (e.g. graphics files or other documents)
on a CD-R/RW or DVD/RW. To write files to a medium simply drag and drop
them from the 'My Computer' section into the upper half of the NeroLINUX
window or from your favorite file manager into the file system editor (use the first
in the list of icons to the lower left of your NeroLINUX window). You can delete
files, create directories and rename files or directories by selecting the relevant
files and right clicking on the mouse to display a menu containing several options.
NeroLINUX Basic functionality and Interface concept •••• 20
Page 21

If you select the root item of the file system editor's file tree and select rename,
you can set your data track's Volume ID.
Please, make sure your file system is part of NeroLINUX's destination track list.
The 'NeroLINUX File system' located in the 'Filesystems' folder in NeroLINUX's
source area is the track-representation of the virtual file system you just edited.
The ISO file system is added to the track list automatically if it is empty when you
start editing the virtual file system. If you want to write a different file system on
your medium, just drag and drop one of the other available file systems into the
track list. When you are finished, click the "Record" button in NeroLINUX's
toolbar. Notice that the recording options panel will also give you some control
over the recording process. You can specify not to finalize a medium or to write a
multisession TOC7 . You can also select the writing speed and whether or not to
eject and/or reload the medium after recording.
3.2 Burning images
It has become common to distribute software, esp. Linux distributions in the form
of so-called ‘Images’. These images can be in various format and NeroLINUX
recognized ISO, NRG and CUE images.
To burn these files to a CD or a DVD using NeroLINUX, first make sure that the
recording options are correctly set - especially the recording medium type - and
then click on the ‘Burn Image’ item in the ‘Recorder’ menu. Select the image file
you want to burn in the file selection dialog that pops up and click on ‘Ok’.
Please note that some CUE files might not be burnable under Linux, due to some
character case problems. If you encounter such a problem, just edit the .cue file
and make sure the character case of the binary files is correct.
Please note that when you are burning an image, the following recording options
are ignored, as they are part of the image file:
CD TEXT (Part of the image file)
Burn as CD EXTRA (Part of the image file)
Bootable options (Part of the image file)
3.3 Making an image bootable
The boot structures of a disc following the El-Torito standard are part of the
image file so whenever your image file is bootable the disc you create from it will
automatically become bootable as well.
NeroLINUX Basic functionality and Interface concept •••• 21
Page 22

3.4 Audio CD recording (Creating CDs playable on
your Home Stereo from other CDs, MP3, WAV
etc.)
NeroLINUX provides two general methods for creating an audio track: you can
build it from a file or taking an existing audio track from another CD.
If wish to build the audio track from a file, all you need to do is to select the audio
file you want to record from NeroLINUX's file system tree and drag and drop it
down into the track list (the pane connected to the second icon in the destination
area). You will see an entry being added to the track list reading the filename of
the audio file it was built from and the audio track size in bytes to the right.
Notice, that you can only use audio files that NeroLINUX can recognize. The
default configuration supports MP3, OGG and WAV files but it is also possible to
add others (see 'advanced configuration'). Note, that NeroLINUX needs some
additional command line tools to be installed on your system to be able to work
with MP3 and OGG files. See section “Software Requirements” for more details.
Taking an existing audio track from another CD is not really much different.
Instead of selecting a file from the file system tree you select a track from one of
the CD-ROM drives listed in the 'CD-ROM Drives' tree in NeroLINUX's source
area.
To copy audio tracks on-the-fly using NeroLINUX you must clear the 'Precache
audio tracks' check box in NeroLINUX's preferences:
NeroLINUX Basic functionality and Interface concept •••• 22
Page 23

You can also freely combine audio tracks coming from another CD and tracks
created from MP3 files as you desire.
You can rearrange the tracks in NeroLINUX's track list to make
the playing order more interesting. To do so, drag the tracks around in the list and
place them in your preferred order. The tracks are always inserted into the track
list at the point where you release your mouse button.
Audio CDs created with NeroLINUX are playable with any audio CD-Player
unless they are multisession discs (which might work with some players) or not
'finalized' (the lead-out has not been written).
Please note, that not all types of media can be played on every CD-Player.
Some older CD-Players might not be able to play CD-Rs because CD-Rs do
not reflect the laser light as well as normal compact discs. Some DVDPlayers cannot play CD-R/RW media. No CD-Player older than 5 years will
support this medium type. Always consider the intended use of your
burned CDs when choosing the medium type.
Important hint: It is possible that NeroLINUX will sometimes not be able to
calculate the playing time of an MP3, OGG or WAV file correctly. Especially
concerning files containing small defects (e.g. an MP3 file transmitted over
digital radio etc.). If you realize that the calculated playing time of your MP3
as displayed in the track list differs from its real playing time, drag and drop
it into the track list with your right mouse button continuously pressed.
This will make NeroLINUX precache your MP3 file which will make
NeroLINUX know the real size of the raw audio stream as decoded by e.g.
mpg123 or ogg123.
Once you have arranged your track list you can select which recorder settings to
use. NeroLINUX lets you choose from several recording modes.
NeroLINUX Basic functionality and Interface concept •••• 23
Page 24

3.5 Recording Modes in NeroLINUX : How to use
NeroLINUX for Disc-At-Once recording
The Disc-At-Once mode is the most elaborate recording mode for Audio-CDs.
Only in Disc-At-Once mode is it possible to record CD-TEXT as well as CDs not
containing a gap of 2 seconds between your audio tracks.
Track-At-Once is the mode of choice for data CD Mastering. It allows
multisession discs to be created and works with a huge quantity of recorders,
even the very old ones. To switch between both recording modes, simply
check/uncheck the 'Disc-At-Once' flag in NeroLINUX's recording options.
3.6 Creating a CD EXTRA or a Mixed Mode CD
CD EXTRA and Mixed Mode CDs are discs that contain audio tracks and also a
data track. The difference is that CD EXTRA can be played back on your home
stereo, as the data track is located at the end of the disc, on a separate session.
In case of a Mixed Mode CD, all the tracks are located in one session and the
data track is always the first track on the disc.
NeroLINUX Basic functionality and Interface concept •••• 24
Page 25

The process of creating a CD EXTRA or a Mixed Mode CD with NeroLINUX is a
mere combination of the steps described in Section 3.1 “Making a CD or DVD
from files stored on your computer's ” and Section 3.4 ”Audio CD recording
(Creating CDs playable on your Home Stereo from other CDs, MP3, WAV etc.)”.
Remember, the data track edited in NeroLINUX's file system editor can be found
in the 'Filesystems' section of the source area. Add the audio tracks you need to
the track list.
After that, check the ‘Burn as CD EXTRA’ check box in the recording options
pane. This check box is only active when a compilation contains both data and
audio tracks. If you want to burn your CD as a CD EXTRA, just make sure that
this option is set. In the other case, your CD will be written as a Mixed Mode CD.
NeroLINUX Basic functionality and Interface concept •••• 25
Page 26

3.7 How to copy a CD or a DVD
To copy a CD or a DVD using NeroLINUX, make sure that your recording options
are correctly set and then click on the ‘Copy’ button in the toolbar or select the
‘Copy Disc…’ item in the ‘Recorder’ menu. The following window appears :
On this window you can find different panes that let you set up your copy
parameters:
On the first one, you can select the temporary image parameters. This image
will be used when you do not want to copy a media on the fly.
The second pane lets you select the copy options. Make sure the source
device and medium type is correct.
Finally the last pane shows you some read options.
Once you have selected the correct settings for the disc you want to copy, just
click on the ‘Copy’ button.
If you have a doubt about the media inserted in one of your devices, just click on
the ‘Disc Info’ button.
3.8 Working with rewritable media
You can work with rewritable media the same way as with normal discs within
NeroLINUX. There is really just one thing you will need in addition to the normal
functions if you are using rewritable media: disc blanking.
To blank a rewritable medium with NeroLINUX, select the 'Erase Rewritable Disc'
item in the ‘Recorder’ menu. Note that NeroLINUX supports two ways of blanking
discs: a full blank and TOC only blank.
NeroLINUX Basic functionality and Interface concept •••• 26
Page 27

A full blank means that all data on your medium will be erased. Depending on
your recorder’s speed this can take as long as your disc's maximum playing
time.
A TOC only will fool the recorder into seeing a blank medium when really just
the first few sectors are blank. Clearing a disc this way is takes less than a
minute with modern recorders.
NeroLINUX Basic functionality and Interface concept •••• 27
Page 28

3.9 Managing multisession discs
The following section will explain how to create multisession discs.
3.9.1 A introduction to how Multisession is done in general
When the first CD-ROMs were released, there were no CD-Recorders and there
was no way to alter the contents of a written CD. There was no way to append
files to backups done with the CD-Recorder, even though there was visibly more
space on the disc. Because the CD was traditionally a write-once medium, there
was no easy way to just append data to it. The result was that a slightly modified
type of TOC was created, containing an additional field with a pointer beyond the
currently written area of the CD so CD-Recorders would know where to continue
writing.
3.9.2 How to start a Multisession disc
In order to create a multisession disc, first, edit your file system as described in
section “Making a CD or DVD from files stored on your computer's ”. After clear
the ‘Finalize disc’ check box in the recording options.
3.9.3 How do I append to a multisession disc?
Insert the multisession disc you want to append data to into your recorder and
click the 'Import' button in NeroLINUX's toolbar or select 'Import session' from the
'Edit' menu. You will then be asked to select the session you want to import with
the following dialog box. Please note that until you choose a valid importable
session the ‘OK’ button will be disabled.
NeroLINUX Basic functionality and Interface concept •••• 28
Page 29

As soon as you have chosen the session you want to import, click on ‘OK’. After
a few seconds the contents of the imported session should appear within the file
system editor. Note, that all files from the previous session are marked in blue in
order to distinguish them from files from the session currently being edited.
NeroLINUX Basic functionality and Interface concept •••• 29
Page 30

You can replace files from the previous session, in which case their color will
change to black or you can rename or delete files from the previous session.
When you are finished editing, click on record. You can repeat this process until
all available space on your disc has been consumed if you leave the ‘Finalize
disc’ option unchecked.
Be aware that every session on a disc will require approximately 15 MB of
additional space for the lead-out stored separately for every session. Try to
collect any files on your hard disk and write them to the CD collectively to save
space.
NeroLINUX Basic functionality and Interface concept •••• 30
Page 31

4 Advanced functions
4.1 Creating a bootable CD or DVD
Bootable media according to the El-Torito standard is the standard for creating
bootable discs for standard PCs. Using the floppy emulation mode, your PCs
BIOS provides some basic CD-ROM access functions that can read out an image
file of a bootable floppy disc stored on your disc.
Using this image, your BIOS will transparently emulate a normal floppy disc in
this mode of operation, e.g. when making your disc bootable using an image of a
DOS boot disk, this image will be visible to your system as drive 'A:' once booting
is done. Note that floppy emulation as well as any other emulation only works as
long as the BIOS is being used to access your disk drive.
With this concept in mind it should be pretty easy to create a bootable disc with
NeroLINUX. Select El-Torito bootable disc from the 'Boot' options in the 'ISO
Options' section and click on Boot options. In the dialog that appears you can
then either select an existing image file of a bootable device, like a DOS boot
disk, or you can select a bootable partition to create a boot image on the fly. If
you have some special needs, you can fine tune the options for creating the
bootable disc in the ‘Expert Settings’ sections of the boot options dialog.
NeroLINUX Advanced functions •••• 31
Page 32

Note, that you do not need NeroLINUX’s bootable media creation capabilities in
order to make a disc image bootable. Those images are either bootable out of
their own right or they are not. See Section 3.3, ”Making an image bootable” for
further information.
4.2 The concept of Precaching
It is less common that people find themselves in the situation where they cannot
record an MP3 file to a CD because their computer simply cannot manage to
decode the MP3 stream as fast as their recorder needs its raw audio stream. But
just imagine you want to make a copy of a very old, worn out compact disc . No
CD-ROM drive will be able to read those CDs accurately within a time that would
satisfy your recorder.
In NeroLINUX, there is a way around this. You can enable precaching for a
particular track type in NeroLINUX's 'Preferences' which will then apply to any
track of that type. Alternatively, you can hold down your right mouse button when
dragging your files/tracks to the Track Editor. This concept also works for the file
system editor. Just imagine you want to create a backup of an old word
processor's installation discs. 1.44" Discs have always been inclined to forget
about their contents after a few years. Precaching the whole ISO9660 file system
will not prevent this because you need to change discs quite a few times while
creating the file system. Again, the solution is to just hold down your right mouse
key while adding the files on your discs, which will make NeroLINUX precache
those individual files.
4.3 Track to file conversion
While functionality to convert tracks to files is provided by most CD recording
programs, few let you decide as accurately as NeroLINUX, how you want them
converted. If you want to store your favorite audio CD's contents on your hard
disk as MP3 files, you can do the following: Drag and drop any track down to the
file system editor and it will be converted into its default file type automatically.
Dragging it with the right mouse button pressed will prompt you with a popup
menu to choose a specific file type to be created.
If you do not want to add your track to the file system editor but want to store it
into a directory on your hard drive, you can select all the tracks you want and
press the right mouse button. Simply select 'Encode Track as ...' in the popup
menu. You will be prompted for a destination directory and the file type you want
to convert to. Note that encoded files will automatically get their filenames set
appropriately if your computer is connected to a freedb server. ID3 Tags will be
set only if a tool called MP3info is installed on your system. Currently, only the
track editor, not the track lists in the source area have a popup menu attached to
them. In order to convert a track to a file you have to drag and drop it into the
track editor first.
Hint: You can also use NeroLINUX's file conversion scheme to convert existing
files of a certain type on your hard drive. Just drag and drop the files you want to
NeroLINUX Advanced functions •••• 32
Page 33

convert down to the Track Editor. This will convert them into tracks. Just follow
the steps above to convert to whatever file type you want.
4.4 Adding a new file type to the NeroLINUX file
types registry
NeroLINUX supports a very versatile way of burning arbitrary (mostly audio) file
types to a CD or DVD. All you need to do to let NeroLINUX make an audio track
out of an audio file is to specify a command line program capable of converting
files of the desired type into some raw 16Bit, 44.1 KHz, and Stereo sound signal
apt for CD recording. The following chapter will explain what to do if you want to
implement support for an unsupported file type in NeroLINUX.
NeroLINUX can convert arbitrary files directly into a track on the medium that is
to be mastered. To accomplish that, NeroLINUX has a 'File types registry'.
Imagine this as the somewhat modified idea of a Mime-Type database, specifying
decoders for each of the referenced file types. You can reach NeroLINUX's file
types registry by entering the preferences and selecting the 'File Types' pane.
NeroLINUX has an entry in this list for each file type supported. By default, you
will find an entry for MP3, ogg-vorbis, WAV, and shorten. Basically, NeroLINUX
needs to know two important things about your file :
the decoder to use for
how to calculate the track size
NeroLINUX Advanced functions •••• 33
Page 34

4.4.1 Specifying the decoder
This first point splits up into some basic information about the type of data your
decoder plug-in will deliver and what NeroLINUX is to make of it.
First, is the Track Type: It can be one of data or audio and will tell NeroLINUX
which type of track it is to create. The PC flag specifies whether NeroLINUX is to
precache files of this type prior to burning. If your recorder does not support some
way of buffer-underrun protection and is rather fast, it can easily happen that your
computer is unable to decode e.g. an MP3 file quickly enough. Just turn on the
PC flag in this case and everything is alright.
Next, NeroLINUX needs to know which endianness the output of your decoder
has: Unfortunately, this may depend upon your system's endianness, e.g.
mpg123 will output little endian on Intel compatible systems while it will output
big endian on e.g. PowerPC systems. Either way, NeroLINUX has to know
about the endianness, otherwise you will hear nothing but static. Simple
approach: If you hear static while trying to preview your track, change the
endianness in your decoder settings.
Now for the most important thing: you have to specify the name of a command
line tool capable of decoding your file type. Ideally, it should be able to receive its
input through stdin and send its output to stdout. In most cases, it is sufficient if
sending output to stdout is supported. You can specify $filename in this case
which will be replaced by the respective file on your hard drive.
Note, however, that future extensions like burning directly from ftp servers will not
be supported using that scheme. The output produced by your decoder must be
16Bit, Stereo, 44.1 KHz. If your decoder cannot create this type of signal, you can
use a chain of decoders to accomplish that goal by specifying multiple command
line decoders, separated by the '|' (piping character).
4.4.2 Calculating the track size
Calculating the track size is extremely important for on-the-fly recording as
NeroLINUX has to know how big the track is going to be prior to actually
decoding your file. To find out about the track size, NeroLINUX has a few built-in
methods referenced by $filesize, $mp3size and $wavsize. All three of them are
pseudo-variables which change their value according to the track's properties.
Apart from that, NeroLINUX supports calling an external program to detect the
track size and provides basic parsing functionality for arbitrary output. The last
two fields in a decoder entry are responsible for that.
The first one specifies the command line program whose output is to be
parsed
The second one specifies the function used to translate the output into a
number representing the length of the track in Bytes.
While the first field may remain blank if you do not need an external tool for track
size calculation, the second field must always contain a function resolving to the
track size in bytes.
If you need to specify an external tool for track size calculation, the first thing you
will have to do is to setup the calling syntax for that program. Enter what you
would type on the command line to retrieve e.g. the playing time of your file with
NeroLINUX Advanced functions •••• 34
Page 35

the filename replaced by '$file'. Do not forget to include the quotation marks as
well. These are required in case the filename of your file contains spaces.
You must then parse the output of your program. Apart from a few mathematical
functions like abs, int, sqrt, sin, cos, tan and C-Style boolean operators,
NeroLINUX supports two powerful ways of retrieving your command line tool's
output:
getpos(y,x)
regexp('regular expression').
As the latter will always produce strings as its function result, you have to use the
strval('string') function to convert a string to a number. The basic idea of this
whole concept is that you can assemble the track length in Bytes from the output
generated by your external program using some mathematical function. For
example, if your command line tool will generate the following output if called with
tracksizetool -filename '$file':
Tracksizetool Version 1.03, Copyright 2001 by Arthur Dent
Playing time of file '/home/ghost/something.ext' is
00 Hours, 2 Minutes, 23 Seconds, 43 Frames
You can use the getpos() function to calculate the track size. To understand what
this function does,, imagine the output generated by tracksizetool as a grid of
numbers: getpos(3,1) will return '00' in our example. getpos(3,2) will return '2' and
getpos(3,3) will return '23'. Generally, getpos(y,x) will return the x-th number in
the y-th line of output. Consequently, we can get the number of frames with
getpos(3,4).
One frame is 1/75th of a second and 2354 Bytes of audio data. So if you know all
you need to know about our file now: the following function will resolve to our
track size in Bytes (for the 44.1kHz,16 Bit, Stereo stream required by
NeroLINUX):
((getpos(3,1)*3600+getpos(3,2)*60+getpos(3,3))*75+getpos(3,4))*2354
Enter this line into the last field of your file type registry entry and the process is
complete. On the other hand, not all command line tools will create output
parseable by the getpos(y,x) function. In this case, you need to use the regexp()
function. Suppose our output will look something like:
Tracksizetool Version 1.03, Copyright 2001 by Arthur Dent
Playing time of file '/home/ghost/some08minuteslongfile.ext' is 00:08:03.23
This is an example of a particularly awkard filename as it contains numbers as
well and will confuse getpos() when retrieving the different parts of our playing
time. So you use a regular expression for this. The result of the regexp('exp')
function is always the first part of the expression put into brackets, e.g.
regexp('.*:([0-9]*):.*') will return the minutes part of our playing time for the output
above as a string. Pass this through the strval() function and you have what you
want. For the example above, the track size calculation function will read
something like this:
((strval(regexp('.* is ([0-9]*):[0-9]*:[0-9]*.[0-9]*$'))*3600+strval(regexp('.* is [09]*:([0-9]*):[0-9]*.[0-9]*$'))*60+strval(regexp('.* is [0-9]*:[0-9]*:([0-9]*).[09]*$')))*75+strval(regexp('.* is [0-9]*:[0-9]*:[0-9]*.([0-9]*)$')))*2354
NeroLINUX Advanced functions •••• 35
Page 36

Note that each of the specified time fragments is being put into brackets once.
NeroLINUX Advanced functions •••• 36
Page 37

5 Frequently asked Questions
Some things just cannot be covered in the standard documentation.
Unfortunately the documentation is the last place the average user looks for a
solution to their problems. Here you can find answers to some FAQ's or
Frequently asked Questions about NeroLINUX
5.1 Audio CDs created with NeroLINUX are playing
fine on my computer but are not recognized by
my stereo
Make sure you have toggled the 'Finalize CD' check box in NeroLINUX's
recording options pane while creating your CD. Scan NeroLINUX's recording
terminal for eventual error messages while finalizing your disc.
If none of the above applies, you are probably using a very old CD-Player that
cannot handle CD-R/RW discs. Unfortunately the only solution to this problem is
to upgrade your CD-Player. Some DVD-Players are not capable of handling CDR/RW media while they are capable of playing regular audio CDs. This is just one
of the many things you should take care of when buying a DVD-Player.
Finally, some very bad quality blank CD-Rs cannot be read by some audio CDPlayers. This is because the organic layer used for recording you music is very
thin on those CD-Rs and your CD-Player's laser might look straight through it.
Using a lower recording speed might sometimes solve this issue.
5.2 When writing audio files, I get a lot of silence at
the end of the track or I get tracks that consist of
nothing but silence
This generally means that the audio file you tried to record was corrupt in some
way. Although mpg123 tries hard to play defective MP3s, it will sometimes get
out of sync and stop playing entirely.
Please also check whether your distribution links from mpg123 to mpg321, which
is a free replacement of mpg123. mpg321, is currently not as stable as mpg123
and will most of the time make NeroLINUX crash.
NeroLINUX Frequently asked Questions •••• 37
Page 38

5.3 When copying audio tracks from other CDs, I get
nothing but silence or the tracks seem to be
incomplete
See question “When writing audio files, I get a lot of silence at the end of the
track or I get tracks that consist of nothing but silence” for possible reasons for
this behavior.
5.4 I can't write multisession discs
Please follow the instructions of the “Managing multisession discs” section in the
NeroLINUX manual.
5.5 I can't hear anything when dragging an audio file
or a track to the preview player but recording
works perfectly well
There is probably a problem with your system's or NeroLINUX's audio
configuration. Please enter NeroLINUX's preferences setup and change the
audio output driver. ESD mode only works if the Enlightenment sound daemon is
running in the background.
If you still cannot hear anything, please check your system's sound setup (e.g. if
the kernel sound module is being loaded correctly) and make sure that no other
applications are blocking your sound hardware.
5.6 NeroLINUX is making awful noises instead of
playing tracks
This is probably due to a misconfigured Enlightenment Sound Daemon (ESD) on
your system. To solve this problem you should switch from 'Enlightenment Sound
Daemon' to 'Open Sound System' in the ‘Audio Setup’ pane of NeroLINUX's
preferences dialog.
5.7 NeroLINUX keeps recording a 2 seconds pregap
between tracks which is inappropriate for the
type of content I'm recording
Please check the 'Disc-at-once' option in NeroLINUX's recording options.
NeroLINUX Frequently asked Questions •••• 38
Page 39

5.8 NeroLINUX seems to be notoriously trying to
open a network connection to some server. Does
it have some sort of built-in Trojan transmitting
my data to some remote database?
This is just the freedb routine trying to identify the CDs in your disc drives. You
can deactivate this routine in the preferences dialog of NeroLINUX.
5.9 I tried to burn a disc with a few files on it. When I
clicked on record, NeroLINUX went through all
the files and recorded them onto the disc.
However, I cannot mount the result. What went
wrong?
You probably added your files to the Track Editor rather than the File Editor with
the result that NeroLINUX created a CD containing several data tracks each
being a copy of one of the files you added (just as if those files had been track
images). Add your files to the file system editor and your media will work
correctly.
5.10 NeroLINUX is running fine on my root account
but it only causes error messages if run from my
normal user account or it doesn't display any
tracks for my CD-ROM drives. Aren't Linux users
supposed to do their daily work as a normal
user?
True. However, NeroLINUX requires the user to have access privileges to the
devices which are not granted to normal users by default within any standard
setup.
See “Setting correct permissions on the devices files” section in the NeroLINUX
manual for more details about how to do this.
5.11 Burning a DVD takes too much time
This is probably due to the fact that you are using a 2.4 kernel and that your DVD
recorder is configured to use the ‘ide-scsi’ driver. Updating your kernel to a 2.6
one and then configure your DVD recorder so that it uses the ‘ide-cdrom’ driver
should solve this problem.
NeroLINUX Frequently asked Questions •••• 39
Page 40

5.12 My external USB/FireWire recorder hangs when
recording a disc
This is due to the USB/FireWire driver controlling your device. Updating your
kernel should solve your problem. You can have a look to your Linux
documentation for more details about kernel updates.
5.13 My USB recorder hides another device when it is
plugged in
This is due to the kernel USB mass storage driver that is buggy. Updating your
kernel should solve your problem. You can have a look to your Linux
documentation for more details about kernel updates.
5.14 I get the error message “HDIO_SET_DMA: failed:
Operation not permitted” when I try to enable
DMA acceleration
This is a Linux kernel problem. Update your kernel and make sure that you have
support for your IDE chipset and for DMA acceleration on all type of devices.
NeroLINUX Frequently asked Questions •••• 40
Page 41

6 Support
Useful links
Nero AG Homepage
Online Shopping
Updates
NeroLINUX Support •••• 41
Page 42

7 Glossary
Buffer underrun
To burn a CD, there must be a continuous flow of data. If the data stream
between the computer and the recorder is so small that its internal buffer is
empty, the writing process is interrupted, as there is no data available to write to
the CD.
CD-Text
As well as audio data, there is space on the CD for a wide variety of additional
information, such as text describing the title and artist on each track. Currently
very few audio CD players have a CD text function. If an audio CD player does
not support CD text, it can play CDs with CD text in the same way as it does
"normal" audio CDs without CD text. This is possible because the additional CD
text information is stored before the start of the audio data in the lead-in area of
the CD.
CD-Extra
CD-i
You must have a CD recorder which supports CD text in order to be able to write
CD text to a CD. You can only write CD text in DAO recording mode (disc-atonce). You can find out whether your recorder supports this feature in the
NeroLINUX 'Choose Recorder' dialog box.
CD-Extra is a Blue Book standard recording format. It was previously called CDPlus and CD-Enhanced (Enhanced CD). This format has none of the
disadvantages of standard mixed mode CDs. On mixed mode CDs the first track
always contains an ISO file system, which means that audio CD players cannot
play the first track of this type of CD. In contrast, CD-Extra has two sessions.
The first session contains up to 98 audio tracks conforming to the Red Book
standard. The second session contains the ISO track with the ISO9660 file
system and the directories CDPLUS and PICTURES. This means that CDs in
CD-Extra format can be played on both CD drives and audio CD players, as the
second session cannot be "seen" by the audio CD player.
The CD-i format (Compact Disc Interactive) was developed by Philips and Sony
and is described in the Green Book. This format is particularly suited to the
creation of interactive multimedia applications. These applications consist of sub-
NeroLINUX Glossary •••• 42
Page 43

programs which can access animations and video and audio sequences. Usually
special players with television screens are used to play CD-i media.
DAE
DAE is the acronym for Digital Audio Extraction. This means that the music tracks
on audio CDs are read in digital format. This is also referred to as audio grabbing.
Not all CD-ROM drives can read music in digital format. Generally, CD-ROM
drives read music tracks in analog format (via the sound card). Using the Nero
CD/DVD Speed program, you can measure the DAE quality of CD drives.
Dependencies
Most program packages coming with a Linux Distribution rely heavily on other
packages. For example, The Gimp, the well-known UNIX image editing program,
requires a library called GTK+ which contains code to visualize dialogs, buttons
etc. In a Microsoft Windows(TM) environment most software packages provide all
the libraries they need themselves. Those libraries are usually copied into the
Windows system directory by the installation routine, a process which not only
requires the user to reboot his machine once the installation procedure has
finished but also increases both the lack of stability of your system and the size of
the software package you want to install. Just imagine two different programs
using the same library in different versions. As windows cannot handle different
versions of the same DLL files effectively, one program ends up overwriting the
library of the other with the consequence that one of the two will usually become
very unstable or will refuse to start at all. To overcome this problem in a
Linux(TM) environment, shared libraries are usually separated from the programs
using them and put into a different library. To avoid a situation in which a program
is installed that needs a certain library which is not, the program's package will
have a dependency set to the library it needs somewhere in the package header.
Thus, the package manager program knows what it takes to make the program
run and can either refuse to install the program or try to install the missing library
as well.
Disc-at-Once
This is a write process which does not create links between the individual
sessions. The recorder starts by writing the lead-in, which is followed by the data
and the lead-out. This process is used primarily by manufacturers of audio CDs.
Disc-at-Once/96 is an extension of Disc-at-Once which gives the software better
control of the burning process. This mode is preferable, if it is available.
DVD
DVD stands for Digital Versatile Disc. It was originally referred to as Digital Video
Disc.
The purpose of developing DVDs was to create a medium which could hold
significantly more data than a CD-ROM. You can store two layers of data on each
side of a DVD. The first layer can hold 4.7 GB and the second layer 3.8 GB,
which means that a single-sided DVD can store 8.5 GB of data. DVDs can only
be read by DVD drives, which can also read CD-ROMs. Unfortunately many DVD
drives are not able to read CD-Rs. Even fewer can read CD-RWs.
NeroLINUX Glossary •••• 43
Page 44

Currently the following types of DVD are available:
DVD-Audio: A high capacity audio medium.
DVD-R: DVD-Rs can store between 3.95, 4.7 and 9.4 GB of data. In order to
store 9.4 GB, you must use the second side of the DVD-R which means that
you have to turn it over.
DVD-RAM: This is a rewritable medium which can store either 2.6 GB (one
layer) or 5.2 GB (two layers) of data.
DVD-ROM: This is the data medium.
DVD-RW: This is a rewritable DVD which can be read by almost any standard
DVD-ROM drive or DVD player. DVD-RW drives can also read and write to
DVDs which are not rewritable. DVD-RWs have a storage capacity of 4.7 GB.
The difference between these and DVD-RAMs is that they can also be played
in standard DVD-ROM drives and standalone DVD players.
DVD+RW: This is a rewritable DVD which can be read by almost any standard
DVD-ROM drive or DVD player. DVD+RW drives can also read and write to
DVDs which are not rewritable. DVD+RWs have a storage capacity of 4.7 GB.
The difference between these and DVD-RAMs is that they can also be played
in standard DVD-ROM drives and standalone DVD players.
DVD-Video: DVD-Videos contain full-length feature films with high audio and
video quality. The videos are encoded in MPEG-2 format.
El Torito
Fast copying
Finalizing
Additional information:
The UDF (Universal Disc Format) file system is used on DVDs. However the
data can also be accessed via an ISO9660 data system which is also included
on the DVD.
DVD format no longer corresponds to any of the formats specified in the
colored books.
El Torito is a specification which describes the structure of a CD used to boot a
PC. A PC with a suitable BIOS can start the operating system from the CD and
therefore does not need a floppy disk or a hard disk.
This is a write process which does not involve storing the data to be written to the
CD on the hard disk first. The data is written directly onto the blank CD. Another
term used for fast copying is "on the fly".
Finalizing is similar to fixing, but applies to the entire disc. No additional data can
be written to a finalized disc. When you burn a CD or DVD in DAO mode, the disc
is automatically finalized. However, the data on a finalized CD-RW can still be
deleted (by choosing the Erase Rewritable item from the Recorder menu).
NeroLINUX Glossary •••• 44
Page 45

Firmware
Fixing
Image file
Grabbing
The firmware in recorders (CD/DVD-ROM drives) functions as the operating
system of the drive and contains instructions which determine how the drive
reacts to commands from the computer. The firmware of the latest recorders can
generally be upgraded. For example, Nero AG's website contains a page with
links to the latest firmware versions. To see the firmware version of your drive,
use the ‘Choose Recorder’ item on the Recorder menu in NeroLINUX.
Fixing is similar to finalizing, but applies only to an individual session rather than
to the whole CD. Fixing means closing the session which has just been written,
so that it can be read. To do this, the lead-in and lead-out data are written to the
disc. In the current version of NeroLINUX, sessions are always fixed
automatically.
This is a writing process which involves creating a physical image of a file. The
contents of the image correspond exactly to the data which will be written to the
CD.
Grabbing is digital audio extraction that is reading audio tracks on a CD in digital
format.
Index positions
You can set index positions within an audio track. These index positions allow
you to move to specific points within the track using an audio CD player.
Unfortunately, very few audio CD players have the functionality which allows
them to move to index positions.
Please note that index positions are not the same as the start and end of tracks.
All audio CD players can move from one track to another on a CD, but very few
can read and move to index positions within a track.
Hybrid CDs
A hybrid CD contains files for more than one operating system. Generally, the
term hybrid CD is used to refer to CDs which can be read by PCs running
Windows and by Macs. If the data is to be accessible to both operating systems,
there must be two copies of it on the CD.
Lead-in
This is an area at the beginning of each session. However, it is only written to the
CD when the session is completed. The lead-in contains the table of contents
(TOC) of the session.
NeroLINUX Glossary •••• 45
Page 46

Lead-out
m3u playlist
This is an area at the end of each session which is written at the same time as
the lead-in.
An m3u file contains a list of MP3 file paths. An m3u file can be created, for
example, by NeroMIX or WinAmp.
Mixed mode CDs
A mixed mode CD has one initial data track followed by audio tracks. This usually
means that audio CD players cannot process the first track. If you are creating
audio CDs to be played on a CD player, it is better to use the CD-Extra format,
because on this type of CD the data follows the audio tracks.
MP3 / mp3PRO
MP3 is an acronym (or file extension) for "MPEG Audio Layer 3". These are
compressed audio files which can be played on a computer using an MP3 player.
(MPEG stands for Motion Pictures Expert Group, which is a US standards
organization responsible for full motion video standards.) MP3 was developed by
the Fraunhofer Institute IIS and is restricted to audio data, in the same way as
mp3PRO, which was developed by Coding Technologies.
The quality of the signal depends on the compression rate. The standard rates
are 64 kbps at 44100 Hz stereo for mp3PRO and 128 kbps at 44100 Hz stereo
for MP3. During the encoding process the original WAV file is generally reduced
to about 5 percent of its original size in mp3PRO format and to about 10 percent
in MP3 format. The encoding process is lossy, but the psychoacoustic models
remove only those parts of the audio file which are considered to be inaudible.
Audible parts of an audio file can only be lost at a high compression rate.
mpg123
Due to some miscommunication between mpg123 and NeroLINUX it is currently
not possible to convert single-channel MP3 files into audio tracks with
NeroLINUX. mpg123 doesn't provide an option to force the creation of a raw
stereo stream and there's no way NeroLINUX can get the information that a
stream is either mono or stereo from mpg123. The file type registry will support
one more field for determining the track format in future versions, though.
Nero (Nero Claudius Caesar)
Nero was born in 37 A.D. and died in 68 A.D. He was Roman emperor from 54 to
68 A.D. He was the son of Agrippina, and was adopted by the Emperor Claudius.
Seneca was appointed as Nero's tutor and Nero was brought up by his stepfather
to be his heir. In 53 A.D. he married Octavia, Claudius' daughter. The first years
of his reign were relatively calm, largely due to the influence of Seneca. Nero
respected the Senate and the existing order. Poets hailed him as the initiator of a
new golden age. Later he had his mother Agrippina murdered and banished his
wife who had not provided him with an heir. He became increasingly tyrannical
and rid himself of his more levelheaded advisers. He made eccentric public
appearances as an artist and charioteer, he prosecuted citizens for treason and
NeroLINUX Glossary •••• 46
Page 47

after the great fire in Rome in 64 A.D. threw suspicion for having started it on the
Christians. The suspicion that Nero himself started the fire cannot be proved, but
it indicates what his citizens thought he was capable of. However, there was no
real systematic persecution of Christians, since the events which took place were
restricted to the city of Rome. After the failure of plot against Nero hatched in the
Senate and lead by Piso, repression increased. Uprisings in Gaul, Spain and
Africa caused the Praetorian Guard to withdraw its allegiance to Nero. The Guard
then declared its support for Galba as emperor and the Senate declared Nero to
be hostis populi Romani (an enemy of the Roman people), upon which he
committed suicide. His death marked the end of the Julian-Claudian imperial
dynasty.
On the fly
This is a write process which does not involve storing the data to be written to the
CD on the hard disk first. The data is written directly onto the blank CD. Another
term used for on the fly is "fast copying".
Packet CD / Packet writing
This is a write process which involves sending the data in blocks to the CD-RW
drive without first creating an image file. The CD-RW drive is used in the same
way as a hard disk or floppy disk, which means that any application can write the
data to the CD. CDs created using packet writing can only be read with a special
UDF driver.
PCM
Pre-gap
Session
Simulation
PCM is the main standard for digitizing audio files and speech. PCM stands for
pulse code modulation and involves digitally encoding analog signals.
This is also referred to as a pause. It is the area on a CD which separates one
track from another. In Nero the default pause is set to 2 seconds (Red Book
standard).
CDs are divided into tracks and sessions. A session consists of all the files which
are written to the CD in the course of one write process and can consist of one or
more tracks. There can be more than one session on a multisession CD.
Simulation corresponds to the process of writing data, except that no data is
written. Simulation is used to check whether the data can be sent to the recorder
quickly enough to avoid a buffer underrun. It can also be used to check whether
the recorder can actually write to the CD. You should use simulation when you
are not sure whether the system can send the data quickly enough. If you have
already burnt a few CDs successfully, you can switch off simulation. If your
recorder has a buffer underrun protection function, you do not need to use
simulation.
NeroLINUX Glossary •••• 47
Page 48

Track
On an audio CD a track corresponds to a piece of music. On a data CD a track is
a unit of data which joins consecutive sectors together.
Track-at-Once
This is a method of writing data which is used for multisession CDs. The CD-RW
drive writes all the tracks one after another and does not end the session until
this is finished.
UDF (Universal Disk Format)
This is a file system developed by OSTA (the Optical Storage Technology
Association). With a UDF driver and packet writing, data can be written to a CD
drive in the same way as to a hard disk or floppy disk drive.
Volume descriptor
The volume descriptor is added to every CD track. It contains information such as
the creation data, the publisher, the title etc. The volume descriptor has a special
significance for formats such as Video CD, Photo CD and CD-i. The volume
descriptor on these types of CD includes information about the program to be
used for reading the data on the CD.
Virtual Image
A virtual image is a project file which contains only references to the files which
are to be written to CD.
VQF
VQF or TwinVQ is a process developed by NTT Human Interface Laboratories to
compress audio information. It has been developed in competition with MP3.
Yamaha calls this process Sound VG. VQF files of similar quality are smaller than
MP3 files but larger than mp3PRO files. More processor power is used in the
decoding process than is the case with MP3 files.
White Book
The White Book is a standard which is more commonly called Video CD.
XSVCD (Extended Super Video CD)
XSVCD stands for Extended Super Video CD. The difference between this and
SVCD is that the average bit rate can be anything up to 9.8 Mbit/s, whereas with
SVCD it is 2.6 Mbit/s. Unfortunately not all drives which can read Super Video
CDs support this format.
XVCD (Extended Video CD)
XVCD stands for Extended Video CD. The difference between this and Video CD
is that the bitrate can be anything up to 3.5 Mbit/s, whereas with VCD it is 1.5
Mbit/s. Unfortunately not all drives which can read Video CDs support this format.
NeroLINUX Glossary •••• 48
Page 49

Yellow Book
The Yellow Book is the standard for the format of CDs used for data storage. As
the data must not contain any errors, additional error correction data is included.
This additional error recognition and correction data is included in Mode 1. In
Mode 2 this information is not included and therefore this mode is only suitable
for less error-prone data such as the video files on Video CDs.
NeroLINUX Glossary •••• 49
 Loading...