

Page 1

Manual
Nero InfoTool
Page 2

Copyright and Trademark Information
Copyright and Trademark Information
This document, like the software described therein, is provided as a license and may only be used or reproduced in accordance with
the licensing agreement. The contents of this document, as well as the associated software, is subject to change without prior notice.
Nero AG rejects any responsibility for the correctness of the contents of this document and rejects any claims that transcend the
clauses of the guarantee agreement.
This document and all of its contents are protected by copyright and are the property of Nero AG. All rights reserved. In addition , thi s
document contains material that is protected by internationally valid copyright. This document may not be reproduced, transmitted, or
transcribed in whole or in part without the express written permission of Nero AG.
Please keep in mind that existing graphics, pictures, videos, music titles or other materials that you may wish to insert or transcribe
into projects may be protected by copyright. The unauthorized use of this type of material in your projects may violate the rights of
the owner of the copyright. Make sure that you obtain all necessary authorizations from the owner of the copyright.
Unless you own the copyright, have permission from the copyright owner or your actions fall under the "fair use" provisions of copyright law, you may be violating national or international copyright laws. The transcribing, re-formation, modification or publication of
copyright-protected material may lead to claims for damages and the enforcement of other legal measures against you. If you are
unsure of your rights, you should contact your legal advisor.
Some Nero Suite applications require technologies developed by third-party manufacturers, some of which are contained in the Nero
Suite as demo versions. These applications can be activated online free of charge or by sending an activation fax to have unlimited
use of the version. Nero will only transmit the data necessary for activation of the technology licensed from third parties. For unlimited use of Nero Suite, it is therefore necessary to have an Internet connection or a fax machine.
Copyright © 2006 - 2008 Nero AG and its licensors. All rights reserved.
Nero, the Nero logo, Nero Digital, Nero Essentials, Nero Express, Nero ImageDrive, Nero LiquidTV, Nero MediaHome, Nero PhotoSnap, Nero Recode, Nero RescueAgent, Nero ShowTime, Nero SecurDisc, Nero StartSmart, Nero Vision, InCD, Move it, and UltraBuffer are trademarks or protected trademarks of Nero AG.
Adobe, Acrobat, Acrobat Reader and Premiere are trademarks or protected trademarks of Adobe Systems, Incorporated. AMD Athlon, AMD Opteron, AMD Sempron, AMD Turion, ATI Catalyst and ATI Radeon are trademarks or registered trademarks of Advanced
Micro Devices, Inc. ATSC is a trademark of the Advanced Television Committee. ICQ is a registered trademark of AOL, LLC. Apple,
iPhoto, iPod, iTunes, iPhone, FireWire, and Mac are brands or registered trade names of Apple, Inc. ARM is a registered trademark
of ARM, Ltd. AudibleReady is a registered trademark of Audible, Inc. BenQ is a trademark of the BenQ Corporation. Blu-ray Disc is a
brand of Blu-ray Disc Association. CyberLink is a registered trademark of CyberLink Corp. DLNA is a registered trademark of Digital
Living Network Alliance. DivX and DivX Certified are registered trademarks of DivX, Inc. Dolby, Pro Logic and the double-D symbol
are brands or registered trademarks of Dolby Laboratories, Inc. DTS and DTS Digital Surround are trademarks or registered trademarks of DTS, Inc. DVB is a registered trademark of the DVB Project. Freescale is a trademark of Freescale Semiconductor, Inc.
Google and YouTube are trademarks of Google, Inc. WinTV is a registered trademark of Hauppauge Computer Works, Inc. Intel,
Pentium and Core are trademarks or registered trademarks of Intel Corporation. Linux is a registered trademark of Linus Torvalds.
Memorex is a registered trademark of Memorex Products, Inc. ActiveX, ActiveSync, DirectX, DirectShow, Internet Explorer, Microsoft, HDI, MSN, Outlook, Windows, Windows Mobile, Windows NT, Windows Server, Windows Vista, Windows Media, Xbox, Xbox
360, the Windows Vista start button and the Windows logo are trademarks or registered trademarks of Microsoft Corporation. My
Space is a trademark of MySpace, Inc. NVIDIA, GeForce and ForceWare are brands or registered trademarks of NVIDIA Corporation. Nokia is a registered trademark of Nokia Corporation. CompactFlash is a registered trademark of SanDisk Corporation. Sony,
Memory Stick, PlayStation, PLAYSTATION and PSP are brands or regi
of Sony Corporation and Victor Company of Japan, Limited (JVC). UPnP is a registered trademark of the UPnP Implementers Corporation. Labelflash is a registered trademark of Yamaha Corporation.
The trademarks mentioned here are named for information purposes only. All trade names and trademarks are the property of their
respective owners.
Nero AG, Im Stoeckmaedle 13-15, D-76307 Karlsbad, Germany
stered trademarks of Sony Corporation. HDV is a trademark
Nero InfoTool
Page 3

Table of contents
1 Start Successfully 4
1.1 About the manual 4
1.2 About Nero InfoTool 4
2 Launching the Program 5
3 Nero InfoTool Window 6
3.1 Saving and Printing the Log 9
3.1.1 Saving the log 9
3.1.2 Printing the log 9
3.2 Verifying System Requirements for Blu-ray 10
4 Technical Information 11
4.1 System requirements 11
4.2 Key Combinations 11
5 Glossary 12
6 Index 13
Table of contents
7 Contact 14
Nero InfoTool III
Page 4
1 Start Successfully
1.1 About the manual
This manual is intended for all users who want to learn how to use Nero InfoTool. It is process-based and explains how to achieve a specific objective on a step-by-ste p basis.
To make best use of this documentation, please note the following conventions:
Indicates warnings, preconditions or instructions that have to be precisely
followed.
Indicates additional information or advice.
Start Successfully
1. Start …
OK
(see…)
[…]
The number at the beginning of a line indicates a prompt for action. Carry
out these actions in the order specified.
Indicates an intermediate result.
Indicates a result.
Indicates text passages or buttons that appear in the program interface.
They are shown in boldface.
Indicates references to other chapters. They are executed as links and are
shown in red and underlined.
Indicates keyboard shortcuts for entering commands.
1.2 About Nero InfoTool
Nero InfoTool allows you to call up information about the most important features of installed
drives, inserted discs, installed software and much more. You obtain detailed data on drive
properties such as firmware
the current DVD region code. Furthermore, Nero InfoTool tells you the name and version
number of the operating system, the ASPI
and also tells you about the hardware configuration of the computer.
Nero InfoTool supports the Screenreader technology (screen reading program). This is a n
alternative user interface with which the written items can be output acoustically from the
screen.
, buffer size, serial number, production date and, for DVD drives,
manager, and the installed burning applications
Nero InfoTool 4
Page 5

2 Launching the Program
To start Nero InfoTool via Nero StartSmart, proceed as follows:
1. Click the Nero StartSmart icon.
The Nero StartSmart window opens.
2. Click the button.
The list of Nero applications is displayed.
Launching the Program
3. Select the Toolbox > Nero InfoTool entry in this selection list.
4. The Nero InfoTool window opens.
You have launched Nero InfoTool via Nero StartSmart.
Nero StartSmart window
Nero InfoTool 5
Page 6
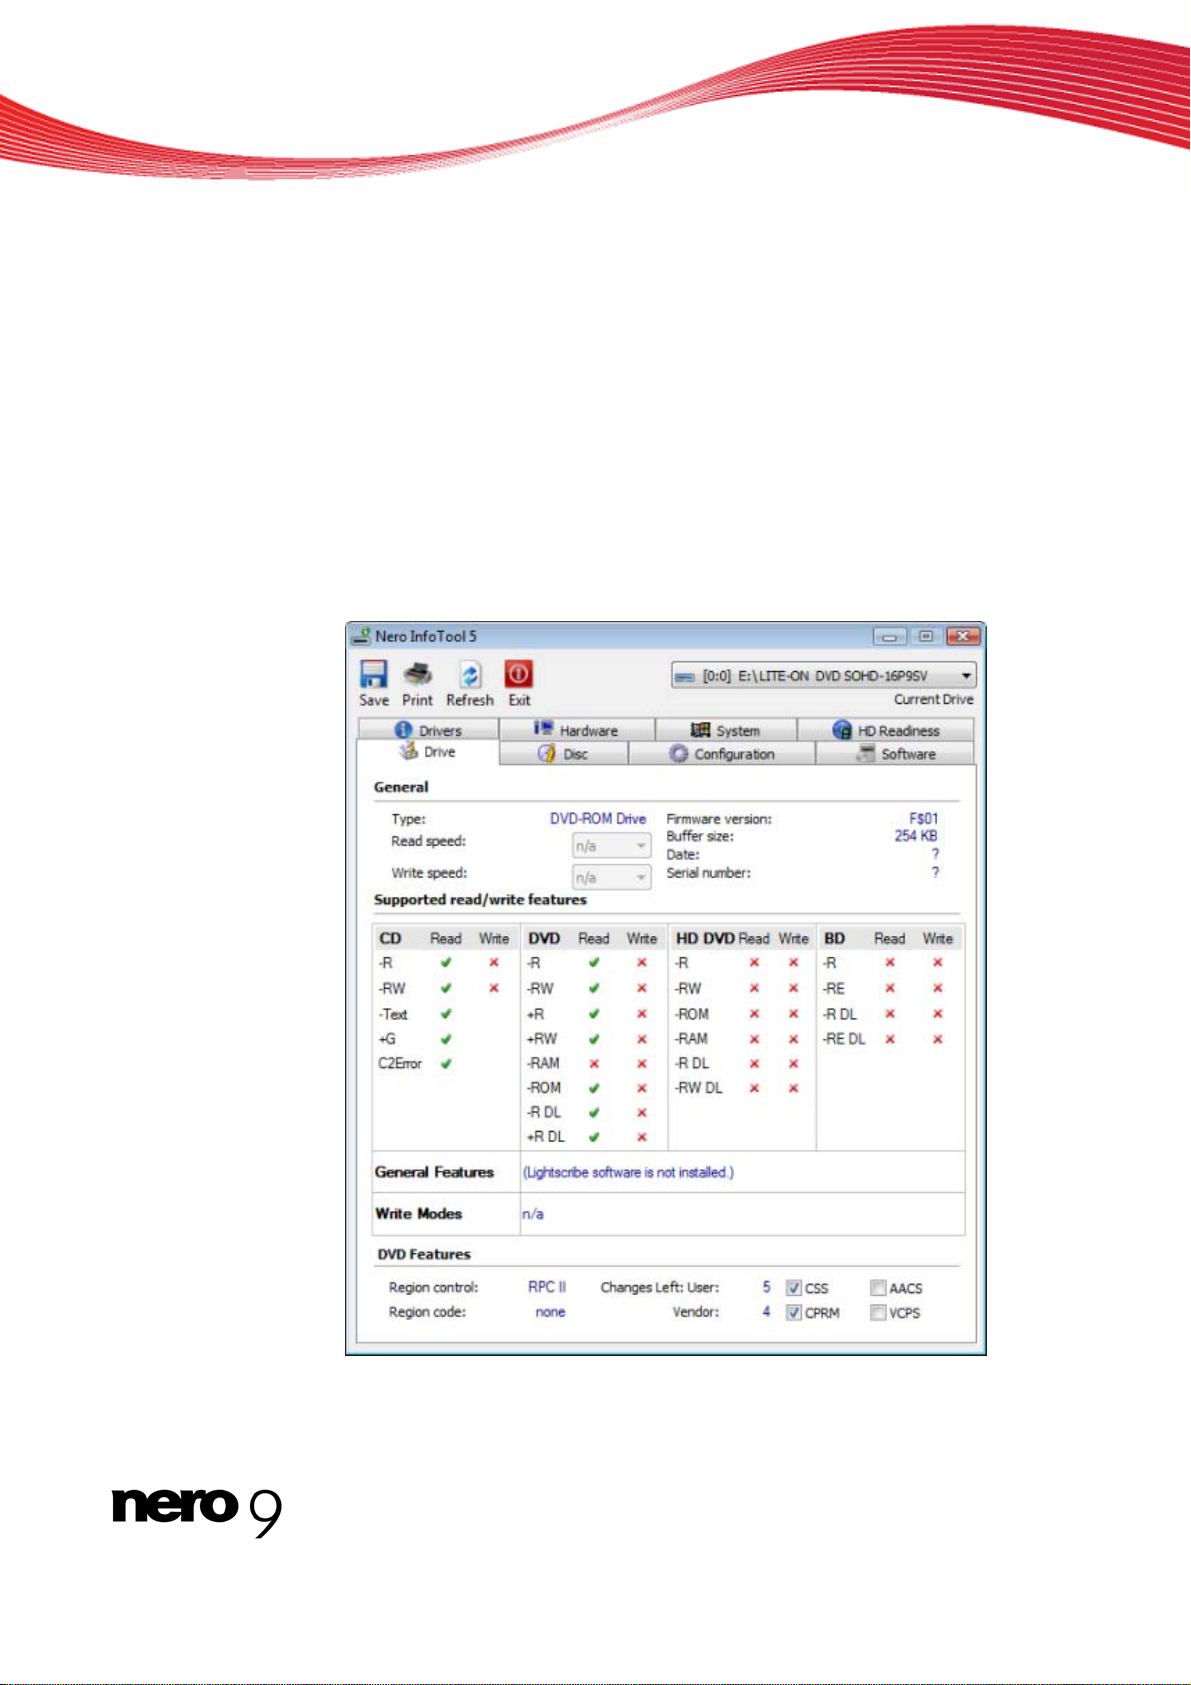
3 Nero InfoTool Window
The Nero InfoTool window offers comprehensive information on eight tabs.
The following tabs are available:
Driver
Hardware
System
HD Re
Drive
Disc
Config
Software
adiness
uration
Nero InfoTool Window
Nero InfoTool Window
Nero InfoTool 6
Page 7
Nero InfoTool Window
The following buttons a
Button
Save
Button
Print
Button
Refresh
Button
Exit
Drop-down menu
Current Drive
The following information is displayed on the Driver tab:
Area
Driver
Area
Video codecs
Area
Audio codecs
nd drop-down menus are available in the Nero InfoTool window:
Opens the Nero InfoTool – S
generated by Nero InfoTool.
Opens the Nero InfoTool – S
generated by Nero InfoTool.
Refreshes the log generated by Nero InfoTool.
Closes Nero InfoTool.
Displays all connected recorders for selection.
Shows all of the software drivers installed on the computer.
Shows all of the video codecs installed on the computer.
Shows all of the audio codecs installed on the computer.
ave/Print window and saves the log
ave/Print window and prints the log
The following information is displayed on the Hardware tab:
Area
m
Syste
Area
Peripherals
The following information is displayed on the System tab:
Area
System
inform
Area
Hot fixes
T g options are available on the HD Readiness tab:
Drop-down menu
Verify the system
requirements for:
ation
he following settin
Displays information about the computer hardware.
Displays information on the peripherals
audio output devices and sound cards.
Displays information about th
version, and Web browser.
Shows hot fixes and updates of the system.
Displays the tasks for which the system requirements are verified.
e installed operating system, DirectX
of the computer such as
Nero InfoTool 7
Page 8
Nero InfoTool Window
Display area
Your system
Display area
Link
Display area
Your Nero version
The following information is displayed on the Drive tab:
Area
General
Drop-down menu
Read speed
Drop-down menu
Write speed
Area
Supported
read/write features
Area
General features
Displays a table, whose columns show the tested components, information about whether an upgrade is required, and the details of
the tested components.
Displays whether system upgrades are required and provides a link
to the system requirements list.
Displays whether the current Nero configuration supports the task
that you selected in the drop-down menu.
Displays general information about the installed and selected recorder.
Shows all the available Reading Speeds
Shows all the available Writing Speeds
Displays the formats that the installed recorder can read and write.
In addition, general features, such as the modes of supported write
features, are listed.
Shows the general features of the selected drive, such as buffer
underrun protection.
of the selected drive.
of the selected drive.
Area
Write Modes
Area
DVD Features
The following information is displayed on the Disc tab:
Area
General
Area
Extended Information
Area
Content
The following information is displayed on the Configuration tab:
Folder tree
Driver
Shows the writing mode of the selected drive (e.g. TAO
Displays any additional DVD burning features of the recorder.
Shows general information on the disc in the drive.
Displays extended information about the inserted disc, such as the
number of tracks and sessions on the CD.
Displays information about the contents of the inserted disc, such
as the name or creation date of the disc.
Displays the driver(s) of the selected entry when it is expanded.
, SAO).
Nero InfoTool 8
Page 9

Nero InfoTool Window
Area
Driver Information
The following information is displayed on the Software tab:
Software list
See also:
Saving and Printing the Log 9
Verifying System Requirements for Blu-ray 10
Displays information about the driver selected in the tree according
to the selection.
Displays the version numbers of the installed Nero applications.
3.1 Saving and Printing the Log
When you open Nero InfoTool a log is automatically generated. You can save or print this
log.
3.1.1 Saving the log
To save the log, proceed as follows:
1. Click the Save button.
The Nero InfoTool – Save/Print window opens.
2. If you do not wish to save information from certain areas:
1. Clear the boxes for the areas that you wish to exclude in the check box area of the Nero
InfoTool – Save/Print window.
2. To see what the log will look like without the deactivated areas, click the Preview button.
The log preview is refreshed.
3. Click the Save button.
The Save As window appears.
4. Select the folder where you want to save the log in your system.
5. Enter the name with which to save the log in the File name text box and click the Save but-
ton.
The Save as dialog is closed. You have saved the log as a text file.
3.1.2
Printing the log
To print the log, procee
d as follows:
1. Click the Print button.
The Nero InfoTool – Save/Print window opens.
2. If you do not wish to print information from certain areas:
Clear the boxes for the areas tha1. t you wish to exclude in the check box area of the Nero
InfoTool – Save/Print window.
2. To see what the log will look like w
ithout the deactivated areas, click the Preview button.
Nero InfoTool 9
Page 10

The log p
review
3. Click the Print button.
The Print window opens.
Nero InfoTool Window
is refreshed.
4. Apply the desired print settings and then click the OK bu
3.2 Verify
1. Click the HD Readiness tab.
2. Select the desired task from the Verify the System Requirements selection list.
tton.
The Print window closes. You have printed the log.
ing System Requirements for Blu-ray
With Nero InfoTool you can check your system to see if it supports Blu-ray discs.
To display any necessary upgr
Depending on the selected entry, the tested components, information about any require
upgrades, and the details of the tested components are displayed in the area below the
Verify the System Requirements selection list. The display area on the left indicates
whether your system needs to be upgraded for the selected task. A link to the system
requirements
nel provides information about whether the current Nero configuration supports the selected task.
for the selected task is provided here. The Your Nero version display pa-
ades for Blu-ray Disc support, proceed as follows:
d
Nero InfoTool 10
Page 11
4 Technical Information
4.1 System requirements
Nero InfoTool is installed along with the Nero Suite. Its system requirements are the same.
You can find more detailed information on the system requirements under www.nero.com
4.2 Key Combinations
The following key combinations for entering commands are available in Nero InfoTool:
Technical Information
.
[Ctrl + S]
[Ctrl+P]
[Ctrl+R]
[Esc]
Opens the Save/Print window.
Opens the Save/Print window.
Calls up the information again and updates it.
Closes Nero InfoTool.
Nero InfoTool 11
Page 12

5 Glossary
Advanced SCSI Programming Interface (ASPI)
The advanced SCCI programming interface is the interface between the software, the SCSI
(Small Computer System Interface) card and the operating system of a PC. This permits
communication between the SCSI device (e.g. a SCSI scanner) and the SCSI card. However, ASPI drivers are also required for ATA, ATAPI, USB and FireWire interfaces.
Firmware
Firmware is software that has been installed on hardware during production (e.g. recorder,
USB device, etc.). It is used for communication between the respective hardware and other
software, e.g. when a USB device is connected to a PC.
Read Speed
The read speed of a drive is a factor of the speed that the laser needs in order to read the
data on an optical storage medium, e.g. 8x or 16x speed.
SAO
The session-at-once method is mainly used for recording on CD EXTRA. A first session with
various audio files is recorded in a single process without switching off the laser. However,
the CD is not closed, which means you can still write more data to it. Afterwards a second
(data) session is written and then the disc is closed.
Glossary
Track-At-Once (TAO)
Track-at-once refers to a write method in which each track is written to the disc individually.
The writing process is interrupted briefly after each track, i.e. the laser starts again for each
track. With this write method, it is only possible to continue writing to a DVD sometimes and
at a later stage. There is a pause of at least 27 ms between tracks, which can be disruptive
for Audio CDs.
Write Speed
The write speed indicates the speed at which a drive can write data to the optical storage
medium, e.g. 8x or 16x speed.
Nero InfoTool 12
Page 13

6 Index
Index
C
Codec
Audio ................................................................. 7
Video ................................................................. 7
Conventions, manual.............................. 4
D
DirectX
Version .............................................................. 7
Driver
Hardware...........................................................8
Software ............................................................7
K
Key Combinations................................. 11
L
Launching the Program........................... 5
M
Manual, conventions............................... 4
P
Peripherals.............................................. 7
Protocol
Preview..............................................................9
Printing...............................................................9
Save...................................................................9
R
Read features.......................................... 8
S
Settings possibilities................................ 7
System requirements............................ 11
W
Web browser........................................... 7
Write features.......................................... 8
Nero InfoTool 13
Page 14

7 Contact
Nero InfoTool is a Nero AG product.
Contact
Nero AG
Im Stoeckmaedle 13-15
76307 Karlsbad
Germany
Nero Inc.
330 N Brand Blvd Suite 800
Glendale, CA 91203-2335
USA
Nero KK
Rover Center-kita 8F-B, 1-2-2
Nakagawa-chuou Tsuzuki-ku
Yokohama, Kanagawa
Japan 224-0003
Internet:
Help:
Fax:
Internet:
Help:
Fax:
E-mail:
Internet:
Help:
www.nero.com
http://support.nero.com
+49 724 892 8499
www.nero.com
http://support.nero.com
(818) 956 7094
US-CustomerSupport@nero.com
www.nero.com
http://support.nero.com
Copyright © 2008 Nero AG and its licensors. All rights reserved.
Nero InfoTool 14
 Loading...