

Page 1
Nero Express Manual
Nero AG
Page 2

Copyright and Trademark Information
The Nero Express manual and all its contents are protected by copyright and are the
property of Nero AG. All rights reserved. This manual contains material that is protected by
internationally valid copyright. No part of this manual may be reproduced, transmitted or
transcribed without the express written permission of Nero AG.
All trade names and trademarks are the property of their respective owners.
Nero AG rejects any claims that transcend the clauses of the guarantee rights. Nero AG
does not accept any liability for the correctness of the content of the Nero Express manual.
The contents of the software supplied, as well as of the Nero Express manual, may be
changed without prior warning.
The trademarks mentioned here are named for information purposes only.
Copyright © 2007 Nero AG and its licensors. All rights reserved.
REV 1.0, SW: 7.5.4.0
Page 3

Contents
Contents
1 General information 5
1.1 About the manual 5
1.2 About Nero Express 5
1.3 Versions of Nero Express 5
2 Technical information 6
2.1 System requirements 6
3 Launching the program 7
3.1 Launching Nero Express via Nero StartSmart 7
3.2 Launching Nero Express directly 7
4 Start screen 8
4.1 Extended area (start screen) 9
4.1.1 Options 11
4.1.2 Copying Audio CD tracks 12
4.1.3 Erasing a disc 14
4.1.4 SecurDisc™ Settings 15
4.1.5 Selecting recorders and activating Nero Image Recorder 16
5 Compilation screen 18
6 Compiling data CD/DVDs 20
6.1 Finding and adding files 22
6.2 Hiding files 24
6.3 Activate SecurDisc™ Settings 24
7 Music 28
7.1 Compiling an Audio CD 28
7.1.1 Customizing properties 29
7.2 Compiling jukebox Audio CD/DVDs 32
7.3 Compiling an Audiobook CD 34
8 Videos and slide shows 35
8.1 Compiling Video CDs/Super Video CDs 35
8.1.1 Customizing properties 37
8.1.2 Customizing the menu 38
8.2 Compiling DVD-Videos 39
Page 3
Page 4

Contents
9 Creating a copy 41
9.1 Copying a CD/DVD 42
10 Loading a disc image or saved project 45
11 LightScribe® 46
11.1 Printing LightScribe® labels (without compilation) 46
11.1.1 Customizing print properties 48
11.2 Printing LightScribe® labels (within the project) 49
12 LabelFlash™ 51
12.1 Burn Label screen 52
12.2 Printing Labelflash™ labels and DiskT@2 53
13 Final Burn Settings screen 55
13.1 Extended area (Burn Settings) 56
13.2 Burning with Nero Image Recorder – creating an image file 57
13.3 Burning discs with the drive 58
14 Final screen 60
15 Glossary 61
16 Index 70
17 Contact 72
17.1 Contact details 72
Page 4
Page 5
General information
1 General information
1.1 About the manual
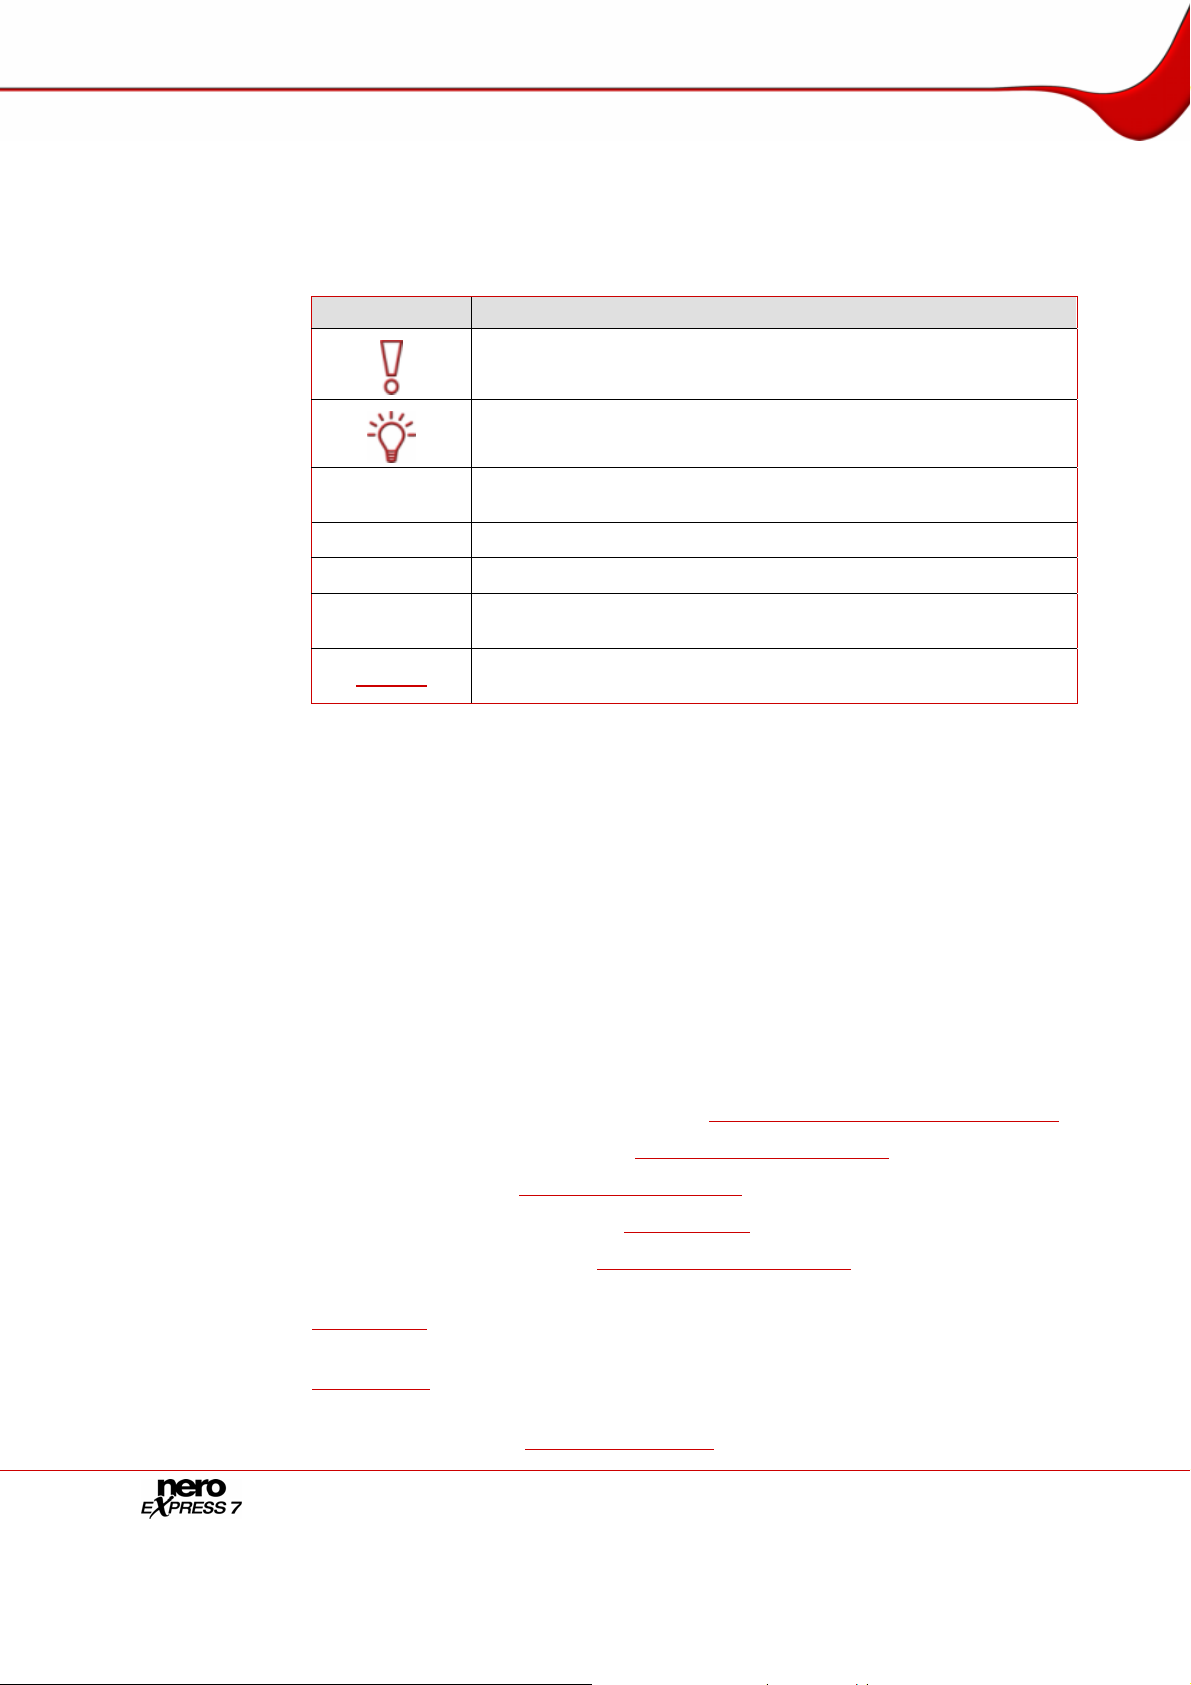
In order to make best use of this manual, please note the following conventions:
Symbol Meaning
Indicates warnings or instructions that have to be followed strictly.
Indicates additional information or advice.
1. Start …
Æ
Î
OK
Chapter
A number at the beginning of a line indicates a request for action.
Carry out these actions in the order specified.
Indicates an intermediate result.
Indicates a result.
Indicates text passages, menu items or buttons that appear in the
program interface of Nero Express. They are shown in bold face.
Indicates references to other chapters. They are executed as links
and are shown in red and underlined.
1.2 About Nero Express
Nero Express provides all the performance and efficiency of Nero Burning ROM with a
simplified user interface. Whether you are a beginner or an expert, Nero Express guides you
quickly and easily through your desired burning tasks. The default settings are selected to
automatically achieve best results. Using the program is remarkably easy: simply select the
object to be burned, add the files, and start burning.
1.3 Versions of Nero Express
Nero Express is available in three different versions: Nero Express, Nero Express
Essentials, and Nero Express Essentials SE.
Nero Express and Nero Express Essentials offer the full range of functions, only Nero
Express Essentials SE does not offer the following functions:
Unrestricted encoding in Nero Digital Audio format
Creating and burning Super Video CDs (see Compiling Video CDs/Super Video CDs)
Linking to Nero CoverDesigner (see Extended area (start screen))
Saving audio files (see Copying Audio CD tracks)
Erasing rewritable CDs/DVDs (see Erasing a disc)
Retrieving disc information (see Extended area (start screen))
Creating labels with LightScribe® (not included in standard functionality, see
LightScribe®)
Creating labels with LabelFlash™ (not included in standard functionality, see
LabelFlash™)
Burn SecurDisc™ data CD's/DVD's with SecurDisc™ (not included in the standard
features by default, see
Page 5
SecurDisc™ Settings)
Page 6

Technical information
2 Technical information
2.1 System requirements
In addition to the general system requirements for the Nero program package, the following
individual system requirements apply to Nero Express:
Microsoft® DirectX® 9.0b or higher
Optional:
LightScribe® compatible recorder and medium
Using LightScribe® Direct Disc Labeling
If you have a CD or DVD recorder with LightScribe
LightScribe
If you have downloaded and installed the latest version of Nero 7 from the Nero website,
you must install the LightScribe
found at
LabelFlash™ recorder and disc
Blu-ray recorder and disc
HD DVD recorder and HD DVD
SecurDisc™ recorder
Installation of the latest WHQL certified device drivers is recommended. WHQL stands for
Windows Hardware Quality Labs and means that the device driver certified by Microsoft
compatible with Microsoft
®
System Software.
®
System Software separately. The latest version can be
www.nero.com/link.php?topic_id=93.
®
Windows® and the respective hardware.
®
support, your system needs the latest
®
is
Page 6
Page 7
Launching the program
3 Launching the program
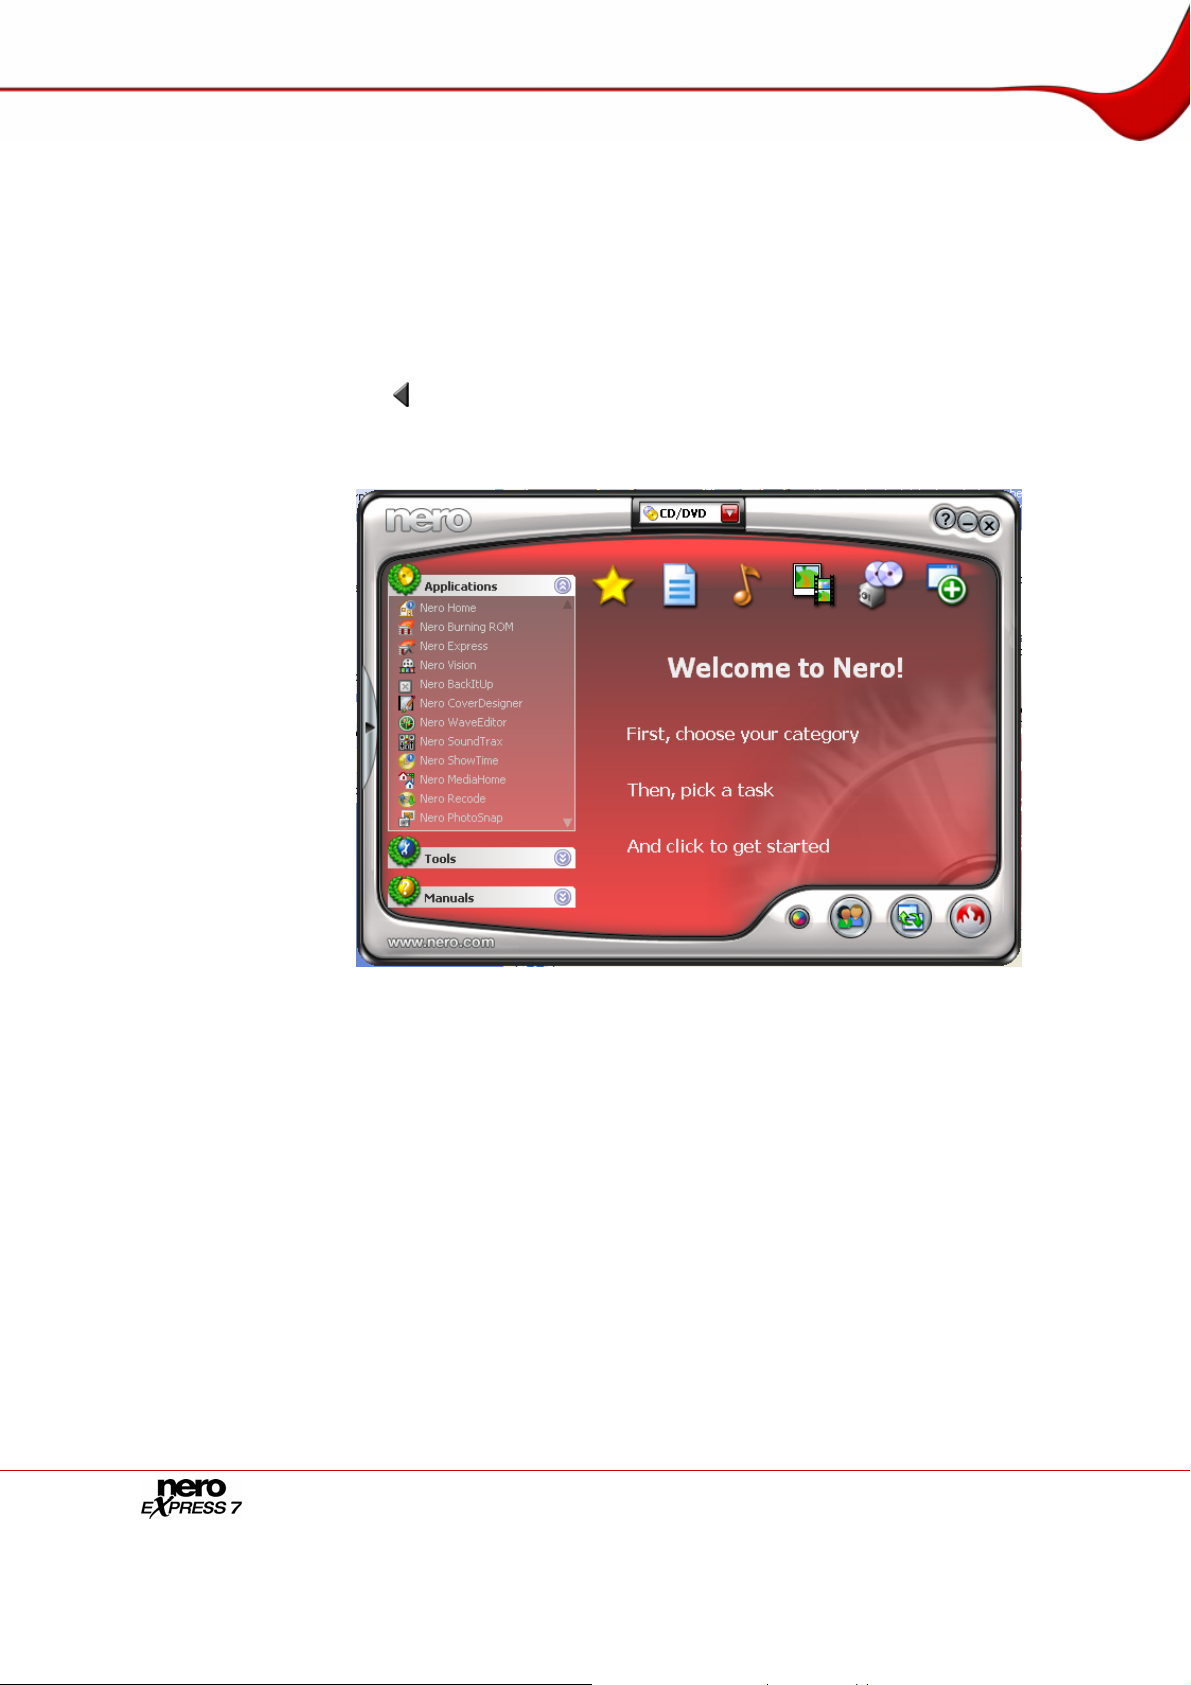
3.1 Launching Nero Express via Nero StartSmart
To launch Nero Express via Nero StartSmart, proceed as follows:
1. Double-click on the Nero StartSmart menu icon.
Æ The Nero StartSmart window is opened.
2. Click on the button in the left margin of the window.
Æ The extended area is opened.
3. Click on the Nero Express entry in the Applications drop-down list.
Æ The Nero Express window is opened.
Î You have launched Nero Express via Nero StartSmart.
3.2 Launching Nero Express directly
To launch Nero Express directly, proceed as follows:
1. Select Start > (All) Programs > Nero 7 (Premium) > Audio / Data > Nero Express.
Æ The Nero Express window is opened.
Î You have launched Nero Express.
Page 7
Fig. 1. Nero StartSmart
Page 8
Start screen
4 Start screen
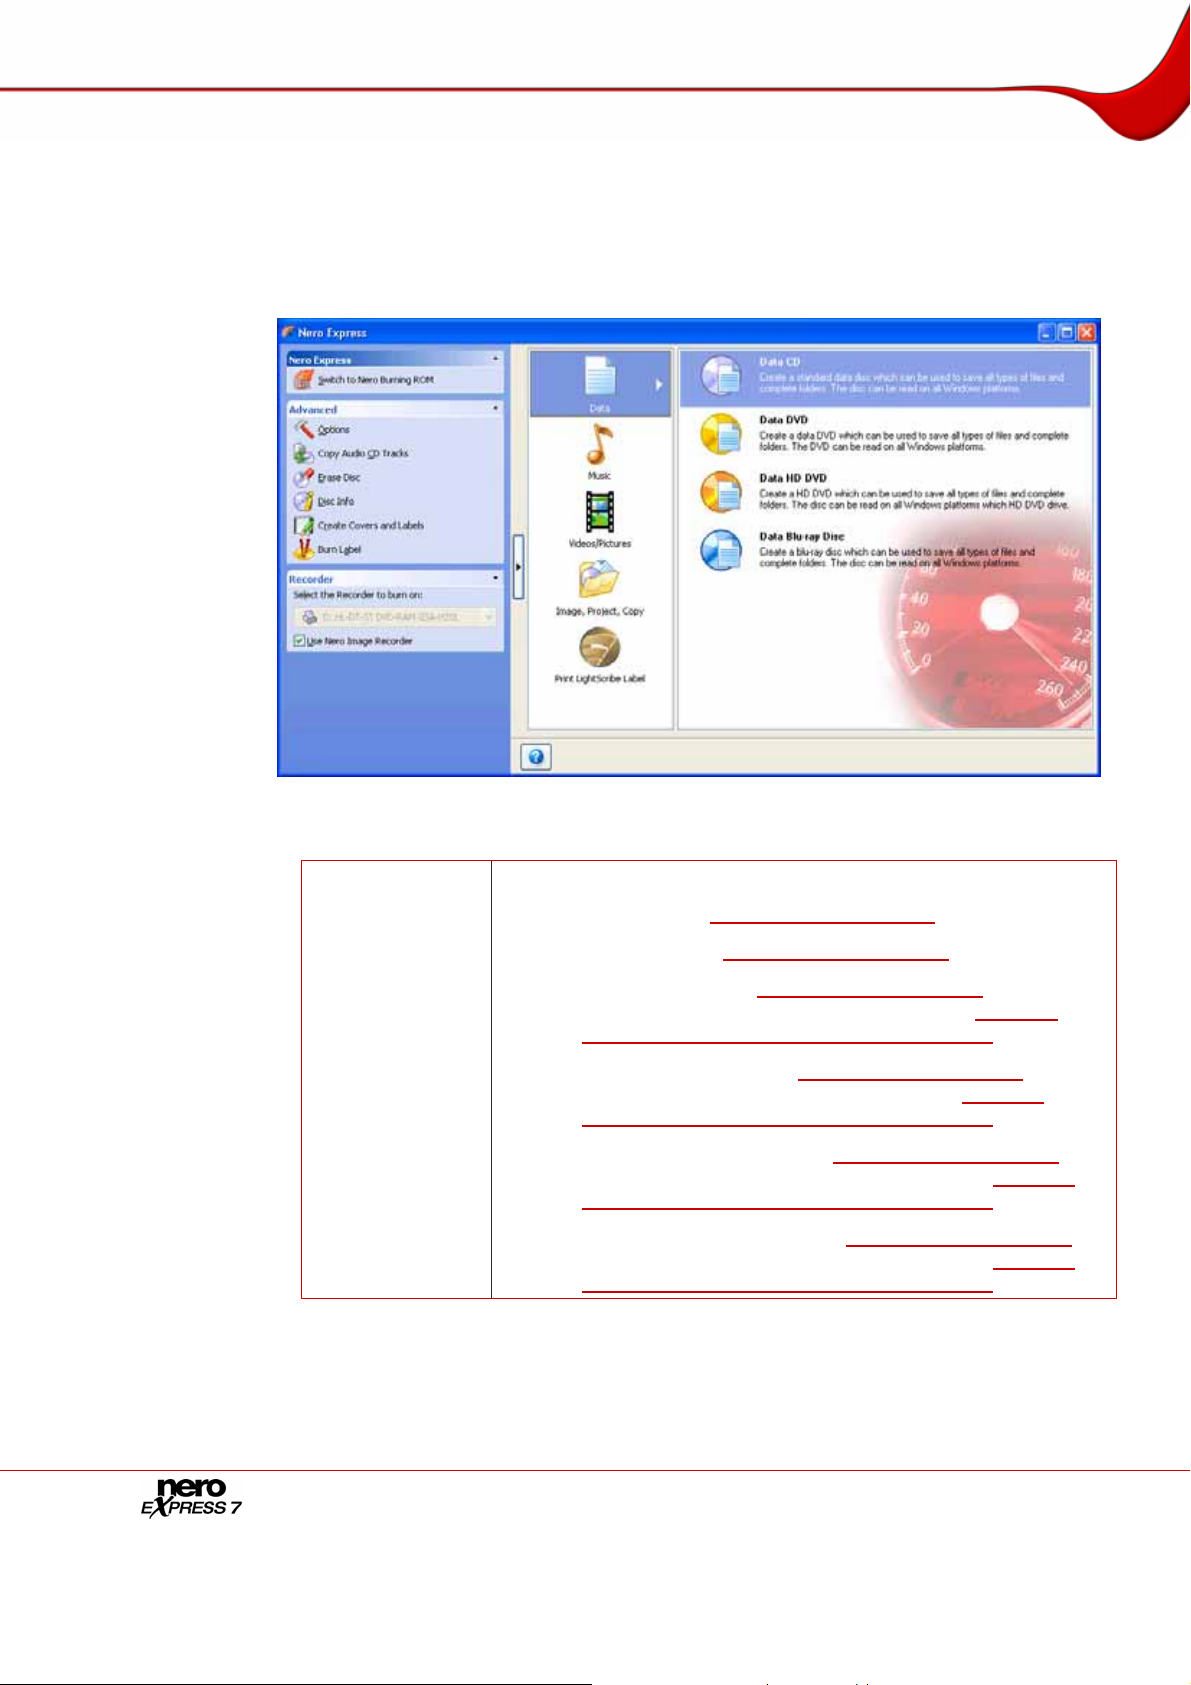
In the Nero Express start screen, click on the relevant menu icons to go to the desired
screen where you can compile and work on your project. The selection is categorized into
two areas: several formats or options are available for the Data, Music, Videos/Pictures,
Image, Project, Copy and Print LightScribe Label compilation methods.
The following compilation methods are available:
Allows you to compile and burn all types of files and folders:
Data CD (see Compiling data CD/DVDs)
Data DVD (see Compiling data CD/DVDs)
Data HD DVD (see Compiling data CD/DVDs)
Available with a HD DVD recorder only (see
recorders and activating Nero Image Recorder
Data Blu-ray Disc (see Compiling data CD/DVDs)
Data
Available with a Blu-ray recorder only (see
recorders and activating Nero Image Recorder
Data SecurDisc™ CD (see Compiling data CD/DVDs
Available with SecurDisc™ recorder only (see
recorders and activating Nero Image Recorder
Data SecurDisc™ DVD (see Compiling data CD/DVDs
Available with SecurDisc™ recorder only (see
recorders and activating Nero Image Recorder
Fig. 2. Start screen with extended area
Selecting
).
Selecting
).
Selecting
).
Selecting
).
Page 8
Page 9
Start screen
Music
Allows you to compile and burn audio and audiobook files in the
formats you want:
Audio CD (see Compiling an Audio CD)
Audiobook CD (see Compiling an Audiobook CD)
Jukebox Audio CD (see Compiling jukebox Audio
CD/DVDs
Jukebox Audio DVD (see Compiling jukebox Audio
CD/DVDs
JukeBox HD DVD (see Compiling jukebox Audio
CD/DVDs
Available with a HD DVD recorder only (see
recorders and activating Nero Image Recorder
Jukebox Blu-ray Disc (see Compiling jukebox Audio
CD/DVDs
Available with a Blu-ray recorder only (see
recorders and activating Nero Image Recorder
Allows you to compile and burn video and/or picture files as
VCD/SVCD or DVD-Video:
)
)
)
Selecting
).
)
Selecting
).
Videos/Pictures
Image, Project,
Copy
Print
LightScribe
Label
Video CD (see Compiling Video CDs/Super Video CDs)
Super Video CD (see Compiling Video CDs/Super Video
Allows you to copy a source disc and to load an image file or a
saved project:
Displays the Disc Label screen.
This is where you can create or load a label in order to print on the
label side of special CDs/DVDs in the recorder (see
Available with a LightScribe® recorder only (see
requirements). The recorder must be selected to enable the option
Selecting recorders and activating Nero Image Recorder).
(see
)
CDs
DVD-Video Files (see Compiling DVD-Videos)
Copy Entire CD (see Creating a copy)
Copy Entire DVD (see Creating a copy)
Disc Image or Saved Project (see Loading a disc image
or saved project
Copy Entire HD DVD (see Creating a copy)
Available with a HD DVD recorder only (see
recorders and activating Nero Image Recorder
Copy Entire Blu-ray Disc (see Creating a copy)
Available with a Blu-ray recorder only (see
recorders and activating Nero Image Recorder
)
Selecting
).
Selecting
).
LightScribe®).
System
4.1 Extended area (start screen)
You can access the extra options and functions in the extended area of the start screen by
clicking on the
Page 9
button in the left margin of the window.
Page 10
Start screen
An extended area with extra options and functions is available in all Nero Express screens
(see also
Extended area (Burn Settings)).
The following menu icons are available:
Closes Nero Express and opens the start screen of
Nero Burning ROM.
Switch to Nero
Burning ROM
This option is only available in the extended area of the start
screen. If you decide to create a project with Nero Express,
the option Saves the active project is displayed in all of the
other windows at this point.
Saves the active
project
Opens the Save As dialog box.
You can save your compilation here.
Opens the Options dialog box.
Options
Copy Audio CD
Tracks
You can customize Nero Express to suit your needs here
Options).
(see
Opens the Save Tracks window.
You can copy audio files from CD to hard drive here (see
Copying Audio CD tracks).
Opens the Erase Rewritable Disc dialog box.
Erase Disc
This is where you can erase the data from a rewritable
CD/DVD (see
Erasing a disc).
Opens the Disc Info dialog box.
Disc Info
This is where you can display information on the CD/DVD
inserted. The total capacity and available capacity will be
shown in addition to the tracks and sessions.
Opens Nero Cover Designer.
Using Nero Cover Designer you can create and print labels
Create Covers and
Labels
and booklets for CDs/DVDs that have been burned.
Please see the separate Nero CoverDesigner user manual
for full instructions on how to make professional looking
covers and labels.
SecurDisc™ Settings
Defines the settings for burning a SecurDisc™ disc.
Opens the Burn Label window.
This is where you can create or load a label in order to print
on the label and/or data side of special DVDs in the recorder
LabelFlash™).
Burn Label
(see
Available with a LabelFlash™ recorder only (see
System
requirements). The recorder must be selected to enable the
option (see
Recorder
Selecting recorders and activating Nero Image
).
Defines the recorder that you want to use for burning and/or
Recorder
the Nero Image Recorder (see
activating Nero Image Recorder
Selecting recorders and
).
Please note that the options Copy Audio CD Tracks, Erase Disc, Disk Info, and Create
Covers and Labels are not available in Nero Express Essentials SE.
Page 10
Page 11
Start screen
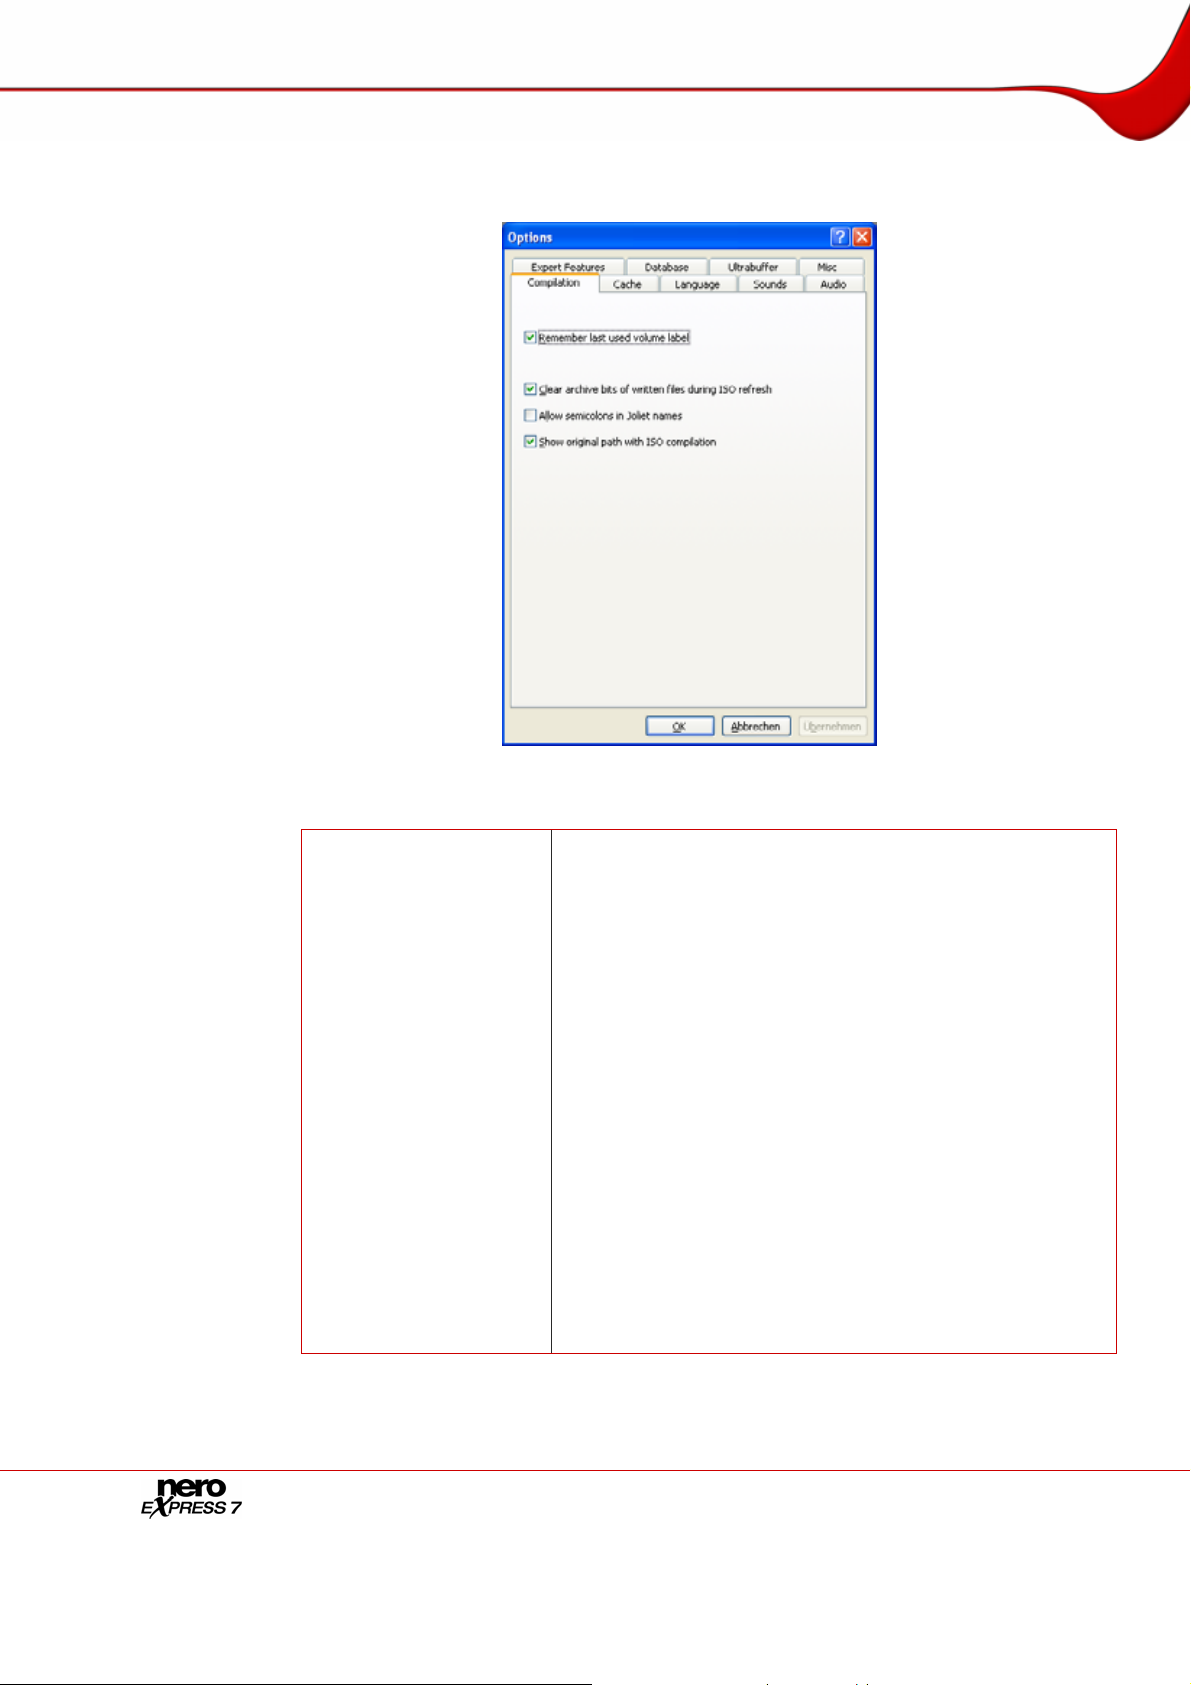
4.1.1 Options
You can customize Nero Express to suit your needs on the various tabs.
The following tabs are available:
Compilation
Fig. 3. Options dialog box
Enables/disables certain basic settings:
Remember last used volume label: makes
available the title for the next disc.
Clear archive bits of written files during ISO
refresh: deletes the archive bits of saved files.
Archive bits are used to identify files that have
been edited. A file is only resaved during the next
backup process if it was edited (and an archive bit
is thus reset).
Allow semicolons in Joliet names: allows the
use of semicolons in addition to standard
uppercase and lowercase letters and Unicode
characters (and German umlauts) in file names in
the Joliet file system.
Show original path with ISO compilation: lists
the full path of the added files in the compilation
screen in the Source column.
We recommend enabling all the check boxes as this makes
Nero Express easier to work with.
Page 11
Page 12

Start screen
Cache
Language
Sounds
Audio
Expert Features
Database
Ultrabuffer
Misc
Defines the settings for the memory where the data is buffered
before and during burning.
If multiple hard drives have been installed, you can select the
fastest one as the cache.
Displays all installed languages and fonts and defines the
language or font you want to display on the Nero Express user
interface.
Defines whether, or for which events, sound files are played in
Nero Express.
Displays the directory in which the audio plug-ins are installed.
Enables additional options and defines settings for the entire burn
process.
Enables/disables the link between Audio CDs and a local user,
program or Internet Audio CD database.
Defines the memory capacity that Nero Express uses as a RAM
buffer.
The ultrabuffer is a second memory that enhances the physical
buffer in the recorder. You can define the memory capacity
manually.
Enables and/or disables a variety of options for the user interface,
compilations, burning, the database, and for other settings in Nero
Express.
4.1.2 Copying Audio CD tracks
Please note that the Copy Audio CD Tracks function is not available in Nero Express
Essentials SE.
Using Nero Express you can convert the audio files or an entire Audio CD into the format
you want and save it to your hard drive. To do this, proceed as follows:
1. Insert the required Audio CD into your computer's drive.
2. Click on the Copy Audio CD Tracks button in the extended area of the screen.
3. If multiple drives are displayed, select the drive containing the Audio CD you require.
Æ A dialog box is opened.
4. If you would like to retrieve artist/title information from the Nero/Internet CD database:
1. Click on the Yes button.
Æ The CD parameters are sent.
The relevant window is opened and the results are displayed in the List of
corresponding CD entries area.
2. Select the relevant entry.
3. Click on the Selected CD button.
Æ The selected data is incorporated into the track list.
Page 12
Page 13
Start screen
5. If you do not want to retrieve artist/title information from the Nero/Internet CD database:
1. Click on the No button.
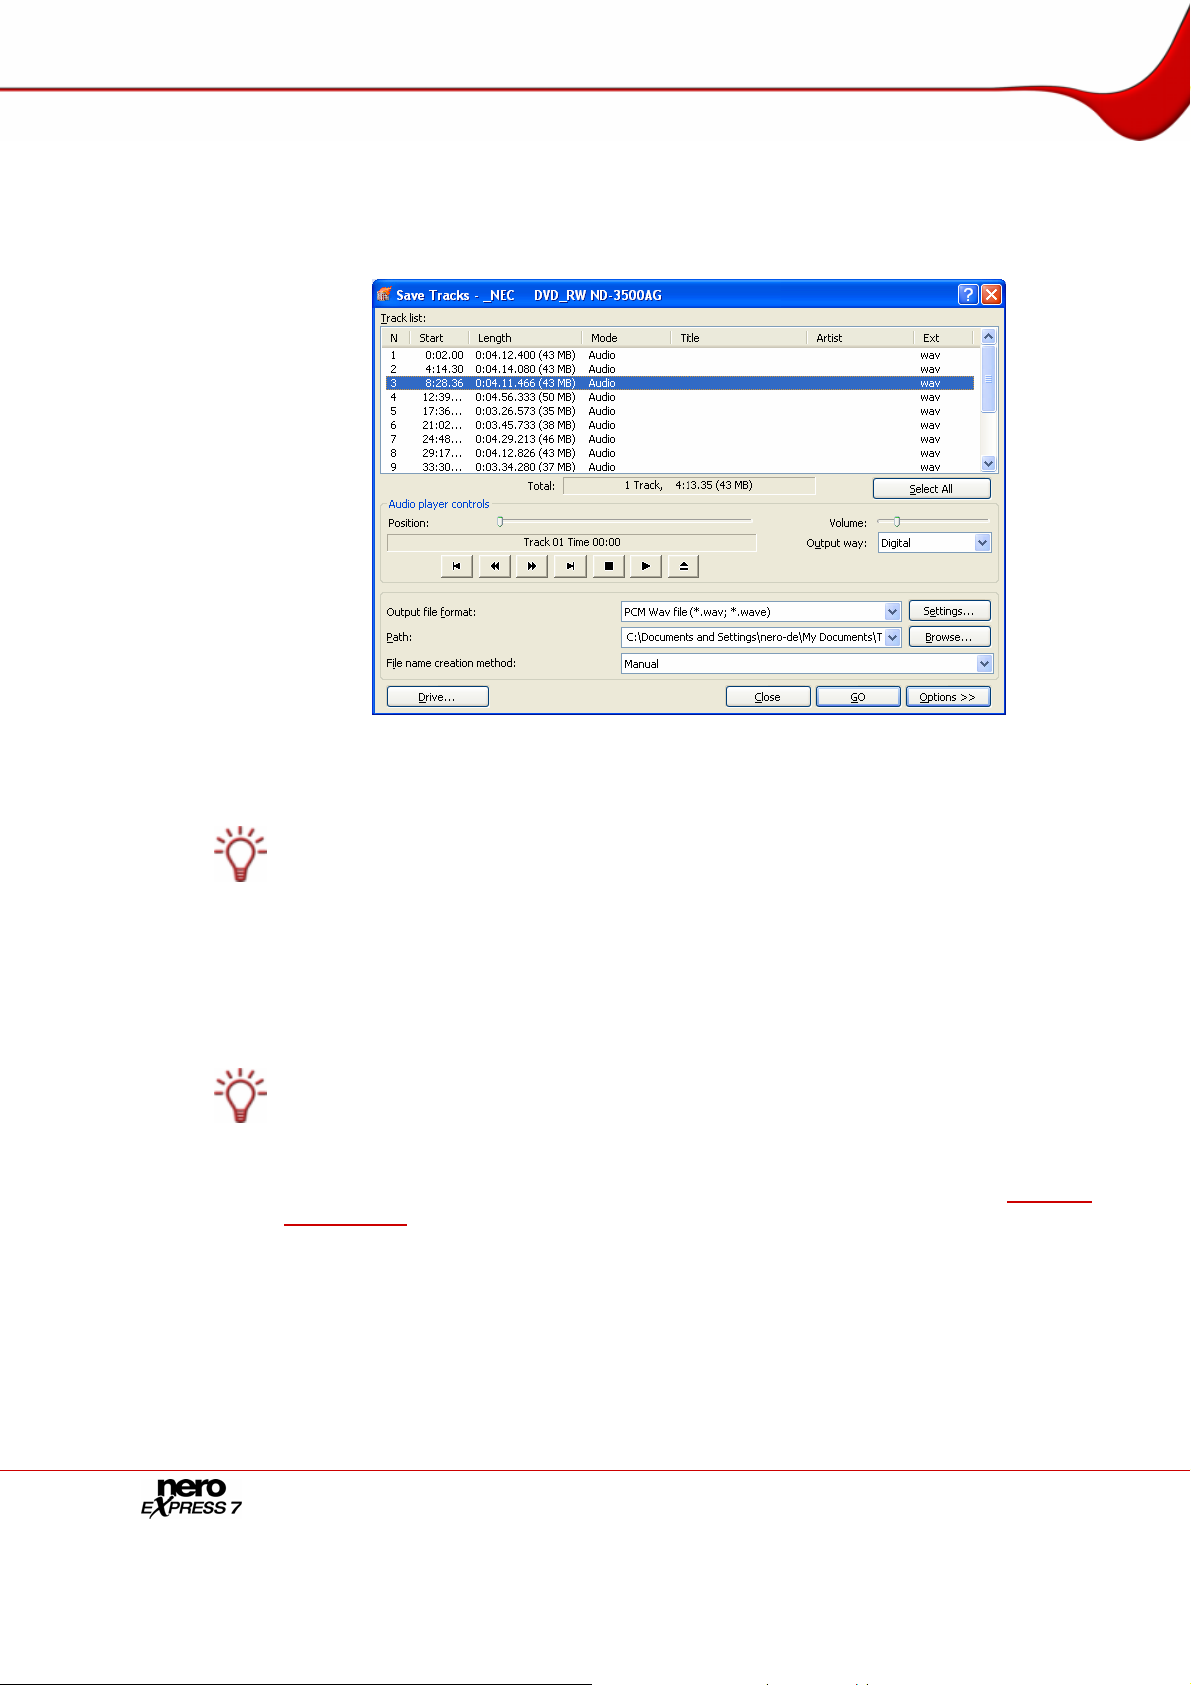
Æ The Save Tracks window is opened.
Fig. 4. Save Tracks window
6. In the track list select the audio files that you want to save to your hard drive.
If you want to convert all audio files, simply click on the Select All button.
7. Select the file format you want from the Output file format drop-down list.
8. In the Path drop-down list select the place where you want to store the converted audio files.
9. Select a File name creation method.
Manual is specified as the default method for the default name. If you select Custom,
enter the name you want for the audio file.
10. If you want to set options in the extended area, click on the Options window (see Extended
area (options)
Æ The extended dialog box is opened.
).
11. Click on the Start button.
Æ Conversion is started and you can follow the progress in the relevant dialog box.
12. Click on the Close button.
Î You have successfully copied individual audio files or an entire Audio CD to your hard
drive.
Page 13
Page 14
Start screen
4.1.2.1 Extended area (options)
You can also perform additional settings in the extended area of the Save Tracks window.
Click on the Options button to open the extended area.
The following check boxes are available:
Jitter Correction
Remove silence
Automatically generate
an M3U playlist of stored
audio tracks
Read Speed
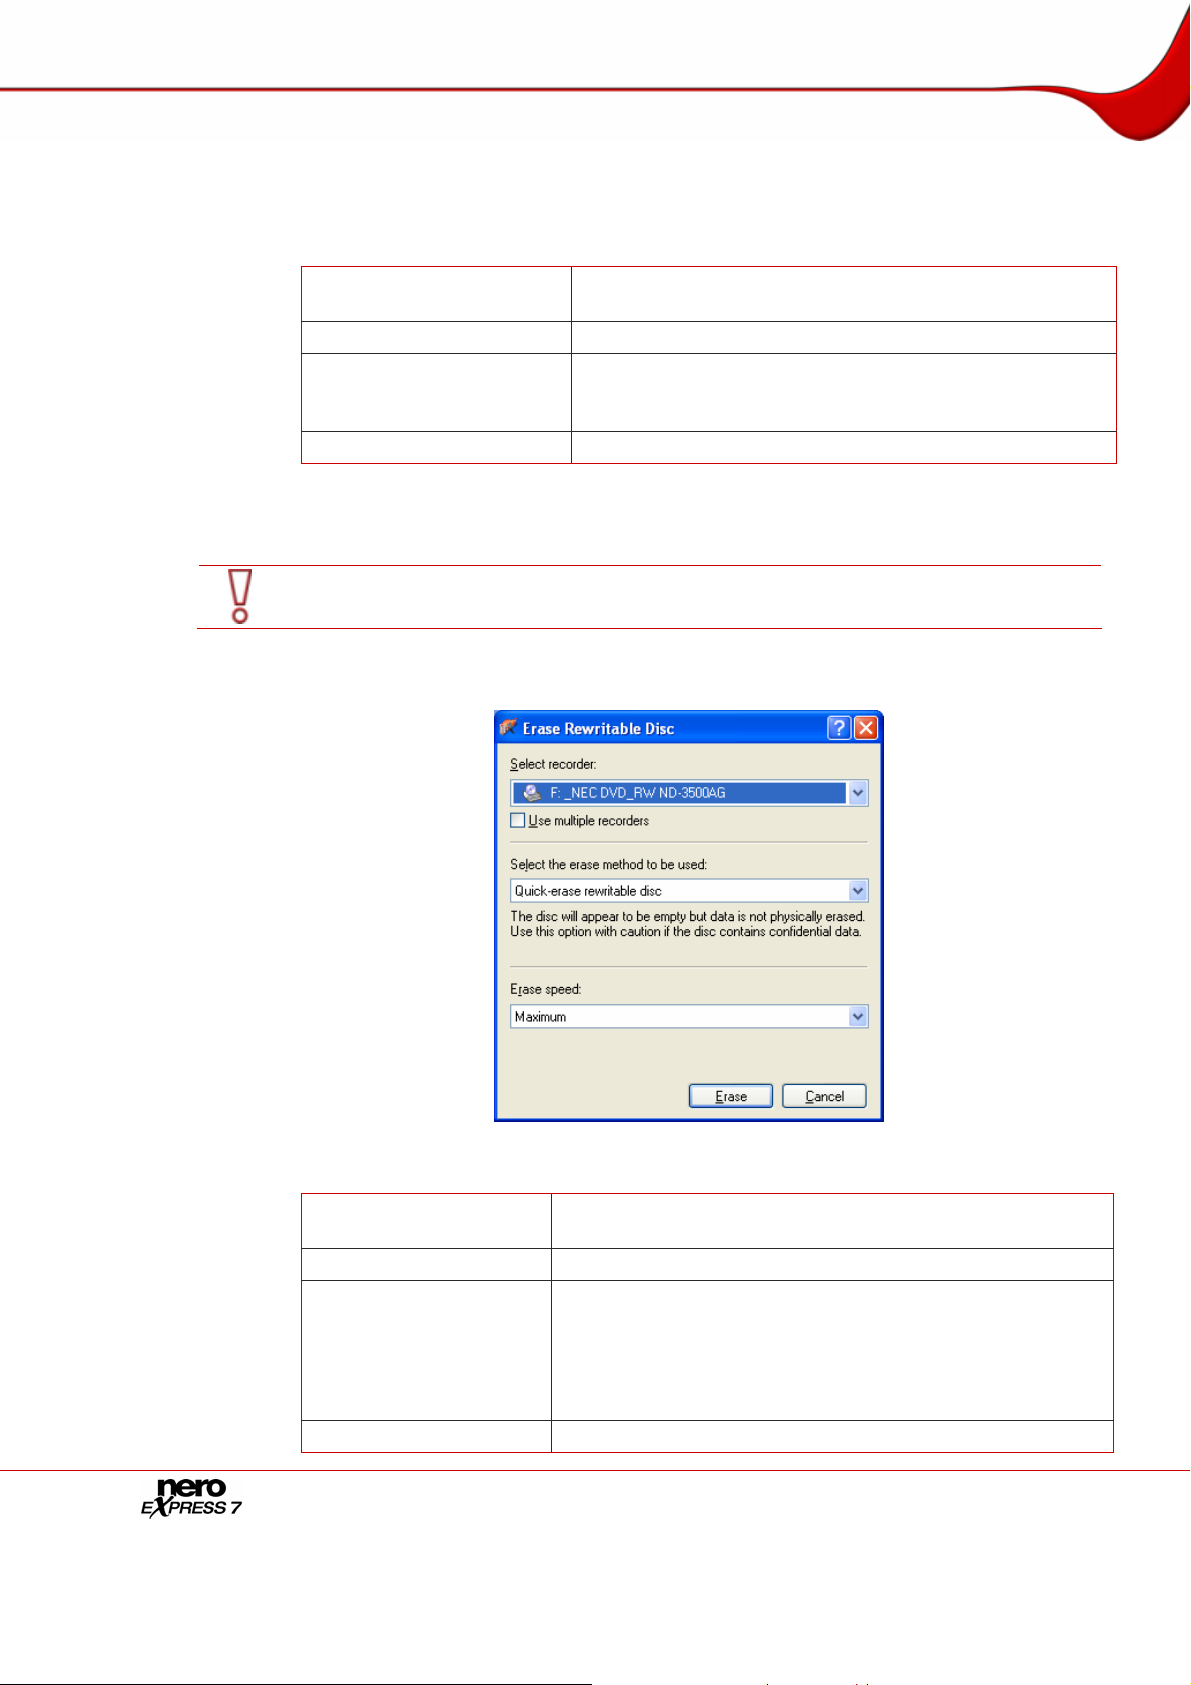
4.1.3 Erasing a disc
Please note that the Erase Disc function is not available in Nero Express Essentials SE.
Using Nero Express you can erase data from a rewritable CD/DVD.
Synchronizes data information by overlapping the
sectors. This prevents gaps from occurring.
Removes the silence from the end of an audio file.
Generates a playlist of audio files that are stored on the
hard drive.
The M3U file format compiles a list of media files.
Defines the speed at which the drive reads the files.
Fig. 5. Erase Rewritable Disc dialog box
The following options are available:
Select recorder
Use multiple recorders
Defines the recorder you want if multiple recorders are
installed.
Simultaneously erases CDs/DVDs in multiple recorders.
Defines the erase method.
Select the erase
method to be used
The Quick-erase rewritable disc method does not
physically erase the data. The disc will appear to be empty.
The Fully erase rewritable disc method erases all data
from the CD/DVD.
Erase speed
Page 14
Defines the erase speed.
Page 15
Start screen
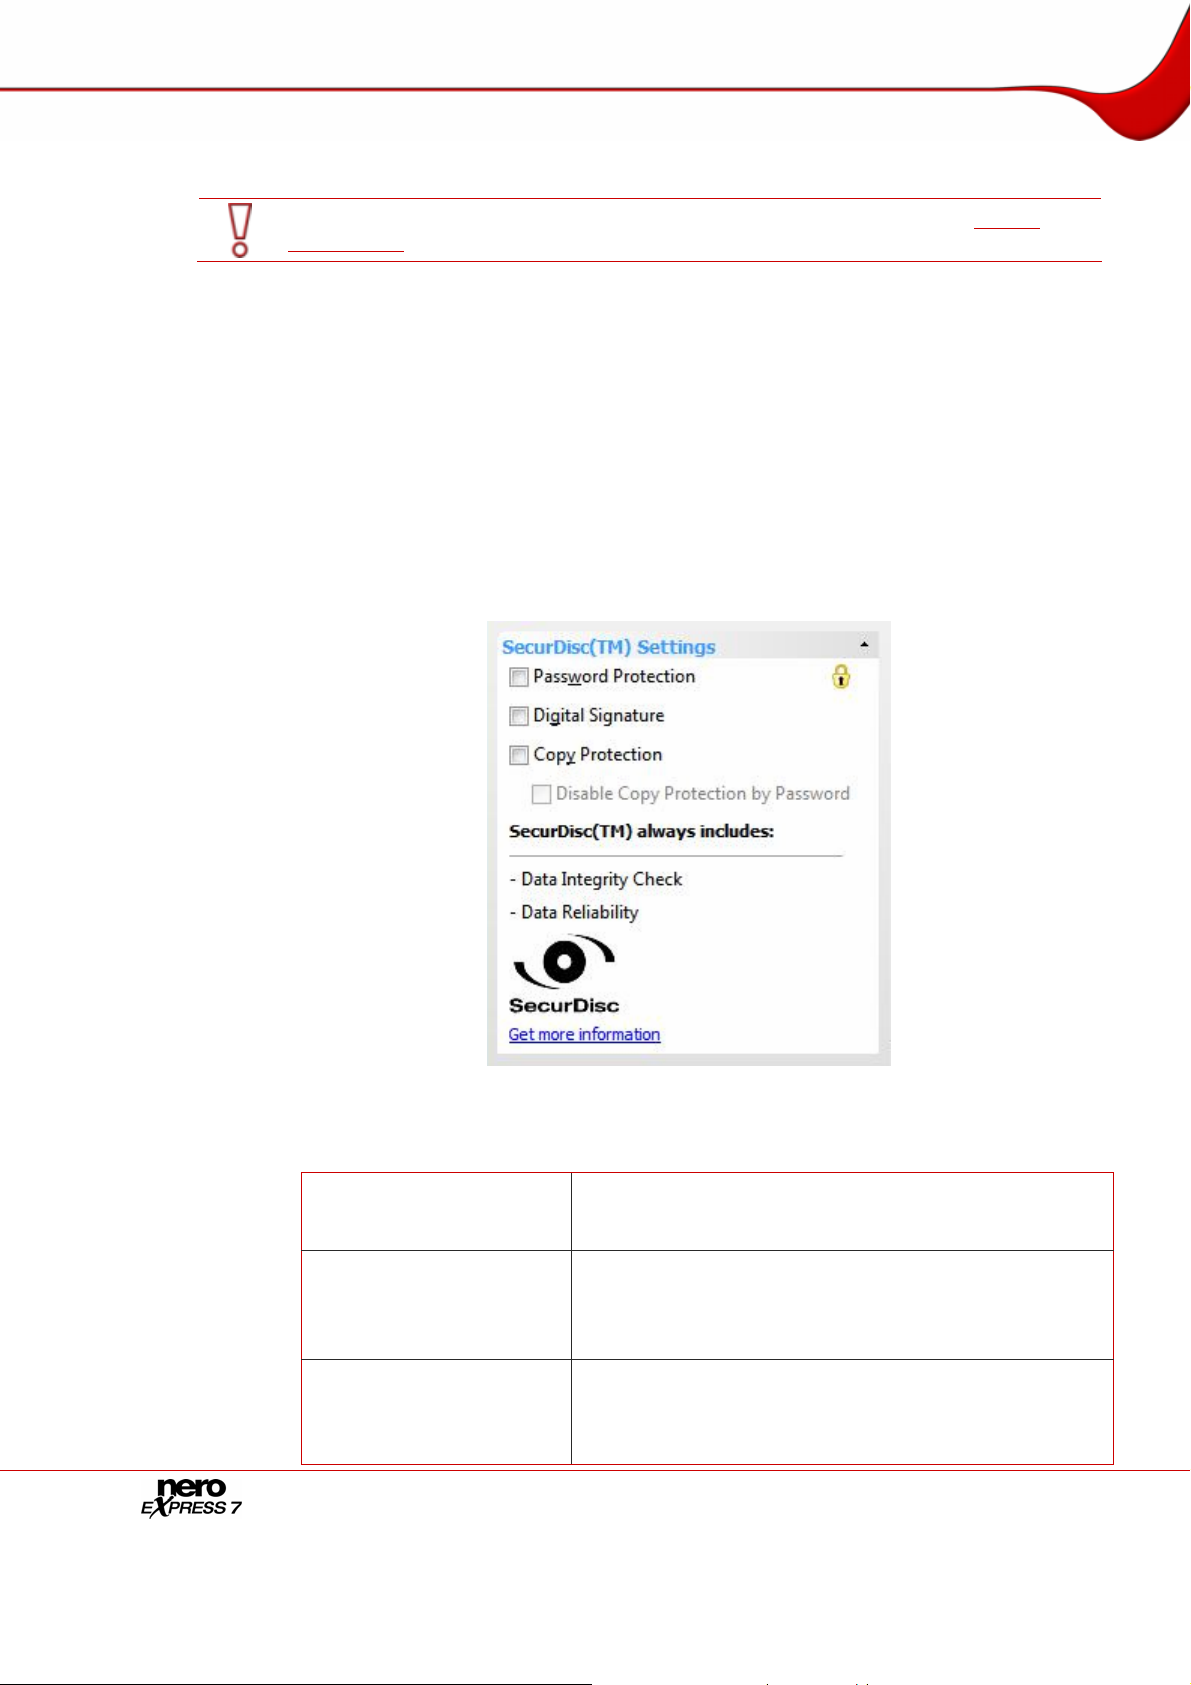
4.1.4 SecurDisc™ Settings
This function is only available with a recorder that supports SecurDisc™ (see
requirements
With Nero Express and a SecurDisc™ recorder, you can burn your data a s data
SecurDisc™ CDs or DVDs.
SecurDisc™ is an innovative security technology characterized by extremely stabile
hardware and software encoding. It uses mandatory storage level security features such as
checksums to verify data integrity and readability, and redundancy storage and defect data
management systems to ensure maximum data reliability, i.e., SecurDisc™ compilations are
more resistant to physical damage (such as scratches). Password protection as well as the
data encryption used by SecurDisc™ protect your data against unauthorized access. In
addition, you can add a digital signature to the disk to authenticate the origin as well as the
integrity of the data.
This function is available as separate Data > Data SecurDisc™ CD/DVD option in the start
screen.
).
System
Fig. 6. Extended Area SecurDisc™ Settings
The following settings are available in the SecurDisc™ Settings area:
When this option is checked, you can activate and/or
Password protection
deactivate the protection against unauthorized access for
all or individual files.
When this option is checked, the SecurDisc™ – Digital
Digital signature
Signature dialog box is opened.
You can configure the key for a digital signature on your
data SecurDisc™ CD/DVD here.
When this option is checked, PDF documents are copy
Prohibit data duplication
protected.
In order to view a copy protected PDF, you require a
special application called SecurDisc™ Viewer;
Page 15
Page 16
Start screen
Allow Duplication by
Password
Data Integrity Check
Data reliability
SecurDisc™ Viewer can be downloaded free of charge at
www.securdisc.net.
Available for data SecurDisc™ DVDs only.
When this option is checked, the SecurDisc™ – Data
Protection dialog box is opened.
You can enter the access password for copy protected
PDF documents here.
Available only if the Prohibit data duplication check box
was already selected.
Checks whether the data on the SecurDisc™ has been
changed maliciously or due to technical damage.
This function is enabled by default and cannot be
disabled.
This offers greater data security, i.e. greater protection in
the event of technical damage on the strength of
redundantly saved data.
This function is enabled by default and cannot be
disabled.
4.1.5 Selecting recorders and activating Nero Image Recorder
If multiple recorders are installed, you can select the recorder that you want to use for
burning from the Recorder drop-down menu. Immediately before burning a project, you can
change the recorder you selected again in the Final Burn Settings window (see
discs with the drive
If a LabelFlash™ recorder is installed on your computer, you can select it to create and
print LabelFlash™ DVD labels in Nero Express. The function is available as a separate
Burn Label menu icon in the extended area of the start window (see
If a LightScribe
print LightScribe
window as a separate Print LightScribe Label option or can be integrated as an
intermediate step into the creation and burn process of a project (see
If a Blu-ray recorder is installed on your computer, you can select it to create and burn
Blu-ray Discs in Nero Express. Corresponding options, e.g. Data Blu-ray Disc, are
available in the start window.
If a HD DVD recorder is installed on your computer, you can select it to create and burn
HD DVDs in Nero Express. Corresponding options, e.g. Data HD DVD, are available in the
start window.
If a SecurDisc™ recorder is installed on your computer, you can select it to create and burn
data SecurDisc™ CDs and/or DVDs in Nero Express. Corresponding options, e.g. Data
SecurDisc™ DVD, are available in the start window.
).
®
recorder is installed on your computer, you can select it to create and
®
CD/DVD labels in Nero Express. The function is available in the start
Burning
LabelFlash™).
LightScribe®).
Page 16
Page 17

Start screen
Apart from installed recorders, Nero Image Recorder is also available in Nero Express. With
Nero Image Recorder you can create and save an image file in order to burn it later (see
Burning with Nero Image Recorder – creating an image file). In order to be able to use Nero
Image Recorder, you can check the Use Nero Image Recorder box in the extended area of
the start screen.
Please note that Nero Image Recorder can only be activated in the extended area of the
start screen.
If Nero Image Recorder is activated, you can also select compilations in Nero Express that
would not be feasible with the recorders installed on your computer. For example, if you
have installed a CD recorder, you can also compile a DVD with Nero Image Recorder and
save the compilation as an image file.
Page 17
Page 18
Compilation screen
5 Compilation screen
You can access the Nero Express compilation screens by selecting the compilation method
you want in the start screen. You can add data to your projects in the compilation screens
and customize the directory structure on the CD/DVD to suit your requirements. The ca pacity
bar in the bottom part of the window indicates how much space is being used by the data on
the CD/DVD. Essentially, all compilation screens have the same structure.
The following buttons are available:
Add
Remove
Play
Total size on disc
Back
Next
Opens the Add files and folders window.
This deletes the selected file.
Plays a selected audio or video file.
Displays the drive space used.
Returns to the start screen.
Switches to the Final Burn Settings screen.
Opens the Audio Track Properties dialog box for Audio CDs
Properties
(see
Video CDs/Super Video CDs (see
Available for Audio, Video, and Super Video CDs only.
Enables a filter that brings the volume of the audio files to be
Normalize all audio
files
burned into line with one another. This is recommended
particularly if the files originate from different sources.
Available for Audio CDs only.
Establishes that the audio files merge into one another without
No pause between
tracks
a pause. If the box is unchecked, a pause of two seconds is
inserted between the files.
Available for Audio CDs only.
Fig. 7. My Video CD compilation screen
Track properties) and the MPEG Info dialog box for
Track properties).
Page 18
Page 19

Compilation screen
Enable (S)VCD
Menu
DVD9(8152MB) /
DVD5(4483MB)
BD DL (47742MB) /
BD (23866MB)
Enables a menu for the CD.
You can customize the look of the menu to suit your
requirements (see
Menu).
Available for Video and Super Video CDs only.
If the DVD burner is capable of burning DVDs with 2 layers
(DVD DL), and if you want to burn files larger than 4483 MB,
you can select the DVD9 (8152 MB) option from the dropdown menu.
Available for DVD-Videos only.
If the burner is capable of burning Blu-ray Discs with 2 layers
(BD DL), and if you want to burn files larger than 23866 MB,
you can select the BD DL(47742MB) option from the dropdown menu.
Available for Blu-ray Discs only.
Page 19
Page 20

Compiling data CD/DVDs
6 Compiling data CD/DVDs
Using Nero Express you can compile and burn all types of files and folders. If a DVD
recorder is installed on your computer, you can burn both data CDs and data DVDs. If you
have a CD recorder, you can only burn data CDs and the option for burning a DVD is already
grayed out in the start screen. There is no difference between the procedures for each
compilation method.
If a HD DVD recorder is installed on your computer, you can select it to display the Data
HD DVD option in the Data area. The procedures for both compiling and burning a data HD
DVD are the same as the compilation method for a data CD/DVD.
In comparison to a DVD, a HD DVD has considerably more space and can store up to 15
GB on a single-layer disc. The capacity bar in the Disc Content compilation window
displays comparatively more available space.
If a Blu-ray recorder is installed on your computer, you can select it to display the Data
Blu-ray Disc option in the Data area of the start screen. The procedures for both compiling
and burning a Blu-ray data disc are the same as the compilation method for a data
CD/DVD.
In comparison to a DVD, a Blu-ray Disc has considerably more space and can store up to
25 GB on a single-layer disc (up to 50 GB on a dual-layer disc). The capacity bar in the
Disc Content compilation window displays comparatively more available spa ce.
If a SecurDisc™ recorder is installed on your computer, you can select it to display the
Data SecurDisc™ CD and Data SecurDisc™DVD options in the Data area of the start
screen. The procedures for both compiling and burning a data SecurDisc™ CD/ DVD a re
the same as the compilation method for a standard data CD/DVD.
In the extended area of the Disk Contents compilation window, additional options are
displayed under SecurDisc™ Settings (see
If Nero Image Recorder is activated, you can also select compilations in Nero Express that
would not be feasible with the recorders installed on your computer. For example, if you
have installed a CD recorder, you can also compile a DVD with Nero Image Recorder and
save the compilation as an image file.
SecurDisc™ Settings).
Page 20
Page 21
Compiling data CD/DVDs
To create a data CD/DVD, proceed as follows:
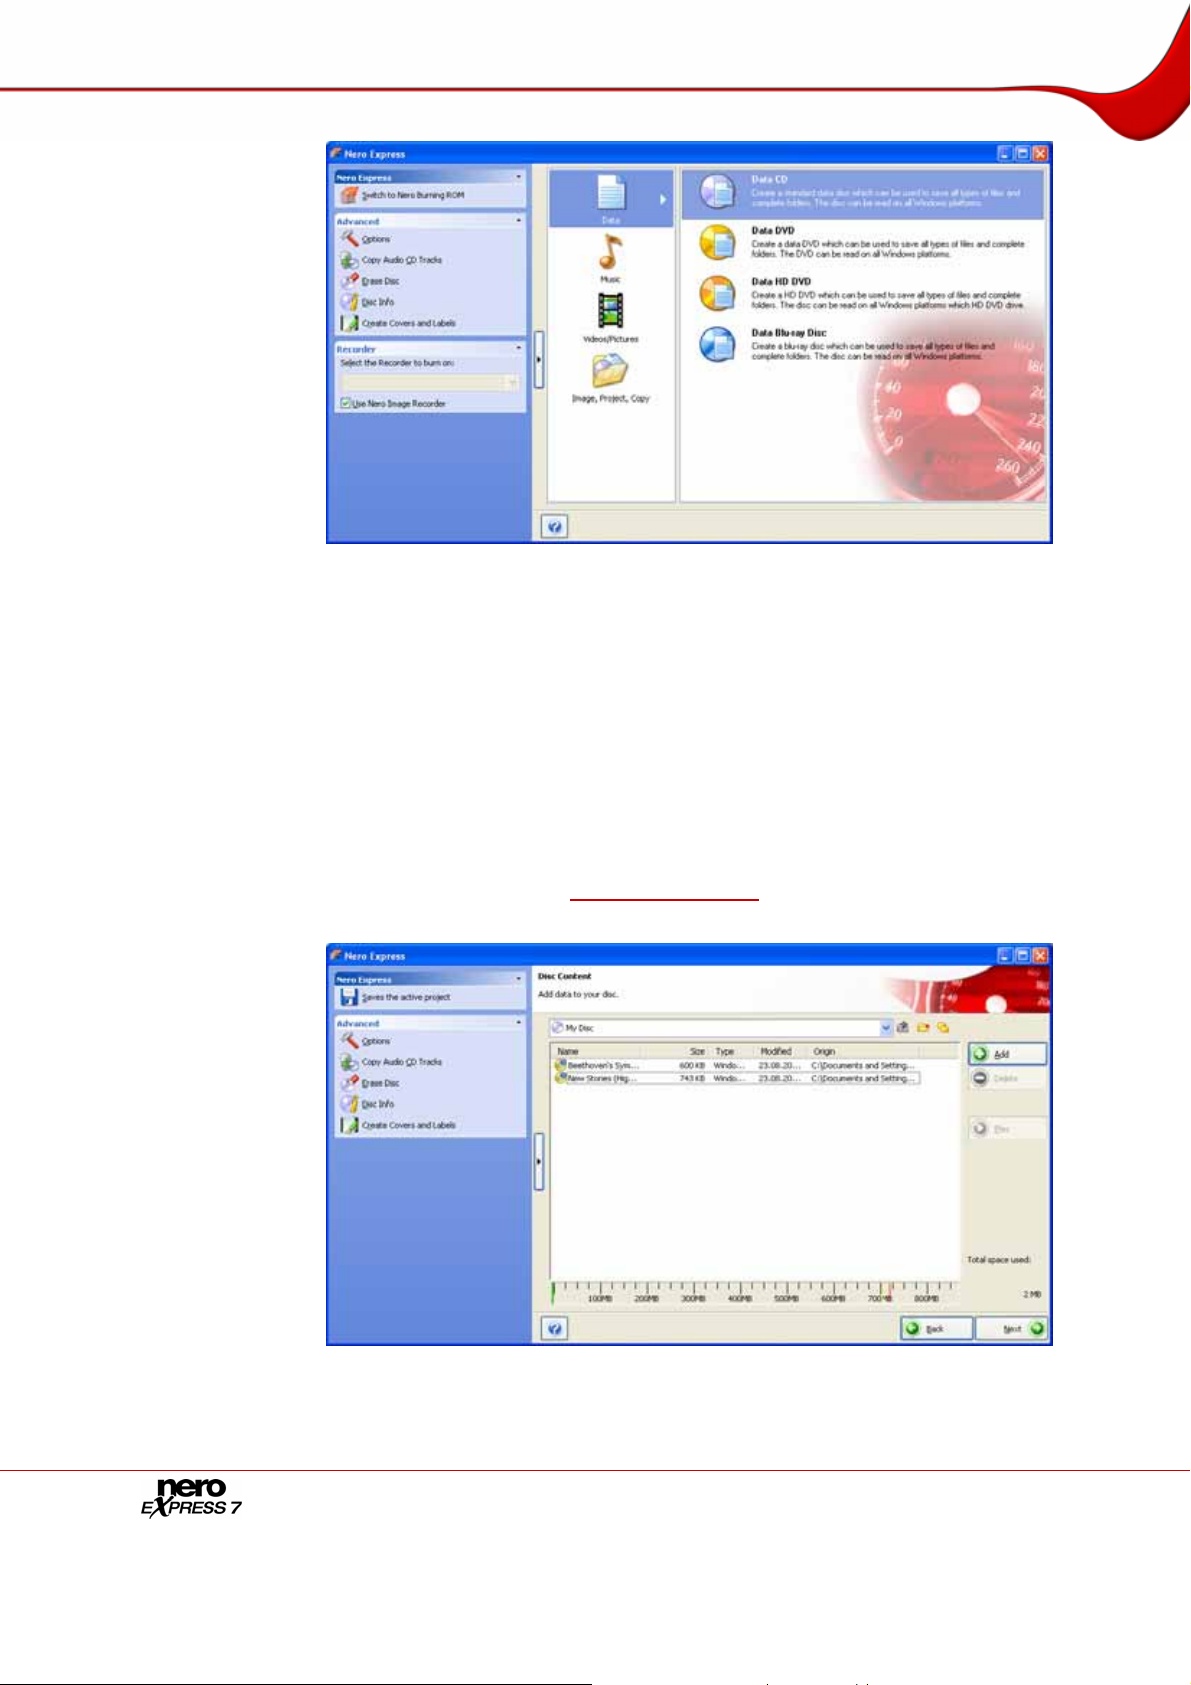
Fig. 8. Data start screen
1. Click on the Data menu icon in the Nero Express start screen.
Æ The Data CD and Data DVD options are displayed.
2. Click on the option you want.
Æ The Disc Content compilation screen for data CDs/DVDs is displayed.
Æ If you selected one of the Data SecurDisc™ CD or Data SecurDisc™ DVD options in
the start screen, an additional dialog is displayed.
In the extended area of the compilation window, additional options are displayed under
SecurDisc™ Settings (see
SecurDisc™ Settings).
Fig. 9. Disc Content compilation screen
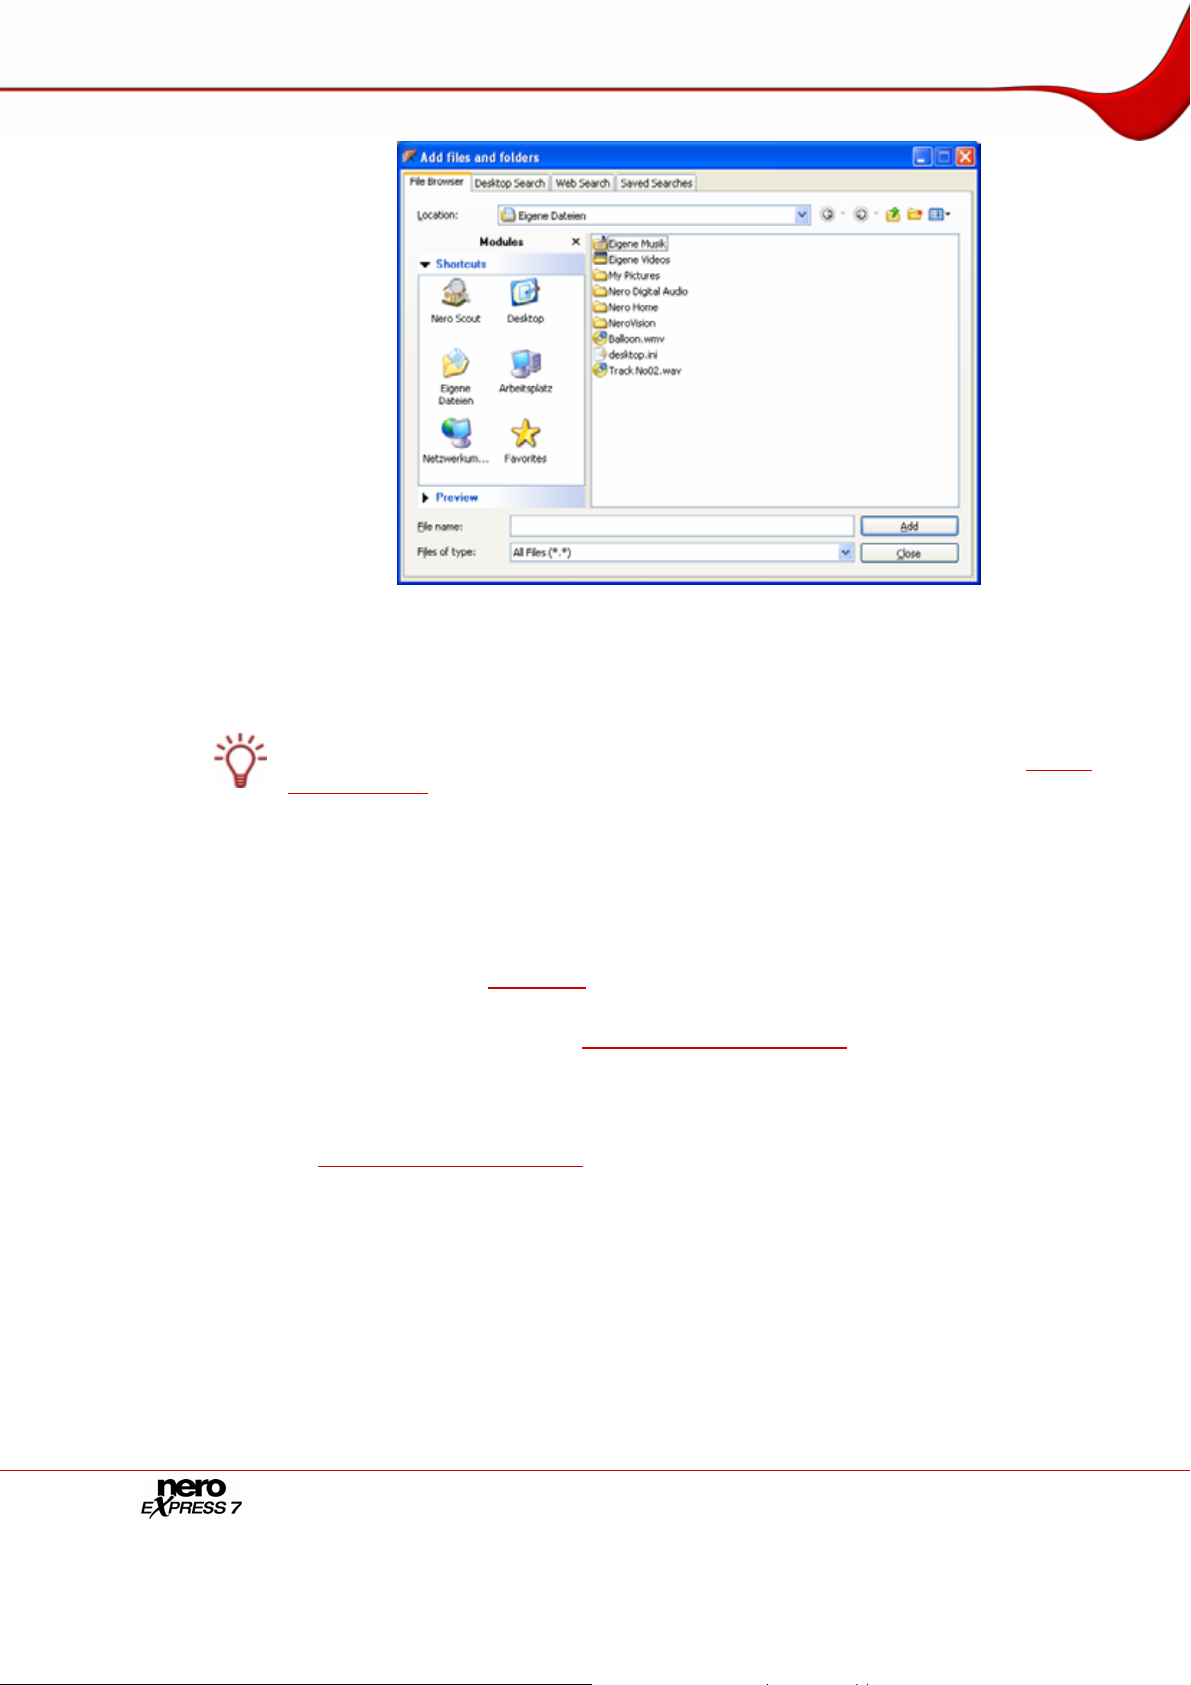
3. Click on the Add button.
Æ The Add files and folders window is opened.
Page 21
Page 22
Compiling data CD/DVDs
Fig. 10. Add files and folders window
4. Select the files that you want to add to the compilation and click on the Add button.
5. Repeat the previous step for all files that you want to add.
If you are searching for specific files and want to add them to your compilation, see
and adding files
.
6. Click on the Close button.
Æ The files are added to the compilation and displayed in the compilation screen.
7. Sort the data on the CD/DVD according to your requirements.
8. Hide specific files (see Hiding files).
9. If you want to create a data SecurDisc™ CD/DVD, select the desired check boxes in the
SecurDisc™ Settings area (see
Activate SecurDisc™ Settings).
10. Click on the Next button.
Æ If you have selected any check boxes in the SecurDisc™ Settings area, the
corresponding dialog boxes are displayed and you can configu re additional settings (see
Activate SecurDisc™ Settings).
Î You have successfully compiled a data CD/DVD and can now burn this compilation.
Finding
6.1 Finding and adding files
To find specific files and to add them to your compilation, proceed as follows:
1. Click on the Add button in the Disc Content compilation screen for data CDs/DVDs.
Æ The Add files and folders window is opened.
Page 22
Page 23

Compiling data CD/DVDs
2. Click on the Desktop Search tab.
3. Enter your search term in the Search Query text box.
You can combine multiple search criteria with one another and further refine your search.
To display text boxes for the advanced search, click on the
4. Click on the Search button.
Æ The results are displayed in the Results area. To improve classification, you can display
the results for the categories Audio, Photos, Video, Documents, and Others
separately.
button.
Fig. 11. Adding files and folders window – Desktop Search tab
5. Select the file you want and click on the Add button.
6. Repeat steps 3 to 6 for all files that you are looking for and want to add to the compilation.
Æ The files are added to the compilation.
Click on the Save Search button to save the results for subsequent projects. Your saved
search is then available on the Saved Searches tab.
7. When you have added all of the files you were looking for to your compilation, click on the
button.
Æ The files are displayed in the compilation screen.
Î You have successfully found specific files and added them to your compilation.
Page 23
Page 24

Compiling data CD/DVDs
6.2 Hiding files
It is very easy to hide files in data CD/DVD compilations for additional protection or for
security reasons so that they do not appear on the normal display. The files behave in the
same way as other hidden system files that are hidden by default, but can easily be
displayed.
To hide individual files, proceed as follows:
1. Right-click the required file to select it.
2. Select the Properties option from the context menu.
Æ The Properties for dialog box is opened.
3. Check the Hide box and click on the OK button.
Î The file is hidden.
6.3 Activate SecurDisc™ Settings
To protect your data SecurDisc™ CD/DVD against unauthorized access, copy protect PDF
files, remove password copy protection, or sign the disk with a digital signature, proceed as
follows:
1. Select the Password protection check box in the extended area of the compilation screen.
Æ A lock symbol shows that all data is protected.
You can enable or disable the protection function for individual files.
Highlight the required file to display the Unprotect/ Protect button. Click on the button to
enable or disable protection.
Page 24
Fig. 12. Properties for dialog box
Page 25

Compiling data CD/DVDs
2. Select the Digital signature check box in the extended area of the compilation screen.
Æ The SecurDisc™ – Digital Signature dialog box is opened.
Fig. 13. SecurDisc™ - Digital Signature Dialog
3. If you have already created a digital key:
1. Click on the Browse button.
Æ The SecurDisc™ – Select Private Keys dialog box is opened.
2. Select the key and click on the OK button.
4. To create a digital key:
1. Click on the Start button.
Æ The SecurDisc ™– Generate Digital Key dialog is displayed.
2. Read the instructions and click on the Next button.
Æ The SecurDisc ™ Key Creation Process dialog box is opened.
3. Move your mouse at random until the creation process is complete.
You can monitor the status of the creation process using the progress bar.
4. Click on the Next button.
The Next button is enabled as soon as the process is complete.
Æ The SecurDisc ™– Key Setting Ended dialog box is opened.
Page 25
Page 26

Compiling data CD/DVDs
5. Enter a file name for the key you have created and click on the Finish button.
Æ The SecurDisc ™– Digital Signature dialog box is opened and the selected key is
displayed in the drop-down menu.
5. Select the Prohibit data duplication check box in the extended area of the compilation
screen.
Æ All PDF files are copy protected.
The Allow duplication by password check box is displayed.
6. To permit duplication of the copy protected data after entering a password:
1. Select the Allow duplication by password check box.
Æ The Protect SecurDisc™ Data dialog box is opened.
2. Enter the required password in the Password input area and click on the OK button.
A wizard offers suggestions by means of an additional dialog box when entering and
selecting the password. It estimates the security level, i.e. the quality of the password,
during entry.
7. Click on the OK button.
Æ The corresponding dialog box will be opened to inform you that the disc is being digitally
signed with the selected key.
You can pass on the relevant public key to recipients to enable them to verify the signature.
8. Click on the OK button.
9. Click on the Next button.
Æ The SecurDisc™ – Data Protection dialog box is opened.
Page 26
Page 27

Compiling data CD/DVDs
Fig. 14. SecurDisc™ - Data Protection Dialog
10. Enter the desired password in the Password field and then click the OK button.
If necessary, a wizard may provide tips in an additional dialog during password entry. The
wizard gauges the security level - i.e., the quality - of the password during entry.
Î You have now protected your data SecurDisc™ CD/DVD against unauthorized access
with a password, copy protected PDF documents, and/or digitally signed the disk, and
can now burn the CD/DVD.
Page 27
Page 28

Music
7 Music
7.1 Compiling an Audio CD
Using Nero Express you can create an Audio CD that contains music files. It can be played
using all standard CD players. To compile an Audio CD, source files with different audio
formats (e.g. MP4, MP3 or WMA) are automatically converted into Audio CD format before
being burned.
Please note that some CD players cannot play CD-RW discs. Use CD-R discs to burn
Audio CDs.
Fig. 15. Audio start screen
To create an Audio CD, proceed as follows:
1. Click on the Audio menu icon in the Nero Express start screen.
Æ The Audio CD, Audiobook CD, Jukebox Audio CD, and Jukebox Audio DVD options
are displayed.
2. Click on Audio CD.
Æ The My Audio CD compilation screen for Audio CDs is displayed.
Page 28
Page 29

Music
Fig. 16. My Audio CD compilation screen
3. Click on the Add button.
Æ The Add files and folders window is opened.
4. Select the audio files that you want to add to the compilation and click on the Add button.
5. Repeat steps 4 and 5 for all audio files that you want to add to the compilation.
If you are searching for specific files and want to add them to your compilation, see
and adding files
.
6. Click on the Close button.
Æ The audio files are added to the compilation and displayed in the compilation screen.
7. Customize the properties of the audio files to suit your requirements (see Customizing
properties
).
8. Check the Normalize all audio files and No pause between tracks boxes as required (see
Compilation screen).
9. Click on the Next button.
Î You have successfully compiled an Audio CD and can now burn this compilation.
7.1.1 Customizing properties
Finding
7.1.1.1
You can display and/or make changes to the audio file properties on the Track Properties,
Indexes, Limits, Splits, and Filters tabs. To open the tabs, click on the Properties button
in the My Audio CD compilation screen for Audio CDs.
Track properties
On the Track Properties tab you will find basic information on the selected file in the
Source information area.
Page 29
Page 30

Music
Fig. 17. Audio Track Properties dialog box – Track Properties tab
The following input areas are available in the Properties area:
Title (CD TEXT)
Artist (CD TEXT)
Pause
International Standard
Recording Code
(ISRC)
Protection
Cross fade with
previous track
CD players that support CD Text show the title name
entered here.
CD players that support CD Text show the artist's name
entered here.
Defines the length of the pause in seconds or frames
between the selected audio file and the next one.
Identifies the CD title using a 12-character digital code. The
ISRC is entered in the subcode and included silently.
If you do not know the ISRC of a title, you should leave this
text box blank.
Enables copy protection.
Enables cross fade for the selected file and the previous
one. If cross fade is enabled, you can set the cross-fading
period in seconds.
Page 30
Page 31

Music
7.1.1.2 Indexes, limits, split
On the Indexes, Limits, Split tab you can set and delete indexes and split audio files to
create two or more shorter ones.
Fig. 18. Audio Track Properties dialog box – Indexes, Limits, Split tab
The following areas and buttons are available:
Oscilloscope
Positions
(Start/End)
Displays a graphical representation of the audio file.
Shows the positions for the beginning and end of the audio file on
the CD.
Highlights a new index entry.
New Index
You can quickly get to the audio section you want using the index
entries.
Edit
Delete
Split
Play
Split at Index
Positions
Zoom In
Zoom Out
Full View
Opens the Edit index position dialog box.
You can define the precise position of a selected index here.
Deletes a selected index.
Splits the audio file at the marked position.
Starts playing from the marked position.
Splits the audio file at all index positions.
Enlarges the graphical representation of the audio file.
Reduces the graphical representation of the audio file.
Displays a graphical representation of the entire audio file.
7.1.1.3 Filters
Page 31
The Filters tab provides filters that enhance or modify the quality of the musical pieces. The
so-called non-destructive procedure is used for processing, i.e. the actual recording is not
changed, but flags are simply set that can be canceled at any time. Additional audio files are
not created during the process and the audio files are not actually changed until they are
burned. Click on the Test Selected Filters button to test the relevant filters.
Page 32

Music
The following filters are available:
Sets the volume of an audio file to a preset value. This filter can be
Normalize
useful to bring the volume of files originating from different sources
into line with one another.
Declick
Hiss
Reduction
Fade In
Fade Out
Stereo
Widening
Karaoke
Echo
Equalizer
Removes clicking and scratching noises, like the noises on old LPs
for example.
Reduces or removes the hiss on an audio file. All frequencies below
a certain threshold (hiss level) are removed.
Fades in the volume of an audio file from zero to full volume. This
filter can be useful for shortening files.
Fades out the volume of an audio file from full volume to silence.
This filter can be useful for shortening files.
Increases/reduces the stereo effect of an audio file. This filter only
works if the original file was recorded in stereo.
Fades out the vocals on an audio file. To do this the parts of a song
that are the same in both stereo channels are faded out.
Adds an echo to the audio file.
Changes the frequency, volume, bass, and pitch of the audio file.
Fig. 19. Audio Track Properties dialog box – Filters tab
7.2 Compiling jukebox Audio CD/DVDs
Using Nero Express you can compile CDs/DVDs in audio formats of your choice (e.g. in
Nero Digital, MP3 or WMA formats). In contrast to Audio CDs that can only be burned on
CDs, you can burn these compilations of different audio formats both on CD and on DVD –
provided that a DVD recorder is installed on your computer. The procedure is identical for
both compilation methods. You can opt for a single format or a mix of audio formats of your
choice.
Nero Express does not convert audio files when creating a Jukebox Audio CD/ DVD. This
means that MP3 files can also be burned as MP3 files for instance.
Page 32
Page 33

Music
If a HD DVD recorder is installed on your computer, you can select it and then display the
JukeBox HD DVD option in the Music area of the start screen. The procedure for
compiling and burning a jukebox HD DVD is the same as the compilation method for a
jukebox Audio CD/DVD.
In comparison to a DVD, a HD DVD has considerably more space and can store up to 15
GB on a single-layer disc. The capacity bar in the My Audio disc compilation window
displays comparatively more available space.
If a Blu-ray recorder is installed on your computer, you can select it to display the
Jukebox Blu-ray Disc option in the Music area of the start screen. The procedures for
both compiling and burning a jukebox Blu-ray disc are the same as the compilation method
for a jukebox Audio CD/DVD.
In comparison to a DVD, a Blu-ray Disc has considerably more space and can store up to
25 GB on a single-layer disc (up to 50 GB on a dual-layer disc). The capacity bar in the My
Audio disc compilation window displays comparatively more available space.
If Nero Image Recorder is activated, you can also select compilations in Nero Express that
would not be feasible with the recorders installed on your computer. For example, if you
have installed a CD recorder, you can also compile a DVD with Nero Image Recorder and
save the compilation as an image file.
To create a jukebox Audio CD/DVD, proceed as follows:
1. Click on the Audio menu icon in the Nero Express start screen.
Æ The Audio CD, Audiobook CD, Jukebox Audio CD, and Jukebox Audio DVD options
are displayed.
2. Click on the option you require, Jukebox Audio CD or Jukebox Audio DVD.
Æ The My Audio disc compilation screen is displayed.
Fig. 20. My Audio disc compilation screen
From a technical point of view, a compilation of special audio formats is a data CD/DVD.
You can also select Data > Data CD/DVD in the Nero Express start screen to create and
burn your project.
Page 33
Page 34
Music
3. Repeat steps 3 to 7 under Compiling an Audio CD.
Æ The audio files are added to the compilation and displayed in the compilation screen.
4. Click on the Next button.
Î You have successfully created a jukebox Audio CD/DVD and can now burn this
compilation.
7.3 Compiling an Audiobook CD
Using Nero Express you can compile audiobook files and burn them as an Audiobook CD,
i.e. in the form of an Audio CD. You can then play this on any standard CD player. Since
audiobooks can have a running time of several hours, Nero Express stores the compilations
of its audiobook files on several CDs if necessary. During the burn process, you will be
prompted to insert new blank discs.
To create an Audiobook CD, proceed as follows:
1. Click on the Audio menu icon in the Nero Express start screen.
Æ The Audio CD, Audiobook CD, Jukebox Audio CD, and Jukebox Audio DVD options
are displayed.
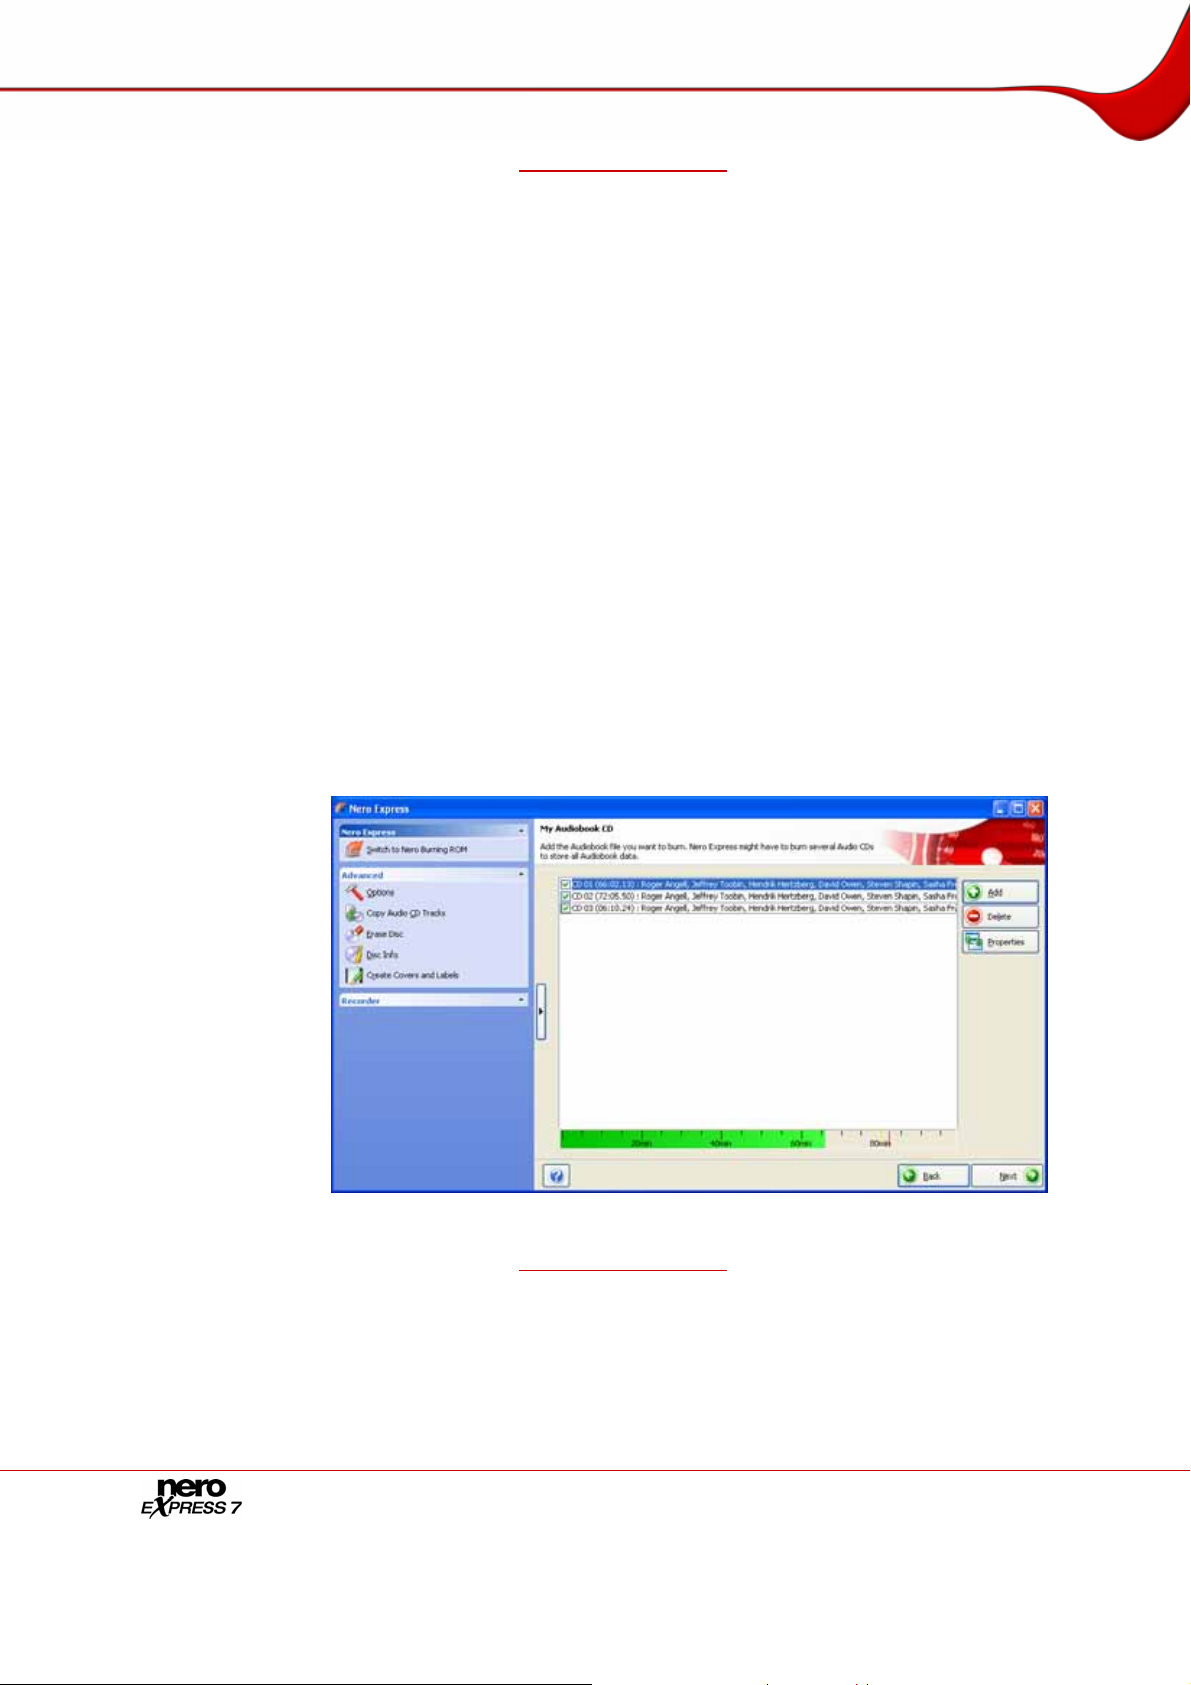
2. Click on the Audiobook CD option.
Æ The My Audiobook CD compilation screen is displayed.
3. Repeat steps 3 to 7 under Compiling an Audio CD.
Fig. 21. My Audiobook CD compilation screen
Æ The audiobook files are added to the compilation and displayed in the compilation
screen.
4. Click on the Next button.
Î You have successfully compiled an Audiobook CD and can now burn this compil ation.
Page 34
Page 35

Videos and slide shows
8 Videos and slide shows
8.1 Compiling Video CDs/Super Video CDs
Using Nero Express you can compile Video CDs (MPEG-1 format) or Super Vide o CDs
(MPEG-2 format) from your video and/or picture files, which can be played on almost all
VCD or SVCD and DVD players as videos or slide shows. Source files are automatically
converted to the correct format during the burn process. The procedure for both compilation
methods is identical.
Please note that the Create Super Video CD is not available in Nero Express Essentials
SE.
When creating a slide show in Nero Express, options such as Accentuate with background
music for example are not available. Other functions are available in Nero Vision.
Please see the separate Nero Vision user manual for full instructions on how to produce
professional looking slide shows.
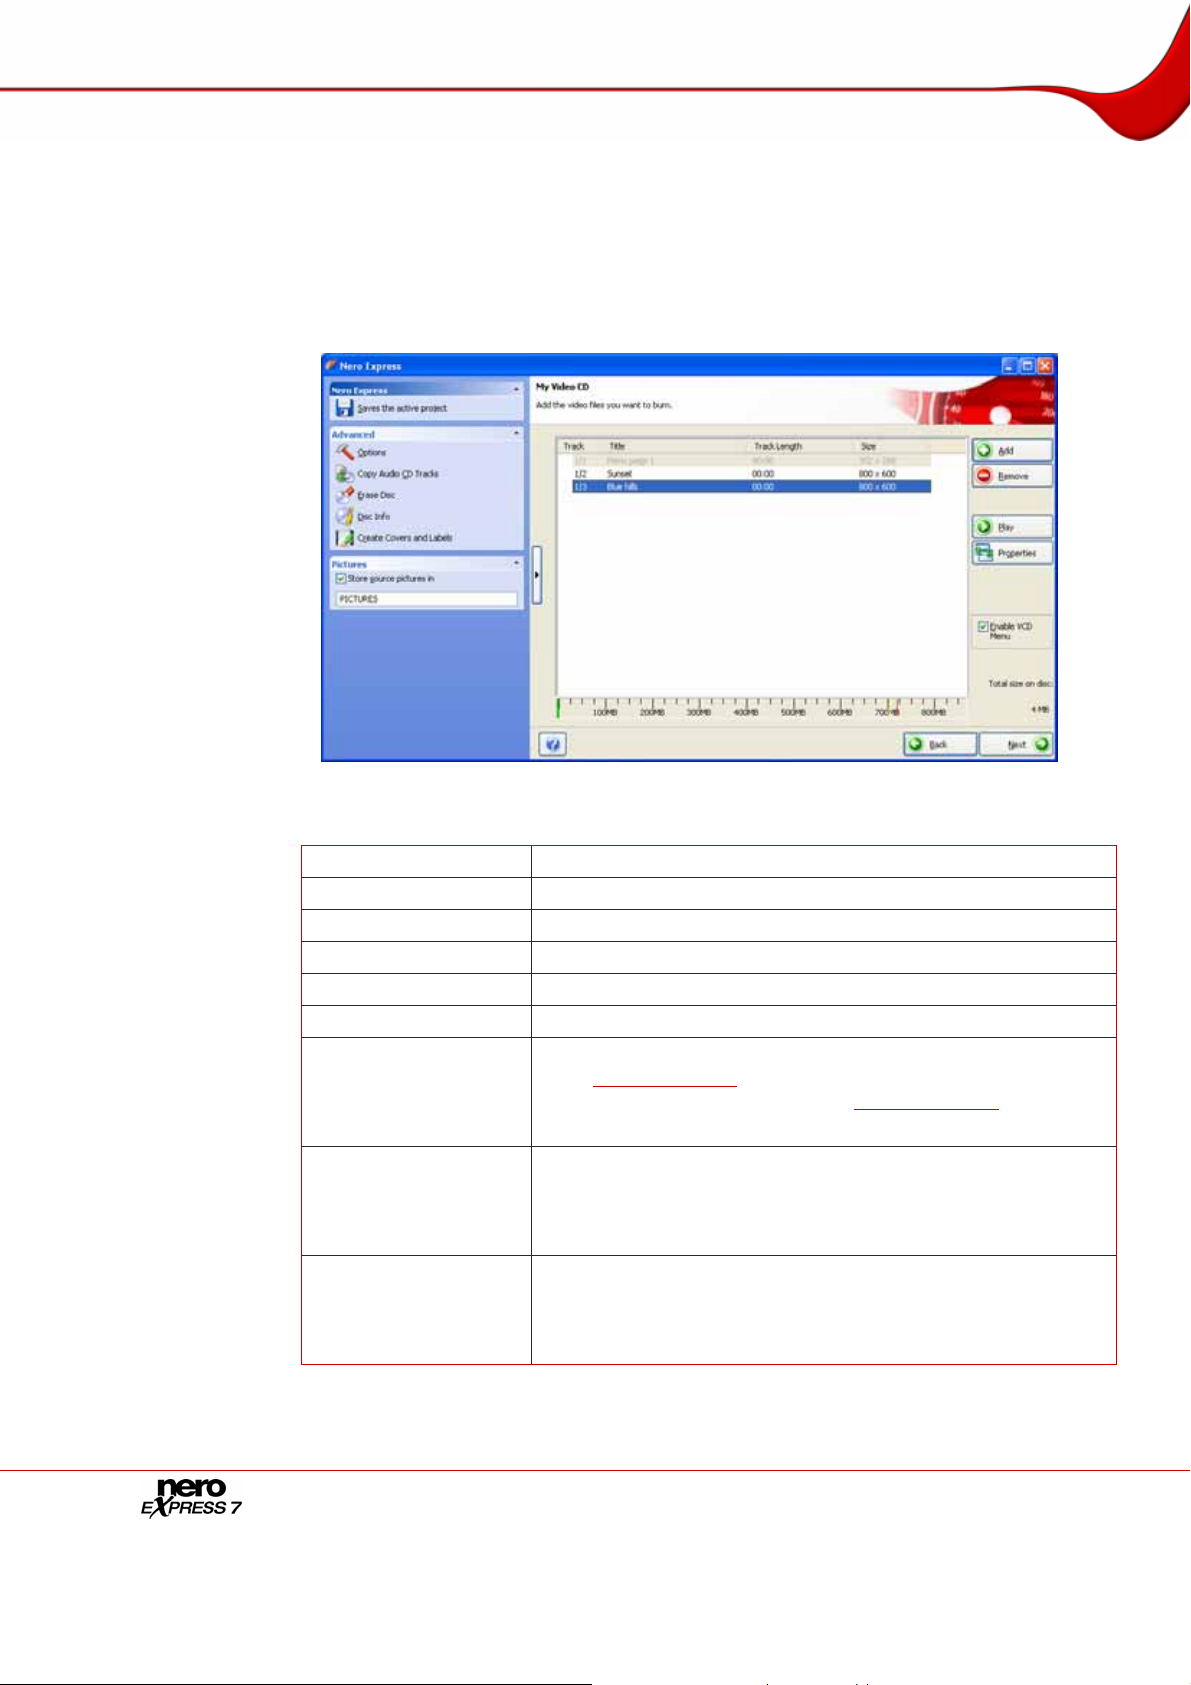
When creating a slide show as a VCD/SVCD the picture files involved are store d in a DAT
file. This type of file cannot be modified or viewed with an image processing program. If you
would like to save the original formats to your CD as well, open the extended area in the
compilation screen and check the Store source pictures in box.
Fig. 22. Videos/Pictures start screen
To create a (Super) Video CD, proceed as follows:
1. Click on the Videos/Pictures menu icon in the Nero Express start screen.
Æ The Video CD, Super Video CD, and DVD-Video Files options are displayed.
2. Click on the option you require, Video CD or Super Video CD.
Æ The My (Super) Video CD compilation screen is displayed.
Page 35
Page 36

Videos and slide shows
3. Click on the Add button.
Fig. 23. My Video CD compilation screen
Æ The Add files and folders window is opened.
4. Select the video and/or picture files that you want to add to the compilation.
5. Click on the Add button.
6. Repeat steps 4 and 5 for all video and/or picture files that you want to add to the compilation.
If you are searching for specific files and want to add them to your compilation, see
and adding files
.
Finding
7. Click on the Close button.
Æ The video and/or picture files are added to the compilation and displayed on the
compilation screen.
8. Customize the properties of the video and/or picture files to suit your requirements (see
Customizing properties).
9. Check the Enable (S)VCD Menu box (see Compilation screen).
10. Click on the Next button.
Æ If you have checked the (S)VCD Menu box, the My (Super) Video CD Menu screen is
displayed.
Page 36
Page 37

Videos and slide shows
1. Customize the look of the menu to suit your requirements (see Customizing the menu).
2. Click on the Next button.
Fig. 24. My Video CD Menu compilation screen
Î You have successfully compiled a (Super) Video CD and can now burn this compilation.
8.1.1 Customizing properties
You can display the properties of a video or picture file and/or change them on the
Properties and Menu tabs. To open the MPEG Info dialog box, click on the Properties
button on the compilation screen.
8.1.1.1
Track properties
The Properties tab contains important information on the selected file.
Fig. 25. MPEG Info dialog box – Properties tab
Page 37
Page 38

Videos and slide shows
The following buttons and input areas are available:
Effects
Pause after track
8.1.1.2 Menu
You can customize the information on your video or picture file for the menu on the Menu
tab.
Opens the Effects dialog box.
You can test or use the various filters in the preview here, or
cancel your selection.
Available for picture files only.
Sets the length of the pause in seconds between the video or
picture file selected and the following one.
The following input areas and options are available:
Title
Picture used as
thumbnail
8.1.2 Customizing the menu
In the My (Super) Video Menu screen you can customize the look of the menu to suit your
requirements. Just as with DVD-Video menus, you can select titles and/or chapters from the
movie to show in the VCD/SVCD menu.
Page 38
Fig. 26. MPEG Info dialog box – Menu tab
Defines the name of the video or picture file in the menu.
Defines which frame is displayed in the menu. You can use the
slider to select the picture you want.
Available for video files only.
Page 39

Videos and slide shows
The following buttons and options are available:
Layout
Background
Text
Show full
screen menu
Set as Default
Opens the Layout Settings dialog box.
You can set the layout of the menu here.
Opens the Background Settings dialog box.
You can load and customize the background image here.
Opens the Text Settings dialog box.
You can enter the text content for headers and footers and select
the font here.
Shows a preview of the full screen menu.
Saves the current menu settings as default values.
8.2 Compiling DVD-Videos
Using Nero Express you can burn DVDs made up of DVD-Video files from your hard drive.
You can show your burned DVDs on almost all DVD players.
Please note that it is not possible to create a DVD-Video from video files in Nero Express.
In Nero Vision you can convert video files into DVD-Videos.
To compile a DVD-Video, proceed as follows:
1. Click on the Videos/Pictures menu icon in the Nero Express start screen.
Æ The Video CD, Super Video CD, and DVD-Video Files options are displayed.
2. Click on DVD-Video.
Æ The DVD-Video files compilation screen is displayed.
Fig. 27. DVD-Video files compilation screen
3. Click on the Add button.
Æ The Add files and folders window is opened.
Page 39
Page 40

Videos and slide shows
4. Select the DVD-Video files that you would like to add to the compilation and click on the Add
button.
5. Repeat steps 4 and 5 for all DVD-Video files that you want to add to the compilation.
If you are searching for specific files and want to add them to your compilation, see
and adding files
.
6. Click on the Close button.
Æ The DVD-Video files are added to the compilation and are displayed in the compilation
screen.
If the DVD-Video files selected are larger than 4483 MB and if a DVD burner which can
burn DVDs with 2 layers (DVD DL) is installed, you can select the DVD9 (8152MB) option
in the drop-down menu.
7. Click on the Next button.
Î You have successfully compiled a DVD-Video and can now burn this compilation.
Finding
Page 40
Page 41

Creating a copy
9 Creating a copy
Using Nero Express and a DVD recorder you can copy both CDs and DVDs. If you have a
CD recorder, you can copy CDs. The procedures are identical.
You can also use a single drive to copy CDs/DVDs. Select the same drive as source and
destination drive.
If you are using a single drive for copying, you will be prompted to remove the source
CD/DVD and to insert a suitable blank disc after the image file has been written. The burn
process then starts automatically.
If you are not in possession of the copyright for the relevant CD/DVD and do not have
authorization from the owner of the copyright, unauthorized copying of CDs violates
national and international legislation.
If a HD DVD recorder is installed on your computer, you can select it to display the Copy
Entire HD DVD option in the Image, Project, Copy area of the start screen. The
procedures for both compiling and burning a data HD DVD are the same as the compilation
method for a data CD/DVD.
In comparison to a DVD, a HD DVD has considerably more space and can store up to 15
GB on a single-layer disc.
If a Blu-ray recorder is installed on your computer, you can select it and use it to display
the Copy Entire Blu-ray Disc option in the Image, Project, Copy area of the start screen.
The procedure for copying a Blu-ray disc is identical to the procedure for copying a
CD/DVD.
In comparison to a DVD, a Blu-ray Disc has considerably more space and can store up to
25 GB on a single-layer disc (up to 50 GB on a dual-layer disc).
If Nero Image Recorder is activated, you can also select compilations in Nero Express that
would not be feasible with the recorders installed on your computer. For example, if you
have installed a CD recorder, you can also compile a DVD with Nero Image Recorder and
save the compilation as an image file.
Fig. 28. Copy CD/DVD screen
Page 41
Page 42

Creating a copy
The following input areas are available in the Select source and destination screen:
Defines the drive from which the source information is
Source drive
read.
Insert the CD or DVD that you want to copy into the drive.
Destination drive
Defines the destination drive:
Insert a blank disc into this drive.
Opens the Recorder Information dialog box.
Info
This contains information on the selected destination
drive.
Enables direct copying from the source to the destination
drive. Data is not buffered on the hard drive during this
Quick copy
process. This option is only available if there are at least
two drives connected (not for Nero Image Recorder).
If this box is not checked, an image file will be created
first, which is then burned.
Defines the speed at which the CD is burned.
Writing speed
Only those burn speeds supported by the selected
recorder are displayed.
Not available for Nero Image Recorder.
Number of copies
Verify data on
disc after burning
Defines the number of copies you require.
Verifies whether the burned data is identical with the
original data.
Not available for Nero Image Recorder.
Defines the folder where the image file is stored.
Image file
You can change the name of the image file and the target
directory.
Not available for Nero Image Recorder.
The following check boxes are available in the extended area:
Read all subchannel
data
Determine maximum
speed
Simulation
Burning
9.1 Copying a CD/DVD
To copy a CD or DVD, proceed as follows:
1. Click on the Image, Project, Copy menu icon in the Nero Express start screen.
Page 42
Reads all subchannel data during copying.
Subchannel data is used to save additional information,
e.g. CD Text.
Not available for Nero Image Recorder.
Performs all steps in the burn process without using the
laser beam.
It can be assumed that a successful simulation will lead to
a successful burn process.
Not available for Nero Image Recorder.
Starts the actual physical burn process (e.g. after a
simulation). This box is checked by default.
Page 43

Creating a copy
Æ The Copy Entire CD, Copy Entire DVD and Disc Image or Saved Project options are
displayed.
Fig. 29. Image, Project, Copy start screen
2. Click on the option you require, Copy Entire CD or Copy Entire DVD.
Æ The Select source and destination screen is displayed.
3. Make the desired settings (see Creating a copy).
You can also copy CDs/DVDs using a single drive. Select the same drive as source and
destination drive.
If you are using a single drive for copying, you will be prompted to remove the source
CD/DVD and to insert a suitable blank disc after the image file has been written. The burn
process then starts automatically.
4. Set other options as required in the extended area of the window (see Creating a copy).
Some CDs/DVDs are copy-protected and cannot be copied. If you are not sure whether
your CD/DVD can be copied, activate simulation before commencing the actual physical
burn process.
5. Click on the Copy button.
6. If you are copying via the drive, the copy process starts.
If you are using Nero Image Recorder, the Save Image File dialog box is opened:
1. Enter a name for your image file in the File Name text box.
2. Select the relevant storage location in the Save to navigation tree and click on the Save
button.
Æ The copy and/or save process starts. You can follow the process status in the status bar.
Page 43
Page 44
Creating a copy
If you are using a single drive for copying, you will be prompted to remove the source
CD/DVD and to insert a suitable blank disc after the image file has been written. The burn
process then starts automatically.
Fig. 30. Copy process screen
7. Click on the Next button.
Î You have successfully copied a CD/DVD and can now continue by selecting another
option from the final screen or by closing Nero Express (see
Final screen).
Page 44
Page 45

Loading a disc image or saved project
10 Loading a disc image or saved project
Using Nero Express you can burn a CD/DVD from an image or a saved compilation that you
had previously saved on the hard drive (see
an image file
Image file or saved compilation
An image file is an exact replica of the data that is to be burned. You can burn it as often as
you like at a later stage, but it requires just as much space on the hard drive as the
compilation to be burned.
A saved compilation stores the links as well as the settings for the files that should be
burned. The content can only be opened with Nero Express as long as the paths remain
identical. The file size of a saved compilation is significantly smaller than the image file.
To load an image file or a saved compilation for the burn process, proceed as follows:
).
1. Click on the Image, Project, Copy menu icon in the Nero Express start screen.
Æ The Copy Entire CD, Copy Entire DVD, and Disc Image or Saved Project options are
displayed.
Burning with Nero Image Recorder – creating
Fig. 31. Image, Project, Copy start screen
2. Click on the Disc Image or Saved Project option.
Æ The Open dialog box is opened.
3. Select the image file (*.nrg) or saved compilation you want and click on the Open button.
Æ The selected file loads and the Final Burn Settings screen is displayed.
Î You have successfully loaded the image file or compilation and can now burn them (see
Burning discs with the drive).
Page 45
Page 46

LightScribe®
11 LightScribe®
Using Nero Express and a LightScribe® recorder you can create or load labels that you can
burn onto the label side of CDs/DVDs in the LightScribe® recorder. The label side of these
discs consists of a special coating or thermal layer, which allows the laser in the recorder to
print images and text on the CDs/DVDs.
The function is available as a separate Print LightScribe Label option in the start screen or
can be integrated as an intermediate step into the creation and burn process of a project.
This function is only available in recorders that support LightScribe
System requirements).
Using LightScribe® Direct Disc Labeling
®
If you have a CD or DVD recorder with LightScribe
LightScribe
If you have downloaded and installed the latest version of Nero 7 from the Nero website,
you must install the LightScribe
found at
®
System Software.
®
System Software separately. The latest version can be
www.nero.com/link.php?topic_id=93.
11.1 Printing LightScribe® labels (without compilation)
support, your system needs the latest
®
technology (see
To create and print a LightScribe® label for your CD/DVD, proceed as follows:
1. In the Recorder section of the extended area in the start screen, select the LightScribe®
recorder you want to use (see
Selecting recorders and activating Nero Image Recorder).
2. Insert a blank LightScribe® disc into the LightScribe® recorder with the label side facing
down.
Æ The Print LightScribe Label menu icon in the Nero Express start screen is displayed.
3. Click on the Print LightScribe Label menu icon.
Æ The Print LightScribe Label option is displayed.
Fig. 32. Print LightScribe Label start screen
4. Click on the Print LightScribe Label option.
Æ The Disc Label screen is displayed.
Page 46
Page 47

LightScribe®
Fig. 33. Disc Label screen
5. Create a label according to your requirements.
The interface in the Disc Label screen works on the same principle as Nero
CoverDesigner. Basically, it is irrelevant whether you print a label on paper or directly onto
an appropriate disc.
Please see the separate Nero CoverDesigner user manual for full instructions on how to
make professional looking covers and labels.
6. Click on the Next button.
Æ The LightScribe Print Properties screen is displayed.
7. Add to the required values in the text boxes and enable the option button for the desired print
quality (see
Customizing print properties).
8. Click on the Print button.
Æ The print process starts. You can monitor the process status in the status bar. As soon
as printing has finished, the Nero – LightScribe dialog box opens and displays a
message about the result of the print process.
Page 47
Page 48

LightScribe®
Fig. 34. Print Process screen
9. Click on the OK button.
10. Click on the Next button in the LightScribe Print Properties screen.
Î You have successfully created and printed a LightScribe® label according to your
requirements and can now continue by selecting another option fro m the final screen or
by exiting Nero Express (see
11.1.1 Customizing print properties
You can customize the print properties of your LightScribe® label to suit your requirements
in the LightScribe Print Properties screen.
Final screen).
Fig. 35. LightScribe Print Properties screen
Page 48
Page 49

LightScribe®
The following text boxes and buttons are available:
Print contrast
Number of copies
Drive
Preview
Adjusts the desired print quality.
This option button is set to Normal by default.
Defines the number of copies you require.
Defines the recorder you require.
Available only if multiple LightScribe® recorders are available.
Opens the LightScribe Print Preview dialog box.
A print preview of the label is displayed here.
11.2 Printing LightScribe® labels (within the project)
To create and print a corresponding LightScribe® label within your project, proceed as
follows:
1. In the Recorder section of the extended area in the start screen, select the LightScribe®
recorder you want to use
2. Compile a project of your choice (see e.g. Compiling data CD/DVDs, Compiling an Audio
, Compiling Video CDs/Super Video CDs or Compiling DVD-Videos).
CD
Selecting recorders and activating Nero Image Recorder).
Æ The Disc Label screen is displayed.
3. Create a label according to your requirements.
The interface in the Disc Label screen works on the same principle as Nero
CoverDesigner. Basically, it is irrelevant whether you print a label on paper or directly onto
an appropriate disc.
Please see the separate Nero CoverDesigner user manual for full instructions on how to
make professional looking covers and labels.
4. Click on the Next button.
Æ The Final Burn Settings screen is displayed.
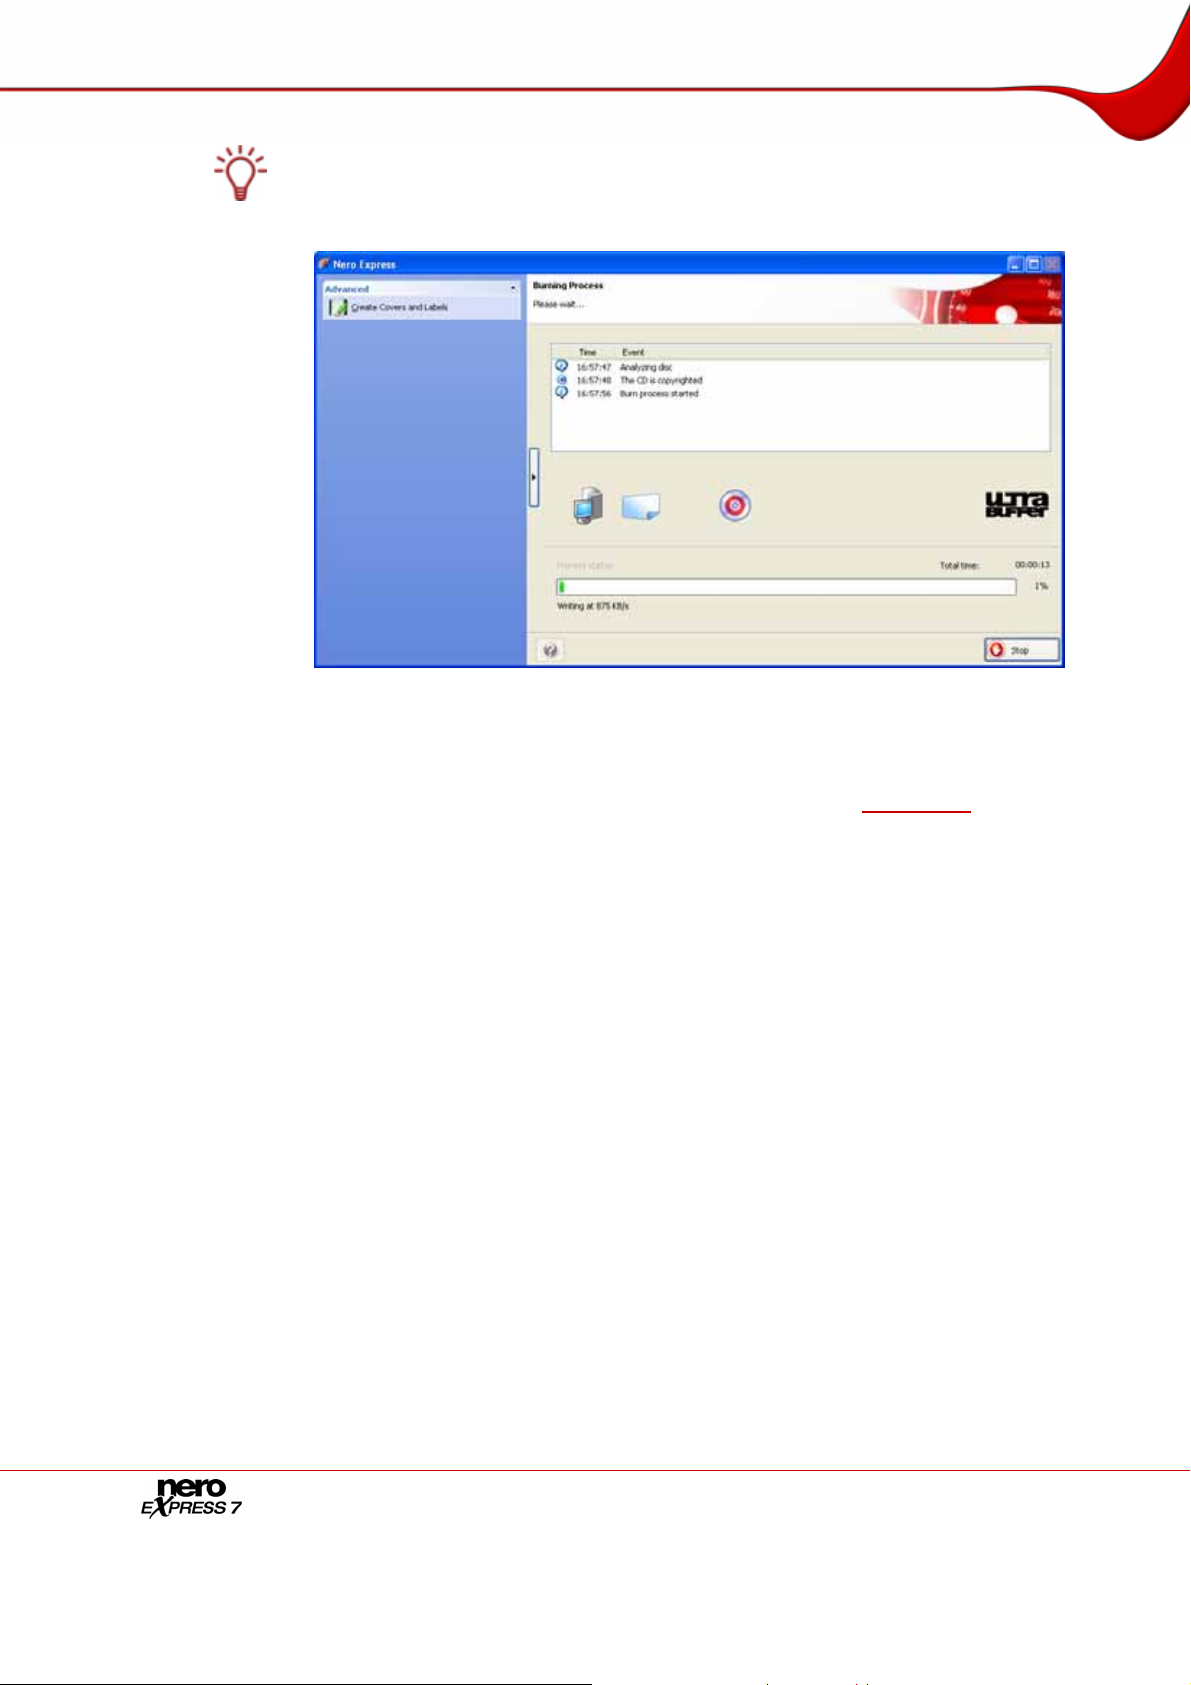
5. Repeat steps 2 to 6 under Burning discs with the drive.
Æ The Burning Process screen is displayed and the burn process starts. You can monitor
the process status in the status bar. As soon as the burn process is finished, the
CD/DVD is ejected and a dialog box is opened.
Page 49
Page 50

LightScribe®
Fig. 36. Burning Process screen – Turn CD dialog box
6. Turn the blank LightScribe
®
disc around, i.e. insert it in the LightScribe® recorder with the
label side facing down.
Æ The LightScribe Print Properties window opens and the print process starts. You ca n
monitor the process status in the status bar. As soon as printing is finished, the Nero –
LightScribe dialog window opens and displays a message about the result of the print
process.
Fig. 37. Print Process screen
7. Click on the OK button.
8. If you would like to print or save a log of the burn process, click on either the Print or Save
button.
9. Click on the Next button.
Î You have successfully created and printed a LightScribe® label as an integral part of
your CD/DVD project and can now continue by selecting another option from the final
screen or by exiting Nero Express (see
Page 50
Final screen).
Page 51

LabelFlash™
12 LabelFlash™
Using Nero Express and a LabelFlash™ recorder you can create or load labels in order to
burn the label or data side of DVDs in the LabelFlash™ recorder. The surface of these discs
consists of a special coating or thermal layer that allows the laser in the recorder to print
images and text on the DVDs.
The function is available as a separate Burn Label option in the extended area of the start
screen.
The interface in the Burn Label screen works on the same principle as Nero
CoverDesigner. Basically, it is irrelevant whether you print a label on paper or directly onto
an appropriate disc.
Please see the separate Nero CoverDesigner user manual for full instructions on how to
make professional looking covers and labels.
This function is only available with a LabelFlash™ recorder (see
System requirements).
Fig. 38. Burn Label start screen
Page 51
Page 52

LabelFlash™
12.1 Burn Label screen
You can create a label according to your requirements in the Burn Label screen.
The following drop-down menus and buttons are available:
Defines the area on the DVD that is to be printed on.
You can set the inner radius (distance between your label and
the inner edge) and the width of the desired printing area.
Printing area
When you are creating a DiscT@2, Nero Express displays only
the available printing area by default, i.e. the area on the data
side of your DVD that is not already taken up by data. You
cannot increase the radius of the printing area.
Opens the LabelFlash™ – Print Properties window.
Printing Quality
You can change the printing quality and contrast level and
show the changes you have made immediately in the print
preview.
Indicates whether the blank disc has been inserted with the
Disc type
label or the data side.
Depending on which side has been inserted, the LabelFlash™
or the DiscT@2 logo will appear in the Burn Label screen.
Preview
Opens the Print Preview window.
A print preview of the label or the DiskT@2 is displayed here.
Provides a selection of templates for designing your label.
Label templates
You can edit and customize a selected template to suit your
needs.
Fig. 39. Burn Label screen
Page 52
Page 53

LabelFlash™
12.2 Printing Labelflash™ labels and DiskT@2
The same procedure is used for creating and printing on the label and data sides.
When you are creating a DiscT@2, Nero Express displays only the printing area available
for pictures and text when you are creating your label by default, i.e. the area on the data
side of your DVD that is not already taken up by data. You cannot increase the printing
area radius.
To print a LabelFlash™ label on the label side or a DiskT@2 on the data side of your DVD,
proceed as follows:
1. In the Recorder area of the extended area in the start screen, select the LabelFlash™
recorder you want to use (see
Æ The Burn Label menu icon is displayed in the extended area of the start screen.
2. Click on the Burn Label menu icon.
Æ The Burn Label window is opened.
3. If you want to print a LabelFlash™ label on the label side of your DVD, insert a
corresponding blank LabelFlash™ disc in the recorder with the label side facing down.
Selecting recorders and activating Nero Image Recorder).
Æ The LabelFlash™ logo is displayed in the Burn Label screen.
4. If you would like to print a DiskT@2 on the data side of your DVD, insert a suitable blank
LabelFlash™ disc in the recorder with the data side facing down.
Æ The DiskT@2 logo appears in the Burn Label screen.
Please note that if you want to burn a DiscT@2 you must always burn it last for a
multisession DVD. Files burned on a DVD with DiscT@2 may be damaged during the burn
process.
5. Create a label according to your requirements.
6. If you would like to make changes to the print properties:
1. Click on the Change button.
Æ The LabelFlash™ - Print Properties window is opened.
Page 53
Page 54

LabelFlash™
Fig. 40. LabelFlash™ - Print Properties window
2. Adjust the print settings to suit your requirements and click on the OK button.
7. Click on the Burn button.
Æ The LabelFlash™ - Print window is opened and the print process starts. You can
monitor the process status in the status bar. As soon as the print process is finished, a
dialog box opens and displays a message about the result of the print process.
Fig. 41. LabelFlash™ - Print Process window
8. Click on the OK button.
Î You have successfully created and printed a LabelFlash™ label or a DiskT@2
according to your requirements and can now continue by selecting another option from
the final screen or by exiting Nero Express (see
Final screen).
Page 54
Page 55

Final Burn Settings screen
13 Final Burn Settings screen
In the Final Burn Settings window you can define the burn settings according to your
requirements, save your project to the hard drive as an image file using Nero Image
Recorder or start the burn process.
Fig. 42. Final Burn Settings screen
The following text boxes and check boxes are available in the Final Burn Settings screen:
Opens the Recorder Information dialog box.
You will find additional information here on the selected recorder and
the media types that can be burned using it. Additional options can
Options
be enabled/disabled. In some burners you can change the Book
Type settings.
Available for data DVDs and DVD-Videos only.
Not available when saving with Nero Image Recorder.
Disc name
Title (CD
TEXT)
Artist (CD
TEXT)
Number of
copies
Verify data on
disc after
burning
Defines the name of the CD/DVD.
Not available for Audio or Audiobook CDs.
Defines the title of the Audio CD if CD Text is supported.
Available for Audio and Audiobook CDs only.
Defines the artist on the Audio CD.
Available for Audio and Audiobook CDs only.
Defines the number of copies you require.
Not available for Audiobook CDs or when saving with Nero Image
Recorder.
Compares the burned data to the original data. With compilations of
multisession CDs/DVDs only the data that was added during the last
burn process is compared.
Not available when saving with Nero Image Recorder.
Page 55
Page 56

Final Burn Settings screen
Enables the option to write additional files to the
CD/DVD. The CD/DVD is not finalized.
Allow files to be added
later (multisession disc)
Multisession CDs/DVDs do not have to be written in a
single burn process. You can burn projects repeatedly
to a CD/DVD until it is completely burned.
Not available for Audio and Audiobook CDs or when
saving with Nero Image Recorder.
13.1 Extended area (Burn Settings)
You can access additional burn settings in the extended area of the Final Burn Settings
screen by clicking on the
An extended area with additional options and functions is available in all Nero Express
screens (see also
Extended area (start screen)).
The following drop-down menus and check boxes are available:
button in the left margin of the window.
Saves the active project
Writing speed
Write Method
Determine maximum
speed
Opens the Save As dialog box.
You can save your compilation here.
Defines the speed at which the CD is burned.
Only the burn speeds that are supported by the selected
recorder are displayed.
Not available when saving with Nero Image Recorder.
Defines the Disc-at-once or Track-at-once write
method.
Using the disc-at-once method the entire CD/DVD can
be burned without the write laser having to stop. With
the track-at-once method the laser switches off after
each track.
Available for CD compilations only. By default DVDs are
burned using the disc-at-once method.
Checks how fast the compiled data can be accessed
and reduces the selected writing speed if necessary.
This prevents a buffer underrun.
Recorders with a function for protecting against buffer
underruns do not require a speed test.
Not available when saving with Nero Image Recorder.
Page 56
Page 57

Final Burn Settings screen
Simulation
Write
Remove silence at end of
*.cda tracks
Create for US TV
standard
Performs all steps in the burn process without using the
laser beam.
We recommend running a simulation if you are
decompressing data before burning, e.g. an Audio CD
from MP3 files.
You can assume that if simulation is successful, the
burn process will also be successful.
Not available when saving with Nero Image Recorder.
Starts the actual physical burn process (e.g. after a
simulation). This box is checked by default.
Removes the silence at the end of an audio file. This
box is checked by default.
Audio data is stored in blocks even if you do not always
finish at the end of a block limit. The last block is filled
with silence.
Available for Audio CDs only.
Generates a CD compatible with most US DVD players.
Available for Video CDs and Super Video CDs only.
13.2 Burning with Nero Image Recorder – creating an image file
To set the burn settings according to your requirements and to save your project as an
image file to the hard drive using Nero Image Recorder , proceed as follows:
Image file or saved compilation
An image file is an exact replica of the data that is to be burned. You can burn it as often as
you like at a later stage, but it requires just as much space on the hard drive as the
compilation to be burned.
A saved compilation stores the links as well as the settings for the files that should be
burned. The content can only be opened with Nero Express as long as the paths remain
identical. The file size of a saved compilation is significantly smaller than the image file.
The Nero Image Recorder must be activated before it appears in the drop-down menu (see
Selecting recorders and activating Nero Image Recorder).
1. Compile a project of your choice (see e.g. Compiling data CD/DVDs, Compiling an Audio
, Compiling Video CDs/Super Video CDs or Compiling DVD-Videos).
CD
Æ The Final Burn Settings screen is displayed.
2. Select the Image Recorder option from the Current Recorder drop-down menu.
3. Add to the required values in the text boxes.
4. Add to the required settings in the extended area as necessary (see Extended area (Burn
Settings)).
5. Click on the Burn button.
Æ The Burning Process screen is displayed and the Save Image File dialog box is
displayed.
Page 57
Page 58

Final Burn Settings screen
6. Enter a name for your image file in the File Name text box.
7. Select the desired storage location in the navigation tree and click on the Save button.
Æ The burn or save process starts. You can monitor the process status in the status bar.
As soon as the burn or save process is finished, the Nero Express dialog box opens
and displays a message about the result of the burn process.
8. Click on the OK button.
9. If you would like to print or save a log of the burn process, click on either the Print or Save
button.
10. Click on the Next button.
Î You have successfully saved a project with Nero Image Recorder and can now continue
by selecting another option from the final screen or by exiting Nero Express (see
screen
).
13.3 Burning discs with the drive
To select one of the available recorders, to define the burn settings for your project
according to your requirements, and to start the burn process, proceed as follows:
1. Compile a project of your choice (see e.g. Compiling data CD/DVDs, Compiling an Audio
, Compiling Video CDs/Super Video CDs or Compiling DVD-Videos).
CD
Æ The Final Burn Settings screen is displayed.
2. Insert a suitable blank disc in the selected drive.
Fig. 43. Burning Process screen
Final
3. Select the recorder you want from the Current Recorder drop-down menu.
4. Add to the desired values in the text boxes as necessary and check the required boxes.
5. Add to the desired settings in the extended area (see Extended area (Burn Settings)).
6. Click on the Burn button.
Page 58
Page 59

Final Burn Settings screen
Æ The Burning Process screen is displayed and the burn process starts. You can monitor
the process status in the status bar. As soon as the burn process is finished, the Nero
Express dialog box opens and displays a message about the result of the print process.
Fig. 44. Burning Process screen
7. Click on the OK button.
8. If you would like to print or save a log of the burn process, click on either the Print or Save
button.
9. Click on the Next button.
Î You have successfully burned a project and can now continue by selecting another
option from the final screen or by exiting Nero Express (see
Final screen).
Page 59
Page 60

Final screen
14 Final screen
Once you have successfully concluded the burn or save process with Nero Express, the final
screen is displayed with the options Burn same project again, New project, Cover
Designer, and Save Project. You can select one of these options to continue working with
Nero Express or you can click on the
The following options are available:
Burn the same
project again
Returns to the Final Burn Settings screen.
You can burn the same project again with the same or different
settings (see
Opens the Nero Express start screen.
New project
You can create a new project here (see e.g.
CD/DVDs
CDs/Super Video CDs
Opens Nero CoverDesigner.
Cover Designer
Please see the separate Nero CoverDesigner user manual for
full instructions on how to make professional looking covers and
labels.
Opens the Save As dialog box.
Save project
You can save the current project if you want to access it again
later.
button to exit the program.
Fig. 45. Final screen
Burning discs with the drive).
Compiling data
, Compiling an Audio CD, or Compiling Video
).
Page 60
Page 61

Glossary
15 Glossary
A/D
Analog/Digital. Conversion of analog signals to digital signals.
AIFF
Apple Interchange File Format. Music file format for files that are extracted from a CD and
saved to the hard drive on a Macintosh system.
ASPI
Advanced SCSI Programming Interface. Interface between software, SCSI card, and the
operating system on a PC. This allows the device to communicate with the SCSI card.
ATAPI
Part of the EIDE (Enhanced Integrated Drive Electronics) interface that provides additional
commands to control a CD-ROM drive, CD-ROM recorder, hard drive, etc.
Audio CD
Generally consists of multiple audio files (titles). Audio CDs contain audio data only that can
be played on commercially available CD players and on computers with the relevant
software.
Block
The smallest addressable information unit on a CD-ROM. A block corresponds to a sector.
Blue Book
Standard for CDs created in the formats CD Extra and Enhanced CD.
Blu-ray
DVDs use a red laser to read and write data, whereas a blue laser is used to write to Blu-ray
Discs. The shorter wavelength (405 nm) of this laser makes it possible to set the laser beam
more precisely. Data can be packed more tightly and takes up less space on the disc. A Bluray Disc can store up to 25 GB on a single-layer disc and up to 50 GB on a dual-layer disc.
Boot CD
Boot refers to the loading of the operating system on your computer when it starts up. This is
normally done from the hard drive. If for some reason you do not want to boot from your hard
drive, you can use a boot CD to boot from the disc drive.
Bridge Disc
A CD-ROM that can be read from CD drives but also from CD-i devices such as a Photo CD
for example.
Buffer
Memory (buffer) integrated in the drive or the recorder where information is stored
temporarily.
Page 61
Page 62

Glossary
Buffer Underrun
During a recording data is continuously fed into the recorder's memory. If there is an
interruption in this steady flow, this results in a buffer underrun.
Cache
Fast temporary storage (buffer), which is used in different areas in a computer. Nero Express
uses the cache in addition to the buffer to store files that cannot be accessed fast enough.
This guarantees that the writing process is executed without interruption and that a buffer
underrun is avoided.
Caddy
Plastic sleeve for protecting a CD. The CD is inserted into the drive in the caddy.
CD-DA
Compact Disc - Digital Audio. The first standard for Audio CDs. An Audio CD consists of
multiple audio files whereby one file generally corresponds to one title/song; in addition, each
file is subdivided into sectors.
CD Extra/Enhanced Music CD
CD Extra is the latest standard for Audio CDs and multimedia components. A CD in this
format has two sessions. The first session contains pure audio data that can be played on a
CD player. The second session contains computer data in any format.
CD-i
Compact Disc-Interactive. Format for multimedia CDs that combine video, audio, and data
and can only be played using a CD-i player or CD-ROM drive that supports CD-i technology.
CD-R
Compact Disc-Recordable. Technology for CD-R (recordable) media.
CD-ROM
Compact Disc-Read Only Memory. Various computer readable forms of data such as
programs, picture or audio data, for instance, can be stored in this format.
CD-ROM - Mode 1 and 2
An addition to the CD-ROM format with additional functions for error detection and
correction. Mode 1 is used for computer data in particular. A code for error correction is used
for this. Mode 2 is used with CD-ROM, CD-XA, and CD-i formats with audio data and
contains an error recognition code only.
CD-WO
Compact Disc–Write Once. CD that can only be written to once. Refer also to CD-R.
CD-XA
Compact Disc-Extended Architecture. This is based on the Yellow Book standard, but you
can also save audio or video data. The different types of data are linked to each other
(interleaving) so that synchronization problems can be reduced.
Page 62
Page 63

Glossary
CIRC
Cross-Interleaved Reed-Solomon Code. Error-recognition and correction process which is
integrated permanently in the hardware of a CD player or recorder.
CLV
Constant Linear Velocity. The data is read from a CD at a constant scan rate.
Digitalization
Conversion of analog signals to digital signals.
Disc-At-Once (DAO)
An entire CD/DVD is recorded without ever stopping the laser. This format is best for Audio
CDs that will be played in home and car stereo equipment.
Quick Copy
Procedure for burning data on a CD-R. In contrast to the quick copy (on-the-fly) method, the
older, traditional method first saves all data to a buffer and then burns it to the CD from
there. The quick copy procedure transfers the data directly from the original storage location
to the CD-R. To do this, Nero uses a compilation, a small file that simply refers to the
transferred data.
Disc Image
The file that is to be copied or written is stored temporarily on the hard drive. A disc image is
produced from this image.
DVD
Digital Versatile or Video Disc.
DVD-R
DVD was originally designed for the movie and games market. In the meantime it has
become possible to burn data and certain video films to a DVD-Video disc and play them on
all DVD-ROM drives. The DVD-R is a non-rewritable format that is compatible with most
DVD-ROM drives and DVD players.
DVD-RAM
Format of rewritable media that is compatible with most DVD-ROM drives and DVD players.
Files can be copied and deleted.
DVD-RW
DVD ReWritable. The DVD-RW is a rewritable disc that fulfills the same functions as a DVDR, but is compatible with fewer DVD-ROM drives and DVD players.
DVD+R/RW
Format developed in cooperation with Hewlett-Packard, Mitsubishi Chemical, Philips, Ricoh,
Sony, and Yamaha. DVD+RW is a rewritable format that is fully and immediately compatible
with DVD players and DVD-ROM drives.
Page 63
Page 64

Glossary
EDC/ ECC
Error Detection Code/Error Correction Code. Used to identify and correct scan errors which
may be due to scratches or dirt on the surface of a CD.
Enhanced Music CD/CD Extra
CD Extra is the latest standard for Audio CDs and multimedia components. A CD in this
format has two sessions. The first session contains pure audio data that can be played on a
CD player. The second session contains computer data in any format.
Finalizing
Definitive conclusion of the process of writing to a CD/DVD. After this it is not possible to
write to the CD/DVD anymore.
Frame
With an Audio CD, 75 sectors provide one second of played music. One sector consists of
up to 98 frames, one frame contains 24 data bytes and 9 control bytes.
Green Book
Standard for CDs that are created in the CD-i format.
HD DVD
DVDs use a red laser to read and write data, whereas a blue laser is used to write to HD
DVDs. The shorter wavelength (405 nm) of this laser makes it possible to set the laser beam
more precisely. Data can be packed more tightly and takes up less space on the disc. A HD
DVD disc can store up to 15 GB on a single-layer disc.
HFS CD
File system used by Apple© Macintosh systems. This format is only suitable for Macintosh
discs.
High Sierra
The forerunner of the current ISO standard 9660. This standard which was publishe d in 1986
has become less important in the meantime.
Host Adapter
Adapter which connects a CD recorder with the SCSI bus of the computer.
Hybrid CD
Consists of data in the HFS section (Mac) and in the ISO 9660 section (PC). If a hybrid CD is
inserted in a Macintosh computer, only the Macintosh-specific data is displayed; if the CD is
inserted in a PC, only the ISO data is displayed.
Image
Describes all edited data which will later be written to a CD.
Table of Contents (T.O.C.)
Indicates the content of every session. The table of contents is stored in the lead-in.
Page 64
Page 65

Glossary
Interlaced Video
In the interlaced mode video images are shown as two fields. In the first field every second
line (1, 3, 5, …, 575) is shown. The second field displays the rest of the lines in the image (2,
4, 6,… 576) so that it appears as a complete picture to the eye. Most video material consists
of fields. A deinterlacer is required for display on a full-screen device (monitor, projector).
Interleaving
Also referred to as nesting, this is the storage of computer data on the CD-ROM/XA in linked
form. Allows synchronization of audio and computer data during playback.
ISO 9660
Universal standard (format) for CDs that defines CD characteristics. This format can easily
be used in many computer environments. If a CD is to be read on a number of systems, the
length of the file name must be kept short. (Up to 8 characters can be used in a DOS
environment.)
Jitter Control (audio correction)
Many CD-ROM drives cannot read an individual sector on an Audio CD, which means that
small gaps occur in the data stream. Audio correction synchronizes the data stream by
overlapping the sectors and so gaps do not occur.
Joliet
File name standard that was designed for Microsoft® Windows® 95 and Microsoft®
Windows® NT. Up to 64 characters are supported in the file name (8 characters in DOS).
Chapter Marks
These are marks set in the video which identify a scene or a position.
Label
Most CDs have an imprint or label. You can use different methods, such as screen printing
for example, to apply a label to the CD.
Lead-In Area
First area (inner-most area) of the user data on a disc. This is where the table of contents
and additional information concerning the CD/DVD is stored.
Lead-Out Area
Last area of user data on a disc. If the CD/DVD has not yet been finalized, the reference to
the next session is stored here.
Mixed Mode
Format that combines audio and data on the CD. In this process, the data is recorded first
followed by the audio files in a single session.
Mode 1/Mode 2
Nero normally writes ISO data in the CD sector format Mode 1, but also supports the socalled XA format. The XA format is an extension of ISO structures and can only be burned in
Mode 2.
Page 65
Page 66

Glossary
Multisession
After a first session has been written to the CD, additional information in a different data set
can be added.
MP3
MPEG-1 Audio Layer 3. Audio format often used to compress audio files to a fraction of their
original size (ratio 1:10) without any loss of quality.
MPEG
Motion Picture Experts Group. Standard that was developed for videos compressed at a
higher ratio (e.g. SVCD and VCD).
MPEG-1
This format which is a part of the MPEG compression family has the highest compression
rate.
MPEG-2
There are only minor differences between MPEG-1 and MPEG-2. MPEG-2 works better with
TV sets with interlacing and is a broadcasting standard.
MPEG-3
Standard for defining high-definition TV.
MPEG-4
This standard is the next generation of MPEG-2.
Master
CD used for reproduction purposes.
Mixed Mode CD
Computer and audio data is stored on a CD of this type. Computer data is generally located
on the first track and the audio data on subsequent tracks.
Multisession CD
CD burned in several successive sessions.
NTSC
Standard for video and television in the United States and Japan. NTSC has more frames
per second than PAL, but has fewer horizontal lines.
OEM
Original Equipment Manufacturer. An OEM product is manufactured by one company for
another, which then sells it as its own product.
Orange Book
Standard in which the CD-MO (Magneto-Optical) and CD-WO (Write Once) technologies are
defined. It provides the basis for CD-R.
Page 66
Page 67

Glossary
PAL
Video and TV standard in Europe. PAL has more horizontal lines than NTSC, but has fewer
frames per second.
Photo CD
CD which is used for storing images, photos, slides, and other visual data. A photo CD
generally consists of multisessions. The standard originates from Kodak and Philips.
Plug-In
Software used to add other features to a program (software) or to support troubleshooting.
Red Book
This standard describes the CD-DA.
Romeo
Old, outdated data structure standard which was created by Adaptec to support file names of
up to 128 characters including spaces. Unicode characters are not supported. Files using the
Romeo standard can only be read under Windows® 95 and Windows® NT operating
systems. However, files of up to 31 characters can also be read on Macintosh systems.
Scan Rate
Indication of the frequency with which analog signals are converted into digital characters.
Fast Copy
Nero reads the data from the CD-ROM/DVD drive and writes it directly to the blank disc in
the CD recorder. This method is faster than copying an image file and it does not require any
space on your hard drive. The disadvantage is that a buffer underrun can occur.
SCSI
Small Computer System Interface. Bus system to which different terminal devices such as a
SCSI hard drive, streamers or a CD recorder may be connected. At this time, SCSI is the
only possibility of operating a CD recorder on a typically used computer system.
Sector
Smallest addressable information unit on a CD. A sector is composed of 2,352 bytes of
which - depending on the type of CD used - differing amounts are available as user data. A
sector generally consists of a header, synchronization bits, and user data. It may also have
error recognition and correction data. A drive with a simple read speed of 1/75 seconds is
required to read a sector.
Session
Closed data area on a CD/DVD. A session is marked at the start and at the end. If more than
one session is recorded on a CD/DVD, this is referred to as a multi-session CD/DVD.
Session-At-Once
Recording type mainly for CD Extra. A first session with different audio files is recorded in a
single process. The laser is then switched off, but the CD is not closed, which means you
can still write more data to it. Afterwards a second (data) session is written and then the disc
is closed.
Page 67
Page 68

Glossary
Simulation
Performs all steps in a burn process without using the laser beam. We recommend running a
simulation if you are decompressing data before burning, e.g. when burning an Audio CD
from MP3 files. You can assume that if simulation is successful, the burn process will also be
successful.
Super Video CD (SVCD)
Source data must be MPEG-2 encoded and the parameters must be SVCD-compliant. The
encoder used must feature the necessary options. SVCD discs can be played on DVD
players, PCs with DVD-ROM or CD-ROM drives with software that supports processing of
this video format.
Track
An individual piece of music on an Audio CD.
Track-At-Once (TAO)
Writing method in which each track is written individually to the CD. The writing process is
interrupted briefly after each track, i.e. the laser switches off.
Driver
Software file that will allow your hardware to be seen by the operating system or software
program and/or enhance their performance.
UDF/ISO CD
File system specially optimized for dealing with large volumes of data.
Video CD (VCD)
Video Compact Disc. Movies, audio, and video data is stored using the MPEG compression
standard. VCDs can be played by the majority of CD-ROMs, DVD players, and DVD-ROM
drives with the appropriate software for processing this video format.
Volume Descriptor
Area at the beginning of a CD containing the structure of the file system. It may also contain
additional and optional information about the CD (e.g. the name of the CD, the publisher, the
copyright notice).
WAV/Wave
Part of the general RIFF standard (Resource Interchange File Format). This format supports
various scan rates and scan depths.
White Book
Format developed by Sony, Philips, and JVC in 1993, in which the Red Book CD format was
enhanced to record digital videos in MPEG-1 format (known as VCD).
WO
Write Once. Disc that can be written to once. This includes CD-Recordable.
WMA File
Windows Media Audio.
Page 68
Page 69

Glossary
Yellow Book
This standard defines the CD-ROM.
Page 69
Page 70

Index
16 Index
A
Audio
Audio CD.............................................................................61
Copying Audio CD Tracks.........................................5, 10, 12
Creating An Audio CD.........................................................28
Track ...................................................................................68
B
Blu-ray................................................ 16, 20, 33, 41, 61
Buring
Writing Method....................................................................63
Burning.......................................................................55
Burn Process.......................................................................59
Burn Settings.......................................................................55
Image File............................................................................55
Nero Image Recorder........................................17, 45, 55, 57
Options..............................................................10, 56, 57, 58
Recorder..............................................................................58
Simulation............................................................................57
Write Method.......................................................................56
Writing Method..............................................................67, 68
Writing Speed......................................................................56
C
Contact.......................................................................72
Copy Protection..........................................................43
Copying......................................................................41
Copying a CD/DVD .............................................................42
Destination Drive.................................................................43
Fast Copy............................................................................67
Source Drive........................................................................43
Copyright....................................................................41
D
Data................................................8, 20, 49, 57, 58, 60
Creating Data CD/DVDs......................................................20
DirectX..........................................................................6
DiskT@2.....................................................................53
E
Erasing a Disc.............................................................14
F
Files
Adding............................................................... 21, 29, 36, 39
Compiling................................................................ 18, 29, 36
Finding Files ..................................................... 22, 29, 36, 40
Hiding............................................................................ 22, 24
G
Glossary......................................................................61
H
HD DVD................................................................33, 41
HD-DVD..........................................................16, 20, 64
L
LabelFlash..................................................5, 10, 16, 51
Burn Label .......................................................................... 51
Label................................................................................... 65
LightScribe ....................................................5, 9, 16, 46
Label................................................................................... 65
Printing Labels.................................................................... 46
M
Music ..........................................................................28
Audio Formats .................................................................... 32
Compiling Jukebox Audio CD/DVDs ..............................9, 32
Creating An Audio CD ...................... 9, 28, 34, 49, 57, 58, 60
Creating Audiobook CD.................................................. 9, 34
Filters.................................................................................. 31
Indexes............................................................................... 31
Track................................................................................... 68
Track Properties ........................................................... 18, 29
N
Nero Burning ROM .....................................................10
Nero CoverDesigner.................................10, 47, 49, 51
Page 70
Page 71

Index
Nero Express
About Nero Express..............................................................5
Customize ...........................................................................11
Exiting..................................................................................60
Starting..................................................................................7
Versions ................................................................................5
Nero Express Essentials ..............................................5
Nero Express Essentials SE.........................................5
Nero Image Recorder...........................................17, 43
Burning..............................................................17, 45, 55, 57
Image ..................................................................................64
Image File......................................................................45, 57
Loading Image File..............................................................45
R
Recorder
Burning................................................................................58
Nero Image Recorder..........................................................43
Recorders............................. 8, 9, 10, 16, 46, 49, 53, 57
Activating Nero Image Recorder.........................................17
Selecting Recorders............................................................16
S
Save.......................................................................9, 45
Saving ..................................................................10, 60
SecurDisc™....................................................10, 16, 20
Activate settings............................................................22, 24
Settings ...............................................................................15
Slide Shows................................................................35
Menu .............................................................................36, 38
Slie Shows
Track Properties..................................................................37
Start Screen..................................................................8
Data....................................................................................21
Extended Area............................................................ 5, 9, 56
Image.................................................................................. 45
LabelFlash..........................................................................51
LightScribe.......................................................................... 46
Music .................................................................................. 28
Video................................................................................... 35
System requirements
DirectX.................................................................................. 6
Soundcard ............................................................................ 6
V
Video ..........................................................................35
Creating DVD-Video.....................................9, 39, 49, 57, 58
Creating VCD/SVCD...........................5, 9, 35, 49, 57, 58, 60
DVD-Video Files.................................................................39
Menu................................................................................... 36
MPEG 1..............................................................................35
MPEG 2..............................................................................35
MPEG-1.............................................................................. 66
MPEG-2.............................................................................. 66
Super Video CD.................................................................. 68
Video CD ............................................................................ 68
Videos
Menu....................................................................... 19, 37, 38
Track Properties ........................................................... 18, 37
W
WHQL-certified driver ...................................................6
Page 71
Page 72

Contact
17 Contact
17.1 Contact details
Nero Express is a Nero AG product.
Nero AG
Im Stöckmädle 13-15
76307 Karlsbad
Germany
Web:
Help:
E-mail:
Fax:
www.nero.com
http://support.nero.com
techsupport@nero.com
+49 724 892 8499
Copyright © 2007 Nero AG and its licensors. All rights reserved.
Page 72
 Loading...