

Page 1
User’s Guide
Nero Express 6
www.nero.com
Page 2

Copyright and Trademark Information
The Nero Express 6 User’s Guide and all contents are copyrighted and the
property of Nero AG. All rights reserved. This User’s Guide contains materials
protected under International Copyright Laws. No part of this Guide may be
reproduced, transmitted or transcribed without the expressed written permission
of Nero AG.
All brand names and trademarks are properties of their respective owners.
The product and material in this manual is subject to change without prior notice
and does not represent a commitment on the part of the manufacturer, who
assumes no liability or responsibility for any errors that may appear in this
manual.
Nero AG accepts no claims beyond those in the warranty. Nero AG accepts no
liability for the correctness of the contents of the Nero Express 6 User’s Guide.
The contents of the enclosed software and the Nero Express 6 User’s Guide is
subject to change.
All trademarks are for information purposes only.
Unless you own the copyright or have the permission of the copyright
holder, the unauthorized copying of discs can represent a violation of
national or international laws and may result in serious penalties.
Copyright © 1995 – 2005 Nero AG
REV 1.5
Page 3

Table of Contents
1 Introduction.......................................................................................... 6
1.1 Welcome to Nero Express 6 ...............................................................6
1.2 OEM vs. Retail Versions of Nero Express 6 ......................................7
1.3 Nero Express 6 SE's special features................................................7
2 Installing Nero Express 6.................................................................... 8
2.1 System Requirements .........................................................................8
2.2 Installing Nero Express 6....................................................................9
2.3 Uninstalling Nero Express 6 ...............................................................9
3 Getting Started................................................................................... 10
3.1 Opening Nero Express 6 for the first time!......................................10
3.2 Go Nero! Button.................................................................................14
3.3 More Button........................................................................................ 15
3.3.1 Configure .............................................................................................16
3.3.2 Save Tracks To Hard Drive .................................................................17
3.3.3 Erase Disc ...........................................................................................20
3.3.4 Disc Info...............................................................................................21
3.3.5 Cover Designer....................................................................................21
3.4 Nero Toolkit........................................................................................22
3.4.1 Nero CD-DVD Speed...........................................................................23
3.4.2 Nero DriveSpeed .................................................................................24
3.5 Nero Wave Editor (Retail Only)......................................................... 26
4 Data..................................................................................................... 27
4.1 Creating your first data disc .............................................................27
4.2 Bootable Data Discs ..........................................................................35
4.3 For Advanced Users..........................................................................39
4.3.1 Hide Files.............................................................................................39
5 Music .................................................................................................. 40
5.1 Music...................................................................................................40
5.2 Creating your first audio disc........................................................... 41
5.3 Creating a disc with audio and data.................................................46
5.4 MP3 .....................................................................................................51
5.4.1 Information mp3PRO encoder plug-in .................................................55
5.5 WMA....................................................................................................57
Nero Express Table of Contents • 3
Page 4

5.6 Nero Digital Audio .............................................................................61
5.7 For Advanced Users..........................................................................66
5.7.1 Image Recorder ...................................................................................66
5.7.2 Audio Properties ..................................................................................67
6 Video/Pictures.................................................................................... 73
6.1 Video/Pictures....................................................................................73
6.2 Creating your first video disc ...........................................................73
6.3 Creating your first super video disc ................................................79
6.4 Advanced Users................................................................................. 85
6.4.1 Video and Super Video Properties ......................................................85
7 DVD ..................................................................................................... 87
7.1 DVD .....................................................................................................87
7.2 Selecting your recorder ....................................................................88
7.3 Creating your first DVD disc.............................................................90
7.4 Creating a DVD-Video disc from DVD-Video files...........................90
8 Copy Entire Disc................................................................................ 94
8.1 Copy Entire Disc ................................................................................94
9 Disc Image or Saved Project ............................................................ 99
9.1 Disc Image or Saved Project ............................................................99
9.2 Creating a disc from a disc image ...................................................99
9.3 Creating a disc from a saved project.............................................103
10 LightScribe....................................................................................... 107
10.1 System requirements ......................................................................107
10.2 Printing LightScribe labels .............................................................108
10.3 Creating a compilation, and burning and printing LightScribe
labels.................................................................................................108
10.4 Printing LightScribe labels (without burning a compilation).......123
10.5 LightScribe FAQs ............................................................................135
11 Preferences ...................................................................................... 137
11.1 Preferences ......................................................................................137
11.2 General Tab ......................................................................................137
11.3 Cache Tab.........................................................................................139
11.4 Language Tab ..................................................................................140
11.5 Sounds Tab ......................................................................................141
11.6 Expert Features Tab ........................................................................ 142
11.7 Database Tab ...................................................................................143
11.8 Ultrabuffer Tab .................................................................................145
11.9 Misc Tab ...........................................................................................146
Nero Express Table of Contents • 4
Page 5

12 Technical Support ........................................................................... 147
12.1 F.A.Q.’s .............................................................................................147
12.2 Contact .............................................................................................149
13 Glossary ........................................................................................... 150
14 Index ................................................................................................. 163
Nero Express Table of Contents • 5
Page 6

1 Introduction
1.1 Welcome to Nero Express 6
Welcome to the world of CD/DVD burning! Thank you for your purchase of Nero
Express 6 – one of the easiest and most reliable CD/DVD recording packages to
help store your data, music, and video on CD or DVD.
With our state-of-the-art technology and nonstop drive for improving our software,
we are continuously implementing the latest know-how, to do our part in making
sure that your burning experience is easy and trouble-free.
As you read this step-by-step instruction guide, it will assist you in creating your
first disc – whether it is Data, Audio, Video, or SVCD. You will soon see how easy
the process can be and you will shortly be on your way to making your first disc!
Nero AG realized that not everyone is a long time user or an expert their first time
burning a CD/DVD and many users needed a little help with their first recording.
So with this understanding, the User’s Guide was created with the very new
users in mind.
Nero Express 6 is a new and innovative wizard based recording application
based on the main application Nero. With the main essentials included such as
data, audio, copy, and video, it will also work with the DVD-RW, and DVD+RW
drives.
You are able to record MP3’s, archive your favourite photo’s, among the many
features of this software.
If you are a user of Nero, Nero Express 6 is automatically integrated. For details
about Nero, please see the Nero manual.
Nero Express Introduction • 6
Page 7

1.2 OEM vs. Retail Versions of Nero Express 6
OEM stands for Original Equipment Manufacturer. It basically means that the
Nero Software that was bundled with your recorder is a smaller version of the
Retail package. It will not have as many features and you would need to upgrade
in order to have full functionality and take advantage of the great new features!
If you are an owner of the Nero Burning ROM Retail version, the following
options are included:
Virus checking before burning
Crossfading option
Use of two recorders simultaneously
1.3 Nero Express 6 SE's special features
Nero Express 6 SE differs from the full version of Nero Express 6, both in
relation to the types of compilation possible, and in the software's range of
functions:
The following compilations are not possible:
miniDVD
Bootable CDs / DVDs
Audio and data
Nero Digital Audio CDs / DVDs
Super Video CDs
The following features are not included or are only available to a limited
extent:
Nero Cover Designer
It is not possible to save audio tracks
Rewritable discs can only be erased using Nero StartSmart
Information on the discs can only be obtained using Nero StartSmart
Nero Express Introduction • 7
Page 8

2 Installing Nero Express 6
2.1 System Requirements
Your system should come with a pre-installed operating system or you may
choose to upgrade your operating system to the latest. Below you will find a list of
those that Nero Express 6 support. Please check to make sure that you have
one of the following operating systems:
Operating System
Windows 98/SE
Windows ME
Windows 2000 (service pack 4 or higher)
Windows XP
Windows Server 2003
Hardware
Your PC must have a 500 MHz system or higher recommended. Please refer
to the PC manuals that came with your system for system configuration
information.
You must have at least 64 MB RAM memory. Generally, more would be better.
The hard disk access time should be less than 19 milliseconds
Graphics card with 8 MB or higher (for video).
We recommend that Nero Express 6 will be most comfortable to work with in
a screen resolution of 1024x768 or greater.
700 MB of free hard drive space for drive images recommended. Generally,
more would be better.
Nero Express Installing Nero Express 6 • 8
Page 9

2.2 Installing Nero Express 6
Step 1: Insert the Nero Express 6 CD-ROM into your CD/DVD drive on your PC.
If you have a feature called “Autorun” activated, this will start your installation
process automatically.
If you do not have “Autorun” activated, you can go to My Computer > Click on the
drive letter of the CD/DVD drive > click setup.exe
Step 2: Follow prompts until you are finished installing the software.
Step 3: Restart your PC
2.3 Uninstalling Nero Express 6
Step 1: Go to Start > Control Panel > Add or Remove Programs.
In some operating systems, you will find - Start > Settings > Control Panel.
Step 2: Select Nero Express 6 in the Add or Remove Programs window and
click “remove”.
Step 3: In some cases, you will find that when removing software, there will be
one or two files that the operating system will ask if you want them removed since
they may be shared by other programs. If you are unsure, always opt to keep
these files.
Nero Express Installing Nero Express 6 • 9
Page 10

3 Getting Started
3.1 Opening Nero Express 6 for the first time!
Now that we are ready to start recording your first disc, let us begin by opening
the program Nero Express 6.
Depending on the version, you can open up the software program as follows:
a. Start >(All) Programs > Nero > Nero 6 > Nero Express.
b. Start >(All) Programs > Nero > Nero 6 Ultra Edition > Nero Express.
c. Start > (All) Programs > Nero > Nero OEM > Nero Express.
F.Y.I.! The path how to open Nero Express 6 described above can differ in some
versions.
Nero Express Getting Started • 10
Page 11
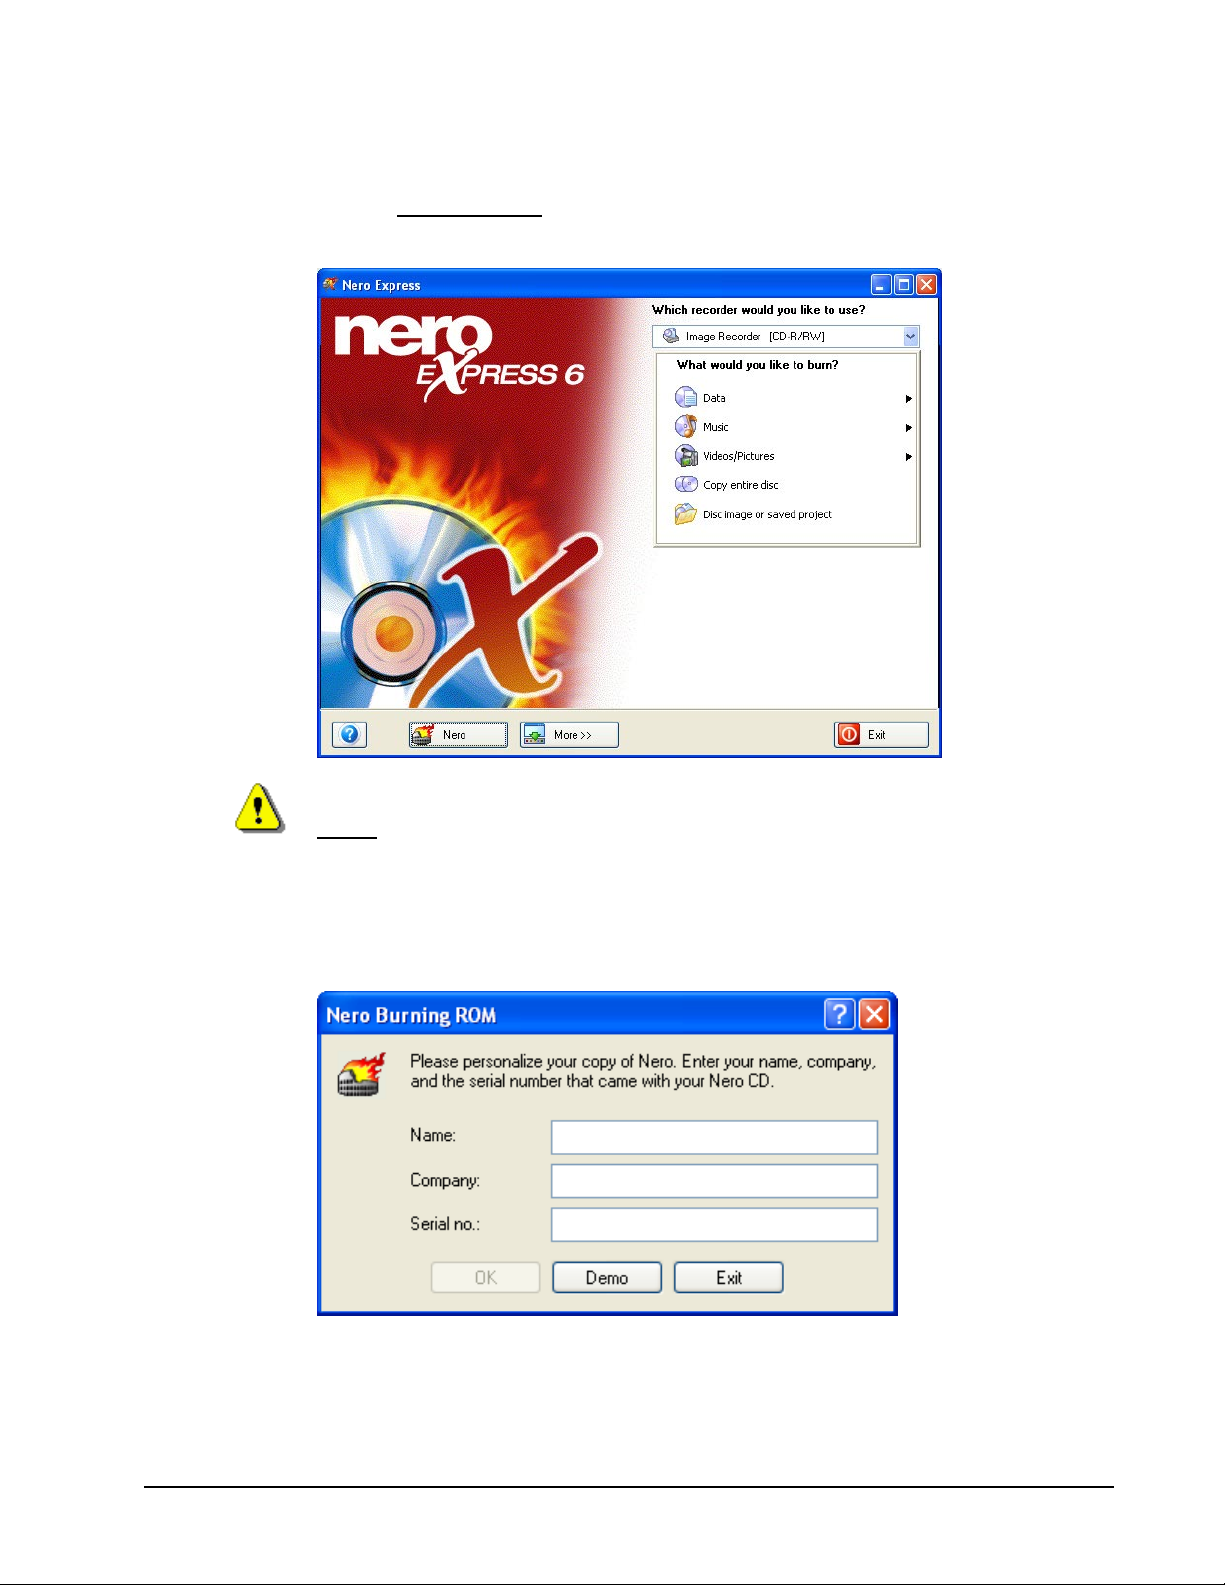
Step 1: As the window opens up, the software will scan for your CD-R/RW/DVD
to make sure that you have a supported device on your PC. If you do not, please
contact www.nero.com
to find out if your recorder is supported or to locate the
latest driver.
F.Y.I.! You can disable this window in the future by checking the box in the lower
hand corner of the window
Step 2: A request for a serial number will only appear if a retail registered version
of Nero 6 or Nero Express 6 was not found on the system and the following
window will appear:
Please personalize your software by entering your name, company, and serial
number. When you are finished, please click “OK”.
If you have a demo version of Nero Express 6, please click the “Demo” button
for your trial period.
Nero Express Getting Started • 11
Page 12
You will have an option to purchase your serial number online so that you are
able to register your software copy.
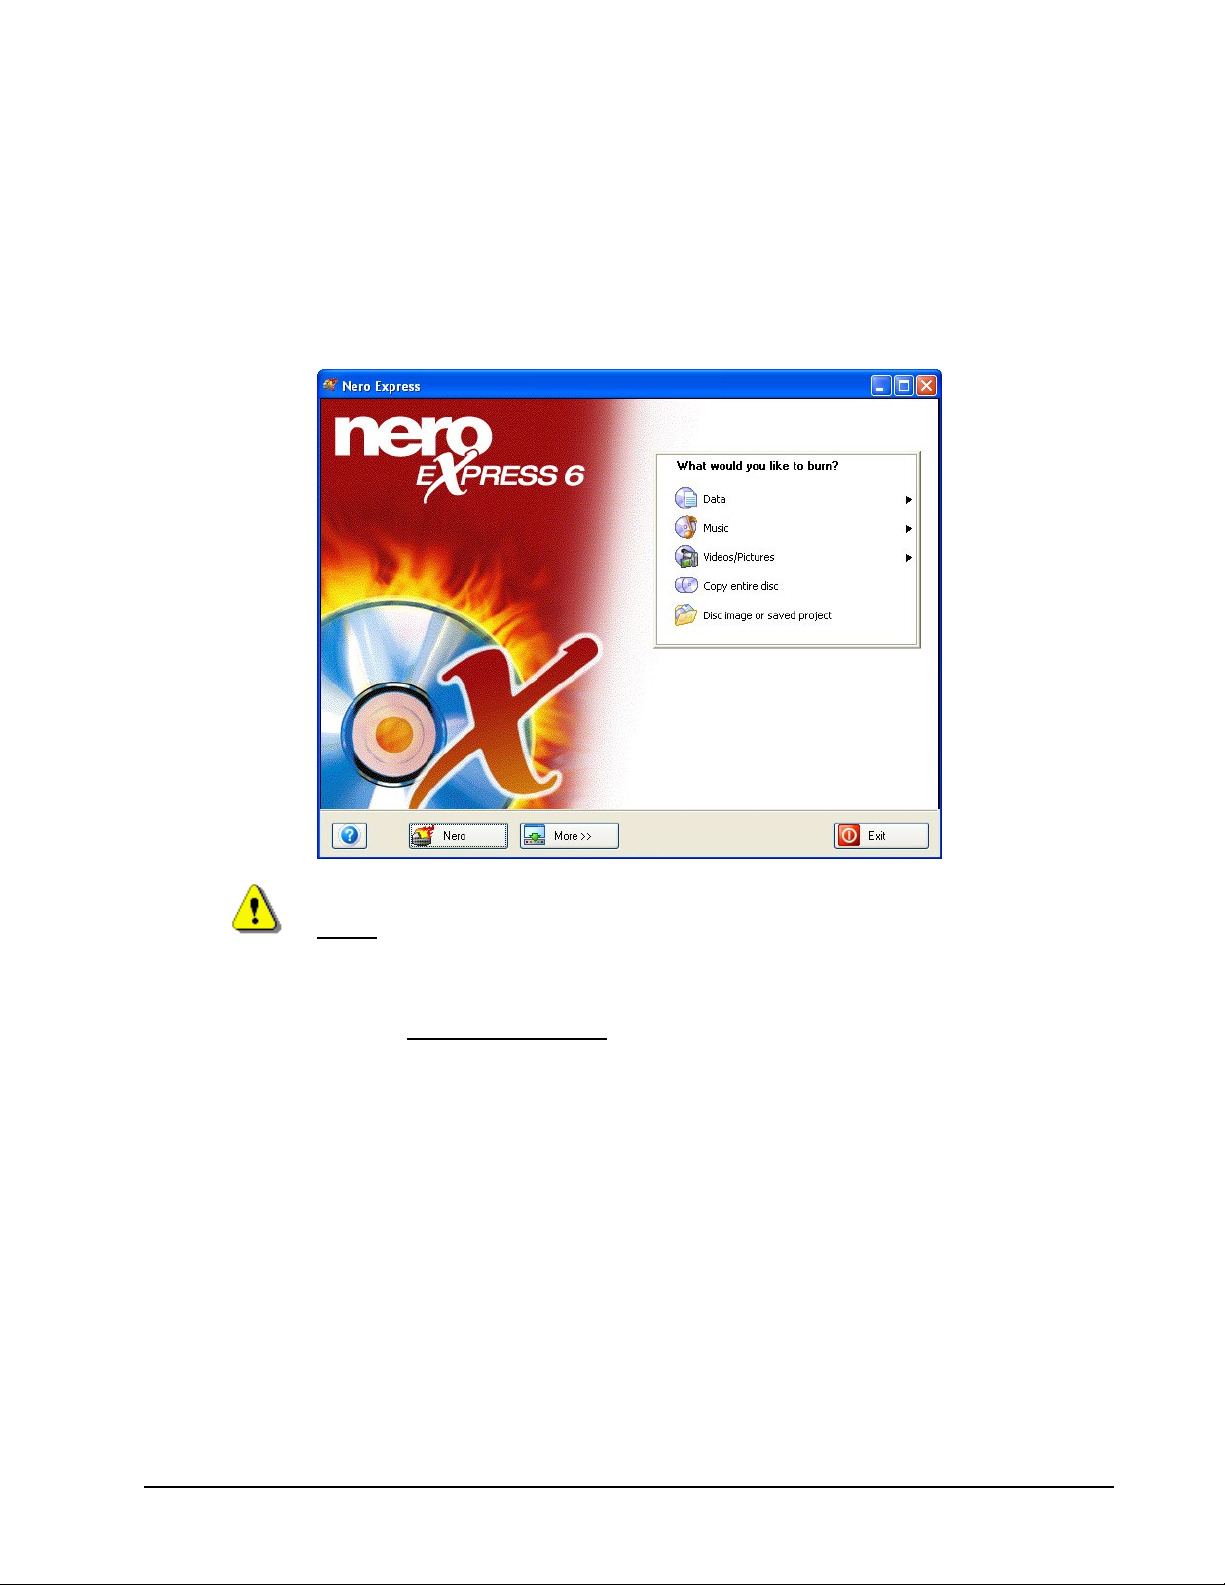
Step 3: From this window, you will be able to select the project you want to burn.
As you further explore this User’s Guide, you will be able to make the CD/DVD of
your choice! Please see the following chapters on how to make various types of
projects.
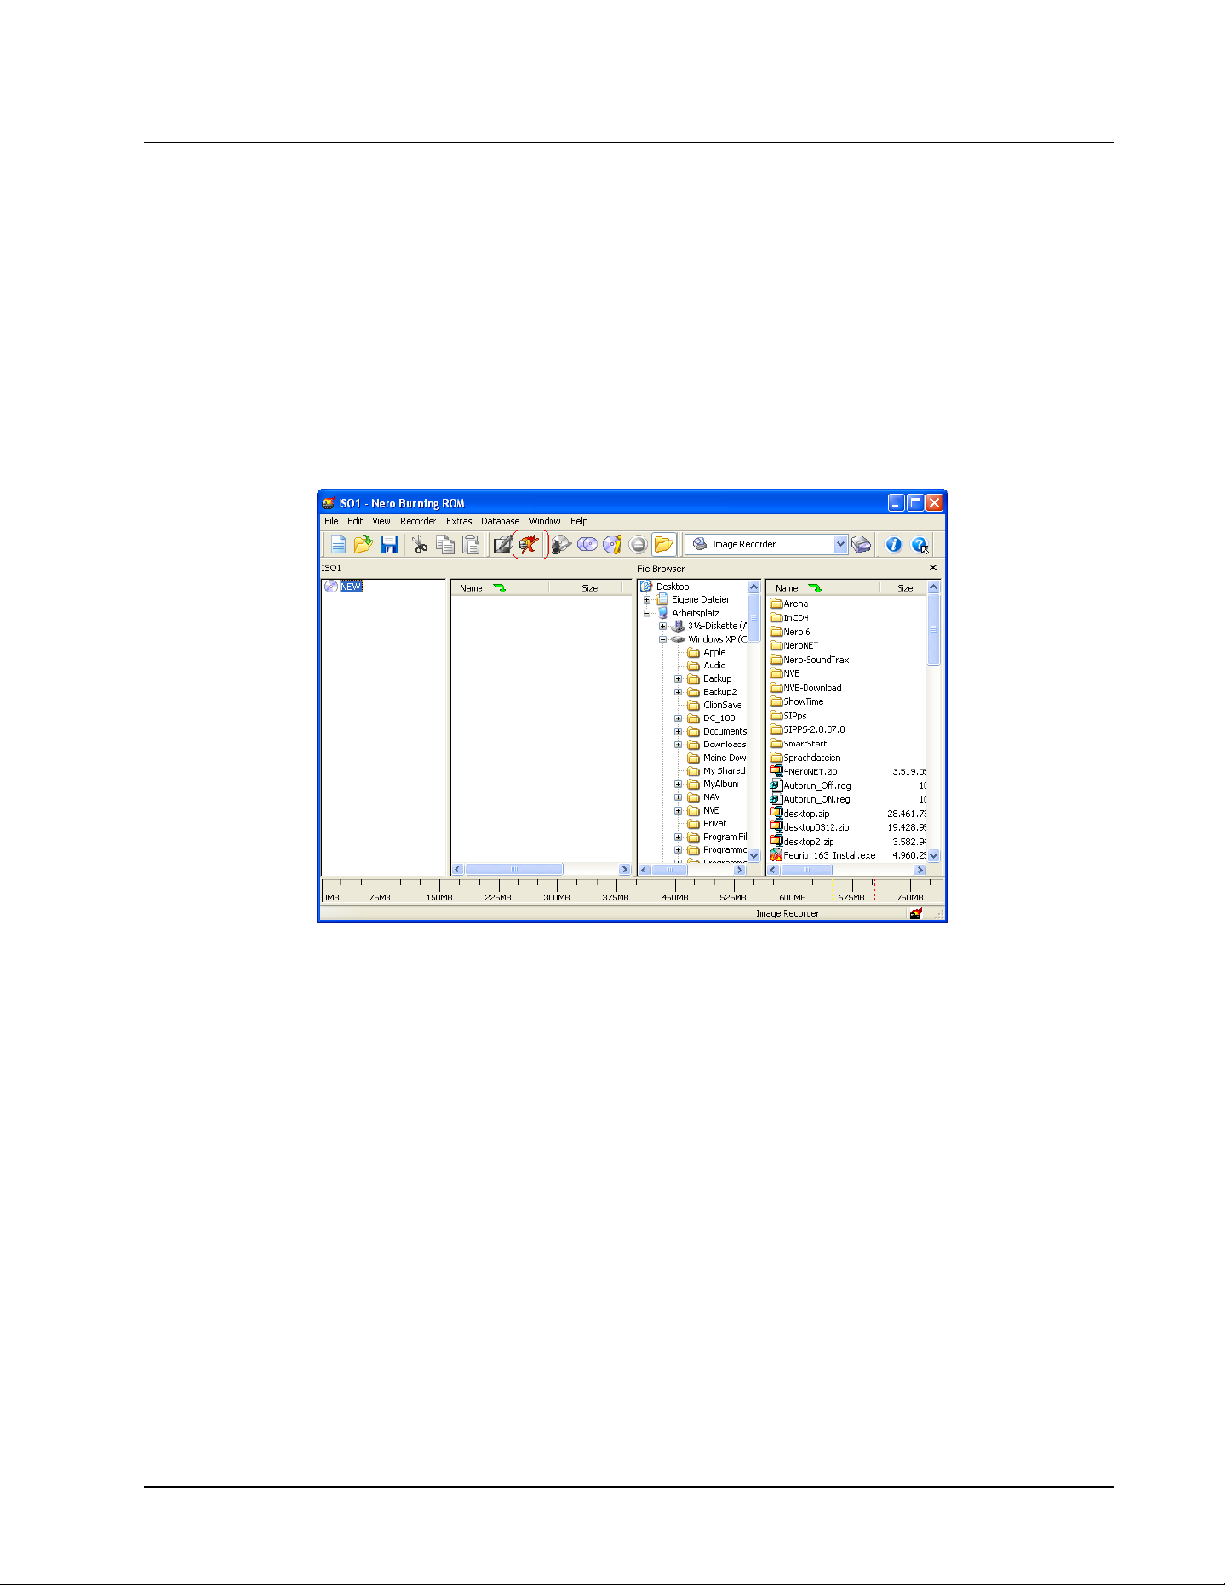
F.Y.I.! You can switch over to the main application Nero Burning ROM by
selecting the “Nero” button at the bottom.
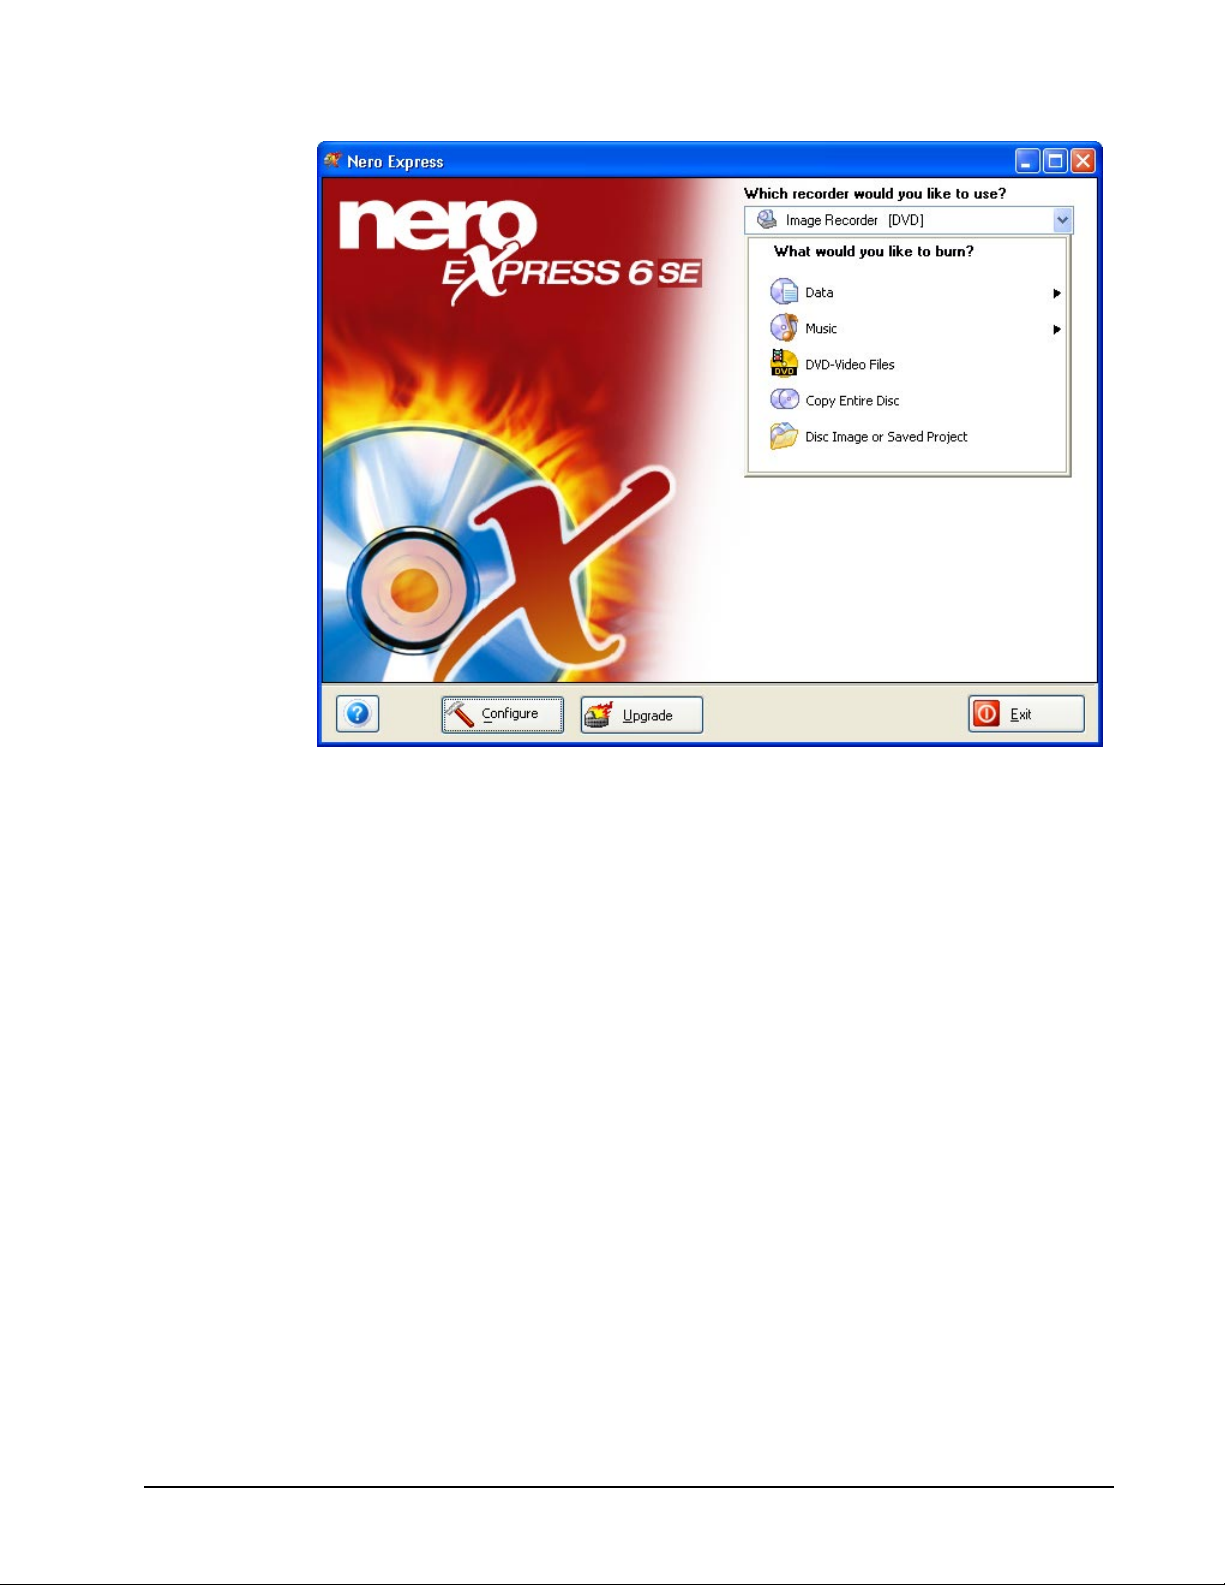
If you have installed Nero Express 6 SE, the 'Upgrade' button will appear
instead of the 'Nero' one. If you click on this button you will be led to the Nero
Website http://www.nero.com
, where you can obtain an upgrade of your Nero
Express 6 SE version and make use of all its functions.
Nero Express Getting Started • 12
Page 13
Nero Express Getting Started • 13
Page 14
3.2 Go Nero! Button
When this option is selected, you will change over to the more powerful burning
program Nero Burning ROM 6 with additional features and options.
You can toggle back and forth between the user-friendly interface Nero Express
6 and the full version Nero Burning ROM 6.
If you are a first time user of software burning products, may we suggest you start
first with Nero Express 6. As you gradually become familiar with the burning
technology, you can switch over to Nero Burning ROM 6 for a more powerful
user interface and additional features.
Nero Express Getting Started • 14
Page 15
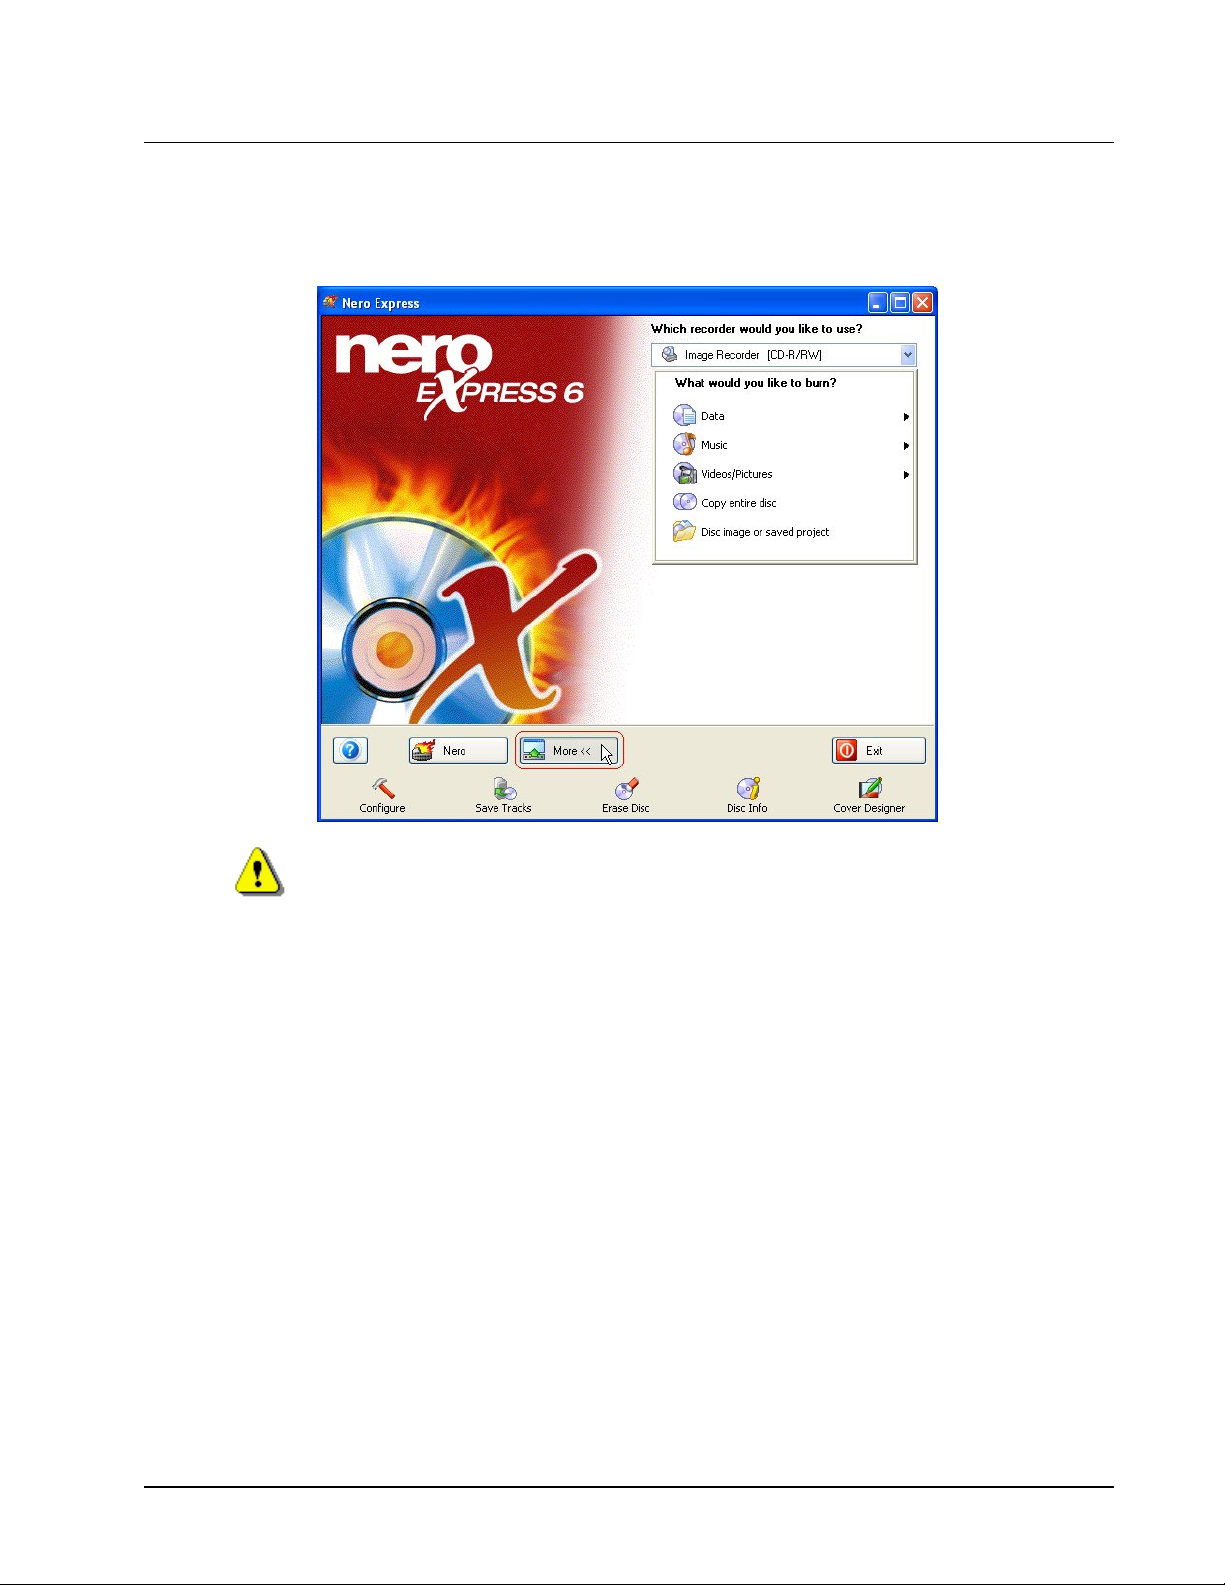
3.3 More Button
When you click the “More” button on the bottom of the Nero Express 6 screen,
an extra window will appear for additional options
If you have installed Nero Express 6 SE, you will no longer be able to use the
'More' button. Instead of this, the 'Configure' button will appear. This lets you
configure Nero Express 6 SE. All the other functions available in this extended
area can either be selected using Nero StartSmart ('Erase disc' and 'Disc info')
or will no longer be offered ('Save tracks' and 'Cover Designer').
Nero Express Getting Started • 15
Page 16
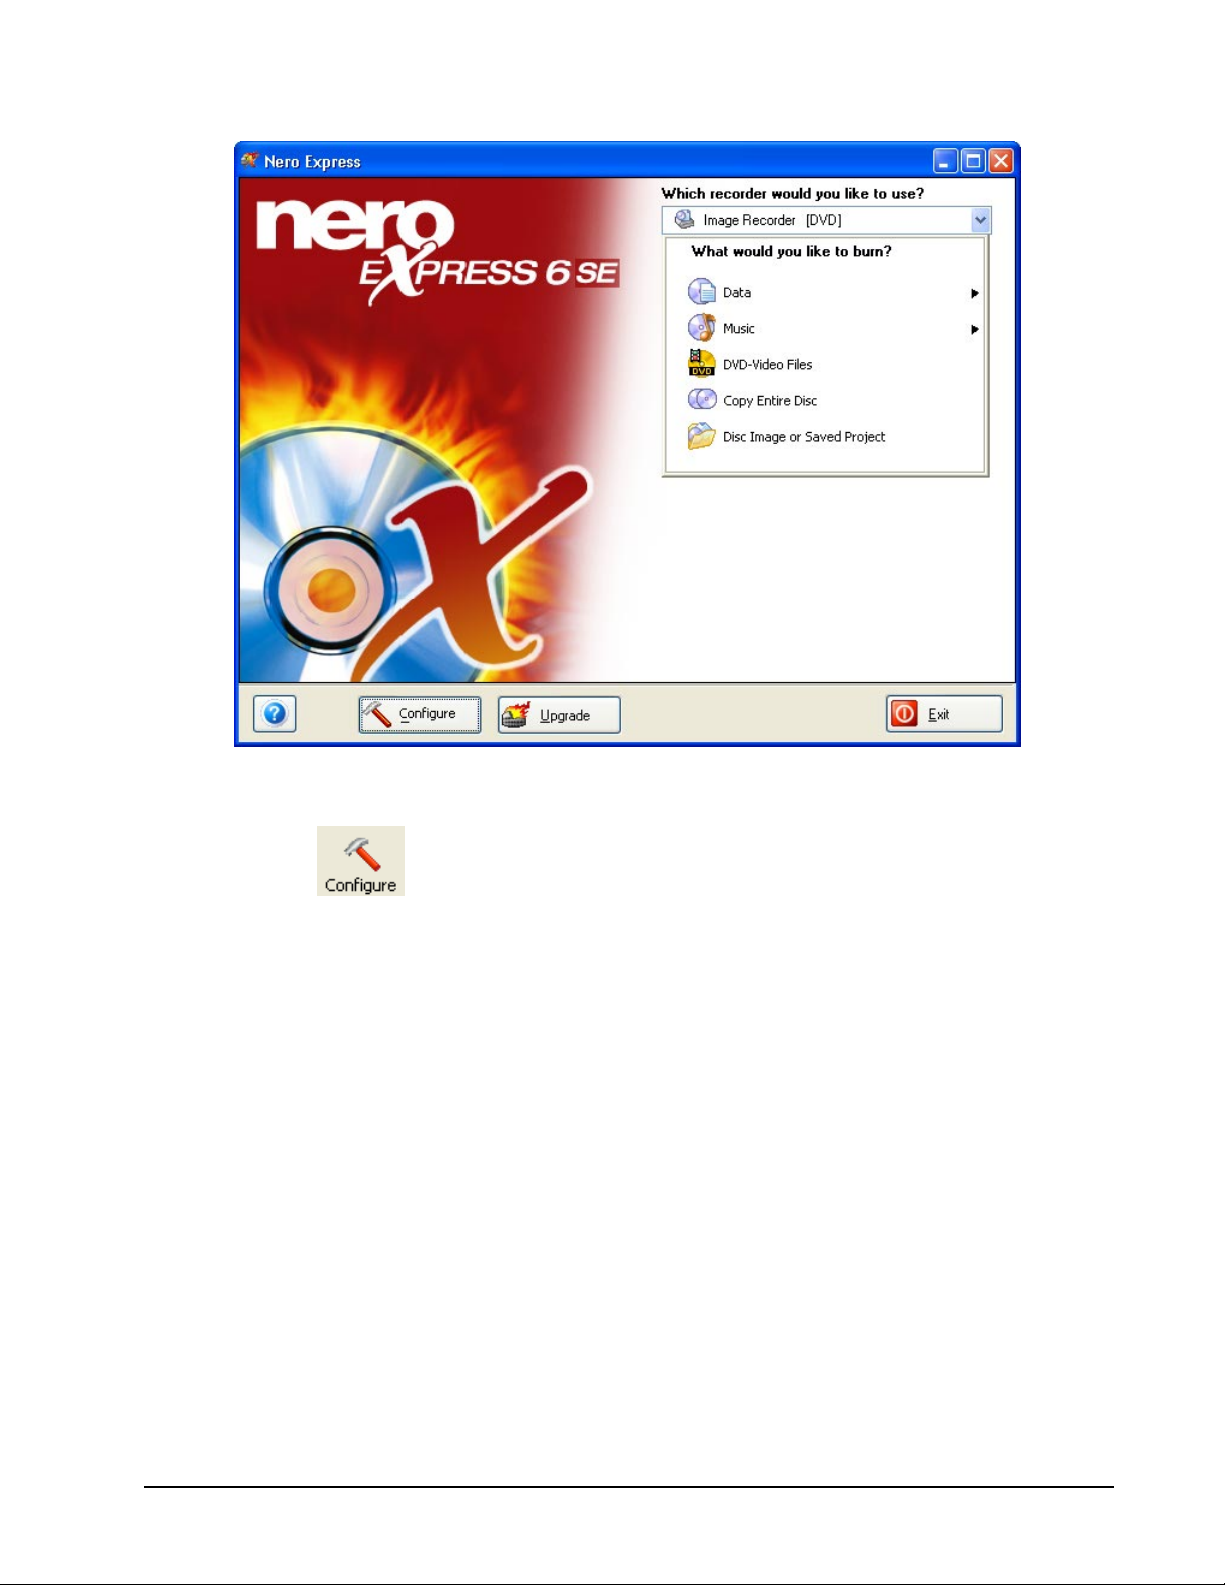
3.3.1 Configure
Change the settings on your Nero Express 6 software for optimal use. When you
click on “More” then the “Configure” button, the “Preferences” window will appear.
You are able to modify the settings for the database, language, cache, and many
other features in this software.
For further information, please have a look on chapter 'Preferences'.
Nero Express Getting Started • 16
Page 17
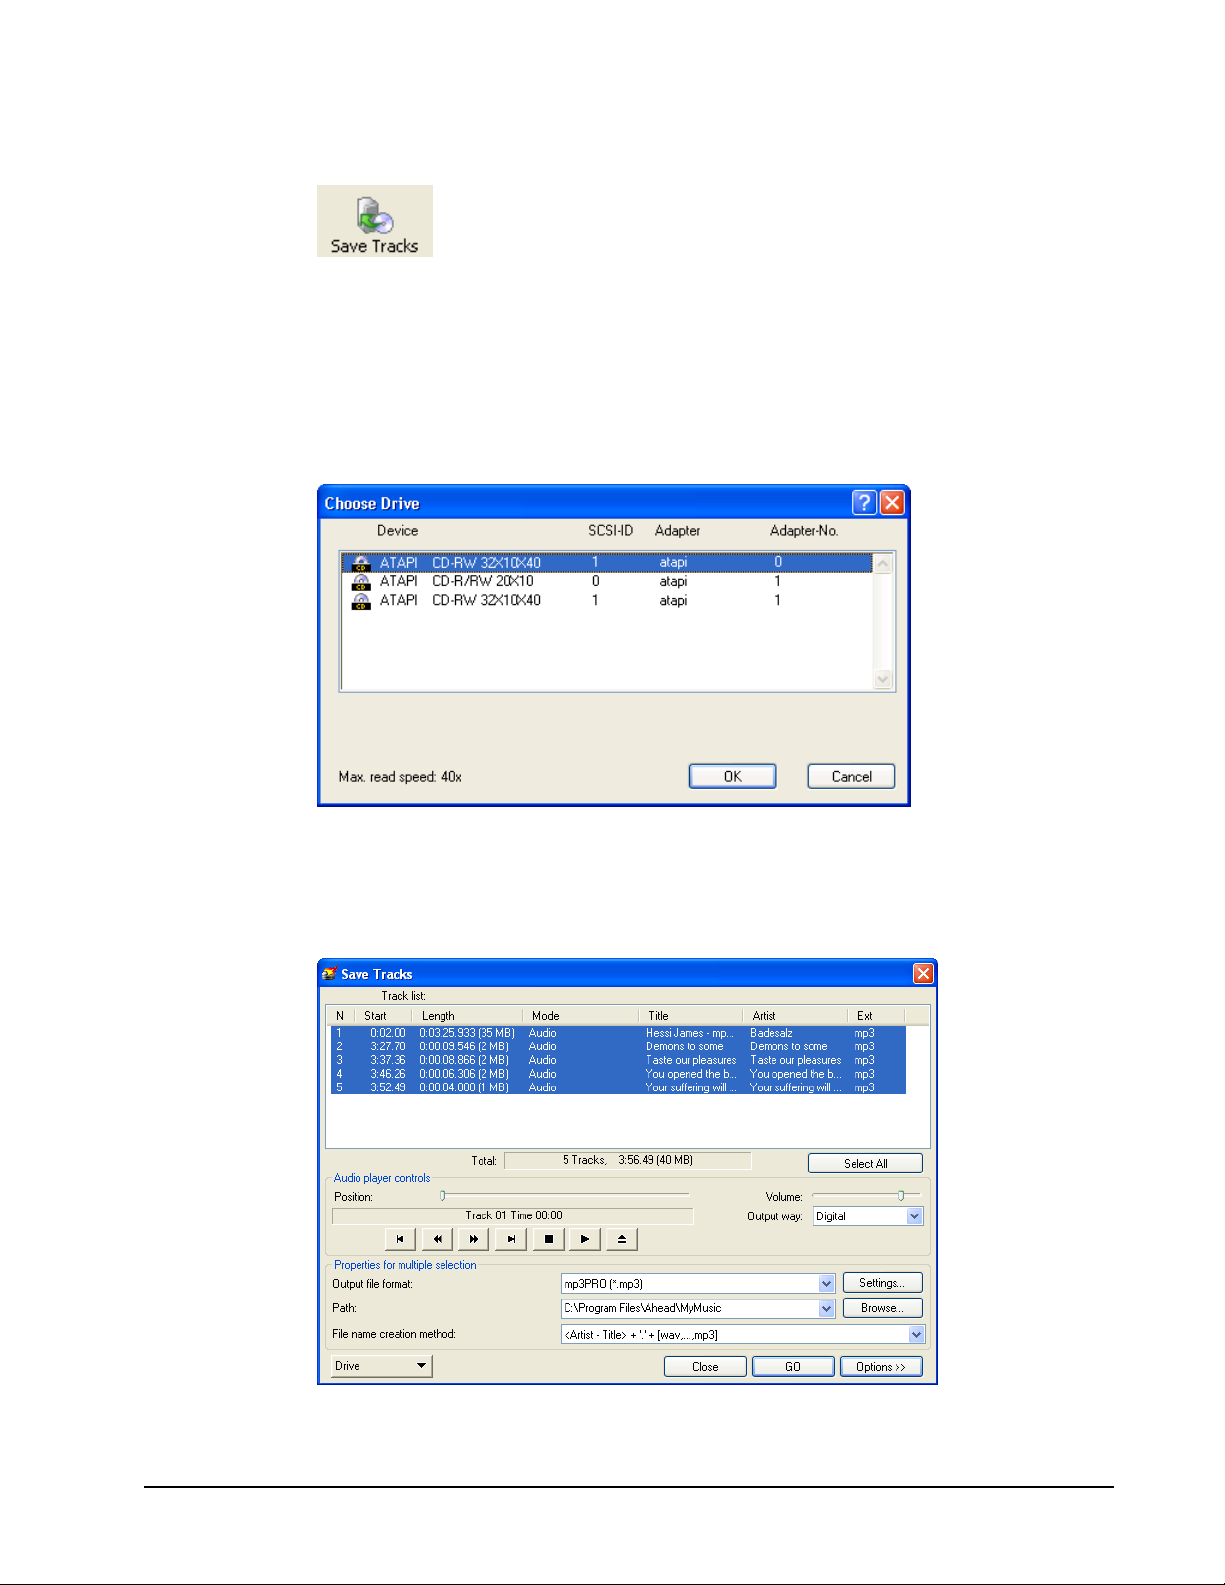
3.3.2 Save Tracks To Hard Drive
You can save individual tracks or an entire disc to your hard drive with this
function. In addition, you are able to play the audio tracks, remove the silences
between the audio tracks and use jitter control. These are some of the many
features in “Save Tracks To Hard Drive”.
When you select “Save tracks to hard drive”, a window will appear asking you to
select your drive:
When your drive has been selected, you are now able to view all the files on your
disc.
You will also have various other options in this window.
Nero Express Getting Started • 17
Page 18
Select All – To select all the files in your Track List window
Output way – You have the option of Digital or Analog.
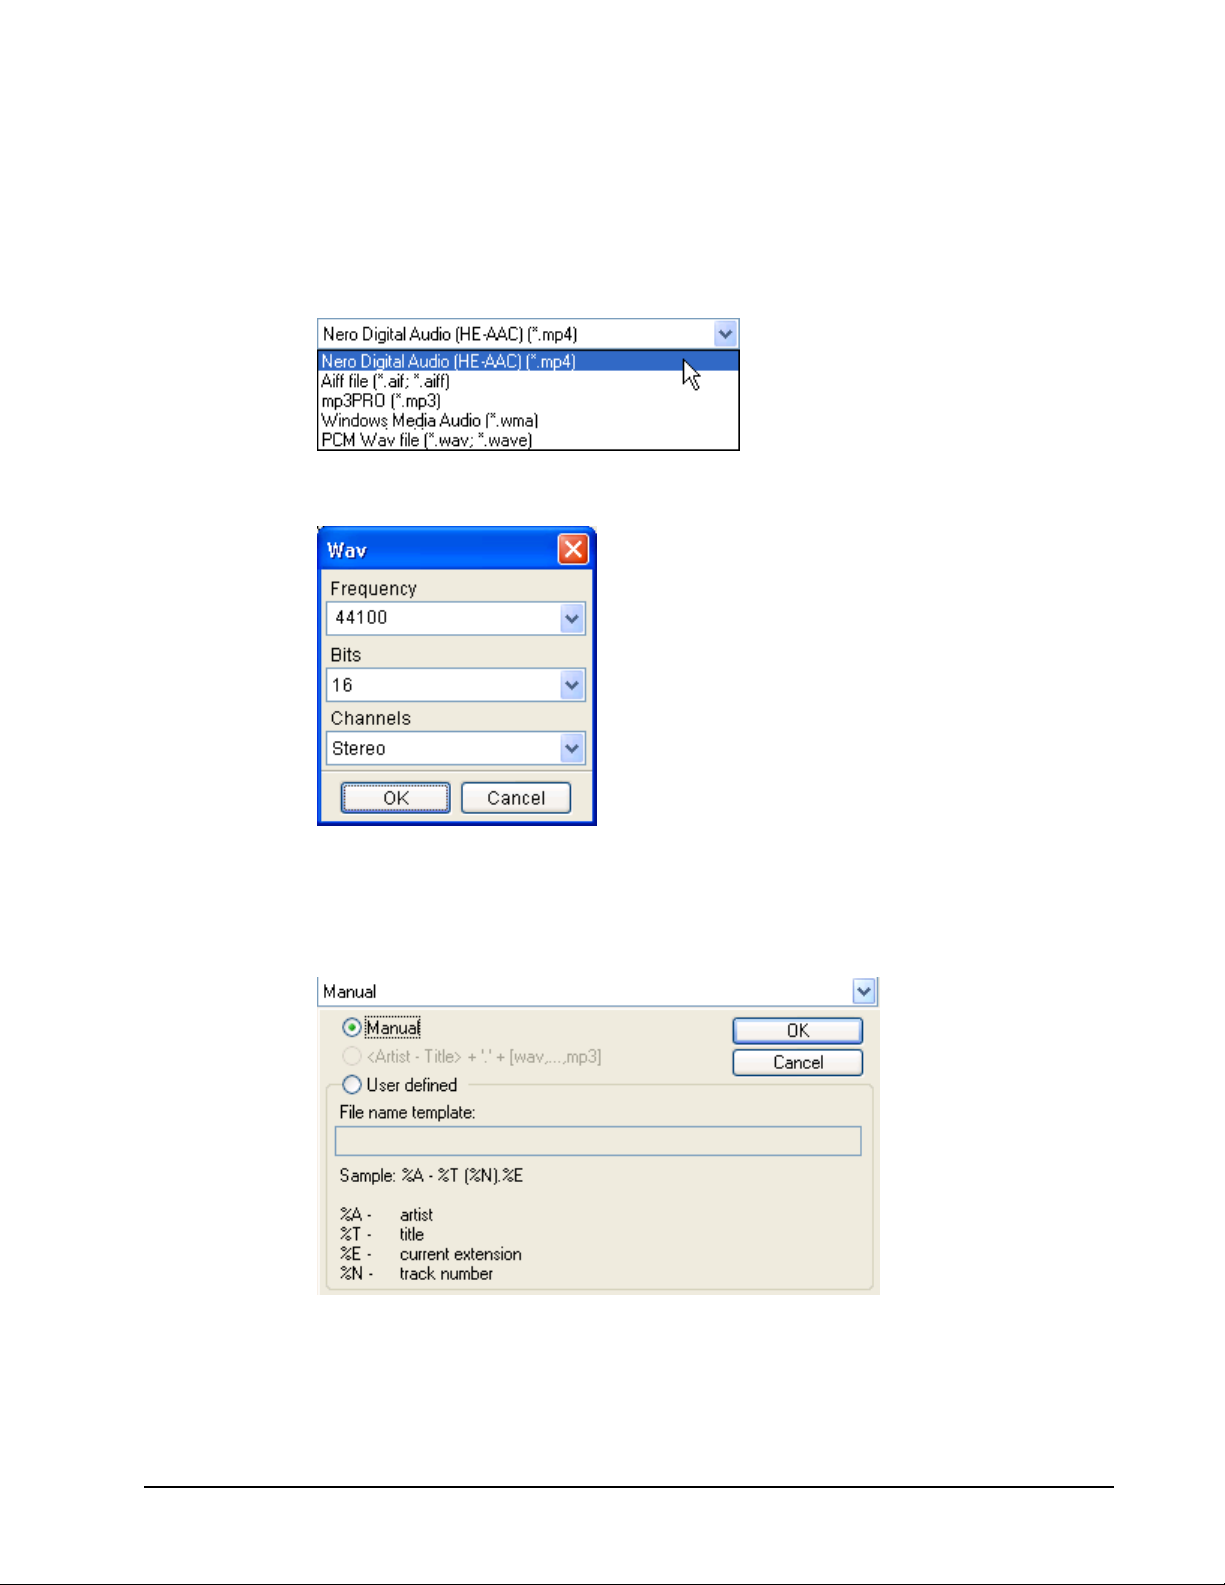
Output file format – Select the type of format you would like to save your audio
file as.
Settings – Select the stereo or mono settings for your audio file.
Path – Select the place on your hard drive in which you will save your audio file.
File name creation method – Type in the name of your audio file by checking
“User Defined” or select “Manual” for the default name.
Nero Express Getting Started • 18
Page 19
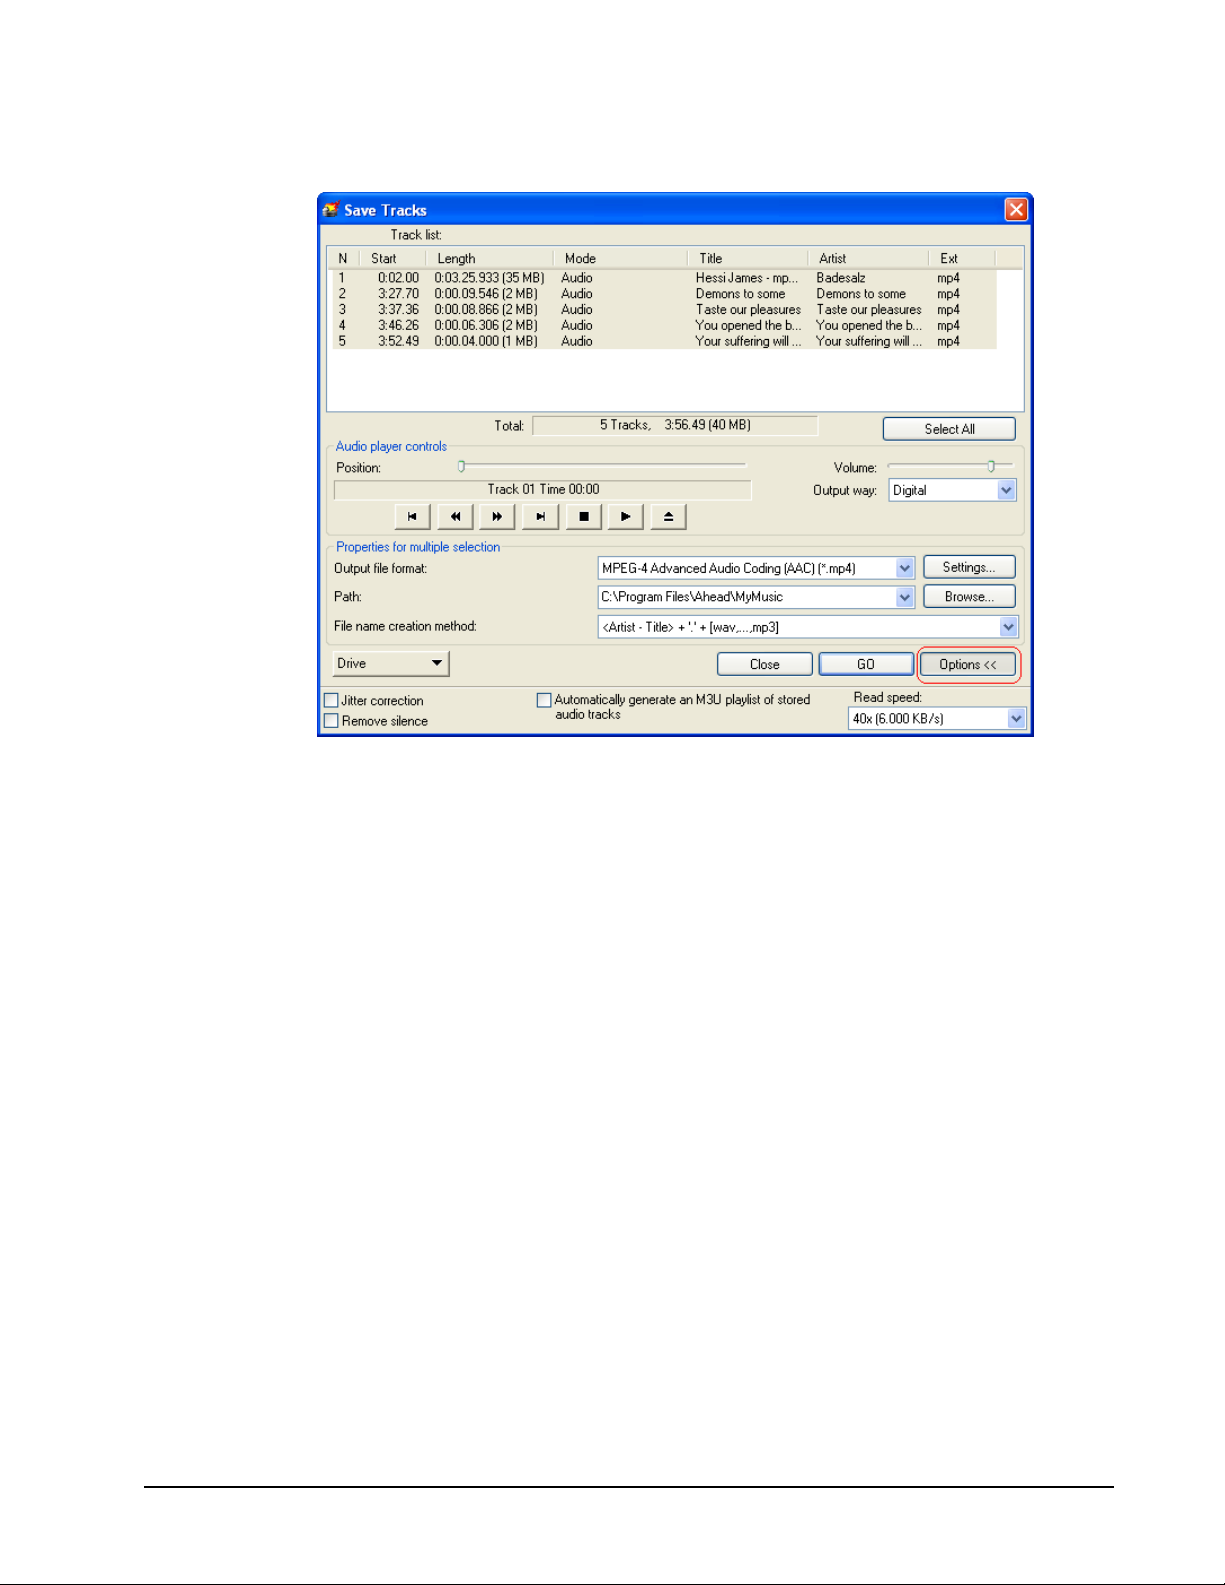
Options – A drop-down box will appear when the “Options” button is clicked.
Jitter correction - Jitter correction synchronizes the data information by
overlapping the sectors and therefore no gaps are created.
Remove silence – Removes the silences at the end of each audio track.
Automatically generate an M3U playlist of stored audio tracks – This option
will automatically generate a playlist of all the audio tracks that are stored on your
hard disk or CD reading device.
Read speed – Select the speed in which your CD device will read the files.
Nero Express Getting Started • 19
Page 20
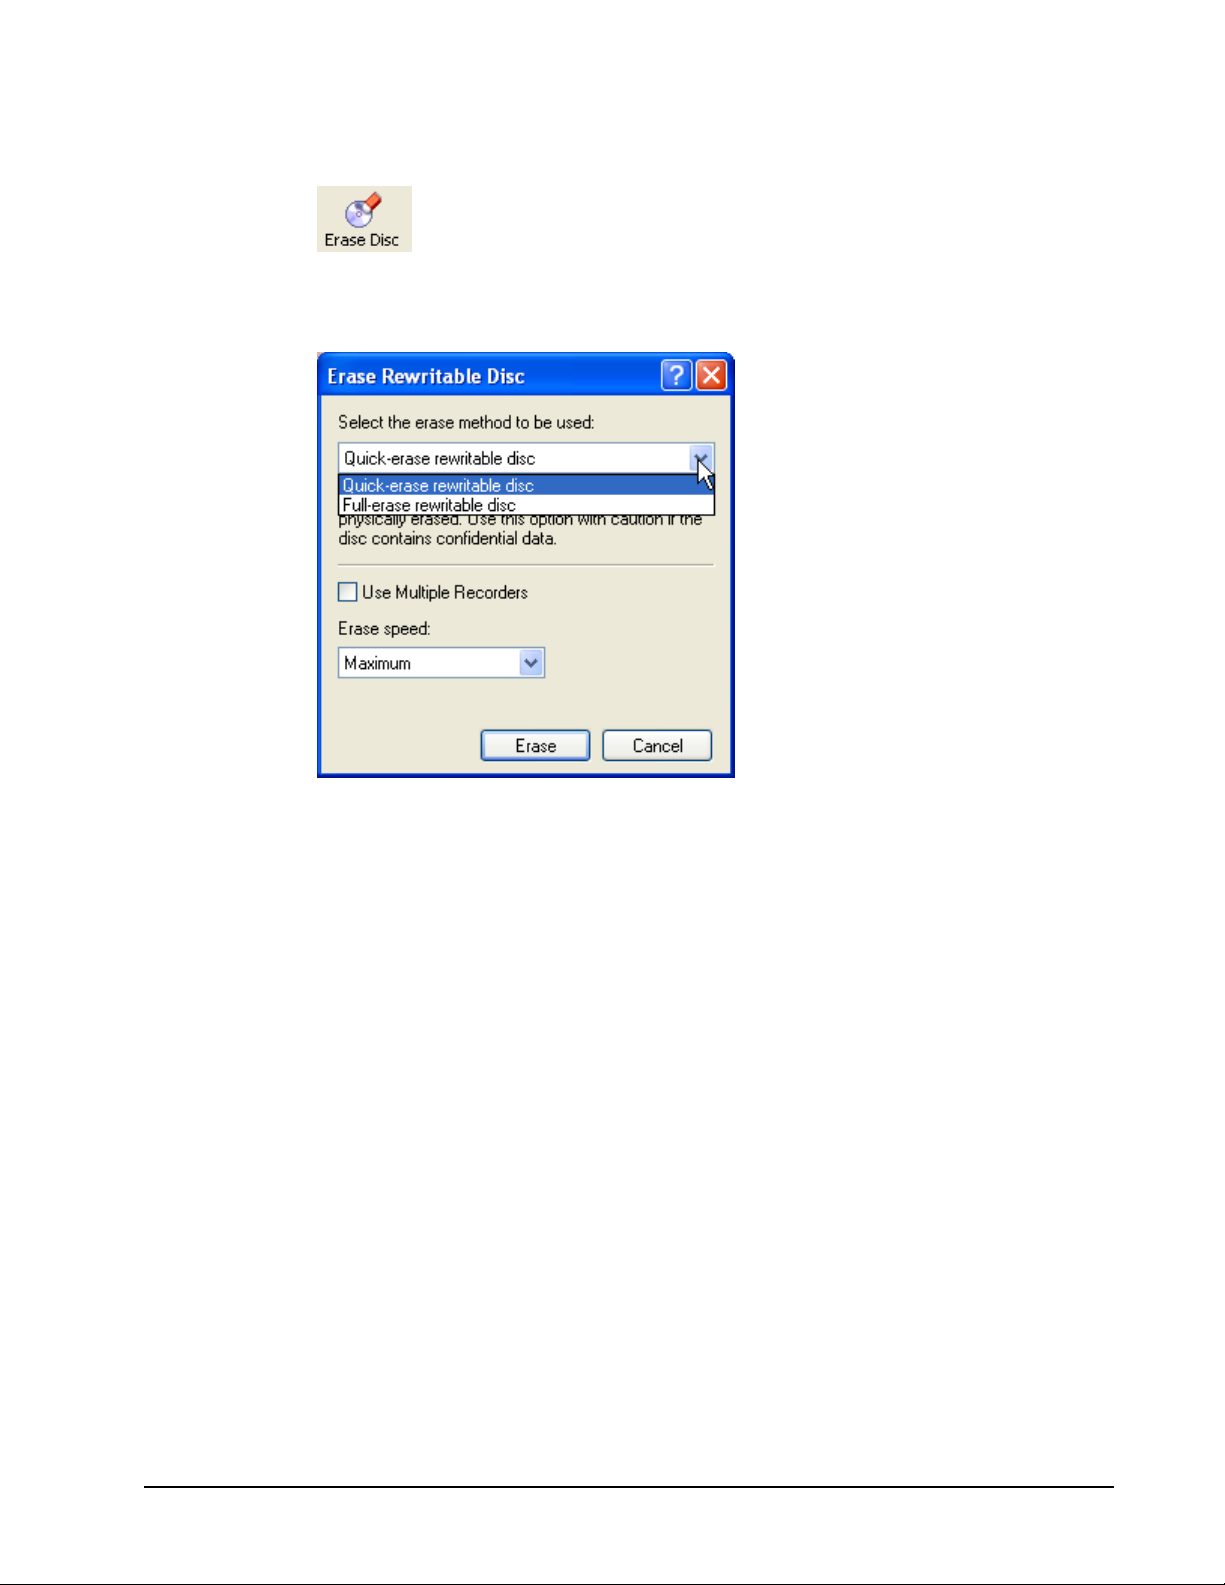
3.3.3 Erase Disc
When a CD-RW disc is in your drive, you have the option to erase your disc so
that additional data may be added to it.
Quick-erase rewritable media – The media will appear to be empty but the data
is not physically erased. The table of contents is left on the disc.
Full-erase rewritable media – This option will fully erase all data on the media.
This procedure will take some time.
Use Multiple Recorders (option only available in the retail package) – Erase
discs in multiple recorders attached to your PC.
Choose erase speed – Select the erase speed.
Nero Express Getting Started • 20
Page 21
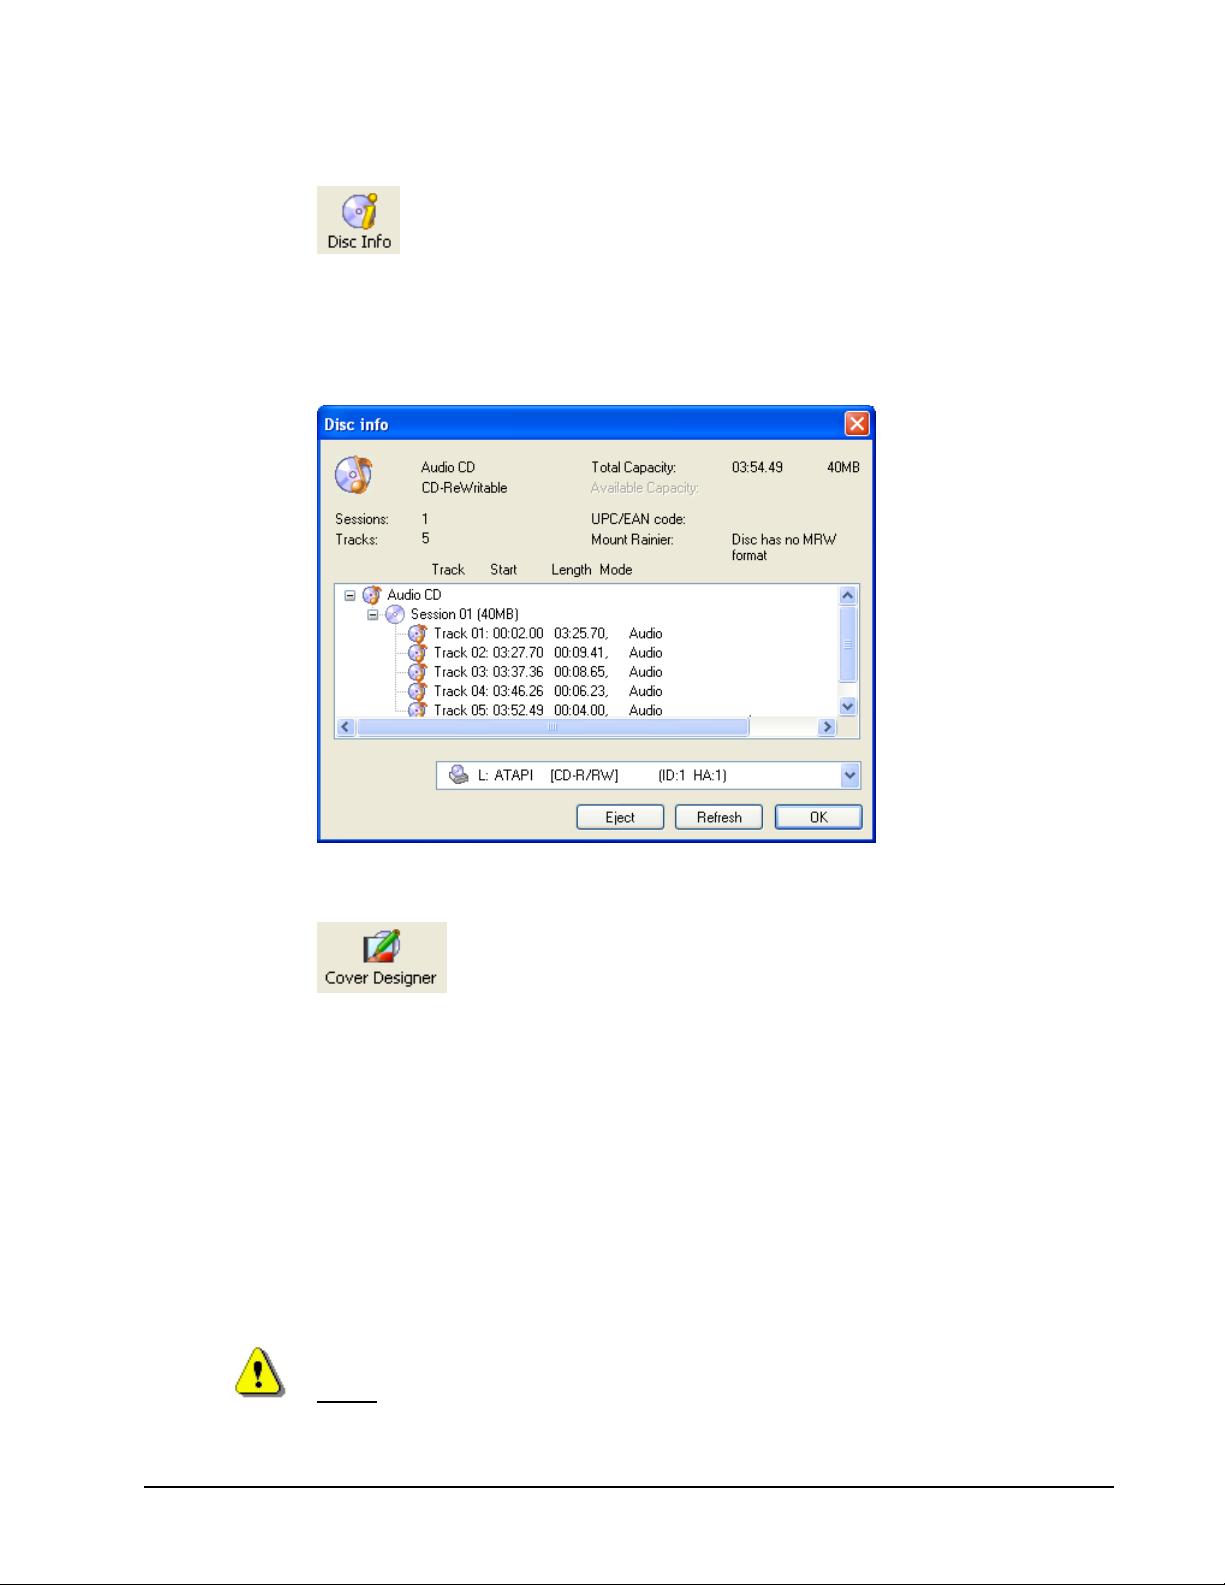
3.3.4 Disc Info
This option will allow you to view all the contents on your disc.
The total capacity and available capacity will be shown in addition to the sessions
and tracks.
3.3.5 Cover Designer
Included with your version of Nero Express 6 is the Nero Cover Designer with
which you are able to create covers and labels for your CD´s and DVD´s using
pre-designed templates or your own designs.
When launched from or after a Data, Audio or Audio and Data project in Nero
Express 6, the contents will be automatically imported, saving you the
annoyance of having to manually type them in.
You can also start the Nero Cover Designer independently of Nero Express 6
by going to the Start > All Programs > Nero > Nero 6 > then > Nero Cover
Designer. (For some operating systems, you will find - Start > Programs > Nero
> Nero Cover Designer.
F.Y.I.! The path how to open Nero Express 6 described above can differ in some
versions.
Nero Express Getting Started • 21
Page 22
Please see the separate Nero Cover Designer User's Guide for full instructions
on how to make professional looking covers and labels.
Included with your version of Nero Express 6 is the Nero Cover Designer. You
are now able to create labels for your jewel cases and discs with the predesigned templates or create them on your own with the user-friendly interface.
You will have the ability to automatically create playlists and/or filename lists,
thus saving you the annoyance of having to manually type them in. In addition,
playlists from external sources (such as FreeDB) can be accessed and used.
Please see enclosed manual for instructions on how to use this feature.
3.4 Nero Toolkit
The Nero Toolkit is a collection of tools and utilities designed to give you
detailed information about your drive(s) as well as advanced control. To start the
Nero Toolkit utilities, go to Start > All Programs > Nero > then > Nero Toolkit
> then select the desired utility. (For some operating systems, you will find Start > Programs > Nero > Nero Toolkit).
F.Y.I.! The path how to open Nero Express 6 described above can differ in some
versions.
Nero Express Getting Started • 22
Page 23
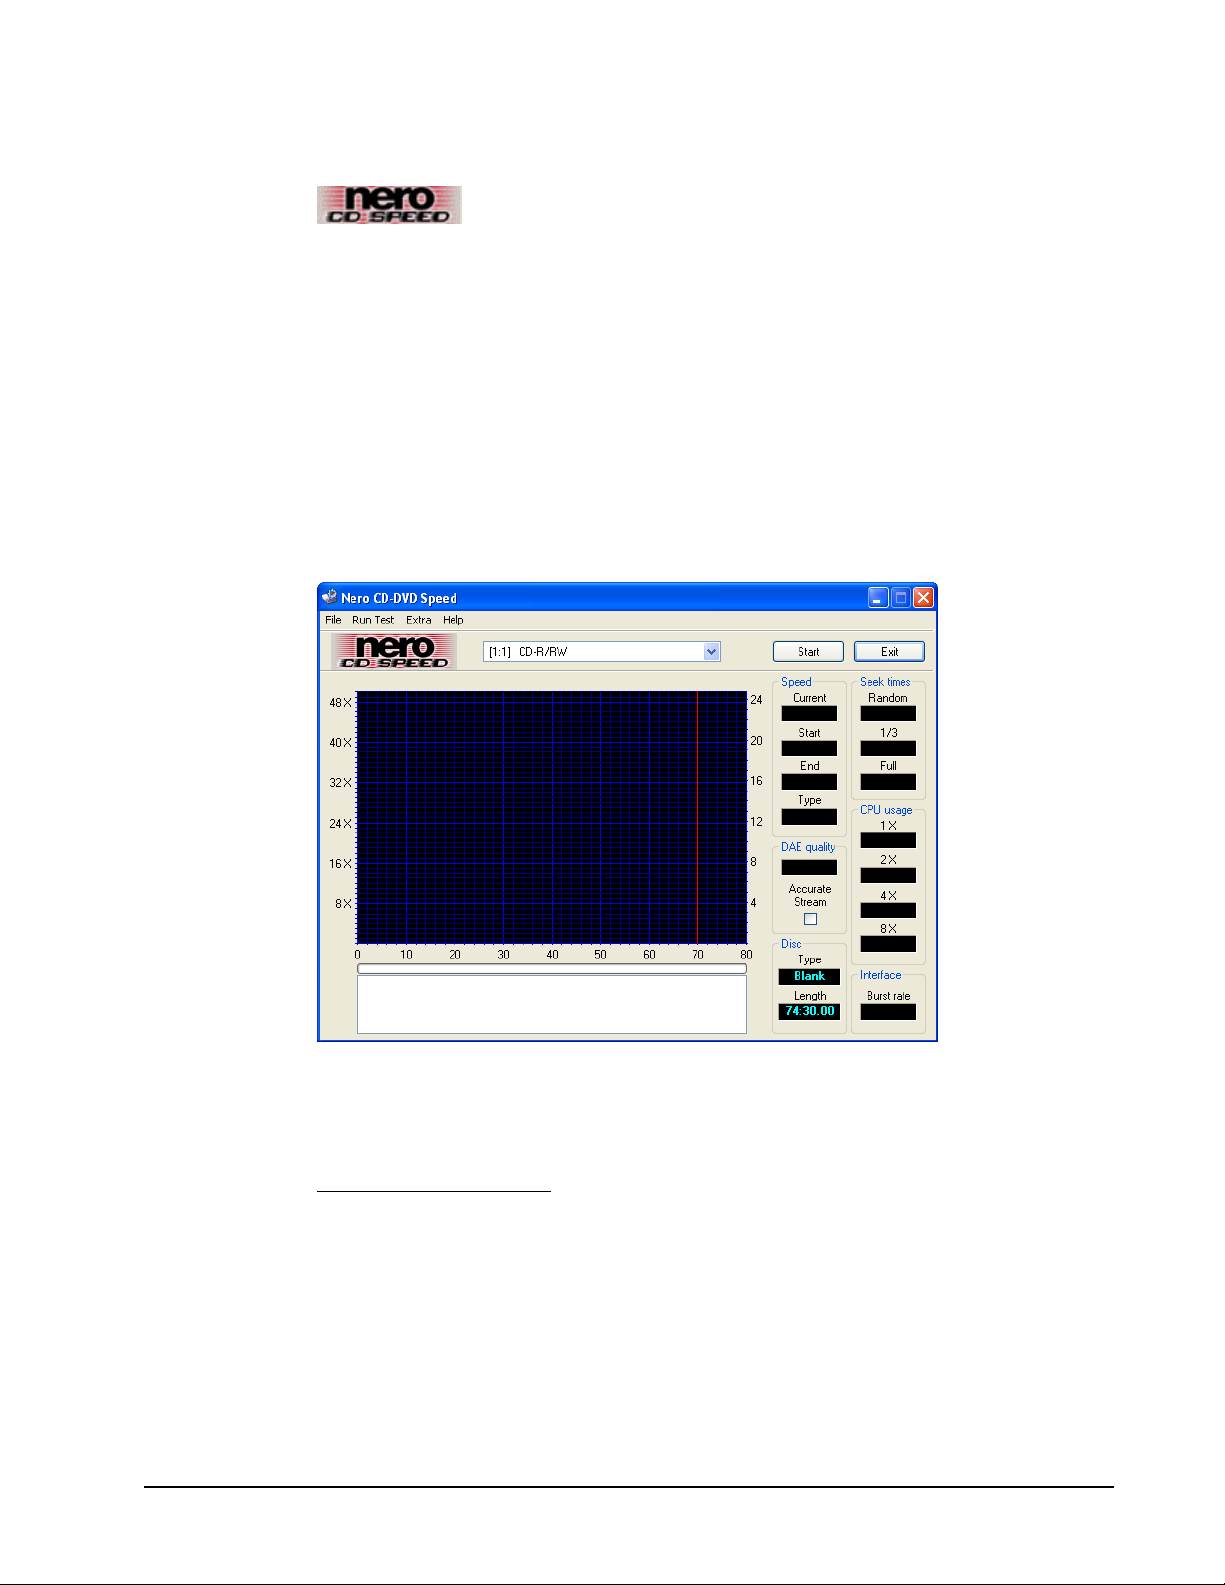
3.4.1 Nero CD-DVD Speed
Nero CD-DVD Speed is a CD-ROM/DVD benchmark which can test the some of
the important features of a CD-ROM/DVD drive. These tests include:
Transfer rate
Seek times
CPU usage
Burst rate
DAE quality
Transfer rate
Spinup/spindown time
Insert a relatively full disc into your CD-ROM or CD-R/RW/DVD drive and click
“Start”. It will then start to run all the benchmark tests on your drive.
There are regular updates for this utility so please make sure you go to
www.cdspeed2000.com
The latest important change is the addition of a new test: ScanDisc. Basically,
ScanDisc will show you the quality of a disc.
The test consists of two parts:
File Test which simply reads all files on the disc and reports all errors. This test
can also be used for benchmarking to give you an idea on how well the drive
performs with for example software installing.
Nero Express Getting Started • 23
to check for the latest version from time to time.
Page 24

Surface Scan checks the quality of each sector and shows the results in a
graph.
3.4.2 Nero DriveSpeed
Nero DriveSpeed is an Nero AG utility, which will set the reading speed of a CD-
ROM/DVD drive.
When you are running this utility for the first time, this window will appear. You
can detect all the support speeds of your recorder by clicking on the “Detect”
button and the information will appear to the left.
You can remove certain supported speeds if you feel they are not needed by
clicking on the “Remove” button.
In addition, you can select the language of your choice by going to the Language
box and choosing your preferred language.
After your speed selection and language has been made, you can view the read
speed and spin down time of your recorder.
Nero Express Getting Started • 24
Page 25

Run at startup – You can select to run Nero Drive Speed when you turn on your
computer.
Start minimized – You can have Nero Drive Speed start when you turn on your
computer but minimized in the background so it will not disturb your work.
Restore speed settings at startup – You can return to default speed settings
once you restart your computer.
The ability for limiting the reading speed of a CD-ROM drive is a must have
feature for high speed drives. Although a high speed drive allows you to transfer
data in less time, there are some disadvantages of using such a drive
A drive faster than 24x can be very noisy which is not surprising as the spindle
speed can be as high as 12000 RPM which is much faster than for example a
hard disk. If the drive only needs to access the CD for a short period of time, for
example software installation, then this is not such a big problem. But it can get
irritating when you're using the drive to play MP3 files. In many cases the noise
from the drive is louder than the sound from the audio file. The data rate of a
MP3 file is usually about 16 KB/sec (@128 kbps) which equals to approximately
0.1X! So a reading speed of 4X is more then adequate for playing MP3's.
You can also use Nero DriveSpeed to increase the DAE speed with some
drives. Asus drives for example set the default DAE speed to 8X while these
drives are actually capable of DAE at up to 20X or even higher!
Speed set after a disc is inserted (Auto Insert Notification must be enabled)
This has been implemented because many drives lose their speed setting
when a new disc is inserted.
Bug fix: speed settings not saved on some configurations
Other small bug fixes/improvements
Nero Express Getting Started • 25
Page 26
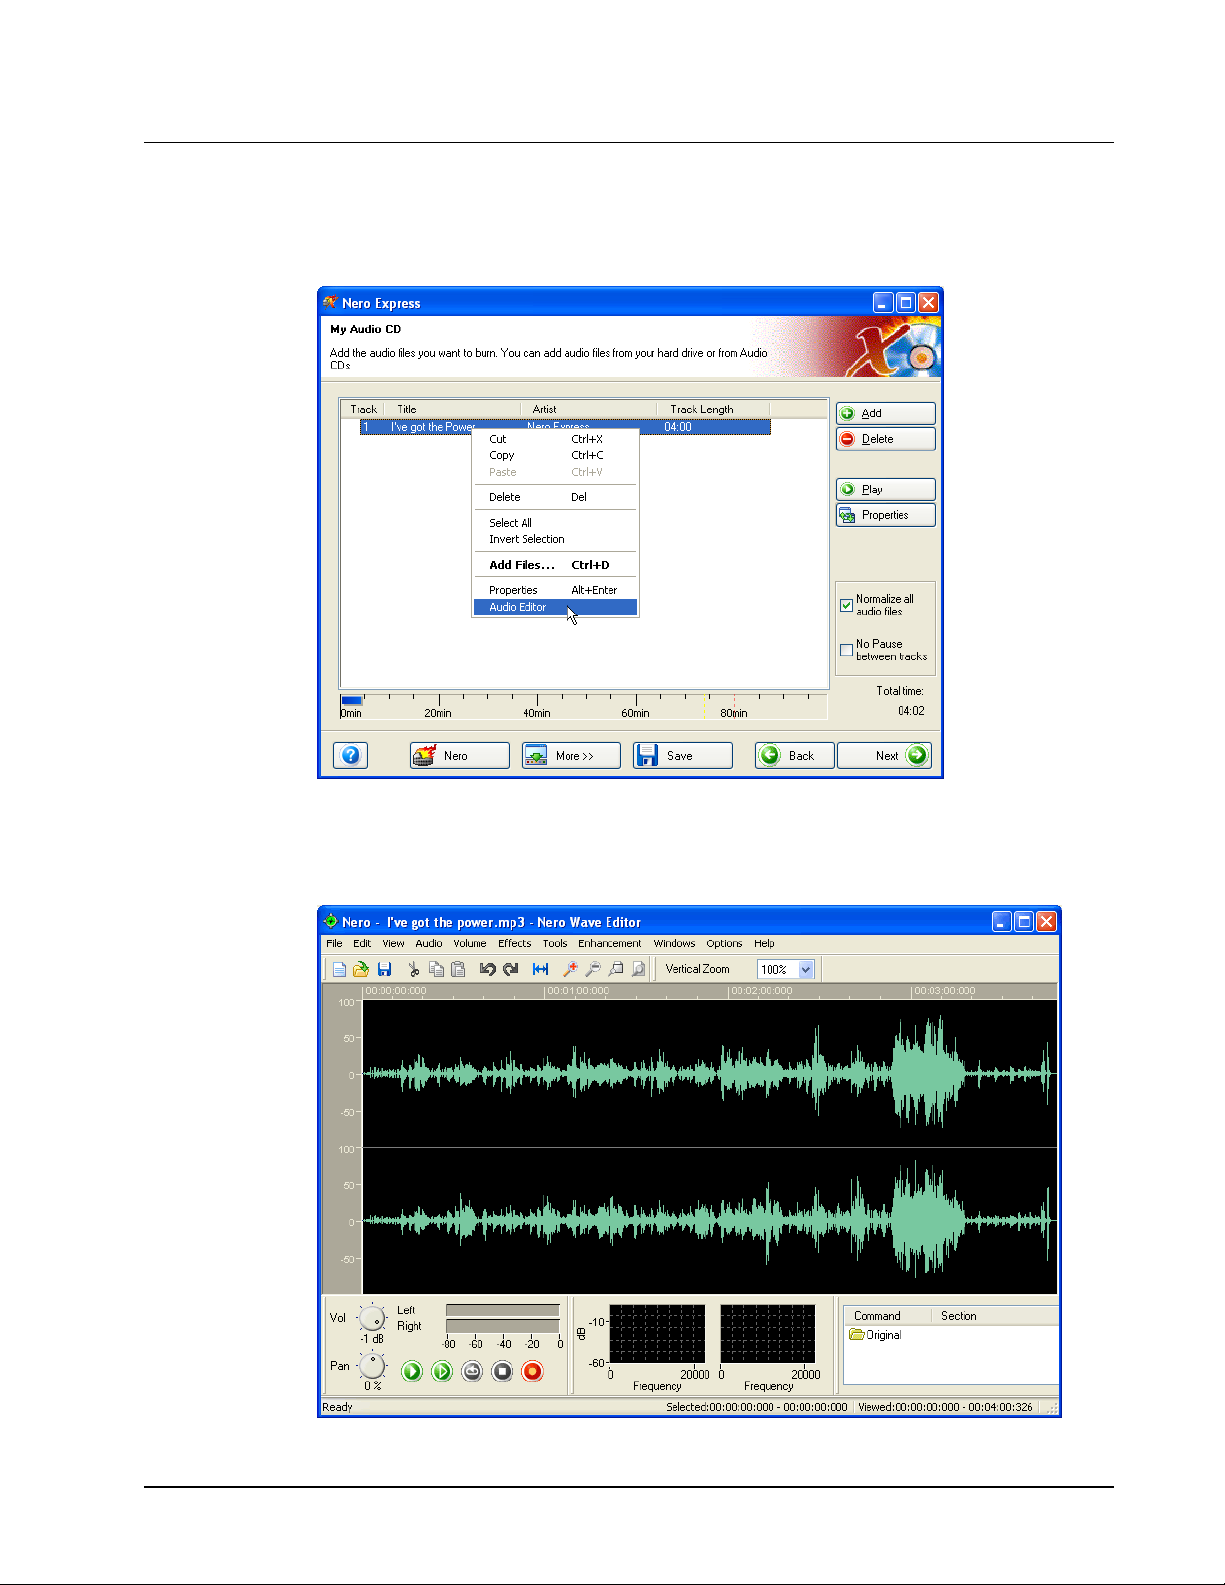
3.5 Nero Wave Editor (Retail Only)
When you right-mouse click on an audio title in an Audio CD compilation, a
window will appear in which you can select the “Audio Editor”.
This will launch the Nero Wave Editor with the audio file you selected where you
can edit your song in the minutest of detail, create enhancements for your audio
track, add fades, effect filters and numerous other features.
Nero Express Getting Started • 26
Page 27
4 Data
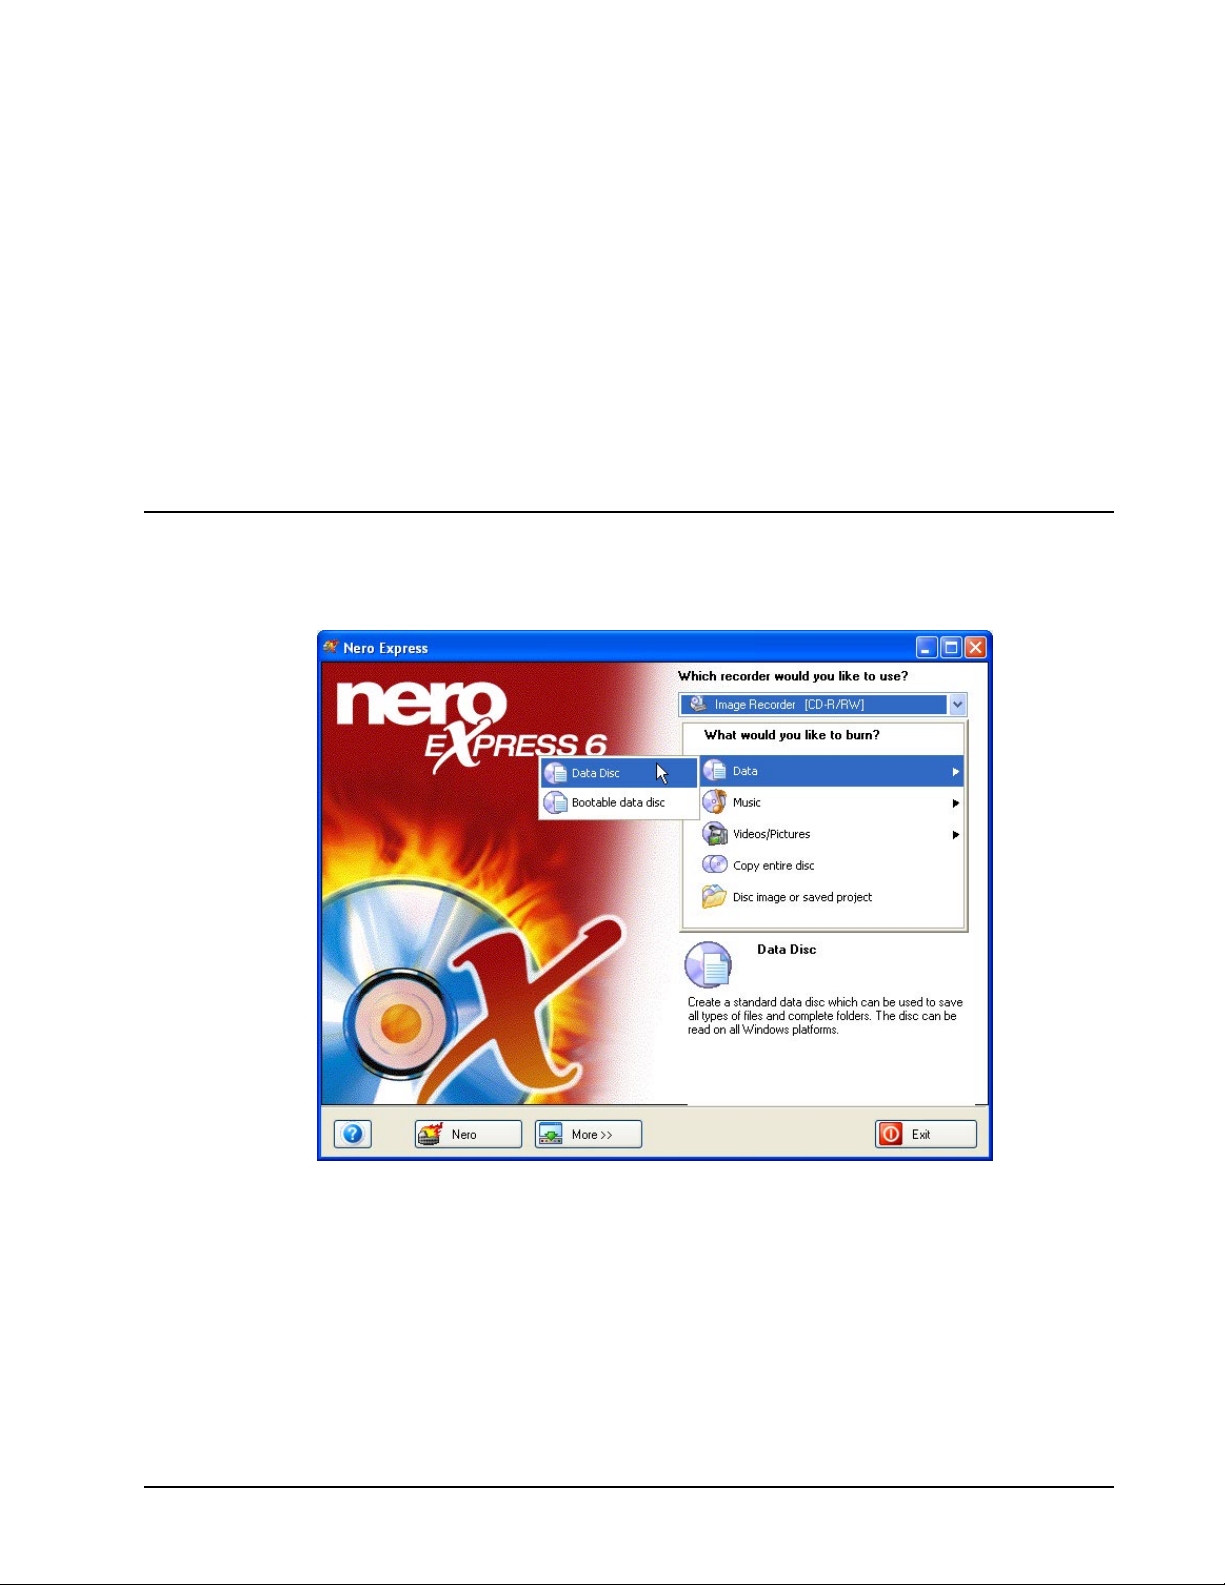
4.1 Creating your first data disc
Step 1: From the project selection page, select Data > Data Disc.
Nero Express Data • 27
Page 28
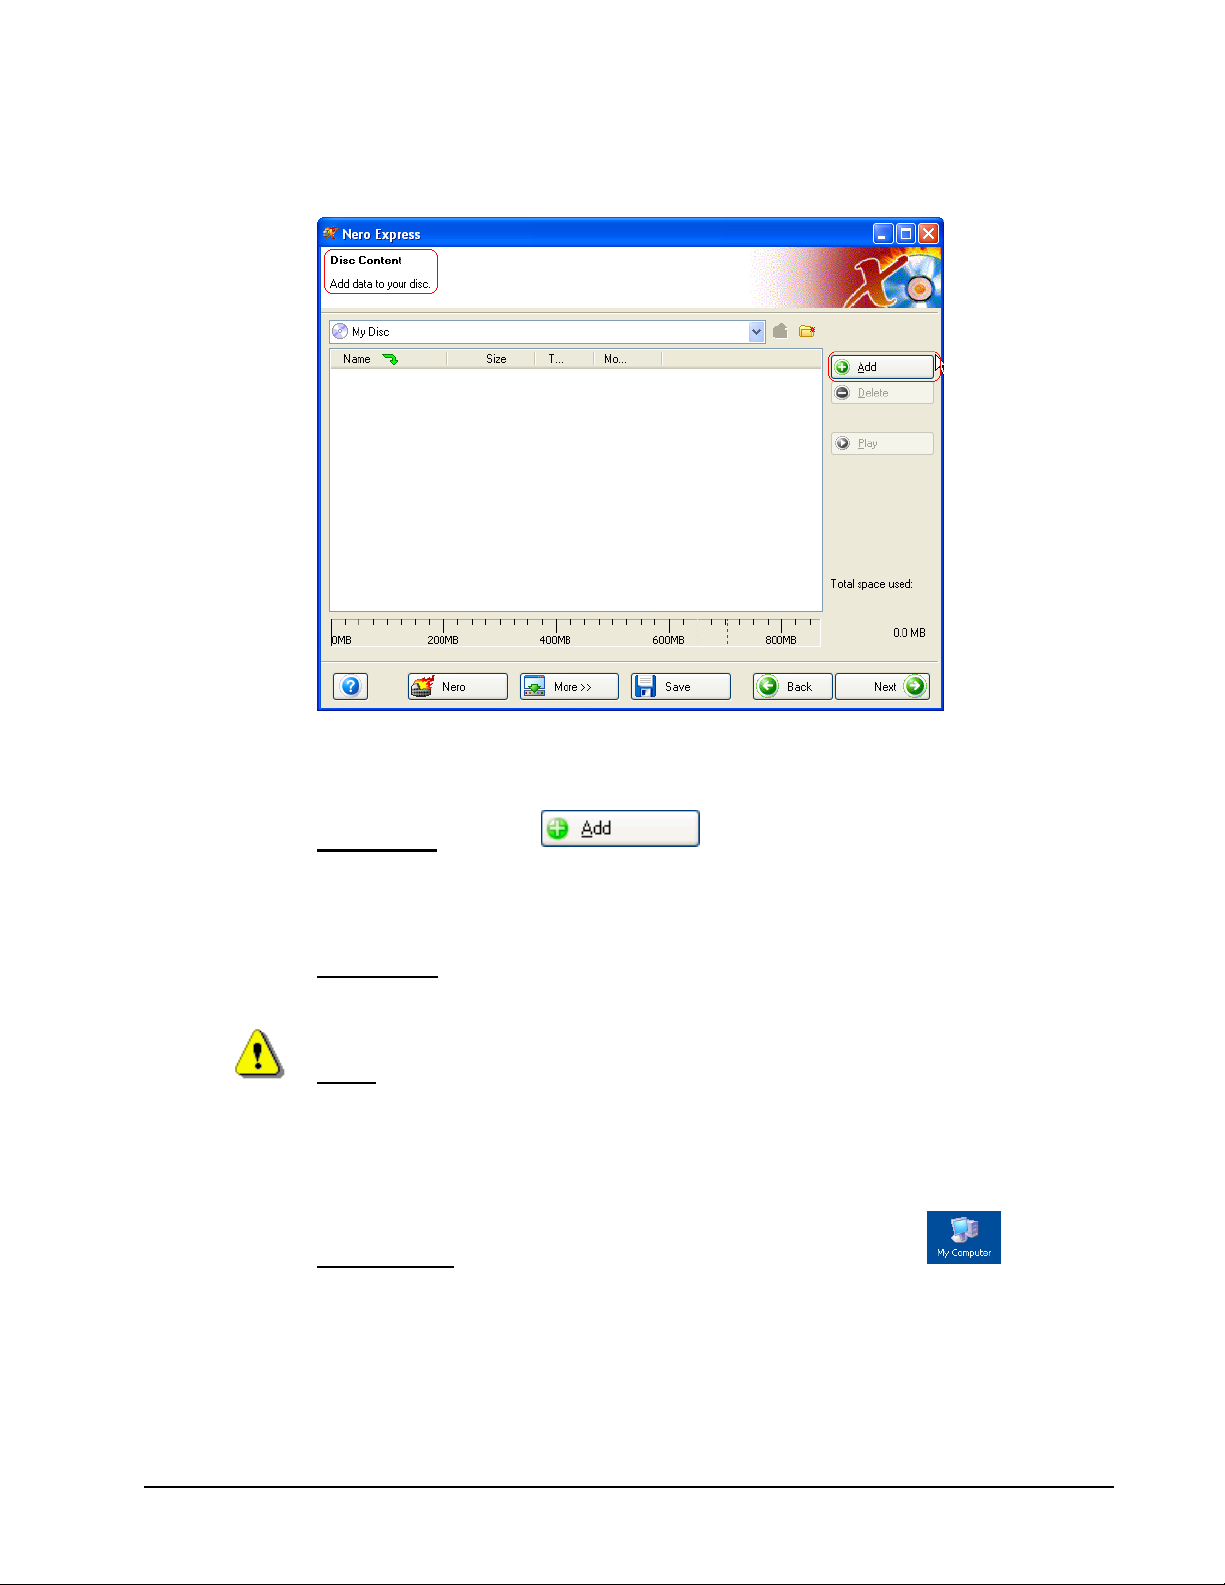
Step 2: From this next window, you are now ready to start adding data to your
layout for recording to disc.
Step 3: There are three very simple ways to add data to the layout window to
make this process quick and easy.
Option One
: Click the button to select the files you would like to
burn. A window will appear that looks very similar to Windows Explorer and from
here, you are able to choose the files you would like to record and save on disc.
Once you have selected your file(s), please click Add.
Option Two
: Add data using Windows Explorer - please go to the Start button in
the corner of your screen All Programs > Accessories > Windows Explorer.
F.Y.I.! Some operating systems will have Start > Programs > Windows
Explorer
When the Windows Explorer appears, you can drag the data you would like to
record into the Nero Express 6 layout.
Option Three
: Add data using My Computer - please click the icon. From
this window, you can drag and drop your files into the Nero Express 6 layout.
Nero Express Data • 28
Page 29
The options for the following feature will vary depending on the project you
select. When selecting Data, Nero Digital Audio, MP3, WMA, or CD-Extra (Music
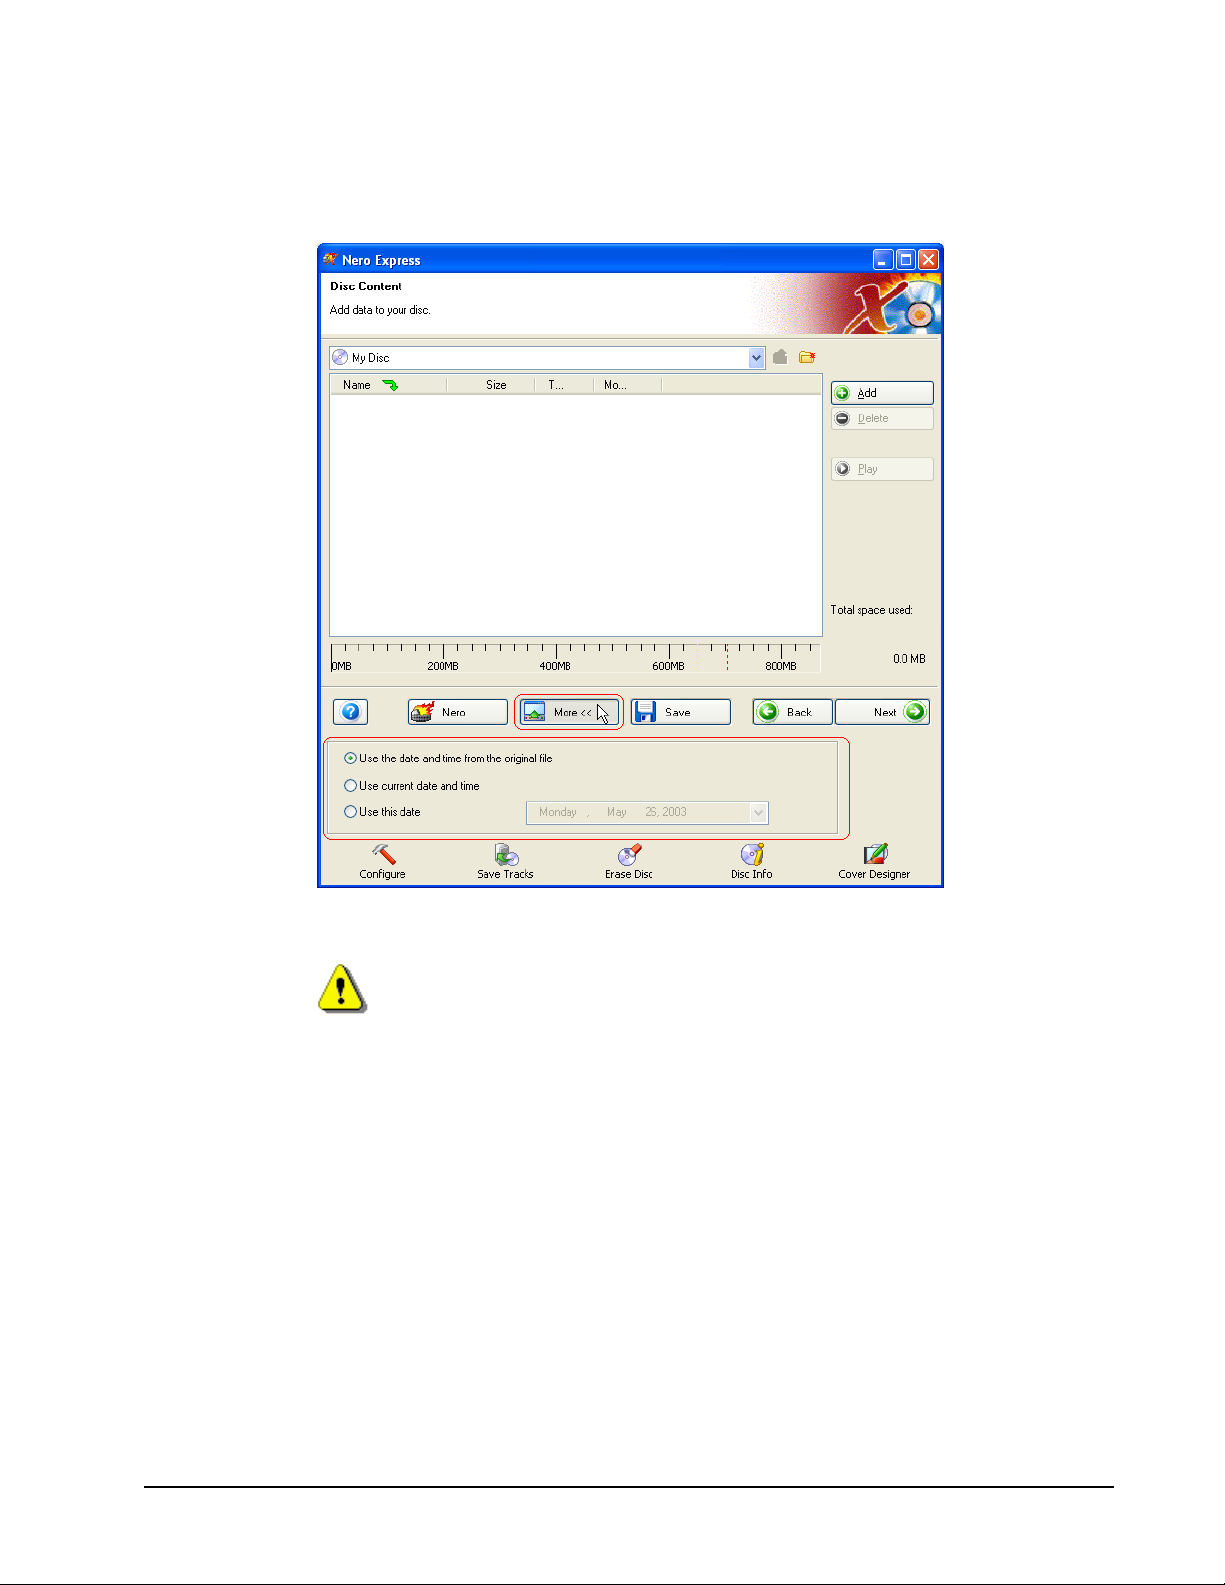
and Data) projects, your window will look like this:
You will have additional options for the date and time for your file name.
See chapter 'For Advanced Users' how to hide files
Nero Express Data • 29
Page 30
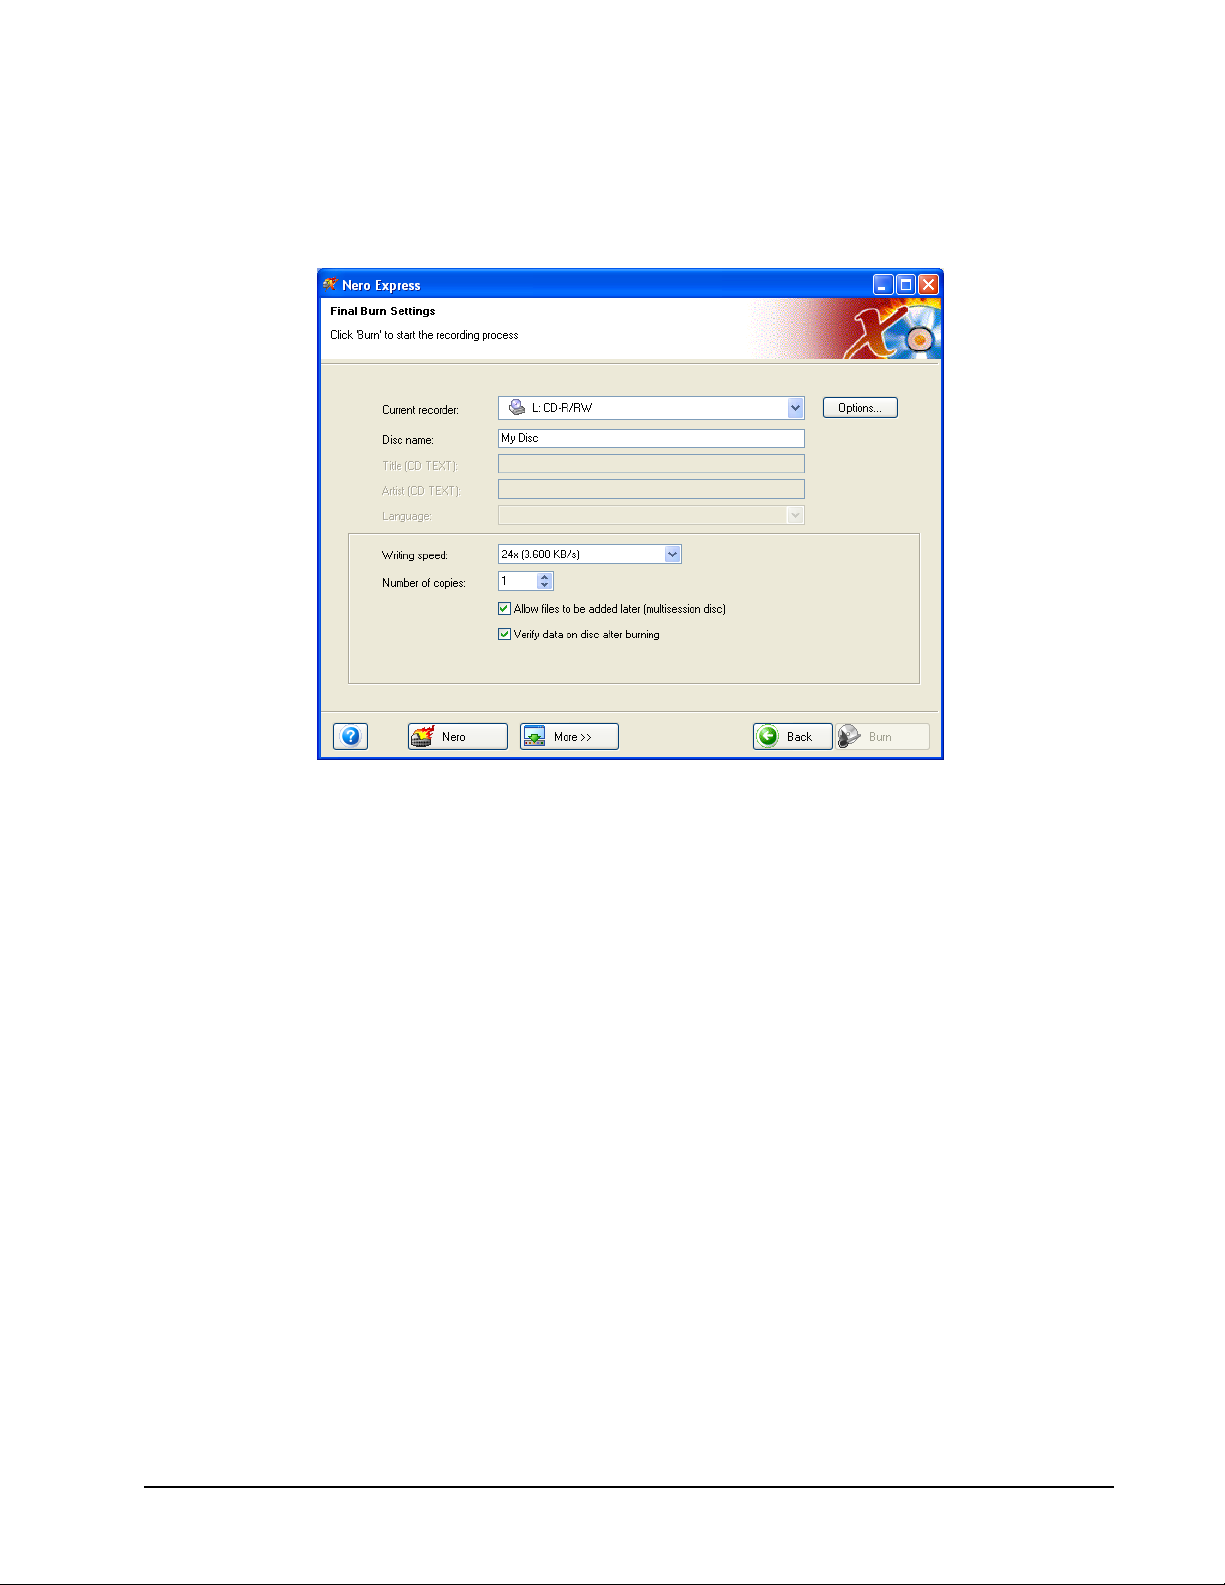
Step 4: Once all your files have been added, click “Next” to prepare your disc for
burning.
Please make your final settings before burning your disc.
Current Recorder – The supported recorders you have connected to your PC
will be displayed and the Image Recorder if you chose to save to your hard drive.
Disc Name – Select a title for your disc.
Writing Speed – Select the speed in which you would like to burn.
Number Of Copies – Select the number of copies you would like to burn.
If you are having trouble burning your disc, please refer to Chapter 'Technical
Support' for F.A.Q. information and technical support.
Nero Express Data • 30
Page 31

When you are ready to burn and click the “More” button at the “Final Burn
Settings” window, another window will appear:
Track-At-Once - With this method, each track is individually written onto the disc.
The write operation is briefly interrupted after each track. This means that a CD-R
or CD-RW can be written on just like any standard disk.
Disc-At-Once - In this mode, all of the tracks are written in a single process onto
the disc without the laser being switched off. This format is best for audio CD’s
that will be played in home and car stereo equipment.
Finalize Disc – The disc will be closed and no additional data or audio can be
written to the disc after finalizing it.
Remove silence at end of *.cda tracks – Each audio track when written will
have a 2-second gap at the end. When checked, this silence is removed.
Nero Express Data • 31
Page 32

Step 5: Ready to record? Click the “Burn” button and you are on your way to
recording your first data disc! As you are burning, you will receive a status
window of the recording process.
Step 6: When it is completed, you will be notified that the burn process has
completed successfully.
F.Y.I.! As one of the many great features in Nero Express 6, it has the ability to
make labels for the jewel case and disc you just burned.
Nero Express Data • 32
Page 33

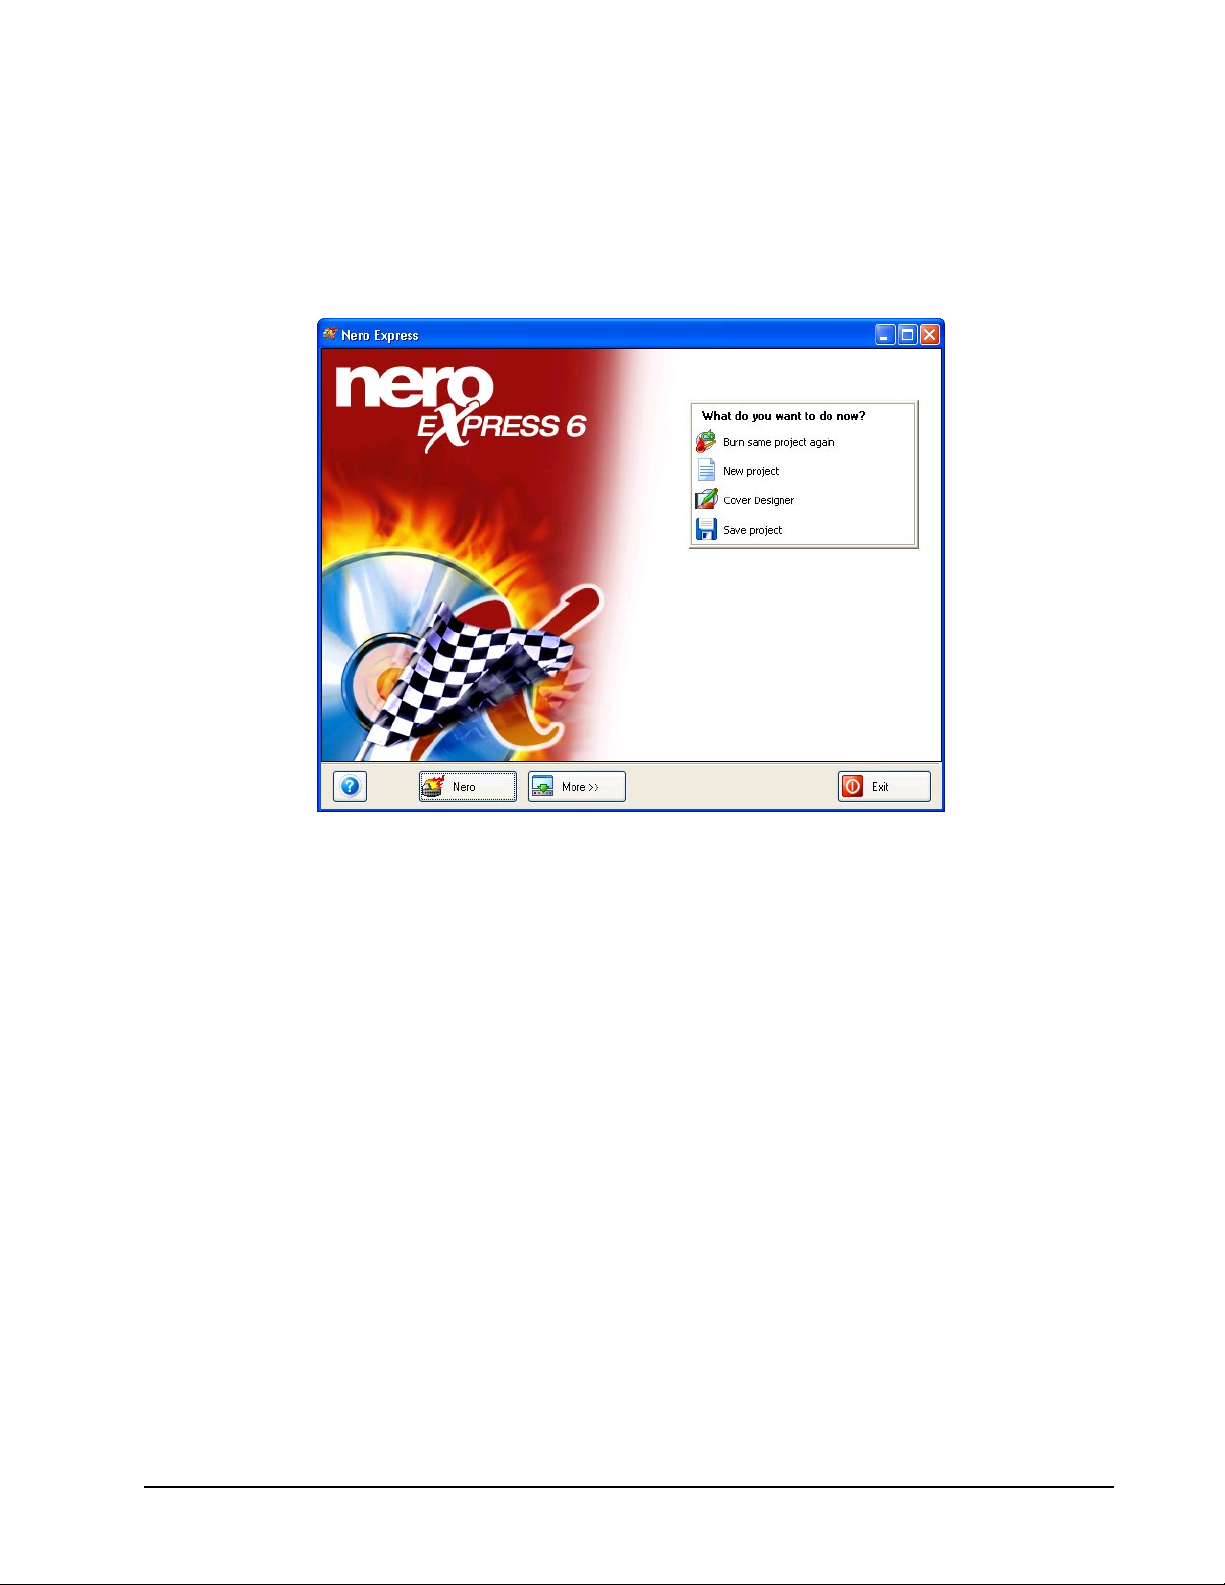
Step 7: When you click OK after the successful recording, you will be returned
back to the recording window. Please click “Next” to move forward to the
following window.
If you would like to burn the same project again, start another project, make
labels, or add more data to your current disc it can be done from this window.
If you have installed Nero Express 6 SE you will not be able to creates labels
and covers, as Nero Cover Designer is not part of the application. If you would
like to use all of Nero Express 6's range of features, then click on the 'Upgrade'
button. This will direct you to a secure online shop, where you can obtain an
upgrade to the full version.
Nero Express Data • 33
Page 34

Nero Express Data • 34
Page 35

4.2 Bootable Data Discs
Creating bootable CD’s as an emergency startup and backup disc is highly
recommended. Bootable CDs are compatible only under Windows 95/98,
Windows ME, Windows 2000, NT, XP or Windows Server 2003.
If you have installed Nero Express 6 SE you will not be able to compile bootable
discs. If you would like to use all of Nero Express 6's range of features, then
click on the 'Upgrade' button. This will direct you to a secure online shop, where
you can obtain an upgrade to the full version.
Step 1: Select your recorder then, under Data, select “Bootable Data Disc”.
Nero Express Data • 35
Page 36

Step 2: You will be brought to the “Disc Content” window where you will be able
to add files. The files and folders will all be visible when you boot from the
bootable disc later on.
Step 3: Click the “Add” button to select the files for your bootable disc.
When you have completed adding all your files, click “Finished".
Nero Express Data • 36
Page 37

Step 4: When you click on “Next”, a dialog will pop up prompting you to insert a
boot floppy disk. The information required to make a bootable data disc will be
read from the boot floppy disk. These are system files which actually allow a
system to boot from a CD and/or DVD. If you do not have a boot floppy disk or do
not know how to create one, please check the help files of your Windows
operating system.
Step 5: When the files have been read from the boot floppy disk, you will be at
the “Final Burn Settings” window.
Nero Express Data • 37
Page 38

Step 6: When you click the “More” button, you will have additional write options
for your disc. You can determine the maximum write speed, simulate burning, or
just write straight to the disc.
When you have made your selection and are ready to record, please click the
“Burn” button!
F.Y.I.! You cannot make bootable Multisession discs!
Nero Express Data • 38
Page 39

4.3 For Advanced Users
4.3.1 Hide Files
If you would like to “Hide” files on your CD/DVD for extra added security or
protection, this can easily be done from the project window.
Right-mouse click on the file in your project window and select “Properties”.
An additional window will appear with information on your file and the option to
check “Hide” to conceal your file.
Nero Express Data • 39
Page 40

5 Music
5.1 Music
Audio
Now you can record your favourite audio CD’s, make a compilation of only the
songs you like, record MP3, Nero Digital Audio and also WMA discs. Learn how
to make WAV files and discs to play in your favorite MP3 player too!
Create a CD-Extra disc in which both data and audio are recorded to one disc.
You can play it in either your PC or your home/car stereo.
Editing title in Audio Contents window
When clicking on the title of your audio track, an edit window will appear in which
you can edit the song title.
Nero Express Music • 40
Page 41

5.2 Creating your first audio disc
Step 1: From the project selection page, select Music > Audio CD.
Step 2: From this next window, you are now ready to start adding audio to your
layout for recording to disc.
Nero Express Music • 41
Page 42

Step 3: There are three very simple ways to add audio to the layout window to
make this process quick and easy.
F.Y.I.! If you want to make audio CDs from existing MP3/mp3PRO music files
you don’t need to convert these files into WAV files first. Nero includes a free
MP3/mp3PRO decoder, than automatically converts your MP3/mp3PRO files into
the appropriate format while you burn your audio CD. The audio CD can then be
played on all commercially available CD players (and most DVD players),
provided that the player can read CD-R (or CD-RW if you recorded on a CD-RW)
discs.
To make your own MP3/mp3PRO files (using music from your audio CDs or
audio files in supported formats such as WAV) you need the Nero MP3/mp3PRO
encoder, which can be purchased separately. You can find out more about the
MP3/mp3PRO encoder in chapter 5.3 or simply visit the Nero AG website at
www.nero.com
.
Option One
- Click the button to select the files you would like to
burn. A window will appear that looks very similar to Windows Explorer and from
here, you are able to choose the files you would like to record and save on disc.
Once you have selected your file(s), please click Add.
Option Two
- Add audio using Windows Explorer - please go to the Start button
in the corner of your screen All Programs > Accessories > Windows Explorer.
F.Y.I.! Some operating systems will have Start > Programs > Windows
Explorer
When the Windows Explorer appears, you can drag the audio you would like to
record into the Nero Express 6 layout.
Option Three
- Add audio using My Computer - please click the icon.
From this window, you can drag and drop your files into the Nero Express 6
layout.
Nero Express Music • 42
Page 43

Editing title in Audio Contents window
When clicking on the title of your audio track, an edit window will appear in which
you can edit the song title.
Step 4: Once all your files have been added, click “Next” to prepare your disc for
burning.
Please make your final settings before burning your disc.
Nero Express Music • 43
Page 44

For additional Burn Settings information, please refer to Chapter 'Preferences'.
If you are having trouble burning your disc, please refer to Chapter 'Technical
Support' for F.A.Q. information and technical support.
Step 5: Ready to record? Click the “Burn” button and you are on your way to
recording your first audio disc! As you are burning, you will receive a status
window of the recording process.
Step 6: When it is completed, you will be notified that the burn process has
completed successfully.
Nero Express Music • 44
Page 45

Step 7: If you click OK after the successful recording, you will be returned back to
the recording window. Please click “Next” to move forward to the following
window.
If you would like to burn the same project again, start another project, make
labels, or add more data to your current disc it can be done from this window.
If you have installed Nero Express 6 SE you will not be able to creates labels
and covers, as Nero Cover Designer is not part of the application. If you would
like to use all of Nero Express 6's range of features, then click on the 'Upgrade'
button. This will direct you to a secure online shop, where you can obtain an
upgrade to the full version.
Nero Express Music • 45
Page 46

5.3 Creating a disc with audio and data
Step 1: When creating a disc with both Audio and Data, you can play the audio in
your home or car stereo and view the data files on your PC. From the project
selection page, select Music > Audio and Date CD.
If you have installed Nero Express 6 SE you will not be able to compile discs
containing both audio and data files. If you would like to use all of Nero
Express 6's range of features, then click on the 'Upgrade' button. This will direct
you to a secure online shop, where you can obtain an upgrade to the full version.
Nero Express Music • 46
Page 47

Step 2: From this next window, you are now ready to start adding audio to your
layout. You will add data first and music later.
There are three very simple ways to add data to the layout window to make this
process quick and easy.
Option One
- Click the button to select the files you would like to
burn. A window will appear that looks very similar to Windows Explorer and from
here, you are able to choose the files you would like to record and save on disc.
Once you have selected your file(s), please click Add.
Option Two
- Add data using Windows Explorer - please go to the Start button in
the corner of your screen All Programs > Accessories > Windows Explorer.
F.Y.I.! Some operating systems will have Start > Programs > Windows
Explorer
When the Windows Explorer appears, you can drag the data you would like to
record into the Nero Express 6 layout.
Option Three
- Add data using My Computer - please click the icon. From
this window, you can drag and drop your files into the Nero Express 6 layout.
Please click Next
Nero Express Music • 47
Page 48

Step 3: From here, you will add your data tracks. Please use the same method
for adding music files as you did for the data above.
Once all your files have been added, click “Next” to prepare your disc for burning.
Nero Express Music • 48
Page 49

Step 4: Please make your final settings before burning your disc.
For additional Burn Settings information, please refer to Chapter 'Preferences'.
If you are having trouble burning your disc, please refer to Chapter 'Technical
Support' for F.A.Q. information and technical support.
Step 5: Ready to record? Click the “Burn” button and you are on your way to
recording your first audio and data disc! As you are burning, you will receive a
status window of the recording process.
Nero Express Music • 49
Page 50

Step 6: When it is completed, you will be notified that the burn process has
completed successfully.
Step 7: When you click OK after the successful recording, you will be returned
back to the recording window. Please click “Next” to move forward to the
following window.
If you would like to burn the same project again, start another project, make
labels, or add more data to your current disc, it can be done from this window.
Nero Express Music • 50
Page 51

If you have installed Nero Express 6 SE you will not be able to creates labels
and covers, as Nero Cover Designer is not part of the application. If you would
like to use all of Nero Express 6's range of features, then click on the 'Upgrade'
button. This will direct you to a secure online shop, where you can obtain an
upgrade to the full version.
5.4 MP3
Step 1: From the project selection page, select Music > MP3 Disc.
Nero Express Music • 51
Page 52

Step 2: From this next window, you are now ready to start adding MP3 files to
your layout.
There are three very simple ways to add data to the layout window to make this
process quick and easy.
Option One
- Click the button to select the files you would like to
burn. A window will appear that looks very similar to Windows Explorer and from
here, you are able to choose the files you would like to record and save on disc.
Once you have selected your file(s), please click Add.
Option Two
- Add data using Windows Explorer - please go to the Start button in
the corner of your screen All Programs > Accessories > Windows Explorer.
F.Y.I.! Some operating systems will have Start > Programs > Windows
Explorer
When the Windows Explorer appears, you can drag the data you would like to
record into the Nero Express 6 layout.
Option Three
- Add data using My Computer - please click the icon. From
this window, you can drag and drop your files into the Nero Express 6 layout.
Once all your files have been added, click “Next” to prepare your disc for burning.
Nero Express Music • 52
Page 53

Step 3: Please make your final settings before burning your disc.
If you are having trouble burning your disc, please refer to Chapter 'Technical
Support' for F.A.Q. information and technical support.
Step 4: Ready to record? Click the “Burn” button and you are on your way to
recording your first MP3 disc! As you are burning, you will receive a status
window of the recording process.
Nero Express Music • 53
Page 54

Step 5: When it is completed, you will be notified that the burn process has
completed successfully.
Step 6: If you click “OK” after the successful recording, you will be returned back
to the recording window. Please click “Next” move forward to the following
window.
If you would like to burn the same project again, start another project, make
labels, or add more data to your current disc it can be done from this window.
Nero Express Music • 54
Page 55

If you have installed Nero Express 6 SE you will not be able to creates labels
and covers, as Nero Cover Designer is not part of the application. If you would
like to use all of Nero Express 6's range of features, then click on the 'Upgrade'
button. This will direct you to a secure online shop, where you can obtain an
upgrade to the full version.
5.4.1 Information mp3PRO encoder plug-in
What is ?:
Using advanced technology and music structure analysis, mp3PRO creates files
that are more compact than original mp3 files with equal or better sound quality
and complete backwards and forwards compatibility. Your old mp3 files will play
without a problem on a new mp3PRO player. New mp3PRO files will play
correctly on old mp3 players, however, without the dramatic mp3PRO
improvements. Of course, new mp3PRO files played on a new mp3PRO decoder
will provide the optimal listening experience!
How the mp3PRO technology works:
When making an mp3PRO file, the new mp3PRO encoder splits audio recordings
into two parts. One part analyzes the low frequency band information and
encodes it into a normal mp3 stream. This allows the encoder to concentrate on
less information and allows it to do a better job of encoding. This also maintains
complete compatibility on old mp3 players. The second part analyzes the high
frequency band information and encodes it into a part of the mp3 stream that is
normally ignored by old mp3 decoders. New or upgraded mp3PRO decoders will
tap into this part of the stream and put the two bands back together, resulting in
the full audio bandwidth.
Nero Express Music • 55
Page 56

More Music on your media:
Offering 128 kbps (kilo bits per second) performance at a 64 kbps encoding rate,
mp3PRO doubles the digital music capacity of flash memory and of compact
discs. For example, traditional audio CDs hold about 15 songs, and an mp3 CD
can hold 150 or more songs encoded at 128 kbps. In the near future, when mp3
CD players incorporate the mp3PRO decoder, consumers will be able to store
over 300 songs on an mp3PRO encoded Compact Disc.
Sound Quality:
The fact is, mp3PRO provides superior sound quality at lower bit rates than
traditional mp3. You simply have to experience the difference yourself.
Download
the new demo version of Nero which includes a 30 times demo
version for the mp3PRO encoder.
If you already own the version 5.5.4.0 or higher of Nero (not the demo version),
then add UNLIMITED
mp3PRO encoder Plug-in
mp3PRO AND MP3 Encoding support with the "Nero
".
If you own an older version of Nero (below 5.5.4.0) you are still able to order the
MP3-Encoder (without "PRO").
The demo and update version of Nero 5.5.4.0 (and future updates) includes a 30
times trial version of the mp3PRO encoder for you to enjoy. After you’ve tested
the encoder 30 times you can decide if you want to buy the unlimited mp3PRO
encoder plug-in. The encoder will let you make both standard mp3s as well as
enhanced mp3PRO files!
If you already own the version 5.0.0.0 or higher (including Nero 5.5) of Nero (not
the demo version), then add UNLIMITED MP3 Encoding support with the "Nero
MP3 encoder Plug-in".
This encoder (without "PRO") cannot be upgraded later to mp3PRO.
Nero Express Music • 56
Page 57

5.5 WMA
Step 1: From the project selection page, select Music > WMA Disc.
Step 2: In the next window, you are now ready to start adding WMA files to your
layout.
Nero Express Music • 57
Page 58

There are three very simple ways to add data to the layout window to make this
process quick and easy.
Option One
- Click the button to select the files you would like to
burn. A window will appear that looks very similar to Windows Explorer and from
here, you are able to choose the files you would like to record and save on disc.
Once you have selected your file(s), please click Add.
Option Two
- Add data using Windows Explorer - please go to the Start button in
the corner of your screen All Programs > Accessories > Windows Explorer.
F.Y.I.! Some operating systems will have Start > Programs > Windows
Explorer
When the Windows Explorer appears, you can drag the data you would like to
record into the Nero Express 6 layout.
Option Three
- Add data using My Computer - please click the icon. From
this window, you can drag and drop your files into the Nero Express 6 layout.
Once all your files have been added, click “Next” to prepare your disc for burning.
Step 3: Please make your final settings before burning your disc.
Current Recorder – The supported recorders you have connected to your PC
will be displayed and the Image Recorder if you chose to save to your hard drive.
Disc Name – Select a title for your disc.
Writing Speed – Select the speed in which you would like to burn.
Nero Express Music • 58
Page 59

Number Of Copies – Select the number of copies you would like to burn.
If you are having trouble burning your disc, please refer to Chapter 'Technical
Support' for F.A.Q. information and technical support.
F.Y.I.! The WMA plugin will install WMA support within Nero. To install, just
download and execute the file.
Step 4: Ready to record? Click the “Burn” button and you are on your way to
recording your first WMA disc! As you are burning, you will receive a status
window of the recording process.
Step 5: When it is completed, you will be notified that the burn process has
completed successfully.
Nero Express Music • 59
Page 60

Step 6: When you click “OK” after the successful recording, you will be returned
back to the recording window. Please click “Next” move forward to the following
window.
If you would like to burn the same project again, start another project, make
labels, or add more data to your current disc it can be done from this window.
If you have installed Nero Express 6 SE you will not be able to creates labels
and covers, as Nero Cover Designer is not part of the application. If you would
like to use all of Nero Express 6's range of features, then click on the 'Upgrade'
button. This will direct you to a secure online shop, where you can obtain an
upgrade to the full version.
Nero Express Music • 60
Page 61

5.6 Nero Digital Audio
If you have installed Nero Express 6 SE you will be unable to compile Nero
Digital audio discs. If you would like to use all of Nero Express 6's range of
features, then click on the 'Upgrade' button. This will direct you to a secure online
shop, where you can obtain an upgrade to the full version.
Step 1: From the project selection page, select Music > Nero Digital Audio
Disc.
Nero Express Music • 61
Page 62

Step 2: In the next window, you are now ready to start adding Nero Digital Audio
files to your layout.
Nero Express Music • 62
Page 63

There are three very simple ways to add data to the layout window to make this
process quick and easy.
Option One
- Click the button to select the files you would like to
burn. A window will appear that looks very similar to Windows Explorer and from
here, you are able to choose the files you would like to record and save on disc.
Once you have selected your file(s), please click Add.
Option Two
- Add data using Windows Explorer - please go to the Start button in
the corner of your screen All Programs > Accessories > Windows Explorer.
F.Y.I.! Some operating systems will have Start > Programs > Windows
Explorer
When the Windows Explorer appears, you can drag the data you would like to
record into the Nero Express 6 layout.
Option Three
- Add data using My Computer - please click the icon. From
this window, you can drag and drop your files into the Nero Express 6 layout.
Once all your files have been added, click “Next” to prepare your disc for burning.
Step 3: Please make your final settings before burning your disc.
Current Recorder – The supported recorders you have connected to your PC
will be displayed and the Image Recorder if you chose to save to your hard drive.
Disc Name – Select a title for your disc.
Writing Speed – Select the speed in which you would like to burn.
Nero Express Music • 63
Page 64

Number Of Copies – Select the number of copies you would like to burn.
If you are having trouble burning your disc, please refer to Chapter 'Technical
Support' for F.A.Q. information and technical support.
Step 4: Ready to record? Click the “Burn” button and you are on your way to
recording your first Nero Digital Audio disc! As you are burning, you will receive a
status window of the recording process.
Step 5: When it is completed, you will be notified that the burn process has
completed successfully.
Nero Express Music • 64
Page 65
Step 6: When you click “OK” after the successful recording, you will be returned
back to the recording window. Please click “Next” move forward to the following
window.
If you would like to burn the same project again, start another project, make
labels, or add more data to your current disc it can be done from this window.
Nero Express Music • 65
Page 66

5.7 For Advanced Users
5.7.1 Image Recorder
For details about how to create an image file, please see the Nero manual.
Enable Image Recorder for all supported recorder formats – When checked,
this will enable the Image recorder to be seen for all supported formats in the
main window.
Nero Express Music • 66
Page 67

Current Recorder – When the “Image Recorder” has been selected for your
audio project, you will have two new additional options.
Title (CD-Text) – Select a title for your disc. It will appear on your LCD screen of
your home or car stereo provided that it supports the CD-Text function. Not all
players do!
Artist (CD-Text) – Select an artist name for your disc. It will appear on your LCD
screen of your home or car stereo provided that it supports the CD-Text function.
Number of copies – Select the number of disc copies you would like to make
5.7.2 Audio Properties
Normalize Audio files – Equalize levels of all the all audio tracks (Volume etc.).
No pause between tracks - When applied, all the audio tracks that will be
burned to disc will no longer have the two second gap between each song.
Select your music track in the audio layout then click the
“Properties” button. You will be able to see the resources of each audio file and
have the capabilities to change and edit the track.
5.7.2.1 Track Properties Tab
You will be able to see the basic track information and also edit the properties of
your audio files.
Nero Express Music • 67
Page 68

File: Name of the MP3 file
Frequency: Stereo requirements for audio
Channels: Stereo requirements for audio
Resolution: Stereo requirements for audio
Title (CD-Text): The name of your song and the artist will be displayed on the
LCD panel of your stereo. Please make sure your equipment supports CD-Text.
Artist: Here you can enter the name of the artist for the song.
Pause: You can set the pause in-between each song by seconds or frames.
International Standard Recording Code (ISRC): An international identification
code for music, which was developed for identifying sound and music video
recordings.
Protection: When applied, you will add protection to your disc, so that it may not
be copied in the future.
Crossfade with previous track: When applied, this feature will blend the audio
tracks together. You can specify the amount of seconds you would like to blend
in-between each track
5.7.2.2 CD EXTRA tab
All information pertaining to the music track is defined in this window including
the language preferences.
Nero Express Music • 68
Page 69

5.7.2.3 Indexes, Limits, Split Tab
Positions: Defines the start and end of your music track.
New Index: You are able to create a new index within your song. With this you
can then skip through the indexes with your audio player to find the particular
audio area you are looking for. Select an area in your song then click “New
Index”.
Define a place in the audio track and click your mouse there. Click the “New
index” button and a marker will be place there to mark the spot. If you want to be
extremely accurate, you can use the “Zoom In” button to view the tracks more
closely.
Split: This function will divide the song into the areas which you specified. Select
an area in the song and click “Split”. As an example, if you have one large audio
file of a live concert in which they play 12 songs and you would like to split the
Nero Express Music • 69
Page 70

audio into 12 tracks, you would use this function. You can then play the audio in
a CD player and each track would be identified as a separate song so that you
can use the seek function to play each track without having to listen to the whole
music piece.
Define a place in the audio track and click your mouse there. Click the “Split”
button and a marker will be place there to mark the spot. If you would like to be
extremely accurate, you can use the “Zoom In” button to view the tracks more
closely.
Play: To play the song in its entirety or a selected portion by highlighting the
area, click “Play”.
Edit: You are able to edit the index or split markers by minutes, seconds, or
frames.
Select the marker and click “Edit”.
Nero Express Music • 70
Page 71

You can edit the actual minutes, seconds, and frames of the audio file.
Delete: Delete the index or split markers that you have made by selecting the
index or split marker and clicking “Delete”.
Zoom In: View your song at close range.
Zoom Out: Have an overall large picture of your song.
Full View: View your song in full.
5.7.2.4 Filters Tab
You can change the audio effects by selecting one or more of the checkboxes
below. After selecting your filters, you can test the effects by choosing “Test
selected filters”.
Normalize: This filter may be used to set the volume of a track to a standard
volume. It may be useful to adjust the volumes of several tracks that were read
from different sound input devices.
DeClick: This filter can be used to remove click/pop/crackle sounds like those
that are caused by old scratched LP’s.
Nero Express Music • 71
Page 72

Hiss Reduction: This filter reduces the hiss level of a given sound. It will remove
all audio in all frequencies that are below a certain threshold (hiss level). If audio
has a constant background hiss then it can be “noise gated” or removed
completely.
Fade In: this filter will gradually fade and blend tracks from silence to full volume.
It’s especially useful to shorten tracks. You will also need to edit the track limits
property page to shorten the track.
Fade Out: This filter will gradually fade out tracks from full volume to silence. It’s
especially useful to shorten tracks. You will also need to edit the track limits
property page to shorten the track.
Stereo Widening: This filter allows you to enhance or reduce the stereo effect of
an audio track. The filter will only have an effect if the original track is already
recorded in stereo. It will leave mono tracks unchanged.
Karaoke: This filter can be used to eliminate the vocals of a song. It works by
removing those parts of the song that are equal on both stereo channels.
Echo: This filter allows you to add an echo effect to the audio track.
Equalizer: This filter allows you to change the frequency, gain, bass, and treble
in your audio track.
Nero Express Music • 72
Page 73

6 Video/Pictures
6.1 Video/Pictures
Video
Get those home movies ready! You can now take your movies or video clips and
store them to CD in miniDVD, Video CD or Super Video CD format. Super Video
CD (or SVCD) is very similar to a video CD, however, this format uses a
compression standard called MPEG to store the audio and data. VCD’s can be
played on most home video players that support this format and CD-ROM and
DVD-ROM players with appropriate software. SVCD discs can be played on DVD
players, PC’s with DVD-ROMS or a CD-ROM drive with software which allows
this type of video format to be seen.
6.2 Creating your first video disc
Step 1: From the project selection page, select Video > Video CD.
Nero Express Video/Pictures • 73
Page 74

Step 2: From this next window, you are now ready to start adding data to your
layout for recording to disc.
Step 3: There are three very simple ways to add data to the layout window to
make this process quick and easy.
Option One
- Click the button to select the files you would like to
burn. A window will appear that looks very similar to Windows Explorer and from
here, you are able to choose the files you would like to record and save on disc.
Once you have selected your file(s), please click Add.
Option Two
- Add data using Windows Explorer - please go to the Start button in
the corner of your screen All Programs > Accessories > Windows Explorer.
F.Y.I.! Some operating systems will have Start > Programs > Windows
Explorer
When the Windows Explorer appears, you can drag the data you would like to
record into the Nero Express 6 layout.
Option Three
- Add data using My Computer - please click the icon. From
this window, you can drag and drop your files into the Nero Express 6 layout.
Nero Express Video/Pictures • 74
Page 75

Step 4: Once all your files have been added, click “Next” to prepare your disc for
the layout.
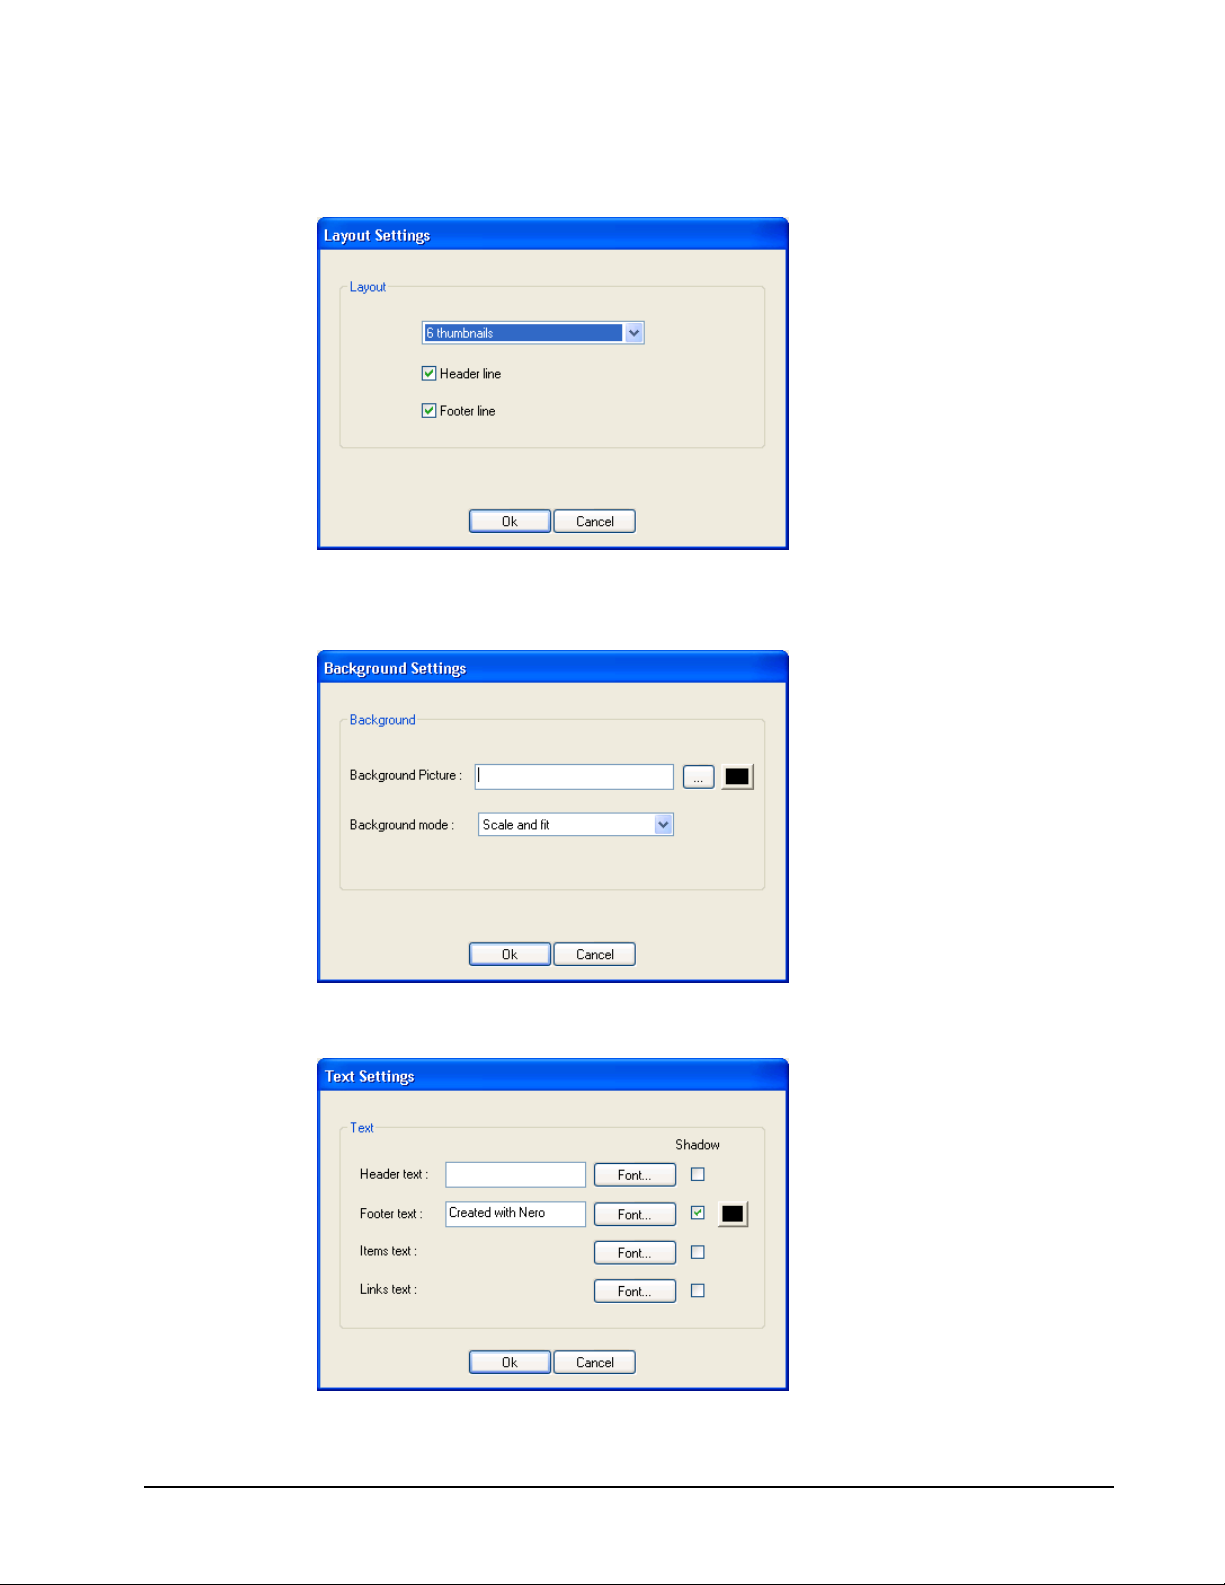
In the My Video CD (VCD) menu, you can change the look of the menu by
clicking on the layout, background, and text buttons.
Layout – You are able to change the thumbnails and add or remove the header
and footer.
Nero Express Video/Pictures • 75
Page 76

Background – Add an image to your background or color. You can also change
the background mode so that you can scale to fit, center, etc…
Text – Change the font style, size, and enter footer and header text.
Show full screen menu – When applied, you will enlarge the screen to full size.
Set as default – Keep the settings you have just made as default if you like the
layout you have created.
Nero Express Video/Pictures • 76
Page 77

Step 5: Please make your final settings before burning your disc.
If you are having trouble burning your disc, please refer to Chapter 'Technical
Support' for F.A.Q. information and technical support.
Step 6: Ready to record? Click the “Burn” button and you are on your way to
recording your first VCD disc! As you are burning, you will receive a status
window of the recording process.
Nero Express Video/Pictures • 77
Page 78

Step 7: When it is completed, you will be notified that the burn process has
completed successfully.
Step 8: If you click OK after the successful recording, you will be returned back to
the recording window. Please click “Next” to move forward to the following
window.
If you would like to burn the same project again, start another project, make
labels, or add more data to your current disc it can be done from this window.
Nero Express Video/Pictures • 78
Page 79

If you have installed Nero Express 6 SE you will not be able to creates labels
and covers, as Nero Cover Designer is not part of the application. If you would
like to use all of Nero Express 6's range of features, then click on the 'Upgrade'
button. This will direct you to a secure online shop, where you can obtain an
upgrade to the full version.
6.3 Creating your first super video disc
If you have installed Nero Express 6 SE you will not be able to compile Super
Video CDs. If you would like to use all of Nero Express 6's range of features,
then click on the 'Upgrade' button. This will direct you to a secure online shop,
where you can obtain an upgrade to the full version.
Step 1: From the project selection page, select Video Pictures > Super Video
CD (SVCD)
Nero Express Video/Pictures • 79
Page 80

Step 2: From this next window, you are now ready to start adding data to your
layout for recording to disc.
Step 3: There are three very simple ways to add data to the layout window to
make this process quick and easy.
Option One
- Click the button to select the files you would like to
burn. A window will appear that looks very similar to Windows Explorer and from
here, you are able to choose the files you would like to record and save on disc.
Once you have selected your file(s), please click Add.
Option Two
- Add data using Windows Explorer - please go to the Start button in
the corner of your screen All Programs > Accessories > Windows Explorer.
F.Y.I.! Some operating systems will have Start > Programs > Windows
Explorer
When the Windows Explorer appears, you can drag the data you would like to
record into the Nero Express 6 layout.
Option Three
- Add data using My Computer - please click the icon. From
this window, you can drag and drop your files into the Nero Express 6 layout.
Step 4: Once all your files have been added, click “Next” to prepare your disc for
the layout.
Nero Express Video/Pictures • 80
Page 81

In the My Super Video CD (SVCD) menu, you can change the look of the menu
by clicking on the layout, background, and text buttons.
Nero Express Video/Pictures • 81
Page 82
Layout – You are able to change the thumbnails and add or remove the header
and footer.
Background – Add an image to your background or color. You can also change
the background mode so that you can scale to fit, center, etc…
Text – Change the font style, size, and enter footer and header text.
Nero Express Video/Pictures • 82
Page 83

Show full screen menu – When checked, you will enlarge the screen to full size.
Set as default – Keep the settings you have just made as default if you like the
layout you have created.
Step 5: Please make your final settings before burning your disc.
If you are having trouble burning your disc, please refer to Chapter 'Technical
Support' for F.A.Q. information and technical support.
Nero Express Video/Pictures • 83
Page 84

Step 6: Ready to record? Click the “Burn” button and you are on your way to
recording your first SVCD disc! As you are burning, you will receive a status
window of the recording process.
Step 7: When it is completed, you will be notified that the burn process has
completed successfully.
Nero Express Video/Pictures • 84
Page 85

Step 8: If you click OK after the successful recording, you will be returned back to
the recording window. Please click “Next” to move forward to the following
window.
If you would like to burn the same project again, start another project, make
labels, or add more data to your current disc it can be done from this window.
6.4 Advanced Users
6.4.1 Video and Super Video Properties
You are able to change the video parameters within the Video and Super Video
layout. When in the layout window, select the file and click “Properties”.
Nero Express Video/Pictures • 85
Page 86

Scaling method – When scaling the size of your video, you will have the choice
of Maximize, Scale and clip, or Scale and fit.
Pause after Track – After each picture clip or video, you have the option to
replay infinitely until the user stops the program or sets the pause after the track
by seconds.
Select picture to use as thumbnail – The slider can move your video frame by
frame. Select the frame in which you would like to represent your thumbnail.
Title – Select the title for your video
Nero Express Video/Pictures • 86
Page 87

7 DVD
7.1 DVD
DVD Disc
If you have a supported DVD recorder (Please visit www.nero.com
currently supported DVD recorders) you can burn DVD discs in the same way
you would burn CDs. Not all the various formats that exist for CD have their
counterpart on DVD. Therefore, once you have chosen to record a DVD, the
“Project Selection” page will look slightly different. You have the choice of burning
a data disc, an MP3 audio disc, an WMA audio disc, an Nero Digital Audio disc,
burning existing DVD-Video files to DVD-Video, copying an entire DVD, opening
a previously saved project or burning a previously created DVD disc image.
Please note that to make a DVD-Video title from video files (such as AVI, etc),
you must use a DVD authoring tool such as NeroVision Express 3. In Nero
Express 6 you can only files which already exist in the format and file structure
required by the Video-DVD standard.
the list of
F.Y.I.! It is not possible to read or copy copy-protected DVD’s or CD’s with Nero
Express 6.
Nero Express DVD • 87
Page 88

7.2 Selecting your recorder
If your DVD recorder is supported and has been detected, simply seclect it from
the “Which recorder would you like to use?” drop-down box. Some DVD
recorders can also record CDs. These so-called “combo recorders” will be listed
twice in the drop-down menu, followed by the extension “CD-R/RW” and “DVD”.
To use the recorder to burn DVD discs, select the entry with the “DVD” extension.
If you do not have a DVD recorder available, you have the possibility to burn
DVD disc images using the DVD Image Recorder. These images can later be
opened in Nero Express 6 and burnt to DVD when a DVD-recorder is available.
If the Image Recorder (DVD) is not available to you as an option, most likely the
feature has not been activated.
Please click on the “More” button then “Configure”.
Nero Express DVD • 88
Page 89

In the Expert Features tab, near the bottom, you will see an option called “Enable
Image Recorder for all supported recorder formats”. Please check this box and
the Image Recorder (DVD) option will appear at your “Start” screen.
Nero Express DVD • 89
Page 90

7.3 Creating your first DVD disc
To make data or music discs, or to copy an entire DVD disc, the steps are the the
same as with CD’s. Please refer to the relevant sections in the user’s guide. Only
the “DVD-Video files” project is a little different and will be explained in detail
below.
7.4 Creating a DVD-Video disc from DVD-Video files
Once the DVD recorder or DVD Image Recorder has been selected, the option to
burn DVD files will appear in your “Start” menu.
Step 1: From the project selection page, select DVD-Video files.
Nero Express DVD • 90
Page 91

Step 2: From this next window, you are now ready to start adding existing DVD-
Video files with extensions such as .VOB, .IFO, .BUP. To ensure a proper
functioning of the DVD-Video disc, it is best to add all the files of the VIDEO_TS
folder.
Step 3: When you are ready, click “Next” to proceed to the next window to start
the burn process.
In the “Final Burn Settings” window, you will only have the option to change back
and forth between your DVD recorder (if you have one available to you) and the
DVD Image Recorder and to label your disc under “Disc Name”. All other options
will be grayed out and not available to you.
Nero Express DVD • 91
Page 92

Step 4: Ready to record? Click the “Burn” button and you are on your way to
recording your first DVD-Video disc! As you are burning, you will receive a status
window of the recording process.
Step 5: When it is completed, you will be notified that the burn process has
completed successfully.
Nero Express DVD • 92
Page 93

Step 6: If you click OK after the successful recording, you will be returned back to
the recording window. Please click “Next” to move forward to the following
window.
If you would like to burn the same project again, start another project, make
labels, or add more data to your current disc it can be done from this window.
If you have installed Nero Express 6 SE you will not be able to creates labels
and covers, as Nero Cover Designer is not part of the application. If you would
like to use all of Nero Express 6's range of features, then click on the 'Upgrade'
button. This will direct you to a secure online shop, where you can obtain an
upgrade to the full version.
Nero Express DVD • 93
Page 94

8 Copy Entire Disc
8.1 Copy Entire Disc
Copy Entire Disc
Copy the complete contents of an entire disc to a blank disc bit by bit. If you are
backing up a disc or making a copy for your personal use, this feature allows you
to make an efficient exact copy.
Step 1: From the project selection page, select Copy entire disc
Nero Express Copy Entire Disc • 94
Page 95

Step 2: From this next window, you are now ready to start the process of copying
from disc to disc.
If you have more than one CD/DVD-ROM or CD/DVD R/RW/ROM drive in your
PC, please use the drop down box to select the drive(s) you would prefer to use.
Source Drive – This is the drive in which it contains the disc you would like
copied.
Destination drive – This drive will contain the blank disc which you will be
burning to.
Quick Copy – Select this option if you would like to copy directly from the source
to the destination drive. No space will be used on your hard disk.
If you are having trouble burning your disc, please refer to Chapter 'Technical
Support' for F.A.Q. information and technical support.
Nero Express Copy Entire Disc • 95
Page 96

If you have selected “Copy entire disc” as your project, you will have this option
when selecting the “More” button.
You will have the burn options for your disc.
Determine maximum speed – When checked, the software will determine the
safest maximum speed for burning your disc.
Simulation – When checked, the software will simulate an actual burn to disc
without actually writing to it.
Write – When checked, the software will immediately burn to disc.
When you are ready to burn and click the “More” button at the “Final Burn
Settings” window, another window will appear:
Nero Express Copy Entire Disc • 96
Page 97

Step 3: Ready to record? Click the “Burn” button and you are on your way to
recording your disc! The source disc will first be analyzed to check for copyrights
and errors on the disc. As you are burning, you will receive a status window of
the recording process.
Step 4: When it is completed, you will be notified that the burn process has
completed successfully.
Nero Express Copy Entire Disc • 97
Page 98

Step 5: When you click OK after the successful recording, you will be returned
back to the recording window. Please click “Next” to move forward to the
following window.
If you would like to burn the same project again, start another project, make
labels, or add more data to your current disc it can be done from this window.
If you have installed Nero Express 6 SE you will not be able to creates labels
and covers, as Nero Cover Designer is not part of the application. If you would
like to use all of Nero Express 6's range of features, then click on the 'Upgrade'
button. This will direct you to a secure online shop, where you can obtain an
upgrade to the full version.
Nero Express Copy Entire Disc • 98
Page 99

9 Disc Image or Saved Project
9.1 Disc Image or Saved Project
Disc Image or Saved Project
If you are unable to finish your project or would like to save it to record multiple
copies, you can save your work and open at a later time.
You can also save to Disc Image if you are having problems with corrupted
source discs/disks or performance problems with your PC. Disc Image is the
safest way to record your data to disc.
9.2 Creating a disc from a disc image
Step 1: From the project selection page, select Disc image of saved project
Nero Express Disc Image or Saved Project • 99
Page 100

Step 2: From this next window, you are now ready to retrieve your disc image or
saved project.
Step 3: Please make your final settings before burning your disc.
For additional Burn Settings information, please refer to Chapter 'Preferences'.
If you are having trouble burning your disc, please refer to Chapter 'Technical
Support' for F.A.Q. information and technical support.
Nero Express Disc Image or Saved Project • 100
 Loading...