

Page 1
Manual
Nero Burning ROM
Page 2

Copyright and Trademark Information
This document and all its contents herein are subject to and protected by international copyright and other intellectual property rig h ts
and are the property of Nero AG and its subsidiaries, affiliates or licensors. All rights reserved. No part of this document may be
reproduced, transmitted or transcribed without the express written permission of Nero AG. All trade names and trademarks and/or
service marks are the property of their respective owners. The trademarks mentioned are expressly named for information purposes
only. Nero AG rejects any claims that transcend the clauses of the guarantee rights to the fullest extent. Nero AG does not undertake
any liability for the correctness of the content of this document. The contents of the software supplied, as well as of this document,
may be changed without prior warning. Some applications of the Nero Suites require technologies developed by third-party
manufacturers. Some of these are included as a trial version in this suite. These technologies need to be activated online (free of
charge) or by sending an activation fax to have unlimited use of the version. Nero will then undertake to release the data necessary
to activate technologies licensed by third-party manufacturers for unlimited use with Nero 12 or Nero 12 Platinum. It is therefore
necessary to have an Internet connection or a fax machine. Unless you own the copyright or have permission from the copyright
owner, you may be violating national or international copyright laws and be subject to payment of damages and other remedies, if
you duplicate, reproduce, modify, or distribute copyrighted material. If you are unsure of your rights you should contact your legal
advisor.
Copyright © 2012 Nero AG and its licensors. All rights reserved.
Nero, Nero BackItUp, Nero Burn, Nero Burning ROM, Nero CoverDesigner, Nero Digital, Nero Express, Nero Kwik Media, Nero Kwik
Backup, Nero Kwik Blu-ray, Nero Kwik Burn, Nero Kwik DVD, Nero Kwik Faces, Nero Kwik MobileSync, Nero Kwik Move it, Nero
Kwik Play, Nero Kwik Photobook, Nero Kwik Places, Nero Kwik Sync, Nero Kwik Themes, Nero Kwik Tuner, Nero MediaStreaming,
Nero Recode, Nero RescueAgent, Nero SmartDetect, Nero Simply Enjoy, Nero SmoothPlay, Nero StartSmart, Nero Soun dTrax,
Nero Surround, Nero Video, Nero Video Express, Nero WaveEditor Burn-At-Once, Layer Ma gic, Liq ui d Me dia, Sec urDisc, the
SecurDisc logo, Superresolution and UltraBuffer are common law trademarks or registered trademarks of Nero AG.
Gracenote, CDDB, MusicID, MediaVOCS, the Gracenote logo and logotype, and the "Powered by Gracenote" logo are either
registered trademarks or trademarks of Gracenote in the United States and/or other countries.
Manufactured under license from Dolby Laboratories. Dolby, Pro Logic, and the double-D symbol are registered trademarks of Dolby
Laboratories, Inc. Confidential unpublished works. Copyright 2011 Dolby Laboratories. All rights reserved.
Manufactured under license under U.S. Patent Nos: 5,956,674; 5,974,380; 6,487,535 & other U.S. and worldwide patents issued &
pending. DTS, the Symbol, & DTS and the Symbol together are registered trademarks & DTS Digital Surround, DTS 2.0+Digital Out
and the DTS logos are trademarks of DTS, Inc. Product includes software. © DTS, Inc. All Rights Reserved.
Adobe, Acrobat, Reader, Premiere, AIR, and Flash are trademarks or registered trademarks of Adobe Systems, Incorporated. Apple,
Apple TV, iTunes, iTunes Store, iPad, iPod, iPod touch, iPhone, Mac and QuickTime are trademarks of Apple Inc. registered in the
U.S and other countries. AMD App Acceleration, AMD Athlon, AMD Opteron, AMD Sempron, AMD Turion, ATI Catalyst, ATI
Radeon, ATI, Remote Wonder, and TV Wonder are trademarks or registered trademarks of Advanced Micro Devices, Inc. Bluetooth
is a trademark owned by Bluetooth SIG, Inc. Blu-ray Disc, Blu-ray, Blu-ray 3D, BD-Live, BONUSVIEW, BDXL, AVCREC and the
logos are trademarks of the Blu-ray Disc Association. Check Point is a registered trademark of Check Point Software Technologies
Ltd. FaceVACS and Cognitec are either registered trademarks or trademarks of Cognitec Systems GmbH. DivX and DivX Certified
are registered trademarks of DivX, Inc. DVB is a registered trademark of the DVB Project. 3GPP is a trademark of European
Telecommunications Standards Institute (ETSI). Facebook is a registered trademark of Facebook, Inc. Google, Android and
YouTube are trademarks of Google, Inc. LightScribe is a registered trademark of the Hewlett-Pac ka rd Dev elo pment Company, L.P.
Ask and Ask.com are registered trademarks of IAC Search & Media. IEEE is a registered trademark of The Institute of Electrical and
Electronics Engineers, Inc. Intel, Intel Core, Intel Quick Sync Video, Intel XScale and Pentium are trademarks or registered
trademarks of Intel Corporation in the U.S. and/or other countries. Philips is a registered trademark of Koninklijke Philips
Electronics.N.V. Linux is a registered trademark of Linus Torvalds. InstallShield is a registered trademark of Macrovision
Corporation. ActiveX, ActiveSync, Aero, Authenticode, DirectX, DirectShow, Internet Explorer, Microsoft, MSN, Outlook, Windows,
Windows Mail, Windows Media, Windows Media Player, Windows Mobile, Windows.NET, Windows Server, Windows Vista,
Windows XP, Windows 7, Windows 8, Xbox, Xbox 360, PowerPoint, Visual C++, Silverlight, the Silverlight Logo, the Windows Vista
start button, and the Windows logo are trademarks or registered trademarks of Microsoft Corporation in the United States and other
countries. My Space is a trademark of MySpace, Inc. NVIDIA, GeForce, ForceWare, and CUDA are trademarks or registered
trademarks of NVIDIA. This program includes software developed by the OpenSSL Project for use in the OpenSSL Toolkit.
(http://www.openssl.org/)\Open SSL is copyright © 199 8-2005 The OpenSSL Project. All rights reserved. This program includes
cryptographic softw ar e wri tte n by Eric Y oun g (eay @ cry pt s oft.com). This progra m inclu des s of t ware w ritt en by Ti m Huds o n
(tjh@cryptsoft.com). Cryptographic software inside Open SSL is copyright © 1995-1998 Eric Young (eay@cryptsoft.com). All rights
reserved. CompactFlash is a registered trademark of SanDisk Corporation. Sony, Memory Stick, PlayStation, and PSP are
trademarks or registered trademarks of Sony Corporation. AVCHD, AVCHD Lite and AVCHD Progressive are trademarks of Sony
Corporation and Panasonic Corporation. HDV is a trademark of Sony Corporation and Victor Company of Japan, Limited (JVC).
MP3 SURROUND, MP3PRO and their logos are trademarks of Thomson S.A. Unicode is a registered trademark of Unicode, Inc.
The USB logo is a trademark of Universal Serial Bus Implementers Corporation. UPnP is a registered trademark of UPnP
Implementers Corporation. Vimeo is a trademark of Vimeo, LLC. Yahoo! and Flickr are registered trademarks of Yahoo! Inc.
Labelflash is a trademark of Yamaha Corporation
Other product and brand names may be trademarks of their respective owners and do not imply affiliation with, sponsorship, or
endorsement by owners.
Nero AG reserves the right to change specifications without notice. Use of this product is subject to the acceptance of the End User
License Agreement upon installation of the software. www.nero.com
Nero AG, Im Stoeckmaedle 18, 76307 Karlsbad, Germany
2
Nero Burning ROM
Page 3

Table of Contents
1
Start Successfully
6
1.1
About the Manual
6
1.2
About Nero Burning ROM
6
1.3
Versions of Nero Burning ROM
7
1.4
Working With the Program
7
1.5
Starting the Program
8
1.6
System Requirements
9
1.7
Supported Formats and Codecs
9
1.7.1
Disc Types
9
1.7.2
Disc Formats
9
1.7.3
Audio Formats and Codecs
10
1.7.4
Video Formats and Codecs
10
1.7.5
Image Formats
10
1.7.6
Formats for Playlists
11
2
User Interface
12
2.1
Main Screen
12
2.2
New Compilation Window
15
2.3
Selection Screen
19
3
Data Disc
22
3.1
Compiling Data Disc
22
3.1.1
Defining Options
24
3.1.1.1
Multisession Settings
24
3.1.1.2
Autorun
27
3.1.1.3
UDF Settings
27
3.1.1.4
ISO Settings
27
3.2
Compiling a SecurDisc disc
29
3.3
Nero DiscSpan (UDF) Compilation and Nero DiscMerge Tool
34
3.3.1
Set Nero DiscSpan Options
34
3.3.2
Creating Multiple Discs with Nero Disc Sp an
35
3.3.3
Copy Data with Nero DiscMerge
38
3.4
Check Point Media Encryption CD/DVD
41
3.5
Saving Data Track
42
4
Audio CD and Audio Files
44
4.1
Compiling Audio CDs
44
4.1.1
Customizing Properties of the Audio File
46
4.1.1.1
Track Properties Tab
46
Table of Contents
Nero Burning ROM
3
Page 4

Table of Contents
4.1.1.2
Indexes, Limits, Split Tab
48
4.1.1.3
Filters Tab
50
4.1.2
Defining Options
51
4.1.2.1
Audio CD Settings
51
4.1.2.2
CDA Settings
52
4.2
Mixed Mode CD and CD EXTRA
54
4.2.1
CD-Extra Settings
54
4.3
Automatic Music Recognition
55
4.3.1
Identifying Audio Files
56
4.4
Copy Audio CDs to Hard Drive
57
4.4.1
Save Audio Tracks to Hard Drive Window
60
4.4.1.1
Source Tab
61
4.4.1.2
Output Tab
62
4.5
Convert Audio File Format
63
4.5.1
Encode Files Window
64
4.5.2
AIFF and WAVE Encoding Options
65
4.5.3
MP3 Lame Encoding Options
66
4.5.4
MP3 and MP3PRO Encoding Options
67
4.5.5
Nero AAC Encoding Options
69
4.5.6
OGG Vorbis Encoding Options
70
5
Video
72
5.1
Compiling DVD-Video
72
5.2
Compiling an AVCHD Video Disc
73
5.3
Compiling a BDMV-V id e o Dis c
76
6
Bootable Disc
79
6.1
Requirements for Booting From a Disc
79
6.2
Bootable Disc Template
79
6.3
Creating and Burning a Bootable Disc
80
7
Loading Image File
82
8
LightScribe
85
8.1
Printing LightScribe Label
85
8.2
CD Label Editor Window
87
9
Labelflash
89
9.1
Burn Label Window
89
9.2
Printing Labelflash Labels and DiskT@2
90
10
Burn Compilation
93
10.1
Choose Recorder Window
93
Nero Burning ROM
4
Page 5

Table of Contents
10.2
Burn Settings
95
10.3
Starting the Burn Process
97
10.3.1
SecurDisc Surface Scan Results
99
10.4
Burning With Image Recorder – Creating an Image File
101
11
Copying a Disc
103
11.1
Methods of Copying
103
11.1.1
On-the-fly Copying
103
11.1.2
Copy Over Image
103
11.2
Copying Disc
104
11.3
Copy Settings
106
11.3.1
Image Settings
108
11.3.2
Copy Options
109
11.3.3
Read Options
110
12
Erase Rewritable Disc Window
113
13
About Nero SecurDisc Viewer
115
13.1
Starting Nero SecurDisc Vie wer
115
13.2
Copying Data to Hard Drive
116
13.3
Checking Data Integrity
117
13.4
Checking Signature
118
14
Nero MediaBrowser
119
15
Configuration Options
122
15.1
Compilation Settings
123
15.2
Cache Settings
124
15.3
Expert Features
124
15.4
Ultrabuffer Settings
125
15.5
LightScribe Settings
126
16
Glossary
127
17
Index
131
18
Contact
134
Nero Burning ROM
5
Page 6

1 Start Successfully
1.1 About the Manual
This manual is intended for all users who want to learn how to use Nero Burning RO M. It is
process-based and explains how to achieve a specific objective on a step-by-step basis.
To make best use of this documentation, please note the following conventions:
Indicates warnings, preconditions or instructions that have to be
precisely followed.
Start Successfully
1. Start …
OK
(see…)
[…]
Indicates additional information or advice.
The number at the beginning of a line indicates a prompt for action.
Carry out these actions in the order specified.
Indicates an intermediate result.
Indicates a result.
Indicates text passages or butto ns tha t appear in the p r ogram
interface. They are shown in boldface.
Indicates references to other chapters. They are executed as links and
are shown in red and underlined.
Indicates keyboard shortcuts for entering commands.
1.2 About Nero Burning ROM
The powerful burning software Nero Burning ROM allows you to burn your data, music and
videos to disc. Nero Burning ROM gives you full, customized control of your burning projects.
You can − among other things − define the file system, the length of the file name and the
character set; you can also change the disc label. And of course, you can also customize the
Nero Burning ROM toolbar and change the keyboard shortcuts.
Despite its wide range of features, Nero Burning ROM has remained an easy-to-use burning
program that creates discs in just a few steps. You select the disc type to be burned
(CD/DVD/Blu-ray), define the project type, add the required data and then start burning.
Using Nero Burning ROM you can save audio files from an Audio CD to the hard drive. In the
process, the files are encoded, i.e. converted into a format that the computer can read. The
6
Nero Burning ROM
Page 7
Audio CD can be automaticall y identifie d with Grac e note. So called metadata such as title,
Music recognition technology and related data are pro vided b y Grac enot e®.
Nero CoverDesigner is not installed automatically wit h Nero 12. However, it can
Nero WaveEditor is not installed automatic ally with Nero 12. However, it can be
genre, and track title are accessed by the Gracenote Media Database and associated to the
tracks. That way you have audio files that are accurately and fully named after the encoding
process.
Gracenote is the industry standard in music recognition technology and related
content delivery. For more information, please visit www.gracenote.com.
1.3 Versions of Nero Burning ROM
Nero Burning ROM is available as part of Nero 12, Nero 12 Platinum and as a standalone
product (Nero Burning ROM 12).
All versions offer the full range of functions, but Nero Burning RO M as standalone product
does not offer access to Nero MediaBrowser unless Nero Kwik Media is insta ll ed .
You can always upgrade your standalone version to Nero 12 or Nero 12 Platinum at
www.nero.com
.
Start Successfully
be downloaded for free from the Download section at www.nero.com or via Nero
ControlCenter and used to geth er with Nero 12. Please see the separate Nero
CoverDesigner user manual for full instructions.
downloaded for free from the Download section at www.nero.com or via Nero
ControlCenter and used to geth er with Nero 12. Please see the separate Nero
WaveEditor user manual for full instructions.
1.4 Working With the Program
The main function of Nero Burning ROM is to select files and folders and to burn them to a
disc. This is done in three basic steps:
In the New Compilation window, select a disc type and the disc format and set the
options on the tabs.
In the selection screen, select files that you want to burn.
Start the burn process.
See also
Main Screen →12
Compiling Data Disc →22
Compiling Audio CDs →44
Nero Burning ROM
7
Page 8
Mixed Mode CD and CD EXTRA →54
The Welcome Application offers information about the main use cases and links
At first startup and if not disabled, the Welcome to Nero Burning ROM window is
Compiling DVD-Video →72
1.5 Starting the Program
There are several ways to open Nero Burning ROM, depending on various factors such as
the product you have installed and the operating system you are using.
On Windows 7 and earlier versions of Windows, you can start Nero Burning ROM via:
Start (the start icon) > (All) Programs > Nero > Nero 12 > Nero Burning ROM
the Nero Burning ROM 12 desktop icon
the Nero 12 Welcome Application if you use Nero 12
to tutorials and other interesting Internet sites by Nero.
To start the Welcom e Application , click the Nero 12 icon on your desktop
(Windows 7 and earlier) or select the Nero 12 tile on the application selection
screen (Windows 8).
On Windows 8, you can start Nero Burning ROM via:
the Nero 12 tile (Windows 8 style user interface) or the Nero 12 desktop icon (desktop
user interface) if you use Nero 12
Start Successfully
the Nero Burning ROM tile (Windows 8 style user interface) or the Nero Burning
ROM 12 desktop icon (desktop user interface) if you use Ner o Burning ROM 12 as a
standalone product
It is also possible to start tasks with Nero Burning ROM from the context menu of
a file or folder.
displayed. Here you will find information about the main use cases with Nero
Burning ROM and links to tutorials and other interesting Internet sites by Nero.
The window can be started at any time within Nero Burning ROM by clicking the
Get Started button.
Nero Burning ROM
8
Page 9
1.6 System Requirements
Nero Burning ROM is part of the Nero product you have installed. Its system requirements
are the same. Detailed system requirements of this and all other Nero products can be found
in the Support section on our Web site www.nero.com
1.7 Supported Formats and Codecs
Start Successfully
.
1.7.1 Disc Types
CD
DVD
Blu-ray - burning only
1.7.2 Disc Formats
Data CD (ISO, UDF, ISO/UDF)
Data DVD (ISO, UDF, ISO/UDF)
Blu-ray data disc (ISO)
SecurDisc CD/DVD/Blu-ray Disc
Audio CD
Mixed Mode CD
CD EXTRA
DVD-Video
Nero Image (NRG)
CUE-Image [Import only]
ISO-Image
AVCHD video
BDMV-Video
Nero DiscSpan (UDF)
You can find more information on Blu-ray support at
www.nero.com/link.php?topic_id=416.
The actual disc formats that are available and the actual disc types (e.g. DVD) to
which can be written depend on the selected recorder.
9
Nero Burning ROM
Page 10
Start Successfully
1.7.3 Audio Formats and Codecs
AAC elementary stream (AAC) - not ripping
Audio Interchange File Format (AIFF, AIF)
Compact Disc Digital Audio (CDA) - not encoding
Dolby Digital (AC3) - only source format in compilations
MP3 / mp3PRO (MP3)
Nero AAC (MP4, M4A)
Ogg Vorbis (OGG, OGM)
PCM WAV file, ADPCM Wav file (WAV, WAVE)
Windows Media Audio (WMA) - not ripping
Free Lossless Audio Codec (FLAC)
1.7.4 Video Formats and Codecs
Advanced Streaming Format (ASF)
Audio Video Interleave (AVI)
Digital Video (DV)
Moving Picture Experts Group-2 (MPG, MPEG, DAT, M2T)
Nero AAC Codec (MP4)
QuickTime Movie (MOV)
Video Object (VOB)
1.7.5 Image Formats
Bitmap (BMP)
Device Independent Bitmaps (DIB)
Graphics Interchange Format (GIF)
Icon Image File (ICO)
JPEG File Interchange Format (JFIF)
Joint Photographic Expert Group (JPEG, JPG, JPE)
Picture Exchange (PCX)
Portable Network Graphics (PNG)
Portable Pixel Map (PPM)
Targa Image File (TGA)
Tagged Image File Format (TIFF, TIF)
Windows Media File (WMF)
Nero Burning ROM
10
Page 11

Start Successfully
1.7.6 Formats for Playlists
Moving Picture Experts Group Audio Layer 3 Uniform Resource Locator/MP3 URL (M3U)
Moving Picture Experts Group Audio Layer 3 Uniform Resource Locator/MP3 URL +
UTF-8 (M3U8)
Playlists File Format (PLS)
11
Nero Burning ROM
Page 12
2 User Interface
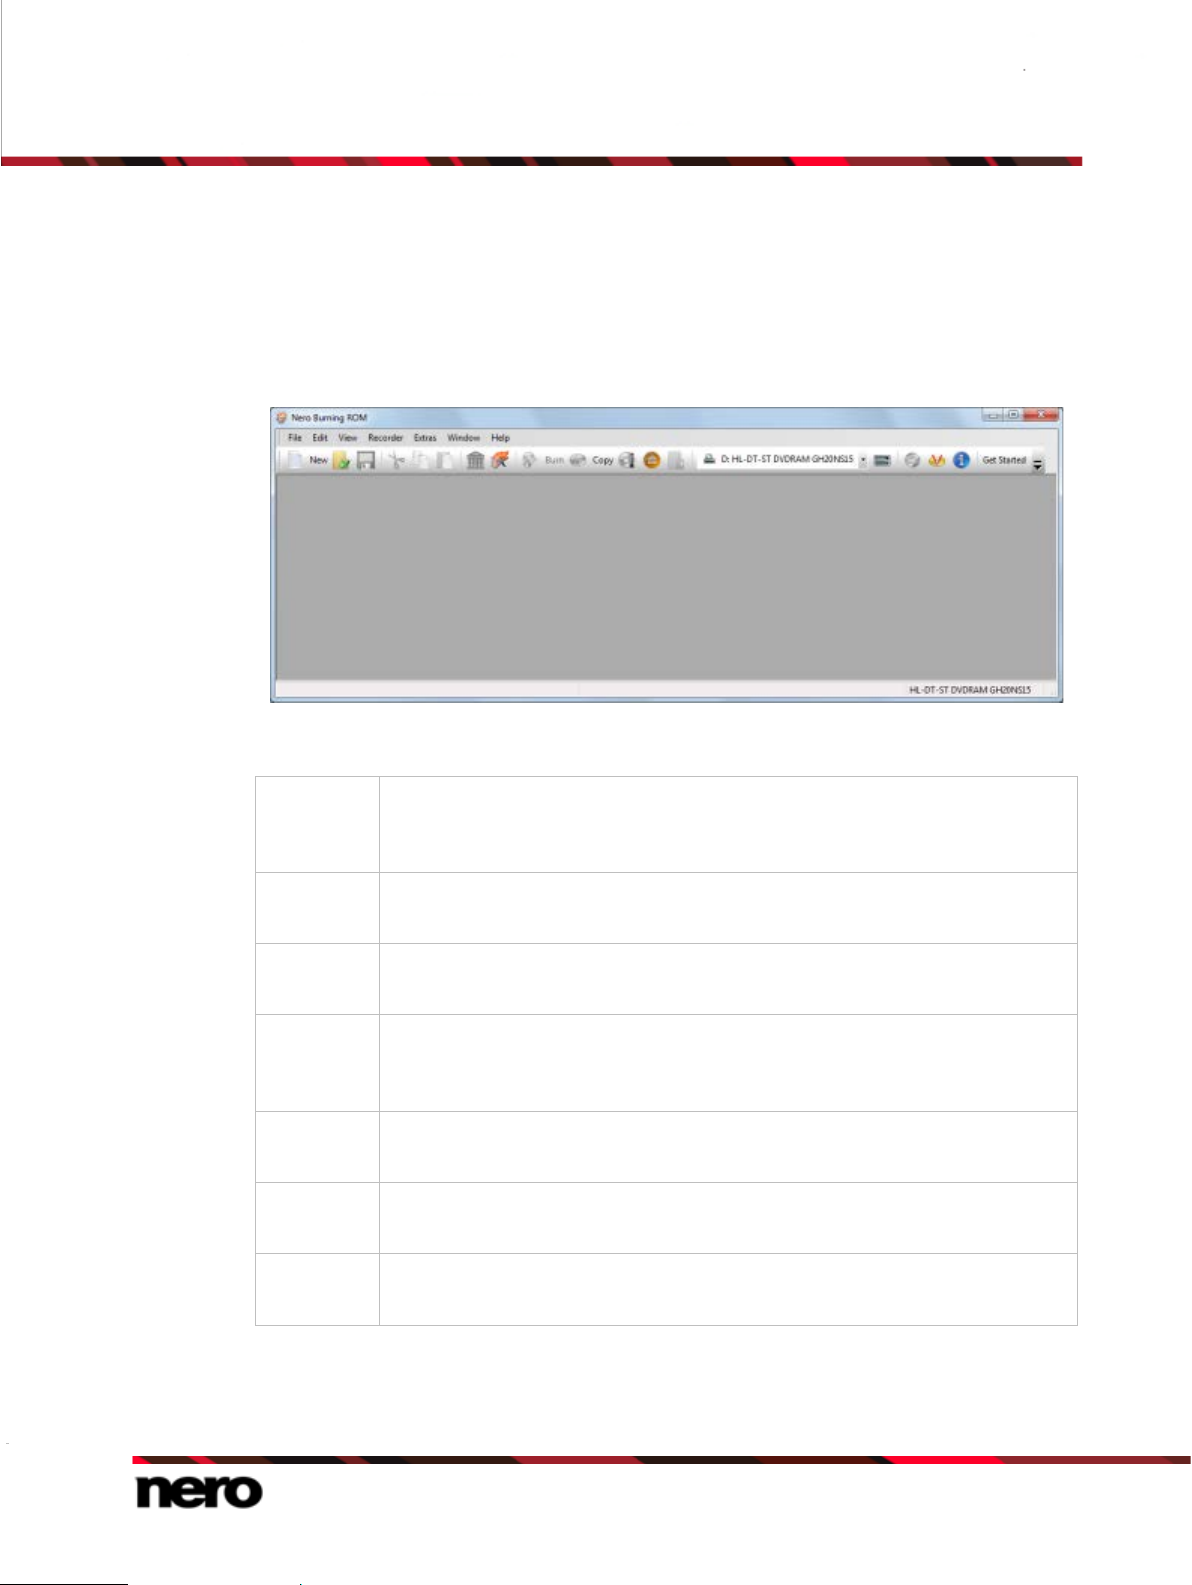
2.1 Main Screen
The main screen of Nero Burning ROM is the starting point for all actions. It consists of a
menu bar and a toolbar with buttons and a drop-down m enu.
User Interface
Main window with menu and toolbar
The following menus are available:
Provides program facilities such as opening, saving, and closing. You can
File
also open the setting options for the compilation, update the compilation, and
define configuration options.
Edit
View
Provides editing facilities for the files in the selection screen such as cutting,
copying, and deleting. You can also display the properties of a selected file.
Provides the option to customize the user interface and to refresh the file
browser.
Provides recorder facilities. You can select the recorder here, start the burn
Recorder
process, and erase a rewritable disc. You can also eject a disc and display
disc information.
Extras
Window
Help
Provides the option to convert tracks into other formats and to save the songs
on an Audio CD to the hard drive.
Provides the option to alter the position of the compilation area and browser
area.
Provides help facilities such as opening the help, and shows information
about the application.
12
Nero Burning ROM
Page 13
User Interface
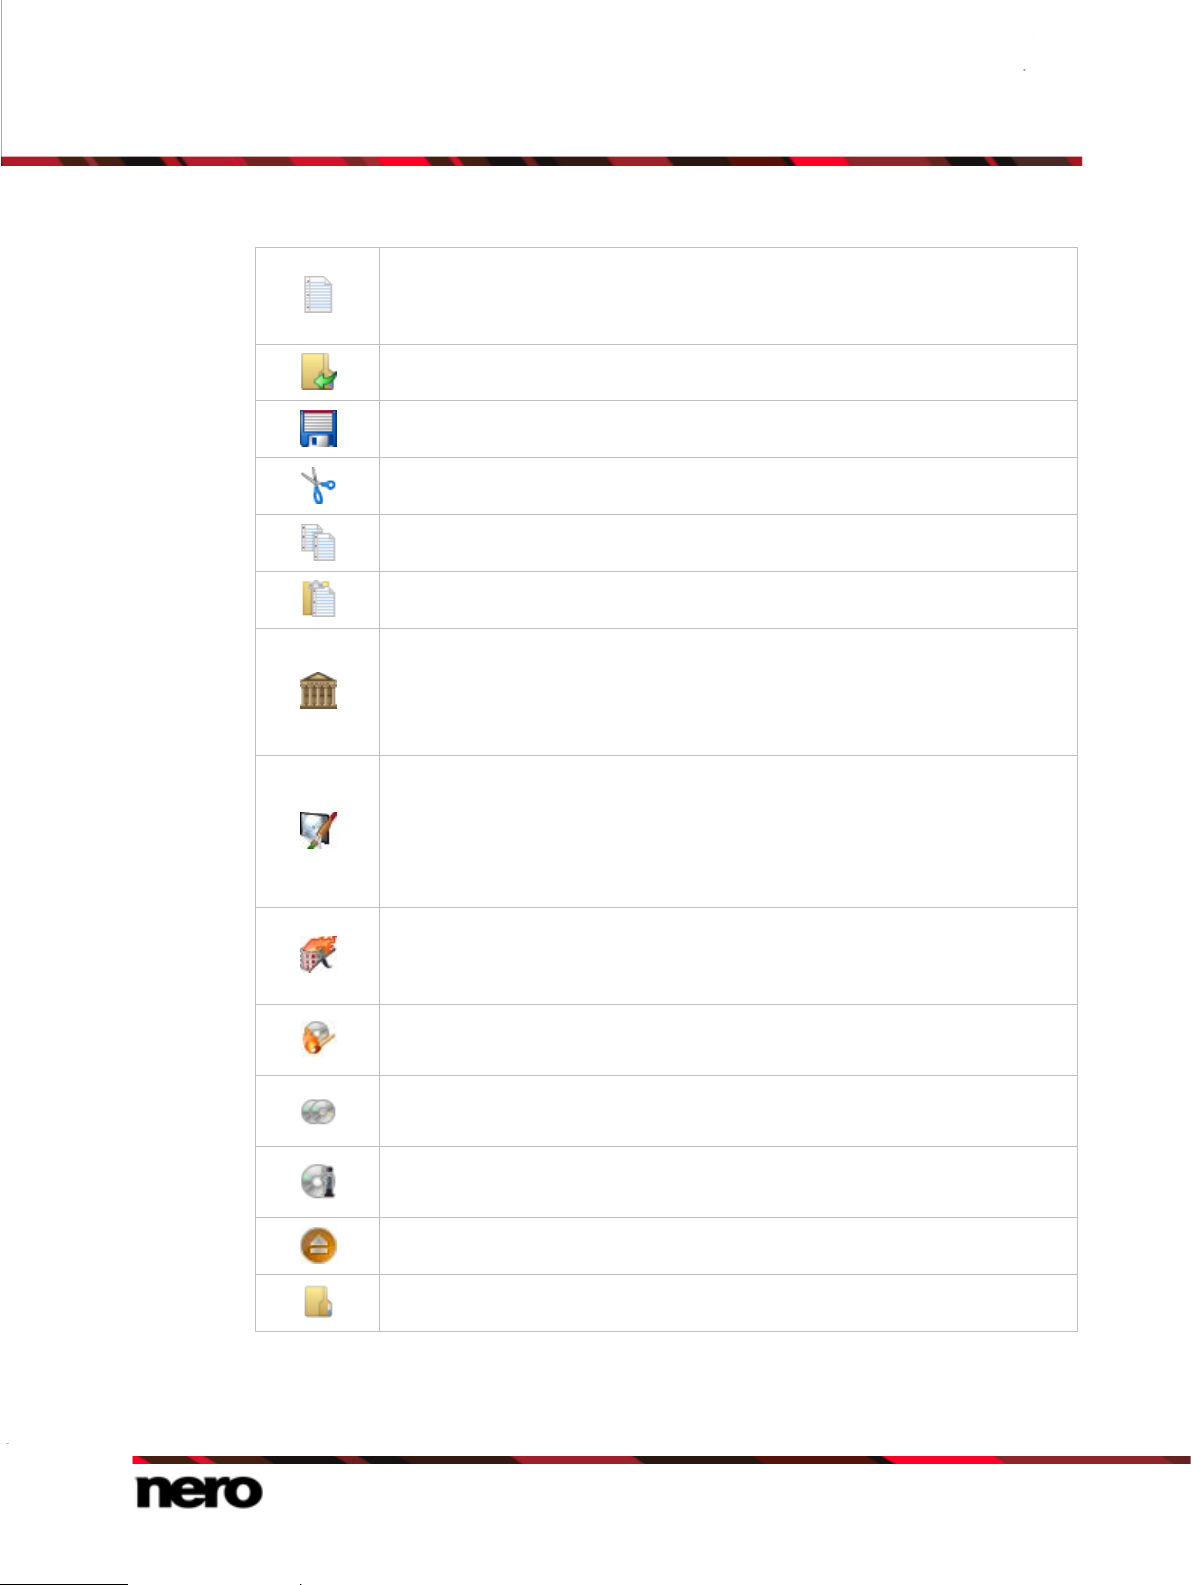
The following configuration options are available in the tool bar of the main screen.
Opens the New Compilation window where you choose a compilation type
and where you can set options for that compilation type as well as burning
and copying.
Opens an existing compilation.
Saves the active compilation.
Cuts selected elements in the compilation (selection).
Copies selected elements of the compilation (selection).
Pastes a selection that was cut or copied beforehand.
Starts Nero MediaBrowser, which you can use to easily find, view and access
media files and add them to your project.
Not available for video compilations (DVD-Video for example) as video
structures are not supported by Nero MediaBr o wser .
Starts Nero CoverDesigner, which you can use to create labels and covers.
Information about a current compilation such as title, number, and names of
the files is incorporated into the document data. You will find further
information in the Nero CoverDesigner manual.
Only available if Nero CoverDesigner is installed.
Starts Nero Express. Ner o Ex pres s is a wizard-driven application based on
Nero Burning ROM. You wi ll find fur ther inf ormation in the Nero Express
manual.
Starts the burn process by opening the Burn Compilation window containing
the Burn tab.
Starts the copy process by opening the New Compilation window containing
the Burn tab.
Displays information on the disc inserted, such as contents (if any) and
capacity for instance.
Opens the selected drive.
Shows or hides the file browser.
13
Nero Burning ROM
Page 14
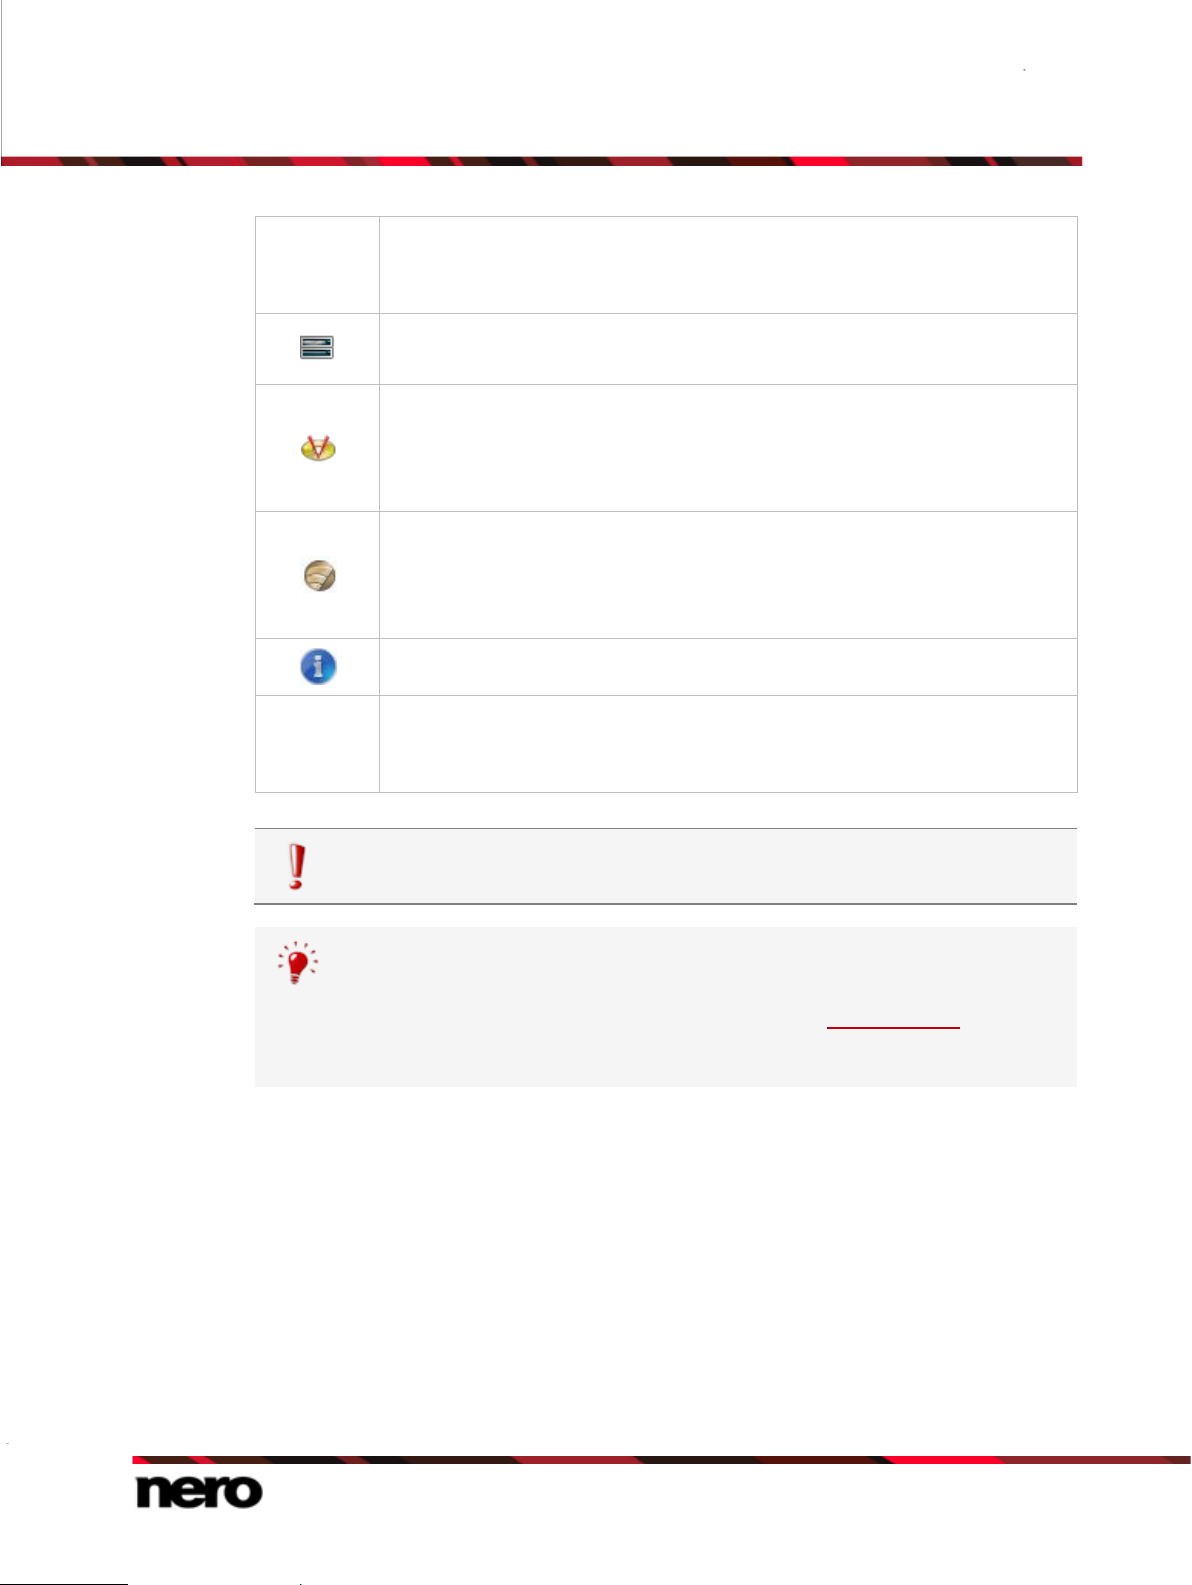
Recorder
With Nero CoverDesigner, you can create covers and labels for discs (CDs,
selection
menu
User Interface
Displays available recorders.
Opens the Choose recorder window where you select an available recorder
for the burn process from a list.
Opens the Burn Label window where you can create or load a label to print
on the label or data side of a Labelflash DVD.
This button is only available if a recorder that supports Labelflash is
connected.
Launches Nero CoverDesi gner to create or load a label to be printed on the
label side of a LightScribe disc.
This button is only available if Nero CoverDesigner is installed and if a
recorder that supports LightScribe is connected.
Displays information on the program and version number.
Opens the Welcome to Nero Burning ROM window where you will find
Get Started
information about the main use cases and links to tutorials, the online help,
the Nero community and other interesting Internet sites by Nero.
Access to Nero MediaBrowser and Nero Expres s is onl y provid ed b y Nero
Burning ROM as part of Nero 12.
DVDs, etc.).
Nero CoverDesigner is not installed automatically with Nero 12. However, it can
be downloaded for free from the Download section at www.nero.com or via Nero
ControlCenter and installed together with Nero 12. You will find further information
in the Nero CoverDesigner manual.
See also
New Compilation Window →15
Bootable Disc →79
LightScribe →85
Labelflash →89
Loading Image File →82
Erase Rewritable Disc Window →113
Configuration Options →122
Nero Burning ROM
14
Page 15
2.2 New Compilation Window
Using Nero Burning ROM you can create image files for disc types that the
In the New Compilation window you can select the disc type and configure the options for
the disc format. The window basically looks the same for all disc types. The only difference is
the tabs that are available. When you start Nero Burning ROM, the New Compilation
window opens automatically. If the window is not open, click the New button. The window
consists of a drop-down menu, a selection list, various tabs, and buttons.
User Interface
New Compilation window, CD-ROM disc type
If the Image Recorder is not enabled, only those disc types supported by the physical
recorder are displayed in the drop-down menu. If the recorder can only burn CDs, the dropdown menu is grayed out.
installed recorder cannot burn. You can enable this function via the File >
Options > Expert Features menu, Enable all Nero supported disc types for
the Image Recorder check box. The drop-down menu in the Compilation
window then makes available all supported disc types.
The following entries are available in the selection list:
Entry
CD/DVD-ROM/Blu-ray
(UDF)
Creates a data disc; all file types can be burned. The burned
data complies with the UDF standard.
Additionally you can use the Nero DiscSpan feature to
comfortably burn a compilation on multiple discs.
Nero Burning ROM
15
Page 16
User Interface
Entry
Audio CD
Entry
Mixed Mode CD
Entry
CD EXTRA
Entry
CD/DVD/Blu-ray Disc
Copy
Entry
CD/DVD-ROM (Boot)
Creates a standard Audio CD that can be played on all (audio)
CD players at least.
Creates a CD with data and audio files in a single session.
Usually a data file is followed by one or more audio files for
instance (e.g. soundtrack for PC games).
Older Audio CD players are often not capable of recognizing the
data file and attempt to play it.
Creates a multisession
stored in two sessions. The first session contains the audio files
and the second session the data.
Common CD players play the first session as Audio CDs. The
second session can only be used by PCs with a CD-ROM drive,
it cannot be recognized by a normal CD player.
Copies a source disc to a CD/DVD/Blu-ray Disc.
Creates a bootable disc.
CD with audio and data files that are
Entry
CD/DVD-ROM/Blu-ray
(ISO)
Entry
CD/DVD-ROM
(UDF/ISO)
Entry
CD/DVD-ROM/Blu-ray
(SecurDisc)
Entry
DVD-Video
Entry
AVCHD (TM) video
Creates a data disc, each file type can be burned. The burned
data complies with the ISO 9660 standard.
Creates a data disc; all file types can be burned. The burned
data complies with the ISO and UDF standards.
Creates a SecurDisc disc, that includes data integrity and
reconstruction. Additional SecurDisc features include the
possibility to protect the data on your disc against unauthorized
access with a password, to digitally sign the disc, and to
configure the data redundancy.
Creates a DVD that delivers high-quality playback of video
and/or picture files on DVD players.
You can use Nero Burnin g RO M to bur n a DVD if the DVD vi deo
title, i.e. a complete DVD folder structure including premastered
files is already available.
Creates an AVCHD video disc that delivers high-quality pla yback
of camcorder video and/or picture files on DVD or Blu-ray
players.
16
Nero Burning ROM
Page 17
Entry
A Jump List is provided by Nero Burning ROM under the Windows 7 operating
User Interface
You can use Nero Burnin g RO M to bur n an AVC HD vi deo disc if
a complete AVCHD folder structure including premastered files
is already available.
Creates a Blu-ray Movie (BDMV) disc that delivers high-quality
playback of video files on Blu-ray players.
BDMV-Video
You can use Nero Burnin g RO M to bur n a BDMV-Video disc if a
complete BDMV folder structure including premastered files is
already available.
In Nero Burning ROM it is not possible to convert video files to DVD-Video, an
AVCHD video, or a BDMV-Video. Converting video files to DVD-Video, to AVCHD
video, or BDMV-Video is possible in Nero Video for example. Nero Video is
included in the full version of Nero 12. More infor mation about Nero Video is
available on the Web site www.nero.com, and more information about video
editing is available in the separate Nero Vi deo manual.
The actual disc formats that are available and the actual disc types (e.g. DVD) to
which can be written depend on the selected recorder.
system. Compilation types, e.g. Aud io-CD, can be chosen directly from the Jump
List.
The following buttons are available:
Button
Nero Express
Button
Open
Button
New
Button
Cancel
Starts Nero Express. N er o Expr ess is a wizard-driven application
based on Nero Burning ROM.
Only available in Nero Burning RO M as part of Nero 12.
Opens a file browser where you can find and open a saved
compilation. You can also open an image file in order to burn a disc.
Creates the selected compilation and displays the selection screen
where you can select the files for burning.
Closes the New Compilation window.
You can set the options for the respective disc format on the tabs in the New Compilation
window.
Nero Burning ROM
17
Page 18
Which tabs are available depends on the disc type that is selected.
The following tabs are available:
User Interface
Tab
Info
Tab
Multisession
Tab
Nero DiscSpan
Tab
Autorun
Tab
ISO
Tab
UDF
Tab
Label
Tab
Dates
Shows statistical information on the compilation.
Contains options for starting and continuing multisession discs.
Contains the option for activating the Nero DiscSpan feature. This
allows you to comfortably burn a compilation on multiple discs when
the data to be burned is too large to fit on a single disc.
Contains the option to select a file to be executed automatically
when the disc is inserted into the disc drive.
Contains options for configuring the ISO file system.
Contains options for configuring the UDF file system.
Defines the labels of the disc.
Allows you to define the dates of the compilation and of the
associated files. You can also specify a validity period for the disc.
You can access the data regardless of the validity period specified.
Defines whether and which files are stored in the buffer memory. If
you posses a Lightscribe recorder you can create the label here or
select what is to be printed. For the CD-ROM (ISO) disc type, you
Tab
Misc
can convert the code for an AVI video here to make it compatible
with Xvid/MPEG -4 or DivX.
We recommend that you only convert the code
if you have
experience with FourCC codes and AVI videos.
Tab
Audio CD
Tab
CDA Options
Contains options for configuring audio files.
You can also enter additional information about the CD.
Defines the strategy used by Nero Burning ROM for handling CD-DA
files from a source audio CD.
Nero Burning ROM
18
Page 19
User Interface
Tab
CD EXTRA
Tab
Boot
Tab
Burn
See also
Compiling Data Disc →22
Compiling Audio CDs →44
Mixed Mode CD and CD EXTRA →54
Compiling DVD-Video →72
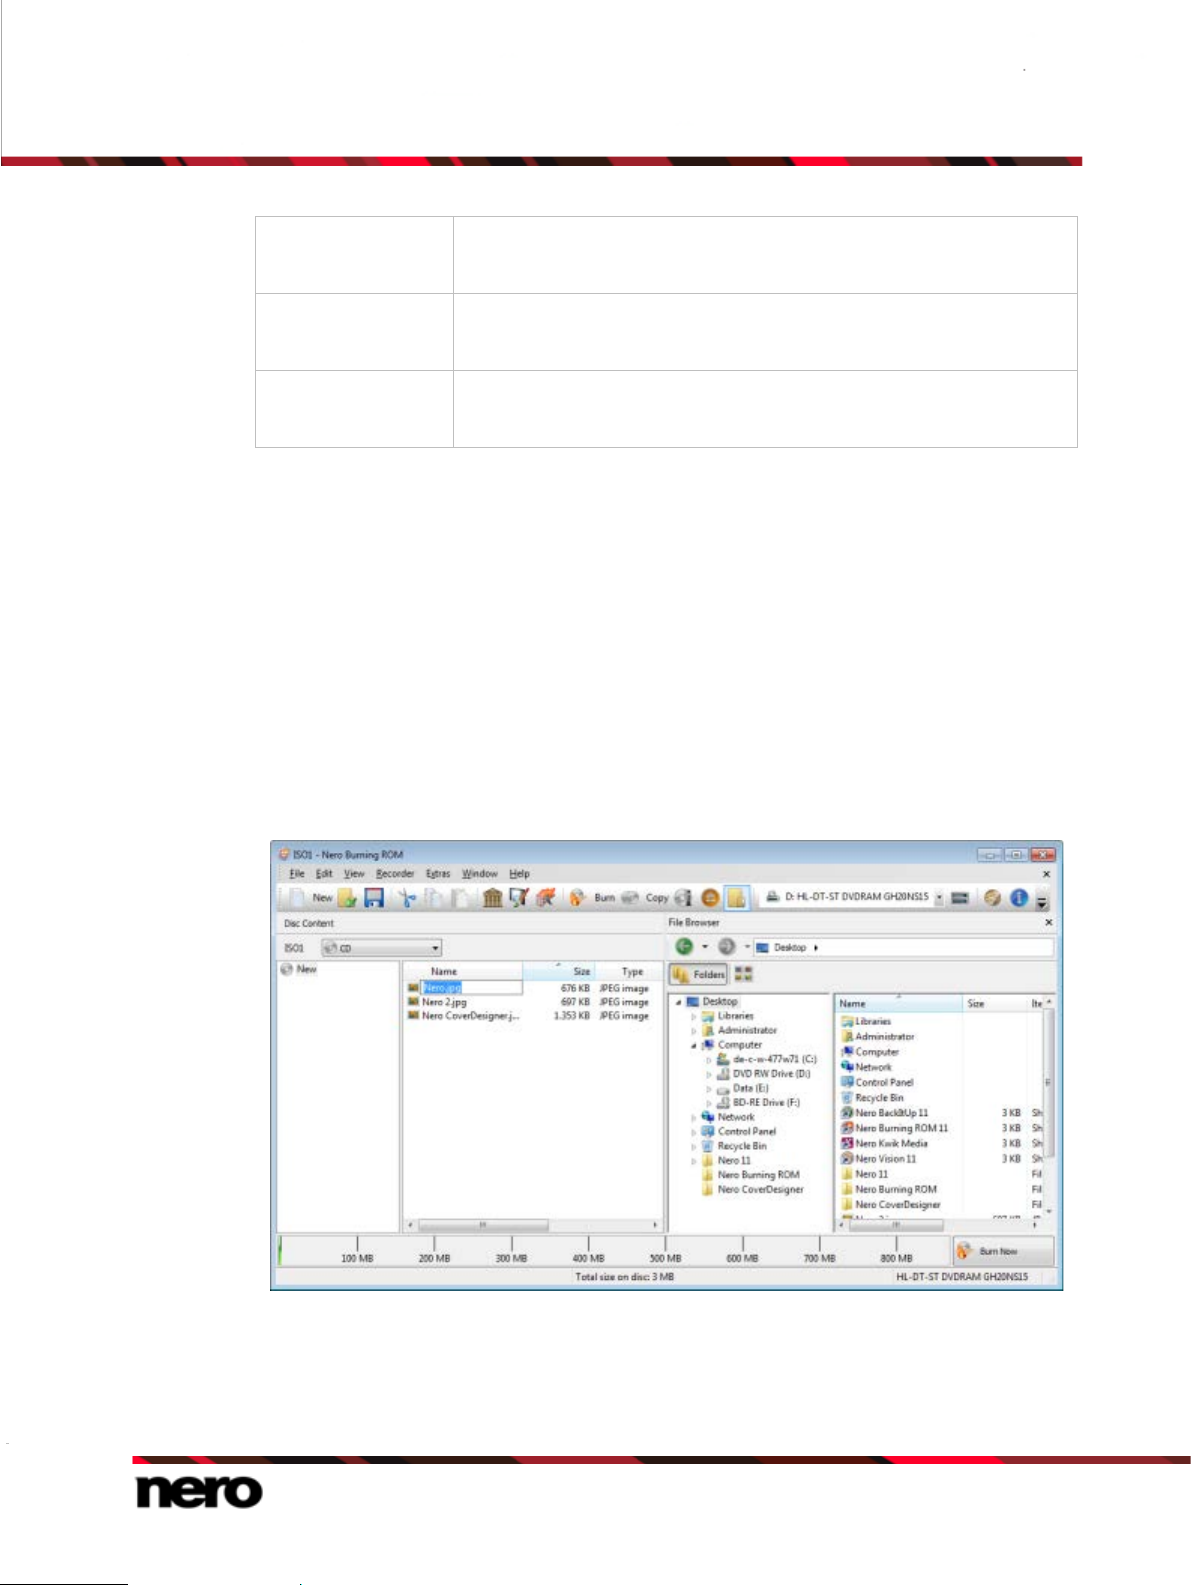
2.3 Selection Screen
The selection screen is displayed in the main screen after you select the disc type and
format in the New Compilation window and click the New button. The selection screen
consists mainly of the compilation area and the browser area. Es sent ia lly, all selection
screens have the same structure.
Contains options for configuring albums.
Contains options for configuring a bootable disc.
Contains options for configuring burning.
Selection Screen
The compilation area (Disc Content) is located on the left side of the screen, and is named
after the relevant compilation. Files and folders are compiled here for burning. In the browser
area (File Browser) on the right side you can find the elements that you want to burn. You
Nero Burning ROM
19
Page 20
User Interface
Actual capacity of media formats
can add data to your projects using the drag and drop function: Drag and drop the elements
from the File Browser area to the Disc Content area.
If the File Browser area is hidden, you can show it again using the button.
The following setting options are available:
Allows you to select another disc type without loss of
Disc type drop-down
menu
information. The option to change the disc type is useful when
starting a compilation without knowing how much space is
required by the files.
Available for data compilations only.
Allows you to expand or shrink the capacity bar according to
Selection list
DVD9 (8.5 GB) /
DVD5 (4.7 GB)
the type of DVD you are going to burn. Choose the DVD9 (8.5
GB) option for a double layer DVD (DVD DL) and DVD5 (4.7
GB) for a single layer DVD.
Available for all DVD compilations.
Selection list
BD QL (BDXL) (128 GB) /
BD TL (BDXL) (100 GB)
BD DL (50 GB) /
Button
The bottom margin of the screen contains a capacity scale in MB or GB for data discs or
minutes (min) for Audio CDs. The exact size of the scale will depend on which disc type you
have selected.
Allows you to expand or shrink the capacity bar according to
the type of Blu-ray Disc you are going to burn:
BD QL (BDXL) (128 GB) for a quadruple la ye r Blu -ray Disc,
BD TL (BDXL) (100 GB) for a triple layer Blu-ray Disc,
BD DL (50 GB) for a double layer Blu-ray Disc (BD DL) and
BD (25 GB)
BD (25 GB) for a single layer Blu-ray Disc.
Available for all Blu-ray Disc compilations except BDMVVideo.
Starts the burn process immediately. If you want to check or
Burn Now
The actual capacity of the DVD5, DVD9, BD DL, and BDXL media formats is less
than as stated by the disc manufacturers. For example, the actual capacity of a
select the burn or compilation options again before burning,
click the Burn button in the upper part of the screen.
4.7 GB DVD5 is around 4.38 GB only.
This is because of different conversion systems. A DVD5-media format can
handle 4.700.000.000 bytes, but this number is not equal to the 4.7 GB stated by
the disc manufacturers. The correct conversion factor for bytes is not 1000, but
1024:
20
Nero Burning ROM
Page 21
User Interface
1024 byte = 1 KB
Capacity of the CD recordable disc
Display the Capacity Bar
1024 KB * 1024 KB = 1 MB
1024 KB * 1024 KB * 1024 KB = 1 GB
A DVD can handle 4.700.000.000 bytes:
4.700.000.000 bytes = 4.589.843 KB = 4.482 MB = 4.377 GB
The capacity bar in Nero Burning ROM will always show you the correct amount
of bytes measured in MB or GB.
When you are compiling files, a capacity bar shows you the estimated size of the selected
files and the available space on the disc. The color of the capacity bar indicates whether the
data will fit on the disc or not:
Green capacity bar
Yellow capacity bar
Red capacity bar
The data will fit on the disc.
The data might fit on the disc. The size of the disc that has been
inserted will determine whether the data will fit or not.
The data will not fit on the disc.
(Unless you have inserted an oversi ze disc .)
The yellow and red marks are set by default for discs that are commercially available. The
disc type you have selected will determine the exact scale value.
For example, blank CDs are available with a capacity of 650 MB (74 min) or 700
MB (80 min). Therefore, the yellow mark is set for CDs at 650 MB and the red at
700 MB.
If the capacity scale is hidden you can display it again by clicking the File >
Options > Compilation menu and by selecting the check box Show the
compilation size in the Nero sta tu s bar.
Nero Burning ROM
21
Page 22
3 Data Disc
The Image Recorder is also suitable for creating an image of a disc type not
3.1 Compiling Data Disc
With Nero Burning ROM you can compile and burn all types of files and folders. If a Blu-ray
recorder is installed on your computer you can burn data CDs, data DVDs and data Blu-ray
Discs. If you have a CD recorder you can only burn data CDs. The procedure for all data
compilation methods is identical.
supported by the connected recorder. For example, you can therefore create a
DVD image without having installe d a DVD recor der. Y ou can the n writ e the
image to a disc at any time.
To create a data disc, proceed as follows:
1. Select the desired disc format (CD, DVD, Blu-ray) from the drop-down menu in the New
Compilation window. (In the case that the New Compilation window is not opened, it can
be opened by clicking the New button on the main screen.)
The selection list shows the compilation types that can be burned.
Data Disc
Nero Burning ROM
New Compilation Window
22
Page 23
Data Disc
You can select an appropriate disc format without loss of information at any time
Enabling Nero DiscSpan is useful, if the file size of the data to be burned is
in the main screen. Note that this has to be technically possible - for example you
are obliged to burn an Audio CD to a CD. But it is possible to start with a data CD
and change later to a data DVD, for example. The possibility to change the disc
type is useful when starting a compilation without knowing how much space is
required by the files.
2. Select the desired compilation type for a data disc from the selection list (CD/DVD-ROM/
Blu-ray Disc (UDF) , CD/DVD-ROM/Blu-ray Disc (ISO), or CD/DVD-ROM/Blu-ray Disc
(UDF/ISO).
The tabs with the configuration options that are valid for this compilation type are
displayed.
3. Set the options you require on the tabs.
larger than the disc size or if you do not know exactly whether the files fit on one
disc. With Nero DiscSpan the files are burned to several discs if necessary. Nero
DiscSpan is only available for UDF-compilations.
Enabling Multisession is useful, if the file size of the data to be burned is much
smaller than the disc size or if you are not sure, if your compilation is complete
yet. With Multisession, you can burn additional content later on.
Note, that you can either enable Nero DiscSpan or enable Multisession.
4. Click the New button.
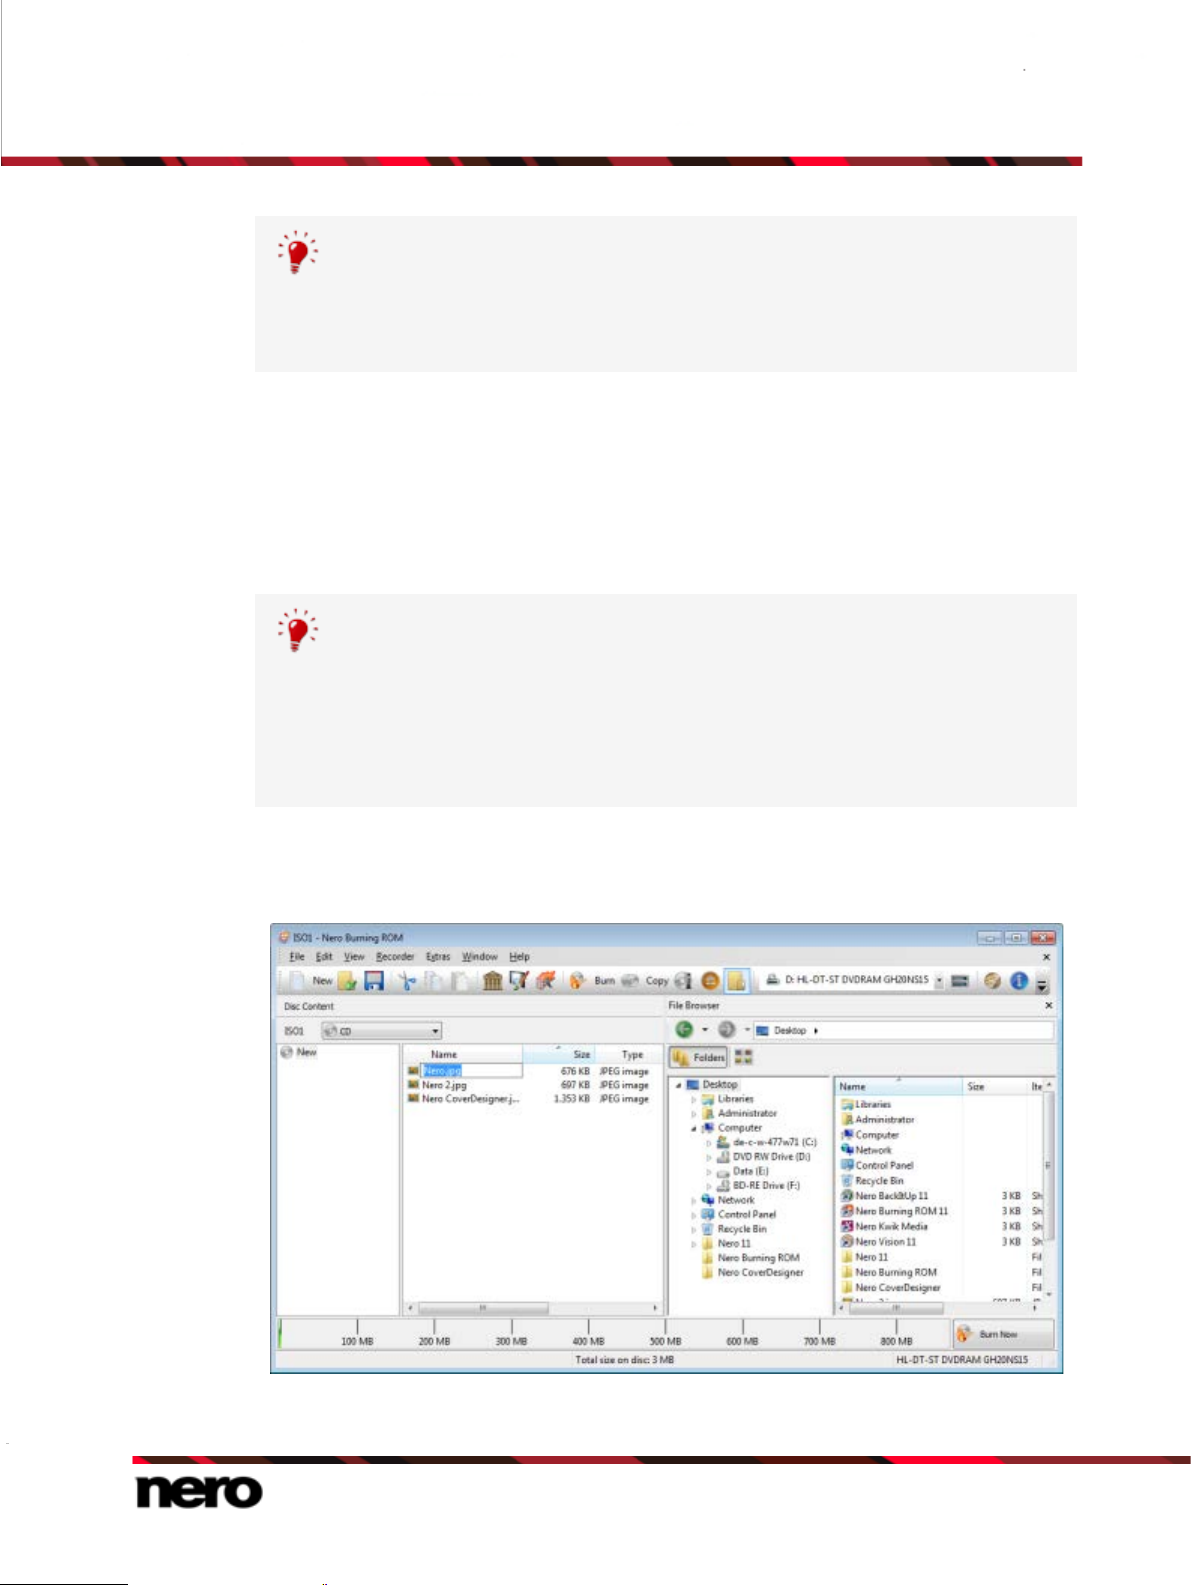
The New Compilation window is closed and the selection screen is displayed.
Compilation screen
Nero Burning ROM
23
Page 24

5. Select the files/folders that you want to burn from the File Browser area.
In Nero Burning ROM, there is the option of defining filters for individual files or
It is very easy to hide files in data compilations for additional protection or for
Nero Burning ROM supports virtual search folders in the Windows Vista operating
6. Drag the required files/folders into the Disc Content area on the left side.
The files are added to the compilation and displayed in the compilation screen. The
capacity bar indicates how much space is required on the disc.
folders by dragging files or folders into the compilation areas with the depressed
right mouse button. For instance, it is possible to filter for a particular type of file
(*.doc, *.xls, *.txt) or select which type of file is not to be taken up in the
compilation area.
security reasons so that they do not appear on the normal display. The files
behave in the same way as other hidden system files that are hidden by default,
but can easily be displayed. To hide files, right-click the required file, select the
Properties option and then select the Hide check box.
Data Disc
system. The search is selected by dragging the search folder into the compilation
area. If you want to select the files of the search folder, you must open the search
folder and drag the files into the compilation.
7. Repeat the previous step for all files that you want to add.
You have successfully compiled a data disc and can now burn this compilation.
See also
Selection Screen →19
3.1.1 Defining Options
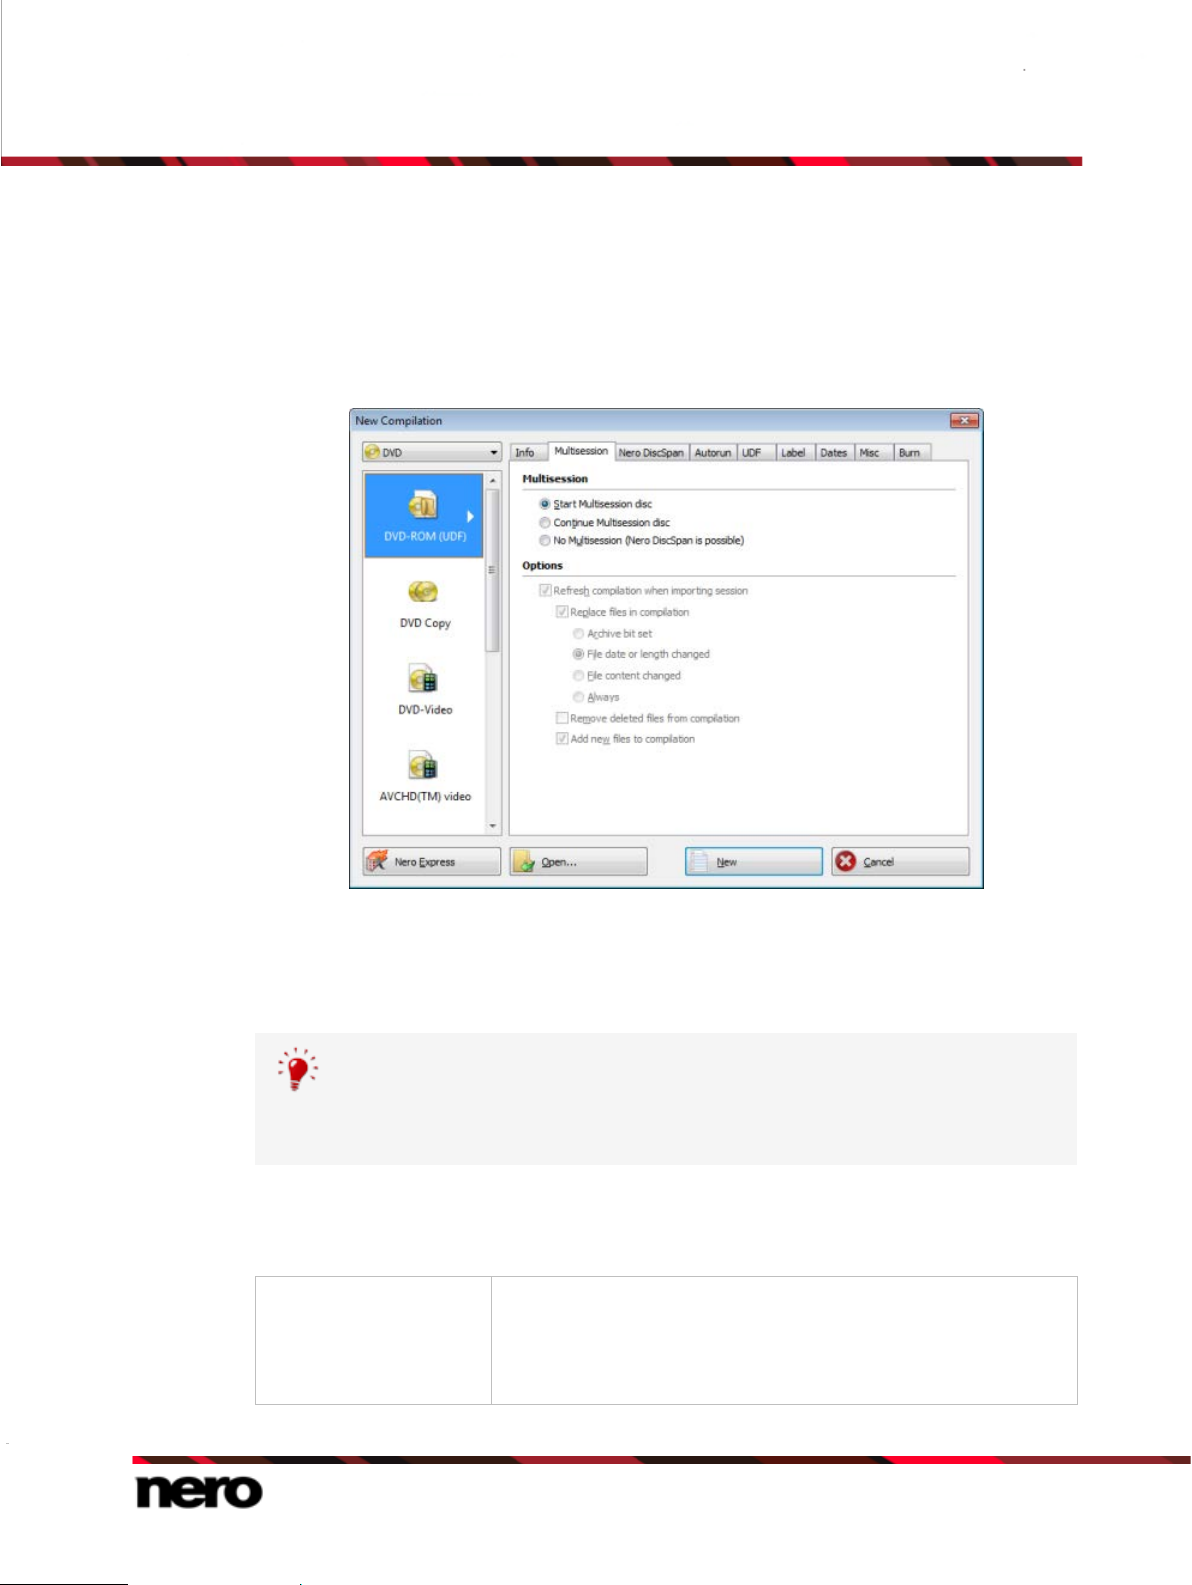
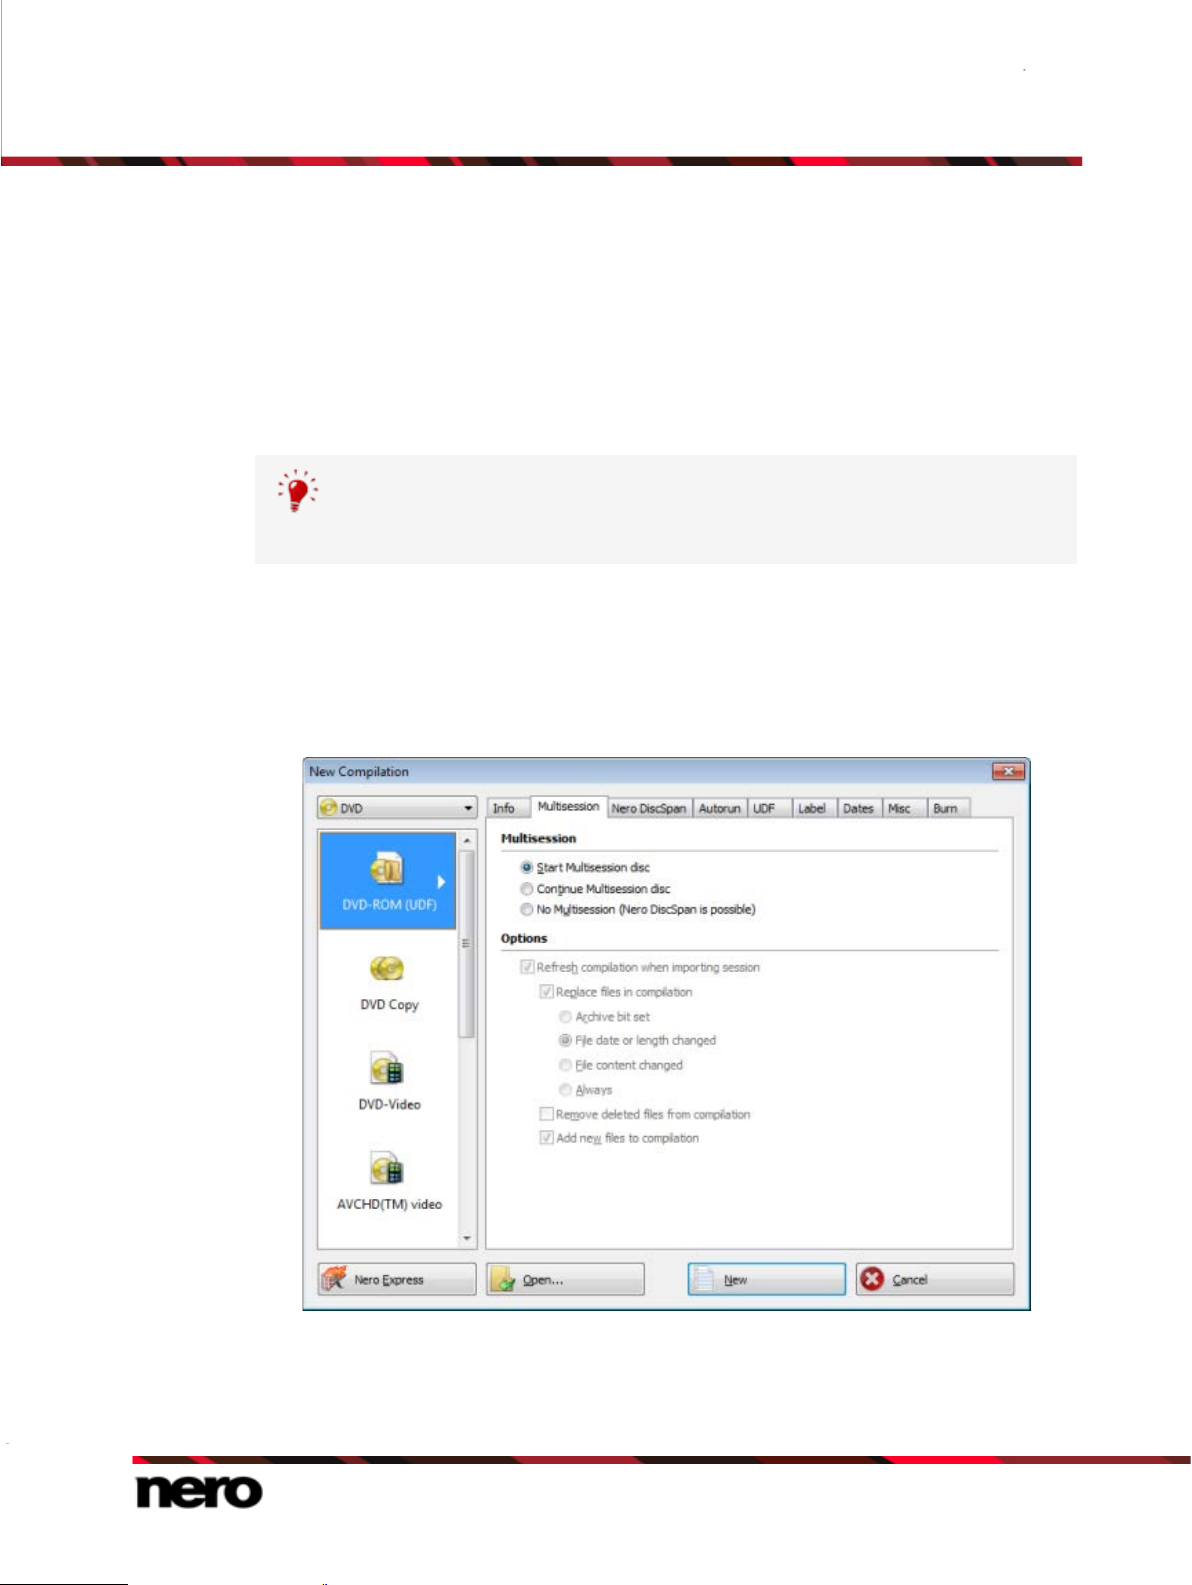
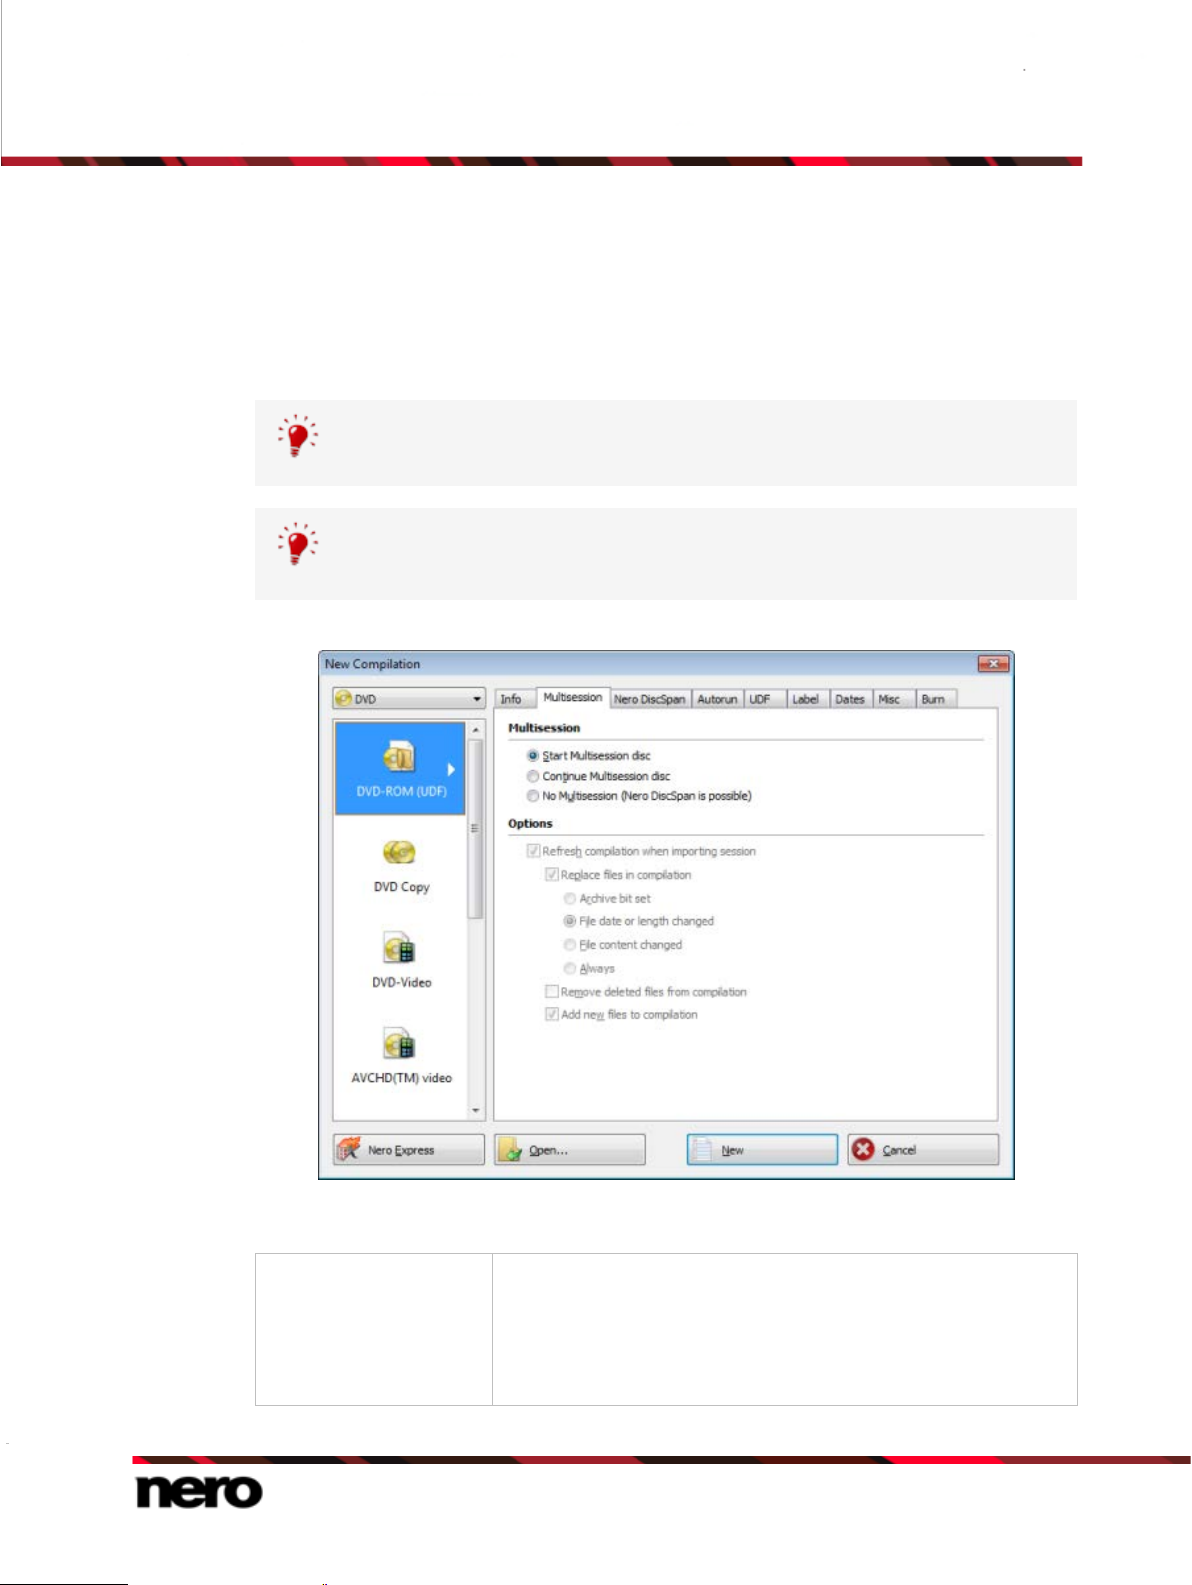
3.1.1.1 Multisession Settings
The Multisession tab provides the option to create multisession discs for data discs.
Multisession discs can be burned in multiple sessions until you have reached the maximum
disc capacity. A session is a self-contained data area that is burned using a single process,
and consists of a lead-in (with the table of contents), one or more tracks, and a lead-out.
Discs without the multisession option, e.g. Audio CDs, are burned in a single session.
If a new multisession disc is being started, Nero Burning ROM also saves (if possible) the
point of origin for the files. This information is used when continuing the multisession disc.
If a multisession disc is being continued, Nero Burning ROM automaticall y sets a cros s
reference to the imported session, i.e. the table of contents for the imported session is
copied to the table of contents for the current session. You must define which session is
being imported when starting your compilation. The files in the previous sessions are
retained and continue to take up space. Nero Burning ROM automatically verifies whet her
Nero Burning ROM
24
Page 25
Data Disc
If you disable the Fin alize d isc check box on the Burn tab, you can always burn
Multisession disc
the correct multisession disc has been inserted for continuation. If not, the disc is ejected.
You can add new files to the compilation or delete files from the compilation when you
continue the multisession disc. Files and folders from the session to be continued can even
be refreshed, that means, changes in the folders like updated or deleted files can be taken
over to the compilation. In any case, after the burn process the disc gives you access to
exactly these files and folders that were visible in the compilation in Nero Burning ROM.
additional sessions on the disc, but then only the last session will be visible and
you will only be able to access data from the last session.
Multisession discs are particularly suitable for backing up important files burned
on a regular basis.
The following option buttons are available on the Multisession tab in the Multisession area:
Burns the selected compilation in one session to the disc.
If the disc already contains sessions, you can also select this
Start Multisession disc
option. Sessions are then not imported and cross references are
not set. This means that only the last session will be visible and
you will only be able to access data from the last session.
Nero Burning ROM
Multisession Tab
25
Page 26

Continues a multisession disc by burning an additional session
to a disc with at least one session. Cross references to the
imported session are set in the process.
Continue Multisession
disc
When you select this option, the multisession disc must be
inserted in a drive. You then have to define which session is
being continued. The compilation screen will show the visible
files and folders on the multisession disc, but grayed out.
Everything you see in the compilation screen will be accessible
on the disc later on.
Creates a disc without a multisession.
However, even a disc without a multisession can be continued
No Multisession
as long as it is not finalized. Sessions are then not imported and
cross references are not set. This means that only the last
session will be visible and you will only be able to access data
from the last session.
When selecting the Continue Multisession disc option button, the Options area is
available with the following chec k boxes:
Data Disc
Refresh compilation
when importing
session
Replace files in
compilation
Remove deleted files
from compilation
Add new files to
compilation
Gives you the possibility to refresh your compilation (and
therefore the accessible files on the multisession disc after
burning).
On the multisession disc, Nero Burning ROM has saved (if it has
been possible) the point of origin for the files. If the files can be
accessed on your computer, Nero Burning ROM can refresh the
compilation to match the files at the point of origin.
If there is a file in the imported session that has been updated
on its point of origin in the meantime, then the outdated version
in the compilation will be replaced with the newest version.
If there is a file in the imported session that has been deleted on
its point of origin in the meantime, then the file in the compilation
will be deleted, too.
If there is a folder in the imported session, and on its point of
origin a file has been added to this folder, then this file will be
added to the compilation, too.
26
Nero Burning ROM
Page 27
3.1.1.2 Autorun
On the Autorun tab in the New Compilation / Compilation Properties window you can
choose a file to be executed automatically when the disc is inserted into a disc drive (on
Windows systems). Furthermore you can select an icon to represent the disc in the Windows
Explorer. The icon has to be in the *.ico format, but will be converted by Nero Burning ROM
12 if you choose another format.
File and icon are selected from the Disc Content area, that means, from the files you have
already added to the actual Nero Burning ROM 12 compilation. So first, you have to compile
your files and then open the Compilation properties window by clicking File > Compilation
Properties. (The window is also opened when you click the Burn button in the task bar.)
Then you can choose file and icon for the autorun execution.
3.1.1.3 UDF Settings
The UDF tab provides options for configuring the UDF (Universal Disc Format) file system.
The UDF standard was developed by Osta (Optical Storage Technology Association) in
response to the requirements of DVDs. The standard works on all platforms.
The following setting options are available in the Options drop-down menu:
Data Disc
Entry
Automatic Settings
Entry
Entry
compatibility mode
3.1.1.4 ISO Settings
The ISO tab provides options for configuring the ISO file system.
ISO 9660 is a system-independent standard. It can be read on all operating systems. The
following features apply:
Permits eight characters plus three characters for the file extension (Level 1) or 31
characters (Level 2) for the file name including the file extension.
Permits eight characters for the folder name.
Restricts the maximum directory depth to eight levels (including root folder).
The characters A-Z, 0-9 and the underscore (_) are permitted.
Sets options automatically for the UDF file system.
We recommend that you select this entry.
Enables you to manually define the UDF partition type and the
Manual Settings
file system version.
Creates a disc that is compatible with an Xbox.
Enable Xbox
This entry is available if the No Multisession option button is
selected on the Multisession tab.
A disc that is compatible with Xbox cannot be created as a multisession disc.
27
Nero Burning ROM
Page 28
Data Disc
If the disc is to be used mainly on computers with Microsoft Windows and you
In the ISO tab, in the area Relax Restriction, the restrictions imposed by the selected file
system can be relaxed. For example, you can allow a higher path level or more than 64
characters for the Joliet
name.
If the disc should be read on all operating systems, select ISO 9660 as the file
system and clear all check boxes in the Rel ax rest r ictions area.
An advisory message appears on the ISO tab in the Information area if the disc
cannot be read on all operating systems.
want to use lowercase letters and/or foreign language characters for the file
names, select ISO 9660 + Joliet as the file system.
The following setting options are available on the ISO tab in the Data and File areas:
Drop-down menu
Data mode
Drop-down menu
File system
Drop-down menu
Length of file name
Drop-down menu
Character set
Selects the mode for the data. Mode 1 and Mode 2/XA are
available. Newer drives can easily read Mode 1 and Mode 2/XA
CDs.
However, some older drives cannot read Mode 1 discs correctly.
In the case that the disc can to be read in any case on older
drives, select the Mode 2/XA format.
Selects the file system that is used for the data.
ISO 9660 only: ISO format alone is used.
ISO 9660 + Joliet: ISO format is used and is enhanced by the
Joliet standard.
ISO 9660:1999: The latest ISO format update is used. Among
other things it allows the use of 207 characters and a deeper
directory depth.
Defines the possible length of the file name. Level 1 and Level
2 are available. In Level 1 the file name can be eight characters
long and the file name extension (e.g. *.doc) three characters. In
Level 2 the file name can be 31 characters long.
Defines the character set used for ISO names.
Nero Burning ROM
28
Page 29
3.2 Compiling a SecurDisc dis c
SecurDisc is a technology with which you can create discs with special protection properties.
No special hardware is needed.
Discs that are created with Nero Burning ROM and the SecurDisc compilation type include
data integrity and reconstruction. Additional SecurDisc features include the possibility to
protect the data on your disc against unauthorized access with a password, to digitally sign
the disc, and to configure the data redundancy.
To be able to copy the protected data to your hard drive and to check the security of the data
you will need a special application named Nero SecurDisc Viewer. The Nero SecurDisc
Viewer is burned automatically to the SecurDisc disc and can be downloaded free of charge
at www.securdisc.net
More information on SecurDisc technology can be found at www.securdisc.net.
To compile a SecurDisc disc, proceed as follows:
1. Select the desired disc format (CD, DVD, Blu-ray) from the drop-down menu in the New
Compilation window. (In the case that the New Compilation window is not opened, it can
be opened by clicking the New button on the main screen.)
The selection list shows the compilation types that can be burned.
or www.nero.com.
Data Disc
2. Select the desired compilation type for a SecurDisc from the selection list.
The tabs with the configuration options that are valid for this compilation type are
displayed.
29
Nero Burning ROM
Page 30
Data Disc
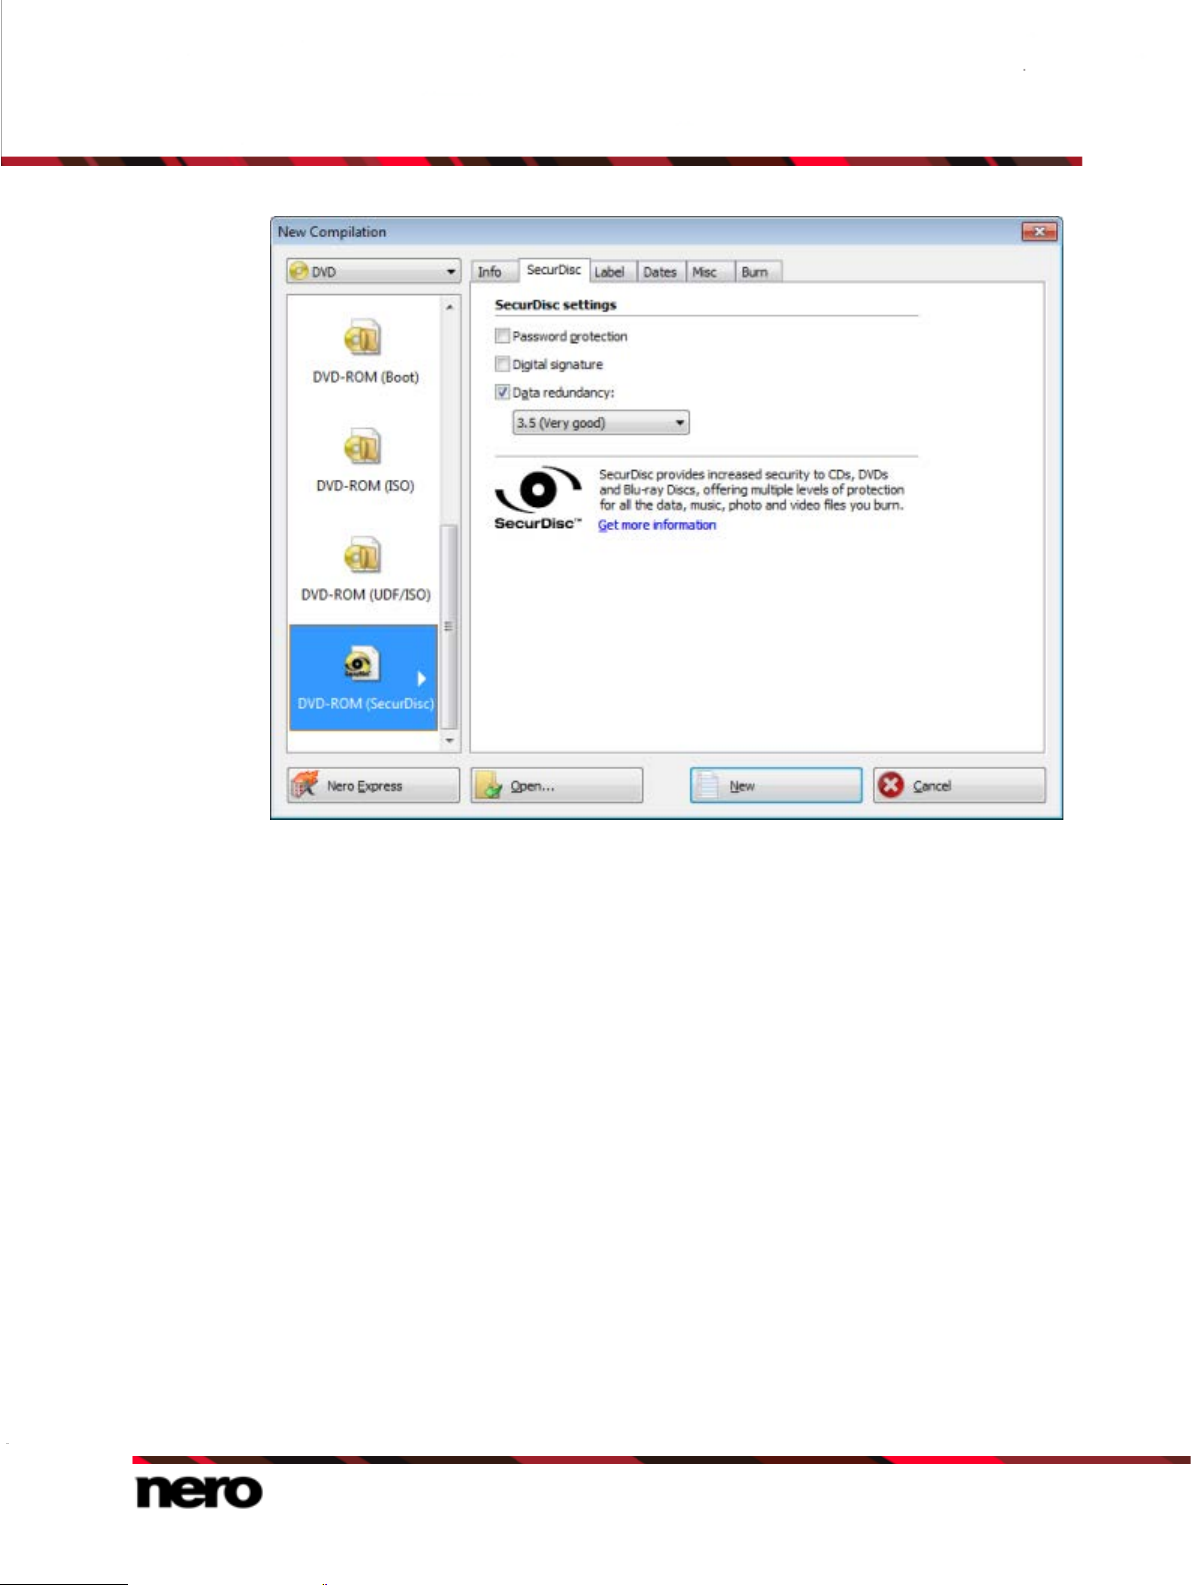
3. If you want to enable the password protection for all files:
1. Enable the Password protection check box on the SecurDisc tab.
The SecurDisc – Protect Data window is opened.
SecurDisc Compilation
30
Nero Burning ROM
Page 31

Data Disc
When appropriate, a wizard offers suggestions in an additional Tips dialog box
2. Enter the desired password in the Password input area and then click the OK button.
when entering and selecting the password. The wizard estimates the security
level, i.e. the quality of the password, during entry.
4. If you want to sign the disc with a digital signature:
1. Select the Digital signature check box on the SecurDisc tab.
The SecurDisc – Digital Signature window is opened.
Nero Burning ROM
31
Page 32

Data Disc
2. If you have already created a digital key, click the Browse button and select the key.
3. If you want to create a digital key, click the Start button.
The SecurDisc – Create Digital Key window is opened.
4. Read the instructions and click the Next button.
The SecurDisc Key Creation Process window is opened.
5. Move your mouse at random until the creation process is complete.
Nero Burning ROM uses the random data to create the SecurDisc key. You can
monitor the status of the creation process using the progress bar. The Next button is
enabled as soon as the process is complete.
6. Click the Next button.
The SecurDisc – Key Creation Completed window is opened.
7. Enter a file name for the key you have created and click the Finish button.
The SecurDisc – Digital Signature window is opened again and the selected key
appears in the drop-d o wn menu.
8. Click the OK button.
The corresponding window is opened to inform you that the disc is being digitally
signed with the selected key.
9. Click the OK button.
32
Nero Burning ROM
Page 33

Data Disc
If the Data redundancy check box is disabled, the disc will be filled completely
A redundancy level of 1,3 means no redundancy and a redundancy level of 9
You can pass on the relevant public key to recipients to enable them to verify the
signature.
5. If you want to enhance the burning speed by limiting the data redundancy or to configure the
data redundancy:
1. Select the Data redundancy check box on the SecurDisc tab.
The drop-down menu is enabled.
2. Select the desired redundancy level.
with copies of the chosen data and checksums. A display panel in the compilation
screen indicates the current redundancy level.
means excellent redundancy.
We recommend a redundancy level of at least 2,5.
6. Click the New button.
The New Compilation window is closed and the selection screen is displayed.
SecurDisc Selection Screen
7. Select the files/folders that you want to burn from the File Browser area.
8. Drag the required files/folders into the Disc Content area on the left side.
Nero Burning ROM
33
Page 34

The files are added to the compilation and displayed in the compilation screen. The
capacity bar indicates how much space is required on the disc.
You can selectively enable the password protection for individual files by marking
the desired file in the compilation screen and clicking the Protect button.
9. Repeat the previous step for all files that you want to add.
You have compiled a SecurDisc disc with settings according to your requirements
and can now burn the disc.
See also
About Nero SecurDisc Viewer →115
3.3 Nero DiscSpan (UDF) Compilati on and Nero DiscMerge Tool
With Nero Burning ROM you can compile and burn all types of files and folders to multiple
discs. The Nero DiscSpan feature for UDF compilations is useful when the data to be
burned is too large to fit on a single disc.
The number of discs to be used is shown in the compilation screen and you can switch the
disc type here. However, during the burn process you are allowed to alternate the disc types
(CD, DVD, Blu-ray Disc) regardless of which disc type you chose at the beginning.
When a single file exceeds the capacity of a disc, Nero Burning ROM can split such files
automatically. In addition, using the SmartFit feature integrated in Nero DiscSp a n , Nero
Burning ROM can distribute files dynamically among several discs. The files are distributed
in such a way that the amount of needed discs is minimized by slightly rearranging the order
of files to optimally use the disc space available. Note that you can either enable splitting of
files or enable SmartFit.
The restore tool Nero DiscMerge and a file catalog is burned on the last disc of the set by
Nero Burning ROM. Nero DiscMerge provides an easy way to copy the content of the Nero
DiscSpan discs to your computer. Nero DiscMerge can also merge split files and restore the
original order of the files distributed by SmartFit.
Data Disc
3.3.1 Set Nero DiscSpan Options
The Nero DiscSpan tab provides configuration options for the Nero DiscSpan feature.
The following configuration options are available:
Check box
Enable Nero DiscSpan
Enables the Nero DiscSpan feature. The compilation is burned
to multiple discs, if necessary.
Nero DiscSpan can only be enabled, if on the Multisession tab
the No Multisession option button is selected.
Nero Burning ROM
34
Page 35

Option button / Input field
Allow the splitting of
files which exceed
Option button
Allow Nero DiscSpan
without file splitting
Check box
Enable SmartFit
Data Disc
Enables the option that files that exceed a certain file size are
split if this is necessary to fill up a disc space. The original order
of the files is being kept.
Note, that you need Nero DiscMerge in order to merge split files
and folders. Nero DiscMerge is automatically burned to the last
disc.
Enables the pure Nero DiscSpan feature (burns the compilation
to multiple discs) without file splitting and without rearranging the
order of files.
Note, that the file size is therefore lim ited b y the disc size at
least.
Enables the option that files are distributed dynamically among
several discs and not necessarily in the original order. The files
are distributed in such a way that the amount of needed discs is
minimized by slightly rearranging the order of files to optimally
use the disc space available. Therefore, it is possible, that files
from one folder are to be found on multiple discs.
The original order of the files can be res tor ed eas ily by Nero
DiscMerge. Nero DiscMerge is automatically burned to the last
disc.
Adds Nero DiscMerge to the last disc. Nero DiscMerge provides
an easy way to copy the content of the Nero DiscSpan discs to
Check box
Add Nero DiscMerge
and file catalog to
master disc
your computer.
Nero DiscMerge can also merge split files and restore the
original order of the files distributed by SmartFit. Therefore, Nero
DiscMerge is automatically burned to the last disc if the Allow
the splitting of files option or the Enable SmartFit option is
enabled.
3.3.2 Creating Multiple Discs with Nero DiscSpan
With Nero Burning ROM you can compile and burn all types of files and folders to multiple
discs. The number of discs to be used is shown in the compilation screen and you can
switch the disc type here.
In order to minimize the amount of needed discs, you can also split large files or re-arrange
the order of files to optimally use the disc spac e avai la ble.
To create an UDF compilation using the Nero DiscSpan feature, proceed as follows:
1. Select the desired disc format (CD, DVD, Blu-ray) from the drop-down menu in the New
Compilation window. (In case that the New Compilation window is not opened, it can be
opened by clicking the New button on the main screen.)
The selection list shows the compilation types that can be burned.
35
Nero Burning ROM
Page 36

2. Select an UDF compilation type from the selection list.
Nero DiscSpan options
The tabs with the configuration options that are valid for this compilation type are
displayed.
3. Click the Nero DiscSpan tab.
The Nero DiscSpan tab is displayed.
Data Disc
4. Select the Enable Nero DiscSpan check box. Make sure, that on the Multisession tab the
No Multisession opt ion bu tton is selec t ed.
Discs that use the Nero DiscSpan feature cannot be created as multisession
discs.
Allow the splitting of files which ex ceed: A files that exceed a certain file size
is split if this is necessary to fill up a disc space.
Allow Nero DiscSpan without file spli tting: The pure Nero DiscSpan feature
(burns the compilation to multiple discs) without file splitting and without
rearranging the order of files.
Nero Burning ROM
New Compilation - DiscSpan (UDF)
36
Page 37

Enable SmartFit: Files are distributed dynamically among several discs and not
necessarily in original order.
In Nero Burning ROM, there is the option of defining filters for individual files or
It is very easy to hide files in data compilations for additional protection or for
5. Set the desired options on the other tabs.
6. Click the New button.
The New Compilation window is closed and the selection screen is displayed.
Data Disc
7. Select the files/folders that you want to burn from the File Browser area.
8. Drag the required files/folders into the Disc Content area on the left side.
The files are added to the compilation and displayed in the compilation screen. The
capacity bar indicates how much space is required by the DiscSpan compilation. On the
left an info field indicates how much discs will be burned.
folders by dragging files or folders into the compilation areas with the depressed
right mouse button. For instance, it is possible to filter for a particular type of file
(*.doc, *.xls, *.txt) or select which type of file is not to be taken up in the
compilation area.
security reasons so that they do not appear on the normal display. The files
behave in the same way as other hidden system files that are hidden by default,
but can easily be displayed. To hide files, right-click the required file, select the
Properties option and then select the Hide check box.
Nero Burning ROM
Selection Screen - DiscSpan (UDF)
37
Page 38

9. If required, you can change the disc type.
Under Windows Vista and Windows 7 you need administrator rights to save the
You have successfully compiled a data disc and can now burn this compilation.
During the burn process you will be prom pted to insert a new disc whene v er
needed. You are allowed to alternate the disc types (CD, DVD, Blu-ray Disc)
regardless of which disc type you chose at the beginning. If you have activated the
respective option, files which exceed a certain size will be split or files will be
distributed dynamically among several discs.
3.3.3 Copy Data with Nero DiscMerge
The tool Nero DiscMerge was burned on the last disc of the set - the so called Master Disc by Nero Burning RO M. Nero DiscMerge contains information about the content of the burned
Nero DiscSpan disc set. The amount of discs and which file or folder was burned to which
disc is also included in the information. Nero DiscMerge provides an easy way to copy the
files and folders to your hard drive by triggering the copy process and prompting you to insert
the single discs of the set. Using Nero DiscMerge you can be sure, that all files and folders
are copied and no disc is forgotten.
You can also exclude individual files from the copy process or select specific files to be
copied.
Furthermore, Nero DiscMerge can merge split files and folders that have been burned on
multiple discs if the split file feature has been used. If the SmartFit feature has been used,
Nero DiscMerge is useful to copy the distributed files and folders in original order. (If the
SmartFit feature is activated it is possible that files from one folder are to be found on
multiple discs . )
Therefore, we recommend using the comfortable Nero DiscMerge when copying Nero
DiscSpan disc content.
Data Disc
files to secure folders such as C:\Program files. Therefore, a User Account
Control message asking for administrator rights may appear with these operating
systems.
To copy the content of Nero DiscSpan discs, proceed as follows:
1. Insert the Master Disc - the last burned disc - into a drive.
Nero DiscMerge starts automatically. The content, i.e. folder structure and files, of the
Nero DiscSpan disc set is displayed.
Nero Burning ROM
38
Page 39

Data Disc
If the program does not start automatically, select the drive with the disc in
Nero DiscMerge
Windows Explorer. You can start Nero DiscMerge manually by double-clicking the
NeroDiscMerge.exe file in the $Nero$ folder.
2. Select the copy target in the Target path input field by clicking the Browse button.
3. Select the check box preceding the folder or the file that you want to copy. Select a folder in
the left to show the contained files in the right.
4. Click the Copy Data button.
The Copy Status window is opened.
A message window is opened prompting for the first burned disc.
5. Remove the current disc and insert the first burned disc into the drive.
6. Click the OK button.
The message window is closed and the copy process is started. Information about the
current step is displayed in the information area. A process bar indicates the progress
being made. When the content of this disc is completely copied, then the disc is ejected.
The message window is opened again prompting for the next disc.
Nero Burning ROM
39
Page 40

Data Disc
Copy Status
7. Insert each disc of the set in chronological burning order as requested by Nero DiscMerge.
Once the copy process is complete, the message "Disc merging complete" is displayed
in the information area. The Cancel button changes to Close.
40
Nero Burning ROM
Page 41

Data Disc
8. Click the Close button.
The Copy Status window is closed.
9. Click the Close button.
Nero DiscMerge is closed.
You have successfully copied the content of multiple Nero DiscSpan discs to your
hard drive.
If files has been split, they are merged together now. If files have been distributed
dynamically among several discs, they are in their correct folder in original order
now.
3.4 Check Point Media Encryption CD/DV D
With Nero Burning ROM and Check Point Media Encryption you can create discs with
special encryption security protection.
This feature is only available if all of the following requirements are fulfilled:
(1) Check Point Endpoint Security Media Encryption, version R73 or later, is
installed on your computer.
(2) You are allowed to create Check Point Media Encryption CD/DVDs.
(3) You have a special serial number.
Copy Status - complete
41
Nero Burning ROM
Page 42

The procedure for compiling and burning a Check Point Media Encryption disc is basically
The encryption of the data does not take place in Nero Burning ROM. Nero AG is
the same as the procedure for compiling and burning data discs. Be sure to select the
CD/DVD-ROM (Check Point) entry in the New Compilation window.
When starting the burn process, a window, which originates from Check Point Media
Encryption, will be opened. After entering security information, e.g. a password for
encryption as defined in your Check Point Media Encryption settings, Check Point Media
Encryption then encrypts the data. When the encryption is finished, the window is closed and
Nero Burning ROM continues the burn process. Depending on your Check Point Media
Encryption settings, a decryption tool is burned on the disc, allowing another user, who does
not have Check Point Media Encryption, to access to the data by entering the password.
not responsible for the data encryption and the decryption tool. These features
are provided by Check Point Software Technologies.
3.5 Saving Data Track
With Nero Burning ROM you can save a data disc as an image file. The image file can later
be burned to a recordable disc. The result is a copy of the original data disc.
To save the data disc as an image file, proceed as follows:
Data Disc
1. Insert the data disc in a drive.
2. Click the Extras > Save Data Tracks menu.
The Select Track window is opened. The tracklist shows you the sessions and data
tracks that are found on the disc. Due to the technical reasons, only the first data track of
the first session can be saved.
Nero Burning ROM
42
Page 43

Data Disc
Select Track
3. Select the first data track.
4. Click the Save Track button.
The Save As window is opened.
5. Select a file name and a storage location.
6. In the Save As drop-down menu, select the desired output format (ISO or NRG) for the
image file.
7. Click the Start button.
The Progress win do w is opene d and displays the progress made while savin g. When
the save process is complete, the window is closed automatically.
You have successfully created an image file starting from a data disc. Now you can
burn the image file to a disc.
43
Nero Burning ROM
Page 44

4 Audio CD and Audio Files
4.1 Compiling Audio CDs
Using Nero Burning ROM you can create an Audio CD that contains music files. It can be
played on all standard CD players. To compile an Audio CD, source files with different audio
formats are automatically converted into Audio CD format before being burned.
Some CD players cannot play CD-RWs. Use CD-R discs to burn Audio CDs.
To create an Audio CD, proceed as follows:
1. Select the CD entry from the drop-down menu in the New Compilation window. (In the
case that the New Compilation window is not opened, it can be opened by clicking the
New button on the main screen.)
2. Select the Audio CD compilation type from the selection list.
The tabs with the configuration options that are valid for this compilation type are
displayed.
Audio CD and Audio Files
Audio CD
44
Nero Burning ROM
Page 45

Audio CD and Audio Files
3. Set the desired options on the tabs.
Audio CDs should always be burned using the disc-at-once method. This entry is
selected by default.
4. Click the New button.
The New Compilation window is closed and the selection screen is displayed.
5. Select the audio files that you want to burn from the File Browser area on the right side.
You can use the hard drive or an Audio CD as source of the audio file.
You can also choose an M3U playlist as a source.
6. Drag the desired audio files into the Disc Content area on the left side.
The files are added to the compilation and displayed in the compilation screen. The
capacity bar indicates how much space is required on the disc.
Compilation screen - Audio CD
7. Repeat the previous step for all audio files that you want to add.
8. Customize the properties of the audio file to suit your requirements.
You have successfully compiled an Audio CD and can now burn this compilation.
45
Nero Burning ROM
Page 46

See also
Selection Screen →19
4.1.1 Customizing Properties of the Audio File
You can display and/or make changes to the audio file properties on the Track Pr opert ies,
Indexes, Limits, Splits and Filters tabs of the Audio Track Properties window. To open
the window, mark an audio file in the compilation screen for Audio CDs and click the
Properties button.
4.1.1.1 Track Properties Tab
On the Track Properties tab you will find basic information on the selected file in the
Source information area. To open the window, mark an audio file in the compilation screen
for Audio CDs and click the Properties button.
Audio CD and Audio Files
The following input areas are available in the Properties area:
Defines a title which is saved as CD Text. CD players that support
Input field
Title (CD Text)
CD Text show the title name entered here.
Only Latin characters can be displayed as CD Text. CD Text can
only be written in disc-at-once mode.
Nero Burning ROM
Track properties
46
Page 47

Input field
Artist (CD Text)
Audio CD and Audio Files
Defines the artist which is saved as CD Text. CD players that
support CD Text show the artist's name entered here.
Only Latin characters can be displayed as CD Text. CD Text can
only be written in Disc-At-Once mode.
Input field
Pause
Input field
International
Standard
Recording Code
(ISRC)
Check box
Protection
Check box
Cross fade with
previous track
Defines the length of the pause in seconds or frames
between the
selected audio file and the previous one.
Identifies the CD title using a 12-character digital code. The ISRC is
entered in the subcode and included silently.
If you do not know the ISRC, you should leave this input field blank.
Sets the copy protection bit for the corresponding track on the Audio
CD. As most CD recording applications simply ignore this bit, copy
protection cannot be ensured. A warning message will be opened in
Nero Burning ROM while copying an Audio CD with copy protected
tracks.
Defines a crossfade between this and the previous audio file. You
can specify the length of the crossfade in seconds or in sectors.
47
Nero Burning ROM
Page 48

4.1.1.2 Indexes, Limits, Split Tab
On the Indexes, Limits, Split tab you can set and delete indexes and split audio files to
create two or more shorter ones. The tab consists of the Oscilloscope and Positions areas.
Audio CD and Audio Files
Indexes, Limits, Split Tab
Audio files are displayed graphically in the Oscilloscope area. The following configuration
options are available in the Positions area:
Selection list s
Start/End
Shows the positions for the beginning and end of the audio file on
the CD.
Sets a new index position at the selected position. For the CD player
Button
New Index
this is the position from which a new song starts, and the player can
also jump to it directly. However, not all CD players support this
feature.
Button
Edit
Button
Delete
Button
Split
Opens the Edit track limit dialog box.
You can enter the exact position of a split.
Deletes a selected index.
Splits the audio file at the marked position.
48
Nero Burning ROM
Page 49

Audio CD and Audio Files
Button
Button
Stop playing
Button
Split at Index
Positions
Button
Zoom In
Button
Zoom Out
Button
Full View
Play
Plays the audio file from the marked position.
During playback, the Stop playing button is displayed.
Stops playback of the audio file.
If playback is stopped, the Play button is displayed again.
Splits the audio file at the set index positions.
Enlarges the graphical representation of the audio file.
Reduces the graphical representation of the audio file.
Displays a graphical representation of the entire audio file.
49
Nero Burning ROM
Page 50

4.1.1.3 Filters Tab
The Filters tab includes filters that improve or change the quality of the music. The so-called
non-destructive procedure is used for processing, i.e. the actual recording is not changed,
but flags are simply set that can be canceled at any time. No additional audio data is
created. The audio files on hard drive are not modified during this procedure.
Audio CD and Audio Files
Audio Track Properties window, Filters tab
The following configuration options are available in the Audio Track Properties window:
Check box
Normalize
Check box
Declick
Check box
Hiss Reduction
Check box
Fade In
Check box
Fade Out
Sets the volume of an audio file to a preset value. This filter can be
useful to bring the volume of files originating from different sources
into line with one another.
Removes clicking and scratching noises, such as those on old LPs
for example.
Reduces or removes the hiss on an audio file. All frequencies
below a certain threshold (hiss level) are removed.
Fades in the volume of an audio file from zero to full volume. This
filter can be useful for shortening files.
Fades out the volume of an audio file from full volume to silence.
This filter can be useful for shortening files.
50
Nero Burning ROM
Page 51

Audio CD and Audio Files
Check box
Stereo Widening
Check box
Karaoke
Check box
Echo
Check box
Equalizer
Button
Test Selected Filters
4.1.2 Defining Options
4.1.2.1 Audio CD Settings
The Audio CD tab provides options for setting the Audio CD.
Increases/reduces the stereo effect of an audio file. This filter only
works if the original file was recorded in stereo.
Fades out the vocals on an audio file. This is done by fading out
the parts of a song that are the same in both stereo channels.
Adds an echo to the audio file.
Opens an equalizer so you can change the volume, bass, and
pitch in different frequency ranges .
Plays the audio file and applies the activated filters. During
playback, the configuration options for the filters can be changed,
allowing the effect to be controlled.
Audio CD Tab
The following configuration options are available on the Audio CD tab in the General area:
Nero Burning ROM
51
Page 52

Audio CD and Audio Files
To add tracks from a source Audio CD to your audio compilation, we generally
Check box
Normalize all audio
files
Enables a filter that brings the volume of the audio files to be
burned into line with one another. This is particularly
recommended if the audio files originate from different sources.
Allows the audio files to merge into one another on the Audio CD
without a pause (just like in live recordings).
Check box
No pause between
tracks
If the check box is cleared, there are pauses of two seconds
between the audio files.
We strongly recommend using the disc-at-once mode.
Otherwise the zero pause length may not be supported by all
recorders and/or a very short clicking noise may be heard
between tracks.
The following configuration options are available in the CD Text area:
Enables the option for writing CD Text. With CD players that
Check box
Write on CD
support CD Text, the title of the CD, the name of the audio file as
well as the name of the artist appear in the display.
CD Text can only be written in disc-at-once mode.
Input field
Title
Defines the label of the Audio CD.
Input field
You can also enter additional information about the Audio CD such as the producer or
comments.
4.1.2.2 CDA Settin g s
The CDA Options tab provides options for configuring CD-DA files on the Audio CD. The
CDA file strategy area allows you to select the strategy that Nero Burning ROM should use
for handling selected audio files from a source Audio CD. In general there are two methods:
Read the audio file and store it in the cache temporarily. The Audio CD can be burned in
disc-at-once
Create a reference to the audio file and read it shortly before burning (track reference).
The Audio CD can only be burned in track-at-once
Artist
Defines the artist.
mode, which supports CD Text.
mode.
recommend the following alternative:
Rip the source Audio CD to hard drive (see Copy Audio CD to Hard Drive→ 57).
Ideally, save the tracks in the lossless FLAC format. Then proceed by adding the
audio files to the audio compilation.
Nero Burning ROM
52
Page 53

Audio CD and Audio Files
The following setting options are available on the CDA Options tab in the C DA File
Strategy area:
Saves the audio files temporarily to the Nero Burning ROM
Drop down menu entry
Diskspace strategy
cache.
If there is no space available, a reference is created to the audio
file and is not read until shortly before burning. This entry is
selected by default.
Drop-down menu entry
Tempfile strategy
Drop-down menu entry
Reference strategy
Drop-down menu entry
Device dependent
strategy
Saves the audio files temporarily to the Nero Burning ROM
cache.
If there is no space available, an error message appears.
Creates a reference to the audio file and reads it shortly before
burning. The source medium can only be a CD/DVD drive, not a
recorder. The disc can only be burned in track-at-once mode.
Creates a reference to the audio file if a CD/DVD drive is
available. Otherwise the tempfile strategy is used.
The following setting options are available on the CDA Options tab in the Drive area:
Selection list
Drive
Drop-down menu
Read speed
Lists recognized drives and burners.
Selects the speed at which the CD is read.
Check box
Cache track on hard
Saves the audio file in the cache before burning.
drive before burning
The following setting options are available on the CDA Options tab in the Advanced area:
Removes silence at the end of individual audio files, i.e. music
Check box
Remove silence at the
end of audio tracks
tracks transition smoothly from one to the next. This check box is
selected by default.
To avoid unwanted effects set the pause length to 0 when
clearing this check box (to set the pause length see
Track
Properties Tab→ 46).
Nero Burning ROM
53
Page 54

4.2 Mixed Mode CD and CD EXTRA
With Nero Burning ROM you can compile CDs that include both audio and data files.
The following compilation methods are available:
Mixed Mode CD
CD EXTRA
A Mixed Mode CD includes the data and the audio files in one session. CD EXTRA includes
the audio files in the first session and the data files in the second session.
The procedure for compiling the audio and data files is basically the same as the procedure
for compiling data or music CDs. Please be sure to select the corresponding entry in the
New Compilation window. The selection screen includes a compilation area for audio files
and one for data files. The compilation can only be burned if files have been added to both
the audio and the data compilation area.
See also
Selection Screen →19
Compiling Audio CDs →44
Compiling Data Disc →22
Audio CD and Audio Files
4.2.1 CD-Extra Settings
The CD EXTRA tab provides configuration options for albums.
The following information is available in the Info area:
Display panels
The following configuration options are available in the Album area:
Input field
Album identification
Input field
Number of volumes in
album
Input field
Album sequence
number
Button
Pictures
Displays information on the compilation.
Defines a name for the album. This is particularly useful when
the album is to comprise several CDs.
Defines the number of discs that the compilation should contain.
Defines the album number of the current disc.
Opens the CD EXTRA Pictures window where you can select
the pictures for the front and flipside of the CD and define the
picture format.
The following configuration options are available in the Localization area:
Nero Burning ROM
54
Page 55

Audio CD and Audio Files
Music recognition technology and related data are provided by Gracenote®.
Display panel
Languages
Button
Add
Button
Delete
Input field
Album Title
Displays available languag es . W hen you selec t a lang uage , you
can add the title for the album in the Album title text box. Each
language can contain a different title.
Opens the New Language window where you can select a new
language from a country list.
Deletes the selected language.
Adds an album title to the language highlighted in the
Languages selection list.
4.3 Automatic Music Recognition
With Gracenote MusicID Nero Burning ROM can identify music files. So called metadata
such as artist, title, and genre are accessed from the Gracenote Media Database and
displayed in Nero Burning ROM. The identified metadata is written to the music file and is
then available.
Identification is possible for single audio files as well as complete original Audio CDs.
If the metadata of the Audio CD is not yet included in the database then you can enter it and
make it available. The metadata is sent to Gracenote and added into the database.
With Gracenote you can have audio files identified out of any sort of audio compilation. This
is particularly useful when audio files are not named or are only partially named. The
metadata that is made available by Gracenote is used for the compilation and is written into
the audio files. In this way your music collection is correctly tagged with all inf or m at io n.
During the following actions, original Audio CDs can be automatically identified in Nero
Burning ROM with Gracenote MusicID.
Copying Audio CD
Saving Tracks from the Audio CD to Hard Drive
Gracenote is the industry standard in music recognition technology and related
content delivery. For more information, please visit www.gracenote.com.
Nero Burning ROM
55
Page 56

4.3.1 Identifying Audio Files
You can have the added audio files in the music compilations identified with Gracenote and
access metadata such as artist and title from the Gracenote Media Database.
To do this, proceed as follows:
1. Select the type of compilation to burn a music CD.
The compilation screen is displayed.
2. Add audio files from the hard drive to the music compilation.
3. Select one or more audio files in the compilation.
4. Right-click to open the context menu.
5. Select the Get metadata entry.
The audio files are analyzed and the required information is sent to Gracenote. The Edit
Meta Data window is opened. The metadata received by Gracenote is displayed in the
New Info area.
Audio CD and Audio Files
Edit Meta Data window
6. If necessary, edit the metadata, e.g. track number, title, artist, album title, year, and genre.
7. Click the Apply button.
Nero Burning ROM
56
Page 57

Music recognition technology and related data are provided by Gracenote®.
The Edit Meta Data window is closed.
The metadata is written int o the audio file and acc ordi ngly shown in Nero Burning
ROM. If the Adjust all file name(s) check box is selected, the file on hard drive is
renamed accordingly (if technically possible).
4.4 Copy Audio CDs to Hard Drive
With Nero Burning ROM you can save audio files from an Audio CD to the hard drive. In the
process, the files are encoded, i.e. converted into a format that the computer can read. The
audio file is usually compressed.
The Audio CD can be automatically identified with Gracenote MusicID. So called metadata
such as title, genre, and track title are accessed by the Gracenote Media Database and
associated to the tracks. If available, Album art is also displayed and associated to the
tracks. That way you have audio files that are accurately and fully named after the encoding
process.
Gracenote is the industry standard in music recognition technology and related
content delivery. For more information, please visit www.gracenote.com.
Audio CD and Audio Files
Audio files from copy-protected Audio CDs cannot be saved.
To save audio files, proceed as follows:
1. Click the Extras > Save Audio Tracks menu.
The Save Audio Tracks to Hard Drive window is opened.
2. Insert your Audio CD into a drive.
The disc is being analyzed and the required information is sent to Gracenote. If an
exactly matching m etadat a entr y is found in the Grac enote Med ia Dat abas e the n that
metadata entry will be used and displayed.
If several metadata entries are found or the found entry is ambiguous, then the Matches
window is opened and the metadata etries in question are displayed.
3. Select the metadata entry that matches your Audio CD.
4. Click the Send New Data button if none of the metadata entries match your Audio CD.
The Edit MetaData window is opened.
Nero Burning ROM
57
Page 58

Audio CD and Audio Files
Edit MetaData
The Edit Meta Data window also opens if no matching entry is found in the
database but you want to enter the metadata and make it available.
5. Edit the audio track metadata (Title and Artist) by clicking in the track list.
6. Edit the Audio CD metadata (Album Title, Artist, Year, and Genre as well as Album Art)
on the right side.
7. Click the Advanced Options button if you want to add additional inform ation.
The Gracenote MusicID Information window, which originates from Gracenote, is
opened. After entering the additional information you have to close this window so that
the Edit MetaData window is displayed again.
8. Click the Submit Data button.
If you have changed the Audio CD's metadata or filled it in for the first time then the
changes are sent to Gracenote and entered into the Gracenote Media Database.
The Edit MetaData window is closed and the information is passed on to the Save
Audio Tracks to Hard Drive window.
58
Nero Burning ROM
Page 59

Audio CD and Audio Files
Save Audio Tracks to Hard Drive
9. Select the tracks that you want to save on the hard drive.
10. Click the Output tab.
The Output tab is opened.
11. In the File Format drop-down menu, select the target file's audio format.
12. Choose a method for creating the file name in the Mode for Creating File Names drop-
down menu.
13. Define other settings according to your preferences.
14. Click the Copy button.
Conversion starts. A folder with the album name is created in the desired folder. The
audio files are saved in this folder and named according to the method you chose. A
playlist file is created and saved in the same folder. Metadata that is identified with
Gracenote is written into the audio file.
The Progress win do w indi c ates the saving progress. When the save process is
complete, this window is closed automatically.
15. Click the Close button.
The Save Audio Tracks to Hard Drive window is closed. You have saved audio
files.
59
Nero Burning ROM
Page 60

4.4.1 Save Audio Tracks to Hard Drive Window
Define the settings for audio files to be saved to the hard drive in the Save Audio Tracks to
Hard Drive windo w . The windo w is opened by clicking the Extras > Save Audio Tracks
menu.
Audio CD and Audio Files
The following setting options are available:
Tab
Source
Tab
Output
Button
Copy
Specifies settings for the source of the audio files.
Sets output files configuration options.
Starts the copy or save process.
Nero Burning ROM
Save Audio Tracks to Hard Drive - Source
60
Page 61

4.4.1.1 Source Tab
The Source tab displays the audio files on the Audio CD. The functions of the control
buttons correspond to the familiar control buttons on CD players.
The following setting options are available:
Audio CD and Audio Files
Drop-down menu
Source drive
Title Selection List
Button
Refresh
Button
Edit
Input fields
Album/Artist/Year
Selection list
Genre
Cover area
Selects the drive where the Audio CD is inserted.
Displays the tracks on the Audio CD. You can select individual tracks
to copy by selecting the respective check box.
Sends a new query to the Gracenote Media Database and
completes the Audio CD's metadata including artist, title name, and
genre if a matching entry exists in the database.
Opens the Edit Meta Data window. Here, you can edit the Audio CD
metadata sent by Gracenote. You can enter the metadata if no entry
for your Audio CD exists in the Gracenote Media Database. This
metadata is sent to Gracenote, and added to the Gracenote Media
Database.
Displays or specifies metadata for the album, artist and year.
Displays or specifies the genre.
Displays Album Art, i.e., the cover of the Audio CD.
Button
Load Cover
Loads an alternative cover from your hard drive.
Nero Burning ROM
61
Page 62

4.4.1.2 Output Tab
You can define the properties of the audio files to be created on the Output tab.
Audio CD and Audio Files
The following setting options are available:
Input window
Output directory
Button
Browse
Drop-down menu
Mode for creating
file name
Check box
Automatically
generate a playlist
of stored audio
tracks
Selects the storage location for the output file.
Opens a browser window where you can select a storage location.
Selects the method to be used for creating the name of the output
file.
Creates a playlist of the saved audio files. A playlist is a list of the
ripped audio files in the right order with the right metadata. It is a
very convenient tool − you simply have to select the playlist to add all
the audio files in contains to an audio compilation or a playback
application.
Copy Audio CDs to Hard Drive - Output
62
Nero Burning ROM
Page 63

Audio CD and Audio Files
Drop-down menu
Playlist format
Drop-down menu
File format
Drop-down menu
Quality
Check box
Force compatibility
with iPod
Check box
Disable ID3v2
Unsynchronization
Selects a format for the playlist.
Selects the output audio format for the selected audio file. The
selected file format is available as the first entry the next time it is
called up. You can choose between Nero AAC Audio, MP3 Audio
,
WAVE, AIFF, FLAC and Ogg Vorbis.
Selects the bitrate for the selected audio file format. If the bit rate is
small, less data is transferred. The file is then small, but quality is
lower. If the bit rate is high, more data is transferred. The file size is
then large, but the quality is high. A value of 128 for MP3 files is near
CD quality. For the MP3 Audio file format you can also select if you
want to create an MP3 file or an mp3PRO
file.
Only available if you selected the N e r o A AC Audi o or MP3 Audio
file format.
Makes Nero AAC Audio available for an iPod.
Is only available if you selected the Nero AAC Audio output format.
Disables the ID3v2 Unsynchronization during the decoding process.
ID3v2 Unsynchronization is a part of the MP3 decoding process. It
increases the chance that the MP3 file can be played even with old
software or hardware that does not support ID3v2. However, some
devices that support ID3v2 do not support ID3v2 Unsychronization.
The display of images or text tags might be corrupt on such devices
when playing MP3 files with unsynchronized ID3v2. Select the check
box if you have encountered such problems.
Check box
Add Album Art to
file if available
Adds Album Art to the files. Album Art works for example as a mini
view in the Explorer. Adding Album Art increases the file size.
Only available if Album Art is available or chosen for this Audio CD.
4.5 Convert Audio File Format
With Nero Burning ROM you can convert an audio file into another format, i.e. transcode the
audio file (e.g. from WAV to MP3).
The following formats are usually available (available formats may depend on the source
format):
AC3: You can specify the bit rate for this audio format
AIFF: See Encoding Options AIFF→ 65
Nero Burning ROM
63
Page 64

FLAC: It is not necessary to specify any settings for this lossless audio format
MP3 (Lame Encoder): See Encoding Options MP3→ 66
MP3/mp3PRO: See Encoding Options MP3/mp3PRO→ 67
Nero AAC Audio: See Encoding Options Nero AAC Audio→ 69
OGG: See Encoding Options OGG→ 70
WAV: See Encoding Options WAV→ 65
WMA: You can set different profiles for this audio format
4.5.1 Encode Files Window
In the Encode Files window, the audio files that are to be encoded are selected and the
properties of the output are defined. You can open the w ind o w via the Extras > Encode
Files menu. The window consists of a selection area and the Properties area.
Audio CD and Audio Files
The following configuration options are available in the selection area:
List
Files to be encoded
Check box
Show full paths
Displays the selected files.
Displays the full source and destination paths for the files in the
Files to be encoded list.
Nero Burning ROM
Encode Files Window
64
Page 65

Button
Add
Audio CD and Audio Files
Opens the browser window where you can select a file to add it to
the list of files to be encoded.
Clicking on the little triangle allows you to select audio files using
Nero MediaBrowser.
Button
Remove
Button
Remove All
Button
Reset Status
Removes the selected file.
Removes all files from the list of Files to be encoded.
Resets the status of the selected file back to Not done.
The following configuration options are available in the Properties area:
Drop-down menu
Output file format
Button
Settings
Display panel
Target file
Button
Browse
Selects the output audio format for the selected audio file.
Opens a window where you can define options such as bit rate
and frequency for the output audio file.
Displays the storage location of the output file or output files.
Opens a browser window where you can select a storage location.
Display panel
Source file info
Displays information on the selected audio file.
The following buttons are available for the encoding process:
Go
Close
Starts the encode process.
Closes the window.
4.5.2 AIFF and WAVE Encoding Options
Nero Burning ROM can encode audio files in AIIF or WAV formats.
Set options in the AIFF/Wave window that you can open in the Encode Files window via the
Settings button. Ensure that you have selected AIFF or Wave as the Output file format.
Nero Burning ROM
65
Page 66

Audio CD and Audio Files
The following setting options are available in the AIFF or Wave window:
Drop-down menu
Frequency
Drop-down menu
Bits
Drop-down menu
Channels
Specifies the scan rate per second and thus determines the
frequency of scanning. The higher the frequency, the more
frequently scanned.
Specifies the scan accuracy and thus determines the quality of the
individual scanner. The higher the bit sign, the more accurate.
Specifies which channels are recorded.
4.5.3 MP3 Lame Encoding Options
With Nero Burning ROM you can encode audio files in MP3 formats using the Lame Codec.
Set these options in the MP3 Settings window that you can open in the Encode files
window via the Settings button. Ensure that you have selected Lame MP3 Encoder as the
Output file format.
The following encoding options are available in the Settings area:
Selects a constant bit rate, i.e. the data flow per unit of time and
the quality of the saved data are the same over the entire audio
Drop-down menu
Constant Bit Rate
file. If the bit rate is small, less data is transferred. The file is then
small, but quality is lower. If the bit rate is high, more data is
transferred. The file size is then large, but the quality is high. The
default value of 128 for MP3
files is near CD quality.
Selects variable bit rate, i.e. the data flow per unit of time - and
Drop-down menu
Variable Bit Rate
thus the quantity of the saved data - adapts to the dynamics of the
audio file. The bit rate, for example, can be lowered at quieter
points in the track.
Select your desired quality level in the drop-down menu.
The following encoding options are available in the Expert settings area:
Specifies the encoder quality. These settings specify whether you
Drop-down menu
Encoding quality
place more value on fast encoding (lowest/fastest) or more value
on a superior psychoacoustic encoder model for the very best
results (highest/slowest).
Check box
Original bit
Sets the original bit in the music file, which differentiates between
the copy and the original.
Check box selected: Original bit = 1, i.e. original.
Check box cleared: Original bit = 0, i.e. copy.
Nero Burning ROM
66
Page 67

Audio CD and Audio Files
Check box
Private bit
Sets the private bit in the music file. It is reserved for the user and
is only used for informational purposes.
Sets the copyright bit in the music file, which identif ies protec ted
Check box
Copyright bit
content.
Check box selected: Copyright bit = 1, i.e. protected.
Check box cleared: Copyright bit = 0, i.e. unprotected.
Check box
Write CRC
Sets a checksum in the music file to ensure that transfer errors are
detected.
4.5.4 MP3 and MP3PRO Encoding Options
With Nero Burning ROM you can encode audio files in MP3 and MP3PRO formats. Set
these options in the MP3PRO window that you can open in the Encode files window via the
Settings button. Ensure that you have selected MP3/MP3PRO as the Output file format.
The following encoding options are available in the Settings area:
Nero Burning ROM
MP3PRO window
67
Page 68

Drop-down menu
Encoder quality
Check box
Constant Bit Rate
Check box
Variable Bit Rate
Audio CD and Audio Files
Specifies the encoder quality. Fast, Medium and Highest are
available. These settings specify whether you place more value on
fast encoding (Fast) or more value on a superior psychoacoustic
encoder model for the very best results (Highest).
Selects a constant bit rate, i.e. the data flow per unit of time and
the quality of the saved data are the same over the entire audio
file. If the bit rate is small, less data is transferred. The file is then
small, but quality is lower. If the bit rate is high, more data is
transferred. The file size is then large, but the quality is high. The
default value of 128 for MP3
files is near CD quality.
In the drop-down menu, select the Options that aff ect the bit rate:
scan rate per second in kBit, scan frequency per second in Hertz
and the channels.
Selects variable bit rate, i.e. the data flow per unit of time - and
thus the quantity of the saved data - adapts to the dynamics of the
audio file. The bit rate, for example, can be lowered at quieter
points in the track.
Select your desired quality level in the drop-down menu.
Note that not all players are able to show the correct length of MP3
files that were recorded with variable bit rate.
The following encoding options are available:
Specifies the encoder method used. If you select the check box,
Check box
Enable MP3PRO
an MP3PRO file is created (*.mp3 file extension).
If you clear the check box, an MP3 file is created (also *.mp3 file
extension).
Button
Expert
Opens the advanced area where you can configure Expert
Features.
The following encoding options are available in the Expert Features area:
Check box
Original bit
Check box
Private bit
Sets the original bit in the music file, which differentiates between
the copy and the original.
Check box selected: Original bit = 1, i.e. original.
Check box cleared: Original bit = 0, i.e. copy.
Sets the private bit in the music file. It is reserved for the user and
is only used for informational purposes.
68
Nero Burning ROM
Page 69

Check box
Copyright bit
Audio CD and Audio Files
Sets the copyright bit in the music file, which identif ies protec ted
content.
Check box selected: Copyright bit = 1, i.e. protected.
Check box cleared: Copyright bit = 0, i.e. unprotected.
Check box
Write CRC
Check box
Allow intensity stereo
coding
Also sets a checksum in the music file to ensure that transfer
errors are detected.
Uses a special codec
directional information and volume.
Mixes two stereo channels down to one mono signal. This option
Check box
Allow downmix
is useful when the output data is of such poor quality that a poor
stereo signal is to be expected. An increase in quality is expected
when downmixing to mono.
Drop-down menu
Padding
Selects a padding type for MP3 blocks. We recommend padding
type ISO that pads MP3 blocks according to the ISO specification.
4.5.5 Nero AAC Encoding Options
Nero Burning ROM can encode audio files in the Nero AAC Audio format.
Set options in the Nero AAC Encoder Settings window that you can open in the Encode
Files window via the Settings button. Ens ure that you hav e selec ted Nero AAC as the
Output file format.
at high frequencies that only saves the
Nero AAC Encoder Settings
69
Nero Burning ROM
Page 70

Audio CD and Audio Files
Use .m4a extension
The file size is then large, but the quality is high. The default value of
The following setting options are available in the Nero AAC Encoder Settings window:
Specifies a variable bit rate, i.e. the data flow per unit of time and
Drop-down menu
entry
Variable Bitrate
thus the quantity of the saved data adapts to the dynamics of the
audio file. The bit rate, for example, can be lowered at quieter points
in the track.
You can set the variable bit rate between 0 and 100. 0 means the
lowest, 100 the highest quality.
Specifies an average bit rate, i.e. the data flow per unit of time and
Drop-down menu
entry
Average Bitrate
thus the quantity of the saved data adapts to the dynamics of the
audio file but the average bit rate tends to the defined value. In
principle is it a variable bit rate with a limited bit band width and thus
combining the advantages of the variable and the constant bitrate.
Drop-down menu
entry
Constant Bitrate
Specifies a constant bit rate, i.e. the data flow per unit of time and
thus the quantity of the saved data is the same over the entire audio
file.
Specifies the bit rate, i.e. the data flow per unit of time and thus the
quantity of the saved data.
Slider
Quality
If the bit rate is small, less data is transferred. The file is then small,
but quality is lower. If the bit rate is high, more data is transferred.
The file size is then large, but the quality is high. The default value of
128 is near CD quality.
Check box
for writing files
Encodes the audio files in the M4A audio file format; which was
defined by Apple.
4.5.6 OGG Vorbis Encoding Options
Nero Burning ROM can encode audio files in the OGG Vorbis format.
Set options in the OGG Vorbis Settings window that you can open in the Encode Files
window via the Settings button. Ensure that you have selected OGG Vorbis as the Output
file format.
The following setting options are available in the OGG Vorbis Settings window:
Specifies a constant bit rate, i.e. the data flow per unit of time and
thus the quantity of the saved data is the same over the entire audio
Check box
Constant Bit Rate
file.
If the bit rate is small, less data is transferred. The file is then small,
but quality is lower. If the bit rate is high, more data is transferred.
Nero Burning ROM
70
Page 71

128 is near CD quality.
Check box
Variable Bit Rate
Audio CD and Audio Files
Specifies a variable bit rate, i.e. the data flow per unit of time and
thus the quantity of the saved data adapts to the dynamics of the
audio file. The bit rate, for example, can be lowered at quieter points
in the track.
You can set the variable bit rate between 0 and 100. 0 means the
lowest, 100 the highest quality.
71
Nero Burning ROM
Page 72

5 Video
5.1 Compiling DVD-Video
With Nero Burning ROM you can burn DVDs made up of DVD-Video files from your hard
drive. You can play your burned DVDs on almost all DVD players.
You can use Nero Burnin g RO M to burn a DVD Video if the DVD video title, i.e. a complete
DVD folder structure, is already available.
In Nero Burning ROM it is not possible to convert video files to DVD-Video, an
AVCHD video, or a BDMV-Video. Converting video files to DVD-Video, to AVCHD
video, or BDMV-Video is possible in N ero Vi de o for example. Nero Video is
included in the full version of Nero 12. More inf ormation about Nero Video is
available on the Web site www.nero.com, and more information about video
editing is available in the separate Nero Video manual.
To compile a DVD-Video, proceed as follows:
1. Select the DVD entry from the drop-down menu in the New Compilation window. (In case
that the New Compilation window is not opened, it can be opened by clicking the New
button on the main screen.)
Bootable Disc
2. Choose the DVD Video compilation type from the selection list.
The tabs with the configuration options that are valid for this compilation type are
displayed.
DVD Video Tab
72
Nero Burning ROM
Page 73

3. Set the options you require on the tabs.
4. Click the New button.
The New Compilation window is closed and the selection screen is opened.
Bootable Disc
5. Select the DVD-Video files that you want to burn from the File Browser area on the right
side.
6. Drag the existing DVD folder structure of the video title (VIDEO_TS) into the Disc Content
area on the left side.
The files are added to the compilation and displayed in the compilation screen. The
capacity bar indicates how much space is required on the disc.
You have successfully compiled a DVD-Video and can now burn this compilation.
See also
Selection Screen →19
5.2 Compiling an AVCHD Video Di sc
With Nero Burning ROM you can burn an AVCHD video disc made up of AVCHD video files
from your hard drive or camcorder. The AVCHD video disc can be burned to a DVD as
usual, or to a Blu-ray Disc. Burning to a Blu-ray Disc has the benefit that it offers more space
than a DVD.
AVCHD video on DVD is compatible to the specification of a Blu-ray Disc. However,
playback is not guaranteed on all Blu-ray players.
DVD Video Compilation Screen
73
Nero Burning ROM
Page 74

You can use Nero Burning ROM to burn an AVCHD video disc if the com plet e fol der
structure including premastered files is already available.
In Nero Burning ROM it is not possible to convert video files to DVD-Video, an
AVCHD video, or a BDMV-Video. Converting video files to DVD-Video, to AVCHD
video, or BDMV-Video is possible in Nero Video for example. Nero Video is
included in the full version of Nero 12. More inf ormation about Nero Video is
available on the Web site www.nero.com, and more information about video
editing is available in the separate Nero Vi deo manual.
To compile an AVCHD video disc, proceed as follows:
1. Select the DVD or Blu-ray entry from the drop-down menu in the New Compilation
window. (In case that the New Compilation window is not opened, it can be opened by
clicking the New button on the main screen.)
2. Choose the AVCHD (TM) video compilation type from the selection list.
The tabs with the configuration options that are valid for this compilation type are
displayed.
Bootable Disc
AVCHD (TM) video - New Compilation Window
3. Enter a name for the AVCHD video disc in the Disc name input field.
Nero Burning ROM
74
Page 75

4. Click the New button.
Files and Folders
Also, the folders \BDMV\META, \BDMV\JAR and \CERTIFICATE must be
The New Compilation window is closed and the selection screen is opened.
It includes the specific AVCHD folder structure.
Bootable Disc
AVCHD video - Selection Screen
5. Select the movie that you want to burn from the File Browser area on the right side.
6. Drag the existing folder structure including premastered files into the Disc Content area on
the left side.
The files are added to the compilation and are displayed in the compilation screen. The
capacity bar indicates how much space is required on the disc.
You have successfully compiled an AVCHD video disc and can now burn this
compilation.
The AVCHD video contains different folders. Only certain files are allowed in an
individual folder. If you only have individual files, you must allocate the right files
to the specific folder:
\BDMV\index.bdmv
\BDMV\MovieObject.bdmv
\BDMV\PLAYLIST\*.mpls
\BDMV\CLIPINF\*.clpi
\BDMV\STREAM\*.m2ts
\BDMV\AUXDATA\sound.bdmv
\BDMV\AUXDATA\*.otf
\BDMV\BDJO\*.bdjo (these files are optional; however, the folder must be
available)
Nero Burning ROM
75
Page 76

available but may remain empty.
If the folder \BDMV\BACKUP is available it contains a copy of the files
index.bdmv, MovieObjects.bdmv and the folders PLAYLIST, CLIPINF and BDJO.
Additionally, an AVCHD video may contain the folder AVCHDTN. This folder must
not be available if it is empty. If it is available, it has to contain the following files:
\AVCHDTN\thumbnail.tidx
\AVCHDTN\thumbnail.tdt2
5.3 Compiling a BDMV-Video Disc
With Nero Burning ROM you can burn a BDMV-Video disc made up of BDMV (= Blu-ray
Movie) files from your hard drive. You ca n play your burned BDMV-Video on almost all Bluray players.
You can use Nero Burnin g RO M to bur n a BDMV-Video if the complete BDMV folder
structure including premastered files is already available.
Bootable Disc
In Nero Burning ROM it is not possible to convert video files to DVD-Video, an
AVCHD video, or a BDMV-Video. Converting video files to DVD-Video, to AVCHD
video, or BDMV-Video is possible in Nero Video for example. Nero Video is
included in the full version of Nero 12. More information about Nero Video is
available on the Web site www.nero.com, and more information about video
editing is available in the separate Nero Vi deo manual.
To compile a BDMV-Video disc, proceed as follows:
1. Select the Blu-ray entry from the drop-down menu in the New Compilation window. (In
case that the New Compilation window is not opened, it can be opened by clicking the
New button on the main screen.)
2. Choose the BDMV-Video compilation type from the selection list.
The tabs with the configuration options that are valid for this compilation type are
displayed.
76
Nero Burning ROM
Page 77

Bootable Disc
3. Enter a name for the BDMV-Video disc in the Disc name input field
4. Click the New button.
The New Compilation window is closed and the selection screen is opened.
It includes the specific and predefined BDMV folder structure.
BD Video Compilation Window
77
Nero Burning ROM
Page 78

Bootable Disc
Files and Folders
BD Video Selection Screen
5. Select the movie that you want to burn from the File Browser area on the right side.
6. Drag the existing BDMV folder structure including premastered files into the Disc Content
area on the left side.
The files are added to the compilation and are displayed in the compilation screen. The
capacity bar indicates how much space is required on the disc.
You have successfully compiled a BDMV-Video disc and can now burn this
compilation.
The BDMV-Video contains different folders. Only certain files are allowed in an
individual folder. If you only have individual files, you must allocate the right files
to the specific folder:
\BDMV\index.bdmv
\BDMV\MovieObject.bdmv
\BDMV\PLAYLIST\*.mpls
\BDMV\CLIPINF\*.clpi
\BDMV\STREAM\*.m2ts
\BDMV\AUXDATA\sound.bdmv
\BDMV\AUXDATA\*.otf
\BDMV\BDJO\*.bdjo (these files are optional; however, the folder must be
available)
Also, the folders \BDMV\META, \BDMV\JAR and \CERTIFICATE must be
available but may remain empty.
If the folder \BDMV\BACKUP is available, it contains a copy of the files
index.bdmv, MovieObjects.bdmv and the folders PLAYLIST, CLIPINF and BDJO.
78
Nero Burning ROM
Page 79

6 Bootable Disc
With Nero Burning ROM you can create a bootable disc with which the computer can be
started without having to access the hard drive. For this reason a bootable disc is often used
as an "emergency disc" to start the computer if it is not possible to access the hard drive.
Bootable discs are created in accord ance w ith the "El T or ito" standar d, an ex tensi on to the
ISO-9660 standard, which defines the structure of data discs. The disc contains a boot
image and an ISO part. The boot image contains all files that are required to load the
operating system and to start the computer. The ISO part can contain any number of data
files that you can back up using this method.
6.1 Requirements for Booting From a Disc
To ensure that a computer can boot from disc, the start sequence must be set in the BIOS of
the computer in such a way that the drive is addressed first as the boot drive (start sequence
CD-ROM, C, A for instance). In the case of an SCSI CD-ROM drive, this drive must be
connected to an SCSI adapter with a separate BIOS in which settings can be modified
accordingly. (This will only work if there are no IDE hard drives present, as these come
before the SCSI adapter in the boot sequence.)
When booting from a disc, you can only start an operating system that does not write to the
medium, such as "MS DOS" or "Linux". During booting, Microsoft Windows 2000 and
Microsoft Windows XP write to the medium from which they are being booted. This is not
possible with a disc and so the process is canceled and the PC cannot be started.
Bootable Disc
6.2 Bootable Disc Templat e
For Nero Burning ROM, the template for creating a bootable disc can be either a logical drive
or a drive image file which contains the contents of a drive as a file sector for sector. If the
template for the bootable disc is a logical drive, the bootable disc will emulate this when the
system is booting. There are three emulation types:
Floppy emulation: This requires a bootable floppy disc for creating the bootable disc. At
startup the bootable disc emulates a floppy disk. In the process, the drive lett ers
increment, so that Drive A: corresponds to the bootable disc. The volume of the start
data is limited by the capacity of the floppy disk (e.g. 1 MB).
Hard drive emulation: A bootable hard drive is required to create the bootable disc. At
startup the disc emulates Drive C. All drive letters from Drive C increment by one. The
volume of the start data is limited by the capacity of the CD (e.g. 700 MB) or DVD (e.g.
8.5 GB). If, for instance, you have a 200 GB hard drive with only one (200 GB) partition,
you cannot create a bootable disc from it without repartitioning your hard drive
accordingly beforehand.
No emulation: In this process the drive names are not changed. This type is used for
bootable installation CDs. This setting is intended for users who do not require a floppy
or hard drive emulation and who want to install their own device driver.
79
Nero Burning ROM
Page 80

6.3 Creating and Burning a Boota ble Disc
If the logical drive you want does not appear in the drop-down menu, the reason
To create a bootable disc, proceed as follows:
1. Click the New button in the m ain Nero Burning ROM screen.
The New Compilation window is opened.
2. Select the desired disc format from the drop-down menu.
3. Select the desired Boot compilation type.
The tabs for the bootable disc are displayed; the Boot tab is in front.
Bootable Disc
4. If the template data for the bootable disc should originate from a logical drive:
1. Select the Bootable logical drive option button in the Source of boot image data area.
2. Select the entry you want from the drop-down menu.
for this is that the drive is bigger than the space available on the disc. Please note
that for operating systems such as Microsoft® Windows® 2000 you need to have
administrator rights in order to be able to access drives directly, which you will
need to do if you are to create bootable discs.
Nero Burning ROM
Boot configuration
80
Page 81

5. If the template data for the bootable disc should originate from an image file:
DosBootimage
1. Select the Image file option button in the Source of boot image data area.
2. Click the Browse button and select the desired image file.
3. Select the Enable expert settings check box and select the emulation type for the
image file from the Kind of emulation drop-down menu if appropriate.
Nero Burning ROM makes the boot image file DosBootimage.ima available. The
path to the image file is entered in the Image file field by default. You ca n also
select the language that should appear while the system is booting and select the
correct keyboard layout from the Boot locale drop-down menu.
DosBootimage is an image of the Caldera DOS boot floppy disk and emulates a
floppy disk. The image contains drivers for reading from disc drives and supports
FAT32 (read/write) as well as NTFS (read only). If you choose DosBootimage for
the bootable disc, the expert settings are already predefined.
If you choose an ISOLINUX boot image file, Nero Burning ROM sets the expert
settings automatically correct for ISOLINUX bootable disc.
Bootable Disc
6. Select any other options required on the tabs.
7. Click the New button.
The selection screen is displayed.
8. Select the files/folders that should be written to the ISO part of the bootable disc and drag
them into the Disc Content area.
The files/folders are displayed in the Disc Content area and the capacity bar
indicates how much storage space is required on the disc. You have now created
the bootable disc and can start the burn process.
81
Nero Burning ROM
Page 82

7 Loading Image File
You can use Nero Burnin g RO M to burn a disc from a disc image that you have previously
saved on the hard drive.
To load a saved image file, proceed as follows:
1. Select a recorder from the drop-down menu.
2. Click the button in the main screen.
The Open window is opened.
Loading Image File
3. Select the desired image file and click the Open button.
The Burn Compilation window is opened.
Open window
82
Nero Burning ROM
Page 83

Loading Image File
4. Set the desired burn options.
5. If technically possible, you can change the disc type in the drop-down menu.
6. Click the Burn button.
The burn process is started. A progress bar indicates the progress being made by the
burn process. When the burn process is complete the disc is ejected.
Burn Compilation window
83
Nero Burning ROM
Page 84

Loading Image File
Burning process
The burning process is complete. You can now remove the burned disc from the
recorder.
84
Nero Burning ROM
Page 85

8 LightScribe
Using Nero Burning ROM and a LightScribe recorder you can create or load labels that you
can burn onto the label side of CDs/DVDs in the LightScribe recorder. The function is
available as a separate Print LightScribe Label option in the start screen or can be
integrated as an intermediate step into the creation and burn process of a project.
This function is only available in recorders that support LightScribe technology.
8.1 Printing LightScribe La be l
The process for printing the label is integrated into the burn process. First, the compilation is
burned. You then flip the disc over, and the label is being burned.
It is possible to burn the label several times to the same LightScribe disc. The printed labels
will be aligned. This darkens the label und often improves the quality. It is also possible to
extend the label with new elements in an additional burn process.
The following requirement must be fulfilled:
LightScribe
▲ A LightScribe recorder is selected.
To print a label within your compilation, proceed as follows:
1. Select the desired compilation type in the New Compilation window.
(In the case that the New Compilation window is not opened, it can be opened by clicking
the New button on the main screen.).
2. Click the Misc tab.
85
Nero Burning ROM
Page 86

3. Select the Print label check box in the LightScribe area.
The interface in the CD Label Editor window and the procedure for creating
4. Click the Create button.
The CD Label Editor window is opened.
LightScribe
5. Create your label or open an existing one that you have created with Nero CoverDesigner.
labels work on the same principle as Nero CoverDesigner. Please see the Nero
CoverDesigner user manual for full instructions on how to make professional
looking covers and labels.
6. Set further options that you require.
7. Click the New button.
The New Compilation window is closed and the selection screen is displayed.
8. Select the files to burn (see Compiling Data Disc→ 22).
9. Insert a blank LightScribe CD with the data side facing down.
10. Click the Burn Now button.
Nero Burning ROM
CD Label Editor
86
Page 87

The interface in the CD Label Editor window works on the same principle as
The burn process starts and the compilation is burned. A progress bar indicates the
progress being made by the burn process. When the burn process is complete the disc
is ejected. A window is opened with the message "Please insert a LightScribe disc
into the drive with the label side facing down".
11. Insert the LightScribe disc into the recorder with the label side facing down and click OK.
The LightScribe Print Properties window is opened and the print process starts. In the
LightScribe Print Properties window a progress bar indicates the progress being
made. When the print process has finished, a window is opened with the message
"Burn process completed successfully".
12. Click the OK button.
The disc is ejected. You have burned the compilation and printed a LightScribe
label.
See also
LightScribe Settings →126
8.2 CD Label Editor Window
In the CD Label Editor window, you can create or load a label. The window is opened when
you click the Create button in the LightScribe area on the Misc tab for the current
compilation.
LightScribe
Nero CoverDesigner. Basically, it is irrelevant whether you print the label on
paper or directly onto an appropriate disc. Please see the separate Nero
CoverDesigner user manual for full instructions on how to make professional
looking covers and labels.
Nero Burning ROM
87
Page 88

LightScribe
The following configuration options are available:
Inner radius
Outer Radius
Width
Label templates
New
Open
Save As
OK
Preview
Defines the distance between the label and the inner edge.
Defines the distance between the label and the outer edge.
Defines the width of the print area.
Contains a selection of different templates for designing the label.
You can continue to edit and customize a selected template.
Generates a new label document.
Opens an existing label which was created using Nero
CoverDesigner.
Saves the label you have created.
Adds the label you created to the compilation and closes the window.
Opens the Print Preview window that shows how the label should
appear on the LightScribe disc.
Document - CD Label Editor Window
Cancel
Cancels the procedure and closes the window.
Nero Burning ROM
88
Page 89

9 Labelflash
The interface in the Burn Label screen works on the same principle as Nero
If you have a Labelflash recorder, you can print a label on the label and/or data side of the
Labelflash DVD. A Labelflash DVD has a special layer between the top and bottom layers;
this layer can be heated by the laser in the recorder so that images and text can be printed
on the DVD.
Labelflash
CoverDesigner. Basically, it is irrelevant whether you print the label on paper or
directly onto an appropriate disc.
Please see the separate Nero CoverDesigner user manual for full instructions on
how to make professional looking covers and labels.
This feature is only available in recorders that support Labelflash technology.
9.1 Burn Label Window
In the Burn Label window you can create or load a label and write it on a Labelflash DVD.
Information on the selected printing quality and rotation speed is displayed on the right-hand
side of the screen. Under Disc type you can see whether the blank disc has been inserted
with the label or data side. Either the Labelflash or the DiscT@2 logo is displayed in the
Burn Label window depending on which side is inserted.
Nero Burning ROM
Burn Label Window
89
Page 90

The following configuration options are available i n the Burn Label window:
If you are creating a DiscT@2, Nero Burning ROM displays only the available
You can print on the label side of the DVD at any time.
Labelflash
Input field
Inner Radius
Input field
Width
Button
Change
Button
Preview
Selection list
Label templates
Button
Burn
Button
Cancel
Defines the distance between the label and the inner edge.
Defines the width of the print area.
Opens the Labelflash Print Properties window.
This is where you can change the printing quality and the contrast
level and display the changes made directly in the print preview.
Opens the Print Preview window that shows how the label should
appear on the Labelflash disc.
Contains a selection of different templates for designing the label.
You can continue to edit and customize a selected template.
Starts the burn process.
Cancels the procedure and closes the window.
print area for creating the label by default, i.e. the area on the data si de of your
DVD that is not already taken up by data. You cannot increase the radius of the
print area.
9.2 Printing Labelflash Labels and DiskT@2
Basically, it is irrelevant whether you print on the label or the data side when creating labels.
The label is actually printed outside the normal burn process.
We recommend that you print on the data side first when you have burned the
compilation. It is not possible to burn data on a printed data side. When you insert
a DVD on which data has already been burned, Nero Burning ROM automatically
identifies the space that is still available on the data side and on which you can
print.
To print a Labelflash label on the label side or a DiskT@2 on the data side of your DVD,
proceed as follows:
1. If you want to print a Labelflash label on the label side, insert a blank Labelflash disc into the
Nero Burning ROM
90
Page 91

Labelflash
The interface in the Burn Label window and creation of a label work on the same
recorder with the label side facing down.
The Burn Label window is opened with the Labelf lash log o.
2. If you want to print a DiskT@2 on the data side, insert a blank Labelflash disc with the data
side facing down in the recorder.
The Burn Label window is opened with the DiskT@2 logo.
3. Create a label according to your requirements or open a label that you have already created
with Nero CoverDesigner.
principle as Nero CoverDesigner. See the separate Nero CoverDesigner manual
for full instructions on how to create professional looking covers and labels.
4. If you want to change the area in which the label is printed, change the print area
accordingly using the input fields Inner Radius and Width.
5. If you want to view or change the print properties:
1. Click the Change button.
The Labelflash Print Properties window is opened.
2. If you want to change the printing quality, select a quality level from the Print quality
profile drop-down menu.
3. If you select the User defined entry from the Print quality profile drop-down menu, you
can change the contrast level and the rotation speed.
4. Click the OK button.
The Labelflash Print Properties window is closed and the changes are accepted.
Nero Burning ROM
91
Page 92

Labelflash
6. Click the Burn button.
The labeling procedure starts and the Labelflash - printing or DiscT@2 - printing
window is opened. The window shows the estimated printing time and the print progress.
When printing is complete, a message window is opened informing about the successful
print process.
7. Click the OK button.
The message window is closed and the disc ejected.
You have successfully printed a label.
Labelflash Print Properties
92
Nero Burning ROM
Page 93

10 Burn Compilation
10.1 Choose Recorder Window
In the Choose Recorder window you can select a recorder for burning. You can open the
window via the button which is on the right side of the recorder drop-down menu. The
window shows useful information about the recorder (e.g. supported disc types). In the
advanced area you can set expert options. The available options depend on the chosen
recorder.
Burn Compilation
The following setting options are available in the advanced area:
Check box
Buffer underrun
protection
Check box
Write extended
lead-out on double-
layer discs
Provides buffer underrun
This feature is particularly useful for burning CDs.
Writes an extended lead-out of 515 MB on the second layer of a
double-layer multisession DVD when this area contains less data.
Doing so improves the read compatibility.
This feature is particularly useful for burning a data multisession
DVD on a double-layer disc. It is not needed when the DVD is going
to be finalized.
Nero Burning ROM
protection.
Choose Recorder
93
Page 94

Check box
Four book type settings are available:
DVD high
compatibility mode
Check box
BD defect
management
Burn Compilation
Burns the DVD up to a radius of at least 1.2 inch (~ 30 mm, approx.
1 GB), even when the compilation contains less data. In doing so the
DVD is forced to meet the DVD-Video specification which reduces
the possibility of read errors.
This feature is particularly useful for burning DVD-Videos.
Burns the Blu-ray Disc in defect management mode. In doing so the
burner allocates part of the disc so that it is able to burn the data that
has been damaged in a write error once again. BD defect
management reduces the write speed but increases d ata sec urity.
This feature is particularly useful for burning data Blu-ray Discs or for
burning backups to Blu-ray Discs.
Drop-down menu
Book Type Settings
Automatic: Automatically selects the most suitable book type for this DVD.
DVD-ROM: Sets the book type to DVD-ROM. Select this setting if the DVD is to
be played on several DVD players or your DVD player has difficulties with selfburned DVDs or of the DVD-, DVD+ or DVD-RW specification.
Physical disc type: Selects the book type which is specified on the DVD.
Current recorder setting: Leaves the book type setting to the recorder.
Defines the book type setting for a DVD.
This feature is particularly useful for burning to a blank DVD.
Nero Burning ROM
94
Page 95

10.2 Burn Settings
The Burn tab on the Bu rn Compilation window provides options for the burn process.
Which options are enabled, depends on the chosen compilation.
Burn Compilation
The following check boxes are available in the Action area:
Checks how fast the compiled data can be accessed and
Check box
Determine maximum
speed
Check box
Simulation
reduces the selected write speed if necessary. This prevents a
buffer underrun.
Recorders with a feature to prevent buffer underruns do not
require a speed test.
Not available when saving with Nero Image Recorder.
Simulates burning. In the process the simulation performs all
steps that are also carried out during burning with the
exception of setting the laser beam. A test determines whether
there is a constant flow of data.
Nero Burning ROM
Burn Tab
95
Page 96

Burn Compilation
Check box
Write
Enables the Burn button.
Closes the disc so that you cannot write to this disc anymore.
Check box
Finalize disc
Depending on the disc format, finalizing may be necessary.
Nero Burning ROM automatically selects this check box for the
relevant disc formats.
Checks the quality of the disc surface after the burn process.
Check box
SecurDisc Surface Scan
You can use this option particularly when burning backups or
discs that have to be archived to ensure that the disc surface
does not have any issues and that burning went well.
This check box is only active if Verify written data is selected.
The following configuration options are available in the Writing area:
Drop-down menu
Write speed
Selects the write speed at which the disc is burned.
Selects the method used to burn the disc. The following
methods are available.
Track-at-once: Burns each audio file (track) separately onto
the disc, i.e. the laser is turned off and turned on again after
Drop-down menu
Write method
each audio file.
Disc/Session-at-once: Burns each session of a multisession
disc separately onto the disc.
Disc-at-once/96: Burns the entire disc in one go without
having to turn off the laser between individual audio files. The
disc is finalized after burning.
Input field
Number of copies
Check box
Buffer underrun
protection
Check box
Using multiple recorders
Defines the number of discs that are to be burned. The default
is set to one disc.
Provides buffer underrun protection.
This check box is only available for a CD and if the selected
burner supports a method which offers buffer underrun
protection.
Burns the compilation to multiple disc. When you click the
Burn button, a window is opened in which you can select the
desired recorders. The burn process is then carried out
simultaneously on the selected recorders.
Nero Burning ROM
96
Page 97

The speed test and simulation are not required for recorders that have a function
for protecting against buffer underruns. Current recorders mostly have such a
You can select an appropriate disc format without loss of information at any time
feature.
Audio CDs should always be burned using the disc-at-once method. This entry is
selected by default.
10.3 Starting the Burn Process
Many CD players cannot read rewritable CDs (CD-RW). You should therefore use
normal CD-ROMs for burning Audio CDs.
To start the burn process, proceed as follows:
1. Choose a recorder from the drop-down menu in the main screen.
2. Insert an appropriate blank disc.
Burn Compilation
3. If technically possible you can change the disc type in the drop-down menu.
in the main screen. Note that this has to be technically possible - for example you
are obliged to burn an Audio CD to a CD. But it is possible to start with a data CD
and change later to a data DVD, for example. The possibility to change the disc
type is useful when starting a compilation without knowing how much space is
required by the files.
4. If you want to check or select the options regarding this compilation type:
1. Click the Burn button in the main screen.
The Burn Compilation window is opened; the Burn tab is in front.
2. Check or select the options on the individual tabs.
3. Click the Burn button.
5. If you want to start directly, click the Burn Now button in the lower main screen.
If the Select multiple recorders check box was selected, the Select Recorder window
is opened.
6. Select recorders here and click the OK button.
The burn process is started. On the screen a progress bar indicates the progress being
made by the burn process. You have some options during the burn process .
Nero Burning ROM
97
Page 98

Burn Compilation
Burning process
7. If you want to shut down the PC after burning (as long as this is technically feasible), select
the Automatically shut down the PC when done check box.
8. If you want to check the written data after burning, select the Verify written data check box.
9. If you want to check the disc surface after burning, select the SecurDisc Surface Scan
check box.
If the SecurDisc Surface Scan check box is selected, the SecurDisc Surfa ce S can
Results window is opened.
98
Nero Burning ROM
Page 99

Burn Compilation
Nero Burning ROM starts with the surface scan. The results are displayed in realtime.
When the burn process has finished, a message window is opened.
10. If you want to display the extended area with the event log, click the Details button.
11. If you want to start another burn process with the same compilation, click the Burn Again
button.
12. Click the OK button.
The burning process is complete. You can now remove the burned disc from the
recorder.
10.3.1 SecurDisc Surface Scan Results
On the SecurDisc Surface Scan Results window the results of the surface scan are
displayed in realtime. The scan test is carried out after the burn process when the
SecurDisc Surface Scan check box is selected, either on the Burn tab or in the Burning
process screen.
The surface scan lets you check the quality of the disc with respect to completeness of the
sectors. The test results are displayed both in a graph and in detail in the display panel
Surface Scan window
99
Nero Burning ROM
Page 100

below the graph.
Burn Compilation
SecurDisc Surface Scan
The graph shows all sectors on the disc in one chart, with each sector being plotted with a
small square. Each square, i.e. each sector, is displayed in a different color depending on its
status. The Surfac e Sc an area shows the respective percentage of sectors in the following
three categories: Good, Damaged, and Bad in real time while the test is runn ing . T he
following colors, i.e. status indicators, are available:
Green
Yellow
Red
Readable sectors with no errors.
Damaged sectors that can still be read using the recorder's internal
error correction feature.
Damaged sectors that cannot be corrected and are consequently
unreadable.
The following display panels are also available in the Surf ace Sc an area while the test is
running:
Nero Burning ROM
100
 Loading...