

Page 1

User Guide
Nero
Nero AG
Page 2

Information on copyright and trade marks
The Nero user manual and all its contents are protected by copyright and are
the property of Nero AG. All rights reserved. This user manual contains material
that is protected by internationally valid copyright. This manual may not - in
whole or in part - be copied, transmitted or otherwise reproduced without the
express written permission of Nero AG.
All trade names and trademarks are the property of the respective owners.
Nero AG rejects any claims that transcend the legal guarantee rights. Nero AG
does not undertake any liability for the correctness of the content of the Nero
user manual. The contents of the software supplied, as well as of the Nero user
manual, may be changed without prior warning.
The trademarks mentioned here are only listed for information purposes.
REV 1.2
Unless you own the copyright or have the permission of the copyright
holder, the unauthorized copying of discs can represent a violation of
national or international laws and may result in serious penalties.
Copyright © 1995 - 2005 by Nero AG
Page 3

Contents
1 General information about Nero Burning ROM 6........................ 10
1.1 About the Nero Help Manual..................................................... 10
1.2 The structure of the Help Manual ............................................. 11
1.3 What’s new with Nero 6.0?........................................................ 12
1.3.1 Introduction .................................................................................. 12
1.3.2 Burning window............................................................................12
1.4 Media supported by Nero.......................................................... 12
1.4.1 CD................................................................................................ 13
1.4.2 DDCD...........................................................................................13
1.4.3 DVD.............................................................................................. 13
1.4.4 HD-Burn ....................................................................................... 14
2 Menu structure .............................................................................. 15
2.1 File............................................................................................... 15
2.1.1 New.............................................................................................. 15
2.1.2 Open ............................................................................................ 15
2.1.3 Close............................................................................................ 15
2.1.4 Save............................................................................................. 15
2.1.5 Save As........................................................................................15
2.1.6 Compilation Info........................................................................... 15
2.1.7 Refresh Compilation..................................................................... 15
2.1.8 Preferences..................................................................................15
2.1.9 Page View.................................................................................... 16
2.1.10 Print..............................................................................................16
2.1.11 Print Disk Cover ........................................................................... 16
2.1.12 Previous File ................................................................................ 16
2.1.13 Exit............................................................................................... 16
2.2 Edit .............................................................................................. 16
2.2.1 Undo............................................................................................. 16
2.2.2 Cut................................................................................................ 16
2.2.3 Copy.............................................................................................16
2.2.4 Paste............................................................................................ 16
2.2.5 Paste Shortcut.............................................................................. 16
2.2.6 Delete...........................................................................................17
2.2.7 Select All...................................................................................... 17
2.2.8 Invert Selection ............................................................................ 17
2.2.9 Properties.....................................................................................17
2.2.10 Add File........................................................................................ 17
2.2.11 Create Folder............................................................................... 17
2.2.12 Find.............................................................................................. 17
Nero Contents • 3
Page 4

2.3 View............................................................................................. 18
2.3.1 Toolbar......................................................................................... 18
2.3.2 Status Bar .................................................................................... 18
2.3.3 Large Icons .................................................................................. 18
2.3.4 Small Icons................................................................................... 18
2.3.5 List................................................................................................ 18
2.3.6 Details.......................................................................................... 18
2.3.7 Arrange Icons...............................................................................18
2.3.8 Original.........................................................................................18
2.3.9 ISO Level 1, ISO Level 2, Joliet ................................................... 18
2.3.10 Refresh......................................................................................... 19
2.4 Recorder ..................................................................................... 19
2.4.1 Choose Recorder......................................................................... 19
2.4.2 Select Robot................................................................................. 19
2.4.3 Burn Compilation.......................................................................... 19
2.4.4 Copy Disk.....................................................................................19
2.4.5 Burn Image................................................................................... 19
2.4.6 Burn HD Backup .......................................................................... 19
2.4.7 Burn HFS Partition....................................................................... 20
2.4.8 Burn DiskT@2..............................................................................20
2.4.9 Erase ReWritable......................................................................... 20
2.4.10 Eject Medium ............................................................................... 20
2.4.11 Medium-Info ................................................................................. 20
2.5 Extras .......................................................................................... 20
2.5.1 File Encoding ............................................................................... 20
2.5.2 Save Track................................................................................... 21
2.5.3 View Track ................................................................................... 21
2.5.4 Autodetect CD/DVD-ROM............................................................ 21
2.6 Database ..................................................................................... 21
2.6.1 Open Program CD Database....................................................... 21
2.6.2 Open Program Title Database ..................................................... 21
2.6.3 Open User CD Database ............................................................. 22
2.6.4 Open User Title Database............................................................ 22
2.6.5 Create A New User Database...................................................... 22
2.6.6 Import Internet Database ............................................................. 22
2.6.7 Repair A Damaged Database ...................................................... 22
2.7 Window ....................................................................................... 23
2.7.1 Horizontal (compilation top) ......................................................... 23
2.7.2 Horizontal (compilation bottom) ................................................... 23
2.7.3 Vertical (compilation left)..............................................................23
2.7.4 Vertical (compilation right)............................................................ 23
2.8 Help ............................................................................................. 23
2.8.1 Contents.......................................................................................23
2.8.2 Use Nero Express........................................................................ 23
2.8.3 Update Antivirus scanner............................................................. 23
2.8.4 Enter new serial number .............................................................. 24
2.8.5 Nero on the Web.......................................................................... 24
2.8.6 About Nero Burning ROM ............................................................ 24
Nero Contents • 4
Page 5

3 Nero Express ................................................................................. 25
3.1 Differences to Nero.................................................................... 25
4 Preferences.................................................................................... 26
4.1 Introduction ................................................................................ 26
4.2 General........................................................................................27
4.3 Cache .......................................................................................... 27
4.4 Language .................................................................................... 27
4.5 Sounds........................................................................................ 27
4.6 Expert Features.......................................................................... 27
4.7 Database ..................................................................................... 28
4.8 Ultrabuffer................................................................................... 28
4.9 File Browser................................................................................ 28
4.10 Mics ............................................................................................. 28
5 Choose Recorder ..........................................................................
5.1 Introduction ................................................................................ 29
5.2 Recorder ..................................................................................... 29
5.3 Image Recorder.......................................................................... 29
5.4 Multiple Recorder....................................................................... 29
29
6 Before you burn your first disc.................................................... 30
6.1 The Burn tab............................................................................... 30
6.2 Determine maximum speed ...................................................... 30
6.3 Simulation................................................................................... 30
6.4 Write ............................................................................................ 31
6.5 Finalize CD.................................................................................. 31
6.6 Write Speed ................................................................................ 31
6.7 Write Method .............................................................................. 31
6.7.1 Disc-at-once................................................................................. 31
6.7.2 Track-at-once............................................................................... 31
6.8 Number of Copies ...................................................................... 32
6.9 Buffer Underrun Protection.......................................................32
6.10 Use Multiple Recorders ............................................................. 32
6.11 Virus Check Before Burning ..................................................... 32
7 Creating a CD/DVD........................................................................ 33
7.1 Introduction ................................................................................ 33
7.2 Data CD (ISO).............................................................................. 33
7.2.1 Background information............................................................... 33
7.2.2 Burning data CDs (without using Multisession)............................ 34
Nero Contents • 5
Page 6

7.3 Data CD (Multisession).............................................................. 36
7.3.1 General ........................................................................................ 36
7.3.2 How are Multisession CDs structured?........................................ 37
7.3.3 Background information............................................................... 37
7.3.4 Creating a Multisession CD (Start)............................................... 38
7.3.5 Creating a Multisession CD (Continue)........................................ 40
7.3.6 Creating a Multisession CD (Finish)............................................. 42
7.3.7 Additional notes............................................................................ 44
7.4 Audio CD..................................................................................... 45
7.4.1 Introduction .................................................................................. 45
7.4.2 Source medium is CD/DVD drive................................................. 46
7.4.3 Source medium is hard disk.........................................................47
7.4.4 Burning audio files from CD......................................................... 47
7.4.5 Burning audio files from your hard disk........................................49
7.4.6 CD-Text........................................................................................51
7.4.7 Special audio filters...................................................................... 52
7.4.8 Audio CD Player........................................................................... 54
7.4.9 Recording records........................................................................54
7.4.10 Splitting tracks..............................................................................54
7.4.11 Encoding...................................................................................... 55
7.4.12 Decoding...................................................................................... 57
7.4.13 M3U Playlists ............................................................................... 58
7.4.14 Nero Wave Editor.........................................................................58
7.4.15 The Nero CD database................................................................ 59
7.5 Mixed Mode CD .......................................................................... 63
7.5.1 Creating a Mixed Mode CD.......................................................... 63
7.6 CD EXTRA................................................................................... 65
7.6.1 Creating a CD EXTRA CD ........................................................... 65
7.7 Bootable CD and DVD................................................................ 68
7.7.1 Conditions.................................................................................... 68
7.7.2 Background.................................................................................. 68
7.7.3 Template for making a bootable CD ............................................ 69
7.7.4 Making bootable CDs...................................................................69
7.8 Video CD/Super Video CD......................................................... 70
7.8.1 Supported formats........................................................................ 70
7.8.2 Video CD......................................................................................71
7.8.3 Super Video CD........................................................................... 71
7.8.4 Re-encoding MPEG-1, MPEG-2/SVCD files................................ 72
7.8.5 Nero DVD plugin .......................................................................... 72
7.8.6 VCD and SVCD menus................................................................ 72
7.9 (Super) Video CD........................................................................ 74
7.9.1 Creating a Video CD.................................................................... 74
7.9.2 Creating a Super Video CD.......................................................... 76
7.10 Images on a Video CD or Super Video CD...............................78
7.10.1 Introduction .................................................................................. 78
7.10.2 Creating a simple CD................................................................... 79
7.10.3 Creating an interactive CD with images....................................... 80
7.11 HFS CD........................................................................................ 84
7.12 Hybrid CDs.................................................................................. 84
7.12.1 Creating a Hybrid CD................................................................... 84
Nero Contents • 6
Page 7

7.13 UDF Format................................................................................. 86
7.13.1 Creating a UDF CD...................................................................... 86
7.13.2 Creating a UDF/ISO Bridge CD ................................................... 88
8 Copying CDs.................................................................................. 91
8.1 Introduction ................................................................................ 91
8.2 Copying methods....................................................................... 92
8.2.1 Copying using an image file......................................................... 92
8.2.2 Copying using a fast copy (on the fly).......................................... 93
8.3 Verifying audio read quality...................................................... 95
8.4 Setting speed on CD/DVD-ROM drives .................................... 96
9 Image file........................................................................................ 99
9.1 Introduction ................................................................................ 99
9.2 Creating an image file................................................................ 99
9.3 Burning the image file ............................................................. 100
9.4 Nero ImageDrive....................................................................... 100
9.4.1 What is Nero ImageDrive?......................................................... 100
9.4.2 Installation of Nero ImageDrive.................................................. 101
9.4.3 Procedure................................................................................... 101
10 Saving tracks using Nero ........................................................... 102
10.1 Saving audio tracks ................................................................. 102
10.2 Saving data tracks ................................................................... 102
11 LightScribe................................................................................... 105
11.1 LightScribe System requirements.......................................... 105
11.2 Printing LightScribe labels...................................................... 105
11.3 Creating a compilation, and burning and printing LightScribe
labels.........................................................................................
11.4 LightScribe FAQs..................................................................... 120
106
12 Nero Toolkit ................................................................................. 122
12.1 Nero CD-DVD Speed ................................................................ 122
12.2 Nero DriveSpeed ...................................................................... 123
12.2.1 Using Nero DriveSpeed ............................................................. 123
12.3 Nero InfoTool............................................................................ 124
13 Miscellaneous.............................................................................. 125
13.1 Virus Checker........................................................................... 125
13.1.1 Updating the database............................................................... 125
13.2 Nero level indicator.................................................................. 125
13.2.1 Modifying the Nero level indicator.............................................. 126
Nero Contents • 7
Page 8

13.3 Automatic detection of CD/DVD-ROM drives ........................ 126
13.3.1 Background................................................................................ 126
13.3.2 Autodetection of CD/DVD-ROM drives ...................................... 126
13.3.3 Resolving problems in the automatic detection process............ 128
13.4 Burning oversize CDs.............................................................. 128
13.4.1 Enabling overburning................................................................. 128
13.5 Automatic system shutdown at the end of the burning
process .....................................................................................
13.5.1 Activating automatic system shutdown ...................................... 131
13.6 Verifying compilations with Nero ........................................... 131
13.6.1 Writing data to a CD or DVD involves more risks than writing data
to a hard disk..............................................................................
13.6.2 Using the Verify option............................................................... 131
13.6.3 How the Verify option works....................................................... 132
13.7 Erasing data from rewritable discs......................................... 132
130
131
14 Additional modules..................................................................... 133
14.1 Nero Cover Designer ............................................................... 133
14.2 Nero Wave Editor ..................................................................... 133
14.3 Nero StartSmart........................................................................ 134
14.4 Nero BackItUp .......................................................................... 134
14.5 Nero SoundTrax ....................................................................... 134
14.6 MP3 encoder............................................................................. 136
14.7 mp3PRO encoder..................................................................... 136
14.7.1 Choosing between MP3 and mp3PRO ...................................... 137
14.8 MPEG-4/AAC enkoder / dekoder............................................. 138
14.9 DVD encoder............................................................................. 139
14.9.1 Super Video CD......................................................................... 139
14.10 MPEG-2/DVD Enkoder ............................................................. 140
14.11 Nero Multi Mounter .................................................................. 141
14.12 Nero SDK .................................................................................. 141
15 FAQs............................................................................................. 142
15.1 General questions about Nero................................................ 142
15.1.1 Can Nero burn and copy CDs on the fly?................................... 142
15.1.2 How do I create a CD image file? .............................................. 143
15.1.3 I have created a multisession CD, but I can only see the first or the
last session in Explorer. Why is this?.........................................
15.1.4 I have entered my serial number, but I cannot open Nero. Why is
this?............................................................................................
15.1.5 Although the speed test and the simulation ran correctly, when I
burn the CD I get SCSI error messages such as 'Host adapter
error' or 'Queueing failed'. What should I do?............................
15.1.6 How can I avoid 'Buffer underrun' errors?.................................. 144
15.1.7 I can't select any language other than English...........................144
15.1.8 Since I installed Nero, my computer is behaving unpredictably.
What is the cause of this?..........................................................
143
143
143
144
Nero Contents • 8
Page 9

15.1.9 I can read the CD that I have burnt in my recorder, but not in all
CD/DVD-ROM drives. Why is this?............................................
145
15.1.10 My fast SCSI CD/DVD-ROM drive can only read relatively slowly
using Nero. Why is this? Why is this?........................................
145
15.1.11 How do I remove the irritating 2-second pause between audio
tracks?........................................................................................
145
15.1.12 The audio CDs which I have burnt have sound interference such
as crackling, humming or rustling. Why is this?.........................
145
15.1.13 One of the following error messages appears during the burning
process. Why is this?.................................................................
146
15.1.14 Nero does not detect my CD/DVD-ROM drive. What should I do?
...................................................................................................
146
15.2 Context-sensitive help............................................................. 147
15.3 Contact...................................................................................... 147
16 Glossary....................................................................................... 149
Nero Contents • 9
Page 10

1 General information about Nero
Burning ROM 6
1.1 About the Nero Help Manual
This help manual describes Nero’s many different functions. There are lots of
different burning programs – but Nero is unique, Nero offers more!
With Nero you can burn all kinds of media:
Audio CD
When you create an audio CD, compressed music files are automatically
converted into CDA format without having to change any settings.
Data CD (ISO)
HFS CD
Mixed Mode CD
CD EXTRA
Video CD/Super Video CD
When you create a video CD, uncompressed video files are automatically
converted into MPG-1 format without having to change any settings. To
create a Super Video CD, you either need to have your data in MEG-2 format
already or you will need to convert your files into this format using the DVD
plugin, which you can buy at an extra charge.
Bootable CD and DVD
Hybrid CDs
UDF Format (CD and DVD)
and of course you can also copy CDs (and DVDs).
The Nero Cover Designer enables you to create your own individual covers for
your CDs.
The Nero Wave Editor enables you to edit audio files.
Nero CD-DVD Speed is a benchmark program which provides detailed
information about the speed of your CD and DVD drives. Knowledge of audio
extraction capability (Digital Audio Extraction - DAE) is particularly important for
saving audio tracks on hard disk and for copying audio CDs because audio data
is extracted digitally from CDs.
Nero DriveSpeed enables you to adjust the reading speed of your CD drive if it
is too noisy when running.
Nero ImageDrive enables you to view the content of an image file.
Nero General information about Nero Burning ROM 6 • 10
Page 11

Nero InfoTool provides you with detailed information about the capabilities of
your CD/DVD drives.
Note: Nero InfoTool is not always included with Nero; you can download it free
from http://www.cdspeed2000.com.
1.2 The structure of the Help Manual
This Help Manual is structured as follows:
The chapter entitled 'Menu structure' describes Nero’s menu structure and
explains what each command does.
The chapter entitled 'Nero Express' offers a brief description of Nero Express
as well as explaining the differences to Nero.
The chapter entitled 'Preferences' describes the tabs and how to change the
general settings for burning with Nero to suit your own personal needs.
The chapter entitled 'Choose Recorder' tells you how to select a recorder. If you
can only see one recorder In the Choose Recorder screen, you probably only
have one physical recorder installed, but thanks to Nero you will also have a socalled Image Recorder which enables you to create image files on your hard
disk which you can burn onto a medium later on.
The chapter entitled 'Before you burn your first disc' tells you how to create the
various kinds of CDs.
The Help Manual is structured as follows:
Before you burn your first disc: This section contains useful tips, tricks and
information about burning media.
Creating a CD/DVD: This section tells you how to burn a medium.
Copying CDs: This section tells you how to copy a medium.
Image file: Here you can find out how to create and burn an image file.
Saving tracks using Nero: This section tells you how to save tracks on a disc
onto your hard disk.
Nero Toolkit: This contains useful tools to make your work easier.
Miscellaneous: This section contains information about programs like the
Virus Checker and other helpful tips on burning, such as how to overburn.
Additional modules: This section contains information about the additional
Nero modules available.
FAQs: Here you will find the answers to frequently asked questions.
Glossary: The glossary explains some of the terms associated with burning
media.
Nero General information about Nero Burning ROM 6 • 11
Page 12

1.3 What’s new with Nero 6.0?
1.3.1 Introduction
The version 6.0 of Nero remains true to its original concept of providing highquality and user-friendly software, offering both enough support for beginners
while at the same time satisfying the needs of more advanced users.
Even though the interface has changed slightly, we think you will be impressed
by the changes, as Nero is now even more convenient and user-friendly.
But that is not all – there are new additions to the Nero program range.
Nero StartSmart is a program which displays the installed components of
Nero as well as opening them. Nero StartSmart allows you to select and
open the right program for every individual type of compilation. The programs
in the Nero Toolkit can also be called up using Nero StartSmart.
Nero BackItUp is a program for backing up and restoring data which is easy
to use, convenient and powerful.
Nero SoundTrax is a professional program for the creation of mastered
audio CDs. More information about Nero SoundTrax can be found in the
associated Quickstart.
Version 4 of our packet writing software InCD is now available. It has been fully
revised and now represents the benchmark for packet writing software. More
information about InCD can be found in the associated Quickstart.
The Nero Wave Editor now supports DirectX and VST plug-ins and contains
new features and filters. More information about Nero Wave Editor can be
found in the associated Quickstart.
1.3.2 Burning window
The Burning window is no longer a separate window which opens when Nero
starts burning, but instead is now integrated into the Nero interface. This means
that you now only have to move around in one interface.
1.4 Media supported by Nero
With Nero you can burn both CDs and DVDs. For this reason, we use the
generic term 'disk' in this manual. You can burn CDs both with a CD recorder and
a DVD recorder. The result depends on the disk you use. With a CD recorder you
can only burn CDs and not DVDs. If you wish to burn a particular compilation
which is only possible with a specific disk format (Video CD or Super Video CD),
then the corresponding disk format will be specified.
Nero General information about Nero Burning ROM 6 • 12
Page 13

1.4.1 CD
Nero provides you with a standard user interface that makes creating any kind
of medium child’s play. You can use any of the tabs for creating CDs; you will
therefore find detailed descriptions of each one in the appropriate sections. As
you can put any type of DDCD and DVD compilation on a CD as well, we have
explained how to burn a CD, but we have not provided specific instructions on
how to create a DDCD or DVD.
1.4.2 DDCD
Nero provides you with a standard user interface that makes creating any kind
of medium child’s play. This also means that the tabs that define the properties
of the DDCD are also largely identical to those for a CD. The procedure for
copying a DDCD is slightly different, for example because a DDCD can only be
used for data and not as a music medium, so the “Read Options” tab is not
available for DDCDs. Options like the choice of format (‘Mode 1’ and ‘Mode 2 /
XA’) are not available for DDCDs, so this area is deactivated on the
corresponding tab.
The individual steps involved in creating a DDCD are no different from those
involved in creating a CD. The process of creating a DDCD is therefore not
described separately.
The DDCD (double-density CD) is an expanded version of the CD and a kind of
halfway house between the CD and the DVD, and accommodates up to 1.3 GB
of data.
You can create the following compilations on a DDCD:
DDCD-ROM (ISO)
Copy of a DDCD
DDCD-ROM (Boot)
DDCD-ROM (UDF)
DDCD-ROM (UDF/ISO)
To find out how to copy a DDCD, for example, please refer to the section
entitled '
1.4.3 DVD
Nero provides you with a standard user interface that makes creating any kind
of medium child’s play. This also means that the tabs which define the
properties of the DVD are also largely identical to those of a corresponding CD.
The procedure for creating a DVD (ISO) is slightly different, for example
because this kind of DVD will not always allow multisessions, so the
corresponding tab will not always be available. Options like the choice of format
(‘Mode 1’ and ‘Mode 2 / XA’) are not available on DVD (ISO)s, so this area is
deactivated on the corresponding tab.
Copying CDs'.
DVD is short for Digital Versatile Disc. On the outside, a DVD looks like a
standard CD. However, it is able to store more data (currently up to 4.7 GB
compared with a CD’s 650 MB) as the information is stored more closely
Nero General information about Nero Burning ROM 6 • 13
Page 14

together, and the disc is written in up to four layers. This information has to be
read by a special laser with a modified wavelength, which is why standard CD
drives cannot read DVDs.
Nero enables you to burn the following kinds of DVD:
DVD-R
DVD-RW
DVD+RW
DVD+R
DVD-RAM
DVD+R DL
DVD-R DL
The individual steps involved in creating a DVD are no different from those
involved in creating a CD. The process of creating a DVD is therefore not
described separately.
You can create the following compilations on a DVD:
DVD-ROM (ISO)
Copy of a DVD
DVD-ROM (Boot)
DVD-ROM (UDF)
DVD-ROM (UDF/ISO)
To find out how to copy a DVD-ROM, for example, please refer to the section
entitled '
Copying CDs'.
1.4.4 HD-Burn
HD-Burn is a process that makes use of DVD technology to write onto CD-Rs.
For example, this makes it possible to double the amount that can be recorded
on a CD-R and so store up to 1.4 gigabytes of data on it instead of 700 MB.
Nero General information about Nero Burning ROM 6 • 14
Page 15

2 Menu structure
2.1 File
2.1.1 New
This opens the selection window for a new compilation.
2.1.2 Open
This opens a compilation you have saved previously. The type and content of
compilations for the various kinds of CD differ, so they have different file
extensions. You can choose the compilation type you require in the ‘Files of
type’ drop-down list.
2.1.3 Close
This closes the active window. If there is a compilation open or if you have
made changes to an existing compilation, you will be asked whether you want to
save your changes.
2.1.4 Save
Saves the selected compilation.
2.1.5 Save As
This enables you to save the selected compilation under another name.
2.1.6 Compilation Info
This provides you with all the information on the active compilation.
2.1.7 Refresh Compilation
This refreshes the active compilation. This command is not available for all
types of CD.+
2.1.8 Preferences
This opens the preferences area in Nero. See the section entitled 'Nero
Express' for more information about the various settings.
Nero Menu structure • 15
Page 16

2.1.9 Page View
This opens a window that displays the content of the compilation selected. You
can also print out this information.
2.1.10 Print
This prints the content of the compilation selected.
2.1.11 Print Disk Cover
This opens the Nero Cover Designer.
2.1.12 Previous File
This command is only active if you have not yet opened an existing compilation.
In this case the names of the last four compilations opened will be listed here.
2.1.13 Exit
This closes Nero. If a compilation is open, you will first be asked whether you
want to save it.
2.2 Edit
2.2.1 Undo
This undoes your last action.
2.2.2 Cut
This copies the file to the clipboard and removes it from its original position.
2.2.3 Copy
This copies the file to the clipboard and leaves it in its original position.
2.2.4 Paste
This pastes in the content of the clipboard.
2.2.5 Paste Shortcut
This pastes in a shortcut instead of the file.
Nero Menu structure • 16
Page 17

2.2.6 Delete
This deletes the selected file.
The file is also immediately removed from the compilation window.
In the File Browser, you will be asked to confirm a file deletion as the file is
actually deleted (i.e. put in the Windows Recycle Bin).
2.2.7 Select All
Selects all the files in a folder.
2.2.8 Invert Selection
This inverts your selection, i.e. all the selected files are deselected and all the
unselected files are selected.
2.2.9 Properties
This shows information on the selected file.
The compilation window contains information such as the source of the file and
the date on which the file was added to the compilation.
In the File Browser, properties are displayed in the same way as in Windows
Explorer.
2.2.10 Add File
This opens a dialog box and displays a folder from which files can be added.
You can change the folder, so you can browse through your entire hard disk
and/or network drives.
This command is only active if a compilation window is selected. The dialog box
that opens is more or less the same as the Nero File Browser, except that it is
less convenient to use.
2.2.11 Create Folder
This creates a new folder in the directory you have selected.
2.2.12 Find
This opens a Find window. This command is only available when a compilation
window is active.
Nero Menu structure • 17
Page 18

2.3 View
2.3.1 Toolbar
Click on this command to display different options for viewing the toolbars
2.3.2 Status Bar
Click on this command to activate or deactivate the status bar. If there is a tick
next to the command, the Status Bar is visible.
2.3.3 Large Icons
Click on this command to display the files in the File Browser with large icons.
2.3.4 Small Icons
Click on this command to display the files in the File Browser with small icons.
2.3.5 List
Click on this command to display the files in the File Browser in list form.
2.3.6 Details
Click on this command to display the details of the files in the File Browser, i.e.
with additional information next to the name such as the file size, file type,
creation date, etc.
2.3.7 Arrange Icons
When you select this command you will see various options for arranging files.
2.3.8 Original
A black dot in front of this command indicates whether the original file and folder
names are being used or whether the name needs to be converted in
accordance with ISO Level 1, ISO Level 2, Joliet .
See also:
ISO Level 1, ISO Level 2, Joliet
2.3.9 ISO Level 1, ISO Level 2, Joliet
A black dot in front of this command indicates whether the original file and folder
names have been converted in accordance with ISO Level 1, ISO Level 2, Joliet
or whether the original name should be restored.
Nero Menu structure • 18
Page 19

See also: Original
ISO Level 1, ISO Level 2, Joliet allows 8.3 format file names (8 characters for
the file name and 3 for the file extension) and 8-character directory names in
Level 1. You can only use the characters A-Z, 0-9 and the underscore (_);
special characters like §, $, % and & may not be used. The maximum number of
directory levels is 8 (including the master directory).
2.3.10 Refresh
Refreshes the content of the File Browser.
2.4 Recorder
2.4.1 Choose Recorder
This displays the recorder(s) installed and enables you to select the recorder
you require.
2.4.2 Select Robot
Opens a dialog for selecting the robot. (Only available if the plug-in has been
purchased)
2.4.3 Burn Compilation
Opens the 'Burn CD’ dialog box. This command is only available when a
compilation is active.
2.4.4 Copy Disk
This opens the ‘Copy CD’ dialog box and enables you to make the desired
settings and start copying your CD.
2.4.5 Burn Image
Opens the dialog box for selecting an image file. After a selection has been
made it launches the 'Burn CD’ dialog box.
2.4.6 Burn HD Backup
This opens a dialog box in which you can select the hard disk and partition.
Once you have done so, the ‘Burn CD’ dialog box will open.
Note: Please make sure you read the Important Information which appears
before the dialog box in which you select the hard disk.
Nero Menu structure • 19
Page 20

Caution: At the moment it is not possible to perform a backup of the hard drive
of NTFS partitions under Windows XP. Windows XP would no longer run after a
restoring the backup.
2.4.7 Burn HFS Partition
This command is only available if an HFS hard drive is installed. It allows CDs to
be created using the HFS file system of a Macintosh computer. Nero is capable
of creating both 'pure’ HFS-CDs as well as hybrid CDs containing HFS and ISO
data.
2.4.8 Burn DiskT@2
Burns a DiskT@2. This command is only available if a recorder is installed
which supports this function.
2.4.9 Erase ReWritable
This opens a dialog box in which you can delete a rewritable medium. You can
only run this option if you have an RW recorder installed with an RW medium
inserted.
2.4.10 Eject Medium
This opens the tray of the recorder you have selected for burning so that the
medium can be removed and a new one inserted. This command is deactivated
if you have selected the Image Recorder.
2.4.11 Medium-Info
This displays information about the medium inserted. The medium may be in the
CD/DVD drive or in a recorder.
Note: Please note that CD drives can only display certain functions such as the
CD text if this is also supported by your computer.
2.5 Extras
2.5.1 File Encoding
This opens a dialog box for converting audio files on your hard disk to one of the
following formats:
WAV
WMA
AAC (up to 50 times or 29 days only; thereafter you must obtain the HE-AAC
plugin)
Nero Menu structure • 20
Page 21

MP3 (up to 30 times only; thereafter you must obtain the MP3 or mp3PRO
plugin)
mp3PRO (up to 30 times only; thereafter you must obtain the MP3 or
mp3PRO plugin)
AIF
2.5.2 Save Track
This saves a track from a medium onto your hard disk. Audio tracks can be
converted into WAV, MP3, mp3PRO or AIF files, and image files (nrg) can be
created from other file types. You can only create an unlimited number of MP3
or mp3PRO files if you have the MP3 or pm3PRO plugin, which you have to
obtain separately. Otherwise you can only use the mp3PRO encoder 30 times
before it is blocked for licensing reasons.
2.5.3 View Track
This enables you to view the content of a data CD as hex data and jump directly
to different sectors.
2.5.4 Autodetect CD/DVD-ROM
This function is only available if Nero has not detected your CD/DVD-ROM drive
(not the recorder).
2.6 Database
2.6.1 Open Program CD Database
This opens the program database and enables you to delete, edit and add a
new CD.
The location of the program database is defined in the Database tab under
Preferences.
See the section entitled '
2.6.2 Open Program Title Database
This opens the program database and enables you to search by title or artist.
Database' for more information.
The location of the program database is defined in the Database tab under
Preferences.
See the section entitled '
Nero Menu structure • 21
Database' for more information.
Page 22

2.6.3 Open User CD Database
This opens the user database and enables you to delete, edit and add a new
CD.
The location of the user database is defined in the Database tab under
Preferences.
See the section entitled '
Database' for more information.
2.6.4 Open User Title Database
This opens the user database and enables you to search by title or artist.
The location of the user database is defined in the Database tab under
Preferences.
See the section entitled '
Database' for more information.
2.6.5 Create A New User Database
This opens a dialog window where you can create a new user database. Select
the directory in which you want the database to be saved. You will then be
asked whether the new database is to be used as a user database. If it is, the
directory is defined in the Database tab under Preferences.
See the section entitled '
Database' for more information.
2.6.6 Import Internet Database
This opens a dialog box in which you can import the Internet database.
See the section entitled '
Importing the program database' for more information.
2.6.7 Repair A Damaged Database
This opens a dialog box in which you can repair a damaged database. As you
may have both program databases and user databases on your system, you
must select the database you want to repair. Nero will let you know if you need
to do this.
Nero Menu structure • 22
Page 23

2.7 Window
2.7.1 Horizontal (compilation top)
The open windows are arranged horizontally with the compilation window at the
top.
2.7.2 Horizontal (compilation bottom)
The open windows are arranged horizontally with the compilation window at the
bottom.
2.7.3 Vertical (compilation left)
The open windows are arranged vertically with the compilation window on the
left. This is Nero’s default setting.
2.7.4 Vertical (compilation right)
The open windows are arranged vertically with the compilation window on the
right.
2.8 Help
2.8.1 Contents
This opens the Nero help file.
2.8.2 Use Nero Express
Activates or deactivates Nero Express. Nero Express is active when the option
is checked. The particularly user-friendly Nero Express interface will then open
when you start making your next compilation.
See the section entitled '
2.8.3 Update Antivirus scanner
Nero Express' for more information.
This command is only active and therefore available in the retail version of
Nero. If you have an Internet connection, it connects to the server and updates
the antivirus database.
See the section entitled '
Nero Menu structure • 23
Virus Checker' for more information.
Page 24

2.8.4 Enter new serial number
This opens a dialog window in which you can enter a new serial number.
2.8.5 Nero on the Web
Opens the homepage of Nero AG.
2.8.6 About Nero Burning ROM
This opens a window containing the number of the installed version and the
user data entered when Nero was installed.
Nero Menu structure • 24
Page 25

3 Nero Express
3.1 Differences to Nero
Nero Express is a innovative application offering Wizard assistance. It is used to
record disks based on the Nero master application. While compiling a project you
can change at any time in the whole process between Nero Express and Nero.
Nero Express can be started from Nero by clicking on the Nero Express icon
'
' in the toolbar.
Nero Express is particularly recommended for beginners, as it automatically
selects the right settings, allowing the user to concentrate on the main objective –
burning disks.
Nero Express will allow you to burn the following compilations onto the disks
marked with an ‘X’.
CD DDCD DVD
Data disk X X X
Bootable data disk X X X
Audio CD X
Audio and data CD X
MP3 disk X X X
WMA disk X X X
Video CD X
Super Video CD X
DVD-Video X
Copy X X X
Image file X X X
Saved compilation X X X
All other compilations can be created with Nero.
You will find further information about using Nero Express in the manual written
especially for Nero Express.
Nero Nero Express • 25
Page 26
4 Preferences
4.1 Introduction
The best way to access the Preferences window in Nero is to go to File/
Preferences.
This window contains tabs where you can change the general settings for burning
media with Nero to suit your own personal needs.
Nero Preferences • 26
Page 27

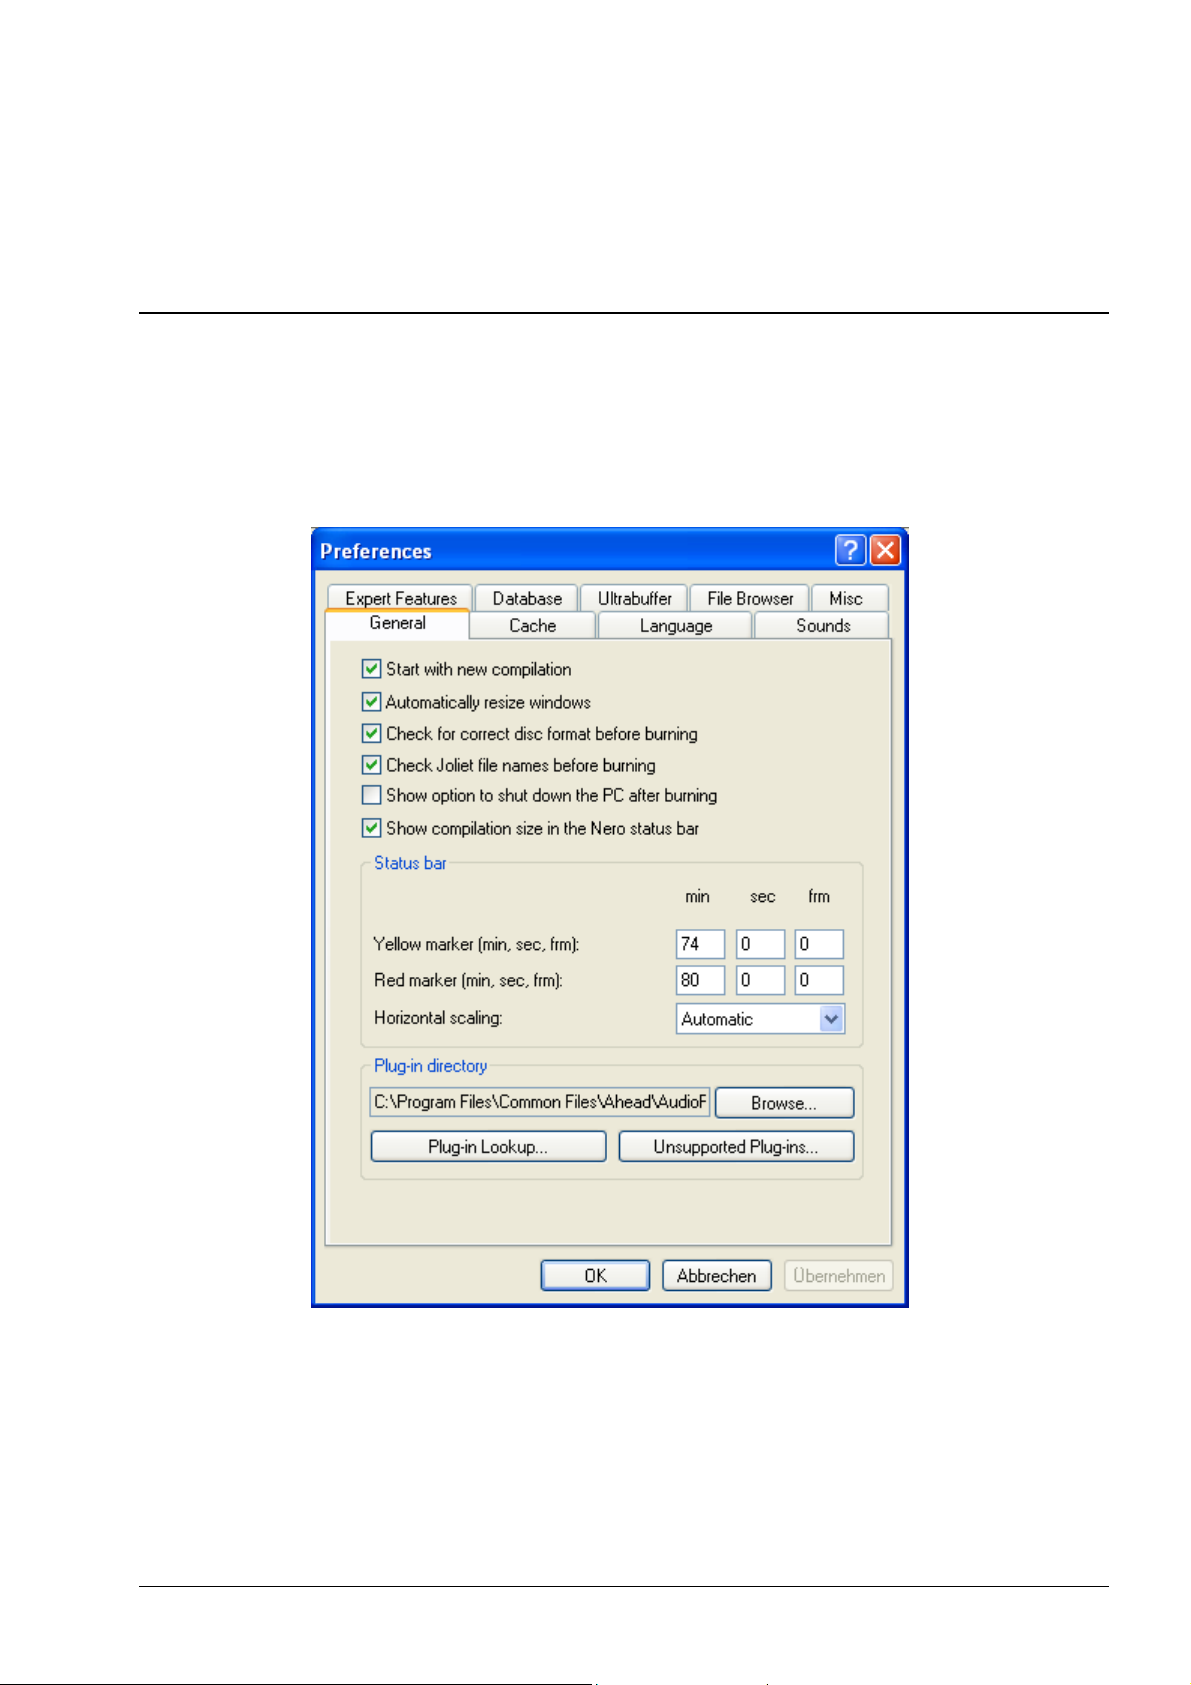
4.2 General
You can change some of the basic settings in this tab. We recommend activating
all the checkboxes as this makes Nero easier to work with.
You can also see which plugins are installed, which are supported and which are
not supported.
If you have more than one cover editor installed on your PC, you can define a
default editor. Nero’s cover editor is Nero Cover Designer. You will find more
information on this in the corresponding section.
4.3 Cache
This tab is where you define the drive and path for the cache, i.e. the memory in
which data is stored temporarily before and during burning. If you have more than
one hard disk installed, we recommend that you check the speed of the various
disks and use the fastest as the cache.
The speed test cannot check the speed of network drives. We therefore advise
you not to choose one of these as the cache.
4.4 Language
This tab is where all the installed languages are displayed and where you select
the language in which you want the commands and functions and all entries in
Nero to be displayed.
Only the languages you selected during installation are displayed. If you would
like to use a different language, insert the installation CD and install the
language.
4.5 Sounds
This tab is where the sounds played in connection with the various burning
actions are defined. When Nero is installed, various sounds are loaded, but you
can also link other sounds to the burning actions.
When the checkbox is activated, the selected sound will be played. When the
checkbox is deactivated, the sound will not be played.
4.6 Expert Features
As its name suggests, this tab is for expert users who have some experience with
burning media.
The Overburn option should be used with particular caution, as it can damage
your recorder. Use this option at your own risk.
Nero Preferences • 27
Page 28

4.7 Database
Nero enables audio CDs to be linked to a local database.
This may be a user database containing the titles that have been burned with
Nero or a program database. The program database comes from freedb.org and
must be loaded onto your PC before use (see '
you have done this, the title of an inserted CD and the artist are (usually)
recognized and will not have to be entered manually.
4.8 Ultrabuffer
This tab allows you to specify how much memory Nero will use as a RAM buffer.
This can either be done automatically or manually. We recommend using the
Automatic Configuration option so as to achieve an optimum relationship
between the existing buffer and the buffer reserved for burning.
When setting the buffer manually, make sure that it is not too small, as a large
buffer will produce more reliable burning results than a small one.
The Nero CD database'). Once
4.9 File Browser
This tab allows you to change the settings for the File Browser – the heart of the
Nero compilation window.
For example, you can specify whether the File Browser should be opened
automatically when you open Nero and whether file operations like Delete or
Rename should be confirmed.
4.10 Mics
This tab allows you to specify whether or not a buffer underrun counter should be
displayed after the end of the burning process. This checkbox is only active on
recorders which support this function.
Nero Preferences • 28
Page 29

5 Choose Recorder
5.1 Introduction
The desired recorder can be selected in the toolbar. You can display the
recorders installed on your computer and choose the recorder you want to use
by going to Choose Recorder in the Recorder menu. This window also
displays information about the recorder selected.
Normally at least two recorders will be displayed; the installed device and the
virtual Image Recorder.
5.2 Recorder
This displays the installed device and gives you important information relevant
to the burning process such as:
the maximum speed
overburning (supported/not supported)
buffer underrun protection (supported/not supported)
CD text (supported/not supported)
the size of the recorder buffer
5.3 Image Recorder
This displays the installed device and gives you important information relevant
to the burning process such as:
the maximum speed
overburning (supported/not supported)
buffer underrun protection (supported/not supported)
CD text (supported/not supported)
the size of the recorder buffer
5.4 Multiple Recorder
Owners of the retail version of Nero can also burn simultaneously on more than
one recorder if they have more than one installed.
Nero Choose Recorder • 29
Page 30
6 Before you burn your first disc
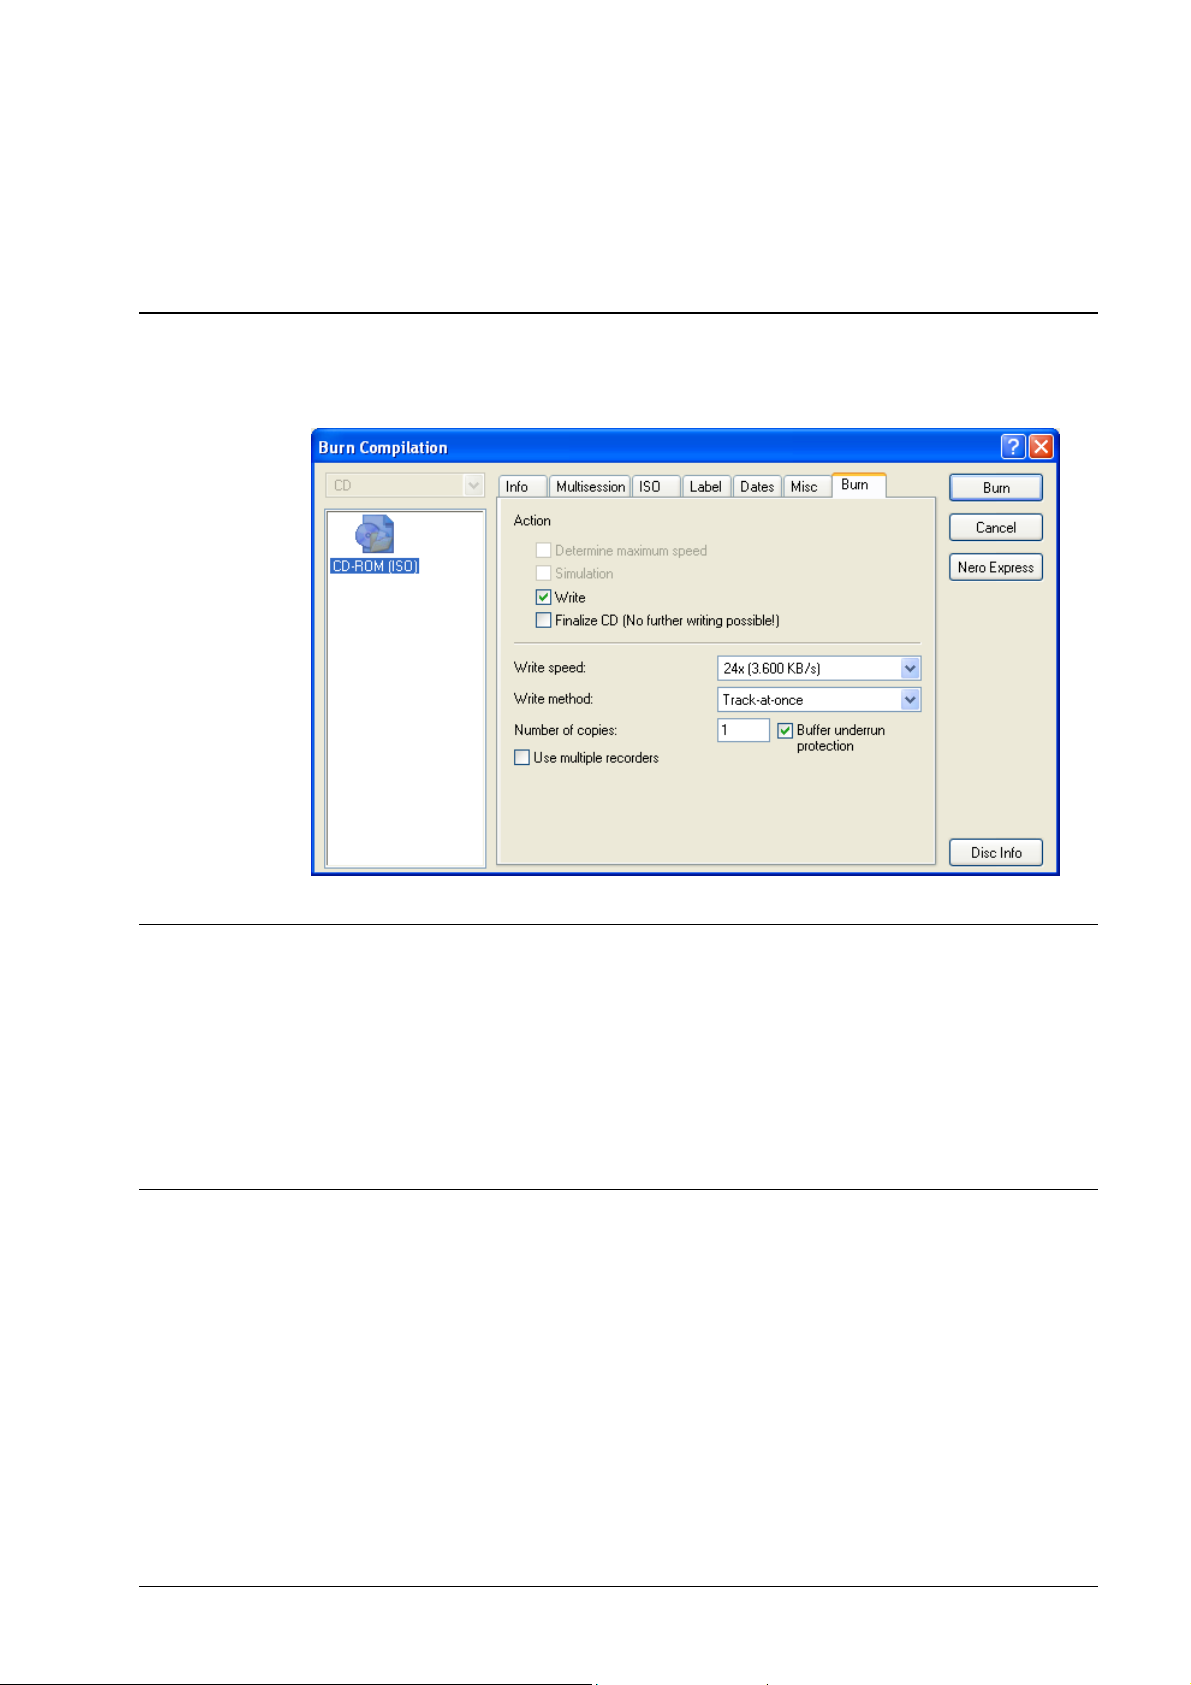
6.1 The Burn tab
The Burn tab looks like this:
6.2 Determine maximum speed
The speed test determines how quickly the compiled files can be accessed. If
the access speed is slower than the burning speed, the burning speed is
reduced so as to avoid a buffer underrun.
Note: It is not necessary to run the speed test when using recorders with buffer
underrun protection.
6.3 Simulation
The simulation runs all the steps involved in burning a medium apart from
activating the laser beam, so that you can assume that if the simulation is
successful, the burning process will also be successful.
We recommend running a simulation if you are decompressing data before
burning, e.g. when burning an audio CD from MP3 files. To play MP3 files on a
CD player, the files have to be converted to the corresponding format (CDA). In
Nero, this decompression takes place during the burning process. It takes up
computer time, which can result in a buffer underrun on older systems. Pentium
3 systems or higher can decompress data and burn at high speeds
simultaneously.
Nero Before you burn your first disc • 30
Page 31

Note: You do not need to run simulations if you are using a recorder with buffer
underrun protection.
6.4 Write
This checkbox starts the actual physical burning process. If this is interrupted,
the result will be faulty and the entire medium may become unusable,
depending on the type of medium. Only recorders with buffer underrun
protection can continue to burn in such cases.
6.5 Finalize CD
When a CD is finalized, it is ‘locked’ and can no longer be burned. Depending
on the type of medium you are burning, this is a necessary process which
enables the medium to be used to the full extent. All the options are correctly set
in Nero’s default settings.
6.6 Write Speed
This drop-down box contains the write speeds supported by the recorder you
have selected (see
select a physical recorder and not the Image Recorder.
Choose Recorder). This field is only displayed when you
6.7 Write Method
There are two alternative methods available for burning media: 'Disc-at-once'
(DAO) and 'Track-at-once' (TAO).
6.7.1 Disc-at-once
With 'Disc-at-once', the whole medium is written in one go without deactivating
the laser. In the 'Disc-at-once/96’ (DAO/96) process, more data is written, which
can produce better results for actions such as copying CDs.
Note: Audio, video and Super Video CDs should always be burned using Discat-once even though it is also possible to select Track-at-once. We do not
recommend using Track-at-once. It is better to use Disc-at-once/96 for copying
CDs.
6.7.2 Track-at-once
With 'Track-at-once', every track is written individually, which means that the
laser is switched off after every track.
Nero Before you burn your first disc • 31
Page 32

6.8 Number of Copies
This field contains the number of disks you wish to burn, whereby the standard
setting is for one disk to be burnt. Enter the required number if you wish to burn
more disks.
6.9 Buffer Underrun Protection
This checkbox is only present if the selected recorder supports a method which
offers buffer underrun protection. The standard setting is for this box to be
checked, as this protection ensures reliable burning of CDs.
6.10 Use Multiple Recorders
If multiple recorders are installed, they can be used to burn disks
simultaneously. When the checkbox is activated, a window will appear after
clicking on the ‘Burn’ button in which the desired recorders can be selected.
6.11 Virus Check Before Burning
This checkbox is only available to owners of a retail version of Nero. When the
box is checked the data which are to be burned are checked for possible viruses
before burning. This ensures that the burned disk is virus-free.
Nero Before you burn your first disc • 32
Page 33

7 Creating a CD/DVD
7.1 Introduction
Nero lets you create your own CDs and DVDs quickly and simply. It doesn’t
matter whether you wish to burn a Data CD, an Audio CD, a Video CD, a Super
Video CD, a DDCD or a DVD - the procedure is the same in each case. You
drag the files with the mouse from the file browser to the compilation window,
open the burn dialog box and start burning.
And don’t worry - you just can’t go wrong:
Let’s say you want to create an Audio CD but you drag a data file into the
compilation window in error. Nero will detect the incorrect data format (which it
does not recognize) and will not add the file to the Audio CD.
7.2 Data CD (ISO)
7.2.1 Background information
7.2.1.1 ISO data in XA format
Nero normally writes ISO data in the CD sector format Mode 1. However Nero
also supports the so-called XA-Format for ISO data. The XA format is an
extension of ISO structures and can only be burned onto the CD in Mode 2
(another CD sector format). 'Normal' ISO Mode 1 tracks behave just like
Mode2/XA tracks when read under DOS/Windows and using modern CD-ROM
drives.
The latest CD-ROM drives can easily read Mode 1 and Mode2/XA-CDs.
However there are still some CD-ROM drives around that cannot read the Mode
1 CDs correctly. Owners of these older drives are advised to write data in the
Mode2/XA-format.
7.2.1.2 ISO 9660
ISO 9660 is a file system that was designed with the aim of creating a file
system that is as system-independent and so as compatible as possible. CDs
with ISO 9660 as the file system can be read on all operating systems.
ISO 9660 supports filenames in 8.3 format in Level 1 (8 characters for the
filename and 3 for the extension) and directory names 8 characters long. Only
characters A-Z, 0-9 and the underscore (_) are allowed. The maximum interleaf
depth is restricted to 8 levels (including root directory).
Nero Creating a CD/DVD • 33
Page 34

A total of 31 characters are allowed in Level 2 and can be read by Windows 95
and higher, whereas DOS and Windows 3.1 usually have trouble handling the
long filenames.
7.2.2 Burning data CDs (without using Multisession)
Please note that when a CD is burned without a multisession, a table of
contents (TOC) for the CD is created at the end of the burn. If the 'Finalize CD‘
option is selected the CD is write protected and no further burning is possible. If
this option is not selected then further sessions can be burned but only the last
session is visible, so the CD looks like there’s nothing else on it – not so! You
can use the '
session. We suggest that you use the '
creating a data CD with several sessions.
Now let’s take a step-by-step look at how to create a CD-ROM (ISO) using
Nero:
All settings may be left at their default values.
1. Insert an empty CD into the recorder.
2. Start a new compilation by clicking on the appropriate button or the File
menu and the command New.
Nero Multi Mounter' program to view the contents of the other
Data CD (Multisession)' option when
3. Click the 'CD-ROM (ISO)' icon - th e Multisession tab is in front. Use the tabs
to specify the attributes of the compilation, such as the name of the CD,
different characteristics and restrictions.
4. Select the 'No Multisession' option so you actually create an ISO CD-ROM.
5. On the ISO tab you can toggle between Mode 1 and Mode 2/XA format as
required. You should not need to verify the format – in the past there were
problems with CD drives that could not read Mode 1 CDs, but these drives
are now no longer in use or at least are very rare. If these options are grayed
it means that selection is not logically possible at present. Mixing Mode 1 and
Mode 2/XA tracks on a CD would result in an unreliable and potentially
unreadable CD format. In the 'File/Directorynames length‘ section you can
specify the ISO level for the length of the names. Up to 31 characters are
permitted for Windows 95 and higher. Names cannot be more than 11
characters long for Windows 3.1 (8 for the name and 3 for the extension).
ISO Level 2 will be best in most cases – if you know that the CD must also be
readable on a Windows 3.1 system then you should select Level 1.
6. On the Label tab you can give your CD a name and overtype the default
name 'New'. You can use letters A-Z, digits 0-9 and the underscore character
(_) – diacritics (accents) and spaces are not supported.
7. On the Dates tab you can specify the date of the compilation and of its files.
The current date and time are entered for the compilation as default, also the
creation date of the files.
8. Use the Misc tab to specify which files will be buffered in the cache. Files
that are on slow media (floppy disks and network drives) and are very small
are moved to the cache by default. You specify the location of the cache on
Cache tab in the File menu (Preferences option).
the
9. Once you have selected your settings, click the New button on the right. You
will now see the empty compilation window for the CD.
Nero Creating a CD/DVD • 34
Page 35

10. If a File Browser is not open yet you can open one by selecting New File
Browser from the View menu or clicking the appropriate 'File Browser' icon.
To specify that Nero is started with an open File Browser, check ‘Start with
File Browser’ in the ‘General’ section on the
File Browser tab (File ->
Preferences).
11. Compile the files for the CD using Drag&Drop editing by simply clicking on
the required files in the File Browser and dragging them into the compilation
window. Clicking the right mouse button opens a context menu where you
can selectively add or omit certain file types. In addition there are a number
of commands that you will also find in Windows Explorer, such as 'Copy',
'Open‘ and 'Cut'.
12. When compiling with Drag&Drop the directory structure is moved across too,
i.e. if you drag an entire folder into the compilation window the folder will be
created on the CD you wish to burn. If you drag a lot of individual files
however this may affect the clarity of the CD’s contents. To avoid this you
can create new folders within the compilation. To do this, select the Create
Folder option from the Edit menu or click the right mouse button and choose
the command from the context menu. A folder you have just created is
assigned the name ‘New’ by default and can be renamed immediately. You
can create as many folders as you need and pull the existing files across
using Drag&Drop. You can of course drag other files into the compilation
window from the File Browser.
13. Click on the Burn Compilation button or select the Burn Compilation
command from the 'Recorder' menu to open the write dialog box. This option
is only available when the compilation window is selected, as can be seen
from the fact that the title bar is blue. If the File Browser is selected (and the
title bar of the compilation window is therefore grayed) the option is not
available and CD writing cannot be started. In this case click anywhere in the
compilation window. The ‘Burn Compilation‘ dialog box now opens - it is the
same as when creating a new compilation but the Burn tab is now in front.
14. In the ‘Action’ section activate the other check boxes you require in addition
to the ‘Write‘ check box. You will find more information about this section in
Before you burn your first disc'. You must remember that when you create a
'
CD with only one session you must activate the 'Finalize CD' checkbox. This
setting write protects the CD and no further writing is possible. (With a
Multisession CD this checkbox should only be activated in the last session of
the CD). All settings on this and the other tabs can now be reviewed and
changed if required.
15. Click on the Burn button to start the burn process (or the simulation depending on the chosen option). All the selected steps now run in sequence
until writing is complete. You can monitor progress in a status window which
shows the individual steps being logged as they are executed. A typical final
message would be: 'Burn process was successful with 12x (1800 KB/s)‘. The
CD is then ejected. The messages shown can either be saved, printed or
discarded. Close the window by clicking on the Discard or Close buttons.
16. You can now check what has been written to your new CD by inserting it
again and clicking the 'Medium Information' icon.
Nero Creating a CD/DVD • 35
Page 36

7.3 Data CD (Multisession)
7.3.1 General
If you want to create a data CD that consists of several sessions, we advise that
you create a Multisession CD. Every complete write process with Nero on a CD,
from inserting the CD you want to write to the CD being ejected, generates a
session on the CD. A session in turn contains one or more tracks. All CDs with
several sessions are 'Multisession CDs'.
There are basically two types of Multisession CD:
Multisession CD for linked files, e.g. for backups
Multisession CD for independent files
7.3.1.1 Multisession CD for linked files
Multisession CDs are advisable, say, when making a weekly Backup of a
number of folders on a CD.
When an ISO compilation is created the required folder is written to the CD in
every new session. Since only a few files may have changed, writing the entire
folder again would have the following disadvantages:
Burning would take an unnecessarily long time because redundant data are
being written each time.
Valuable CD space would be wasted as the same data is copied a number of
times.
With a CD-R, data can only be written to a CD but cannot be deleted or
changed, so the following procedure is used with Multisession CDs:
Instead of writing the unchanged data again with every session (i.e. every
backup procedure), Nero only writes cross-references to a previous CD track
which contains the unchanged file. Only the changed files are completely rewritten.
By activating the two checkboxes 'Replace files in compilation' and 'Add new
files to compilation' in the 'Options' section you will ensure that this actually
happens.
Of course when individual sessions are linked to one another there must be
some way of ensuring that the tracks (which have a definite connection to an
existing CD) are not written to another CD by mistake. This would make all files
with references outside the tracks unreadable later on! For this reason Nero
checks that the correct CD has been loaded for burning. If it hasn‘t, then the CD
that has been loaded in error is ejected.
You will find detailed information about burning Multisession CDs in the
chapters '
(Continue))' and '
Nero Creating a CD/DVD • 36
Creating a Multisession CD (Start))', 'Creating a Multisession CD
Creating a Multisession CD (Finish)'.
Page 37

7.3.1.2 Multisession CD for nonlinked files
If the files in the file session you wish to burn are so small that further files can
be added, and if you want to use all of the space on the CD, you can create a
Multisession CD.
By clearing the two checkboxes 'Replace files in compilation' and 'Add new files
to compilation' in the 'Options' section you will ensure that Nero will not search
for links to existing files on the CD.
You will find detailed information about burning Multisession CDs in the
chapters '
(Continue))' and '
Creating a Multisession CD (Start))', 'Creating a Multisession CD
Creating a Multisession CD (Finish)'.
7.3.2 How are Multisession CDs structured?
This chapter explains the background to Multisession CDs and is pretty
technical – it is intended mainly for users who already have some experience of
CD burning and want to know a little more. The 'normal' user who just wants to
create a Multisession CD with Nero can skip this chapter.
The ISO file system has a very useful feature that helps us to create
Multisession CDs: The way files are stored in ISO tables of contents is that the
absolute
means that all blocks in all CD tracks are numbered sequentially.
start block of each file and the file’s length in blocks is given. Absolute
So what happens when a file’s start block belongs to a different track than the
one where the TOC you want to create is located? No problem! CD-ROM
drivers and recorders will simply read the file from another track.
CDs are written session by session and track by track, so of course only tracks
that have already been written can be addressed. This is why a reference track
must be specified first when creating Multisession ISO CDs with Nero. Nero
reads this track in and remembers the positions of the files that are on it. At the
next write session these positions are then re-written for unchanged files.
Additional Multisession information on the CD
When a new Multisession CD is started, Nero saves not just the files and folders
but also their source location on the hard disk. When a Multisession compilation
is updated, this additional information is used to automatically replace, add or
delete modified files.
Multisession CDs can still be created even if there is no additional Nero
information on the reference track. The disadvantage of this however is that the
references to the hard disk which we mentioned above will not be known to
Nero and so there can be no automatic update.
7.3.3 Background information
7.3.3.1 ISO data in XA format
Nero normally writes ISO data in the CD sector format 'Mode 1‘. However Nero
also supports the so-called 'XA format' for ISO data. The XA format is an
Nero Creating a CD/DVD • 37
Page 38

extension of ISO structures and can only be burned onto the CD in 'Mode 2'
(another CD sector format). 'Normal' ISO Mode 1 tracks behave just like
Mode2/XA tracks when read under DOS/Windows and using modern CD-ROM
drives.
The latest CD-ROM drives can easily read Mode 1 and Mode2/XA-CDs.
However there are still some CD-ROM drives around that cannot read the Mode
1 CDs correctly. Owners of these older drives are advised to write data in the
Mode2/XA-format.
7.3.4 Creating a Multisession CD (Start)
Now let’s take a step-by-step look at how to create a Multisession CD using
Nero:
All settings may be left at their default values.
1. Insert an empty CD into the recorder.
2. Start a new compilation by clicking on the appropriate button or the File
menu and the command New.
3. Click the 'CD-ROM (ISO)' icon - th e Multisession tab is in front. Use the tabs
to specify the attributes of the compilation, such as the name of the CD,
different characteristics and restrictions.
4. Activate the 'Start Multisession CD' option to create a Multisession CD.
5. On the ISO tab you can toggle between Mode 1 and Mode 2/XA format as
required. You should not need to verify the format – in the past there were
problems with CD drives that could not read Mode 1 CDs, but very few of
these drives will still be in use today. If these options are grayed it means that
selection is not logically meaningful at present. Mixing Mode 1 and Mode
2/XA tracks on a CD would result in an unreliable and potentially unreadable
CD format. In the 'File/Directorynames length‘ section you can specify the
ISO level for the length of the names. Up to 31 characters are permitted for
Windows 95 and higher. Names cannot be more than 11 characters long for
Windows 3.1 (8 for the name and 3 for the extension). ISO Level 2 will be
best in most cases – if you know that the CD must also be readable on a
Windows 3.1 system then you should select Level 1.
6. On the Label tab you can give your CD a name and overtype the default
name 'New'. You can use letters A-Z, digits 0-9 and the underscore character
(_) – diacritics (accents) and spaces are not supported.
7. On the Dates tab you can specify the date of the compilation and of its files.
The current date and time are entered for the compilation as default, also the
creation date of the files.
8. Use the Misc tab to specify which files will be buffered in the cache. Files
that are on slow media (floppy disks and network drives) and are very small
are moved to the cache by default. You specify the location of the cache on
Cache tab in the File menu (Preferences option).
the
9. Once you have selected your settings, click the New button on the right. You
will now see the empty compilation window for the CD.
10. If a File Browser is not open yet you can open one by selecting New File
Browser from the VIEW menu or clicking the appropriate 'File Browser' icon.
To specify that Nero is started with an open File Browser, check ‘Start with
Nero Creating a CD/DVD • 38
Page 39

File Browser’ in the ‘General’ section on the File Browser tab (File ->
Preferences).
11. Compile the files for the CD using Drag&Drop editing by simply clicking on
the required files in the File Browser and dragging them into the compilation
window.
Clicking the right mouse button opens a context menu where you can
selectively add or omit certain file types. In addition there are a number of
commands that you will also find in Windows Explorer, such as 'Copy', 'Open‘
and 'Cut'.
When compiling with Drag&Drop the directory structure is moved across too,
i.e. if you drag an entire folder into the compilation window the folder will be
created on the CD you wish to burn.
If you drag a lot of individual files however this may affect the clarity of the
CD’s contents. To avoid this you can create new folders within the
compilation. To do this, select the Create Folder option from the Edit menu
or click the right mouse button and choose the command from the context
menu.
A folder you have just created is assigned the name ‘New’ by default and can
be renamed immediately. You can create as many folders as you need and
pull the existing files across using Drag&Drop. You can of course drag other
files into the compilation window from the File Browser.
12. Click on the Burn Compilation button or select the Burn Compilation
command from the 'Recorder' menu to open the write dialog box. This option
is only available when the compilation window is selected, as can be seen
from the fact that the title bar is blue. If the File Browser is selected (and the
title bar of the compilation window is therefore grayed) the option is not
available and CD writing cannot be started. In this case click anywhere in the
compilation window.
The ‘Burn Compilation‘ dialog box now opens - it is the same as when
creating a new compilation but the Burn tab is now in front.
13. In the ‘Action’ section activate the other check boxes you require in addition
to the ‘Write‘ check box. You will find more information about this section in
Before you burn your first disc'.
'
Important:
You must remember to clear the 'Finalize CD' checkbox when creating the
first session of a Multisession CD. With a Multisession CD this checkbox is
only checked for the last session of the CD. This setting write protects the CD
and no further writing is possible. )
All settings on this and the other tabs can now be reviewed and changed if
required.
14. Click on the Burn button to start the burn process (or the simulation depending on the chosen option). All the selected steps now run in sequence
until writing is complete. You can monitor progress in a status window which
shows the individual steps being logged as they are executed. A typical final
message would be: 'Burn process was successful with 12x (1800 KB/s)‘. The
CD is then ejected. The messages shown can either be saved, printed or
discarded. Close the window by clicking on the Discard or Close buttons.
15. You can now check what has been written to your new CD by inserting it
again and clicking the 'CD Info’ icon.
Nero Creating a CD/DVD • 39
Page 40

7.3.5 Creating a Multisession CD (Continue)
Now let’s take a step-by-step look at how to continue an existing Multisession
CD using Nero:
All settings may be left at their default values.
1. Load the Multisession CD you wish to continue into the recorder.
2. Start a new compilation by clicking on the appropriate button or the File
menu and the command New.
3. Click the 'CD-ROM (ISO)' icon - th e Multisession tab is in front. Use the tabs
to specify the attributes of the compilation, such as the name of the CD,
different characteristics and restrictions.
4. Activate the 'Continue Multisession CD' option to create an ISO CD.
For a Multisession CD with linked files, activate the two checkboxes 'Replace
files in compilation' and 'Add new files to compilation' in the 'Options'
section.
For a Multisession CD with independent files, clear the two checkboxes
'Replace files in compilation' and 'Add new files to compilation' in the
'Options' section – this will ensure that Nero will not search for links to
existing files on the CD.
5. On the ISO tab you can toggle between Mode 1 and Mode 2/XA format as
required. You should not need to verify the format – in the past there were
problems with CD drives that could not read Mode 1 CDs, but very few of
these drives should still be in use today. If these options are grayed it means
that selection is not logically meaningful at present. Mixing Mode 1 and Mode
2/XA tracks on a CD would result in an unreliable and potentially unreadable
CD format.
In the 'File/Directorynames length‘ section you can specify the ISO level for
the length of the names. Up to 31 characters are permitted for Windows 95
and higher. Names cannot be more than 11 characters long for Windows 3.1
(8 for the name and 3 for the extension). ISO Level 2 will be best in most
cases – if you know that the CD must also be readable on a Windows 3.1
system then you should select Level 1.
6. On the Label tab you can give your CD a name and overtype the default
name 'New'. You can use letters A-Z, digits 0-9 and the underscore character
(_) – diacritics (accents) and spaces are not supported.
7. On the Dates tab you can specify the date of the compilation and of its files.
The current date and time are entered for the compilation as default, also the
creation date of the files.
8. Use the Misc tab to specify which files will be buffered in the cache. Files
that are on slow media (floppy disks and network drives) and are very small
are moved to the cache by default. You specify the location of the cache on
Cache tab in the File menu (Preferences option).
the
9. Once you have selected your settings, click the New button on the right.
Select the ISO track you want to continue. This will usually be the last ISO
track on the CD, so this selection is preset. Click the OK button. The files and
folders that are already on the CD are now read and automatically updated.
The Nero Multisession compilation window now opens.
Nero Creating a CD/DVD • 40
Page 41

The new Multisession compilation window displays all of the files and folders
found on the CD. Depending on the selected update options some files and
folders will be gray and some black.
Black files and folders are the ones that have been added or replaced.
Folders in which at least one file or folder has been replaced or added are
also displayed black so it is clear where the changes are.
Files and folders that are shown grayed in the compilation window are not
written again during burning. They already exist on the CD. Nero will
therefore only write a reference to these files on the CD.
10. Compile the files for the CD using Drag&Drop editing by simply clicking on
the required files in the File Browser and dragging them into the compilation
window.
Clicking the right mouse button opens a context menu where you can
selectively add or omit certain file types. In addition there are a number of
commands that you will also find in Windows Explorer, such as 'Copy', 'Open‘
and 'Cut'.
When compiling with Drag&Drop the directory structure is moved across too,
i.e. if you drag an entire folder into the compilation window the folder will be
created on the CD you wish to burn.
If you drag a lot of individual files however this may affect the clarity of the
CD’s contents. To avoid this you can create new folders within the
compilation. To do this, select the Create Folder option from the Edit menu
or click the right mouse button and choose the command from the context
menu.
A folder you have just created is assigned the name ‘New’ by default and can
be renamed immediately. You can create as many folders as you need and
pull the existing files across using Drag&Drop. You can of course drag other
files into the compilation window from the File Browser.
11. Click on the Burn Compilation button or select the Burn Compilation
command from the 'Recorder' menu to open the write dialog box. This option
is only available when the compilation window is active, as can be seen from
the fact that the title bar is blue. If the File Browser is active (and the title bar
of the compilation window is therefore grayed) the option is not available and
CD writing cannot be started. In this case click anywhere in the compilation
window.
The ‘Burn Compilation‘ dialog box now opens - it is the same as when
creating a new compilation but the Burn tab is now in front.
All settings on this and the other tabs can now be reviewed and changed if
required.
12. In the ‘Action’ section activate the other check boxes you require in addition
to the ‘Write‘ check box. You will find more information about this section in
Before you burn your first disc.
Important:
You must remember to clear the 'Finalize CD' checkbox when continuing the
session of a Multisession CD. With a Multisession CD this checkbox is only
checked for the last session of the CD. This setting write protects the CD and
no further writing is possible.
All settings on this and the other tabs can now be reviewed and changed if
required.
Nero Creating a CD/DVD • 41
Page 42

13. Confirm your selection by clicking on the Burn button. All the selected steps
now run in sequence until writing is complete. You can monitor progress in a
status window which shows the individual steps being logged as they are
executed. A typical final message would be: 'Burn process was successful
with 12x (1800 KB/s)‘. The CD is then ejected. The messages shown can
either be saved, printed or discarded. Close the window by clicking on the
Discard or Close buttons.
14. You can now check what has been written to your new CD by inserting it
again and clicking the 'CD Info’ icon.
7.3.6 Creating a Multisession CD (Finish)
In this section we show you step by step how to use Nero to continue and finish
an existing Multisession CD so that it is write protected and no further writing is
possible.
All settings may be left at their default values.
1. Load the Multisession CD you wish to continue into the recorder.
2. Start a new compilation by clicking on the appropriate button or the File
menu and the command New.
3. Click the 'CD-ROM (ISO)' icon - th e Multisession tab is in front. Use the tabs
to specify the attributes of the compilation, such as the name of the CD,
different characteristics and restrictions.
4. Activate the 'Continue Multisession CD' option to create an ISO CD.
For a Multisession CD with linked files, activate the two checkboxes 'Replace
files in compilation' and 'Add new files to compilation' in the 'Options'
section.
For a Multisession CD with independent files, clear the two checkboxes
'Replace files in compilation' and 'Add new files to compilation' in the
'Options' section – this will ensure that Nero will not search for links to
existing files on the CD.
5. On the ISO tab you can toggle between Mode 1 and Mode 2/XA format as
required. You should not need to verify the format – in the past there were
problems with CD drives that could not read Mode 1 CDs, but very few of
these drives should still be in use today. If these options are grayed it means
that selection is not logically meaningful at present. Mixing Mode 1 and Mode
2/XA tracks on a CD would result in an unreliable and potentially unreadable
CD format.
In the 'File/Directorynames length‘ section you can specify the ISO level for
the length of the names. Up to 31 characters are permitted for Windows 95
and higher. Names cannot be more than 11 characters long for Windows 3.1
(8 for the name and 3 for the extension). ISO Level 2 will be best in most
cases – if you know that the CD must also be readable on a Windows 3.1
system then you should select Level 1.
6. On the Label tab you can give your CD a name and overtype the default
name 'New'. You can use letters A-Z, digits 0-9 and the underscore character
(_) – diacritics (accents) and spaces are not supported.
7. On the Dates tab you can specify the date of the compilation and of its files.
The current date and time are entered for the compilation as default, also the
creation date of the files.
Nero Creating a CD/DVD • 42
Page 43

8. Use the Misc tab to specify which files will be buffered in the cache. Files
that are on slow media (floppy disks and network drives) and are very small
are moved to the cache by default. You specify the location of the cache on
the
Cache tab in the File menu (Preferences option).
9. Once you have selected your settings, click the New button on the right.
Select the ISO track you want to continue. This will usually be the last ISO
track on the CD, so this selection is preset. Click the OK button. The files and
folders that are already on the CD are now read and automatically updated.
A Nero Multisession compilation window now opens.
The new Multisession compilation window displays all of the files and folders
found on the CD. Depending on the selected update options some files and
folders will be gray and some black.
Black files and folders are the ones that have been added or replaced.
Folders in which at least one file or folder has been replaced or added are
also displayed black so it is clear where the changes are.
Files and folders that are shown grayed in the compilation window are not
written again during burning. They already exist on the CD. Nero will
therefore only write a reference to these files on the CD.
10. Compile the files for the CD using Drag&Drop editing by simply clicking on
the required files in the File Browser and dragging them into the compilation
window.
Clicking the right mouse button opens a context menu where you can
selectively add or omit certain file types. In addition there are a number of
commands that you will also find in Windows Explorer, such as 'Copy', 'Open‘
and 'Cut'.
When compiling with Drag&Drop the directory structure is moved across too,
i.e. if you drag an entire folder into the compilation window the folder will be
created on the CD you wish to burn.
If you drag a lot of individual files however this may affect the clarity of the
CD’s contents. To avoid this you can create new folders within the
compilation. To do this, select the Create Folder option from the Edit menu
or click the right mouse button and choose the command from the context
menu.
A folder you have just created is assigned the name ‘New’ by default and can
be renamed immediately. You can create as many folders as you need and
pull the existing files across using Drag&Drop. You can of course drag other
files into the compilation window from the File Browser.
11. Click on the Burn Compilation button or select the Burn Compilation
command from the 'Recorder' menu to open the write dialog box. This option
is only available when the compilation window is active, as can be seen from
the fact that the title bar is blue. If the File Browser is selected (and the title
bar of the compilation window is therefore grayed) the option is not available
and CD writing cannot be started. In this case click anywhere in the
compilation window.
The ‘Burn Compilation‘ dialog box now opens - it is the same as when
creating a new compilation but the Burn tab is now in front.
12. If you now wish to finish the CD, activate the ’Finalize CD’ checkbox. This
option finalizes and write protects the CD which you have created. In the
‘Action’ section activate the other check boxes you require in addition to the
Nero Creating a CD/DVD • 43
Page 44

‘Write‘ check box. You will find more information about this section in Before
you burn your first disc.
Important:
Please ensure that the ’Finalize CD’ checkbox is only active when you create
the final session of a Multisession CD. Otherwise, your CD will be finalized
and write protected. No further writing to the CD is now possible.
All settings on this and the other tabs can now be reviewed and changed if
required.
13. Confirm your selection by clicking on the Burn button. All the selected steps
now run in sequence until writing is complete. You can monitor progress in a
status window which shows the individual steps being logged as they are
executed. A typical final message would be: 'Burn process was successful
with 12x (1800 KB/s)‘. The CD is then ejected. The messages shown can
either be saved, printed or discarded. Close the window by clicking on the
Discard or Close buttons.
14. You can now check what has been written to your new CD by inserting it
again and clicking the 'CD Info’ icon.
7.3.7 Additional notes
7.3.7.1 Saving Multisession compilations
Saving Multisession compilations is not absolutely necessary as Nero
automatically saves all of this information to your CD when a Multisession
compilation is burned.
Even so, just like ISO compilations, Multisession compilations can also be saved
to your hard disk as a Nero document. The Multisession CD retains both the
references to the reference track and a kind of 'fingerprint'. This fingerprint
contains characteristic features of the CD and is used to identify the associated
reference CD so that incorrectly loaded CDs can be ejected.
7.3.7.2 Copying, cutting and pasting in ISO and Multisession compilations
Copying, cutting and pasting files and folders is basically possible within ISO or
Multisession compilations. However you should be aware of a number of
constraints which are due to the nature of Multisession compilations.
If you want to continue a Multisession CD which was not compiled with Nero
and/or which was created on another PC, then Nero cannot automatically
update the compilations as it does not know the positions of the files on the hard
disk. Of the displayed files, Nero only knows their size and position on the
reference CD. If such an entry were now copied and pasted to another 'normal'
ISO compilation, the file could not be correctly burned later on because Nero
does not know what is in it and does not know whether the file is on the hard
disk, and if it is, where it is.
To prevent such problems occurring when burning, Nero displays an error
message when such an attempt at pasting is made, and refuses to carry out the
operation. Similar problems would of course also occur when transferring files
from one Multisession document to another.
Nero Creating a CD/DVD • 44
Page 45

You should therefore be clear in your mind that when handling Multisession
compilations you are often not dealing with data that are directly accessible, and
that as a result there are certain limitations in regard to convenience as
compared with ISO compilations that have to be remembered.
7.4 Audio CD
7.4.1 Introduction
An Audio CD is a CD that contains music files and that can be played with any
regular CD player which you can buy in a store – the songs on the CD must
either be in CDA format or be converted to this format.
Almost all CD players can only read CD-Rs, i.e. using rewritable CDs (CD-RW)
is not recommended. Nero writes the audio data to the CD-RW correctly but
many CD players will not be able to play back the tracks.
If possible, audio CDs should always be burned in the 'Disc-at-once' mode. This
will make the most out of the features that Nero offers and will avoid unwanted
'hiss and crackle‘ between individual tracks.
A CD that contains music files in a variety of different formats (say MP3 or
WMA) is strictly speaking an audio CD as well, but since a CD player cannot
read these formats and play them back, these CDs are not referred to as Audio
CDs.
Nero does not mind what audio format the files are in because compressed files
(e.g. MP3, mp3PRO, WAV, WMA or AIF) are automatically converted prior to
burning so that they can be burned in CDA format. However decoding these
files takes a certain amount of time and so the burning speed may have to be
matched to the PC’s power and computing processes.
Although writing Audio CDs with Nero is really simple, it is worth spending a few
moments thinking about your source medium. There are basically two ways of
creating Audio CDs. With one method the audio tracks come from an Audio CD
and with the other the audio files are on a hard disk.
To copy an existing Audio CD, you will find all the information you need in the
chapter ' '
If you wish to use tracks from an existing Audio CD and/or tracks from a
number of Audio CDs, then there are several strategies with which Nero can
handle the audio files. You will find further information about these strategies
in the chapter '
about burning will be found in the chapter '
Copying CDs'.
Source medium is CD/DVD drive'. The information you require
Burning audio files from CD'.
If you want to use audio files that are on your hard drive, then the chapter
entitled '
option. The information you require about burning will be found in the chapter
'
Burning audio files from your hard disk'.
Note: Music CDs with a special copy protection have been around on the
market for some time now. These CDs cannot be played or copied with a normal
PC. If you experience problems with copying, please make sure that you are not
Nero Creating a CD/DVD • 45
Source medium is hard disk' will explain the advantages of this
Page 46

using CDs of this type. You can identify this from a note on the cover of the
original CD.
7.4.2 Source medium is CD/DVD drive
7.4.2.1 Dragging & dropping audio tracks
When dragging & dropping audio files that are on a CD (CDA) the user has a
basic choice of four different strategies with which Nero can handle the CDA
files. The strategy is selected on the CDA Options tab. You will see this tab in
the 'New Compilation' dialog box which opens when you create a new
compilation. If a compilation is already open, select your required strategy or
check the selected strategy in the File menu with the Compilation info option.
The 'General Settings' section offers you a choice of four different strategies:
Diskspace strategy (the default)
With this strategy the CDA files are buffered in Nero’s cache directory if
sufficient space is available. If no space is available then a track reference is
created.
Tempfile strategy
With this strategy the CDA files are buffered in Nero’s cache directory if
sufficient space is available. If no space is available, an error message is
displayed.
Reference strategy
The CDA files are handled as track reference. The source medium can only
be a CD/DVD drive, not a recorder.
Device dependant strategy
CDA files are handled as track reference where possible, otherwise the
tempfile strategy is used.
The diskspace and tempfile strategies can be used to burn in 'Disc-at-once'
mode. We advise that you use one of these two strategies.
The reference strategy can only be used for 'Track-at-once' burning and can
only be read by CD/DVD drives, not by recorders. The reason why 'Track-atonce' must be used with this strategy (it is preset) is that when you use files that
are on an interchangeable medium you may need to switch the source CD if the
audio files come from different source CDs or if a track has to be approached at
a remote read position on the source CD. This can mean a long wait between
tracks however. In the 'Track-at-once' mode the wait between tracks can be any
length of time without ruining the target CD.
The burning mode that can be used with the device dependant strategy
depends on the source medium, i.e. if the tracks are from a CD/DVD player,
then only a reference is created and only 'Track-at-once' can be used.
The chapter '
created with drag&drop editing.
Nero Creating a CD/DVD • 46
Burning audio files from CD' explains how to burn compilations
Page 47

7.4.2.2 Copying audio tracks
Copying CDA files to a hard disk offers the user more ways of using audio files.
Unlike drag&drop, tracks can be converted to other formats.
The chapter '
compilations with copied audio tracks.
You will find full details about copying CDA files in the chapter '
tracks'.
Burning audio files from your hard disk' explains how to burn
7.4.3 Source medium is hard disk
The advantage of burning audio files that are on a hard disk is that the CD can
be written using 'Disc-at-once'. This means that you can get more out of the
functionality of many recorders. For example, you can write CD text, specify the
pause length or set additional index positions - these capabilities are only
available with 'Disc-at-once'.
The disadvantage is that the audio files need storage space on the hard disk.
Depending on the audio format, around 10 MB per minute is required (in WAV
format). If the files are compressed, e.g. in MP3 format, then the space
requirement is cut by 90%. You can test the advantages of MP3 compression
with Nero: You can convert up to 30 audio files to MP3 format. The chapter
Saving audio tracks' tells you how to do this.
'
The chapter '
compilations with copied audio tracks.
Burning audio files from your hard disk' explains how to burn
Saving audio
7.4.4 Burning audio files from CD
Now let’s take a step-by-step look at how to create an Audio CD using Nero.
All settings may be left at their default values.
1. Insert an empty CD-R into the CD recorder.
2. Insert an Audio CD into your CD drive.
3. Start a new compilation by clicking on the appropriate button or the File
menu and the command New.
4. Click the 'Audio CD' icon - the Audio CD tab is in front. Use the tabs to
specify the attributes of the compilation, such as the name of the CD,
different characteristics and restrictions.
5. Use the CDA Options tab to specify the strategy which Nero will use to
handle the CDA files on an Audio CD (see also:
tracks).
6. Once you have selected your settings, click the New button on the right. You
will now see the empty compilation window for CD.
If a File Browser is not open yet you can open one by selecting New File
Browser from the View menu or clicking the appropriate 'File Browser' icon.
To specify that Nero is started with an open File Browser, check ‘Start with
File Browser’ in the ‘General’ section on the
Preferences).
Dragging & dropping audio
File Browser tab (File ->
Nero Creating a CD/DVD • 47
Page 48

7. Insert the first original CD from which you wish to extract audio tracks into
your CD-ROM drive and open this drive with the File Browser.
8. Compile the CDA files for the first audio CD using Drag&Drop editing by
simply clicking on the required files in the File Browser and dragging them
into the compilation window.
Nero now analyzes the source CD and the required CDA files and shows
them in the File Browser. You will also see a small window in which you can
enter a name for the source CD. This is for your own convenience so that
when you select the reference strategy for writing Nero can prompt you to
insert the named CD that it needs for writing.
9. Double click one (or more) audio files to open the 'Audio Information' dialog
box. The tabs offer you a wide variety of options:
'Audio Track Properties' tab
You can give the selected piece of music a name and enter the artist.
If the audio tracks can be burned in the 'Disc-at-once' mode then you can
specify the pause between the tracks (this is particularly useful with live
recordings if you do not want pauses, i.e. silence in this case, between tracks
– select a pause time of 0 seconds in this situation).
If you have a retail version of Nero you can create a cross fade between two
audio tracks, so the new number starts to play quietly while the current
number is still playing. The current track will meld into the new track without a
break. In this case activate the checkbox and specify the seconds for the
fade.
'Indexes, Limits, Split' tab
The top part of the tab shows the progress of the audio track as a graph.
The New Index button sets a new index position at the selected position. For
a CD player this is the position from which a new number starts and the
player can also jump to it directly.
Caution: Not all CD players support this function.
The Split button splits the audio track at the selected position, i.e. the track is
physically split and becomes two (or more) tracks. These split tracks behave
just like two independent tracks, so they can be named and the pause
between them can be specified.
The Play button plays the track from the selected position. While the track is
playing the button switches to a Stop button.
The Delete button deletes a selected new index position or the position for a
split track.
'Filter' tab
You will see a number of filters on the left. The settings on the right change
depending on the selected filter.
To select a filter, activate its checkbox. The Test Selected Filters button
plays the audio track - this lets you check that you are happy with the result
before you confirm the changes.
10. Now insert the second CD (the one with the audio files you want to burn) into
your CD-ROM drive, select the File Browser and update the screen contents
by pressing F5 (or select the Refresh option from the View menu).
Nero Creating a CD/DVD • 48
Page 49

11. Open the drive with the File Browser and compile the CDA files for the
second Audio CD with Drag&Drop as described above in Point 8.
Repeat the last three steps for each additional CD you wish to use.
12. Click on the Burn Compilation button or select the Burn Compilation
command from the 'Recorder' menu to open the write dialog box. This option
is only available when the compilation window is selected, as can be seen
from the fact that the title bar is blue. If the File Browser is selected (and the
title bar of the compilation window is therefore grayed) the option is not
available and CD writing cannot be started. In this case click anywhere in the
compilation window.
The ‘Burn Compilation‘ dialog box now opens - it is the same as when
creating a new compilation but the Burn tab is now in front.
Important: Do not deactivate the 'Disc-at-once' checkbox if it is already
selected. If the checkbox is not active the CD will be written in the 'Track-atonce' mode which may result in hiss and crackle between tracks.
13. Click the Burn button to start the burning process. All the selected steps now
run in sequence until writing is complete. You can monitor progress in a
status window which shows the individual steps being logged as they are
executed.
14. If you selected the reference strategy when you compiled the tracks, Nero
can prompt you to insert the required CD while writing is in progress.
15. A typical final message would be: 'Burn process was successful with 12x
(1800 KB/s)‘. The CD is then ejected. The messages shown can either be
saved, printed or discarded. Close the window by clicking on the Discard or
Close buttons.
16. You can now check what has been written to your new Audio CD by inserting
it again and clicking the 'CD Info’ icon.
Important: If your burned Audio CDs crackle, hum or hiss, you probably have
problems with the so-called 'Audio Jitter Effect'. This is due to basic problems
which the hardware has when reading audio data and has nothing to do with
Nero.
You will find further information in these chapters: '
ROM drives' and '
Verifying audio read quality'.
7.4.5 Burning audio files from your hard disk
1. If the audio files you wish to burn are already on your hard disk then you can
skip this point and continue from point 2.
If the audio tracks you wish to burn are not on your hard disk, then
Setting speed on CD/DVD-
copy them first to your hard disk with Windows Explorer if they are WAV,
MP3 or other audio formats and you do not intend to convert them to
another format, or
save the tracks to your hard disk if they are Audio CDs and the files are in
CDA format or if you wish to compress audio files. The chapter '
audio tracks' tells you how to do this.
2. Insert an empty CD-R into the CD recorder.
Nero Creating a CD/DVD • 49
Saving
Page 50

3. Start a new compilation by clicking on the appropriate button or the File
menu and the command New.
4. Click the 'Audio CD' icon - the Audio CD tab is in front. Use the tabs to
specify the attributes of the compilation, such as the name of the CD,
different characteristics and restrictions.
5. On the CDA-Options tab you can select how Nero will handle CDA files that
are on a Music CD – this tab is irrelevant for burning files that are on a hard
disk however.
6. Once you have selected your settings, click the New button on the right. You
will now see the empty compilation window for CD.
If a File Browser is not open yet you can open one by selecting New File
Browser from the View menu or clicking the appropriate 'File Browser' icon.
To specify that Nero is started with an open File Browser, check ‘Start with
File Browser’ in the ‘General’ section on the
File Browser tab (File ->
Preferences).
7. Compile the files for the Wave files using Drag&Drop editing by simply
clicking on the required files in the File Browser and dragging them into the
compilation window.
Double click one (or more) audio files to open the 'Audio Information' dialog
box. The tab offers you a wide variety of options. The main ones are:
'Audio Track Properties' tab
If your recorder supports the writing of CD Text, you can insert information for
CD Text on this tab.
You will find further information about CD Text in the chapter '
CD-Text'.
You can also specify the length of the pause between tracks – the default
pause between two tracks is 2 seconds.
Tip: You may feel that a pause between tracks is irritating, especially with live
recordings. In this case set a pause length of 0 seconds.
You can create a cross fade between two audio tracks, so the new number
starts to play quietly while the current number is still playing. The current
track will meld into the new track without a break. In this case activate the
checkbox and specify the seconds for the fade.
'Indexes, Limits, Split' tab
The top part of the tab shows the progress of the audio track as a graph.
The New Index button sets a new index position at the selected position. For
a CD player this is the position from which a new number starts and the
player can also jump to it directly.
Caution: Not all CD players support this function.
The Split button splits the audio track at the selected position, i.e. the track is
physically split and becomes two (or more) tracks. These split tracks behave
just like two independent tracks, so they can be named and the pause
between them can be specified.
The Play button plays the track from the selected position. While the track is
playing the button switches to a Stop button.
The Delete button deletes a selected new index position or the position for a
split track.
'Filter' tab
Nero Creating a CD/DVD • 50
Page 51

You will see a number of filters on the left. The settings on the right change
depending on the selected filter.
To select a filter, activate its checkbox. The Test Selected Filters button
plays the audio track - this lets you check that you are happy with the result
before you confirm the changes.
8. Click on the Burn Compilation button or select the Burn Compilation
command from the 'Recorder' menu to open the write dialog box. This option
is only available when the compilation window is selected, as can be seen
from the fact that the title bar is blue. If the File Browser is selected (and the
title bar of the compilation window is therefore grayed) the option is not
available and CD writing cannot be started. In this case click anywhere in the
compilation window.
The ‘Burn Compilation‘ dialog box now opens - it is the same as when
creating a new compilation but the Burn tab is now in front.
Important: Do not deactivate the 'Disc-at-once' checkbox. If the checkbox is
not active the CD will be written in the 'Track-at-once' mode which may result
in hiss and crackle between tracks.
9. Click the Burn button to start the burning process. All the selected steps now
run in sequence until writing is complete. You can monitor progress in a
status window which shows the individual steps being logged as they are
executed.
10. A typical final message would be: 'Burn process was successful with 12x
(1800 KB/s)‘. The CD is then ejected. The messages shown can either be
saved, printed or discarded. Close the window by clicking on the Discard or
Close buttons.
11. You can now check what has been written to your new Audio CD by inserting
it again and clicking the 'CD Info’ icon.
Important: If your burned Audio CDs crackle, hum or hiss, you probably have
problems with the so-called 'Audio Jitter Effect'. This is due to basic problems
which the hardware has when reading audio data and has nothing to do with
Nero.
You will find further information in these chapters: '
ROM drives' and '
7.4.6 CD-Text
CD-Text is an extra item of information on Audio CDs which allows newer style
CD players to display the CD title and the names of the tracks and artists. Your
CDs will be played correctly even if your CD player does not support CD-Text.
This is possible because the additional CD-Text information is stored in the CD’s
so-called 'lead-in' area before the start of the audio data.
Setting speed on CD/DVD-
Verifying audio read quality'.
Creating CDs with CD-Text is only possible when two conditions are met: Your
recorder must support this function and the CD must be burned in the 'Disc-atonce' mode.
Nero Creating a CD/DVD • 51
Page 52

7.4.6.1 Creating an Audio CD with CD-Text
CD-Text cannot be written to a CD unless this function is supported by the CD
recorder you are using and the disc is written in the 'Disc-at-once' mode. A CD
can always be written in 'Disc-at-once' mode is the audio files are on a hard
drive. The use of 'Disc-at-once' for compilations of Audio CDs depends on the
selected strategy. You will find full details about this topic in the chapter
'
Dragging & dropping audio tracks'.
You can see whether your recorder can write CD-Text by selecting the Choose
Recorder option from the Recorder menu. Now highlight the required recorder
and read the information.
Tip: In the same way you can also check whether your recorder supports
'Overburn', 'Buffer Underrun Protection' and 'Disc-at-once'.
Create an Audio CD as described in the chapter '
'
Burning audio files from your hard disk'. Please note the following points:
First, create a new audio compilation and drag the audio tracks you want into
the compilation.
From the File menu, select Compilation Info and on the 'Audio CD' tab
check the 'Write CD-Text to the CD' checkbox.
Enter the title of the CD and its artist. These entries should not be longer than
64 characters each.
In the compilation window click an audio track and enter the track’s title and
artist on the tab.
Before writing, make sure that the 'Disc-at-once' mode is active.
Now click the Burn button to write the Audio CD with CD-Text.
7.4.6.2 Viewing CD-Text information
You can view CD-Text on Audio CDs provided the selected read drive supports
the reading of CD-Text. Recorders that can write CD-Text can do this.
Insert an Audio CD into the recorder.
Select the Save Tracks option from the Recorder menu and choose the drive
you require.
Burning audio files from CD' or
Now view the information you want in the ‘Title’ and ‘Artist’ columns.
7.4.6.3 Copying CDs with CD-Text information
Nero automatically copies the existing CD-Text if the reading drive and the
selected recorder both support CD-Text. This applies to both image copies and
on the fly copies.
Please also refer to the following chapters: '
drives' and '
Verifying audio read quality'.
Setting speed on CD/DVD-ROM
7.4.7 Special audio filters
If you are unhappy with the quality of your audio tracks, Nero offers a range of
filters can enhance the quality of the music tracks or change the tracks. The
Nero Creating a CD/DVD • 52
Page 53

tracks are edited 'non-destructively' which means that the actual recording is not
affected and only selections are set. The big advantage of the non-destructive
method is that editing steps can be undone at any time and no additional audio
data are created as you work. The audio files are not actually changed until they
are written.
The filters are found in the 'Audio Information' dialog box on the Filter tab. The
window is opened by double clicking an audio track in the compilation window.
Clicking the Test Selected Filters button plays the audio track - this lets you
check that you are happy with the result before you confirm the changes.
Normalizing
If the audio tracks you are burning come from different sources then the
volume of the individual tracks can be matched with this filter. All audio tracks
in the compilation must have been selected for this filter to function correctly.
Declicking
This is used to remove clicking noise when the audio file comes from a
scratched vinyl.
Hiss Reduction
This filter reduces the hiss of an audio file by removing the frequency
components that are below a certain value.
Fade In
This filter fades the audio track in from silence to full volume.
Fade Out
This filter fades the audio track out from full volume to silence.
Stereo Widening
This filter changes the intensity of the stereo effect with stereo recordings.
Karaoke
This filter removes those parts of a song that are equal on both stereo
channels. This is usually the vocal so this effect can be used for karaoke
CDs.
Please also refer to the chapter: '
Creating a Karaoke CD'.
Echo
This effect provides a number of options for echo effects.
Equalizer
This effect opens an equalizer so you can change the volume in different
frequency ranges.
Tip: The Nero Wave Editor program which is part of the Nero package
provides you with even more filters and different audio editing options. To locate
this program, select Start > Programs > Nero > Nero 6> Nero Wave Editor.
7.4.7.1 Creating a Karaoke CD
Creating a karaoke CD is rather complex because the karaoke filter must be set
individually for each song.
Create an Audio CD as described in the chapter '
'
Burning audio files from your hard disk'.
Burning audio files from CD' or
Please note the following points:
Nero Creating a CD/DVD • 53
Page 54

First, create a new audio compilation and drag the audio tracks you want into
the compilation.
In the compilation window, double click the song on which you want to set the
karaoke filter.
Activate the 'Karaoke' filter on the Filter tab.
Specify the strength of the effect, the vocal balance and the quality of the
conversion.
Click the Test Selected Filters button to play the song and ensure that you
are happy with the result. If you are not happy, change the effect strength
and vocal balance, and test again.
Now click OK to confirm your changes and close the dialog box. The name of
the filter will appear in the 'Filter' column in the compilation window.
Now repeat the relevant points for each additional song.
Burn the karaoke CD when you have converted the songs.
7.4.8 Audio CD Player
Nero has an integrated CD player which can play audio files before they are
saved so that you can check whether you really want to save them. The player
can also play tracks digitally so it can send the audio files direct to the sound
card. This means that even if the recorder is not connected to the sound card by
a cable the audio files can still be played with the sound card.
Insert an Audio CD into your CD drive.
Select Save Track from the Recorder menu.
Highlight the tracks you want.
Click the Play button to play the first track.
Tip: The CD player blocks all other functions in Nero so it is not advisable to let
it run in the background. However the Nero Wave Editor program which is part
of the Nero package provides you with a full CD player which does not affect
your working with Nero. You will find this program when you select:
Start > Programs Nero > Nero 6 > Nero Wave Editor.
7.4.9 Recording records
The Nero Wave Editor lets you digitize records and save them on hard disk.
You will find detailed instructions on how to do this in the quick guide and the
program’s online help. When a record is recorded, two tracks are created (one
from the from and one from the back). When these two tracks are burned the
songs would not be individually controllable with a CD player. The track has to
be split to make this possible. The chapter '
this.
Splitting tracks' tells you how to do
7.4.10 Splitting tracks
Very long audio tracks can be split so that specific passages within the track can
be triggered directly and/or become a separate track in their own right Long
Nero Creating a CD/DVD • 54
Page 55

audio tracks are created, for example, when copying from record to hard disk,
and they can be split before they are burned.
1. Double click the required track in the audio compilation and click the
Indexes, Limits, Split tab.
2. Select the position where you want to split the track.
3. Click the Split button.
4. Click OK to close the window and confirm that you really want to split the
track.
Please also refer to the chapter:
7.4.11 Encoding
Encoding an audio file means compressing it. With Nero you are able to convert
audio tracks to the most popular formats such as MP3 and mp3PRO. When they
are burned, Nero treats these formats just like other audio formats, so they can
be used to create Audio CDs without difficulty, i.e. the compressed files are
automatically decoded before they are burned.
7.4.11.1 MP3 and mp3PRO
Because of its good audio quality and small file size the MPEG3 audio format
(with the extension MP3) has become the format most used to transmit audio
data on the Internet. This is why Nero also supports the burning of the popular
MP3 files - Nero handles them just like any other audio files and they are
automatically decoded before burning.
You can test the Nero mp3PRO encoder plugin as soon as Nero is installed.
You can encode up to 30 audio files or pieces of music from CD in the popular
MP3 or mp3PRO format.
'Indexes, Limits, Split' tab.
mp3PRO files can be compressed to half the size of the conventional MP3 files
with the same quality. These two file types have the same extension: mp3.
MP3 Plugin
The MP3 plugin uses the brand new and ultrafast MP3 encoder from the
Fraunhofer Institut, the inventors of MP3. With the MP3 encoder you can
condense your favorite pieces of music down to 10 % of their original size. And
with virtually no audible loss of quality! Nero AG would like nothing better than to
let its users create as many MP3 files as they want but we cannot do this for
licensing reasons as the rights are held by Fraunhofer Institut and we would
need to pay them fees. That’s why you can only test the encoder 30 times. If
after that you wish to continue using the encoder, you will find further
information about buying the mp3PRO plugin in the
mp3PRO Plugin
The mp3PRO plugin uses the brand new and ultrafast mp3PRO encoder from
Coding technologies, the inventors of mp3PRO. With the mp3PRO encoder you
can condense your favorite pieces of music down to 5 % of their original size.
And with virtually no audible loss of quality!
Webshop.
Nero Creating a CD/DVD • 55
Page 56

Nero AG would like to offer you the opportunity to create any number of
mp3PRO files, but for licensing reasons this is not possible, because Coding
Technologies owns the rights to the encoder, which means that license fees
would have to be paid. That’s why you can only test the encoder 30 times. If
after that you wish to continue using the encoder, you will find further
information about buying the mp3PRO plugin in the
Webshop.
To use the mp3PRO encoder you must have Nero Version 5.5.4.0 (not a demo
version) installed on your PC as a minimum requirement.
The high processing power needed to decompress MP3 files means that the
maximum possible burning speed will depend on the power of your PC. As a
‘rule of thumb‘ we can say that Pentium systems with a clock speed over
100Mhz should be capable of burning at twice the speed. Computers of Pentium
II class and higher should be capable of burning 4 or even 8 times faster.
Pentium III or IV PCs can achieve even higher burn speeds.
Note: MP3 files downloaded from the Internet may be damaged by transmission
errors. Such problems may affect the sound. Nero displays a warning telling you
if damaged MP3 files have been added to an audio compilation. During writing,
damaged files are logged with the warning message 'Lost sync within the MP3
stream‘.
The MP3 library used by Nero only supports the MPEG Layer3 standard format
at present. A similar error message appears if Nero receives MP3 files for
decoding and its MPEG3 library cannot process the file format.
7.4.11.2 Encoding Audio CDs
The encoding method described in this chapter is only suitable for tracks on
Audio CDs. The encoding of audio files that are on hard drive is described in the
chapter '
Encoding tracks that are on hard disk'.
When you encode audio tracks you can save the encoded and saved tracks as
an M3U playlist. You will find full details about this topic in the chapter '
Playlists'.
1. Load the Audio CD with the tracks you wish to encode in a CD drive.
2. Select Save Track from the Extras menu.
3. Select the drive that contains the CD with the tracks that are to be encoded.
4. Highlight the audio tracks you wish to encode.
5. Select the output file format by clicking the dropdown button and highlighting
the required format.
6. Click the Settings button and specify the required encoding quality and
bitrate.
7. Choose the path for saving the audio file. If the audio file has no meaningful
name, you can click the button with the three dots on it and rename the file.
8. Click the Start button to start encoding - a window shows you how encoding
is progressing.
M3U
9. When encoding is complete, click Close to close the window.
Nero Creating a CD/DVD • 56
Page 57

7.4.11.3 Encoding tracks that are on hard disk
The encoding method described in this chapter is only suitable for audio tracks
that are located on a hard drive. If you wish to encode tracks from an Audio CD
please refer to the chapter '
1. Select File Encoding from the Extras menu.
2. Click the Add button and select the directory containing the audio tracks you
wish to encode.
3. Highlight the audio tracks you wish to encode.
4. Click the Settings button and specify the required encoding quality and
bitrate.
5. Choose the path for saving the audio file. If the audio file has no meaningful
name, you can click the button with the three dots on it and rename the file.
6. Click the Start button to start encoding - a window shows you how encoding
is progressing.
7. When encoding is complete, click Close to close the window.
7.4.11.4 Burning encoded files
If the audio files you wish to encode are in a compressed format (MP3) then
Nero will decompress them automatically before burning. Just open an audio
compilation and pull the compressed files you want into the compilation window
with drag&drop.
Encoding Audio CDs'.
You will find full details about creating an Audio CD files in the chapter '
audio files from your hard disk'.
7.4.12 Decoding
Converting compressed audio tracks is called decoding. Unlike encoding, with
decoding it makes no difference what medium the audio tracks are on.
7.4.12.1 Decoding audio tracks
1. Select File Conversion from the Extras menu.
2. Click the Add button and select the directory containing the audio tracks you
wish to decode.
3. Highlight the audio tracks you wish to decode.
4. Click the Settings button and specify the frequency, bitrate and channels.
5. Choose the path for saving the audio file. If the audio file has no meaningful
name, you can click the button with the three dots on it and rename the file.
6. Click the Start button to start decoding - a window shows you how decoding
is progressing.
Burning
7. When decoding is complete, click Close to close the window.
Nero Creating a CD/DVD • 57
Page 58

7.4.13 M3U Playlists
Nero supports lists of audio files in the ASCII text format which are labeled as
playlists and are in M3U format. They can be edited using Windows Notepad,
for example. If you drag an M3U file into the compilation window, Nero will add
all the files on the playlist to the audio compilation.
A great additional benefit with M3U playlists is that you can also specify
information about the artists and titles in an audio file. In this way you can even
import title and artist information if the audio tracks have been saved as WAV
files. WAV files do not normally allow artists and titles to be saved. When an
M3U playlist with title and artist information is read by Nero however, this
information is also imported.
M3U files can also be created, for example with the help of one of the MP3 play
programs that are available on the market. Once you are happy with your music
compilation it can be easily added to an audio compilation by dragging and
dropping the playlist. M3U files created by Nero can also be read by MP3 play
programs such as NeroMIX.
7.4.13.1 Creating M3U Playlists
Playlists can be created with Nero when you save or decode Audio CDs.
1. Insert the required CD into a CD drive.
2. Select Save Track from the Recorder menu.
3. Select the drive with the CD inserted.
4. Click the Options button at the bottom of the window.
5. Activate the 'Automatically generate a M3U playlist of stored audio‘
checkbox.
6. Highlight the required audio tracks.
7. Click the Settings button and specify the required encoding quality and
bitrate.
8. Choose the path for saving the audio file. If the audio file has no meaningful
name, you can click the button with the three dots on it and rename the file.
9. Click the Start button to start saving - a window shows you how the save is
progressing.
10. When copying is complete, give the playlist a name and click Save.
11. When the save is complete, click Close to close the window.
7.4.14 Nero Wave Editor
You can use Nero’s filter functions to lay a filter over audio tracks in order to
modify them. You will find full details in the chapter '
If you wish to make extensive changes to the audio file then the Nero Wave
Editor is the right tool for the job, and can be used to edit and play audio tracks.
The Nero Wave Editor is available in Audio, Mixed Mode and CD EXTRA
compilations. The two buttons Play and Edit appear in the window for these
compilations.
Nero Creating a CD/DVD • 58
Special audio filters'.
Page 59

When the burn process is started or when the compilation window is closed all
tracks in that compilation that are linked to the Nero Wave Editor are closed.
You will find full details about the functions of the Nero Wave Editor in the Help
files for that program.
Playing audio files
Click the Play button to play the audio tracks that you have highlighted.
Editing audio files
Clicking Edit opens the highlighted audio track and the Nero Wave Editor.
Make the changes you want, then save them.
If the audio file has been saved with a different name in the Wave Editor, when
you close Nero Wave Editor, Nero asks you if you want to add the new file to
the compilation instead of the old one.
7.4.15 The Nero CD database
Unfortunately most Audio CDs contain no information about the tracks that are
on them – only Audio CDs with CD Text do this. When an Audio CD is created
this means that the titles and artists of the tracks usually have to be entered
manually. However Nero has a built-in CD and title database designed to locate
the titles, artists and all the tracks on an officially released Audio CD. This is
achieved with a kind of ‘fingerprint’ on the CD. The information obtained in this
way can be used or a range of purposes, such as:
Generating meaningful filenames when saving audio tracks (see also:
Encoding). These filenames make it easier for you to compile your own Audio
CDs and also provide the information that is printed on the cover by Nero
Cover Designer. Information about the title and artist is also saved in the
audio file provided the audio file format allows this. This is possible with MP3
and WMA (MS Audio) files for instance, but not with WAV files.
Automatic addition of CD-Text when copying Audio CDs. This makes it
possible to create CD copies that are in a way better than the original
because they get more information. With the added CD-Text, an audio CD
player with the right equipment can display the title and artist on a CD.
7.4.15.1 Unzipping the program database
Owners of a full version of Nero will find the free program database on their CD.
The database is zipped and will have to be unzipped before it can be
configured.
1. Unzip the archive 'CDDB.zip' which is on the CD in the 'FreeCDDB' directory
and extract it to a new folder on your hard disk.
Caution: This requires around 120MB of disk space.
2. In Windows Explorer create another directory (target directory) to hold the
imported CD program database. There should still be at least around 250MB
of free space on the selected drive. We do not recommend that you locate
the Nero database onto a network drive as simultaneous access of the
database by several users is not yet supported.
Nero Creating a CD/DVD • 59
Page 60

Note: When installing the database remember that the target drive should
still have at least 300MB of free space.
Note:
Owners of the demo version can also use this free program database. However
to do this you must download the free CD database to your PC, e.g. from
http://freedb.freedb.org.
7.4.15.2 Importing the program database
Depending on how your PC is configured, the database can take up to one day
(!) of processing time to import! This is unavoidable because of the sheer size of
the database and the large number of cross-references that Nero has to create.
Once imported however, read access to the database is very fast. You can
cancel the download at any time but we do not advise this, as it CANNOT be
resumed. The database would have to be imported again and this would create
double entries.
1. Select Import Internet Database from the Extras menu.
2. Select the drive that contains the unzipped directory.
3. Select the destination path for the database.
4. When the import is complete you will see a window asking you if you wish to
use this database as the Nero program database. Click Yes to confirm your
choice.
7.4.15.3 Creating a user database
Unlike the program database which contains information about published CDs,
the user database is suitable for your own CD compilations. Creating a user
database will ensure that information about CDs you have created yourself is
not lost if the program database is overwritten.
1. In Windows Explorer create a directory (target directory) to hold the user
database.
2. Select Create a New User Database from the Extras menu and highlight the
destination path for the new user database.
3. When the import is complete you will see a window asking you if you wish to
use this database as the user database. Click Yes to confirm your choice.
7.4.15.4 Configuring local Nero databases
If when you imported the program database/user database you answered Yes
when asked if you want to use these as your new database(s), then the
directories are entered automatically. However you can still review the settings
on the relevant tab after you have imported the database(s).
Before using the Nero database just take a little time to make sure that the
settings are right. To configure these settings, select File, Preferences and
then the Database tab. You will see that there are three setting areas.
Nero Creating a CD/DVD • 60
Page 61

7.4.15.5 Configuring the Internet database for reading
As well as the local database, Nero supports access to Internet databases with
CD information that comply with the so-called CDDB standard. The free Internet
CD database http://freedb.freedb.org is preset as a preference - Nero can
access this directly on the Internet provided you have an Internet connection.
Select Preferences from the File menu and click the Database tab.
Check that 'freedb.freedb.org' is preset as the read server in the 'Use
Internet CD database' area.
Check that '/~cddb/cddb.cgi' is set as the address.
Check that '80' is entered as the port.
Caution: Remember that errors made in keying these parameters are likely to
cause network failures. When you change these parameters you must also
make sure that correct spelling is used. If you are using a proxy server you
should enter the data required to access your proxy server in the Proxy
Configuration dialog box. If you don’t have the necessary information, please
ask your network administrator or Internet provider. If in doubt, try without a
proxy server first.
7.4.15.6 Configuring the Internet database for writing
As well as downloading CD descriptions from the Internet database you can
also make them accessible for other users. In this way you can help improve the
quality of the Internet database when you own a CD that does not exist in either
the local or the Internet database. This does not apply to CDs with tracks you
have compiled yourself. However since it is unlikely that anyone else owns an
identical CD, entries about such CDs should not be uploaded to the Internet
database, as this would create meaningless CD entries.
1. Select Preferences from the File menu and click the Database tab.
2. Activate the 'Submit E-Mail address' checkbox and check that 'freedb-
submit@freedb.org' is shown as the address.
3. Enter your email address and the name of the SMTP server in the boxes
provided. Please ask your network administrator or Internet provider for the
name if you do not have this information.
4. The 'Application Name' field shows the name and version of the program
used to upload CD database entries – i.e. Nero and the installed program
version.
Note: When uploading CD entries remember that Internet databases are not
normally updated immediately by the Internet database administrators as new
entries must first be checked for plausibility. This means that if you upload a CD
description today, it would probably not appear on the Net for several days.
7.4.15.7 Configuring database settings
Information from the CD databases can be used for a variety of purposes. You
will find the necessary checkboxes in the lower section of the 'Database' tab:
Open the database during 'Save Track':
Nero Creating a CD/DVD • 61
Page 62

When this checkbox is activated Nero opens the database dialog box when
the Save Track option is selected from the Recorder menu. You can now
save the necessary information when you convert audio tracks to audio files.
See also: '
Saving audio tracks'.
Open the database during 'CD Copy':
When this checkbox is activated Nero opens the database dialog box while
the Audio CD is being copied. Nero uses the information obtained in this way
to create CD-Text. If you do not have a recorder that can write CD-Text, you
can also use the information to create a cover for the CD with the Nero
Cover Designer. The information about the audio tracks will be automatically
added by Nero.
Open the database during '*.cda Drag&Drop':
When this checkbox is activated Nero opens the database dialog box while
Audio CDs are being dragged and dropped. There is no need for you to enter
a name for the CD and the tracks added to the compilation.
7.4.15.8 The database dialog box and how it is used in Nero
Depending on how Nero is configured (see '
The Nero CD database') the
database dialog box appears on many different occasions, such as when
copying Audio CDs or saving audio tracks to harddisk. This is done to get
information about titles and artists on the CD and its tracks. This is then used to
create CD Text information or to generate meaningful filenames when tracks are
saved. The database dialog box first tries to get CD Text information about the
loaded CD from the source drive. If this information is available, the dialog box
is not opened. If CD-Text information cannot be obtained (for example because
the CD contains no CD-Text or the source drive does not support CD-Text),
then the dialog box is opened. It now searches in the Nero CD database (if
installed), in the user database (if installed) and in the Internet database if
required. Another feature is that it searches through the database of the
Windows CD player which can also manage a list of CDs that have already
been detected.
The search results are then shown in a list. The dialog box may find several
different entries or none at all. There can be several different entries when
different CDs have the same ‘fingerprint’. This 'fingerprint' is obtained from the
start positions of the individual tracks, the number of tracks and the playing time
of the CD. It is obvious that CDs with the same number of tracks, the same
playing time and the same track start positions will also have the same
'fingerprint'. Neither Nero nor the Internet database can tell them apart. There
will be different entries for an existing CD. It will be down to the user to select
the correct entry. Other errors can be caused by the fact that many older
recorders did not have the ‘Disc-at-once’ mode. Without this mode the start
positions of the tracks on the CD can 'slip'. If an inaccurate CD copy like this is
used for uploading, then there will be duplicates of CD entries, or CDs that are
actually in the database will not be found. This is a problem you will
unfortunately have to live with in the CD database.
If there is no entry in the list of possible CDs and if no suitable entry can be
found in the Internet database either (Access Internet Database button), then
the only solution is to define your own entry. You can create this entry by
clicking Create A New CD Entry. Don’t forget to enter the title and artist for
every track. This is particularly important if you intend to upload your CD entry to
the Internet at a later time. There is no sense in ‘burdening‘ the Internet
database with incomplete entries.
Nero Creating a CD/DVD • 62
Page 63

However we recommend that you only make newly created CD entries available
to the general public on the Internet for purchasable original CDs. Likewise,
there is no sense in uploading descriptions of CDs you have compiled yourself
as they will only clog up the Internet database and in any case no other user
should own this special CD. Please remember too that you can only upload
entries in ASCII characters to the Internet database. This database does not
support special characters such as German ‘umlauts‘ or special Asian
characters. Special characters should therefore be written out in ASCII notation,
e.g. 'Marius Mueller Westernhagen' instead of 'Marius Müller Westernhagen'.
The selected entry is used by Nero as a source of information for artist and title
entries and entered in the user database where it can be used for future access
to the CD. If you do not wish to use an entry, click Cancel.
7.5 Mixed Mode CD
A Mixed-Mode CD is a CD with different file formats in a single session. A data
track followed by one or more audio tracks (e.g. a soundtrack with PC games) is
a typical example. Older audio CD players are often unable to recognize the
data track as such and attempt to play it. The CD EXTRA format has been
developed to combat this problem. Please refer to the section '
EXTRA CD'.
Creating a CD
7.5.1 Creating a Mixed Mode CD
Now let’s take a step-by-step look at how to create a Mixed Mode CD using
Nero:
All settings may be left at their default values.
1. Insert an empty CD into the recorder.
2. Start a new compilation by clicking on the appropriate button or the File
menu and the command New.
3. Click the 'Mixed Mode CD' icon - the ISO tab is in front. Use the tabs to
specify the attributes of the compilation, such as the name of the CD,
different characteristics and restrictions.
On the ISO tab you can toggle between Mode 1 and Mode 2/XA format as
required. You should not need to verify the format – in the past there were
problems with CD drives that could not read Mode 1 CDs, but very few of
these drives should still be in use today. If these options are grayed it means
that selection is not logically meaningful at present. Mixing Mode 1 and Mode
2/XA tracks on a CD would result in an unreliable and potentially unreadable
CD format.
In the 'File/Directorynames length‘ section you can specify the ISO level for
the length of the names. Up to 31 characters are permitted for Windows 95
and higher. Names cannot be more than 11 characters long for Windows 3.1
(8 for the name and 3 for the extension). ISO Level 2 will be best in most
cases – if you know that the CD must also be readable on a Windows 3.1
system then you should select Level 1.
Nero Creating a CD/DVD • 63
Page 64

4. On the Label tab you can give your CD a name and overtype the default
name 'New'. You can use letters A-Z, digits 0-9 and the underscore character
(_) – diacritics (accents) and spaces are not supported.
5. On the Dates tab you can specify the date of the compilation and of its files.
The current date and time are entered for the compilation as default, also the
creation date of the files.
6. You can enter additional information about the CD you wish to burn on the
Audio CD tab.
7. Use the CDA Options tab to specify the strategy which Nero will use to
handle the CDA files on an Audio CD (see also:
Dragging & dropping audio
tracks).
8. Use the Misc tab to specify which files will be buffered in the cache. Files
that are on slow media (floppy disks and network drives) and are very small
are moved to the cache by default. You specify the location of the cache on
the
Cache tab in the File menu (Preferences option).
9. Once you have selected your settings, click the New button on the right. You
will now see the empty compilation window for CD.
If a File Browser is not open yet you can open one by selecting New File
Browser from the View menu or clicking the appropriate 'File Browser' icon.
To specify that Nero is started with an open File Browser, check ‘Start with
File Browser’ in the ‘General’ section on the
File Browser tab (File ->
Preferences).
10. Compile the audio files for the Mixed Mode CD using Drag&Drop editing by
simply clicking on the required files in the File Browser and dragging them
into the audio area of the compilation window. This area is in the lower
section of the compilation window and includes columns headed 'Track',
'Title', 'Duration' and 'Pause'.
Clicking the right mouse button opens a context menu where you can
selectively add or omit certain file types. In addition there are a number of
commands that you will also find in Windows Explorer, such as 'Copy', 'Open‘
and 'Cut'.
11. Compile the data files for the Mixed Mode CD using Drag&Drop editing by
simply clicking on the required files in the File Browser and dragging them
into the data area of the compilation window. This area is in the top section of
the compilation window and includes columns headed 'Name' and 'Size'.
12. Click on the Burn Compilation button or select the Burn Compilation
command from the 'Recorder' menu to open the write dialog box. This option
is only available when the compilation window is selected, as can be seen
from the fact that the title bar is blue. If the File Browser is selected (and the
title bar of the compilation window is therefore grayed) the option is not
available and CD writing cannot be started. In this case click anywhere in the
compilation window.
The ‘Burn Compilation‘ dialog box now opens - it is the same as when
creating a new compilation but the Burn tab is now in front.
13. In the ‘Action’ section activate the other check boxes you require in addition
to the ‘Write‘ check box. You will find more information about this section in
Before you burn your first disc'. You must remember that when you create a
'
CD with only one session you must activate the 'Finalize CD' checkbox.
Caution:
Nero Creating a CD/DVD • 64
Page 65

You must ensure that the ‘Finalize CD‘ checkbox is activated. This setting
write protects the CD and no further writing is possible.
14. Click on the Burn button to start the burn process (or the simulation depending on the chosen option). All the selected steps now run in sequence
until writing is complete. You can monitor progress in a status window which
shows the individual steps being logged as they are executed. A typical final
message would be: 'Burn process was successful with 12x (1800 KB/s)‘. The
CD is then ejected. The messages shown can either be saved, printed or
discarded. Close the window by clicking on the Discard or Close buttons.
15. You can now check what has been written to your new CD by inserting it
again and clicking the 'CD Info’ icon.
Important: If your burned audio tracks crackle, hum or hiss, you probably have
problems with the so-called 'Audio Jitter Effect'. This is due to basic problems
which the hardware has when reading audio data and has nothing to do with
Nero.
Please refer to: '
ROM drives'.
Verifying audio read quality' and 'Setting speed on CD/DVD-
7.6 CD EXTRA
A CD in the CD EXTRA format (also known as an Enhanced CD) is a
Multisession CD that consists of two sessions: the first session contains the
audio files and the second session the data.
Existing normal audio CD players play the first session as an Audio CD. The
second session contains data files whose contents may relate to the audio track
in the first session, for example with song lyrics and background information
about the music, or they may just contain gimmicks in the form of video clips.
The second session can only be used by PCs with a CD-ROM drive, it cannot
be ‘seen‘ by a normal CD player.
7.6.1 Creating a CD EXTRA CD
Now let’s take a step-by-step look at how to create a CD EXTRA CD using
Nero:
All settings may be left at their default values.
1. Insert an empty CD into the recorder.
2. Start a new compilation by clicking on the appropriate button or the File
menu and the command New.
3. Click the 'CD EXTRA' icon - the CD EXTRA tab is in front. Use the tabs to
specify the attributes of the compilation, such as the name of the CD,
different characteristics and restrictions.
Note:
The dialog box that opens has more tabs than can be seen at one time. Use
the scroll arrows to view all the tabs.
Nero Creating a CD/DVD • 65
Page 66

4. You can use the text boxes on the CD EXTRA tab to specify the album
identification. This is particularly useful when the album is to comprise of
several CDs. You can also specify the number of volumes in the album and
the album set sequence number. The default for the number of volumes and
the sequence number is 1.
The Pictures button opens a dialog box where you can select two pictures to
be saved on the front and back of the CD. You can also specify the color
format for the encoding resolution for all of the pictures that will be written to
the CD.
A CD EXTRA can contain information in different languages. Click the Add
beneath the 'Language' window to select these languages from a list of
countries. You could enter the album title for each language, for example.
You should specify at least one language. (Caution: The setting for Germany
is under 'Germany'). When you highlight a language you can enter a name in
the 'Album Title' box.
5. On the ISO tab you can toggle between Mode 1 and Mode 2/XA format as
required. You should not need to verify the format – in the past there were
problems with CD drives that could not read Mode 1 CDs, but very few of
these drives should still be in use today. If these options are grayed it means
that selection is not logically possible at present. Mixing Mode 1 and Mode
2/XA tracks on a CD would result in an unreliable and potentially unreadable
CD format. In the 'File/Directorynames length‘ section you can specify the
ISO level for the length of the names. Up to 31 characters are permitted for
Windows 95 and higher. Names cannot be more than 11 characters long for
Windows 3.1 (8 for the name and 3 for the extension). ISO Level 2 will be
best in most cases – if you know that the CD must also be readable on a
Windows 3.1 system then you should select Level 1.
6. On the Label tab you can give your CD a name and overtype the default
name 'New'. You can use letters A-Z, digits 0-9 and the underscore character
(_) – diacritics (accents) and spaces are not supported.
7. On the Dates tab you can specify the date of the compilation and of its files.
The current date and time are entered for the compilation as default, also the
creation date of the files.
8. You can enter additional information about the CD you wish to burn on the
Audio CD tab.
9. Use the CDA Options tab to specify the strategy which Nero will use to
handle the CDA files on an Audio CD (see also:
Dragging & dropping audio
tracks).
10. Use the Misc tab to specify which files will be buffered in the cache. Files
that are on slow media (floppy disks and network drives) and are very small
are moved to the cache by default. You specify the location of the cache on
the
Cache tab in the File menu (Preferences option).
11. Once you have selected your settings, click the New button on the right. You
will now see the corresponding compilation window for CD. The lower audio
section is empty and in the upper data area you can see two folders –
'CDPLUS' and 'PICTURES'. These folders and the files in them are needed
to create a CD EXTRA and cannot be changed. If a File Browser is not open
yet you can open one by selecting New File Browser from the View menu or
clicking the appropriate 'File Browser' icon. To specify that Nero is started
with an open File Browser, check ‘Start with File Browser’ in the ‘General’
section on the
File Browser tab (File -> Preferences).
Nero Creating a CD/DVD • 66
Page 67

12. Compile the audio files for the CD EXTRA using Drag&Drop editing by
simply clicking on the required files in the File Browser and dragging them
into the audio section of the compilation window. This area is in the lower
section of the compilation window and includes columns headed 'Track',
'Title', 'Duration' and 'Pause'. Clicking the right mouse button opens a context
menu where you can selectively add or omit certain file types. In addition
there are a number of commands that you will also find in Windows Explorer,
such as 'Copy', 'Open‘ and 'Cut'.
Note:
Double-clicking an audio file opens the 'Audio Information' dialog box. This
dialog box is virtually identical to the one that opens when you create Audio
CDs except it has an additional CD EXTRA tab. Entries on this tab are not
possible unless you selected a language when creating the CD.
Choose the language you want and enter information about the audio track.
Repeat for every additional language. If no language was selected, a note
will appear when you click the tab. If this happens, select Compilation Info
from the File menu and add a language.
13. Compile the data files for the CD EXTRA using Drag&Drop editing by simply
clicking on the required files in the File Browser and dragging them into the
data area of the compilation window. This area is in the top section of the
compilation window and includes columns headed 'Name' and 'Size'.
14. Click on the Burn Compilation button or select the Burn Compilation
command from the 'Recorder' menu to open the write dialog box. This option
is only available when the compilation window is selected, as can be seen
from the fact that the title bar is blue. If the File Browser is selected (and the
title bar of the compilation window is therefore grayed) the option is not
available and CD writing cannot be started. In this case click anywhere in the
compilation window. The ‘Burn Compilation‘ dialog box now opens - it is the
same as when creating a new compilation but the Burn tab is now in front.
15. In the ‘Action’ section activate the other check boxes you require in addition
to the ‘Write‘ check box. You will find more information about this section in
Before you burn your first disc'.
'
Caution:
You must ensure that the ‘Finalize CD‘ checkbox is activated. This setting
write protects the CD and no further writing is possible.
16. Click on the Burn button to start the burn process (or the simulation depending on the chosen option). All the selected steps now run in sequence
until writing is complete. You can monitor progress in a status window which
shows the individual steps being logged as they are executed. A typical final
message would be: 'Burn process was successful with 12x (1800 KB/s)‘. The
CD is then ejected. The messages shown can either be saved, printed or
discarded. Close the window by clicking on the Discard or Close buttons.
17. You can now check what has been written to your new CD by inserting it
again and clicking the 'CD Info’ icon.
Important: If your burned audio tracks crackle, hum or hiss, you probably have
problems with the so-called 'Audio Jitter Effect'. This is due to basic problems
which the hardware has when reading audio data and has nothing to do with
Nero.
Please refer to: '
Verifying audio read quality' and 'Setting speed on CD/DVD-
ROM drives'.
Nero Creating a CD/DVD • 67
Page 68

7.7 Bootable CD and DVD
7.7.1 Conditions
A PC can only be booted from a CD when its BIOS supports this function (start
sequence e.g. 'CD-ROM, C, A') or, if a SCSI CD-ROM drive is being used, the
drive must be connected to a SCSI adapter with its own BIOS whose settings
can be changed accordingly. (This will only work when there are no IDE
harddisks present as these come before the SCSI adapter in the boot
sequence.)
If neither of these conditions is met then the PC cannot be booted from a CDROM.
Even so, not every operating system can be booted from a CD. During booting,
Windows95/98/Me and Windows NT/2000/XP write to the medium from which
they are being booted. This is not possible with a CD and so the process is
cancelled and the PC cannot be started. No provision for booting from a ROM
medium was made when these operating systems were developed. When
booting from a CD therefore, you can only start an operating system that does
not write to the medium, such as 'MS-DOS' or 'Linux'.
Bootable CDs are created according to the 'El Torito' standard. The CD contains
a boot image and an ISO part. When the read driver for the CD-ROM drive and
the 'Mscdex.exe' file have been installed, MS-DOS can access the ISO part of
the CD which runs the rest of the installation routine.
7.7.2 Background
Bootable CDs are created using the so-called 'El Torito' specification. This is an
extension of the ISO Level 1, ISO Level 2, Joliet standard which controls the
structure of Data CDs: A bootable CD consists of a boot partition and an
optional ISO track. The format sees a boot section that contains the information
needed to start the CD and a boot catalog.
Such a CD can only be made from an existing bootable partition. The entire
partition is copied to the CD so the CD must be smaller than 650 MB (or 700
MB).
There are three basic types of Boot CDs: Floppy Emulation, Harddisk Emulation
and No Emulation.
With Floppy Emulation, a bootable floppy is needed to create the bootable
CD. The size of the start data is limited by the capacity of the floppy disk
(e.g.: 1.44 MB). When starting, the Boot CD is assigned Drive A and the
actual disk drive is treated as B.
Harddisk Emulation requires a bootable hard disk to create the bootable CD.
The Boot CD is assigned drive letter C and the existing hard disks are
incremented a letter, so C becomes D, D becomes E and so forth. During
booting the CD behaves as if it were CD drive C. Up to 640MB (or 700 MB)
of boot data can be stored on a CD with this type of bootable CD. However
this requires a harddisk partition with 640 (or 700) MB max. This partition
must first be created if it does not yet exist.
Nero Creating a CD/DVD • 68
Page 69

With No Emulation, the drive letters are not changed. This type is used for
bootable installation CDs.
7.7.3 Template for making a bootable CD
A 'template' in the form of a bootable drive is needed to make a bootable CD.
There are basically three types of bootable CD:
1. Floppy Emulation: Floppy Emulation requires a bootable floppy to make the
bootable CD. When it is booted, the CD behaves as if the floppy were
inserted in Drive A. The drive letters increment, so that Drive A: corresponds
to the bootable CD. Floppy disk drive A: can be accessed as B: after booting.
The size of the start data is basically limited by the capacity of the floppy disk
(e.g.: 1.44 MB).
2. Harddisk Emulation: A bootable hard disk is required to create the bootable
CD. When booted, the CD behaves as if the CD were Drive C:. Its 'old' Drive
C: becomes Drive D:, its old Drive D: becomes Drive E: and so forth. Up to
640MB of boot data can be stored on a CD with this type of bootable CD. Of
course this means that the template drive must not be bigger than 640 MB or
it will not 'fit' on the CD. So if you have a 2 GB hard disk with only one 2 GB
partition for example, you will not be able to create a bootable CD from it
without first re-partitioning your hard disk in a suitable way. This is a problem
of principle and has nothing to do with Nero.
3. No Emulation: This feature is only intended for use by out-and-out experts
who require no floppy or harddisk emulation and wish to install their own
device drivers. 'Windows 2000 CD' uses this method, for example.
For Nero the template for making a bootable CD can be either a logical drive
(e.g. the C: drive) or a so-called 'Image File' of a drive. Image files contain the
contents of a drive sector by sector as a file. Image files can be created with
packages such as 'Norton Disk Editor' or 'WinImage' and are usually very large
(as large as the drive from which they were created, obviously!).
7.7.4 Making bootable CDs
You will find basic information about bootable CDs based on the 'El Torito'
standard in the section entitled '
create a bootable CD with Nero.
1. Insert an empty CD into the recorder.
2. Start a new compilation by clicking on the appropriate button or the File
menu and the command New.
3. Click the 'CD-ROM (Boot)' icon - the Boot tab is in front. Use the tabs to
specify the attributes of the compilation, such as the name of the CD,
different characteristics and restrictions.
Background'; this section only describes how to
4. In the upper section of the Boot tab (Source of boot image data) you can
specify whether the template data for the bootable CD originate from a logical
drive or a drive image files (refer to '
Note: If your preferred logical drive does not appear on the list of drives on
this tab, this is because the drive is bigger than 640MB. This amount of data
cannot fit on a CD so Nero does not display these drive in the list.
Nero Creating a CD/DVD • 69
Template for making a bootable CD').
Page 70

Please remember also that under Windows NT/2000/XP you must have
administrator rights to access drives 'directly' which is absolutely essential for
creating bootable CDs. This restricted direct drive access under Windows
NT/2000/XP is a deliberate Microsoft feature designed to prevent hackers
gaining access to confidential data of other users.
5. The lower part of the tab (expert settings) contains detailed settings for 'El
Torito' standard compliant bootable CDs. These settings are normally grayed
which indicates that Nero makes the right settings for you automatically.
When an image file is entered as the source of the boot image, Nero cannot
make the right settings automatically. If this is the case, or if you want to
change the expert settings manually, you can enter all the parameters by
hand. Activate the 'Enable expert settings' checkbox if required. You are of
course now responsible for the CD working correctly later on.
6. Once you have selected your settings, click the New button on the right. You
will now see the empty compilation window for CD. If a File Browser is not
open yet you can open one by selecting New File Browser from the View
menu or clicking the appropriate 'File Browser' icon. To specify that Nero is
started with an open File Browser, check ‘Start with File Browser’ in the
‘General’ section on the
7. Compile the required files with Drag&Drop by clicking on them in the File
Browser and dragging them into the compilation window, or copy an image
file.
File Browser tab (File -> Preferences).
8. Click on the Burn Compilation button or select the Burn Compilation
command from the 'Recorder' menu to open the write dialog box. This option
is only available when the compilation window is selected, as can be seen
from the fact that the title bar is blue. If the File Browser is selected (and the
title bar of the compilation window is therefore grayed) the option is not
available and CD writing cannot be started. In this case click anywhere in the
compilation window. The ‘Burn Compilation‘ dialog box now opens - it is the
same as when creating a new compilation but the Burn tab is now in front.
9. In the ‘Action’ section activate the other check boxes you require in addition
to the ‘Write‘ check box. You will find more information about this section in
Before you burn your first disc'.
'
Caution: You must ensure that the ‘Finalize CD‘ checkbox is not activated.
Otherwise the CD will be write protected and no further writing is possible.
10. Click on the Burn button to start the burn process (or the simulation depending on the chosen option). All the selected steps now run in sequence
until writing is complete. You can monitor progress in a status window which
shows the individual steps being logged as they are executed. A typical final
message would be: 'Burn process was successful with 24x (3600 KB/s)‘. The
CD is then ejected. The messages shown can either be saved, printed or
discarded. Close the window by clicking on the Discard or Close buttons.
11. You can now check what has been written to your new CD by inserting it
again and clicking the 'CD Info’ icon.
7.8 Video CD/Super Video CD
7.8.1 Supported formats
Nero can burn (S)VCDs with the following formats:
Nero Creating a CD/DVD • 70
Page 71

AVI
ASF
MPGMPEG
MPEG
MOV
7.8.2 Video CD
A Video-CD contains MPEG-1 video sequences. The standard for making
Video-CDs was laid down by Philips and JVC in the White Book in 1993. The
first track contains the CD-i play program for the Video-CD as well as the CDI,
MPEGAV and VCD directories based on the ISO Level 1, ISO Level 2, Joliet file
system. The next tracks are in the format CD-ROM/XA-Mode 2/Form 2 Sectors
and contain the MPEG encoded audio/video sequences that are listed in
MPEGAV.
Video-CDs can be played on CD-i players, special Video-CD players or on a PC
on CD-ROM drives with CD-ROM/XA support and MPEG decoder (standard on
Windows 98 and higher) or your own Video CD software.
Video CD supports the following formats:
352x288 with 25 frames a second (PAL)
352x288 with 29.97 frames a second (NTSC)
704x576 as single frame
704x480 as single frame
352x288 with 29.976 frames a second (“FILM” resolution)
Caution: Some players do not support this format.
The Super Video CD (SVCD) format is an enhancement of Video CD.
7.8.3 Super Video CD
Super Video CDs contain MPEG-2 video sequences. Super Video CD is the
technological successor to Video CD, and, from a visual point of view, is closer
to DVD than to VCD.
On a Video CD the films are coded in MPEG-1 format (25 frames per second) at
a resolution of 352 x 288 pixels (PAL, 25 frames per second) or 352 x 240
(NTSC, 29.97 frames per second). On an SVCD the data transfer rate is 2.6
Mbit/s, which is double that of a VCD. The MPEG-2 encoder for SVCD uses a
resolution of 480 x 576 (PAL, 25 Hz) or 480 x 480 (NTSC, 29.97 Hz), which is
two-thirds that of DVD.
The highest possible resolution for individual images is, however, the same: 704
x 576 or 704 x 480.
In addition, a variable bit rate can be used, which means that quiet scenes with
few movements can be compressed more than hectic action scenes.
At the highest quality, around 35 minutes of film fit on a Super Video CD (using
a standard blank disc with 74 minutes of storage capacity).
Nero Creating a CD/DVD • 71
Page 72

Today’s Super Video CD format is a combination of developments of the Super
Video CD (SVCD) format of the same name developed by the China Recording
Standards Committee and of the High-Quality Video CD (HQ-VCD) format of the
Video CD Consortium (Philips, Sony, Matsushita and JVC).
7.8.4 Re-encoding MPEG-1, MPEG-2/SVCD files
In certain situations MPEG files may not have the right characteristics of a
(S)VCD for a compilation. When this happens, Nero detects the incorrect format
and the user has three options: 'Ignore Compatibility', 'Re-Encode the File' or
'Cancel'.
Re-encoding involves a number of steps. Decoding the existing file as it is,
converting the resolution and framerate, and re-encoding. If this option is
selected, re-encoding starts as soon as burning is initiated. Because AVI files
are being encoded, the process will need both time and temporary memory
space. The characteristics of the produced video tracks can be checked using
the 'Encoding resolution' option on the 'Video CD' tab in the New Compilation
window.
Burning MPEG-2 on VCD or MPEG-1 on SVCD is only allowed when the Nero
DVD plugin module is installed. Please read the next section for more
information.
7.8.5 Nero DVD plugin
You can make Super Video CDs when the files are already in the MPEG-2
format or when other video formats are converted to it. MPEG-2 files can be
decoded and encoded when this plugin is installed. It contains a file called
'VMPEG-2Enc.dll' which must be in the Nero directory. The file is loaded when a
video decode/encode operation is required.
For licensing reasons this plugin cannot be supplied with Nero. However you
can purchase the DVD plugin on the Nero AG website at
7.8.6 VCD and SVCD menus
Nero can create a menu for a (S)VCD. This menu consists of one or more
pages which are the start of the (S)VCD. The user is able to navigate through
the menu pages using the Previous and Next player buttons. The menu pages
show all of the items that are on the CD. The user can select these items with
the player’s digit keys or with a pointer device (e.g. mouse).
7.8.6.1 Setting menu parameters
The menu parameters are found on the Menu tab in the 'New Compilation'
window. If the menu is enabled, the menu pages will be created in the
compilation.
www.nero.com.
The user has a choice of preconfigured layouts. The result can be previewed in
a small window by selecting the 'Preview First Page' checkbox. Some of the
layouts have a thumbnail – this is extracted from the picture and video
Nero Creating a CD/DVD • 72
Page 73

elements. The next section explains how to configure thumbnails for video
elements.
The user can choose a background picture and specify how it will fit the page
size. The foreground areas that are not filled by the picture are filled with the
color selected on the square button next to the Browse button.
The Font button is used to select the text format of the different elements on the
pages. The checkboxes beside this button provide shadow for these text
sections. The shadow makes it easier to read the text against different
backgrounds. Activating the Shadow checkbox opens a color selection button.
The Set as default button allows the user to save his current settings. The
settings are loaded the next time a menu is created.
7.8.6.2 Item titles and thumbnails
The title of an item that appears in the menu can be specified when the
characteristics for that item are accessed in the compilation window. This setting
is on the 'Menu' tab.
For video elements, this tab can be used to select a picture that will be extracted
from the video and used as a thumbnail. The slider determines the moment for
this picture in the video. The picture preview is updated immediately when the
slider is moved.
7.8.6.3 Supported image formats
Filetypes bmp, ico, ljp, pbm, pcx, png, tga, tif and wmf can now be used as a
source for freeze frames.
All of these files could be added directly to a video compilation. They can also
be used as source images for CD EXTRA.
7.8.6.4 Possibility of burning source pictures onto CD
When burning a (S)VCD with freeze frames, the pictures can be stored in their
original form on the recorded CD, i.e. they do not need to be converted first.
To do this, check the 'Store source pictures in' checkbox on the Video CD tab in
the New Compilation window.
7.8.6.5 Automatic aspect ratio adjustment
When freeze frames and menus are written to a (S)VCD, Nero will make the
necessary conversions automatically and retain the correct aspect ratio (the
ratio of width to height). This is necessary because the pixels in (S)VCD are not
square even though this is the case with most computer settings.
Example: A computer image with a resolution of 640x480 fits exactly into a PAL
SVCD image with a resolution of 704x576.
The actual resolution depends on the 'Encoding resolution‘ option on the 'Video
CD' tab in the compilation window.
Nero Creating a CD/DVD • 73
Page 74

7.8.6.6 Joliet support for (Super) Video CDs
Joliet can now be activated for (S)VCD on the 'ISO' tab. This creates a CD with
standard compatibility as Joliet complies with ISO requirements.
7.9 (Super) Video CD
7.9.1 Creating a Video CD
You can make Video CDs when the files are already in the MPEG-1 format or
when other video formats are converted to it. Nero contains a built-in MPEG-1
encoder with which MPEG-1 files can be created.
Now let’s take a step-by-step look at how to create a Video CD using Nero: All
settings may be left at their default values.
1. Insert an empty CD into the recorder.
2. Start a new compilation by clicking on the appropriate button or the File
menu and the command New.
3. Click the 'Video-CD' icon in the New Compilation dialog box which opens
when Nero is started. If Nero is already running you can open this dialog box
by selecting the 'New Compilation‘ icon on the toolbar.
4. The Video CD tab offers a number of options which you can use to tailor the
Video CD to your specific requirements. The 'Create standard compliant CD'
checkbox should be enabled to ensure that you make a Video CD that can
be played in a DVD player. You specify the color format to which the video
files will be converted in the 'Encoding resolution‘ section: Pal or NTSC. If
you want to be able to add pictures to the video, then they can be copied to a
separate directory. In this case check the ‘Store source pictures in’ checkbox.
The 'Use CD-i application' checkbox is only intended for users with
experience of CD-i applications.
5. On the Menu tab you can create a menu that appears when the Video CD is
inserted. Activate the checkbox and use the boxes to specify how the menu
will look. If you click the Set as default button, the settings for menu entries
will be saved and will be loaded automatically the next time a Video CD is
created.
6. On the ISO tab you can select the ISO level for the length of the names in the
'File-/Directorynames length' section. Up to 31 characters are permitted for
Windows 95 and higher. Names cannot be more than 11 characters long for
Windows 3.1 (8 for the name and 3 for the extension). ISO Level 2 will be
best in most cases – if you know that the CD must also be run on a Windows
3.1 system then you should select Level 1.
7. On the Label tab you can give your CD a name and overtype the default
name 'New'. You can use letters A-Z, digits 0-9 and the underscore character
(_) – diacritics (accents) and spaces are not supported.
8. On the Dates tab you can specify the date of the compilation and of its files.
The current date and time are entered for the compilation as default, also the
creation date of the files.
Nero Creating a CD/DVD • 74
Page 75

9. Use the Misc tab to specify which files will be buffered in the cache. Files
that are on slow media (floppy disks and network drives) and are very small
are moved to the cache by default. You specify the location of the cache on
the
Cache tab in the File menu (Preferences option).
10. Once you have selected your settings, click the New button on the right. You
will now see the empty compilation window for a Video CD. The large window
is for the videos and pictures, the small window for other filetypes. These
may be text files or even a software player for your PC. If a File Browser is
not open yet you can open one by selecting New File Browser from the
View menu or clicking the appropriate 'File Browser' icon. To specify that
Nero is started with an open File Browser, check ‘Start with File Browser’ in
the ‘General’ section on the
File Browser tab (File -> Preferences).
Compile the files for the CD using Drag&Drop editing by simply clicking on
the required files in the File Browser and dragging them into the appropriate
compilation window.
Clicking the right mouse button opens a context menu where you can
selectively add or omit certain file types. In addition there are a number of
commands that you will also find in Windows Explorer, such as 'Copy', 'Open‘
and 'Cut'.
Note:
If an MPEG file does not have the correct characteristics of a VCD, Nero
detects the incorrect format and the user has three options: 'Ignore
Compatibility', 'Re-Encode the File' or 'Cancel'.
Ignoring compatibility burns the file to the CD with no changes. This option is
specifically aimed at experienced users.
Re-encoding decodes the existing file, converts it to the correct resolution
and Framerate and encodes it again. (Re-encoding is done before burning.
This process requires both time and temporary memory space.
Canceling interrupts the addition of the video file, i.e. it is not added to the
compilation.
Important: If you do not drag an MPEG file into the video section, it will not
be written as a video track and will need more space on the CD.
Double-clicking a video file opens the 'MPEG Information' dialog box.
'Properties' tab
This tab displays basic information about the selected video. You can also
specify the length of the pause after the video.
Click OK to confirm your choice and close the dialog box.
'Menu' tab
This tab is only available when you have enabled the checkbox on the Menu
tab.
You can change the title of the video and extract a picture from the video for
use as a thumbnail. Use the slider to view the video frame by frame.
Click OK to confirm your choice and close the dialog box.
Note: If you have highlighted several video files, the 'Video Properties' dialog
box will open. This box displays information about the videos you have
highlighted. You can also specify the pause between the files.
Click OK to confirm your choice and close the dialog box.
Nero Creating a CD/DVD • 75
Page 76

11. Click on the Burn Compilation button or select the Burn Compilation
command from the 'Recorder' menu to open the write dialog box. This option
is only available when the compilation window is selected, as can be seen
from the fact that the title bar is blue. If the File Browser is selected (and the
title bar of the compilation window is therefore grayed) the option is not
available and CD writing cannot be started. In this case click anywhere in the
compilation window.
12. In the ‘Action’ section activate the other check boxes you require in addition
to the ‘Write‘ check box. You will find more information about this section in
'
Before you burn your first disc'. You must remember that when you create a
Video CD you must activate the 'Finalize CD' checkbox. This setting write
protects the CD and no further writing is possible.
All settings on this and the other tabs can now be reviewed and changed if
required.
13. Click on the Burn button to start the burn process (or the simulation depending on the chosen option). All the selected steps now run in sequence
until writing is complete. You can monitor progress in a status window which
shows the individual steps being logged as they are executed. A typical final
message would be: 'Burn process was successful with 12x (1800 KB/s)‘. The
CD is then ejected. The messages shown can either be saved, printed or
discarded. Close the window by clicking on the Discard or Close buttons.
14. You can now check what has been written to your new CD by inserting it
again and clicking the 'CD Info’ icon.
7.9.2 Creating a Super Video CD
You can make Super Video CDs when the files are already in the MPEG-2
format or when other video formats are converted to it. For licensing reasons
this plugin cannot be supplied with Nero. However you can purchase the DVD
plugin on the Nero AG website at
Now let’s take a step-by-step look at how to create a Super Video CD using
Nero: All settings may be left at their default values.
1. Insert an empty CD into the recorder.
2. Start a new compilation by clicking on the appropriate button or the File
menu and the command New.
3. Click the 'Super Video CD' icon in the New Compilation dialog box which
opens when Nero is started. If Nero is already running you can open this
dialog box by selecting the 'New Compilation‘ icon on the toolbar.
4. The Super Video CD tab offers a number of options which you can use to
tailor the Video CD to your specific requirements. The 'Create standard
compliant CD' checkbox should be enabled to ensure that you make a Super
Video CD that can be played in a DVD player. You specify the color format to
which the video files will be converted in the 'Encoding resolution‘ section:
Pal or NTSC. If you want to be able to add pictures to the video, then they
can be copied to a separate directory. In this case check the ‘Store source
pictures in’ checkbox.
www.nero.com.
The 'Use CD-i application' checkbox is only intended for users with
experience of CD-i applications.
Nero Creating a CD/DVD • 76
Page 77

5. On the Menu tab you can create a menu that appears when the Super Video
CD is inserted. Activate the checkbox and use the boxes to specify how the
menu will look. If you click the Set as default button, the settings for menu
entries will be saved and will be loaded automatically the next time a Super
Video CD is created.
6. On the ISO tab you can select the ISO level for the length of the names in the
'File-/Directorynames length' section. Up to 31 characters are permitted for
Windows 95 and higher. Names cannot be more than 11 characters long for
Windows 3.1 (8 for the name and 3 for the extension). ISO Level 2 will be
best in most cases – if you know that the CD must also be run on a Windows
3.1 system then you should select Level 1.
7. On the Label tab you can give your CD a name and overtype the default
name 'New'. You can use letters A-Z, digits 0-9 and the underscore character
(_) – diacritics (accents) and spaces are not supported.
8. On the Dates tab you can specify the date of the compilation and of its files.
The current date and time are entered for the compilation as default, also the
creation date of the files.
9. Use the Misc tab to specify which files will be buffered in the cache. Files
that are on slow media (floppy disks and network drives) and are very small
are moved to the cache by default. You specify the location of the cache on
Cache tab in the File menu (Preferences option).
the
10. Once you have selected your settings, click the New button on the right. You
will now see the empty compilation window for a Super Video CD. The large
window is for the videos and pictures, the small window for other filetypes.
These may be text files or even a software player for your PC. If a File
Browser is not open yet you can open one by selecting New File Browser
from the View menu or clicking the appropriate 'File Browser' icon. To specify
that Nero is started with an open File Browser, check ‘Start with File Browser’
in the ‘General’ section on the
File Browser tab (File -> Preferences).
Compile the files for the CD using Drag&Drop editing by simply clicking on
the required files in the File Browser and dragging them into the appropriate
compilation window. Clicking the right mouse button opens a context menu
where you can selectively add or omit certain file types. In addition there are
a number of commands that you will also find in Windows Explorer, such as
'Copy', 'Open‘ and 'Cut'.
Note:
If an MPEG file does not have the correct characteristics of an SVCD, Nero
detects the incorrect format and the user has three options: 'Ignore
Compatibility', 'Re-Encode the File' or 'Cancel'.
Ignoring compatibility burns the file to the CD with no changes. This option is
specifically aimed at experienced users.
Re-encoding decodes the existing file, converts it to the correct resolution
and Framerate and encodes it again. (Re-encoding is done before burning.
This process requires both time and temporary memory space.
Canceling interrupts the addition of the video file, i.e. it is not added to the
compilation.
Important: If you do not drag an MPEG file into the video section, it will not
be written as a video track and will need more space on the CD.
11. Double-clicking a video file opens the 'MPEG Information' dialog box.
'Properties' tab
Nero Creating a CD/DVD • 77
Page 78

This tab displays basic information about the selected video. You can also
specify the length of the pause after the video. Click OK to confirm your
choice and close the dialog box.
'Menu' tab
This tab is only available when you have enabled the checkbox on the Menu
tab.
You can change the title of the video and extract a picture from the video for
use as a thumbnail. Use the slider to view the video frame by frame. Click
OK to confirm your choice and close the dialog box.
Note: If you have highlighted several video files, the 'Video Properties' dialog
box will open. This box displays information about the videos you have
highlighted. You can also specify the pause between the files. Click OK to
confirm your choice and close the dialog box.
12. Click on the Burn Compilation button or select the Burn Compilation
command from the 'Recorder' menu to open the write dialog box. This option
is only available when the compilation window is selected, as can be seen
from the fact that the title bar is blue. If the File Browser is selected (and the
title bar of the compilation window is therefore grayed) the option is not
available and CD writing cannot be started. In this case click anywhere in the
compilation window.
In the ‘Action’ section activate the other check boxes you require in addition
to the ‘Write‘ check box. You will find more information about this section in
Before you burn your first disc'. You must remember that when you create a
'
Super Video CD you must activate the 'Finalize CD' checkbox. This setting
write protects the CD and no further writing is possible.
All settings on this and the other tabs can now be reviewed and changed if
required.
13. Click on the Burn button to start the burn process (or the simulation depending on the chosen option). All the selected steps now run in sequence
until writing is complete. You can monitor progress in a status window which
shows the individual steps being logged as they are executed. A typical final
message would be: 'Burn process was successful with 12x (1800 KB/s)‘. The
CD is then ejected. The messages shown can either be saved, printed or
discarded. Close the window by clicking on the Discard or Close buttons.
14. You can now check what has been written to your new CD by inserting it
again and clicking the 'CD Info’ icon.
7.10 Images on a Video CD or Super Video CD
7.10.1 Introduction
Images can be quickly and cost-effectively archived on a Video CD or Super
Video CD, and this is also an easy way to make them available to others.
Filetypes bmp, ico, ljp, pbm, pcx, png, tga, tif and wmf can be used for this CD.
Note: When creating a CD with images we advise that you select a Video CD
compilation to optimize compatibility with DVD players.
Nero Creating a CD/DVD • 78
Page 79

7.10.2 Creating a simple CD
Now let’s take a step-by-step look at how to create a CD with images using
Nero: All settings may be left at their default values.
1. Insert an empty CD into the recorder.
2. Start a new compilation by clicking on the appropriate button or the File
menu and the command New.
3. Click the 'Video-CD' icon in the New Compilation dialog box which opens
when Nero is started. If Nero is already running you can open this dialog box
by selecting the 'New Compilation‘ icon on the toolbar.
4. The Video CD tab offers a number of options which you can use to tailor the
Photo CD to your specific requirements. You should enable the 'Create
standard compliant CD' and 'Use CD-i application' checkboxes to ensure that
you make a Photo CD that can be played in as many players as possible.
The 'Store source pictures in' checkbox should also be enabled.
Note: The encoding resolution is irrelevant when making a this CD.
5. On the ISO tab you can select the ISO level for the length of the names in the
'File-/Directorynames length' section. Up to 31 characters are permitted for
Windows 95 and higher. Names cannot be more than 11 characters long for
Windows 3.1 (8 for the name and 3 for the extension). ISO Level 2 will be
best in most cases – if you know that the CD must also be run on a Windows
3.1 system then you should select Level 1.
6. On the Label tab you can give your CD a name and overtype the default
name 'New'. You can use letters A-Z, digits 0-9 and the underscore character
(_) – diacritics (accents) and spaces are not supported.
7. On the Dates tab you can specify the date of the compilation and of its files.
The current date and time are entered for the compilation as default, also the
creation date of the files.
8. Use the Misc tab to specify which files will be buffered in the cache. Files
that are on slow media (floppy disks and network drives) and are very small
are moved to the cache by default. You specify the location of the cache on
Cache tab in the File menu (Preferences option).
the
9. Once you have selected your settings, click the New button on the right. You
will now see the empty compilation window for a Video CD. The large window
is for the pictures, the small window for other filetypes. These may be text
files or even a software player for your PC. If a File Browser is not open yet
you can open one by selecting New File Browser from the View menu or
clicking the appropriate 'File Browser' icon. To specify that Nero is started
with an open File Browser, check ‘Start with File Browser’ in the ‘General’
section on the
10. Compile the files for the CD using Drag&Drop editing by simply clicking on
the required files in the File Browser and dragging them into the appropriate
compilation window. Clicking the right mouse button opens a context menu
where you can selectively add or omit certain file types. In addition there are
a number of commands that you will also find in Windows Explorer, such as
'Copy', 'Open‘ and 'Cut'.
File Browser tab (File -> Preferences).
Double-clicking a picture file opens the 'MPEG Information' dialog box.
'Properties' tab
Nero Creating a CD/DVD • 79
Page 80

This tab displays basic information about the selected picture. You can also
specify the length of the pause after the picture. Click OK to confirm your
choice and close the dialog box.
Note: If you have highlighted several picture files, the 'Video Properties'
dialog box will open. This box displays information about the pictures you
have highlighted. You can also specify the pause for all picture files. Click OK
to confirm your choice and close the dialog box.
11. Click on the Burn Compilation button or select the Burn Compilation
command from the 'Recorder' menu to open the write dialog box. This option
is only available when the compilation window is selected, as can be seen
from the fact that the title bar is blue. If the File Browser is selected (and the
title bar of the compilation window is therefore grayed) the option is not
available and CD writing cannot be started. In this case click anywhere in the
compilation window.
12. In the ‘Action’ section activate the other check boxes you require in addition
to the ‘Write‘ check box. You will find more information about this section in
Before you burn your first disc'. You must remember that when you create a
'
Video CD you must activate the 'Finalize CD' checkbox. This setting write
protects the CD and no further writing is possible.
All settings on this and the other tabs can now be reviewed and changed if
required.
13. Click on the Burn button to start the burn process (or the simulation depending on the chosen option). All the selected steps now run in sequence
until writing is complete. You can monitor progress in a status window which
shows the individual steps being logged as they are executed. A typical final
message would be: 'Burn process was successful with 12x (1800 KB/s)‘. The
CD is then ejected. The messages shown can either be saved, printed or
discarded. Close the window by clicking on the Discard or Close buttons.
14. You can now check what has been written to your new CD by inserting it
again and clicking the 'CD Info’ icon.
7.10.3 Creating an interactive CD with images
Now let’s take a step-by-step look at how to create an interactive CD with
images using Nero: All settings may be left at their default values.
1. Insert an empty CD into the recorder.
2. Start a new compilation by clicking on the appropriate button or the File
menu and the command New.
3. Click the 'Video-CD' icon in the New Compilation dialog box which opens
when Nero is started. If Nero is already running you can open this dialog box
by selecting the 'New Compilation‘ icon on the toolbar.
4. The Video CD tab offers a number of options which you can use to tailor the
CD to your specific requirements. You should enable the 'Create standard
compliant CD' and 'Use CD-i application' checkboxes to ensure that you
make a CD that can be played in as many players as possible. The 'Store
source pictures in' checkbox should also be enabled.
Note: The encoding resolution is irrelevant when making a CD.
Nero Creating a CD/DVD • 80
Page 81

5. Click on the Menu tab to create a menu which appears when the CD is
inserted. Activate the checkbox and specify how the menu will look in the
‘Layout’ section.
6. On the ISO tab you can select the ISO level for the length of the names in the
'File-/Directorynames length' section. Up to 31 characters are permitted for
Windows 95 and higher. Names cannot be more than 11 characters long for
Windows 3.1 (8 for the name and 3 for the extension). ISO Level 2 will be
best in most cases – if you know that the CD must also be readable on a
Windows 3.1 system then you should select Level 1.
7. On the Label tab you can give your CD a name and overtype the default
name 'New'. You can use letters A-Z, digits 0-9 and the underscore character
(_) – diacritics (accents) and spaces are not supported.
8. On the Dates tab you can specify the date of the compilation and of its files.
The current date and time are entered for the compilation as default, also the
creation date of the files.
9. Use the Misc tab to specify which files will be buffered in the cache. Files
that are on slow media (floppy disks and network drives) and are very small
are moved to the cache by default. You specify the location of the cache on
the
Cache tab in the File menu (Preferences option).
10. Once you have selected your settings, click the New button on the right. You
will now see the empty compilation window for a Video CD. The large window
is for the pictures, the small window for other filetypes. These may be text
files or even a software player for your PC. If a File Browser is not open yet
you can open one by selecting New File Browser from the View menu or
clicking the appropriate 'File Browser' icon. To specify that Nero is started
with an open File Browser, check ‘Start with File Browser’ in the ‘General’
section on the
File Browser tab (File -> Preferences).
11. Compile the files for the Photo CD using Drag&Drop editing by simply
clicking on the required files in the File Browser and dragging them into the
appropriate compilation window. Clicking the right mouse button opens a
context menu where you can selectively add or omit certain file types. In
addition there are a number of commands that you will also find in Windows
Explorer, such as 'Copy', 'Open‘ and 'Cut'.
Double-clicking a picture file opens the 'MPEG Information' dialog box.
'Properties' tab
This tab displays basic information about the selected picture. You can also
specify the length of the pause after the picture. Click OK to confirm your
choice and close the dialog box.
Note: If you have highlighted several picture files, the 'Video Properties'
dialog box will open. This box displays information about the pictures you
have highlighted. You can also specify the pause for all picture files. Click OK
to confirm your choice and close the dialog box.
12. Click on the Burn Compilation button or select the Burn Compilation
command from the 'Recorder' menu to open the write dialog box. This option
is only available when the compilation window is selected, as can be seen
from the fact that the title bar is blue. If the File Browser is selected (and the
title bar of the compilation window is therefore grayed) the option is not
available and CD writing cannot be started. In this case click anywhere in the
compilation window.
13. In the ‘Action’ section activate the other check boxes you require in addition
to the ‘Write‘ check box. You will find more information about this section in
Nero Creating a CD/DVD • 81
Page 82

'Before you burn your first disc'. You must remember that when you create a
Video CD you must activate the 'Finalize CD' checkbox. This setting write
protects the CD and no further writing is possible.
All settings on this and the other tabs can now be reviewed and changed if
required.
14. Click on the Burn button to start the burn process (or the simulation depending on the chosen option). All the selected steps now run in sequence
until writing is complete. You can monitor progress in a status window which
shows the individual steps being logged as they are executed. A typical final
message would be: 'Burn process was successful with 12x (1800 KB/s)‘. The
CD is then ejected. The messages shown can either be saved, printed or
discarded. Close the window by clicking on the Discard or Close buttons.
15. You can now check what has been written to your new CD by inserting it
again and clicking the 'CD Info’ icon.
7.10.3.1 Single pictures and slideshows
With Nero version 5.0 and higher you can also add single pictures to a (Super)
Video CD. Unlike video films, single pictures can and must be encoded by
Nero itself.
From version V5.5, filetypes bmp, ico, ljp, pbm, pcx, png, tga, tif and wmf can be
used as a source for freeze frames.
The encoded pictures are stored in the first track and are listed in the
SEGMENT directory when the CD contents are viewed on a PC. A (S)VCD must
contain at least one further track so Nero generates an additional empty track if
the (S)VCD contains single pictures only.
It is Nero’s declared objective to make the production of simple slideshows as
easy as possible. For this reason Nero uses the same interface with the user as
it does for Audio CDs (a simple list of the pieces on the CD) and creates a CD
that plays these pieces in the specified sequence. The pictures are
automatically converted to the resolution which is expected of (S)VCD, so the
original pictures can have any resolution. Options which can be used to
intervene in the picture editing process are planned for future versions of Nero.
The creation of small preview pictures that can be magnified to full picture size
by means of simple commands is also planned.
The resolutions that are supported by both standards are shown below:
PAL NTSC
VCD, normal 352x288 352x240
VCD, high 704x576 704x480
SVCD, normal 480x576 480x480
SVCD, high 704x576 704x480
A VCD always stores the normal resolution for older players and it can also offer
the higher resolution for players with a better display. An SVCD on the other
hand only stores one of the two resolutions. Nero generates the higher
resolution when the source picture is large enough and also detects the video
mode automatically.
Nero Creating a CD/DVD • 82
Page 83

7.10.3.2 Technical background
Video CD V2.0 (VCD) is a standard for saving video data on a CD. It gets more
data on a CD and allows interactive selection of the CD’s contents. Special
players such as CDI a DVD players support this format. The video and audio
dataflows are compressed with MPEG-1, Audio Level 2 and played at realtime
speed (75 blocks a second). Because this format and video/audio data generally
tolerate bit errors the space that is normally needed for error correction can also
be used for MPEG data. This increases the amount of user data in a block from
2048 to 2324 bytes per block, giving the VCD 13% more capacity compared
with MPEG file storage on a data CD.
The Super Video CD (SVCD) format is an extension of the VCD standard in
which the MPEG-2 compression standard is used with variable bit rate coding
which allows twice the bit rate of the VCD. As a result the SVCD also offers
enhanced image quality, however total playing time is reduced when the full
bandwidth is actually used. At maximum bit rate, an SVCD only stores around
35 minutes of videofilm as against 70 minutes on a VCD.
An (S)VCD is an XA disk with several Mode-2 tracks. The first track usually
contains Form-1 blocks with the normal 2048 bytes per block and stores a CDROM (ISO) image so that the CD can be read by a PC. Certain files and
directories are required by the standards:
(S)VCD: Information about the available tracks and how they must be played
EXT (VCD only): More detailed information about the type of playing; only
relevant for CDI players
CDI (VCD only): This directory contains the Philips CDI application and its
utilities. These files are licensed by Philips and taken from the Nero root
directory. This application is needed for playing tracks on a CDI player.
MPEGAV (MPEG-2 for SVCD): The AVSEQxx files contain the MPEG tracks
on the Video-CD. The first track only contains references to the data which
are stored not in the first track but in the subsequent tracks. This means that
although these files have a long nominal length they do not require much
space in the ISO track.
SEGMENT: The ITEMxxxx files represent the encoded single pictures. They
are stored in the first track as Form-2 blocks and have a fixed length of
150 blocks.
The encoded files can be played on a PC provided a suitable package such as
Windows Media Player is installed. DVD player software is required for MPEG-
2.
Other files and directories can be added to the CD-ROM. These are ignored by
a player. (S)VCD also supports other special functions such as karaoke and
hierarchical menus with pictures, but these are not used by Nero at the present
time. Nero simply takes a list of MPEG or picture files and writes them to a CD
in such a way that playing starts immediately with the first file, and the player’s
forward and reverse keys can be used to skip from file to file.
You can set a pause that stops play at the end of every file. The pause is only a
value in the description of the file so there is no need to create empty blocks;
the pause can be very long or can even be set to infinite, in which case the
player is stopped and waits for an input from the user.
Nero Creating a CD/DVD • 83
Page 84

7.11 HFS CD
HFS is the name of the Apple Macintosh file system. Nero can burn so-called
Hybrid CDs (which contain both ISO Level 1, ISO Level 2, Joliet and HFS data;
see '
Creating a Hybrid CD') and 'pure' HFS-CDs (which can only be read on
Apple Macintosh computers!). An SCSI harddisk with the HFS data must be
connected up to the PC for this to work. The data can only be generated and
edited with an Apple Macintosh PC. The layout of the file icons, the drive icon
and the window positions on the Apple Mac are defined by the settings on the
selected HFS partition.
When connecting the hard disk with the HFS data, the SCSI harddisk must of
course be connected and powered up before the PC is turned on. There must
also be no duplication of SCSI device numbers. You should also ensure that the
HFS data do not exceed 640 MB otherwise they will not 'fit' on the CD.
1. From the 'Recorder' menu, select 'Burn HFS Partition...'.
This opens a dialog box with list of available HFS partitions. If the list is blank
then no SCSI harddisk with HFS data has been found.
2. Now select the required HFS partition from the list and click 'OK'.
You will now see the familiar Nero tab where you can start the write process
in the normal way.
3. The tab contains a number of checkboxes, some of which are already
enabled.
All settings on this and the other tabs can now be reviewed and changed if
required.
4. Confirm your selection by clicking on the Burn button. All the selected steps
now run in sequence until writing is complete. You can monitor progress in a
status window which shows the individual steps being logged as they are
executed. A typical final message would be: 'Burn process was successful
with 12x (1800 KB/s)‘. The CD is then ejected. The messages shown can
either be saved, printed or discarded. Close the window by clicking on the
Discard or Close buttons.
7.12 Hybrid CDs
A Hybrid CD contains files for the PC based on the ISO Level 1, ISO Level 2,
Joliet standard and for Apple Macintosh computers based on the HFS standard.
Nero creates so-called 'non shared' Hybrid CDs. This means that if you wish
to use files on the Mac and on a PC then they must be on the CD twice: Once in
the ISO sector and once in the HFS sector.
Caution: If you want to make a Hybrid CD from a PC, the HFS input data must
be on an SCSI harddisk connected to the PC. Remember however that the data
on the SCSI harddisk can only be created with an Apple Mac computer.
7.12.1 Creating a Hybrid CD
An SCSI harddisk with the HFS input data must be connected up to the PC
before a Hybrid CD can be created. The SCSI harddisk must be connected and
Nero Creating a CD/DVD • 84
Page 85

powered up before the PC is switched on. There must also be no duplication of
SCSI device numbers.
Caution: Neither the ISO data nor the HFS data nor both data together may
exceed 640 MB as they will not fit on the CD.
1. Insert an empty CD into the recorder.
2. Start a new compilation by clicking on the appropriate button or the File
menu and the command New.
3. Click the 'CD-ROM (Hybrid)' icon - the Hybrid tab is in front. It shows the
existing Mac partitions. If the list is blank then no SCSI harddisk with HFS
data has been found. Select the required HFS partition.
4. On the ISO tab you can toggle between Mode 1 and Mode 2/XA format as
required. You should not need to verify the format – in the past there were
problems with CD drives that could not read Mode 1 CDs, but very few of
these drives should still be in use today. If these options are grayed it means
that selection is not logically possible at present. Mixing Mode 1 and Mode
2/XA tracks on a CD would result in an unreliable and potentially unreadable
CD format. In the 'File/Directorynames length‘ section you can specify the
ISO level for the length of the names. Up to 31 characters are permitted for
Windows 95 and higher. Names cannot be more than 11 characters long for
Windows 3.1 (8 for the name and 3 for the extension). ISO Level 2 will be
best in most cases – if you know that the CD must also be readable on a
Windows 3.1 system then you should select Level 1.
5. On the Label tab you can give your CD a name and overtype the default
name 'New'. You can use letters A-Z, digits 0-9 and the underscore character
(_) – diacritics (accents) and spaces are not supported.
6. On the Dates tab you can specify the date of the compilation and of its files.
The current date and time are entered for the compilation as default, also the
creation date of the files.
7. Use the Misc tab to specify which files will be buffered in the cache. Files
that are on slow media (floppy disks and network drives) and are very small
are moved to the cache by default. You specify the location of the cache on
Cache tab in the File menu (Preferences option).
the
8. Once you have selected your settings, click the New button on the right. You
will now see the empty compilation window for CD-ROM. If a File Browser is
not open yet you can open one by selecting New File Browser from the
View menu or clicking the appropriate 'File Browser' icon. To specify that
Nero is started with an open File Browser, check ‘Start with File Browser’ in
the ‘General’ section on the
File Browser tab (File -> Preferences).
9. Compile the files for the CD using Drag&Drop editing by simply clicking on
the required files in the File Browser and dragging them into the compilation
window. First, the files for the ISO part of the Hybrid CD or that will be 'visible'
later on the PC, and second the files for the HFS part of the Hybrid CD which
will be visible later on the Mac.
Note: The layout of the file icons, the drive icon and the window positions on
the Apple Mac are defined by the settings on the selected HFS partition.
Clicking the right mouse button opens a context menu where you can
selectively add or omit certain file types. In addition there are a number of
commands that you will also find in Windows Explorer, such as 'Copy', 'Open‘
and 'Cut'.
Nero Creating a CD/DVD • 85
Page 86

10. Click on the Burn Compilation button or select the Burn Compilation
command from the 'Recorder' menu to open the write dialog box. This option
is only available when the compilation window is selected, as can be seen
from the fact that the title bar is blue. If the File Browser is selected (and the
title bar of the compilation window is therefore grayed) the option is not
available and CD writing cannot be started. In this case click anywhere in the
compilation window. The ‘Burn Compilation‘ dialog box now opens - it is the
same as when creating a new compilation but the Burn tab is now in front.
11. In the ‘Action’ section activate the other check boxes you require in addition
to the ‘Write‘ check box. You will find more information about this section in
Before you burn your first disc'. You must remember that when you create a
'
CD with only one session you must activate the 'Finalize CD' checkbox. This
setting write protects the CD and no further writing is possible. (With a
Multisession CD this checkbox is only checked for the last session of the
CD.)
All settings on this and the other tabs can now be reviewed and changed if
required.
12. Click on the Burn button to start the burn process (or the simulation depending on the chosen option). All the selected steps now run in sequence
until writing is complete. You can monitor progress in a status window which
shows the individual steps being logged as they are executed. A typical final
message would be: 'Burn process was successful with 12x (1800 KB/s)‘. The
CD is then ejected. The messages shown can either be saved, printed or
discarded. Close the window by clicking on the Discard or Close buttons.
13. You can now check what has been written to your new CD by inserting it
again and clicking the 'CD Info’ icon.
7.13 UDF Format
The UDF file system was developed when it became increasingly obvious that
the ISO 9660 file system used on CDs was no longer meeting the needs of
rewritable media and DVDs. It was optimized mainly to accommodate large data
volumes and to make it easy to modify an existing file system.
Nero can burn UDF and so-called 'UDF Bridge CDs', which contain both a UDF
and an ISO 9660 file system. The UDF file system can be read by, say,
Windows 98 and Windows 2000 with no special drivers. In case of doubt,
Windows 2000 and Windows 98 also read the UDF file system if both an ISO
9660 and a UDF file system are detected on the medium. Writing in UDF format
is particularly important when burning DVDs because UDF is the preferred
operating system for these media.
7.13.1 Creating a UDF CD
Please note that Nero does not yet support Multisession UDF-CDs and that
therefore UDF or UDF-Bridge Sessions must be written on blank CDs.
Now let’s take a step-by-step look at how to create a CD-ROM (UDF) using
Nero:
All settings may be left at their default values.
Nero Creating a CD/DVD • 86
Page 87

1. Insert an empty CD into the recorder.
2. Start a new compilation by clicking on the appropriate button or the File
menu and the command New.
3. Click the 'CD-ROM (UDF)' icon - the Title tab is in front. Use the tabs to
specify the attributes of the compilation, such as the name of the CD,
different characteristics and restrictions. On this tab you can give your CD a
name and overtype the default name 'New'. You can use letters A-Z, digits 09 and the underscore character (_) – diacritics (accents) and spaces are not
supported.
4. On the Dates tab you can specify the date of the compilation and of its files.
The current date and time are entered for the compilation as default, also the
creation date of the files.
5. Use the Misc tab to specify which files will be buffered in the cache. Files
that are on slow media (floppy disks and network drives) and are very small
are moved to the cache by default. You specify the location of the cache on
Cache tab in the File menu (Preferences option).
the
6. Once you have selected your settings, click the New button on the right. You
will now see the empty compilation window for CD-ROM.
7. If a File Browser is not open yet you can open one by selecting New File
Browser from the View menu or clicking the appropriate 'File Browser' icon.
To specify that Nero is started with an open File Browser, check ‘Start with
File Browser’ in the ‘General’ section on the
File Browser tab (File ->
Preferences).
8. Compile the files for the CD using Drag&Drop editing by simply clicking on
the required files in the File Browser and dragging them into the compilation
window.
Clicking the right mouse button opens a context menu where you can
selectively add or omit certain file types. In addition there are a number of
commands that you will also find in Windows Explorer, such as 'Copy', 'Open‘
and 'Cut'.
9. When compiling with Drag&Drop the directory structure is moved across too,
i.e. if you drag an entire folder into the compilation window the folder will be
created on the CD you wish to burn.
If you drag a lot of individual files however this may affect the clarity of the
CD’s contents. To avoid this you can create new folders within the
compilation. To do this, select the Create Folder option from the Edit menu
or click the right mouse button and choose the command from the context
menu.
A folder you have just created is assigned the name ‘New’ by default and can
be renamed immediately. You can create as many folders as you need and
pull the existing files across using Drag&Drop. You can of course drag other
files into the compilation window from the File Browser.
10. Click on the Burn Compilation button or select the Burn Compilation
command from the 'Recorder' menu to open the write dialog box. This option
is only available when the compilation window is selected, as can be seen
from the fact that the title bar is blue. If the File Browser is selected (and the
title bar of the compilation window is therefore grayed) the option is not
available and CD writing cannot be started. In this case click anywhere in the
compilation window.
Nero Creating a CD/DVD • 87
Page 88

The ‘Burn Compilation‘ dialog box now opens - it is the same as when
creating a new compilation but the Burn tab is now in front.
11. In the ‘Action’ section activate the other check boxes you require in addition
to the ‘Write‘ check box. You will find more information about this section in
'
Before you burn your first disc'. You must remember that when you create a
UDF-CD with only one session you must activate the 'Finalize CD' checkbox.
This setting write protects the CD and no further writing is possible.
All settings on this and the other tabs can now be reviewed and changed if
required.
12. Click on the Burn button to start the burn process (or the simulation depending on the chosen option). All the selected steps now run in sequence
until writing is complete. You can monitor progress in a status window which
shows the individual steps being logged as they are executed. A typical final
message would be: 'Burn process was successful with 12x (1800 KB/s)‘. The
CD is then ejected. The messages shown can either be saved, printed or
discarded. Close the window by clicking on the Discard or Close buttons.
13. You can now check what has been written to your new CD by inserting it
again and clicking the 'CD Info’ icon.
7.13.2 Creating a UDF/ISO Bridge CD
The big advantage of a UDF/ISO Bridge CD is that the data comply with both
the UDF standard and the ISO standard. The data are only added to the
compilation once and Nero automatically creates a UDF and an ISO table of
contents. These two tables of contents allow the CD to be used as a Bridge CD.
Please note that Nero does not support Multisession UDF/ISO Bridge CDs at
the present time. UDF Bridge sessions must therefore be written to blank CDs.
Now let’s take a step-by-step look at how to create a CD-ROM (ISO/UDF) using
Nero:
All settings may be left at their default values.
1. Insert an empty CD into the recorder.
2. Start a new compilation by clicking on the appropriate button or the File
menu and the command New.
3. Click the 'CD-ROM (UDF/ISO)' icon - the ISO tab is in front. Use the tabs to
specify the attributes of the compilation, such as the name of the CD,
different characteristics and restrictions.
On the ISO tab you can toggle between Mode 1 and Mode 2/XA format as
required. You should not need to verify the format – in the past there were
problems with CD drives that could not read Mode 1 CDs, but very few of
these drives should still be in use today. If these options are grayed it means
that selection is not logically possible at present. Mixing Mode 1 and Mode
2/XA tracks on a CD would result in an unreliable and potentially unreadable
CD format. In the 'File/Directorynames length‘ section you can specify the
ISO level for the length of the names. Up to 31 characters are permitted for
Windows 95 and higher. Names cannot be more than 11 characters long for
Windows 3.1 (8 for the name and 3 for the extension). ISO Level 2 will be
best in most cases – if you know that the CD must also be readable on a
Windows 3.1 system then you should select Level 1.
Nero Creating a CD/DVD • 88
Page 89

4. On the Label tab you can give your CD a name and overtype the default
name 'New'. You can use letters A-Z, digits 0-9 and the underscore character
(_) – diacritics (accents) and spaces are not supported.
5. On the Dates tab you can specify the date of the compilation and of its files.
The current date and time are entered for the compilation as default, also the
creation date of the files.
6. Use the Misc tab to specify which files will be buffered in the cache. Files
that are on slow media (floppy disks and network drives) and are very small
are moved to the cache by default. You specify the location of the cache on
the
Cache tab in the File menu (Preferences option).
7. Once you have selected your settings, click the New button on the right. You
will now see the empty compilation window for CD-ROM.
If a File Browser is not open yet you can open one by selecting New File
Browser from the View menu or clicking the appropriate 'File Browser' icon.
To specify that Nero is started with an open File Browser, check ‘Start with
File Browser’ in the ‘General’ section on the
File Browser tab (File ->
Preferences).
8. Compile the files for the CD using Drag&Drop editing by simply clicking on
the required files in the File Browser and dragging them into the compilation
window.
Clicking the right mouse button opens a context menu where you can
selectively add or omit certain file types. In addition there are a number of
commands that you will also find in Windows Explorer, such as 'Copy', 'Open‘
and 'Cut'.
When compiling with Drag&Drop the directory structure is moved across too,
i.e. if you drag an entire folder into the compilation window the folder will be
created on the CD you wish to burn.
If you drag a lot of individual files however this may affect the clarity of the
CD’s contents. To avoid this you can create new folders within the
compilation. To do this, select the Create Folder option from the Edit menu
or click the right mouse button and choose the command from the context
menu.
A folder you have just created is assigned the name ‘New’ by default and can
be renamed immediately. You can create as many folders as you need and
pull the existing files across using Drag&Drop. You can of course drag other
files into the compilation window from the File Browser.
9. Click on the Burn Compilation button or select the Burn Compilation
command from the 'Recorder' menu to open the write dialog box. This option
is only available when the compilation window is selected, as can be seen
from the fact that the title bar is blue. If the File Browser is selected (and the
title bar of the compilation window is therefore grayed) the option is not
available and CD writing cannot be started. In this case click anywhere in the
compilation window.
The ‘Burn Compilation‘ dialog box now opens - it is the same as when
creating a new compilation but the Burn tab is now in front.
10. In the ‘Action’ section activate the other check boxes you require in addition
to the ‘Write‘ check box. You will find more information about this section in
Before you burn your first disc'. You must remember that when you create a
'
UDF-CD with only one session you must activate the 'Finalize CD' checkbox.
This setting write protects the CD and no further writing is possible.
Nero Creating a CD/DVD • 89
Page 90

All settings on this and the other tabs can now be reviewed and changed if
required.
11. Click on the Burn button to start the burn process (or the simulation depending on the chosen option). All the selected steps now run in sequence
until writing is complete. You can monitor progress in a status window which
shows the individual steps being logged as they are executed. A typical final
message would be: 'Burn process was successful with 12x (1800 KB/s)‘. The
CD is then ejected. The messages shown can either be saved, printed or
discarded. Close the window by clicking on the Discard or Close buttons.
12. You can now check what has been written to your new CD by inserting it
again and clicking the 'CD Info’ icon.
Nero Creating a CD/DVD • 90
Page 91

8 Copying CDs
8.1 Introduction
Copying CDs is easy with Nero. All you have to do is decide how you would like
to copy the CD:
Fast copy (on the fly) from CD/DVD-ROM drive to recorder.
Create the copy with the help of a temporary image file on the hard disk. We
recommend that you read in the original CD using the recorder.
The method you use for copying will depend on your particular requirements: we
do not recommend either method a priori as they both have advantages and
disadvantages.
Choose copy over image if you
Feel that obtaining the best possible reproduction (particularly regarding
audio index positions and general audio quality) of the original CD is
important.
Have the extra time needed to produce a copy using an image file.
Have sufficient space for the image file on the hard disk.
Would like to make several copies of the same CD.
Think it likely that read errors may have occurred on the source CD (for
example because scratches are clearly visible).
You only have a CD drive.
Choose fast copy if you
Do not have much time to spare.
Do not have enough space for an image file on the hard disk (for example
you will need about 10 MB per minute of audio data; on the other hand a data
CD requires a large image file of several hundred MBs!).
See also:
Copying methods
Verifying audio read quality
Setting speed on CD/DVD-ROM drives
Nero Copying CDs • 91
Page 92

8.2 Copying methods
8.2.1 Copying using an image file
There are three stages to copying using an image file. First of all Nero reads the
original CD from a CD drive and then, in the second stage, produces an image
file on the hard disk containing all the information from the CD. In the third stage
Nero writes the image file already created onto an empty CD.
This procedure guarantees the greatest possible insurance against data being
supplied too slowly which could lead to defective blanks. With audio CDs this
choice allows audio data to be corrected - something which would not be
possible with simultaneous reading and burning.
The following is a step-by-step guide to using Nero to copy a CD:
All settings may be left at their default values.
1. Place the CD to be copied in the recorder.
2. Start a new compilation by clicking on the appropriate button or the File
menu and the command New.
3. Click on the Copy CD icon - the Burn tab is in front. Set the procedure for
copying CDs on the tabs.
4. Click on the Copy Options tab and deactivate the "Fast copy " control field.
Check whether the CD drive shown also contains the original CD and, if
necessary, change it by clicking on the drop down button and selecting the
drive required. If necessary you can also change the read speed of the CD
drive selected.
5. Click on the Image tab and define the name of the image file and the
directory where this is to be stored.
If you do not need the image file for another copying operation you can have
it deleted automatically. To do this, activate the "Delete Image File after CD
Copy" control field.
Note: A copy over image may consist of up to 1000 MBs so you should
ensure that you have enough storage space on the hard disk selected. We
also recommend that you save the copy over image on the fastest hard disk.
If you click on the appropriate button Nero will automatically carry out a
speed test of all your hard disks and provide you with the result.
6. Click on the Read Options tab and decide how Nero is to behave during
reading.
7. Click on the Burn tab to define the actions to be implemented, the burn
speed and the number of copies to be burnt.
8. Click on the Copy button to start the copying process. Nero now carries out
all the necessary stages as defined. A status window will appear showing the
stages implemented and informing you how the burn process is progressing.
Note: If you read in the original CD with the recorder the tray will open after
producing the image file. Remove the original CD and insert an empty one.
When Nero has finished the write process a window will appear saying, for
example, "Burn process 12 x (1800 KBs) successful".
Nero Copying CDs • 92
Page 93

9. Click on the OK button to close the dialog box. The CD is then ejected. The
messages shown can either be saved, printed or discarded. Close the
window by clicking on the Discard or Close buttons.
10. Now you can verify what has been written on your new CD by inserting the
CD into the recorder again and clicking on the CD-Info icon.
See also:
Copying using a fast copy (on the fly)
Verifying audio read quality
Setting speed on CD/DVD-ROM drives
8.2.2 Copying using a fast copy (on the fly)
Nero can perform a fast copy (on the fly) straight from the CD-ROM to the
recorder without using an "intermediate" image file.
Some of the disadvantages listed below do not apply to recorders which have a
mechanism (BURN-Proof, Just Link, Safe Burn, etc.) to prevent a buffer
underrun thereby making the burn process more stable. This is a simplified
version of how it works: if the data is not supplied quickly enough the recorder
interrupts the burn process, waits until there is enough data in the buffer again
and continues to write at the same point.
Advantage
This feature, which is often desirable, allows faster copying and also requires no
additional storage space on the hard disk.
Disadvantage
The advantage of speed may also become a disadvantage:
Firstly there must be a CD/DVD-ROM drive available which can supply data
fast enough. For example if you want to burn 24x the input data must be able
to be read in at least 24x (better with 32x) from the CD/DVD-ROM so that no
buffer underrun occurs. It is not so easy to guarantee this because some CDROM audio data reads considerably more slowly than "normal" data (Mode 1
or Mode 2). For example there are modern 48x CD ROM drives which read
audio data slower than 10x!
If errors occur when reading the CD - because there is a scratch on the CD
for example - the error cannot possibly be eliminated by reading the
appropriate point of the CD several times because, unlike the image file
approach, there is no time (threat of buffer underrun). In such a situation
there is nothing else Nero can do but write the questionable data received or
just null data. In other words direct copies are very susceptible to read errors!
Many CD/DVD-ROM drives are unable to provide information about the
number and type of sessions. They can only give information on the number
Nero Copying CDs • 93
Page 94

and type of tracks. This means that Nero sometimes cannot prepare an
exact copy of a CD.
Audio tracks may contain index positions. However these can only be
identified if the appropriate point on the CD is being read. When producing a
"disc-at-once" copy this information does have to be available before the
burn process is begun. This means that with fast copies Nero cannot copy
audio index positions at the same time. These will therefore inevitably be lost!
The quality of audio data read in may suffer here. Nero's method of copying
a CD is such that some megabytes of data are read from the CD/DVD-ROM
and then written onto the recorder. This inevitably occurs because Nero does
not have enough main memory to record the entire CD (sometimes more
than 700 MB!) and no image file is to be made (even a fast copy (on the fly)).
The CD/DVD-ROM drive often reads at higher speed than that at which the
recorder can write the data. This means it is possible for Nero's internal
buffer to be unable to accept any more data. This can lead to a situation
where the CD/DVD-ROM drive has already read audio data in its internal
buffer (cache) but has not yet been able to "deliver" to Nero because Nero's
buffer is full. This means that the CD/DVD-ROM is forced to reposition the
reading head. As the CD is turning continuously in the CD-ROM/DVD drive,
the reading head has to jump back to a previous position. Many CD/DVDROM drives cannot adjust the reading head for audio CDs accurately and
therefore sometimes invalid audio data is transmitted.
The fast copying of a CD requires at least one CD/DVD drive and one recorder
to be connected.
Here is a step-by-step account of how to produce a CD/DVD with Nero using a
fast copy:
All settings may be left at their default values.
1. Place the CD/DVD to be copied in the CD/DVD drive.
2. Place an empty CD/DVD in the recorder.
3. Start a new compilation by clicking on the appropriate button or the File
menu and the command New.
4. Click on the Copy CD icon - the Burn tab is in front. Set the procedure for
copying CD and/or DVDs on the tabs.
5. Click on the Copy Options tab and activate the "fast copy (on the fly)"
control field.
Note: If you are unable to activate the control box the read drive is also the
burn drive. In this case click on the drop down button and select another
drive. If necessary you can also change the read speed of the chosen
CD/DVD drive.
6. Click on the Read Options tab and decide how Nero is to behave during
reading.
7. Click on the Burn button to start the burn process (or the simulation depending on the chosen option). Nero now runs all the necessary stages
selected. A status window will appear showing the stages implemented and
informing you how the burn process is progressing. As soon as Nero has
completed the write process a window will appear showing a result e.g. "burn
process 12x (1800 KB/s) successful".
Nero Copying CDs • 94
Page 95

8. Click on the OK button to close the dialog box. The CD is then ejected. The
messages shown can either be saved, printed or discarded. Close the
window by clicking on the Discard or Close buttons.
9. You can now check what has been written on your CD by reinserting the CD
and clicking on the CD-Info icon.
See also:
Copying using an image file
Verifying audio read quality
Setting speed on CD/DVD-ROM drives
8.3 Verifying audio read quality
Audio data from CDs is read digitally for the purpose of saving audio tracks to
hard disk and copying CDs.
Yes, you did read that correctly - digitally. All CD/DVD-ROM drives can play
audio CDs in analogue format (i.e. through head sets or sound card) but not all
can read audio data digitally and even then only a few of these drives produce
good quality audio reading. So: the digital extraction of audio data is essentially
different from simply playing an audio CD.
In practice the quality of the digitally read audio data is never going to be
satisfactory. For example sometimes there are "jumps" in the audio data which
are noticeable as unpleasant clicking noises when playing a saved audio file or
listening to a copy CD. The amount of such defects in the audio data is heavily
dependent on the type and make of the CD/DVD-ROM drive.
Before extracting audio data or copying CDs each owner of a CD ROM should
be aware of how good the audio read quality of his own CD/DVD-ROM drive is.
Armed with this knowledge unusable CD copies can be avoided by selecting
better copy options. To diagnose your CD-ROM proceed as follows:
1. First of all please check to see whether your CD/DVD-ROM drive is already
supported by Nero. Look up whether the command Autodetect CD ROM is
available on the Extras menu. If so run through the CD/DVD-ROM
autodetect first of all (see Section '
the command is highlighted in gray and therefore cannot be activated the
installed CD/DVD-ROM drive has been detected.
2. Now insert the Nero CD into the CD/DVD-ROM drive. If this starts the
installation of Nero cancel this as Nero has already been installed.
3. Choose the command Save Track from the Recorder menu and select your
CD/DVD-ROM drive as the source drive. Select the second track (and/or the
first audio track) and save as a wave file on your hard disk.
Autodetection of CD/DVD-ROM drives'). If
4. Now from the File menu find the New command for a new audio compilation
and then drag the wave file extracted in Stage 3 into the audio compilation.
5. Double click on the track of the audio compilation corresponding to the wave
file.
6. Click on the tab Indices, Limits, Split. You will see a colored rectangle.
Zoom several times into the graphical view of the audio file by clicking on the
Nero Copying CDs • 95
Page 96

appropriate button until a zigzag line (a so-called "saw tooth") can be seen.
The upper row corresponds to the left stereo channel and should have an
even "zigzag line" (or more specifically a "saw tooth") and the lower row (right
stereo channel) a horizontal line.
7. When looking closely at audio data it usually corresponds to one of the
following three quality stages:
If there is a repetitive, regular zigzag line in the upper half over the entire
area and a horizontal null line in the lower half, your CD/DVD-ROM drive has
very good audio read qualities. If your drive can also read audio data quickly
there is nothing to prevent you using your drive for fast copies of all kinds.
If the zigzag line appears exclusively in the upper row but sometimes has
irregularities compared to previous or later runs, as if parts had been cut out
and added again at some other point, your CD/DVD-ROM drive suffers from
the "jitter effect" and is therefore only suitable to a limited extent for fast
copies. If used for fast copies or to save audio tracks the burnt CD and/or
the saved file may possibly contain unpleasantly audible clicks in the audio
data. The CD/DVD-ROM drive can be used without any problems for fast
copies of data CDs but only conditionally (i.e. allowing for loss of quality) for
copying CDs with audio tracks.
If the zigzag line sometimes appears in the upper and sometimes in the lower
row or if both displayed channels contain only "nonsense" (for example both
channels have horizontal lines or quite different forms than the expected
zigzag line on the left/upper channel) your CD/DVD-ROM drive does not
have such good audio read quality. In this case we would seriously
discourage you from using your CD/DVD-ROM drive for fast copies of CDs
containing audio tracks or for saving audio tracks. The CD/DVD-ROM drive
may, however, be used without any problem for fast copies of data CDs.
Nero CD-DVD Speed
You can also verify the audio read quality (DAE - Digital Audio Extraction) of the
CD-/DVD drive using the benchmark program Nero CD-DVD Speed, a
component of the Nero CD. You will find more details of this program in the
chapter on
See also:
Copying using an image file
Copying using a fast copy (on the fly)
Setting speed on CD/DVD-ROM drives
Nero CD-DVD Speed.
8.4 Setting speed on CD/DVD-ROM drives
Nero can specifically set the read speed on CD/DVD-ROM drives. This feature
is primarily used to resolve problems when reading audio data (particularly the
so-called "jitter effect"), the frequency of which also increases on many drives at
higher read speeds. A lower read speed can often also give drives the ability to
correct any read errors which occur by reading in sectors again. Sometimes
noise can be avoided by reading more slowly from slightly scratched audio CDs.
Nero Copying CDs • 96
Page 97

The significance of the effect of read speed on the error rate when reading from
audio data is heavily dependent on the hardware being used.
Unfortunately the command used for setting various speeds is also dependent
on the hardware. Such commands are specific to the manufacturer on SCSICD/DVD-ROM drives and are often not documented. In view of this and the
many different CD/DVD-ROM drive types we have once again got out of this
temporarily unrecognized command by using Nero's drive autodetection to set
the speed. However it is not always possible to find the read speeds supported
because firstly the read speeds of audio and data tracks are often different and
secondly the read speed depends on the output data of the computer concerned
and, finally, because many drives accept the setting of all possible and
impossible speeds without complaining, so that it is often unclear what speeds
are supported by the hardware. It is therefore possible, following autodetection
of a drive, to be unable to select all possible speeds of a CD/DVD-ROM drive or
not to have quite the desired effect. In this instance you should contact
techsupport@nero.com to ask whether any more information has become
available on this drive in the meantime. In the worst scenario it may be that your
drive supports no commands at all for setting speed or only Nero understands
commands unrecognized by Nero. In this case the possibility of setting read
speed will remain unavailable (shown in gray).
Renewed autodetection of your CD/DVD-ROM drive
If you are not satisfied with the settings available on your CD/DVD-ROM drive
you can have your CD/DVD-ROM drive detected again with the newer version of
Nero so that Nero also learns the commands to set the speed of your CD/DVDROM drive. To do this please proceed as follows:
1. Determine the exact equipment name of your CD/DVD-ROM drive. This is
possible in Windows under System Control > System > Equipment
Manager > CD ROM. Note the exact description.
2. Look for the file 'cdrom.cfg'. This is in the Nero installation directory.
3. Open the file 'CDROM.CFG' using a text editor (for example 'Accessory >
'Notepad') and look for the entry for your CD/DVD-ROM drive with the name
from Stage 1). When using another text editor ensure that the text is stored
exclusively as pure ASCII text ("text only"). Storing e.g. in Word format (.doc)
would render the file unusable!
4. Annotate the former entry for your drive by preceding it with a semicolon (;).
The effect of this is that the rows marked in this way will no longer be read.
The entry might then look something like this:
;[DriveXXXX CD-ROM CT.778]
;TYPE=SCSI GENERIC_5
;COM=1
;CDRCAP_MAXREADSPEED=1800
;CDRCAP_MAXREADDASPEED=900
5. Save and close the file and start Nero.
6. Now you can have your CD/DVD-ROM drive detected once again. The new
version of Nero will now also recognize the commands to set the drive speed
and enter this in the Nero database. Of course, as before, we would
Nero Copying CDs • 97
Page 98

appreciate receiving the parameters of the CD/DVD-ROM drive found in this
way. The parameters thus found would then be included by us in the
subsequent version of Nero and therefore be of benefit to all users of Nero. If
you have any problems with the control of your CD/DVD-ROM drive using
Nero (e.g. reading of audio no longer possible etc.) you may use the old
settings again to remove the semicolons added in Stage 3.
Nero DriveSpeed
You can define such parameters as drive speed using the Nero DriveSpeed
program which is a component part of the Nero Toolkit. You may find this
useful because the noises it produces as drive speed increases had become
louder and louder and we needed a program which could deal with this problem.
If a program does not take long to load the noise level of the drive might not be
an issue but with constant access to a CD this will be perceived as interference.
However a brake can be installed simply by setting the read speed. If the use of
Nero DriveSpeed gives rise to conflicts with the speed settings in Nero, Nero's
settings predominate. Detailed information on the program can be found in the
Section '
Nero DriveSpeed'.
See also:
Copying using an image file
Copying using a fast copy (on the fly)
Verifying audio read quality
Nero Copying CDs • 98
Page 99

9 Image file
9.1 Introduction
There are two independent stages involved in burning an image file. Firstly Nero
produces an image file which is stored on the hard disk and contains all
information on the CD to be burnt.
Straight after this, or at any other time, Nero can write the image file already
produced onto a blank CD.
9.2 Creating an image file
Here is a step-by-step guide to creating an image file using Nero:
1. From the Recorder menu select the command Choose Recorder and select
Image Recorder (and not the currently installed recorder). Then confirm this
selection using OK.
2. Next create a CD-ROM or audio compilation as described in the appropriate
sections.
3. Click on the Burn Compilation button or select the Burn Compilation
command from the 'Recorder' menu to open the write dialog box.
Note: If you are unable to click on the "Burn Compilation" command the
compilation window is not the currently active window. To correct this: please
click on the compilation window to activate it.
The Burn Compilation dialog box will then open – the procedure is the
same as for producing a new compilation but the Burn tab is now in front.
You will be able to activate only the "Burn" action because you are producing
an image file.
4. Now check all settings on this and other tabs one more time and amend
where necessary.
5. Click on the Burn button to start creating an image file.
6. Enter a name in the image file dialog box which opens and define the
location for saving the file. The compilation files will be written to this image
file, i.e. the image file will be at least as big as the files of the compilation in
total. Now click on the Save button to start creating the image file.
Nero now carries out all the necessary stages as defined. A status window
will appear showing the stages implemented and informing you how the burn
process is progressing. As soon as Nero has finished the write process a
window will appear containing the message "Burn process successful".
7. Click on the OK button to close the dialog box. The messages shown can
either be saved, printed or discarded. Close the window by clicking on the
Discard or Close buttons.
Nero Image file • 99
Page 100

9.3 Burning the image file
This is a step-by-step guide to burning a previously created image file using
Nero:
1. Select the command Choose Recorder from the Recorder menu and select
the recorder installed (not the image recorder) and confirm the selection
using OK.
2. From the Recorder menu select the Burn Image command.
3. A dialog box will open and you can select the image file you would like to
burn. Nero currently supports NRG, ISO and CUE-Sheet formats. Select the
desired file and click on the Open button. The Burn Compilation dialog box
will then open – the procedure is the same as for producing a new
compilation but the Burn tab is now in front.
4. Now check all settings on this and other tabs one more time and amend
where necessary.
5. Confirm your selection by clicking on the Burn button. Nero now carries out
all the necessary stages as defined. A status window will appear showing the
stages implemented and informing you how the burn process is progressing.
As soon as Nero has finished the write process a window will appear with a
result message such as "Burn process 24x (3600 KBs) successful".
6. Click on the OK button to close the dialog box. The CD is then ejected. The
messages shown can either be saved, printed or discarded. Close the
window by clicking on the Discard or Close buttons.
7. Now you ca n verify what has been written onto your CD by inserting the CD
once more and clicking on the Medium Information icon.
9.4 Nero ImageDrive
The Nero ImageDrive program is only available in the retail version!
Up until now one problem with image files was that you were no longer able to
see the content. If you had saved a number of image files and/or not given the
image files unambiguous names the only way out was to burn the image to find
out what it contained.
Nero ImageDrive helps you in this situation by allowing you to inspect the
structure of the image file.
9.4.1 What is Nero ImageDrive?
ImageDrive produces a "virtual" drive which is added to the existing drives and
also contains a drive letter. This means that you can allocate a drive letter to an
image file and also treat it like an inserted CD. However this does mean that the
contents of an image cannot be amended.
Nero Image file • 100
 Loading...