

Neff GmbH
Carl-Wery-Stra e 34 ß
81739 München
Operating instructions ........
.........
.............
..
2
Mode d’emploi ...............................................
36
Instrucciones de funcionamiento .........
.... 70
Gebrauchsanweisung
..
....
.................
.......
..
19
Gebruiksaanwijzing
.
...
............
....
.............
....
87
en
de
fr
it
es
nl
Avvertenze per l’uso ....
...........
...
..............
.... 53
www.neff-int
ernational.co
m
Cod. 9000346869 F

Table of contents
Operating the electric hob with
Your new appliance ........................................ 5
Burners .......................................................... 6
Switching on manually ....................................... 6
Safety system .................................................. 7
Switching off a burner ........................................ 7
Power levels .................................................... 7
1
Safety precautions .......................................... 3
Switching on automatically ................................. 7
Warnings ........................................................ 8
9
Suitable pans ................................................. 9
Wok pan ........................................................
Switching on and off ....................................... 10
Additional pan support ...................................... 12
Additional coffee maker support .......................... 12
Cooking recommendations ............................ 12
double hotplate ............................................ 10
Precautions for use ........................................ 13
Cleaning and maintenance ............................ 14
Accessories .................................................... 12
Cleaning ........................................................ 14
Suggestions ................................................... 11
Unsuitable products .......................................... 14
Maintenance ................................................... 15
Faults ............................................................. 16
Technical Assistanse Service ........................ 17
Environmentally-friendly waste management ......... 17
Used appliances and packaging .................... 17
Warranty conditions ......................................... 17

Dear customer,
Congratulations on your choice. Thank you for purchasing one of our
appliances. This practical, modern and functional appliance is manufactured
using materials of the highest quality which are subject to strict Quality
Control checks throughout the entire manufacturing process. The appliance
is meticulously tested to ensure that it meets your demands and produces
perfect cooking results.
Do not remove the appliance from its protective packaging until it is installed
in the unit.
Please read these instructions carefully before proceeding to install and use
the appliance. The information contained in these instructions is essential for
the correct operation of the appliance and, more importantly, for your safety.
The packaging of your appliance has been manufactured using only the
materials which are strictly necessary to guarantee efficient protection
during transport. These materials are 100% recyclable, thus reducing the
environmental impact. You can also contribute to caring for the environment,
by following the advice below:
- dispose of the packaging in the appropriate recycling bin,
- before you get rid of an old appliance, make sure you disable it. Contact
your local authority to find out the address of your nearest recycling centre
to dispose of your appliance,
- do not pour used oil down the sink. Collect it in a sealed container and
take it to an appropriate collection point or, failing that, place it in the rubbish
bin (it will end up in a controlled dump; this is probably not the best option,
but it will avoid contaminating ground water).
IMPORTANT:
In the unlikely event that the appliance should arrive damaged or not meet
your expectations in terms of quality, please inform us as soon as possible.
For the warranty to be valid, the appliance must not have been tampered
with, or used inappropriately.
2

Safety precautions
Read these instructions carefully. Reading these
instructions will enable you to use your appliance safely
and effectively.
All operations relating to installation, regulation and
conversion to other types of gas must be carried
out by an authorised installation engineer, respecting
applicable regulations, standards and the specifications
of the gas and electricity providers.
You are recommended to contact the Technical
Assistance Service to convert to another type of gas.
Before installing your new hob, ensure that it is being
installed according to the assembly instructions.
This appliance can only be installed in a well ventilated
place in accordance with existing regulations and
ventilation specifications. The appliance must not be
connected to a combustion product removal device.
This appliance has been designed for home use only,
not for commercial or professional use. This appliance
cannot be installed on yachts or in caravans. The
warranty will only be valid if the appliance is used for the
purpose for which it was designed.
The place in which the appliance is installed must have
fully-functioning ventilation, in accordance with the
regulations.
Do not subject the appliance to draughts. These might
blow out the burners.
This appliance leaves the factory set to the type of gas
that is indicated on the specifications plate. If this must
be changed, read the Assembly instructions.
Do not tamper with the appliance’s interior.
If necessary, call our Technical Assistance Service.
These operating and installation instructions should be
retained, and passed onto the buyer if the appliance is
sold.
Do not switch on the appliance if it is damaged in any
way. Contact our Technical Assistance Service.
3

The surfaces of cooking appliances heat up during
use. Care must be taken when using these appliances.
Keep children well away from the appliance.
This appliance is only intended for cooking purposes,
not as a heating system.
Fat or oil which is overheated can catch fire easily. Do
not leave oil or fats to heat up unattended. If oil or fats
do catch fire, never use water to put the fire out. Risk
of burns! Put the fire out by covering the pan with a lid
and switch off the hotplate.
In the event of a malfunction, turn off the appliance’s
gas and electricity supply. For repairs, call our Technical
Assistance Service.
If one of the controls will not turn, do not force it. Call
the Technical Assistance Service immediately, so that
they can repair or replace it.
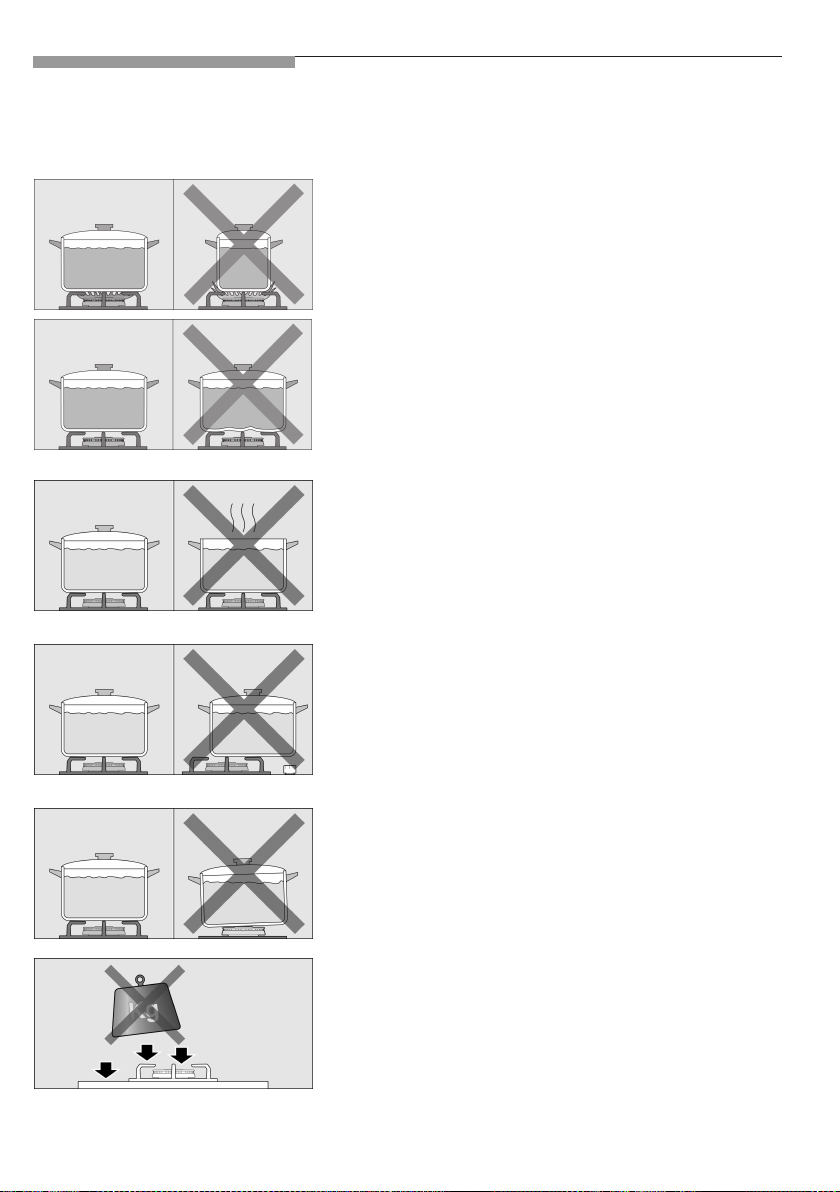
Never place unstable pans on the hob or the burners,
as they may accidentally tip over.
Do not clean the hob using a steam cleaner.
Risk of electrocution!
This appliance is class 3 type, according to the EN 301-1 regulation for gas appliances: built-in appliance.
Do not store or use corrosive chemicals, products
which produce fumes, flammable materials or non-food
products below or near this domestic appliance.
This appliance is not intended for use by persons
(including children) with reduced physical, sensory or
mental capabilities, or lack of experience and
knowledge, unless they have been given supervision or
instruction concerning use of the appliance by a person
responsible for their safety.
kЙоЙк=дЙ~оЙ=нЬЙ=~ййдб~еЕЙ=ме~ннЙеЗЙЗ=ЗмкбеЦ=зйЙк~нбзеK=
The graphics in this instruction manual are given as a
guide only.
The manufacturer is exempt from all responsibility if this
the requirements of this manual are not complied with.
4
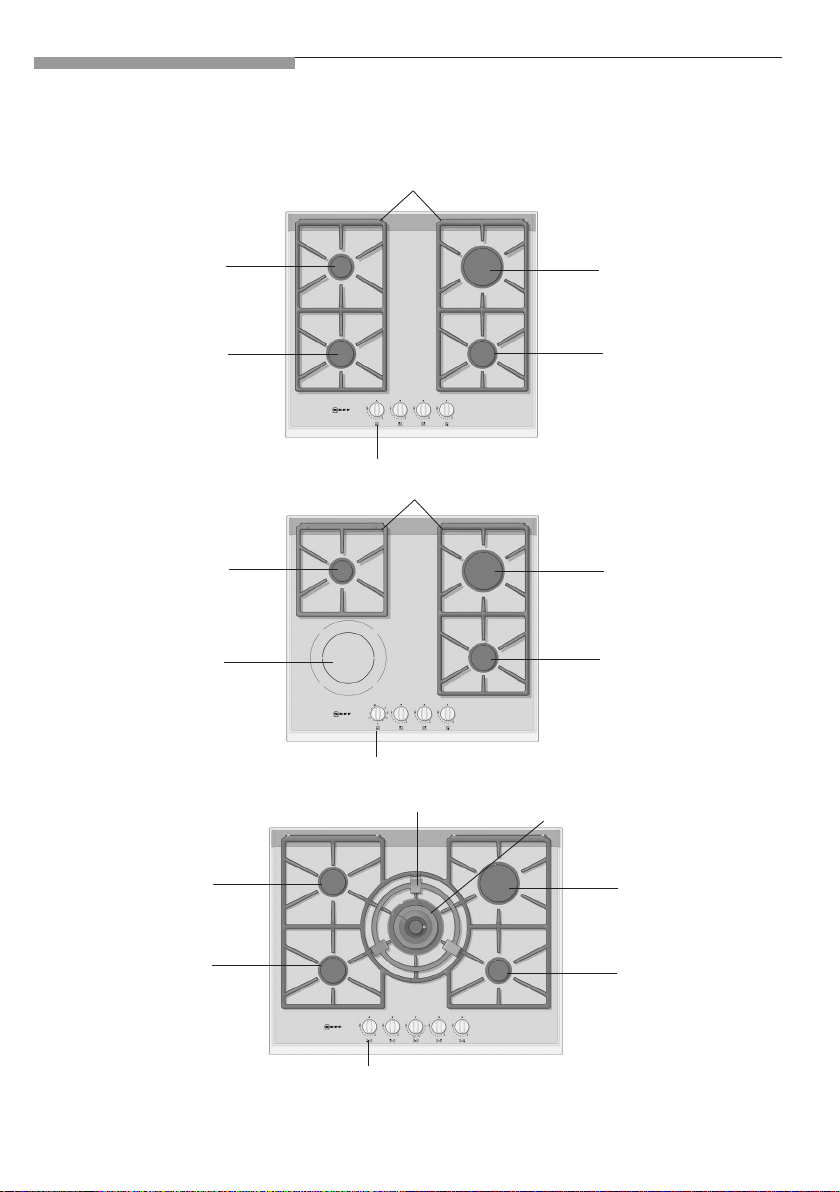
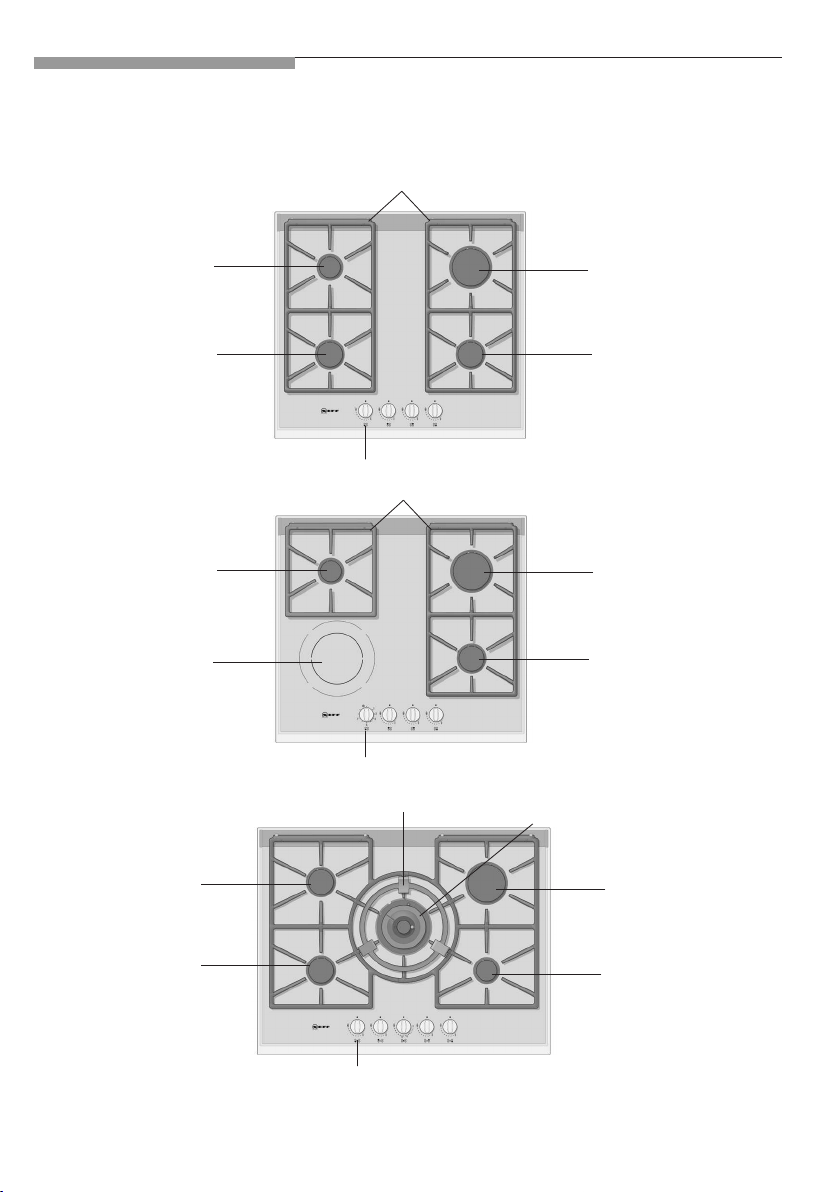
Your new appliance
Pan supports
Burner (up to
1.1 kW)
Burner (up to
1.9 kW)
Burner (up to
1.1 kW)
Electric plate
1800 W
Control knob
Pan supports
Control knob
Pan supports
Burner (up to
2.8 kW)
Burner (up to
1.9 kW)
Burner (up to
2.8 kW)
Burner (up to
1.9 kW)
Dual double flame burner
D (up to 4,25 kW)
Burner (up to
1.9 kW)
Burner (up to
1.9 kW)
Burner (up to
2.8 kW)
Burner (up to
1.1 kW)
Control knob
5
The gas burners
Operation
Fig. 1
Fig. 2
Fig. 3
There are indications to show which burner each
control knob operates. Fig. 1.
It is essential to ensure that all the burner parts
and the pan supports are correctly installed for the
appliance to work correctly. Fig. 2-3-4-5.
Fig. 4
Fig. 5
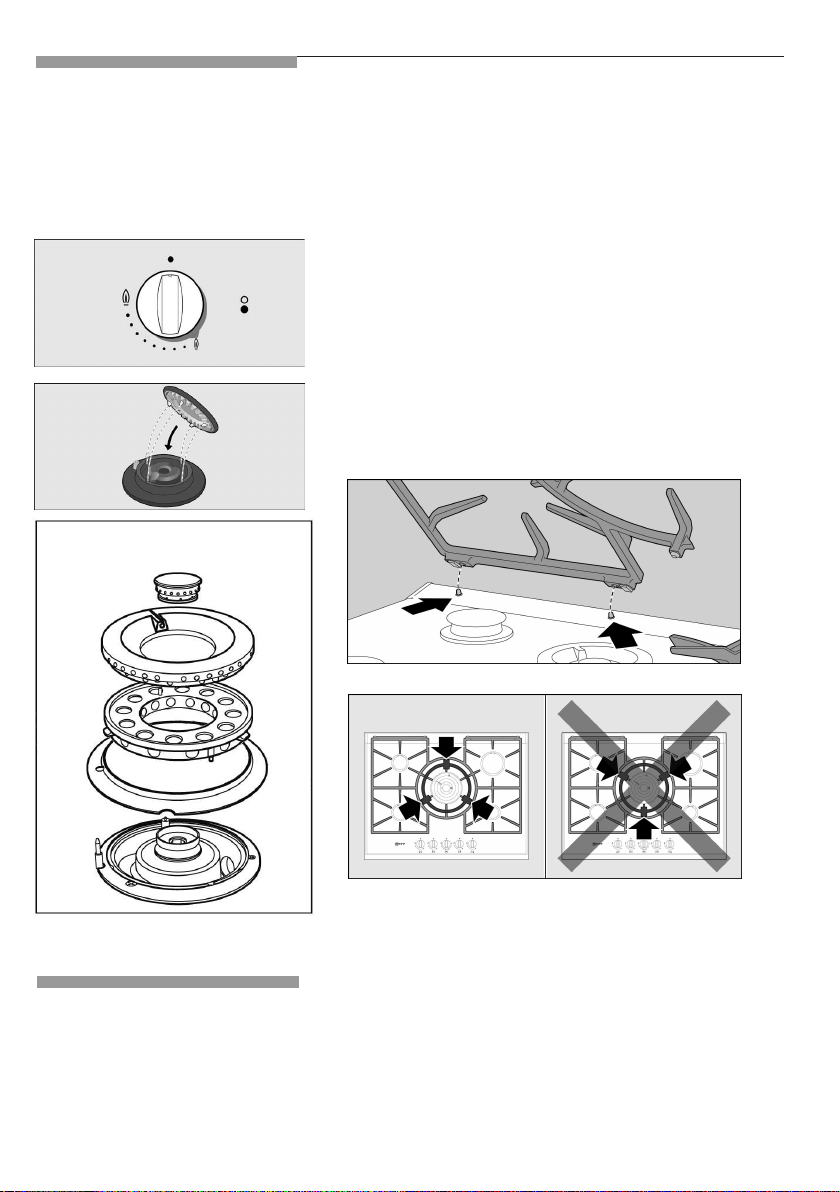
Switching on manually
6
1. Press the chosen burner control and turn it
anticlockwise to the required setting.
2. Use any type of lighter or flame (cigarette lighter,
matches, etc.) and bring it close to the burner.

Switching on
automatically
If your hob features the automatic ON function
(ignition sparkers):
1. Press the chosen burner control and turn it
anticlockwise to the maximum power setting.
While the control is still pressed down, sparks are
produced on all burners. The flame ignites (it is no
longer necessary to press down the control).
2. Turn the control to the required setting.
If it does not come on, turn the control to the off
setting and repeat the steps above. This time,
press and hold the control for longer (up to 10
seconds).
Warning! If after 15 seconds have elapsed, the
flame does not ignite, switch off the burner and
open a nearby window or door. Wait at least one
minute before trying to switch the burner back on.
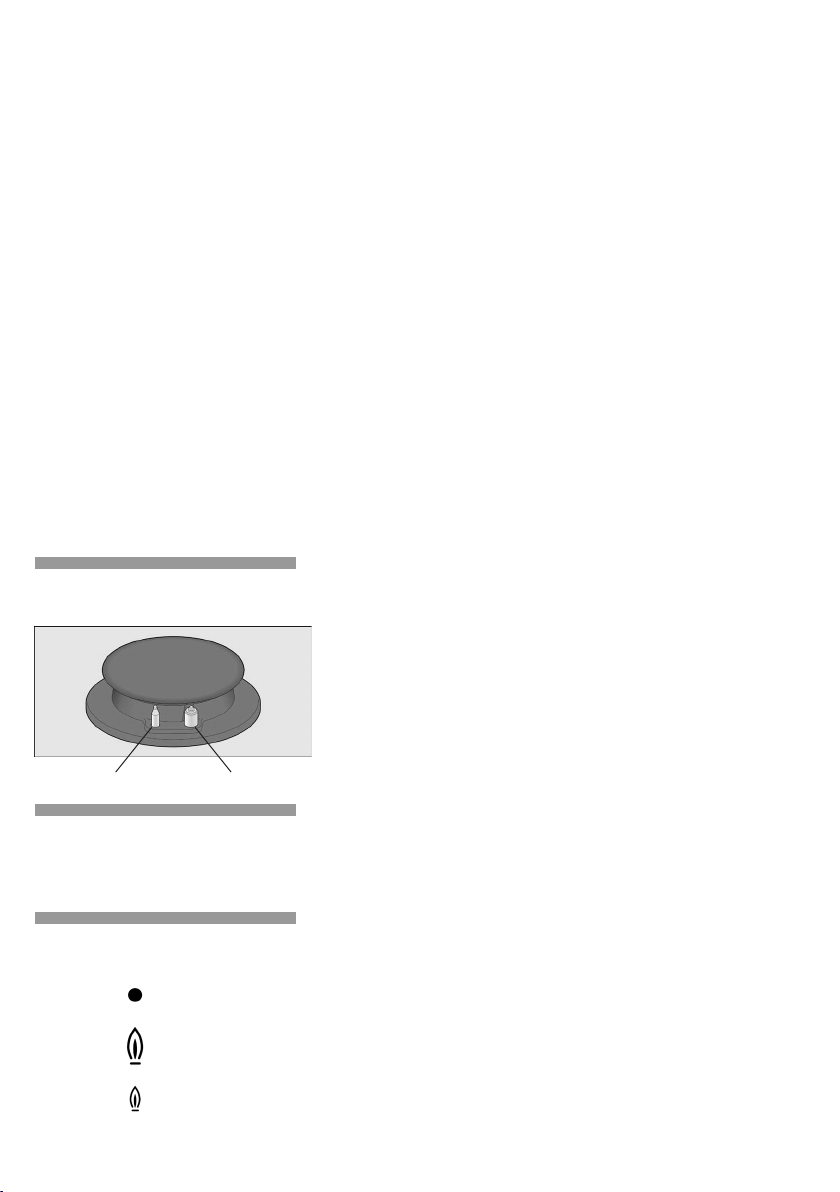
Safety system
Thermocouple
Ignition
sparker
Switching off a burner
Power levels
Setting
Large flame
Economy
flame
Control off
Maximum capacity or
aperture and electricity
on
Minimum capacity or
aperture
Depending on the model, your hob may have a
safety system (thermocopuple) that prevents the
flow of gas if the burners accidentally switch off.
To ensure that this device is active, switch on the
burner as usual and, without releasing the control,
press and hold it down firmly for 4 seconds after
lighting the flame.
Turn the corresponding control clockwise to the 0
setting.
The progressive controls can be used to control
the power needed, from minimum to maximum
power.
7

For dual double flame burners, the inner and outer
flames can be controlled separately.
The available power levels are as follows:
Inner and outer flame on full power.
Outer flame on minimum, inner flame on full power.
Inner flame on full power.
Inner flame on minimum.
Warnings
8
It is normal to hear a whistling noise while the burner is
operating.
When it is first used, it is normal for the burner to give off
fumes; this does not pose any risk and does not indicate
a malfunction; they will disappear in time.
A few seconds after the burner is switched off, a sound
(thud) will be produced. This is not a fault- this means
that the safety device is no longer operating.
Keep the burner as clean as possible. If the ignition
sparkers are dirty, they will not light properly. Clean them
periodically using a small non-wire brush. Bear in mind
that the ignition sparkers must not suffer any serious
impacts.
An orange-coloured flame is normal. This is caused by
the presence of dust in the atmosphere, spilt liquids, etc.
The kitchen will become hot and humid when this
gas appliance is used. You must therefore ensure that
the kitchen is well-ventilated. Either keep the natural
ventilation apertures open, or install an extractor hood.

If using the appliance intensively for prolonged periods
additional ventilation may be required, for example,
by opening a window; more effective ventilation may
also be required, for example, by increasing the hob’s
ventilation, if possible.
If the burner flames are accidentally blown out, switch off
the burner operating control and do not try to relight it
for at least one minute.
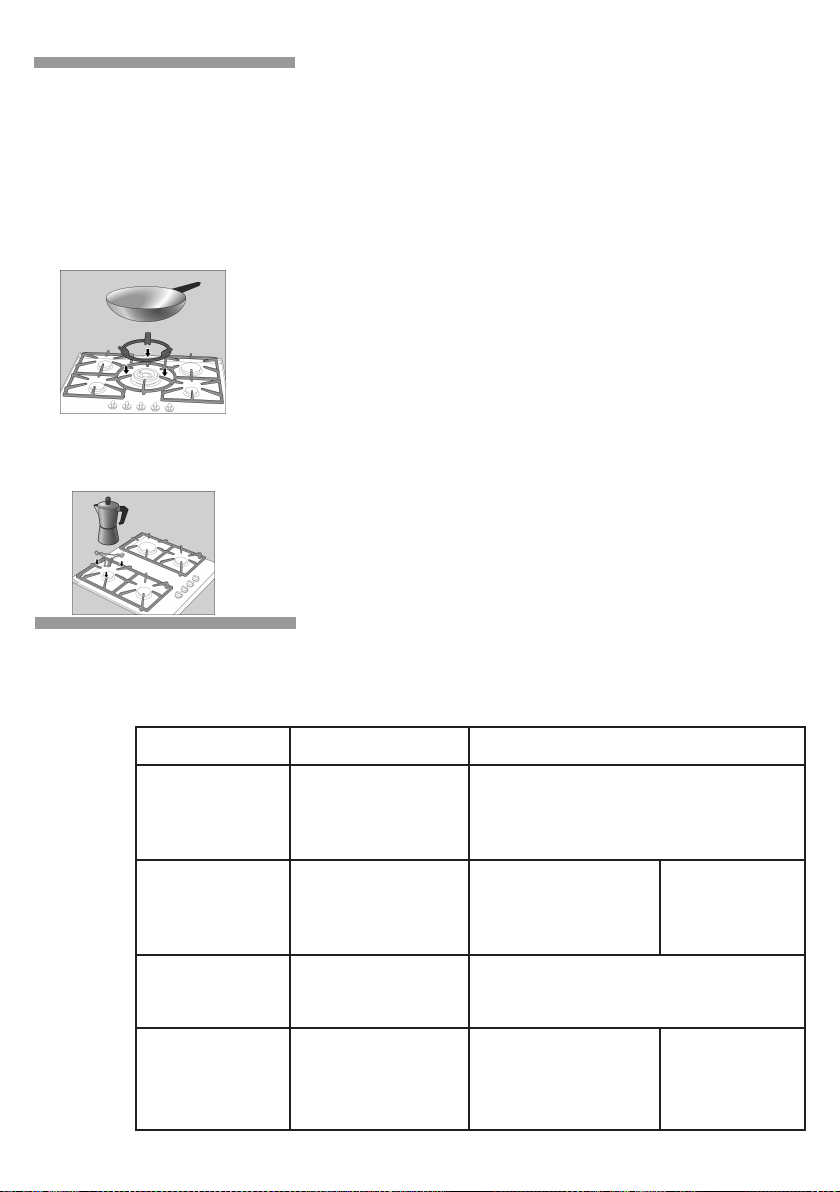
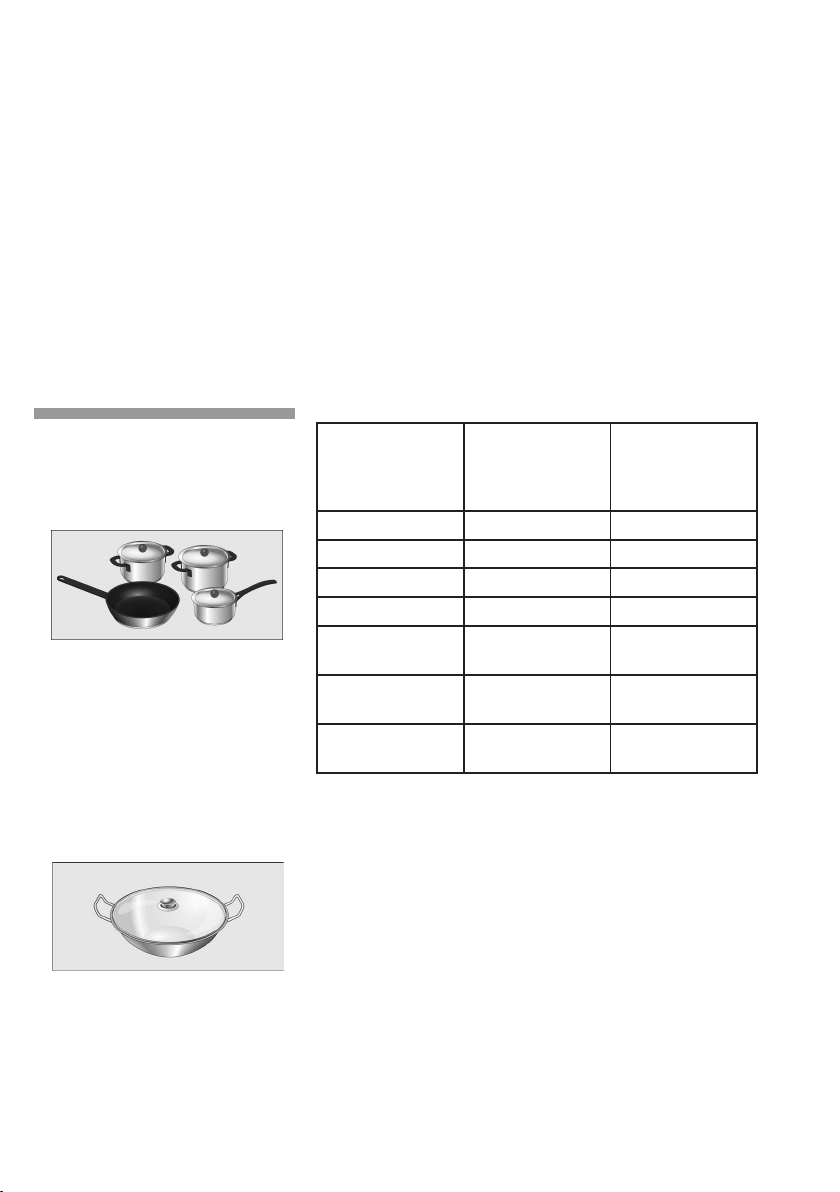
Suitable pans
Wok pan
Minimum
Burner
Double flame
burner
Double flame
burner B
Double flame
burner D
Rapid burner 22 cm 26 cm
Semi-rapid
burner
Auxiliary burner 12 cm 16 cm
Electric plate 18 cm
pan diameter
22 cm
22 cm
22 cm
14 cm 20 cm
Maximum
pan diameter
A wok is a cooking vessel originating in China; it is
a kind of deep, round, lightweight pan with handles
and a flat or concave base.
Food can be prepared in various ways in a wok: it can
be stewed, stir fried, cooked on a low heat, pan-fried,
or steamed. It could be said that woks serve as both
as a saucepan and a frying pan and, owing to their
shape and size, they can be used to cook quite large
ingredients.
When cooking with a wok, heat is diffused more
uniformly and gently; the intense heat which
accumulates means that food takes less time to
cook and also requires less oil, making it one of the
quickest and healthiest ways of cooking. Always
follow the manufacturer’s instructions when cooking
with a wok.
9

Operating the electric hob with double
hotplate
Models equipped with a ceramic hob are dual circuit
hobs and therefore include two hotplates, a central
700 W hotplate and another complete 1800 W
hotplate, if your appliance operates on 230 V.
Switching on
and off
Switching on
Fig. 6
Fig. 6a
Switching off
Note
The small hotplate (central hotplate), is switched
on by turning the control clockwise to setting 0 to
unlock it, after which the control can be positioned
to any of the settings marked from 1 to 9. Fig. 6:
Setting 1: low power.
Setting 9: full power.
If you also want to use the extendable hotplate, the
control must be turned beyond setting 9 (Fig. 6a)
and then positioned to setting 9 (maximum heat
setting) or set to any other intermediate setting for
lower heat levels. To use the small hotplate again,
turn the control anticlockwise to setting 0, and
switch on again.
The residual heat/operating indicator light will go out
once the surface of the hob has cooled down.
It is recommended to start cooking on full power
and then to use the intermediate settings after a few
minutes.
10
Do not allow liquids to be spilt on the surface of the
electric hob.
Do not cook with wet pans.

Residual heat
The electric hob can be switched off slightly before
the end of the cooking time. The residual heat will
enable you to continue cooking for several minutes,
thus saving energy.
Suggestions
Hob with 9 settings
Melting: chocolate, butter, gelatine 1-2
Cooking: rice, white sauce and ragout. 2-3
Cooking: potatoes, pasta, vegetables 4-5
Searing: stews, roast joints 4-5
Steaming: fish 5
Heating, warming: ready meals 2-3-4-5
Grilling: escalopes, steaks, omelettes 6-7-8
Cooking and browning
9
These suggested settings are intended as a guide
only.
The power must be increased for:
- large quantities of liquid,
- large quantities of food,
- cooking using pans without lids.
11
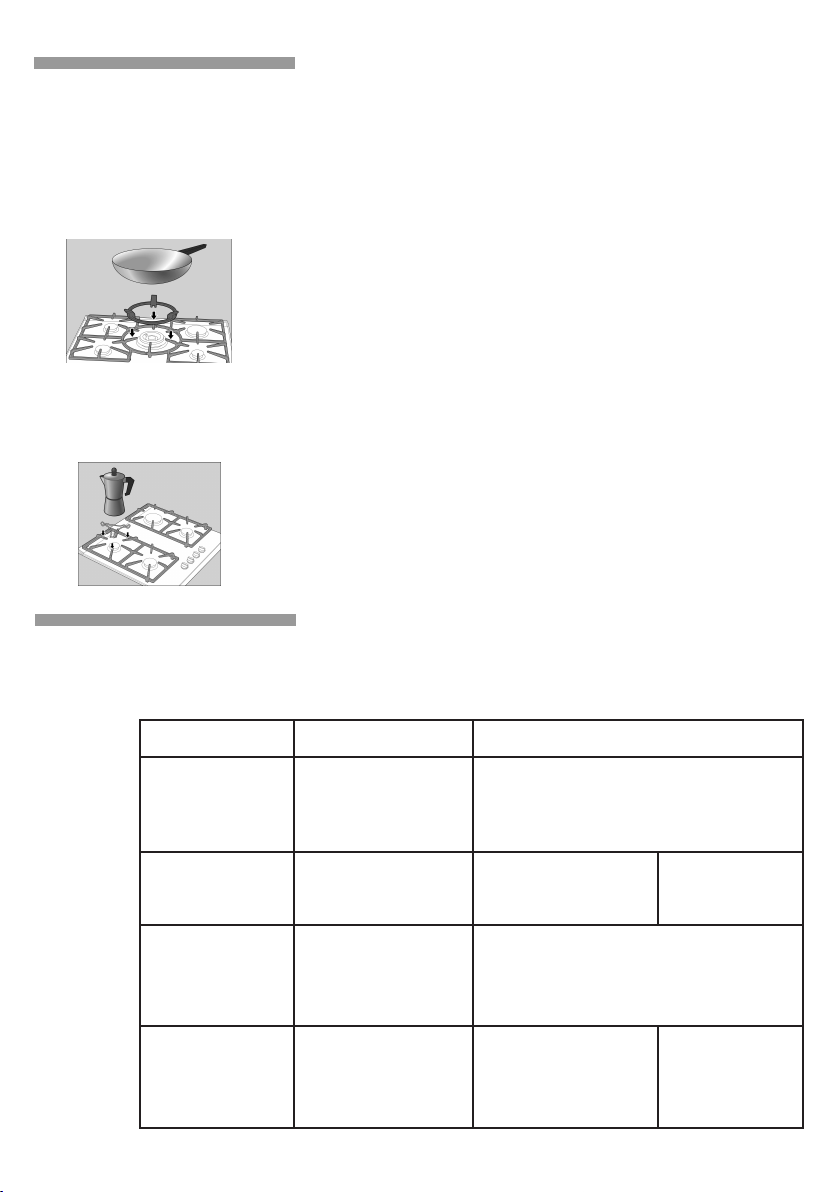
Accessories
Depending on the model, the hob may include the
following accessories. These are also available from
the Technical Assistance Service.
Additional pan
support
Additional coffee
Only for use on the double flame burner with pans
which are more than 26 cm in diameter (roasting
dishes, earthenware pots, etc.) and with pans with a
concave base.
Only for use on the auxiliary burner with pans which
are no more than 12 cm in diameter.
maker support
The manufacturer accepts no liability if these additional pan supports are not used or are used incorrectly.
Cooking
recommendations
Burner Very high High Medium Low
Boiling, steaming,
Double flame
burner
Rapid burner
griddling, toasting,
paellas, Asian food
(wok).
Scallops, steaks,
omelettes,
frying.
Reheating and keeping things hot:
cooked and pre-cooked dishes.
Rice, white sauce and
ragout.
Steaming:
fish,
vegetables.
12
Semi-rapid
burner
Auxiliary burner
Steaming potatoes,
fresh vegetables,
stews and pasta.
Cooking: casseroles,
rice pudding and
caramels.
Reheating, keeping things hot
and making tasty casseroles.
Defrosting and slow
cooking: vegetables,
fruits and frozen
products.
Melting: butter,
chocolate,
gelatine.
Precautions for use
The following advice is intended to help you save
energy and prevent cookware damage:
Use pans which are the right size for each burner.
aз=езн=млЙ=лг~дд=кЙЕЙйн~ЕдЙл=зе=д~кЦЙ=ДмкеЙклK=qЬЙ=
Сд~гЙ=лЬзмдЗ=езн=нзмЕЬ=нЬЙ=лбЗЙл=зС=кЙЕЙйн~ЕдЙлK=
Do not use damaged cookware, which does not sit
evenly on the hob. Pans may be overturned.
Only use a pan with thick, flat base.
aз=езн=Еззв=пбнЬзмн=дбЗл=зк=пбнЬ=дбЗл=зеду=й~кнб~дду=
ЕзоЙкбеЦ=кЙЕЙйн~ЕдЙлK=vзм=~кЙ=п~лнбеЦ=ЙеЙкЦуK=
=
=
Always place the cookware right over the burner, not
to one side. Otherwise it could be overturned.
Do not place large pans on the burners near the
controls. These may be damaged by the very high
temperatures.
Place the pans on the pan supports, never directly on
the burner.
Pans should be placed on the hob carefully.
Do not strike the hob and do not place excessive
weight on it.
Make sure that the pan supports and burner covers
are correctly positioned before using the appliance.
13
Cleaning and maintenance
Cleaning
Unsuitable products
Once the appliance is cool, use a sponge to clean it
with soap and water.
After each use, clean the surface of the respective
burner parts once they have cooled down. If any
bits are left (overcooked food, drops of grease etc.),
however few, they will become stuck to the surface
and more difficult to remove later. The holes and
grooves must be clean for the flame to ignite properly.
The movement of some pans may leave metal residue on
the pan supports.
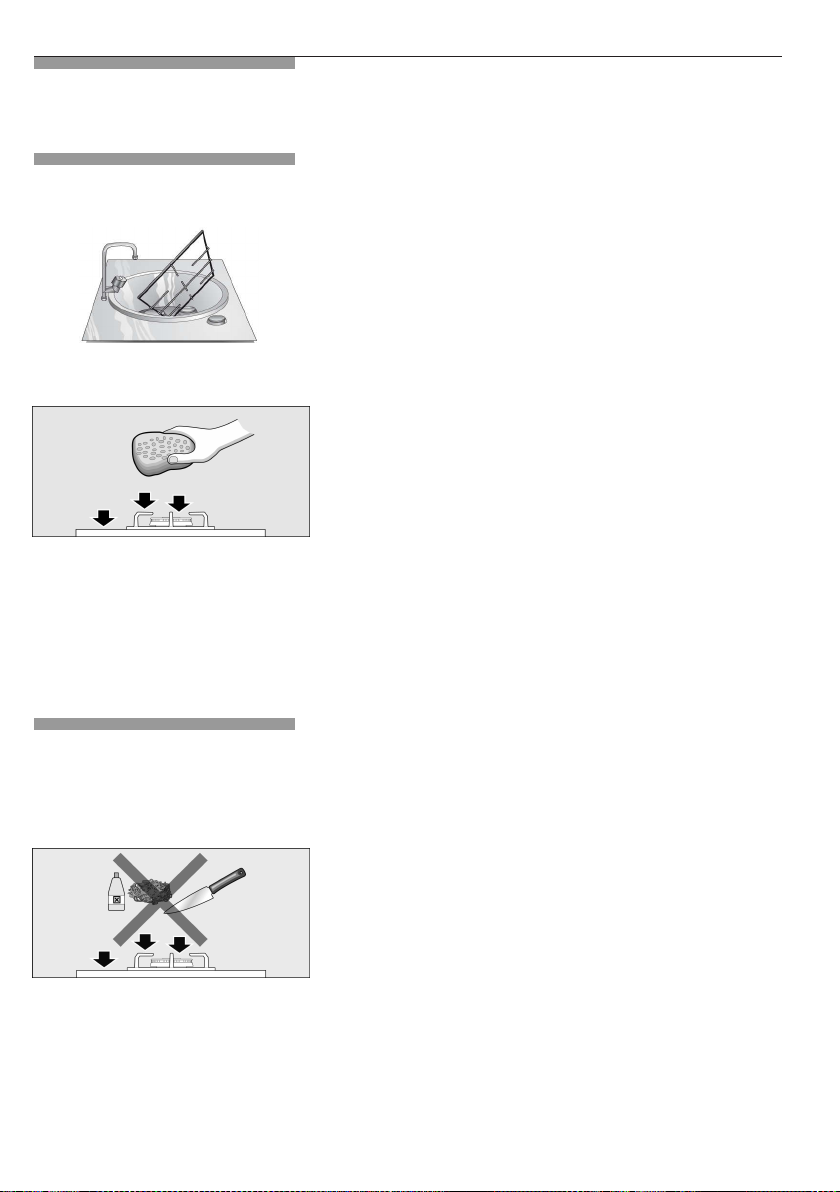
Clean the burners and pan supports using soapy water
and scrub with a non-wire brush.
If the pan supports are fitted with rubber rests, ensure
that these are also cleaned. The rests may come
loose and the pan support may scratch the hob.
Always dry the burners and pan supports completely.
Water droplets or damp patches on the hob at the
start of cooking may damage the enamel.
After cleaning and drying the burners, make sure the
burner covers are correctly placed on the burner flame
diffuser.
Never slide pans across the glass surface, as you may
scratch it. In addition, try not to drop heavy or sharp
objects on the glass. Never strike any part of the hob.
14
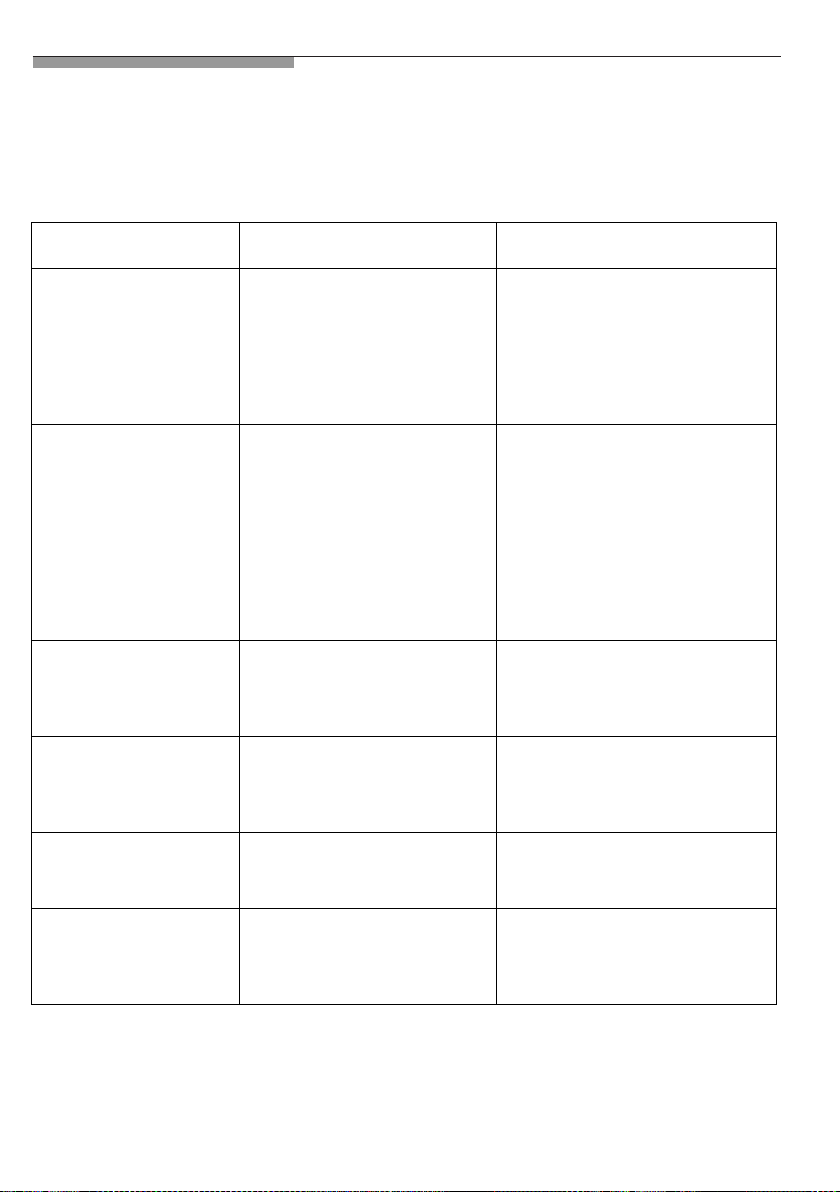
Do not use steam cleaners. This could damage the
hob.
Never use abrasive products, steel scourers, sharp
implements, knives, etc. to remove bits of hardened
food from the hob.
If your hob is fitted with a glass or aluminium panel,
never use a knife, scraper or similar to clean the point
where it joins the metal.
Do not use knives, scrapers or similar implements
to clean the point where the glass meets the burner
trims, the metal frames or the glass/aluminium panels,
if fitted.

Maintenance
Always clean off any liquid as soon as it is spilt: you
will save yourself any unnecessary effort.
Grains of sand that may come from cleaning fruits
and vegetables will scratch the glass surface.
Melted sugar, or foods which contain a lot of sugar
which may have spilt, should be cleaned off the
hotplate immediately, using the glass scraper.
15
Faults
Sometimes certain faults detected can be easily
resolved. Before calling the Technical Assistance
Service, bear in mind the following advice:
Fault Possible cause Solution
The general
electrical system is
malfunctioning.
The automatic ON
function does not work.
The burner flame is not
uniform.
The flow of gas does
not appear normal or no
gas comes out.
The kitchen smells of
gas.
Defective fuse.
The automatic safety switch has
tripped or a fuse has
blown.
There may be food or cleaning
products stuck between the
ignition sparkers and the
burners.
The burners are wet.
The burner covers are not
correctly positioned.
The appliance is either not
earthed, not connected properly
or the earth connection is faulty.
The burner components are not
correctly positioned.
The grooves on the diffuser are
dirty.
The gas mains are turned off.
If the gas is supplied from a gas
bottle, check that this is
not empty.
A gas tap has been left on.
There may be a leak from the
coupling to the gas bottle.
Check the fuse in the main
fuse box and change it if it is
damaged.
Check the main control
panel to see if the automatic
safety switch has tripped or
a fuse has blown.
The space between the ignition
sparker and the burner must
be clean.
Dry the burner covers carefully.
Check that the covers are correctly
positioned.
Contact an electrical engineer.
Ensure the components are
correctly positioned.
Clean the grooves on the diffuser.
Turn on all stop cocks.
Change the gas bottle.
Turn off the gas taps.
Check that the coupling is
sound.
The safety valve on one
of the burners is not
working.
16
The control knob was not held
down for long enough.
The grooves on the diffuser are
dirty.
Once the burner is lit, hold
the control knob down a few
seconds longer. Clean the
grooves on the diffuser.
Technical Assistance Service
When contacting our Technical Assistance Service,
please provide the product number (E-Nr.) and production number (FD) of the appliance. This information is given on the specifications plate located on the
lower section of the hob and on the label in the user
manual.
Warranty conditions
The applicable warranty conditions are those set out
by the company’s representative office in the country
of purchase. Detailed information is available from
retail outlets. Proof of purchase must be presented to
obtain the benefits of the warranty.
We reserve the right to introduce changes.
Used appliances and packaging
If the symbol is shown on the specifications
plate, bear in mind the following instructions.
Environmentallyfriendly waste
management
Unpack the appliance and dispose of the packaging
by environmentally-friendly means.
This appliance complies with European Directive
2002/96/CE on Waste Electrical and Electronic
Equipment (WEEE).
17
17

INHALT
Betrieb des elektrischen Kochfelds mit
Empfehlungen … … … … … … … … … … … … … ..
Zubehör ..........................................................
Zusatzrost Wok ................................................
Zusatzrost Kaffeekocher ....................................
Empfehlungen zum Kochen ................................
Hinweise bei der Benutzung ...........................
Reinigung und Pflege .....................................
Reinigung .......................................................
Ungeeignete Pflegemittel ...................................
Pflege ............................................................
Störungen .......................................................
Technischer Kundendienst .............................
Garantiebedingungen ........................................
Verpackung und Altgeräte ..............................
Umweltschonende Entsorgung ............................
18
Sicherheitshinweise .......................................... 20
Ihr neues Gerät ................................................. 22
Brenner ............................................................ 23
Anzünden per Hand ............................................ 23
Sicherheitssystem ......................................... 24
Ausschalten eines Brenners ................................. 24
Leistungsstufen ................................................. 24
Automatische Zündung ........................................ 24
Warnhinweise ................................................... 25
Geeignete Kochgefäße ....................................... 26
Wok ................................................................ 26
Ein- und ausschalten … … … … … … … … … … ... 27
28
29
29
Zweikreis-Kochzone … … … … … … … … … .… 27
29
29
30
31
31
33
31
34
34
32
34
34

Geehrte Kundin, geehrter Kunde,
wir gratulieren zur Wahl des neuen Geräts und bedanken uns für das
entgegengebrachte Vertrauen. Dieses praktische, moderne und funktionelle
Gerät wird aus Materialien bester Qualität hergestellt, die während des
gesamten Produktionsprozesses strikten Qualitätskontrollen unterliegen und
genauestens geprüft werden, um Ihre Anforderungen an einen perfekten
Kochvorgang zu erfüllen.
Belassen Sie das Gerät bis zum Einbau in der Schutzhülle.
Wir bitten Sie, diese Anweisungen vor dem Einbau oder der Benutzung
des Geräts durchzulesen. Die darin enthaltenen Informationen sind für den
korrekten Betrieb und - wichtiger noch - für Ihre eigene Sicherheit sehr
wichtig.
Die Verpackung Ihres Geräts besteht aus Materialien, die notwendig
sind, um einen wirksamen Schutz beim Transport zu garantieren. Diese
Materialien sind vollständig wiederverwendbar und verringern damit
die Umweltbelastung. Wie wir können auch Sie einen Beitrag zum
Umweltschutz leisten, indem Sie folgende Ratschläge beachten:
- Entsorgen Sie die Verpackung in einer Tonne für recyclingfähige
Materialien.
- Machen Sie ein Altgerät vor der Entsorgung unbrauchbar. Informieren
Sie sich bei Ihrer örtlichen Verwaltung über die Adresse des nächsten
Wertstoffhofs und liefern Sie Ihr Gerät dort ab.
- Schütten Sie verwendetes Bratfett oder Öl nicht durch das Spülbecken.
Sammeln Sie das Öl in einem verschließbaren Gefäß und geben Sie es bei
einer Sammelstelle ab oder werfen Sie es, wenn dies nicht möglich ist, in die
Mülltonne (so gelangt es auf eine kontrollierte Mülldeponie; vermutlich nicht
die beste Lösung, doch wird so kein Wasser verschmutzt).
WICHTIG:
Falls das Gerät wider Erwarten Schäden aufweisen oder Ihre
Qualitätsanforderungen nicht erfüllen sollte, setzen Sie uns davon so schnell
wie möglich in Kenntnis. Zur gültigen Einlösung der Garantie darf das Gerät
nicht unbefugt manipuliert bzw. benutzt worden sein.
19

Sicherheitshinweise
Lesen Sie diese Gebrauchsanweisung aufmerksam
durch. Nur so können Sie Ihr Gerät effektiv und sicher
benutzen.
Alle Installations-, Regelungs- und Umstellungsarbeiten
auf eine andere Gasart müssen von einem autorisierten
Fachmann und unter Beachtung der geltenden
Regelungen und gesetzlichen Vorgaben sowie der
Vorschriften der örtlichen Strom- und Gasversorger
vorgenommen werden.
Für Umstellungsarbeiten auf eine andere Gasart
empfehlen wir, den Kundendienst zu rufen.
Vor dem Einbau Ihres neuen Kochfelds stellen Sie
sicher, dass beim Einbau den Montageanweisungen
gefolgt wird.
Dieses Gerät darf nur an einem ausreichend belüfteten
Ort und nur in Übereinstimmung mit den für die
Belüftung geltenden Bestimmungen und Richtlinien
eingebaut werden. Das Gerät darf nicht an einen
Schornstein oder eine Abgasanlage angeschlossen
werden.
Am Einbauort für dieses Gerät müssen die
Belüftungsbestimmungen vollständig erfüllt werden.
Das Gerät nicht der Zugluft aussetzen. Die Brenner
Dieses Gerät ist werkseitig auf die auf dem Typenschild
angegebene Gasart eingestellt. Falls auf eine andere
Hantieren Sie nie im Inneren des Geräts.
Gegebenenfalls rufen Sie bitte unseren Kundendienst.
Bewahren Sie die Installations- und
Gebrauchsanweisungen gut auf und geben Sie sie an
einen eventuellen neuen Besitzer des Gerätes weiter.
Dieses Gerät wurde ausschließlich für die Verwendung
in Privathaushalten entworfen; eine kommerzielle oder
gewerbliche Nutzung ist nicht gestattet. Dieses Gerät
darf nicht auf Jachten oder in Wohnwagen eingebaut
werden. Die Garantie gilt nur dann, wenn das Gerät
ausschließlich für seinen vorgesehenen Zweck genutzt
wird.
können sonst ausgehen.
Gasart umgestellt werden muss, lesen Sie bitte die
Einbauanleitung.
Falls Sie einen Schaden am Gerät feststellen,
Sie es nicht an. Rufen Sie unseren
schließen
Kundendienst.
20
Die Oberflächen der Kochherde werden während
des Betriebs heiß. Handeln Sie vorsichtig. Halten Sie
Kinder fern.

Benutzen Sie das Gerät nur zum Kochen, niemals als
Heizgerät.
Überhitztes Fett oder Öl ist leicht entzündlich.
Entfernen Sie sich nicht vom Gerät, wenn Fett oder Öl
erhitzt wird. Falls sich Fett oder Öl entzündet, löschen
Sie das Feuer nicht mit Wasser. Verbrennungsgefahr!
Decken Sie den Topf oder die Pfanne zum Ersticken
der Flamme mit einem Deckel ab und schalten Sie die
Kochstelle aus.
Beim Auftreten eines Defektes stellen Sie die Gas- und
rufen Sie bitte unseren Kundendienst.
Falls sich ein Bedienknebel nicht drehen lässt,
versuchen Sie es nicht gewaltsam. Wenden Sie sich
zum Reparieren oder Ersetzen des Bedienknebels
sofort an den Kundendienst.
Stellen Sie keine verformten, instabilen Töpfe auf
Platten und Brenner, die Töpfe können umfallen.
Dieses Gerät entspricht Klasse 3 gemäß EN 30-1-1
für Gasgeräte: Einbaugeräte.
Lagern Sie keine ätzenden chemischen
Reinigungsmittel oder Produkte, Dampfreiniger,
Die in diesem Bedienungshandbuch dargestellten
Grafiken sind orientativ.
Der Hersteller ist jeglicher Verantwortung enthoben,
wenn die Bestimmungen dieses Handbuchs nicht
eingehalten werden.
Stromzufuhr des Gerätes ab. Für Reparaturarbeiten
Verwenden Sie zur Reinigung des Kochfeldes
keine Dampfreiniger. Lebensgefahr durch
Stromschlag!
brennbare Materialien oder andere Produkte, die keine
Lebensmittel sind, unter diesem Haushaltsgerät bzw.
benutzen Sie diese nicht in unmittelbarer Nähe.
Das Gerät ist nicht für die Benutzung durch Personen
(einschließlich Kinder)
vorgesehen, die in ihrer
körperlichen, sensorischen oder geistigen
Leistungsfähigkeit beeinträchtigt sind oder denen es an
Erfahrung oder Kenntnissen mangelt, es sei denn, sie
stehen unter Beaufsichtigung oder wurden von
einer für
ihre Sicherheit verantwortlichen Person in der Benutzung
des Gerätes unterrichtet.
i~ллЙе=pбЙ=З~л=dЙк®н=п®ЬкЙеЗ=ЗЙл=_ЙнкбЙДЙл=ебЕЬн=
меДЙ~мСлбЕЬнбЦнK=
=
21
Ihr neues Gerät
Rost
Brenner bis
1,1 kW
Brenner bis
1,9 kW
Brenner bis
1,1 kW
Elektromulde
1800 W
Bedienknebel
Rost
Bedienknebel
Rost
Brenner bis
2,8 kW
Brenner bis
1,9 kW
Brenner bis
2,8 kW
Brenner bis
1,9 kW
Dualer Doppelbrenner D
bis 4.25 kW
22
Brenner bis
1,9 kW
Brenner bis
1,9 kW
Brenner bis
2,8 kW
Brenner bis
1,1 kW
Bedienknebel

Gasbrenner
Betrieb
Abb. 1
Abb. 2
Abb. 3
An jedem Bedienknebel ist der Brenner markiert,
der damit geregelt wird. Abb. 1.
Für eine korrekte Funktionsweise des Geräts
müssen sowohl die Roste als auch alle Teile der
Brenner richtig aufliegen. Abb. 2-3-4-5.
Abb. 4
Abb. 5
Anzünden per Hand
1. Drücken Sie den Bedienknebel des gewählten
Brenners hinein und drehen Sie ihn nach links bis auf
die gewünschte Position.
2. Nähern Sie dem Brenner einen Anzünder oder
eine Flamme (Feuerzeug, Streichholz, etc.).
23
Automatische Zündung
Wenn Ihr Kochfeld über eine automatische
Zündung verfügt (Zündkerzen):
1. Drücken Sie den Bedienknebel des gewählten
Brenners hinein und drehen Sie ihn nach links bis
auf die maximale Position.
Während Sie den Bedienknebel gedrückt halten,
werden Funken an allen Brennern geschlagen.
Die Flamme geht an (der Bedienknebel kann nun
losgelassen werden).
2. Drehen Sie den Bedienknebel auf die
gewünschte Position.
Falls die Flamme nicht gezündet wurde, drehen
Sie den Bedienknebel zurück auf Aus und
wiederholen Sie die Schritte. Halten Sie dieses
Mal den Bedienknebel länger gedrückt (bis zu 10
Sekunden).
Hinweis! Wenn nach 15 Sekunden die Flamme
nicht gezündet wurde, machen Sie den Brenner
aus und öffnen Sie Tür oder Fenster. Warten Sie
wenigstens eine Minute, bevor Sie es erneut
versuchen.
Sicherheitssystem
Thermoelement
Zündkerze
Ausschalten eines
Brenners
Leistungsstufen
24
Position
große
Flamme
kleine
Flamme
Bedienknebel aus
größte Öffnung
bzw. Leistung und
elektrische Zündung
kleinste Öffnung bzw.
Leistung
Je nach Modell verfügt Ihr Kochfeld über ein
Sicherheitssystem (Thermoelement), das den
Austritt von Gas verhindert, wenn die Brenner
versehentlich ausgehen. Um zu prüfen, ob diese
Vorrichtung aktiv ist, entzünden Sie einen Brenner
und halten Sie den Bedienknebel weiterhin
während 4 Sekunden nach dem Anzünden der
Flamme fest gedrückt.
Drehen Sie den betreffenden Bedienknebel nach
rechts, bis die Position 0 erreicht ist.
Zwischen maximaler und minimaler Position
können Sie durch die stufenlosen Bedienknebel
genau die Leistung einstellen, die Sie benötigen.

Die inneren und äußeren Flammen der dualen
Doppelbrenner können unabhängig voneinander
reguliert werden.
Die möglichen Leistungsstufen sind:
Äußere und innere Flamme auf maximaler Leistung.
Äußere Flamme auf minimaler, innere Flamme auf
maximaler Leistung.
Innere Flamme auf maximaler Leistung.
Innere Flamme auf minimaler Leistung.
Warnhinweise
Ein Pfeifton während des Benutzens der Brenner ist
normal.
Während des ersten Gebrauchs ist es normal, dass
Gerüche frei werden. Das stellt kein Risiko bzw. keinen
Defekt dar; die Gerüche verschwinden mit der Zeit.
Einige Sekunden nach Abschalten des Brenners ist ein
dumpfes Geräusch zu hören. Dies ist normal und
bedeutet, dass das Sicherheitssystem deaktiviert wurde.
Achten Sie auf höchste Sauberkeit. Bei verschmutzten
Zündkerzen funktioniert das Anzünden nicht fehlerfrei.
Reinigen Sie die Zündkerzen regelmäßig mit einer
kleinen, nicht-metallischen Bürste. Achten Sie darauf,
dass auf die Zündkerzen keine gewaltsamen Schläge
ausgeübt werden.
Eine orangefarbene Flamme ist normal. Sie entsteht
durch in der Luft befindlichen Staub, übergelaufene
Flüssigkeiten, etc.
25
Die Benutzung eines Gaskochgeräts erzeugt in
dem Raum, in dem es betrieben wird, Wärme und
Feuchtigkeit. Sie müssen sicherstellen, dass eine gute
Belüftung der Küche gewährleistet ist: die natürlichen
Belüftungsöffnungen geöffnet halten, oder eine
mechanische Belüftung (Abzugshaube) installieren.
Die intensive und lange Benutzung des Geräts
kann eine zusätzliche Belüftung erfordern, z. B. durch
Öffnen eines Fensters, oder eine effizientere Belüftung,
z. B. durch Erhöhung der Leistung der mechanischen
Belüftung (Abzugshaube), falls vorhanden.
Wenn die Flammen des Brenners versehentlich
ausgehen, drehen Sie den Bedienknebel des Brenners
auf Aus und zünden Sie den Brenner für mindestens
eine Minute nicht erneut an.
Geeignete
Kochgefäße
Wok
Mindest-
Brenner
Doppelbrenner 22 cm
Doppelbrenner B 22 cm
Doppelbrenner D 22 cm
Schnellbrenner 22 cm 26 cm
Normalbrenner 14 cm 20 cm
Sparbrenner 12 cm 16 cm
Elektromulde 18 cm
durchmesser
des
Kochgefäßes
Höchst-
durchmesser
des
Kochgefäßes
Der Wok ist ein aus China stammendes Kochgefäß
und ähnelt einer leichten, runden und tiefen Pfanne mit
Griffen und einem flachen oder runden Boden.
Im Wok können Speisen auf verschiedene Weise
zubereitet werden: als Gulasch, gebraten, durch
langsames Garen, gegrillt und gedünstet. Man kann
sagen, dass der Wok zugleich Pfanne und Kochtopf ist
und dank seiner Form und Größe die Zubereitung großer
Mengen erlaubt.
Im Wok verteilt sich die Hitze gleichmäßiger und sanfter.
Die intensive Hitze im Wok erlaubt das raschere Garen
von Speisen, wobei weniger Öl benötigt wird. Dadurch
.
ist das Kochen mit dem Wok eine der schnellsten und
gesündesten Kochmethoden. Bei der Benutzung eines
Woks beachten Sie die Anweisungen des Herstellers.
26

Betrieb des elektrischen Kochfelds mit
Zweikreis-Kochzone
Die Modelle mit Glaskeramik-Kochfeld funktionieren
mit zwei Stromkreisen, so dass zwei verschiedene
Kochzonen verfügbar sind: eine zentrale, kleine
Kochzone mit 700 W und eine große Kochzone mit
1800 W, wenn Ihr Gerät mit 230 V arbeitet.
Ein- und
ausschalten
Einschalten
Abb. 6
Abb. 6a
Ausschalten
Hinweis
Die kleine (zentrale) Kochzone wird eingeschaltet,
indem der Schalter im Uhrzeigersinn über die
Position 0 hinausgedreht wird. Danach kann er auf
eine beliebige Position von 1 bis 9 gebracht werden.
Abb. 6:
Position 1: minimale Leistung.
Position 9: maximale Leistung.
Wenn Sie darüber hinaus die vergrößerte Heizzone
verwenden wollen, drehen Sie den Schalter über die
Position 9 hinweg (Abb. 6a) und stellen ihn danach
auf Position 9 (höchste Heizstufe) oder eine andere,
niedrigere Position, die weniger Hitze erzeugt,
zurück. Wenn Sie die kleine Kochzone wieder
verwenden wollen, drehen Sie den Schalter gegen
den Uhrzeigersinn bis zur Position 0 und stellen Sie
nun eine neue Position ein.
Die Betriebskontrollleuchte / Restwärmeanzeige
geht aus, wenn die Oberfläche des Kochfelds
abgekühlt ist.
Wir empfehlen, am Beginn des Kochvorgangs die
maximale Leistung zu benutzen und nach einigen
Minuten mittlere Positionen zu wählen.
Vermeiden Sie das Überlaufen von Flüssigkeiten auf
der Oberfläche des elektrischen Kochfelds.
Kochen Sie nicht mit feuchten Töpfen oder Pfannen.
27

Restwärme
Das elektrische Kochfeld kann bereits kurz vor
Ende des Kochvorgangs ausgeschaltet werden.
Die Restwärme erlaubt es, einige Minuten
weiterzukochen und so Energie zu sparen.
Empfehlungen
Kochfeld mit 9
Stufen
Zerlassen: Schokolade, Butter, Gelatine 1-2
Kochen: Reis, Béchamel, Ragout 2-3
Kochen: Kartoffeln, Nudeln, Gemüse 4-5
Schmoren: Gulasch, Rollbraten 4-5
Dampfgaren: Fisch 5
Erwärmen, warm halten: Fertiggerichte 2-3-4-5
Braten: Schnitzel, Beefsteak, Omelett 6-7-8
Kochen und Anbraten
9
Die vorgeschlagenen Kochstufen sind rein informativ.
Erhöhen Sie die Leistung bei:
- größeren Flüssigkeitsmengen,
- größeren Gerichten,
- Kochvorgängen in Töpfen oder Pfannen ohne
Deckel.
28
Zubehör
Je nach Modell sind im Kochfeld folgende
Zubehörteile inbegriffen. Diese Teile können auch
Zusatzrost Wok
Zusatzrost
Kaffeekocher
Empfehlungen
zum Kochen
Brenner Sehr stark Stark Mittel Langsam
Doppelbrenner
Schnellbrenner
Zur ausschließlichen Benutzung auf dem
Doppelbrenner und mit Kochgefäßen, die
einen größeren Durchmesser als 26 cm haben
(Bratpfannen, Tontöpfe, etc.), und Gefäßen mit runden
Böden.
Zur ausschließlichen Benutzung auf dem Sparbrenner
und mit Kochgefäßen, die einen kleineren
Durchmesser als 12 cm haben.
Der Hersteller übernimmt für die fehlende oder
fehlerhafte Verwendung dieser Zusatzroste keine
Verantwortung.
Kochen, Garen,
Braten, Bräunen,
Paellas, asiatische
Küche (Wok).
Schnitzel, Beafsteak,
Omelett, Frittiertes.
Aufwärmen und Warmhalten:
vorbereitete Gerichte, Fertiggerichte.
Reis, Béchamel,
Ragout.
Dampfkochen:
Fisch, Gemüse.
Normalbrenner
Sparbrenner
Dampfkartoffeln,
frisches Gemüse,
Eintopf,
Nudelgerichte.
Kochen:
Schmorgerichte,
Milchreis, Karamell.
Aufwärmen und Warmhalten:
zubereiteter Gerichte und Kochen feiner
Gerichte.
Auftauen und
langsam Kochen:
Hülsenfrüchte, Obst,
Gefriergerichte.
Schmelzen:
Butter,
Schokolade,
Gelatine.
29
 Loading...