

Page 1
*9000261399* 9000261399 920822
.+(
PLQ
PLQ
%
920822 Ø Montageanleitung
Þ Notice de montage
é Installatievoorschrift
Ú Installation instructions
$
PLQ
Page 2
PLQ
Page 3

de
Ø
fr
nl
Montageanleitung
Wichtige Hinweise
Gaskochfeld und Herd müssen vom gleichen Hersteller und
kombinierbar sein. Achten Sie auf die Kombinationspunkte, sie
müssen gleich sein. Beachten Sie die Montageanleitung des
Kochfeldes.
Türgriff nicht zum Transport oder Einbau des Gerätes benutzen.
Gerät vor dem Einbau auf Transportschäden prüfen.
Bei allen Montagearbeiten muss das Gerät spannungslos sein.
Möbel vorbereiten
Nur ein fachgerechter Einbau nach dieser Montageanleitung
garantiert einen sicheren Gebrauch. Bei Schäden durch falschen Einbau haftet der Monteur.
Einbaumöbel müssen bis 90 °C temperaturbeständig sein,
angrenzende Möbelfronten bis 70 °C.
Alle Ausschnittarbeiten an Möbel und Arbeitsplatte vor dem Einsetzen der Geräte durchführen. Späne entfernen! Die Funktion
von elektrischen Bauteilen kann beeinträchtigt werden.
Vorsicht beim Einbau! Teile, die während der Montage zugänglich sind, können scharfkantig sein. Zur Vermeidung von Schnittverletzungen Schutzhandschuhe tragen.
Nicht befestigte Möbel mit einem handelsüblichen Winkel A an
der Wand befestigen.
Möbel mit Arbeitsplatte fest verbinden.
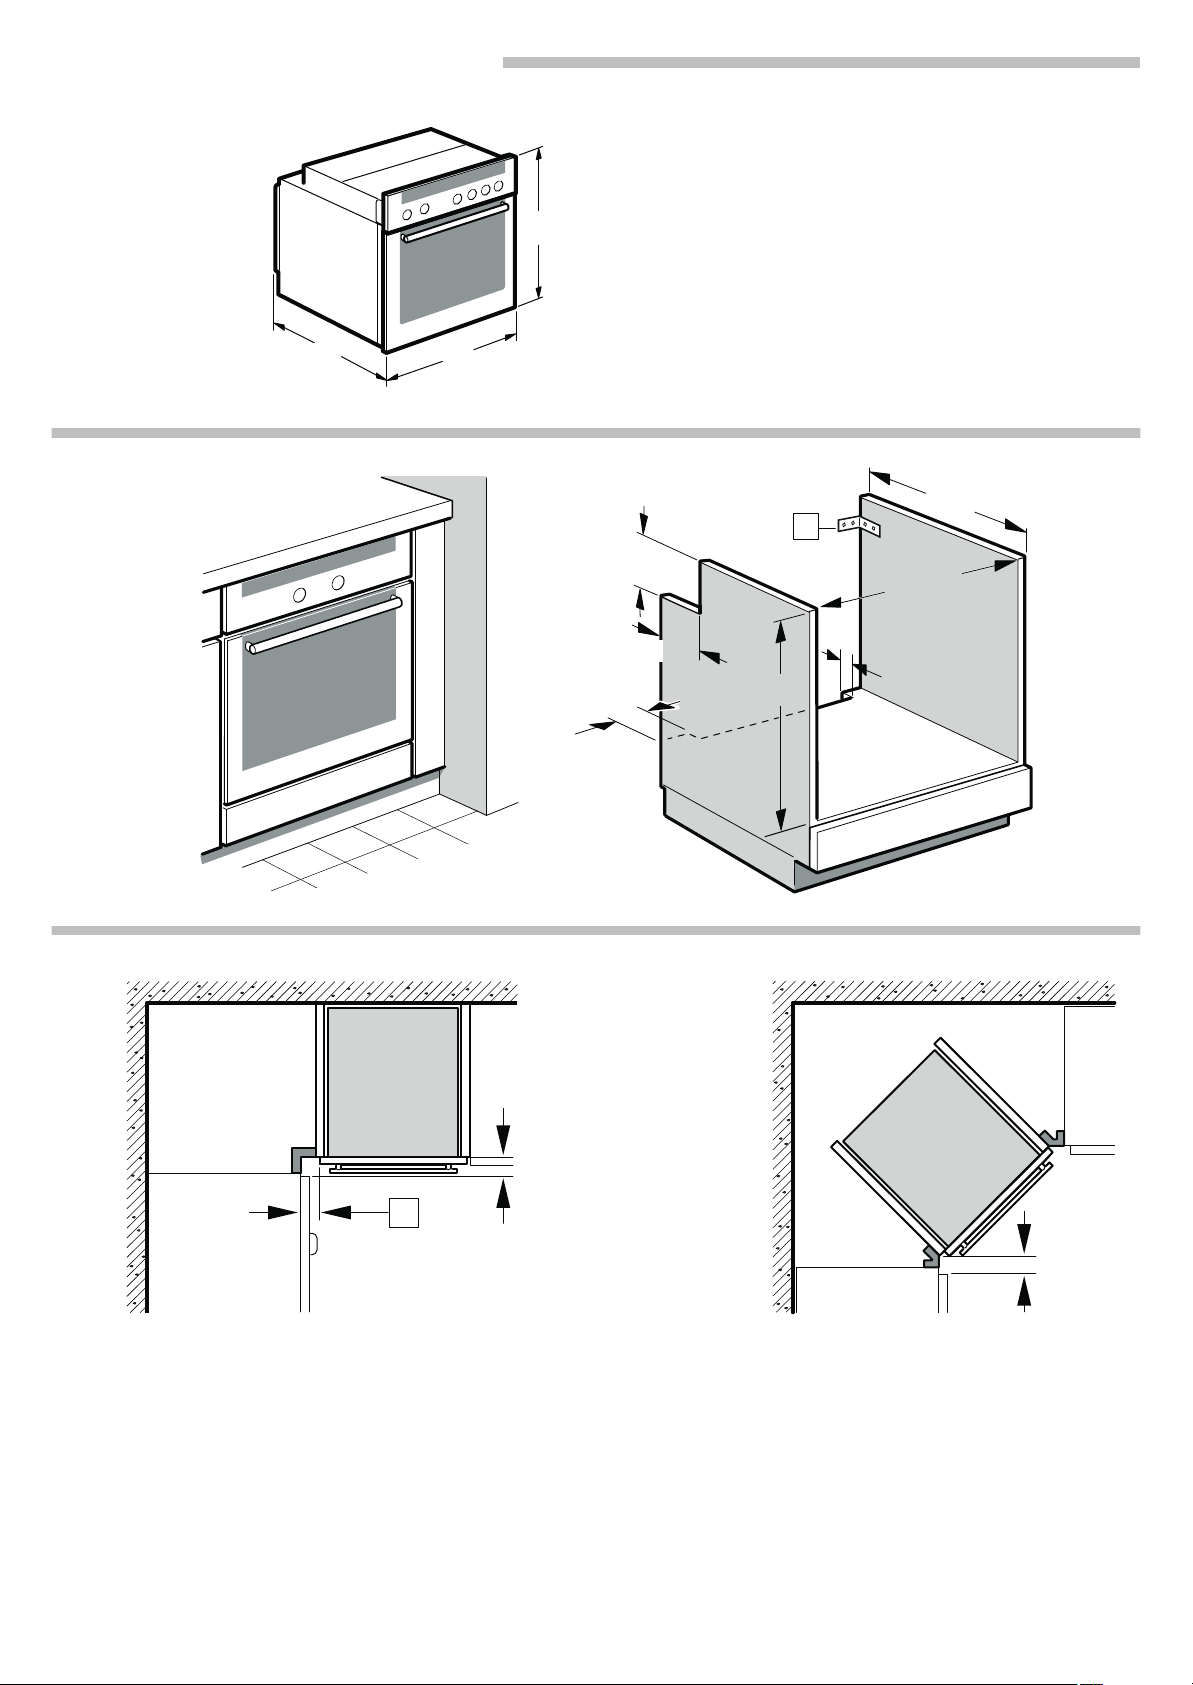
Gerät unter Arbeitsplatte (Bild 1)
Zur Belüftung des Gerätes muss der Zwischenboden einen
Spalt von 20 mm zur Aufstellwand aufweisen.
Der Spalt zwischen Arbeitsplatte und Gerät darf nicht durch
zusätzliche Leisten verschlossen werden.
Für den Gasanschluss wird ein 100x100 mm-Ausschnitt links
oder rechts benötigt.
Eckeinbau (Bild 2)
Beim Eckeinbau Mindestabstände beachten. Ausreichend
Abstand B zur Möbelfront und deren Griffe beachten. Die Gerätetür muss sich öffnen lassen.
Gerät anschließen
Das Gerät darf nur mit dem mitgelieferten Anschlusskabel angeschlossen werden.
Angaben auf dem Typenschild zu Spannung und Gesamtleistung beachten.
Das Gerät darf nur an eine vorschriftsmäßig installierte Schutzkontakt-Steckdose angeschlossen werden.
Wenn der Stecker nach dem Einbau nicht mehr erreichbar ist,
muss installationsseitig eine allpolige Trennvorrichtung mit
einem Kontaktabstand von min. 3 mm vorhanden sein.
Der Berührungsschutz muss durch den Einbau gewährleistet
sein.
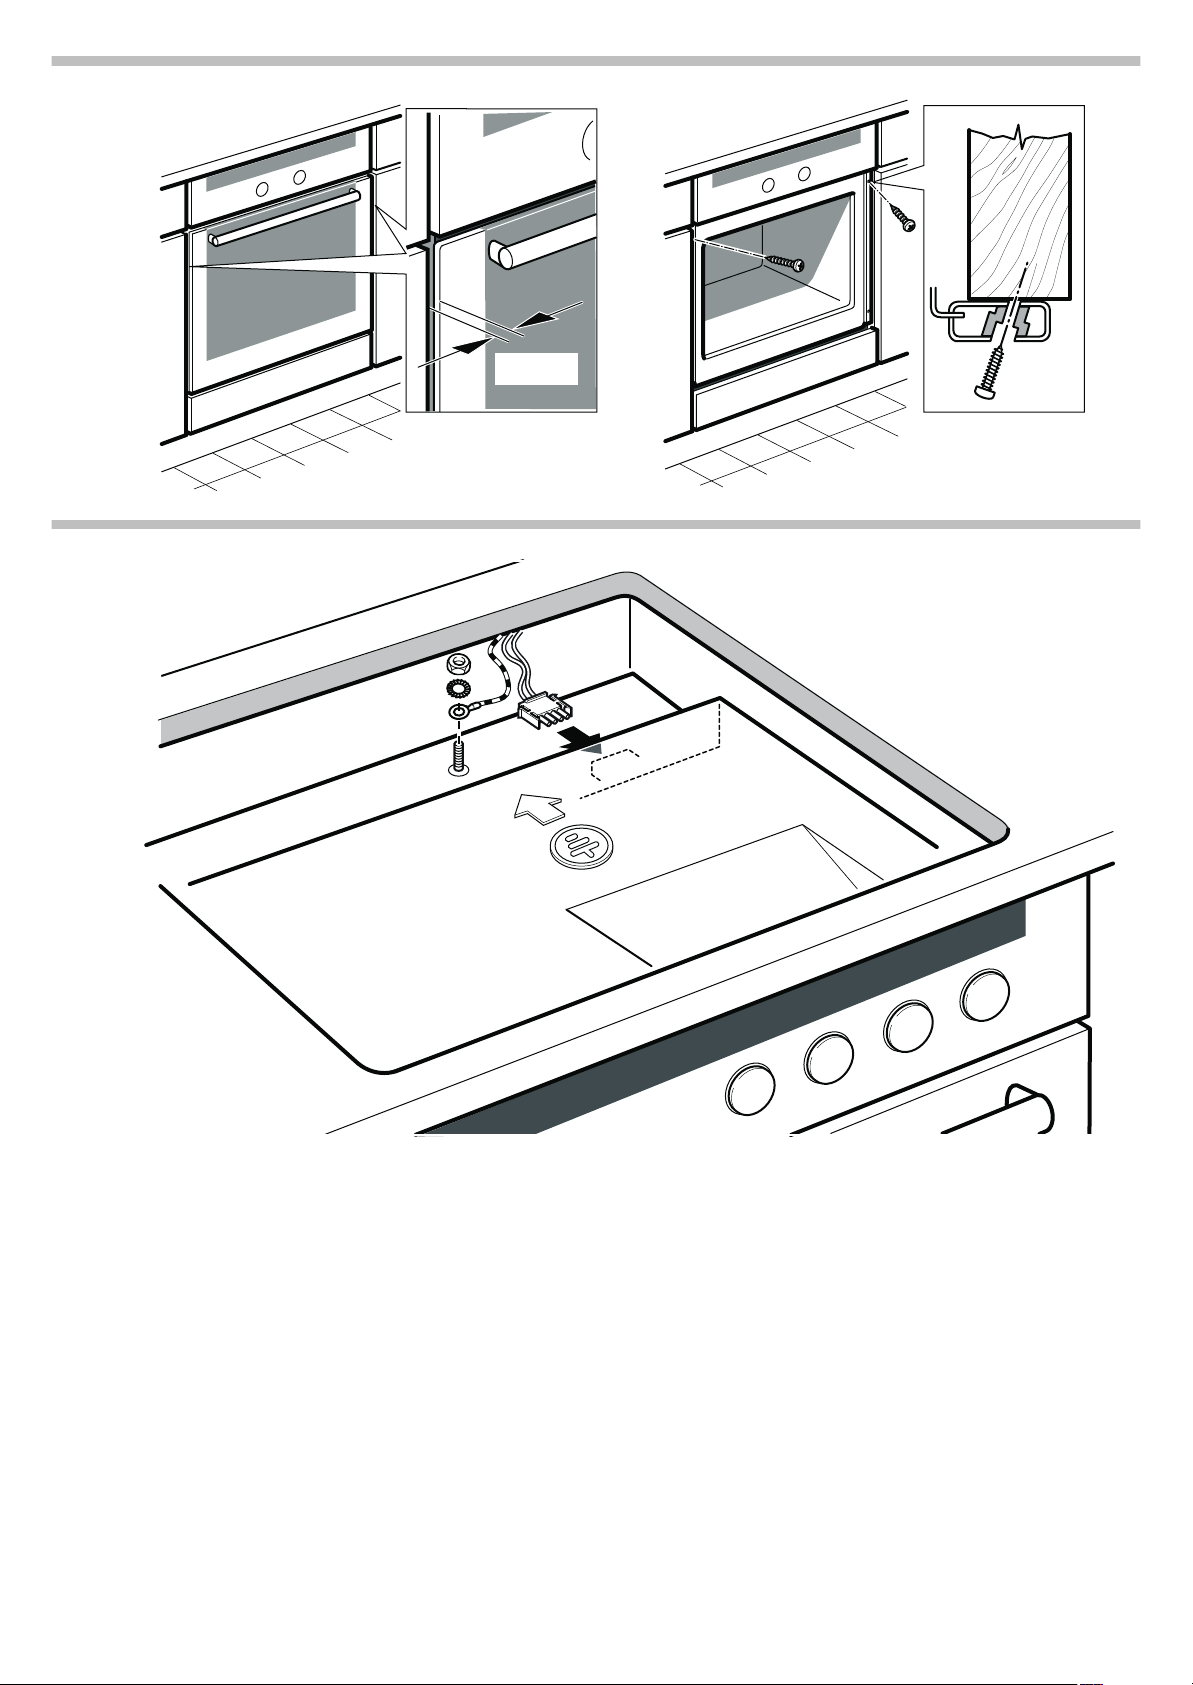
Gerät befestigen - Bild 3
1. Gerät ganz einschieben. Dabei Anschlusskabel nicht knicken,
einklemmen oder über scharfe Kanten führen.
2. Gerät mittig ausrichten.
Zwischen Gerät und angrenzenden Möbelfronten ist ein Luftspalt von 5 mm erforderlich.
3. Gerät mit der Wasserwaage exakt waagrecht ausrichten.
4. Gerät festschrauben.
Gaskochfeld anschließen - Bild 4
Grün-gelbes Erdungskabel des Gaskochfeldes an die Erdungsschraube
nem Erdungskabel besteht Stromschlaggefahr!
Anschlussstecker des Gaskochfeldes anschließen.
< des Gerätes anschließen. Bei nicht angeschlosse-
Ausbau
1. Gerät spannungslos machen.
2. Befestigungsschrauben lösen.
3. Gerät leicht anheben und ganz herausziehen.
Þ
Notice de m ontage
Recommandations importantes
Le table de cuisson gaz et la cuisinière doivent être du même
fabricant et être combinables. Veillez aux points de
combinaison, ils doivent être identiques. Respectez la notice de
montage de la table de cuisson.
Ne pas utiliser la poignée de la porte pour transporter ou
encastrer l'appareil.
Avant d'encastrer l'appareil, vérifier s'il présente des avaries.
L'appareil doit être mis hors tension pour tous les travaux de
montage.
Préparation du meuble
Uniquement une installation effectuée selon cette notice de
montage garantit une utilisation en toute sécurité. En cas de
dommages résultant d'une installation incorrecte, l'installateur
est responsable.
Les meubles d'encastrement doivent résister à une température
jusqu'à 90 °C, la façade des meubles voisins jusqu'à 70 °C.
Effectuer tous les travaux de découpe sur le meuble et sur le
plan de travail avant d'encastrer les appareils. Enlever les
copeaux ! Le fonctionnement des composants électriques peut
être compromis.
Attention lors de l'encastrement ! Des éléments accessibles
pendant le montage peuvent posséder des arêtes coupantes.
Porter des gants de protection pour éviter des coupures.
Les meubles non fixés doivent être fixés au mur au moyen d'une
équerre A usuelle du commerce.
Arrimer solidement les meubles au plan de travail.
Appareil sous le plan de travail - fig. 1
Pour l'aération de l'appareil, le faux-plancher doit être à une
distance de 20 mm du mur d'adossement.
L'écart entre le plan de travail et l'appareil ne doit pas être
obturé par des baguettes supplémentaires.
Pour le raccordement au gaz, il est nécessaire de pratiquer une
découpe de 100x100 mm à gauche ou à droite.
Encastrement angulaire - fig. 2
En cas d'encastrement angulaire, respecter les distances
minimales. Respecter une distance suffisante B vers la façade
de meuble et de ses poignées. Il doit être possible d'ouvrir la
porte de l'appareil.
Raccordement de l'appareil
L'appareil doit uniquement être raccordé au moyen du câble de
raccordement fourni.
Respecter les indications figurant sur la plaque signalétique
concernant la tension et la puissance totale.
L'appareil doit être raccordé impérativement à une prise de
courant de sécurité installée de manière réglementaire.
Si, après l'encastrement de l'appareil, la prise n'est plus
accessible, il faut installer côté secteur un dispositif de coupure
omnipolaire avec un écartement des contacts d'au moins 3 mm.
L'encastrement doit garantir la protection contre les contacts
accidentels.
Fixer l'appareil - fig. 3
1. Pousser l'appareil à fond dans le meuble, tout en veillant à ne
pas plier ni coincer le câble d'alimentation et ne pas le faire
passer par-dessus d'arêtes coupantes.
2. Centrer l'appareil.
Une fente d'aération de 5 mm est nécessaire entre l'appareil et
la façade des meubles voisins.
3. Aligner l'appareil exactement à l'horizontale en utilisant le
niveau à bulle.
4. Visser l'appareil.
Raccorder la table de cuisson gaz - fig. 4
Visser le câble de mise à la terre (vert-jaune) de la table de
cuisson gaz sur la vis de mise à la terre
de câble de mise à la terre non raccordé il y a risque de choc
électrique !
Raccorder la fiche de connexion de la table de cuisson gaz.
< de l'appareil. En cas
Dépose
1. Mettre l'appareil hors tension.
2. Desserrer les vis de fixation.
3. Soulever légèrement l'appareil et le retirer complètement.
é
Installatievoorschrift
Belangrijke aanwijzingen
De gaskookplaat en het fornuis dienen van dezelfde fabrikant en
combineerbaar te zijn. Let op de combinatiepunten. Deze
Page 4

moeten gelijk zijn. Neem het installatievoorschrift van de
en
kookplaat in acht.
Deurgreep niet gebruiken voor het transport of de inbouw van
het apparaat.
Apparaat voor de inbouw controleren op transportschade.
Bij alle montagewerkzaamheden dient het apparaat
spanningsloos te zijn.
Meubel voorbereiden
Alleen als de inbouw op deskundige wijze en conform dit
installatievoorschrift wordt uitgevoerd, is de veiligheid bij het
gebruik gegarandeerd. De monteur is aansprakelijk voor
schade als gevolg van een verkeerde inbouw.
Inbouwmeubels dienen bestand te zijn tegen een temperatuur
van maximaal 90 °C, aangrenzende voorzijden van meubels
tegen een temperatuur van maximaal 70 °C.
Alle uitsnijdingswerkzaamheden aan het meubel en het
werkblad uitvoeren voordat de apparaten worden ingebracht.
Spanen verwijderen! Deze kunnen invloed hebben op de
werking van elektrische componenten.
Voorzichtig bij het inbouwen! Delen die tijdens het inbouwen
toegankelijk zijn, kunnen scherpe randen hebben. Draag
werkhandschoenen ter voorkoming van snijwonden.
Niet bevestigde meubels met een gebruikelijke, in de handel
verkrijgbare haakA aan de wand bevestigen.
Werkblad en meubel goed aan elkaar bevestigen.
Apparaat onder werkblad- Afbeelding 1
Voor de ventilatie van het apparaat dient er een spleet van
20 mm tussen het tussenschot en de plaatsingswand te zijn.
De spleet tussen werkblad en apparaat mag niet door extra
deklatten worden afgesloten.
Voor de gasaansluiting dient zich links of rechts een uitsnijding
van 100x100 mm te bevinden.
Hoekinbouw - Afbeelding 2
Bij hoekinbouw dient u zich aan de minimale afstanden te
houden. Voldoende afstand B tot de voorzijden van meubels en
de deurgrepen hiervan aanhouden. De deur van het apparaat
moet geopend kunnen worden.
Apparaat aansluiten.
Het apparaat mag alleen met de bijgeleverde aansluitkabel
worden aangesloten.
Gegevens op het typeplaatje over de spanning en het totale
vermogen in acht nemen.
Het apparaat mag alleen op een geaarde contactdoos worden
aangesloten die volgens de voorschriften is geïnstalleerd.
Wanneer de stekker na het inbouwen niet meer toegankelijk is,
moet op het apparaat een schakelaar met een contactafstand
van minstens 3 mm voorhanden zijn.
De bescherming tegen aanraking dient door de inbouw te zijn
gewaarborgd.
Apparaat bevestigen - Afbeelding 3
1. Apparaat helemaal inschuiven. Zorg er voor dat het
aansluitsnoer hierbij niet knikt, wordt ingeklemd of over
scherpe randen geleid.
2. Apparaat centrisch uitrichten
Tussen het apparaat en de aangrenzende voorzijden van
meubels dient een luchtspleet van minstens 5 mm aanwezig te
zijn.
3. Apparaat met een waterpas exact horizontaal uitrichten.
4. Apparaat vastschroeven.
Gaskookplaat aansluiten - Afbeelding 4
Groen-gele aardingskabel van de gaskookplaat aansluiten op
de aardingsschroef
aardingskabel niet is aangesloten bestaat het risico van een
schok.
Aansluitstekker van de gaskookplaat aansluiten.
< van het apparaat. Wanneer de
Demontage
1. Maak het apparaat spanningsloos.
2. Bevestigingsschroeven losdraaien.
3. Het apparaat licht optillen en helemaal naar buiten trekken.
Ú
Install ation in struc tions
Important notes
The gas hob and cooker must be made by the same
manufacturer and be designed to work in combination. Check
the combination points. They must be the same. Observe the
fitting instructions for the hob.
Do not use the door handle to carry or install the appliance.
Before installation, check the appliance for transportation
damage.
The appliance must be disconnected from the power supply
during all installation work.
Preparing the kitchen units
Safe use of this appliance can only be guaranteed if it has been
installed professionally in accordance with these installation
instructions. The installer is liable for damages incurred as a
result of incorrect installation.
Units into which ovens are to be fitted must be heat-resistant up
to 90 °C and adjacent cabinets up to 70 °C.
Carry out all cut-out work on the furniture unit and worktop
before fitting the appliances. Remove shavings. Otherwise, the
correct operation of electrical components may be adversely
affected.
Caution during installation. Parts that are accessible during
installation may have sharp edges. Wear protective gloves to
prevent injury from cuts.
Secure freestanding units to the wall using standard,
commercially available brackets A.
Permanently fix furniture units to the worktop.
Appliance under worktop - Fig. 1
To ventilate the appliance, there must be a gap of 20 mm
between the intermediate floor and the wall.
The gap between the worktop and the appliance must not be
closed using additional battens.
A 100 x 100 mm cut-out on the left or right-hand side is
required for the gas connection.
Corner installation - Fig. 2
For corner installation, check minimum clearances. Ensure that
there is sufficient clearance B for the front panel and its handles.
Check that the appliance door can be opened properly.
Connecting the appliance to the power supply
The appliance must only be connected using the connecting
cable supplied.
Note the information on the nameplate for voltage and total
power.
The appliance must only be connected to a protective contact
socket which has been correctly installed.
If the plug is no longer accessible following installation, an allpole isolating switch must be present on the installation side
with a contact gap of at least 3 mm.
Contact protection must be ensured by the method of
installation.
Fastening the appliance in place - Fig. 3
1. Fully insert the appliance. Do not kink or trap the power cable,
or route it over sharp edges.
2. Centre the appliance.
There must be an air gap of 5 mm between the appliance and
adjacent cabinets.
3. Using a spirit level, adjust the appliance so that it is perfectly
level.
4. Screw the appliance firmly in place.
Connecting the gas hob - Fig. 4
Connect the green and yellow earth cable of the gas hob to the
earthing screw
shock if the earthing cable is not connected.
Connect the gas hob connection plug.
< of the appliance. There is a risk of electric
Removal
1. Disconnect the appliance from the power supply.
2. Undo the securing screws.
3. Lift the appliance slightly and pull it out completely.
 Loading...