

Page 1
Electronic User’s Guide
Electronic User’s Guide
Electronic User’s GuideElectronic User’s Guide
April 2008
- 1 -
Page 2

Copyright
Copyright
CopyrightCopyright
Copyright
POWERMATE User’s Guide, Copyright © 2008 NEC Computers Asia Pacific Sdn. Bhd. (418989-A)
(“NECCAP”). All Rights Reserved. No part of this manual may be reproduced or transmitted, in any form or
by any means, whether electronic, chemical, manual or otherwise, including but not limited to photocopying,
recording, or information storage and retrieval systems, for any purpose without prior written permission of
NECCAP.
Disclaimer
NECCAP specifically disclaims all warranties, either expressed or implied, including, but not limited to,
implied warranties of merchantability and fitness for a particular purpose with respect to this product
and documentation to the extent permitted by the law. NECCAP reserves the right to revise or make
changes or improvements to this product or documentation at any time without any obligations to notify
any persons or users of such revisions or improvements.
In no event shall NECCAP be liable for any consequential or incidental damages, including but not
limited to loss of business profits or any other commercial damages, arising out of the use of this
product.
Trademarks
POWERMATE is a registered trademark of NEC Corporation.
Celeron, Celeron Inside, Centrino, Centrino Logo, Core Inside, Intel, Intel Logo, Intel Core, Intel Inside, Intel
Inside Logo, Intel Viiv, Intel vPro, Itanium, Itanium Inside, Pentium, Pentium Inside, Xeon and Xeon Inside
are trademarks or registered trademarks of Intel Corporation or its subsidiaries in the United States and other
countries.
AMD, the AMD Arrow logo, AMD Athlon, AMD Turion and combinations thereof, and AMD PowerNow! are
trademarks of Advanced Micro Devices, Inc.
Microsoft, Encarta, MSN, Windows, Outlook, Office logo and Windows logo are either registered trademarks
or trademarks of Microsoft Corporation in the United States and/or other countries. Windows Vista® is either
a registered trademark or trademark of Microsoft Corporation in the United States and/or other countries.
PS/2 is a trademark of International Business Machines, Inc.
Other product names mentioned in this manual may be trademarks or registered trademarks of their
respective companies NECCAP claims no interest in trademarks other than its own.
- 2 -
Page 3

VIRUS WARNING
VIRUS WARNING
VIRUS WARNINGVIRUS WARNING
NECCAP guarantees that this product is 100% virus free. Please take the following precautions to
protect your system against new viruses:
• Do not use illegal copies of software protected by copyright.
• Run an antivirus program and update it regularly.
• Check all floppy disks carefully using a virus scanner before you start using them.
• When your computer is connected to a network, please make sure that only authorised persons
have access to your system (you can use passwords and share files as Read Only).
• Always use a personal Internet Firewall to help protect your computer from attacks by viruses,
Trojans, worms and intruders.
EPILEPSY WARNING
EPILEPSY WARNING
EPILEPSY WARNINGEPILEPSY WARNING
Some people are susceptible to epileptic seizures or loss of consciousness when exposed to certain flashing
lights or light patterns in everyday life. Such people may have a seizure while watching television images or
playing certain games. This may happen even if the person has no medical history of epilepsy or has never
had any epileptic seizures.
If you or anyone in your family has ever had symptoms related to epilepsy (seizures or loss of
consciousness) when exposed to flashing lights, consult your doctor prior to playing such games. We advise
that parents monitor the use of games by their children. If you or your child experience any of the following
symptoms: dizziness, blurred vision, eye or muscle twitches, loss of consciousness, disorientation, any
involuntary movement or convulsion while playing a game, IMMEDIATELY discontinue use and consult your
doctor.
THUNDERSTORM WARNING
THUNDERSTORM WARNING
THUNDERSTORM WARNINGTHUNDERSTORM WARNING
•
This warning is only applicable if the product you purchase has a modem and/or TV tuner. Same
precautions should be taken if you are connecting a modem or TV tuner to the product.
•
Always disconnect telephone cable and/or antenna cable even though the product is in power off or in
standy mode.
- 3 -
Page 4

Safety And Comfort
Safety And Comfort
Safety And ComfortSafety And Comfort
SAFETY PRECAUTIONS
Cables
Please make sure that cables are not strained and that there is no risk of people walking or tripping over
them. Also make sure that other devices do not place stress on the cables. Make sure that power cords are
connected to a grounded electrical outlet. The power outlet should be easily accessible and as close to the
computer as possible. Do not overload any power outlet with too many adapters.
Cleaning your computer
Always unplug your computer from the power outlet before cleaning it.
Do not use liquid or aerosol cleaners, use a damp cloth instead. Never spray any cleaning product directly on
to the screen. If dust has accumulated inside your computer, do not use a vacuum cleaner to remove it.
If you spill liquid on your computer or any device attached to it, switch it off immediately, unplug the power
cord and make sure it is completely dry before switching it on again. Wait overnight if necessary.
Computer environment
Make sure your computer's environment is free from dust, dampness or direct sunlight. Place your computer
away from sources of heat, such as radiators, or any device producing heat (e.g., amplifiers). Also ensure
your computer is away from magnetic fields or any device generating static electricity.
Do not place your computer on a carpet or any other surface that may have an electrical charge. Cellular
phones can cause interference with the audio devices of your computer. Make sure you keep mobile phones
at least 30 centimeters away from your computer. To keep your computer running smoothly, please
remember the following:
• If you are new to computing, we recommend taking a computer-training course before using your
computer.
• Always save your work and make regular backup copies of your documents on rewritable media (e.g.,
CDRW disc). In the event of a major computer failure, you could lose all your personal data unless you
have made personal backups.
• To protect your computer from viruses, perform a virus check before opening a file on a floppy, received
by e-mail, or downloaded from the Internet. Your anti-virus program can perform these checks
automatically. Regularly scan your hard disk drive for viruses and delete them if any are found. Check
your anti-virus software website in order to be updated on the latest viruses.
• To save disk space and optimize your computer’s performance, use the system tools included with
Windows®, such as Disk cleanup or Defragmenter, on a regular basis.
• Never switch off your computer if one of the drives is still running (check that all drive indicator
lights are off).
• Before you connect or disconnect the power cord at the back of the computer, please ensure that
the power plug is disconnected from the wall outlet.
HEALTH PRECAUTIONS
Please follow the guidelines below to use your computer comfortably and to avoid health problems. If
you work or play for hours at a time, then make sure you take regular breaks. Look away from the
computer’s screen once in a while. Do not use your computer if you are tired.
If the ‘warmth’ symbol is present on the underside of the computer, this indicates that while
using the computer the underside surface can b eco m e h ot. Av o id con tinu o us bod y
con tact and do n ot p l ace the computer on your lap while operating it.
Some disorders of the hands, wrists, arms, neck, shoulders, legs and back may be associated
with or aggravated by certain repetitive actions. To reduce your risk of developing these
disorders, type with your wrists straight and your hands and wrists floating above the keyboard.
If you experience periods of pain, tingling, numbness or other discomfort, please contact
your doctor.
- 4 -
Page 5

Packing List
Packing List
Packing ListPacking List
• System
• Signal Cable & Power Cable
• Keyboard & Mouse*
• Wireless Keyboard*
• User Guide*
*For specific models only
If the items are not found in the packaging box, it means that the item is not applicable to the system you
purchased, hence it is not included for you in the system.
To synchronize the wireless mouse and keyboard with your POWERMATE P
1. Insert batteries into the keyboard and mouse.
2. Connect the power cord and ensure the power plug is connecting to the wall outlet.
*
*
The power cable may vary from country to country.
3. Power on your POWERMATE P.
Step 1:
i. Power on the POWERMATE P.
- 5 -
Page 6
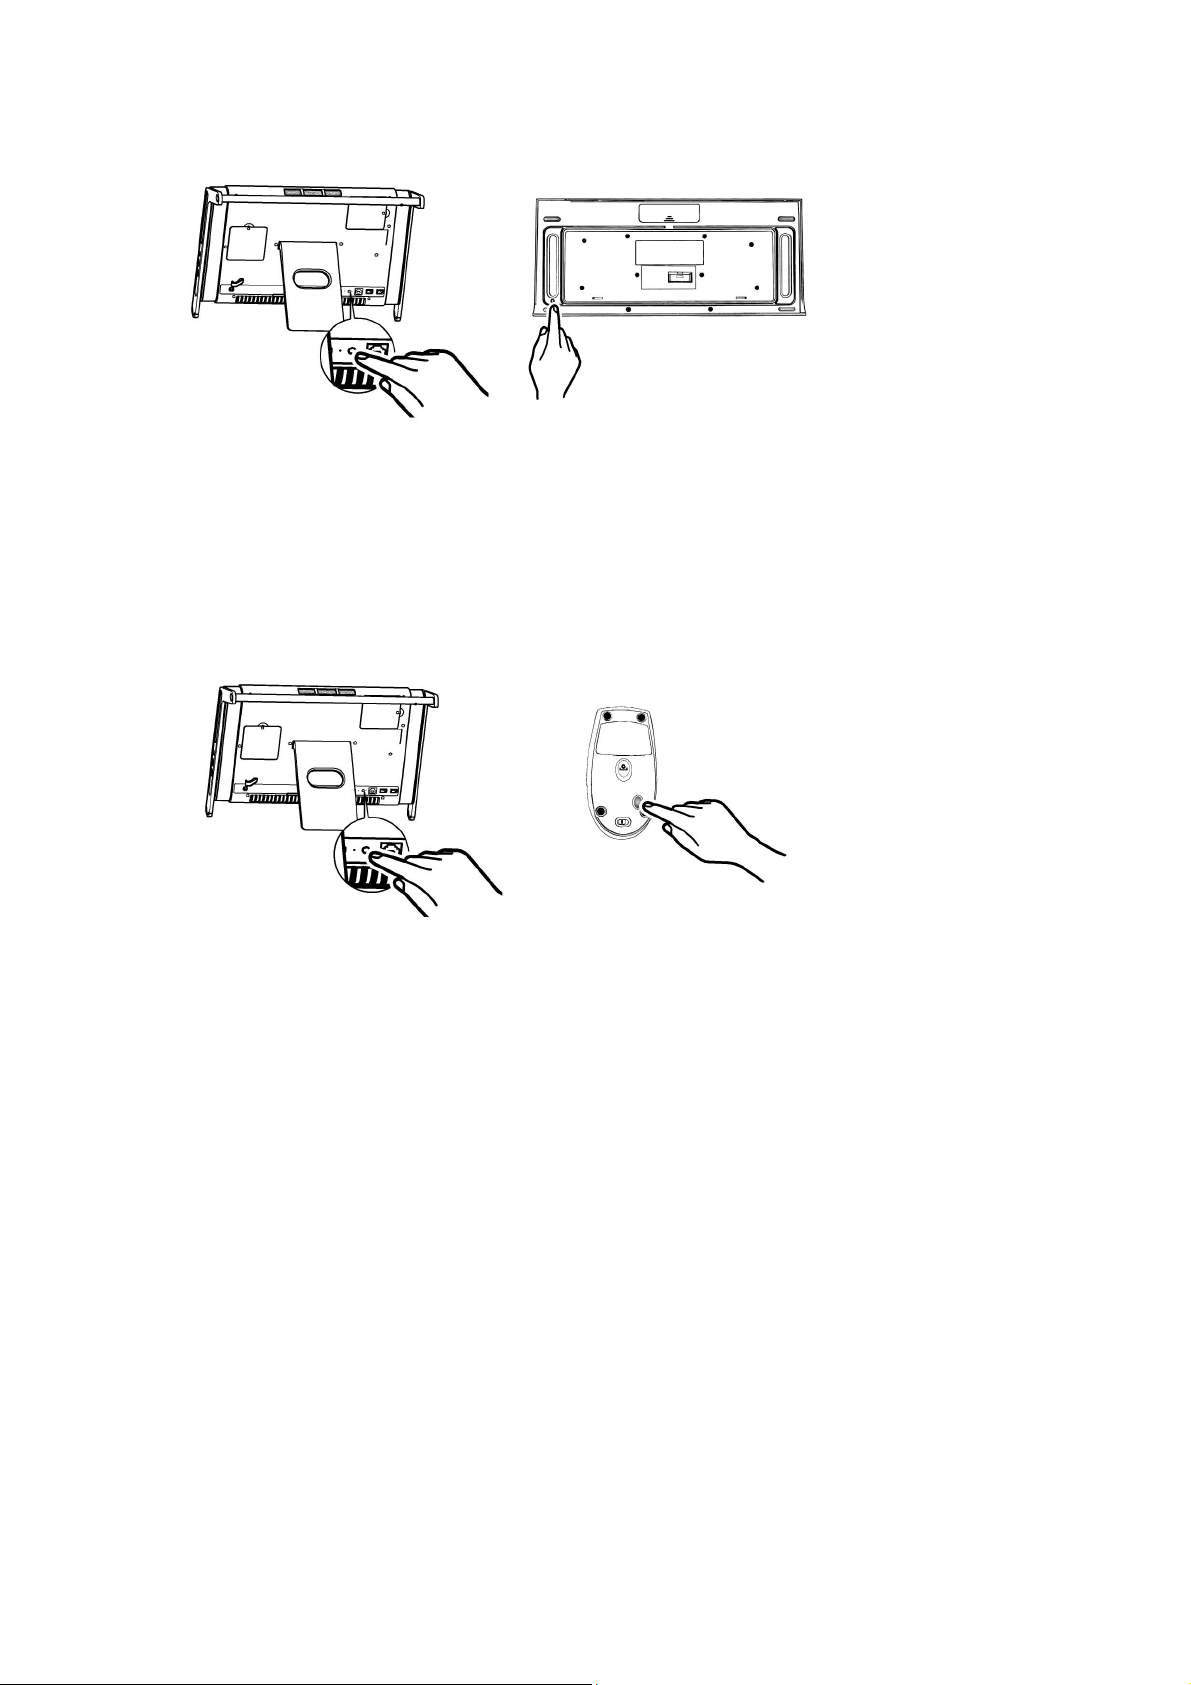
4. Synchronize the keyboard with your POWERMATE P.
Step 2:
i. Press the connect button (about 6 seconds) at the back of POWERMATE P.
ii. You can see green light is fast blinking.
iii. Press the connect button at the back of the keyboard (about 6 seconds) until the battery indicator (RED
LED) on the keyboard flashes once.
iv. Wait for 1 minute until the connection is done.
5. Synchronize the mouse with your POWERMATE P.
Step 3:
i. Press the connect button (about 6 seconds) at the back of POWERMATE P.
ii. You can see green light is blinking.
iii. Press the connect button at the back of the mouse (about 6 seconds) until the mouse sensor (RED LED)
is off then release it.
iv. Wait for 1 minute until the connection is done.
- 6 -
Page 7
Dual
Dual Boot
Dual Dual
Boot
BootBoot
IMPORTANT
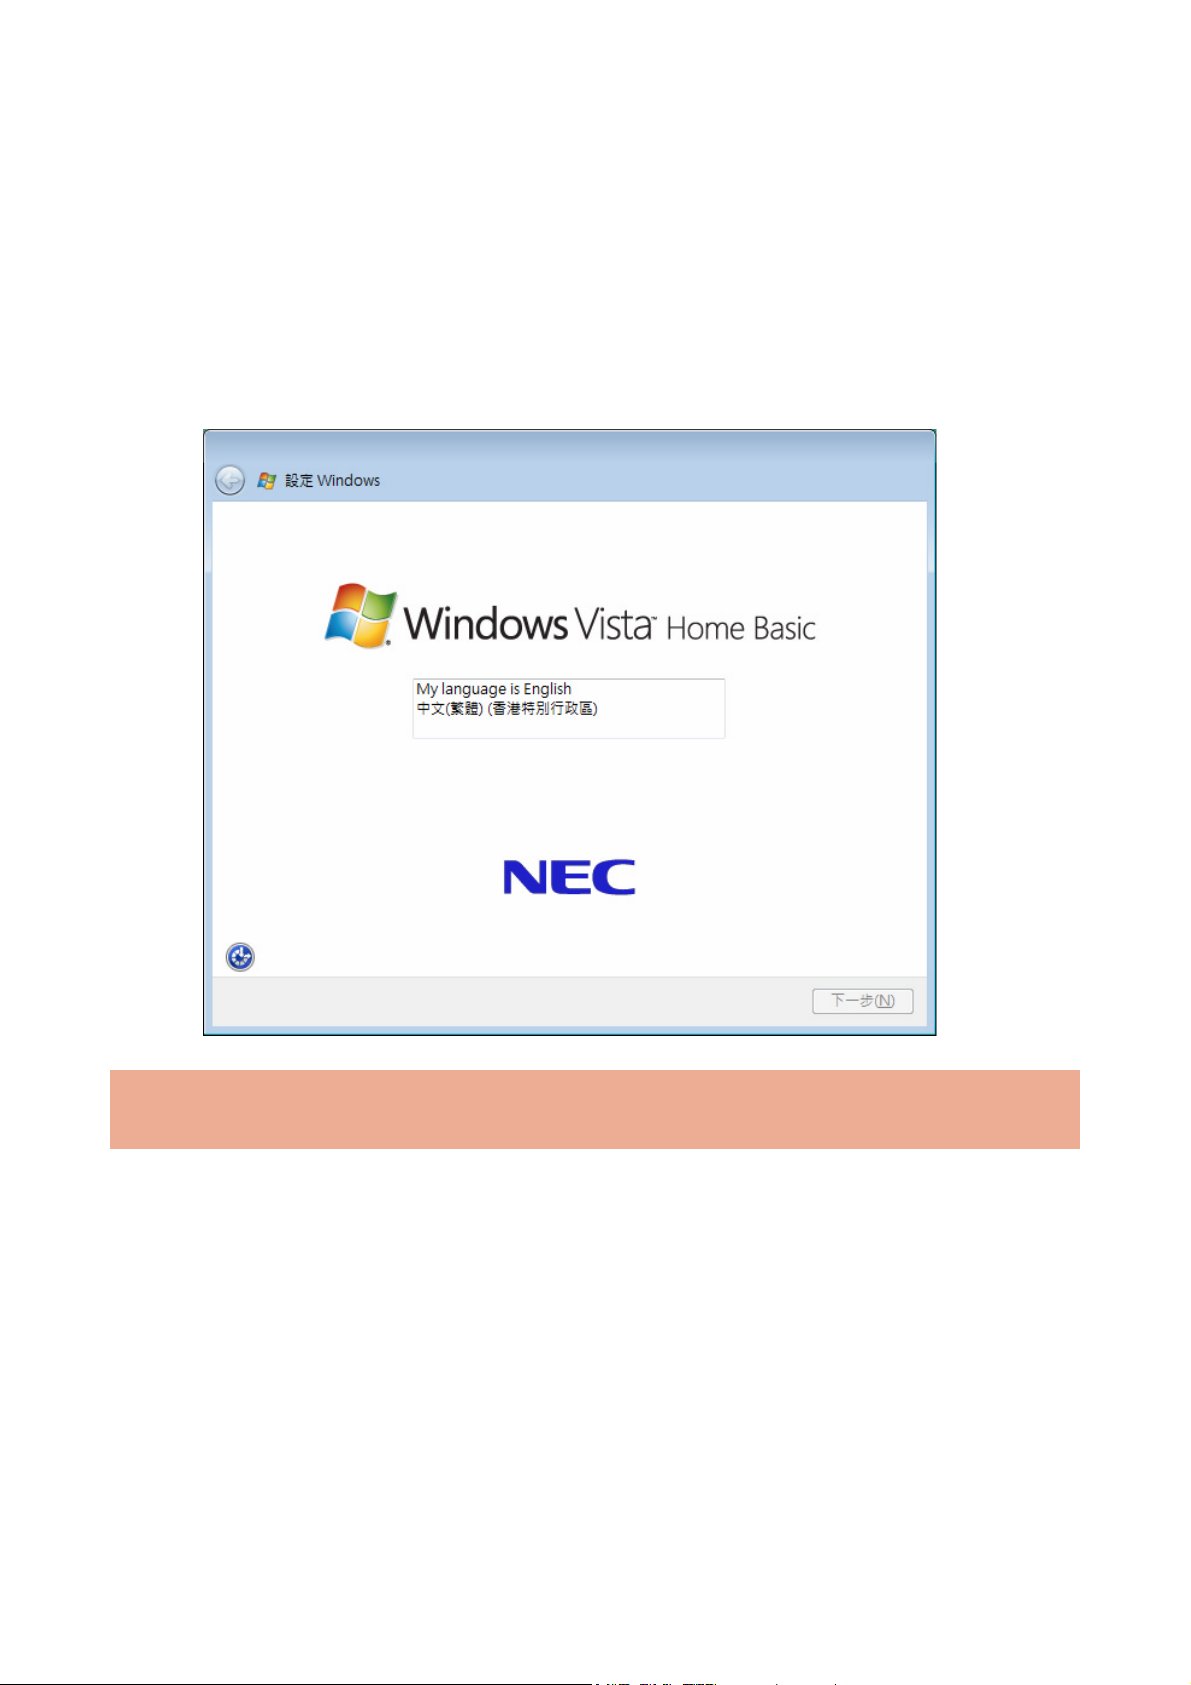
Windows® Language Selection
*This option is applicable for Hong Kong Dual Boot models only.
Your PC has already been pre-installed with 2 language versions of Windows; Vista
is English, and Traditional Chinese. When you start your system for the first time, you are required to choose
either one of the operating system language you prefer (Please refer to the picture below). Please select the
language you prefer carefully as this can only be done once.
®
operating system, that
CAUTION:
the selected language permanently. You will not be able to change this selection for the operating system
language.
Referring to the guide provided above, please follow the on screen instructions accordingly.
Once you have selected the language you prefer, your operating system will be installed with
- 7 -
Page 8

GETTING TO KNOW YOUR COMPUTER
GETTING TO KNOW YOUR COMPUTER
GETTING TO KNOW YOUR COMPUTERGETTING TO KNOW YOUR COMPUTER
WINDOWS VISTA OPERATING SYSTEM SETUP
When you switch on the computer, the message "©Microsoft Corporation” will be displayed. Please wait a
while for the “First page of set up Windows®” screen to be displayed.
The procedure described below applies to systems featuring LAN capabilities. Some of these
screens may otherwise not appear.
1. First page of set up Windows® screen.
Choose your appropriate Country or Region, Time and Currency, and Keyboard Layout. Then click the
Next button in the lower right corner.
2. The End User License Agreement screen.
Carefully read the license agreement, and click in the relevant check box to accept its terms. Click the
Next button.
3. Choose a username and picture screen.
Enter user name and password (optional) and also choose a picture at the bottom of the screen for
your user account. Click the Next button.
4. Type a computer name and choose a desktop background screen.
Enter a computer name then choose a desktop background out of 6 options provided at bottom of the
screen (3 backgrounds are provided by Windows on the left hand side & 3 backgrounds are provided by
NEC on the right hand side). Click the Next button.
5. Help protect Windows automatically screen.
There are 3 options provided, read each of the options content and then click your preferred option.
6. Review your time and date setting screen.
Choose and set appropriate Time Zone, Date & Time. Click the Next button.
7. Select your computer’s current location screen.
This page only appears if your system is connected to a network. These have 3 options provided; read
each of the options content and then click your preferred option.
8. Thank you! screen.
Click the Start button to complete the Windows Vista operating system installation.
VISTA FAQ
VISTA FAQ
VISTA FAQVISTA FAQ
Please visit our “Questions and Answers” website frequently to obtain the latest information and updates
regarding your system:
http://www.nec-computers-ap.com/faq/vista.asp
When you run MDVD Creator program, a section might be hidden depending on the screen resolution. In this
case, please resize the window by dragging the sides.
- 8 -
Page 9
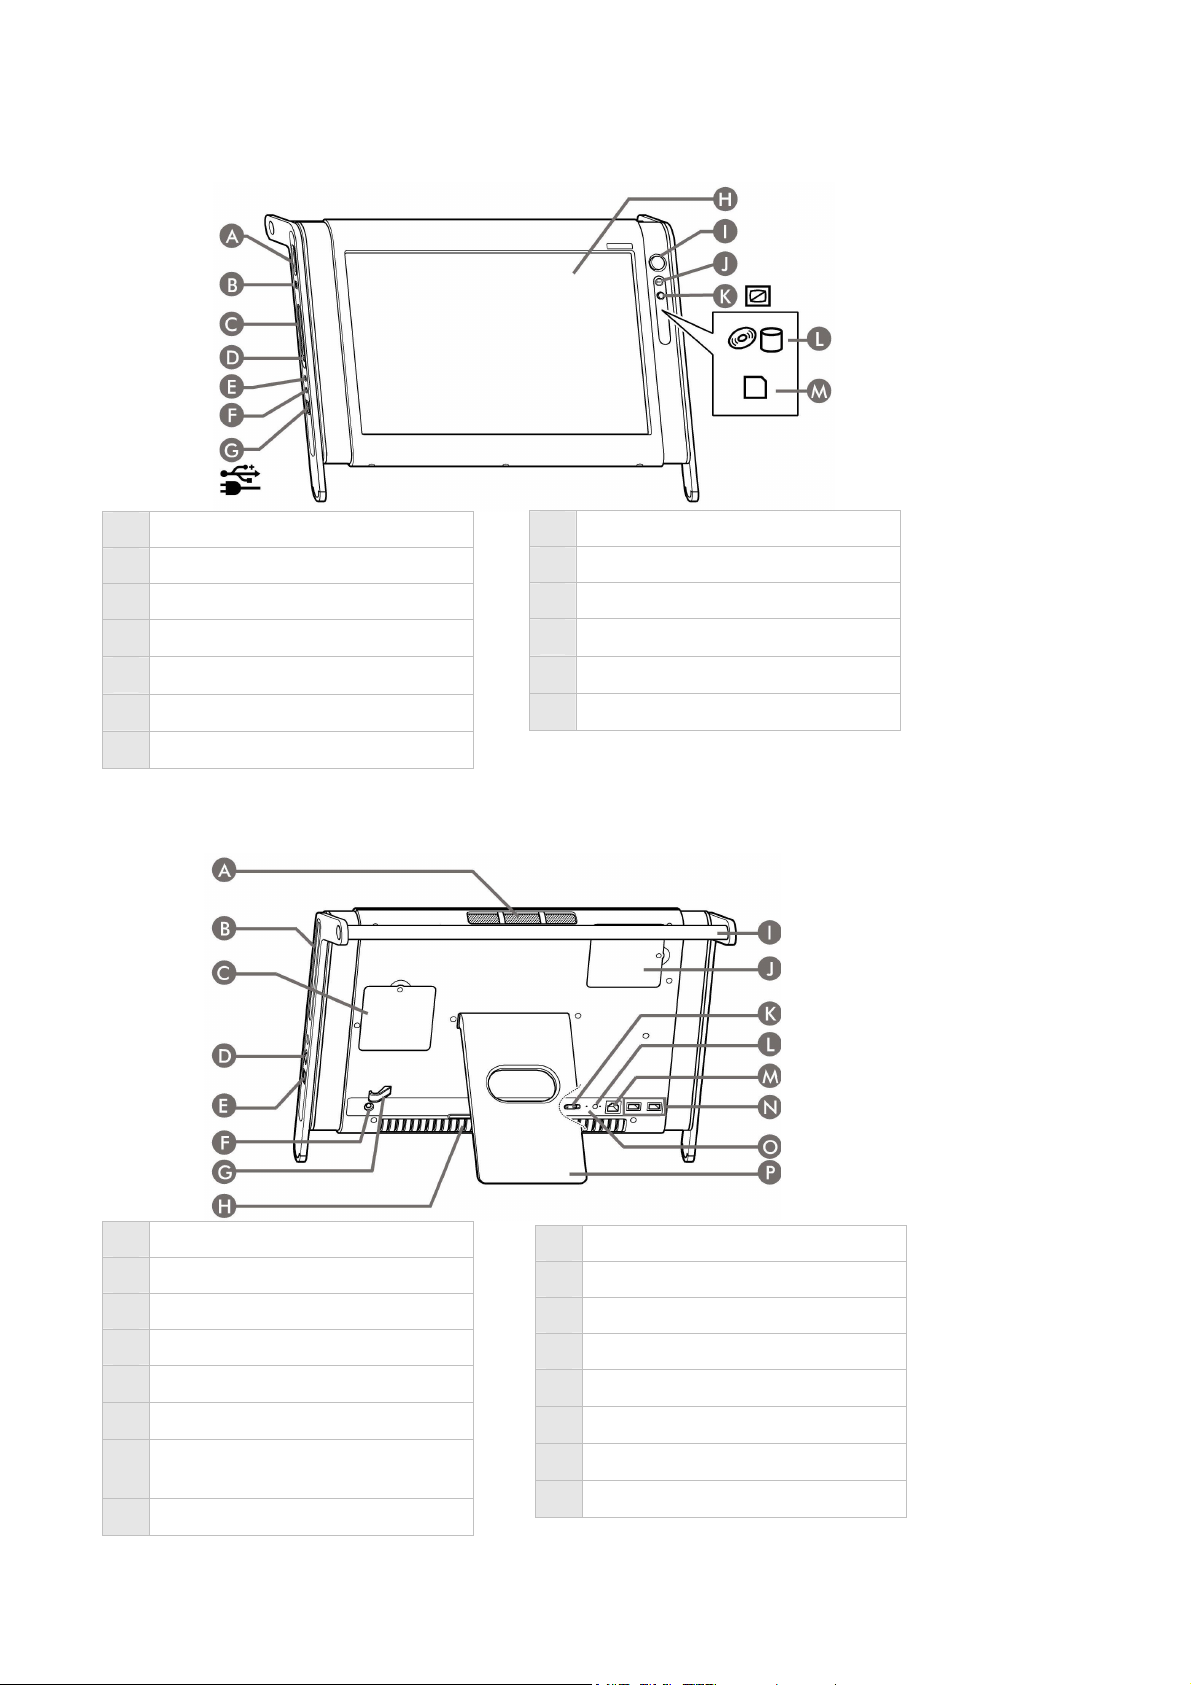
System
H
A
Memory Slot
B
IEEE 1394 Port
C
PC Card Slot
D
PC Card Eject Button
E
Microphone In
F
Headphone Out
G
USB Port with Charger *
* This USB Port allows you to charge your USB compatible devices e.g. Mobile Phone, MP3 player without
turning on your PC.
LCD Display
I
Power Button
J
One Touch Multi Button
K
Night Mode LED
L
Hard disk & ODD Access LED
M
Memory Access LED
A
Vent
B
Optical Drive
C
B-CAS Slot
D
Brightness Controller
E
USB Port
F
DC Connector
G
Hook (to organize cable loops
I
Flex Bar
J
Memory Slot
K
Wireless On / Off Switch
L
Connect Button *
M
LAN Port
N
USB Port
O
Wireless LED
and stabilize power connection)
P
H
Vent
Stand
* This Connect Button allows you to connect wireless RF Keyboard and Mouse.
- 9 -
Page 10
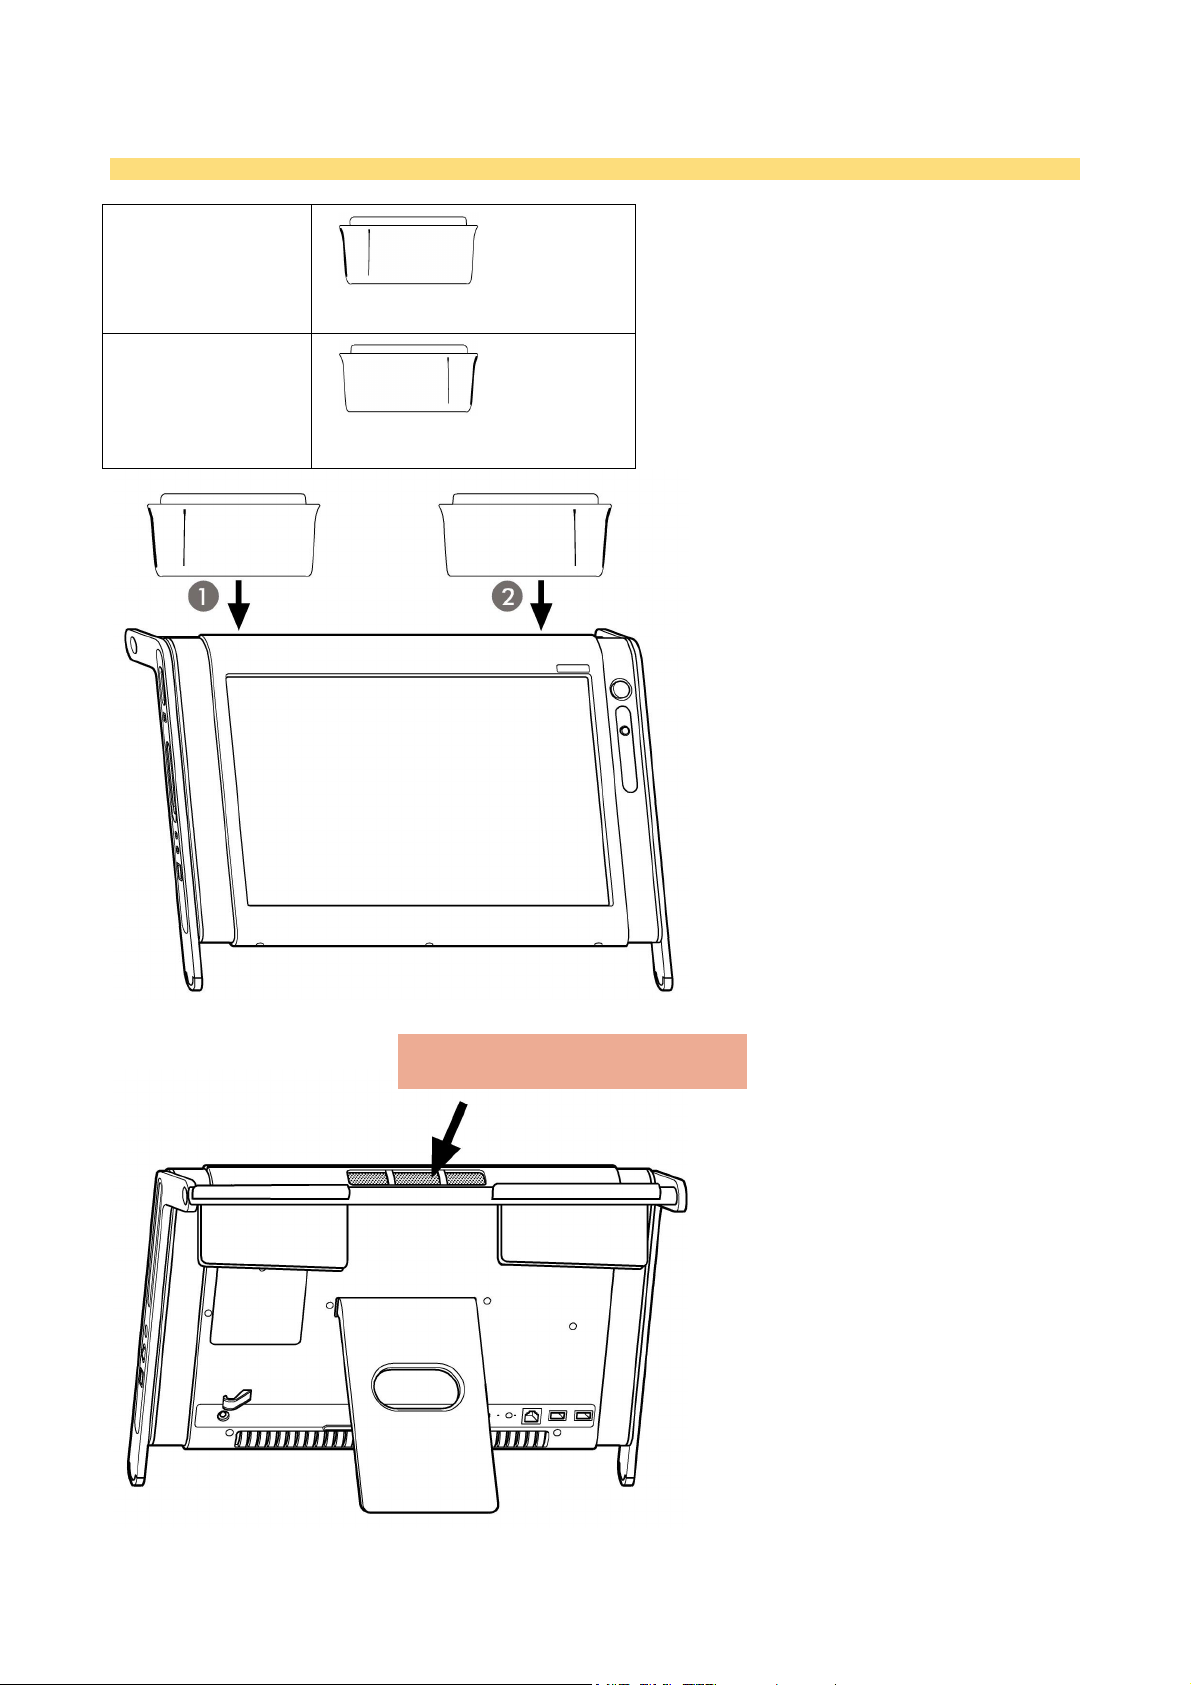
To position the Gadget Pocket
Place your computer in this position and follow the steps stated to install the gadget pocket.
Left gadget pocket
Right gadget pocket
The guide track is located on left
side of gadget pocket.
The guide track is located on right
side of gadget pocket.
CAUTION:
Do not block the vent
when place gadget pocket.
- 10 -
Page 11

Web Camera
Web Camera
Web Camera Web Camera
Web Camera Web Camera Stand
(For selected models only)
(For selected models only)
(For selected models only)(For selected models only)
Installation
1
2
3
4
5
To turn on the
web camera
- 11 -
Page 12

Electronic User’s Guide
Electronic User’s Guide
Electronic User’s GuideElectronic User’s Guide
Print
• To print the Electronic User’s Guide, go to File and then click Print in the menubar.
TROUBLESHOOTING
TROUBLESHOOTING
TROUBLESHOOTINGTROUBLESHOOTING
STEP BY STEP TROUBLESHOOTING
We all experience problems with our computer from time to time so don’t panic!
Although it might seem like a serious problem, in most cases it needs a simple fix that you can carry out
without the need to call for help. Use this troubleshooting guide to help solve some common problems.
Step 1 – Check your documentation
User’s Guide (For specific models only)
• Provide basic information.
Electronic User’s Guide (For specific models only)
• The Electronic User’s Guide contains details and information about your computer.
Step 2 – Use the tools included on your computer
Windows and NEC have included powerful tools on your computer. Before you contact NEC, please try the
following:
• Use NEC Smart Restore to reinstall any of the software or drivers that are supplied with your computer. If
you need to reinstall software or drivers for other items, please check the user manual supplied with the
product, or the manufacturer’s website.
• Use Windows System Restore to restore your computer to previous state.
• If you are still experiencing problems, use the NEC RECOVERY Program to restore your computer to its
original configuration.
Step 3 – Contacting NEC
If you are not able to resolve your problem you can contact NEC Customer Support. Please check the
terms of you warranty, and have your computer’s serial number on hand before you call us. Please
write down any error message causing the problem, and have the computer in front of you, switched on
if possible.
Service & Warranty Section
(For specific models only)
- 12 -
Page 13

Hardware
r
Before purchasing a new hardware device, make sure you check that it is compatible with your
computer. Please check the compatibility with the sale representative, retailer or manufacturer.
Internal hardware component
If you wish to install an internal hardware component, it will be necessary to open your computer. For best
results, an authorised service provider should perform such installation. For further information on
upgrading your system's Random Access Memory (RAM) or Processor (CPU), please check with the
authorised service provider.
External hardware devices
Installing a new hardware device such as a printer, scanner, joystick, etc. is not a complicated task. Each
type of device has its own installation specifications and process. Check the documentation provided with
your hardware device for details about installing your device. If you have problems installing your new
hardware, please contact the manufacturer or retailer, or check their website for more help and advice.
Remember to shut down your compute
cables.
and device before disconnecting or reconnecting any
- 13 -
Page 14

REGULATORY INFORMATION
REGULATORY INFORMATION
REGULATORY INFORMATIONREGULATORY INFORMATION
MODIFICATIONS TO THE PRODUCT
Radio Frequency Interference
The manufacturer is not responsible for any radio or TV interference caused by unauthorised modifications to
this equipment.
Safety Warning
The manufacturer is not responsible for any safety hazard caused by unauthorised modifications to this
equipment.
RADIO FREQUENCY INTERFERENCE STATEMENT
Changes or modifications to this unit not expressly approved by the party responsible for compliance
could void the user's authority to operate the equipment.
This is a Class B Digital Device. This equipment has been tested and found to comply with the limits
for a Class B digital device, pursuant to CISPR22 Standard. These limits are designed to provide
reasonable protection against harmful interference in a residential installation. This equipment
generates, uses and can radiate radio frequency energy and, if not installed and used in accordance
with the instructions, may cause harmful interference to radio communications.
There is no guarantee, however, that interference will not occur in a particular installation. If this
equipment does cause harmful interference to radio or television reception, which can be
determined by turning the equipment on and off, the user is encouraged to try to correct the
interference by one or more of the following measures.
• Reorient or relocate the receiving antenna.
• Increase the distance between the equipment and receiver.
• Connect the equipment to an outlet on a circuit different from the one to which the receiver is
connected.
To meet CISPR22 Standard, shielded cables and power cords are required when connecting this
device to a personal computer or other Class B certified device.
CONNECTIONS AND REMOTE EARTH
PELV (Protected Extra Low Voltage)
To ensure the extra-low voltage integrity of the equipment, only connect equipment with mains-protected
electrically-compatible circuits to the external ports.
SELV (Safety Extra Low Voltage)
Every input and output of this product is classified as Safety Extra Low Voltage, except the modem, which is
classified as TNV-3.
Remote Earth
To prevent electrical shock, connect all local (individual office) computers and computer support equipment
to the same electrical circuit of the building's wiring. If you are unsure, check the building's wiring to avoid
remote earth conditions.
Building Supply
Only connect the equipment to a building supply that is in accordance with current wiring regulations in your
country.
- 14 -
Page 15

Cables
The EMC performance of the system is guaranteed only if the cable and interface use efficient shielding.
The use of shielded interface cable is required for USB, IEEE1394, serial, printer, game, analogue or digital
audio/video, Ethernet LAN, PS2, TV or FM antennas, and generally all high speed cable’ interfaces.
Only Ethernet LAN or RTC modem cables can have lengths exceeding 3 meters.
For Ethernet LAN cable, use FTP shielded cables only (cat≥5).
Heat build-up
The AC adapter and the underside of the computer can become heated after prolonged use. Sustained
physical contact with either should be avoided. Contact with either should be avoided.
Battery
• Replacing batteries
A lithium battery in some computers maintains system configuration information. In the event that the
battery fails to maintain system configuration information, we recommend that you replace the battery.
There is a danger of explosion if the battery is incorrectly replaced. Replace only with the same or
equivalent type recommended by the manufacturer.
• Battery Disposal
Ultimate disposal of the batteries should be handled according to all national laws and regulations. Do not
place used batteries in your regular waste: the incineration, landfilling or mixing of batteries with the
municipal solid waste stream is prohibited by law in most countries. Contact your local waste management
officials for other information regarding the environmentally sound collection, recycling, and disposal of the
batteries.
- 15 -
Page 16

LASER COMPLIANCE STATEMENT
LASER COMPLIANCE STATEMENT
LASER COMPLIANCE STATEMENTLASER COMPLIANCE STATEMENT
The optical devices are tested and certified to be compliant with International Electro-technical Commission
IEC825-1 and European Norm EN60825-1 and EN60825-2 regulations for Class 1 laser products.
Class 1 laser products are not considered hazardous. The optical devices are designed such that there is
never human access to laser radiation above a Class 1 level during normal operation or prescribed
maintenance conditions.
The optical devices installed in your computer are designed for use solely as components of such electronic
products and therefore do not comply with the appropriate requirements of Code of Federal Regulation Sec.
1040.10 and Sec. 1040.11 for COMPLETE laser products.
WARNING
WARNING----HAZARDOUS VOLTAGE!
WARNINGWARNING
Hazardous voltage is present inside your computer when it is connected to an AC supply even when the
computer’s power switch is off. Exposure to Hazardous Voltage could cause personal injury. To avoid risk of
injury, contact an Authorised Service Provider for proper installation of optional hardware devices.
Radio
Radio----communication Regulation (if applic
RadioRadio
communication Regulation (if applicable)
communication Regulation (if appliccommunication Regulation (if applic
HAZARDOUS VOLTAGE!
HAZARDOUS VOLTAGE!HAZARDOUS VOLTAGE!
able)
able)able)
Specific regulations apply when using wireless radio-communication products.
- 16 -
Page 17

YOUR WORKING ENVIRONMENT
YOUR WORKING ENVIRONMENT
YOUR WORKING ENVIRONMENTYOUR WORKING ENVIRONMENT
This section describes the basics for setting up a healthy work environment.
Please consider the following suggestions when setting up a comfortable work area.
Lighting
Be sure your work place is well-lit. If the lighting in your room is not bright enough, use a desk lamp to
provide light where you need it. Avoid bright or reflected light sources in your field of vision.
Desk
The ideal computer desk should place the keyboard between 60 and 70cm from the floor, depending on your
height and preference. Generally, your arms should be at right angles to the keyboard when you sit in front of
it with your fingers on the space bar. If your desk is taller than this, you can lower the keyboard to a
comfortable level by adding a keyboard drawer.
Your desk should also be deep enough to let you place the monitor at a comfortable distance from your eyes
about 45-70cm. A too shallow desk will force you to sit uncomfortably close to the screen.
Your Chair
Your chair should adjust up and down, backward and forward, for maximum comfort. Your knees and hips
should be at right angles to your chair’s seat, with your thighs parallel to the floor, and both feet flat on the
floor.
Placing the Components
Computer
Wherever you place the computer, make sure that:
• optical drives are within easy reach. You should not have to bend or stretch to reach them.
• your work materials are also within easy reach.
• there is enough free space around the system so it can be properly ventilated.
Make sure that system’s location gives you enough room to connect the various cables to your
system without straining them.
Monitor
The monitor should be about 45-70 cm from your eyes, and the top of your screen should be at eye level, or
lower. If you have a desktop computer, you can place the monitor on top of it.
The ideal position of your monitor is perpendicular to and at least 1.5 m from a window or another light
source, so that your monitor does not reflect glare and you do not get blinded by the light. If your monitor has
a tilt/swivel base, you can tilt it slightly downward to minimise reflected light. If you cannot adjust your
monitor’s angle or the lighting in your work area, try adding an anti-glare screen.
- 17 -
Page 18

Using your Computer Comfortably
Posture
Sit with your back relaxed, and your hips and knees at an approximate 90-degree angle to your chair’s seat.
If necessary, adjust your chair so that your thighs are roughly parallel to the floor, and your feet are flat. If
your feet cannot reach the floor, please use a footrest.
Typing
As you type, allow your hands to “float” over the keyboard. Do not bend your wrists.
Using the Mouse
Move your entire arm instead of bending your wrist. Be sure that the position of the mouse allows easy
movement.
Take a Break
If you work for hours at a time, take regular rest breaks. Get up from your chair, stretch, and limber up your
wrists with simple exercise. If possible, vary your
tasks during the day so that you do not sit in one position for several hours.
Some disorders of the hands, wrists, arms, neck, shoulders, legs and back may be associated
with or aggravated by certain repetitive actions.
To reduce your risk of developing these disorders, type with your wrists straight and your hands
and wrists floating above the keyboard and avoid resting your wrists on sharp edges. If you
experience periods of pain, tingling, numbness or other discomfort, please contact your doctor.
Useful Accessories
Here are some accessories which can help you work more comfortably.
Keyboard drawer – If your desktop is too high to allow comfortable typing, a keyboard drawer can help, by
letting you position your keyboard at a level below the desk surface. Many drawers are wide enough to hold
both your keyboard and mouse.
Wrist rest – These padded strips sit in front of your keyboard and mouse pad, and support your wrists and
arms.
Mouse pad – If you are using a mouse, place a mouse pad under it. The pad provides the proper surface
necessary to use your mouse effectively.
- 18 -
Page 19

System Components
System Components
System ComponentsSystem Components
For information on the specification of your computer, please refer to the UPC label on the packaging box
that comes with your system.
UPC Label
Note: The UPC Label varies according to the model.
Recommended Environment
Operation
• Temperature: 5°C to 35°C
• Relative Humidity: 20% to 80% (Non-condensing)
• Do provide sufficient ventilation to ensure effective cooling
Storage
• Temperature: -20°C to 60°C
• Relative Humidity: 20% to 80% (Non-condensing)
Orientation
• Always place your computer in up right orientation
• Incorrect orientation may cause improper cooling to the computer
- 19 -
Page 20

NEC Recovery Program
Y
NEC Recovery Program
NEC Recovery Program NEC Recovery Program
Your computer is supplied with a backup partition on the hard disk drive which contains all data you may
need in order to restore your configuration as it was when leaving the factory. This partition occupies about
10 GB of your hard disk drive.
This backup partition is hidden.
The NEC Recovery Program can restore your computer to the same state as when you purchased it, while
giving you an option to retain all settings and personal data for later retrieval.
Due to the wide range of reasons for which the NEC Recovery Program may be used, no
guarantee can be given that all data will be retained.
The procedure described below is only applicable if your backup data is stored on your computer’s hard disk.
If you wish to restore your computer using Recovery DVD, please see note below.
ou are strongly recommended to create a set of Recovery DVD for future use.
Be ready with 2 blank DVD-R. Please use the MDVDCreator tool. Click on the icon at Start button
- All Program – MDVDCreator to launch MDVDCreator program. It will guide you
through the process.
Before you run MDVDCreator program, you need to disable UAC (User Account Control). To do this,
go to Start button
Turn User Account Control on or off. Then uncheck the “Use User Account Control (UAC) to help
protect your computer”. Click OK button.
- Control Panel - User Account and Family Safety - User Accounts -
(from backup partition)
(from backup partition)
(from backup partition)(from backup partition)
- 20 -
Page 21

Before using the NEC Recovery Program it is recommended that you FIRST try fixing your
computer with Windows Vista® System Restore.
System Restore can be used to restore your computer to a previous state when it was known to
function correctly, without affecting your personal data files (such as documents, browsing history,
drawings, favourites, or e-mails).
The NEC Recovery Program Allows Two Types Of Recovery:
Full Recovery
Removes all your personal data and restores your computer to its original factory state. By using this option,
all your data will be lost (personal documents and settings, drivers updates, etc.)
Partial Recovery
Restores your original operating system and software to their original factory state without deleting your
personal data.
After recovery, all software titles that you have installed on your computer must be
reinstalled before you can use them again. Only the pre-installed titles (e.g. DVD Player, CDwriter) will function without additional installation.
- 21 -
Page 22

IMPORTANT
Please read this section carefully before using NEC Recovery Program!
• Backup your personal files:
Save a copy of your personal documents onto floppy disks, memory cards or high capacity disks. If you
own a CD writer, you can backup larger amounts of data and create your own archives.
• Return your computer to its original configuration:
1. Remove any additional hardware components (e.g. sound card, video card, network card) that you may
have added to your computer.
2. Reinstall the original NEC hardware components if you have removed them.
3. Make sure that your keyboard, mouse, monitor and speakers are connected properly (if applicable to
your computer).
4.
Disconnect any additional devices that you have connected to your computer (e.g. scanner, printer,
etc.)
Starting The NEC Recovery Program
For notebook, before starting the NEC Recovery Program, please make sure your computer
is in AC mode.
To launch the NEC Recovery Program:
1.
Press the <F8> key upon startup.
2.
Then select “Repair Your Computer” at Advanced Boot Options page.
3.
Select your preferred keyboard layout. Then click “NEXT” button.
- 22 -
Page 23

4.
Select “User Name” & “Password” (if available). Then click “OK” button.
5.
At System Recovery Options, choose “NEC Recovery Tools”.
6.
Click “Next” button to continue.
7.
Select either “Partial Recovery” or “Full Recovery”. Then click “Next” button to continue.
- 23 -
Page 24

8.
Click “OK” button to continue.
9.
Click “Start” button to start the recovery process.
Please wait a while for the recovery process to be completed.
10.
The NEC Recovery tools application will close automatically after the recovery is completed.
11.
Finally you have to restart your computer by clicking the “Restart” button at System Recovery Options.
- 24 -
Page 25

If you wish to perform a Full Recovery:
Y
Full Recovery will remove all your personal data and restore your computer to its original factory
state.
Select Full Recovery and click on Next. Then follow the on-screen instructions to complete the recovery.
If you wish to perform a Partial Recovery:
1. Select Partial Recovery and click on Next.
2. Then follow the on-screen instructions to complete the recovery.
There may be a delay the first time Windows restarts after the recovery process. This delay depends
on the amount of data that must be retrieved from the selected account.
3. After the Partial Recovery process has been completed and if you have used default Windows settings,
you may retrieve your data in the following locations:
• Your Documents and Settings:
C:\user\[Previous User Name]\...
• Applications:
C:\Program Files\[Application Name]\...
• Other files:
You can use the Windows Search Engine to find other files.
ou should consider deleting items on the desktop and in the Start Menu, and also folders
for applications you no longer wish to use.
4. Finally, reinstall software titles you wish to use.
NOTE: For information on the specification of your notebook, please refer to the UPC label on the packaging
box that comes with your system.
DO NOT delete folders for software that you did not originally install yourself – they may
contain important Windows files.
NOTE: The illustrations, colours and pictures shown are for illustration purposes. They may vary slightly
from country to country and the unit you purchase.
CAUTION: Before you connect or disconnect the power cord at the AC Port of your computer, please ensure
that the power plug is disconnected from the wall outlet.
WARNING: Do not place this notebook on your lap and / or allow it to be in contact with any part of your
body while operating.
- 25 -
Page 26

NEC Computers
1 Limited Warranty
NEC Computers (“NEC”) warrants the Product/s against defects in material and workmanship, under normal
use, and will provide the following warranty support:
Warranty Period:
1 Year (from original date of purchase)
Warrantable Items:
(a) Electronic Hardware including Battery and AC Adaptor for Notebook/Laptop (1 Year from original date of
purchase).
(b) Bundled Software (90 Days from original date of purchase).
(c) Consumable items included in the original factory packing (such as bundled CD titles) for the Product
that fails due to a defect in workmanship or materials will be replaced free of charge for a period of 60
days from the original date of purchase.
The (“Warranty Period”) commences on the date of purchase by the original purchaser from an authorized
NEC Computers reseller, and ends on the one year anniversary from the date of purchase (“the warranty”).
NEC hardware products are manufactured from parts tested to NEC quality assurance standards. You are
entitled to warranty service if repair or replacement of a defective hardware component is required on this
hardware product during the warranty period.
Replacement or repair of any part of this product shall not imply that the period of the Warranty
recommences with respect to the Product, or any part of the Product.
The Warranty is only available to the original purchaser who has REGISTERED the Product, and who is a
CUSTOMER of NEC (see point 4 for details on how to register your purchase).
NEC shall not be liable for any special, incidental or consequential damages or for loss, damage or expense
directly or indirectly arising from customers use or inability to use the equipment, or for personal injury or loss
or destruction of any other property.
NEC shall not be liable for loss, damage or expense to products directly or indirectly arising from
damage caused by power surges or electrical storm damage.
NEC conducts rigorous testing to ensure that the risk of computer virus is eliminated. Subject only to the
foregoing, NEC disclaims all liability for loss or damage of any kind caused by computer virus.
The Warranty will not apply to Products, or any parts thereof, that have been maintained contrary to the
specification or instructions supplied with the Product, or if the Product has been added to, modified, or
moved otherwise than by an NEC Authorized Repairer, or if it has been subject to misuse, neglect, accident
or unusual hazards (including but not limited to exposure to excessive humidity, dust or incorrect power
current).
The Warranty only covers Products purchased from an authorized NEC reseller in the country where you
purchased the Product.
The Warranty will only be applicable if NEC receives a notice of the fault within the Warranty Period.
It is solely the responsibility of the customer to backup all data deemed important or critical by the customer.
NEC excludes all other warranties in respect of the Product, either express or implied. NEC’s liability for
breach of legislation shall be limited at the option of NEC:
(a) In the case of goods to:
(i) The replacement of goods or the supply of equivalent goods, or
(ii) The repair of goods, or
(iii) The payment of costs of having the goods repaired.
(b) In the case of services to:
(i) The supplying of the service again, or
(ii) The payment of cost of having the service supplied again.
- 26 -
Page 27

NEC warranty does not cover any factory included software, including the Windows® operating system after
90 days from the original date of purchase, or purchased separately from the NEC system.
Only applicable to Australia
NEC shall not be liable except as specifically provided for in the Trade Practices Act or Consumer
Guarantee Act, for any special, incidental or consequential damages or for loss, damage or expense
directly or indirectly arising from customers use or inability to use the equipment, or for personal injury or
loss or destruction of any other property.
NOTE: NOTHING IN THIS CARD AFFECTS THE STATUTORY RIGHTS OF THE CUSTOMER.
2 Technical Support
NEC provides telephone support to REGISTERED CUSTOMERS of NEC for all Hardware Products covered
under the Warranty. This support is available to the original purchaser from an authorized NEC reseller. (See
point 4 for details on how to register your Purchase).
Alternative support options are available for out of warranty products on a fee based system.
3 How to obtain service during the warranty period
If the Product does not perform as warranted during the term of the Warranty Period you can request
assistance from a NEC Authorized Service Provider by contacting NEC Computers.
At the time of your telephone call you should ensure the following:
(a) Your computer has been REGISTERED with NEC (see point 4 for details on how to register),
(b) You are seated in front of your computer,
(c) You have the following details ready; model number; serial number; date of purchase; authorized
resellers’ name and location; description of the problem. (The Product model number and serial number
may be found on a label located at the back or bottom of the Product).
The Customer Service Technician will attempt to resolve your problem over the phone. If your problem
cannot be determined over the phone, it may be necessary to return the Product to NEC for analysis or
repair.
Service is provided at local country time between the hours from 0900 to 1700, Monday through Friday,
except on Public holidays.
Should service prove to be unnecessary or the fault requiring service is due to customer misuse, computer
virus or any other reason outside the scope of any non-excludable statutory warranty, or this Limited
Warranty, NEC reserves the right to charge the customer its reasonable cost of providing the service.
If you are required to ship the Product to NEC or its Authorized Service Provider for service, it must be
securely packed (in the original packaging) and insured for shipment, as NEC does not accept liability for
loss or damage to the Product. A copy of your dated invoice, the Product serial number and a detailed
description of the problem you are experiencing must be included in the package. A Return Material
Authorization (RMA/TPM) number must be clearly displayed on the package.
NEC or its Authorized Service Provider reserves the right to refuse service at any location if, in their sole
opinion, performance of the services could put the safety of their personnel in jeopardy. You must telephone
NEC for an authorization number and “ship to” address before shipping any Product to NEC. Product/s
shipped to NEC without an authorization RMA/TPM number will be refused and returned to you at your own
cost.
The Product MUST be returned within 14 days of receiving an authorization number.
- 27 -
Page 28

Important Warnings:
• All non-NEC components which were not originally installed by NEC must be removed from the system
before NEC’s Authorized Service Providers perform service.
• Neither NEC nor its Authorized Service Provider is responsible for non-NEC components, installed by
either a reseller or their owner, which have been left in the unit.
• Repairs on the system may result in the need to reformat the hard disk. Reformatting the disk
permanently removes ALL
• Before shipping, or before any service is provided, you are strongly advised to copy or backup all data
you may have on your hard disk drive. Neither NEC nor its Authorized Service Provider is responsible for
any loss or destruction of data or media resulting from the service/s performed hereunder.
NEC will not pay for the following:
1. Removal and installation charges.
2. Costs of any technical adjustments (set-up or service adjustments), including adjustment of user
controls and configuration of software or BIOS.
3. Costs involved in configuration of other products, or software, installed into the Product.
4. Payment of any shipping charges incurred in obtaining warranty service.
5. Payment of any charges incurred by Non-Authorized repairers.
Your computer system must be unplugged at all times while installing hardware components.
4 How to Register your Product
IF YOU HAVE NOT ALREADY DONE SO, PLEASE REGISTER YOUR PRODUCT AT OUR PRODUCT
REGISTRATION WEBSITE AT:
http://www.nec-computers-ap.com/regwarranty
You will not be eligible for Warranty if you have not registered within 90 calendar days from the original date
of purchase.
5 Definitions
The “Product” means: NEC Notebook or NEC Desktop Computer.
6 Contact Information
NEC Computers Asia Pacific International Contact Number
Tel: (604) 5097389
NEC Computers Asia Pacific Sdn Bhd (Malaysia)
Tel: 1800 68 2200
NEC Computers Singapore Pte Ltd (Singapore)
Tel: 1800 888 2200
NEC Computers Australia Pty Ltd (Australia)
Tel: (02) 9313 0055 (Sydney)
1300 780 103 (Outside Sydney)
To ensure timely response to any future service request, please proceed to register immediately.
Visit our website at www.nec-computers-ap.com to register your NEC Extended Warranty NOW.
files or software programs installed.
- 28 -
Page 29

NEC Computers
1 Pernyataan Garansi Terbatas
NEC Computers (“NEC”) memberikan garansi untuk produk-produk NEC terhadap kerusakan yang
diakibatkan karena cacat material atau cacat dalam pembuatan selama jangka waktu pengunaan produk
yang normal dan memberikan garansi sebagai berikut:
Jangka Waktu Garansi:
1 (satu) tahun (dari tanggal pembelian pelanggan)
Ketentuan Garansi:
(a) Perangkat keras elektronik termasuk baterai dan AC adaptor untuk Notebook/Laptop (1 tahun dari
tanggal pembelian pelanggan).
(b) Pemakaian perangkat lunak pelanggan (90 hari dari tanggal pembelian pelanggan).
(c) Barang habis pakai (Consumable items) yang termasuk dalam kemasaan original (seperti CD titles)
untuk produk yang tidak berfungsi akibat cacat dalam pembuatan atau cacat material akan diberikan
pengantinya tanpa ada pungutan biaya apapun dalam kurun waktu 60 hari dari tangggal pembelian
pelanggan.
“Masa Garansi” berlaku dari tanggal pembelian perlanggan yang terdapat pada bukti pembelian pelanggan
yang diperoleh dari distributor resmi NEC Computer dan masa berlaku garansi berakhir setelah 12 bulan dari
tanggal pembelian. Perangkat keras produk-produk NEC terbuat dari bahan-bahan yang telah di uji coba
untuk memenuhi Standar quality yang dijamin oleh NEC. Pelanggan berhak to menerima jasa perbaikan
atau pergantian terhadap produk yang mengalami cacat pada bahan perangkat dan memerlukan perbaikan
selagi masih dalam masa garansi.
Pergantian atau perbaikan pada bagian manapun dari pada produk tidak akan mempengaruhi masa Garansi
yang bersangkutan untuk produk tersebut atau bagian dari pada produk tersebut.
Garansi hanya akan berlaku kepada pembelian pertama (original) yang telah MENDAFTARKAN produk dan
merupakan PELANGGAN NEC (harap membaca point 4 untuk keterangan lebih lanjut untuk tata cara
pendaftaran produk yang telah anda beli)
NEC tidak berkewajiban untuk segala kerusakaan yang diakibatkan oleh modifikasi yang tidak resmi, salah
penggunaan, pengoperasian yang tidak sesuai dengan spesifikasi produk atau penggunaan produk diluar
tempat yang disyaratkan, NEC juga tidak berkewajiban untuk mengganti atau memgembalikan uang atau
memperbaiki kerusakan yang diakibat oleh pelanggan terhadap produk maupun terhadap dirinya atau pihak
lain atau asset pihak lain.
NEC tidak akan bertanggun jawab untuk segala kerugian, kerusakaan atau biaya yang akan timbul
baik secara langsung maupun tidak langsung yang dapat timbul dari kerusakaan yang diakibatkan
oleh aliran listrik atau kerusakaan akibat badai listrik.
NEC senantiasa melakukan uji coba terhadap produk-produk nya agar dapat mengeliminasi resiko yang
timbul akibat virus khususnya untuk masa yang akan datang. NEC tidak akan berkewajiban untuk menganti
rugi untuk segala jenis kerugian atau kerusakan yang timbul akibat virus komputer.
Garansi tidak berlaku apabila produk atau bagian-bagian produk yang dimana pemakaian, pengoperasian di
luar tempat dan syarat-syarat yang ditentukan oleh produk untuk beroperasi dengan baik atau apabila
produk terlah mengalami modifikasi atau penambahan/perubahan yang tidak dilakukan oleh Jasa Perbaikan
Resmi dari NEC atau telah disalah gunakan, kerusakan akibat kelalaian pelanggan atau bencana alam
(termasuk dan tidak terbatas untuk kontak berlebihan terhadap panas, debu ataupun voltase listrik yang
tidak sesuai)
Garansi hanya meliputi Produk yang telah dibeli dari distributor resmi NEC in dalam Negara dimana produk
tersebut dibeli.
Garansi hanya meliputi Produk yang telah dibeli dari distributor NEC yang resmi in dalam Negara dimana
produk tersebut dibeli.
Garansi hanya berlaku apabila NEC menerima pemberitahuan ada kesalahan dalam Masa Garansi.
- 29 -
Page 30

Menjadi tanggung jawab pelanggan untuk menyimpan semua data yang dianggap penting atau kritikal oleh
pelanggan yang bersangkutan. NEC tidak bertanggung jawab apapun selain produknya sendiri. Resiko NEC
apabila telah melakukan pelanggaran legislatif akan terbatas atas opsi NEC:
(a) Apabila menyangkut barang-barang:
(i) Akan diberikan barang pegantinya atau dengan menyediakan barang yang mirip atau
(ii) Perbaiki barang tersebut atau
(iii) Memberikan konpensasi untuk perbaikan barang tersebut.
(b) Apabila menyankut jasa:
(i) Penyediaan jasa yang sama atau
(ii) Pembayaran untuk memerima jasa yang sama.
Garansi yang diberikan NEC tidak meliputi garansi pabrik yang termasuk Perangkat lunak, termasuk sistem
operasi Windows
®
setelah 90 hari dari tanggal pemberlian atau pembelian secara terpisah sistem dari
NEC.
Hanya berlaku di Australia
NEC tidak akan bertanggung jawab selain secara spesifik diharuskan oleh Peraturan Perdagangan atau
Peraturan yang mengatur Hak Konsumen, untuk memberikan pergantian khusus, incidental atau kerugian
yang diakibat oleh kerusakan atau kehilangan, pemberian satunan atau pembiayaan baik secara langsung
atau tidak langsung kepada pelanggan untuk ketidak mampuan pelanggan dalam penggunaan peralataan
atau cedera yang diderita atau kerusakaan atas asset pribadi atau pihak lain.
Catatan: TIDAK ADA SATU PUN HAL DIKARTU INI YANG AKAN MENGHILANGKAN HAK ANDA
SEBAGAI KONSUMEN.
2 Dukungan Teknisi
NEC menyediakan dukungan melalui telepon untuk PENDAFTARAN PELANGGAN NEC untuk semua jenis
Perangkat Produk yang dijamin oleh Garansi ini. Dukungan ini tersedia kepada Pelanggan yang telah
melakukan transaksi pembelian di distributor resmi NEC. (Harap baca point 4 untuk tata cara melakukan
pendaftaran Produk anda).
Dukungan alternatif juga tersedia untuk produk yang mendapatkan jaminan untuk sistemnya tapi akan
dibebankan biaya.
3 Bagaimana caranya untuk mendapatkan jasa perbaikan
Apabila Produk tidak melakukan seperti bagaimana semestinya dalam masa dimana Garansi masih
berlaku maka anda bisa minta untuk diperbantu oleh Jasa Perbaikan Resmi NEC dengan cara
menghubungi mereka NEC Computers.
Pada saat anda menghubungi mereka per telepon anda harus memastikan yang berikut ini:
(a) Komputer anda sudah TERDAFTAR dengan NEC (lihat point 4 untuk keterangan bagaimana
mendaftar),
(b) Komputer anda anda didepan anda,
(c) Anda memiliki informasi berikut; nomor model; nomor serial; tanggal pembelian; nama dan lokasi
tempat dimana anda beli; penjelasan masalah yang anda alami. (Nomor produk dan nomor serial
mungkin tidak terdapat pada label yang ada dibalik atau belakang produk).
Tehnisi Jasa Pelanggan akan berusaha untuk mengatasi masalah anda melalui telepon. Apabila masalah
tidak dapat diatasi maka anda perlu membawa produk kepada NEC untuk di analisa lebih lanjut atau
diperbaiki.
Jasa perbaikain yang berlaku di Negara asal dapat diperoleh dari pukul 0900 sampai dengan 1700, Senin
sampai dengan Jumat, tidak termasuk hari libur.
Apabila setelah diteliti dan sampai pada kesimpulan bahwa tidak perlu di servis atau perlunya servis
diakibatkan oleh kelalaian pelanggan, virus computer atau alas an lain diluar ketentuan garansi ini atau
Garansi terbatas tidak meliputinya, NEC memiliki hak untuk membebankan biaya ke pelanggan untuk jasa
tersebut.
Apabila anda diperlukan untuk mengirim Produk anda ke NEC atau kepada Jasa Perbaikan Resmi NEC
untuk menerima perawatan, produk harus dibungkus dengan rapid dan tertutup rapat. (dengan
- 30 -
Page 31

menggunakan bungkusan aslinya) dan diasuransikan untuk pengiriman karena NEC tidak akan bertanggung
jawab atas kehilangan atau kerusakang terhadap produk. Satu rangkap bukti kwitansi pembelian, nomor seri
produk dan diskripsi detail mengenai produk anda dan masalah yang sedang dialami produk didalam paket.
Return Material Authorization/Authorisasi Pemgembalian Material (RMA/TPM) nomor harus terpapar jelas
pada paket.
NEC atau Jasa Perbaikain Resmi berhak untuk tidak melakukan perbaikain dimana pun apabila menurut
mereka performa jasa yang diberikan sangat riskan untuk keselamatan merekan atau rekan mereka. Anda
harus menghubungan NEC melalui telepon untuk memperoleh nomor authorisasi dan mengirim ke alamat
sebelum melakukan pengiriman produk apapun ke NEC. Produk yang dikirim ke NEC tanpa RMA/TPM
nomor akan ditolak and dikembalikan atas biaya pelanggan.
Produk HARUS dikembalikan dalam waktu 14 hari dari waktu anda telah meneriam nomor authorisasi.
Pemberitahuan Penting:
• Semua non- NEC komponen yang bukan perangkat asli yang terpasang diproduk akan dikeluarkan oleh
NEC dari sistem sebelum melakukan perbaikan oleh Jasa Perbaikain NEC.
• NEC ataupun Jasa Perbaikain Resmi NEC tidak bertanggung jawab untuk semua perangkat non-NEC
yang telah dipasang oleh pihak lain atau pemilik produk apabila dibiarkan di unit sebelum perbaikain.
• Perbaikan pada sistem mungkin akan memperlukan format hard disk. Format hard disk akan
menghapus SEMUA files atau perangkat lunak yang ada di dalam unit.
• Sebelum pengiriman atau sebelum jasa apapun dilakukan terhadap produk anda dianjurkan untuk
melakukan backup atau penyimpan secara terpisah atau mengandakan semua data yang ada di hard
disk drive anda. Baik NEC dan Jasa Perbaikain Resmi NEC tidak bertanggung jawab terhadap
kehilangan atau kerusakan data atau media yang mungkin terjadi dari hasil perbaikain yang akan
dilakukan.
NEC tidak akan membayar untuk :
1. Biaya Pergantian dan installasi.
2. Segala Biaya akibat penyesuaian teknisi (set-up atau jasa penyesuaian), termasuk penyesuaian dari
pada kontrol pengguna dan konfigurasi perangkat lunak atau BIOS.
3. Biaya yang termasuk dalam konfigurasi dari pada produk atau perangkat lunak lain yang telah di
masukan kedalam Produk.
4. Pembayaran biaya pengiriman dalam memperoleh jasa perbaikain.
5.
Pembayaran biaya yang timbul dari pihak yang bukan merupakan bagian dari Pemberi Jasa Perbaikan
resmi NEC.
Sistem komputer anda harus dalam keadaan tidak tercolok pada setiap saat apabila anda melakukan
aktivitas pemasangan perangkat komponen.
4 Bagaimana cara untuk Mendaftarkan Produk anda?
APABILA ANDA BELUM MELAKUKAN PENDAFATARAN HARAP SEGERA MENDAFTARKAN
PRODUK ANDA DI WEBSITE KAMI:
http://www.nec-computers-ap.com/regwarranty
Anda tidak akan memdapatkan Garansi terhadap produk anda apabila anda tidak mendaftar dalam waktu
90 hari dari tanggal pembelian pelanggan.
5 Definisi
Kata “Produk” berarti: NEC Notebook atau NEC Desktop Computer.
- 31 -
Page 32

6 Informasi Kontak
NEC Computers Asia Pacific Nomor Kontat International
Tel: (604) 5097389
NEC Computers Asia Pacific Sdn Bhd (Malaysia)
Tel: 1800 68 2200
NEC Computers Singapore Pte Ltd (Singapore)
Tel: 1800 888 2200
NEC Computers Australia Pty Ltd (Australia)
Tel: (02) 9313 0055 (Sydney)
1300 780 103 (Outside Sydney)
Untuk menjamin agar anda mendapatkan tanggapan sesegera mungkin untuk permintaan jasa di masa yang
akan datang kami menghimbau anda untuk segera mendaftar.
Kunjungi website kami di www.nec-computers-ap.com untuk mendaftarkan Perpanjang Masa Garansi
NEC anda SEKARANG.
- 32 -
 Loading...