

NEC T1000, PlasmaSync T1000 User Manual

English
German
Spanish
Italian
French
Swedish
Russian
T1000
(42” Wide VGA Plasma)
User Manual
ENGLISH
This symbol refers to a hazard or unsafe practice, which can result in severe personal injury or death.
DEUTSCH
Dieses Symbol bedeutet eine mögliche Gefahr für Ihr Leben und Ihre Gesundheit, wenn bestimmten Handlungsaufforderungen nicht nachgekommen wird,
bzw. wenn entsprechende Vorsichtsmaßnahmen nicht getroffen werden.
ESPAÑOL
Este símboloindic a unposible pel igropara su vida y su salud si no se siguen determinadas instrucciones de manejo o si no se adoptan las medidas de precaución correspondientes.
ITALIANO
Questo simbolo indica un potenziale pericolo di morte e di nocività per la salute nel caso i n cui non vengano soddisfatti determinati requisiti oppure non vengano
prese le relative misure precauzionali.
FRANÇAIS
Ce pictogramme annonce un risque éventuel mettant votre vie et votre santé en danger si vous n’observez pas certaines instructions à suivre, le cas échéant,
si vous ne prenez pas les précautions exigées.
SVENSK
Denna symbol anger farligt eller osäkert handhavande som kan leda till allvarlig personskada eller dödsfall.
РИССКИЙ ЯЗЫК
Этот символ обозначает сопряженную с риском деятельность, которая может привести к серьезным травмам или смерти.
ENGLISH
This symbol refers to a hazard or unsafe practice, which can result in a personal injury or property damage.
DEUTSCH
Dieses Symbol warnt Sie vor Fehlverhalten, welches Sach- und Umweltschäden zur Folge hat.
ESPAÑOL
Este símbolo le advierte de comportamientos incorrectos que pueden causar daños materiales o medioambientales.
ITALIANO
Questo simbolo mette in guardia contro un possibile uso non corretto, che potre bbe provocare danni materiali ed ambientali.
FRANÇAIS
Ce pictogramme vous avertit qu’un comportement inapproprié peut causer des dommages matériels et des dommages à l ’environnement.
SVENSK
Denna symbol anger farligt eller osäkert handhavande som kan leda till personskada eller egendomsskada.
РИССКИЙ ЯЗЫК
Этот символ обозначает сопряженную с риском деятельность, которая может привести к травмам или порче имущества.
ENGLISH
This symbol provides i nformation about handling of the product or about the relevant part of the operating instructions to which particular attenti on should be
paid.
DEUTSCH
Dieses Symbol gibt Informationen über die Handhabung des Produkts oder den jeweiligen Teil der Bedienungsanleitung, auf den besonders aufmerksam gemacht werden soll.
ESPAÑOL
Este símbolo señala informaciones sobre el manejo del producto o la parte correspondiente del manual de usuario a las que debe prestarse una atención
especial.
ITALIANO
Questosimbolo fornisce informazioni in merito all’utilizzo del prodotto o alla relativa parte delle istruzioni per l’uso a cui si deveprestare particolare attenzione.
FRANÇAIS
Ce pictogramme informe sur les opérations relatives au produit ou attire spécialement votre attention sur une certaine partie des i nstructions de service.
SVENSK
Denna symbol ger information om hur utrustningen sk a handhas eller om den tillämpliga delen i användarhandboken som särskilt ska uppmärksammas.
РИССКИЙ ЯЗЫК
Этот символ дает информацию об обращении с аппаратом или о важной части инструкций по эксплуатации, на которую следует обратить особое
внимание.
E 2005, All rights reserved.
Trademarks:
MS-DOS® and Windows® are registered trademarks of Microsoft®.
Other trademarks are the property of their respective owners.
The information in this document is subject to change without notice.
[2950-4042-C283 Rev.00]

Table of Contents
1ENGLISH
Safety instructions 3.............................
Important basic principles for use 3...............
PDP Monitor phosphor ”burn” (Image Retention)
characteristics 3............................
Waste disposal 5...............................
Cleaning 5....................................
Cleaning the plasma TV 5....................
Cleaning the casing 5........................
Conformity 5..................................
In the event of any faults 5.......................
Batteries 5....................................
Overview 6......................................
Scope of supply 6..............................
Connection sockets 7...........................
Remote control 8...............................
Local operator control 9.........................
Getting started 10.................................
Unpacking, viewing, locating and installing 10.......
Unpacking 10................................
Viewing position 10...........................
Location 10.................................
Installation 11................................
Wall mounting 11............................
Connecting and switching on the display 12.........
Connecting the display 12.....................
SDTV - HDTV compatible 13...................
Switching on the display 14....................
Using the OSD menu (On Screen Menu) 14.........
Configuring settings 14.......................
OSD Menu 15.....................................
Select Source 15................................
Volume Control 15...............................
OSD Menu Structure 15..........................
Picture 16......................................
Picture Mode 16.............................
Custom 16..................................
Contrast 17.................................
Brightness 17................................
Colour 17...................................
Sharpness 17...............................
Colour Tone 17..............................
Size 18.....................................
NR (Noise Reduction) 19......................
TV channel 20..................................
Country 20..................................
Auto Store 20................................
Manual Store 21.............................
Manual Store - Prog. 21.......................
Manual Store - Colour System 22...............
Manual Store - Sound System 22...............
Manual Store - Channel 23....................
Manual Store - Search 24.....................
Manual Store - Store 24.......................
Add / Delete 25..............................
Sort 26.....................................
Name 26....................................
Fine Tune 27................................
TV Sound 28...................................
Mode 28....................................
Startup Volume 28............................
Balance 29..................................
Equalizer 29.................................
Auto Volume 30..............................
Sound Mode 30..............................
Setup 31.......................................
Reset to factory defaults 31....................
Time - Clock 31..............................
Time - On Timer 32...........................
Time - Off Timer 33...........................
Time - On Timer Channel 33...................
Time - On Timer Volume 34....................
Language 34................................
OSD Tone 35................................
Blue Screen 35..............................
TTX Group 35...............................
PIP (Picture In Picture) 36........................
PIP - Input Source 36.........................
PIP - Size 37................................
PIP - Position 37.............................
PIP - Swap 37...............................
PIP - Sound Select 38........................
Picture PC 38...................................
Picture Mode 38.............................
Custom 39..................................
Colour Tone 39..............................
Size 40.....................................

Table of Contents
2 ENGLISH
PC 41......................................
H-Position 42................................
V-Position 42................................
Phase 42...................................
Troubleshooting 43................................
Technical specfication 44..........................
Appendix 45......................................
Supported timings (PC) 45........................
Connecting pin assignment for VGA 46.............
Connecting pin assignment for DVI-D 46............
Connecting pin assignments for SCART 46.........

Safety instructions
3ENGLISH
Safety instructions
Before you put this plasma TV into operation please read through this user manual carefully.
This plasma TV is intended exclusively for the reception and reproduction of video and audio signals.
Take heed of the safety directions so that when used in compliance with the intended use there is no danger to your health.
Installation and connection errors can damage the unit or any devices connected to it. Take heed of the warnings and directions
on the unit and in the operating manuals.
This plasma TV is designed only for use in residential rooms and offices.
Protect the plasma TV against moisture. This includes continuous high levels of air humidity, proximity to water, dripping water,
spray water and rain. Do not operate this plasma TV in rooms with a high dust incidence. Do not put any vessels that are filled
with water, e.g. vases, on the unit. If you connect an external aerial,please ensure that no water can penetrate the cable infeed.
Under no circumstances may any objects be allowed to enter the unit through the ventilation apertures. This would cause short
circuits and could therefore cause a fire. Should anything get into the unit at any time, immediately turn off the unit via the mains
power switch and disconnect the mains plug from the plug receptacle. Do not try to open the unit yourself. Instead, contact the
hotline or a qualified service engineer.
Protect the plasma TV against heat, heat accumulation and direct sunlight. Avoid proximity to fire, heaters and ovens. Do not
drape curtains over the unit.
The ventilation apertures may not be covered or blocked in order to avoid faults and overheating. During installation maintain
a sufficient distance from other any equipment, furniture, walls and ceiling so that air circulation is possible.
If the plasma TV is moved quickly from cold surroundings to warm surroundings,moisture can collect on the surface and inside
the unit. Should this situation occur, do not switch on the unit, but wait until the moisture has evaporated. If the unit is used with
such a collection of moisture, malfunctions may occur.
The voltage supply used must correspond with the specifications on the type plate.
Use only the mains cable supplied.
This plasma TV is completely disconnected from the electrical mains only when the mains switch is switched off and the mains
cable is pulled out of the unit or the plug is pulled out of the plug receptacle.
Connect this plasma TV only to a MAINS plug receptacle with an earth conductor connection. Ensure that the mains plug and
plug receptacle are accessible at all times.
Differing conditions can cause an electrical hazard, fire or failure of the unit.
Never remove the plug from the receptacle by pulling it out of the plug receptacle by the mains cable. Avoid laying the mains cable
in the vicinity of hot objects.
Disconnect the mains plug and aerial plug if there is a thunderstorm or if you are going to be absent for a long period of time.
The power supply system can get damaged through an overload caused by lightning striking the antenna system.
Always turn off the plasma TV and the signal source before you connect the two devices.
The plasma unit is equipped with a supplementary filter panel made of glass. If the unit is exposed to an excessive load, e.g.
due to shock, vibration, bending or heat shock, the glass surface can break. Do not subject the glass surface to any pressure
or knocks. Should the glass be broken, immediatelyunplug the mains plug from the plug receptacle.Do not touch the fragments
with your bare hands. There is a danger of injury from sharp-edged glass fragments.
Important basic principles for use
The plasma TV that you have purchased meets the highest quality requirementsin this product segment and has been checked
forpixel defects. Despite taking thegreatestcare duringproductionofthese units,for technologicalreasons it cannot be excluded
absolutely that there are some pixels with defects.
We request your understanding for the fact that such defects, provided that they are within the limits specified by the standard,
cannot be considered to be as an appliance defect in the terms of the warranty.
The luminance diminishes gradually with increasing usage time, as is the case with all plasma TV’s on a phosphorus basis.
PDP Monitor phosphor ”burn” (Image Retention) characteristics
Plasma panels like CRTs, (computer monitorsand TVs) use phosphor to display images. A fundamental chemical phenomenon
of phosphor is that depreciation occurs. That means the phosphor property, which contributes to light output, deteriorates with
usage.
ENGLISH

Safety instructions
4 ENGLISH
Phosphor ”burn-in” (Image Retention)
Phosphor used in all plasma screens loses its brightness with usage (so-called ”on” state.) Phosphor ”burn” is explained as follows: When a static pattern is displayed, this results in higher usage of phosphor for the ”on” state pixels compared to the ”off”
statepixels. This creates a difference in light output between the ”on” state pixelsand the ”off”state pixels. In certain images with
big differences in light output, the human eye detects this as a ”burn-in” effect.
Life Time
The service life of plasma panels is commonly defined as the period before the reduction in value of brightness amounts to half
itsoriginalvalue.Another and more correct way of stating this is its”halflife”.Withthe factory default settings,under normaloperating conditions, displaying moving video, the average expected half life of plasma displays is more than 60,000 hours.
Note: This figure is for reference only. This average is not a guarantee for either the service life or continued brightness.
Warranty
Phosphor burn and loss in brightness are excluded from the normal and extended manufacturer’s warranty.
Period of time before phosphor burn occurs
The exact period of time before phosphor burn occurs is impossible to state due to the fact that many variables are involved.
As described below, it is advised that proper measures be taken from the onset in order to decrease the chances of phosphor
burn.
Measures to help reduce the chances of phosphor burn
Several simple actions can be taken to reduce the chances of phosphor burn.
D Avoid use of strong, contrasting mono colour still over extensive periods.
D Switch off the monitor when not in use.
D Always enable and use your computer’s screensaver function when using an RGB input source. [Please note that some
screensavers may have a permanent but varied brightness object moving in a confined area of the screen. This type of
so called screen saver will in the long term cause burn-in.]
D Avoid displaying static images or static patterns whenever possible.
If your Plasma TV has been used much, operated for several hours at a time,or in the event that you must display a staticimage,
the following steps should be taken to reduce the likelihood of phosphor burn:
D Lower the monitor’s brightness and contrast settings to the lowest acceptable level without impairing readability of the
screen image. Settings of approximately 50% of maximum brightness and contrast are recommended.
D Whenever possible, display an image with many colours and colour gradations (i.e. photographic or photo-realistic
images).
D Create content using complementary pastel colours with minimal contrast between light and dark areas.
D Avoid displaying images with few colours and distinct, sharply defined borders between colours.
D Avoid displaying static images, such as a company name or logotype, for an extended period on the occasion of busi-
ness presentations.
D Avoid displaying in the 4:3 mode for an extended period of time. The vertical edges of the 4:3 image can cause phosphor
burn.
Possible countermeasures once phosphor burn occurs
Once phosphor burn occurs, it is impossible to completely eliminate it. The best countermeasure is to follow the steps above
to help prevent phosphor burn in the first place.
Unfavourable conditions can cause your plasma TV to picture noise (hum). The picture noise (humming) generally comes from
the mains voltage supply and can occur through the connection of different earth conductors.You can provide a remedy by puttinga so-calledsheath current filter between theincomingaerial lead and the aerial input socketon the plasmaTV. Sheath current
filters are available in the retail trade in the form of a small inline plug.
For technical reasons the unit can generate noise inside itself.However,this mustnot exceed the value specified in the appliance
specification.
If your plasma TV is connected to an external aerial, the latter must be earthed as protection against electric shocks and static
charging. The earthing must comply with the valid regulations.
For ergonomic reasons we recommendthat you avoid the use of red or blue fonts or symbols on dark backgrounds. On account
of the poor contrast such a display causes poor legibility and causes early eye fatigue. Therefore please use displays that are
rich in contrast, e.g. black font on a white background.
To avoid aching eyes and obtain an optimized viewing distance, the distance from theunit shouldbe five to six timesthe display’s
diagonaldimension.In yourtelevisionroom it shouldbe so light thatyou could also read. The contrast is lost with too much brightness. Too little light strains the eyes due to the alternation between light and dark on the display.
Safety instructions
5ENGLISH
Waste d isp o sal
If you want to dispose this unit, do not mix it with general household waste. There is a separate collection system for
used electronic products in accordance with legislation that requires proper treatment, recovery and recycling.
This unit and its packaging have been produced largely from materials that can be disposed of in an environmentally friendly
manner and that can be properly recycled.
After use the unit will be taken back for reuse or recycling, provided that it is handed back in a condition that corresponds to its
use having been in compliance with the intended use.
Any non-recyclable parts of the unit will be disposed of in the proper manner.
If you have any questions about disposal, please contact the place where you purchased the unit or our service department.
Cleaning
Before you start any cleaning, turn off the unit and unplug the mains plug from the plug receptacle.
Cleaning the plasma TV
Use a glass cleaning product with a soft cloth for cleaning the plasma TV. Do not use any abrasives!
Cleaning the casing
Do not use anychemical solvents orcleaning agents forcleaning the casing, otherwise the surface of the unit could be damaged.
If you clean the surface of the casing with a wet cloth, drops of water can get into the unit, which will cause malfunctions.
Use a vacuum cleaner with a soft brush attachment for cleaning the ventilation apertures.
Conformity
This unit is a plasma TV and complies with the following directives and standards of the European Union:
D 89/336/ECCE of 03 May 1989 with subsequent modifications(directive92/31/ECCE of April 1992 and directive 93/68/ECCE
of 22 July 1993)
D 73/23/ECCE of 19 February 1973 with subsequent modifications (directive 93/68/ECCE of 22 July 1993)
D EN55013, EN55020, EN61000-3-2/-3 (ElectroMagnetic Compatibility)
D EN60065 (Safety Requirements).
Conformity with the requirements is certified by the designation of the
mark on the product.
The manufacturer c annot be held liablefor operationoutside of the operatingconditions as described in these operating instructions. Your product liability and warranty claims shall be deemed as invalid.
In the event of any faults
Unplug the mains plug from the plug receptacle, if the unit is damaged.
Pullthe mainsplug out of the plug receptacle,if the unitgives offany smoke, anunpleasant odour orany unusualnoises.Proceed
in the same way if the unit is no longer able to display a picture after it has been switched on or during operation. Do not attempt
to continue operating the plasma TV in this condition.
Under no circumstances should you open the unit yourself. Inside the display there are no parts thatcan be serviced or replaced
by you. Contact our service hotline or another suitable technical workshop.
Batteries
When inserting the batteries ensure that the polarity (+/-) agrees with the markings on the remote control.
Batteries may not be disposed of in the domestic waste. The used batteries must be disposed of at a municipal collection centre or thrown into the containers provided for this purpose in the retail trade.
Do not expose the batteries to excessive heat, do not throw them into a fire, do not recharge them and do not attempt to open
them; they could leak or even explode.
Please remove the batteries from the remote control, if the unit is not to be used for a long period of time.
ENGLISH
Overview
6 ENGLISH
Overview
The plasma TV offers a broad range of connection options for PCs, DVD players, video recorders, video cameras, etc.
No matter whether displayed on television, video or PC, all images are presented with a very sharp outline and distortion-free
on an absolutely flat display surface. They have an excellent degree of brightness and exceptional brilliance. Other important
features include the display’s large diagonal dimensions with a length ratio of 16:9 and a very slim overall depth.
To be able to watch your TV, connect the unit to a terrestrial aerial, SAT receiver or cable TV box.
The TV is operated interactively via the remote control provided and the on-screen menu (OSD). A wide range of picture quality
settings can be adjusted using these.
A new type of cooling system means that the plasma TV can operate without any disturbing fan noise. Being as quiet as a
conventional television set, the plasma TV is ideal for use in living rooms, as well as conference rooms.
Equipment
D High-quality aluminium frame
D Fanless design
D 16:9 format
D Full screen in 16:9 and 4:3 format
D Digital comb filter
D Compatible with PAL, SECAM and NTSC
D Compatible with VGA, SVGA, WXGA, XGA and UXGA
D TOP / FLOF Videotext
D Automatic channel identification and channel sorting (where available)
D Sleep Timer
D 2 x EURO SCART (SCART2 with RGB)
D 1 x Y/C (S-Video)
D 1xYUV
D 1 x CVBS
D 1 x DVI-D (Digita l)
D 1 x VGA (Analogue)
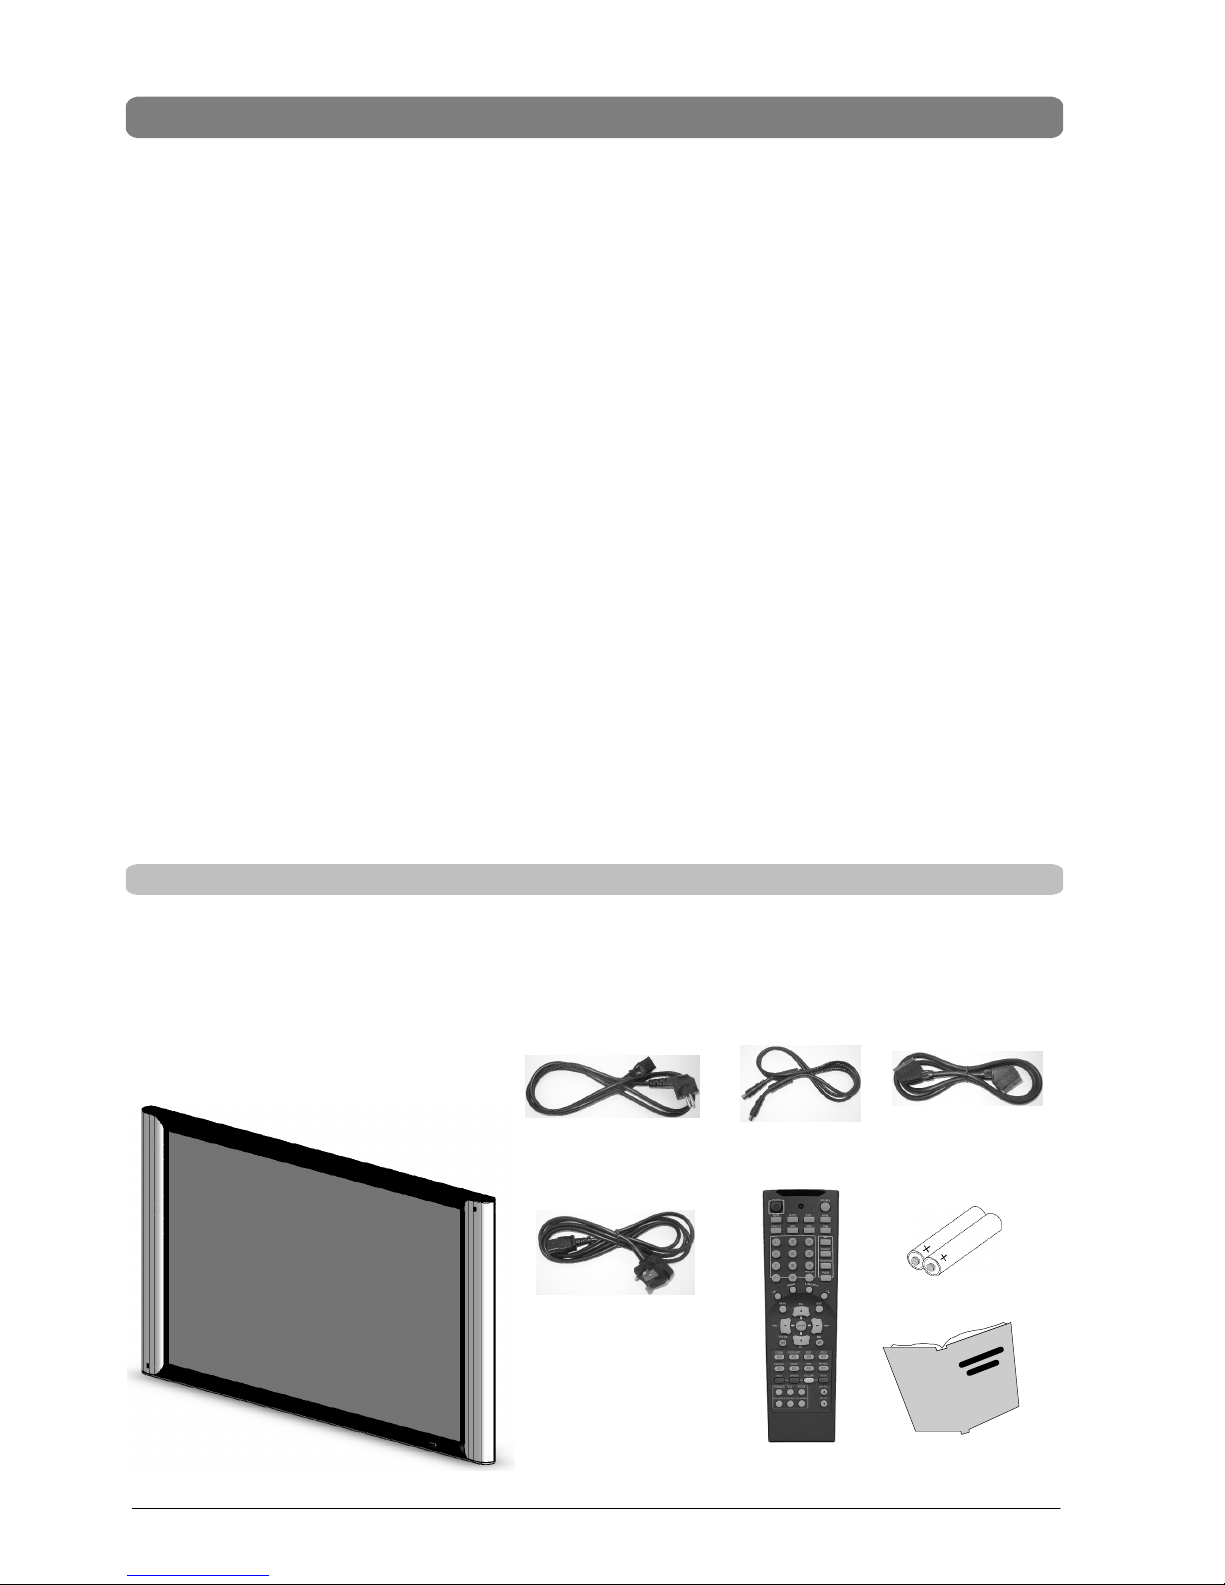
Scope of supply
Afterunpacking, please check the plasma TV for possible transportation damage and ensure that the delivery is complete. The
supplier can only accept claims for transportation damage if you advise them of this before starting to use the unit. If any part
of the delivery is missing, please contact our service hotline. Please keep the original packing in the event you have to return
the display unit.
Plasma TV
Operating manualRemote control
AAA Batteries
Scart cableMains cable for Europe
(except U.K. and Ireland)
Mains cable for U.K. and
Ireland
Antenna cable
Overview
7ENGLISH
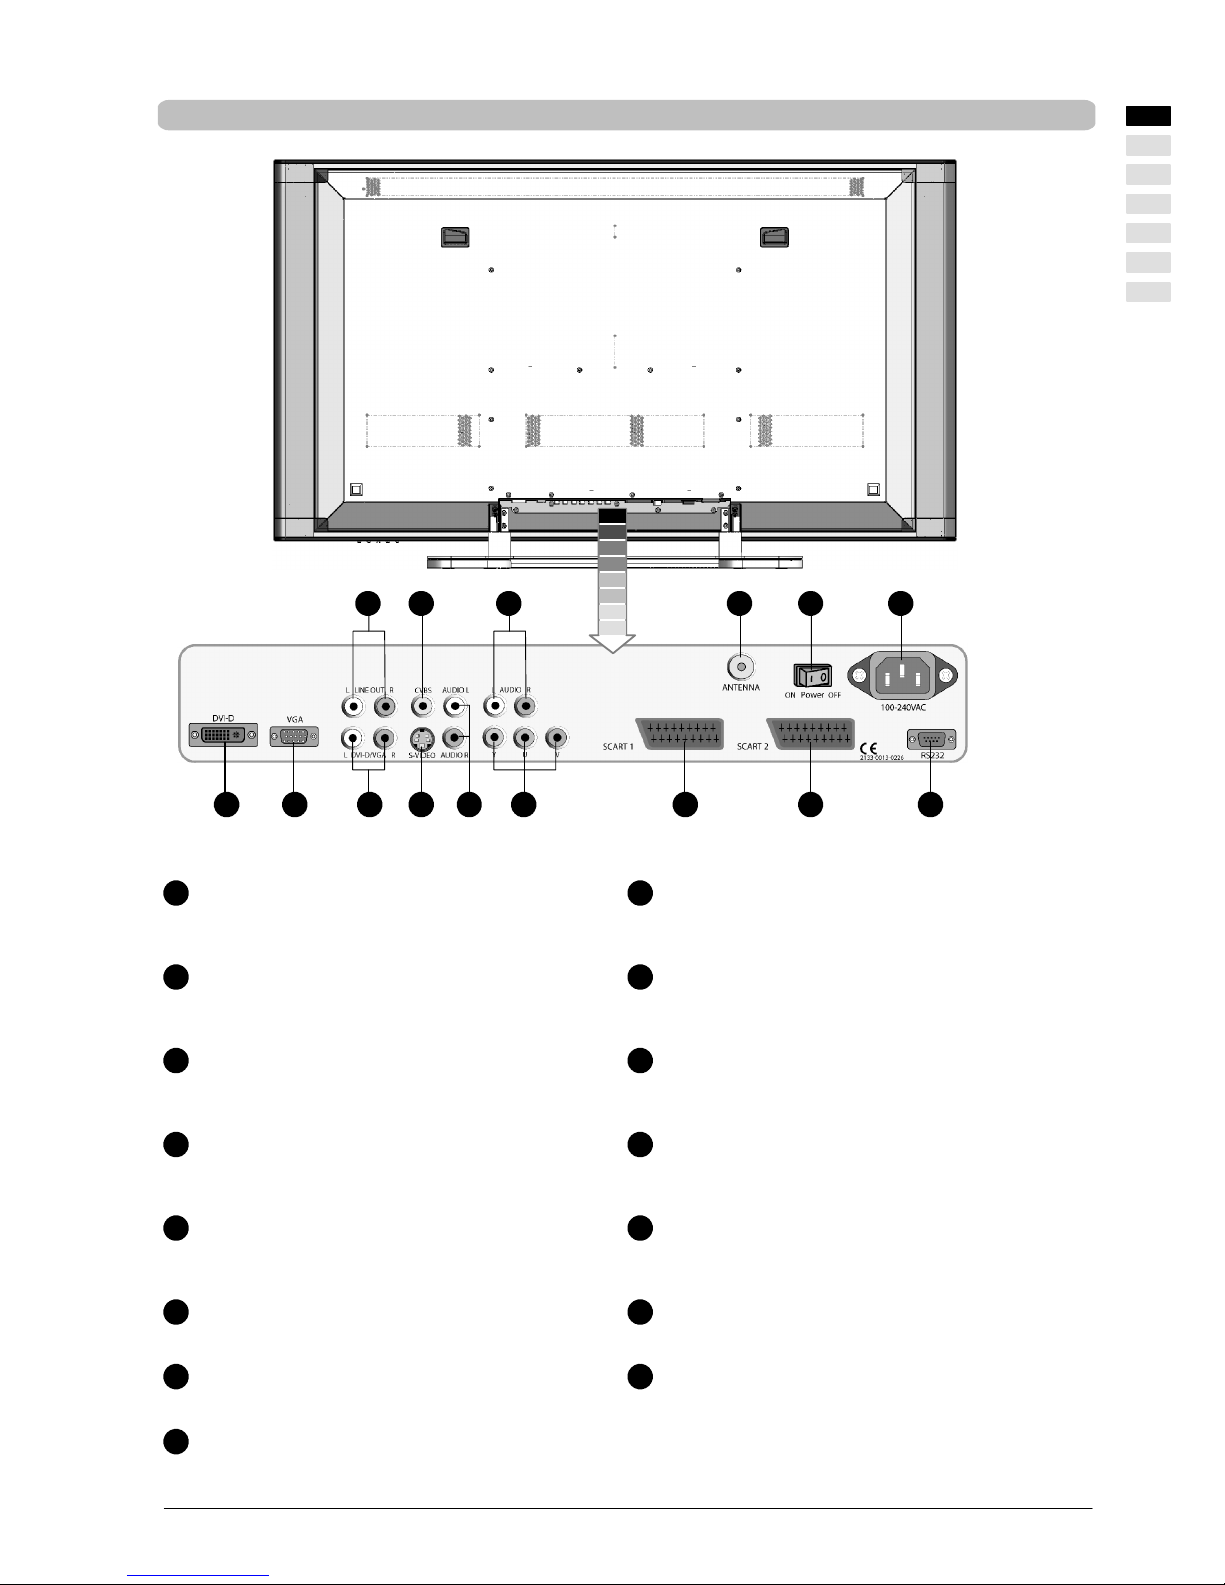
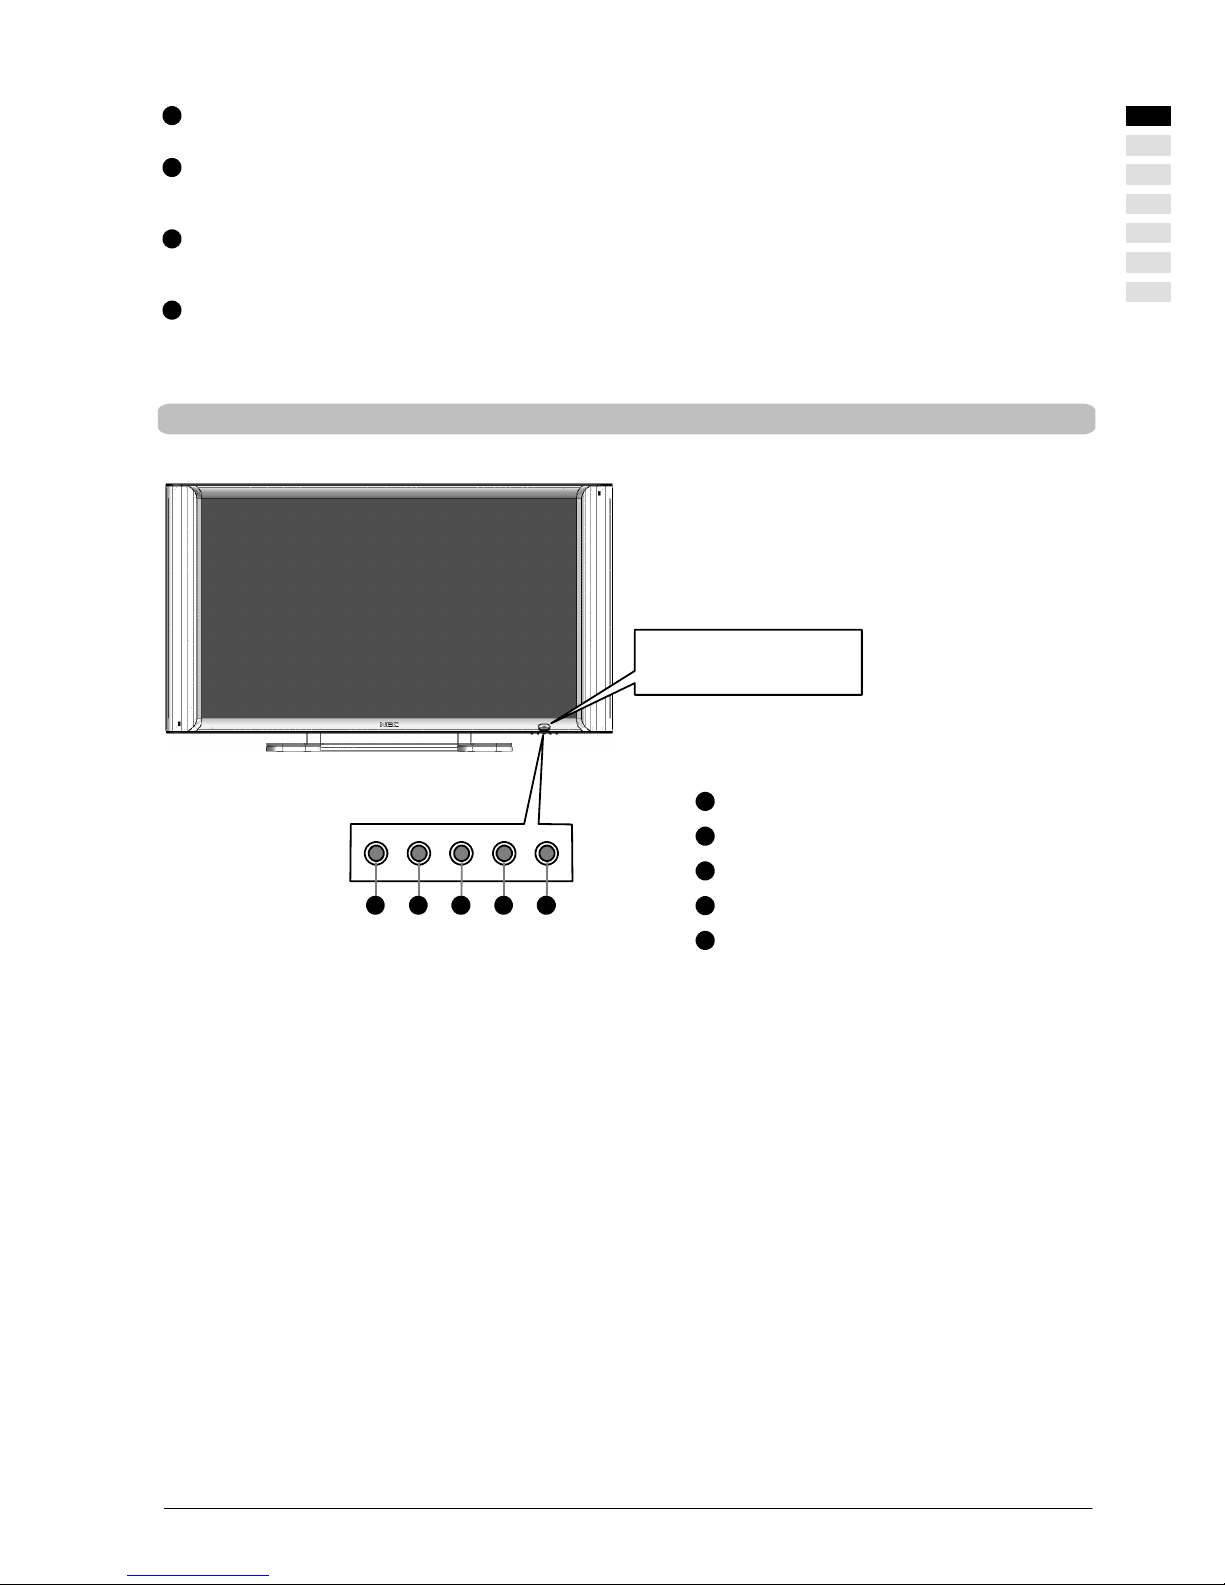
Connection sockets
5 8 9 10 116 7 12
32
13
1 15 144
1 LINE OUT L/R 9 AUDIO L/R
Audio output for connection of active Audio input S-video or CVBS
loudspeakers (with amplifier integrated)
2 CVBS 10 YUV
Input for a mixed video signal (composite) Connection for a DVD player or satellite receiver with
YUV output
3 AUDIO L/R 11 SCART 1
Audio input for YUV Connection of a DVD player, satellite receiver,
video recorder
4 ANTENNA 12 SCART 2
Antenna input (HF) Connection of a DVD player, satellite receiver (RGB),
(terrestrial antenna or cable connection) video recorder, decoder
5 DVI-D 13 RS232
Input for digital video signals, e.g. from the PC or Serial interface for service purposes
from a DVD player with DVI output
6 VGA 14 Mains input socket
Input for analogue RGB signals, e.g. PC Connection for the mains cable supplied
7 DVI-D/VGA (L/R) 15 Mains switch (on/off)
Audio input e.g. PC (analogue/digital)
8 S-VIDEO
Connection of devices with an S -video output
e.g. DVD player, video recorder, camcorder
ENGLISH

Overview
8 ENGLISH
Remote control
1
POWER
Switches the device on or over to stand-by mode.
2
MUTE
Switches the sound to mute or back on.
3
SLEEP
Sets the timer.
4
DUAL I-II
Selection of sound mode.
5
ARC
Sets the page ratio.
6
0 - 9 numeric keys
Switches the unit on.
TV mode: channel selection
Video text mode: selection of a page.
-/--
Input of a two-digit channel number.
PRE-CH
Changes back to the previous sender.
7
SWAP
Changes the input source from main picture to PIP.
8
PC
Selects the PC connection as an input source.
9
MENU
Opens the OSD menu.
10
ENTER
Selection of a menu option.
11
VOL - / A
Reduces the volume.
Execution of a function in the OSD menu.
12
TXT ON
Switches video text mode on or off.
13
PR- / B
Reduces the channel number.
Navigation within the OSD menu.
14
STORE
FLOP/LIST
Changes between FLOP and LIST mode.
SIZE
Changes the size.
HOLD
Stops the updating of video text pages.
CANCEL
Exits video text mode.
INDEX
Back to index page.
TIME
Changes between TV picture with time display and
video text page.
REVEAL
Displays hidden text on video text pages.
15
RED / GREEN / YELLOW / BLUE
Selection of a video text page.
16
SOURCE
Selects an input source.
17
INFO
Display information about the current source.
18
STILL
Generates a still picture of the current scene.
19
SSM
Selects sound mode.
20
PSM
Selects picture mode.
21
PIP
Switches on PIP mode.
P.INPUT
Changes the PIP input (PC / DVI / YUV).
P.POSITION
Changes the PIP image position. Not possible with the
setting “Split Screen”.
P.SIZE
Changes the size of the PIP image.
22
S.SELECT
Changes the sound between main picture and PIP.
23
TV
Changes to TV mode.
Overview
9ENGLISH
24
EXIT
Quits the OSD menu.
25
PR+ / Y
Increases the channel number.
Navigation within the OSD menu.
26
VOL+ / "
Increases the volume.
Execution of a function in the OSD menu.
27
MIX
Shows the selected programme and video text
at the same time.
Local operator control
The functionsof the buttons on the unitmatch those on the remote control.
1
VOL- button
2
VOL+ button
3
PR- button
4
PR+ button
5
POWER / SOURCE button
1 2 3 4 5
POWER ON indicator (blue)
STANDBY indicator (red)
Remote control sensor
ENGLISH

Getting started
10 ENGLISH
Getting started
Before you make any connections, switch off all the relevant appliances, including the plasma TV.
Unpacking, viewing, locating and installing
Unpacking
. Place the box upright with its underside on a solid base. The direction of the arrowheads on the long side of the box
indicates the top of the box.
. Remove the packaging tape from the opening edge and open the box’s flap outwards.
. Remove the two top polystyrene packing corners and take the accessories box out of the packing. This is located on the
side at the rear of the display.
Polystyrene corner
Polystyrene corner
Viewing position
D Although the plasma display has a large display angle, its best performance is achieved when viewed directly from a
central front position. Align the display with the most frequent viewing position.
Location
D Light reflection
Avoid placing the display opposite windows or other light sources.
D Access to the mains input
The mains input and mains switch should be easily accessible at all times.
D Air supply
Leave a space at the side and to the rear of at least 100 mm from any furniture. The space above the unit should be at
least 300 mm from any furniture or the ceiling.
With the wall mounting the space must above at least 800 mm to any furniture or to the ceiling. Laterally and down you
should keep to a least space of 100 mm.
D Ambient temperature
To ensure safe, reliable operation the ambient temperature must be between 5 °C and 35 °C.

Getting started
11ENGLISH
Table installation Wall mounting
800 mm Space
100 mm
Space
100 mm
Space
300 mm
Space
100 mm
Space
100 mm Space
Installation
D Two persons are required to remove the plasma TV from the packing. Never lift the display alone. Any
attempt to lift the display alone will pose a risk to your health.
D Place the display on a stable, horizontal base. The base must be solid and capable of bearing the load.
D Before installing it, make sure that the display is switched off and that the mains cable and signal cable
are unplugged.
Wall mounting
D The plasma TV screen may be mounted on vertical walls only.
D Before mounting it check whether the loadbearing capacity of the wall is suitable for 3-times the weight
of the plasma display screen (for the weight see page 44 ”Technical Specifications”). If in doubt, seek
the advice of a qualified installer.
D Before installing it, make sure that the display is switched off and that the mains cable and signal cable
are unplugged.
D Two people are required to mount the display screen on the wall.
. Turn the plasma TV screen so that the front side (screen)
is pointingdownwards and place it on a completelyflatand
firm surface.
. Loosen the 6 screws that fasten it to the table foot and re-
move these.
. Fit the 2 fastening hooks (rawl plugs and fastening hooks
are not includedin the itemssupplied)horizontally and with
the appropriate distance between them (for this distance
see drilling template in the accessories pack) to the wall.
The fasteningmaterialmust be designed for 3-times the weight of the plasma display screen. If
necessary, please consult a qualified installer.
. Position the plasma TV screen so that the fasteninghooks
can be introduced into the openings provided for this purpose on the rear side of the appliance.
ENGLISH
Holes for
brackets
Screws from
the table foot
Ømin.6,5mm
Getting started
12 ENGLISH
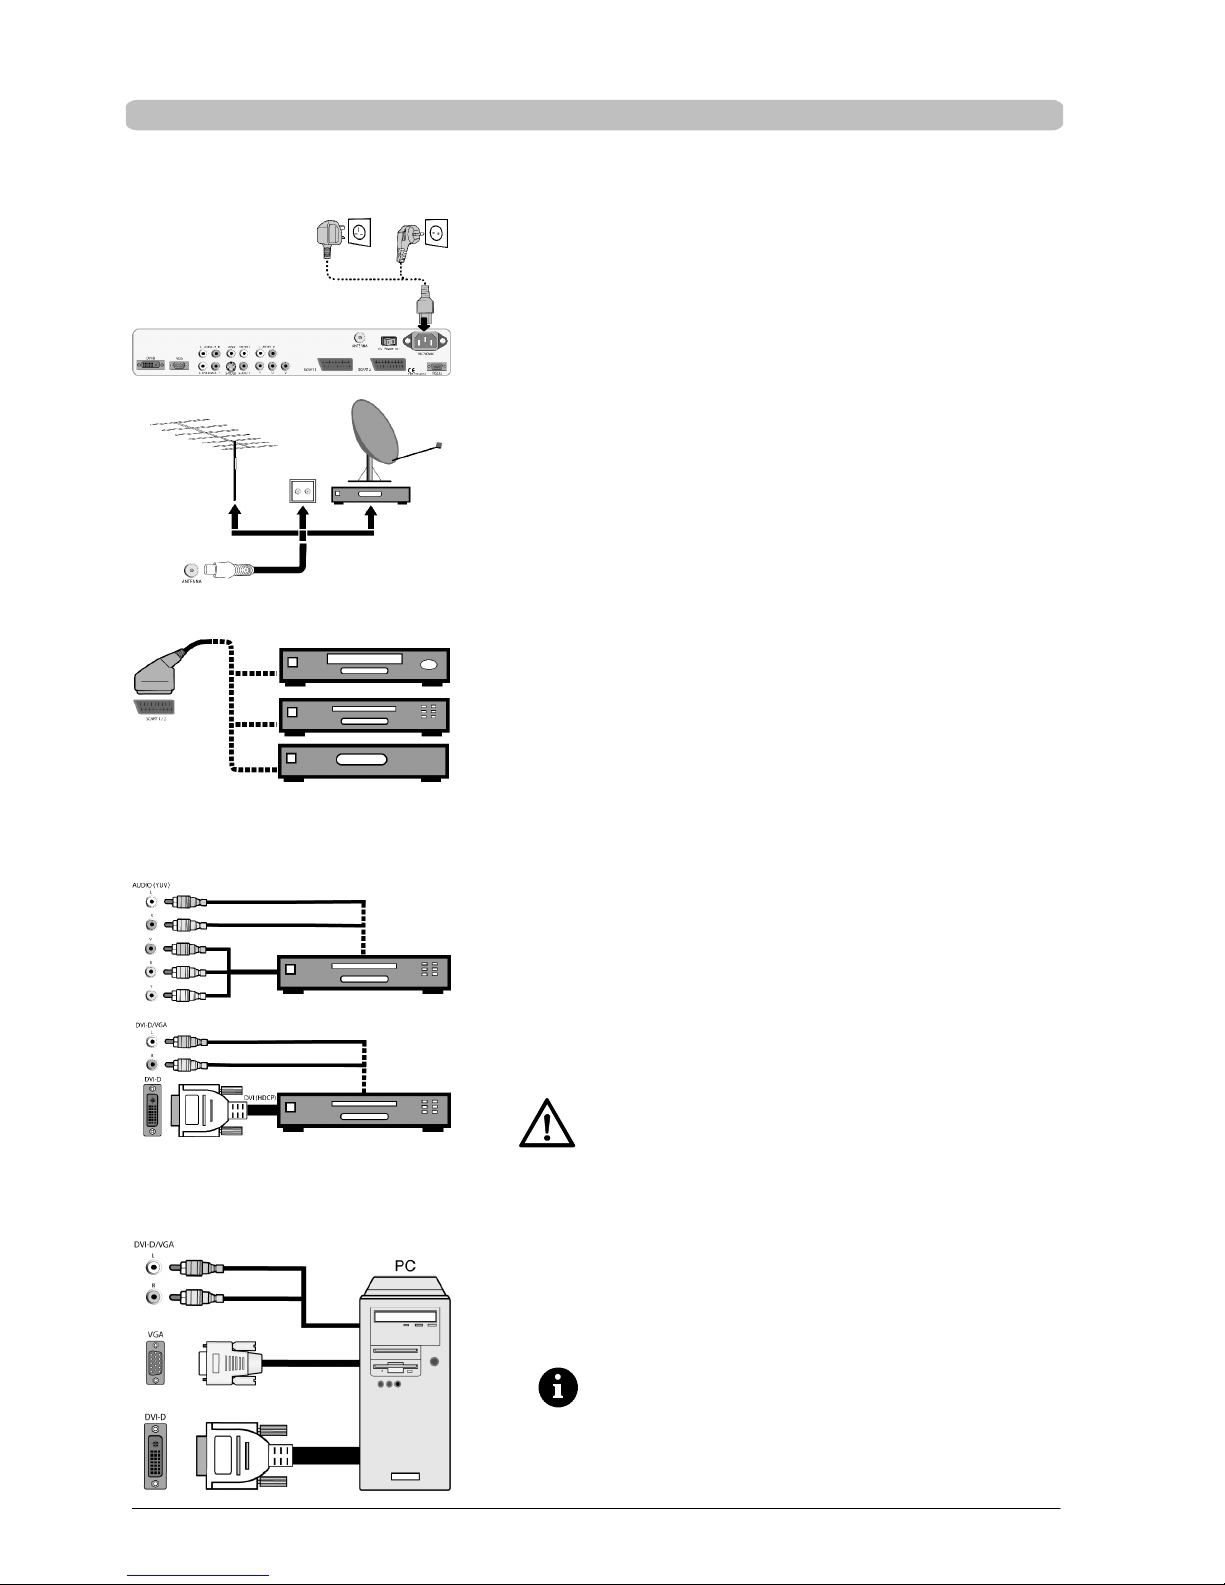
Connecting and switching on the display
Connecting the display
(for an overview of the connection sockets see the illustration on page 9)
. Plug the mainspower cordintothe mainsinputjack on theplasma TVand
the mains plug into a plug receptacle.
Cable connection / terrestrial aerial / satellite receiver
If you would like to connect a cable, a terrestrial aerial or a satellite receiver, use the ANTENNA socket for this purpose.
Video recorder / DVD player / satellite receiver
If you receive your TV channels via satellite, connect your receiver by
means of a SCART cable to the SCART 1 or SCART 2 socket.
In addition, SCART 2 has a connection socket for RGB sources,
e.g. a DVD player.
DVD player / satellite receiver
For connection of a DVD player or another video source to a YUV -output
please use the display’s YUV-input and the audio input AUDIO (YUV).
If your DVD player has a HDMI output port, you can use the DVI input port
and the audio input port DVI-D/VGA (L/R) on the plasma TV using c om mercially available cable.
If a DVD player is connected to the DVI input port of the display screen, the following must be ensured:
D Beforeyou make a connection between the DVD playerand
the display screen using the cables, you must disconnect
the mains plug of the DVD player from the plug socket.
D Once the cables are plugged in on the DVD player and on
the display screen, the mains plug of the DVD player can be
reconnected to the mains.
If you do not comply with this procedure, damage can be
caused to the DVD player or to the display screen!
VGA (RGB analogue)
Use the VGA socket to connect your PC DSUB socket to the display. For the
PC-sound, use the audio input DVI-D/VGA (L/R) at the display.
On older PC graphic cards it is possible that pin 9 is barred.
Should this be the case, please contact the service hotline.
DVI-D (RGB digital)
Use the DVI-D socket to connect your PC DVI-D socket to the display. For
the PC-sound, use the audio input DVI-D/VGA (L/R) at the display.
Getting started
13ENGLISH
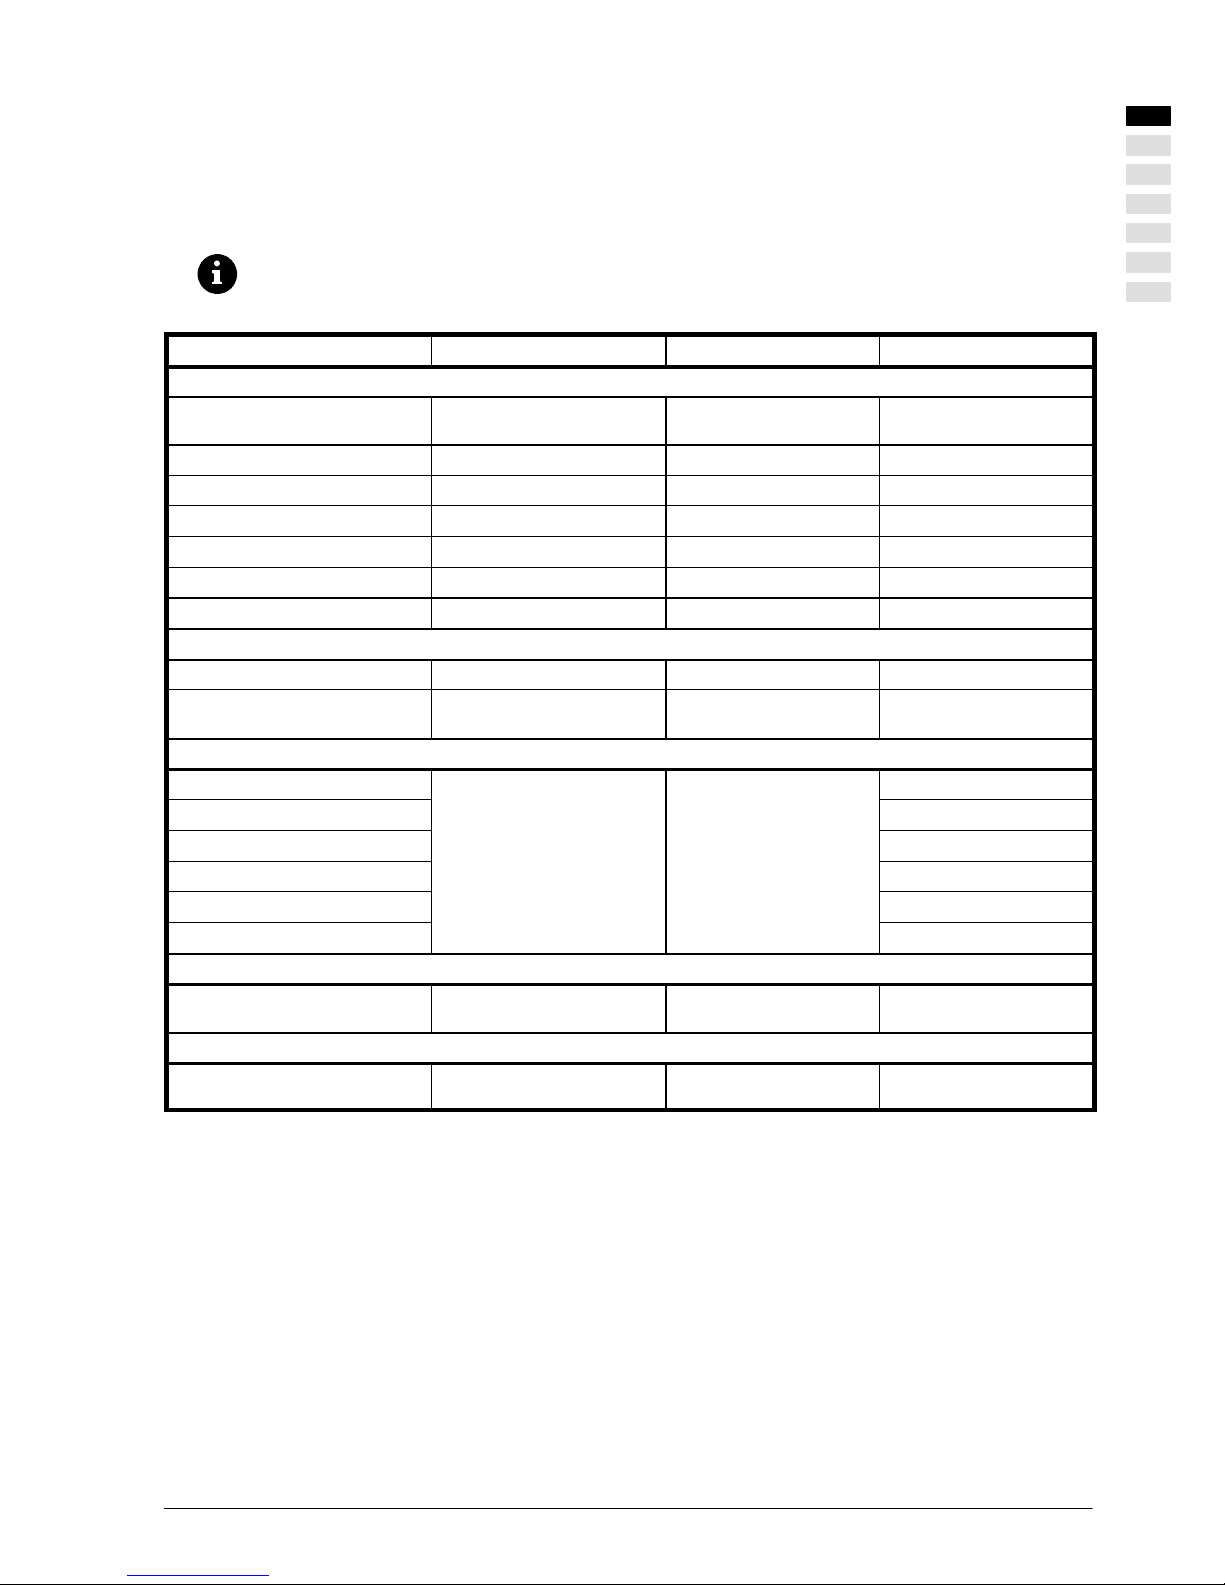
SDTV - HDTV compatible
The plasma TV is able to process standardized normal resolution (SDTV) and future-safe high-resolution video signals (HDTV)
via the interfaces provided.
To make the connection of your external signal sources, such as DVD player and SAT receiver, easier for you, you will find an
assignment of the possible signal types to the screen’s corresponding optimal input jack in the following overview.
Please refer to the operating manual for the external device to determine the type of signal!
Type of signal Synchronization Device input Comments (standard)
YUV, YPrPb - Sync On Green
PAL, NTSC
480i30, 576i25
Sync On Green YUV (3 x RCA) CCIR601
480p60 BiLevel Sync YUV (3 x RCA) CEA770.2
576p50 BiLevel Sync YUV (3 x RCA) CEA770.2
720p50 TriLevel Sync YUV (3 x RCA)
720p60 TriLevel Sync YUV (3 x RCA)
1080i25 TriLevel Sync YUV (3 x RCA)
1080i30 TriLevel Sync YUV (3 x RCA)
RGB
PAL, NTSC 480i30, 576i25 Composite Sync SCART1
VGA analogue
(30kHz-80kHz;50Hz-90Hz)
External H-sync and V-sync VGA analogue (DSUB 15)
DVI with or without HDCP copy protection
480p60
576p50
720p50
External H-sync and V-sync
720p60
ExternalH-syncandV-sync
(TMDS)
DVI-D
1080i25
1080i30
CVBS, Video
PAL, NTSC
480i30, 576i25
Composite Video SCART1/2,
CVBS (RCA)
CCIR601
S-VHS, Y/C, S-Video
PAL, NTSC
480i30, 576i25
Composite Video (on Y) Y/C (MiniDIN) CCIR601
ENGLISH
 Loading...