

Page 1

INSTRUCTION MANUAL
COLOUR TELEVISION
PF32WT100
Page 2

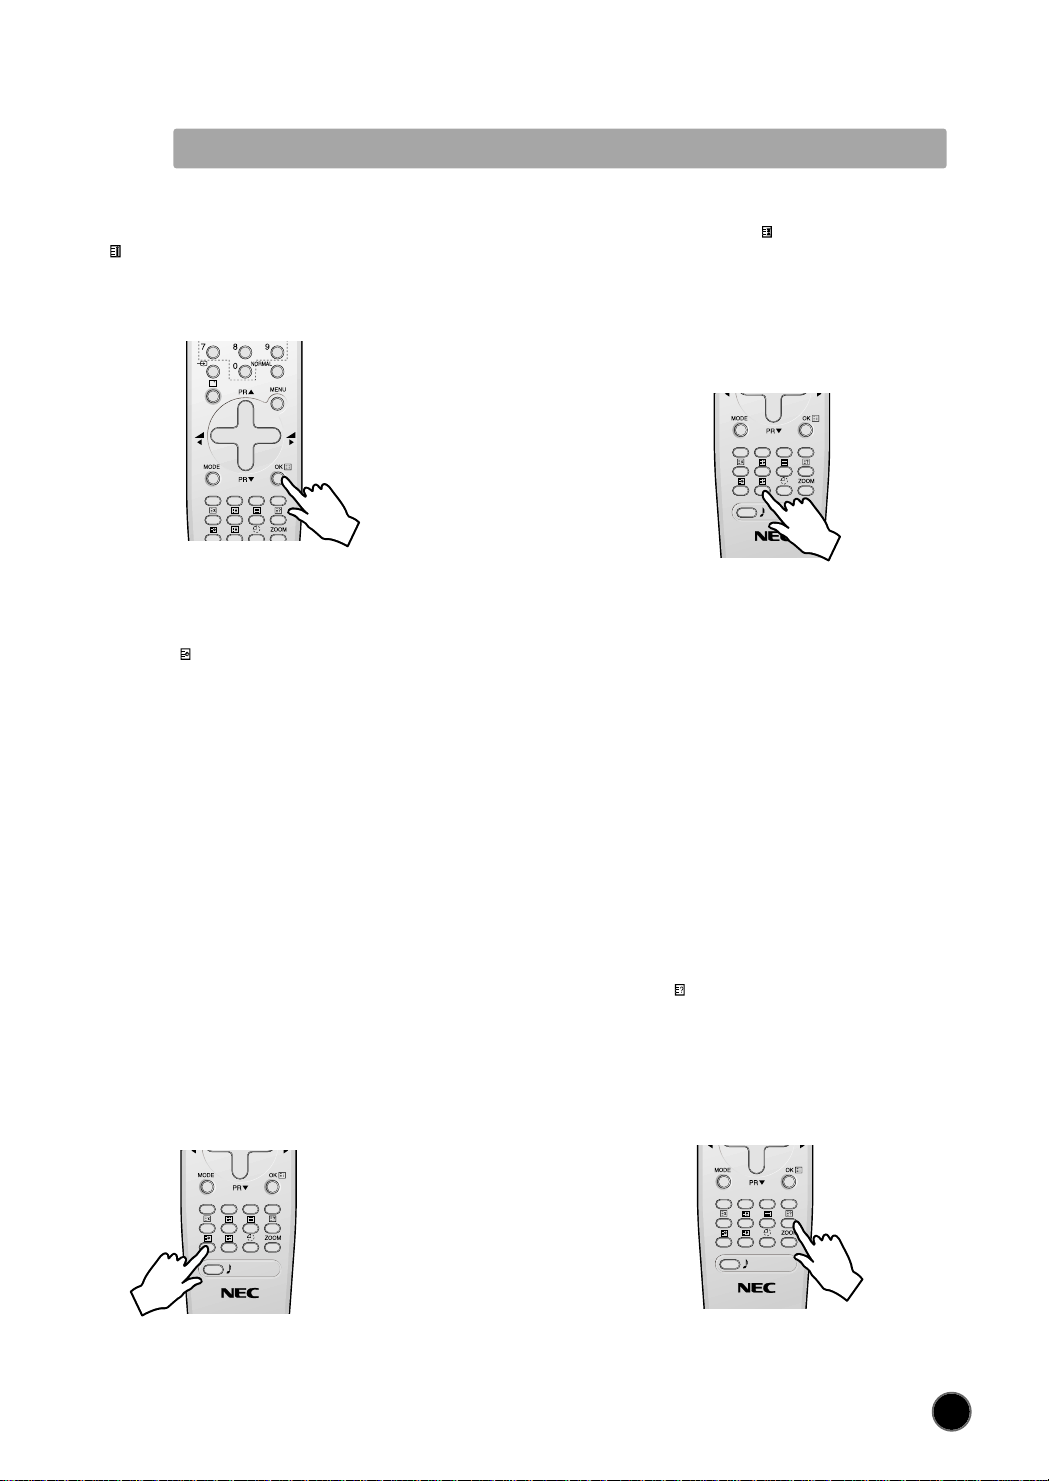
3
TABLE OF CONTENTS
IMPORTANT SAFEGUARDS 4
IDENTIFICATION OF CONTROLS 6
Main body (Front) 6
Main body (Top) 6
Main body (Side) 7
Main body (Back) 7
CONNECTING EXTERNAL EQUIPMENT 8
TV/AV selection 8
Connection to a camcoder or other video player 8
Connection to Digital Audio 9
REMOTE CONTROL 10
Remote Control Hand Piece 10
Battery Installation & Functions 10
BASIC INSTALLATION 11
Switching on TV set 11
Automatic tuning 11
MENU DESCRIPTION 12
Main menu 12
How to use the sub-menus 12
Picture menu 13
Sound menu 14
Install menu 16
Program list edit 16
Feature menu 17
SOUND CONTROL 18
Volume adjustment 18
Mute 18
Mono forcing, Dual language 18
PICTURE CONTROL 19
Picture setting 19
Program status display (Recall) 19
Sleep function 19
Format selection 19
TELETEXT 20
Entering / Exit Teletext Mode 20
Page Selection 20
Teletext format picture & sound control 20
Useful teletext functions 21
BEFORE CALLING SERVICE PERSONNEL 22
SPECIFICATION 23
Page 3

4
IMPORTANT SAFEGUARDS
1 Read Instructions All the safety and operating instructions should be read before the appliance is operated.
2 Retain Instructions The safety and operating instructions should be retained for future reference.
3 Heed Warnings All warnings on the appliance and in the operating instructions should be adhered to.
4 Follow Instructions All operating and use instructions should be followed.
5 Cleaning Unplug TV from the wall outlet before cleaning. Do not use liquid cleaners or aerosol cleaners.
Use a damp cloth for cleaning.
6 Attachments Do not use attachments not recommended by the TV manufacturer as they may cause hazards.
7 Water and Moisture Do not set liquids,including flower vase and vessels filled with chemicals or water
etc,on top of the unit as liquid could get inside the unit.If a hazardous object falls inside the TV set,unplug it
immediately and call qualified technician for remove.
8 Accessories Do not place this TV on an unstable cabinet,
stand, bracket, or table. The TV may fall, causing serious injury
to someone, and serious damage to the appliance. Use only
with a cabinet, stand, bracket, or table recommended by the
manufacturer, or sold with the TV. Any mounting of the appliance
should follow the manufacturer’s instructions and use a mounting
accessory recommended by the manufacturer. An appliance and
cart combination should be moved with care. Quick stops,
excessive force, and uneven surfaces may cause the appliance
and cabinet combination to overturn.
9 Ventilation Slots and openings in the cabinet and the back or bottom are provided for ventillation and to
ensure reliable operation of the TV and to protect it from overheating, and these openings must not be blocked
or covered. The openings should never be blocked by placing the TV on a bed, sofa, rug, or other similar
surface. This TV should never be placed near or over a radiator or heat register. This TV should not be placed
in a built-in installation such as a bookcase or rack unless proper ventilation is provided or the manufacturer’s
have been adhered to. Around the space should be more than 10cm.
10 Power Sources This TV should be operated only from the type of power source indicated on the marking
label. If you are not sure of the type of power supply to your home, Please contact NEC service centres.
11 Grounding or Polarization This TV is equipped with a polarized alternating current line plug (a plug
having one blade wider than the other). This plug will fit into the power outlet only one way. This is a safety
feature. If you are unable to insert the plug fully into the outet, contact your electrician to replace your obsolete
outlet. Do not defeat the safety purpose of the polarized plug.
12 Power- Cord Protection Power-supply cords should be routed so that they are not likely to be walked on
or pinched by items placed upon or against them, paying particular attention to cords at plugs, and the point
where they exit from the appliance.
13 Lightning For added protection for this TV receiver during a lightning and storm, or when it is left
unattended and unused for long periods of time, unplug it from the wall outlet and disconnect the antenna or
cable system. This will prevent damage to the TV due to lightning and power-line surges.
14 Power Lines An outside antenna system should not be located in the Vicinity of overhead power lines or
other electric light or power circuits, or where it can fall into such power lines or circuits. When installing an
outside antenna system, extreme care should be taken to keep from touching such power lines or circuits as
contact with them might be fatal.
PORTABLE CABINET WARNING
Page 4

5
15 Overloading Do not overload wall outlets and extension cords as this can result in a risk of fire or electric
shock.
16 Object and Liquid Entry Never push objects of any kind into this TV through openings as they may touch
dangerous voltage points or short out parts that could result in a fire or electric shock. Never spill liquid of any
kind on the TV.
17 Servicing Do not attempt to service this TV yourself as opening or removing covers may expose you to
dangerous voltage or other hazards. Refer all servicing to qualified service personnel.
18 Damage Requiring Service Unplug this TV from the wall outlet and refer servicing to qualified service
personnel under the following conditions :
A. When the power-supply cord or plug is damaged or frayed.
B. If liquid has been spilled, or objects have fallen into the TV.
C. If the TV has been exposed to rain or water.
D. If the TV does not operate normally by following the operating instructions. Adjust only those controls that
are covered by the operating instructions, as improper adjustment of other controls may result in damage
and will often require extensive work by a qualified technician to restore the TV to its normal operation.
E. If the TV has been dropped or damaged in any way.
F. When the TV exhibits a distinct change in performance - this indicates a need for service.
19 Replacement Parts When replacement parts are required, be sure the service technician has used
replacements parts specified by the manufacturer that have the same characteristics as the original part.
Unauthorized substitutions may result in fire, electric shock, injury to persons or other hazards.
20 Safety Check Upon completion of any service or repairs to this TV, ask the service technician to perform
routine safety checks to determine that the TV is in proper operating condition.
21 Heat This TV product should be situated be situated away from heat sources such as radiators, heat
registers, stoves, or other products (including amplifiers) that produce heat.
22 Secondary Switch When switching off, the apparatus is not completely switched off from the mains. To
disconnect it from the mains, you have to unplug mains.
23 The appliance is not intended for use by young children or infirm persons without supervision.
24 Young children should be supervised to ensure that they do not play with the appliance.
25 The surface of the TV screen is coated with a thin film,which can easily damaged.Be very careful with it when
handling the TV.
26 Should the TV become soiled,wipe it with a soft dry cloth.Never use any cleaner or detergent on it.
Page 5
6
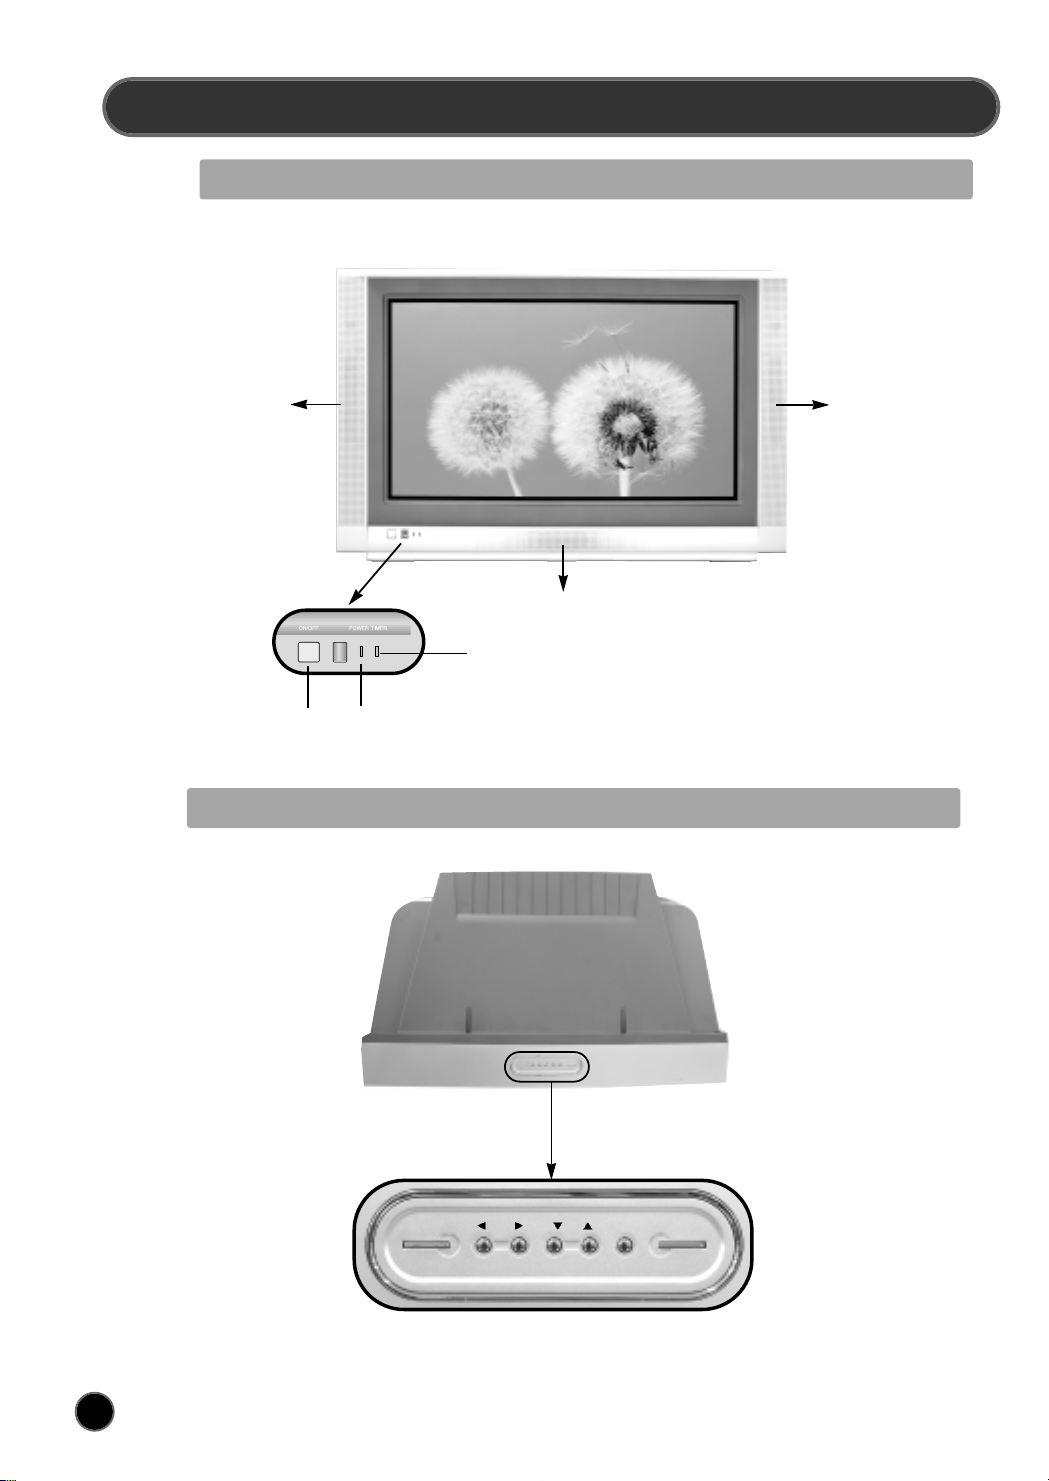
IDENTIFICATION OF CONTROLS
Main Body (Front)
Main Body (Top)
MAIN POWER
POWER INDICATOR
TIMER
Left Speaker
Right Speaker
Center Speaker
TTVV//AAVV VVOOLL CCHH
MENU
OK
Page 6
7
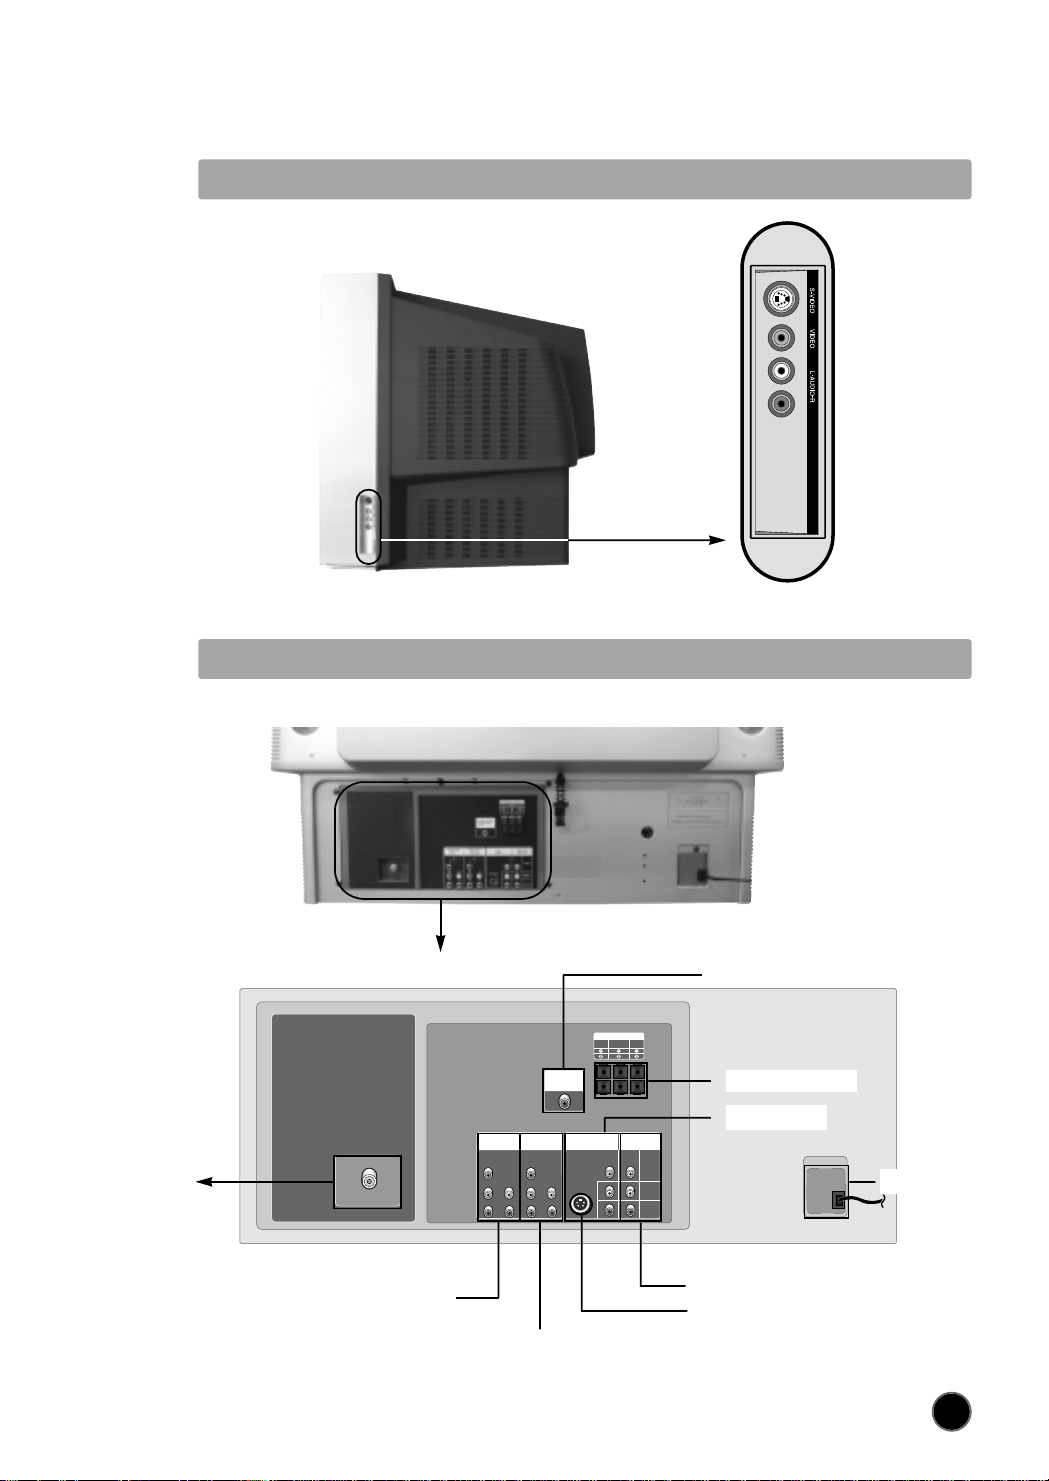
Main Body (Side)
Main Body (Back)
AV2 INPUT
Connection to
Antenna Cable
DVD INPUT
DTV INPUT
Monitor Output
S-Video
Power Cord
AV 1 Input
Speaker Output
Digital Audio Input (SPDIF)
ANT
DIGITAL AUDIO
INPUT
DVD
DTV
INPUT
INPUT
Y
Y
Cb Pb
Cr Pr
L
L
RR
SPEAKER OUTPUT
Sr-L
Sr-R WOOFER
8 /10W
8 /5W
8 /5W
(SPDIF)
MONITOR
AV1
OUTPUT
INPUT
S-VIDEO
VIDEO
AUDIO L
(MONO)
AUDIO R
Page 7
8
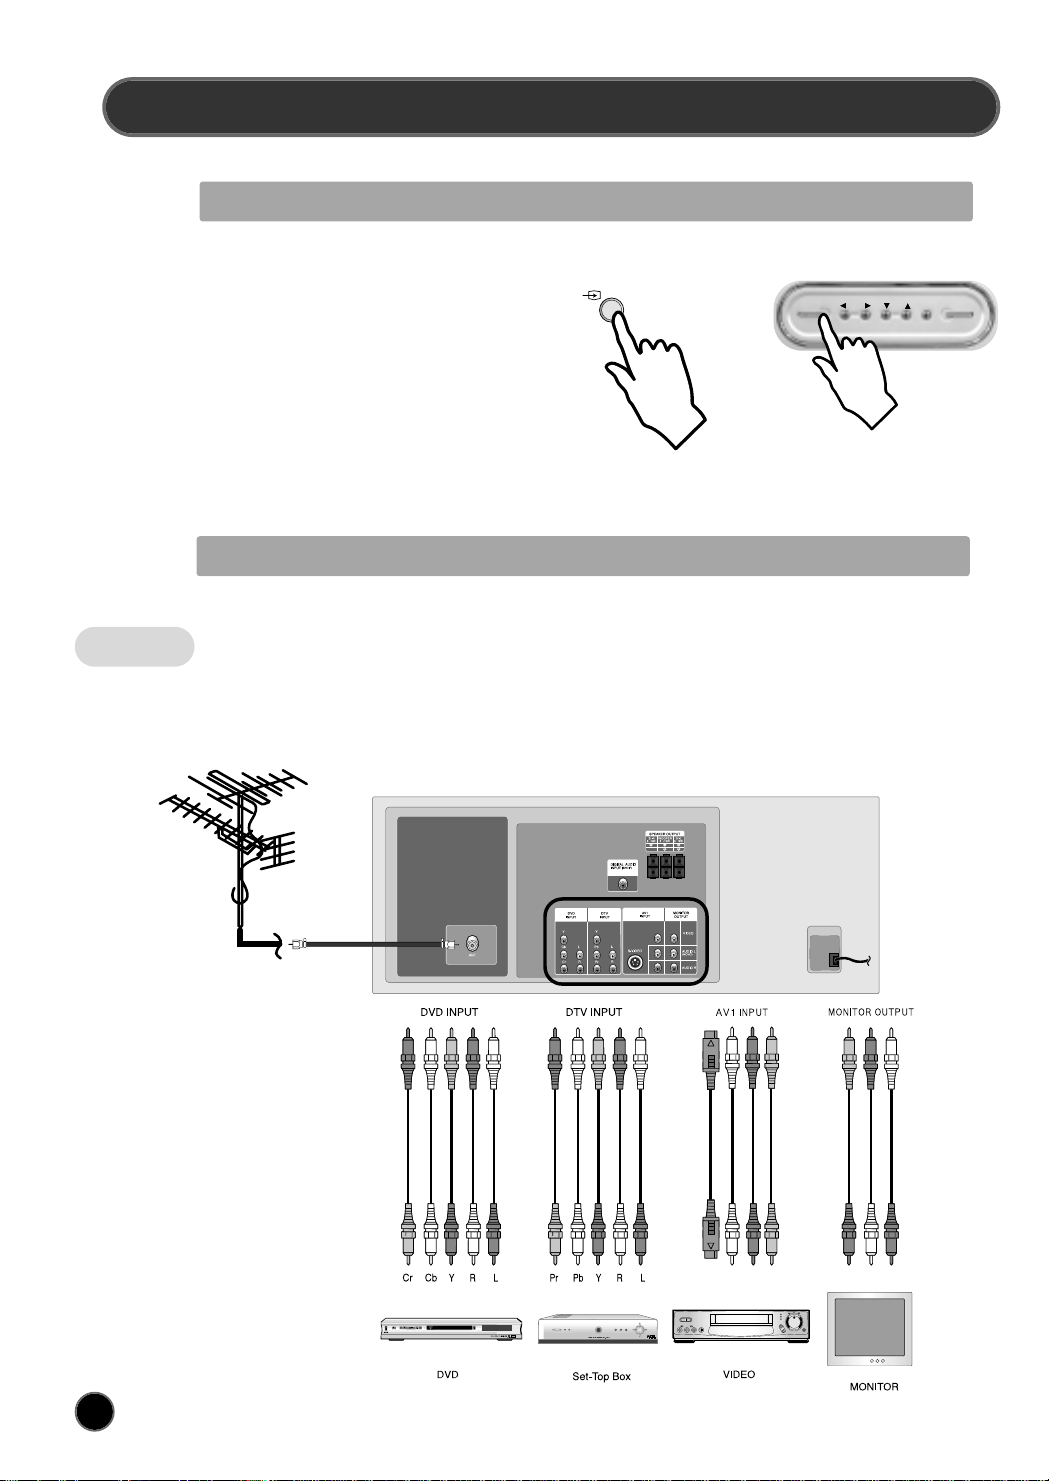
CONNECTING EXTERNAL EQUIPMENT
TV/AV Selection
Allows to switch between TV and external modes, By
repeatedly pressing the remote control TV/AV or the TV top
panel TV/AV button, the on-screen display is changed as
shown :
RF >AV 1 >AV 2 >DVD >DTV
But it is changed according to whether you connect
S-VIDEO 1(S-VIDEO 2) or not.
If you connect S-VIDEO 1 (S-VIDEO 2), SVHS 1 (SVHS 2)
is displayed instead of AV 1 (AV 2).
That is, S-VIDEO 1 (S-VIDEO 2) & AV 1 (AV 2) can not be
displayed at the same time.
Connection to a camcoder or other video player
Connect the AUDIO / VIDEO OUT terminal of your video player (or camcoder) to AUDIO / VIDEO
IN terminal of with AUDIO / VIDEO connecting cable.
When marking connection,please ensure that you turn the main switch OFF to prevent any damage
to the equipment.
Remark : DVD INPUT is 576i input only and DTV INPUT is 576p or 1080i(50Hz) input only.
If there are wrong connections,TV does not display any picture.
BACK
TTVV//AAVV VVOOLL CCHH
MENU
OK
Page 8

9
Remark : You can’t connect with S-VIDEO & VIDEO at the same
time. So user has to select the one of them.
Connection to Digital Audio
You can enjoy the high quality sound of Dolby Digital sound.
When marking connection,please ensure that you turn the main switch OFF to prevent any damage to the equipment.
What is Dolby Digital ?
Dolby Digital is the surround sound technology recently used in theaters, and is now available to reproduce this
realistic effect at home. You can enjoy motion picture and live concert DVD video discs with dynamic realistic sound
by connecting the TV / DVD to the 6 channel amp equipped with a Dolby Digital decoder or Dolby Digital processor.
Remark : SPDIF is used in digital sound.
So it can be operated in AV and DVD/DTV INPUT Mode
SIDE (AV2 INPUT)
Sr-R WOOFER
Sr-L
8 /5W
8 /10W
8 /5W
DIGITAL
AUDIO INPUT
(SPDIF)
SPEAKER OUTPUT
Page 9

10
REMOTE CONTROL
Remote Control Hand Piece
TV mode
POWER
SOUND MUTE
NUMBER 0..9
SLEEP
TV / AV
PROGRAM UP
(CURSOR UP)
VOLUME DOWN
(CURSOR LEFT)
.
.
.
SKIP
MOVE
(LISTENING MODE)
MODE
ZOOM
RECALL
NORMAL
OK/PRESET
MENU
VOLUME UP
(CURSOR RIGHT)
PROGRAM DOWN
(CURSOR DOWN)
TV > TELETEXT
.
.
.
DELETE
TELETEXT mode
POWER
SOUND MUTE
NUMBER 0..9
.
.
PAGE UP
VOL/BRIGHT/CONTRAST DOWN
CANCEL
PAGE HOLD
SUBPAGE
RED
GREEN
.
.
.
.
.
INDEX
VOL/BRIGHT
MENU SELECTION
VOL/BRIGHT UP
PAGE DOWN
TELETEXT > TV
HEIGHT
REVEAL
CYAN
YELLOW
A1
A2
A3
A4
A5
A6
A7
A8
A9
A10
A11
A12
A13
A14
A15
A16
A17
A18
A19
A20
A21
A22
A23
A24
A25
A26
A1
A2
A3
A4
A5
A6
A7
A8
A9
A10
A11
A12
A13
A14
A15
A16
A17
A18
A19
A20
A21
A22
A23
A24
A25
A26
Battery Installation & Functions
Remark : As previously stated, All description will be written by using upper words
Battery installation Tips for remote operation
Insert two size AAA batteries matching the +/polarities of the battery to the +/- marks inside the
battery compartment.
When the remote control will not be used for a
long period of time or when the batteries are worn
out, remove the batteries to prevent leakage.
Do not throw the batteries into a fire. Dispose of
used batteries in the specified manner.
Do not drop, dampen or disassemble the remote
control.
5m
30"
30"
Effective range
Page 10

11
BASIC INSTALLATION
Switching On TV Set
1)
If stand-by indicator is red, then
the TV set is in stand-by mode.
You can switch on using the
remote control POWER button
(A1), the NUMBER 0….9 buttons
(A3), or PROGRAM UP (A6) /
DOWN (A21) buttons. The front
panel PROGRAM UP/DOWN
buttons can also be used.
Once on, the stand-by indicator turns
off and the picture appears on the
screen.
2) If stand-by indicator is not lit,
then the TV set is powered off.
You must press the TV set
front panel MAIN POWER
button.
If a picture does not appear,
then the stand-by indicator will
be lighted red. In this case,
use the remote control as
indicated in 1).
3)
If stand-by indicator is flickering then
the TV set is in child-lock mode.
It is necessary to use the remote
control POWER button (A1),
NUMBER 0….9 buttons (A3), or
PROGRAM UP (A6) / DOWN (A21)
buttons. The Top panel PROGRAM
UP/DOWN buttons will not function.
Once on, the stand-by indicator turns
and the picture appears on the
screen.
SWITCHING OFF
TV SET
1)Pressing the remote control
POWER button (A1), you can
switch off to stand-by mode (low
power consumption mode) which
also allows quick restart by remote
control (see above: SWITCHING
ON TV SET).
Remark: If a broadcast signal is not present after 30 minutes, the TV set will be automatically turned to stand-by mode.
2)Pressing the TV set front panel MAIN
POWER button, you can completely
power off the TV set. In this case, you
must use the same front panel
POWER button to switch on again
(see above: SWITCHING ON TV
SET).
Automatic Tuning
ATSS = Automatic Tuning and Sorting System.
To start the ATSS function :
1) Press the MENU button (A19), then select the INSTALL menu by using Remote control CURSOR UP (A6), DOWN
(A21) buttons.
2) Press and hold the OK button (A18) to start the automatic tuning.
The ATSS function has started when the phase “Please Wait!” appears (in red characters) in the help instructions box,
below the install menu. when the ATSS function is finished, the stored programs are displayed on screen using Edit
menu presentation (to exit tuning before automatic tuning is finished, press the remote control MENU button (A19)).
Page 11

12
MENUS DESCRIPTION
MAIN MENU
The sub-menus referred to here are PICTURE, SOUND, INSTALL, FEATURES
All menus are removed within 25 seconds if you don't press any button.
Press the remote control MENU button (A19) to display the main menu. Then, you have the choice between
several sub-menus:
If you want to Exit the main menu, press the MENU button (A19) a second time.
- To select one of the sub-menus, use the remote control CURSOR UP (A6), DOWN (A21) buttons.
- To enter the selected sub-menu, press the remote control OK button (A18).
Remark: In AV mode the INSTALL menu is not available, and will not be selectable.
PICTURE
SOUND
INSTALL
FEATURES
POSITION
ACCESS
EXIT
MENU
OK
«
»
HOW TO USE THE SUB-MENUS
- Select the
desired Position
by using the
remote control
CURSOR UP
(A6) or DOWN
(A21) buttons.
- The remote control
CURSOR LEFT (A7)
or RIGHT (A20)
buttons if you want to
modify the function
value
- The remote
control
NUMBER 0...9
buttons (A3) to
enter directly
new data.
- Store (if needed)
by pressing the
remote control
OK button (A18).
- Then Exit to main
menu by pressing
the MENU button
(A19).
Page 12

13
PICTURE MENU
-You can select the picture quality instantly.
To Select the Picture Mode
1. Press the menu button to select the PICTURE and then displayed on
the right appearances. By pressing the OK button or NORMAL
button, the following three modes change cyclically.
FAVOURITE > NORMAL I > NORMAL II
- The current selected picture mode is displayed in the menu header.
- The FAVOURITE mode contains the settings that you last entered.
2. You can select the BRIGHTNESS, CONTRAST, COLOUR,
SHARPNESS, TINT and PIC.TILT with CURSOR UP (A6)/DOWN
(A21) buttons.
After selecting items, you can adjust each level with CURSOR LEFT
(A7)/RIGHT (A20).
3. NOISE RED (NOISE REDUCTION) feature is selected On/Off
according to your preference.
4. PIC.TILT feature adjusts a tilt of displayed picture with CURSOR
LEFT (A7)/RIGHT (A20).
The red point of bar represents the center tilt of picture.
5. If the NTSC standard is detected, then TINT will available.
Otherwise TINT will be displayed, but not selectable.
PICTURE FAVOURITE
BRIGHTNESS
CONTRAST
COLOUR
SHARPNESS
TINT
NOISE RED
PIC. TILT
OFF
POSITION
ADJUST
EXIT
OK PRESET
MENU
« »
«
»
Page 13

14
SOUND MENU
To Select Listening Mode
1. Press the menu button to select the SOUND and to be displayed on the
right appearance. By pressing the CURSOR LEFT (A7)/RIGHT (A20),
the following five modes change cyclically.
STEREO > SURROUND > CONCERT > JAZZ CLUB > CATHEDRAL
- STEREO
This mode operates differently according to input source.
If RF or AV sources are inputted, it is operated STEREO or MONO by
only R/L (RIGHT/LEFT) speakers.
If SPDIF source is inputted, it is operated down mixed Dolby Digital
sound by only R/L speakers. Other speakers are not supportable.
- SURROUND
This mode operates automatically according to input source
(Reference the table.)
- CONCERT/ JAZZ CLUB/ CATHEDRAL
You can select mode according to your preference. These modes add your
choice to SURROUND sound.
So, you can enjoy a stereophonic sound by selecting these modes.
-
VOICE CLARITY:This feature gives you more correct and clean Pronunciations.
Especially, it is outstanding in speech program.
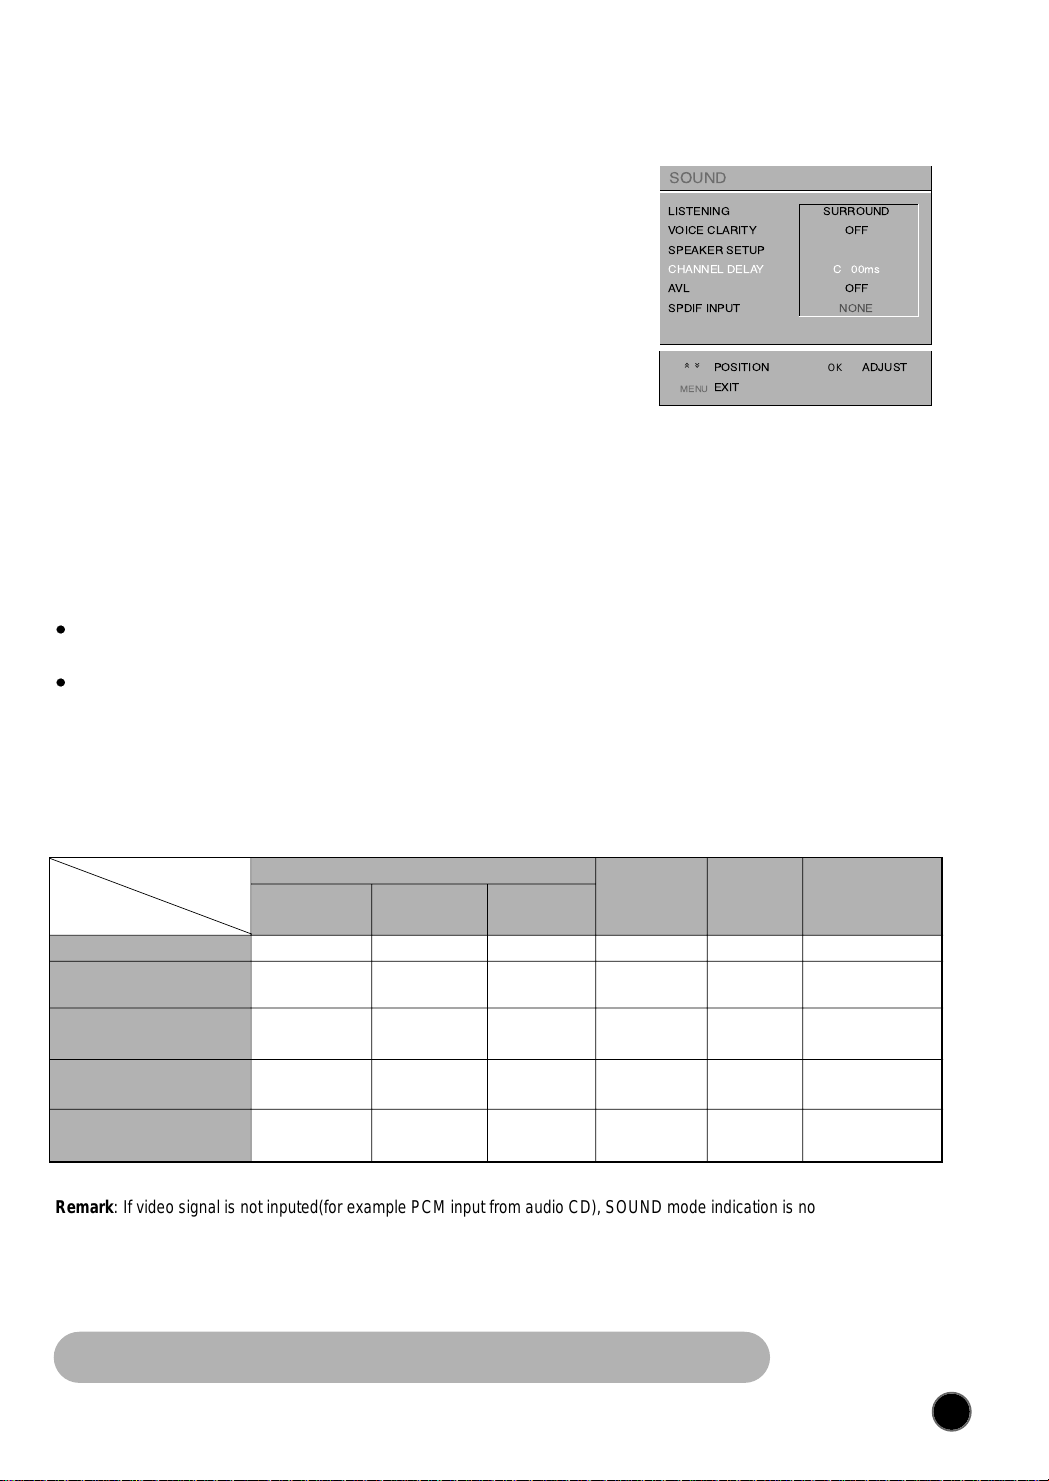
SOUND
LISTENING
VOICE CLARITY
SPEAKER SETUP
CHANNEL DELAY
AVL
SPDIF INPUT
SURROUND
OFF
OFF
NONE
POSITION
ADJUST
EXIT
MENU
« »
«
»
Input source Listening Mode
Dolby Digital 2.0 CH Dolby Pro Logic II
SPDIF Dolby Digital Dolby Digital
Except Dolby Digital 2.0 CH
PCM Dolby Pro Logic II
AV / RF Mono or Stereo Dolby Pro Logic II
Remark: Dolby Digital 2.0 CH represents
which is coded R/L sound. DTS
source through SPDIF input is not
supportable.
To Set up Speakers.
Reference
L/R : Left(Right) speaker
Ls/Rs : Left (Right) surround speaker
C : Center speaker.
SUB : Sub Woofer speaker
1. Press the CURSOR UP(A6)/DOWN(A21) buttons to select the
speaker setup and Press the OK (A18) button. then It will be displayed
on the right appearance.
2. You can setup the speaker output. If all speakers are connectrd, then
turn on Ls/Rs. If Ls/Rs is off, the Ls and Rs level menu will be inactive.
3. TEST TONE feature can be selected by pressing CURSOR LEFT(A7)/
RIGHT (A20)buttons. After turning the test tone ON, user can adjust
the level of each speakers connected, using NOISE tone.Simply use
CURSOR UP(A6)/ DOWN (A21)to select the speakers, and then do
the level adjustment using CURSOR LEFT(A7)/ RIGHT (A20)buttons.
Remark: When adjusting the speaker level,it is a good way to use this
test tone.
4. You can adjust all speakers’ level. Red point of each bar represents
original speaker level. If you press the CURSOR LEFT (A7), the
selected speaker level is decreased. On the contrary, the speaker
level is increased.
SOUND
LISTENING
VOICE CLARITY
SPEAKER SETUP
CHANNEL DELAY
AVL
SPDIF INPUT
SURROUND
OFF
OFF
NONE
POSITION
ADJUST
EXIT
MENU
OK
«
»
SPEAKER SETUP
Ls/Rs
TEST TONE
L LEVEL
C LEVEL
R LEVEL
Ls LEVEL
Rs LEVEL
SUB LEVEL
OFF
OFF
POSITION
ON / OFF
EXIT
MENU
« »
«
»
Page 14
15
5. CHANNEL DELAY feature provides you a variety of sound effect with
delaying signal The user can give a delay to each speaker(C/Ls/Rs). To
adjust the speaker delay, Press OK (A18). You can select a speaker by
using CURSOR UP (A6) /DOWN (A21) buttons.
Its range of delay: C 00ms ~05ms
Ls/Rs 00ms ~ 15ms
6. AVL feature has On/Off according to your preference. This feature
corrects for large volume level changes such as occur when passing
from a movie to advertisements.
7. SPDIF INPUT indicates what input source (AV1/ SVHS1, AV2/SVHS2,
DVD, DTV and NONE) connects to SPDIF. This function will only works
if a Digital Audio output is connected to the TV through Dolby DIGITAL
(AUDIO INPUT) connector. This SPDIF menu indicates where the
SPDIF (Digital audio) can be heard. If you select SPDIF INPUT “DVD”,
then you can listen the sound of SPDIF (digital audio) only when you
select “DVD” through TV/AV button. Otherwise the R/L line input will be
heard.
Ex) You can listen to DVD Line input L/R sound, when you see DVD and
select SPDIF INPUT “AV1/SVHS1, AV2/SVHS2, DTV or None”.
NOTE:
Ensure that SPDIF is set to NONE,if there is no digital audio input
connected.
If by mistake the SPDIF input is selected to one of the input (AV1 AV2 /
DVD / DTV), while there is no digital audio input connected,then no
sound will be heard at that selected input.
Remark: SOUND MODE INDICATION
This feature displays which sound mode operates.
As you know, sound mode is changed according to input source
and listening mode.
SOUND
LISTENING
VOICE CLARITY
SPEAKER SETUP
CHANNEL DELAY
AVL
SPDIF INPUT
SURROUND
OFF
C 00ms
OFF
NONE
POSITION
ADJUST
EXIT
MENU
OK
«
»
Remark: If video signal is not inputed(for example PCM input from audio CD), SOUND mode indication is not displayed.
Dolby Digital 2.0 : Dolby Digital 2CH (R/L)
Dolby PL II : Dolby Pro Logic II
Manufactured under License from Dolby Laboratories,
“Dolby”, “Pro Logic”, and the double-D symbol are trademarks of Dolby Laboratories.
Input Source SPDIF
AV(R/L Input) RF DESCRIPTION
Dolby Digital Dolby Digital PCM
Listening Mode (Except 2.0ch) (2.0)
STEREO Dolby Digital Dolby Digital Not Display Not Display Not Display L/R/SUB Speaker
SURROUND Dolby Digital Dolby Digital Dolby PL II Dolby PL II Dolby PL II All Speaker
Dolby PL II
CONCERT(SURROUND+ Dolby Digital Dolby Digital Dolby PL II Dolby PL II Dolby PL II All Speaker
CONCERT EFFECT) Dolby PL II
JAZZ CLUB(SURROUND+ Dolby Digital Dolby Digital Dolby PL II Dolby PL II Dolby PL II All Speaker
JAZZ CLUB EFFECT) Dolby PL II
CATHEDRAL(SURROUND+
Dolby Digital Dolby Digital Dolby PL II Dolby PL II Dolby PL II All Speaker
CATHEDRAL EFFECT) Dolby PL II
Page 15

16
PROGRAM LIST EDIT
INSTALL MENU
Automatic tuning system
Program list edition
Channel number
Channel Frequency
Channel name
Program number
Program storage number
Country
Channel number
Channel Frequency
Channel name
Program number
Program storage number
INSTALL
ATSS
EDIT
CHANNEL
FREQUENCY
NAME
PROGRAM
STORE TO
AUS
C46
671,25
ABCDEFG
09
09
WARNING : This television has been factory pretuned to channels 2, 7, 9, 10 and 28. If the auto search function
is activated, these preset channels will be deleted and new channels tuned to 1, 2, 3 ETC.
To enter the EDIT menu: From Install menu, select "Edit", and press the OK button
(A18): the EDIT menu appears.
The current program being displayed is highlighted in blue (on the central line). In
the above case, the current program is PR00. The 3 previous, and 3 following
programs, are always displayed. Any program from 00 to 99 can be selected, by
using the remote control CURSOR UP (A6) / DOWN (A21) buttons.
The memorised programs can be modified as follows :
EDIT
PR
03
02
01
00
99
98
97
NAME
-------
-------
ABC
-------
-------
-------
-------
CH
C23
C33
C26
S41
S41
S41
S41
SKIP
Program number
Station name
Channel number
Skip code
: Program skipped
Nothing : Program not skipped
This allows you to easily manipulate the existing program order allocation.
by using EDIT menu functions described below
Channel deleting
- Select the program to delete
using the remote control
CURSOR UP (A6) / DOWN
(A21) buttons.
- Press the remote control
YELLOW "Delete" button
(A26). The deleted program is
moved to program number 99
with skip changed to "YES".
The existing 99 program is
moved to program number 98
and so on.
Channel order changing
- Select the program to move using the
remote control CURSOR UP (A6) /
DOWN (A21) buttons.
- Press the remote control GREEN
"Move" button (A12). The program line
background is highlighted in orange,
and can be moved to another position
using the remote control CURSOR UP
(A6)/ DOWN (A21) buttons.
- When the desired position is reached,
confirm the new position pressing the
remote control GREEN "Confirm"
button (A12). Then the program line
background will return again to gray.
Channel skipping
- You can select skip "YES"
or "NO" using the remote
control RED "Skip" button
(A11). A program with skip
"YES" doesn't appear on
screen when changing
channels with the
PROGRAM UP (A6) /
DOWN (A21) buttons.
Page 16

17
FEATURE MENU
-TO SELECT CHILD LOCK
1) You can prevent the use of the TV set without the remote control.
Press the MENU button to select the FEATURES and press the
Cursor Up (A6)/Down (A21) to select the CHILD LOCK.
2) Press the Cursor Left (A7)/Right (A20) to change CHILD LOCK
on/off.
3) Once the user has set this CHILD LOCK to on or off, it will remain
in this condition until the user changes it again.
-TO SET WAKE TIME & WAKE PROG
It is necessary to have set the clock in order to be able to use this
function. If the CLOCK is not set then the WAKE TIME &WAKE
PROG will not be selectable.
1) Select the WAKE TIME with the Cursor Up (A6)/Down (A21).
2) Press the Cursor Left (A7)/Right (A20) to activate the hour or the
minute and Preset the hour or the minute with the direct number
buttons (A3)
3) After setting a WAKE TIME, you can select WAKE PROG with the
Cursor Left (A7)/Right (A20) or direct number buttons (A3).
-TO SET CLOCK
This function allows user to enter the time manually.
If you turn off the set with the main power button, the clock setting is
lost. An automatic attempt is made to set the clock again at power on.
-SCAN MODE
This function allows user to select 100Hz/PROGRESSIVE (50Hz)
according to your preference.
Remark : This function can be selected in RF & AV PAL signals.
100Hz can not be selected in AV NTSC input or DTV INPUT.
FEATURES
CHILD LOCK
WAKE TIME
WAKE PROG.
CLOCK
SCAN MODE
POSITION
ON/OFF
EXIT
MENU
« »
«
»
ON
OFF
02
12 : 24
100Hz
Page 17

18
SOUND CONTROL
VOLUME ADJUSTMENT
-
If you are unable to get good sound quality for a
program due to poor reception, you can force a
change from stereo to mono transmission by
pressing the remote control MODE button (A14).
Then the program status display will indicate
"MONO" with a icon.
- On the other hand, during a program with dual
language transmission, the MODE button
(A14) allows you to toggle between the first
and second language. The program status
display will indicate "DUAL 1" or "DUAL 2"
(plus NICAM according to the received signal).
- To return to initial state, press again the MODE
button (A14).
Use the remote control VOLUME
UP (A20) / DOWN (A7) buttons or
the TV set front panel VOLUME
UP / DOWN buttons.
MUTE
MONO FORCING, DUAL LANGUAGE
Mute the sound by pressing the remote control SOUND
MUTE button (A2).
Then, logo is displayed. The previous sound setting
is returned after pressing the same button a second
time.
If a sound related function is used (e.g. VOLUME, )
then the MUTE will also be cancelled.
TTVV//AAVV VVOOLL CCHH
MENU
OK
Page 18

19
PICTURE SETTING
PICTURE CONTROL
You can select three pictures settings, by using the remote control NORMAL button (A17)
:
- Normal I (standard hard picture)
- Normal II (standard soft picture)
- Favourite
For other adjustments: BRIGHTNESS, CONTRAST, COLOUR, SHARPNESS, NOISE
REDUCTION, use the PICTURE menu.
If an NTSC signal is received, then the TINT adjustment will also be available.
01
ABC
NORMAL I
18:20
01
ABC
NORMAL II
18:20
01
ABC
FAVOURITE
18:20
PROGRAM STATUS DISPLAY (Recall)
Use the remote control RECALL button
(A16) to display (for 4 seconds only)
program status information. This display
appears also after a program selection
or switching on the TV set.
01
ABC
MONO
18:20
Dolby PLII
Channel name
Sound transmission Mode:
Displayed with forced icon( ) only if
forced to mono by MODE button (A14)
Sound Mode Indication
Channel number
Clock
SLEEP FUNCTION
The set will turn off (to stand-by mode) after a period of time that you can select. By repeated use of the remote control
SLEEP button (A4), you can enter one of the following settings :
OFF > 20 min > 40 min > 60 min > 80 min > 100 min > 120 min > OFF
The SLEEP time remaining (before TV turn-off) can be seen again at any
time by one touch on the remote control SLEEP button (A4).
A second touch (while the status display is active) will modify the SLEEP time
remaining.
01 ABC
STEREO
20
Remaining time (minutes)
before TV set switches off
FORMAT SELECTION
The user can be forced the preferred mode by repeated pressing of the
remote control ZOOM button(A15) :
the following picture formats are available :
STANDARD > PANORAMA > ZOOM 1 > ZOOM 2 > 4 : 3
Remark : This function is not used in DTV INPUT mode.
Page 19

20
TELETEXT
- Select the desired program with teletext.
- Press the remote control TELETEXT ( ) button (A22) to select teletext
mode. The initial page (or the last page viewed if you have already used
teletext in the present channel) appears.
ENTERING / EXIT TELETEXT MODE
PAGE SELECTION
TELETEXT FORMAT PICTURE & SOUND CONTROL
- You can directly enter the 3 figure page number by using the remote control NUMBER 0...9 buttons (A3).
- You can sequentially select teletext pages by pressing the remote control PAGE UP (A6) / DOWN (A21) buttons.
- At the base of the screen a menu of coloured page links is available, showing either page numbers or a title with
headings (eg Sport, News) in RED, GREEN, YELLOW or CYAN colour. These pages can be accessed by using the
corresponding coloured buttons (A11, A12, A26, A25) on the remote control.
Once a request is made, the page number is shown in the extreme top left corner of the screen. If the requested page
is not immediately available the rolling header will be active until the page arrives.
Doubling character height
Repeatedly pressing the HEIGHT button (A23) doubles the character height in
the following order:
Upper half of the page (UP) > Lower half of the page (DOWN) > Return to normal
height.
If the page is in UP or DOWN mode, then normal size is automatically set if :
- A new page request is made (e.g. CYAN, INDEX or PAGE UP/DOWN).
- CANCEL mode (A8) function is used.
- VOLUME menu is activated the with the MENU button (A19).
Note : The menu at the base of the screen is always visible
Volume and brightness control in teletext mode
VOLUME ( and sound MUTE), BRIGHTNESS controls are all possible in teletext. The
BRIGHTNESS controls is dedicated to the teletext display.
- Access the VOLUME control by pressing the MENU button (A19) in teletext mode. A
bar graph will appear in the lower part of the screen (as in TV mode). If MUTE is
active, a mute icon is also shown.
- A second press on the MENU button (A19) will access the BRIGHTNESS control,
and the third press will back to normal condition.
- The active bargraph will timeout after 3-4 seconds (as in TV mode VOLUME control)
or by pressing on the MENU button (A19) third time (after brightness control)
- Each control can be adjusted by using the remote control CURSOR RIGHT (A20) /
LEFT (A7) buttons.
- Mute can always be activated by pressing the SOUND MUTE button (A2).
- Any change to the VOLUME level will cancel the SOUND MUTE.
Page 20
21
USEFUL TELETEXT FUNCTIONS
INDEX button (A18): Allows you to return directly to the
initial teletext page.
SUBPAGE button (A10): Allows you to request a specific subpage:
- Press the SUBPAGE button (A10). At the base of the screen a
SUBPAGE menu will appear. This has a red subpage minus
link, a green subpage plus link, plus a white background
showing (e.g. for page 110), 110 / 0001. This is ready to
accept the subpage number.
- Enter directly the subpage number you want with the remote
control NUMBER 0...9 buttons (A3): for example to request the
2nd subpage, type 0002.
- Alternatively, use the red subpage minus link or the green
subpage plus link.
- The subpage number entered is shown at the base of the screen.
- If the requested page is not immediately available the rolling
header will be active until the page arrives. Warning: If the
subpage is not available (does not exist), then the header will
roll continuously and no new page will be found.
- To exit subpage mode, press the SUBPAGE button (A10) again.
Note : Teletext specification allows for subpage numbers 0000
to 3979 (the first figure is limited to the range 0..3, and
the third figure 0..7).
REVEAL button (A24): Press this button to
reveal, on certain pages, hidden information
such as the answer to a quiz.
- Press the button again to hide the information.
PAGE HOLD button (A9): Any teletext page
or subpage can be held on the screen by
pressing the PAGE HOLD button.
- The page number shown in the extreme top
left corner of the screen will become red.
- Press the HOLD button again to cancel hold
mode (the page number will return to white).
Page 21

22
BEFORE CALLING SERVICE PERSONNEL
Symptoms Correction
Colour is not displayed and net Check the external antenna and cable TV conditions.
pattern is displayed on the specific Check whether you select the correct channel.
channel.
Vertical and horizontal line and net Check the interference wave caused by car, neon sign, and
pattern are displayed on the high frequency.
screen in a moment. Check the strong interference radio wave from wave of
Vibration is also displayed. other devices or radio station. Please stop the use mobile
phone, hair dryer, and electric drill.
Pictures are overlapped and white Check damage of antenna or connection of antenna cable.
and black spots are displayed Check the height and direction of antenna. If it is incorrect,
please adjust the antenna.
The original colours are not displayed Remove from magnetic fields or rotate set until purity error
in a screen in specific areas. disappears.
Picture is displayed irregularly. Check the connection of antenna cable (incorrect connection
or disconnection).
Move this product to another location.
No picture and sound Plug the power cord into the wall outlet securely.
Press the [TV / AV] button to change input mode.
No sound [ ] button may be pressed.
Check the volume.
Check whether SPDIF is selected to one of the input or not
(Refer to Page 15).Select SPDIF to NONE,if there is no
digital audio input connected.
The remote control does not work Check a stoppage of power supply
properly
Check whether the power cord is plugged into the wall
outlet
The batteries in remote control may be exhausted or loaded
in wrong polarity.
Check whether the remote control is too far from the player
and is not pointed at the remote sensor of the player.
Page 22

23
MODEL PF32WT100
TV Standard Colour system PAL, NTSC 3.58 / 4.43 (AV)
Sound system B/G, D/K, I, H, M (AV)
Rated voltage 220-240V ~, 50Hz
Power Power on 160 W
consumption Stand-by 1.2W 10%
Sound Output Main R/L
7W + 7W (10% THD, 80% MOD,At 1KHz,Listening :STEREO)
Power Surround R/L, Center 5W +5W ,5W (10%THD,SPDIF,Dolby Digital -20dBFs,1KHz,
Listening : SURROUND
Woofer
7W (10%THD,SPDIF,Dolby Digital -20dBFs,100Hz,Listening : SURROUND)
BAND : CH0 - CH4 [CH0(46.25 ), CH2(64.25 )]
BAND : CH5 - CH12 [CH7(182.25 ),
Channel VHF CH10(196.25 ), CH10(209.25 )]
Coverage CABLE BAND : S1 - S3 , S1- S20
HYPER BAND : S21 - S41
UHF BAND IV, V : CH21 - CH69 [CH28(527.25 )]
Tuning System Frequency Synthesizer Tuning System
Channel Indication On Screen Display
Program Selection 100 Programs
AV1 RCA Jack
S-VHS 1 (S-Video)
REAR
SPDIF(Coaxial)
Input DVD INPUT, DTV INPUT
Aux, Terminal
SIDE
AV2 RCA Jack
S-VHS 2 (S-Video)
Output REAR
Monitor Out RCA Jack
Surround R/L, Woofer Speaker
Remote Control Unit
R-49C08
(Required two 1.5V battries type with AAA size)
Dimension 890(W) 580(W) 564(D)
Picture Tube 32” WIDE FLAT TYPE
Weight Net weight 57 kg
Gross weight 63 kg
SPECIFICATION
Page 23

NEC Australia Pty. Ltd.
ABN 86 001 217 527
Home Electronics Group
NEC Service Centres PH: 131-632
NEC Australia Pty. Ltd.
Home Electronics Group
244 Beecroft Road EPPING 2121
Tel: 131 632
Fax: (02)9877 2353
NEW South Wales
Sydney 184 Milperra Rd, Revesby 2212 (02)9780 8688
Newcastle 120 Parry Street, Newcastle West 2302 (02)4926 2466
Victoria
Melbourne Unit 1/6 Garden Road, Clayton 3168 (03)8562 6245
Queensland
Brisbane Unit 4/305 Montague Road, WEST END 4101 (07)3840 5858
Southport Shop 1, 48 Ferry Road, Southport 4215 (07)5591 3670
South Australia
Adelaide 84A Richmond Rd, Keswick, 5053 (08)8375 5710
Western Australia
Perth 45 Sarich Court, Osborne Park 6017 (08)9445 5901
For Service in outer areas, please contact your NEC retailer for the address of the nearest
Authorised NEC Service Centre.
P/N : 48586720E101-R0
 Loading...