

NEC NVM-2e, NVM-DS Quick Setup Manual

NVM-2e
with i-Series
Quick Setup Guide
2.01
Read Chapter 1: Introduction, to:
• Learn about the NVM-2e Voice Mail System (page 1).
Read Chapter 2: Installing the Voice Mail, to:
• Install the Voice Mail Hardware (page 8).
• Connect a laptop to the Voice Mail (page 9).
• Connect the Voice Mail to the phone system (page 10).
Read Chapter 3: Phone System Programming, to:
• Learn how to program your telephone system for Voice Mail (page 11).
Read Chapter 4: Programming the Voice Mail, to:
• Follow basic programming steps to get Voice Mail up and running (page 15).
Read Chapter 5: End-User Operation, to:
• Operate the Voice Mail (page 35).
Read Chapter 6: NVM-2e Menu Trees, to:
• Learn about the NVM-2e Menu Trees and the functions that you can perform
from each menu (page 41).
Read Appendix A: Application Notes, to:
• Learn about sev eral unique applications that s how the Voice Mail’s power and
flexibility (page 47).

This manual has been developed by NEC America, Inc. It is intended for the use of its customers and service personnel, and
should be read in its entirety before attempting to install or program the system. Any comments or suggestions for imp r oving
this manual would be appreciated. Forward your remarks to:
NEC America, Inc., Corp orate Networks Group
4 Forest Parkway Shelton, CT 06484
Attention: Manager, Technical Publications
http://www.cng.nec.com
Nothing contained in this manual shall be dee m ed to be, and this manual does not constitute, a warranty of, or representation
with respect to, any of the Equipment covered. This manua l is subject to change withou t notice and NEC America, Inc. has
no obligation to provide any updates or corrections to this manual. Further, NEC America, Inc. also reserve s the right,
without prior notice, to make changes in equ ipment design or components as it deems appropriate. No repre sentation is made
that this manual is complete or accurate in all respects and NEC America, Inc. shall not be liable for any errors or omissions.
In no event shall NEC America, Inc. be liable for any incidental or consequential damages in connection with the use of this
manual. This document contains proprietary informat ion that is protecte d by copyright. All rights are reserved. No part of this
document may be photocopied or reproduced without prior written consent of NEC America, Inc.
© 2002 by NEC America, Inc. All Rights Reserved
Printed in U.S.A.

Table of Cont ents NVM- 2e/i- Series Quick Setup G uide ◆ TOC-i
Table of Contents
Chapter 1:
Introduction . . . . . . . . . . . . . . . . . . . . . . . . . . . . . . . . . . . . . . . . . . . . . . . . . . . . 1
About the Voice Mail System . . . . . . . . . . . . . . . . . . . . . . . . . . . . . . . . . . . . . . . . . . . .1
NVM-2e Voice Mail System . . . . . . . . . . . . . . . . . . . . . . . . . . . . . . . . . . . . . . . . . . . . . . . . . . . . . . 1
The Automated Attendant and the Instruction Menu . . . . . . . . . . . . . . . . . . . . . . . . .1
Subscriber Mailboxes. . . . . . . . . . . . . . . . . . . . . . . . . . . . . . . . . . . . . . . . . . . . . . . . . 1
Default Numbering and Mailbox Assignments . . . . . . . . . . . . . . . . . . . . . . . . . . . . . .1
The NVM-2e Cabinet. . . . . . . . . . . . . . . . . . . . . . . . . . . . . . . . . . . . . . . . . . . . . . . . . . . . . . . . . . . . 2
The Communication Port (COM 2) . . . . . . . . . . . . . . . . . . . . . . . . . . . . . . . . . . . . . . . . . . . . . . . . .2
Specifications. . . . . . . . . . . . . . . . . . . . . . . . . . . . . . . . . . . . . . . . . . . . . . . . . . . . . . . . . . . . . . . . . . 3
Chapter 2:
Installing the Voice Mail . . . . . . . . . . . . . . . . . . . . . . . . . . . . . . . . . . . . . . . . . . 5
Overview . . . . . . . . . . . . . . . . . . . . . . . . . . . . . . . . . . . . . . . . . . . . . . . . . . . . . . . . . . . . .5
Installation Requirements . . . . . . . . . . . . . . . . . . . . . . . . . . . . . . . . . . . . . . . . . . . . . . 6
Unpacking the Equipment . . . . . . . . . . . . . . . . . . . . . . . . . . . . . . . . . . . . . . . . . . . . . . . . . . . . . . . . 6
General Equipment Requirements . . . . . . . . . . . . . . . . . . . . . . . . . . . . . . . . . . . . . . . . . . . . . . . . . .6
Phone System Requirements . . . . . . . . . . . . . . . . . . . . . . . . . . . . . . . . . . . . . . . . . . . . . . . . . . . . . . 6
Site Requirements . . . . . . . . . . . . . . . . . . . . . . . . . . . . . . . . . . . . . . . . . . . . . . . . . . . . . . . . . . . . . . 7
Installing the Voice Mail Hardware . . . . . . . . . . . . . . . . . . . . . . . . . . . . . . . . . . . . . . . 8
Connecting a Laptop to the Voice Mail . . . . . . . . . . . . . . . . . . . . . . . . . . . . . . . . . . . . . . . . . . . . . . . . . . . . . 9
Connecting the Voice Mail to a Phone System . . . . . . . . . . . . . . . . . . . . . . . . . . . . 10
Connecting to the i-Series Phone System. . . . . . . . . . . . . . . . . . . . . . . . . . . . . . . . . . . . . . . . . . . . . . . . . . . 10

TOC-ii ◆ NVM-2e/i-Series Quick Setup Guide Table of Contents
Chapter 3:
Phone System Programming . . . . . . . . . . . . . . . . . . . . . . . . . . . . . . . . . . . . . 11
Overview . . . . . . . . . . . . . . . . . . . . . . . . . . . . . . . . . . . . . . . . . . . . . . . . . . . . . . . . . . . 11
Phone System Programming . . . . . . . . . . . . . . . . . . . . . . . . . . . . . . . . . . . . . . . . . . .1 2
Voice Mail Required Hardware and Software. . . . . . . . . . . . . . . . . . . . . . . . . . . . . . . . . . . . . . . . 12
Phone System Hardware and Software Requirements. . . . . . . . . . . . . . . . . . . . . . . . . . . . . . . . . . 12
Hardware . . . . . . . . . . . . . . . . . . . . . . . . . . . . . . . . . . . . . . . . . . . . . . . . . . . . . . . . . 12
Software . . . . . . . . . . . . . . . . . . . . . . . . . . . . . . . . . . . . . . . . . . . . . . . . . . . . . . . . . . .12
Required Phone System Programming . . . . . . . . . . . . . . . . . . . . . . . . . . . . . . . . . . . . . . . . . . . . . 12
Optional Phone System Programming. . . . . . . . . . . . . . . . . . . . . . . . . . . . . . . . . . . . . . . . . . . . . . 14
Chapter 4:
Programming the Voice Mail . . . . . . . . . . . . . . . . . . . . . . . . . . . . . . . . . . . . . 15
Overview . . . . . . . . . . . . . . . . . . . . . . . . . . . . . . . . . . . . . . . . . . . . . . . . . . . . . . . . . . . .15
Initializing the Voice Mail for Your Phone System . . . . . . . . . . . . . . . . . . . . . . . . . 16
Installing the Phone System. . . . . . . . . . . . . . . . . . . . . . . . . . . . . . . . . . . . . . . . . . . . . . . . . . . . . . 16
Default Setup for the Voice Mail . . . . . . . . . . . . . . . . . . . . . . . . . . . . . . . . . . . . . . . . 17
Testing the Voice Mail . . . . . . . . . . . . . . . . . . . . . . . . . . . . . . . . . . . . . . . . . . . . . . . . 18
Modifying the Time and Date. . . . . . . . . . . . . . . . . . . . . . . . . . . . . . . . . . . . . . . . . . . 19
Default . . . . . . . . . . . . . . . . . . . . . . . . . . . . . . . . . . . . . . . . . . . . . . . . . . . . . . . . . . . . . . . . . . . . . . 19
Modifications to Default . . . . . . . . . . . . . . . . . . . . . . . . . . . . . . . . . . . . . . . . . . . . . . . . . . . . . . . . 19
Setting the Time and Date . . . . . . . . . . . . . . . . . . . . . . . . . . . . . . . . . . . . . . . . . . . . . . . . . . . . . . . 19
For more information. . . . . . . . . . . . . . . . . . . . . . . . . . . . . . . . . . . . . . . . . . . . . . . . . . . . . . . . . . . 19
Basic Voice Mail Programming. . . . . . . . . . . . . . . . . . . . . . . . . . . . . . . . . . . . . . . . . 19
Checking the Default Automated Attendant . . . . . . . . . . . . . . . . . . . . . . . . . . . . . . . . . . . . . . . . . . . . . . . . 20
About Call Routing Mailboxes . . . . . . . . . . . . . . . . . . . . . . . . . . . . . . . . . . . . . . . . . . . . . . . . . . . 20
About Answering Schedule Tables . . . . . . . . . . . . . . . . . . . . . . . . . . . . . . . . . . . . . . . . . . . . . . . . 20
Default . . . . . . . . . . . . . . . . . . . . . . . . . . . . . . . . . . . . . . . . . . . . . . . . . . . . . . . . . . . . . . . . . . . . . . 21
Modifications to Default . . . . . . . . . . . . . . . . . . . . . . . . . . . . . . . . . . . . . . . . . . . . . . . . . . . . . . . . 22
Programming . . . . . . . . . . . . . . . . . . . . . . . . . . . . . . . . . . . . . . . . . . . . . . . . . . . . . . . . . . . . . . . . . 22
For more information. . . . . . . . . . . . . . . . . . . . . . . . . . . . . . . . . . . . . . . . . . . . . . . . . . . . . . . . . . . 22

Table of Cont ents NVM-2e/i-Series Quick Setup Guide ◆ TOC-iii
Assigning Answering Schedule Tables to Ports or Trunks . . . . . . . . . . . . . . . . . . . . . . . . . . . . . . . . . . . . . 23
Default . . . . . . . . . . . . . . . . . . . . . . . . . . . . . . . . . . . . . . . . . . . . . . . . . . . . . . . . . . . . . . . . . . . . . . 23
Modifications to Default . . . . . . . . . . . . . . . . . . . . . . . . . . . . . . . . . . . . . . . . . . . . . . . . . . . . . . . . 23
Programming . . . . . . . . . . . . . . . . . . . . . . . . . . . . . . . . . . . . . . . . . . . . . . . . . . . . . . . . . . . . . . . . . 23
For more information. . . . . . . . . . . . . . . . . . . . . . . . . . . . . . . . . . . . . . . . . . . . . . . . . . . . . . . . . . . 23
Completing the AST Worksheet . . . . . . . . . . . . . . . . . . . . . . . . . . . . . . . . . . . . . . . . . . . . . . . . . . . . . . . . . 24
Default . . . . . . . . . . . . . . . . . . . . . . . . . . . . . . . . . . . . . . . . . . . . . . . . . . . . . . . . . . . . . . . . . . . . . . 24
Modifications to Default . . . . . . . . . . . . . . . . . . . . . . . . . . . . . . . . . . . . . . . . . . . . . . . . . . . . . . . . 25
Programming . . . . . . . . . . . . . . . . . . . . . . . . . . . . . . . . . . . . . . . . . . . . . . . . . . . . . . . . . . . . . . . . . 25
For more information. . . . . . . . . . . . . . . . . . . . . . . . . . . . . . . . . . . . . . . . . . . . . . . . . . . . . . . . . . . 25
Creating and/or Customizing the Call Routing Mailboxe s . . . . . . . . . . . . . . . . . . . . . . . . . . . . . . . . . . . . . 26
Default . . . . . . . . . . . . . . . . . . . . . . . . . . . . . . . . . . . . . . . . . . . . . . . . . . . . . . . . . . . . . . . . . . . . . . 26
Modifications to Default . . . . . . . . . . . . . . . . . . . . . . . . . . . . . . . . . . . . . . . . . . . . . . . . . . . . . . . . .26
Programming . . . . . . . . . . . . . . . . . . . . . . . . . . . . . . . . . . . . . . . . . . . . . . . . . . . . . . . . . . . . . . . . . .26
For more information . . . . . . . . . . . . . . . . . . . . . . . . . . . . . . . . . . . . . . . . . . . . . . . . . . . . . . . . . . .26
Programming the ASTs . . . . . . . . . . . . . . . . . . . . . . . . . . . . . . . . . . . . . . . . . . . . . . . .27
Default . . . . . . . . . . . . . . . . . . . . . . . . . . . . . . . . . . . . . . . . . . . . . . . . . . . . . . . . . . . . . . . . . . . . . . 27
Modifications to Default . . . . . . . . . . . . . . . . . . . . . . . . . . . . . . . . . . . . . . . . . . . . . . . . . . . . . . . . 27
Programming . . . . . . . . . . . . . . . . . . . . . . . . . . . . . . . . . . . . . . . . . . . . . . . . . . . . . . . . . . . . . . . . . .27
For more information. . . . . . . . . . . . . . . . . . . . . . . . . . . . . . . . . . . . . . . . . . . . . . . . . . . . . . . . . . . 27
Modifying the Dial Action Tables . . . . . . . . . . . . . . . . . . . . . . . . . . . . . . . . . . . . . . . 28
Default . . . . . . . . . . . . . . . . . . . . . . . . . . . . . . . . . . . . . . . . . . . . . . . . . . . . . . . . . . . . . . . . . . . . . . .28
Default Dial Action Tables for i-Series . . . . . . . . . . . . . . . . . . . . . . . . . . . . . . . . . . . . . . . . . . . . .29
Modifications to Default . . . . . . . . . . . . . . . . . . . . . . . . . . . . . . . . . . . . . . . . . . . . . . . . . . . . . . . . 30
Programming . . . . . . . . . . . . . . . . . . . . . . . . . . . . . . . . . . . . . . . . . . . . . . . . . . . . . . . . . . . . . . . . . 31
For more information. . . . . . . . . . . . . . . . . . . . . . . . . . . . . . . . . . . . . . . . . . . . . . . . . . . . . . . . . . . 31
Modifying Instruction Menus. . . . . . . . . . . . . . . . . . . . . . . . . . . . . . . . . . . . . . . . . . . .32
Modifying Instruction Menus (Main Greeting Portion) . . . . . . . . . . . . . . . . . . . . . . . . . . . . . . . . . . . . . . . . 3 2
Default . . . . . . . . . . . . . . . . . . . . . . . . . . . . . . . . . . . . . . . . . . . . . . . . . . . . . . . . . . . . . . . . . . . . . . 32
Modifications to Default . . . . . . . . . . . . . . . . . . . . . . . . . . . . . . . . . . . . . . . . . . . . . . . . . . . . . . . . .32
Modifying Instruction Menus (Dialing Options Portion) . . . . . . . . . . . . . . . . . . . . . . . . . . . . . . . . . . . . . . .33
Default . . . . . . . . . . . . . . . . . . . . . . . . . . . . . . . . . . . . . . . . . . . . . . . . . . . . . . . . . . . . . . . . . . . . . . .33
Modifications to Default . . . . . . . . . . . . . . . . . . . . . . . . . . . . . . . . . . . . . . . . . . . . . . . . . . . . . . . . 33
Programming . . . . . . . . . . . . . . . . . . . . . . . . . . . . . . . . . . . . . . . . . . . . . . . . . . . . . . . . . . . . . . . . . .33
For more information. . . . . . . . . . . . . . . . . . . . . . . . . . . . . . . . . . . . . . . . . . . . . . . . . . . . . . . . . . . 33
Recording Names for the Subscriber Mailboxes . . . . . . . . . . . . . . . . . . . . . . . . . . .34
Default . . . . . . . . . . . . . . . . . . . . . . . . . . . . . . . . . . . . . . . . . . . . . . . . . . . . . . . . . . . . . . . . . . . . . . 34
Modifications to Default . . . . . . . . . . . . . . . . . . . . . . . . . . . . . . . . . . . . . . . . . . . . . . . . . . . . . . . . .34
Programming . . . . . . . . . . . . . . . . . . . . . . . . . . . . . . . . . . . . . . . . . . . . . . . . . . . . . . . . . . . . . . . . . 34
For more information . . . . . . . . . . . . . . . . . . . . . . . . . . . . . . . . . . . . . . . . . . . . . . . . . . . . . . . . . . .34

TOC-iv ◆ NVM-2e/i-Series Quick Setup Guide Table of Contents
Chapter 5:
End-User Operation. . . . . . . . . . . . . . . . . . . . . . . . . . . . . . . . . . . . . . . . . . . . . 35
Overview . . . . . . . . . . . . . . . . . . . . . . . . . . . . . . . . . . . . . . . . . . . . . . . . . . . . . . . . . . . .35
Telling Subscribers About the Master Extension . . . . . . . . . . . . . . . . . . . . . . . . . . 36
Using the Voice Mail. . . . . . . . . . . . . . . . . . . . . . . . . . . . . . . . . . . . . . . . . . . . . . . . . . 36
Calling Your Mailbox . . . . . . . . . . . . . . . . . . . . . . . . . . . . . . . . . . . . . . . . . . . . . . . . . . . . . . . . . . 36
Leaving a Message (Keyset only) . . . . . . . . . . . . . . . . . . . . . . . . . . . . . . . . . . . . . . . . . . . . . . . . . .36
Forwarding Calls to your Mailbox . . . . . . . . . . . . . . . . . . . . . . . . . . . . . . . . . . . . . . . . . . . . . . . . .37
Transferring Calls to a Mailbox . . . . . . . . . . . . . . . . . . . . . . . . . . . . . . . . . . . . . . . . . . . . . . . . . . .37
Recording your call . . . . . . . . . . . . . . . . . . . . . . . . . . . . . . . . . . . . . . . . . . . . . . . . . . . . . . . . . . . . .38
Person a l A n sw er i n g M ac hine Emu la ti o n ( K ey set Only). . . . . . . . . . . . . . . . . . . . . . . . . . . . . . . . 38
Checking Your Messages (Keyset Only) . . . . . . . . . . . . . . . . . . . . . . . . . . . . . . . . . . . . . . . . . . . .39
Chapter 6:
NVM-2e Menu Trees . . . . . . . . . . . . . . . . . . . . . . . . . . . . . . . . . . . . . . . . . . . . 41
Overview . . . . . . . . . . . . . . . . . . . . . . . . . . . . . . . . . . . . . . . . . . . . . . . . . . . . . . . . . . . .41
NVM-2e Menu Trees. . . . . . . . . . . . . . . . . . . . . . . . . . . . . . . . . . . . . . . . . . . . . . . . . . 42
User’s Menu . . . . . . . . . . . . . . . . . . . . . . . . . . . . . . . . . . . . . . . . . . . . . . . . . . . . . . . . . . . . . . . . . . . . . . . . . .42
System Administrator Menu. . . . . . . . . . . . . . . . . . . . . . . . . . . . . . . . . . . . . . . . . . . . . . . . . . . . . . . . . . . . . 43
Database Management Menu (Sheet 1) . . . . . . . . . . . . . . . . . . . . . . . . . . . . . . . . . . . . . . . . . . . . . . . . . . . . .44
Database Management Menu (Sheet 2) . . . . . . . . . . . . . . . . . . . . . . . . . . . . . . . . . . . . . . . . . . . . . . . . . . . . 45
Database Management Menu (Sheet 3) . . . . . . . . . . . . . . . . . . . . . . . . . . . . . . . . . . . . . . . . . . . . . . . . . . . . .46
Appendix A:
Application Notes . . . . . . . . . . . . . . . . . . . . . . . . . . . . . . . . . . . . . . . . . . . . . . 47
Overview . . . . . . . . . . . . . . . . . . . . . . . . . . . . . . . . . . . . . . . . . . . . . . . . . . . . . . . . . . . .47
Application Note ANV0004A . . . . . . . . . . . . . . . . . . . . . . . . . . . . . . . . . . . . . . . . . . . .48
One Company , wit h A u to A tt en d an t on ly An s w er i n g C al ls A t N i ght . . . . . . . . . . . . . . . . . . . . . . . . . . . . . 48
Application Note ANV00005A . . . . . . . . . . . . . . . . . . . . . . . . . . . . . . . . . . . . . . . . . . .50
One Company, with Auto Attendant Answering Calls Day & Night . . . . . . . . . . . . . . . . . . . . . . . . . . . . . 50
Application Note ANV00006A . . . . . . . . . . . . . . . . . . . . . . . . . . . . . . . . . . . . . . . . . . 52
One Company, with Auto Attendant Answering Calls Day & Night . . . . . . . . . . . . . . . . . . . . . . . . . . . . . 52

Chapter 1: In troduc tio n NVM-2e/i-Series Quick Setup Guide ◆ 1
Chapter 1:
Introduction
About the Voice Mail System
About the Voice Mail System
NVM-2e Voice Mail System
Welcome to the NVM-2e Voice Mail syste m!
The Automated Attendant and the Instruction Menu
After you install your NVM-2e Voice Mail system and perform some simple programming, you
will ha ve an Automated Attendant who answers calls, using the rec or d ed default main greeting
from the Instructi on Menu. This menu typically begins with the Thank you for calli n g greeting,
and a list of dialing options follows this greeting. The Automated Attendant lets outside callers
press digits on their Touch Tone phones to process their ow n ca lls. A caller can also lea ve a
recor d ed message for an extension, when the extension is busy, does not answer, or is in the Do N ot
Disturb mode. Or t he calle r can re turn to th e Aut omated Att endant for more d ialing options . If you
wish, you can customize the greeting and the dialing options in the Instruction Menu.
Subscriber Mailboxes
In addition, t he NVM-2e Voice Mail s ystem pro vides a Subs cribe r Ma ilbox f or up to 50 ex ten sions.
This Subscriber Mailbox holds the recorded me s sa ges, lets the extension users record and send
messages to each other, and offers many other features. The Voice Mail lets exte ns ion users know
when they have ne w messages in their Subscriber Mailboxes by lighting the Message Lamp on key
phones.
Default Numbering and Mailbox Assignments
The default numbering of the Subscriber Mailboxes in the NVM-2e depends on the phone system
that you install, but the default Voice Mail for every phone system provides a total of 49 Subscriber
Mailboxes. (One extension number is reserv ed for c onnecting a FAX machine.) If you wish, you
can change thes e mailbox assignments.
About the Voice Mail System
2 ◆ NVM-2e/i-Series Quick Setup Guide Chapter 1: Introduction
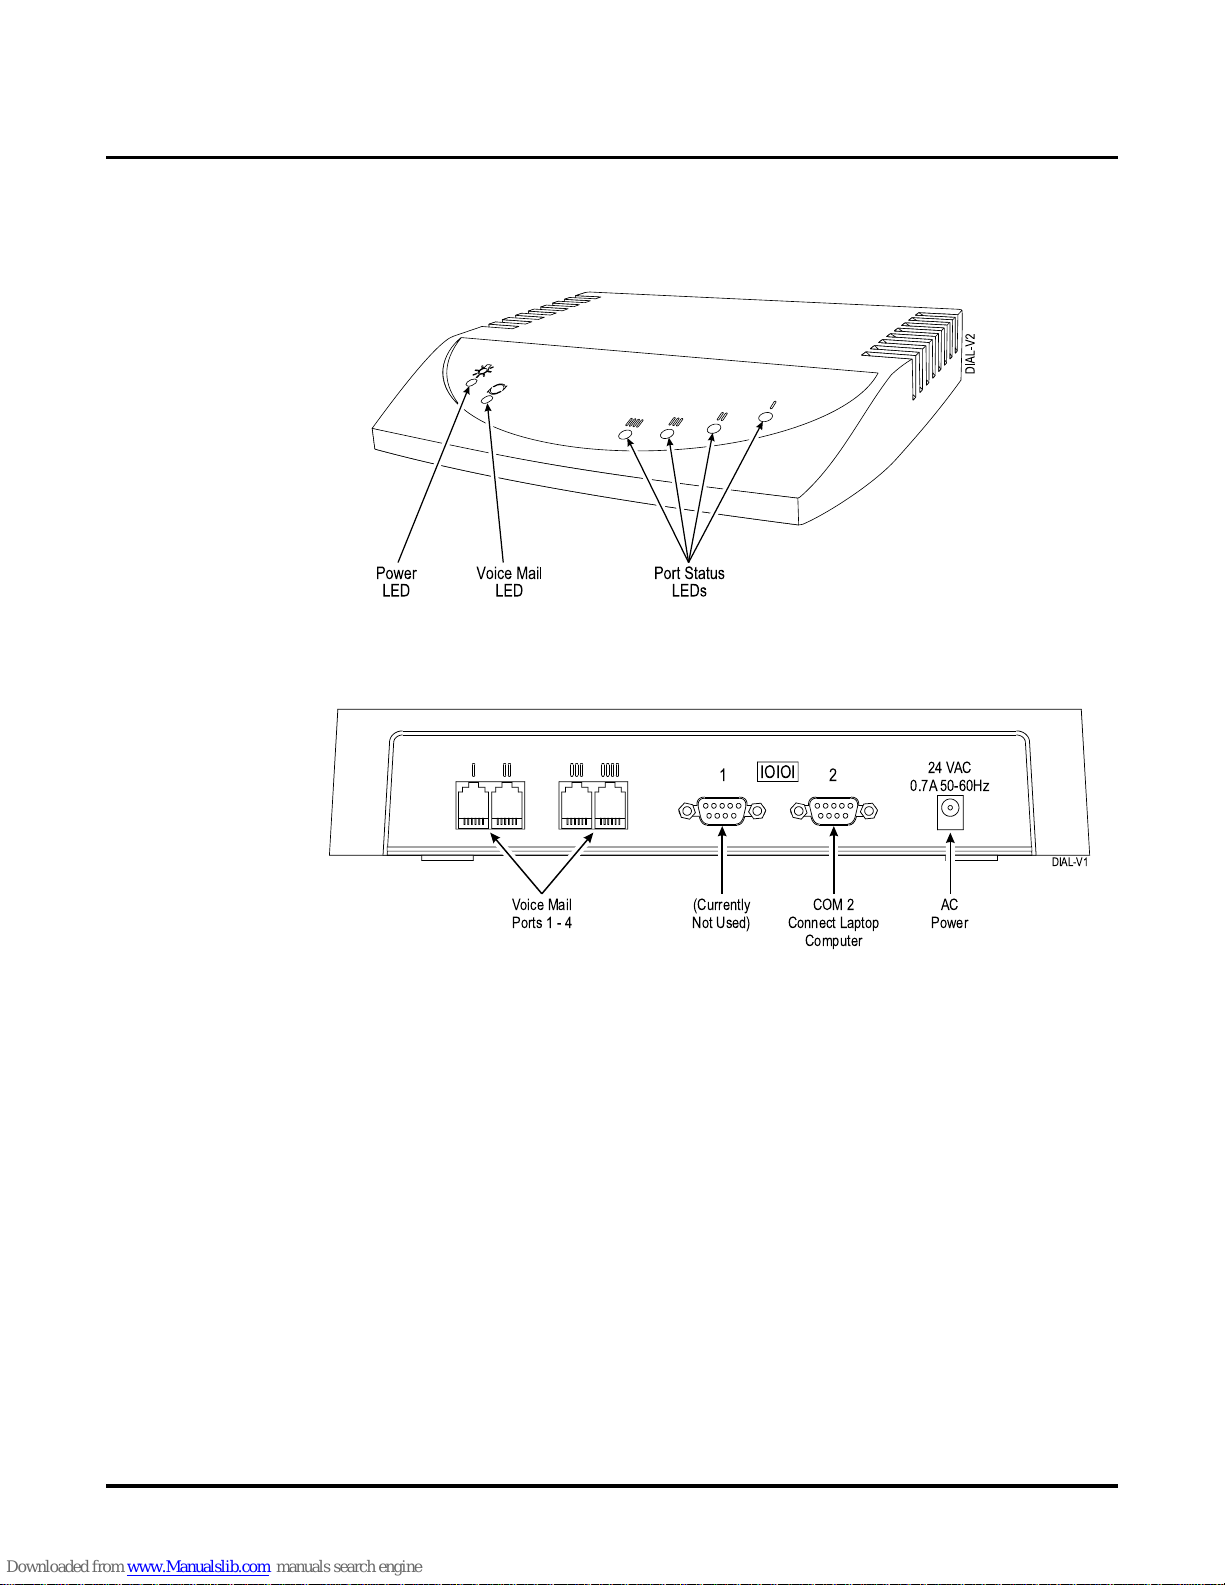
The NVM-2e Cabinet
Figure 1 and Figure 2 show the front and the back of the NVM-2e cabinet.
Figure 1: Front - NVM - 2e Voice Mail Ca bi net
Figure 2: Back - NVM-2e Voice Mail Cabinet
The Communication Port (COM 2)
To program the NVM-2e Voice Mail system, you can use COM 2 (shown in Figure 2) with a
terminal emulat ion software, such as ProCom Plus or Hyper Terminal , which is installed on a
laptop computer.
12
24 VAC
0.7A 50-60Hz
IOIOI
DIAL-V1
Voice Mail
Ports1-4
AC
Power
(Currently
Not Used)
COM 2
Connect Laptop
Computer

About the Voice Mail System
Chapter 1: Introduction NVM-2e/i-Series Quick Setup Guide ◆ 3
Specifications
Cabinet Dimensions Length: 12 13/16 inches
Width: 9 15/16 inches
Height: 2 inches
Weight: 5 lb.
Ports 2 or 4
Voice Storage 3 hours
Mailboxes 66 (See page 17)
Maximum Tenants 1
Answering Schedule Tables 2 (with software version 2.0)
1 (with software version prior to 2.0)
Dial Action Tables 4
Telephone System Interface One Analog Station Port for Each Voice
Mail Port
Programming Phone system single line extension or
direct connection to RS-232C port
Electrical Requirements 105 - 120 VAC, 60 Hz
Environmental Requirements
Room Temperature
Humidity
Dust
50-104oF (10-40oC)
20-85% non-condensing
No visible accumulation within 24 hours
Reliability Designed to meet 50,000 hours MTBF
Safety Approv a ls UL, CSA
EMI Emiss i o n s Complies with FCC part 15, class A

About the Voice Mail System
4 ◆ NVM-2e/i-Series Quick Setup Guide Chapter 1: Introduction

Overview
Chapt er 2: Installing the Voice Mail NVM-2e/i-Series Quick Setup Guide ◆ 5
Chapter 2:
Installing the
Voice Mail
Overvi ew
Overview
This chapter te lls you how to install your NVM-2e Voice Mail. Specifically, you find instructions
for:
1. Installation Requirements (page 6)
2. Installing the Voice Mail Hardware (page 8)
3. Connecting a Laptop to the Voice Mail (page 9)
4. Connecting the Voice Mail to the i-Series Phone System (page 10)

Installation Requirements
Unpacking the Equipment
6 ◆ NVM-2e/i-Series Quick Setup Guide Chapter 2: Installing the Voice Mail
Unpacking the EquipmentInstallation Requirements
Unpacking the Equipment
Unpacking the Equipment
Unpack the Voice Mail equipment and make sur e you ha ve the following items:
● NVM-2e Voice Mail cabinet (P/N 17780)
● External power supply
General Equipment Requirements
You will als o need the following items:
● Standard Telecom tool s, including a Phillips -head screwdriver
● ESD wrist strap (to be worn at all times)
● Laptop or other IBM-comp atible computer containing a standard communications software
program, such as Procomm Plus
● Surge Protector
● Standard sheet rock (dry-wall) screws, a center-hole punch (or other pointed tool), tape, and
hammer
● RJ-45 null modem cable
● The manuals for your telephone system
Phone System Requirements
Each Voice Mail port must be connected to an analog extension circui t in the phone system. You
may connect the Voice Mail port directly to the analog sta tio n port or to a port on a 2-OPX Module .
For each Voice Mail port, you may use:
- at least one modular li ne cord
- a port on a 2-OPX Module (if desired)
- cross-connec t wire and modular jack assemblies (see the phone system manual for details).

Installation Requirements
Site Requirements
Chapt er 2: Installing the Voice Mail NVM-2e/i-Series Quick Setup Guide ◆ 7
Installation Requirements
Site Requirements
Site Requirements
Be sure to provi de the following conditions:
● A dust-free site, far away from large motors
● Adequate ventilation for the cabinet
● Adequate space above and below if you plan to wall-mount the cabinet
● Temperature of 50–104°F (10–40°C)
● Non-condensing humi dity of 28– 85%
● 10-90% relative humidity (non-condensing).
● Do not place anything on top of this unit or obscure the vents.
● Do not expose this pr oduct to rain or any type of moisture.
● Do not locate the unit near heating applianc es .
● Do not expose the operating unit to direct sunlight.
● Locat e the unit away fro m dev ic e s th at gener ate ele ct r ical noi se li ke fl uo r escen t la m p s an d
motors.
● Protect the unit from dust, high temperat ures , and vibration.
● Do not place any covering over the unit while it is in operation/
● Do not obstruct the ventilation holes on the sides of the unit.
● Allow at least two inch es o f clearanc e fro m an y adj a c en t sur fa ce .
● Request outside lines with open loop flash disconnect supervis ion from the phone company.
Outside lines with open loop disconnect supervi s ion prevent the recording of unwanted
silence. This can happen when an Automated Attendant caller records a message and then
hangs up, but the Voice Mail is unabl e to detect the hangup. To test your system, call in and
wait for the Autom ated Attendan t to to ans wer , and then ha ng up. See if the port drops (hangs
up).
Request that your telephone compan y apply an open loop of at l ea st 300 milliseconds. If this
feature is not available in the area, request that continuous dial tone be sent upon disconnect
from the far end (that is when an Automated Attendant calle r hangs up).
IMPORTANT
Take care of this Voice M ail Syste m by ob serving al l s i te re qu i r ements list ed be l ow.
Failure to do so may harm th e rel iability and continued operation of the equipmen t.
Installing the Voice Mail Hardware
8 ◆ NVM-2e/i-Series Quick Setup Guide Chapter 2: Installing the Voice Mail
Installin g the Voi ce Mail H ardware
To install the Voice Mail:
1. Place the Voice Mail on any sturdy flat surface.
OR
Mount the Voice Mail on a wall, using the screw slots located on the bottom of the cabinet.
Make sure that the ventila tion slots are not blocked. Position the cabinet so that LEDs can be
seen. The LEDs are li t w h en :
- the unit has power (Powe r LED)
- the Voice Mail is initializing (Voice Mail LED)
- a particular Voice Mail port is busy (Power Status LEDs).
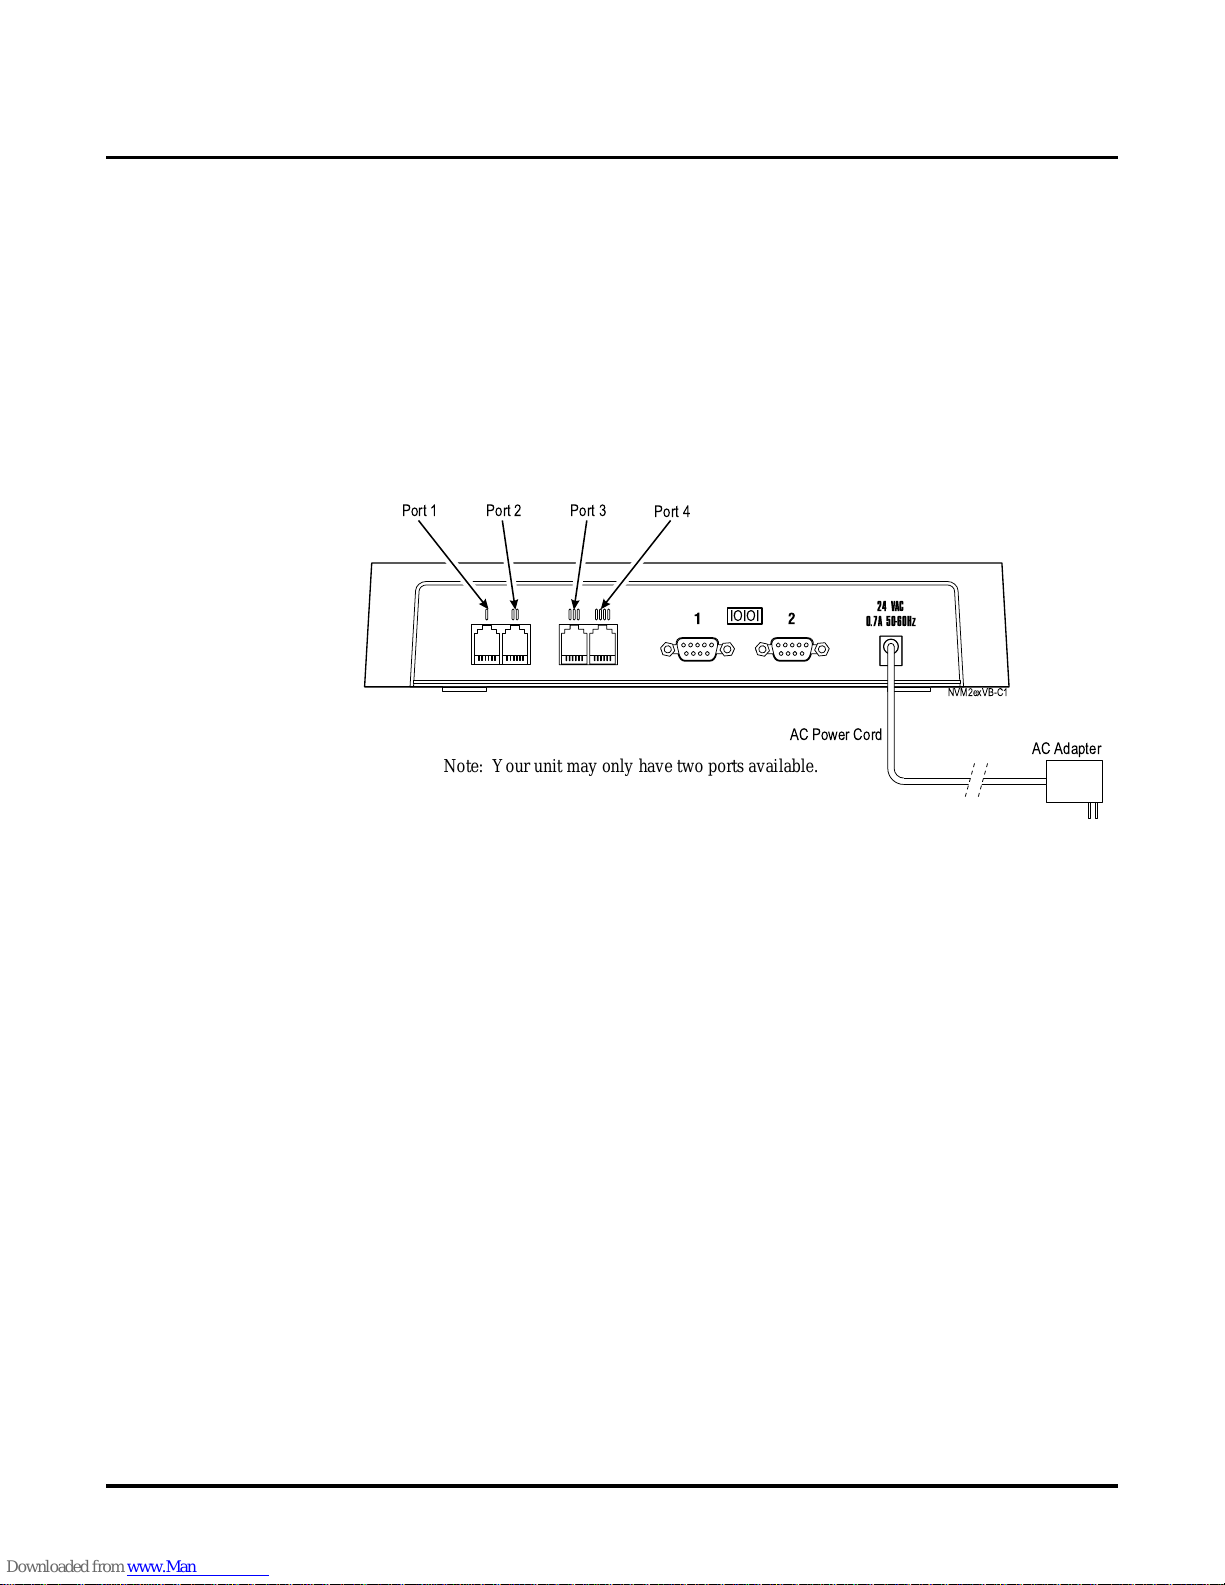
2. Plug the Voice Mail power supply cord into the connector labele d 24 VAC. Plug the AC
Adapter into a 120 V, 60 Hz grounded outlet. See Figure 3.
Figure 3: Installing the NVM-2e Voice Mail System
12
24 VAC
0.7A 50-60Hz
IOIOI
NVM2exVB-C1
Port 2
Port 4
Port 1
Port 3
AC Adapter
AC Power Cord
Note: Your un it m a y only have two po rts av ai la b le.
Installing the Voice Mail Hardware
Connecting a Laptop to the Voice Mail
Chapt er 2: Installing the Voice Mail NVM-2e/i-Series Quick Setup Guide ◆ 9
Connecting a Laptop to the Voice Mail
Connecting a Laptop to the Voice Mail
You need a laptop computer to modify certain Voice Mail parameters that you ca nnot program
through a System Administrator Mailbox, such as mailbox numbers, port options, and various system options. You also need a laptop computer to view reports or perform diagnostics.
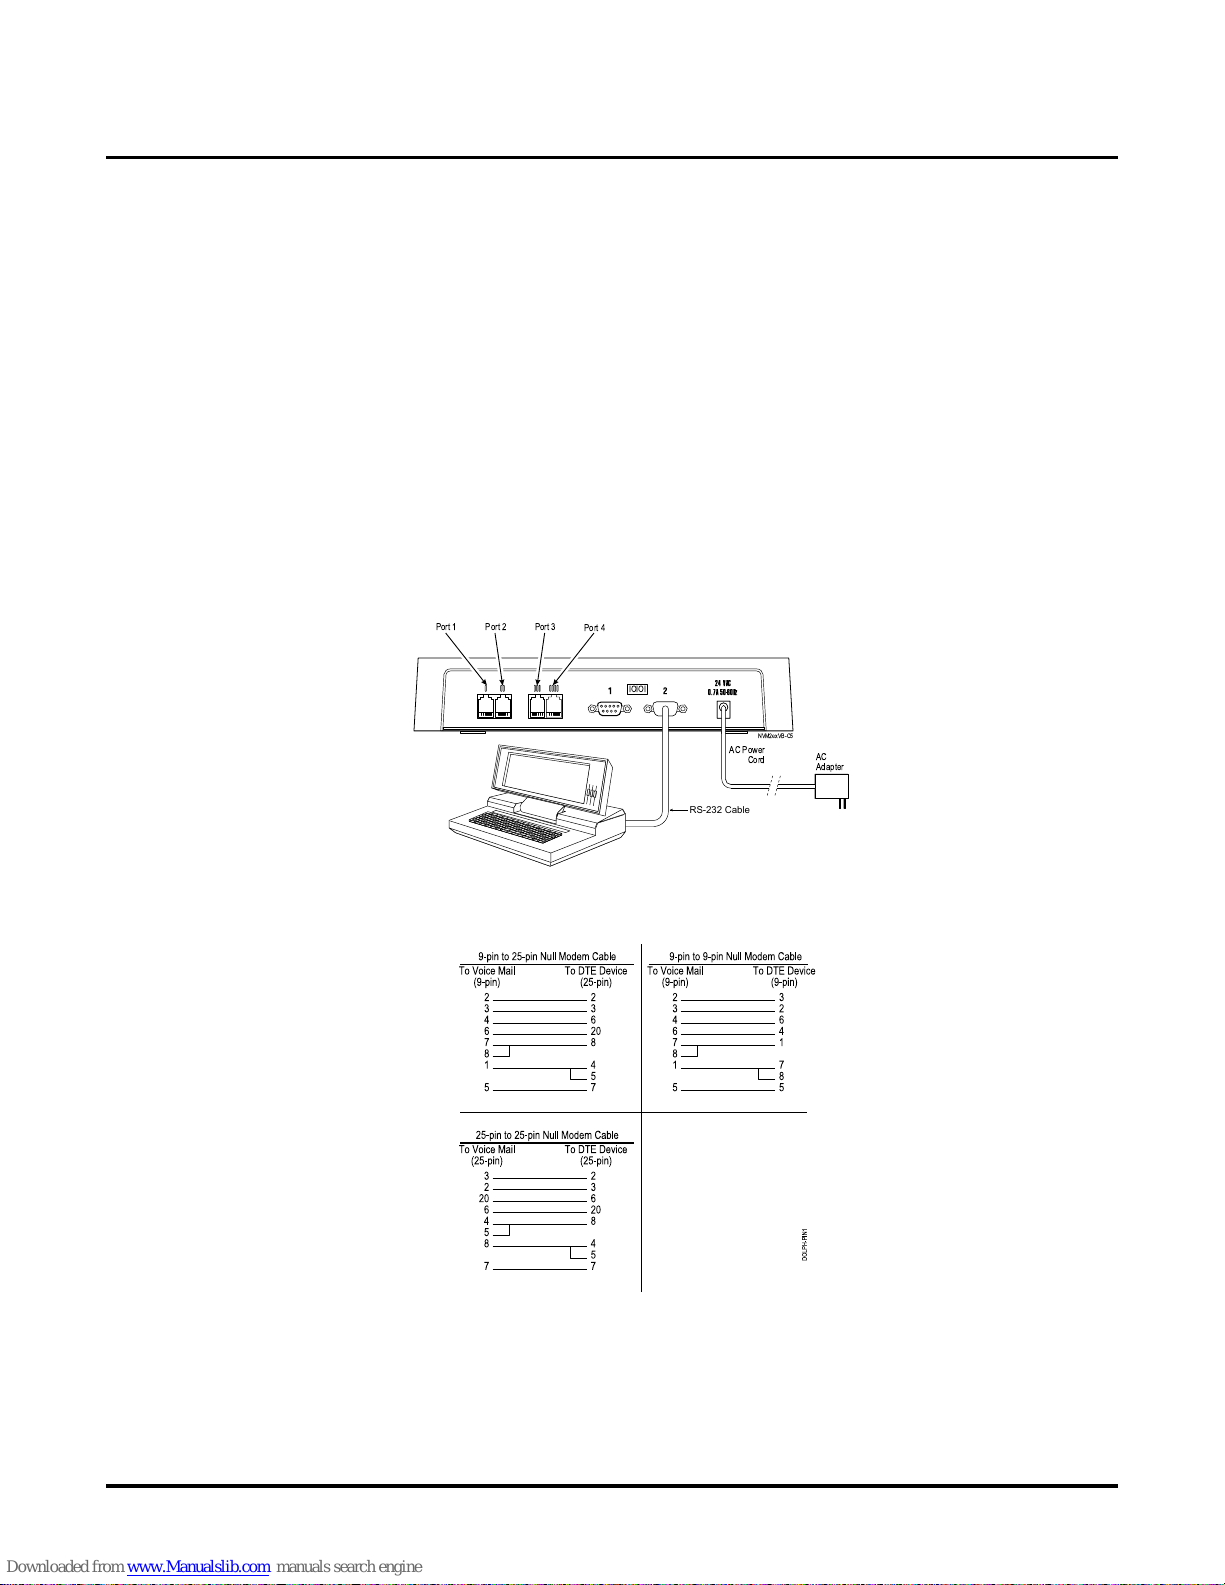
To connect a laptop computer to the NVM-2e:
1. Use an RS-232 c able (null modem) to connect the laptop computer to the connector labeled 2
on the Voice Mail. See Figure 4. Make sure that the RS-232 cable has one of the pin-outs
shown in Figure 5.
2. Turn on the laptop computer.
3. Use standard communications software (such as ProComm Plus) to set the laptop to 115200
baud, 8 data bits, no parity, and 1 stop bit. The terminal emulation should be VT100.
■ If you are using W indows HyperTerminal after you selec t the proper COM port for your
laptop: In Port sett ing s, set the Baud Rate to 115200 , Dat a Bits to 8, Parit y to N, Stop Bit s
to 1, and Flow Control to None. Do not leav e Flow Control at t he def au lt se tt ing wh ich is
Hardware. If the laptop does not c o mmunicate with the Voice Mail, try setting Flow Control to x/on, x/off.
Figure 4: Connecting a Laptop Computer to the NVM-2e Voice Mail
.
Figure 5: Required Pin-puts for the RS-232 Cable
4. When the laptop is communicating with the Voice Mail, you will see the Main Menu for the
NVM-2e.
5. Proceed to Connecting the Voice Mail to the i-Series Phone System on the next page.
12
24 VAC
0.7A 50-60Hz
IOIOI
NVM2exVB-C5
AC
Adapter
AC Power
Cord
Port 2
Port 4
Port 1
Port 3
RS-232 Cable
Connecting the Voice Mail to a Ph one System
Connecting to the i-Series Phone System
10 ◆ NVM-2e/i-Series Quick Setup Guide Chapter 2: Installing the Voice Mail
Connecting the Voice Mail to a P hone System
Connecting to the i-Series Phone System
Connecting the Voice Mail to the i-Series Phone System
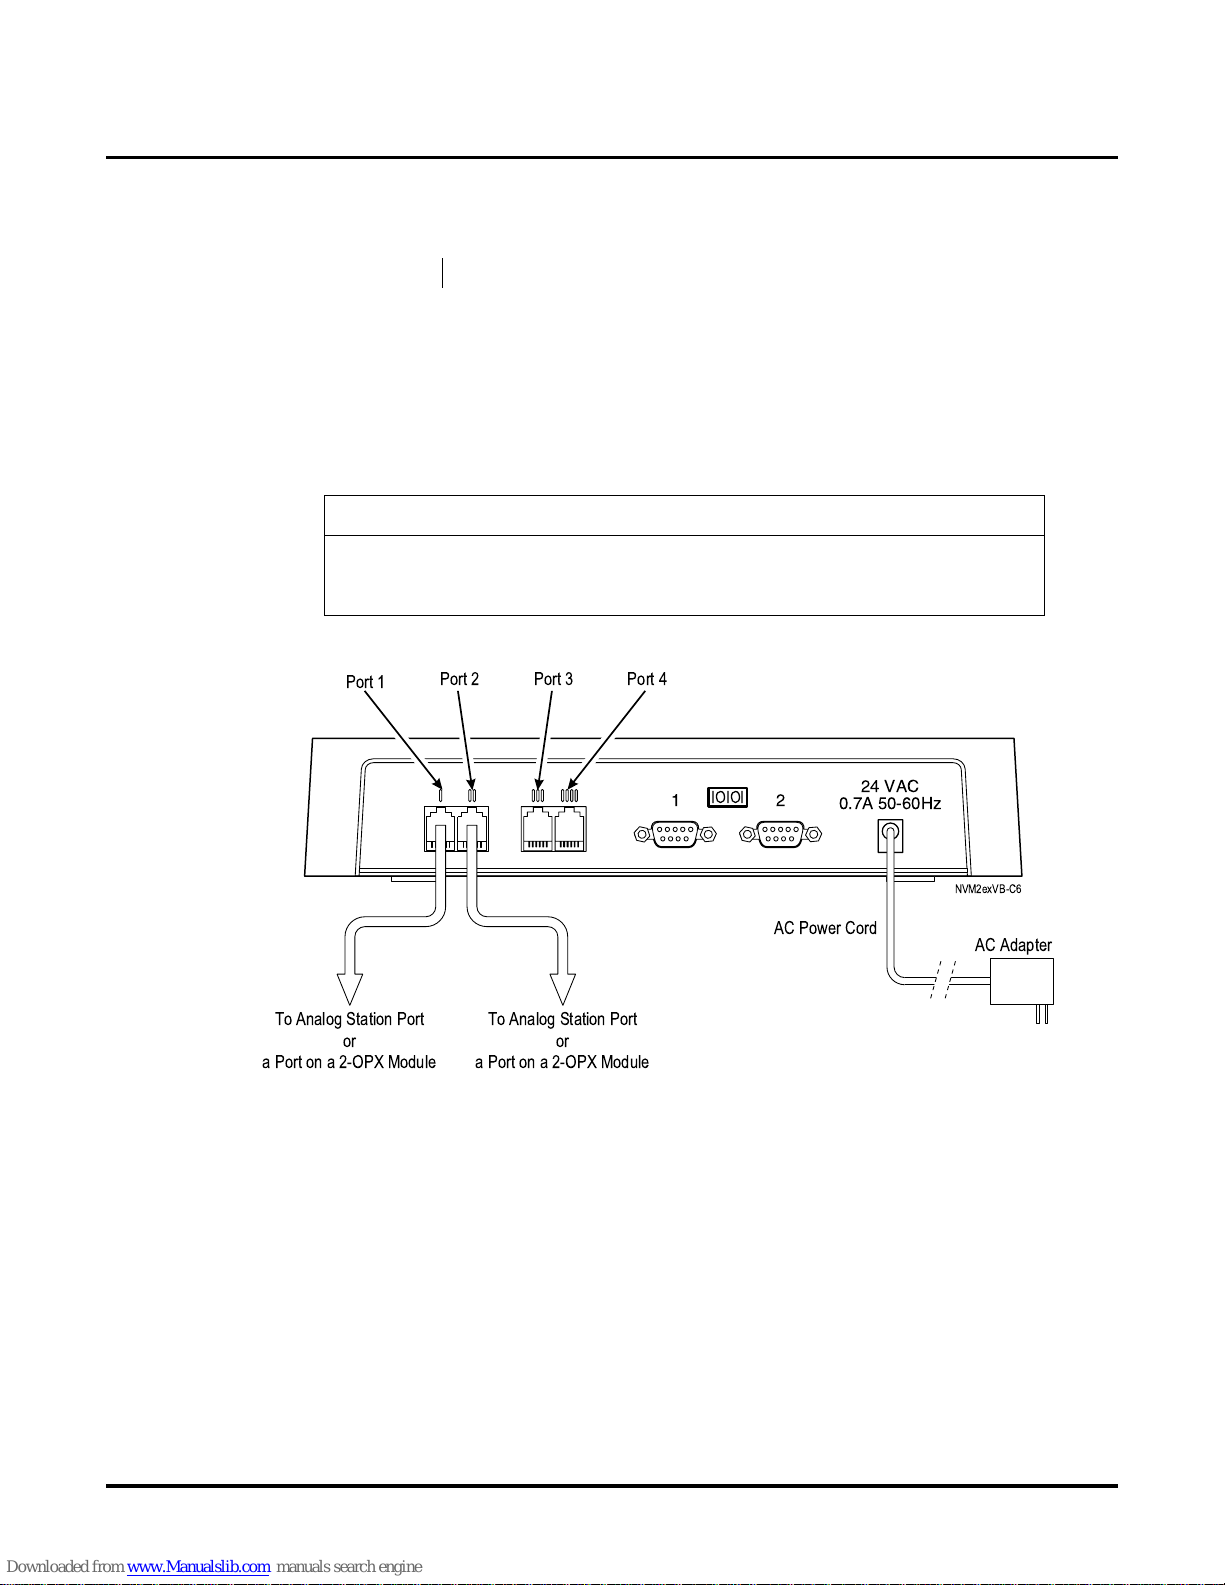
To connect the NVM-2e to the i-Series Phone System:
1. Plug one end of a modular line cord into Port 1 on the NVM-2e.
Plug the other end into an analog station port or a port on a 2-OPX Module, as
shown in Figure 6.
2. Repeat step 1 for Port 2.
3. Repeat step 1 for Ports 3 and 4 if your Voice Mail contains 4 ports.
.
Figure 6: Connecting an i-Series Phone System to the NVM-2e
Availability: All versions of the NVM-2e integrate with the i-Series.
IMPORTANT NOTE
Extension s will rece iv e notif ic ation of new messages (bl ink ing Message Waiting Lights
and interrupted dial tone for single lin e phone s) only if Voice Mail Port 2 is connected
to the phone system.
12
24 VAC
0.7A 50-60Hz
IOIOI
NVM2exVB-C6
AC Adapter
AC Power Cord
Port 2 Port 4
Port 1
Port 3
To Analog Station Port
or
a Port on a 2-OPX Module
To Analog Station Port
or
a Port on a 2-OPX Module

Overview
Chapter 3: Phone System Programming NVM-2e/i-Series Quick Setup Guide ◆ 11
Chapter 3:
Phone System
Programming
Overvi ew
Overview
Your phone sys tem requires specific e ntries in several programs, so that it integrates correctly with
the NVM-2e Voice Mail. In addition, the phone system may need to have a piece of spe cific equipment or a certain software level in order for it to operate correctly with the Voice Mail.
This chapter tells you if need any special equipment and the specific programs you will need to
config ure your phone system, so that it integrates with NVM-2e.

Phone System Programming
For the i-Series
12 ◆ NVM-2e/i-Series Quick Setup Guide Chapter 3: Phone System Programming
Phone System Programming
For the i-Series
Voice Mail Required Hardware and Software
Phone System Hardware and Software Requirements
Hardware
Each analog Voice Mail port requires one analog port o n the ASTU card . The NVM-2e
integr ates with the 28i, 124i (as long as it is not fully expanded), 28i/124i commonized, and
the 124ie (as long as it is not fully expanded).
Software
Analog Voice Mail is supported in all i-Serie s software vers ions.
Required Phone System Programming
➻ 0004 - Automatic Extension Circuit Type
(Use Phone Programming. Applies to 28i/124i commonized, 124ie)
Make sure that you ha ve already connected the NVM-2e to the phone system before you use
this program.
Run program 0004 to automatically set up extension circuit types.
Note: Running 0004 after the system is set up may require that you re-program certain
devices (such as DSS Consoles and DCI’s).
➻ 0005 - Extension Circuit Type (Whenever possibl e, use 0004)
(Use Phone Programming. Applies to 28i/124i commonized, 124ie)
Assign circuit type 3 to analog Voice Mail ports.
Assign circuit 9, order 2 to digital Voice Mail ports. (Remember to program both the oddnumbered port and the next consecutive even port reserved by the system.)
Note: Entering circuit type using 0005 may require a manua l entry in 1001. [In 1001 - Basic
Extension Port Setup (Part A), Item 1: Telephone Sig naling Type, enter 1 for DTMF.]
Availability: All versions of the NVM-2e integrate with the i-Series.
IMPORTANT
Before you program the phon e system, make sure that you have performed all steps in
Chapter 2: Installing the Voice Mail (beginning on page 5 ). This simplifies programming the phone system. Specifically, make sure that you have connected the NVM-2e
to the phone system.

Phone System Programming
For the i-Series
Chapter 3: Phone System Programming NVM-2e/i-Series Quick Setup Guide ◆ 13
➻ 1001 - Basic Extension P ort Setup (part A), Item 5: Terminal Type
(Use Phone Programming. Applies to Commonized Software)
Set all station ports used for Voice Mail as type 1. (Enables DTMF dialing into Voice Mail
from Keysets .)
➻ 1003 - Extension (Department) Groups
Put all the Voice Mail ports in a Department Group (typically the last available group. For 28i/
124i, use group 8), and assign an order number (1, 2, 3, etc.)
This group is used to distribute calls directed to the Voice Mail. It also allows DILs to the
Voice Mail to ring other Voice Mail ports when the DIL’s assigned port is busy.
➻ 1005 - Class of Service
Assign all of the Voice Mail ports with an unus ed Cla ss of Se rvice (t ypi cally, the last a v ail able
COS. For 28i/124i, use COS 8.).
➻ 0410 - Extension (Department) Group Options, Item 3: Voice Mail Group
Enter 1 for the Voice Mail group (the Group you assigned in Program 1003)
Designate which Department Group is to be assigned as a Voice Mail Group.
➻ Program 0419 - Class of Service Options (Part B), Item 26: Message Wait Dialtone
Enter 0 (zero) for the Class of Service assigned to the Voice Mail ports.
(Stutter dial tone on a Voice Mail port causes Message Wait Lamping and tr ansf er problems.)
➻ 0516 - Voice Mail Master Number
Assign an e xtens ion number and n ame fo r the Voice Mail Maste r Number. Be sure th e number
you select doe s not c orres pond to a n inst alle d e xtens ion or fe ature. Con sider pickin g a n umber
that is outside the normal extension numbering range (e.g., 600). Do not sele ct a numbe r that
begins with 1, 8 or 9.
➻ 1017 - Voice Mail Por t Assignment
(Applies to 28i/124i with software versions 5.07 and lower)
(F or ALL other i-series soft ware versions, use Program 1003)
Assign single line (ASTU PCB) ports as Voice Mail po r ts. The sy stem allows u p to 16 Voice
Mail ports.
 Loading...