

Page 1
LCD REAR PROJECTION
MONITOR
INSTRUCTION MANUAL
L CD PROJE CTION - MONITOR
Special Features
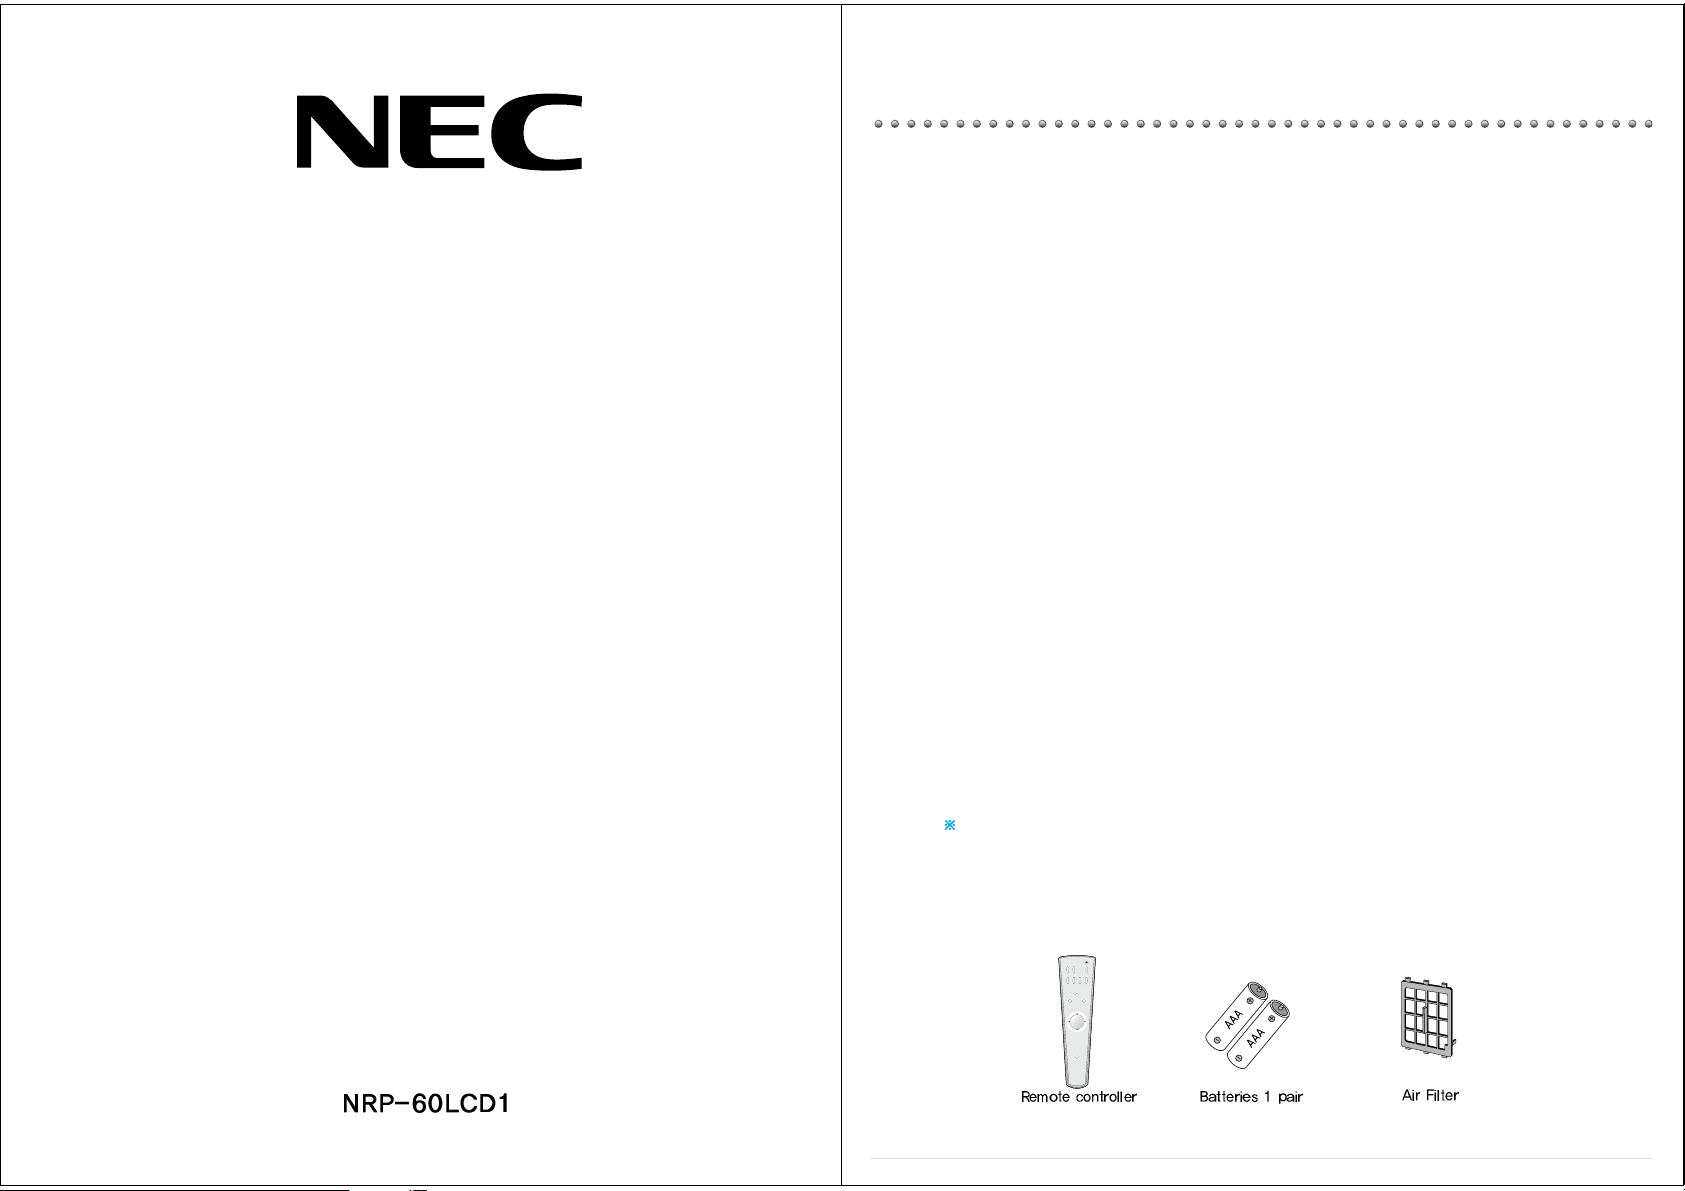
ACCESSORIES
-1-
VIDEO
MULTI
MEDIA
POWER
MENU
RECALL
DOLBY
SOUND
SOUND
MODE
SCREEN
SIZE
MUTE
SCREEN
MODE
SLEEP
VOL VOL
This user's manual contains important safeguards and instructions that must be
followed by the user for its proper usage and maintenance.
Please read the instructions carefully, and keep the manual in a safe place for future
reference.
LCD Rear Projection Monitor NRP-60LCD1
Wide screen with the highest picture quality! Experience the reality and feel the
amazing sensation!
•Reality and sensation experienced only in theaters!
Small crystal liquid particles compounding the wide screen LCD Projection Monitor provides a clear image and higher
quality of picture!
•Wide Screen! Minimized Space!
LCD Projection Monitor is easy to install and move around since it is much smaller and lighter compared to an original
CRT type monitor.
•Exceptionally bright engine
The LCD Rear Projection Monitor NRP-60LCD1 has improved its light source by using 130W, which makes the images of
the screen much clear and much brighter than just a normal LCD Projection Monitor.
•LCD panels of 2.76 million pixels
The LCD Rear Projection Monitor NRP-60LCD1 has three separate LCD panels of 2.76 million pixels that help to generate
sharper, clearer and brighter images.
•No magnetic influence
The LCD type Monitor is not affected by magnetic field as that of the CRT type projection monitor; thus, distortion of the
picture quality or flickering of the image does not occur. It may be used with oversized speakers, or installed in a place
where Monitor installation was previously undoable.
•Lenticular Screen
The Nec lenticular screen of 0.155mm pitch contains an anti-reflection coating that improves its contrast, and consequently,
its picture and color quality at the least parts of the edge with the 2.76 million color pixels.
•Dolby Surround Pro Logic
The LCD Rear Projection Monitor NRP-60LCD1 contains the highest quality amp, which provides the richest sound only
of Dolby Surround Pro Logic without any additional connection other than the usual speaker systems (Woofer, Surround
R, L).
Page 2
Table of Contents
-2-
Installation and Maintenance
Connection guide
Menu Guide
Preference Guide
L CD PROJE CTION - MONITOR
-3-
Special Features
Your new HD Upgradeable big screen monitor has many special features that makes a
perfect addition to your home entertainment system. Below we have highlighted a
handful.
NRP-60LCD1
NRP-60LCD1 has impressive ability to display both video and computer images with the
highest level clarity that has never been previously offered to the home theater. The
advanced circuitry has the ability to accept:
• Conventional video (480i), (576i)
• Progressive scan video (480p), (576p)
• Both 1080i, 720p and 480p HDTV images
• VGA, S-VGA, XGA, SXGA and UXGA computer graphics
HD Upgradeable
With the use of an optional DTV receiver, your NEC big screen can display high
definition pictures.
Wide Screen Picture Format
You will be able to view pictures as the movie directors intended you to see them. Both
the DTV and DVD supporting the wide screen format will enable you to enjoy a
sensation that can only be experienced in theaters and now in the comfort of your home.
Page 3

-4-
CAUTION:
TO REDUCE THE RISK OF ELECTRIC SHOCK, DO NOT REMOVE COVER
(OR BACK).
NO USER-SERVICEABLE PARTS INSIDE.
REFER SERVICING TO QUALIFIED SERVICE PERSONNEL.
CAUTION
RISK OF ELECTRIC SHOCK
DO NOT OPEN
The lightning flash with arrowhead symbol, within an equilateral triangle, is intended to
alert the user to the presence of uninsulated “dangerous voltage” within the product’s
enclosure that may be of sufficient magnitude to constitute a risk of electric shock.
The exclamation point within an equilateral triangle is intended to alert the user to the
presence of important operating and maintenance (servicing) instructions in the
literature accompanying the appliance.
WARNING:
TO REDUCE THE RISK OF FIRE OR ELECTRIC SHOCK, DO NOT EXPOSE THIS PRODUCT TO RAIN OR
MOISTURE.
CAUTION:
TO PREVENT ELECTRIC SHOCK, MATCH WIDE BLADE OF PLUG TO WIDE SLOT, FULLY INSERT.
L CD PROJE CTION - MONITOR
IMPORTANT SAFEGUARDS
-5-
Please read the following safeguards for your Monitor and retain for future reference.
Always follow all warnings and instructions marked on the monitor.
1. Read, Retain and Follow All Instructions
Read all safety and operating instructions before operating the Monitor. Retain the safety and operating
instructions for future reference. Follow all operating and use instructions.
2. Heed Warnings
Adhere to all warnings on the appliance and in the operating instructions.
3. Cleaning
Unplug the Monitor from the wall outlet before cleaning. Do not use liquid, abrasive, or aerosol cleaners.
Cleaners can permanently damage the cabinet and screen. Use a lightly dampened cloth for cleaning.
4. Attachments and Equipment
Never add any attachment and/or equipment without approval of the manufacturer as such additions may
result in the risk of fire, electric shock or other personal injury.
5. Water and Moisture
The apparatus shall not be exposed to dripping or splashing and that no objects filled with liquids, such as
vases, shall be placed on the apparatus.
6. Accessories
Do not place the Monitor on an unstable cart, stand, tripod, or table. The Monitor may fall,
causing serious injury to a child or adult and serious damage to the Monitor. Use only with a cart,
stand, tripod, bracket, or table recommended by the manufacturer, or sold with the Monitor. Any
mounting of the Monitor should follow the manufacturer’s instructions, and should use mounting
accessories recommended by the manufacturer. An appliance and cart combination should be
moved with care. Quick stops, excessive force, and uneven surfaces may cause the appliance
and cart combination to overturn.
7. Ventilation
Slots and openings in the cabinet are provided for ventilation and to ensure reliable operation of the Monitor and
to protect it from overheating. Do not block these openings or allow them to be obstructed by placing the
Monitor on a bed, sofa, rug, or other similar surface. Nor should it be placed over a radiator or heat register. If
the Monitor is to be placed in a rack or bookcase, ensure that there is adequate ventilation and that the
manufacturer’s instructions have been adhered to.
8. Power Source
This Monitor should be operated only from the type of power source indicated on the marking label. If you are
not sure of the type of power supplied to your home, consult your appliance dealer or local power company.
9. Power-Cord Protection
Power-supply cords should be routed so that they are not likely to be walked on or pinched by items placed
upon or against them, paying particular attention to cords at plugs, convenience receptacles, and the point
where they exit from the Monitor.
10. Lightning
For added protection for this Monitor during a lightning storm, or when it is left unattended and unused for a
long periods of time, unplug it from the wall outlet and disconnect or cable system. This will prevent
damage to the Monitor due to lightning and power-line surges.
Page 4
-6-
12. Overloading
Do not overload wall outlets and extension cords as this can result in a risk of fire or electric shock.
13. Object and Liquid Entry
Never push objects of any kind into this Monitor through openings as they may touch dangerous voltage
points or short-out parts that could result in fire or electric shock. Never spill liquid of any kind on or into the
Monitor.
14. Servicing
Do not attempt to service this Monitor yourself as opening or removing covers may expose you to dangerous
voltage or other hazards. Refer all servicing to qualified service personnel.
15. Damage Requiring Service
Unplug the Monitor from the wall outlet and refer servicing to qualified service personnel under the following
conditions:
(a) When the power-supply cord or plug is damaged.
(b) If liquid has been spilled, or objects have fallen into the Monitor.
(c) If the Monitor has been exposed to rain or water.
(d) If the Monitor does not operate normally by following the operating instructions. Adjust only those
controllers
that are covered by the operating instructions as an improper adjustment of other controllers may result in
damage and will often require extensive work by a qualified technician to restore the Monitor to its normal
operation.
(e) If the Monitor has been dropped or the cabinet has been damaged.
(f) When the Monitor exhibits a distinct change in performance - this indicates a need for service.
16. Replacement Parts
When replacement parts are required, be sure the service technician has used replacement parts specified
by the manufacturer or have the same characteristics as the original part. Unauthorized substitutions may
result in fire, electric shock or other hazards.
17. Safety Check
Upon completion of any service or repair to the Monitor, ask the service technician to perform safety checks to
determine that the Monitor is in safe operating condition.
18. Heat
The product should be situated away from heat sources such as radiators, heat registers, stoves, or other
products (including amplifiers) that produce heat.
L CD PROJE CTION - MONITOR
Warning
This section must be read carefully and followed by the user
prior to the operation of the product.
-7-
The manual states important instructions for the user's own safety, and the proper operation of the product.
To reduce the risk of electric shock, do not
remove cover or back. No user -serviceable
parts inside. Refer to qualified service
personnel for repair.
Do not put any object that contains
water - such as flowerpot - on the unit.
The water may penetrate into the unit,
and be a cause of fire or hazardous
electric shock.
To prevent fire and damages to the product,
unplug the unit from the outlet during
lightning storm, or when it is left unattended
and unused for a long period of time.
Do not put on or use the product near
water and moisture-such as in a bathroom,
washbowl, etc. It may be a cause of fire and
electric shock hazards.
Do not let children hang on or climb on
the product since it may be a cause of
serious injury.
Take the plug when unplugging the unit
from the outlet. The cord may cause fire
or electric shock if damaged.
Do not place the product in a lean or
unstable place since it may cause a
serious injury to a person, as well as
damage to the product if it falls.
Slots and openings in the case are provided
for ventilation to ensure reliable operation of
the product. Never put in any item-such as a
coin, paper, match- through these openings
since it may touch dangerous voltage points
that could result in fire or shock hazard.
Page 5

Caution
-8-
Please keep the user's manual in a safe place for future reference.
Do not put volatile substance-such as
benzene, naphtha- near the product
since it may cause a change in the
product’s color.
Do not expose the product in a dusty or
moisturized place since it may be a
cause of malfunctioning.
Place the Monitor far away from the
view since it may cause damage in your
eyesight.
Refer servicing to qualified service
personnel for cleaning at least once a
year since dust inside the Monitor set
may be a result or fire and
malfunctioning of the product.
The product should be situated away
from any heat source-such as radiators,
heat registers, stoves, or other products
that produce heat.
Do not put on any heavy item on the
power cord since it may result in fire or
hazardous electric shock if the cord is
damaged.
Do not cover the top of the Monitor set.
Ventilation will be prevented, and it
may be a cause of fire if the product is
internally overheated.
Unplug the power from the outlet and all the related
connections from the unit to prevent electric shock. At
least two people must work together to move the
Monitor set when transporting to prevent the Monitor
from falling, and consequently, any serious injury or
damage.
Do not touch the power cord with
moisturized or watery hands when
plugging to or unplugging from the
outlet since it may be a cause of electric
shock.
Do not spill water or drop the remote
controller since it may be a cause of
malfunctioning.
L CD PROJE CTION - MONITOR
Cautions in Installation and Conveyance
Caution
-9-
When Installing the Unit.
Please maintain an approximate distance of 10cm from the wall when installing.
It may be a cause of fire or shutting off of the Monitor set since the unit may be overheated if
it is too close to the wall.
When Moving or Transporting the Unit.
(1)Have at least two people transporting the unit for your own safety.
(2)Please grab the parts of the unit as indicated in the illustration.
Transporting the unit grabbing places of the unit other than the ones indicated in the picture,
result in malfunctioning, destruction, and serious injury. You must grab the handle provided with
one hand, and grab the front panel with the other hand to prevent the unit from falling down.
(Please do not try to lift up the product since the unit provides casters for easy conveyance.)
Page 6
Maintenance Tips
-10-
Air Filter Cleaning
Please clean the filter periodically for the product s proper functioning and operation. Particularly,
more frequent cleaning may be necessary if the Monitor is installed and utilized in a dusty place.
Please use the following steps when cleaning it up.
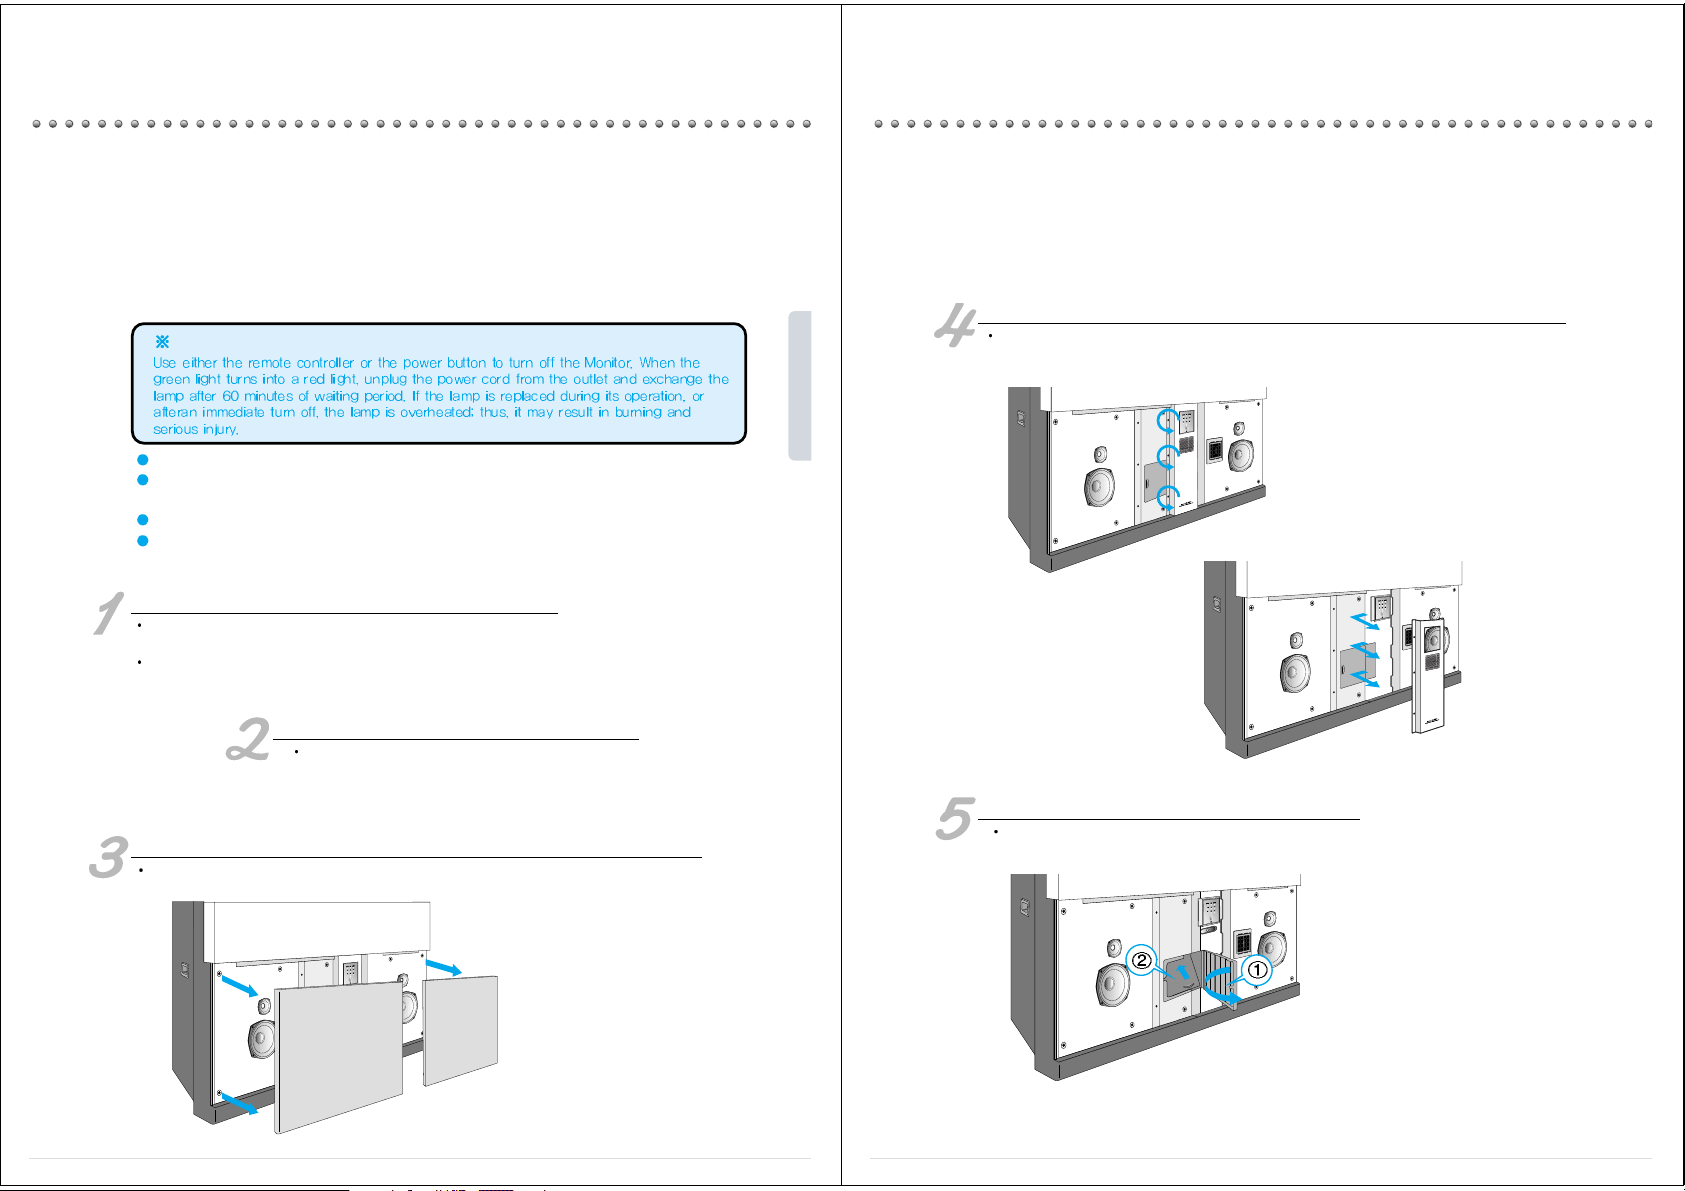
T urn off the MONITOR set
Use either the remote controller or the power button to turn off the Monitor. When
the power is off, the unit will stand by momentarily for cooling.
Wait until the power lamp at the front panel turns red.
Disconnect the Unit Completely
When the cooling process of the mercury lamp ends, unplug the
power cord from the outlet.
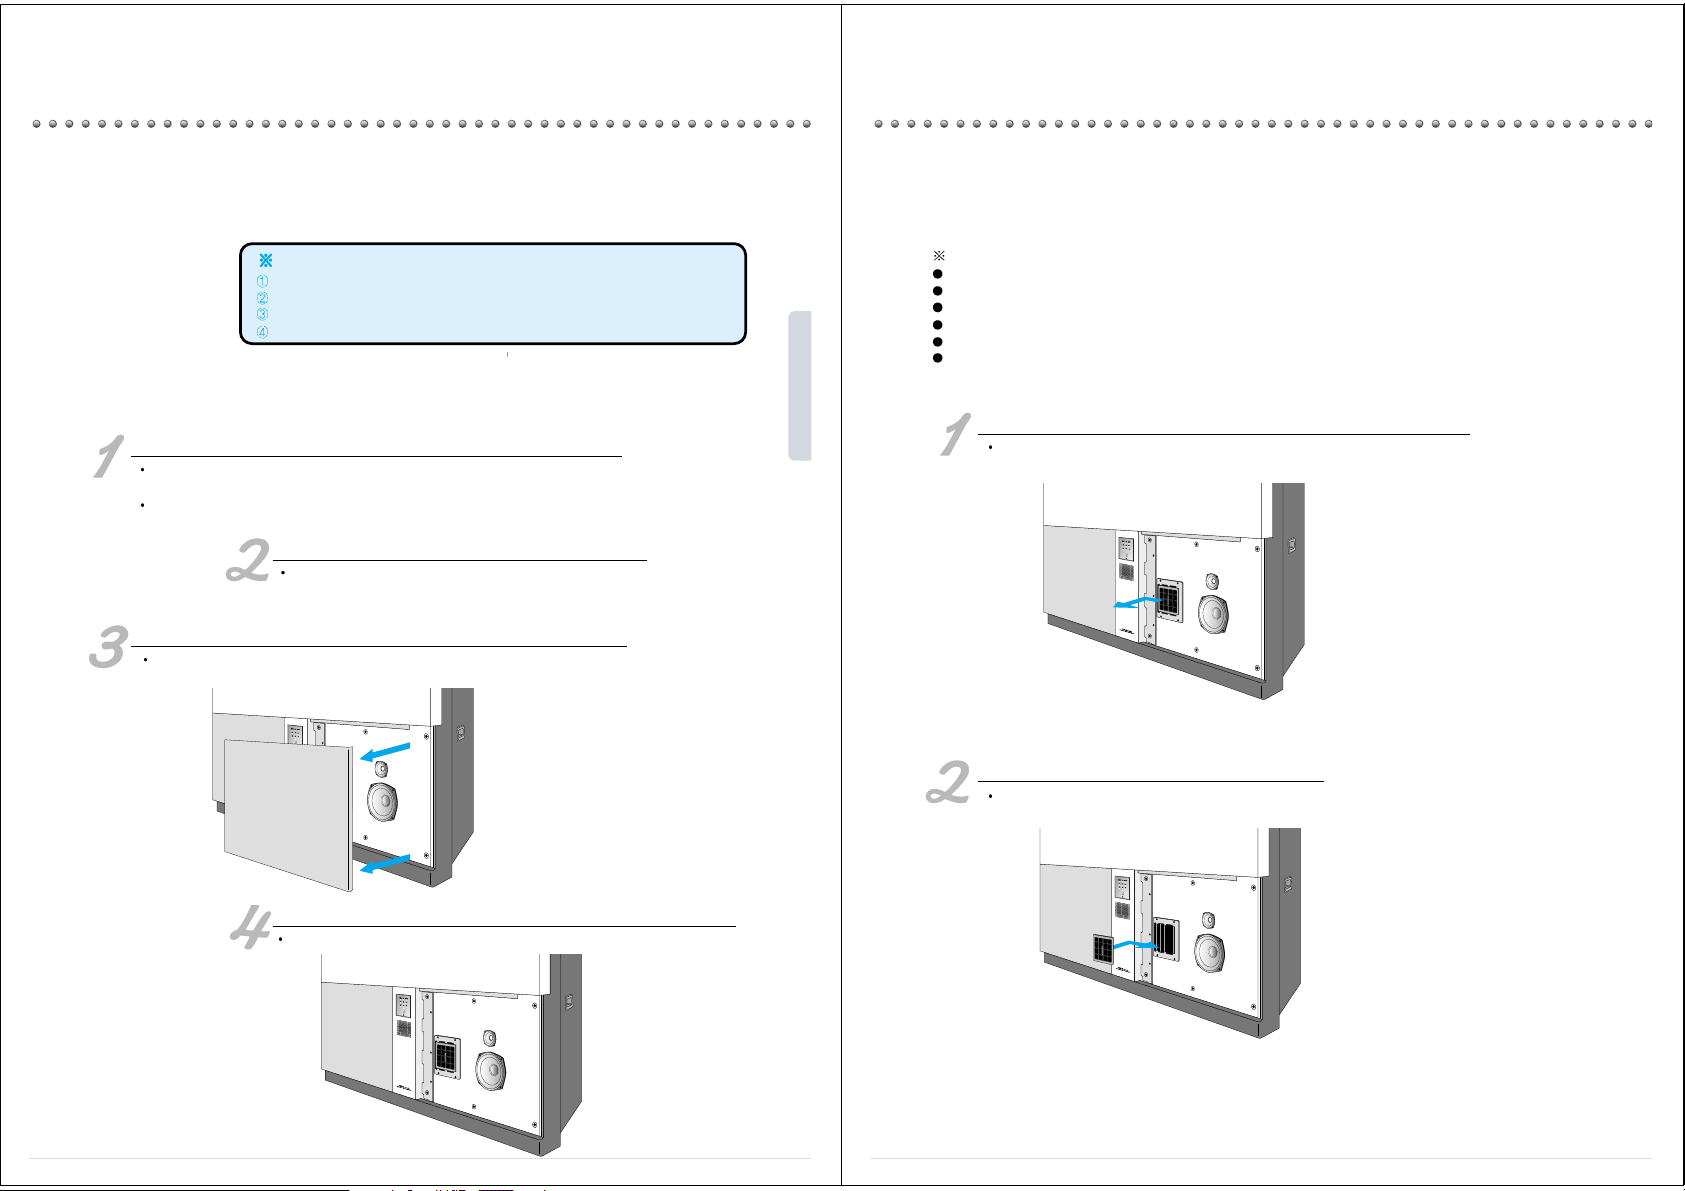
Pull off the Speaker Grill at the Front Panel
Refer to the illustration provided below. Pull off the speaker grill of the right side of the
panel. Begin taking off from the most exterior part.
Caution
Unplug the power cord from the outlet before cleaning.
When vacuuming the filter, please do so from the outmost surface.
The Monitor set will not operate if the air filter has not been properly assembled.
Change the air filter if damaged or wet.
Clean the filter
Do not remove the filter from the unit, and use the vacuum cleaner to remove the
dust.
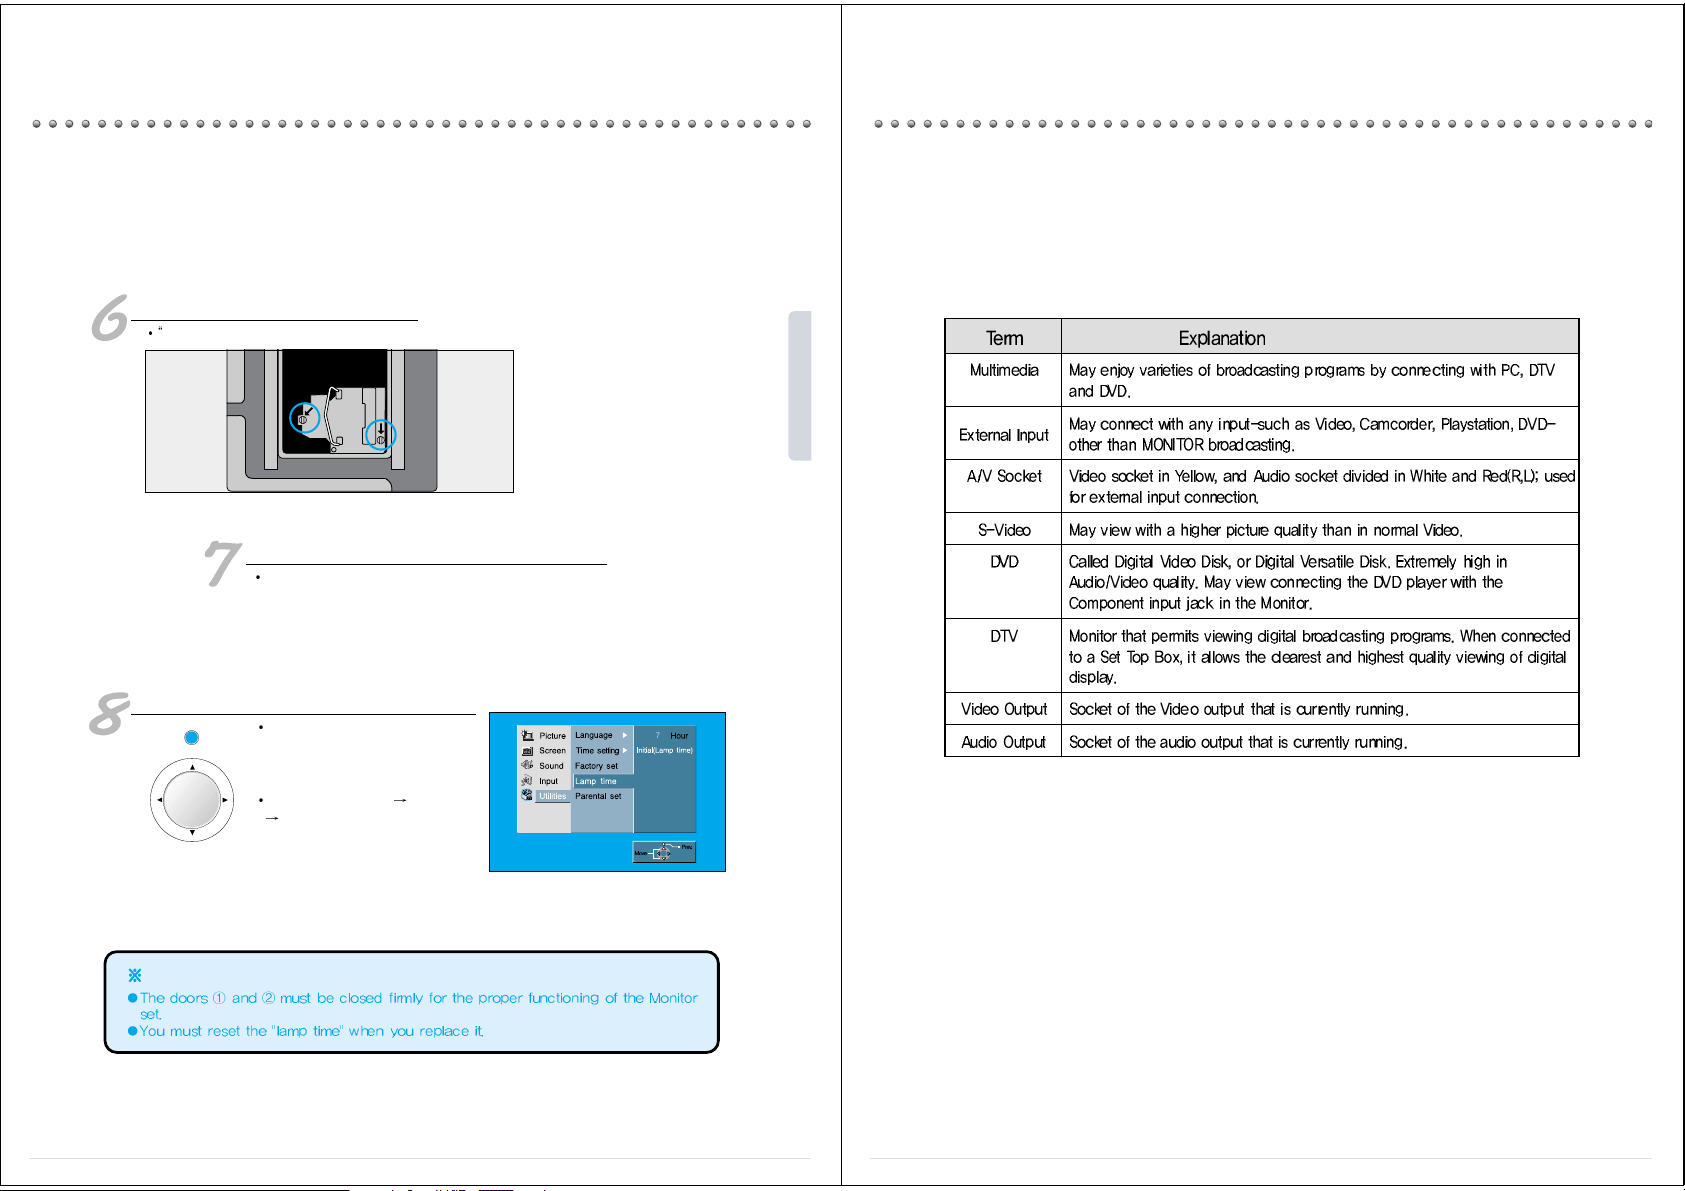
L CD PROJE CTION - MONITOR
Air Filter Change
-11-
Cautions
When changing the air filter, please do so after having brushed away dust on the set.
Do not let the dust get into the unit since the product contains "short-out" parts.
Do not detach the filter sponge fixed on the filter cover.
Do not clean the filter sponge with water since it may be a cause of blocking its holes.
You must fit in the filter cover properly to the set. If not, the unit will not power on.
It is essential to change the air filter at the time of changing the lamp.
Pull off the Speaker Grill at the Front Panel
Pull off the speaker grill of the right side of the panel as the way you have done when
cleaning the air filter. Hold the filter knob and remove it as in the direction illustrated.
Fit in the new air filter and adjust the speaker grill properly.
Install the New Air Filter
Page 7
-12-
Lamp Change
T urn off the Monitor set.
Use either the remote controller or the power button to turn off the Monitor.
When the power is off, the unit will stand by momentarily for cooling.
Wait until the power lamp at the front panel turns red.
Disconnect the Unit Completely.
When the cooling process of the lamp ends, unplug the power cord from
the outlet.
Pull off the Speaker Grill at the Front Panel.
Refer to the illustration provided below. Pull off speaker grill at the front panel. Begin taking off
from the outmost part.
Do not remove any screw except the ones indicated.
Do not touch the protection glass of the lamp since it may minimize the screen brightness
capability or cause shortage in its lifetime.
Shattering of the lamp may occur if it is used for an extremely long period of time .
Change the air filter when replacing the lamp.
Caution
The screen brightness may be reduced or the light bulb may be shattered when the lamp has been used for a
long period of time.
In this case, you must purchase the lamp DSJ-LF10 from Nec Electronics Service Center, and exchange it as
the following instruction since its lifetime has been terminated.
L CD PROJE CTION - MONITOR
-13-
Detach the Front Controller Panel.
Loose three screws at the left-hand side with a (+) driver, and separate the front controller panel from
the unit.
Open the Door
Pull off the door 1, and then, pull up the door 2 to open as below.
Page 8
-14-
Loose T wo Screws of the Lamp.
Use a (-) driver to separate the lamp from the unit.
Exchange the Lamp
Exchange the lamp and re-assemble in the opposite sequence.
Caution
Reset the Lamp Timer
Plug in the power cord into the outlet,
and turn on the Monitor set either
using the remote controller or the
Power button.
Please select "Utilities" "Lamp time"
“Initial (Lamp time)” and reset the
lamp time.
L CD PROJE CTION - MONITOR
Glossary
-15-
MENU
VOL VOL
Page 9
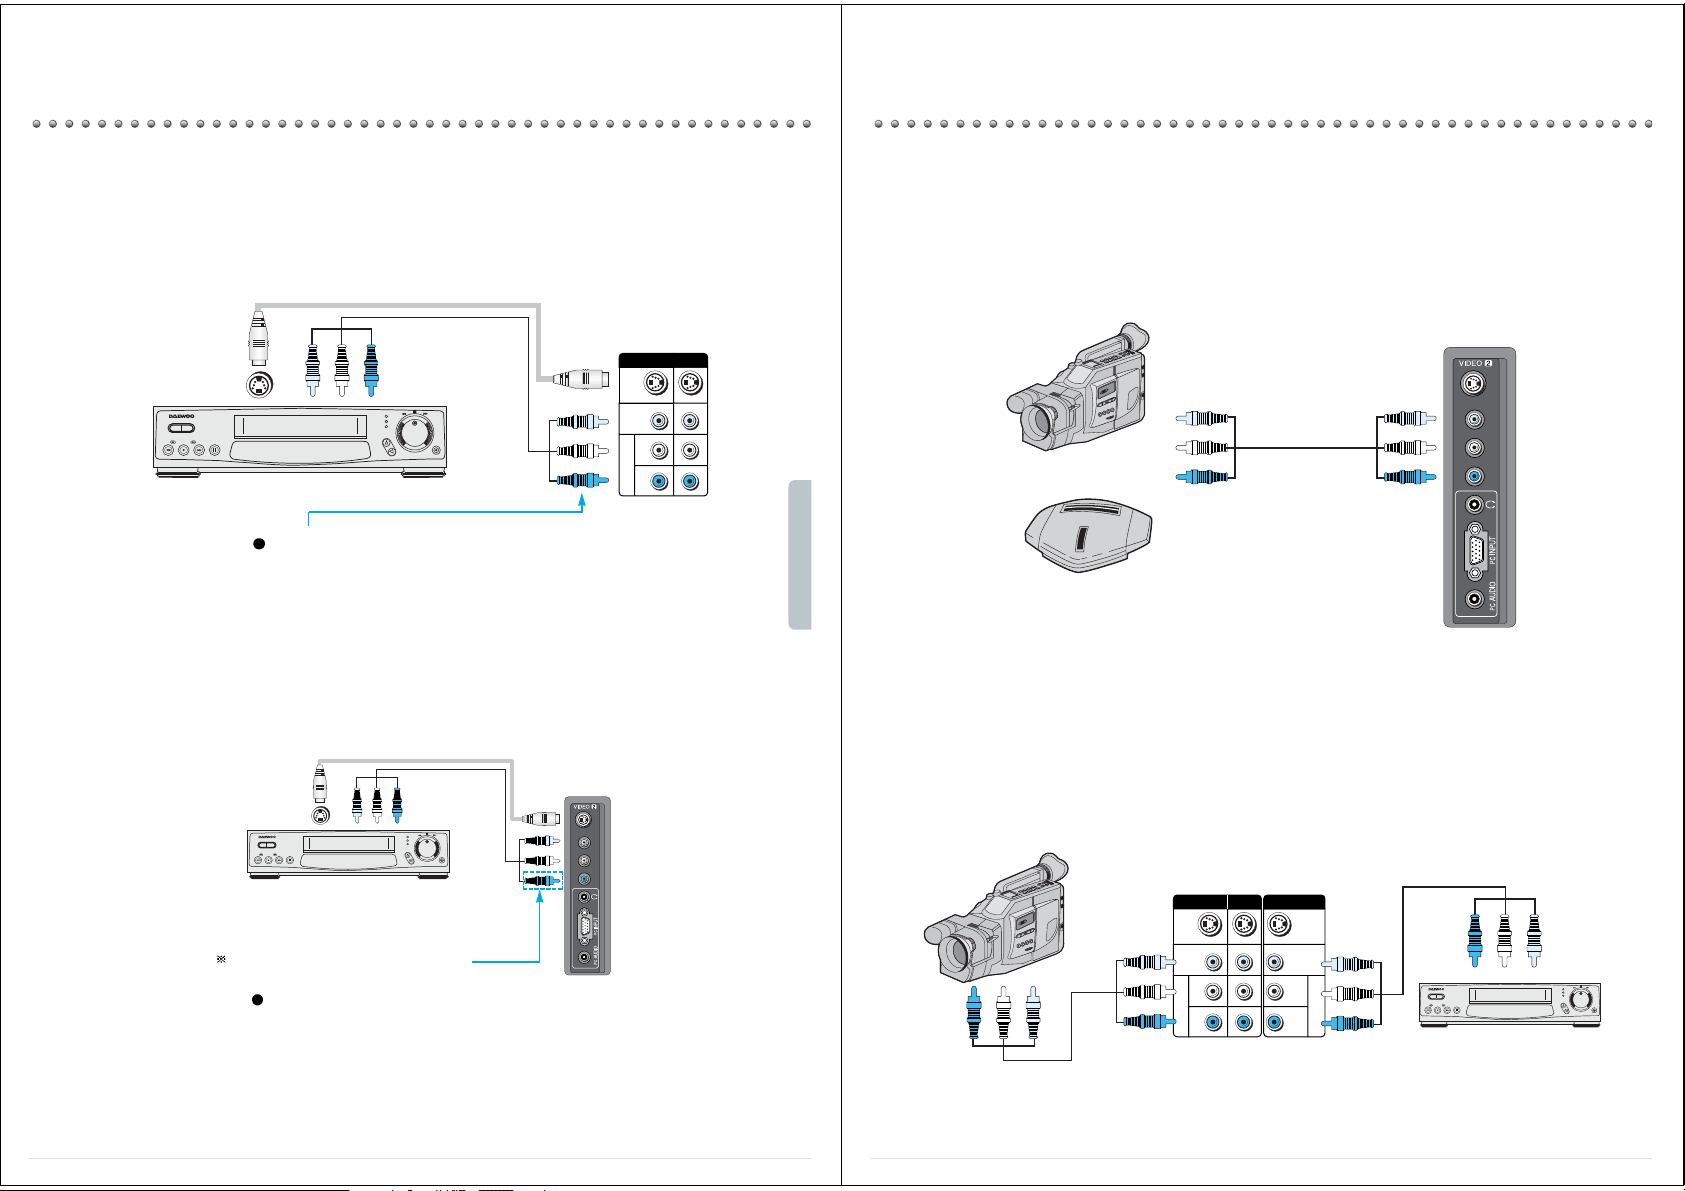
Video Connection
-16-
Connecting with an side panel
S-VIDEOVIDEO
R - AUDIO - L
Connect either S-Video or Video input to the unit. When both are
connected, the output display will be in S-VHS4.
You may connect S-Video input to enjoy a clearer and brighter picture images. You can choose and make the
connection with VIDEO2 input(side panel).
VCR
Side Panel
Connection is not necessary in Mono mode.
VIDEO 1
SVIDEO
VIDEO
AUDIO
L
R
VIDEO 3
Connect either S-Video or Video input to the unit. When both are
connected, the output display will be in S-Video.
Connecting with an External Source
You may connect S-Video input to enjoy a clearer and brighter picture images. You can choose and make the
connection with any one of Video 1,2, or 3 inputs.
L CD PROJE CTION - MONITOR
Camcorder & Playstation Connection
-17-
Watching the Camcorder Recording on Monitor
-Use the input jack provided at the side panel of the MONITOR set
-Use the same connection method for playstation
-Connect the camcorder and video as follows.
-Turn the camcorder's video output switch on, and play the recorded material.
-Press the "VIDEO" button, and select VIDEO1 Input.
-Then start recording for VCR.
Playing a Recorded Material and Recording a Video simultaneously
S-VIDEOVIDEO
R - AUDIO - L
Playstation
Camcorder
Side Panel
VIDEO 1
SVIDEO
SVIDEO
VIDEO
AUDIO AUDIO
L
R
L
R
VIDEO
VIDEO 3
MONITOR OUTPUT
Video
Camcorder
Page 10

DVD Connection
-18-
DVD
-480i, 576i input signal is possible for DVD input.
-DVD screen output is composed of three separate primary color jack(Y/Cb/Cr), resulting in a higher image quality.
-Y/Cb/Cr, may also be noted as Y/PB/PR or Y/Pb/Pr in different DVD players.
-The DVD player
s audio output must be connected to the DVD audio input socket at the back of the Monitor set.
-You must use a 480p, 576p input capable component1 jack if you want to get the progressive scan (480p, 576p)
DVD screen display.
VIDEO AUDIO
L
R
DVD
L CD PROJE CTION - MONITOR
-19-
Audio Connection
Surround Speaker Connection
Feel the realism with the surround sound effect!
-You may minimize the volume of the Monitor set, and listen to the sound.
-The default status of
Dolby sound is in Line out: Internal .
-Connect the Audio system to the monitor of the Monitor set. Then, press <Menu>-<Sound>-<External set> to
listen. and select
Line out:External .
Standard Audio Connection
AUDIO
L
R
VIDEO
MONITOR OUTPUT
SPEAKER OUTPUT
SURROUND SURROUND
WOOFER
L
R
8Ω/7W
8Ω/7W
8Ω/10W
Surround Speaker
Surround Speaker
Woofer Speaker
Audio System
Page 11

Digital Satellite Receiver Connection
-20-
Watching High Definition Digital Broadcasting
The signal input of 1080i, 720p, and 480p are available in this product.
You may use a general A/V jack for its connection.
LR
VIDEO
AUDIO
L
R
DTV INPUT
Digital Satellite Receiver
L CD PROJE CTION - MONITOR
External Input Connection Source
Watching cable television is only possible after you have subscribed to the local broadcasting company and
installed a cable receiver. You may make the connection to any of the Video input 1, 2, 3.
Cable TV Broadcasting Connection
-21-
CATV Receiver
Input
Cable TV Broadcasting
Station
VIDEO 1
SVIDEO
VIDEO
AUDIO
VIDEO 3
L
R
Page 12
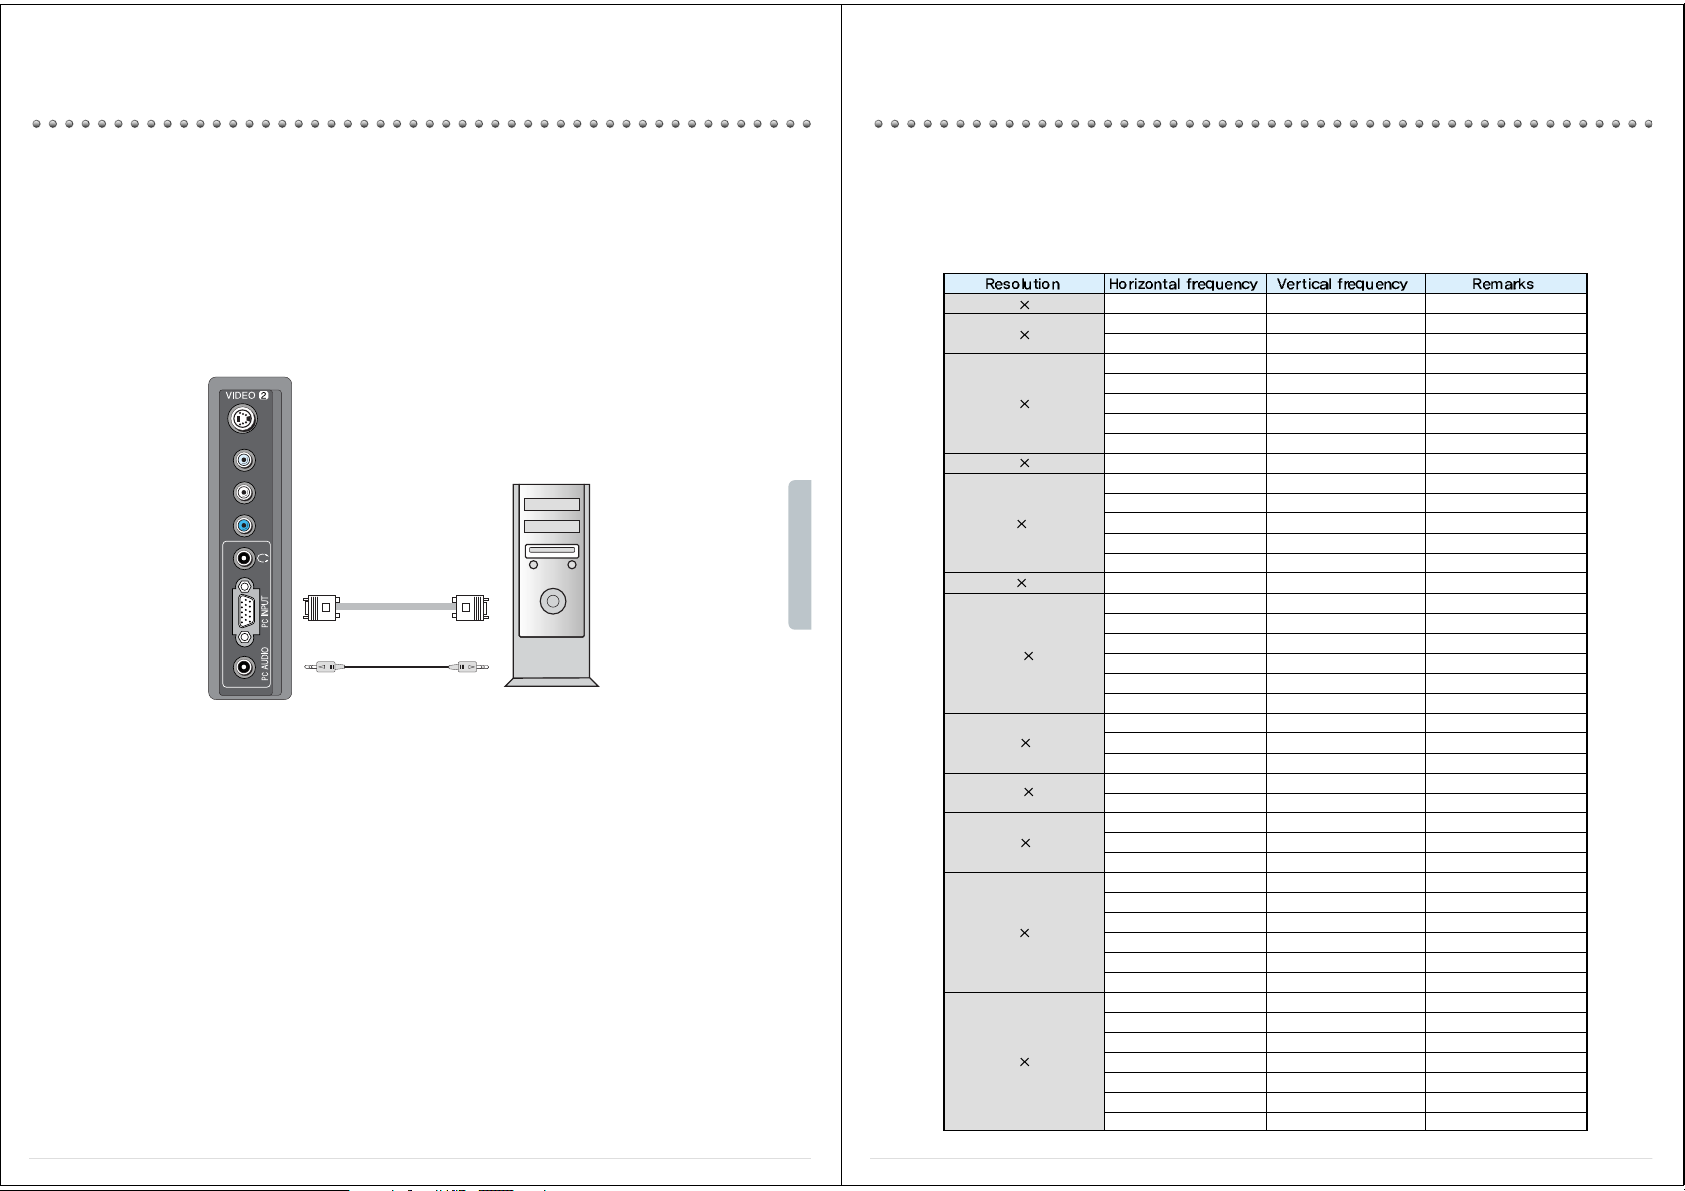
Personal Computer Connection
-22-
Watching PC on Monitor
No additional appliance is necessary to watch the PC screen on the Monitor.
When connecting with the PC, use the input jacks provided at the side of the Monitor.
PC, audio, and any other related connection cable must be purchased additionally.
S-VIDEOVIDEO
Side Panel PC
L CD PROJE CTION - MONITOR
RESOLUTION SUPPORTED
-23-
The standard screen is wide.
37.861 85.1 VESA
24.823 56.4 NEC
37.861 85.1 VESA
35 66.7 Macintosh
37.861 72.8 VESA
37.5 75.0 VESA
39.375 75.0 IBM
43.269 85.0 VESA
37.927 85.1 VESA
35.156 56.3 VESA
37.879 60.3 VESA
800 600 48.077 72.2 VESA
46.875 75.0 VESA
53.674 85.1 VESA
832 624 49.726 75.1 Macintosh
48.193(48.077) 59.3(59.8) Macintosh(OAK)
48.363 60.0 VESA
56.476 70.1 HP&VESA
60.241 74.9(74.6) Macintosh
60.023 75.0 VESA
68.677 85.0 VESA
63.851 70.0 VESA
1152 864 67.5 75.0 VESA
77.094 85.0 VESA
61.769 66.0 SUN
71.713 76.0 SUN
60 60.0 VESA
1280 960 75 75.0 VESA
85.938 85.0 VESA
46.433 43.4 VESA
63.981 60.0 VESA
78.125 72.0 HP&HITA
78.855 74.1 Sony&NEC
79.976 75.0 VESA
91.146 85.0 VESA
62.5 48.0 VESA
75 60.0 VESA
81.25 65.0 VESA
87.5 70.0 VESA
93.75 75.0 VESA
100 80.0 VESA
106.25 85.0 VESA
640 350
720
400
640
480
1024 768
1152
900
1280 1024
1600
1200
640
400
Page 13
Name of Each Part
-24-
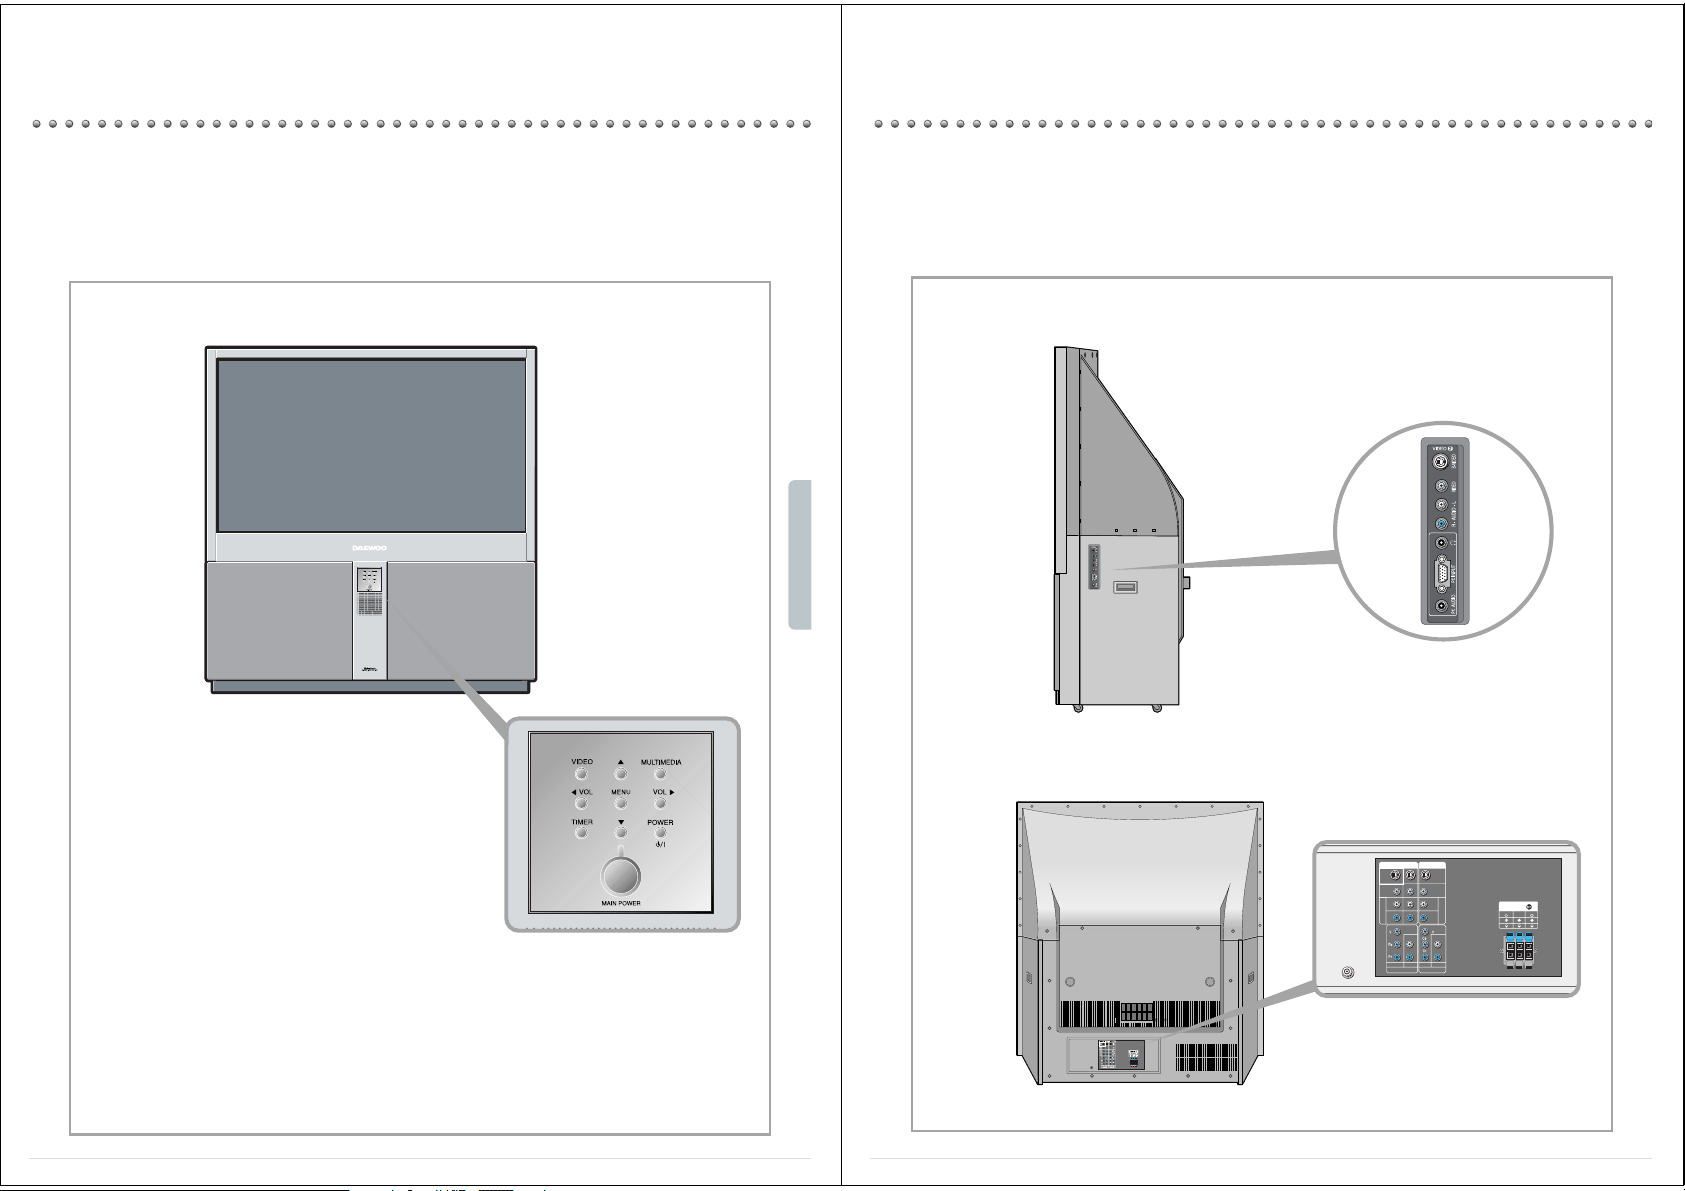
Front Panel
Buttons on the Monitor set have the same function as those of the remote controller.
D I G I T A L
Front Panel Button
If you turn the Monitor set off by pressing the main power(on/off)
button at this panel, will prevent all operation of both the Monitor
set and the remote controller. Unless you are not using the unit
for a long period of time, have the main power on this panel
turned on at all times.
Remote controller signal receiver
the screen contains the remote controller signal receiving
window; thus, point the remote controller towards the screen
when using it.
Timer Lamp
The timer lamp will be on when the on/off of the timer set-up is
programmed.
L CD PROJE CTION - MONITOR
-25-
Side and Rear Panel
Side Panel
It is convenient to use the input jacks provided at
the side panel when connecting to the
camcorder or play station. It is also convenient
when connecting a personal computer to the
Monitor set, and when listening to the sound
through headphones.
Back Panel
VIDEO 1
SVIDEOS-VIDEO
VIDEO
DTV INPUT DVD INPUT
VIDEO AUDIO
VIDEO AUDIO
AUDIO
AUDIO
L
R
LRL
R
L
R
VIDEO
VIDEO 3
MONITOR OUTPUT
SPEAKER OUTPUT
SURROUND SURROUND
WOOFER
LR
Page 14

-26-
Rermote Controller Guide
Parts of the remote controller
VIDEO
MULTI
MEDIA
POWER
MENU
RECALL
DOLBY
SOUND
SOUND
MODE
SCREEN
SIZE
MUTE
SCREEN
MODE
SLEEP
VOL VOL
Do not drop or spill liquid on it.
Do not expose on heat, dust, and humidity
Push to open the cover of the remote controller
Set the batteries in the battery cell after checking the electrode,
and then shut the cover.
MENU
Use it to make picture adjustment, screen
format, sound adjustment, input selection, and
utilities.
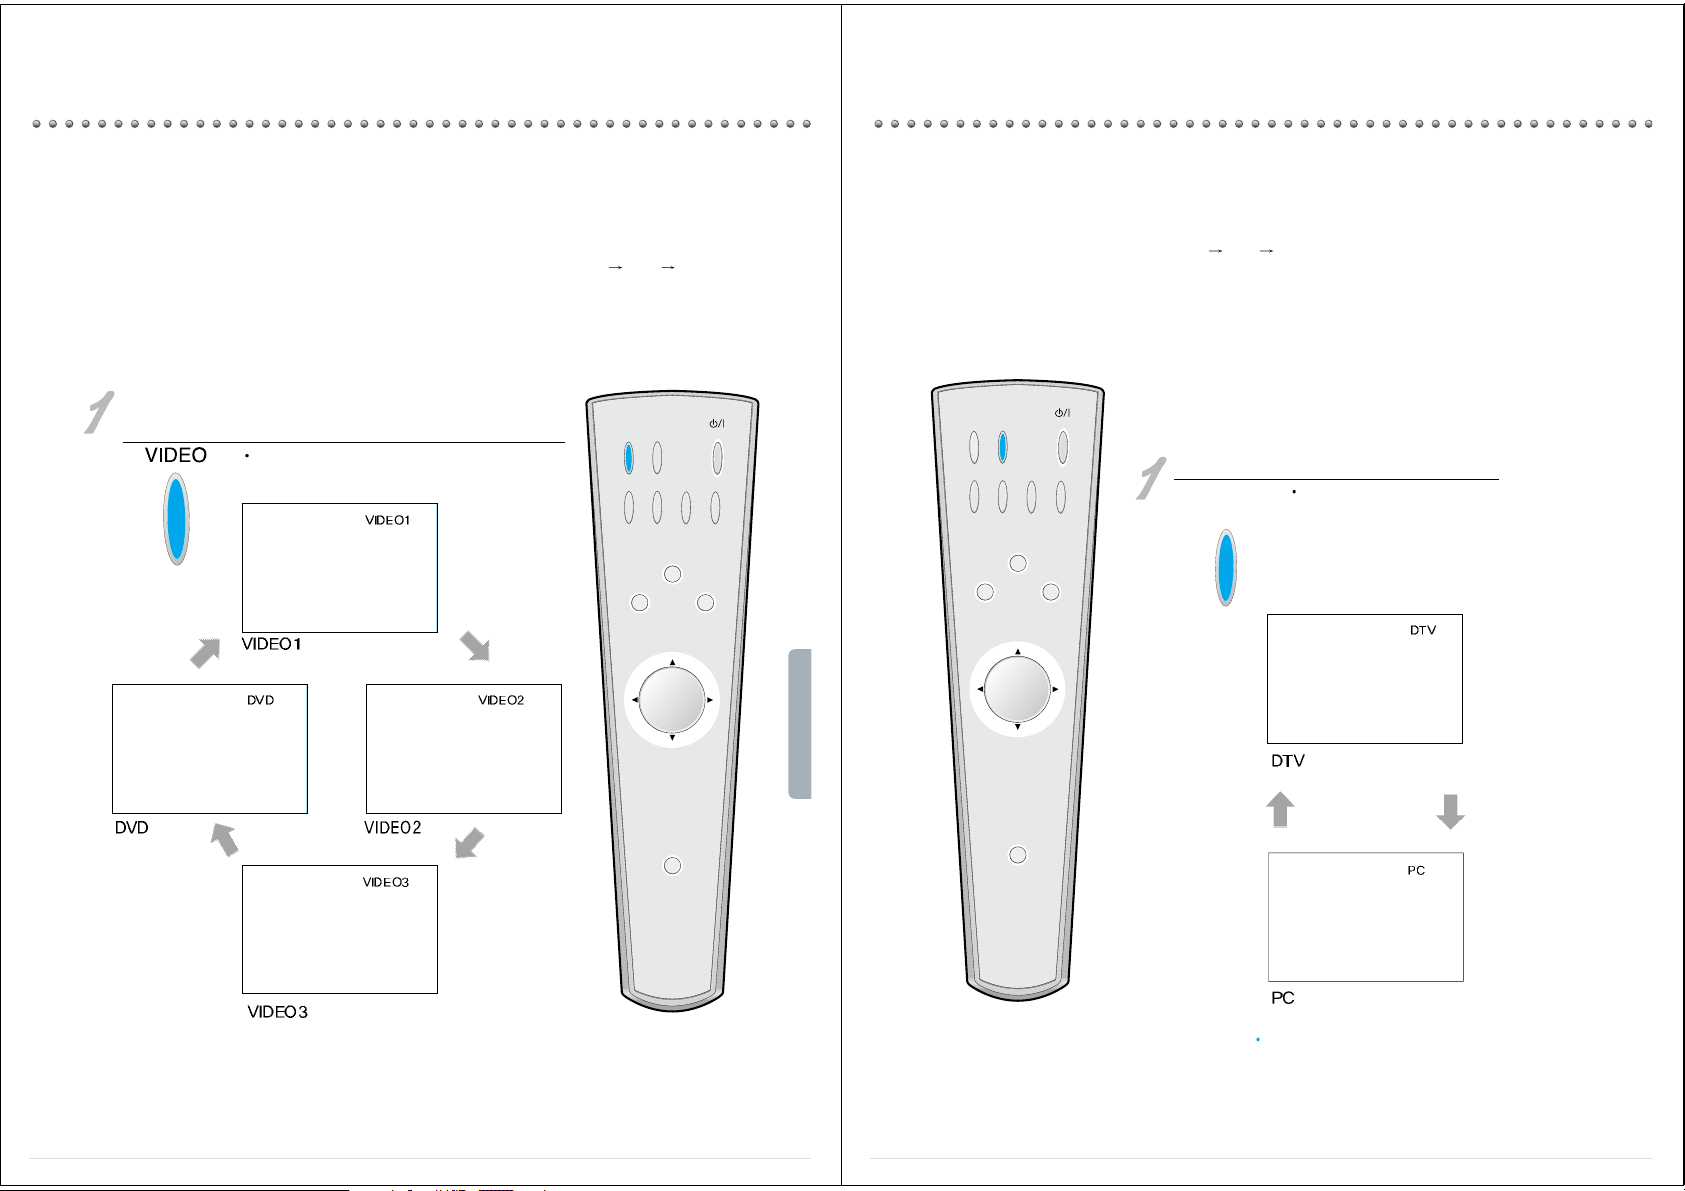
VIDEO
Use this function to make video input selection.
It changes in the following sequence
VIDEO1
VIDEO2 VIDEO3 DVD
RECALL
Power
VOLUME
Mute
If the remote controller does not operate properly, check
whether the Video mode is correctly selected when
changing the input,
whether the main power is turned on; and
whether the batteries are not low.
Dolby Sound
This button allows you to choose one of the Pro Logic
modes. Each time the button is pressed, it rotates from
3-Stereo
Wide Normal Pro-Logic Off.
Screen Size
This feature converts the screen size by changing its
aspect ratio. Each time you press the button, it will be
changed from Normal
Wide Panorama Enlarge
(LB)
Enlarge (LBS)
Screen Mode
This feature converts the screen mode each time you
press the button from Normal
Bright Soft User.
MULTIMEDIA
DVD-DTV or pc can be selected altermately.
Use it when selecting DVD-DTV or pc.
Sound Mode
This feature allows you to choose the mode , Each time
the button is pressed, it rotates from Normal
Music
Movie News User.
Sleep Timer
This feature is used to set up the time of automatic
turn off.
L CD PROJE CTION - MONITOR
Basic Menu Guide
-27-
Basic Menu
When the "menu" button is pressed, the basic menu window will appear on the screen. It contains a list of 5
entries-Picture, Screen, Sound, Input, Utilities. Furthermore, each entry contains its pertinent sub-items, and
when an entry is selected, a list of its sub-items will appear at the right.
Its sub-items are Brightness, Contrast, Sharpness, Color, and Tint.
Its sub-items are Screen Size, Screen Mode, and Adjustment (PC/DTV)
Its sub-items are Sound Mode, Equalizer, Dolby Pro Logic, Sound Balance,
Dolby Sound, and External set.
Its sub-items are Input select, VIDEO1, VIDEO2, VIDEO 3, DVD, DTV and PC.
Its sub-items are Language, Time setting, Factory set and Lamp Time.
Displaying the main menu
When the menu button is
pressed, the basic menu
will appear.
Selecting an item
Press the “
/ ”
button to
select on the item. Follow the
instructions on the screen to
set up.
When the setting is done,
press the "menu" button to
close the window.
The menu window will
automatically disappear if not
closed after an approximate
time of 8 seconds
The window below the main menu where states "move, previous,
next, select" changes its color, and helps to recognize currently
selected menu.
MENU
VOL VOL
MENU
VOL VOL
Page 15

To watching Monitor
-28-
Turning on the Monitor
Buttons on the Monitor set have the same functions as those of the remote controller.
T urning on the Monitor set.
Plug the power cord to the outlet and press the main power at the front controller panel.
A red lamp will light up.
Operating the Monitor set.
It is LCD-Projection Monitor characteristics that it takes a little while for the video to be
displayed on the screen when it is turned on. This is not malfunctioning; thus, please be
patient and wait for a moment.
The degree of brightness will decrease insignificantly after 3 minutes is passed. This is not a
breakdown; it is only using a power saving process to maximize the lamp's lifetime.
When the power buttons are pressed, the main power lamp may flicker in green, but the
secondary power lamp may flicker in red and orange alternately. In this case, the Monitor's
main power has been erroneously pressed, or has been turned off improperly by a power
stoppage or by any other reason. However, please wait for an instant, and the Monitor will
be back on (the latest 1min. 30sec.) since this is not a malfunctioning of the product.
Press the power button on the remote controller or on the Monitor set.
When the main power lamp flickers on green, the screen will gradually turn on.
During this instance, the power button will not operate.
When the process is completed, the main power lamp lights on green
Monitor
REMOTE
CONTROLLER
POWER
Timer On/Off and the main power lamp flickering in red: Please check whether the air filter and lamp cover is properly fixed
and adjusted.
Timer On/Off and the main power lamp flickering in red and orange alternately: There must be a problem with the lamp. You
may have to change the optical lamp or call for service. (For the lamp exchange, please refer to page 12 of the manual)
Timer On/Off and the main power lamp flickering in orange: There must be a problem in the cooling fan. Please call for
service.
The main power lamp flickering in orange: The product is overheated and its temperature is extremely high for some reason.
Please check if the slots and openings of front and rear panels are blocked impeding its ventilation or if the filter is full of dust
and needs some cleaning. After checking them, press the power button on the remote controller or the one on the Monitor
set to turn on the Monitor and operate again.
L CD PROJE CTION - MONITOR
Turning off the Monitor
The lamp's lifetime may be reduced if the Monitor set is not turned off properly.
Please read the indications carefully, and power it off as instructed in this manual.
T urning off the Monitor set.
Press the power button on the remote controller or that of the Monitor
set.
Audio and Video will be turned off and the main power lamp will flash
in green at this time. This is not malfunctioning nor an error; it is just
a process of cooling the lamp off. During this time, the power button
will not operate. A red light will light up after a minute.
If the button is pressed within 10 seconds after the power is turned
off, the video will be displayed without the standby period.
Checking proper shut down
Please have the main power on at all times, except
when the unit is not used for a long period of time.
Press the power button when the main power light is in
red.
Improper turning off of the Monitor set may cause a
damage to the lamp.
-29-
You must press and turn on the main
power button for the remote
controller and the function keys on
the Monitor set to operate. If the
main power is turned off, neither the
remote controller nor the function
keys on the Monitor set will operate.
1. Press the "mute" button
2. The sound will be off if the screen
displays "muting"
3.
When the "mute" button is pressed
once more, the sound will be back on.
For example, use this feature when
there is a telephone call or when there
is a visitor.
There is no damage caused to the
Monitor set if there is no distortion
on the screen image or affect on its
sound quality. This may happen
when the cabinet is compressed by
the internal temperature change.
POWER
Page 16
Watching VCR
-30-
Watching VCR
Please refer to the connection guide of Monitor to external input provided at the page 15~21.
The input may be selected by pressing Menu
Input Input select
VIDEO
MULTI
MEDIA
POWER
MENU
RECALL
DOLBY
SOUND
SOUND
MODE
SCREEN
SIZE
MUTE
SCREEN
MODE
SLEEP
VOL VOL
Connect Either the VCR or DVD with the Monitor and
Press the "VIDEO" of the Remote Controller Repeatedly .
Each time the “VIDEO” button is
pressed, the video input changes as
follows.
L CD PROJE CTION - MONITOR
Connect Either DTV or PC with the Monitor and Press the
"MUL TIMEDIA" Button on the Remote Controller.
Each time the “MULTIMEDIA” button is
pressed, DTV or PC input changes as
follows.
If the connection has not been established,
"No signal ! Please check input signal or press
“VIDEO1” key or “MULTIMEDIA” key, will be
displayed on the screen.
Watching DTV or PC
-31-
Watching DTV or PC
This feature may be selected by pressing Menu Input Input select
VIDEO
SCREEN
MODE
RECALL
MULTI
MEDIA
SCREEN
DOLBY
SIZE
SOUND
MENU
VOL VOL
POWER
SLEEP
SOUND
MODE
MULTI
MEDIA
MUTE
Page 17

-32-
Screen Adjustment of DTV or PC
This feature is only available when there is DTV or PC input. It provides information on the resolution and
frequency, and helps adjust its positions.
Displaying the Menu.
Press the “menu” button
The following menu will appear on the
screen
You must operate it only when the DTV or
the PC is connected.
Selecting an Entry .
Select the "Screen" pressing the “
/ ”
buttons
Press the “Vol”button.
When the “Vol
”button is pressed, an
extended menu will be displayed on the
screen.
VIDEO
MULTI
MEDIA
POWER
MENU
RECALL
DOLBY
SOUND
SOUND
MODE
SCREEN
SIZE
MUTE
SCREEN
MODE
SLEEP
VOL VOL
MENU
VOL VOL
MENU
VOL VOL
L CD PROJE CTION - MONITOR
Adjusting Screen Format.
Select "Adjustment with
"Vol
/
" buttons
When the "Vol " button is
pressed, a gauge menu will be
displayed on the screen.
Use the "Vol / " buttons to
format the screen.
The screen's horizontal and
vertical sizes can only be
adjusted in the "Wide" size of
the PC input.
Exiting Screen Format.
Press the "menu" button
until the menu window
disappears.
-33-
MENU
VOL VOL
MENU
VOL VOL
Page 18

-34-
Screen Size Adjustment
You may change the screen size at your preference. It is more entertaining and fun watching Monitor.
You may adjust it by pressing Menu
Screen Size.
VIDEO
MULTI
MEDIA
POWER
MENU
RECALL
DOLBY
SOUND
SOUND
MODE
SCREEN
SIZE
MUTE
SCREEN
MODE
SLEEP
VOL VOL
Selecting Screen Size.
Press the "Screen Size" button.
The size and the aspect ratio of the screen that you are
currently watching will be changed.
Each time you press the button, it will be changed as follows:
Wide
Panorama Enlarge - LB Enlarge - LBS Normal
Wide: With the screen of 16:9 aspect ratio, you can feel the exceptional sensation that you may can only feel
in theaters
Panorama: 4:3 ratio is enlarged to 16:9, while remaining the centered object as is keeping it natural.
Enlarge - LB: Enlarge the image as is
Enlarge - LBS: Enlarges the screen, and places the caption on the image in case you are watching Video with
caption on it.
Normal: Currently broadcasting normal Monitor screen size
L CD PROJE CTION - MONITOR
-35-
You may select the screen mode already provided by the factory at your preference without going through the
adjustments yourself.
You may make the selection by pressing Menu Screen Mode.
Selecting Screen Mode.
Press the "Screen Mode" button.
Each time you press the button, it will be changed as follows:
Adjust the brightness, contrast, and sharpness on each screen
mode, and you will be automatically on the "user" screen.
Adjustment is possible in each “VIDEO” mode.
SCREEN
MODE
However, when the Input is in PC, only "Normal" and "Movie" modes are available.
Normal: Initially set-up mode. Use it when the surrounding is bright.
Bright: You may enjoy a brighter and a clearer picture image.
Soft: It makes your eyes less tired even watching video for a long-term
User: You adjust the screen and customize it at your preference.
Normal: Initially set-up mode.
Movie: You may enjoy natural picture images when watching Video with PC connection.
Screen Mode Adjustment
SCREEN
SIZE
VIDEO
SCREEN
MODE
RECALL
MULTI
MEDIA
SCREEN
DOLBY
SIZE
SOUND
MENU
VOL VOL
POWER
SLEEP
SOUND
MODE
MUTE
Page 19

-36-
Making Picture Adjusting
You may adjust the brightness, contrast, sharpness, color and tint at your preference.
Displaying the Menu.
Press the "menu" button
The following menu will be displayed on the
screen.
VID
EO
M
UL
TI
M
E
D
IA
POW
ER
MENU
RECALL
DO
LBY
SO
UND
SOUND
M
ODE
SCREEN
SIZE
MU
TE
SCR
EEN
M
ODE
SLEEP
VO
L
VOL
MENU
VOL VOL
Adjusts the degree of
brightness and darkness of
the objects with the
background of the picture.
Adjusts the degree of
brightness or darkness of
the whole screen
Adjusts the shapes of the
objects providing a clearer
and softer image.
Adjusts the degree of the
color saturation
Adjusts and reproduces a
person's skin color most
naturally.
Tint adjust ment is available
in NTSC signal and DTV
mode only.
Brightness, Contrast, and Sharpness are
the only three adjustments available.
L CD PROJE CTION - MONITOR
Viewing the Sub-Menu.
Press the
“( / )”
buttons
and select “picture”
When
“Vol”button is
pressed, an extended menu
window will appear.
Select the sub-item to be
adjusted with the
“( / )”
button once again.
When
“Vol”button is
pressed, an gauge menu will
be displayed on the screen.
Making Adjustment.
Select the item to be adjusted
pressing the
“( / )”
button.
Each time the
“( / )”
button is pressed, the entry
will be changed in the
sequence of Brightness
Contrast Sharpness
Color.
When Adjusting the Color.
Select "Color" pressing the
“( / )”
buttons
Adjust the "color" with
“Vol
/”buttons.
You may adjust
Brightness, Contrast and
Sharpness, with the same
method.
Exiting Picture Adjustment.
Press the “Menu” button
until the menu window
disappears from the
screen.
-37-
MENU
VOL VOL
MENU
VOL VOL
MENU
VOL VOL
MENU
VOL VOL
Page 20
-38-
Sound Adjustment
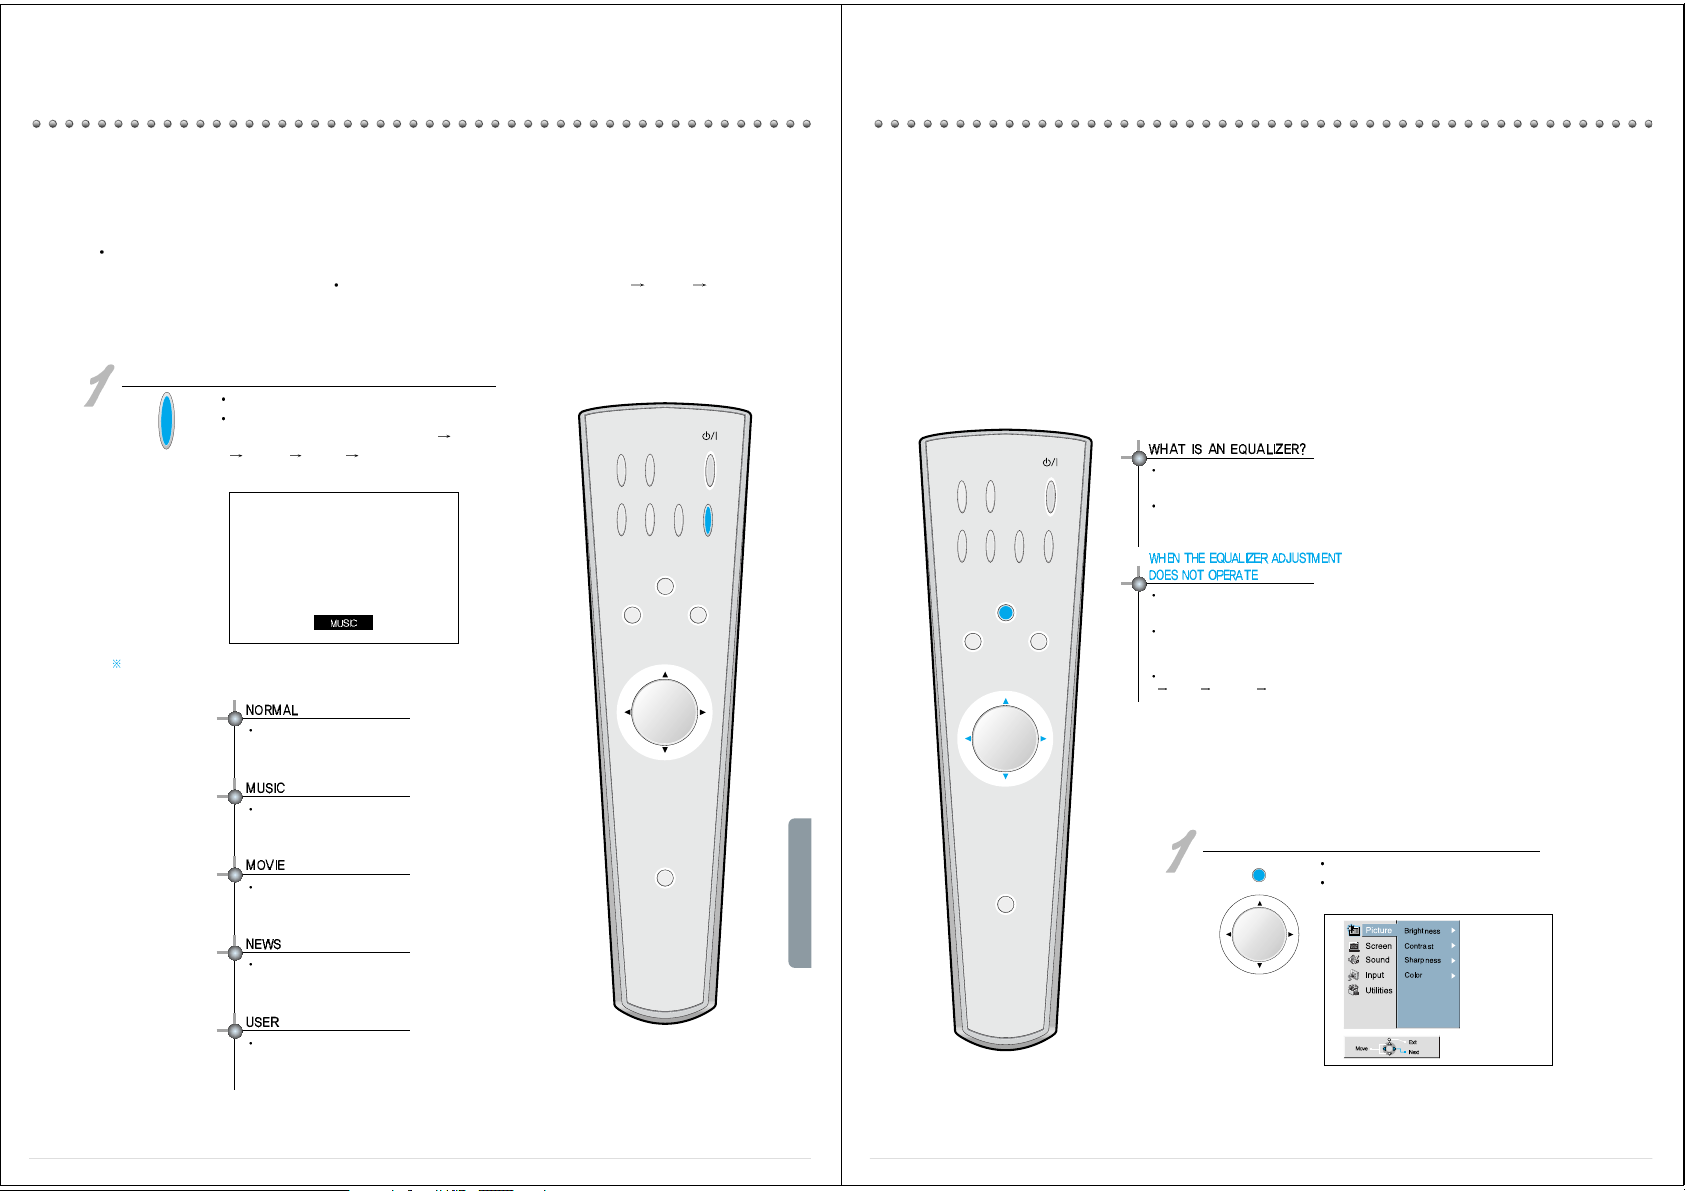
Adjusting the Sound Mode
You may select the sound mode already provided by the factory at your preference without going through
the adjustments yourself.
You may have this selection by pressing Menu Sound Mode.
Selecting Sound Mode.
Press the "Sound Mode" button.
Each time you press the button, it will be
changed in the sequence of "Normal"
"Music"
"Movie" "News" "User" mode.
The Sound Mode cannot be adjusted when Dolby Pro Logic is selected.
VIDEO
MULTI
MEDIA
POWER
MENU
RECALL
DOLBY
SOUND
SOUND
MODE
SCREEN
SIZE
MUTE
SCREEN
MODE
SLEEP
VOL VOL
SOUND
MODE
Generally, it is good to hear all type
of music
It provides the most harmonic
sound with its bass and treble when
listening to the music.
Sound effect is extremely rich, and
gives you a real sensation when
watching a movie.
The speaker's voice is accentuated
and it is moderate when watching
news and documentary programs.
you adjust the sound quality and
customize it at your preference.
L CD PROJE CTION - MONITOR
-39-
Using Equalizer
You may adjust the equalizer provided and enjoy the sound quality at your preference.
Either high or low tone may be diversely adjusted as the way you want it.
Displaying the Menu.
Press the “menu” button.
The following menu will be displayed on
the screen
VIDEO
MULTI
MEDIA
POWER
MENU
RECALL
DOLBY
SOUND
SOUND
MODE
SCREEN
SIZE
MUTE
SCREEN
MODE
SLEEP
VOL VOL
MENU
VOL VOL
This feature is a function that provides
a range of sound adjustment used on
the audio products.
120Hz, 500Hz - low-pitched tone
1 KHz, 5 KHz - moderate tone
10 KHz - high-pitched tone
The equalizer cannot be used for
sound mode adjustment when the
"Dolby Pro Logic" mode is on
You may adjust the sound mode by
first selecting "Pro Logic Off" with the
"Dolby Sound" button on the remote
controller.
You may select this by pressing Menu
Sound Pro Logic Pro Logic
Off.
Page 21
-40-
Using Equalizer
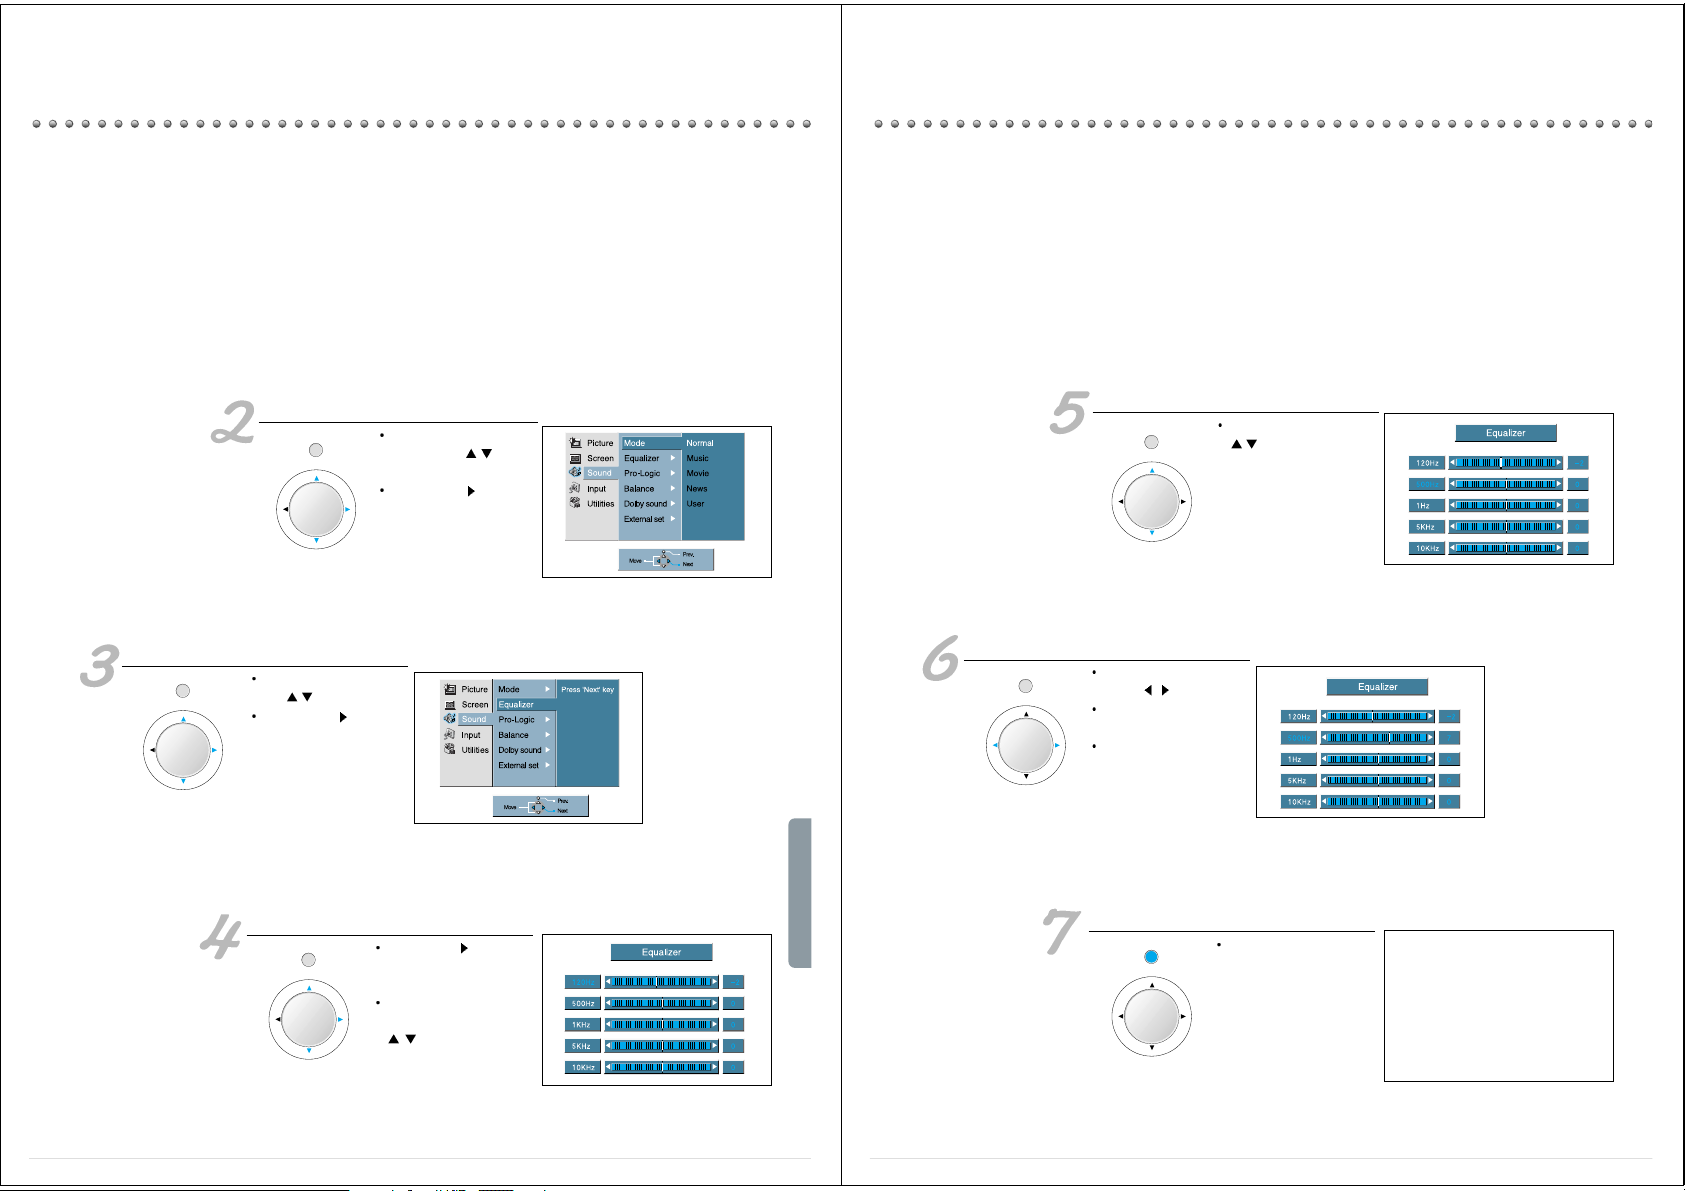
Select "Equalizer" pressing
the
“
/ ”
buttons.
When the “Vol”button is
pressed, an extended
menu will appear.
Viewing Sound Range.
Press the “Vol”button
and select the sound
range to be adjusted.
Select the item to be
adjusted pressing the
“ / ”
buttons.
Making "Sound Adjustment"
Select "Sound Adjustment"
pressing the
“ / ”
button.
When the “Vol”button is
pressed, an extended
menu will appear.
MENU
VOL VOL
L CD PROJE CTION - MONITOR
Adjusting Sound Range.
Select the sound range using
the
“Vol
/”buttons.
Adjust the sound range in the
same method.
The sound range of the
equalizer adjustment is -32~32
Exiting Sound Adjustment.
Press the “Menu” button
until the menu window is
disappeared from the
screen.
When Adjusting to "500Hz"
Select "500Hz" pressing the
“ / ”
buttons.
-41-
MENU
VOL VOL
MENU
VOL VOL
MENU
VOL VOL
MENU
VOL VOL
MENU
VOL VOL
Page 22

-42-
Dolby Sound
The original sound system has been improved, and you may hear three-dimensional, Dolby Pro Logic sound.
You may have this selection by pressing
<Menu> <Sound> <Pro-Logic>
VID
EO
MULTI
ME
DIA
POWER
MENU
RECALL
DOLBY
SOUND
SOUND
MODE
SCREEN
SIZE
MUTE
SCREEN
MODE
SLEEP
VOL VOL
L CD PROJE CTION - MONITOR
-43-
Choosing Dolby Pro Logic
Press the "Dolby sound" button.
Each time you press the button, it will be changed in the
following sequence
It may be adjusted by pressing Menu Sound Pro-Logic
DOLBY
SOUND
Page 23

-44-
Speaker Sound Adjustment
You may adjust the Speaker sound by pressing Menu Sound Dolby Sound(or Sound Balance)
Dolby Pro Logic related sound adjustment cannot be done when the "Pro Logic Off" mode is on.
Noise sequencer: When you select Menu Sound External set Noise sequencer, you will hear "noise
tone" in sequence from left to center to right to surround speakers.
Displaying the Menu.
Press the “Menu” button.
The following screen will be displayed.
Choosing "Sound"
Select Sound" pressing the
“( / )”
buttons.
When the
“Vol”button is pressed, an extended menu
will appear on the screen.
VIDEO
MULTI
MEDIA
POWER
MENU
RECALL
DOLBY
SOUND
SOUND
MODE
SCREEN
SIZE
MUTE
SCREEN
MODE
SLEEP
VOL VOL
MENU
VOL VOL
MENU
VOL VOL
L CD PROJE CTION - MONITOR
Choosing on Entry
Select the entry to adjust
pressing the
“Vol /
”
buttons.
When adjusting the "Surround Balance"
Select "S-Balance" pressing the
“ / ”
buttons.
When the
“Vol
”
button is
pressed, an extended menu will
appear on the screen.
Making Adjustment.
Adjust "S-Balance" pressing the
“Vol /”buttons..
You may select and adjust the
Balance, Sub-woofer volume,
Surround Volume, and Center
Volume, in the same method by
pressing the
“( / )”
buttons.
Exiting Sound Adjustment.
Press the “Menu” button
until the menu window
disappears from the screen.
-45-
MENU
VOL VOL
MENU
VOL VOL
MENU
VOL VOL
MENU
VOL VOL
Page 24

-46-
Using the Memory Feature
Displaying the Menu.
Press the “menu” button
The following menu will
appear on the screen
Viewing the Sub-Items.
Select "Utilities" using the
“ / ”
buttons
When the “Vol”button is
pressed, an extended
menu will appear on the
screen.
Choosing "Time Setting"
Select "time setting"
pressing the
“ / ”
buttons
Viewing Extended Menu
When the “Vol”button is
pressed, an extended
menu will appear on the
screen.
Time Setting
This feature makes the Monitor turn on automatically at a certain time that you set-up.
You must set-up the current time before utilizing this memory feature.
VIDEO
MULTI
MEDIA
POWER
MENU
RECALL
DOLBY
SOUND
SOUND
MODE
SCREEN
SIZE
MUTE
SCREEN
MODE
SLEEP
VOL VOL
MENU
VOL VOL
MENU
VOL VOL
MENU
VOL VOL
MENU
VOL VOL
L CD PROJE CTION - MONITOR
-47-
Selecting "Current Time"
The word "Current Time" will turn into light blue
Press the
“Vol”button and select "hour". The
word "hour" will turn into yellow. Press the
“ / ”
buttons to adjust the time.
Press the
“Vol”button and select "minute" as
you have done above. The word "minute" will turn
into yellow, and at this time, press the
“ / ”
buttons and adjust the minutes.
Choosing "on time" or "off time"
You may select either "On time" or "Off time"
pressing the
“Vol”button after you had set
up the current time.
When "On time" is selected, the word "On time"
will turn into light blue.
When Adjusting "On time"
Use the
“ / ”
buttons to select "Utilities"
Press the
“Vol”button and select "hour" when the
word "On time" is in light blue. The word "hour" will
turn into yellow.
When the
“ ”
button is pressed, the number will
increase;
When the
“ ”
button is pressed, the number will
decrease.
Use the same method to adjust the minutes.
Use the same method to set -up "Off Time"
If you want to turn the "On Time/Off Time" option off,
use the
“
/ ”
button to change the set-up to "off"
Exiting time setting
Press the menu button until the menu
window disappears from the screen.
The 'Timer" lamp will light up red when
the setting has been completed.
MENU
VOL VOL
MENU
VOL VOL
MENU
VOL VOL
MENU
VOL VOL
Page 25

-48-
Setting "Sleep Timer"
This feature permits the unit to turn off automatically after 10 to 120 minutes depending on the time you set-up
Using Sleep Timer
Press the "Sleep" button.
Each time the "Sleep" button is pressed, the menu will
change in the following sequence: "Sleep-timer off"
"Off
in 10 min."
"Off in 30 min." "Off in 60 min." "Off in
90 min."
"Off in 120 min." repeatedly.
Stop pressing the button at the time period that you want
to set up.
SLEEP
L CD PROJE CTION - MONITOR
-49-
Adjusting to "Factory Set"
Select Menu Utilities Factory Set
Checking "Lamp Time"
Select Menu Utilities Lamp Time
You can view the accumulated lamp usage time.
Adjusting to the Factory set
You may enjoy the optimum picture and sound by
selecting Menu
Utilities Factory set.
Do not reset the "Lamp Time" without exchanging the lamp with a new one.
If the "Lamp Time" is reset without the lamp actually changed, the accumulated time
used will display 0 hour, and the actual time used cannot be viewed.
When Changing the Lamp
You must reset "Initial(Lamp Time)" by
selecting "Utilities"
"Lamp time" at the
menu
VIDEO
MULTI
MEDIA
POWER
MENU
RECALL
DOLBY
SOUND
SOUND
MODE
SCREEN
SIZE
MUTE
SCREEN
MODE
SLEEP
VOL VOL
VIDEO
MULTI
MEDIA
POWER
MENU
RECALL
DOLBY
SOUND
SOUND
MODE
SCREEN
SIZE
MUTE
SCREEN
MODE
SLEEP
VOL VOL
MENU
VOL VOL
MENU
VOL VOL
VIDEO
SCREEN
MODE
RECALL
MULTI
MEDIA
SCREEN
DOLBY
SIZE
SOUND
MENU
VOL VOL
MUTE
SLEEP
POWER
SOUND
MODE
Page 26

-50-
Selecting the On-Screen Language
The language of the program on the screen can be changed to one of the following
On-Screen languages: English, Spanish, French,Portuguese, Dutch, Italian, and Russian.
Press the Menu button
The following screen will be displayed.
MENU
VOL VOL
Select Utilities by pressing the Up/Down buttons.
Select "Utilities" by pressing
the
“
/ ”
buttons.
When the “Vol”button is
pressed, an extended menu
window will appear.
L CD PROJE CTION - MONITOR
-51-
Select Language
Select "Language" by pressing
the
“ / ”
buttons.
When the “Vol”button is
pressed, an extended menu
window will appear.
Select “On-Screen Language”
you want to be displayed by
pressing the
“ / ” and
“Vol”buttons.
Exiting On-Screen Language
press the menu button
until the menu window
disappears.
MENU
VOL VOL
VIDEO
SCREEN
MODE
RECALL
MULTI
MEDIA
SCREEN
DOLBY
SIZE
SOUND
MENU
VOL VOL
MUTE
POWER
SLEEP
SOUND
MODE
MENU
VOL VOL
MENU
VOL VOL
English
Spanish
French
Portuguese
Dutch
Italian
Russian
Page 27

-52-
Symptoms and Solutions
Please check the following list prior to calling Nec Service Center for assistance
Is the Monitor power cord
plugged into the outlet
correctly?
Please check the power cord
and connect it properly to the
outlet.
Press the main power button at
the front controller panel.
Has the "mute" button at the
remote controller been pressed
accidentally?
Have you checked its volume?
Press the "mute" button on the
remote controller once more.
Adjust the volume pressing the
"
" button
Have you checked the Color?
Isn't the program itself
broadcasting in black and white?
Have you checked the antenna
connection?
Adjust the color pressing the
“
/ ” buttons as explained in
page 36
Check other broadcasting
programs
Turn the antenna towards
where the broadcasting station
is
Have you checked the antenna?
Have you checked whether it
has been interfered by vehicles
or neon signs?
Hasn't the remote controller receiving
window be blocked or interfered by
any object?
Aren't the batteries on the remote
controller low?
Hasn't the remote controller mode set
up in cable mode?
T roubleshootings
L CD PROJE CTION - MONITOR
-53-
Specifications
Page 28
NEC Australia Pty. Ltd.
ABN 86 001 217 527
Home Electronics Group
NEC Service Centres
NEW South Wales
Sydney 184 Milperra Rd, Revesby 2212 (02)9780 8688
Newcastle 120 Parry Street, Newcastle 2302 (02)4926 2466
Victoria
Melbourne 480 Princes Highway, Noble Park 3174 (03)9554 6245
Queensland
Brisbane 116 lpswich Rd, Woollongabba 4102 (07)3361 5858
Southport Shop 1, 48 Ferry Rd, Southport 4215 (07)5591 3670
South Australia
Adelaide 84A Richmond Rd, Keswick, 5053 (08)8375 5710
Western Australia
Perth 45 Sarich Court, Osborne Park 6017 (08)9445 5901
For Service in outer areas, please contact your NEC retailer for the address of the nearest
Authorized NEC Service Centre.
NEC Australia Pty. Ltd.
244 Beecroft Road EPPING 2121
Tel. 131-632 Fax. (02)9930 2380
NEC Service Centres
 Loading...