

Page 1

eBeam Education Suite
Version 2.4
© Luidia Incorporated, 2011
Page 2

© 2011 Luidia, Incorporated
About...
4
What's New
5
Minimum System Requirements
6
Setup
7
Hardware Setup
7
eBeam Edge(TM) Setup
8
eBeam Classic Setup
11
The Interactive Stylus
13
Software Setup
15
eBeam Education Taskbar Menu
18
Bluetooth Wireless Setup
19
eBeam Edge Setup
20
eBeam Classic Setup
21
Bluetooth Wireless Settings
23
Interactive Hardware Detection
24
Calibration
25
eBeam Education Options & Preferences
26
eBeam Education Options
26
Scrapbook Options
28
eBeam System Preferences
28
eBeam Tool Palette
30
Handwriting Recognition Tool
34
On-Screen Keyboard
35
Recorder
36
Snapshot
39
Text Tool
40
Voting Tool
41
Standard Annotation Toolbar
43
eBeam Home
44
eBeam Home Shortcuts
45
eBeam Scrapbook
47
Scrapbook Menus
47
File Menu
48
Edit Menu
51
View Menu
54
Cover Sheet
56
Master Page
57
Layers
58
Playback
60
Spotlight
61
Page Menu
62
Meetings Menu
64
Help Menu
65
Scrapbook Features
66
Scrapbook Elements
66
Scrapbook Elements Edit Toolbar
71
Background Settings
74
Hyperlinked Elements
76
Importing PowerPoint, Excel and Word Documents
78
Exporting Documents into Scrapbook
80
Table of Contents
Page 2
Page 3

© 2011 Luidia, Incorporated
Gesture Based Navigation
81
eBeam Inscribe Wireless Tablet
84
Document Camera
87
Gallery
89
Adding Images to Scrapbook Pages
89
Favorites
90
Templates
92
Flickr
94
Encyclopædia Britannica
95
Shared Meetings
97
What is a Shared Meeting?
97
Hosting/Sharing a Meeting
98
Join a Meeting
100
Sending an Invitation
101
Accepting an Email Invitation
102
Archive a Meeting
103
Retrieve a Meeting
105
Participants
109
Chat
111
Page 3
Page 4

© 2011 Luidia, Incorporated
About...
eBeam Education Suite
Version 2.4
eBeam Education Suite is made up of eBeam Scrapbook, the eBeam Tool Palette and
eBeam Home. eBeam Education Suite makes it easy to develop, organize and communicate
classroom information. It includes software applications that allow you to annotate lessons
on-the-fly, create and save multi-page brainstorm sessions and mark up content from
outside applications. eBeam Education Suite software is easy to set up and intuitive to use,
creating a fun learning environment for students and teachers, and enhancing the impact of
every lesson plan.
eBeam Scrapbook is a powerful resource that can be used to create lessons, store
annotations and enliven curriculum material.
The eBeam Tool Palette provides quick access to important tools that can be used as a part
of Scrapbook, in conjunction with your every day applications or to annotate over your entire
desktop. The tools in the eBeam Tool Palette change depending on the environment that you
are working in.
eBeam Home works on top of Scrapbook. It creates a centralized shortcut to the most
commonly used resources, m aking the eBeam Education Suite an even more integral part of
everyday teaching resources.
Copyright 2011 Luidia, Inc.
All rights reserved.
The publications included with the interactive product are protected by copyright, and all rights are reserved. No part
of it may be reproduced or transmitted in any form or by any means for any purpose without express prior written
consent from Luidia, except as expressly permitted herein. Information in this document is subject to change without
notice and does not represent a commitment on the part of Luidia.
The software described in this publication is furnished under license and may only be used or copied in accordance
with the terms of such license.
Portions of the Scrapbook Gallery ©2011 Luidia, Inc. All Rights Reserved.
Portions of the Scrapbook Gallery ©2005 Mythic Wave Productions, Inc. All Rights Reserved.
Rev 2.4
Page 4
Page 5

© 2011 Luidia, Incorporated
What's New
New Features with this release:
For files saved before version 2.3.3, converted text retains its type size and location.
Correction: In Scrapbook, changes in Annotation or Snapshot mode are saved even when
Scrapbook isn’t open.
In Powerpoint, the tool palette remains visible when you select the next slide.
Page 5
Page 6

© 2011 Luidia, Incorporated
Minimum System Requirements
Windows-compatible computer with Pentium IV or equivalent with 1GB RAM
Windows 7, Vista or XP
120 MB available hard drive space for standard eBeam Education Suite software
65K color SVGA or comparable high performance video card
CD-ROM drive or Internet connection (for software installation)
Internet connection (for registering your software and participating in shared meetings)
One available USB port or Bluetooth connection
Digital projector or display device attached to computer
Page 6
Page 7

© 2011 Luidia, Incorporated
Setup
Hardware Setup
Select a topic below for a description of how to set up an eBeam system. If your system is
not described here then refer to the setup documentation included in the box.
eBeam Classic Setup
eBeam Edge(TM) Setup
eBeam Engage(TM) Setup
Page 7
Page 8

© 2011 Luidia, Incorporated
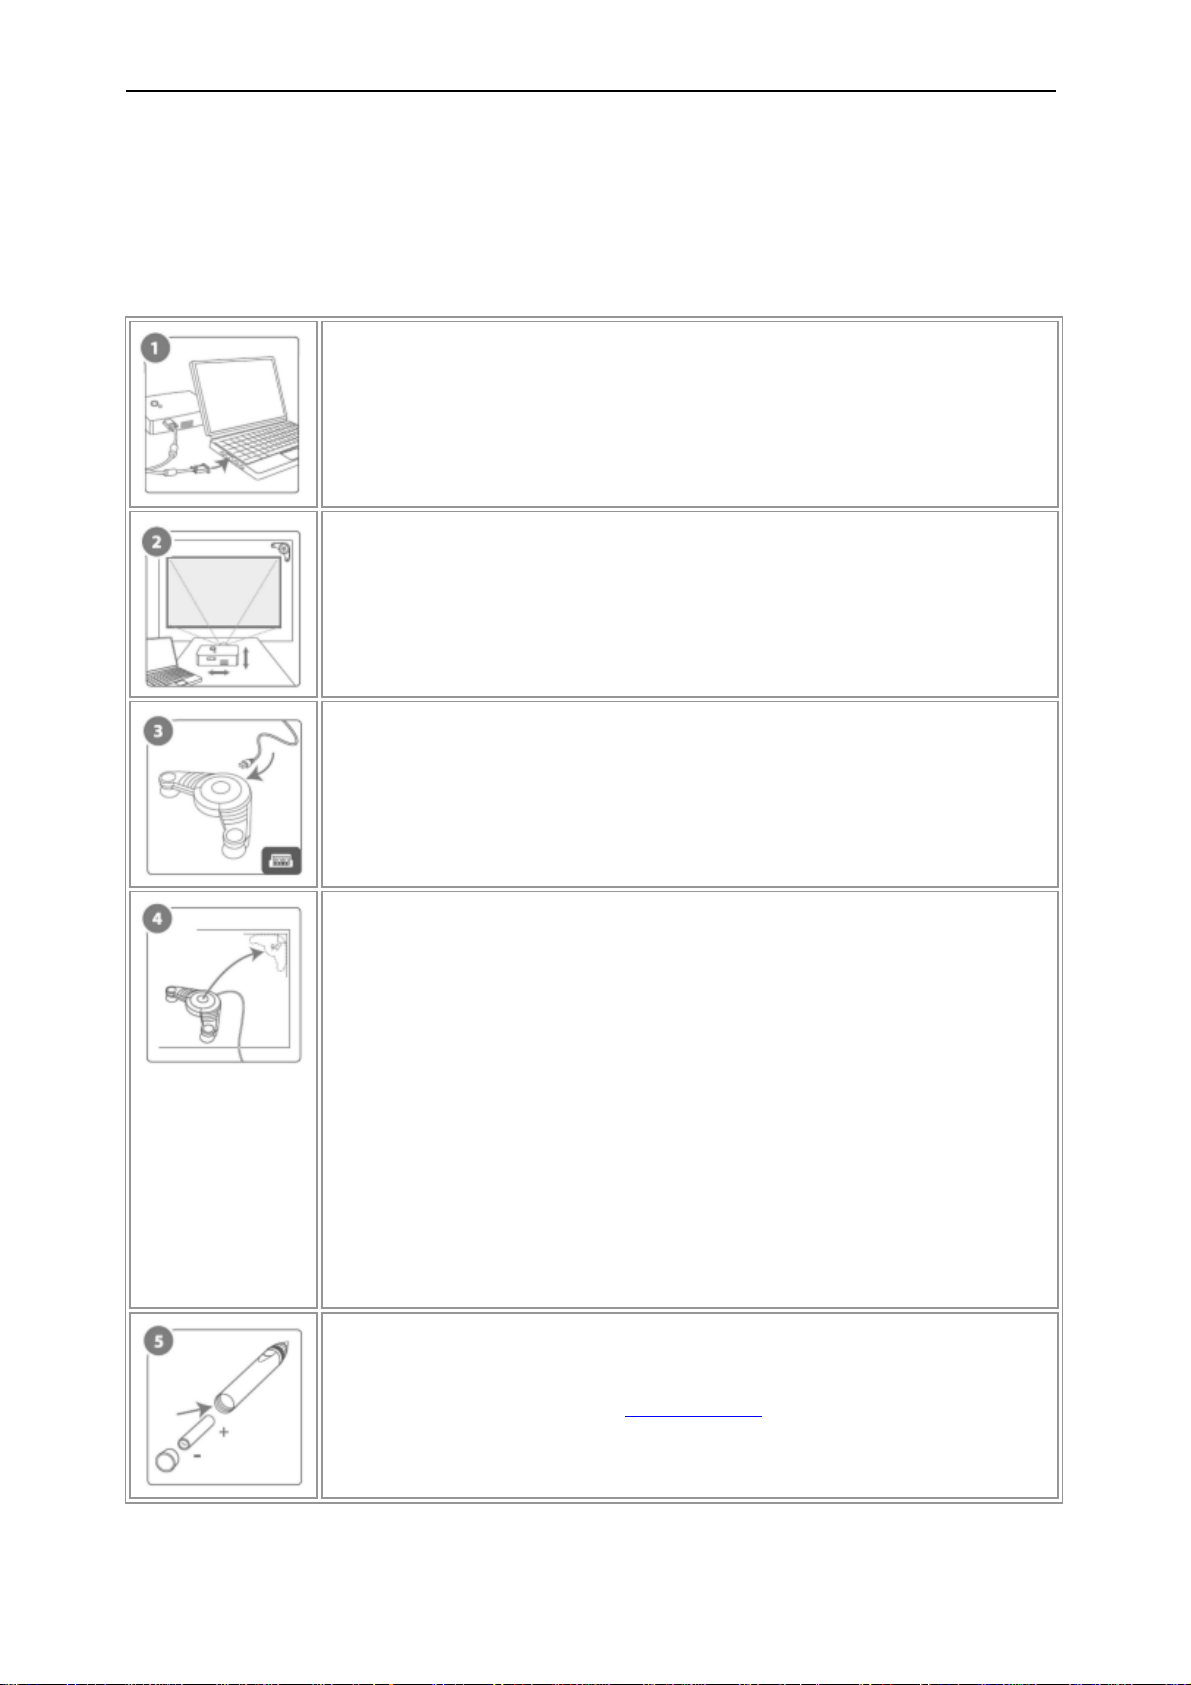
Connect your projector to your com puter.
Turn on your projector and align/focus the image on the board.
Connect the eBeam USB cable to your eBeam Receiver.
Peel the Command Adhesive backing from the Receiver.
Hold the Receiver and prepare to place it carefully in the indicated
location.
Place the Receiver so that it is centered vertically on the board and
parallel to the frame.
eBeam Edge(TM) Setup
This section demonstrates the quick setup instructions for the eBeam(R) edge(TM) receiver.
Page 8
Page 9
© 2011 Luidia, Incorporated
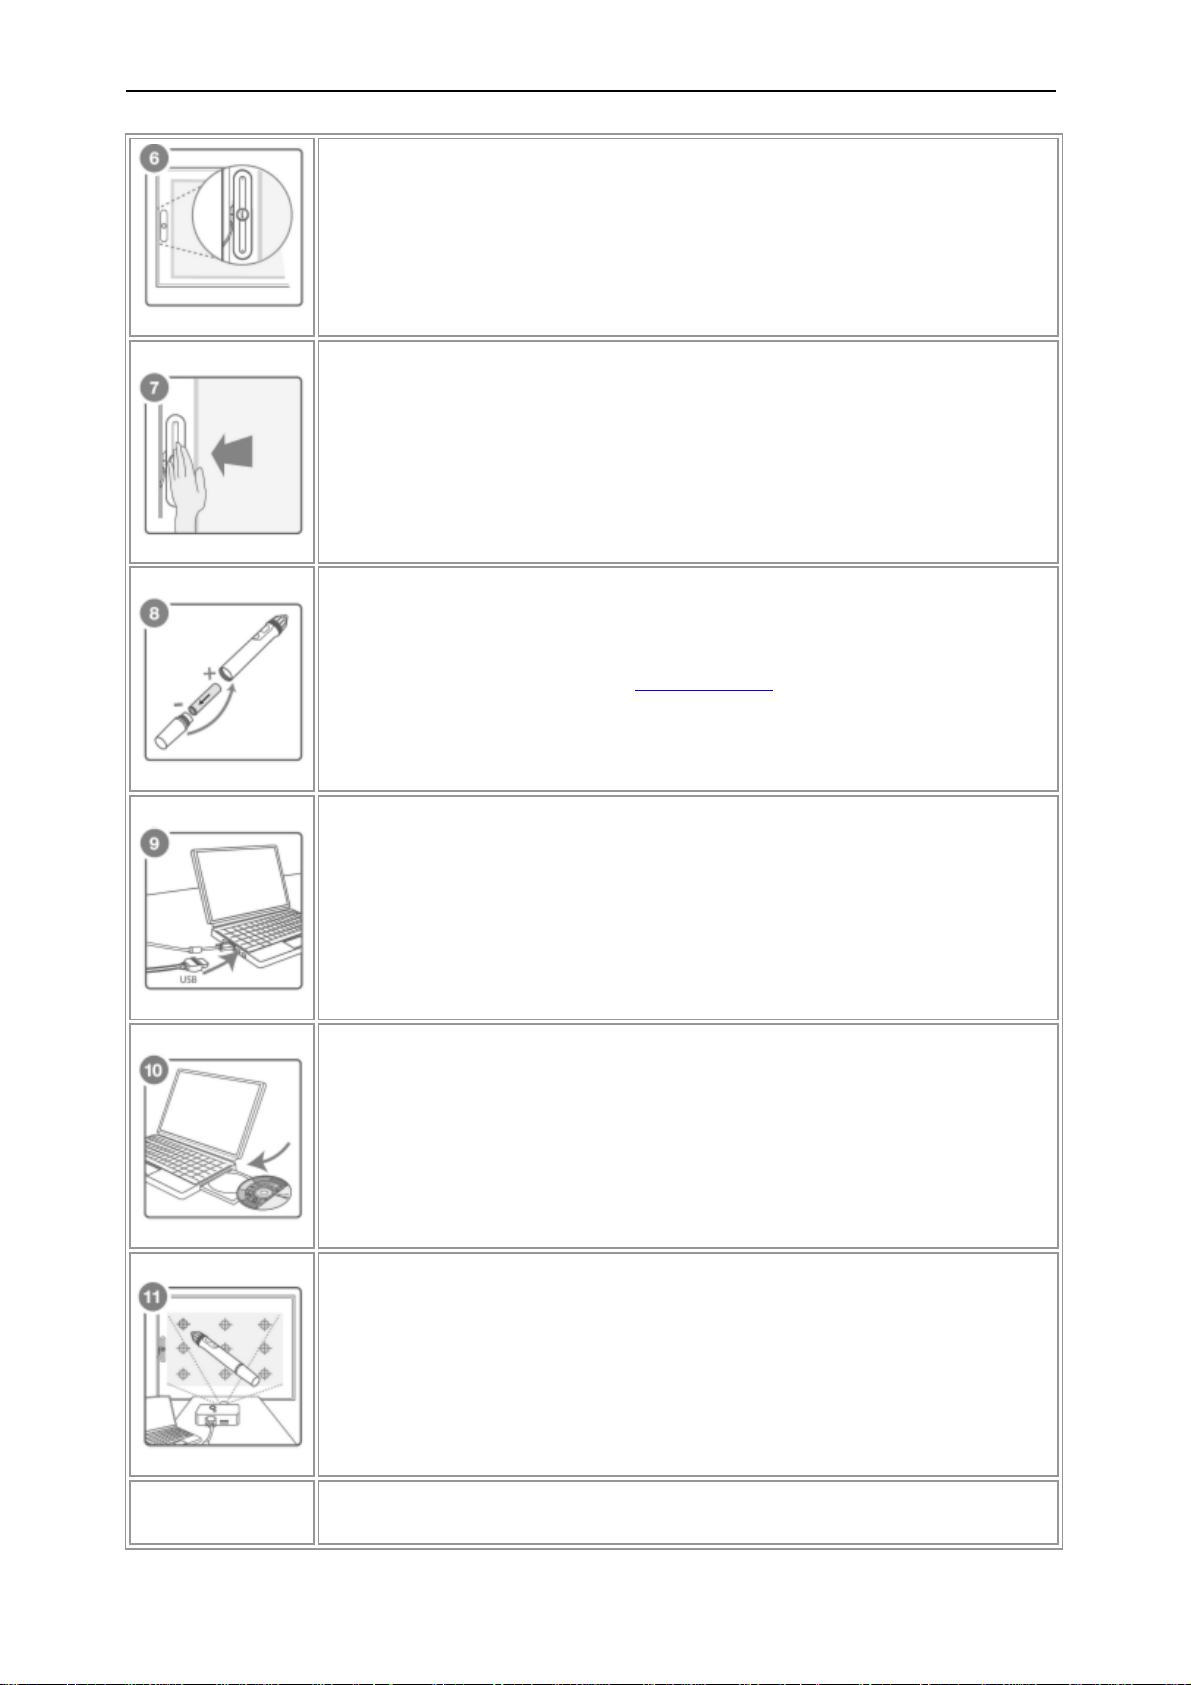
Press the Receiver firmly against the board for best adhesion.
Install the AAA battery in your eBeam Stylus.
Connect the eBeam USB cable to your computer USB port.
Insert the eBeam software CD and install.
Launch the eBeam software and calibrate the system.
Finished!
Page 9
Page 10

© 2011 Luidia, Incorporated
Page 10
Page 11
© 2011 Luidia, Incorporated
Connect your projector to your com puter.
Turn on your projector and align/focus the image on the board.
Connect the eBeam USB cable to your eBeam Receiver.
Attach the eBeam Receiver mounting bracket to the board.
The eBeam package contains the following receiver mounting options.
Suction cups
Command adhesive
Magnetic mounting brackets
The eBeam R eceiver is pre-attached to the suction cup mounting
bracket. To detach any of the mounting brackets from the eBeam
Receiver, position thumbs at bottom corners of the bracket and push
up; the bracket should easily snap off.
To secure brackets to the receiver, position the desired bracket over
the back of the receiver and snap it into place. To permanently fasten
the receiver, use the clear mounting bracket -- the one without suction
cups. Fasten the receiver to the mounting surface through the holes in
the clear mounting bracket.
Install the AA battery in your eBeam Stylus.
eBeam Classic Setup
The following describes a typical setup for the eBeam USB or Bluetooth Wireless receivers
and related hardware.
Page 11
Page 12

© 2011 Luidia, Incorporated
Connect the eBeam USB cable to your computer USB port.
Insert the eBeam software CD and install.
For additional information on setting up Bluetooth on your computer,
see Bluetooth Wireless Configuration.
Launch the eBeam software and calibrate the system.
Finished!
Page 12
Page 13
© 2011 Luidia, Incorporated
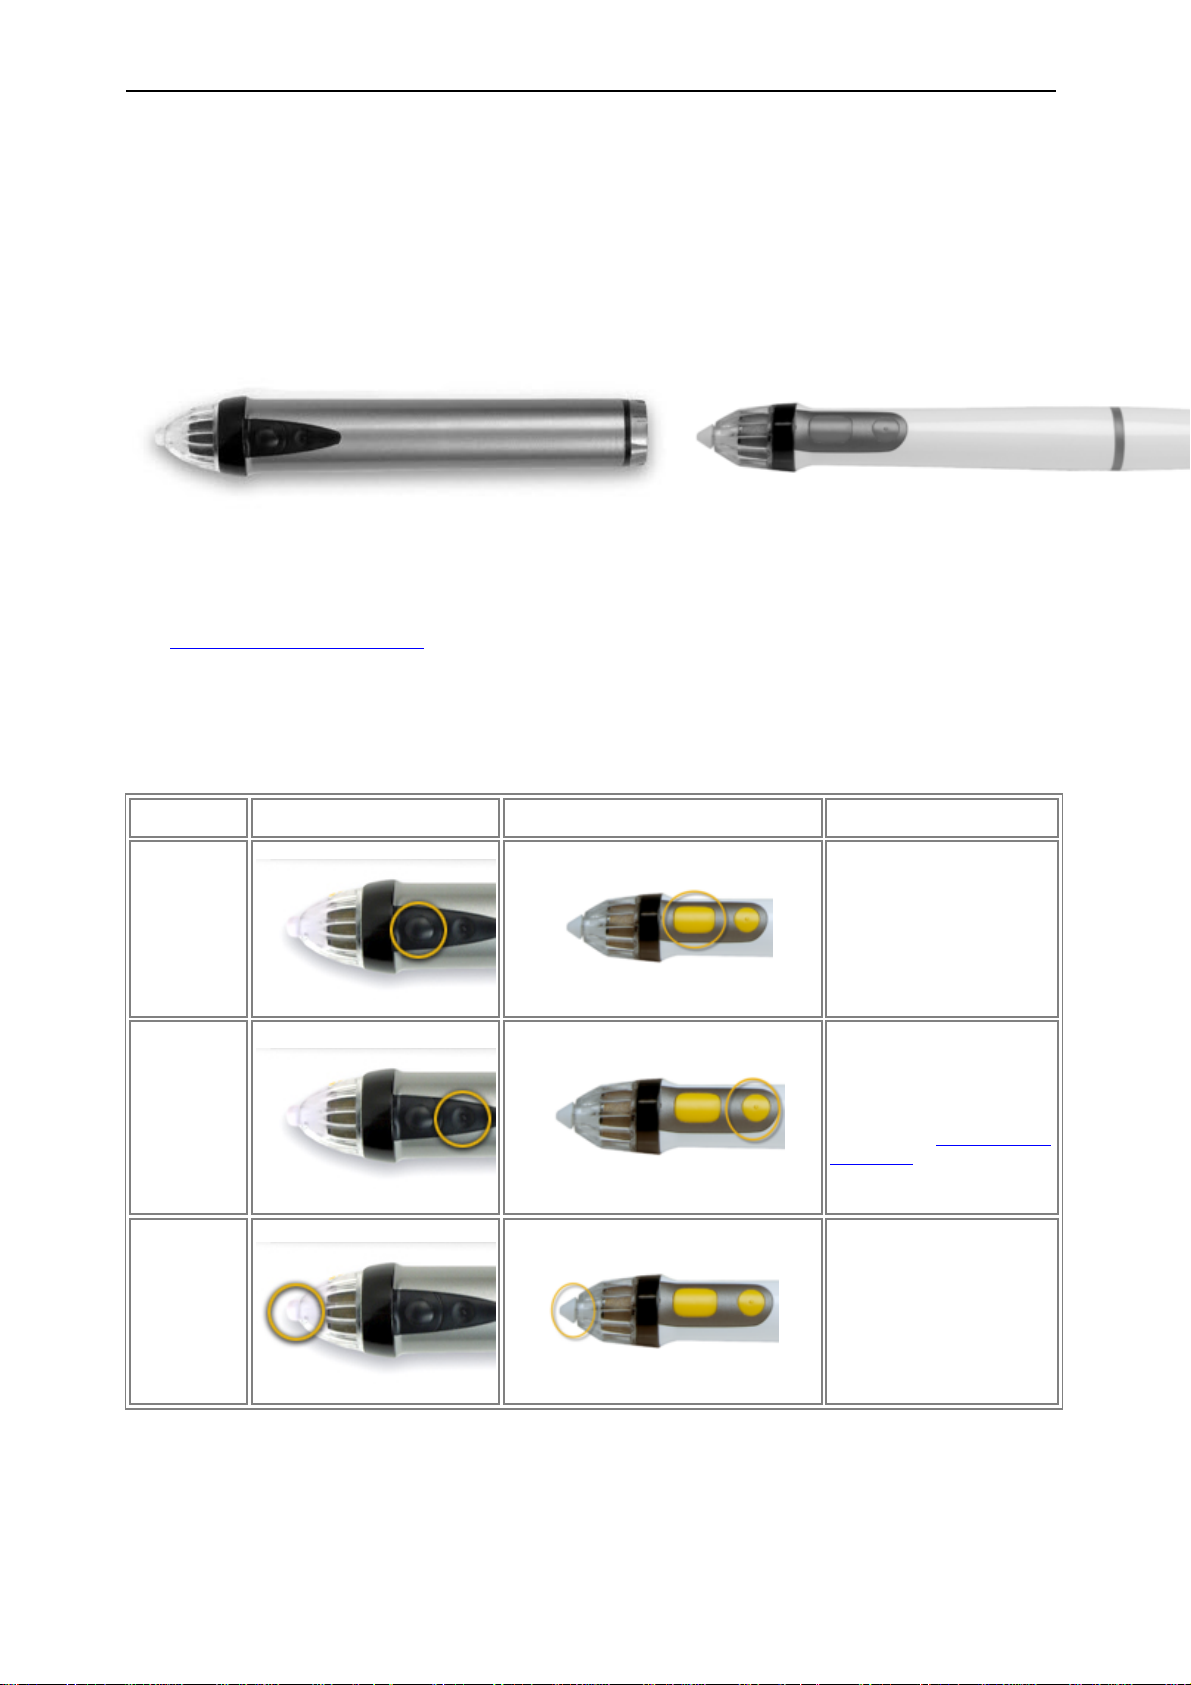
Model 303
Model 305
Name
Model 303
Model 305
Description
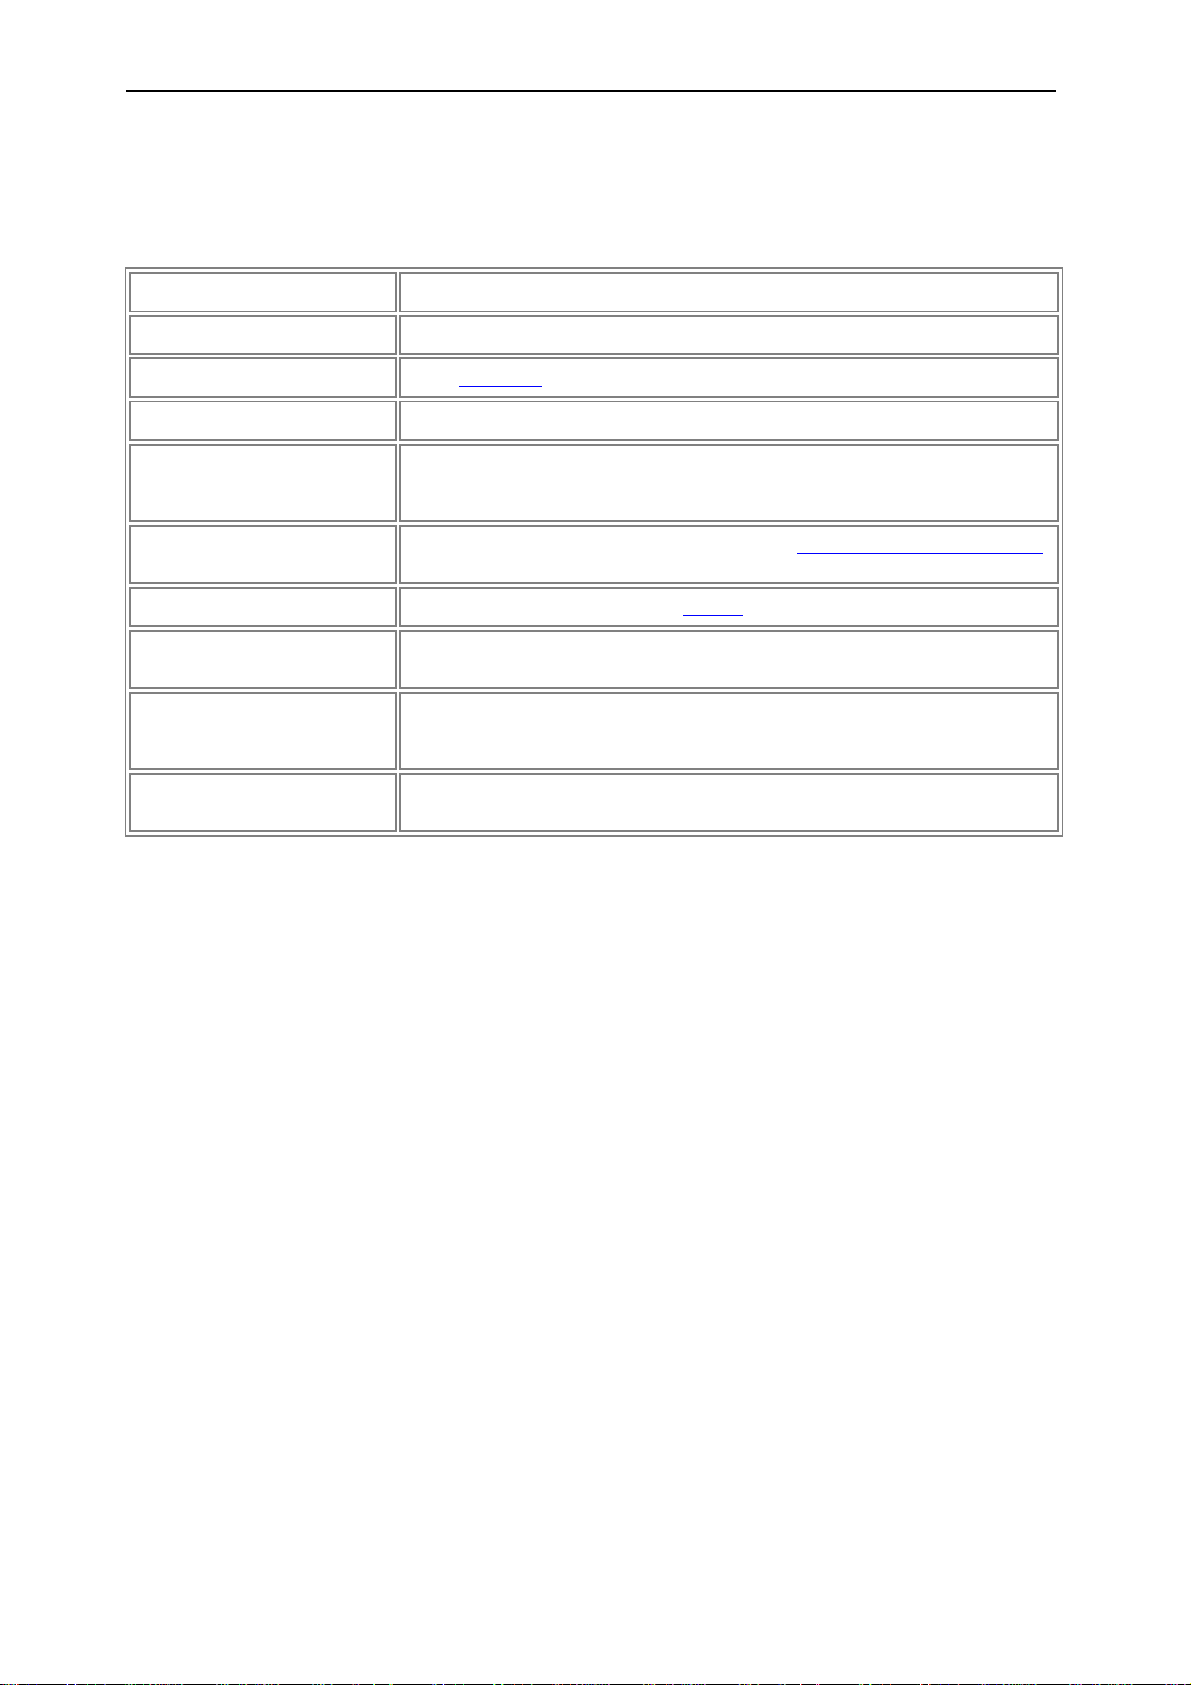
Menu
Button
The Menu Button is the
equivalent of the right-click
button on your mouse.
Tool Palette
Button
The Tool Palette Button
shows and hides the eBeam
Tool Palette. This button is
also used for Gesture Based
Navigation.
Pen Tip
The Pen Tip performs the
same action as the left-click
button on your mouse.
The Interactive Stylus
The Interactive Stylus was created specifically for use with an eBeam-enabled projection
system. The Interactive Stylus behaves exactly like a mouse attached to your computer.
In this document, we often refer to a tap on the board as opposed to a mouse click to
indicate that you are using the Interactive Stylus to perform an action.
See Gesture Based Navigation for a description of advanced software navigation using the
Interactive Stylus.
The following table shows the different components of the Interactive Stylus and what those
components do.
Page 13
Page 14

© 2011 Luidia, Incorporated
Battery Cap
The battery cap unscrews
counter-clockwise to allow
you to insert or replace the
AA battery (Model 303) or
AAA battery (Model 305).
Page 14
Page 15

© 2011 Luidia, Incorporated
Software Setup
The interactive software can be installed from the installation CD that came in the box or
from a downloaded web package.
At launch, the software provides access to the basic software feature set. The options for
unlocking the full software feature set are:
Connect the software to an interactive receiver.
Activate the software using a CD-Key or security key (see The W elcome Dialog Box).
Use your eBeam Focus Document Camera as a security key.
Use your eBeam Inscribe Wireless Tablet as a security key.
If the software does not detect the interactive hardware or a security key at launch, then
you will be prompted with the Welcome dialog box to complete your software setup.
The Welcome Di alog Box
The Welcome dialog box appears when you are not connected to the interactive hardware
and have not installed a software activation code.
To launch the software select one of the following options:
Connect: I have an interactive receiver and I need help connecting it.
Activate: I want to use a software license key to activate the software.
Try: I want to use the full feature set of the software for 30 days.
Join a meeting: I just want to join a meeting as a remote participant.
To use the software to simply open and edit Scrapbook files, click the Close button.
Activate the Software Using a Software License Key
A Software License Key is included with some products or can be acquired from your
product vendor. One software license key is required to activate a single Windows PC.
To activate your software:
Make sure your computer is connected to the Internet.
1.
Launch the software.
2.
Go to the activation website by one of the following methods:
3.
Select the Activate Now button from the Welcome dialog box, or
o
Select Options from the eBeam Education taskbar menu, choose the Activation
o
tab and then select Get Activation Code.
This opens your default web browser to Luidia's website where you are prompted to enter
the software license key and your contact information.
Enter your software license key and contact information in the activation web page.
4.
Page 15
Page 16

© 2011 Luidia, Incorporated
Once all information has been properly entered, the website will email an activation code
to the email address that you have just provided.
Copy the activation code from the em ail into the text field in the Activation tab.
5.
Click the Activate Now button.
6.
The software will activate and launch. You will not need to enter the activation code
again.
Notes:
If a valid activation code or security key is detected you m ight still be prompted to
connect to the interactive hardware. This prompt exists to assist users who use the
software with a hardware connection. If you do not wish to be prompted again then you
can uncheck the Display this notification when interactive hardware not found
checkbox from the dialog box or by navigating to the System Preferences > System
tab.
Existing users may activate the software using a security key (HASP dongle). This option
is only available to existing users who already possess a security key. Simply plug the
security key into your USB port prior to launching the software.
See also: Deactivating or Moving the Software to Another Computer.
Try the Software for 30 Days
Select the Try option to enable the full feature set of the software for 30 days.
Use the Software as a Vi ewer (basic features only)
Each time you launch the software, the software first attempts to locate interactive receiver
hardware, a valid activation code or a security key (HASP dongle). If these items are not
detected then only the basic software features are available and the eBeam Education
taskbar icon is disabled.
If you only wish to use the software to join a shared meeting, select the Join Meeting
button from the Welcome dialog box.
If you only wish to use the software to open a Scrapbook file, select the Close button from
the Welcome dialog box. Scrapbook will open automatic ally.
Deactivati ng or Moving the Software to Another Computer
If you want to move the software to another computer, you will first need to deactivate it on
your current computer. To deactivate the software:
Open the Activation tab by selecting Options from the eBeam Education taskbar menu ,
1.
then click on the Activation tab.
Select the Deactivate Now button.
2.
Remember that if you deactivate the software you will only have access to the
o
basic software features.
Copy the reference number provided and send to technical support at http://www.e-
3.
beam.com /support/techform.html. Technical support will make sure that you can then
activate the software on another PC.
Page 16
Page 17

© 2011 Luidia, Incorporated
Note: Technical support m ight require 24 hours to reset your activation.
Page 17
Page 18
© 2011 Luidia, Incorporated
Menu Item
Description
Interactive Tools
Shows/hides the eBeam Tool Palette.
Scrapbook
Opens Scrapbook.
Spotlight
Opens Spotlight.
Calibrate Interactive Area
Initiates the calibration. The interactive hardware must be detected by the
software before calibration can begin.[$X$IF_CON3] Not active in this software
version.[$X$END_CON3]
Detect System
Attempts to detect the interactive hardware. See Interactive Hardware Detection.
[$X$IF_CON3] Not active in this software version.[$X$END_CON3]
Options
Opens the Options dialog box. See Options.
About
Displays the About dialog box for the software. To close, click anywhere in the
About dialog box.
Help
Opens a sub-menu that allows you to access help and also provides links to
various registration and support pages that are provided by the hardware
manufacturer of your interactive system.
Exit
Completely closes the software. If you have Scrapbook open, you will be
prompted to first save the Scrapbook file.
eBeam Education Taskbar Menu
The following menu items are offered from the eBeam Education taskbar menu:
Page 18
Page 19

© 2011 Luidia, Incorporated
Bluetooth Wireless Setup
Select a topic below for a description of how to configure your Bluetooth connection for your
eBeam B luetooth Wireless system. If your system is not described here then refer to the
setup documentation included in the box.
eBeam Εdge(TM) Setup
eBeam Classic Setup
Bluetooth Wireless Settings
Page 19
Page 20

© 2011 Luidia, Incorporated
eBeam Edge(TM) Setup
For your eBeam Edge Bluetooth receiver to work properly, you must have Windows XP SP2
or later, Vista, or 7.
Set up a Bl uetooth Wireless connection to the receiver
Plug the Bluetooth USB key that came with your eBeam Edge product into a USB port on
1.
your PC. Two events should occur:
The Windows New Hardware Setup message should appear in your taskbar telling you
that the device has been detected.
A Bluetooth icon should appear in your taskbar.
Right click the Bluetooth icon in your taskbar and select Add A Bluetooth Device.
2.
Complete the Add Bluetooth Device Wizard.
3.
Make sure My device is set up and ready to be found is checked. Click Next.
a)
The Windows operating system will search for Bluetooth devices.
Select your eBeam device from the list. Click Next.
b)
Select Use the passkey found in the documentation and type in 1234. Click
c)
Next.
The Windows operating system will now install the eBeam Bluetooth receiver.
Click Finish.
d)
Launch the software. The software will automatically detect the Bluetooth receiver.
4.
Page 20
Page 21

© 2011 Luidia, Incorporated
eBeam Classic Setup
eBeam Classic Bluetooth Setup
The Bluetooth-enabled eB eam Classic is supported only on Windows Vista, Windows 7 or
Windows XP Service Pack 2 or higher at this time.
To check the Service Pack level you are working with go to Start > Control Panel > System.
Before you begin, make sure you have the latest eBeam software as well as an updated
IOGEAR driver installed on your computer. Visit http://www.iogear.com/support/dm/ to get
the updated driver and setup instructions for your computer.
Select the computer that you are working with to finish your setup:
Windows 7 / Vista Setup
Windows XP Setup
Windows 7 / Vista Setup
1)
Plug your eB eam receiver into a power outlet, and confirm that the light is glowing
blue.
2)
If your IOGEAR isn ’t already inserted into an available USB port on your computer, do
so at this time.
3)
Verify that your computer has recognized the inserted Bluetooth adapter. Look for a
Bluetooth icon in the system tray of your computer (in the lower right-hand of the
screen).
4)
Right-click on the Bluetooth icon and select “Add A Device” / “Add a Bluetooth
Device”. Your Bluetooth Wizard will begin.
5)
Highlight your Bluetooth-enabled eBeam device and click Next. (Your device will be
called eBeam -“XXXXXX”).
6)
Select “Use the passkey found in the documentation” / “Enter the device’s pairing
code”.
7)
Enter “1234”, and click Next. (This passkey will be requested whenever you pair the
eBeam receiver with another computer.)
8)
Finish the Bluetooth Wizard, and verify that the glowing blue light on your eBeam
receiver flashes four times. Your setup is complete.
Windows XP Setup
1)
Plug your eB eam receiver into a power outlet, and confirm that the light is glowing
blue.
2)
Insert the IOGEAR adapter into an available USB port on your computer.
3)
Verify that your computer has recognized the inserted Bluetooth dongle. Look for a
Bluetooth icon in the system tray of your computer (in the lower right-hand of the
screen).
Page 21
Page 22

© 2011 Luidia, Incorporated
4)
Double click the B luetooth icon and your Bluetooth Wizard will begin. Leave all 3
boxes checked and click Next.
5)
A General dialog box appears allow you to change the name of your computer and
select your computer type. Click Next twice.
6)
The Bluetooth Service Selection Dialog Box allows you to choose what services you
would like your computer to offer other computers. Uncheck all of the boxes and click
Next twice.
7)
Make sure the drop down menu is set to "Show All Devices". Select your eB eam
receiver and click Next. (Your device will be called eBeam-“XXXXXX”).
8)
Enter “1234”, and click Next. (This passkey will be requested whenever you pair the
eBeam receiver with another computer.)
9)
Check the box next to "White Board" and select Configure.
10)
Uncheck "Secure Connection" and click OK.
11)
Finish the Bluetooth Wizard, and verify that the glowing blue light on your eBeam
receiver flashes four times. Your setup is complete.
Page 22
Page 23

© 2011 Luidia, Incorporated
Friendly
Name
Shows the name for the Bluetooth receiver that is listed on the PC when you search for Bluetooth
devices. The eBeam receiver is shipped with a default Friendly Name.
Change: Select this button to change the Friendly Name. You will need to enter a new Friendly name
into the Change Friendly Name Dialog Box, and click OK. There is an eight character limit on the
Friendly Name. You must select the Apply N ew Settings button to accept any changes.
Security
Allows you to determine who can use the Bluetooth enabled receiver. You must select the Apply New
Settings button to accept any changes.The options include:
Allow the eBeam receiver to be "discovered" by Bluetooth enabled devices : Lets you set if
the Bluetooth Wireless receiver can be detected by Bluetooth enabled devices. If this box is not
checked, other Bluetooth enabled devices w ill not be able to detect it without knowing the Friendly
Name.
Require Authentication: Allows you limit access to the Bluetooth Wireless receiver to only those
people who have receiver's PIN number.
Passkey: Select the Change button to change the passkey for your receiver.
Use Encryption: Ensures that wireless transmissions are secure from unauthorized access.
Bluetooth Wireless Settings
The Bluetooth Settings Dialog Box can help you set preferences for your Bluetooth-
enabled eBeam receiver. To open this dialog box your Bluetooth receiver must be connected
to your computer with a USB cable and your software must be launched. To open the dialog
box:
Right-click the eBeam Education icon in the eBeam Education Taskbar menu
Select Options
On the General Tab select System Preferences
On the System Tab select Bluetooth Settings. The Bluetooth Settings Dialog Box will
open.
Bluetooth Settings Dialog Box
The Bluetooth Settings Dialog Box contains the following options:
Page 23
Page 24
© 2011 Luidia, Incorporated
Help
Launches eBeam Education Suite Help.
Setup
Opens the eBeam System Preferences dialog box where you can change hardware detection frequency
and notifications.
Cancel
Closes the Detect Interactive Receiver dialog box and allows your to use the limited eBeam Education
Suite software without a receiver.
Retry
Starts a new search for your interactive receiver. Choose this if you believe your hardw are is connected,
but was not detected.
Interactive Hardware Detection
Every time you launch the software or select Detect System from the eBeam Education
taskbar menu, the software attempts to connect your interactive hardware. If the interactive
receiver hardware is not detected, you are prompted to connect to the hardware.
Detect Interactive Receiver Dialog Box
The following options are available from the Detect Interactive Receiver dialog box:
Disabli ng the Hardware Detection Prompt
Every time the software attempts to connect to the hardware you will be prompted to
connect to the interactive hardware. If a valid activation code or security key is detected you
might still be prom pted to connect to the interactive hardware. This prompt exists to assist
users who use the software with both a software activation and hardware connection.
You can turn this notification on/off by navigating to the System Preferences > System
tab and selecting the Display this notification when interactive hardware not found
checkbox.
Page 24
Page 25

© 2011 Luidia, Incorporated
Calibration
Calibrati ng Your Software
You need to calibrate your surface so that the eBeam Education Suite software knows what
size whiteboard or flat surface you are using.
To calibrate your surface, you will need to make sure your interactive receiver is setup and
detected and that the software is launched.
To initiate a calibration,
Select the Calibrate button from the Tool Palette if Scrapbook is not open, or
Select Calibrate Interactive Area from the eBeam Education taskbar menu at any tim e.
You will calibrate by clicking the Interactive Stylus on the targets in the projected area as
directed by the software. If you have multiple monitors you will see the message Click here
to calibrate this screen (press ESC to cancel calibration). Select the desired projected
area and calibrate.
Page 25
Page 26
© 2011 Luidia, Incorporated
Palette Options
Size: This option allows you to resize the Tool Palette.
Transparency : This option allow s you to select the transparency of the Tool Palette.
Features
Hide Cursor When Drawing: Hides the Windows' arrow during annotations. You can also
access this option by selecting Edit > Options > Preferences tab in Scrapbook.
Double-Click Eraser Clears Screen: Allows you to double-click the Eraser tool to erase all
annotations created while annotating your desktop or during a PowerPoint Presentation.
Sticky Palettes: If a tool has a secondary palette, such as a color ring or line thickness
ring, that secondary palette will be opened automatically each time the tool is chosen. The
last used secondary palette will be remembered and opened by default the next time the
tool is selected.
Gesture Based Navigation: Turns on/off gesture based navigation.
Smooth Drawing: Smooths lines drawn by the eBeam Stylus. You can also access this
option by selecting Edit > Options > Preferences tab in Scrapbook.
Restore Defaults
The Restore Defaults button causes all Tool Palette Options to be returned to their default
settings.
Restore Default
Colors
If any custom colors have been selected, Restore Default Colors resets all colors to the default
color set.
System
Preferences
Opens the eBeam System Preferences dialog box. See eBeam System Preferences for more
information.
After
Annotatin
g the
Desktop
When you finish annotating your desktop, you can keep a record of the annotated desktop as a new
page in Scrapbook. Options for desktop annotations are Save, Discard, or Ask Each Time.
Always save as new Scrapbook page: The annotated page becomes a new page in Scrapbook.
Save the Scrapbook file to keep the new Scrapbook page.
Always discard annotations: The annotated page is automatically discarded. No record is kept.
Ask me each time: When you finish annotating the desktop, you will be prompted to save the
annotated page as a new page in Scrapbook. You will have the choice to save or discard the page.
eBeam Education Options & Preferences
eBeam Education Options
The eBeam Education Options dialog box is used to set the eBeam Tool Palette and
drawing specific preferences. The eBeam Education Options Dialog B ox can be opened by
selecting eBeam Education Taskbar Menu > Options . There are three tabs available
here:
General Tab
Annotations Tab
Activation Tab
General Tab
Annotations Tab
The Annotations tab allows you to set behavior for how desktop and PowerPoint annotations
are saved. The following options are available:
Page 26
Page 27
© 2011 Luidia, Incorporated
Open Scrapbook after saving annotations: Default setting – opens Scrapbook. This setting gives
you immediate feedback that your annotation has been placed in Scrapbook. Save the Scrapbook
file to keep the new Scrapbook page.
Navigatin
g an
Annotate
d
PowerPoi
nt
Slideshow
When you change slides in a PowerPoint Slideshow, you must choose whether or not to save annotations
into the PowerPoint file as objects. Options for desktop annotation are Save, Discard, or Ask Each Time.
Always add objects to PowerPoint file: The annotations are automatically saved to each slide as
an object on the slide. You must to save the PowerPoint file to keep the annotations permanently.
Always discard annotations: The annotations are automatically discarded. No record is kept.
Ask me each time: Each time you change slides, you will be prompted to save the annotations as
objects. You must save the PowerPoint file to keep the annotations permanently.
Purchase License
Button
Launches the Luidia store where you can purchase a license key to activate the eBeam
software.
Get Activation Code
Button
Launches the Luidia Software Activation Request form so you can request an activation code.
You will need to request an activation code if you deactivate your software or move your
software to another computer.
Activation Code Text
Box
Once you receive an activation code, paste it in the Activation Code Text Box and press
Activate Now.
Activate Now Button
Once a code is entered into the activation code text box, pressing Activate now starts the
activation of your eBeam software.
Activation Tab
The following options are available in the Activation Tab:
Page 27
Page 28

© 2011 Luidia, Incorporated
Communication
Port
Autodetect: If Autodetect is selected, the software will automatically attempt to connect to
interactive hardware on USB and COM communication ports.
Connect To: The Connect To option allows you to manually specify which communication port
to connect to the hardware on.
Detect Device: Attempts to detect the interactive hardware.
Close Connection: Software disconnects from the hardware. Frees the port.
Bluetooth Settings: Opens the Bluetooth Wireless System Configuration Settings
dialog. See Bluetooth Wireless Configuration for more information. The receiver must be
connected to the PC with a USB cable in order to be configured.
Connect To LAN: If your OEM interactive Receiver provides an option for connection to a
Local Area Network, see your OEM hardware or software manual for instructions.
Advanced
Open appropriate application when stylus or marker pen is used. If this is checked:
o
When a Marker Pen is used, the whiteboard software opens (if installed).
o
When an Interactive Stylus is used, the projection software opens.
Display Low Battery message: If this is checked, a low battery warning will appear when
the pen or eraser battery is low.
Display system connecting status: If this is checked, a status dialog box will appear while
the software attempts to connect to the hardware.
Hardware Diagnostics: Displays information used by technical support to diagnose
environmental problems. The receiver must be connected to the PC either wirelessly or with a
USB cable and must be detected by the software.
System Information: Opens the Windows System Information dialog box.
Calibration
The Calibration section allows you to launch the projection calibration process by selecting the
Calibrate Projection Area button.
Scrapbook Options
eBeam System Preferences
The System Preferences dialog in the Windows Control Panel allows you to set hardware
specific preferences.
If your receiver is not detected, see Interactive Hardware Detection .
There are two tabs that can be accessed in System Preferences.
The System Preferences tab.
The Projection tab.
System Preferences Tab
Projection Tab
Page 28
Page 29

© 2011 Luidia, Incorporated
Stylus Buttons
The Stylus Buttons section allows you to configure each of the two buttons on the Interactive
Stylus.
For each button, it is possible to set the button to be:
o
Off - Button causes no action
o
Left Click - Left mouse click
o
Middle Click - Middle mouse click
o
Right Click - Right mouse click
o
Move Cursor - Causes the mouse cursor to hover
o
Show/Hide Tool Palette - Open close the eBeam Tool Palette.
Select button options from the pull down lists.
Page 29
Page 30
© 2011 Luidia, Incorporated
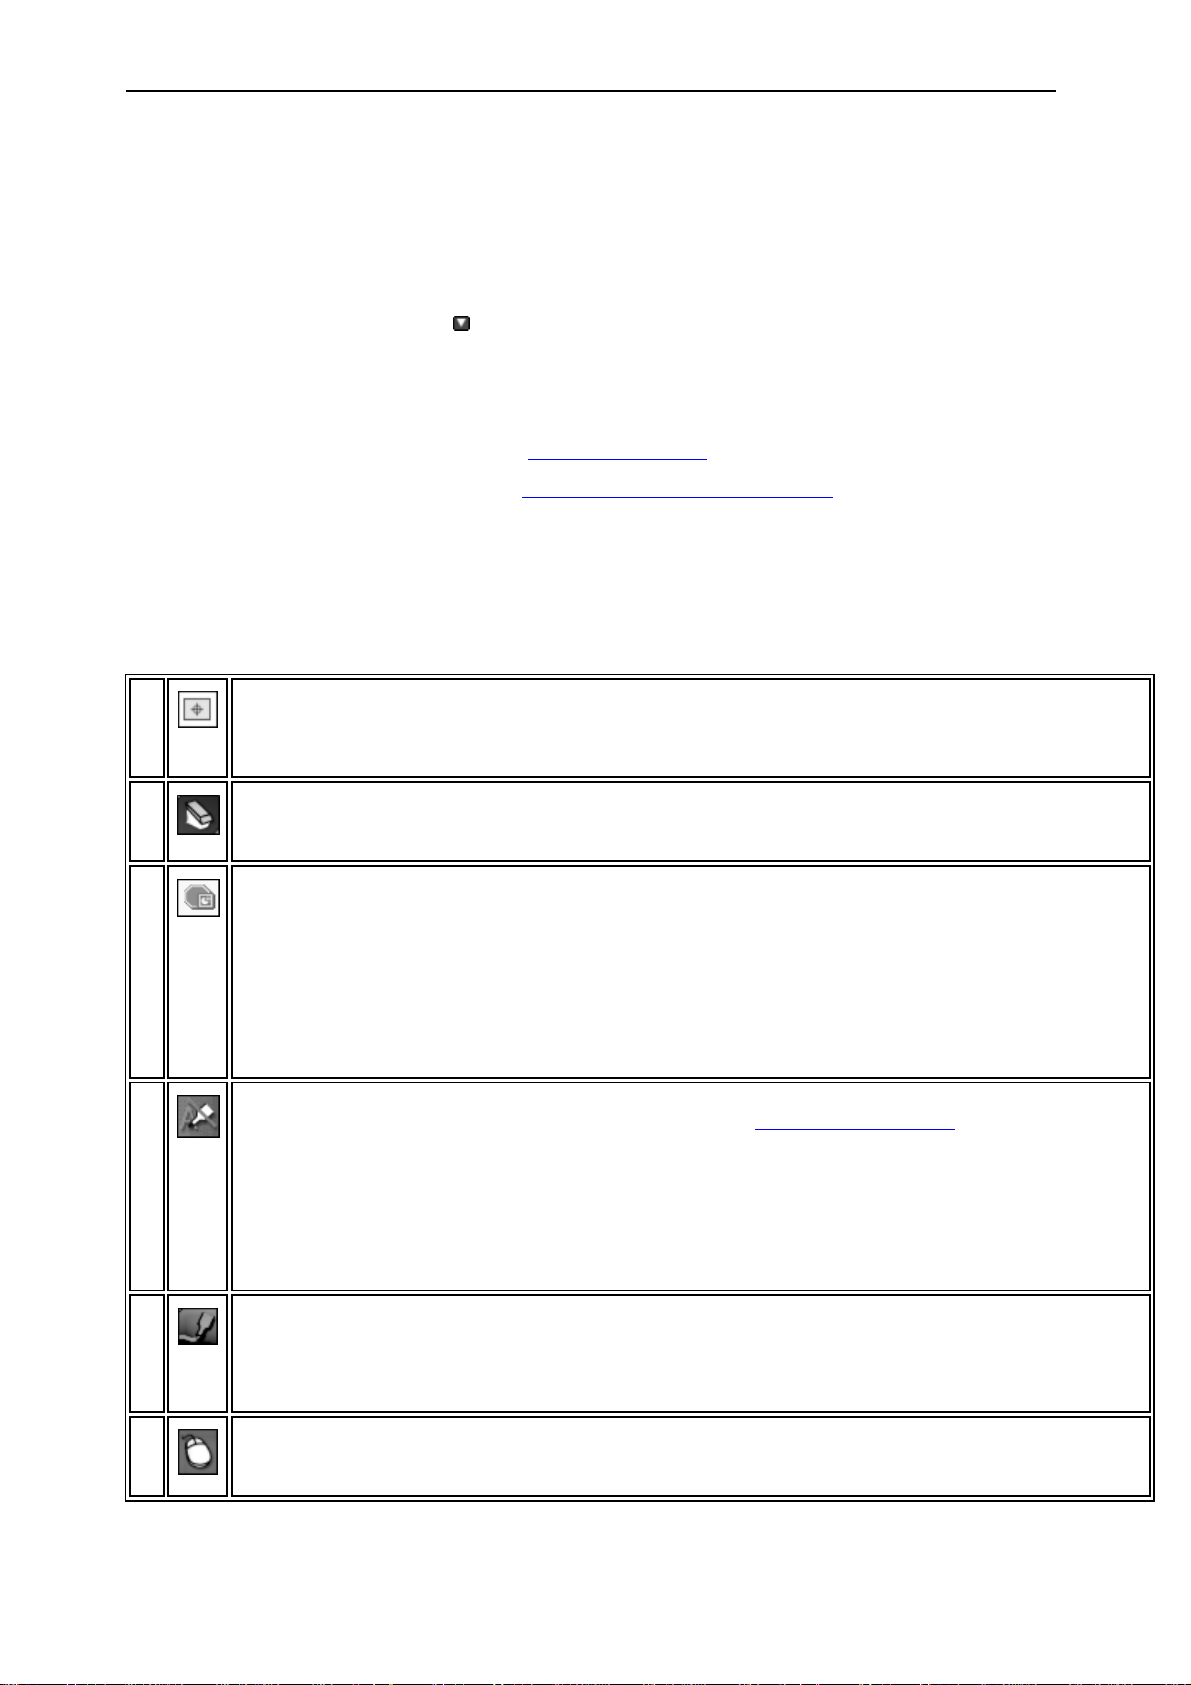
Cali
bra
te
Too
l
The Calibrate Tool starts the interactive calibration process. See Calibration for more information.
Era
ser
Too
l
The Eraser Tool allows you to erase annotations made using the pen or highlighter tool. The Eraser Tool cannot
erase objects made using the shapes tool.
Exit
Po
wer
Poi
nt
Pre
sen
tati
on
Too
l
The Exit PowerPoint Presentation Tool causes the PowerPoint slide show to be ended. This tool is not available
once you are outside of a PowerPoint presentation.
Ha
nd
writ
ing
Rec
ogn
itio
n
Too
l
The Handwriting Recognition Tool turns the Handwriting Recognition software on/off. The Handwriting
Recognition Tool is located in the sub menu of the Text Tool. See Handwriting Recognition for more information.
Hig
hlig
hte
r
Too
l
The Highlighter Tool allows you annotate the desktop freehand. When the Highlighter Tool is selected, the center
of the Tool Palette changes to show the current color and line width settings. A custom color can be selected by
double-clicking a color on the palette ring. The standard set of colors can be restored by selecting eBeam
Education Options > General Tab > Restore Defaults.
Note: Some highlighter colors may not be visible on some computer backgrounds.
Mo
use
Too
l
The Mouse Tool allows you to start navigating your desktop.
eBeam Tool Palette
The eBeam Tool Palette is used to navigate, annotate and edit the content on your computer.
The tools on the Tool Palette change depending on the application that you are using. The
four main places that you can use the Tool Palette are: in PowerPoint, in Scrapbook, on top
of all applications (in Screen Annotation Mode) or outside of any application.
Note: Whenever a Tool has the arrow symbol, that indicates that there is another tool
available as in the submenu of this tool. Click and hold the arrow, and the sub menu will
appear. While holding, select the tool you would like to use and release.
To show or hide the Tool Palette:
Press the Tool Palette button on the Interactive Stylus, or
Select eBeam Tool Palette from the eBeam Education taskbar menu .
The eBeam Tool Palette appears automatically whenever a receiver or security key is
detected and you launch eBeam Hom e or eBeam Scrapbook. If no receiver or security key is
detected and you launch these applications, the Standard Annotation Toolbar launches
instead of the eBeam Tool Palette.
The following tools are available on the eBeam Tool Palette, depending on the application you
are using:
Page 30
Page 31

© 2011 Luidia, Incorporated
Ne
w
Pag
e
Too
l
The New Page Tool creates a new page in a Scrapbook file. The new page is inserted directly after the displayed
page. The New Page Tool is available in the sub menu of the Snapshot Tool.
OnScr
een
Key
boa
rd
Too
l
The On-Screen Keyboard Tool allows you to enter text by tapping keys w ith the Interactive Stylus. You can close
the On-Screen Keyboard by selecting the On-Screen Keyboard button again or selecting the red close (X) button
on the On-Screen Keyboard. See On-Screen Keyboard for more information.
Opt
ion
s
Too
l
The Options Tool launches the eBeam Education Options dialog box.
Pen
Too
l
The Pen Tool allows you annotate the desktop freehand. When the Pen Tool is selected, the center of the Tool
Palette changes to show the current color and line width settings. A custom color can be selected by doubleclicking a color on the palette ring. The standard set of colors can be restored by selecting eBeam Education
Options > General Tab > Restore Defaults.
Poi
nte
r
Too
l
The Pointer Tool is enabled only during a shared meeting. It allow s each participant to point to data within the
meeting window. Each participant's pointer is displayed in a different color. When the Pointer Tool is selected, the
outside ring of the Tool Palette changes to show the different pointer settings. The follow ing options are available:
Rotate pointer counter-clockwise: Rotates the pointer 90 degrees in a counter-clockwise direction.
Show Pointer: Shows the pointer on the screen.
Rotate pointer clockwise: Rotates the pointer 90 degrees in a clockwise direction.
Hide Pointer: Hides the pointer.
The Pointer Tool is available in the sub menu of the Select Tool.
Po
wer
Poi
nt
Mo
use
Too
l
The PowerPoint Mouse T ool allows you to navigate a PowerPoint slide show.
Rec
ord
er
Too
l
The Record Tool allows you to record everything that happens on your desktop including voice tracks from your
computer’s microphone. The Recorder Tool is available in the sub menu of either the Save Tool, the Snapshot Tool
or the Exit PowerPoint Presentation Tool depending on w hat environment you are in. See Recorder for more
information.
Re
do
Too
l
The Redo Tool allows you to redo the last undone annotation. You can redo multiple times back back to the
beginning of a series of changes. Redo is disabled once a new annotation occurs.
Sav
e
Too
l
The Save Tool allows you to save a snapshot of your desktop into Scrapbook as a new page. As the new page is
being saved, a save icon will appear on your desktop. You must save the Scrapbook file if you w ant to keep the
page permanently.
Scr
apb
ook
Too
l
The Scrapbook Tool opens/hides the Scrapbook application.
Scr
een
An
The Screen Annotation Tool changes you to Screen Annotation Mode. When you enter Screen Annotation Mode,
a snapshot is taken of your desktop. This snapshot is turned into the background image that you can write on
while you are in Screen Annotation Mode. A translucent frame appears around the border of your screen indicating
that you are in this mode.
Page 31
Page 32

© 2011 Luidia, Incorporated
not
atio
n
Too
l
Sel
ect
Too
l
The Select Tool allows you to select a single Scrapbook element to move, rotate, resize, group or copy. You can
also draw a bounding rectangle around a group of elements with the select tool. For more information about
working with Scrapbook elements, see Scrapbook Elements.
Sh
ape
s
Too
l
The Shapes Tool allows you draw shapes. When the Shapes Tool is selected, the center of the Tool Palette
changes to show the current color, shape and line width settings.
Slid
e
Bac
k
Too
l
The Slide Back Tool allows you to move to the previous page in a Scrapbook file or Powerpoint presentation.
Slid
e
For
war
d
Too
l
The Slide Forward Tool allows you to move to the next page in a Scrapbook file or PowerPoint presentation.
Sn
aps
hot
Too
l
The Snapshot Tool allows you to take a picture of the current screen and save it into Scrapbook as either a
background image in a new page or a Scrapbook element in the current page. See Snapshot for more information
Sp
otli
ght
Too
l
The Spotlight Tool highlights a particular region of your desktop. See Spotlight for more information.
Sta
rt
Po
wer
Poi
nt
Pre
sen
tati
on
Too
l
The Start PowerPoint Presentation Tool opens the Open File dialog box so you can browse your files and select
a PowerPoint presentation to open.
Tex
t
Too
l
The Text Tool allows you to add a text box to the displayed page. See Text Tool for more information.
Un
do
Too
l
Undo erases the previous annotation.
Vot
ing
Too
l
The Voting Tool opens the Voting response system. The Voting Tool is available in the sub menu of the
PowerPoint Mouse Tool. See Voting Tool for more information.
Zoo
m
Too
l
The Zoom Tool allows you to zoom into or out of the page displayed in Scrapbook. When the Zoom Tool is
selected, the center of the Tool Palette changes to show the current zoom settings. You can either choose a
percentage to zoom in to, or select:
Zoom in (+): Zooms the page in by a factor of 1.25 to no greater than 2000%
Page 32
Page 33

© 2011 Luidia, Incorporated
Fit Page ( ): Compresses or expands the page to fit into the page display area. Fit Page can also be
selected by pressing Ctrl+0.
Zoom out (-):Zooms the page out by a factor of 1.25 to no lower than 25%
Page 33
Page 34

© 2011 Luidia, Incorporated
Handwriting Recognition Tool
Handwriting Recognition is used to convert Interactive Stylus annotations into text that can
be used in Text Boxes and dialog boxes.
eBeam Education Suite software specifically works with ritePen® version 2.5 or later or
MyScript® Stylus version 2.6 or later.
To update to the latest version, visit www.visionobjects.com for MyScript and www.evernote.
com for ritePen.
Page 34
Page 35

© 2011 Luidia, Incorporated
Use Click Sound
Turns on a clicking sound when you tap each key
Turn on Numeric Key
Pad
Adds the numeric key pad to the right of the keyboard
To Use the OnScreen Keyboard
Click on Keys: Allows you to select keys by clicking them.
Hover over Keys: Allows you to select keys by hovering over them. You can set the
duration of time you need to hover before a key is selected.
Scan through Keys: Allow s you to select keys as the keyboard is automatically scanned.
You can select which key click you need to select before the scanning will stop.
Text prediction
Allows you to use text prediction to guess the w ord as you are entering the text. You can also
determine whether or not you would like a space after each predicted word.
On-Screen Keyboard
On-Screen Keyboard opens a floating On-Screen Keyboard that you can use to enter text.
You can change the font and font size of the text by using the Text Edit Toolbar. You can
close the On-Screen Keyboard by selecting the On-Screen Keyboard button again or
selecting the red close (X) button.
Keyboard Options
To open the On-Screen Keyboard Options, select the Option key from the keyboard. The
following options are available:
See Text Tool for information about using the On-Screen Keyboard to create text and for
changing text attributes.
Page 35
Page 36

© 2011 Luidia, Incorporated
Start
Recording
The Start Recording button causes Recorder to immediately begin recording.
The Start Recording button has a sub-menu palette that allows you to select the size of
your recording area. From left to right, the options are:
Record Entire Screen: Recorder captures everything shown in your primary
monitor.
Record Selected Area: You w ill be prompted to drag your mouse to select an area
of the primary monitor to record.
Record Window: You will be prompted to drag cross hairs from a dialog box to the
application that you wish to record. If you drop the cross hair on the Scrapbook
window, only the Scrapbook Page will be recorded. Note: When recording an
application window w hile using multiple monitors, the application can be located on
a secondary monitor.
Pause
Recording
Pause Recording stops Recorder temporarily. To begin recording again, click the Start
Recording button.
To end your recording, first click Start Recording and then click Stop Recording.
Stop
Recording
Stop Recording stops the Recorder. You will be prompted to save the movie file. Once
the movie file has been saved, a notification dialog w ill appear that:
Displays the movie duration
Displays the movie file location
Gives you the option to play back the movie immediately or to close.
The movie is saved in *.avi format, and can be played back in Window s Media Player.
Recorder
Status
The Recorder Status box displays recording specific data.
Recording indicator. When Recorder is recording, the record indicator is red and
blinking.
Audio. If audio in enabled, then a speaker is show n. If audio is disabled, the
speaker is not shown. See Recorder Options.
Movie Timer. The timer displays how long Recorder has been recording.
Recorder
Options
Recorder Options opens the Recorder Options dialog box.
Recorder
Use Recorder to record everything that happens on your desktop including voice tracks
from your computer’s m icrophone. Play back your recording instantly in our Movie Player if
you save the recording in the default *.ebm form at. Or save your recording as an .avi, .swf
or .wmv m ovie.
See the following Recorder topics:
Recorder Controls
Recorder Options
Movie File Type Options
Recorder Controls
The Recorder m enu contains:
Page 36
Page 37

© 2011 Luidia, Incorporated
Hide Recorder
Wheel
The Hide Recorder Wheel button allows you to keep the Recorder menu from being
recorded in your video. Select the Hide Recorder Wheel button to hide the menu. To
reopen the menu, select the Recorder tool from the eBeam Tool Palette.
Section
Description
Video
Frame Rate: The frame rate determines how many snapshots per second are taken of your
screen. A higher frame rate will cause your movie to be smoother during playback. How ever,
a higher frame rate requires more memory on your PC. Setting the Frame Rate to a low er
rate can help when your PC performance is slow .
Recommended Frame Rate for Available Memory:
o
100 MB Available Memory - Set the Frame Rate to 5 frames/second
o
250 MB Available Memory - Set the Frame Rate to 10 frames/second
o
500 MB or More Available Memory - Set the Frame Rate to 15 frames/second
You can determine the amount of available memory by opening Windows Task Manager,
under the Performance Tab look at the Physical Memory (K) section, and look at the Available
Memory. Divide the Available memory by 1000 to get the number of free MB.
Recommended Frame Rate for Your Processor:
o
Pentium IV or Similar Performance - Set the Frame Rate to 5 frames/second
o
Performance less than Pentium IV - In many cases a Frame Rate of 3 frames/second
will be sufficient for good performance. However, in severe cases it is necessary to
set the Frame Rate to 1 frame/second.
Turn off hardw are acceleration while recording : In some cases, the hardware
acceleration setting for your monitor can interfere w ith recording. This checkbox temporarily
disables hardware acceleration. Important Note: After enabling this option, when you start
and end recording, your monitor will go black for 1-2 seconds. This is expected behavior.
Audio
Include Audio Track: Check Include Audio Track if you are using a microphone to record
audio. The softw are checks for an attached microphone and w ill automatically check this
checkbox if it finds a microphone.
Device: Allow s you to select the device.
Source: Allows you to select the audio source.
Sample Rate: Choose from a spectrum betw een 11.025 kHz to 96.0 kHz
Stereo: Check Stereo to record in stereo.
MP3 Compression: Check MP3 Compression to access a range of quality from Low quality to
Very High quality
Saving Files
Save here by default: Use the Browse button to select the default file save location.
Alert me before recording if available disk space is less than: The final movie file can
potentially get very big depending on how long the recording is. It is important that there is
enough space on your PC to save the file once recording is complete. This option causes a
warning dialog to appear when you have reached the specified amount of disk space.
Recorder Options
The Recorder Options dialog box allows you to set audio, video and file save settings
specific to Recorder.
Movie File Type Options
Page 37
Page 38

© 2011 Luidia, Incorporated
.ebm (eBeam default format)
Plays on Windows using Luidia's Movie Player
.avi (Microsoft Audio Video
Interleave)
Plays on Mac OS and Windows using Apple QuickTime Player or Microsoft Windows
Media Player
.swf (Macromedia Flash
Movie)
Plays on Mac OS and Windows using Adobe Flash Player or a Web browser with a
Flash plug-in installed
.wmv (Windows Media Video
File)
Plays on Mac OS and Windows using Microsoft Windows Media Player or a Web
browser with the Windows Media Player plug-in installed
You can save movies as .ebm , .avi, .swf or .wmv file types.
Page 38
Page 39

© 2011 Luidia, Incorporated
Snapshot
Snapshot allows you to take a picture of the current screen and save it into Scrapbook
either as a background image in a new page or a Scrapbook element in the current page.
Select the Snapshot Tool button.
1.
Select one of the following options:
2.
Capture screen: Captures the entire desktop as a single image. As a default, the
o
captured image is saved as a background into a new page in Scrapbook. To save
the image as a Scrapbook element on the current page, check the Import as
Object checkbox.
Capture a selection : Minimizes the Scrapbook, and the cursor becomes a cross
o
hairs. To select an area to capture, use the Interactive Stylus to draw a selection
rectangle.
Select the Go button to save an image into Scrapbook.
3.
Page 39
Page 40

© 2011 Luidia, Incorporated
Text Tool
The Text Tool allows you to add a text box to the displayed page. A text box is also a
Scrapbook Element.
Modify text attributes through the Text Edit Toolbar which displays whenever a text box is
open.
The following buttons are available on the Text Edit Toolbar:
Font selection
Font size selection
Increase font size
Decrease font size
Font color
Text box fill color
Bold text
Italicize text
Underline text
Left justify
Center text
Right justify
Decrease indent
Increase indent
Bullet points
Text box outline color
Page 40
Page 41

© 2011 Luidia, Incorporated
Tool
Control
Description
Voting
Response
Window
The Voting Response window contains 2 pieces of information: Number of responses and
feedback.
Number of responses (shown as 5) shows the number of responses you have received
to the current question. If this number is shown in green, voting is still open for this
question. If this number is shown in red (see image to left), then voting is closed.
Feedback shows the number of your audience members who pressed the ? on their
response card to indicate that they have feedback about the current question.
Repoll
Question
Select Repoll Question to clear the previous responses and get ready to accept new
responses from the audience for the currently displayed question. Both the original
responses and the new responses are stored in the TurningPoint 2008 session file.
If the slide show had previous voting session data saved, it might open showing voting
closed. To begin voting again, select the Repoll Question button.
Insert Slide
Insert Slide allows you to insert a slide into a presentation that is currently open for voting.
Pressing this button opens a drop-down menu allowing you to select the slide type to be
inserted into the presentation. You are able to gather voting results on the inserted slide
immediately.
Toggle
Results
The Toggle Results button changes the values displayed on each results chart. The values
can be represented as either numbers or percents. This button only works w hen a results
chart is shown.
Show/Hide
Showbar
The Show/Hide Showbar button opens and closes the TurningPoint 2008 Showbar. The
Showbar contains the options available to the Voting Tool and also additional TurningPoint
2008 options.
Refer to TurningPoint 2008 help for more information on the Showbar.
Display
Participant
Monitor
The Display Participant Monitor button opens the Participant Monitor.
Refer to TurningPoint 2008 help for more information on the Participant Monitor.
Show the
Original
Chart
The Show the Original Chart button can be used after using the Toggle Results or Data
Slicing buttons to return the chart to its appearance when it was first created.
Voting Tool
Use the Voting Tool on the Tool Palette with the eBeam R espond RF voting system to
allow participants to respond to electronic testing, formative assessments, surveys, opinion
polls, gam es and questions posed by the presenter. The data collected from these keypads is
imm ediately transmitted to the presentation, giving the presenter a better understanding of
comprehension.
Before using the Voting Tool on the Tool Palette, make sure that the eBeam Respond product
is set up completely. Carefully follow the instructions from the eBeam Respond Quick Start
Guide instructions that came with your product.
The eBeam R espond voting response system is powered by TurningPoint® 2008 software. For
detailed instructions on how to set up eBeam Respond (voting system) enabled PowerPoint
files and sim ilar topics, go to your Start menu > Turning Technologies, LLC > TurningPoint
2008 and refer to the user guides provided for Office 2003 and 2007.
See the following topics:
Voting Tool Controls
How to Run a Voting Session with eBeam Respond
Voting Tool Controls
The Voting Tool controls are described in the following table.
Page 41
Page 42

© 2011 Luidia, Incorporated
Open
TurningPoi
nt 2008
Help
Opens the TurningPoint 2008 help file.
Data
Slicing
The Data Slicing button shows the responses on the chart for the portion of the audience
who chose a certain response on another question.
Refer to TurningPoint 2008 help for more information on data slicing.
Page 42
Page 43

© 2011 Luidia, Incorporated
Marker
The Marker Tool allows you to annotate the displayed page freehand in one of four solid colors.
The color can be selected from the palette that appears when the Marker Tool is selected. The
marks become annotation elements. See Scrapbook Elements for more information.
Highlighte
r
The Highlighter Tool allows you to annotate the displayed page freehand in one of four
transparent colors. The color can be selected from the palette that appears when the Highlighter
Tool is selected. The marks become annotation elements. See Scrapbook Elements for more
information.
Eraser
The Eraser Tool allows you to erase an annotation element made by the marker or highlighter tool
on a Scrapbook page. The eraser size can be selected from the palette that appears when the
Eraser Tool is selected. See Scrapbook Elements for more information.
Zoom
The Zoom Tool allows you to adjust the viewing size of the displayed page. The range of zoom
values are 25-2000%. Holding down the Shift key reverses the zoom direction. A zoom value can
also be selected from the pull-down list that appears when the Zoom Tool is selected.
Text
The Text Tool allows you to add a text box to a page in any size, font and color available on your
computer. The size, font and color may be selected from the palette that appears when the Text
Tool is selected. See Text Tool for more information.
Pointer
The Pointer Tool allows each participant in a meeting to point to data anywhere within the meeting
window. Each participant's pointer is displayed in a different color.
The Pointer Tool is only enabled during a shared meeting.
The Pointer direction (right, left, up, down) can be selected from the palette that appears when
the Pointer Tool is selected. You can also hide the Pointer by selecting the Hide Pointer button
from the palette that appears when the Pointer tool is selected.
Shapes
The Shapes Tool allows you to draw shapes in Scrapbook. The shape, color and line w idth can be
selected from the palette that appears w hen the Shapes Tool is selected. The marks become
Shape elements. See Scrapbook Elements for more information.
Select
The Select Tool allows you to select a Scrapbook element on a page to move, rotate, resize, group
or copy. To select a Scrapbook element, click the element and handles will appear.
The Select Tool can also be used to draw a bounding rectangle around a group of elements to
manipulate the entire group of elements at one time.
For more information about working w ith Scrapbook elements, see Scrapbook Elements .
Standard Annotation Toolbar
The standard annotation toolbar appears only when an interactive receiver or security key is
not detected.
The tools on the standard annotation toolbar include (from left to right):
Page 43
Page 44

© 2011 Luidia, Incorporated
eBeam Home
eBeam Education Suite software comes with the eBeam Home application. eBeam Home is
your resource for creating a centralized area for shortcuts to the programs and files that you
use most often. The following topics are available for eBeam Home:
To learn about more about working with shortcuts, see eBeam Hom e Shortcuts.
Launching eBeam Home
You can launch eBeam Hom e in the following ways:
Click on the software icon in the eB eam Education Suite software folder installed in the
Application Files on your computer.
Select eBeam Hom e from the eBeam Education Taskbar Menu.
You can also create a shortcut to eBeam Hom e on your computer desktop and launch the
application by clicking this shortcut.
Note: Launching eBeam Hom e will also launch the eBeam Tool Palette.
Hiding eBeam Home
You can hide eBeam Hom e in the following ways:
Click on the close button in the top corner of your eBeam Hom e Window.
Right-click anywhere outside of a shortcut within the eBeam Home Window and select
Close eBeam Home .
Select eBeam Hom e from the eBeam Education Taskbar Menu.
Whenever you click on a shortcut in eBeam Home, the eBeam Home Window will hide, and
your application, file or folder will launch. In order to see the eBeam Home Window again
you will need to relaunch it.
Page 44
Page 45

© 2011 Luidia, Incorporated
To Use the Add Shortcut Button:
eBeam Home Shortcuts
eBeam Home Shortcuts
There are nine default shortcuts included in eBeam Home. You can customize these
shortcuts at any time, up to 25 shortcuts. If there are multiple users on your computer,
these shortcuts will be saved per user account. The following shortcut topics are available
with eBeam Home:
Adding a Shortcut
Removing a Shortcut
Renaming a Shortcut
Reordering Shortcuts
Broken Shortcuts
Restoring Shortcuts
Restoring Default Shortcuts
Adding a Shortcut
You can add a shortcut to your eBeam Home Window by either using the Add Shortcut
Button, or by dragging your shortcut.
Click the Add Shortcut Button from the bottom left corner of your eBeam Home Window,
1.
and select Add Hyperlink or Add Shortcut.
If you select hyperlink, type or paste the hyperlink you would like to add, and click OK. If
2.
you select shortcut, browse for the shortcut you would like to add and select OK.
To Drag the Shortcut:
Find the file, folder or webpage that you would like to add as a shortcut.
1.
Click and drag the the file, folder, or webpage to the eBeam Home Window and release
2.
your cursor anywhere inside the window.
Note: If you already have 25 shortcuts and you try to add another, you will receiver an error
dialog box. Click OK to exit the error dialog box, and remove a shortcut before attempting to
add another one.
Removing a Shortcut
You can remove a shortcut from your eBeam Home Window in the following ways:
Right-Click Shortcut
Right-click on the shortcut in your eBeam Home Window, and select Remove Shortcut.
1.
Select Yes from the dialog box that appears.
2.
Hover Over Shortcut
Hover over the shortcut in your eBeam Home Window and a Remove Icon appears .
1.
Click this icon.
Select Yes from the dialog box that appears.
2.
Renaming a Shortcut
You can rename a shortcut at any time. To rename a shortcut:
Page 45
Page 46

© 2011 Luidia, Incorporated
Right-click on the shortcut and select Rename.
Single click on the shortcut text.
The shortcut text will become an editable field. Enter the new shortcut name and click
outside of the text field or press Enter.
Reordering Shortcuts
You can reorder the shortcuts in your eBeam Home Window at any tim e. To reorder the
shortcuts:
Press and hold your cursor over a shortcut
1.
Drag your cursor to the new location and release.
2.
Broken Shortcuts
If you move, rename or delete a file, folder or application that links to an eBeam Home
shortcut, you will create a broken shortcut. Clicking on a broken shortcut will produce an
error dialog box. From this dialog box you can search for the moved or renamed file, folder
or application and create a new shortcut.
Restoring Shortcuts
If you replace a file, folder or application that links to an eBeam Hom e shortcut without
changing the nam e of either the shortcut or the linked file, the broken link will be restored
and your shortcut will work again.
Restoring Default Shortcuts
If you would like to restore the eBeam Home Window to its default set of shortcuts, rightclick anywhere within the eBeam Home Window outside of a shortcut and select Restore
Default Shortcuts. In the dialog box that appears, select which default shortcuts you would
like to restore. You can select from :
All shortcuts
Only those shortcuts that were removed
Cancel
Once you make your selection, the dialog box will disappear.
Page 46
Page 47

eBeam Scrapbook
Scrapbook Menus
File Menu
Edit Menu
View Menu
Page Menu
Meetings Menu
Help Menu
© 2011 Luidia, Incorporated
Page 47
Page 48

© 2011 Luidia, Incorporated
New
New creates a new Scrapbook meeting file after closing any previously opened
meetings.
To create a new Scrapbook meeting file:
1.
Choose File > New or press Ctrl+N.
2.
If a meeting is open when New is chosen, Sc rapbook prompts you to save the
current meeting. Select Yes to save the meeting, No to close the meeting without
saving or Cancel to remain in the current meeting.
A new meeting is created every time Scrapbook opens.
Open
Open allows you to open a Scrapbook (*.esb) file or an eBeam Capture (*.wbd) file.
To open a Scrapbook file:
1.
Choose File > Open, or press Ctrl+O.
A standard Open File dialog box appears.
2.
Navigate to the *.esb file and select that file.
3.
Select OK.
Import/Merge
Import/Merge allows you to:
Import an Excel, Pow erPoint or Word file to the background of the currently
selected page, or
Merge an existing Scrapbook (*.esb) or Capture (*.w bd) file to the currently
open file.
Note: Import/Merge is disabled during a shared meeting.
Save
Save allows you to save a Scrapbook (*.esb) file. To save a Scrapbook file:
1.
Choose File > Save, or press Ctrl+S.
2.
If the file has been saved before, it is saved again under the existing name.
If this is the first time the meeting has been saved, the standard Save As dialog box
opens.
Save As
Save As allows you to save a new Scrapbook (*.esb) file or to save an existing
Scrapbook meeting file under a new name.
To save a Scrapbook file:
1.
Choose File > Save As.
The standard Save As dialog box opens.
2.
Enter a meeting name and select the folder location. The default folder location is
under My Documents in My Scrapbook.
3.
Select the file type.
4.
Select the range of pages you want to save:
o
All - Saves all pages. The default range is All pages. This is also the only
option available when the Scrapbook file has only one page.
o
Selected - Saves only selected pages. You can select multiple pages by
clicking on each Thumbnail while holding dow n the Ctrl key, then saving
the document.
File Menu
File Menu options are described below:
Page 48
Page 49

© 2011 Luidia, Incorporated
o
Pages - Allows you to select a range of pages to save.
Note: If you have not previously saved the file, any unselected pages will be lost
when you use the Selected or Pages options and are saving to either *.esb or *.
wbd.
5.
Select OK.
Save As Web Page
Save As Web Page allow s you to save a Scrapbook (*.esb) meeting file in HTML
format for posting to the Internet/intranet as a web page.
To save a Scrapbook file in HTML format:
1.
Choose File > Save As Web Page .
The Save As dialog box appears.
2.
Enter a meeting name and select the folder location. The default folder location is
under My Documents in My Scrapbook.
3.
Select the range of pages you want to save:
o
All - The default range is All pages. This is also the only option available
when the Scrapbook file has only one page.
o
Selected - Saves only selected pages. You can select multiple pages by
clicking on each Thumbnail while holding down the Ctrl key, then saving
the document.
o
Pages - Allows you to select a range of pages to save.
4.
Select Save.
Archive Meeting
Archive Meeting allows you to archive your Scrapbook meeting file on an eBeam
server.
See Archive a Meeting for more information.
Retrieve Meeting
Retrieve Meeting allows you to retrieve an archived Scrapbook meeting file from an
eBeam server.
See Retrieve a Meeting for more information.
Page Setup
Page Setup opens the Page Setup dialog box. The Page Setup dialog box allows you
to choose header and footer information for a printed Scrapbook page and allows you
to add a border for the printed page.
Print Setup
Print Setup opens the standard Print Setup dialog box. The Print Setup dialog box
allows you to select all desired printer settings, including portrait or landscape
orientation and paper source.
Print Page
Print Page prints only the displayed page to your default printer.
Print
Print opens the standard Print dialog box. This dialog allows you to select a page
range and the number of copies you want to print. The default settings are to print all
pages in the file and to print one copy.
To print the Scrapbook file, choose File > Print or press Ctrl+P.
Send
Send allows you to send a Scrapbook meeting file (*.esb) as an attachment via any
MAPI-compliant mail system, such as Microsoft Exchange.
To send a Scrapbook meeting file via email:
1.
Choose File > Send.
The Send dialog box appears.
2.
Select the file format and page range from the Send dialog box
3.
Select OK.
Scrapbook opens an untitled e-mail message in your MAPI-compliant mail program
Page 49
Page 50

© 2011 Luidia, Incorporated
with your file as an attachment. Use your address book to fill in names of the
recipients and send the email as you normally would.
You can send a Scrapbook meeting in any file format (except HTML) that is suitable
for an e-mail attachment.
Send to Kindle
Send to Kindle allows you to send a Scrapbook meeting file in PDF, JPG or BMP
format to your Kindle device as an attachment via any MAPI-compliant mail system,
such as Microsoft Exchange.
To send a Scrapbook meeting file to Kindle:
1.
Choose File > Send to Kindle
The Send to Kindle dialog box appears.
2.
Select the file format and page range from the Send to Kindle dialog box.
3.
Type the email address for your Kindle device into the E-mail text field.
4.
Select OK.
Scrapbook opens an e-mail message titled Kindle in your MAPI-compliant mail
program with your file as an attachment. Use your address book to fill in names of the
recipients and send the email as you normally would.
Exit
Exit closes Scrapbook, but does not close the eBeam Tool Palette. See the eBeam
Education taskbar menu for more information.
If you have not saved your Scrapbook file, you will be prompted to save the file
before Scrapbook closes.
Page 50
Page 51

© 2011 Luidia, Incorporated
Undo
Undo cancels the last change on a Scrapbook page. It is possible to undo all changes to return
the Scrapbook page to a totally empty state. Undo applies only to the current page.
To Undo:
Choose Edit > Undo, or
Select the Undo button from the Scrapbook Toolbar, or
Press Ctrl+Z.
Redo
Redo allows you to redo the last undone change. If you have used Undo multiple times, you can
redo the changes back to the beginning of the series. Redo is disabled once a new change has
been made to the page. Redo applies only to the current page
.
To Redo:
Choose Edit > Redo, or
Select the Redo button from the Scrapbook Toolbar, or
Press Ctrl+Y.
Cut
Cut is used to cut individual or grouped Scrapbook elements from a Scrapbook page or with the
Text Tool to cut text from active text boxes. These cut elements and text can then be pasted to
a new Scrapbook page or active text box.
To cut an element from a Scrapbook page:
1.
Use the Select Tool to select the element(s) to cut.
2.
Choose Edit > Cut, or press Ctrl+X.
3.
Paste to another Scrapbook page, or open another application such as MS Word or MS Paint
and paste.
To cut text from text box:
1.
Highlight the text in the text box.
2.
Choose Edit > Cut, or press Ctrl+X.
Copy
Copy allows you to copy individual or grouped Scrapbook elements from a Scrapbook page to
other Scrapbook pages or applications. It can also be used with the Text Tool to copy and paste
text within active text boxes.
To copy an element from a Scrapbook page:
1.
Use the Select Tool to select the element(s) to copy.
2.
Choose Edit > Copy, or press Ctrl+C.
3.
Paste to another Scrapbook page, or open another application such as MS Word or MS Paint
and paste.
To cut text from text box:
1.
Highlight the text in the text box.
2.
Choose Edit > Copy, or press Ctrl+C.
Notes:
You can also copy an element from one Scrapbook page to another by dragging the element
Edit Menu
Edit Menu options are described below:
Page 51
Page 52

© 2011 Luidia, Incorporated
onto a new thumbnail.
Paste
Paste is used to paste Scrapbook elements into a Scrapbook page from either another
Scrapbook page or from your computer's clipboard. It is also used with the Text Tool to cut and
paste text between active Scrapbook text boxes.
To paste an element:
1.
Cut or copy the individual or grouped elements from a Scrapbook page, the Gallery or an
outside image file.
2.
Select the Scrapbook page.
3.
Choose Edit > Paste, or press Ctrl + V.
To paste text between active Scrapbook text boxes:
1.
Copy text from another Scrapbook text box.
2.
Open a new text box.
3.
Choose Edit > Paste, or press Ctrl + V.
N ote: Text copied from other applications will be pasted into Scrapbook as an image element.
Select All
Select All allows you to select all Scrapbook elements in a page. The elements can be
manipulated as one, but are not grouped.
To select all:
Choose Edit > Select All, or press Ctrl+A.
Duplicate
Duplicates the selected individual or grouped element(s).
To duplicate an element:
1.
Use the Select Tool to select the element(s). See Select elements individually or in groups.
2.
Choose Edit > Duplicate, or press Ctrl+D.
Delete
Deletes the selected individual or grouped element(s).
To delete an element:
1.
Use the Select Tool to select the element(s) and use one of the follow ing methods to delete
the object:
o
Choose Edit > Delete,
o
Select the Delete Object button from the Scrapbook Toolbar, or
o
Press the Delete key.
Order
Order allows you to change the Z-order of the elements on your Scrapbook page. See Move an
element forward or backward.
Grouping
Group is used to bond a selection of elements together so they can be manipulated as a single
element. See Group and ungroup elements for more information.
Alignment
The Alignment menu allows you to access a sub-menu w ith Alignment and Distribute
options.
Alignment is used to align selected Scrapbook elements relative to each other. Distribute is used
to distribute Scrapbook elements equal distances from each other.
See also Align and Distribute elements.
Orientation
Orientation is used to rotate individual or grouped Scrapbook elements without changing the
placement of the elements on page.
To set the orientation of one or more Scrapbook elements:
1.
Use the Select Tool to select the element.
2.
Select your orientation option from the Edit > Orientation menu. The options are:
Rotate Right: Rotates the element clockw ise 90 degrees.
Page 52
Page 53

© 2011 Luidia, Incorporated
Rotate Left: Rotates the element counter-clockwise 90 degrees.
Flip Vertical: Flips the element vertically.
Flip Horizontal : Flips the element horizontally.
Reset Image
Properties
Change the selected element back to the size it was when it was brought into the application.
Options
Options opens the Scrapbook Options dialog box, displaying the following tabs:
Preferences
Proxy Server
Software Updates
Page 53
Page 54

© 2011 Luidia, Incorporated
Normal (View Page and
Thumbnails)
Normal allows you to switch to the Page and Thumbnails View. Switch to the Page and
Thumbnails View by:
Choosing View > Normal, or
Pressing Ctrl+1, or
Selecting the View Page and Thumbnails (Normal) button from the Scrapbook Toolbar.
Thumbnails
Thumbnails allows you to switch to the Thumbnails View. Switch to the Thumbnails View
by:
Choosing View > Thumbnails , or
Pressing Ctrl+2, or
Selecting the View Thumbnails button from the Scrapbook Toolbar.
Page
Page allows you to switch to the Page View. Switch to the Page View by:
Choosing View > Page, or
Pressing Ctrl+3, or
Selecting the View Page button from the Scrapbook Toolbar.
Gallery
Gallery opens Scrapbook's Integrated Clip-Art Gallery. Open the Gallery by:
Choosing View > Gallery, or
Pressing Ctrl+4, or
Selecting the Gallery button from the Scrapbook Toolbar.
You can use this feature to add graphics from the provided library of clip art to your
presentations. You can also add your own directories to the gallery. See Gallery,
Scrapbook Elements, and Background Settings for more information about using images.
Full Screen View
Full Screen View maximizes the current page to full screen size.
To go to full screen:
Choose View > Full Screen View , or
Select the Full Screen button from the Scrapbook Toolbar.
To return to normal screen size:
Right-click the screen (press the Tool Palette button on the Interactive Stylus), and
select Full Screen Off from the menu that appears, or
Select the Full Screen button from the Scrapbook Toolbar.
Use Cover Sheet
Use Cover Sheet allows you to cover all or part of your page. You can size the sheet
during your presentation as well as set its orientation and transparency.
Spotlight
Spotlight is useful for drawing attention to a particular region of your desktop.
eBeam Focus Viewer
eBeam Focus Viewer launches the eBeam Focus Document Camera viewer.
Participants
Participants opens the Participants w indow so you can see who has joined a shared
Scrapbook meeting. To open the Participants window:
Choose View > Participants, or
Press Ctrl+5, or
Select the Participant View button from the Scrapbook Toolbar.
Master Page
Master Page opens the master page. All changes made to the master page appear as a
background image on all Scrapbook pages except those that contain their own background
settings.
Open the Master Page by:
View Menu
View Menu options are described below:
Page 54
Page 55

© 2011 Luidia, Incorporated
Choosing View > Master Page, or
Pressing Ctrl+6.
Layers
Layers can be used to add content to a Scrapbook meeting file. Layers can be hidden or
shown.
Open the Layers by:
Choosing View > Layers, or
Pressing Ctrl+7.
Toolbar
Choosing the Toolbar option causes a sub-menu to open with the following three
selections:
Interactive Tools: Show/hide the Tool Palette.
Playback: Show /hide the Playback toolbar.
Status Bar: Show/hide the Scrapbook status bar.
Zoom To
Zoom To allows you to zoom in or out on the currently displayed page.
Choosing the Zoom To menu option causes a sub-menu to open with the following zoom
selections: 500%, 300%, 200%, 100%, 50%, and 25%.
The page will remain at the selected zoom value until a new zoom value is chosen.
Zoom In
Zoom In allows you to zoom in on the currently displayed page.
To zoom in on a page:
Choose View > Zoom In, or
Press Ctrl+Num +.
Zoom Out
Zoom Out allows you to zoom out on the currently displayed page.
To zoom out of a page:
Choose View > Zoom Out, or
Press Ctrl+Num -.
Fit Page
Fit Page compresses or expands the page to fit into the page display area. Fit Page can
also be selected by pressing Ctrl+0.
Actual Size
Actual Size zooms the Page to 100%.
Page 55
Page 56

© 2011 Luidia, Incorporated
Options
Transparency: This option allows you to select how dark the grayed out area w ill be.
o
30% - lightest
o
20% - lighter
o
10% - light
o
0% - completely opaque
Rotate: This option allows you to rotate the cover sheet so you can expose different areas of
the screen.
o
Clockwise by 90 deg.
o
Counter-clockwise by 90 deg.
Exit (X)
Closes the Cover Sheet feature.
Cover Sheet
Cover Sheet is useful for hiding page content and gradually revealing presentation points
during a lesson or meeting.
To start Cover Sheet, select View > Use Cover Sheet. You can now control the display of
Scrapbook page content and customize the Cover Sheet.
When the Cover Sheet is visible, the page area of the Scrapbook is grayed out; thumbnails
are not affected. You can uncover more of any page by dragging the covered area in the
direction you wish it to m ove. Dragging affects only the page you are viewing.
The cover sheet always fully covers a page until you uncover a section of the page. Cover
Sheet options (Transparency and Rotation) you set remain in effect on all pages.
You can interact normally with the Scrapbook in the lighted area. Markups that begin in the
lighted area will continue into the covered area.
The Cover Sheet has the following control menus.
Page 56
Page 57

© 2011 Luidia, Incorporated
Master Page
Master Page is used to create a background template for all pages in the Scrapbook
meeting, except for those pages containing their own background settings.
Open the Master Page by choosing View > Master Page in Scrapbook. The Master Page
will open the first time as a blank page.
Any changes made to the Master Page, such as background settings, adding layers,
annotating the page or adding Scrapbook elements are reflected as the background on all
pages in the Scrapbook meeting, except for those pages containing their own background
settings.
The Master Page contents:
will be set as the background on all new pages.
will not overwrite the background on existing pages that already contain background
settings.
will overwrite the background on existing pages that have content, but do not contain
background settings.
To clear the Master Page, remove all background images using Background Settings, and use
the Clear Page button from the Master Page toolbar to clear all elements.
Close Master Page Button
Close Master Page closes the Master Page and returns to annotating regular Scrapbook
Pages.
Page 57
Page 58

© 2011 Luidia, Incorporated
Layers
The following section describes Layers and how to use them in your Scrapbook meeting.
What are Layers?
How to Use Layers
What are Layers?
Every Scrapbook page is made up of layers that can be shown or hidden at any time. The
order of these layers are:
Page Background Layer: The page background can be set using Background Settings
to display an image, display a tem plate of a grid or horizontal lines, and/or be set to a
specific background color. The page background cannot be modified by the annotation
tools.
Annotation Layers: The annotation layers are transparent layers that are stacked on
top of the page background layer. These layers contain Scrapbook elements.
Any Scrapbook page can have multiple annotation layers. When you add a new layer, it is
stacked on top of the existing layers. This means that annotations are displayed with the
latest layer shown at the top.
The three types of annotation layers that are found in each Scrapbook page are:
Default Layer: The default annotation layer in the Scrapbook page. This layer
o
always exists for any Scrapbook page and cannot be deleted.
User Layers 1 - 18: Up to 18 additional layers can be added to a Scrapbook
o
page. The default layer and the user layers are always shared to remote
participants during a shared meeting.
Private Layer: The top-most layer is the private layer. The private layer is shown
o
only on the local computer and is never shared through a shared meeting. The
purpose of the private layer is to give the local user a private workspace within
the Scrapbook session. Note: Private layers are hidden when a shared meeting is
synchronized.
All annotation layers can be locked and/or shown/hidden.
How to Use Layers
Turn on layers by choosing Layers from the View Menu. This opens the Layers dialog box
that lets you select, add, delete and move layers of a Scrapbook page.
Layers Title Bar
The Layers dialog title bar indicates which Scrapbook page you are currently working in.
Layers Tools
Page 58
Page 59

© 2011 Luidia, Incorporated
Add Layer
Add Layer adds a new blank layer to the currently selected Scrapbook
page. The new layer is always added as the top-most layer (under the
user layer). The new layer is alw ays added as visible and unlocked.
Delete Layer
Delete Layer causes the selected layer to be deleted. It is not possible
to delete the private or default layers.
Move Layer Up
Move Layer Up causes the layer to be moved one level higher in the
layer list. The highest a layer can be moved is directly below the private
layer. The private and default layers cannot be moved.
Move Layer Down
Move Layer Down causes the layer to be moved one level lower in the
layer list. The lowest a layer can be moved is directly above the default
layer. The private and default layers cannot be moved.
Show/Hide
Show/Hide makes the layer visible/invisible. When the eye is shown in the
box, the layer is visible on the page. When the box is empty, the layer is
invisible.
Lock Layer
Lock Layer protects the layer from any new annotations. When the padlock is
shown in the box, the layer is locked. When the box is empty, it is possible to
add Scrapbook elements to the layer.
Layers - Layer List
Each layer has it's own settings. These settings are described in the table below.
Page 59
Page 60

© 2011 Luidia, Incorporated
Jump to Beginning
Jumps to the beginning of the Scrapbook meeting (if All Pages is checked) or to
the beginning of the selected page.
Drag Control Slider
Allows you to step through the meeting forward or reverse by using the
Interactive Stylus or your mouse to drag the drag bar on the drag line, or to
immediately jump to a specific point in the meeting by dragging the drag bar to
a location on the drag line.
Play
Replays the entire Scrapbook meeting (if All Pages is checked) or the selected
Page from beginning to end. During playback, the Play button changes to a
Stop button, allowing you to stop the playback.
Jump to End
Jumps to the end of the Scrapbook meeting (if All Pages is checked) or the
beginning of the selected page.
All Pages
Sets the number of pages played. If All Pages is checked, selecting Play causes
the entire meeting to be played back. If All Pages is not checked, only the
currently displayed page is played back. You also can set this option in the Page
> Playback sub-menu.
Loop
Option for looping through the entire Scrapbook meeting (if All Pages is
checked) or for looping the selected page. You also can set this option in the
Page > Playback sub-menu.
Play Speed
Sets the speed at which the meeting is played. The slowest speed is 0.5x; the
fastest speed is 8.0x. You also can set this option in the Page > Playback submenu.
Playback
The Playback Toolbar can be opened by choosing View > Toolbar > Playback.
The Playback Toolbar allows you to replay the meeting like a movie. The meeting can be
played forward line by line and at varying speeds. Playback can be restricted to either the
current page, or set to play all pages.
The following Playback tools are available on the Playback Toolbar.
Note: Playback is enabled only when the Page and Thumbnails View or Page View are
selected.
Page 60
Page 61

© 2011 Luidia, Incorporated
Options
Spotlight options you set remain in effect until you reset them.
Transparency: This option allow s you to select how dark the grayed out area surrounding the
spotlight will be.
Spotlight shape: This option allow s you to select the shape of the spotlight.
Spotlight size: This option allow s you to select the size of the spotlight.
Exit (X)
Closes the spotlight feature.
Spotlight
The Spotlight is useful for drawing attention to a particular region of your desktop.
To start Spotlight select the Spotlight menu item in the eBeam Education taskbar menu or
from the Scrapbook Toolbar.
You can now highlight a specific area of your desktop and use the Spotlight Options menu
to customize the spotlight.
To move the spotlight, click in the grayed-out area, then drag. Clicking in the spotlight lets
you interact normally with the desktop items in the spotlight area.
Spotlight's Options menu can be found in the top right corner of the screen.
Page 61
Page 62

© 2011 Luidia, Incorporated
New
New creates a new blank page in the Scrapbook meeting.
To create a new page:
Choose Page > New, or
Select the New Page button from the Scrapbook Toolbar.
The new page is inserted directly after the displayed page.
Clear
Clear clears all elements from the displayed page.
To clear a page, select the page to be cleared and:
Choose Page > Clear, or
Select the Clear Page button from the Scrapbook Toolbar.
Duplicate
Duplicate creates a copy of the displayed page and makes the copy the displayed page.
To duplicate a page, select the page to be duplicated and:
Choose Page > Duplicate, or
Select the Duplicate Page button from the Scrapbook Toolbar.
The duplicated Page is inserted directly after the displayed Page.
Delete
Delete deletes the displayed page.
To delete a page, select the page to be deleted and:
Choose Page > Delete, or
Select the Delete Page button from the Scrapbook Toolbar.
Delete All
Delete All deletes all pages from the Scrapbook meeting. All data will be lost.
Next Page/Previous
Page
Next Page navigates to the next page in the Scrapbook meeting. This option is available
only when the last page in the meeting is not displayed.
To select Next Page:
Choose Page > Next Page, or
Select the Next Page button from the Scrapbook Toolbar, or
Press the Page Down button on your keyboard.
Previous Page navigates to the previous page in the Scrapbook meeting. This option is
available only when the first page in the meeting is not displayed.
To select Previous Page:
Choose Page > Previous Page, or
Select the Previous Page button from the Scrapbook Toolbar, or
Press the Page Up button on your keyboard.
Go To Page
Go To Page allows you to select the page to be displayed by typing in or selecting a page
number.
To go to a page:
1.
Choose Page > Go To Page to open the Go To Page dialog.
2.
Select a page using the up-and-dow n arrow buttons, or type the page number into the
text box.
3.
Select OK.
Or:
Page Menu
Page Menu options are described below:
Page 62
Page 63

© 2011 Luidia, Incorporated
Use the Page Selection tools on the Scrapbook Toolbar .
Playback
See Playback for more information.
Add Hyperlink
Add Hyperlink allows you to add a hyperlink to a Scrapbook element.
See Hyperlinked elements and Scrapbook elements for more information.
Add Image
Add Image allows you to import an image file or screen capture into the currently selected
page.
See Scrapbook elements for more information.
Add Flash File
Add Flash File allows you to import a Flash file (*.swf) or Flash movie (*.flv) into the
currently selected page.
See Scrapbook elements for more information.
Add Snapshot
Add Snapshot allows you to import a screen shot.
Background Settings
Background Settings allows you to:
Import an image file or screen capture to the background of the selected page.
Set the background color and transparency of a page.
Add a grid or horizontal lines to the selected page.
Add Page to
Templates
When you select Add Page to Templates, a copy of the entire page and all its contents is
saved as a template in the Templates folder.
Page 63
Page 64

© 2011 Luidia, Incorporated
Share/End Meeting
Share Meeting allows a meeting host to share a Scrapbook meeting over the
Internet/intranet. While a meeting is shared, this menu option changes to End Meeting.
Join Meeting/Leave Meeting
Join Meeting allows invited participants to log into a shared Scrapbook meeting. The
participant will need to know the meeting name and a password (if applicable) prior to
attempting to log in to the meeting. While participating in a meeting, this menu option
changes to Leave Meeting.
Send Invitation
Send Invitation allows the meeting host to send e-mail invitations to all invited
participants for the shared Scrapbook meeting.
Allow Annotations
Allow Annotations allows the host to decide whether or not to allow the Participants
to add annotations in the shared Scrapbook meeting.
Synchronize Participants
Synchronize Participants allows the meeting host to keep the participants on the
same page. While Synchronize Participants is on, the host controls which page is
displayed.
Meetings Menu
Meetings Menu options are described below:
Page 64
Page 65

© 2011 Luidia, Incorporated
Help Menu
The Help Menu opens a sub-menu that allows you to access help and also provides links to
various registration and support pages that are provided by the hardware manufacturer of
your interactive system.
Page 65
Page 66

© 2011 Luidia, Incorporated
Element
Description
Annotations
Annotations are lines drawn on the Scrapbook page using the Pen Tool or Highlighter Tool. Once
drawn, the line becomes an element that can be moved, rotated, resized, grouped, etc.
Annotation lines are automatically grouped w ith other lines based on how closely the annotations
are drawn together and the elapsed time betw een the drawing of the lines. Grouping is done to
preserve groups of lines that are meant to stay together, such as letters, numbers, shapes, etc.
Autogrouping can be turned on or off in the Scrapbook Options dialog. Uncheck Autogroup pen
and highlighter strokes to turn grouping off. See Group and ungroup an element.
Annotations can not be modified using the Scrapbook Elements Edit Toolbar (a.k.a. the Object
Edit Tools).
Shapes
Shapes are drawn on the Scrapbook Page using the Shapes Tool. Once draw n, the shapes
becomes an element that can be moved, rotated, resized, grouped, etc.
Notes:
Shapes cannot be modified using the Scrapbook Elements Edit Toolbar (a.k.a. the Object Edit
Tools).
Shapes cannot be erased using the Eraser Tool.
When adding a hyperlink to a shape, the hyperlink icon may not alw ays appear on the shapes
but may instead appear near the shape.
Text Boxes
A text box is an element that displays typed text on the Scrapbook page. Text boxes have their
own edit toolbar. See Text Tool for more information.
Image Files
Image files, such as JPG and GIF images, can be imported into the Scrapbook page as elements.
To import an image file as an element:
Choose View > Gallery, or select the Gallery icon on the Scrapbook Toolbar to open the
Gallery. The Gallery allow s you to import an image file from a directory as a Scrapbook
element or as a Background. If you choose Import As Object, the picture you select appears
on your page as an element that you can manipulate.
Choose Page > Add Image to browse your computer to find the image filename.
Drag-and-drop the image file from your desktop or Explorer directly onto the Scrapbook
page.
You can also drag and drop some types of files, such as Excel, Word and Pow erPoint from
your desktop onto a Scrapbook page and w ork with the resulting images as elements. In
Scrapbook Features
Scrapbook Elements
The content of a Scrapbook page is made up of several types of objects known as elements.
These elements are annotations, shapes, text boxes, image files and Flash files. Each
element is selectable using the Select Tool.
See the following topics:
What is a Scrapbook Element? : This topic defines the Annotation, Shapes, Text Box,
Image File and Flash file elements.
How to Use Scrapbook Elements: Describes things you can do with Scrapbook elements,
such as moving, duplicating, locking, etc.
What is a Scrapbook Element?
Scrapbook elements are described in the following table.
Page 66
Page 67

© 2011 Luidia, Incorporated
multipage files, you will be prompted to select the page to use. See Background Settings for
information on how to import multipage files as background images.
Take a snapshot of your screen.
Supported file formats for image files:
Bitmap (*.bmp)
Graphic Files (*.gif, *.jpg, *.ico, *.emf, *.wmf, *.png)
Excel Spreadsheets (*.xls). See Import a PowerPoint, Excel and Word Document.
PowerPoint Presentations (*.ppt). See Import a Pow erPoint, Excel and Word Document.
Word Document (*.doc, *.rtf). See Import a PowerPoint, Excel and Word Document.
Notes:
Excel, PowerPoint and Word documents can only be loaded as elements one page at a time.
To load more than one page at a time, see Background Settings.
If you attempt to load a file type that is not supported the page w ill display a file icon and the
filename, but will not attempt to load that file into the page.
Flash Files
Flash file in *.swf (Flash file) and *.flv (Flash movie) formats can be imported into the Scrapbook
page as elements.
Scrapbook will automatically embed play controls into your Flash element so you can use them
with your Select tool to play, pause, rewind or fast forward the movie. There is also a progress
bar which you can use to move to any particular point in the playback.
To import Flash into a Scrapbook page:
Choose Page > Add Flash File and select the file in the Open dialog box, or
Drag-and-drop the Flash file onto your Scrapbook page.
Notes:
The entire Flash file will be embedded into your Scrapbook file so it can greatly increase your
file size.
Due to the size of the Flash elements, they are not displayed during a shared meeting. A
container will appear in the participant page, but video will not run.
Flash elements can not be grouped, added to the Master Page, deleted using the Del key or
modified using the Scrapbook Elements Edit Toolbar (a.k.a. the Object Edit Tools).
How to Use Scrapbook Elements
See the following Scrapbook elements topics:
Select Individual or Multiple Elements
Manipulate Elements (using the Edit Menu)
Lock (protect) an Element
Move, Rotate and Resize Elements
Align and Distribute Elements
Order Elements
Group and Ungroup Elements
Use the Scrapbook Elements Edit Toolbar
Hyperlink a Scrapbook Element
Page 67
Page 68

© 2011 Luidia, Incorporated
To rotate an element, first select the element and then tap and hold the top
handle. The mouse cursor will change to circular arrows to indicate that you are
ready to rotate the element(s). If you are rotating a group of elements you can
grab the handle of any element in the group. Drag the handle clockwise or
counter-clockwise to rotate.
Notes:
During rotation the object is redrawn continuously. The smoothness of the
rotation depends on the speed of the computer, so on slower computers the
rotation will be less smooth.
Select Individual or Multiple Elements
Most operations on an element require that you select the element first. When an
element is selected it will have drag handles and a rotate handle.
Select an element by choosing the
Scrapbook page. To deselect an element use the Select Tool and click anywhere outside
of the element's bounding box.
To select multiple elements draw a rectangle around the elements with the Select Tool
or click multiple elements individually while holding the Ctrl key. The elem ents are
selected but are not grouped.
To select all elements on a Scrapbook page at once:
Select Edit > Select All, or
o
Right-click (press the Tool Palette button on your Interactive Stylus) on the page
o
and select Select All, or
Press Ctrl+ A on your keyboard.
o
Select Tool
and then clicking the element in the
Lock (protect) an Element
Locking a Scrapbook element protects it from being modified in any way. Once an element is
locked it can be hyperlinked but it cannot be moved, rotated, resized, cut, copied,
duplicated, deleted, ordered, grouped, aligned, oriented, edited or reset.
When an elem ent is selected the drag and rotate handles are replaced with a black border
and an im age of a lock appears in the center of the element
When you select a mixture of locked and unlocked elements, none of the selected elements
can be manipulated. To modify locked elements they must first be unlocked.
To lock an element choose the Select tool, select the element and select Lock > Lock from
your right-click m enu.
To unlock a locked element, select the element and then select Lock > Unlock from your
right-click menu.
Move, Rotate and Resize an Element
When moving or rotating multiple elem ents at one time, you must first select all the
elements using the Select Tool and draw a rectangle around them to create a temporary
group.
Move an element by dragging it to the new location. It is not necessary to first select the
element if you are only moving a single element.
Page 68
Page 69

© 2011 Luidia, Incorporated
To resize an element, first select the element and then tap and drag one of
the square handles. The element will resize as you drag.
o
Maintain Aspect Ratio : To maintain the element's aspect ratio
while resizing, only drag using a corner drag handle.
o
Ignore Aspect Ratio : To resize an element without maintaining the
element's aspect ratio, drag using a side drag handle.
Align and Distribute Elements
Alignm ent is used to align selected Scrapbook elements relative to each other. Distribute is
used to distribute elements equal distances from each other.
To align or distribute a group of elements, first use the
Then choose the alignm ent or distribute option from the Edit menu or from your right-click
(press the Tool Palette button on your Interactive Stylus) menu.
Alignment Options
Align Left: The elements will align vertically to the left edge of the left most object.
Align Center: The elements will align vertically to the averaged center point of all the
elements.
Align R ight : The elements will align vertically to the right edge of the right most
element.
Align Top: The elements will align horizontally to the top edge of the highest object.
Align Middle: The elements will align horizontally to the averaged center point of all the
elements.
Align Bottom: The elements will align horizontally to the bottom edge of the lowest
object.
Distribute Options
Distribute Horizontally: The elements will be distributed evenly and horizontally
between the center points of the left and right most elements.
Select Tool
to select the elements.
Distribute Vertically: The elements will be distributed vertically and evenly between the
center points of the top and bottom elem ents.
Order Elements
Elements exist on a Scrapbook page in order. The last element added to a page will be on
top of and may cover elements added previously. The order that elements are displayed in is
referred to as the Z-order.
To move an element forward or backward in the Z-order, first you must select the element
using the Select Tool. Once an element is selected it can be moved in front of or behind
other elements by choosing one of the following options from the Edit > Order menu: Bring
to Front, Send to Back, Bring Forward, or Send Backward. You can also right-click (press the
Tool Palette button on your Interactive Stylus) the Scrapbook page to find the Order menu.
Page 69
Page 70

© 2011 Luidia, Incorporated
Group and Ungroup an Element
Grouping is used to manipulate a group of elements at the same time. It causes a set of
elements to behave as a single element, even while editing or resizing. A grouped set of
elements cannot be ungrouped by using the Select Tool to select outside of the group.
To group elements together, use the Select Tool to draw a bounding rectangle around a
group of elem ents, and then choose Edit > Grouping > Group or select Grouping > Group
from your right-click menu.
To ungroup grouped elements, use the Select Tool to select the grouped element, and
then choose Edit > G rouping > Ungroup or select Grouping > Ungroup from your right-
click menu.
Note: Autogrouping can be turned on or off in the Scrapbook Options dialog. Choose Edit >
Options and then click the Preferences tab. Uncheck Autogroup pen and highlighter
strokes to turn grouping off.
Page 70
Page 71

© 2011 Luidia, Incorporated
The Crop Tool is used to remove the outer parts of an image element (see
Scrapbook Elem ents).
The Crop Tool is the default tool selection when you open the Object Edit Tools.
When the Crop Tool is selected, crop handles appear at the corners of the selected
Scrapbook element's bounding box; the cursor changes to cropping cursor while
inside the bounding box.
To crop the Scrapbook elem ent, move any of the crop handles. You will be able to
see the entire image, although the part of the image you are cropping out will be
shaded grey.
To close out of the Crop Tool, deselect the object.
If an error is made or you just want to restore the original image:
Select Edit Menu > Reset Image Properties , or
Choose Reset Image Properties from the Right-click menu (press the Tool
Palette button on your Interactive Stylus).
T ransparency is used to render part of an image element
transparent. This is useful for removing image backgrounds or similar
functions. The transparency tools consist of the Transparency Dropper
Scrapbook Elements Edit Toolbar
Scrapbook includes an Object Edit Toolbar that can be used to modify the transparency of
or to crop image elements.
The Object Edit Tools cannot modify Flash files, Annotation elements or Text Box elem ents.
Note: The Object Edit Tools can only be used on single elem ents. You cannot open the
toolbar when you have selected multiple elements or have selected a grouped element.
To open the toolbar:
Double-click a single element, or
o
Use the Select Tool to highlight the element, then right-click and choose Edit.
o
You can also Press the Tool Palette button on your Interactive Stylus.
o
Object Edit Toolbar
The Object Edit Toolbar contain the following tools:
Crop Tool
Transparency Tool and Transparency Slider
Crop Tool
T ransparency Tool and Transparency Slider
Page 71
Page 72

© 2011 Luidia, Incorporated
and the Transparency Slider (shown to the left from left to right).
The Transparency Tool (dropper) is used to set individual colors
transparent. When you use the Transparency Tool dropper to select a
single color, it will render that color transparent as well as any color
within 5 values of that color.(+/-, 5, 5 of RGB).
The Transparency Slider is used to globally set the transparency of
the entire elem ent at once.
If an error is made while using the Transparency tools or you just
want to restore the original image:
Select Edit Menu > Reset Image Properties , or
Choose Reset Image Properties from the Right-click menu
(press the Tool Palette button on your Interactive Stylus).
See the following transparency topics:
Set Single Color Transparency Within an Element
Set Multiple Color Transparency Within an Element
Set Transparency of an Element Using the Transparency Slider
Set Single Color Transparency Within an Element
The default behavior of the Transparency Tool is to only render one color transparent at a
time. If you set one color to transparent and then attempt to pick a new color to set
transparent, the original color will be restored.
To set a single color transparent:
Select the element and open the Object Edit Tools.
1.
Select the Transparency Tool (dropper button).
2.
When the Transparency Tool is selected, the bounding box changes to have no
handles; the cursor changes to the transparency dropper while inside the bounding
box.
N ote: The bounding box will only pick visible pixels as transparent pixels from the
border or background will be automatically cropped.
Select a color within the selected Scrapbook element.
3.
The selected color everywhere within the Scrapbook element is now transparent.
Set Multiple Color Transparency W ithin an Element
To set multiple colors to be transparent:
Follow the directions under Set single color transparency within an element.
1.
Hold down either the Shift or Control Key while selecting the additional colors.
2.
Set Transparency of an Element Using the Transparency Slider
You can adjust or set the global transparency of an element any tim e the Object Edit Tools
are open regardless of the currently selected edit tool.
Page 72
Page 73

© 2011 Luidia, Incorporated
Use the Transparency Slider to select a setting between 100% (default) to 0% opaque.
Page 73
Page 74

© 2011 Luidia, Incorporated
Background Settings Options
All options affect the displayed age or selected thumbnail in Scrapbook.
Load Background: Opens the standard Open dialog box. To load an image,
navigate to and select the file you w ant to load into the page background
and then select Open.
Load from Clipboard: Loads data from the computer's clipboard as the
background image. If there is no data in the computer's clipboard, this
button is disabled.
Remove Image: Removes the background image from the page. Any
annotations will remain on the page.
File Scaling Options:
o
Do Not Scale: The file is imported into the background as is. This
option is not available if the image size is bigger than the page
size.
o
Scale Proportionally: The file is scaled to fit as much of the page
Background Settings
Background Settings allow you to set a color, image or document as the background for
any Scrapbook page. Scrapbook elements remain visible in front of the background settings,
and during a shared meeting background Settings are displayed to all participants (see Share
a meeting).
To open the Scrapbook Background Settings dialog box, select Background Settings
from the Page menu in the Scrapbook window.
The Page Background can be set in the following ways:
Print to eBeam Scrapbook Image Writer as a background,
Import from File > Import/Merge,
Select Page > Background Settings to locate the Background Settings dialog box,
Take a snapshot of your screen,
Import images from the Gallery, or
Set a Master Page.
See Supported File Formats for information on which file types can be imported by
Background Settings as a background image.
Using Background Settings
The Page > Background Settings option in Scrapbook allows you to:
Import an image file, Excel, Word or PowerPoint file, screen captures or data from the
clipboard as a background image on the selected page.
Set any color for the background of the page.
Turn on/off grid lines for that page (any imported background images remain in the
background of the page).
The following table describes the Background Settings dialog box features.
Page 74
Page 75

© 2011 Luidia, Incorporated
as possible w hile retaining the aspect ratio.
o
Scale to Fit: The file is scaled to fit the page completely. The
aspect ratio is not preserved.
o
Tile/Repeat: The file is tiled over the entire page. This option is
not available for files with more than 1 page. This option is not
available if the image size is bigger than the page size.
Transparency: The Transparency of a background image on a page can be
adjusted. Change the transparency of a single page background by opening
the Background Settings dialog when that page is displayed and adjust the
Transparency slider control in Options. Adjusting the transparency w hile
importing a multi-page file will cause all pages in the file to be imported at
the selected transparency level.
Background Settings Color
The background of the page can be set to any Window s supported color.
Color: Select the Color checkbox to turn background color on.
Solid: Select the Solid button to cause the background color to be displayed
as a solid color. When Solid is selected, you can change the background
color by selecting the Edit button.
Gradient: Select the Gradient button to cause the background color to be
displayed as a blend of two colors. When Gradient is selected, you can
change the two colors to be blended by selecting either Edit button.
Background Settings Grid/
Lines
A Grid or Lines can be shown over any background color or image.
Grid/Lines: Select the Grid/Lines checkbox to turn background grid/lines
on.
Style: Select the Style pull-down list to choose a grid or horizontal lines.
Line Width: Select the Line Width pull-down list to set the line width.
Color: Select the Edit button to change the line color.
Transparency: Set the transparency of the lines by adjusting the
transparency slider control.
Supported File Formats for Background Settings:
Bitmap (*.bmp)
Graphic Files (*.gif, *.jpg, *.tif, *.ico, *.em f, *.wmf)
Excel Spreadsheets (*.xls). See Im port a PowerPoint, Excel and Word Document.
PowerPoint Presentations (*.ppt). See Im port a PowerPoint, Excel and Word Docum ent.
Word Docum ent (*.doc, *.rtf). See Import a PowerPoint, Excel and Word Document.
If you attempt to load a file type that is not supported, the page will display a file icon
and the filenam e but will not attempt to load that file into the page.
Page 75
Page 76

© 2011 Luidia, Incorporated
Hyperlinked Elements
A hyperlinked element is a Scrapbook elem ent contained in a Scrapbook page that also
contains a hyperlink. A hyperlinked element can be identified by the icon of a globe displayed
in the bottom left corner of the element.
Use your Select Tool to select the globe icon on the element and your default web browser
will open to the hyperlink URL address.
The following topics describe how to add, edit and remove hyperlinks when working with
Scrapbook elements.
Add a Hyperlink to an Element
Edit or Rem ove a Hyperlink
Add a Hyperlink to an Element
Use the Select Tool to select the image or annotation element.
1.
Choose Page > Add Hyperlink, or right-click on the element and choose Add Hyperlink
2.
to Object.
Choose the type of hyperlink you want to add by selecting one of the buttons (Web Page,
3.
Scrapbook Page or File).
For a Web Page type or paste a standard URL address, such as "http://www.luidia.
com", into the Add Hyperlink dialog box.
Note : You must use one of the following prefixes in the URL:
http://
https://
ftp://
www.
For a Scrapbook page, use the drop-down menu to choose one of the pages currently
open in Scrapbook.
For a File, select the Browse button to navigate to the file to which you want to create
a hyperlink.
Select the Add button. The image, annotation, shape or Flash element appears selected
4.
with a small globe icon in the corner.
Edit or Remove a Hyperlink
Use the Select Tool to select the image or annotation element.
1.
Choose Page > Edit/Remove Hyperlink, or right-click on the element and select Edit/
2.
Remove Hyperlink. The Edit Hyperlink window displays.
Change the UR L address and select the OK button, or click the Remove Hyperlink
3.
button.
Note: Remove Hyperlink will not delete the element.
Page 76
Page 77

© 2011 Luidia, Incorporated
Page 77
Page 78

© 2011 Luidia, Incorporated
Importing PowerPoint, Excel and Word Documents
This section covers procedures for importing PowerPoint, Excel and Word documents into
Scrapbook. For m ore on how background images are used in Scrapbook, see Background
Settings.
Note: You must have Microsoft Office installed in order to import PowerPoint, Excel and
Word docum ents into Scrapbook.
To import a PowerPoint, Excel or Word document into Scrapbook as a
Background
In Scrapbook select File > Import/Merge or select Page > Background Settings, and
1.
use the Load Background button to locate the file.
Make sure you've selected the document type from the Files of type list, then navigate
2.
to and select the file you wish to import.
In the Import File dialog box, select one of the following choices
3.
Load many images and use them for new pages—loads pages/sheets/slides
o
that fall within the range you specify.
Load one image only and use it for the current page —loads one page/sheet/
o
slide that you specify by its num ber.
Excel only: To load data from one sheet only, specify the sheet and the range of
o
cells to be used. To load data from m any sheets, specify the sheets to be used.
Select OK. The Import File dialog closes.
4.
If you imported using the Background Settings dialog you should now select OK and
5.
Scrapbook imports the background according to the selections you made through the
Background Settings import process.
See also:
Background Settings
Improving PowerPoint Image Quality
To import a PowerPoint, Excel or Word document into Scrapbook as an
Object
Choose Page > Add Image
1.
Make sure you've selected the type of file, then navigate to and select the file you wish to
2.
import.
There are different import options based on file type.
3.
PowerPoint and Word Files: Select a page range. All pages in that range will be
o
imported as a separate object.
Excel Files: Select a sheet. Only one sheet can be imported at a time.
o
Select OK. The Import File dialog closes.
4.
See also: Scrapbook Elements.
Page 78
Page 79

© 2011 Luidia, Incorporated
Improving PowerPoint Image Quality
The Scrapbook import typically decreases the file size of PowerPoint slides that contain high
quality im ages by converting the images into a lower quality im age format. This means that
the images shown in Scrapbook are not as sharp or clear as the original PowerPoint slides.
If you want retain the high image quality of the original PowerPoint slides, do the following
when im porting to Scrapbook:
Choose Edit > Options.
1.
Select the Preferences tab.
2.
Check the Use original image quality checkbox found under PowerPoint Presentation
3.
Import.
Checking Use original image quality causes the high image quality of the original
PowerPoint slide to be maintained as the file is imported into Scrapbook. However, checking
this option also results in higher PC memory consumption and increases the time required to
save, share and join meetings.
Page 79
Page 80

© 2011 Luidia, Incorporated
Exporting Documents into Scrapbook
Exporting Documents as Backgrounds and Objects
You can export documents into Scrapbook as backgrounds from any application that can
print. This is a great option for PDFs and CAD drawings. For more on how background images
are used in Scrapbook, see Background Settings.
You can also export documents as objects (rather than backgrounds). See Print documents
to Scrapbook as objects in Scrapbook Options.
To export a document into Scrapbook as a Background
From your application (such as Word, Excel, PowerPoint, Acrobat, AutoCAD), choose File
1.
> Print. The Print dialog displays.
From the Print dialog, select eBeam Scrapbook Image Writer from the list of printers.
2.
Specify print rages as appropriate given the type of document you are working with, then
3.
click OK. Scrapbook immediately imports your document as a background im age.
Page 80
Page 81

© 2011 Luidia, Incorporated
Using the Interactive Stylus
The diagram on the left demonstrates what each of
the buttons on the Interactive Stylus are used for.
The bottom button (button furthest from the tip) is
the Tool Palette button that is used to show and
hide the Tool Palette.
The Tool Palette button is also used in gesturing.
Gesture Based Navigation
Gesture Based Navigation (gesturing) is an advanced navigation style that allows you to
navigate the various eB eam Tool palette using click-sweep motions of the Interactive Stylus.
Gesturing allows you to select between tools and tool properties without needing to have the
Interactive Tools palettes visible on the screen.
See the following topics for more information.
Activate Gesture Based Navigation
How Gesturing Works
Mapping a Gesture to a Tool
Mapping a Gesture to a Property
Activate Gesture Based Navigation
To activate gesture based navigation, select the Options button from eBeam Education
Taskbar Menu, and select the Gesture Based Navigation checkbox.
How Gesturing Works
How to Gesture
All gesture selections are performed using the Tool Palette button on the Interactive Stylus
without touching the stylus to the projection surface. To gesture, hold the Interactive Stylus
so that you can comfortably press the Tool Palette button with your finger.
Gestures can be performed anywhere on the screen area, regardless of the visibility or
location of the Tool Palette.
A gesture begins when you press and hold the Tool Palette button and ends when the
button is released. The invisible path of motion that is drawn between pressing and releasing
the Tool Palette button determines the gesture selection.
Page 81
Page 82

© 2011 Luidia, Incorporated
Select a T ool Property
Once you're in the desired tool property, you can make a selection by gesturing a straight
line from any given point on the screen to the direction of the desired property and then
back again to the starting point, all in one motion.
Switch T o T he Color Property Ring
To switch to the color property, begin a gesture from any given point on the screen and
draw a straight line to the left, and then down - forming an approximate 90 degree corner.
Switch to the Line Thickness Property Ring
To switch to the thickness property, begin a gesture from any given point on the screen and
draw a straight line to the right, and then down - forming an approximate 90 degree
corner.
Switch to the Shapes Property Ring
The Shapes Tool is the only tool that has a shapes property.
To switch to the shapes property, begin a gesture from any given point on the screen and
draw a straight line down, and then left OR right - forming an approximate 90 degree
corner.
Mapping a Gesture to a Tool
The Tool Palette contains 8 main tools in any environment.
One of eight tools can be selected at a time by gesturing a straight line from any point on
the screen to the direction of the desired tool.
Mapping a Gesture to a Tool Property
A tool property is some defining characteristic of a tool. In the case of the
properties are pen color and line thickness.
Each tool might also have a property ring that can have from 4 to 8 different selections. For
inform ation on how to select a single property from a property ring, see Select a Property.
It is only possible to use one property ring at a time. If you have just gestured to select a
color but now want to select line thickness, you must change the property ring. See the
following topics for information on how to change between the different property rings.
Switch to the Color Property Ring
Switch to the Line Thickness Property Ring
Switch to the Shapes Property Ring
Pen Tool
, the tool
Page 82
Page 83

© 2011 Luidia, Incorporated
Page 83
Page 84

© 2011 Luidia, Incorporated
eBeam Inscribe Wireless Tablet
The eBeam Inscribe wireless tablet allows you to make annotations during presentations or
while using Scrapbook using just the wireless pen and tablet and the Tablet Toolbar. You
have a number of options for configuring the behavior of the tablet and pen, including
Scrapbook Direct, Standard Mouse Mode, Absolute Mouse Mode and Relative Mouse Mode.
See the following topics:
Installing the Wireless Tablet
Pairing the Tablet
Absolute and Relative Mouse Mode
Standard Mouse Mode
Scrapbook Direct
Using the Tablet Toolbar
Installing the Wireless Tablet
Installing the wireless tablet is a simple two-step process.
1. Install the driver (included on the installation CD or found at http://www.e-beam.com
under Downloads).
2. Pair the tablet and your PC .
Pairing the Tablet
Pairing the tablet is the process of establishing communication between your PC and the
tablet. You must do this before the tablet will function with your computer.
To pair the tablet
Plug the USB receiver, or key, into a USB port on your PC.
1.
Turn on the wireless tablet by pressing its power button for at least three seconds.
2.
Press the binding button on the back of the tablet and the binding button on the USB
3.
receiver sim ultaneously. Both the LCD display of the tablet and the blue LED of the USB
receiver will blink.
Once the binding process has finished, notice that the LCD display of the tablet will show
4.
000 to 005. If binding multiple tablets to a PC, each tablet will show a unique three digit
number.
Note: You can pair up to five different tablets to your PC.
Absolute and Relative Mouse Mode
There are two ways to control the cursor when using the tablet--Absolute Mouse Mode and
Relative Mouse Mode.
In Absolute Mouse Mode (the default setting), the area of the tablet is mapped directly to the
screen area. The upper right tablet area equals the upper right corner of screen. When
Scrapbook Direct is turned on and you are using Absolute Mouse Mode, the tablet surface
maps directly to the Scrapbook page.
In Relative Mouse Mode, the pen and tablet behave the way a mouse typically works, or like
a touch pad on a laptop. You can touch down, make a mark, lift up the pen, move it to the
left or right, touch down again, and begin moving from the same spot on the screen. There is
no direct or literal mapping of the tablet area to the screen workspace.
Page 84
Page 85

© 2011 Luidia, Incorporated
Mouse on Desktop/Select in
Scrapbook
In Scrapbook, use this button to choose the Select Tool. Outside of Scrapbook, use
this button to select the Mouse from Desktop Tool.
Color Specific Pen Selection
Buttons (red, green, blue,
black)
Outside of Scrapbook, use these buttons to annotate the desktop, then save your
desktop annotations in Scrapbook. If you are in Scrapbook, use these buttons to
select a red, green, blue or black pen to use on a Scrapbook page.
To select Absolute or Relative Mouse Mode
Select the Pen Pad icon in the Windows Taskbar menu.
1.
The Pen Pad control window displays.
Under the About tab in the Tracking Mode area, select the Pen (Absolute) or Pen
2.
(Relative) radio button.
Select OK. The Pen is now in Absolute Mouse Mode.
3.
Standard Mouse Mode
You can use the wireless tablet and pen in a standard manner to do the tasks you would
typically perform with a mouse, such as locating files, selecting items, launching
applications, and generally navigating your computer's operating system.
When using the tablet and pen in standard mouse mode, here is what you need to know
about using the pen:
Left-click - Pressing the tip of the stylus against the tablet is the equivalent of a
left-click.
Right-click - Pressing the button closest to the tip is the equivalent of a right-click.
Double-click - Pressing the button farthest from the tip is the equivalent of a
double-click.
Scrapbook Direct
With Scrapbook Direct turned on, the entire tablet working area is mapped directly to the
current Scrapbook page. Since the pen and tablet cannot access anything outside of the
current Scrapbook page when Scrapbook Direct is turned on, you can use the pen with the
tablet toolbar along the top of the tablet to select different tools rather than changing tools
with the eBeam Tool Palette.
To turn on Scrapbook Direct
Begin using the tablet in standard mouse mode.
1.
Launch Scrapbook.
2.
Using the pen and tablet, press the Scrapbook Direct toolbar button on the far right end
3.
of the tablet toolbar. Scrapbook Direct is now on, and the tablet's writing surface is
mapped directly to the current Scrapbook page.
Note: If Scrapbook is not open, the Scrapbook Direct toolbar button is disabled.
Using the tablet and pen with Scrapbook Direct turned on
When using the tablet and pen with Scrapbook Direct turned on:
Pressing the tip of the stylus against the tablet is the equivalent of a left-click.
The button closest to the tip is disabled.
Pressing the button farthest from the tip toggles back and forth between showing and
hiding the eB eam Tool Palette.
Using the Tabl et Toolbar
Page 85
Page 86

© 2011 Luidia, Incorporated
Color Specific Highlighter
Selection Buttons (yellow,
green)
Outside of Scrapbook, use these buttons to annotate the desktop, then save your
desktop annotations in Scrapbook. If you are in Scrapbook, use these buttons to
select a yellow or green highlighter to use on a Scrapbook page.
Eraser
If you are not in Scrapbook, the eraser tool is disabled. If you are in Scrapbook, it
selects the eraser tool.
Pen and Highlighter Thickness
If the Pen or Highlighter Tool is currently selected (on the desktop or in
Scrapbook), these buttons change the thickness of the pen or highlighter. If the
Pen or HighlighterTtool is not selected, these buttons are disabled.
Undo/Redo
Undo cancels the last change on a Scrapbook page.
Redo allows you to redo the last undone change, provided you had previously
used the Undo Tool.
Full Screen in Scrapbook
Press this button to either enter or exit full screen mode in Scrapbook. If you are
not in Scrapbook the button is inactive. This function is not available when
Scrapbook Direct is on.
Scrapbook Direct
Press this button to turn Scrapbook Direct on or off.
Page 86
Page 87

© 2011 Luidia, Incorporated
Document Camera
The eBeam Focus Document Camera (DocCam)takes still images or videos that you can
use as backgrounds or objects on a Scrapbook page. Save your images in the Gallery for
easy access, and weave them into your presentations. The images are stored as medium
resolution jpeg files.
To launch eBeam Focus Viewer
The eBeam Focus DocCam works with Windows Vista and Windows XP, and does not require
a driver.
Plug the DocCam into a USB 2.0 port on your computer.
1.
Select the eBeam Focus Viewer button from the Scrapbook toolbar or from the View
2.
menu.
The eBeam Focus Viewer window opens, floating over the Scrapbook window. A live feed
from the cam era displays in the eBeam Focus Viewer window.
Note: If there is no DocCam connected, the following error message displays: “Your
document camera could not be found. Check connection and try again.”
Other Ways to Capture Images
You can use the eBeam Focus Viewer button to launch any connected or embedded
camera.
You must load any required camera drivers and connect external cameras via USB.
Caution: You cannot acquire images and video using twain drivers. Several commonly
used cameras em ploy this method and will not launch from the eBeam Education Suite.
See the following topics:
Document Camera Folder
Resizing the eBeam Focus Viewer Window
Closing eBeam Focus Viewer
Capturing Images and Video
Alignment Grid
Full Screen
Meetings
Document Camera Folder
The Document Camera folder displays in the Gallery once you have launched eBeam Focus
Viewer with a DocCam connected to your computer. This is where the Gallery stores images
and video clips captured from the DocCam.
Resizing the eBeam Focus Viewer Window
You can resize the eBeam Focus Viewer window by selecting and dragging the edges of the
window. The Viewer window resizes with the movement of the mouse in real time. The
DocCam Viewer window size does NOT affect capture resolution for images or videos.
Page 87
Page 88

© 2011 Luidia, Incorporated
Add DocCam
Image to
Scrapbook as
background
Adds the current still image in the DocCam to Scrapbook as
a background.
Add DocCam
Image to
Scrapbook as
object
Adds the current still image in the DocCam to Scrapbook as
an object.
Add DocCam
Image to the
Gallery
Adds the current still image in the DocCam to Gallery in the
Document Camera Folder.
Capture Video
Stars recording video with your Document Camera, and
opens the Recorder Toolbar
Alignment Grid
Turns on/off the alignment grid. The alignment grid covers
your current image in a 9 x 12 grid so you can align your
image.
Recorder
Toolbar
This tool is only available once you launch the recorder. The
Recorder Toolbar contains the Record, Pause and Stop
Buttons to record a video. Once you stop recording a Save
As dialog box opens where you can enter the details to save
your video.
Full Screen On
Expands the Document Camera Viewer Window to full
screen. Turn full screen off by selecting the full screen off
icon or right-click on the full screen image and select Full
Screen Off.
Closing eBeam Focus Viewer
Select the red [X] in the upper right corner of the Viewer window. The DocCam Viewer
window closes.
Capturing Images and Video
You can use the eBeam Focus DocCam to capture images and videos, then use them in your
Scrapbook pages.
Document Camera Toolbar
Once you launch the Docum ent Camera, you will see the Document Camera Toolbar. The
following tools are available
:
Page 88
Page 89

© 2011 Luidia, Incorporated
Gallery
Adding Images to Scrapbook Pages
You can import an image from the Gallery into a Scrapbook page either as a Scrapbook
Element or as a Background Image. If you import an object as a Scrapbook element, then
you can later move, rotate, resize, copy/paste and edit the object within the Scrapbook page.
If you import an object as a background image, then the image is imported into the
background of the selected Scrapbook page and cannot be edited the same way you can edit
a Scrapbook element. In order to modify or delete a background, you must do so through
Background Settings.
Add an Image as a Scrapbook Element
Select a Scrapbook page.
1.
Search for an im age using the Gallery Folders, the Favorites Folder(s), the Encyclopædia
2.
B ritannica Content folder or the Flickr search capability.
Once you have located the images you want to use, select them in the Preview Pane by
3.
pressing Shift+Select or Ctrl+ Select while clicking on the images. With Shift+Select, you
can select multiple adjacent images. With Ctrl+Select, you can select multiple
non-adjacent images.
Use one of the following methods to add the im age to the Scrapbook page:
4.
With the image selected in the Preview Pane, select the Add as Object button from the
Gallery Toolbar.
Drag-and-drop the object from the Preview Pane onto the Scrapbook page, Or
Double-click the object in the Preview Pane.
Scrapbook adds your selected images into the Scrapbook page as Scrapbook elements.
Note: With multiple im ages selected, the Add Object as Background option is not available
since the background can consist of only one image.
Add an Image as a Scrapbook Page Background
Select a Scrapbook page.
1.
Select an image using the Gallery Directory Tree and Preview Pane.
2.
With the image selected in the Preview Pane, select the Add as Background button
3.
from the Gallery Toolbar.
The object is now shown on the Scrapbook page as a background. The background image has
a default scale setting of Scale Proportionally. To change this setting, select the Page menu,
then Background Settings.
Page 89
Page 90

© 2011 Luidia, Incorporated
Favorites
The Favorites folder can help you quickly access the images that you use most often. A
favorite is a short-cut to files in your Gallery. Deleting a favorite does not delete the actual
file, it deletes only the reference to that file in your Favorites folder. You can also use
sub-folders under the Favorites folder to organize your Gallery images.
Populating the Favorites Folder
Using Favorites on Scrapbook Pages
Working with Favorites Folders and Sub-Folders
Populating the Favorites Folder
The Favorites folder is there to give you faster access to the images you use regularly. It
does not come pre-populated with images.
To add a Gallery Object to the Favorites folder
Select a Gallery Object from the Preview Pane.
1.
Drag and drop your selected Gallery Object into the Favorites folder, or right-click on
2.
your selected Gallery Object and choose Add to Favorites. A reference to the Gallery
Object is saved to the Favorites root folder.
To remove a Gallery Object from Favorites folder
Select the Favorites folder or sub-folder that contains the object you want to remove.
1.
From the Preview Pane, select the item you want to remove.
2.
Right-click on your selected item and choose Delete Favorites, or press the Delete key
3.
on your keyboard. The reference to the Gallery Object is removed from the Favorites
folder.
Working wi th Favorites Folders and Sub-Folders
The Favorites folder can help you track, organize and work with your favorite images. If you
want to organize a larger set of favorite images, you may want to create a structure of
sub-folders to nam e and use as you choose.
To add a sub-folder to the Favorites folder
Select the Favorites folder in the Gallery Directory Tree.
1.
Select Add Folder from the Gallery Toolbar. The Add Folder dialogue box opens.
2.
Enter a name for your new sub-folder in the Name field.
3.
Click OK. Your new sub-folder appears under the Favorites folder.
4.
To remove a folder from the Favorites folder
Select the folder that you want to remove.
1.
Use one of the following methods to rem ove the folder:
2.
Select Remove Folder from the Gallery Toolbar.
o
Right-click on the folder you want to remove, then click Remove Folder.
o
Page 90
Page 91

© 2011 Luidia, Incorporated
Press the Delete key on your keyboard.
o
A dialogue will appear to confirm the removal.
Click Remove. The folder is removed from the Favorites folder.
3.
Move Favorites from one Favorites folder to another
Navigate to the object in your Favorites folder that you want to move using the Preview
1.
Pane. Select the object.
Drag and drop the selected favorite into the new Favorites folder. The favorites object is
2.
removed from the original Favorites folder and placed into the new Folder.
Page 91
Page 92

© 2011 Luidia, Incorporated
Templates
If you have created a page that you want to use repeatedly, you can store it in the
Templates folder. Starting out a new project with templates can save you time. You can
begin with a template, then modify it as needed for each new project.
Populating the Tem plates Folder
Working with Templates and Page Backgrounds
Adding and R em oving Links to Folders in the Templates Folder
Populating the Templates Folder
To add a page to the Templates folder
Use one of the following methods for adding a page to the Templates folder:
Right-click directly on the Scrapbook page and select Add Page to Templates or select
1.
Page > Add Page to Templates. The Add Page to Templates Folder dialog window
displays.
Enter a name for your new template page.
2.
Click OK. A copy of the entire page and all its contents is saved as a template in the
3.
Templates folder.
To delete a template
Select the Templates folder.
1.
From the Preview Pane, select the Template you want to delete.
2.
Use one of the following methods to delete the template:
3.
Select the Delete key on your keyboard or right-click the template in the Preview
a)
Pane and select Delete Templates. The Delete Template confirmation window
displays.
Select Delete. The template no longer displays in the Preview Pane and is no
b)
longer associated with the Templates folder.
Working wi th Templates and Page Backgrounds
As you work with tem plates and page backgrounds, it is helpful to be aware of certain
options you have. In the simplest case, you may have a blank Scrapbook page, and you want
to start by adding a Template to your page that includes a background and some page
objects.
In other cases, if you are working with a Scrapbook page that already has a background but
you want to include page objects from a template that has a different background, you can
add the page objects from the Template without replacing your current page background in
Scrapbook.
You also have the option of replacing a page background with the background and objects
from a tem plate.
To add a Template Page to a Scrapbook Page
Select the Templates folder.
1.
Page 92
Page 93

© 2011 Luidia, Incorporated
From the Preview Pane, select the template you want to add.
2.
Select the Add as Background icon. The template background and objects are added to
3.
your current Scrapbook page.
If the Scrapbook page already contains a background, a dialogue box will open prompting
you with the question: Would you like to replace the Current Background with the
Template Background? Select Yes if you want to replace the current page background
with the template background, and the background is replaced along with the template
objects. Select No if you do not want to replace the current page background with the
template background, and background is not replaced but the template objects are
added.
You also have the option to add a template from the Preview Pane in the following ways:
Right-click the template you want to use in the Preview Pane and select Add to Current
Page or Add to N ew Page .
Drag and drop the template page onto the current Scrapbook page.
Note: Master Page objects will be added as normal objects in the Scrapbook page.
Adding and Removing Links to Folders in the Templates Folder
To add a Link to a Folder in the Templates folder
Click the Templates Folder.
1.
From the Gallery Toolbar, click the Add Link to Folder icon, or right-click on the
2.
Templates Folder and select Add Link to Folder. The Add Link to Folder dialog displays.
Enter a name and browse to the folder’s location using the Browse button.
3.
Click OK. The new linked folder displays under the Templates folder.
4.
To remove a Link to a Folder from the Templates folder
Select the Templates sub-folder that you want to remove.
1.
Right-click on the sub-folder and select Remove Link to Folder, or press the Delete
2.
key on your keyboard or select the Remove Link to Folder icon from the Gallery
Toolbar. A confirm ation dialogue window displays.
Click Remove. The sub-folder is removed from the Templates folder.
3.
Page 93
Page 94

Flickr
© 2011 Luidia, Incorporated
We have integrated key features from Yahoo's photo sharing site Flickr
so that you can easily search for photos and integrate them into your Scrapbook pages. You
can save images for later use by saving them in the Favorites folder.
Accessing Flickr
Searching for Images
Search History
into the Gallery
(TM)
Accessing Flickr
Accessing Flickr through the Gallery is very simple. Select the Flickr folder, use search terms
in the Flickr search field, and navigate through the Preview Pane to view the search results.
Note: To access Flickr through the Gallery, your computer must be connected to the
Internet.
Searching for Images
Using the Flickr search field, you can quickly search for and select among millions of images
from Flickr.com.
To search for images in Flickr
Enter a search term in the Flickr search field.
1.
Select the magnifying glass icon or press Enter to initiate your search. Images relating
2.
to your search term will appear as thumbnails in the Preview Pane.
Search History
For your convenience, the Flickr search field saves your search history. You can clear the
search history whenever you like.
To show the search history
Click the down arrow to the right of the search field. The search history displays in the
drop-down list.
To clear the search history
Click the down arrow to the right of the magnifying glass icon.
1.
Select Clear R ecent Searches. The search history is now cleared.
2.
Page 94
Page 95

© 2011 Luidia, Incorporated
Encyclopædia Britannica
We have integrated key features from Encyclopædia Britannica into the Gallery giving you
access to a wide range of educational content and online resources while navigating
Scrapbook. Search for information to incorporate into your presentations or save images in
your Scrapbook meeting file. All images that you save will be stored in the Encyclopædia
Britannica Content folder for later use.
Note: You must have the Encyclopædia Britannica software installed or be logged into your
existing Encyclopædia Britannica account before you can access all of the resources available
in the Encyclopædia Britannica directory. If you are already a registered Britannica user,
clicking the directory link from the Gallery will give you the opportunity to log into your
account. If you are not a registered user or don't have the Britannica software installed, you
will have the opportunity to start a trial session or sign up for an Encyclopædia Britannica
subscription once you click the directory link from the Gallery. You must be online in order to
log into your account, register for a trial session or sign up for Encyclopædia Britannica
subscription.
Accessing Encyclopædia B ritannica
Encyclopædia B ritannica Content Folder
Accessing Encyclopædia Britannica
In order to access Encyclopædia Britannica from the Gallery, you m ust first install the
Encyclopædia B ritannica software using the installation CD that came in your box.
Once the software is installed, click the Encyclopædia Britannica directory in the Gallery
directory tree.
A separate window will open floating over your Scrapbook page, prompting you to choose
which library you want to start browsing. Make your selection and start browsing.
Note: Once you launch your Encyclopædia B ritannica software, a new directory called
Encyclopædia B ritannica Content will appear in the Gallery directory tree.
Encyclopædia Britannica Content Folder
For your convenience, you can save any images you find while browsing Encyclopædia
Britannica in your Gallery for later use. These images will be stored in the Encyclopædia
Britannica Content folder in your Gallery directory tree.
Save images to your Encyclopædia Britannica Content Folder
Search for an im age in your Encyclopædia Britannica software.
1.
When you have found an image you want to keep for later use, press the Save button or
2.
right-click the image and select Save Image As.
Name the file in the Save dialog box that appears and click the Save button.
3.
Note: If you try to save content other than an image, you will only be given the option to
Save As (instead of Save Image As). Click the image you want to save until you are given
Page 95
Page 96

© 2011 Luidia, Incorporated
the option to Save Image As. If you save content other than an image, you will not be able
to access it from the Gallery. See
the Gallery.
Access images in your Encyclopædia Britannica Content Folder
Click on the Encyclopæ dia Britannica Content folder in your Gallery directory tree. All
1.
images that you have added will be displayed in the Preview Pane.
Select the image you would like to use in the Preview Pane.
2.
See Adding Images to Scrapbook Pages for inform ation on how to incorporate these images
into your presentation.
Preview Pane
for file types that are compatible with
Page 96
Page 97

© 2011 Luidia, Incorporated
Shared Meetings
What is a Shared Meeting?
A Shared Scrapbook Meeting is a meeting that is broadcast over your local intranet or the
Internet.
At one location, the meeting coordinator/host uses the interactive system (software and
hardware) to host or broadcast the meeting over the network (see Hosting/Sharing a
Meeting). Rem ote participants use the interactive software or a Web browser to log into the
meeting (see Join a Meeting).
The meeting is held in real time, which means that remote participants see the notes and
annotations as they are created.
If the meeting coordinator allows, participants can annotate meeting pages, highlight
important points, and add notes that can be seen by all other participants as well as the
coordinator.
To allow remote participants (located outside of your local network firewall) to access your
shared m eeting, the meeting server must be located on the Internet. Luidia currently hosts a
meeting server that may be used by any eBeam-enabled interactive system user.
Page 97
Page 98

© 2011 Luidia, Incorporated
Meeting Name
The meeting name is the name show n in the Join Meeting dialog box. The meeting name is
saved as the default name for subsequent meetings, until you change it. The meeting name can
be up to 20 characters.
My Name
The name displayed in the Participants View . See Participants.
Notes
Any notes/comment you would like to include.
Publish Meeting
Name
Select Publish Meeting Name if you want the name of the meeting to be visible to netw ork
users who are attempting to join a meeting using either the Join Meeting (see Joining a Meeting
for more information) dialog box, or the Meetings w eb page located at w ww.e-beam.com.
If you do not publish the name, guests w ill need to know the full meeting name beforehand and
manually type it into the Join Meeting dialog box.
Password/
Confirm/Use
Password
If a password is required, check the Use Passw ord checkbox and type the same passw ord into
both the Password and Confirm text boxes.
The password must be at least 6 characters, and can be up to 20 characters.
Send Meeting
Invitation
Meeting invitations are e-mail invitations that are sent out using your standard e-mail client. If
Send Meeting Invitation is checked, the Send Invitation dialog box opens once you select
the Share Meeting button. See Sending an Invitation for more information.
Hosting/Sharing a Meeting
The following explains how to host/share a meeting over your local intranet or the
Internet.
When sharing a meeting, be aware of the following items.
While Scrapbook v2.2 can open files created by previous versions of Scrapbook (v2.1 and
earlier), previous versions of Scrapbook cannot open v2.2 files. During shared meetings,
previous versions of Scrapbook do not support (will not display) text boxes created in
Scrapbook v2.2. Scrapbook v2.2 will display (but cannot edit) text boxes created by
previous versions of Scrapbook.
If hosting a shared meeting using Scrapbook v2.2, we recommend that you select the
Deny access to remote participants with mismatched software versions checkbox
from the Share Meeting dialog box.
If you share the meeting on your local intranet, only people within your intranet can
access the meeting. If you share your meeting over the Internet (using an eBeam
server), participants from any Internet location can access your meeting.
To share a meeting an interactive receiver or software activation must be detected. Also,
if there is any possibility that your network uses a proxy server, see
You can host one shared meeting at any time.
Proxy Server Setup
See:
Hosting A Shared Meeting
Leaving A Shared Meeting
For meeting host specific tools, see Meeting Host Tools found in the Participants window.
Hosting a Shared Meeting
Choose Meetings > Share Meeting, or select the Share Meeting button from the
1.
Scrapbook Toolbar to open the Share Meeting dialog.
Under Meeting Information , enter the following:
2.
.
Page 98
Page 99

Archive Meeting
on the Server
An archived meeting allows you to search for, view, download, edit and/or delete your archived
meeting (based on the archive privileges you select). If Archive Meeting on the Server is
checked, the Archive Meeting dialog opens after you select the Share M eeting button. See
Archive a Meeting for more information.
Synchronize
Participants
Immediately
Causes remote participants to be synchronized from the start of the meeting. Synchronize is on
by default. See Participants.
Deny access to
remote
participants with
mismatched
software versions
The version of software you are using is not fully compatible w ith previous versions. During a
shared meeting, participants running previous versions may not be able to see imported image
files and will not be able to see w hen annotation or image elements are moved, rotated, resized,
etc. Selecting Deny access to remote participants with mismatched software versions will
only allow participants using the same softw are version or later to join your meeting.
Notes:
© 2011 Luidia, Incorporated
While the Archive Meeting dialog appears after selecting the Share Meeting
o
button, your selected archive parameters are not saved to the server until you
select the End Meeting button. However, meeting data is cached on the server in
case the meeting unexpectedly quits.
During your meeting, you may change your meeting parameters at any time by
o
choosing Meeting > Archive Meeting.
Under Server Information , select the server that will host the meeting.
3.
The pull-down m enu lists the default server and any other servers you have previously
added to your server list.
Note: If you wish to host the meeting from your computer, select Use my PC to Host
this Meeting and then type in a port number. For m ost occasions, the default port value
of 80 is best.
Notify guests of the meeting name, meeting time and password, if required. See Sending
4.
an Invitation for more inform ation.
Select Share.
5.
Your shared m eeting is now available on the network using the specified meeting server.
Leaving A Shared Meeting
To leave a shared meeting at any time:
Select the Share/End Meeting button from the Scrapbook Toolbar.
1.
Choose Meetings > End Meeting
2.
Important Note: When the meeting host ends a shared meeting, all participants are
disconnected from the m eeting. As the meeting host, make sure the meeting is completely
over before attempting to close the meeting.
Page 99
Page 100

© 2011 Luidia, Incorporated
Join a Meeting
Using Scrapbook to Join a Meeting
Open Scrapbook from:
1.
the eBeam Tool Palette, or
o
the eBeam Education Taskbar menu , or
o
the Scrapbook m enu option found in the Windows Start bar.
o
Choose Join Meeting from the
2.
In the Join Meeting dialog box, select the meeting server, enter your nam e and select a
3.
meeting name from the Meeting list.
The Meeting list shows active meetings whose names have been published.
If the pull-down m enu does not include the meeting server you want, you can manually
type the server name. You can also add a server to your server list so that you can
quickly select it on another occasion.
Select Refresh to update the list of published meetings.
4.
If the meeting appears with a Lock icon, enter the password.
If the meeting is not listed, enter the meeting name and a password if required.
Select Join.
5.
To leave a meeting, choose Meetings > Leave Meeting From, or select the Leave Meeting
button from the Scrapbook Toolbar.
Notes:
When the meeting host ends a shared meeting, all participants are disconnected from the
meeting. Once disconnected, participants can continue to print, save, annotate and
modify their Scrapbook record of the meeting.
Scrapbook Toolbar
.
Page 100
 Loading...