

Page 1
UM330X/UM280X/
UM330W/UM280W
Quick Setup Guide
UM330X/UM280X/
UM330W/UM280W
Quick Setup Guide
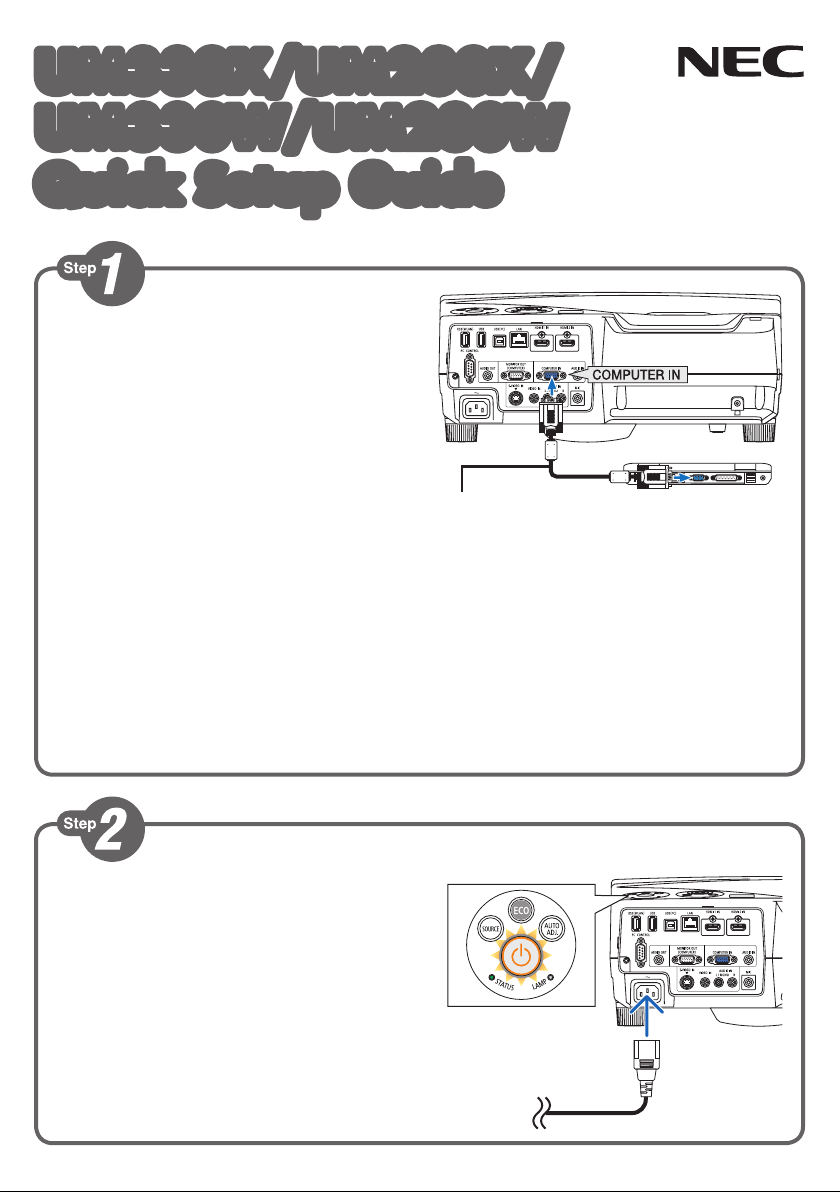
Remove the cable cover when using for the first time.
Connect your computer to the projector.
Entfernen Sie beim erstmaligen Gebrauch die Kabelabdeckung.
Schließen Sie ihren Computer an den Projektor an.
Retirez le cache-câbles lors de la première utilisation.
Connecter l’ordinateur au projecteur.
Rimuovere il copricavi al momento del primo utilizzo.
Collegate il vostro computer al proiettore.
Quite la cubierta para cables al usarlo por primera vez.
Conectar el ordenador al proyector.
Remova a proteção do cabo ao usar pela primeira vez.
Conecte seu computador ao projetor.
Ta bort kabelskyddet vid första användningstillfället.
Anslut din dator till projektorn.
Снимите крышку кабеля при использовании в первый раз.
Подключите компьютер к проектору.
처음 사용시 케이블 덮개를 분리하십시오.
컴퓨터를 프로젝터에 연결하십시오.
(→ page 5 of the User’s Manual)
Connect the supplied power cord.
Schließen Sie das mitgelieferte Netzkabel an.
Connecter le câble d’alimentation fourni.
Collegate il cavo d’alimentazione in dotazione.
Conecte el cable de alimentación suministrado.
Conecte o cabo de alimentação fornecido.
Anslut den medlevererade nätkabeln.
Подсоедините силовой кабель, входящий в комплект поставки.
전원 케이블을 연결하십시오.
Supplied computer cable (VGA)
Computer-Kabel (VGA) (im Lieferumfang enthalten)
Câble d’ordinateur fourni (VGA)
Cavo per computer (VGA) in dotazione
Cable de ordenador suministrado (VGA)
Cabo de computador (VGA) fornecido
Medföljande datorkabel (VGA)
Прилагаемый компьютерный кабель (VGA)
제공된 컴퓨터 케이블(VGA)
Page 2
Drawings of the projector with the cable
cover attached to it are used in this and
all subsequent examples.
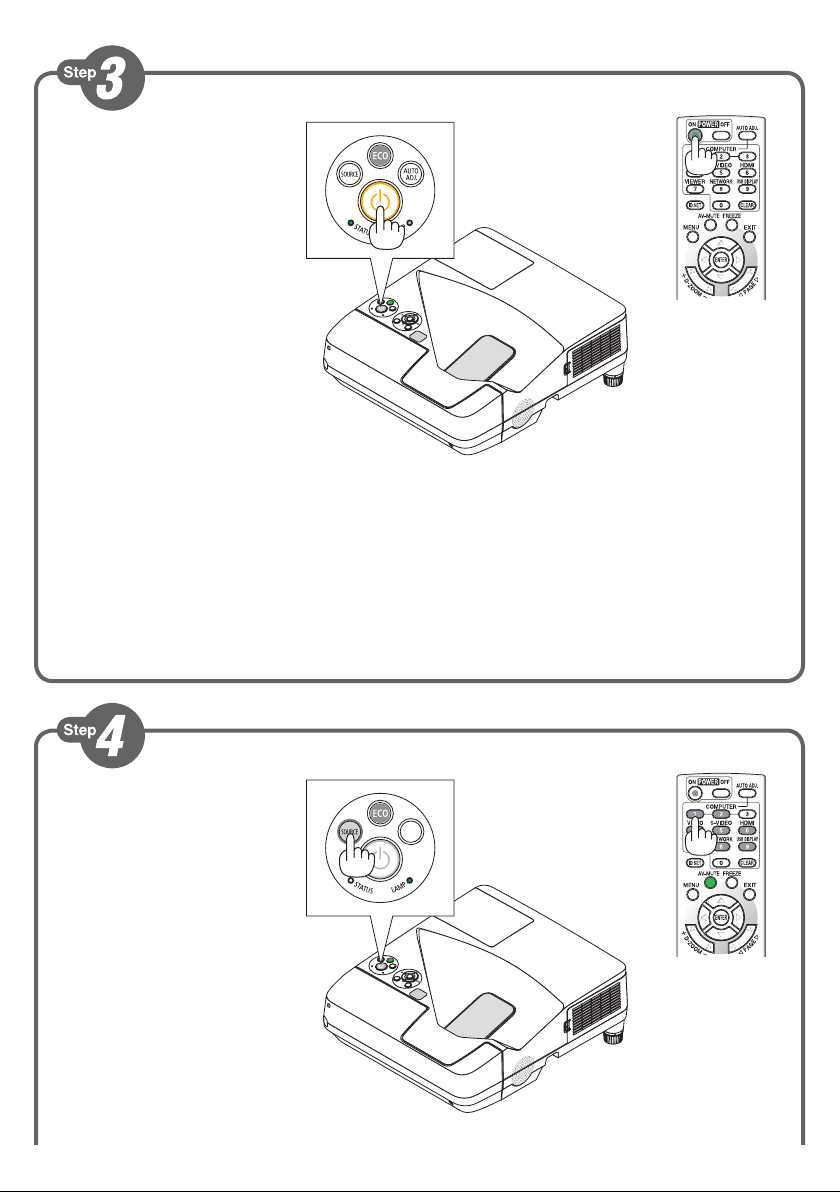
Turn on the projector.
In diesem und in allen folgenden
Beispielen werden Zeichnungen
verwendet, auf denen der Projektor mit
angebrachter Kabelabdeckung dargestellt
ist.
Schalten Sie den Projektor ein.
Des illustrations présentant le cachecâbles fixé sur le projecteur sont utilisées
dans cet exemple et dans les exemples
suivants.
Allumer le projecteur.
Illustrazioni del proiettore con il copricavi
fissato sono usate in questo e in tutti gli
esempi successivi.
Accensione del proiettore.
En este y en los siguientes ejemplos
se usan esquemas del proyector con
la cubierta para cables instalada en el
mismo.
Encienda el proyector.
Os desenhos do projetor com a proteção
do campo anexada são usados neste e
em todos os exemplos subsequentes.
Ligue o projetor.
Bilder på projektorn med kabelskyddet
monterat används för detta och alla
efterföljande exempel.
Slå på strömmen till projektorn.
Иллюстрации проектора с прикрепленной
к нему крышкой кабеля используются в
этом и последующих примерах.
Включите питание проектора.
프로젝터에 케이블 덮개가 부착된
도면이 본 예제와 다음의 모든 예제에
사용됩니다.
프로젝터를 켜십시오.
Select a source.
Auswählen einer Quelle.
Sélectionner une source.
Selezione di una fonte.
Selección de una fuente.
Selecione uma fonte.
Välja en källa.
Выберите источник.
입력원 선택하십시오.
Page 3

Fn F1 F
12
TIP:
Press the AUTO ADJ. button to optimize an RGB
image automatically.
TIPP:
Drücken Sie zum automatischen Optimieren des RGBBildes die AUTO ADJ.-Taste.
ASTUCE:
Appuyer sur la touche AUTO ADJ. pour optimiser
automatiquement une image RGB.
SUGGERIMENTO:
Premete il tasto AUTO ADJ. per ottimizzare automaticamente l’immagine RGB.
SUGERENCIA:
Pulse el botón de AUTO ADJ. para optimizar una imagen RGB automáticamente.
DICA:
Pressione o botão AUTO ADJ. (Ajuste automático) para otimizar automaticamente uma imagem RGB.
TIPS:
Tryck på AUTO ADJ.-tangenten för att optimera en RGB-bild automatiskt.
СОВЕТ:
Для выполнения автоматической оптимизации цветовых оттенков изображения нажмите кнопку AUTO ADJ.
팁:
AUTO ADJ.버튼을 누르면 RGB 이미지를 자동으로 활용할 수 있습니다.
(→ page 25, 106, 128 of the User’s Manual)
Page 4

Adjust the picture size and position.
Einstellung der Bildgröße und Bildposition.
Ajuster la taille et de la position de l’image.
Regolate delle dimensioni e della posizione
dell’immagine.
Ajuste del tamaño y la posición de la imagen.
Ajuste o tamanho da imagem e a posição.
Justera bildstorlek och position.
Настройте размер и положение изображения.
영상 크기와 위치를 조정하십시오.
Adjust the tilt foot
Einstellung des Kippfußes
Régler le pied de réglage de l’inclinaison
Regolate il piedino d’inclinazione
Ajuste de las patas de inclinación
Ajuste o pé de inclinação
Justera lutningen med foten
Настройка ножки для регулировки наклона
기울기 받침을 조절하십시오.
(→ Page 21 of the User’s Manual)
Up
Nach oben
Haut
Su
Arriba
Para cima
Uppåt
Вверх
위로
Down
Nach unten
Bas
Giù
Abajo
Para baixo
Neråt
Вниз
아래로
Page 5

Digital Zoom
Focus
(
page 22 of the User’s Manual)
→
You can also use the ▲ or ▼ button to perform
Keystone correction manually with no menu
displayed.
Sie können die Trapezkorrektur bei ausgeblendetem
Menü auch mit den Tasten ▲ und ▼ per Hand
vornehmen.
Vous pouvez également utilisez les touches
▲
ou ▼ pour effectuer la correction Keystone
manuellement sans afficher aucun menu.
È inoltre possibile utilizzare il tasto ▲ o ▼ per
eseguire la correzione della distorsione trapezoidale
manualmente senza menu visualizzato.
También pude utilizar los botones ▲ o ▼ para
llevar a cabo la corrección keystone manualmente
sin ningún menú visualizado.
Você também pode usar o botão ▲ ou ▼ para
executar manualmente a correção do trapezoide
sem nenhum menu exibido.
Du kan också använda tangenten ▲ eller ▼ för att
utföra Keystone-korrigering manuellt när menyn
inte visas.
Также можно использовать кнопку ▲ или ▼, чтобы
выполнить коррекцию трапециевидного искажения
вручную без открытия меню.
또한 ▲ 또는 ▼ 버튼을 사용하여 메뉴를 표시하지
않고 수동으로 키스톤 보정을 수행할 수 있습니다.
(→ page 23 of the User’s Manual)
(
page 20 of the User’s Manual)
→
Page 6

1. Press the POWER OFF button twice.
*7N8N3251*
The lamp will go off. The POWER indicator
will change color to orange and the STATUS
indicator will light green. This indicates the
projector is in the standby mode.
2. Disconnect the power cord from the wall outlet.
1. Drücken Sie die POWER-OFF-Taste zweimal.
Die Lampe schaltet sich aus. Die POWER-
Anzeige ändert ihre Farbe zu orange, und die
STATUS-Anzeige leuchtet grün. Dadurch wird
angezeigt, dass sich der Projektor im StandbyModus befindet.
2. Ziehen Sie das Netzkabel aus der Steckdose.
1. Appuyez deux fois de suite sur la touche
POWER OFF.
La lampe s’éteint. Le témoin POWER change
de couleur et passe à l’orange, puis le témoin
STATUS s’allume en vert. Ceci indique que le
projecteur se trouve en mode de veille.
2. Débranchez le câble d’alimentation de la prise
murale.
1. Premere due volte il tasto POWER OFF.
La lampada si spegne. L’indicatore POWER
cambia colore in arancione e l’indicatore
STATUS si accende in verde. Ciò indica che il
proiettore è in modalità di attesa.
2. Scollegare il cavo di alimentazione dalla presa a
muro.
1. Pulse el botón POWER.OFF dos veces.
La lámpara se apagará. El indicador POWER
cambiará a color naranja y el indicador STATUS
se iluminará en verde. Esto indica que el
proyector se encuentra en el modo de espera.
2. Desconecte el cable de alimentación de la toma
de corriente.
1. Pressione duas vezes o botão POWER OFF
(Desligar alimentação).
A lâmpada apagará. O indicador POWER
(Alimentação) mudará de cor para laranja e o
indicador STATUS (Estado) acenderá em verde.
Isto indica que o projetor está no modo espera.
2. Desconecte o cabo de alimentação da tomada
da parede.
1. Tryck på POWER OFF-tangenten två gånger.
Lampan släcks. POWER-indikatorn ändrar
färg till orange och STATUS-indikatorn lyser
grönt. Detta visar att projektorn är i standbyläge.
2. Koppla bort nätkabeln från vägguttaget.
1. Дважды нажмите кнопку POWER OFF.
Лампа погаснет. Индикатор POWER изменит
цвет на оранжевый, а индикатор STATUS
загорится зеленым цветом. Это означает, что
проектор находится в режиме ожидания.
2. Отсоедините силовой кабель от розетки.
1.POWEROFF버튼을두번누릅니다.
램프가꺼집니다.POWER식별등의색상이
오렌지색으로변경되고STATUS식별등이
녹색으로켜집니다.이것은프로젝터가대기
모드에있음을나타냅니다.
2.전원케이블을벽에있는콘센트에서뽑아
놓으십시오.
(→ page 26 of the User’s Manual)
Printed in China
©NEC Display Solutions, Ltd. 2012
Ver. 1/09/12
 Loading...