

Page 1

Express5800/ftServer:
System Administrator’s Guide
for the Linux
®
Operating System
NEC Corporation of America
456-01730-000
Page 2

Notice
The information contained in this document is subject to change without notice.
UNLESS EXPRESSLY SET FORTH IN A WRITTEN AGREEMENT SIGNED BY AN AUTHORIZED REPRESENTATIVE
OF NEC, NEC MAKES NO WARRANTY OR REPRESENTATION OF ANY KIND WITH RESPECT TO THE
INFORMATION CONTAINED HEREIN, INCLUDING WARRANTY OF MERCHANTABILITY AND FITNESS FOR A
PURPOSE. NEC assumes no responsibility or obligation of any kind for any errors contained herein or in connection with
the furnishing, performance, or use of this document.
Software described in NEC (a) is the property of NEC and/or its licensees, (b) is furnished only under license, and (c) may
be copied or used only as expressly permitted under the terms of the license.
NEC documentation describes all supported features of the user interfaces and the application programming interfaces
(API) developed by NEC and/or its licensees. Any undocumented features of these interfaces are intended solely for use
by NEC personnel and are subject to change without warning.
This document is protected by copyright. All rights are reserved. No part of this document may be copied, reproduced, or
translated, either mechanically or electronically, without the prior written consent of NEC Corporation of America. Portions
of this document are copyrights of Stratus Technologies and are reprinted here, under permission from Stratus
Technologies Bermuda, Ltd.
The NEC Corporation of America logo, Express5800/
Corporation of America. ActiveService Network is a trademark of Stratus Technologies Bermuda, Ltd. All other
trademarks and trade names are the property of their respective owners.
ftServer, and the Express5800/ftServer logo, are trademarks of NEC
The registered trademark Linux is used pursuant to a sublicense from the Linux Mark Institute, the exclusive licensee of
Linus Torvalds, owner of the mark on a worldwide basis. NEBS is a trademark of Telcordia Technologies, Inc.
Red Hat, Red Hat Linux, and Red Hat Enterprise Linux are registered trademarks of Red Hat, Inc. in the US and other
countries. UNIX is a registered trademark of X/Open Company, Ltd., in the U.S.A. and other countries.
Manual Name: Express5800/ftServer: System Administrator’s Guide for the Linux Operating System
Part Number:
Revision Number: 04
Publication Date: January 2008
NEC Corporation of America
6535 N. State Highway 161
Irving, Texas 75038-2402
© 2006 NEC Corporation of America. All rights reserved.
456-01730-000
Page 3

Contents
Preface xi
1. Introduction to ftServer System Administration
ftServer System Terminology 1-2
System and Network Administration Overview 1-2
Installing and Updating So ftware on ftServer Systems 1-2
Updating ftServer System Firmware 1-2
Conguring Your ftServer System 1-3
Managing Data Storage Devices 1-3
Using the Express5800/ftServer Fault-Tolerant Express Builder 1-3
Network Management and Reporting 1-3
Troubleshooting ftServer Systems 1-3
Additional Documentation and Resources 1-3
Red Hat Enterprise Linux 1-4
Express5800/ ftServer Documentation 1-4
Linux and UNIX Documents 1-4
2. Installing the Operating System and Express5800/ftServer
System Software 2-1
Installation Overview 2-2
Boot Media 2-3
Default System Setup 2-3
Linux Version Information 2-4
Storage Default Settings 2-4
Ethernet Default Conguration 2-5
USB and RS232C Default Settings 2-5
Default System Initialization and Run-Level Control 2-6
Default User Environments, Shells, and Access
Control 2-6
System Indicators and Switches 2-6
Separately Released and Optional Distribution Components 2-6
Installation Interfaces 2-7
Supported Hardware and Firmware 2-7
1-1
Contents iii
Page 4

Contents
Pre-Installation Checklist 2-7
Initial Linux Operating System and Express Builder Installation or
Default Reinstallation 2-10
Booting the Operating System 2-10
Installing the Operating System 2-11
Installing Express Builder for Fault Tolerance 2-13
Avoiding CD-ROM Mount Command Failure After
Disabling SELinux 2-14
Reinstalling Express Builder After a Failed Installation 2-14
Booting in Linux Rescue Mode 2-15
Post-Installation Tasks and Considerations 2-17
Default Configuration Notes 2-17
Configuring the Network 2-17
Adding Fault-Tolerant Utilities to PATH 2-18
Performing an Installation Without a Kickstart File 2-18
Additional Documentation and Resources 2-19
3. Updating ftServer System Firmware
Updating the System BIOS 3-1
Updating BMC Firmware 3-5
4. Updating the Operating System and Express5800/ftServer
System Software
General Upgrade Considerations 4-2
Upgrade Requirements 4-2
Related Considerations 4-2
Upgrading or Restoring the Linux Operating System 4-3
Express5800/ftServer Kernel Modules 4-4
Upgrading the Linux Operating System 4-4
Restoring the Linux Operating System 4-5
Upgrading or Restoring Express Builder 4-6
Creating a Backup System Disk 4-7
Recovering from a Failed Software Upgrade 4-8
Related Information and Resources 4-8
5. Setting Up the ftServer System
Setting Up Internal Disk Storage 5-2
Internal Disk Storage Overview 5-2
The Console Log and the
/var/log/messages File
Configuring Internal Disks 5-3
Managing Partitions 5-4
3-1
4-1
5-1
5-2
iv Express5800/ftServer: System Administrator’s Guide for the Linux Operating System
Page 5

Contents
Default Internal Disk Configuration for a Newly
Installed System 5-8
Checking the Current State of the Internal Disk Subsystem 5-8
Storage Device Definition 5-9
Setting Up RAID Arrays 5-9
RAID Array Overview 5-9
Creating a RAID-1 Array 5-10
Creating a RAID-0 Array 5-12
Creating and Mounting a File System 5-14
Checking the Current State of RAID 5-14
Removing and Replacing Disks 5-15
Disk Insertion 5-16
Administering RAID Arrays 5-16
To Stop a RAID Array and Move It to Another System 5-16
Errors and Faulty Mirrors 5-17
Removing a Faulty Mirror 5-17
Resynchronization 5-18
Replacing a Failed Disk 5-19
Configuring Safe Mode 5-20
Manually Creating Partitions on Blank Disks and Adding
to RAID-1 Arrays 5-20
Replacing Defective Disks Interactively 5-21
Replacing Defective Disks Manually 5-21
The
duplex_blank_disk Command
5-25
System Backup and Disaster Recovery 5-26
Ethernet Devices 5-26
Physical Device Naming 5-26
Monitoring and Configuring Channel-Bonding Interfaces 5-28
Monitoring Channel-Bonding Interfaces 5-28
Configuring Channel-Bonding Interfaces 5-29
Determining Interface Device Names 5-30
MAC Addresses 5-31
Other System Configuration Information 5-31
Disabling Hyperthreading 5-32
Configuring the System Video Display 5-33
Managing the System Clock 5-33
Additional Documentation and Resources 5-34
6. Managing Data Storage Devices
CD-ROM Drives 6-1
USB Storage Devices 6-1
USB Floppy Drives 6-4
USB Solid-State Devices 6-4
Additional Resources 6-5
6-1
Contents v
Page 6

Contents
7. Using ftServer Fault-Tolerant Utilities and Software
The
ftsmaint Command
Device Path Enumeration 7-5
ftServer System Device Path Enumeration 7-5
ftsmaint
Examples 7-10
Displaying System Status 7-10
Bringing System Components Down and Up 7-12
Removing a PCI Adapter From Service and Bringing
It Into Service 7-13
Kernel Memory Dump File Management 7-13
8. Simple Network Management Using Net-SNMP and ftlSNMP
Installing and Configuring ftlSNMP 8-1
ftlSNMP Inventory 8-2
Manually Installing and Upgrading the ftlSNMP RPM 8-3
ftlSNMP Prerequisites 8-4
SNMP Configuration File Updates 8-4
The
snmpd.conf File
The
ftlsubagent.conf and
ftltrapsubagent.conf Files
Configuring SNMP to Start at System Initialization 8-6
Configuring SNMP for Service Management 8-6
SNMP Foundations and Concepts 8-8
ftlSNMP Management Commands 8-9
The Basic Net-SNMP Commands 8-10
MIBs 8-11
Some Objects Defined by Standard MIBs 8-12
SNMPv3 Support 8-14
SNMP’s View of a Network 8-14
Extensions and Fault-Tolerant SNMP Operation 8-15
Installing Remote Network Management Services 8-16
Configuring SNMP for Remote Service Management 8-17
Deploying SNMP Agents and Subagents 8-17
Verifying Traps 8-18
Managing SNMP 8-18
Testing Your SNMP Configuration 8-19
Managing ftServer Hardware Components 8-20
Example: Managing Hardware 8-21
Testing Ethernet Ports 8-23
Example: Testing Ethernet Ports 8-23
SNMP and MIBS 8-24
Device Enumeration 8-25
7-1
7-1
8-1
8-5
8-5
vi Express5800/ftServer: System Administrator’s Guide for the Linux Operating System
Page 7

ftServer System Operation State Management 8-25
SNMP Network Management Station Considerations 8-26
Initial SNMP Testing 8-27
Initial Testing of
Initial Testing of
ftltrapsubagent
ftlsubagent
8-27
8-29
Removing ftlSNMP 8-29
OpState:State Definitions 8-30
OpState:Reason Definitions 8-31
GET and SET Operations for ftlSNMP MIB Objects 8-32
SRA-ftLinux-MIB OID Values and Properties 8-32
Trap Filtering 8-33
Trap-Filtering Capability 8-33
Activating and Deactivating Trap Filtering 8-33
Trap-Filtering Examples 8-34
Contents
9. Troubleshooting ftServer Systems
LED and Visual Diagnostics 9-1
System Boot Problems 9-1
Normal Boot Sequence 9-2
Possible Boot Problems 9-3
Missing Drivers Prevent Booting 9-3
GRUB Problem 9-4
RAID Problem 9-5
Automatic Reboot After Boot Monitoring Timeout 9-5
System Log Messages 9-6
Error and Log Messages Regarding Keyboard and Mouse 9-6
Index
9-1
Index-1
Contents vii
Page 8

Figures
Figure 2-1. SAS (SATA) Drive Arrangement for Installation 2-9
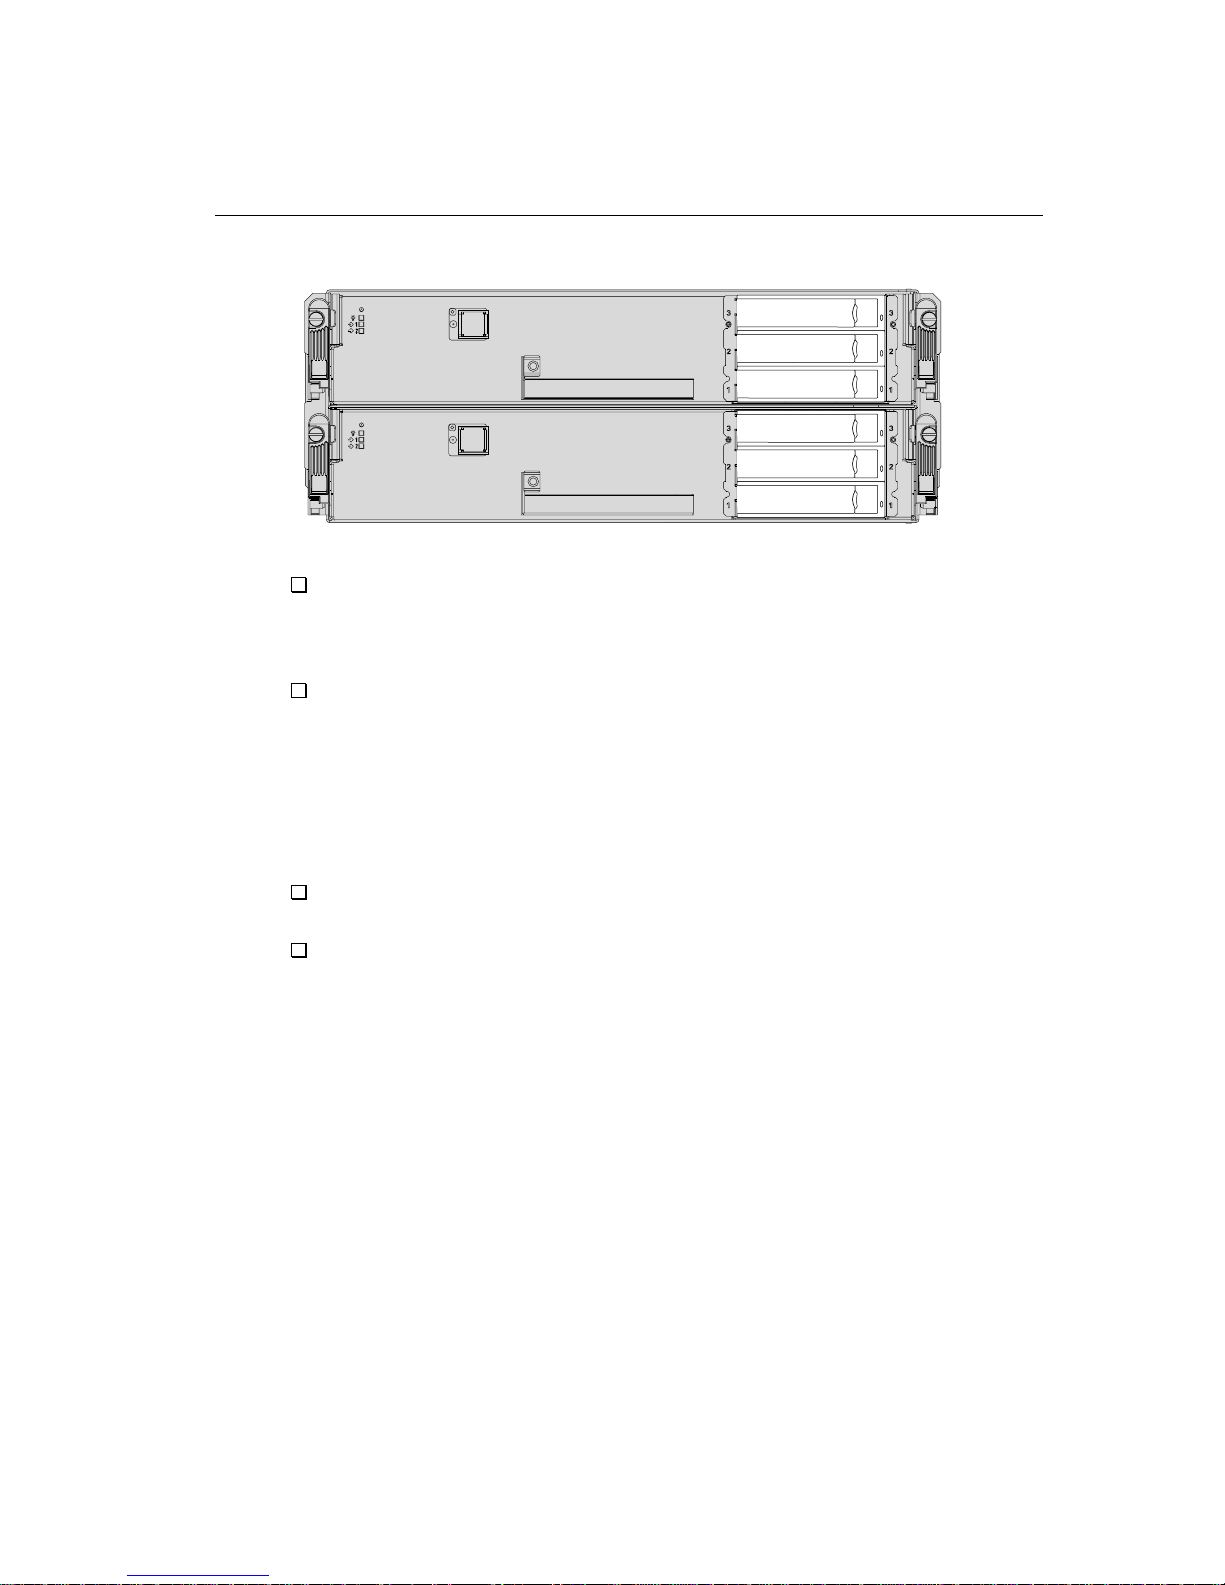
Figure 5-1. CPU-I/O Enclosures: Front Panel with Drive Slots
Fully Populated 5-3
Figure 7-1. ftServer Enclosures: Locations of Major Enumerated Devices
(Front View) 7-8
Figure 7-2. ftServer Enclosures: Locations of Major Enumerated Devices
(Rear View) 7-9
Figure 8-1. AgentX-Enabled Extensions and Subagents 8-17
Figure 8-2. Operational State Management on ftServer Systems 8-25
viii Express5800/ftServer: System Administrator’s Guide for the Linux Operating System
Page 9

Tables
Table 2-1.
Table 5-2. Ethernet Devices in ftServer CPU-I/O Enclosures 5-27
Table 7-1. Device Paths of ftServer Devices 7-5
Table 8-1. Meaning of
Table 8-2. Operation State Values, Names, and Definitions 8-30
Table 8-3. Reason Codes, Names, and Definitions 8-31
Table 8-4. Set Operations Currently Implemented in ftlSNMP 8-32
CD-ROMs Included With ftServer Systems
Duplex for ftServer System Components
2-2
8-26
Tables ix
Page 10

Examples
Example 5-1. Checking the Current State of the Internal Storage
Subsystem 5-9
Example 5-2. Checking the Current State of RAID 5-15
Example 5-3. Resynchronization 5-18
Example 5-4. Running GRUB 5-24
Example 5-5. Pairing a Spare Internal Disk with the Running
System Disk 5-25
Example 5-6. Default Configuration of Embedded Ethernet Devices 5-28
Example 7-1. Displaying System Status with the ftsmaint Command 7-10
Example 8-1. Traps that Can Occur for I/O Element 11 When Trap
Filtering Is Off 8-34
Example 8-2. Traps That Can Occur for I/O Element 11 when Trap
Filtering Is On 8-38
Example 8-3. Traps That Can Occur for When Trap Filtering Is Off 8-40
Example 8-4. Traps That Can Occur When Trap Filtering Is On 8-41
Example 9-1. Possible Keyboard and Mouse Error Messages at
Boot Time 9-6
x Express5800/ftServer: System Administrator’s Guide for the Linux Operating System
Page 11

The Express5800/ftServer: System Administrator’s Guide for the Linux Operating
System
systems running a supported Linux distribution and ftControl system software
sfor the Linux Operating System (Express Builder).
This document is intended for system and network administrators using or migrating to
Express5800/ftServer systems running a supported Linux distribution and Express
Builder, and for system and application programmers who develop tools and scripts for
use on these systems. Background knowledge of Linux or UNIX
systems, and Linux or UNIX and TCP/IP network server and network administration
technologies is assumed.
documents tasks and information for system administrators of NECAM
Revision Information
This document is a revision.
This revision incorporates the following changes:
•
It documents the Express5800/ftServer Dual-Core and Quad-Core hardware platforms.
Preface
®
shells, tools, and
•
It documents the changed system software installation procedures.
•
It documents the internal storage SAS (SATA) disk drives.
•
It documents added functionality of the ftsmaint command.
•
It includes various updates and corrections.
Notation Conventions
This document uses the notation conventions described in this section.
Warnings, Cautions, and Notes
Warnings, cautions, and notes provide special information and have the following
meanings:
WARNING
!
A warning indicates a situation where failure to take
or avoid a specified action could cause bodily harm
or loss of life.
Preface xi
Page 12

Preface
CAUTION
!
A caution indicates a situation where failure to take or
avoid a specified action could damage a hardware device,
program, system, or data.
NOTE
A note provides important information about the operation
of an ftServer system.
Typographical Conventions
The following typographical conventions are used in this document:
•
The italic font introduces or defines new terms. For example:
ftServer systems use replicated, fault-tolerant hardware to eliminate single
points of failure and protect data integrity
•
The bold font emphasizes words in text. For example:
Update the BIOS before you install or upgrade Express Builder.
•
The monospace font represents text that would appear on your display screen. The
monospace bold font represents text you must type in examples that contain both
user input and system output. The monospace italic font represents terms in
command lines that are to be replaced by literal values. For
example:
To display the state of a CPU enclosure, type a command in the following
format:
/opt/ft/bin/ftsmaint ls n
If you type /opt/ft/bin/ftsmaint ls 0 at the prompt, the following
output appears:
H/W Path : 0
Description : CPU Node Assembly
.
.
.
•
The percent sign (%) and the number sign (#) are standard default prompt signs
that have a specific meaning at a command prompt. Although a prompt is
sometimes shown at the beginning of a command line as it would appear on the
screen, you do not type it.
xii Express5800/ftServer: System Administrator’s Guide for the Linux Operating System
Page 13

•
% indicates you are logged in to a user account and are subject to certain
access limitations.
•
# indicates you are logged in to the system administrator account and have
superuser access. Users of this account are referred to as root. The # prompt
sign used in an example indicates the command can only be issued by root.
Syntax Notation
This document uses the following format conventions for documenting commands:
•
Square brackets ([ ]) enclose command argument choices that are optional. For
example:
cflow [-r] [-ix] [-i] [-d num] files
•
The vertical bar (|) separates mutually exclusive arguments from which you choose
one. For example, the following shows two mutually exclusive, but optional,
argurments:
command [arg1 | arg2]
The following example shows two mutually exclusive argurments, one of which is
required:
Preface
In either case, you may use either arg1 or arg2 when you type the command.
•
Ellipsis (...) indicates that you can specify the preceding argument as many times
as you need to on a single command line. For example,
Getting Help
If your Express5800/ftServer system is covered by a service agreement, please contact
NEC Corporation of America Technical Support (866-269-1239).
Notices
•
All regulatory notices are provided in the site planning guide for your system.
command arg1 | arg2
command [arg1 arg2 arg3 ...]
NOTE
Dots, brackets, and braces are not literal characters; you
should not type them. Any list or set of arguments can
contain more than two elements. Brackets and braces are
sometimes nested.
Preface xiii
Page 14

Preface
•
VTM is not available with Express5800/ftServer for Linux systems.
•
Express Service Network is not available with Linux systems.
•
Although this guide may document modem functionality, modems are not available
for all systems. Ask your sales representative about modem availability.
xiv Express5800/ftServer: System Administrator’s Guide for the Linux Operating System
Page 15

Chapter 1
Introduction to ftServer
System Administration
This chapter discusses the following topics:
•
‘‘ftServer System Terminology”
•
‘‘System and Network Administration Overview”
•
‘‘Additional Documentation and Resources”
ftServer systems running a supported Linux distribution together with
Express5800/ftServer System Software for the Linux Operating System (Express Builder)
operate as fault-tolerant servers. The supported server models are the Express5800/
ftServer Dual-Core and Quad-Core systems. Every Express5800/ftServer system uses
replicated, fault-tolerant hardware to eliminate single points of failure and protect data
integrity in all areas of data handling, including:
•
Processing. Replicated, fault-tolerant processing components process the same
instructions at the same time. In the event of a component malfunction, the partner
component acts as an active spare that continues normal operation, preventing
system downtime and data loss.
•
Internal Storage. Mirrored RAID
Serial attached SCSI and Serial Advanced Technology Attachment SAS (SATA)
disks prevent single disk failures from causing data loss. Replacement disks are
automatically recognized and mirrored.
1 (Redundant arrays of inexpensive disks) arrays
1-
•
Networking. Duplexed network components maintain network connectivity. When
the operating system detects a malfunction in the primary member of a duplexed
pair, it automatically fails over to the secondary member.
Express Service architecture built into ftServer systems supports these features with
self-checking hardware and onboard diagnostics to detect, isolate, and report potential
problems before they affect server operation, offering complete hardware diagnostics
and alarms.
Introduction to ftServer System Administration 1-1
Page 16

ftServer System Terminology
ftServer System Terminology
Each ftServer system houses two CPU-I/O enclosures. Each CPU-I/O enclosure
includes a CPU element and an I/O element, as follows:
•
CPU element 0 and I/O element 10: The upper enclosure, also referred to as
CPU-0, I/O-10.
•
CPU element 1 and I/O element 11: The lower enclosure, also referred to as
CPU-1, I/O-11.
System and Network Administration Overview
Most examples and discussions in this guide assume that you are acting with root-user
or superuser privileges. They do not always specify when you should (or should not)
be acting as root.
Installing and Updating Software on ftServer Systems
If you ordered the operating system from NECAM, the supported Linux distribution and
Express Builder were installed at the factory. You also received distribution CDs containing
Express Builder and the operating system. These CDs are provided so that you can,
if necessary, reinstall your ftServer system’s software.
If you ordered a supported Linux distribution from a vendor other than NECAM, the
vendor can also provide you with distribution CDs for installing or reinstalling the
system software. You need to use the Express Builder CD with the CDs for the supported
Linux distribution to achieve a fault-tolerant ftServer system.
Before you install your ftServer system’s software, you must prepare your ftServer
system by following the hardware installation instructions provided in the installation
guide for your system.
See Chapter 2 and Chapter 4 for software installation and update procedures.
Updating ftServer System Firmware
Specific firmware versions are required for a given release of Express Builder. The
firmware in an ftServer system delivered from the factory does not require updating.
However, subsequent updates to Express Builder may require firmware updates. When
updating Express Builder, use the versions of firmware and software that are supplied
on the ExpressBuilder for Linux CD.
your system BIOS and Baseboard Management Controller (BMC) firmware.
1-2 Express5800/ftServer: System Administrator’s Guide for the Linux Operating System
Chapter 3 provides procedures for updating
Page 17

Additional Documentation and Resources
Configuring Your ftServer System
After installing the Linux operating system and Express Builder, you must configure
your system. See
Chapter 5 for configuration information.
Managing Data Storage Devices
In addition to the SAS (SATA) disk storage discussed in Chapter 5, your system supports
CD-ROM drives and USB storage devices. Chapter 6 provides a discussion of these
devices and the information needed to manage them.
Using the Express5800/ftServer Fault-Tolerant Express Builder
While you can use standard Linux tools to perform many system administration tasks
on your ftServer systems, some tasks on fault-tolerant systems require specialized
supporting utilities. The Express Builder includes libraries and utilities to support
fault-tolerant system administration tasks.
and utilities to manage fault-tolerant features and supporting applications of your
system. They include the Express Service Network package that provides support
for Express Service Network access using an attached modem. This package allows
the NEC Corporation of America Customer Support Center or your authorized NEC
service representative to provide remote support for your system. Your system comes
with Express Service Network installed.
Chapter 7 discusses management tasks
Network Management and Reporting
Express Builder includes optional utilities to allow remote support of your ftServer system.
These include an extensible network administration framework and a server-monitoring
utility that provides notification services.
the optional ftlSNMP package implementing Simple Network Management Protocol
(SNMP) for managing network objects. The ftlSNMP package is typically installed with
Express Builder.
Chapter 8 discusses the configuration and use of
Troubleshooting ftServer Systems
Problem identification, system and application diagnostics, and system configuration to
resolve problems with ftServer systems are essential troubleshooting tasks.
discusses system features and procedures to assist you in troubleshooting ftServer
systems.
Additional Documentation and Resources
The following resources provide additional information that may be helpful to you in
administering your ftServer system.
Introduction to ftServer System Administration 1-3
Chapter 9
Page 18

Additional Documentation and Resources
Red Hat Enterprise Linux
Documentation for the Red Hat Linux operating system is available at
http://www.redhat.com/docs.
Express5800/ftServer Documentation
The ExpressBuilder CD-ROM provided with your system contains all of the
system documentation for ftServer systems that run the Linux operating system. It is
®
provided in Adobe Acrobat
Portable Document Format (PDF) for viewing and printing.
This manual occasionally refers to other documentation that is specific to your
particular ftServer system.
Linux and UNIX Documents
The following sources provide further information about the Linux and UNIX operating
systems.
•
The Linux Documentation Project: http://www.tldp.org/
The System Administrator’s Guide LDP v0.8 and the Network Administrators
Guide LDP v2.0 are two freely redistributable publications available from the Linux
Documentation Project Web site that you can use to supplement this
Express5800/ftServer: System Administrator’s Guide for the Linux Operating
System
. The LDP also provides other online manuals, how-to
documents, and links to additional online-accessible data.
• Sunsite Web page, University of North Carolina, provides well-ordered archives
and links to many resources:
• Linux Administration Handbook
ftp://sunsite.unc.edu/pub/Linux/.
, by Nemeth, Snyder, and Hein, copyright 2002,
Prentice Hall PTR, div. of Pearson Education, Inc.:
1-4 Express5800/ftServer: System Administrator’s Guide for the Linux Operating System
Page 19

Additional Documentation and Resources
http://vig.prenhall.com/catalog/academic/product/0,4096,0130084662,00.html
This volume is a reference manual for both system and network administration of
the Linux operating system. It focuses on available (at time of publication) open
source tools but incorporates in-depth knowledge of UNIX administration utilities
and network management practices.
Linux in a Nutshell--A Desktop Quick Reference, 4th Ed., by Siever, Figgens, and
•
Weber, copyright 2003, O’Reilly & Associates, Inc.:
This book can help you assess available tools and assemble an effective toolkit for
managing servers and networks, for example.
Open Source Network Administration, by James Kretchmar, copyright 2004,
•
Prentice Hall PTR, div. of Pearson Education, Inc.:
http://vig.prenhall.com/catalog/academic/product/0,4096,0130462101,00.html
This volume is a basic reference for common open source TCP/IP network
administration utilities and technologies, including SNMP tools and methods.
UNIX Systems: Advanced Administration and Management Handbook, Bruce H.
•
and Karen B. Hunter, copyright 1996, Pearson Education. Although this book is an
older book that covers only the UNIX operating system, the advice and wisdom
packaged here for administrators of UNIX-type operating systems and TCP/IP
networks is usually available only through intensive experience.
Introduction to ftServer System Administration 1-5
Page 20

Additional Documentation and Resources
1-6 Express5800/ftServer: System Administrator’s Guide for the Linux Operating System
Page 21

Chapter 2
Installing the
Operating
Express5800/
System and
ftServer System
Software
This chapter discusses the following topics:
•
‘‘Installation Overview”
•
‘‘Separately Released and Optional Distribution Components”
•
‘‘Installation Interfaces”
•
‘‘Supported Hardware and Firmware”
•
‘‘Pre-Installation Checklist”
•
‘‘Initial Linux Operating System and Express Builder Installation or Default Reinstallation”
•
‘‘Post-Installation Tasks and Considerations”
•
‘‘Performing an Installation Without a Kickstart File”
•
‘‘Additional Documentation and Resources”
The procedures described in this chapter are for a fresh installation or complete
reinstallation of a supported Linux operating system and the Express5800/ftServer
System Software for the Linux Operating System (Express Builder) on ftServer systems.
Chapter 4 describes an upgrade procedure and system and package restoration
procedures for upgrading a recent distribution to the current software distribution level.
2-
NOTE
Be sure to read the accompanying Release Notes:
Express5800/ftServer for the Linux Operating
System
initial installation or a reinstallation of Linux and Express Builder.
Installing the Operating System and Express5800/ftServer System Software 2-1
document before you undertake an
Page 22

Installation Overview
Installation Overview
An installable distribution CD-ROM (CD) set is provided. Table 2-1 lists the CDs
included in this distribution.
Table 2-1. CD-ROMs Which May Be Included With ftServer Systems
ExpressBuilder for Linux CD Express5800/ftServer fault-tolerant system
ftControl Software Update Updated ftServer fault-tolerant
Express Builder Debug Info Includes debuginfo RPMs.
stnetnoCMOR-DC
software
system software.
Set of Red Hat® Enterprise Linux
operating system CDs
Red Hat Enterprise Linux operating
system, related packages, and
documentation
If your site did not purchase the Linux operating system distribution from NECAM, you
must perform the complete initial Linux operating system installation. However, if you
purchased an ftServer system and the Linux operating system from NECAM, the Linux
operating system and Express Builder are preinstalled. You do not need to reinstall or
upgrade this software. You should familiarize yourself with this chapter, then log in.
To log in to the system
1. Log in as root.
2. Enter the root password.
(A password must have at least six characters.) After you read and accept the
necessary end-user license agreements, continue to
Chapter 5 to begin configuring
the ftServer system.
If you have a current installation that requires only minor upgrading review your Release
Notes:Express5800/ftServer for the Linux Operating System, then see Chapter4 and,
if necessary, Chapter 3.
If some time has elapsed since your Express5800/ftServer system was delivered, there
may be updated documentation and software that may be useful to you.
N O T E
Firmware updates may require Express Builder updates. Express Builder
updates may require firmware updates. When updating
2-2 Express5800/ftServer: System Administrator’s Guide for the Linux Operating System
Page 23

From time to time, NECAM may issue an update to Express Builder. See Chapter 4
for information about updating from an Express Builder update disk.
If you need to repair a corrupted system, or update the system to a new release,
determine whether the upgrade procedure in
before doing a full installation.
Boot Media
Installation Overview
Express Builder, use the versions of firmware and software that are
supplied on the ExpressBuilder for Linux (1 of 2) CD.
CAUTIONCAUTION
!
The procedure described in this chapter is for a full
installation or reinstallation of a supported Linux operating
system and Express Builder. It is assumed that no valuable
data exists on the target system disks. The installation and
upgrade installation procedures will destroy existing
data on the drives in the bottom slot (labeled 1) of
each CPU-I/O enclosure
Chapter 4 will meet your requirements
The supported Linux operating system is provided on a set of distribution CDs available
from NECAM or the Linux operating system vendor.
Default System Setup
This section provides an overview of the default setup that is provided on initial
installation or complete reinstallation of the Linux operating system distribution. It does
not reflect installation of optional packages.
Installing the Operating System and Express5800/ftServer System Software 2-3
Page 24

Installation Overview
NOTE
The Linux operating system installer program does not
anticipate customer-added and unknown hardware. Any
such hardware should be added, and the system
configured as required to support it, only after installation
procedures have been completed and the system has
been determined to function as expected.
Linux Version Information
You can check the installed version of the Linux operating system on your system using
the uname command. The -r specifies that the kernel release level be returned.
# uname -r
2.6.9-34.EL.serial.idesmp
To check the installed Express Builder distribution release level using the rpm command, enter:
$ rpm -q lsb-ft-eula_display
lsb-ft-eula_display-4.0-65
Storage Default Settings
CAUTIONCAUTION
!
Prepare for installation by installing disk drives of identical
size and geometry into the internal storage in the bottom
slot (the two slots labeled 1: sda and sdd) of each
CPU-I/O enclosure. Remove all internal drives from the
other four slots (sdb, sdc, sde, and sdf). The installation
process pairs the two installed drives.
NOTES
Do not install SATA disk drives in slots sda and sdd.
1.
For performance reasons, these drives are not supported
as boot disks, but can be used freely as data disks.
2. Express5800/ftServer Dual-Core and Quad-Core
systems may be mounted in a rack or in a pedestal.
The terms upper, top, lower, and bottom assume a
rack (horizontal) installation. In pedestals, systems
are rotated 90 degrees counterclockwise from their
rack-mounted position, so upper becomes left, lower
becomes middle or right, and bottom becomes right.
2-4 Express5800/ftServer: System Administrator’s Guide for the Linux Operating System
Page 25

Installation Overview
The installation process creates a disk drive RAID array, pairing sda and sdd drives as
a mirrored set that holds the entire installed Linux software distribution and Express
Builder. On this mirrored drive set, the GRUB bootloader on the master boot record at
track 0 makes both drives in the set bootable using GRUB configuration data stored in
the /boot partition. Storage is allocated as shown in
•
The /boot directory is installed as an ext2 file system on /dev/sda1 and
Ta bl e 5-1.
/dev/sdd1, on a partition of at least 256 MB. This partition contains the GRUB
boot loader configuration file and GRUB restricted shell, as well as the Linux kernel
and initial RAM disk files.
•
A swap partition provides 2048 MB of swap space.
NOTE
Regardless of installed system memory, the current Linux
kernel can only use about 2 GB of swap space per swap
partition. The kernel can address swap partitions on more
than one drive, so it is possible to improve swap
performance on multi-drive systems by using swap
partitions on each installed drive pair. However, for fault
tolerance, always use mirrored swap partitions. See
‘‘Setting Up Internal Disk Storage’’ on page 5-2 for more
information.
•
The root partition comprises 32 GB.
•
The remainder of the space is an extended partition that includes 36 GB or more
of unused space. This extended partition can be further divided by logical
partitions.
All internal drives used in mirrored RAID arrays in the internal hot-swap drive bays must
have firmware that meets ftServer specifications. Do not update your internal drives
with firmware from sources other than NEC Corporation of America. Contact your
NEC Corporation of America Customer Support Center or your authorized NEC service
representative for your internal SAS (SATA) drive support requirements.
Ethernet Default Configuration
At installation, the 10/100/1000-Megabits per second (Mbps) embedded Ethernet
adapters of each CPU-I/O enclosure are configured. For more information about
configuring Ethernet interfaces, see
USB and RS232C Default Settings
Only the USB keyboard and, optionally, a USB mouse should be attached to the
system during an initial installation of the operating system.
Installing the Operating System and Express5800/ftServer System Software 2-5
‘‘Ethernet Devices’’ on page 5-26.
Page 26

Separately Released and Optional Distribution Components
In most cases, attached devices are recognized and addressable on installation (as is
a standard USB keyboard, for example), although hot-plugged devices may not be.
USB 2.0 interface specifications are supported.
After installation, you may need to set serial-port flow control and data-rate
characteristics for attaching serial data communications equipment or data terminal
equipment, such as an asynchronous terminal, a printer, or attached modem. Note that
the Linux operating system and most application software treat data communications
equipment somewhat differently from data terminal equipment.
Default System Initialization and Run-Level Control
Default system initialization and run-level-controlled process configuration are basic
and not tailored specifically for server operations. You will need to configure the system
as required for your specific application.
Default User Environments, Shells, and Access Control
The GRUB bootloader package supplied with the Linux distribution includes a
restricted GRUB shell that can be entered at system boot for boot loader configuration
and boot recovery operations. See grub(1) for a discussion of this feature. Make sure
that GRUB requires root privilege, and password-protect this shell for system security.
System Indicators and Switches
See the User Guide and User Guide (Setup) for your system for information about the
LED indicators and switches of your ftServer system.
Separately Released and Optional Distribution Components
You can install and use provided optional tools. You can install optional packages by
using the rpm command to select and install packages from a mounted CD-ROM drive.
C A U T I O NC A U T I O N
!
Some installed and optional utilities may depend on
specific versions of other packages required by your
system for fault-tolerant operation. Always use the
software packages that are provided with the Express Builder
distribution, unless you have good reason to replace a
package. Before updating a distribution package, use rpm
2-6 Express5800/ftServer: System Administrator’s Guide for the Linux Operating System
Page 27

to check dependencies. Note that rpm does not always
reveal specific release-level dependencies.
From the Express Builder distribution, Express Service Network and ftlSNMP packages
are installed as options and require additional configuration before they can be used. See
‘‘Kernel Memory Dump File Management’’ on page 7-13 and Chapter 8 for information
on configuring and using these utilities.
Installation Interfaces
The installation process has two parts. First, you install the Linux operating system, and
then you perform the Express Builder installation.
You must connect a supported monitor to the VGA port on the rear of the system, and
a supported USB mouse and keyboard to a USB port on the rear of the system.
The Linux operating system and Express Builder installation process use an attached LCD
or SVGA-capable monitor attached to the SVGA connector at the ftServer back panel and
a USB mouse and keyboard attached to a USB port.
Installation Interfaces
Supported Hardware and Firmware
The Linux operating system combined with Express Builder can be installed only on
supported Express5800/ftServer Dual-Core and Quad-Core systems. Do not attempt to
install this software combination on an ftServer system that does not support it. Express
Builder interfaces with ftServer firmware that has been tuned to support fault tolerance.
Specific Express Builder releases may require corresponding updates to the system BIOS
or baseboard management controller (BMC) firmware.
Pre-Installation Checklist
The following checklist is provided for an initial installation or a full reinstallation of a
supported Linux operating system and Express Builder. If you need to upgrade an existing
Express Builder release, see
❏
Check that you have current release notes and installation guides for your
distribution. To restore your installation, make sure you have the appropriate
version of the release level that you will restore. The Release Notes:
Express5800/ftServer for the Linux Operating System
the ExpressBuilder for Linux CD, provides the information that you need.
Also check the system hardware against the release notes. The I/O elements and
installed devices must comply with any identified configuration requirements and
Installing the Operating System and Express5800/ftServer System Software 2-7
Chapter 4.
in PDF format, on
Page 28

Pre-Installation Checklist
support restrictions on hardware that apply either to this installation procedure or
to the current Express Builder release generally.
❏
The installation CDs ask that you read and accept end user license agreements
(EULAs). You should not perform the installation if you cannot accept the EULAs
or are not authorized to accept them. Installation terminates without completion if
you decline a required EULA. You can read the text of the required EULAs in the
installation guide for your system.
❏
If you are reinstalling a release, back up all data files and prepare backup files to
reconfigure the system for security and network operation after the installation
procedure has been performed.
❏
Verify that your system BIOS and BMC firmware versions are compatible with the
Express Builder release you are about to install. You can obtain required versions
of firmware from the Express Builder CD-ROM.
If system BIOS or BMC firmware updates are needed, you must update the
firmware before you begin the installation or upgrade process. You can obtain the
required firmware from the Express Builder CD that comes with the distribution.
See
Chapter 3 for details.
❏
Use the CD-ROM drive in the top CPU-I/O enclosure during the installation. Do not
use the drive in the lower CPU-I/O enclosure. Verify that the top enclosure is the
active enclosure.
❏
Ensure that the keyboard, mouse, and console are attached to the system. The
installer uses a graphical user interface on the ftServer system console, which
consists of a monitor attached to an SVGA port and an attached USB keyboard and
mouse.
❏
With the ftServer system halted, detach all peripheral devices from the system.
This includes unsupported adapters, USB, and other serial devices.
No USB devices other than the keyboard and mouse should be attached to the
ftServer system.
❏
No external modem or other devices should be attached to the serial ports of the
ftServer system.
❏
The bottom slots (slots sda and sdd) in the internal storage enclosures must
contain a matched pair of supported disk drives having the same model, firmware
level, and geometry. These must not be SATA drives. All other drives must be
removed from the system. See the drive arrangement in
Figure 2-1. For
information about the supported disk drives, see the operation and maintenance
guide for your system.
During the installation, the two installed drives will be paired and configured using
RAID-1 mirroring. A Linux boot partition, a swap partition, and a root partition will
be installed on the paired drives.
2-8 Express5800/ftServer: System Administrator’s Guide for the Linux Operating System
Page 29
Initial Linux Operating System and Express Builder Installation or Default Reinstallation
Figure 2-1. SAS (SATA) Drive Arrangement for Installation
sdc
sdb
sda
sdf
sde
sdd
asys076
Make sure that the system and monitor power connections are secure and firmly
plugged in before beginning an installation procedure. Power cabling should be
guarded against inadvertent disconnection during the installation process. The
monitor may use a separate power source.
Begin the installation process with both CPU-I/O enclosures inserted and with the
ftServer system halted. A red LED is lit at the left side of each CPU-I/O enclosure.
Ensure that the green power button at the right side of the upper CPU-I/O
enclosure is lit; the lit LED indicates that it is the active (primary) enclosure. If the
upper CPU-I/O enclosure is not the active enclosure, you must make it the active
enclosure by performing the actions listed in step
2 of the installation procedure in
‘‘Initial Linux Operating System and Express Builder Installation or Default
Reinstallation’’ on page 2-10.
For security during installation and initial configuration, isolate the ftServer system
from networks and other communicating hosts.
Be aware that a system with a newly installed operating system and Express
Builder is not secure until it has been configured. In addition, you may want to change
the default network settings.
Initial Linux Operating System and Express Builder Installation
or Default Reinstallation
The User Guide (Setup) contains detail procedures to install the Linux operationg system
and the ftControl Software.
Installing the Operating System and Express5800/ftServer System Software 2-9
Page 30

Initial Linux Operating System and Express Builder Installation or Default Reinstallation
Avoiding CD-ROM Mount Command Failure After Disabling SELinux
During the installation of Express Builder, you choose whether to enable or disable
SELinux. If you choose to enable SELinux, and then disable SELinux at a later time,
the command to mount the CD-ROM device fails unless you edit the /etc/fstab file
to remove a parameter that is added to the file when you disable SELinux.
To allow the command to mount a CD-ROM to function properly, edit the /etc/fstab
file.
On the /dev/hda /media/cdrecorder line, replace the following text:
fscontext=system_u:object_r:removable_t
with the following:
fscontext=system_u:object_r:removable_t,exec,noauto,managed 0 0
When you disable SELinux, this parameter is added to the /etc/fstab file, which
causes the command to mount the CD-ROM to fail.
Reinstalling Express Builder After a Failed Installation
If the attempt to install Express Builder fails, before again trying to install it, perform the
following steps to uninstall the requisite files and attempt to reinstall Express Builder in
the correct sequence.
1. Remove all NECAM packages except eula_display with this command:
rpm -e --nodeps --allmatches `rpm -qa | grep lsb-ft | grep
-v eula_display`
2. Remove eula_display with this command:
rpm -e --nodeps lsb-ft-eula_display
3. Reinstall Express Builder by mounting the CD and issuing the install.sh command.
If the system does not then reboot automatically, reboot the system manually.
Booting in Linux Rescue Mode
If the OS installation fails, whether or not Express Builder installed successfully, attempt to
boot the system in rescue mode. Use the Red Hat Enterprise Linux CD-ROM #1 to boot in
rescue mode.
2-14 Express5800/ftServer: System Administrator’s Guide for the Linux Operating System
Page 31

Initial Linux Operating System and Express Builder Installation or Default Reinstallation
To boot in rescue mode
1. Disconnect any floppy disk drive attached to the system’s USB port.
NOTE
If a floppy drive is connected when you boot in rescue
mode, the system will be unable to find the internal
storage drives.
2. Insert Red Hat Enterprise Linux CD-ROM #1 into the CD-ROM drive in the upper
CPU-I/O enclosure. The system boots from this CD.
3. Disable the Boot Monitoring function in CMOS (for detailed instructions see the
User Guide (Setup)).
4. After the system boots from the CD, and as soon as the boot prompt appears,
type the following line at the boot prompt and press ENTER:
# boot: linux rescue
NOTE
You must type something (at least one character) on the
boot prompt line before its timeout period expires.
Otherwise, the boot will proceed with incorrect
parameters and the keyboard will be disabled. If this
happens, you can recover by power-cycling the system
and booting again.
5. After several minutes, the Language prompt appears. Follow the prompts.
6. Issue the following command:
chroot /mnt/sysimage
You may need to remove and re-apply system power before you can reboot from the
disk.
If the disks are not detected and automounted, contact the NEC Corporation of
America Customer Support Center or your authorized NEC service representative for
assistance.
Installing the Operating System and Express5800/ftServer System Software 2-15
Page 32

Post-Installation Tasks and Considerations
Post-Installation Tasks and Considerations
After installing the operating system and Express Builder consider the following topics.
•
‘‘Default Configuration Notes”
•
‘‘Configuring the Network”
•
‘‘Adding Fault-Tolerant Utilities to PATH”
Default Configuration Notes
After installation, the default installed system should appear as described in ‘‘Default
System Setup’’ on page 2-3. The following notes apply to the default system
configuration.
NOTES
1. After you upgrade or restore the Linux operating
system and Express Builder distributions as described
in this chapter, you may also need to separately install
optional packages using the rpm command.
2. The system disk pair was created as a RAID-1
mirrored drive set on drives sda and sdd. Each drive
is bootable and configured identically to the other.
3. After installation, the kudzu, haldaemon, and
microcode_ctl services are disabled. Do not enable
these services.
Configuring the Network
Perform the following tasks to configure the system for operating on a network.
1. Issue the following command to launch the Linux graphical network-configuration
program:
# system-config-network
2. In the graphical network configuration tool, specify the network hostname for your
system.
See the section on adding hosts in the Red Hat Enterprise Linux 4 System
Administration Guide for detailed information about configuring networks.
2-16 Express5800/ftServer: System Administrator’s Guide for the Linux Operating System
Page 33

Performing an Installation Without a Kickstart File
Adding Fault-Tolerant Utilities to PATH
Express5800/ftServer fault-tolerant utilities, like ftsmaint and ASNConfig, reside
in the /opt/ft/bin and /opt/ft/sbin
include these directories.
to
directories. Consider setting your PATH
Performing an Installation Without a Kickstart File
1. After installation, while the system is booting, the GRUB menu must supply:
linux reboot=warm nmi_watchdog=0 i8042.noaux
At the boot prompt.
You must type something (at least one character) on the boot prompt line before
its timeout period expires. Otherwise, the boot will proceed with incorrect
parameters and the keyboard will be disabled. If this happens, you can recover by
power-cycling the system and booting again.
This command is necessary for your Express5800/ftServer to be fault-tolerant.
You can find additional information about the kickstart files in the Red Hat Linux OS
system administration documentation.
Installing the Operating System and Express5800/ftServer System Software 2-17
Page 34

Additional Documentation and Resources
2. Manually make the second disk a bootable disk. At the command prompt, type the
following lines to make both system disks bootable:
# /sbin/grub
device (hd0) /dev/sda
root (hd0, 0)
setup (hd0)
device (hd0) /dev/sdb
root (hd0, 0)
setup (hd0)
quit
•
Make sure that the system is running the SMP kernel.
•
You must install all required software packages. You may have to manually
resolve package dependency failures when installing Express Builder.
•
Make sure that the kernel command line does not contain rhgb.
•
Make sure that services like kudzu, haldaemon, and microcode_ctl are disabled.
•
Make sure that partitions are set up correctly.
Additional Documentation and Resources
•
The GNU GRUB Web page, Free Software Foundation:
http://www.gnu.org/software/grub/grub.en.html
• GRUB: GRand Unified Bootloader version 0.5, original documentation Web site:
http://www.uruk.org/orig-grub/
• GRUB file system syntax and semantics document, by Eric Bolyn, primary author
of GRUB:
http://www.uruk.org/orig-grub/filesystem.txt
2-18 Express5800/ftServer: System Administrator’s Guide for the Linux Operating System
Page 35

Chapter 3
Updating ftServer System
Firmware
This chapter discusses the following topics:
•
‘‘Updating the System BIOS”
•
‘‘Updating BMC Firmware”
Consult the Release Notes: Express5800/ftServer for the Linux Operating
System
Operating System (Express Builder) version you have (or will upgrade to) to determine
what firmware version numbers are required.
for the Express5800/ftServer System Software for the Linux
CAUTIONCAUTION
!
Update your system firmware only if that version is
compatible with your current Express Builder installation, or if
you will immediately update to operating system or Express Builder
releases that are supported by the updated firmware.
3-
Updating the System BIOS
Make sure that the BIOS you intend to install is compatible with the Express Builder release
level that you have (or that you will install immediately after performing the BIOS upgrade).
Verify in the applicable version of the Release Notes: Express5800/ftServer for the
Linux Operating System
Release Notes do not specify a different procedure or sequence for performing the
BIOS update. To check the BIOS version, type the following command:
# /opt/ft/bin/ftsmaint ls 0
.
.
.
Firmware Rev : 20.0
that the BIOS is compatible, and also that the
Updating ftServer System Firmware 3-1
Page 36

Updating the System BIOS
The preceding example displays a BIOS version number of 20.0 for the top CPU-I/O
enclosure (see
Express5800/ftServer BIOS updates are image files that you must transfer from
removable media or download from a network-accessible archive.
Take care when updating firmware. It is a necessary failover characteristic for the
CPU-I/O enclosures to be paired in duplexed operation. On system boot and before
duplexing, if the ftServer system detects differing firmware between the system CPU
elements, the firmware from the CPU-I/O enclosure that is booting is replicated to the
other enclosure automatically, allowing the enclosures to synchronize.
NOTE
If an ftServer system boots from the system enclosure
that has not been upgraded, the upgraded system
firmware will be overwritten with older firmware in order to
synchronize to duplex. This defeats the intended upgrade.
CAUTIONCAUTION
!
Do not interrupt a BIOS firmware update while a burn (that
is, a write to EEPROM) is in progress. Interrupting power
to a CPU-I/O enclosure during a burn can result in
EEPROM damage that prevents it from storing the
firmware successfully. Correcting this problem may
require that you obtain a replacement CPU-I/O enclosure.
Table 7-1 for a list of system device IDs).
Read this entire procedure to review your options before beginning.
To update the system BIOS
1. Insert the ExpressBuilder for Linux CD in the CD-ROM drive in the CPU-I/O
enclosure whose power button is lit.
2. Log on to the system as root.
3. Mount the CD-ROM drive by typing the following command:
# mount /media/cdrecorder
3-2 Express5800/ftServer: System Administrator’s Guide for the Linux Operating System
Page 37

Updating the System BIOS
4. Use the ftsmaint command to verify that you are starting from a known, good
state. At this point, both CPU-I/O enclosures should be operating duplexed.
# /opt/ft/bin/ftsmaint ls 0
H/W Path : 0
Description : Combined CPU/IO
State : ONLINE
Op State : DUPLEX
Reason : SECONDARY
LED (Green) : ON
LED (Yellow) : OFF
LED (White) : ON
Modelx : AA-G94340
Firmware Rev : 1.3:90
ECO Level : 37
Min Partner ECO Level : 0
Serial # : 401318
MTBF Fault Count : 0
MTBF Last Timestamp : None
MTBF Threshold : 1200
MTBF Value : 0
MTBF Type : useThreshold
Logic Revision : 18023
Then run the following command:
# /opt/ft/bin/ftsmaint ls 1
N O T E
To determine what model your system is, type the
ftsmaint lsSystem command. The model is identified
in the Description field.
5. Obtain the latest BIOS image for the Express5800/ftServer and copy it to the
ftServer tmp folder.
Updating ftServer System Firmware 3-3
Page 38

Updating the System BIOS
6. Perform the BIOS burn by issuing the following commands to one of the CPU-I/O
enclosures.
# /opt/ft/bin/ftsmaint bringDown 0
Completed bringDown on the device at path 0.
# /opt/ft/bin/ftsmaint burnProm
Path and filename for the BIOS
Updated firmware on the device at path 0.
# /opt/ft/bin/ftsmaint jumpSwitch 0
Transferred processing to the device at path 0.
# /opt/ft/bin/ftsmaint bringUp 1
Completed bringUp on the device at path 1.
The preceding commands burn the BIOS to both CPUs as follows:
•
bringDown: Takes the CPU
•
burnProm: Burns the new BIOS to CPU
•
jumpSwitch : Brings CPU
1, in lower enclosure, and then takes CPU 1 down.
CPU
•
bringUp: Brings CPU
new BIOS from CPU
with CPU
0.
0 onto it, reruns diagnostics, and resynchronizes CPU 1
0 element, in the upper enclosure, out of service.
0.
0 up, runs diagnostics on it, synchronizes it with
1 up, runs diagnostics on it, automatically burns the
NOTES
At this point, reboot only if you need to change BIOS
configuration settings.
7. Repeat step 4 to verify that the CPU-I/O enclosures are again duplexed.
8. If the new BIOS did not perform as you expected, first verify that you do not also
need to perform an Express Builder upgrade to use the new BIOS. If so, proceed
9
to step
(returning here if the upgrade procedure does not initiate or follow the
documented and expected steps). If your operating system is fully up-to-date, it is
likely that the BIOS image file was not the correct firmware file for your system, or
the EEPROM that holds the BIOS did not properly capture the BIOS. This occurs
rarely, but it can happen. In that case, repeating the burn procedure usually works.
9. Double-check that you have a good BIOS image file before attempting the BIOS
upgrade again. It should not matter whether you retry the burn on the upper
CPU-I/O enclosure or the lower CPU-I/O enclosure, but you should note which
option you choose in case troubleshooting is required. Remember that image files
are easily corrupted during file transfer if copied from one format to another, as
when written out as a regular file rather than stored as an image, or by transfer as
3-4 Express5800/ftServer: System Administrator’s Guide for the Linux Operating System
Page 39

a character file rather than a binary file. You can detect such corruption by
computing a checksum with the md5sum command before and after copying. A
repeated BIOS burn failure is likely to be caused by a command syntax error or by
using a damaged or inappropriate BIOS image file.
10. If it is necessary to update the BMC firmware, follow the procedure described in
‘‘Updating BMC Firmware’’ on page 3-5.
11. If you now need to update the Linux operating system and Express Builder, place
the Express Builder CD in the upper CD-ROM drive and reboot. See the Release
Notes: Express5800/ftServer for the Linux Operating System
operating system update procedures.
Updating BMC Firmware
Each I/O element contains a socketed Baseboard Management Controller (BMC) chip.
Firmware updates are provided on a bootable CD-ROM.
To check the BMC firmware version, type the following command:
# /opt/ft/bin/ftsmaint ls 10/120
.
.
.
Firmware Rev : 7.0.0
Updating BMC Firmware
and Chapter 2 for
The preceding example displays a BMC firmware version number of 7.0.0 for
element 0.
CPU
CAUTIONCAUTION
!
Do not interrupt a BMC firmware update with a burn in
progress. Interrupting power can result in EEPROM
damage or corrupted BMC firmware that requires field
service or replacement I/O elements to recover.
To update the BMC firmware from a CD
1. Insert the ExpressBuilder for Linux CD in the CD-ROM drive in the CPU-I/O
enclosure whose power button is lit.
2. Log on to the system as root.
3. Mount the CD-ROM drive by typing the following command:
# mount /media/cdrecorder
Updating ftServer System Firmware 3-5
Page 40

Updating BMC Firmware
4. Obtain the latest BMC image for the Express5800/ftServer
and copy it to the ftServer tmp folder.
NOTE
All ftServers running a supported Linux distribution and
Express5800/ftServer system software for the Linux
Operating System (Express Builder) use the same BMC firmware.
5. Type the following commands to update the BMC firmware on each I/O element:
# /opt/ft/bin/ftsmaint burnProm
path and filename for the BMC firmware
Updated firmware on the device at path 10/120.
# /opt/ft/bin/ftsmaint burnPROM
path and filename for the BMC firmware
Updated firmware on the device at path 11/120.
6. Type the following commands to verify that your BMC firmware is duplexed (be
sure that the opstate is DUPLEX):
# /opt/ft/bin/ftsmaint ls 10/120
# /opt/ft/bin/ftsmaint ls 11/120
7. Type the following commands to verify that the I/O elements are duplexed (be sure
that the opstate is DUPLEX):
# /opt/ft/bin/ftsmaint ls 10
# /opt/ft/bin/ftsmaint ls 11
3-6 Express5800/ftServer: System Administrator’s Guide for the Linux Operating System
Page 41

Chapter 4
Updating the
Operating
Express5800/
System and
ftServer System
Software
This chapter documents how to upgrade the Linux operating system and the
Express5800/ftServer System Software for the Linux Operating System
(Express Builder). It discusses the following topics:
•
‘‘General Upgrade Considerations”
•
‘‘Upgrading or Restoring the Linux Operating System”
•
‘‘Upgrading or Restoring Express Builder”
•
‘‘Creating a Backup System Disk”
•
‘‘Recovering from a Failed Software Upgrade”
•
‘‘Related Information and Resources”
NOTES
1. If you want to update or reinstall an individual
software package that is provided in a Red Hat
Package Manager (RPM) file, use the rpm command
(see rpm(8)).
4-
2. The Linux operating system upgrade script has been
upgrade process.
3. If you need to perform a complete reinstallation rather
Updating the Operating System and Express5800/ftServer System Software 4-1
tested only with firmware, hardware, and devices
meeting design specifications of the Express5800/
ftServer system and its system options. See the
Release Notes: Express5800/ftServer for the Linux
Operating System
than a release-level upgrade or restoration, see
Chapter 2 for preparation and for the procedure.
for issues that
may relate to the
Page 42

General Upgrade Considerations
General Upgrade Considerations
When upgrading the Linux operating system or the Express Builder, be aware of the
following requirements and related considerations.
Upgrade Requirements
First, ensure that the system’s BIOS and BMC firmware levels support the new Express
Builder version. You can obtain required versions of firmware from the ExpressBuilder for
Linux CD. If necessary, upgrade the firmware (see
Optionally, upgrade the Linux operating system, as described in ‘‘Upgrading or
Restoring the Linux Operating System’’ on page 4-3. Before upgrading the operating
system software, check with the NEC Corporation of America Customer Support
Center or your authorized NEC service representative to ensure that your ftServer
system supports the new version.
Upgrade the Express Builder, as described in ‘‘Upgrading or Restoring Express Builder’’on page 4-6.
Related Considerations
The upgrade and reinstallation processes do not overwrite the following files, if you
have modified them:
Chapter 3).
•
/etc/modprobe.d/ft-network.conf
•
/etc/sysconfig/network-scripts/ifcfg-bond0
•
/etc/sysconfig/network-scripts/ifcfg-bond1
•
/etc/sysconfig/network-scripts/ifcfg-eth000010
•
/etc/sysconfig/network-scripts/ifcfg-eth000011
•
/etc/sysconfig/network-scripts/ifcfg-eth080010
•
/etc/sysconfig/network-scripts/ifcfg-eth080011
If the RPM file on an upgrade CD contains updated versions of these files and if you
have modified the original file, the upgrade process saves the updated file to the
/etc/OPT/ft/network-scripts/ARCHIVE directory, giving each file a .rpmnew
extension.
To complete an upgrade to your system, do one of the following:
•
If you do not want to preserve your changes, copy the .rpmnew file to the
appropriate directory, but remove the .rpmnew extension.
4-2 Express5800/ftServer: System Administrator’s Guide for the Linux Operating System
Page 43

Upgrading or Restoring the Linux Operating System
•
To preserve your changes, incorporate the updates into the files you have modified.
Compare files in the /etc/OPT/ft/network-scripts/ARCHIVE directory that
have a .rpmnew extension to your modified files, and copy the updates from the
.rpmnew file to your modified file.
For example, if you added a port to the bond defined in the
/etc/sysconfig/network-scripts/ifcfg-bond0 file and if the RPM file for the
upgrade contains an update to the ifcfg-bond0 file from the earlier RPM file, the
upgrade process copies the updated ifcfg-bond0 file from the new RPM as
/etc/OPT/ft/network-scripts/ARCHIVE/ifcfg-bond0.rpmnew. After the
upgrade, modify your /etc/sysconfig/network-scripts/ifcfg-bond0 file
with any differences you note in the
/etc/OPT/ft/network-scripts/ARCHIVE/ifcfg-bond0.rpmnew file.
NOTES
1. Resolve the differences in these files immediately, or
back up the rpmsave or .rpmnew files to another
location. If the same .rpmsave or .rpmnew files are
generated by uninstalling Express Builder, or by an
upgrade or reinstallation, the previous archived versions
could be overwritten.
2. If you uninstall Express5800/ftServer system software,
any of these network files that you modified are saved
to the
/etc/OPT/ft/network-scripts/ARCHIVE
directory and given a .rpmsave extension.
Upgrading or Restoring the Linux Operating System
Use this checklist to prepare for the Linux operating system upgrade or reinstallation:
❏
Before performing an upgrade to a system in use, perform a complete file system
backup.
❏
Carefully read the current Release Notes: Express5800/ftServer for the Linux
Operating System
Distribution Release Notes may have been updated with information about
restrictions or problems and workarounds, software updates, and document
corrections not found in the Release Notes from earlier distribution CDs. Verify
that the new Linux operating system version you are about to install is
intended for installation on your ftServer system.
❏
The system that you wish to upgrade must be configured to load from a bootable
system disk that is in the ftServer system’s boot path.
document at http://support.necam.com for this release.
Updating the Operating System and Express5800/ftServer System Software 4-3
Page 44

Upgrading or Restoring the Linux Operating System
The following topics apply when upgrading or restoring the Linux operating system.
•
‘‘Express5800/ftServer Kernel Modules”
•
‘‘Upgrading or Restoring the Linux Operating System”
Express5800/ftServer Kernel Modules
Whenever the Linux operating system is upgraded, a new Linux kernel is installed.
Whenever Express Builder is installed or upgraded, the fault-tolerant
Express5800/ftServer kernel modules are automatically rebuilt at the next boot time.
These modules must be present for fault-tolerant operation. The following
requirements must be met, to ensure that these modules will be rebuilt.
•
Express5800/ftServer kernel modules are only built for SMP kernels. Make sure that
you only use SMP kernels.
•
The kernel-smp-devel package must be installed. The version of this package must
match the version of the kernel-smp in use.
•
The /boot file system must be mounted when Express5800/ftServer kernel
modules are rebuilt so the initrd can be re-created with these modules (/boot
is mounted by /etc/fstab).
•
The directory /opt/ft must reside within the root file system.
Immediately after rebuilding kernel modules at boot time, the system automatically
reboots to place these rebuilt modules into use. If the system cannot successfully build
all the required Express5800/ftServer kernel modules, a policy of whether a
non-fault-tolerant boot is allowed or prohibited takes effect. This policy is set by the
/etc/opt/ft/modules.policy file and affected by the
/etc/opt/ft/non_ft_boot.sh script. Execute the install.sh installation
script to review or change the policy.
Upgrading the Linux Operating System
Use the Red Hat Update Agent (up2date) to install a new Linux operating system U
update.
Before you install a new Linux operating system U update (for example U3), make sure
to do the following:
•
See the Release Notes: Express5800/ftServer for the Linux Operating System
or check with the NEC Corporation of America Customer Support Center or your
authorized NEC service representative to make sure there is an Express Builder
version available tosupport the Linux operating system update.
•
Make sure the system is registered with Red Hat and has entitlement on the RHN
server.
4-4 Express5800/ftServer: System Administrator’s Guide for the Linux Operating System
Page 45

Upgrading or Restoring the Linux Operating System
By default, the Update Agent on a system running Express Builder is configured to
access the following servers:
•
The Red Hat RHN server for Linux OS patches
To upgrade the Linux operating system
1. Start the Red Hat Update Agent from the graphical desktop, or by running the
up2date command on the command line.
The Update Agent does the following:
•
Queries the RHN server for new versions of RPMs that are already installed on
your system.
•
Lists all available updates.
2. Select the updates you want to install.
•
By default all available OS updates that do not affect the kernel are selected
for installation.
•
By default all available OS updates that do require kernel modification are not
selected.
To install these updates, explicitly select their check boxes.
•
By default, all available Express Builder updates are selected for installation.
3. The Update Agent downloads the updates and prompts you to install them.
4. To install a new version of Express Builder, see ‘‘Upgrading or Restoring Express Builder.”
5. Reboot the system only if you manually selected an update that modifies the
kernel.
By default, the Update Agent only updates RPMs that are already installed on the
system. If the operating system upgrade failed or you want to return the system to the
previous operating system version, see
‘‘Recovering from a Failed Software Upgrade’’
on page 4-8.
Restoring the Linux Operating System
1. Make sure that you have a backup system disk, in case the reinstallation fails or
you want to return to the previous version of the Linux operating system. See
‘‘Creating a Backup System Disk’’ on page 4-7 for details.
2. Shut down the ftServer system with the command:
# halt -p
3. See the User Guide (Setup) to ensure that your system is configured for reinstallation.
Updating the Operating System and Express5800/ftServer System Software 4-5
Page 46

Upgrading or Restoring Express Builder
If the operating system reinstallation failed or you want to return the system to the
previous operating system version, see
on page 4-8.
Your system should now have the same version of operating system software installed
as it had previously. But since it has no Express Builder software, its fault-tolerant
features are not operational, so you must upgrade or restore Express Builder on your
system. See ‘‘Upgrading or Restoring Express Builder’’ on page 4-6.
‘‘Recovering from a Failed Software Upgrade’’
Upgrading or Restoring Express Builder
Prepare for the Express Builder upgrade using this checklist:
Before performing an upgrade to a system in use, perform a complete file system
backup.
Stop ftlSNMP services before upgrading the Express Builder.
If you upgrade the firmware to support the new Express Builder version, backup the
BIOS and BMC firmware files on your system. If the upgrade fails or if you chose to
return to the previous Express Builder version after the upgrade, you will need these
files to return the firmware to its earlier versions.
If you must restore an installation whose system files are corrupt, this upgrade may
fail. To ensure that Express Builder is performing correctly, you should either perform
a complete Express Builder reinstallation or restore the system from backups.
Carefully read the current Release Notes: Express5800/ftServer for the Linux
Operating System document on http://support.necam.com. Distribution
Release Notes may have been updated with information about restrictions or
problems and workarounds, software updates, and document corrections that
Release Notes from earlier distribution CDs do not have.
To update or reinstall Express5800/ftServer system software for the Linux
operating system
1. Make sure that you have a backup system disk, in case the installation fails or you
want to return to the previous version of Express Builder. See ‘‘Creating a Backup
System Disk’’ on page 4-7 for details.
2. Ensure that your system is prepared for the upgrade by checking the items in
‘‘Pre-Installation Checklist’’ on page 2-7.
3. If you are upgrading to a new version of Express Builder, skip this step and go to step
4. If you want to reinstall the same Express Builder version that is currently installed (for
example, to ensure that it is not corrupted), you must remove the currently installed
Express Builder packages by typing the following commands:
4-6 Express5800/ftServer: System Administrator’s Guide for the Linux Operating System
Page 47

a. Remove all NECAM packages except eula_display with this command:
rpm -e --nodeps --allmatches ‘rpm -qa | grep lsb-ft | grep
-v eula_display`
b. Remove eula_display with this command:
rpm -e --nodeps lsb-ft-eula_display
4. Follow the instructions in ‘‘Installing Express Builder for Fault Tolerance’’ on page 2-13.
Your system now has a new version of Express Builder installed and the upgrade is complete.
If the upgrade failed or you want to return the system to the previous Express Builder version,
see ‘‘Recovering from a Failed Software Upgrade’’ on page 4-8.
Creating a Backup System Disk
To create a backup system disk
1. Shut down the system with the command:
# halt -p
2. Remove the system disk from the bottom slot of the CPU-I/O enclosure whose
power switch is not lit and set it aside as a backup disk.
Creating a Backup System Disk
3. To boot the system, lift the switch cover of the CPU-I/O enclosure whose power
switch is lit green, and press the switch momentarily.
4. After the system has booted, insert a spare disk in the bottom slot of the CPU-I/O
enclosure whose power switch is not lit.
5. Perform the procedures described in ‘‘Manually Creating Partitions on Blank Disks
and Adding to RAID-1 Arrays’’ on page 5-20.
Updating the Operating System and Express5800/ftServer System Software 4-7
Page 48

Recovering from a Failed Software Upgrade
NOTE
Backup disks can be new, factory-fresh disks or disks
recycled from other systems. However, care must be
taken with recycled disks. The partition table and RAID
superblocks that exist on a recycled disk can confuse the
system.
Recovering from a Failed Software Upgrade
Use this procedure if an upgrade procedure failed or if you want to go back to the
software versions installed before an upgrade procedure was performed.
To recover from a failed software upgrade procedure
1. Shut down the system with the command:
# halt -p
2. Remove the system disks from the bottom slots of both CPU-I/O enclosures and
set them aside.
3. Insert the backup system disk you prepared before performing the upgrade in the
bottom slot of the CPU-I/O enclosure whose power switch is lit (green).
4. Boot the system by lifting the switch cover of the core CPU-I/O enclosure whose
power switch is lit (green), and by pressing the switch momentarily.
5. After the system has booted, insert the one of the disks you set aside in step 2 in
the bottom slot of the CPU-I/O enclosure whose power switch is not lit.
The drive spins up, the system adds it to the RAID array and resynchronizes it so
that it mirrors the backup system disk. You can monitor the mirroring process of
drives sda and sdd by using the tools described in
/proc/mdstat file.
6. If you upgraded the BIOS and BMC firmware during the upgrade process, you must
restore the firmware to its previous version. See
The system is now restored to the pre-upgrade state.
Chapter 5 or by monitoring the
Chapter 3 for details.
Related Information and Resources
Release Notes: Express5800/ftServer for the Linux Operating System
4-8 Express5800/ftServer: System Administrator’s Guide for the Linux Operating System
Page 49

Chapter 5
Setting Up the ftServer System
This chapter discusses the following topics:
•
‘‘Setting Up Internal Disk Storage”
•
‘‘Setting Up RAID Arrays”
•
‘‘Removing and Replacing Disks”
•
‘‘Administering RAID Arrays”
•
‘‘System Backup and Disaster Recovery”
•
‘‘Ethernet Devices”
•
‘‘Other System Configuration Information”
•
‘‘Additional Documentation and Resources”
At system startup, the operating system autoprobes hardware for legacy devices and
attached devices that are not already configured for use on the system. Often, the
device is recognized and automatically supported, requiring no direct configuration.
While the operating system may recognize legacy devices, Express5800/ftServer
System Software for the Linux Operating System (Express Builder) does not support
them as fault-tolerant devices. To be supported as a fault-tolerant device, a device
must have a special hardened driver that supports surprise removal and fault
management by Express Builder
Some system components, such as data storage, may require additional configuration.
The following sections discuss them, as well as some of the automated features of the
ftServer system that support fault-tolerant operation and ease system administration.
.
5-
Setting Up the ftServer System 5-1
Page 50

Setting Up Internal Disk Storage
Setting Up Internal Disk Storage
This section discusses the following topics:
•
‘‘Internal Disk Storage Overview”
•
‘‘The Console Log and the /var/log/messages File”
•
‘‘Configuring Internal Disks”
•
‘‘Managing Partitions”
•
‘‘Default Internal Disk Configuration for a Newly Installed System”
•
‘‘Checking the Current State of the Internal Disk Subsystem”
•
‘‘Storage Device Definition”
Internal Disk Storage Overview
ftServer systems support up to six internal Serial Advanced Technology Attachment
SAS (SATA) disks, three in each CPU-I/O enclosure.
You can use RAID 1 to mirror the disks in one enclosure with the corresponding disks
in the other enclosure for fault tolerance. (You should not mirror disks in the same
internal storage enclosure.) RAID 1 directs I/O flow to the appropriate disks in the two
CPU-I/O enclosures. When a CPU-I/O enclosure (or a disk in it) is pulled, the RAID-1
mirrors are broken, the other CPU-I/O enclosure becomes simplex, and its disk status
LED becomes amber. (Pulling the CRU would cause all disk LEDs in the remaining
CRU to go amber. Pulling one disk would cause only its partner's LED to go amber.)
An amber LED indicates that the device is no longer safe to pull. The Opstate Manager
(OSM) administratively removes the missing mirrors from their RAID 1 arrays.
When the CPU-I/O enclosure is re-inserted, the SAS (SATA) driver spins up the disk(s),
and the OSM administratively adds the mirrors back into their RAID arrays. The other
CPU-I/O enclosure remains simplex until all mirror synchronization completes. (The
RAID-1 fast resync feature can greatly reduce resync time.)
SAS (SATA), RAID, DM-multipath, and OSM plug-ins are independent modules that
interact with each other.
The Console Log and the /var/log/messages File
The system console displays messages from the internal storage subsystem. This
includes messages when disks are inserted and removed and when disk errors occur.
The console messages are also in the system log (/var/log/messages). Tailing the
messages file while configuring disks is very helpful.
# tail -f /var/log/messages
5-2 Express5800/ftServer: System Administrator’s Guide for the Linux Operating System
Page 51

Since some disk-configuration operations produce considerable console output, it can
be helpful to log on to another session.
Configuring Internal Disks
The six internal storage disks are persistently named based on the slot that they
occupy. As shown in
/dev/sda, /dev/sdb, and /dev/sdc, from bottom to top. In the lower CPU-I/O enclosure,
they are /dev/sdd, /dev/sde, and /dev/sdf, from bottom to top. The name is associated
with the slot, not the disk.
Figure 5-1. CPU-I/O Enclosures: Front Panel with Drive Slots Fully Populated
Figure 5-1, in the upper CPU-I/O enclosure, the disks are
Setting Up Internal Disk Storage
sdc
sdb
sda
sdf
sde
The Linux operating system allows many possible configurations of these six disks.To
simplify administration and reduce confusion, this section presents recommended
configurations.
For convenience, the disks are used in pairs based on vertical grouping of the disks in
the CPU-I/O enclosures; sda is paired with sdd, sdb with sde, and sdc with sdf. RAID-1
arrays are created by placing one mirror on each disk of the pair. For example, RAID
array /dev/md0 occupies sda1 and sdd1.
Each SAS (SATA) disk in a pair must be the same size.
In the CPU-I/O enclosure internal disk slots, insert only hard drives provided by
NECAM. Inserting any other type of device may cause data loss or system failure.
Managing Partitions
You can use the fdisk or sfdisk utilities to display and change a disk's partition table
and geometry (see fdisk(8) and sfdisk(8) for details). During the Linux operating system
installation, all of the mirrored boot partitions are created as type 0xfd (Linux RAID
sdd
asys076
Setting Up the ftServer System 5-3
Page 52

Setting Up Internal Disk Storage
autodetect). After the installation, you use the fdisk utility to add data disks with the
type 0x83 (Linux). Both disks of a RAID pair must have the same geometry, partition
table, and type.
You can use the fdisk command to manage disk partitions.The following example
uses the internal storage enclosure disk sdb.
To display the partition table
1. Enter the fdisk command.
# fdisk /dev/sdb
The number of cylinders for this disk is set to 17849.
There is nothing wrong with that, but this is larger than
1024,and could in certain setups cause problems with:
1) software that runs at boot time (e.g., old versions of
LILO)
2) booting and partitioning software from other OSs
(e.g., DOS FDISK, OS/2 FDISK)
Command (m for help):
2. Enter the p argument of the fdisk command.
Command (m for help): p
Disk /dev/sdb: 146.8 GB, 146815737856 bytes
255 heads, 63 sectors/track, 17849 cylinders
Units = cylinders of 16065 * 512 = 8225280 bytes
Device Boot Start
/dev/sdb1
Command (m for help):
1
End Blocks Id System
17849 143372061 83 Linux
3. In this example, there is one partition, sdb1, that is 143,372,061 1K blocks long.
Note the geometry, 255 heads, 63 sectors/track. This is the information
required when you need to adjust the geometry of a replacement partner disk to
match (see
‘‘Manually Creating Partitions on Blank Disks and Adding to RAID-1
Arrays’’ on page 5-20). Enter the q command to quit, or continue with other
commands, as required.
The following example creates a new partition table and adds a primary partition, sdb1,
of type 0xfd on sdb.
5-4 Express5800/ftServer: System Administrator’s Guide for the Linux Operating System
Page 53

Setting Up Internal Disk Storage
To create a new partition table and add a partition
1. If fdisk is not already running, enter the fdisk command.
# fdisk /dev/sdb
The number of cylinders for this disk is set to 17849.
There is nothing wrong with that, but this is larger than
1024, and could in certain setups cause problems with:
1) software that runs at boot time (e.g., old versions of
LILO)
2) booting and partitioning software from other OSs
(e.g., DOS FDISK, OS/2 FDISK)
Command (m for help):
2. Enter the o command to create a new empty DOS partition table. Note the caution
displayed by the command.
Command (m for help): o
Building a new DOS disklabel. Changes will remain in memory
only, until you decide to write them. After that, of course,
the previous content won't be recoverable.
The number of cylinders for this disk is set to 17849.
There is nothing wrong with that, but this is larger than
1024, and could in certain setups cause problems with:
1) software that runs at boot time (e.g., old versions of
LILO)
2) booting and partitioning software from other OSs
(e.g., DOS FDISK, OS/2 FDISK)
Warning: invalid flag 0x0000 of partition table 4 will be
corrected by w(rite)
Command (m for help):
3. Enter the n command to add a new partition.
Command (m for help): n
Command action
e extended
p primary partition (1-4)
4. Enter e or p to specify the desired type.
p
Partition number (1-4):
Setting Up the ftServer System 5-5
Page 54

Setting Up Internal Disk Storage
5. Enter the partition number you wish to assign (the choices depend on the type
specified).
Partition number (1-4): 1
First cylinder (1-8924, default 1):
6. Enter the desired starting cylinder number for the partition, or press ENTER to
accept the default (this example accepts the default).
Using default value 1
Last cylinder or +size or +sizeM or +sizeK (1-8924, default
8924):
7. Enter the desired last cylinder number for the partition, the size in megabytes or
kilobytes, or press ENTER to accept the default (this example accepts the default).
Using default value 8924
Command (m for help):
8. Enter the t command.
Command (m for help): t
Selected partition 1
Hex code (type L to list codes):
9. Press ENTER to accept the default ID (83). Enter fd if you want the partition
system ID to be Linux RAID autodetect.
Hex code (type L to list codes): fd
Changed system type of partition 1 to fd (Linux RAID
autodetect)
Command (m for help):
10. Enter the w command to write the partition table to the disk and exit fdisk.
Command (m for help): w
5-6 Express5800/ftServer: System Administrator’s Guide for the Linux Operating System
Page 55

Setting Up Internal Disk Storage
Default Internal Disk Configuration for a Newly Installed System
The Linux operating system is installed on the sda/sdd pair of SAS (SATA) disks.
See User Guide (Setup) for configuration of internal disk.
N O T E
The RAID array is not deterministic.
Checking the Current State of the Internal Disk Subsystem
The /proc/scsi/scsi file displays the current state of the internal disk subsystem.
It shows all of the disks and their names and states, as well as additional information.
This example shows a system with two SAS (SATA) disks.
Setting Up the ftServer System 5-7
Page 56

Setting Up RAID Arrays
Example 5-1. Checking the Current State of the Internal Storage Subsystem
# cat /proc/scsi/scsi
Attached devices:
Host: scsi0 Channel: 00 Id: 00 Lun: 00
Vendor: ATA Model: ST380013AS Rev: 3.00
Type: Direct-Access ANSI SCSI revision: 05
Host: scsi4 Channel: 00 Id: 00 Lun: 00
Vendor: ATA Model: ST380013AS Rev: 3.00
Type: Direct-Access ANSI SCSI revision: 05
Storage Device Definition
The Linux operating system automatically creates device nodes for all devices in a
system.
Miscellaneous SCSI devices such as scanners are generally mapped as /dev/sg*
devices. Note that the Linux operating system also allows some non-SCSI devices to
be addressable as SCSI pseudo-devices. This can be useful to allow certain SCSI
software packages to work with non-SCSI devices.
Setting Up RAID Arrays
This section discusses the following topics:
•
‘‘RAID Array Overview”
•
‘‘Creating a RAID-1 Array”
•
‘‘Creating a RAID-0 Array”
•
‘‘Creating and Mounting a File System”
•
‘‘Checking the Current State of RAID”
RAID Array Overview
RAID is the basis for fault-tolerant file system availability. As disks come in and go out
of service, the only way to keep the file system available is to mirror it on multiple disks
with a disk in each CPU-I/O enclosure.
All of the file systems are created on RAID devices.
The system supports RAID-1 (mirrored) and RAID-0 (striped) on RAID-1. RAID-0 is
configured using RAID-1 devices, since the underlying devices must be fault tolerant.
Each RAID array has a number (for example, /dev/md23) that must be unique among
the running RAID arrays. The RAID array numbers are in the range 0 through 128.
5-8 Express5800/ftServer: System Administrator’s Guide for the Linux Operating System
Page 57

Setting Up RAID Arrays
Device files are created for the first 128 RAID arrays. Use the mknod command (see
mknod(1)) to create additional device files as needed. The number is the minor device
number, and it is also used in the name.
The smaller numbers are used by the installer, so it is convenient to add new RAID
arrays above 10. When RAID arrays are intended to be moved between systems, try
to pick numbers that are unique among all of the systems.
The /etc/mdadm.conf file, which describes all of the RAID arrays for the system, is
created during installation. This file contains one line for each RAID array. When
creating a new RAID array, it is convenient to copy an existing line and modify it to suit
your needs. Here is a typical line:
ARRAY /dev/md2 super-minor=2
You can create, start, and stop the RAID arrays. You can manage RAID-1 arrays by
adding and removing mirrors.
The following sections discuss working with RAID arrays. This includes configuring
RAID arrays, administration, and tools.
NOTE
To ensure fault-tolerant operation of your system, only use
the mdadm command to create RAID arrays.
Creating a RAID-1 Array
The example in this discussion uses the disk pair sdb and sde. The RAID array is called
/dev/md20 and consists of sdb1 and sde1.
To create a RAID-1 array
1. Select a pair of same-sized disks and insert them into two corresponding slots in
different CPU-I/O enclosures. This example uses the middle slot (sdb) of the upper
CPU-I/O enclosure, and the middle slot (sde) of the lower enclosure.
2. When the disks have spun up, partition them for the desired RAID array (see
‘‘Managing Partitions’’ on page 5-4). You can mark the partitions with code 83.
Setting Up the ftServer System 5-9
Page 58

Setting Up RAID Arrays
3. Edit the /etc/mdadm.conf file so that the new RAID array will start each time the
system boots.
a. Use an existing ARRAY line as a model. Copy it to the bottom of the file.
b. Edit the device and the two disks. In this example, the device is changed to
md20 and the two disks are changed to /dev/sdb1 and /dev/sde1. The result
should look like the following:
ARRAY /dev/md20 level=1 num-devices=2
devices=/dev/sdb1//dev/sde1
Always define RAID-1 arrays on disks in the embedded slots to have two disks
and no spares.
c. Save the file and exit the editor.
4. Make the RAID array with the following command:
# mdadm --create /dev/md20 --level=1 --raid-devices=2 /dev/sdb1
/dev/sde1
This command creates the RAID array and starts it.
NOTE
When an array is created, /proc/mdstat shows that
disks are in the process of resynchronizing, but the LEDs
on those disks do not light. Although /proc/mdstat
reports a resynchronization in progress, none is occurring
and no disk I/O is involved. In this case, ignore the
resynchronization information in /proc/mdstat.
5-10 Express5800/ftServer: System Administrator’s Guide for the Linux Operating System
Page 59

Setting Up RAID Arrays
When the command completes, the RAID array is up and running. You can use the
mdadm command to see the status of the new RAID array:
# mdadm -Q --detail /dev/md20
/dev/md20:
Version : 00.90.01
Creation Time : Wed Sep 28 15:20:08 2005
Raid Level : raid1
Array Size : 143371968 (136.73 GiB 146.81 GB)
Device Size : 143371968 (136.73 GiB 146.81 GB)
Raid Devices : 2
Total Devices : 2
Preferred Minor : 20
Persistence : Superblock is persistent
Update Time : Wed Sep 28 15:20:58 2005
State : clean
Active Devices : 2
Working Devices : 2
Failed Devices : 0
Spare Devices : 0
Number Major Minor RaidDevice State
0 8 17 0 active sync /dev/sdb1
1 8 49 1 active sync /dev/sde1
UUID : 866e4ecd:12657190:79293b72:6b774c0d
Events : 0.3
Creating a RAID-0 Array
When the desired file system is larger than a single disk, use RAID-0 to combine
multiple RAID-1 arrays into a single RAID array.
This example assumes that two RAID-1 arrays have been created: md20, consisting
of sdb1 and sde1; and md21, consisting of sdc1 and sdf1 on the sdc/sdf pair of disks.
To create a RAID-0 array
1. Select a pair of RAID-1 arrays.
Setting Up the ftServer System 5-11
Page 60

Setting Up RAID Arrays
2. Edit the /etc/mdadm.conf file so that the new RAID-0 array starts each time the
system boots.
a. Use an existing ARRAY line as a model. Copy it to the bottom of the file.
b. Edit the device and the two disks. In this example, the device is changed to
md30 and the two devices take the RAID-1 array names. The result should
look like the following:
ARRAY /dev/md30 level=0 DEVICES=/dev/md20,/dev/md21
c. Save the file and exit the editor.
3. Make the RAID array with the following command:
# mdadm --create /dev/md30 --level=0 --raid-devices=2 /dev/md20
/dev/md21
This command creates the RAID array and starts it.
If you type the mdadm command again, it shows the active RAID array:
# mdadm -Q --detail /dev/md30
/dev/md30:
Version : 00.90.01
Creation Time : Wed Sep 28 15:20:08 2005
Raid Level : raid0
Array Size : 286743808 (273.46 GiB 293.63 GB)
Raid Devices : 2
Total Devices : 2
Preferred Minor : 30
Persistence : Superblock is persistent
Update Time : Wed Sep 28 15:20:58 2005
State : clean
Active Devices : 2
Working Devices : 2
Failed Devices : 0
Spare Devices : 0
Chunk Size : 64K
Number Major Minor RaidDevice State
0 9 20 0 active sync /dev/md20
1 9 21 1 active sync /dev/md21
UUID : f5762850:f7dd0c84:5c720b6b:b328ca20
Events : 0.1
5-12 Express5800/ftServer: System Administrator’s Guide for the Linux Operating System
Page 61

To stop the device, use the mdadm command with the -S argument, as follows:
mdadm -S /dev/md30
Creating and Mounting a File System
The RAID arrays created in the preceding examples are raw disk block devices. You
can mount a file system on the RAID array.
The following command creates an ext-3 journaled file system in the RAID-0 array
created above:
# mkfs.ext3 /dev/md30
You can mount the file system on a convenient mount point, /big_data, as follows:
# mkdir /big_data
# mount /dev/md30 /big_data
To verify the work, use the command df to show the size of the file system:
# df /big_data
Setting Up RAID Arrays
Use the command ls to show the lost+found directory in the file system:
# ls -l /big_data
At this point, be sure to add the mount to the /etc/fstab file, so the file system is
mounted during boot. Reboot the system to make sure it works.
NOTE
A single disk that is not part of a RAID array must have a
file system mounted on it to ensure that its operation state
is reported correctly.
Checking the Current State of RAID
The mdstat file displays the current state of RAID. It shows all running RAID arrays
and their current status, including which mirrors are present, whether they are
synchronized, and more. See
Example 5-2.
Setting Up the ftServer System 5-13
Page 62

Removing and Replacing Disks
NOTE
The device names displayed in /proc/mdstat are the
kernel names for each device. These are different from
the user device names displayed by the mdadm
command.
Example 5-2. Checking the Current State of RAID
# cat /proc/mdstat
Personalities : [raid0] [raid1]
md30 : active raid0 md21[1] md20[0]
286743808 blocks 64k chunks
md21 : active raid1 sdf1[1] sde1[0]
143371968 blocks [2/1] [_U]
md20 : active raid1 sdd1[1] sdb1[0]
143371968 blocks [2/2] [UU]
md1 : active raid1 sdc2[1] sda2[0]
2096384 blocks [2/2] [UU]
md2 : active raid1 sdc3[2](F) sda3[0]
31647936 blocks [2/1] [U_]
md0 : active raid1 sdc1[1] sda1[0]
2096384 blocks [2/2] [UU]
unused devices: <none>
In this example, md30 is a RAID-0 array made up of md20 and md21. The remaining
stanzas are for RAID-1 arrays. Note that md21 is operating in degraded mode. It is
missing a disk: [2/1] [_U].
Removing and Replacing Disks
For disk fault tolerance, disk mirrors must be maintained when disks or CPU-I/O
enclosures are removed and replaced. For information about the recommended
partnering confirmation for internal disks, see
This section discusses the following topics:
•
‘‘Disk Insertion”
•
‘‘Administering RAID Arrays”
5-14 Express5800/ftServer: System Administrator’s Guide for the Linux Operating System
‘‘Configuring Internal Disks’’ on page 5-3.
Page 63

Disk Insertion
When you reinsert a pulled disk, the OSM storage plugin attempts to match it with an
existing disk. If it finds a match, it hot-adds the mirror partitions on the inserted disk
back into the existing RAID arrays and resynchronizes them (see
on page 5-18).
Similarly, if you replace a failed disk, the OSM plugin automatically adds the
replacement disk to a running RAID array.
Administering RAID Arrays
This section discusses the following topics:
•
‘‘To Stop a RAID Array and Move It to Another System”
•
‘‘Errors and Faulty Mirrors”
•
‘‘Removing a Faulty Mirror”
•
‘‘Resynchronization”
•
‘‘Replacing a Failed Disk”
•
‘‘Manually Creating Partitions on Blank Disks and Adding to RAID-1 Arrays”
Administering RAID Arrays
‘‘Resynchronization’’
You can use the mdadm command to administer RAID arrays. The following sections
provide examples of how to perform some common administrative procedures using
mdadm.
NOTE
Never remove both member disks of a RAID-1 array. The
Linux operating system does not support that operation.
To Stop a RAID Array and Move It to Another System
You can stop RAID-0 and RAID-1 arrays, if they are not in use. Unmount the file system
(if one is mounted) and stop the array as shown in the following example:
# umount /dev/md30
# mdadm -S /dev/md30
Before physically removing the disks from the system, check that the RAID array no
longer appears in /proc/mdstat. Edit the /etc/fstab and /etc/mdadm.conf
files on the current system to delete it. Edit the information into the files in the new
system. If the new system already has the device in use, you cannot start the RAID
array.
Setting Up the ftServer System 5-15
Page 64

Administering RAID Arrays
You can start a RAID array when it is stopped. Use the following command to start a
RAID array that was already configured in /etc/mdadm.conf:
# mdadm -A /dev/md30
Errors and Faulty Mirrors
When an error is reported on a mirror, the mirror is marked faulty and it is no longer
used. The last active mirror is never marked faulty even if errors are reported against it.
The SCSI subsystem (which comprises the SCSI midlayer and the low-level drivers)
returns errors to RAID software when its error management code determines that the
I/O request cannot succeed. When this happens, RAID software marks the mirror faulty
and retries reads on another mirror but otherwise ignores write errors.
Every time an active disk is pulled, all outstanding I/O is returned as errors. When a
disk is pulled, all RAID members or mirrors that have active I/O on the missing disk are
marked faulty. This may not be all RAID arrays that use the disk.
When a mirror becomes faulty, the disk and CPU-I/O enclosure of the remaining active
mirror becomes simplex and that enclosure is no longer safe to pull.
If you want to remove a good disk from a RAID array, you must mark it faulty. You can
use the mdadm command to simulate an error and mark the mirror faulty.
# mdadm /dev/md20 -f /dev/sdb1
The /proc/mdstat file shows an F after a faulty mirror in the display:
md20 : active raid1F sdc1[1] sdf1[0]F
4095872 blocks 0 active chunks [2/1] [_U]
Removing a Faulty Mirror
Before removing a mirror, check the /proc/mdstat file to make sure that it is marked
faulty. You can use the mdadm command to remove a faulty mirror from a RAID array,
as shown in the following example:
# mdadm /dev/md20 -r /dev/sdb1
In the preceding example, the mirror (/dev/sdb1) is removed from the RAID array
(/dev/md20). After running this command, the /proc/mdstat file shows the RAID
array without the mirror.
You cannot remove a mirror that is not faulty. Before a disk is pulled, all of the mirrors
on it must be marked faulty (either by the operating system or with the mdadm -f
command) and removed with the mdadm -r command before the system can
5-16 Express5800/ftServer: System Administrator’s Guide for the Linux Operating System
Page 65

completely remove the disk (the OSM storage plugin automates these tasks). This
means that until all mirrors are removed, a replacement disk inserted in the same slot
will not spin up.
You can use the mdadm command to add a mirror into a running RAID array. The
following example shows how to do this.
# mdadm /dev/md20 -a /dev/sdb1
In the preceding example, /dev/md20 is the RAID array and /dev/sdb1 is the mirror.
After running this command, the /proc/mdstat file shows the RAID array with the
new mirror as a spare. The command starts resynchronization of the mirror.
Resynchronization can take a while, depending on how much data must be written to
the new mirror. Resynchronization must finish before the add operation is complete.
Resynchronization
There are two classes of resynchronization: fast and full. A fast resync is done when
the mirror was recently part of the array and RAID software knows what has been
written while the mirror was missing. If the fast resync is not possible (for example,
when a clean new disk is added), a full resync is performed. The full resync
synchronizes all of the mirror that is in use. If nothing was written while the mirror was
missing, no resync is needed.
Administering RAID Arrays
Synchronization begins automatically when the mirror is added to a RAID array. RAID
software limits one resync per disk at a time so that, for example, on the system disks,
there may be one active resync and several delayed resyncs.
Example 5-3 provides an
example of resynchronization.
Example 5-3. Resynchronization
# cat /proc/mdstat
Personalities : [raid1]
md21 : active raid1 sde1[0] sdf1[1]
104320 blocks [2/1] [U_]
resync=DELAYED
md20 : active raid1 sdc1[2] sdd1[0]
33640000 blocks [2/1] [U_]
[===>.................] recovery = 19.0%
(6400000/33640000) finish=2.1min
speed=206451K/sec
md1 : active raid1 sdb2[1] sda2[0]
2096384 blocks [2/2] [UU]
Setting Up the ftServer System 5-17
Page 66

Administering RAID Arrays
md2 : active raid1 sdb3[1] sda3[0]
31647936 blocks [2/2] [UU]
md0 : active raid1 sdb1[1] sda1[0]
104320 blocks [2/2] [UU]
unused devices: <none>
#
NOTE
The device names displayed in /proc/mdstat are the
kernel names for each device. These are different from
the user device names displayed by the mdadm
command.
As long as there is a missing mirror or a resynchronization in process, RAID and the
CPU-I/O enclosure are simplex for the active mirror.
Replacing a Failed Disk
When you need to replace a failed disk, the OSM plugin can automatically add the
replacement disk to a running RAID array, provided the following conditions exist:
•
The replacement disk must be blank, as defined by the current safe mode setting.
If safe mode is active, zero the disk's partition table and RAID superblocks. Then
remove and reinsert the disk to start the automatic disk replacement. For more
information about safe mode, see
•
Do not reboot the system or stop and restart OSM after you remove the failed disk
‘‘Configuring Safe Mode.”
until you have inserted the replacement disk and it has synchronized with its
partner. The information necessary to perform automatic disk replacement is not
persistent, so if OSM is restarted, the replacement disk must be paired using a
different method.
•
The failed disk must have been paired with one (and only one) partner disk. For
example, if /dev/md4 consisted of partitions sda1 and sdb1, and /dev/md5
consisted of sdb2 and sdc2, automatic disk replacement would not work for disk
sdb. In addition, partition numbers on the failed disk and its partner, for any
partitions belonging to RAID1 arrays, must be the same.
•
The failed disk must belong to a RAID 1 on top of a disk, partition, or multipath. If
the failed disk belongs to a RAID0 (even if that RAID0 is part of a RAID1), the blank
disk will not be added to the RAID array.
5-18 Express5800/ftServer: System Administrator’s Guide for the Linux Operating System
Page 67

NOTE
If the running member of the RAID array was a system
disk, the bootloader (grub) is added to the newly-inserted
disk.
To replace a failed disk
1. While the system and RAID array are running, remove the failed disk.
2. Insert a blank disk. The blank disk is automatically added to the array.
Configuring Safe Mode
By default, the OSM configuration file, /opt/ft/osm/config.xml, configures this
automatic pairing of disks in safe-mode. In safe mode, a newly inserted disk is
considered blank if it has no valid partition table or RAID superblocks. Otherwise, a
newly inserted disk is considered blank even if it has a valid partition table or RAID
superblocks, as long as it does not belong to a running RAID array.
The following entry in the OSM configuration file configures safe mode:
<entry key="blankDiskSafeMode" value="true"/>
To specify that automatic pairing of disks not operate in safe-mode, replace the word
true with false so that the file contains the following entry:
Administering RAID Arrays
<entry key="blankDiskSafeMode" value="false"/>
Because OSM preferences are only read at start-up time, you must reboot the system
for a change to take effect.
Manually Creating Partitions on Blank Disks and Adding to RAID-1 Arrays
When you create a backup system disk (which is described in ‘‘Creating a Backup
System Disk’’ on page 4-7), you must create its partitions, use the mdadm command to
add it to a RAID-1 array, and run the grub command.)
NOTE
Do not perform these procedures if you are replacing a
failed disk. See, instead,
page 5-19.
•
‘‘Replacing Defective Disks Interactively”
•
‘‘Replacing Defective Disks Manually”
‘‘Replacing a Failed Disk’’ on
Setting Up the ftServer System 5-19
Page 68

Administering RAID Arrays
Replacing Defective Disks Interactively
To replace a defective disk, perform the following procedures:
•
Remove the defective disk and insert a spare disk.
•
Run the duplex_blank_disk command (see ‘‘The duplex_blank_disk
Command’’ on page 5-25).
NOTE
Replacement disks can be new, factory-fresh disks or
disks recycled from other systems. Care must be taken
with recycled disks. The partition table and RAID
superblocks that exist on the disk can confuse the system.
Replacing Defective Disks Manually
To replace a defective disk by manually issuing commands for each step of the
process, perform the following procedures:
•
Remove the defective disk and insert a spare disk.
•
Verify that the spare disk is not in use.
•
Zero the spare disk.
•
Partition the spare disk to match the running disk.
•
Add partitions on the spare disk to RAID-1 arrays.
•
Run the GRUB boot loader (only if the running disk is the system disk).
NOTE
Replacement disks can be new, factory-fresh disks or
disks recycled from other systems. Care must be taken
with recycled disks. The partition table and RAID
superblocks that exist on the disk can confuse the system.
To remove a defective disk and insert a spare disk
1. Remove the defective disk from any RAID arrays that it belongs to, using the
instructions presented in
‘‘Removing a Faulty Mirror’’ on page 5-17.
2. Physically remove the disk.
3. Insert a spare disk in the slot previously occupied by the defective disk. The drive
spins up automatically.
5-20 Express5800/ftServer: System Administrator’s Guide for the Linux Operating System
Page 69

Administering RAID Arrays
To verify that the spare disk is not in use
Type the following commands and check the resulting output:
# mdadm --detail --scan
# swapon -s
# cat /etc/mtab
To zero the spare disk
Perform one of the following procedures:
•
Zero the spare disk’s RAID superblocks by typing a command such as the following
for each partition on the spare disk (substitute the device node of the partition you
wish to zero for sdb1 in this example):
# mdadm --zero-superblock /dev/sdb1
NOTE
Zeroing the disk’s RAID superblocks takes very little time
but may not remove everything from the disk. If you are
concerned about this, zero the entire disk as described in
the following step.
•
Zero the entire spare disk by typing a command such as the following (substitute
the device node of the disk you wish to zero for sdf in this example).
# dd if=/dev/zero of=/dev/sdf bs=1024k
NOTE
Zeroing the entire disk takes quite a long time but
removes everything from the disk, thus eliminating many
problems.
To partition the spare disk to match the running disk
1. Save the partition table of the running disk to a file with a command like the
following:
# sfdisk -d /dev/sda > sda_partition_table
2. Write the saved partition table to the spare disk with a command like the following:
# sfdisk /dev/sdd < sda_partition_table
Setting Up the ftServer System 5-21
Page 70

Administering RAID Arrays
Occasionally, sfdisk returns the following error while writing the saved partition
table to the spare disk:
Checking that no-one is using this disk right now ...
BLKRRPART: Input/output error
This error indicates that the disk is currently in use, so you should not repartition it.
Perform these steps to correct this error:
a. Unmount all file systems.
b. Swap off all swap partitions on this disk.
c. Use the --no-reread flag to suppress this check.
d. Use the --force flag to overrule all checks.
NOTE
The preceding error does not occur if the spare disk
already contained a valid partition table.
If you are sure that the spare disk is not in use, force sfdisk to write the partition
table by using the --no-reread flag.
To add partitions on the spare disk to RAID-1 arrays
1. Type the following command to determine which RAID-1 arrays the running disk
belongs to:
# mdadm --detail --scan
ARRAY /dev/md2 level=raid1 num-devices=2
UUID=5ddb14c7:d5e0b2d6:ad80086d:8db2a245
devices=/dev/sda2
ARRAY /dev/md1 level=raid1 num-devices=2
UUID=3838df6e:60caf7e6:695d0f62:de94e821
devices=/dev/sda3
ARRAY /dev/md0 level=raid1 num-devices=2
UUID=3e4ad330:c8ee5dfc:f48bd88a:401ada25
devices=/dev/sda1
5-22 Express5800/ftServer: System Administrator’s Guide for the Linux Operating System
Page 71

Administering RAID Arrays
2. Add each partition on the spare disk to the RAID-1 array containing the
corresponding partition on the running disk with commands like the following:
# mdadm -a /dev/md0 /dev/sdd1
mdadm: hot added /dev/sdd1
# mdadm -a /dev/md1 /dev/sdd3
mdadm: hot added /dev/sdd3
# mdadm -a /dev/md2 /dev/sdd2
mdadm: hot added /dev/sdd2
Perform the following procedure only if the running disk is the system disk.
To run GRUB
If the running disk is the system disk, run the GRUB boot loader on the boot partition
of the spare disk, after resynchronization is complete on that partition.
Example 5-4
shows a typical use of GRUB:
Example 5-4. Running GRUB
# /sbin/grub
GNU GRUB version 0.95 (640K lower / 3072K upper memory)
[ Minimal BASH-like line editing is supported. For the first word, TAB
lists possible command completions. Anywhere else TAB lists the possible
completions of a device/filename.]
grub> device (hd0) /dev/sdd
grub> root (hd0,0)
Filesystem type is ext2fs, partition type 0xfd
grub> setup (hd0)
Checking if "/boot/grub/stage1" exists... no
Checking if "/grub/stage1" exists... yes
Checking if "/grub/stage2" exists... yes
Checking if "/grub/e2fs_stage1_5" exists... yes
Running "embed /grub/e2fs_stage1_5 (hd0)"... 16 sectors are embedded.
succeeded
Running "install /grub/stage1 (hd0) (hd0)1+16 p (hd0,0)/grub/stage2
/grub/grub.conf"..
. succeeded
Done.
grub> quit
On your own system, replace the /dev/sdd shown in Example 5-4 with the device
node for your spare disk. In the root (hd0,0) command, the second zero is
thenumber of the partition to GRUB. GRUB partitions are zero-based rather than
one-based, so these commands actually indicate that partition 1 on /dev/sdd has
been GRUBbed.
Setting Up the ftServer System 5-23
Page 72

Administering RAID Arrays
The duplex_blank_disk Command
The duplex_blank_disk command prompts you for all of the information required
to pair a spare disk with a running disk. You can run it by typing:
# /opt/ft/bin/duplex_blank_disk
In Example 5-5, the command prompts you for information that is needed to pair a
spare internal disk with the running system disk.
Example 5-5. Pairing a Spare Internal Disk with the Running System Disk
# /opt/ft/bin/duplex_blank_disk
Device Path ID of blank disk (e.g. 10/40/1 or 70/1): 11/40/1
Device node(s) for 11/40/1: /dev/sdd
Is this the correct blank disk device? (yes/no) y
Device Path ID of source disk (e.g. 10/40/1 or 70/1): 10/40/1
Device node(s) for 10/40/1: /dev/sda
Is this the correct source disk device? (yes/no) y
Source disk is partitioned: partitioning blank disk to match.
Source disk partition 1 belongs to RAID 1 /dev/md0.
Adding blank disk partition 1 to RAID 1 /dev/md0.
mdadm: hot added /dev/sdd1
Source disk partition 2 belongs to RAID 1 /dev/md2.
Adding blank disk partition 2 to RAID 1 /dev/md2.
mdadm: hot added /dev/sdd2
Source disk partition 3 belongs to RAID 1 /dev/md1.
Adding blank disk partition 3 to RAID 1 /dev/md1.
mdadm: hot added /dev/sdd3
Waiting for resync to complete before grubbing /dev/sdd1.
Grubbing /dev/sdd1
5-24 Express5800/ftServer: System Administrator’s Guide for the Linux Operating System
Page 73

System Backup and Disaster Recovery
Your ftServer system provides many safeguards against losing data due to hardware
failures. However, it cannot cover all contingencies, so it is still important to perform
regular backups and enact a good disaster-recovery program.
Ethernet Devices
Network interface naming on ftServer systems running a supported Linux distribution
together with Express Builder is different from that on other Linux systems. On ftServer
systems, physical devices are given names corresponding to their hardware location.
After installing Express Builder, the interfaces associated with the Ethernet adapters are
operational. Multiple interfaces can be bonded together in a channel-bonding interface.
This section discusses the following topics:
•
‘‘Physical Device Naming”
•
‘‘Monitoring and Configuring Channel-Bonding Interfaces”
•
‘‘MAC Addresses”
Physical Device Naming
System Backup and Disaster Recovery
On many Linux systems, Ethernet devices are normally assigned names based on the
order of discovery at system startup. The names begin with the letters “eth,” followed
by a number starting with 0 and counting up. This is convenient because the first (and
often only) device on a host is predictably named eth0 and can be configured without
detailed knowledge of the device type.
On an ftServer system, configuration may change dynamically when hardware failures
occur, repairs are made, or when an administrator adds or removes components.
Creating new Ethernet device names when new hardware is installed, tracking the
name of an device while it is removed and replaced and matching it up again, or
deleting the name would be difficult and the results confusing.
Instead, Express Builder assigns to network devices names that are derived from their
physical location in the system.
devices in ftServer CPU-I/O enclosures.
Table 5-2 shows the names of the embedded Ethernet
Setting Up the ftServer System 5-25
Page 74

Ethernet Devices
.
Table 5-2. Ethernet Devices in ftServer CPU-I/O Enclosures
Device Location
Ethernet
Interface Device
Name
Embedded 10/100/1000-Mbps
CPU-0, I/O-10, slot 5, port 0 eth000010
Ethernet PCI adapter
Embedded 10/100/1000-Mbps
CPU-1, I/O-10, slot 5, port 1 eth000011
Ethernet PCI adapter
Embedded 10/100/1000-Mbps
CPU-0, I/O-11, slot 5, port 0 eth080010
Ethernet PCI adapter
Embedded 10/100/1000-Mbps
CPU-1, I/O-11, slot 5, port 1 eth080011
Ethernet PCI adapter
Ethernet PCI adapter CPU-0, I/O-10, PCI slot 9,
port 0
Ethernet PCI adapter CPU-1, I/O-10, PCI slot 9,
port 1
Ethernet PCI adapter CPU-0, I/O-10, PCI slot 10,
port 0
Ethernet PCI adapter CPU-1, I/O-10, PCI slot 10,
port 1
Ethernet PCI adapter CPU-0, I/O-10, PCI slot 11,
port 0
Ethernet PCI adapter CPU-1, I/O-10, PCI slot 11,
port 1
eth000008
eth000009
eth000218
eth000219
eth000220
eth000221
Ethernet PCI adapter CPU-0, I/O-11, PCI slot 9,
Ethernet PCI adapter CPU-1, I/O-11, PCI slot 9,
Ethernet PCI adapter CPU-0, I/O-11, PCI slot 10,
Ethernet PCI adapter CPU-1, I/O-11, PCI slot 10,
Ethernet PCI adapter CPU-1, I/O-11, PCI slot 11,
Ethernet PCI adapter CPU-1, I/O-11, PCI slot 11,
5-26 Express5800/ftServer: System Administrator’s Guide for the Linux Operating System
eth080008
port 0
eth080009
port 1
eth080218
port 0
eth080219
port 1
eth080220
port 0
eth080221
port 1
Page 75

Monitoring and Configuring Channel-Bonding Interfaces
By default, the physical Ethernet interfaces listed in Tab le 5-2 are bound together into
two channel-bonding interfaces, called bond0 and bond1. The two channel-bonding
interfaces are set to operate in active-backup mode (mode 1) with Dynamic Host
Configuration Protocol (DHCP) enabled.
In many cases, no additional configuration is necessary. However, you may want to
change the default configuration to better meet your particular networking
requirements.
You configure and administer the Ethernet interfaces on your ftServer system just as
you would on any standard Linux system. Additionally, you can use the ftsmaint
command to obtain information about the fault-tolerant status of the interfaces.
This section discusses the following topics:
•
‘‘Monitoring Channel-Bonding Interfaces”
•
‘‘Configuring Channel-Bonding Interfaces”
•
‘‘Determining Interface Device Names”
Monitoring Channel-Bonding Interfaces
You can monitor the fault-tolerant status of channel-bonding interfaces by using the
ftsmaint command.
Ethernet devices:
Example 5-6 shows the default configuration of the embedded
Ethernet Devices
Example 5-6. Default Configuration of Embedded Ethernet Devices
# /opt/ft/bin/ftsmaint lsVnd
Virtual Network Device (VND) Groups
===================================
Group Name Status Inet Address RX Errors TX Errors Collisions
--------------------------------------------------------------------bond0 ONLINE 134.111.78.103 0 0 0
bond1 ONLINE 192.168.4.10 0 0 0
bond2 OFFLINE - 0 0 0
bond3 OFFLINE - 0 0 0
bond4 OFFLINE - 0 0 0
VND Group Members
=================
Member Group Name Status Interface Link State Link Speed
-------------------------------------------------------------------------eth000010 bond0 DUPLEX UP - eth000011 bond1 DUPLEX UP - -
Setting Up the ftServer System 5-27
Page 76

Ethernet Devices
eth080010 bond0 DUPLEX UP - eth080011 bond1 DUPLEX UP - -
In Example 5-6, there are two online channel-bonding interfaces (masters), bond0 and
bond1, each composed of two physical interfaces (slaves). The output shows the four
physical slave interfaces in the system and also shows their status and the name of the
bond to which they belong. Note that three other channel-bonding interfaces are
defined by default, but they are not configured and are therefore offline.
You can monitor additional information about the currently installed channel-bonding
and physical interfaces by running the Linux ifconfig tool.
Configuring Channel-Bonding Interfaces
You configure and administer channel-bonding interfaces using standard Linux
procedures. Configuration of channel-bonding interfaces is controlled by the ifcfg-*
files in the /etc/sysconfig/network-scripts directory. You modify existing
channel bond configurations by editing the bond’s ifcfg-bondn file or the bond’s
slaves’ interface ifcfg-eth* files. Additionally, you use standard Linux network
utilities like ifdown, ifup, service, ifconfig, ip, and route.
By default, the system supports five channel-bonding interfaces. In the unlikely event
that you must configure more than five bonding master interfaces (up to a maximum of
10), modify the options line in the /etc/modprobe.d/ft-network.conf file so that
max_bonds=x, where x is the desired number of channel-bonding interfaces. Perform
the following procedure to activate configuration-file modifications.
To activate configuration-file modifications
1. Type the ifdown command to stop all network interfaces.
2. Type the rmmod command to unload the bonding kernel module. This disables
network access.
3. Type the modprobe command to reload the bonding module. This enables
network access with the newly designated number of channel-bonding interfaces.
4. If necessary, type an ifup bondN command for each bonded interface you wish
to restart.
All channel-bonding interfaces must operate in the same mode. If you want to change
the mode from the default setting (mode 1, active-backup mode), modify the options
line in the /etc/modprob.d/ft-network.conf file so that mode=x, where x is the
desired mode of operation. To activate configuration-file modifications, perform the
preceding procedure.
5-28 Express5800/ftServer: System Administrator’s Guide for the Linux Operating System
Page 77

NOTES
1. There must be at least one alias for an active bond in
the /etc/modprobe.d/ft-network.conf file, or
bonding cannot occur.
2. The /etc/modprobe.d directory should contain no
more than one ft-network.conf file.
Determining Interface Device Names
When you add a PCI Ethernet adapter to a system, you must determine the device
names of the physical interfaces on the adapter before you can configure it. See
Figure 7-1 and Figure 7-2 for the hardware device path of PCI Ethernet adapters,
then refer to Table 5-2 to determine the device names.
and
When installing a PCI adapter, you can use the output of the lspci command to
confirm its Ethernet interface device name. By comparing the output of lspci before
and after installing the adapter, you can identify the newly displayed output that
corresponds to the newly installed adapter. The output might look like the following:
04:02.0 Ethernet controller: Intel Corp. 82546EB Gigabit
Ethernet Controller (Copper) (rev 01)
Ethernet Devices
The device names for the two physical interfaces on the newly added, dual-Ethernet
adapter shown above are eth000008 and eth000009.
CAUTIONCAUTION
!
Issuing an lspci command with the -xxx option may
temporarily interfere with the fault-tolerant operation of the
system. To avoid this problem, never type the lspci
command with the -xxx option.
To add two physical interfaces and configure a new channel-bonding interface
1. Install the first Ethernet PCI adapter in a supported slot in one CPU-I/O enclosure.
NOTE
When adding a pair of Ethernet PCI adapters to the
system, be sure to install one adapter in the upper
CPU-I/O enclosure and the other in the lower CPU-I/O
enclosure, in same-numbered slots. This is necessary to
maintain fault tolerance. If you install both devices in the
same enclosure, and that enclosure fails, you will lose
connectivity.
Setting Up the ftServer System 5-29
Page 78

Other System Configuration Information
2. Determine the interface device name for each physical Ethernet interface on this
newly installed adapter. See
for details.
You must add this device name to the physical interface’s configuration file (see
5).
step
3. Repeat steps 1 and 2 for the second adapter in the corresponding slot in the
second paired CPU-I/O enclosure.
4. Create a new bond file (for example, ifcfg-bond2) in the
etc/sysconfig/network-scripts directory. Use the contents of an existing
bondn file as a guide.
5. Create two new physical interface configuration files for the two new physical
interfaces. Use the contents of an existing ifcfg-eth* file as a guide. Be sure to
use the device names of the newly installed adapters (see step
6. Type the following command to bring up the new interface:
# ifup bond2
MAC Addresses
You can use the ifconfig command to determine the current MAC address of an
Ethernet interface. Alternatively, you can examine the interface’s address file in the
sys/class/net/interfacename directory.
‘‘Determining Interface Device Names’’ on page 5-30
2).
For the embedded Ethernet adapter interfaces, Ethernet MAC addresses are
algorithmically generated from a base MAC address assigned to the machine as a
whole. Each physical device receives a different MAC address. Because of this, a
channel-bonding interface (and all of its physical devices) may get a different MAC
address from one reboot to the next, depending on which physical device is available
first (based on which CPU-I/O enclosure is used during the boot).
Other System Configuration Information
In addition to setting up storage and network devices, you may want to perform the
following tasks to set up your system:
•
Configure ftlSNMP to allow remote management of your ftServer system. See
Chapter 8 for instructions.
•
Disable hyperthreading.
Information about video display settings is also included.
5-30 Express5800/ftServer: System Administrator’s Guide for the Linux Operating System
Page 79

You also need to perform the following configuration tasks, using standard Linux
procedures:
•
Configuring the IP address for the bond0 and bond1 interfaces (static or DHCP,
and gateway in /etc/sysconfig/network-scripts/ifcfg-bond0 and
/etc/sysconfig/network-scripts/ifcfg-bond1)
•
Configuring DNS resolution for the system (/etc/nsswitch.conf and
/etc/resolv.conf)
•
Configuring static routes for the system (/etc/sysconfig/static-routes)
•
Configuring the system hostname (/etc/hosts and
/etc/sysconfig/network)
•
Configuring the system time zone (/etc/sysconfig/clock)
Disabling Hyperthreading
Some system installations may disable hyperthreading to facilitate application
execution.
CAUTIONCAUTION
!
Disable hyperthreading only if your system satisfies the
minimum BIOS version requirements. Contact the NEC
Corporation of America Customer Support Center or your
authorized NEC service representative to confirm that you
have the correct BIOS version.
Other System Configuration Information
To disable hyperthreading, you enter the ftServer Setup utility.
To disable hyperthreading
1. Turn on or restart your system. When the Express5800/ftServer logo screen
appears, press F2 to enter your system’s BIOS setup utility.
The BIOS setup utility’s Main menu appears after the system completes more of
the POST (power-on self-test) process.
2. On the Main menu, use the right-arrow key to select the Advanced tab.
3. Use the down-arrow key to select Advanced Processor Options and press Enter.
4. Select Hyper Threading Technology and press Enter.
5. Change the value from Enabled to Disabled and press Enter.
6. Press Esc, then select Exit Saving Changes and press Enter.
The system resumes booting.
Setting Up the ftServer System 5-31
Page 80

Other System Configuration Information
Configuring the System Video Display
Your ftServer system's video comes configured by default. There is normally no need
to change the video displays settings, and the system is strictly limited in some of its
parameters. For instance, the screen resolution is limited to 1024x768 pixels. However,
it is possible, though not advisable, to change the video configuration.
CAUTIONCAUTION
!
Using other means to configure the video —including any
of those available from a Red Hat icon—may result in loss
of system fault tolerance, or may cause the system to boot
only in text mode, or may return an error message.
If you do alter video settings, change them only by using a text editor to change the
entries in the /etc/X11/xorg.conf file. Use one of the configured video modes that
the Express Builder installation program installed in the xorg.conf file.
To do this, select one of the available modes for the pixel depth you are using by putting
the desired mode first in the list for that depth. Changes made to xorg.conf file are
preserved during an upgrade.
Managing the System Clock
You may see the following message after the system boots or after you attempt to use
the system-config-time utility:
Cannot access the Hardware Clock via any known method.
Use the --debug option to see the details of our search for
an access method.
The message occurs when you are trying to use Coordinated Universal Time (UTC).
Instead, use the Network Time Protocol (NTP).
The following message does not indicate a problem with the system. The clock will be
properly reset and you can safely ignore the message.
Losing some ticks... checking if CPU frequency changed
5-32 Express5800/ftServer: System Administrator’s Guide for the Linux Operating System
Page 81

Additional Documentation and Resources
Additional Documentation and Resources
Linux System Administrator’s Guide v0.8, Linux Documentation Project:
http://www.ibiblio.org/pub/Linux/docs/linux-doc-project/system-admin-guide/
http://unthought.net/Software-RAID.HOWTO/
Managing RAID on Linux, Derek Vadala, O’Reilly & Associates, 2003:
http://www.oreilly.com/catalog/mraidlinux/
Setting Up the ftServer System 5-33
Page 82

Additional Documentation and Resources
5-34 Express5800/ftServer: System Administrator’s Guide for the Linux Operating System
Page 83

Chapter 6
Managing Data Storage
This chapter discusses the following topics:
•
‘‘CD-ROM Drives”
•
‘‘USB Storage Devices”
•
‘‘Additional Resources”
Chapter 5 explains basic storage device definition and the configuration and
management of the internal disk drives embedded in CPU-I/O enclosures. This chapter
briefly discusses other data storage devices that are included with or can be optionally
attached to the system.
CD-ROM Drives
An ftServer system supports two CD-ROM or DVD+RW drives, which may appear as
the following names on the system, depending on whether a CD-ROM or DVD writer is
in the drive:
•
In CPU-0, I/O-10: /dev/cdrom, /dev/dvdwriter, /dev/hde
•
In CPU-1, I/O-11: /dev/cdrom1, /dev/dvdwriter1, /dev/hdi
Devices
6-
USB Storage Devices
USB storage devices, including floppy-disk and solid-state storage, are supported
through the SCSI driver. These devices appear as SCSI devices. You can get
information about these devices by examining the file /proc/scsi/scsi, by running
the command lsusb, or by examining the system log (/var/log/messages).
When you connect a USB device to the USB bus, the SCSI driver scans it once and
assigns a name (for example, sde). This is the device’s internal name that is displayed
by commands such as /proc/mdstat and in the system log. When mounting and
unmounting a USB device, do not use this name. Instead, use the name assigned by
the udev command. This name has the format sd*usb. For example, sd1usb is the
name of the device attached to port 1 of the root USB hub.
Managing Data Storage Devices 6-1
Page 84

USB Storage Devices
If a device is plugged into a USB hub, the name has two numbers. For example,
sd1.3usb is the name of the device attached to port 3 of a hub connected to port 1 of
the root USB hub. If you add another hub to the chain, the device name would contain
a third number.
The udevinfo command translates the internal name into the name assigned by the
udev command. For example, the following command and output show that the udev
command has assigned the name sd1usb to the device with the internal name sde:
# udevinfo -q name -p /sys/block/sde
sd1usb
The ls command displays the device node for this device:
# ls -l /dev/sd1usb
brw-rw---- 1 root disk 8, 64 Oct 24 16:18 /dev/sd1usb
You can also translate the name assigned by the udev command into the internal
name. For example:
# ls -l /dev/sd*usb
brw-rw---- 1 root disk 8, 64 Oct 24 16:18 /dev/sd1usb
6-2 Express5800/ftServer: System Administrator’s Guide for the Linux Operating System
Page 85

USB Storage Devices
Once you have the name assigned by the udev command (in this case, sd1usb),
you can use udevinfo to find the internal name (in this case, sde):
# udevinfo -q path -n /dev/sd1usb
/block/sde
For more information about the udevinfo command, see udevinfo(8).
CAUTIONCAUTION
!
Before unplugging the device, make sure that it is not
being used (the usage count is 0). If a file system is
mounted, unmount it (and make sure the umount
command completes) before unplugging the device. The
umount command flushes any buffered pages back to the
device, so failing to wait for umount to complete can
cause data corruption.
NOTES
1. An important consequence of the fact that the SCSI
subsystem scans USB devices only on connection is
that simply removing a floppy disk from the floppy
drive or inserting a disk does not cause a rescan. You
must unplug the floppy drive and plug it back in to
cause a rescan.
2. During failovers, access to USB storage devices is
not robust.
3. If an AC switch occurs, some USB devices are not
properly reset and disappear from ftsmaint output.
To reset these devices, you must unplug them and
then plug them back in.
4. When you unplug a device and later plug it back in,
the internal name may change if the SCSI subsystem
has added other devices while it was removed. The
name assigned by the udev command, however,
does not change.
If the active CPU-I/O enclosure fails over to the other enclosure, a mounted USB
disk-drive device may become unusable. If this happens, remove the device from
the system and then insert it back in the system.
USB storage devices are not bootable devices.
Managing Data Storage Devices 6-3
Page 86

USB Storage Devices
Most floppy disks and solid-state devices come with a virtual file allocation table (VFAT)
file system. You can create ext-2 or other file systems on the device as well. You can
mount them on a convenient mount point, for example:
# mkdir /mnt/floppy
# mount /dev/sdg1 /mnt/floppy
USB Floppy Drives
The USB floppy drive appears as follows in /proc/scsi/scsi.
Host: scsi0 Channel: 00 Id: 00 Lun: 00
Vendor: ATA Model: ST380013AS Rev: 3.00
Type: Direct-Access ANSI SCSI revision: 05
Host: scsi4 Channel: 00 Id: 00 Lun: 00
Vendor: ATA Model: ST380013AS Rev: 3.00
Type: Direct-Access ANSI SCSI revision: 05
The system log shows details about the device:
scsi4 : SCSI emulation for USB Mass Storage devices
Vendor: NEC Model: USB UF000x Rev: 1.50
Type: Direct-Access ANSI SCSI revision: 02
SCSI device sdaz: 2880 512-byte hdwr sectors (1 MB)
sdaz: Write Protect is on
Write Protect is on indicates that the disk is read-only.
USB Solid-State Devices
The following is an example of the /proc/scsi/scsi display for a solid-state device.
Host: scsi5 Channel: 00 Id: 00 Lun: 00
Vendor: LEXAR Model: JUMPDRIVE SECURE Rev: 3000
Type: Direct-Access ANSI SCSI revision: 02
6-4 Express5800/ftServer: System Administrator’s Guide for the Linux Operating System
Page 87

The system log provides details about the device, including its size:
scsi5 : SCSI emulation for USB Mass Storage devices
Vendor: LEXAR Model: JUMPDRIVE SECURE Rev: 3000
Type: Direct-Access ANSI SCSI revision: 02
SCSI device sdaz: 506880 512-byte hdwr sectors (260 MB)
Additional Resources
Linux Allocated Devices, LANANA:
http://www.lanana.org/docs/device-list/devices.txt
Additional Resources
Managing Data Storage Devices 6-5
Page 88

Additional Resources
6-6 Express5800/ftServer: System Administrator’s Guide for the Linux Operating System
Page 89

Chapter 7
Using ftServer Fault-Tolerant
Utilities and Software
This chapter discusses the following topics:
•
‘‘The ftsmaint Command”
•
‘‘Kernel Memory Dump File Management”
•
‘‘Kernel Memory Dump File Management”
The Express5800/ftServer System Software for the Linux Operating System (Express
Builder) provides a special command interface, ftsmaint, for managing the fault-
tolerant components of your ftServer system. It also includes a monitoring and
diagnostic package, the Express Service Network, that enables your ftServer system to
interact with the Express Service Network. When you configure the Express Service
Network, the NEC Corporation of America Customer Support Center or your authorized
NEC service representative can receive alarm notifications when faults or other significant
events occur on your system, and can remotely diagnose problems. The following
sections explain how to use the ftsmaint command and how to configure the
Express Service Network, and also information about managing dump files and about
system load.
7-
The ftsmaint Command
The ftsmaint command provides a control interface for managing your ftServer
system’s fault-tolerant functions. To see basic command options, type the ftsmaint
command.
The ftsmaint command arguments support both device query and management
tasks. Some of the command arguments only apply to certain devices or systems,
which you must specify following the command argument.
Most of the ftsmaint command task arguments require an enumerated hardware
specification argument following them, indicated by path in the command descriptions
that follow. Any hardware path value shown in ftsmaint ls output can be used as
a path argument.
Using ftServer Fault-Tolerant Utilities and Software 7-1
Page 90

The ftsmaint Command
The task arguments are as follows (See also ftsmaint(8)):
•
ftsmaint ls path
This command displays the status of the hardware specified by the enumerated
path. Specifying a path displays a detailed status of the hardware at that path.
Omitting the path argument displays a less-detailed table of all fault-tolerant
devices on the system. See
information.
Output from ftsmaint ls path reflects what the OSM reports about the state of
a given component. Because of system latency, this may not reflect the immediate
state of the device. However, you cannot, as a result of this discrepancy, issue a
command that would take the system offline. (See
To verify the actual state of the device, check the opstate of its LED.
•
ftsmaint lsLong
This command displays the status of all fault-tolerant devices on the ftServer
system. This command also returns the status of “empty” devices such as
unpopulated PCI slots. This command is useful to study the addressable
fault-tolerant devices that can be queried or controlled with Express Builder software.
‘‘Device Path Enumeration’’ on page 7-5 for more
ftsmaint bringDown
.)
•
ftsmaint lsPeriph
This command displays information about peripheral devices, such as CD-ROMs,
DVDs, and modems.
•
ftsmaint lsVND
This command displays the status of the Ethernet channel-bonding interfaces in
the ftServer system.
•
ftsmaint acSwitch [ 10 | 11 ]
If you do not provide an enumerated hardware specification, this command toggles
the active compatibility of the I/O elements between I/O element 10 and I/O
element 11. If you do specify an I/O element, it forces the enumerated enclosure to
active status.
•
ftsmaint bringDown path
This command removes from service the CPU element, I/O element, or CPU-I/O
enclosure slot specified by path. No other devices are supported. When you bring
down a device, the effect on the system is the same as physically removing
CPU-0,
I/O-10.
7-2 Express5800/ftServer: System Administrator’s Guide for the Linux Operating System
Page 91

The ftsmaint Command
NOTE
The ftsmaint bringDown command will not permit you
to bring down a simplex device, because this would
disable the system.
•
ftsmaint bringUp path
This command brings into service the CPU element, I/O element, or CPU-I/O
enclosure slot specified by path. No other devices are supported.
•
ftsmaint burnProm fw_file path
This command updates the firmware contained in the file fw_path into the
EPROM devices on the ftServer device specified by path. This command can only
be used to update BMC and BIOS firmware.
•
ftsmaint clearMtbf path
This command clears the MTBF value of the CPU-I/O enclosure, CPU-I/O
enclosure, or CPU-I/O enclosure slot specified by path.
•
ftsmaint identify [start|stop] path
This command starts or stops the LEDs on the device specified by path. The
device can be a CPU board, an I/O board, or an I/O slot.
•
ftsmaint dump path
This command generates a dump of the BMC or CPU element specified by path.
BMC dumps are stored in /var/crash/date/bmcx.dmp, where x is 10 or 11.
CPU dumps are stored in /var/crash/YYYY-MM-DD-hh-mm/vmcore. See
Ta bl e 7-1 for path values for BMC and CPU.
•
ftsmaint powerOn modem
This command supplies electrical power to the modem.
•
ftsmaint powerOff modem
This command removes electrical power from the modem.
•
ftsmaint reset modem
This command restores modem settings to their factory defaults.
•
ftsmaint resetMtbf path
This command resets the MTBF value of the CPU element, I/O element, or
CPU-I/O enclosure slot specified by path.
Using ftServer Fault-Tolerant Utilities and Software 7-3
Page 92

The ftsmaint Command
NOTE
Do not use this feature to retain a faulty or degraded
device in service. It may be useful if the MTBF for a device
has been degraded by testing or configuration error.
•
ftsmaint runDiag path
This command starts diagnostics on the CPU element or I/O element specified by
path.
•
ftsmaint setPriority level path
This command sets the priority level of the CPU element specified by path to the
value in the level argument.
•
ftsmaint setMtbfThresh value path
This command sets the MTBF threshold to value of the CPU element , I/O element,
or CPU-I/O enclosure slot specified by path.
•
ftsmaint setMtbfType policy path
This command sets the MTBF type to policy on the CPU element , I/O element, or
CPU-I/O enclosure slot. The policy argument can take one of the following
values:
•
useThreshold
•
neverRestart
•
alwaysRestart
•
ftsmaint setSensorThresh th_name value path
This command sets the threshold specified by th_name on the sensor device
specified by path to value. The th_name argument can take one of the following
values:
•
uf (upper fatal)
•
uc (upper critical)
•
unc (upper noncritical)
•
lf (lower fatal)
•
lc (lower critical)
•
lnc (lower noncritical)
7-4 Express5800/ftServer: System Administrator’s Guide for the Linux Operating System
Page 93

The opstates for the sensors are as follows:
•
FATAL: above uf or below lf
•
CRITICAL: above uc or below lc
•
WARNING: above unc or below unc
•
NORMAL: default
•
ftsmaint -version
This command returns the build number of the ftsmaint command on your
system. This number coincides with the build number of Express Builder installed
on the system.
Device Path Enumeration
Some subsystems and components of the ftServer system are addressable by device
path IDs. Device path enumerators uniquely identify the various devices in an ftServer
system.
ftServer System Device Path Enumeration
Ta bl e 7-1 lists the device paths for devices in an ftServer system.
The ftsmaint Command
Table 7-1. Device Paths of ftServer Devices (Page 1 of 3)
Location
Top CPU element Top CPU element 0
Device
DIMMs (addressed by slot) 0/0—0/7
Processors 0/20, 0/23
CPU internal temperature sensor 0/20/130,
CPU 12v sensors 0/20/150, 0/23/150
Ambient air temperature sensor 0/130
Fan sensors 0/140, 0/141
Voltage sensors 0/150—0/152
Path
0/23/130
Using ftServer Fault-Tolerant Utilities and Software 7-5
Page 94

The ftsmaint Command
Table 7-1. Device Paths of ftServer Devices (Page 2 of 3)
Location
Bottom CPU
element
Top I/O element
Device
Path
Bottom CPU element 1
DIMMs (addressed by slot) 1/0—1/7
Processors 1/20, 1/23
CPU internal temperature sensor 1/20/130,
1/23/130
CPU 12v sensors 1/20/150, 1/23/150
Ambient air temperature sensor 1/130
Fan sensors 1/140, 1/141
Voltage sensors 1/150—1/152
Top I/O element 10
Mass storage controller
—EIDE controller
SAS (SATA) controller
—SAS (SATA) controller
USB controllers
—USB host controller
10/0
—05:00.0
†
10/1
—05:01.0
10/2
—05:02.0–05:02.2
VGA controller
—Graphics controller
Ethernet controller
—Ethernet card
PCI device
—Core logic
10/3
—05:03.0
10/5
—04:02.0, 04:02.1
10/8
—03:01.0
PCI slots 9, 10, 11 10/9—10/11
Storage enclosure in top I/O element 10/40
Internal disk slot 1 (maps to sda) 10/40/1
Internal disk slot 2 (sdb) 10/40/2
Internal disk slot 3 (sdc) 10/40/3
BMC 10/120
7-6 Express5800/ftServer: System Administrator’s Guide for the Linux Operating System
Page 95

Table 7-1. Device Paths of ftServer Devices (Page 3 of 3)
The ftsmaint Command
Location
Bottom I/O
element
Device
Path
Fan speed sensor 10/140
Voltage sensors 10/150—10/162
Bottom I/O enclosure 11
Mass storage controller
—EIDE controller
SAS (SATA) controller
—SAS (SATA) controller
USB controllers
—USB host controller
VGA controller
—Graphics controller
Ethernet controller
—Ethernet card
PCI device
—Core logic
11/ 0
—7c:00.0
11/ 1
—7c:01.0
11/ 2
—7c:02.0–7c:02.2
11/ 3
—7c:03.0
11/ 5
—7b:02.0, 7b:02.1
11/ 8
—7a:01.0
PCI Slots 9, 10, 11 11/9—11/11
Storage enclosure in top I/O enclosure 11/40
Internal disk slot 1 (maps to sdd) 11/40/1
Internal disk slot 2 (sde) 11/40/2
Internal disk slot 3 (sdf) 11/40/3
BMC 11/120
Fan speed sensor 11/140
Voltage sensors 11/150—11/162
† IDs in the format nn:nn.n indicate PCI bus, slot, and function. These numbers may
change as a result of certain system events and are provided here as representative sample
data only.
Using ftServer Fault-Tolerant Utilities and Software 7-7
Page 96

The ftsmaint Command
Figure 7-1 and Figure 7-2 show the locations of the major enumerated devices.
Figure 7-1. ftServer Enclosures: Locations of Major Enumerated Devices (Front View)
4
1
5
Callout Device ID Component
1 0 CPU-0, I/O-10
2 10/40/1 Internal disk drive 1, sda
3 10/40/2 Internal disk drive 2, sdb
4 10/40/3 Internal disk drive 3, sdc
5 1 CPU-1, I/O-11
6 11/40/1 Internal disk drive 1, sdd
7 11/40/2 Internal disk drive 2, sde
8 11/40/3 Internal disk drive 3, sdf
3
2
8
7
6
asys076a
7-8 Express5800/ftServer: System Administrator’s Guide for the Linux Operating System
Page 97

The ftsmaint Command
Figure 7-2. ftServer Enclosures: Locations of Major Enumerated Devices (Rear View)
132
6 45
Callout Device ID Component
1 10/9 Slot 1, low profile (PCI Slot - 9)
2 10/10 Slot 2, full height (PCI Slot - 10)
3 10/11 Slot 3, full height (PCI Slot - 11)
4 11/9 Slot 1, low profile (PCI Slot - 9)
5 11/10 Slot 2, full height (PCI Slot - 10)
6 11/11 Slot 3, full height (PCI Slot - 11)
asys077a
Using ftServer Fault-Tolerant Utilities and Software 7-9
Page 98

The ftsmaint Command
ftsmaint Examples
The following sections provide examples of how to use the ftsmaint command:
•
‘‘Displaying System Status”
•
‘‘Bringing System Components Down and Up”
•
‘‘Removing a PCI Adapter From Service and Bringing It Into Service”
Displaying System Status
To display the status of the fault-tolerant devices and subsystems in your ftServer
system, issue the following command:
# ftsmaint ls
Example 7-1. Displaying System Status with the ftsmaint Command
root@lstlinux14 14:37:27 ~> /opt/ft/bin/ftsmaint ls
Modelx H/W Path Description State OPState FRev Fct
================================================================================
AA-G90730 0 Combined CPU/IO ONLINE DUPLEX * 0
AA-M23100 0/0 1GB DDR-2 DIMM ONLINE ONLINE - AA-M23100 0/1 1GB DDR-2 DIMM ONLINE ONLINE - -
- 0/2 - MISSING EMPTY - -
- 0/3 - MISSING EMPTY - -
- 0/4 - MISSING EMPTY - -
- 0/5 - MISSING EMPTY - -
- 0/6 - MISSING EMPTY - -
- 0/7 - MISSING EMPTY - -
- 0/20 15 4 1 ONLINE ONLINE - -
- 0/20/130 Internal Temp - NORMAL - -
- 0/20/150 +12V - NORMAL - -
- 0/23 0 0 0 ONLINE ONLINE - -
- 0/23/130 Internal Temp - NORMAL - -
- 0/23/150 +12V - NORMAL - -
- 0/130 Ambient Air Temp - NORMAL - -
- 0/140 Fan1 - NORMAL - -
- 0/141 Fan2 - NORMAL - -
- 0/150 +1.2V VTT - NORMAL - -
- 0/151 +1.8V VDD - NORMAL - -
- 0/152 +12V - NORMAL - AA-G90730 1 Combined CPU/IO ONLINE DUPLEX * 0
AA-M23100 1/0 1GB DDR-2 DIMM ONLINE ONLINE - AA-M23100 1/1 1GB DDR-2 DIMM ONLINE ONLINE - -
- 1/2 - MISSING EMPTY - -
- 1/3 - MISSING EMPTY - -
- 1/4 - MISSING EMPTY - -
- 1/5 - MISSING EMPTY - -
- 1/6 - MISSING EMPTY - -
- 1/7 - MISSING EMPTY - -
- 1/20 15 4 1 ONLINE ONLINE - -
- 1/20/130 Internal Temp - NORMAL - -
- 1/20/150 +12V - NORMAL - -
7-10 Express5800/ftServer: System Administrator’s Guide for the Linux Operating System
Page 99

The ftsmaint Command
- 1/23 0 0 0 ONLINE ONLINE - -
- 1/23/130 Internal Temp - NORMAL - -
- 1/23/150 +12V - NORMAL - -
- 1/130 Ambient Air Temp - NORMAL - -
- 1/140 Fan1 - NORMAL - -
- 1/141 Fan2 - NORMAL - -
- 1/150 +1.2V VTT - NORMAL - -
- 1/151 +1.8V VDD - NORMAL - -
- 1/152 +12V - NORMAL - AA-G90730 10 Combined CPU/IO ONLINE DUPLEX - 0
- 10/0 Mass Storage Ctlr ONLINE ONLINE - 0
- 05:00.0 Fast Track TX EIDE Ctlr ONLINE ONLINE - -
- 10/1 Mass Storage Ctlr ONLINE DUPLEX - 0
- 05:01.0 PCI/PCI-X SATA Ctlr ONLINE DUPLEX - -
- 10/2 Serial Bus Ctlrs ONLINE ONLINE - 0
- 05:02.0 USB 1.0 Host Ctlr ONLINE ONLINE - -
- 05:02.1 USB 1.0 Host Ctlr ONLINE ONLINE - -
- 05:02.2 USB 2.0 Host Ctlr ONLINE ONLINE - -
- 10/3 Display Ctlr ONLINE DUPLEX - 0
- 05:03.0 ATI Rage Mobility ONLINE DUPLEX - -
- 10/4 - MISSING EMPTY - -
- 10/5 Network Ctlr ONLINE DUPLEX - 0
- 04:02.0 2-port 1GB Enet NIC ONLINE DUPLEX - -
- eth000010 Network Interface ONLINE DUPLEX - -
- 04:02.1 2-port 1GB Enet NIC ONLINE DUPLEX - -
- eth000011 Network Interface ONLINE DUPLEX - -
- 10/6 Bridge ONLINE ONLINE - 0
- 10/7 Bridge ONLINE ONLINE - 0
- 10/8 Misc ONLINE ONLINE - 0
- 03:01.0 ftSwitch Core Logic ONLINE ONLINE - -
- 10/9 Network Ctlr ONLINE ONLINE - 0
AA-U57500 04:01.0 2-port 1GB Copper Enet NIC ONLINE ONLINE - -
- eth000008 Network Interface BROKEN BROKEN - AA-U57500 04:01.1 2-port 1GB Copper Enet NIC ONLINE ONLINE - -
- eth000009 Network Interface BROKEN BROKEN - -
- 10/10 - MISSING EMPTY - -
- 10/11 - MISSING EMPTY - -
- 10/40 SATA Enclosure - - - AA-D64200 10/40/1 160GB SATA Disk Drive ONLINE DUPLEX 3.00 AA-D64300 10/40/2 74GB SATA Disk Drive ONLINE ONLINE 33.0 -
- 10/120 Baseboard Management Ctlr ONLINE DUPLEX 4.0.0 -
- 10/140 Fan - NORMAL - -
- 10/150 -12V - NORMAL - -
- 10/151 +1.3V - NORMAL - -
- 10/152 +1.5V GB - NORMAL - -
- 10/153 +2.5V GB - NORMAL - -
- 10/154 +2.5V SATA - NORMAL - -
- 10/155 +2.5V VGA - NORMAL - -
- 10/156 +3V CLK - NORMAL - -
- 10/157 +3.3V - NORMAL - -
- 10/158 +3.3Vs - NORMAL - -
- 10/159 +3.3V GBE - NORMAL - -
- 10/160 +5V - NORMAL - -
- 10/161 +5Vs - NORMAL - -
- 10/162 +12V - NORMAL - AA-G90730 11 Combined CPU/IO ONLINE DUPLEX - 0
- 11/0 Mass Storage Ctlr ONLINE ONLINE - 0
- 7c:00.0 Fast Track TX EIDE Ctlr ONLINE ONLINE - -
Using ftServer Fault-Tolerant Utilities and Software 7-11
Page 100

The ftsmaint Command
- 11/1 Mass Storage Ctlr ONLINE DUPLEX - 0
- 7c:01.0 PCI/PCI-X SATA Ctlr ONLINE DUPLEX - -
- 11/2 Serial Bus Ctlrs ONLINE ONLINE - 0
- 7c:02.0 USB 1.0 Host Ctlr ONLINE ONLINE - -
- 7c:02.1 USB 1.0 Host Ctlr ONLINE ONLINE - -
- 7c:02.2 USB 2.0 Host Ctlr ONLINE ONLINE - -
- 11/3 Display Ctlr ONLINE DUPLEX - 0
- 7c:03.0 ATI Rage Mobility ONLINE DUPLEX - -
- 11/4 - MISSING EMPTY - -
- 11/5 Network Ctlr ONLINE DUPLEX - 0
- 7b:02.0 2-port 1GB Enet NIC ONLINE DUPLEX - -
- eth080010 Network Interface ONLINE DUPLEX - -
- 7b:02.1 2-port 1GB Enet NIC ONLINE DUPLEX - -
- eth080011 Network Interface ONLINE DUPLEX - -
- 11/6 Bridge ONLINE ONLINE - 0
- 11/7 Bridge ONLINE ONLINE - 0
- 11/8 Misc ONLINE ONLINE - 0
- 7a:01.0 ftSwitch Core Logic ONLINE ONLINE - -
- 11/9 Network Ctlr ONLINE ONLINE - 0
AA-U57500 7b:01.0 2-port 1GB Copper Enet NIC ONLINE ONLINE - -
- eth080008 Network Interface BROKEN BROKEN - AA-U57500 7b:01.1 2-port 1GB Copper Enet NIC ONLINE ONLINE - -
- eth080009 Network Interface BROKEN BROKEN - -
- 11/10 - MISSING EMPTY - -
- 11/11 - MISSING EMPTY - -
- 11/40 SATA Enclosure - - - AA-D64200 11/40/1 160GB SATA Disk Drive ONLINE DUPLEX 3.00 AA-D64300 11/40/2 74GB SATA Disk Drive ONLINE ONLINE 33.0 -
- 11/120 Baseboard Management Ctlr ONLINE DUPLEX 4.0.0 -
- 11/140 Fan - NORMAL - -
- 11/150 -12V - NORMAL - -
- 11/151 +1.3V - NORMAL - -
- 11/152 +1.5V GB - NORMAL - -
- 11/153 +2.5V GB - NORMAL - -
- 11/154 +2.5V SATA - NORMAL - -
- 11/155 +2.5V VGA - NORMAL - -
- 11/156 +3V CLK - NORMAL - -
- 11/157 +3.3V - NORMAL - -
- 11/158 +3.3Vs - NORMAL - -
- 11/159 +3.3V GBE - NORMAL - -
- 11/160 +5V - NORMAL - -
- 11/161 +5Vs - NORMAL - -
- 11/162 +12V - NORMAL - -
IO Enclosure 11 is the Active Compatibility Node.
This is an ftServer , 1-way DMR, 3.2 GHz system, P-Package P3403R-1D,
...
* Use lsLong to see this value.
Bringing System Components Down and Up
You can use the ftsmaint command to bring down and restart a fault-tolerant
subsystem. After bringing up a system, it attempts to synchronize and duplex the
corresponding components automatically.
7-12 Express5800/ftServer: System Administrator’s Guide for the Linux Operating System
 Loading...