

Page 1

PlasmaSync Plasma Monitor
PlasmaSync
PX-42XM4A
Start up Guide
™
42XM4
Start up Guide
NEC Solutions (America), Inc.
Guide rapide
Guía de inicio
Guia de iniciação
Page 2

202
Page 3

Start up Guide
(Enhanced split screen Model)
For the operation of your plasma monitor, refer to the CD-ROM.
Contents
Important Information .................................. En-2
Installation .................................................. En-4
Ventilation Requirements for enclosure mounting ...... En-4
Creating a video wall ........................................... En-5
Cable Management..............................................En-5
Caution when placing the plasma monitor in portrait
mode .............................................................. En-6
Using the remote control ....................................... En-6
Battery Installation and Replacement ..................... En-6
Using the wired remote control mode .................... En-6
Operating Range .................................................... En-6
Handling the remote control................................... En-6
Part Names and Function .............................. En-7
Front View .......................................................... En-7
Rear View/ Terminal Board ...................................En-8
Remote Control .................................................... En-9
Basic Operations ......................................... En-10
POWER ............................................................ En-10
To turn the unit ON and OFF: .............................. En-10
VOLUME .......................................................... En-10
To adjust the sound volume:................................. En-10
MUTE ............................................................... En-10
To mute the audio: ............................................... En-10
DISPLAY ............................................................En-10
To check the settings:........................................... En-10
DIGITAL ZOOM ................................................. En-10
AUTO ADJUST .................................................. En-10
To adjust the size or quality of the picture automatically: ....
OFF TIMER ........................................................En-10
To set the of f timer:.............................................. En-10
To check the remaining time: ............................... En-10
To cancel the off timer: ........................................ En-10
OSM (On Screen Menu) Controls ................... En-11
Menu Operations ............................................... En-11
Menu Tree ......................................................... En-12
Troubleshooting .......................................... En-14
Specifications ............................................. En-15
Limited Warranty Plasma Monitors .............................. En-16
En-10
User’s Manual on CD-ROM
䢇 The complete user’s manual is supplied on the CD-ROM in
PDF (Portable Document Format) and provides detailed
product and useage information for your NEC plasma monitor.
Y ou must have Adobe Acrobat Reader™ or Adobe Reader™
in order to view and/or print the PDF files.
NOTE:
Adobe Acrobat Reader or Adobe Reader can be
downloaded from Adobe’s website.
Visit http://www.adobe.com and obtain the current version for
your OS.
䢇 Viewing the User’s Manual (PDF)
[Windows]
1. Insert the supplied CD-ROM in your computer’s CD-ROM drive.
2. A menu should be displayed automatically.
If this does not happen:
1) On the Windows desktop, double-click the [My Computer] icon.
2) Double-click the [NECPLASMA-UM] CD-ROM drive letter.
3) Double-click the “start_menu.pdf”.
3. Click your product name.
The user’s manual will be displayed on the screen.
[Macintosh]
1. Insert the supplied CD-ROM in your Macintosh’s CD-ROM drive.
2. Double-click the [NECPLASMA-UM] CD-ROM icon.
3. Double-click the “start_menu.pdf”.
The Start Menu will be shown.
4. Click your product name.
The user’s manual will be displayed on the screen.
䢇 Copying the User’s Manual (PDF) to your computer
The user’s manual on the supplied CD-ROM can be copied
onto your computer’s hard drive.
ENGLISH
Contents of the Package
䡺 Plasma monitor
䡺 Power cord
䡺 Remote control with two AAA Batteries
䡺 Manuals (Start up Guide and CD-ROM)
䡺 Ferrite cores
䡺 Cable clamps
Options
• Wall mount unit
• Ceiling mount unit
• Tilt mount unit
• Tabletop Stand
• Attachable speakers
Page 4

Important Information
Precautions
Please read this manual carefully before using your plasma monitor and
keep the manual handy for future reference.
CAUTION
RISK OF ELECTRIC SHOCK
DO NOT OPEN
CAUTION:
TO REDUCE THE RISK OF ELECTRIC SHOCK, DO
NOT REMOVE COVER. NO USER-SERVICEABLE
PARTS INSIDE.
REFER SERVICING TO QUALIFIED SERVICE
PERSONNEL.
This symbol warns the user that uninsulated voltage
within the unit may have sufficient magnitude to cause
electric shock. Therefore, it is dangerous to make any
kind of contact with any part inside of this unit.
This symbol alerts the user that important literature
concerning the operation and maintenance of this unit
has been included.
Therefore, it should be read carefully in order to avoid
any problems.
WARNING
TO PREVENT FIRE OR SHOCK HAZARDS, DO NOT EXPOSE THIS
UNIT TO RAIN OR MOISTURE. ALSO DO NOT USE THIS UNIT’S
POLARIZED PLUG WITH AN EXTENSION CORD RECEPT ACLE OR
OTHER OUTLETS, UNLESS THE PRONGS CAN BE FULLY
INSERTED. REFRAIN FROM OPENING THE CABINET AS THERE
ARE HIGH-VOLTAGE COMPONENTS INSIDE. REFER SERVICING
TO QUALIFIED SERVICE PERSONNEL.
Warnings and Safety Precaution
This plasma monitor is designed and manufactured to provide
long, trouble-free service. No maintenance other than cleaning
is required. Please see the section “Plasma monitor cleaning
procedure”.
The plasma display panel consists of fine picture
elements (cells) with more than 99.99 percent active cells. There
may be some cells that do not produce light or remain lit.
For operating safety and to avoid damage to the unit, read
carefully and observe the following instructions.
To avoid shock and fire hazards:
1. Provide adequate space for ventilation to avoid internal heat buildup. Do not cover rear vents or install the unit in a closed cabinet or
shelves.
If you install the unit in an enclosure, make sure there is adequate
space at the top of the unit to allow hot air to rise and escape. If the
monitor becomes too hot, the overheat protector will be activated and
the monitor will be turned off. If this happens, turn off the power to the
monitor and unplug the power cord. If the room where the monitor is
installed is particularly hot, move the monitor to a cooler location, and
wait for 60 minutes to cool the monitor. If the problem persists, contact
your dealer for service.
2. Do not use this unit’s polarized plug with extension cords or outlets
unless the prongs can be completely inserted.
3. Do not expose the unit to water or moisture.
4. Avoid damage to the power cord, and do not attempt to modify the
power cord.
5. Unplug the power cord during electrical storms or if the unit will
not be used over a long period.
6. Do not open the cabinet which has potentially dangerous high voltage
components inside. If the unit is damaged in this way the warranty will
be void. Moreover, there is a serious risk of electric shock.
7. Do not attempt to service or repair the unit. The manufacturer is not
liable for any bodily harm or damage caused if unqualified persons
attempt service or open the back cover. Refer all service to authorized
Service Centers.
8. This equipment shall be connected to a MAIN outlet with a protective
earth-ground connection.
9. The outlet shall be installed near the equipment and shall be easily
accessible.
To avoid damage and prolong operating life:
1. Use only with 100-240V 50/60Hz AC power supply. Continued
operation at line voltages greater than 100-240 Volts AC will shorten
the life of the unit, and might even cause a fire hazard.
2. Handle the unit carefully when installing it and do not drop.
3. Set the unit away from heat, excessive dust, and direct sunlight.
4. Protect the inside of the unit from liquids and small metal objects. In
case of accident, unplug the power cord and have it serviced by an
authorized Service Center.
5. Do not hit or scratch the panel surface as this causes flaws on the surface
of the screen.
6. For correct installation and mounting it is strongly recommended to
use a trained, authorized dealer.
7. As is the case with any phosphor-based display (like a CRT monitor,
for example) light output will gradually decrease over the life of a Plasma
Display Panel.
8. To avoid sulfurization it is strongly recommended not to place the unit
in a dressing room in a public bath or hot spring bath.
9. Do not use in a moving vehicle, as the unit could drop or topple over
and cause injuries.
10. Do not place the unit on its side, upside-down or with the screen facing
up or down, to avoid combustion or electric shock.
Plasma monitor cleaning procedure:
1. Use a soft dry cloth to clean the front panel and bezel area. Never use
solvents such as alcohol or thinner to clean these surfaces.
2. Clean plasma ventilation areas with a vacuum cleaner with a soft brush
nozzle attachment.
3. To ensure proper ventilation, cleaning of the ventilation areas must be
carried out monthly. More frequent cleaning may be necessary
depending on the environment in which the plasma monitor is installed.
Recommendations to avoid or minimize image retention:
Like all phosphor-based display devices and all other gas plasma displays,
plasma monitors can be susceptible to image retention under certain
circumstances. Certain operating conditions, such as the continuous
display of a static image over a prolonged period of time, can result in
image retention if proper precautions are not taken. To protect your
investment in this plasma monitor, please adhere to the following
guidelines and recommendations for minimizing the occurrence of image
retention:
* Always enable and use your computer ’s screen saver function
during use with a computer input source.
* Display a moving image whenever possible.
* Change the position of the menu display from time to time.
* Always power down the monitor when you are finished using it.
If the plasma monitor is in long term use or continuous operation take the
following measures to reduce the likelihood of image retention:
* Lower the Brightness and Contrast levels as much as possible without
impairing image readability.
* Display an image with many colors and color gradations (i.e.
photographic or photo-realistic images).
* Create image content with minimal contrast between light and dark
areas, for example white characters on black backgrounds. Use
complementary or pastel color whenever possible.
* A void displaying images with few colors and distinct, sharply defined
borders between colors.
Plasma monitor driving sound
The panel of the Plasma monitor is composed of extremely fine pixels and
these pixels emit light according to received video signals. This principle
may cause you to hear a buzz or electrical hum coming from the Plasma
monitor. Also note that the rotation speed of the cooling fan motor increases
when the ambient temperature of the Plasma monitor becomes high. You
may hear the sound of the motor at that time.
Note:
The following items are not coverd by the warranty.
• Image retention
• Panel generated sound, examples: Fan motor noise, and electrical
circuit humming /glass panel buzzing.
Contact your dealer for other recommended procedures that will best
suit your particular application needs.
En-2
Page 5

dnd
Warning
Not for use in a computer room as defined in the
Standard for the Protection of Electronic Computer/
Data Processing Equipment ANSI/NFPA 75.
This equipment has been tested and found to comply
with the limits for a Class B digital device, pursuant
to Part 15 of the FCC Rules. These limits are
designed to provide reasonable protection against
harmful interference in a residential installation. This
equipment generates, uses, and can radiate radio
frequency energy and, if not installed and used in
accordance with the instructions, may cause harmful
interference to radio communications. However, there
is no guarantee that interference will not occur in a
particular installation. If this equipment does cause
harmful interference to radio or television reception,
which can be determined by turning the equipment
off and on, the user is encouraged to try to correct
the interference by one or more of the following
measures:
• Reorient or relocate the receiving antenna.
• Increase the separation between the equipment and
receiver.
• Connect the equipment into an outlet on a circuit
different from that to which the receiver is connected.
• Consult the dealer or an experienced radio / TV
technician for help.
This Class B digital apparatus complies with
Canadian ICES-003.
NOTE:
When you connect a computer to this monitor, use an RGB
cable including the ferrite core on both ends of the cable.
And regarding power cable, attach the supplied ferrite
cores. If you do not do this, this monitor will not conform
to mandatory FCC standards.
Set the ferrite cores on both ends of the power cable
(supplied).
Use the band to fasten the ferrite core (supplied) to the
power cable.
Caution
This model is for use with the following optional
accessories. Use with other optional accessories is
capable of resulting in instability causing possible
injury.
Manufacturer’s name: NEC Viewtechnology, Ltd.
Speakers: PX-42SP1U, PX-SP2U/S, PX-SP2U/B
Stand: PX-ST1U, PX-ST1U/S
Please contact NEC Solutions (America), Inc. for
approved optional accessories.
Disposing of your used
product
EU-wide legislation as implemented in
each Member State requires that used electrical
and electronic products carrying the mark (left)
must be disposed of separately from normal
household waste. This includes plasma monitors
and their electrical accessories. When you dispose
of such products, please follow the guidance of
your local authority and/or ask the shop where you
purchased the product.
After collecting the used products, they are reused
and recycled in a proper way. This effort will help
us reduce the wastes as well as the negative
impact to the human health and the environment
at the minimum level.
The mark on the electrical and electronic products
only applies to the current European Union
Member States.
CAUTION
When disposing of used batteries, please comply
with governmental regulations or environmental
public instruction’s rules that apply in your country/
area.
wer
supplie
n
En-3
Page 6

50mm (2")
50
mm
(2") 50
mm
(2")
Wall
Wall
50mm (2")
50mm (2")
Installation
You can attach your optional mounts or stand to the plasma monitor in one of the following two ways:
* While it is upright. (See Drawing A)
* As it is laid down with the screen face down (See Drawing B). Lay the protective sheet, which was wrapped around the
monitor when it was packaged, beneath the screen surface so as not to scratch the screen face.
* Do not touch or hold the screen face when carrying the unit.
• This device cannot be installed on its own. Be sure to use a stand or original mounting unit. (Wall
mount unit, Stand, etc.)
• For correct installation and mounting it is strongly recommended to use a trained, authorized
dealer.
Failure to follow correct mounting procedures could result in damage to the equipment or injury
to the installer.
Product warranty does not cover damage caused by improper installation.
* Use only a mounting kit or stand recommended by the manufacturer and listed as an accessory.
Drawing A
Drawing B
Ventilation Requirements for
enclosure mounting
T o allow heat to disperse, leave space between surrounding
objects as shown on the diagram when installing.
En-4
Page 7
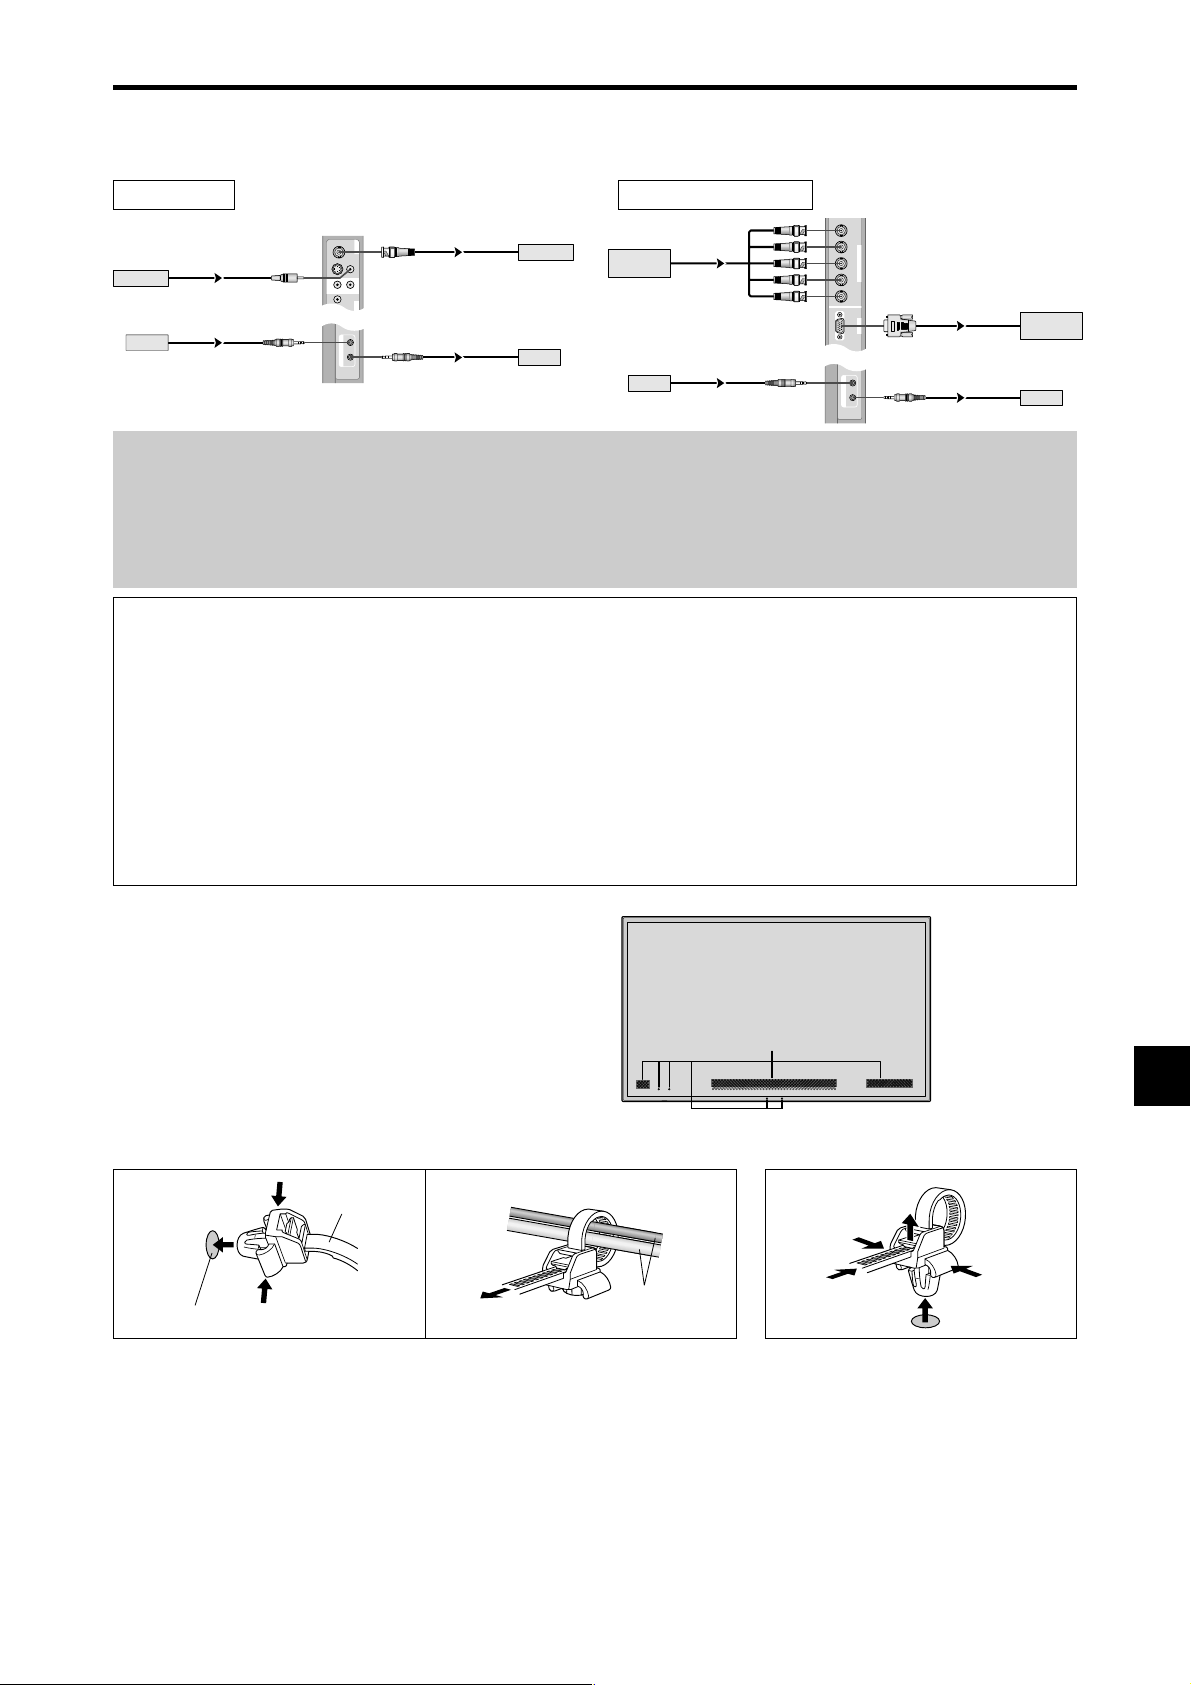
RGB
2
/
DVD
2
/
HD
2
RGB
1
R/
VD
G/ B/
HD
(
IN/OUT
)
Cr/Pr Y Cb/Pb
IN OUT
REMOTE
BNC connector
RGB signal/
DVD/HD signal
IN
OUT
IN
OUT
Remote
control
RGB signal/
DVD/HD signal
Remote
control
Creating a video wall
With built-in matrix display capability, you can create a (2⳯2, 3⳯3, 4⳯4, 5⳯5) video wall.
• Connect signal cables and remote cables as shown below.
Video signal RGB/DVD/HD signal
VIDEO
BNC connector
VIDEO
(
IN/OUT
1
)
VIDEO
VIDEO
2
VIDEO Signal
Remote
control
RCA phono plug
IN
IN
3
AUDIO
(
MONO
)
R
L
1
Y
DVD
1
IN OUT
REMOTE
Note:
1. The VIDEO1 and RGB1 terminals can be used for either INPUT or OUTPUT.
When LOOP OUT is ON, do not connect an OUTPUT signal fr om another unit as it may damage the other unit due to an
extraordinary load.
2. LOOP OUT can not be turned ON while signals are input to the RGB1 terminal.
3. LOOP OUT can be turned ON while signals are input to the RGB1 terminal if the POWER is switched ON.
Information
• T o loop signals out to another plasma display, set the LOOP OUT to ON.
• To create a video wall, set the VIDEO WALL menu items properly.
• To connect monitors, please use a 1~2m (3.3~6.6 feet) BNC cable (any commercially available cable).
• If the image quality is poor, do not use the monitor’s out terminal. Use a distribution amplifier (any commercially
available distribution amplifier) to connect the split signals to the respective monitor INPUT terminals.
• Being used as a video wall function, maximaly 4-screen is rough-standard with lower than 1024⳯768, 60Hz
signal.
• A distribution amplifier is particularly recommended when creating a 3⳯3 (or greater) video wall.
• When looping from plasma to plasma, a 1~2m (3.3~6.6 feet) 15 pin male D-Sub - 5BNC conversion cable is
required.
OUT
OUT
VIDEO Signal
Remote
control
Cable Management
Using the cable clamps provided with the plasma display;
Bundle the signal and audio cables at the back of the unit
to connect to the display.
To attach To detach
1. 2.
mounting hole
clamp
cables
Back of the unit
mounting holes
En-5
Page 8
External Control
IN OUT
REMOTE
Caution when placing the plasma monitor in portrait mode
• Use the optional unit. Contact your store of purchase when installing.
• Rotate 90° clockwise as seen from the front when installing.
90°
• After installing, make sure the NEC logo is located at the
left hand side of the screen when facing the plasma from
the front.
• Be sure to set “OSM ANGLE” to “V” when using.
* Failure to heed the above cautions may lead to malfunction.
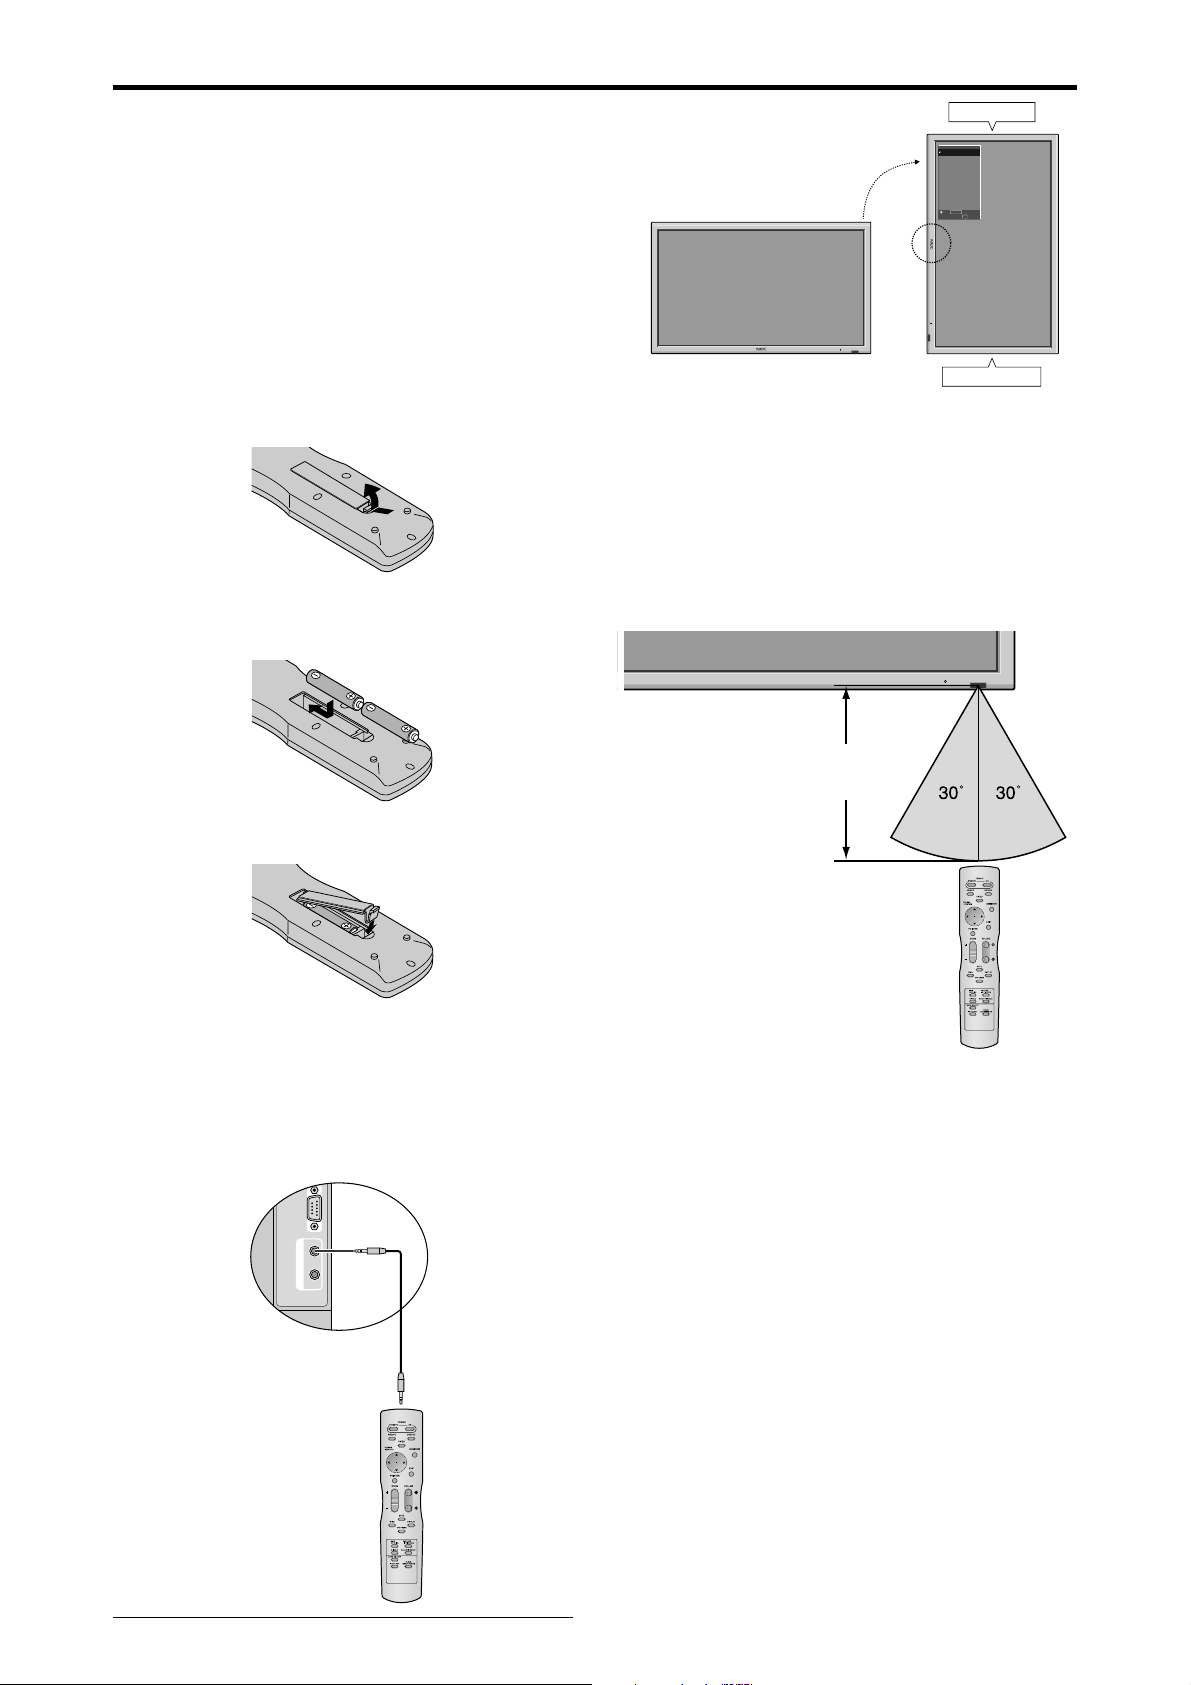
Using the remote control
INPUT SELECT
VOLUME
MENU/ENTER
Battery Installation and Replacement
Insert the 2 “AAA” batteries, making sure to set them in
with the proper polarity.
1.Press and open the cover.
2.Align the batteries according to the (+) and (–) indication
inside the case.
DOWN UP LEFT/-RIGHT/+/EXIT
Operating Range
* Use the remote control within a distance of about 7 m/
23ft. from the front of the monitor’s remote control sensor
and at horizontal and vertical angles of up to approximately
30°.
* The remote control operation may not function if the
monitor’s remote control sensor is exposed to direct
sunlight or strong artificial light, or if there is an obstacle
between the sensor and the remote control.
OPTION1
MENU/ENTER
OSM
DOWN UP LEFT/
VOLUME
BNC INPUT
: RGB
-
RIGHT/
D-SUB INPUT
+
INPUT SELECT
/EXIT
: RGB
RGB SELECT
: AUTO
HD SELECT
: 1080B
INPUT SKIP
: OFF
ALL RESET
: OFF
1024ⴒ768
SEL.
MENU/ENTER
Bottom side
Top side
OK
EXIT
RETURN
3.Replace the cover.
Using the wired remote control mode
Connect the remote cable* to the remote control’s remote
jack and the “REMOTE IN” terminal on the monitor.
When the cable is connected, the mode automatically
switches to wired remote control. When the wired remote
control mode is used, the remote control can be operated
even if no batteries are loaded.
Remote Control
Cable*
To Remote Jack
Approx.
7m/23ft
Handling the remote control
• Do not drop or mishandle the remote control.
• Do not get the remote control wet. If the remote control
gets wet, wipe it dry immediately.
• Avoid heat and humidity.
• When not using the remote control for a long period,
remove the batteries.
• Do not use new and old batteries together, or use dif ferent
types together.
• Do not take apart the batteries, heat them, or throw them
into a fire.
• When using the remote control in the wireless condition,
be sure to unplug the remote cable from the REMOTE
IN terminal on the monitor.
* The 1/8 Stereo Mini cable must be purchased separately.
En-6
Page 9

Part Names and Function
Front View
INPUT SELECT
VOLUME
MENU/ENTER
DOWN UP LEFT/-RIGHT/+/EXIT
MENU/ENTER
7
VOLUME
DOWN UP LEFT/-RIGHT/
6
5
q Power
Turns the monitor’s power on and off.
w Remote sensor window
Receives the signals from the remote control.
e POWER/STANDBY indicator
When the power is on ............................. Lights green.
When the power is in the standby mode ... Lights red.
r INPUT SELECT / EXIT
Switches the input.
Functions as the EXIT buttons in the On-Screen Menu
(OSM) mode.
INPUT SELECT
+
/EXIT
4
1
t LEFT/– and RIGHT/+
Enlarges or reduces the image. Functions as the
CURSOR (
/ ) buttons in the On-Screen Menu
(OSM) mode.
y VOLUME DOWN and UP
Adjusts the volume. Functions as the CURSOR (▲/
▼) buttons in the On-Screen Menu (OSM) mode.
u MENU/ENTER
Sets the On-Screen Menu (OSM) mode and displays
the main menu.
2
3
WARNING
The Power on/off switch does not completely
disconnect power from the display.
En-7
Page 10

Rear View/ Terminal Board
BD A
(IN/OUT)
R
Y Cb/Pb Cr/Pr
3
L
(
)
MONO
1
DVD
1
/
HD
1
AUDIO
1
VIDEO
2
CE F GHIJK
AUDIO
2
R
(
)
MONO
L
VIDEO
DVD
1
/
HD
1
AUDIO
1
YL/R L/RCb/Pb Cr/Pr
RGB
R/Cr/Pr G /Y B/Cb/ Pb
AUDIO
RGB
2
/
DVD
2
/
HD2RGB
2
R/Cr/Pr G/Y B/Cb/Pb
2
/
DVD
1
AUDIO
3
RGB 3EXTERNAL CONTROL
(IN/OUT)
VD L/RHD
2
/
HD
2
RGB
VDHD
(IN/OUT)
REMOTE
IN OUT
DVI
1
AUDIO
3
RGB
3
R
(
)
Digital RGB
DVI
(
)
L
MONO
EXTERNAL CONTROL
REMOTE
IN OUT
A AC IN
Connect the included power cord here.
B EXT SPEAKER L and R
Connect speakers (optional) here. Maintain the correct
polarity. Connect the
(positive) speaker wire to the
EXT SPEAKER terminal and the (negative)
speaker wire to the
EXT SPEAKER terminal on
both LEFT and RIGHT channels.
Please refer to your speaker’s owner’s manual.
C VIDEO1, 2, 3 (BNC, RCA, S-Video)
Connect VCR’s, DVD’s or Video Cameras, etc. here.
VIDEO1 can be used for Input or Output.
D AUDIO1, AUDIO2, AUDIO3
These are audio input terminals.
The input is selectable. Set which video image
corresponds to the audio input from the audio menu
screen.
E DVD1 / HD1
Connect DVD’s, High Definition or Laser Discs, etc.
here.
F RGB2/ DVD2/ HD2
RGB2: Y ou can connect an analog RGB signal
and the syncronization signal.
DVD2/ HD2: You can connect DVDs, High
Definition sources, Laser Discs, etc.
here.
This input can be set for use with an
RGB or component source.
G RGB1 (mini D-Sub 15pin)
Connect an analog RGB signal from a computer, etc.
here. This input can be used for Input or Output.
H RGB3
(DVI 24pin)
Connect a digital signal (TMDS) from a source with a
DVI output.
This input can be set for use with an RGB/PC3.
I EXTERNAL CONTROL
This terminal is used when operating and controlling
the monitor externally with a control system (by RS232C).
J REMOTE IN (DC +5V)
Connect the remote cable* to the remote control’s
remote jack to obtain wired remote control.
K REMOTE OUT (C-MOS DC +5V)
Connect the remote cable* to the REMOTE IN jack of
the other display monitor to obtain wired remote
control.
Connection Example: Connecting a TV tuner
PLASMA DISPLAY
VIDEO
IN
VIDEO
OUT
REMOTE
OUT
REMOTE
IN
TV T uner
Remote Control
Carrier fHz: 38kHz
* The 1/8 Stereo Mini cable must be purchased separately.
En-8
TV T uner
Page 11

Remote Control
q POWER ON/STANDBY
Switches the power on/standby.
(This does not operate when the POWER/ST ANDBY
indicator of the plasma is off.)
w RGB/PC
Press this button to select RGB/PC as the source.
RGB/PC can also be selected using the INPUT
SELECT button on the monitor.
e DVD / HD
Press this button to select DVD/HD as the source.
DVD/HD can also be selected using the INPUT
SELECT button on the monitor.
r VIDEO
Press this button to select VIDEO as the source.
→ VIDEO1 → VIDEO2 → VIDEO3
VIDEO can also be selected using the INPUT SELECT
button on the monitor.
t MENU/ENTER
Press this button to access the OSM controls.
Press this button during the display of the main menu
to go to the sub menu.
y CURSOR (▲ / ▼ /
Use these buttons to select items or settings and to
adjust settings or switch the display patterns.
/ )
u EXIT
Press this button to exit the OSM controls in the main
menu. Press this button during the display of the sub
menu to return to the previous menu.
i POINTER
Press this button to display the pointer.
o ZOOM (+ /–)
Enlarges or reduces the image.
!0 VOLUME (+ /–)
Adjusts the audio volume.
!1 MUTE
Mutes the audio.
!2 WIDE
Automatically detects the signal and sets the aspect ratio.
Wide button is not active for all signals.
!3 DISPLAY
Displays the source settings on the screen.
!4 OFF TIMER
Activates the off timer for the unit.
!5 SIDE BY SIDE
Press this button to show a couple of pictures in the
side-by-side mode.
!6 PICTURE IN PICTURE
Press this button to show a couple of pictures in the
picture-in-picture mode.
!7 SINGLE
Cancels the split screen mode.
!8 SELECT/FREEZE
Press this button to select the active picture in a split
screen mode.
When the PIC FREEZE function is operating, this button
can be used to display still images on the sub screen.
!9 AUTO ADJUST
Press this button to adjust Fine Picture, Picture ADJ,
Position, and Contrast automatically. Press this button
in video mode and the Auto Adjust switches to ZOOM
mode automatically when a letter box image is
displayed.
@0 ID SELECT
Set the ID number in the remote control. The remote
control can then be used only for a display with the
same ID number. When several displays are used
together they can be controlled individually.
@1 CLEAR/SEAMLESS SW
Clears the number set by the ID SELECT button.
When the SEAMLESS SW function is operating, this
button can be used to switch the input source quickly.
@2 Remote control signal transmitter
Transmits the remote control signals.
@3 Remote Jack
Insert the plug of the remote cable (The 1/8 Stereo
Mini cable) here when using the supplied remote
control in the wired condition.
En-9
Page 12

Basic Operations
POWER
To turn the unit ON and OFF:
1. Plug the power cord into an active AC power outlet.
2. Press the Power button (on the unit).
The monitor’s POWER/STANDBY indicator turns red
and the standby mode is set.
3. Press the POWER ON button (on the remote control) to
turn on the unit.
The monitor’s POWER/STANDBY indicator will light
up (green) when the unit is on.
Press the POWER ST ANDBY button (on the remote control)
4.
or the Power button (on the unit) to turn off the unit.
The monitor’s POWER/STANDBY indicator turns red
and the standby mode is set (only when turning off the
unit with the remote control).
VOLUME
To adjust the sound volume:
1. Press and hold the VOLUME button (on the remote
control or the unit) to increase to the desired level.
2. Press and hold the VOLUME
control or the unit) to decrease to the desired level.
button (on the remote
MUTE
To mute the audio:
Press the MUTE button on the remote control to mute the
audio; press again to restore.
DISPLAY
To check the settings:
1. The screen changes each time the DISPLAY button is
pressed.
2. If the button is not pressed for approximately three seconds,
the menu turns off.
DIGITAL ZOOM
Digital zoom specifies the picture position and enlarges
the picture.
1. (Be sure ZOOM NAV is off.)
Press the POINTER button to display the pointer. (
To change the size of the picture:
Press the ZOOM+ button and enlarge the picture.
The pointer will change to resemble a magnifying glass.
)
(
A press of the ZOOM- button will reduce the picture
and return it to its original size.
To change the picture position:
Select the position with the ▲▼
2. Press the POINTER button to delete the pointer.
buttons.
)
AUTO ADJUST
To adjust the size or quality of the picture
automatically:
Press the AUT O ADJUST button.
OFF TIMER
To set the off timer:
The off timer can be set to turn the power off after 30, 60,
90 or 120 minutes.
1. Press the OFF TIMER button to start the timer at 30
minutes.
2. Press the OFF TIMER button to the desired time.
3. The timer starts when the menu turns off.
→ 30 → 60 → 90 → 120 → 0
OFF TIMER 30
To check the remaining time:
1. Once the off timer has been set, press the OFF TIMER
button once.
2. The remaining time is displayed, then turns off after a few
seconds.
3. When five minutes remain the remaining time appears
until it reaches zero.
OFF TIMER 28
To cancel the off timer:
1. Press the OFF TIMER button twice in a row .
2. The off timer is canceled.
OFF TIMER 0
Note:
After the power is turned off with the off timer ...
A slight current is still supplied to the monitor. When you
are leaving the r oom or do not plan to use the system for a
long period of time, turn off the power of the monitor.
Information
AUTO ADJUST ON setting
When RGB (still picture) input is selected:
Fine Picture, Picture ADJ, Position, and Contrast will
be adjusted automatically.
When RGB (motion picture), VIDEO, or Y/Pb/Pr
(component) input is selected:
The screen size switches to ZOOM mode automatically
when a letter box image is displayed.
En-10
Page 13

OSM (On Screen Menu) Controls
Menu Operations
The OSM window is displayed with respect to the
screen as shown on the diagram.
* Depending on the screen’s mode, the OSM may be
displayed differently.
In the explanation, the OSM section is shown close up.
MAIN MENU 1 / 2
PICTURE
AUDIO
IMAGE ADJUST
OPTION1
ADVANCED OSM
: OFF
NEXT PAGE
MENU/ENTEROKEXIT
SEL.
The following describes how to use the menus and the
selected items.
1. Press the MENU/ENTER button on the remote control to
display the MAIN MENU.
EXIT
MAIN MENU 1 / 2
PICTURE
AUDIO
IMAGE ADJUST
OPTION1
ADVANCED OSM
NEXT PAGE
MENU/ENTEROKEXIT
SEL.
MAIN MENU 2 / 2
PREVIOUS PAGE
LANGUAGE
COLOR SYSTEM
SOURCE INFORMATION
: OFF
EXIT
Note:
The main menu disappears by pressing the EXIT
button.
Information
Advanced menu mode
When “ADVANCED OSM” is set to “ON” in the main
menu (1/2), full menu items will be shown.
MAIN MENU 1 / 2
PICTURE
AUDIO
IMAGE ADJUST
OPTION1
OPTION2
OPTION3
OPTION4
ADVANCED OSM
NEXT PAGE
MENU/ENTEROKEXIT
SEL.
: ON
EXIT
* The actual screen may be different from the ones
in this manual.
MENU/ENTEROKEXIT
SEL.
EXIT
2. Press the cursor buttons ▲ ▼ on the remote control to
highlight the menu you wish to enter.
3. Press the MENU/ENTER button on the remote control to
select a sub menu or item.
CONTRAST
BRIGHTNESS
SHARPNESS
COLOR
TINT
PICTURE MODE
NR
NEXT PAGE
SEL. ADJ. RETURN
PICTURE 1 / 2
: NORMAL
: OFF
EXIT
: 52
: 32
: 16
: 32
GR
: 32
4. Adjust the level or change the setting of the selected item
by using the cursor buttons
on the remote control.
5. The adjustments or settings are then stored in memory.
The change is stored until another change is made.
6. Repeat steps 2 – 5 to adjust an additional item, or press
the EXIT button on the remote control to return to the
main menu.
* When adjusting using the bar at the bottom of the screen,
press the
or button within 5 seconds. If not, the
current setting is stored and the previous screen appears.
En-11
Page 14

Menu Tree
* For further details of each menu item, please refer to the CD-ROM.
:Shaded areas indicate the default value.
←→
: Press the
or button to adjust.
:Menu items in a ruled box are available when the ADVANCED OSM is set to ON.
Main menu Sub menu Sub menu 2 Sub menu 3 Sub menu 4 RESET
PICTURE CONTRAST ←→ 0←52→72 YES En-20
BRIGHTNESS ←→ 0←32→64 YES En-20
SHARPNESS ←→ 0←16→32 YES En-20
COLOR ←→ 0←32→64 YES En-20
TINT R←→G 0←32→64 YES En-20
PICTURE MODE BRIGHT/NORMAL/THEAT.1/THEAT.2/DEFAULT YES En-20
NR OFF/NR-1/NR-2/NR-3 YES En-20
COLOR TEMP. LOW/MID LOW/MID/HIGH YES En-20
WHITE BALANCE GAIN RED ←→ 0←40→70 YES En-21
GAIN GREEN ←→ 0←40→70 YES En-21
GAIN BLUE ←→ 0←40→70 YES En-21
BIAS RED ←→ 0←40→70 YES En-21
BIAS GREEN ←→ 0←40→70 YES En-21
BIAS BLUE ←→ 0←40→70 YES En-21
GAMMA 1←→2←…→4 YES En-21
LOW TONE *
COLOR TUNE RED Y←→M0←32→64 YES En-21
Main menu Sub menu Sub menu 2 Sub menu 3 Sub menu 4 RESET
AUDIO BASS ←→ 0←13→26 YES En-22
TREBLE ←→ 0←13→26 YES En-22
BALANCE L←→R -22←0→+22 YES En-22
AUDIO INPUT1 VIDEO 1-3 / HD/DVD 1-2 / RGB 1-3 YES En-22
AUDIO INPUT2 VIDEO 1-3 / HD/DVD 1-2 / RGB 1-3 YES En-22
AUDIO INPUT3 VIDEO 1-3 / HD/DVD 1-2 / RGB 1-3 YES En-22
RESET OFF←→ON YES En-21
3
AUTO←→1←…→3 YES En-21
GREEN C←→Y0←32→64 YES En-21
BLUE M←→C0←32→64 YES En-21
YELLOW G←→R0←32→64 YES En-21
MAGENTA R←→B0←32→64 YES En-21
CYAN B←→G0←32→64 YES En-21
RESET OFF←→ON YES En-21
REFERENCE
REFERENCE
Main menu Sub menu Sub menu 2 Sub menu 3 Sub menu 4 RESET
IMAGE ADJUST ASPECT MODE NORMAL/FULL/STADIUM/ZOOM/2.35:1/14:9/TRUE*
Main menu Sub menu Sub menu 2 Sub menu 3 Sub menu 4 RESET
OPTION1 OSM DISPLAY OSM OFF←→ON YES En-23
V-POSITION ←→ -64←0→+64 YES En-22
H-POSITION ←→ -128←0→+127 YES En-22
V-HEIGHT ←→ 0←→64 YES En-22
H-WIDTH ←→ 0←→64 YES En-22
AUTO PICTURE OFF←→ON*
FINE PICTURE*
PICTURE ADJ.*
BNC INPUT RGB←→COMP. YES En-23
D-SUB INPUT RGB — En-23
RGB SELECT AUTO YES En-23
HD SELECT 1080B/1035I/1080A NO En-24
INPUT SKIP OFF←→ON YES En-24
ALL RESET OFF←→ON — En-24
1
←→*20←→64 YES En-22
1
←→*20←→128 YES En-22
OSM ADJ. 1←…→6 YES En-23
OSM ANGLE H←→V YES En-23
OSM ORBITER OFF←→ON YES En-23
OSM CONTRAST LOW←→NORMAL YES En-23
2
3
— En-22
NO En-22
REFERENCE
REFERENCE
En-12
Page 15
Main menu Sub menu Sub menu 2 Sub menu 3 Sub menu 4 RESET
REFERENCE
OPTION2 PWR. MGT. OFF←→ON YES En-25
CINEMA MODE OFF←→ON YES En-25
LONG LIFE PLE AUTO/LOCK 1/LOCK 2/LOCK 3 YES En-25
ORBITER AUTO 1 YES En-26
AUTO 2 YES En-26
MANUAL H-DOT/V-LINE/TIME YES En-26
OFF YES En-26
INVERSE OFF YES En-26
ON WORKING TIME/WAITING TIME YES En-26
WHITE YES En-26
SCREEN WIPER OFF YES En-27
ON WORKING TIME/WAITING TIME/SPEED YES En-27
SOFT FOCUS OFF/1/2/3/4 YES En-27
GRAY LEVEL 0←…→3←…→15 YES En-27
S1/S2 AUTO←→OFF YES En-28
PICTURE SIZE*
3
OFF←→ON YES En-28
DVI SET UP PLUG/PLAY PC←→STB/DVD NO En-28
BLACK LEVEL LOW←→HIGH NO En-28
CLOSECAPTION OFF←→CC1~4←→TEXT1~4 YES En-28
CAPTION CONT. LOW←→NORMAL YES En-28
Main menu Sub menu Sub menu 2 Sub menu 3 Sub menu 4 RESET
OPTION3 TIMER PRESENT TIME
DAYLIGHT SAVING TIME
OFF←→ON NO En-29
REFERENCE
DAY/HOUR/MINUTES NO En-29
PROGRAM OFF YES En-29
ON DATE/ON/OFF(HOUR, MINUTES)/INPUT/FUNCTION YES En-29
MULTI REPEAT OFF YES En-30
ON MULTI MODE/WORK TIME/INPUT MODE YES En-30
PWR. ON MODE INPUT LAST /MULTI/ VIDEO 1-3 / HD/DVD 1-2 / RGB 1-3 YES En-30
VOLUME LAST←→0←…→44 YES En-30
CONTROL LOCK OFF←→ON YES En-30
IR REMOTE OFF←→ON YES En-31
LOOP OUT OFF←→ON YES En-31
REMOTE ID ALL←→1←→4 NO En-31
ID NUMBER ALL←→1←…→256 YES En-31
VIDEO WALL DIVIDER OFF/1/4/9/16/25 YES En-32
POSITION
No.1←…→No.4/No.7←…→No.15/No.16←…→No.31/No.32←…→No.56
— En-32
DISP. MODE SPLIT←→BLANK YES En-32
AUTO ID OFF←→ON YES En-32
IMAGE ADJUST ASPECT MODE NORMAL/FULL/STADIUM/ZOOM/2.35:1/14:9/TRUE*
V-POSITION/H-POSITION/V-HEIGHT/H-WIDTH/AUTO PICTURE/
FINE PICTURE*
1/
PICTURE ADJ.*
1
3
— En-33
P. ON DELAY OFF/ON/MODE1/MODE2 YES En-33
PLE LINK OFF←→ON YES En-33
REPEAT TIMER OFF YES En-34
ON DIVIDER/SOURCE/WORK TIME YES En-34
Main menu Sub menu Sub menu 2 Sub menu 3 Sub menu 4 RESET
REFERENCE
OPTION4 SUB. PICTURE SUB. P DETECT OFF←→AUTO YES En-34
DISPLAY FADE←→NORMAL YES En-34
SUB. P RATE 20%←…→100% YES En-34
ZOOM NAV OFF←→S BY S←→BTM LFT←→BTM RGT←→TOP RGT←→TOP LFT YES En-34
PIC FREEZE OFF←→S BY S1←→S BY S2←→BTM LFT←→BTM RGT←→TOP RGT←→TOP LFT YES En-35
SEAMLESS SW OFF YES En-35
ON SELECT1/SELECT2 YES En-35
TEXT INSERT OFF/TOP/MID HIGH/MID LOW/BOTTOM YES En-36
INPUT/PIC. RATE/DISPLAY YES En-36
Main menu Sub menu Sub menu 2 Sub menu 3 Sub menu 4 RESET
REFERENCE
ADVANCED OSM OFF←→ON YES En-36
LANGUAGE ENGLISH/DEUTSCH/FRANÇAIS/ESPAÑOL/ITALIANO/SVENSKA/У/PORTUGUÊS NO En-36
COLOR SYSTEM AUTO/3.58NTSC/4.43 NTSC/PAL/PAL 60/PAL-N/PAL-M/SECAM NO En-37
SOURCE INFORMATION
— — En-37
*1 Only when AUTO PICTURE is OFF
*2 RGB/PC only
*3 “PICTURE SIZE”, “TRUE” and “LOW TONE” are only for 50 and 61 inch types.
Information
Restoring the factory default settings
Select “ALL RESET” under the OPTION1 menu. Note that this also restores other settings to the factory defaults.
En-13
Page 16

Troubleshooting
If the picture quality is poor or there is some other problem, check the adjustments, operations, etc., before requesting service.
Symptom
The unit emits a crackling sound.
Picture is disturbed.
Sound is noisy.
Remote control operates erroneously.
The remote control does not work.
Monitor’s power does not turn on when the
remote control’s power button is pressed.
Monitor does not operate when the remote
control’s buttons are pressed.
The front panel buttons of the main unit do
not function.
No sound or picture is produced.
Picture appears but no sound is produced.
Poor picture with VIDEO signal input.
Poor picture with RGB signal input.
Tint is poor or colors are weak.
Nothing appears on screen.
Part of picture is cut off or picture is not
centered.
Image is too large or too small.
Picture is unstable.
POWER/STANDBY indicator is lighted in red.
POWER/STANDBY indicator is blinking in
red.
POWER/STANDBY indicator is blinking in
green and red, or green.
Checks
• Are the image and sound normal?
• Is a connected component set directly in front or at
the side of the display?
• Are the remote control’s batteries worn out?
• Is IR REMOTE set to ON?
• Has an ID number been set for the main unit?
• Is the monitor’s power cord plugged into a power
outlet?
• Are all the monitor’s indicators off?
• Are the remote control’s batteries worn out?
• Is IR REMOTE set to OFF?
• Has an ID number been set for the main unit?
• Is the remote control pointed at the monitor, or is
there an obstacle between the remote control and
the monitor?
• Is direct sunlight or strong artificial light shining on
the monitor’s remote control sensor?
•
Are the remote control’s batteries worn out?
• The remote cable is plugged into the REMOTE IN
terminal (Wired).
• The front panel buttons do not function during
Control Lock.
• Is the monitor’s power cord plugged into a power
outlet?
• Is the volume set at the minimum?
• Is the mute mode set?
• Are the speakers properly connected?
• Is AUDIO INPUT set correctly?
• Improper control setting.
Local interference.
Cable interconnections.
Input impedance is not correct level.
• Improper control setting.
Incorrect 15 PIN connector pin connections.
• Are the tint and colors properly adjusted?
• Is the computer’s power turned on?
• Is a source connected?
• Is the power management function in the standby
or off mode?
• Is LOOP OUT set to ON?
• Is the position adjustment appropriate?
• Is the screen size adjustment appropriate?
• Is the computer’s resolution setting appropriate?
• Horizontal and / or vertical sync signal is not
present when the Intelligent Power Manager
control is on.
• The temperature inside the main unit has become
too high and has activated the protector.
——————
• If there are no abnormalities in the image and sound,
the noise is caused by the cabinet reacting to
changes in temperature. This will not affect
performance.
• Leave some space between the display and the
connected components.
• Replace both batteries with new ones.
• Set IR REMOTE OFF on OPTION3 menu.
• Set an ID number with the ID SELECT button, or set
the ID number to ALL.
• Plug the monitor’s power cord into a power outlet.
• Press the power button on the monitor to turn on the
power.
• Replace both batteries with new ones.
• Set IR REMOTE ON.
• Set an ID number with the ID SELECT button, or set
the ID number to ALL.
• Point the remote control at the monitor’s remote
control sensor when pressing buttons, or remove the
obstacle.
• Eliminate the light by closing curtains, pointing the
light in a different direction, etc.
• Replace both batteries with new ones.
• Unplug the remote cable from the monitor.
• Set the Control Lock to OFF.
• Plug the monitor’s power cord into a power outlet.
• Increase the volume.
• Press the remote control’s MUTE button.
• Connect the speakers properly.
• Set AUDIO INPUT on the AUDIO menu correctly.
• Adjust picture control as needed.
Try another location for the monitor.
Be sure all connections are secure.
• Adjust picture controls as needed.
Check pin assignments and connections.
• Adjust the tint and color (under PICTURE).
• Turn on the computer’s power.
• Connect source to the monitor.
• Operate the computer (move the mouse, etc.).
• Set LOOP OUT OFF.
• Adjust the IMAGE ADJUST properly.
• Press the WIDE button on the remote control and
adjust properly.
• Set to the proper resolution.
• Check the input signal.
• Promptly switch off the power of the main unit and
wait until the internal temperature drops. See*1.
• Prompty switch off the power of the main unit. See
*2.
Remedy
*1 Overheat protector
If the monitor becomes too hot, the overheat protector will be activated and the monitor will be turned off. If this happens, turn off the power to the monitor
and unplug the power cord. If the room where the monitor is installed is particularly hot, move the monitor to a cooler location and wait for the monitor
to cool for 60 minutes. If the problem persists, contact your dealer.
*2 In the following case, power off the monitor immediately and contact your dealer or authorized Service Center.
The monitor turns off 5 seconds after powering on and then the POWER/STANDBY indicator blinks. It indicates that the power supply circuit, plasma
display panel, temperature sensor, or one or more fans have been damaged.
En-14
Page 17

Specifications
Screen Size 36.3"(H)⳯20.3"(V) inches
922(H)⳯515(V) mm
diagonal 42"
Aspect Ratio 16 : 9
Resolution 1024(H)⳯768(V) pixels
Pixel Pitch 0.036"(H)⳯0.027"(V) inches
0.9(H)⳯0.671(V) mm
Color Processing 4,096 steps, 68.7 billion colors
Signals
Synchronization Range Horizontal : 15.5 to 110.0 kHz
(automatic : step scan)
Vertical : 50.0 to 120.0 Hz
(automatic : step scan)
Input Signals RGB, NTSC (3.58/4.43), P AL (B,G,M,N),
P AL60, SECAM, HD*
1
, DVD*1 , DTV*
Input Terminals (VIDEO1 and RGB1 can also be used as OUTPUT terminals)
RGB
Visual 1 (Analog) mini D-sub 15-pin⳯1
Visual 2 (Analog) BNC (R, G, B, HD, DV)⳯1*
Visual 3 (Digital) DVI-D 24-pin⳯1*
3
2
Video
Visual 1 BNC⳯1
Visual 2 RCA-pin⳯1
Visual 3 S-Video: DIN 4-pin⳯1
DVD/HD
Visual 1 RCA-pin (Y, Cb/Pb, Cr/Pr)⳯1*
Visual 2 BNC (Y, Cb/Pb, Cr/Pr)⳯1*
Visual 3 DVI-D 24-pin⳯1*
3
1
1, *2
Audio Stereo RCA⳯3(Selectable)
External Control D-sub 9-pin⳯1(RS-232C)
Sound output 8W+8W at 6 ohm
Power Supply AC100-240V 50/60Hz
Current Rating 4.5A (maximum)
Power Consumption 285W (typical)
Dimensions 40.2 (W)⳯24 (H)⳯3.9 (D) inches
1022 (W)⳯610 (H)⳯98(D) mm
Weight 66 lbs / 30 kg (without stand)
Environmental Considerations
Operating Temperature 0°C to 40°C / 32°F to 104°F
Humidity 20 to 80% (no condensation)
Altitude 720 to 1114 hPa
(0 to 9180 feet / 0 to 2800 m)
Storage Temperature -10°C to 50°C / 14°F to 122°F
Humidity 10 to 90% (no condensation)
Altitude 700 to 1114 hPa
(0 to 9840 feet / 0 to 3000 m)
Other Features Motion compensated 3D Scan Converter (NTSC,
PAL, 480I, 576I, 525I, 625I, 1035I, 1080I), 2-3
pull down Converter (NTSC, 480I, 525I, 1035I,
1080I (60Hz)), 2-2 pull down Converter (P AL,
576I, 625I, NTSC, 480I, 525I), Digital Zoom
Function (100-900% Selectable), Video Wall 4-25
multi screen, Self Diagnosis, Image Burn
reduction tools (PLE LOCK1~3, INVERSE,
WHITE, ORBITER (Auto1,2/Manual), SCREEN
WIPER), Color T emperature select (high/mid/mid
low/low, user has 4 memories), Control lock
(Except power SW), Auto Picture, Input Skip,
Color Tune, Low Tone (3 mode), Auto ID,
Programmable Timer, Gamma Correction (4
mode), Loop through interface, Plug and play
(DDC1, DDC2b, RGB3: DDC2b only),
Split screen operations
Regulations UL 60950-1, CAN/CSA-C22.2 No.60950-1-03,
FCC class B, ICES-003 class B
1.59"
40.2" (1022)
36.3" (922)
20.3" (515)
1
(40.4)
24" (610)
Units are in inch
3.9"
(98)
2.31"
(57.6)
(mm)
The features and specifications may be subject to change without
notice.
*1HD/DVD/DTV input signals supported on this system.
480P (60 Hz) 480I (60 Hz) 525P (60 Hz)
525I (60 Hz) 576P (50 Hz) 576I (50 Hz)
625P (50 Hz) 625I (50 Hz) 720P (60 Hz)
720P (50 Hz) 1035I (60 Hz) 1080I (50 Hz)
1080I (60 Hz) 1080P (50 Hz) 1080P (60 Hz)
2
*
The 5-BNC connectors are used as RGB/PC2 and HD/DVD2 input.
Select one of them under “BNC INPUT”.
3
*
Compatible with HDCP.
Supported Signals
• 640ⴒ480P @ 59.94/60Hz • 1920ⴒ1080I @ 50Hz
• 1280ⴒ720P @ 59.94/60Hz • 720ⴒ576P @ 50Hz
• 1920ⴒ1080I @ 59.94/60Hz • 1280ⴒ720P @ 50Hz
• 720ⴒ480P @ 59.94/60Hz
Note: In some cases a signal on the plasma monitor may not be displayed
properly. The problem may be an inconsistency with standards from
the source equipment (DVD, Set-top box, etc...). If you do experience
such a problem please contact NEC Solutions (America), Inc. and also
the manufacturer of the source equipment.
En-15
Page 18

Limited Warranty Plasma Monitors
NEC Solutions, Inc. (hereinafter NEC Solutions) warrants
this product to be free from defects in material and
workmanship under the following terms and, subject to
the conditions set forth below, agrees to repair or replace
(at NEC Solutions’ sole option) any part of the enclosed
unit which proves defective. Replacement parts or products
may be new or refurbished and will meet specifications of
the original parts or products.
HOW LONG IS THE WARRANTY?
Parts and labor are warranted for (1) one year from the
date of the first customer purchase.
WHO IS PROTECTED?
This warranty may be enforced only by the first purchaser.
WHA T IS COVERED AND WHAT IS NOT COVERED
Except as specified below, this warranty covers all defects
in material or workmanship in this product. The following
are not covered by the warranty:
1. Any product which is not distributed in the U.S.A. or Canada by
NEC Solutions or which is not purchased in the U.S.A. or Canada
from an authorized NEC Solutions dealer.
2. Any product of which the serial number has been defaced,
modified or removed.
3. Damage, deterioration or malfunction resulting from:
a. Accident, misuse, abuse, neglect, fire, water, lightning or other
acts of nature, unauthorized product modification, or failure
to follow instructions supplied with the product.
b. Repair or attempted repair by anyone not authorized by NEC
Solutions.
c. Any shipment of the product (claims must be presented to the
carrier).
d. Removal or installation of the product.
e. Any other cause which does not relate to a product defect.
f. Burns or residual images upon the phosphor of the panel.
4. Cartons, carrying cases, batteries, external cabinets, magnetic
tapes, or any accessories used in connection with the product.
5. Service outside of the U.S.A. and Canada.
WHAT WE WILL PAY FOR AND WHAT WE WILL
NOT PAY FOR
W e will pay labor and material expenses for covered items,
but we will not pay for the following:
1. Removal or installation charges.
2. Costs of initial technical adjustments (set-up), including
adjustment of user controls. These costs are the
responsibility of the NEC Solutions dealer from whom
the product was purchased.
HOW YOU CAN GET WARRANTY SERVICE
1. To obtain service on your product, consult the dealer from whom
you purchased the product.
2. Whenever warranty service is required, the original dated invoice
(or a copy) must be presented as proof of warranty coverage.
Please also include in any mailing your name, address and a
description of the problem(s).
3. For the name of the nearest NEC Solutions authorized service
center, call NEC Solutions at 800-836-0655.
LIMITATIONS OF LIABILITY
Except for the obligations specifically set forth in this
warranty statement, we will not be liable for any direct,
indirect, special, incidental, consequential, or other types
of damages, whether based on contract, tort, or any other
legal theory, whether or not we have been advised of the
possibility of such damages. This warranty is in lieu of all
other warranties expressed or implied, including, but not
limited to, the implied warranties of merchantability or
fitness for a particular purpose.
EXCLUSION OF DAMAGES
NEC Solutions’ liability for any defective product is
limited to the repair or replacement of the product at our
option. NEC Solutions shall not be liable for:
1. Damage to other property caused by any defects in this
product, damages based upon inconvenience, loss of use of
the product, loss of time, commercial loss; or
2. Any other damages whether incidental, consequential or
otherwise. Some states do not allow limitation on how long
an implied warranty lasts and/or do not allow the exclusion
or limitation of incidental or consequential damages, so the
above limitations and exclusions may not apply to you.
HOW ST A TE LA W RELATES TO THE WARRANTY
This warranty gives you specific legal rights, and you may
also have other rights which vary from state to state.
FOR MORE INFORMATION,
TELEPHONE 800-836-0655
NEC SOLUTIONS (AMERICA), INC.
1250 N. Arlington Heights Road, Suite 400
Itasca, Illinois 60143-1248
Note:
All products r eturned to NEC Solutions (America),
Inc. for service MUST have prior approval. To get
approval, call NEC Solutions (America), Inc. at 800-836-
0655.
3. Shipping charges.
En-16
Page 19

Guide rapide
(Modèle à découpe d’image avancée)
Pour le fonctionnement de votre moniteur plasma, référez-vous au CD-ROM.
Table des matière
Recommandations importantes ..................... Fr-2
Installation .................................................. Fr-4
Ventilation requise pour le montage de l’ensemble ........... Fr-4
Créer un mur d’images ................................................. Fr-5
Fixation des câbles ....................................................... Fr-5
Faire attention lorsque le moniteur plasma est installé
verticalement ............................................................ Fr-6
Comment utiliser la télécommande ................................. Fr-6
Mise en place et remplacement des piles ......................... Fr-6
Utilisation du mode télécommande à câble...................... Fr-6
Distance de fonctionnement ............................................Fr-6
Manipulation de la télécommande ................................... Fr-6
Noms des composants et leur fonction ........... Fr-7
Vue de face ................................................................. Fr-7
Vue arrière / Raccordements ......................................... Fr-8
Télécommande ............................................................. Fr-9
Fonctions de base ....................................... Fr-10
POWER (MARCHE/ARRÊT) ......................................... Fr-10
Pour mettre en marche et arrêter l’appareil : .................. Fr-10
VOLUME................................................................... Fr-10
Pour régler le volume sonore : ....................................... Fr-10
MUTE (SOURDINE) .................................................... Fr-10
Pour mettre le son en sourdine : ..................................... Fr-10
DISPLAY (AFFICHAGE) ................................................ Fr-10
Pour vérifier les réglages : ............................................. Fr-10
ZOOM NUMERIQUE.................................................. Fr-10
AUTO ADJUST (REGLAGE AUTO) ............................... Fr-10
Pour régler automatiquement le format et la qualité de
l’image: ...................................................................... Fr-10
OFF TIMER (ARRÊT TEMPORISÉ) .................................. Fr-10
Réglage de la temporisation de l’alimentation : ............. Fr-10
Vérification du temps restant avant l’arrêt
automatique: ............................................................... Fr-10
Annulation de la temporisation de l’alimentation: ......... Fr-10
Commandes OSM (MENUS ÉCRAN) ................. Fr-11
Opérations de menu ................................................... Fr-11
Arborescence de menus .............................................. Fr-12
Dépannage................................................. Fr-14
Caractéristiques ......................................... Fr-15
Garantie limitée Moniteurs Plasma....................... Fr-16
Manuel d’utilisation sur CD-ROM
䢇 Le manuel d’utilisation complet est fourni sur le CD-ROM en
format PDF (Portable Document Format) et fournit des
informations détaillées concernant le produit et son utilisation
pour votre moniteur plasma NEC.
Vous devez avoir Acrobat Reader™ ou Adobe Reader ™ pour
pouvoir visionner et/ou imprimer les fichiers PDF.
REMARQUE:
être téléchargés sur le site d’Adobe.
Rendez-vous sur http://www.adobe.com pour obtenir la version
correspondant à votre système d’exploitation.
䢇 Visionner le manuel d’utilisation (PDF)
[Windows]
1. Insérez le CD-ROM fourni dans le lecteur de CD-ROM de votre
ordinateur.
2. Un menu doit s’afficher automatiquement.
Si ce n’est pas le cas :
1) Sur le bureau Windows, double-cliquez sur l’icône [Mon
ordinateur].
2)Double-cliquez sur la lettre du lecteur de CD-ROM
[NECPLASMA-UM].
3) Double-cliquez sur “start_menu.pdf”.
3. Cliquez sur le nom de votre produit.
Le guide de l’utilisateur s’affichera à l’écran.
[Macintosh]
1. Insérez le CD-ROM fourni dans le lecteur de CD-ROM de votre
Macintosh.
2. Double-cliquez sur l’icône du CD-ROM [NECPLASMA-UM].
3. Double-cliquez sur “start_menu.pdf”.
Le menu de départ s’affichera.
4. Cliquez sur le nom de votre produit.
Le guide de l’utilisateur s’affichera à l’écran.
䢇 Copier le manuel d’utilisation (PDF) sur votre ordinateur
Le manuel d’utilisation se trouvant sur le CD-ROM fourni peut
être copié sur le disque dur de votre ordinateur.
Adobe Acrobat Reader ou Adobe Reader peuvent
Contenu du colis
䡺 Moniteur à plasma
䡺 Cordon d’alimentation
䡺 Télécommande avec 2 piles R6 AAA
䡺 Manuels (Guide rapide et CD-ROM)
䡺 Tores en ferrite
䡺 Collier de câble
Options
• Unité de montage mural
• Unité de montage au plafond
• Unité de montage incliné
• Support sur table
• Haut-parleurs amovibles
FRANÇAIS
Page 20

Recommandations importantes
Précaution
V euillez lire avec attention ce manuel avant d’utiliser le moniteur à plasma
et le conserver accessible pour s’y référer ultérieurement.
ATTENTION..
RISQUE D’ELECTROCUTION
NE PAS OUVRIR
ATTENTION:
POUR EVITER TOUT RISQUE D’ELECTROCUTION,
NE PAS OUVRIR LE BOITIER. A L’INTERIEUR,
AUCUNE PIECE NE NECESSITE L’INTER-VENTION
DE L’UTILISATEUR. EN CAS DE PROBLEME,
S’ADRESSER A UN REPARATEUR SPECIALISTE.
Ce symbole est une mise en garde contre les risques
d’électrocution que présentent certaines parties
dépourvues d’isolation à l’intérieur de l’appareil. Il est
donc dangereux d’établir le moindre contact avec ces
parties.
Ce symbole avertit l’utilisateur que d’importantes
informations sont fournies sur le fonctionnement ou
l’entretien de cet appareil. De ce fait, il faut lire
attentivement ces instruc-tions pour éviter tout problèm.
AVERTISSEMENT
AFIN D’EVITER TOUT RISQUE D’INCENDIE OU
D’ELECTROCUTION, NE PAS EXPOSER CET APP AREIL A LA
PLUIE OU A L’HUMIDITE. NE PAS BRANCHER LA PRISE
D’ALIMENTATION POLARISEE DANS UNE PRISE MURALE
AVEC UNE RALLONGE OU UN ADAPTATEUR MULTIPRISE
SI LES FICHES NE PEUVENT ETRE INSEREES
COMPLETEMENT. EVITER D’OUVRIR LE BOITIER CAR
CELUI-CI PROTEGE DES COMPOSANTS FONCTIONNANT
A HAUTE TENSION. EN CAS DE PROBLEME, S’ADRESSER
A UN REPARATEUR SPECIALISTE.
Avertissements et précautions de
sécurité
Ce moniteur à plasma a été conçu et fabriqu pour une utilisation
fiable et durable. Il ne nécessite aucun entretien en dehors du
nettoyage. Voir la section “Méthode de nettoyage du moniteur à
plasma” plus loin.
Le panneau à affichage plasma est constitué de fines particules
d’images (cellules) dont plus de 99,99%sont actives. Certaines
d’entre elles ne produisent pas de lumière ou restent allumées.
Pour des raisons de sécurité et pour éviter d’endommager l’appareil,
lire attentivement les instructions suivantes.
Pour éviter les risques d’éléctrocution et d’incendie:
1.
Laisser suffisamment d’espace autour de l’appareil pour la ventilation et
éviter toute augmentation excessive de la température interne. Ne pas couvrir
les fentes d’aération ou installer l’appareil dans un endroit trop exigu.
Si vous installez l’appareil dans un espace clos, assurezvous qu’il y ait
suffisamment d’espace au dessus pour permettre l’air chaud de s’élever
et de s’évacuer.
Si la température du moniteur devient excessive, la protection contre
les surchauffes entrera en action et coupera l’alimentation. Dans ce cas,
éteindre l’appareil et débrancher le câble d’alimentation. Si la
température de la pièce dans laquelle se trouve le moniteur est
particulièrement élevée, déplacer celui-ci dans un endroit plus frais et
attendre environ 60 minutes qu’il refroidisse. Si le problème persiste,
prendre contact avec votre revendeur.
2. Ne pas raccorder la prise d’alimentation polarisée de ce périphérique à
une rallonge ou une prise murale si les fiches ne peuvent pas être
complètement insérées.
3. Ne pas exposer cet appareil à la pluie ou à l’humidité.
4. Eviter d’endommager le câble d’alimentation et ne pas le modifier.
5. Débrancher le câble d’alimentation électrique pendant les orages ou les
longues périodes d’inactivité.
6. Ne pas ouvrir le boîtier protégeant les parties dangereuses fonctionnant
hauts voltages. Si l’appareil est endommagé de cette manière, la garantie
sera annulée. De plus, les risques d’électrocution grave sont grands.
7. Ne pas essayer d’intervenir ou de réparer l’appareil. Le fabricant décline
toute responsabilité en cas de blessure corporelle ou de dégâts matériels
résultant d’une opération d’entretien quelconque effectuée par des
personnes non qualifiées ou résultant de l’ouverture du couvercle arrière.
S’adresser au service après-vente autorisé.
8. Cet équipement doit être connecté à une prise secteur (MAIN) équipée
d’une mise à la terre.
9. La prise secteur doit se trouver près de l’équipement et doit être facile
d’accès.
Pour éviter tout dommage et assurer une utilisation durable:
1. Utiliser seulement une alimentation en courant de 100– 240 V 50/60
Hz. T oute utilisation prolongée avec un courant supérieur à 100–240 V
risque de diminuer la durée de vie de l’appareil et même de provoquer
un incendie.
2. Manipuler l’appareil avec précautions lors de son installation, ne pas le
laisser tomber.
3. L’installer loin de toute source de chaleur ou de poussière. Ne pas
l’exposer au soleil.
4.
Eviter la pénétration de liquides ou petits objets métalliques l’intérieur de
l’appareil. En cas d’incident de ce genre, débrancher le câble d’alimentation
électrique et confier le moniteur à un service après-vente agréé.
5. Ne pas cogner ou rayer la surface de l’écran, des déformations de l’image
en résulteraient.
6. Pour un montage et une installation correcte, il est fortement
recommandé de faire appel à un revendeur agréé et qualifié .
7. Comme c’est le cas pour tout affichage à base de phosphore (comme
un moniteur CRT, par exemple), la puissance de lumière baisse
graduellement au cours de la vie du panneau d’affichage à plasma.
8. Pour éviter tout risque de sulfuration, il est fortement conseillé de ne
pas installer l’appareil dans un vestiaire, un bain public ou un bain de
source thermale.
9. Ne pas utiliser dans un véhicule en marche car l’unité pourrait tomber
ou glisser et provoquer des blessures.
10. Pour éviter l ‘inflammation ou les chocs électriques, ne pas placer l’unité
sur la tranche, à l’envers ou avec l’écran vers le bas ou vers le haut.
Méthode de nettoyage du moniteur à plasma:
1. Nettoyer le panneau avant et le cadre en procédant à l’aide d’un chiffon
doux et sec. Ne jamais utiliser de solvents du type alcool ou diluant
pour le nettoyage de ces surfaces.
2. Nettoyer les prises d’aération du plasma en procédant à l’aide d’une
brosse à poils doux fixée à un aspirateur.
3.
Pour garantir la bonne ventilation du moniteur, nettoyer les prises d’air
tous les mois. Un nettoyage plus fréquent peut s’avérer nécessaire selon
les conditions environnantes dans lesquelles le moniteur à plasma est utilisé.
Pour éviter les risques de brûlage du luminophore, les mesures
suivantes sont recommandées:
Comme tous les périphériques d’affichage à base luminophore et tous les
autres affichages gaz plasma, les moniteurs plasma peuvent être sujets au
brûlage du luminophore dans certaines circonstances. Certaines conditions
d’utilisation, telles que l’affichage continu d’une image statique pour une
durée prolongée, peuvent causer le brûlage du luminophore si aucune
précaution n’est prise. Pour protéger votre investissement dans ce moniteur
à plasma, veuillez suivre les directives et les conseils suivantes pour
minimiser l’occurence le marquage de l’écran:
* S’assurer de mettre en marche et d’utiliser l’économiseur d’écran chaque
fois que c’est possible, pendant l’utilisation avec une source d’entrée
venant d’ un ordinateur.
* Afficher une image en mouvement aussi souvent que possible.
* Changer la position de l’affichage de menu de temps à autre.
* Toujours couper l’alimentation après la fin de l’utilisation du moniteur.
Si le moniteur à plasma est en usage continu ou de longue durée, prendre
les mesures suivantes afin d’éviter l’occurence le brûlage du luminophore:
* Abaisser le niveau de l’image (contraste, luminance) autant que possible,
sans faire perdre la lisibilit de l’image.
* Afficher une image avec de nombreuses couleurs et graduations de
couleur. (par ex. des images photo-graphiques ou photo-réalistes).
*
Créer un contenu d’image avec un contraste minimal entre les zones sombres
et les zones claires, par exemple des caractères blancs sur un fond noir.
Utiliser des couleurs complémentaires ou pastels le plus souvent possible.
* Eviter d’afficher des images avec peu de couleurs et des limites nettes et
clairement définies entre les couleurs.
Son de fonctionnement du moniteur plasma
Le panneau du moniteur plasma est composé de pixels extrêmement fins et
ces pixels émettent de la lumière en fonction des signaux vidéo reçus. Ce
principe peut créer un bourdonnement ou un ronflement électrique venant
du moniteur plasma. V euillez également noter que la vitesse de rotation du
ventilateur de refroidissement peut augmenter lorsque la température
ambiante du moniteur plasma augmente. Lorsque cela se produit, il est
possible que vous entendiez le moteur du ventilateur.
Remarque:
Les éléments suivants ne sont pas couverts par la garantie.
• Rémanence
• Sons générés par le panneau, par exemple : Bruit du moteur de
ventilateur, ronflement du circuit électrique / bourdonnement du
panneau de verre.
Contactez un revendeur agréé ou un revendeur de marque pour d'autres
Fr-2
procédures qui conviendront le mieux à vos besoins particuliers.
Page 21

Avertissement
Ne pas utiliser dans une salle d’ordinateurs telle que
définie dans la Norme pour la protection des
ordinateurs électroniques/appareils de traitement des
données ANSI/NFP A75.
Attention
Ce modèle peut être utilisé avec les accessoires
optionnels suivants. L’utilisation de ce modèle avec
d’autres accessoires optionnels peut entraîner une
instabilité qui peut causer des blessures.
Cet appareil a été testé est trouvé conforme avec
les limites des appareils numériques de classe B,
conformément à l’article 15 du règlement FCC. Ces
limites sont conçues pour offrir une protection
raisonnable contre les interférences nuisibles dans
une installation résidentielle. Cet appareil génère,
utilise et peut émettre de l’énergie radiofréquence
et, s’il n’est pas installé et utilisé selon les instructions,
peut causer des interférences nuisibles aux
communications radio. Cependant, il n’y a aucune
garantie que de telles interférences ne se produisent
pas pour une installation particulière. Si cet appareil
causait des interférences nuisibles à la réception
radio ou télévisée, ce qui peut être déterminé en
mettant l’appareil hors et sous tension, vous être
encouragé à essayer de corriger ces interférences à
l’aide de l’une ou plusieurs mesures suivantes:
• Réorientez ou déplacez l’antenne réceptrice.
• Augmentez l’espace entre l’appareil est le récepteur.
• Connectez l’appareil sur une prise secteur
appartenant à un circuit différent de celui sur lequel
le récepteur est connecté.
• Consultez votre revendeur ou un technicien radio/
télévision expérimenté.
Cet appareil numérique de la classe B est conforme
à la norme NMB-003 du Canada.
Nom du fabricant : NEC Viewtechnology, Ltd.
Enceintes: PX-42SP1U, PX-SP2U/S, PX-SP2U/B
Support: PX-ST1U, PX-ST1U/S
Veuillez contacter NEC Solutions (America), Inc. pour
obtenir la liste des accessoires optionnels agréés.
Mise au rebut de votre
produit usagé
La législation européenne, appliquée dans
tous les Etats membres, exige que les produits
électriques et électroniques portant la marque (à
gauche) doivent être mis au rebut séparément des
autres ordures ménagères. Ceci inclus les moniteurs
plasma et leurs accessoires électriques. Lorsque
vous mettez au rebut ces produits, veuillez suivre
les recommandations des autorités locales et/ou
demandez conseil au magasin qui vous a vendu le
produit.
Une fois ces produits mis au rebut, ils sont recyclés
et de manière appropriée. Cet effort nous aidera à
réduire les déchets et à maintenir au niveau minimum
leurs conséquences négatives sur la santé humaine
et sur l’environnement.
La marque figurant sur les produits électriques et
électroniques ne s’applique qu’aux Etats membres
actuels de l’Union Européenne.
REMARQUE:
Pour raccorder un ordinateur à ce moniteur, procéder à
l’aide d’un câble RGB à âme de ferrite aux deux
extrémités. Sur les câbles d’alimentation électrique, fixer
les âmes de ferrite fournies aux extrémités. Si vous ne
faites pas cela, le moniteur ne sera pas conforme aux
normes obligatoires FCC.
Monter les tores en ferrite aux deux extrémités du câble
d’alimentation électrique (fourni).
Fixer le tore en ferrite (fourni) au câble d’alimentation à
l’aide d’un collier.
Câble d’alimentation (fourni)
Collier
tore
Collier
tore
ATTENTION
Lorsque vous diposez de piles / batteries usées,
veuillez vous conformer aux normes
gouvernementales ou environnementales en
vigueur dans votre pays ou région.
Fr-3
Page 22

50mm (2")
50
mm
(2") 50
mm
(2")
Mur
Mur
50mm (2")
50mm (2")
Installation
Le socle-support optionnel peut être attaché au moniteur à plasma selon l’une des deux méthodes suivantes :
* Position verticale. (Voir la figure A)
* Position horizontale avec l’écran face vers le bas (Voir la figure B). Poser la feuille de protection, enveloppant le moniteur
dans son emballage, sous la surface de l’écran pour la protéger contre les rayures.
* Ne pas toucher ou saisir l’écran pendant le transport de l’appareil.
• Cet appareil ne peut pas être installé indépendamment. S’assurer d’utiliser un support ou une
unité de montage d’origine. (Unité de montage mural, support, etc)
• Pour effectuer une installation et un mon-tage corrects, il est recommandé de faire appel au
concessionnaire spécialisé et agréé.
Si la procédure de montage n’est pas correctement suivie, l’appareil peut être endommagé et
l’installateur s’expose à des risques de blessure.
La garantie de l’appareil ne couvre pas les dégâts occasionnés par une installation.
* N’utilisez le que le kit ou support de montage fourni par le fabricant et les options listées ci-après.
Figure A
Figure B
Ventilation requise pour le montage
de l’ensemble
Afin de dissiper la chaleur, laisser un espace libre entre
les objets environnants comme indiqué sur le schéma lors
de l’installation.
Fr-4
Page 23

Dos de l’appareil
trous de fixation
Créer un mur d’images
RGB
2
/
DVD
2
/
HD
2
RGB
1
R/
VD
G/ B/
HD
(
IN/OUT
)
Cr/Pr Y Cb/Pb
IN OUT
REMOTE
Signal RGB/
DVD/HD
ENTREE
Connecteur BNC
SORTIE
Signal RGB/
DVD/HD
Télécommande
ENTREE
SORTIE
Télécommande
Grâce aux possibilités de l’affichage matriciel, il est possible de créer un mur vidéo 4-25.
• Raccorder les câbles signal et les câbles télécommande comme illustré ci-dessous.
Signal vidéo Signal RGB/DVD/HD
VIDEO
Connecteur BNC
VIDEO
(
IN/OUT
1
)
VIDEO
VIDEO
2
Signal VIDEO
Télécommande
ENTREE
ENTREE
Prise phono RCA
3
AUDIO
(
MONO
)
R
L
1
Y
DVD
1
IN OUT
REMOTE
Remarque:
1. Les bornes VIDEO1 et RGB1 sont utilisables en INPUT (entrée) et OUTPUT (sortie).
Si LOOP OUT (MODE RÉPÉTITION) est sur MARCHE, ne pas raccorder un signal OUTPUT provenant d’un autre
appareil sous peine de charge excessive et de détérioration de cet autre appareil.
Il n’est pas possible de mettre LOOP OUT (MODE RÉPÉTITION) sur MARCHE quand des signaux sont entrés par la borne RGB1.
2.
3. Il est possible de mettre LOOP OUT (MODE RÉPÉTITION) sur MARCHE quand des signaux sont entrés par la borne
RGB1 si l’alimentation électrique (POWER) est sur ON (marche).
Informations
• Pour mettre des signaux en boucle avec un autre écran d’affichage à plasma, régler la fonction LOOP OUT (MODE
BOUCLE) sur MARCHE.
• Pour créer un mur d’images, régler les options du menu MUR D’IMAGE en conséquence.
• Pour le raccordement de moniteurs, utiliser un câble BNC de 1 à 2 m (3,3 à 6,6 pieds) de long (d’un type disponible
dans le commerce).
• Si la qualité de l’image est médiocre, ne pas raccorder la borne sortie du moniteur. Raccorder les signaux composites aux
bornes INPUT (entrée) respectives du moniteur en procédant à l’aide d’un amplificateur de distribution (d’un type disponible
dans le commerce).
• Avec la fonction mur d’images, la projection sur 4 écrans est approximative si le signal est inférieur à 1024⳯768,
60 Hz.
• Il est particulièrement recommandé d’utiliser un amplificateur de distribution lorsque vous utilisez 9 écrans ou un mur
vidéo.
• A vec une installation à deux moniteurs et plus, les raccordements doivent être ef fectués avec un câble de conversion ou
un connecteur BNC-RCA, un mini-câble 15 fiches D-Sub – câble BNC (×5) ou un connecteur de conversion.
SORTIE
SORTIE
Signal VIDEO
Télécommande
Fixation des câbles
Fixer les câbles à signal et les câbles au dos de l’écran
d’affichage auquel ils sont raccordés en procédant à l’aide
des colliers de câble fournis avec l’écran à plasma.
Pour fixer Pour libérer
1. 2.
trou de fixation
collier
câbles
Fr-5
Page 24

Faire attention lorsque le moniteur plasma est installé verticalement
External Control
IN OUT
REMOTE
• Utilisez l’unité en option. Contactez votre magasin d’achat lors de l’installation.
• Lors de l’installation, faites pivoter de 90° dans le sens des aiguilles d’une montre
en faisant face au moniteur.
• Après installation, vérifiez avec la marque de logo NEC en
faisant face au moniteur.
• Assurez-vous de régler “ANGLE OSM” sur “VER T.” lors de
l’utilisation.
* Le fait de ne pas tenir compte de cet avertissement peut entraîner
un dysfonctionnement.
90°
Côté supérier
OPTION1
MENU/ENTER
OSM
DOWN UP LEFT/
VOLUME
SELECT BNC
: RGB
-
RIGHT/
SELECT D-SUB
+
INPUT SELECT
: RGB
/EXIT
SÉLECT. RVB
: AUTO
HD SELECT
: 1080B
SELECT SKIP
: ARRET
ALL RESET
: ARRET
1024ⴒ768
SEL.
MENU/ENTER
OK
EXIT
RETOUR
Comment utiliser la télécommande
Mise en place et remplacement des piles
Insérer les 2 piles R6 “AAA” en respectant bien les
polarités.
1. Appuyer et ouvrir le couvercle.
2. Aligner les piles en fonction des marques (+) et (–)
situées dans le boîtier.
INPUT SELECT
VOLUME
MENU/ENTER
DOWN UP LEFT/-RIGHT/+/EXIT
Côté inférieur
Distance de fonctionnement
* Utiliser la télécommande à une distance d’environ 7m/23
pieds du capteur du signal de télécommande et selon un
angle horizontal et vertical d’environ 30°.
* La télécommande peut ne pas fonctionner si le capteur sur
le moniteur est exposé directement au soleil ou à une
lumière artificielle de forte intensité ; il en va de même si
un obstacle est interposé entre la télécommande et le capteur
du moniteur.
3. Remettre le couvercle.
Utilisation du mode télécommande à câble
Connecter le câble de télécommande* à la prise de
télécommande de la télécommande et à la borne
"REMOTE IN" du moniteur.
Lorsque le câble est connecté, le mode commute automatiquement à la télécommande à câble.
Lorsque le mode de télécommande à câble est utilisé, la
télécommande peut être utilisée, même si aucune pile n’est
insérée.
Câble de télécommande*
Vers la prise télécommande
Approx.
7m/23 pieds
Manipulation de la télécommande
• Ne pas faire tomber ou manipuler incorrectement la
télécommande.
• Ne pas mouiller la télécommande. Si la télécommande
est mouillée, l’essuyer immédiatement.
• Eviter de l’exposer à la chaleur et à l’humidité.
• Lorsque la télécommande n’est pas utilisée pendant une
longue période, enlever les piles.
• Ne pas utiliser des piles neuves avec des piles usées en
même temps, et ne pas utiliser des piles de marques
différentes en même temps.
• Ne pas démonter les piles, ne pas les chauffer , et ne pas
les jeter au feu.
• Lors de l’utilisation de la télécommande sans câble,
s’assurer de débrancher le câble de télécommande de la
borne REMOTE IN (télécommande) du moniteur.
* Le mini-câble stéréo 1/8 n’est pas fourni.
Fr-6
Page 25

Noms des composants et leur fonction
Vue de face
INPUT SELECT
VOLUME
MENU/ENTER
DOWN UP LEFT/-RIGHT/+/EXIT
MENU/ENTER
7
VOLUME
DOWN UP LEFT/-RIGHT/
6
+
5
q Alimentation électrique
Met en marche ou arrête le moniteur.
w Fenêtre du capteur des signaux de télécommande
Reçoit les signaux de la télécommande.
e Indicateur POWER/STANBY
(MARCHE/VEILLE)
S’allume en vert........ quand l’appareil est en marche.
S’allume en rouge..... quand l’appareil est en veille.
r INPUT SELECT/EXIT
SORTIE)
(SELECTION DE L’ENTREE /
Commute l’entrée.
Fonctionne comme les boutons EXIT dans le mode
d’affichage des menus (OSM).
INPUT SELECT
/EXIT
4
1
t LEFT/– et RIGHT/+
Elargit ou réduit la taille de l’image. Fonctionne comme
les boutons du CURSEUR (
d’affichage des menus (OSM).
y VOLUME plus fort et moins fort
Réglage du volume. Fonctionne comme les boutons
du CURSEUR (▲/▼) dans le mode d’affichage des
menus (OSM).
u MENU/ENTER
(UTILISER L’APPAREIL)
Affiche le mode de menus sur l’écran (OSM) et affiche
le menu principal.
AVERTISSEMENT
Le commutateur de Marche/Arrêt ne déconnecte pas
totalement l’affichage plasma de l’alimentation secteur .
2
3
(GAUCHE/ – et DROITE/ +)
/ ) dans le mode
Fr-7
Page 26

Vue arrière / Raccordements
BD A
(IN/OUT)
R
3
L
(
MONO
1
Y Cb/Pb Cr/Pr
)
R
(
MONO
L
AUDIO
DVD
1
/
HD
1
AUDIO
1
VIDEO
2
CE F GHIJK
VIDEO
AUDIO
1
YL/R L/RCb/Pb Cr/Pr
2
R/Cr/Pr G /Y B/Cb/ Pb
)
AUDIO
DVD
1
/
HD
1
RGB
2
/
DVD
2
/
HD2RGB
2
R/Cr/Pr G/Y B/Cb/Pb
RGB
2
/
DVD
1
AUDIO
3
RGB 3EXTERNAL CONTROL
(IN/OUT)
VD L/RHD
2
/
HD
2
RGB
VDHD
(IN/OUT)
REMOTE
IN OUT
DVI
1
AUDIO
3
RGB
3
R
(
)
Digital RGB
DVI
(
)
L
MONO
EXTERNAL CONTROL
REMOTE
IN OUT
A AC IN (ENTREE DU CORDON
D’ALIMENTATION ELECTRIQUE CA)
Branchement du câble d’alimentation fourni avec l’appareil.
B EXT SPEAKER L et R (HP EXT. G et D)
Connexions des haut-parleurs (option). Bien respecter
la polarité. Raccorder le câble
(positif) à la borne
EXT SPEAKER et le câble (négatif) à la borne
EXT SPEAKER pour chaque canal GAUCHE et
DROIT.
Voir le mode d’emploi des haut-parleurs.
C VIDEO1, 2, 3 (BNC, RCA, S-Video)
Raccorder ici les magnétoscopes (VCR), les lecteurs
de DVD ou les vidéoscopes.
VIDEO1 peut être utilisé en entrée ou en sortie.
D AUDIO1, AUDIO2, AUDIO3
Bornes audio.
Cette entrée est sélectionnable. Régler le type d’image
vidéo à afficher sur l’écran de menu.
E DVD1 / HD1
Connexions pour DVD, lecteur laser vidéo haute
définition, etc.
F RGB2/ DVD2/ HD2
RGB2: Entrée du signal RGB analogique et du
signal de synchronisation.
DVD2/HD2: Vous pouvez connecter ici des DVD,
des sources Haute Définition, des
disques lasers, etc.
Cette entrée peut être réglée pour une
utilisation avec une source RGB ou
composant.
H RGB3
(DVI à 24 broches)
Connecter un signal numérique (TMDS) à partir d’une
source équipée d’une sortie DVI.
Cette entrée peut être réglée pour une utilisation avec
une source RGB/PC3.
I EXTERNAL CONTROL (COMMANDE
EXTÉRIEURE)
Cette borne est à utiliser pour la commande et le
contrôle extérieurs (par RS-232C) du moniteur.
J REMOTE IN (DC +5V)
Pour permettre la commande à distance câblée,
raccorder le câble de télécommande* au jack
télécommande de la télécommande.
K REMOTE OUT (C-MOS DC +5V)
Pour permettre une commande à distance câblée,
raccorder le câble de télécommande* au jack REMOTE
IN de l’autre moniteur d’affichage.
Exemple de connexion: Connexion d’un tuner TV.
PLASMA DISPLAY
VIDEO
IN
VIDEO
OUT
REMOTE
OUT
TV T uner
Remote Control
Carrier fHz: 38kHz
TV T uner
REMOTE
IN
* Le mini-câble stéréo 1/8 n’est pas fourni.
G RGB1 (mini D-sub à 15 broches)
Raccorder ici les signaux RGB analogiques provenant
d’un ordinateur ou autre. Ce connecteur peut être utilisé
en entrée ou en sortie.
Fr-8
Page 27

Télécommande
q POWER ON/ST ANDBY (Alimentation électrique)
Allume/met l’appareil en attente.
(Cela ne fonctionne pas quand l’indicateur POWER/
STANDBY de l’appareil principal est éteint.)
w RGB/PC
Appuyer sur cette touche pour choisir RGB/PC comme source.
RGB/PC peut aussi être sélectionné en utilisant le bouton INPUT SELECT sur le moniteur.
e DVD / HD
Appuyer sur cette touche pour choisir DVD/HD
comme source.
DVD/HD peut aussi être sélectionné en utilisant le bouton INPUT SELECT sur le moniteur.
r VIDEO
Appuyer sur cette touche pour choisir VIDÉO comme
source.
VIDEO peut aussi être sélectionné en utilisant le bouton INPUT SELECT sur le moniteur.
t MENU/ENTER
Appuyer sur ce bouton pour accèder aux commandes OSM.
Appuyer sur ce bouton pendant l’affichage du menu
principal pour aller dans les sous-menus.
y CURSOR (▲ / ▼ /
Utiliser les touches pour sélectionner des articles ou
des réglages ainsi que pour effectuer les réglages ou
commuter l’affichage.
→ VIDEO1 → VIDEO2 → VIDEO3
/ )
u EXIT
Appuyer sur ce bouton pour sortir des commandes
OSM dans le menu principal. Appuyer sur ce bouton
pendant l’affichage d’un sous-menu pour retourner au
menu précédent.
i POINTER
Appuyer sur ce bouton pour afficher le pointeur.
o ZOOM (+ /–)
Elargit ou réduit la taille de l’image.
!0 VOLUME (+ /–)
Réglage du volume sonore.
!1 MUTE
Met le son en sourdine.
!2 WIDE
Détecte automatiquement le signal et détermine le
rapport hauteur/largeur.
La touche “large” (Wide) ne fonctionne pas pour tous
les signaux.
!3 DISPLAY
Affiche la source sélectionnée à l’écran.
!4 OFF TIMER
Active la temporisation de la coupure de l’alimentation.
!5 SIDE BY SIDE
Appuyez sur cette touche pour afficher des images en
mode côte-à-côte.
!6 PICTURE IN PICTURE
Appuyez sur cette touche pour afficher des images en
mode image dans l’image.
!7 SINGLE
Annule le mode de division de l’écran.
!8 SELECT/FREEZE
Appuyer sur cette touche pour sélectionner l'image
active en mode d'écran multi.
Lorsque la fonction GEL IMAGE est en
fonctionnement, cette touche peut être utilisée pour
afficher les images fixes sur le sous-écran.
!9 AUTO ADJUST
Appuyer sur cette touche pour que les réglages de piqué,
ajustement d'image, position et contraste soient
automatiquement effectués. Appuyer également sur cette
touche pour faire passer automatiquement le format
d'écran en mode ZOOM avec la légende superposée ne
s'affichant complètement que lorsque l'image contient des
parties sombres au-dessus et au-dessous.
@0 ID SELECT (SÉLECT. ID)
Entrer le numéro d’identification (ID) dans la
télécommande. Cette télécommande n’est utilisable
qu’avec un écran d’affichage de même numéro d’ID.
Quand plusieurs écrans sont utilisés simultanément,
leur commande peut s’effectuer individuellement.
@1 CLEAR (EFFACER)/SEAMLESS SW
Pour effacer le numéro entré à l’aide de la touche ID
SELECT.
Lorsque la fonction SEAMLESS SW est en
fonctionnement, cette touche peut être utilisée pour
commuter rapidement la source d’entrée.
@2 Transmetteur de signaux de la télécommande
Transmet les signaux de commande à distance.
@3 Prise Jack de la télécommande
Insérer la fiche du câble de télécommande (Le mini-câble
stéréo 1/8) lors de l’utilisation de la télécommande reliée
Fr-9
par câble.
Page 28

Fonctions de base
POWER (MARCHE/ARRÊT)
Pour mettre en marche et arrêter l’appareil :
1. Relier le câble d’alimentation à une prise active du secteur.
2. Appuyer sur la touche d’alimentation électrique (Power)
(de l’appareil).
Le voyant POWER/ST ANDBY (MARCHE/VEILLE) sur
le moniteur s’allume en rouge pour indiquer que ce dernier
est en veille.
3. Appuyer sur la touche POWER ON (de la télécommande)
pour mettre le moniteur en marche.
Le voyant POWER/ST ANDBY (MARCHE/VEILLE) sur
le moniteur s’allume en vert pour indiquer que ce dernier
est alimenté.
4. Pour mettre l’appareil hors tension, appuyer sur la touche
POWER STANDBY (de la télécommande) ou sur la
touche Power (alimentation électrique) de l’appareil.
Le voyant POWER/ST ANDBY (MARCHE/VEILLE) sur
le moniteur s’allume en rouge pour indiquer que ce dernier
est en veille (uniquement lorsqu'on éteint l'appareil avec
la télécommande).
VOLUME
Pour régler le volume sonore :
1. Pour amener le volume sonore au niveau souhaité, appuyer
et laisser le doigt sur la touche VOLUME
de télécommande ou de l’appareil).
2. Appuyer et maintenir le doigt sur la touche VOLUME
(de la télécommande ou du moniteur) pour réduire le
volume jusqu’au niveau souhaité.
(du boîtier
MUTE (SOURDINE)
Pour mettre le son en sourdine :
Appuyez sur la touche MUTE de la télécommande pour
couper le son ; appuyez de nouveau pour le rétablir.
DISPLAY (AFFICHAGE)
Pour vérifier les réglages :
1. L ’écran change chaque fois que l’on appuie sur la touche
DISPLAY.
2. L’indication disparaît au bout d’environ trois secondes si
la touche n’est pas actionnée.
ZOOM NUMERIQUE
Le zoom numérique définit la position des images et élargit
les images.
1. (S’assurer que ZOOM NAVIG est à l’arrêt.)
)
.
Appuyer sur la touche POINTER pour l’afficher .(
Pour modifier la taille de l’image :
Appuyer sur le bouton ZOOM+ et élargir l’image.
Le pointeur prend la forme d’ une loupe. ( )
Une pression sur le bouton ZOOM- va réduire la taille de
l’image et la remettre à sa taille d’origine.
Pour modifier la position de l’image :
Sélectionner la position avec les boutons ▲▼
2. Appuyer sur la touche POINTER pour le faire disparaître.
AUTO ADJUST (REGLAGE AUTO)
Pour régler automatiquement le format et la
qualité de l’image:
Appuyer sur la touche AUT O ADJUST.
Informations
Paramètre AUTO ADJUST MARCHE
Lorsqu’une entrée RGB (image fixe) est sélectionnée:
Le réglages de piqué, ajustement d’image, position et
contraste seront automatiquement effectués.
Lorsque une entrée RGB (image animée), VIDEO
ou Y/Pb/Pr (composantes) est sélectionnée:
Le format d’image passe automatiquement en mode
ZOOM avec la légende superposée ne s’affichant
complètement que lorsque l’image contient des parties
sombres au-dessus et au-dessous.
OFF TIMER (ARRÊT TEMPORISÉ)
Réglage de la temporisation de l’alimentation :
La temporisation d’alimentation peut être réglée pour que le
moniteur s’éteigne seul au bout de 30, 60, 90 ou 120 minutes.
1. Appuyer sur la touche OFF TIMER pour régler la temporisation à 30 minutes.
2. Appuyer sur la touche OFF TIMER jusqu’à l’obtention
de la durée souhaitée.
La temporisation commence à partir du moment où le menu disparaît.
3.
→ 30 → 60 → 90 → 120 → 0
ARRET HORL 30
Vérification du temps restant avant l’arrêt
automatique:
1. Une fois la temporisation réglée, appuyer une nouvelle
fois sur la touche OFF TIMER.
2. Le temps restant avant l’arrêt automatique est affiché puis
disparaît après quelques secondes.
3. Pendant les cinq dernières minutes de temporisation, le
temps restant s’affiche jusqu’à l’arrêt automatique.
ARRET HORL 28
Annulation de la temporisation de l’alimentation:
1. Appuyer sur la touche OFF TIMER deux fois de suite.
2. La temporisation est annulée.
ARRET HORL 0
Remarque:
Après que l’alimenation est coupée par le mode de temporisation…
Un courant de faible intensité est toujours envoyé au
moniteur. Si l’on doit quitter les lieux ou ne pas utiliser le
système pendant une durée prolongée, il est préférable de
Fr-10
couper complètement l’alimentation du moniteur.
Page 29

Commandes OSM (MENUS ÉCRAN)
Opérations de menu
La fenêtre OSM s’affiche sur l’écran exactement
comme indiqué sur le schéma.
* Selon le mode dans lequel se trouve l’écran, l’OSM
peut montrer un affichage différent.
Dans l’explication, l’affichage OSM est illustré en
gros plan.
MENU PRINCIPAL
IMAGE
AUDIO
REGLAGE IMAGE
OPTION1
OSM AVANCÉ
PAGE
SEL.
Ce chapitre décrit l’utilisation des menus et des rubriques
sélectionnées.
1. Appuyer sur la touche MENU/ENTER de la
télécommande pour accéder au MENU PRINCIPAL.
1 / 2
:
ARRET
+
MENU/ENTEROKEXIT
EXIT
MENU PRINCIPAL 1 / 2
IMAGE
AUDIO
REGLAGE IMAGE
OPTION1
OSM AVANCÉ
PAGE
MENU/ENTEROKEXIT
SEL.
: ARRET
+
EXIT
Remarque:
Le menu principal disparaît en appuyant
sur le bouton EXIT (sortie).
Informations
Mode menu avancé
Si “OSM AV ANCÉ” est réglé sur “MARCHE” au menu
principal (1/2), toutes les rubriques du menu sont
affichées.
MENU PRINCIPAL 1 / 2
IMAGE
AUDIO
REGLAGE IMAGE
OPTION1
OPTION2
OPTION3
OPTION4
OSM AVANCÉ
PAGE
MENU/ENTEROKEXIT
SEL.
+
: MARCHE
EXIT
* L’écran réel peut être différent de ceux montrés dans
ce manuel.
MENU PRINCIPAL 2 / 2
MENU/ENTEROKEXIT
SEL.
-
EXIT
PAGE
LANGAGE
TV SYSTÈMES
SIGNAL INFORMATION
2. Appuyer sur les flèches ▲ ▼ de la télécommande pour
sélectionner le menu souhaité.
3. Appuyer sur la touche MENU/ENTER de la
télécommande pour activer le sous-menu ou la rubrique
souhaitée.
CONTRASTE
LUMINANCE
PIQUÉ
COULEUR
TEINTE
MODE IMAGE
NR
PAGE
SEL. ADJ. RETOUR
IMAGE 1 / 2
: NORMAL
+
: ARRET
EXIT
: 52
: 32
: 16
: 32
GR
: 32
4. Régler le niveau ou modifier le réglage de la rubrique
souhaité à l’aide des touches
la télécommande.
5. Le réglage ou le paramétrage est mémorisé.
La modification devient la référence jusqu’à nouveau
paramétrage.
6. Répéter les étapes 2 à 5 pour régler un paramètre
supplémentaire ou appuyer sur la touche EXIT (sortie) de
la télécommande pour retourner au menu principal.
* Lors du réglage à l’aide de la barre au bas de l’écran,
appuyez sur la touche
ou dans les 5 secondes. Si vous
ne le faites pas, la configuration actuelle est sauvegardée
et l’écran précédent apparaît.
Fr-11
Page 30

Arborescence de menus
* Pour plus de détails sur chaque élément de menu, veuillez vous référer au CD-ROM.
:La partie hachurée indique la valeur par défaut.
←→
: Appuyer sur le bouton
ou pour régler.
:Les rubriques du menu sont accessibles dans une fenêtre réglée quand OSM AVANCÉ est réglé sur MARCHE.
MENU PRINCIPAL SOUS-MENU SOUS-MENU 2 SOUS-MENU 3 SOUS-MENU 4
IMAGE CONTRASTE ←→ 0←52→72 OUI Fr-20
MENU PRINCIPAL SOUS-MENU SOUS-MENU 2 SOUS-MENU 3 SOUS-MENU 4
AUDIO BASSE ←→ 0←13→26 OUI Fr-22
LUMINANCE ←→ 0←32→64 OUI Fr-20
PIQUÉ ←→ 0←16→32 OUI Fr-20
COULEUR ←→ 0←32→64 OUI Fr-20
TEINTE R←→G 0←32→64 OUI Fr-20
MODE IMAGE CLAIR/NORMAL/CINEMA1/CINEMA2/DEFAUT OUI Fr-20
NR ARRET/NR-1/NR-2/NR-3 OUI Fr-20
TEMP. COUL BASSE -/BASSE +/MEDIUM/HAUTE OUI Fr-20
BALANCE DES BLANCS
GAMMA 1←→2←…→4 OUI Fr-21
TON BAS *
REGL COULEUR ROUGE J←→M0←32→64 OUI Fr-21
AIGUE ←→ 0←13→26 OUI Fr-22
BALANCE L←→R -22←0→+22 OUI Fr-22
AUDIO INPUT1 VIDEO 1-3 / HD/DVD 1-2 / RGB 1-3 OUI Fr-22
AUDIO INPUT2 VIDEO 1-3 / HD/DVD 1-2 / RGB 1-3 OUI Fr-22
AUDIO INPUT3 VIDEO 1-3 / HD/DVD 1-2 / RGB 1-3 OUI Fr-22
3
LUM. ROUGE ←→ 0←40→70 OUI Fr-21
LUM. VERTE ←→ 0←40→70 OUI Fr-21
LUM. BLEUE ←→ 0←40→70 OUI Fr-21
CONT. ROUGE ←→ 0←40→70 OUI Fr-21
CONT. VERTE ←→ 0←40→70 OUI Fr-21
CONT. BLEUE ←→ 0←40→70 OUI Fr-21
RESET ARRET←→MARCHE OUI Fr-21
AUTO←→1←…→3 OUI Fr-21
VERT C←→J0←32→64 OUI Fr-21
BLEU M←→C0←32→64 OUI Fr-21
JAUNE V←→R0←32→64 OUI Fr-21
MAGENTA R←→B0←32→64 OUI Fr-21
CYAN B←→V0←32→64 OUI Fr-21
RESET ARRET←→MARCHE OUI Fr-21
RÉINITIALISATION REFERENCE
RÉINITIALISATION REFERENCE
MENU PRINCIPAL SOUS-MENU SOUS-MENU 2 SOUS-MENU 3 SOUS-MENU 4
REGLAGE IMAGE MODE NORMAL/COMPLET/STADIUM/ZOOM/2.35:1/14:9/REELLE*
V-POSITION ←→ -64←0→+64 OUI Fr-22
H-POSITION ←→ -128←0→+127 OUI Fr-22
V-HAUTEUR ←→ 0←→64 OUI Fr-22
H-LARGEUR ←→ 0←→64 OUI Fr-22
RÉGLAGE AUTO ARRET←→MARCHE*
1
RÉG FIN*
RÉG. IMAGE*
MENU PRINCIPAL SOUS-MENU SOUS-MENU 2 SOUS-MENU 3 SOUS-MENU 4
OPTION1 OSM AFFICHER OSM ARRET←→MARCHE OUI Fr-23
SELECT BNC RGB←→COMP. OUI Fr-23
SELECT D-SUB RGB — Fr-23
SÉLECT. RVB AUTO OUI Fr-23
HD SELECT 1080B/1035I/1080A NON Fr-24
SELECT SKIP ARRET←→MARCHE OUI Fr-24
ALL RESET ARRET←→MARCHE — Fr-24
←→*20←→64 OUI Fr-22
1
←→*20←→128 OUI Fr-22
AJUST OSM 1←…→6 OUI Fr-23
ANGLE OSM HOR.←→VERT. OUI Fr-23
POSITION OSM ARRET←→MARCHE OUI Fr-23
CONTRAST. OSM BASSE-←→NORMAL OUI Fr-23
2
3
RÉINITIALISATION REFERENCE
— Fr-22
NON Fr-22
RÉINITIALISATION REFERENCE
Fr-12
Page 31

MENU PRINCIPAL SOUS-MENU SOUS-MENU 2 SOUS-MENU 3 SOUS-MENU 4
OPTION2 ECO ÉNERGIE ARRET←→MARCHE OUI Fr-25
MODE CINEMA ARRET←→MARCHE OUI Fr-25
LONGUE DURÉE PLE AUTO/VERROU1/VERROU2/VERROU3 OUI Fr-25
ROTATION PIX AUTO 1 OUI Fr-26
INVERSION ARRET OUI Fr-26
SCREEN WIPER ARRET OUI Fr-27
FOCUS LEGER ARRET/1/2/3/4 OUI Fr-27
NIVEAU GRIS 0←…→3←…→15 OUI Fr-27
S1/S2 AUTO←→ARRET OUI Fr-28
TAILLE IMAGE*
DVI SET UP PLUG/PLAY PC←→STB/DVD NON Fr-28
CLOSECAPTION ARRET←→CC1~4←→TEXTE1~4 OUI Fr-28
CAPTION CONT. BAS←→NORMAL OUI Fr-28
MENU PRINCIPAL SOUS-MENU SOUS-MENU 2 SOUS-MENU 3 SOUS-MENU 4
OPTION3 TIMER HORLOGE HEURE D ETE ARRET←→MARCHE NON Fr-29
POWER ON ENTREE LAST / MULTI / VIDEO 1-3 / HD/DVD 1-2 / RGB 1-3 OUI Fr-30
VERROUILLAGE ARRET←→MARCHE OUI Fr-30
IR REMOTE ARRET←→MARCHE OUI Fr-31
MODE BOUCLE ARRET←→MARCHE OUI Fr-31
ID CONNEXION ALL←→1←…→4 NON Fr-31
NUMERO ID ALL←→1←…→256 OUI Fr-31
MUR D’IMAGE DECOUPAGE ARRET/1/4/9/16/25 OUI Fr-32
MENU PRINCIPAL SOUS-MENU SOUS-MENU 2 SOUS-MENU 3 SOUS-MENU 4
OPTION4 2EME SOURCE DETECTION ARRET←→AUTO OUI Fr-34
ZOOM NAVIG ARRET←→CT A CT←→BAS GCH←→BAS DRT←→HT DRTE←→HT GCH OUI Fr-34
GEL IMAGE ARRET←→CT A CT1←→CT A CT2←→BAS GCH←→BAS DRT←→HT DRTE←→HT GCH OUI Fr-35
SEAMLESS SW ARRET OUI Fr-35
AFFICH. TEXT ARRET / EN HAUT / 1/2SUP. / 1/2INF. / EN BAS
MENU PRINCIPAL SOUS-MENU SOUS-MENU 2 SOUS-MENU 3 SOUS-MENU 4
OSM AVANCÉ ARRET←→MARCHE OUI Fr-36
LANGAGE ENGLISH/DEUTSCH/FRANÇAIS/ESPAÑOL/ITALIANO/SVENSKA/У/PORTUGUÊS NON Fr-36
TV SYSTÈMES AUTO/3.58NTSC/4.43 NTSC/PAL/PAL 60/PAL-N/PAL-M/SECAM NON Fr-37
SIGNAL INFORMATION
— — Fr-37
3
ARRET←→MARCHE OUI Fr-28
BLACK LEVEL LOW←→HIGH NON Fr-28
PROGRAMME ARRET OUI Fr-29
MULTI REPET. ARRET OUI Fr-30
VOLUME LAST←→0←…→44 OUI Fr-30
POSITION
AFFICHAGE SPRIT←→BLANC OUI Fr-32
AUTO ID ARRET←→MARCHE OUI Fr-32
TRAME MODE
ON. DIFFÉRÉ ARRET/MARCHE/MODE1/MODE2 OUI Fr-33
PLE LINK ARRET←→MARCHE OUI Fr-33
REPEAT TIMER ARRET OUI Fr-34
AFFICHAGE FONDU←→NORMAL OUI Fr-34
TRANSPARENCE 20%←…→100% OUI Fr-34
MARCHE SÉLECT1/SÉLECT2 OUI Fr-35
AUTO 2 OUI Fr-26
MANUEL PIXEL H/LIGNE V/DURÉE OUI Fr-26
ARRET OUI Fr-26
MARCHE TEMPS FONCT./TEMPS ATTEN. OUI Fr-26
BLANC OUI Fr-26
MARCHE TEMPS FONCT./TEMPS ATTEN./VITESSE OUI Fr-27
JOUR/HEURE/MINUTES NON Fr-29
MARCHE DATE/ON/OFF(HEURE/MINUTES)/ENTRÉE/FONCTION OUI Fr-29
MARCHE MODE MULTI/WORK TIME/MODE ENTREE OUI Fr-30
No.1←…→No.4/No.7←…→No.15/No.16←…→No.31/No.32←…→No.56
NORMAL/COMPLET/STADIUM/ZOOM/2.35:1/14:9/REELLE*3— Fr-33
V-POSITION/H-POSITION/V-HAUTEUR/H-LARGEUR/RÉGLAGE AUTO/RÉG FIN*
MARCHE DECOUPAGE/SOURCE/WORK TIME OUI Fr-34
ENTREE/TRSPARENCE/AFFICHAGE OUI Fr-36
RÉINITIALISATION REFERENCE
RÉINITIALISATION REFERENCE
— Fr-32
1
/RÉG. IMAGE*
RÉINITIALISATION REFERENCE
RÉINITIALISATION REFERENCE
1
*1 Uniquement lorsque RÉGLAGE AUTO est désactivé
*2 RGB/PC uniquement
*3 “TAILLE IMAGE”, “REELLE” et “TON BAS” se sont que pour les types 50 et 61 pouces.
Restauration des réglages par défaut
(réglage d’usine)
Sélectionner “ALL RESET” sous le menu de OPTION1. Noter que cette action restaure tous les réglages d’usine par défaut.
Fr-13
Page 32

Dépannage
Si l’image est de qualité médiocre ou s’il existe un autre problème, vérifier les réglages, le fonctionnement, etc., avant
d’appeler le service après-vente.
Symptôme
L’appareil émet un bruit de
craquement.
L’image est déformée.
Le son est bruyant.
La télécommande fonctionne de
façon erronée.
La télécommande ne fonctionne
pas.
Le moniteur ne s’allume pas
lorsque l’on appuie sur la touche
marche de la télé-commande.
Le moniteur ne fonctionne pas
lorsque l’on appuie sur les touches
de la télécommand
Les boutons du panneau avant de
l’appareil principal ne fonctionnent
pas.
Le moniteur ne produit aucun son
ou image.
L’image est présente mais il n’y a
pas de son.
Image de qualité médiocre avec
une entrée de signal VIDEO.
Image de qualité médiocre avec
une entrée de signal RGB.
La teinte n’est pas correcte et les
couleurs sont faibles.
Rien n’apparaît à l’écran
Une partie de l’image n’est pas visible ou
l’image n’est pas centrée.
L’image est trop large ou trop petite.
L’image est instable.
L’indicateur ALLUME/VEILLE est
(POWER/STANDBY) s’allume en
rouge.
L’indicateur ALLUME/VEILLE
(POWER/STANDBY) clignote en et
rouge.
Le témoin ALIMENTATION/
ATTENTE clignote en vert et en
rouge, ou vert.
• L’image et le son sont-ils normaux ?
• Le composant connecté est-il placé directement devant
• Est-ce que les piles de la télécommande sont usagées ?
• Est-ce que la fonction IR REMOTE est réglée sur
• Est-ce que’un numéro d’ID a été assigné à l’unité
•
• Est-ce que les lampes témoins sont éteintes ?
• Est-ce que les piles de la télécommande sont usagées ?
• Est-ce que la fonction IR REMOTE est réglée sur
• Est-ce que’un numéro d’ID a été assigné à l’unité
• Est-ce que la télécommande est dirigée vers le moniteur
• Est-ce que le soleil ou une forte lumière éclaire le
• Est-ce que les piles de la télécommande sont usagées ?
• Le câble de commande est connecté dans la borne
• Les boutons du panneau avant ne fonctionnent pas
• Est-ce que le moniteur est raccordé au secteur ?
• Est-ce que le volume est réglé sur le minimum ?
• Est-ce que le volume est en sourdine ?
• Est-ce que les haut-parleurs sont raccordés
• L’entrée AUDIO INPUT est-elle effectuée correcte-ment
• Réglage des commandes inadapté.
• Réglage des commandes inadapté.
• Est-ce que la teinte et la couleur sont rég-lées
• Est-ce que l’ordinateur est en marche ?
• Est-ce qu’une source est connectée ?
• Est-ce que la gestion d’énergie est en veile ou sur arrêt ?
•
• Est-ce que le réglage de l’emplacement de l’image a été
• Est-ce que les réglages de dimension d’écrans ont été
• Est-ce que la résolution d’affichage est correcte ?
• Les signaux de synchronisation horizontale et/ou
• La température à l’intérieur de l’appareil principal est
Vérification
ou à côté de l’affichage?
MARCHE ?
principale ?
Est-ce que le moniteur est raccordé au secteur ?
ARRET ?
principale ?
ou y a-t-il un obstacle entre la télécommande et le
moniteur ?
capteur de la télécommande du moniteur ?
REMOTE IN (commande par câble).
lorsque le mode de verrouillage des commandes est
activé.
correctement ?
?
Interférence localisée.
Interconnexions des câbbles.
L’impédance en entrée n’est pas à un niveau correct.
Connexion incorrete sur connecteur à 15 broches.
correctement ?
Est-ce le MODE BOUCLE est réglé sur MARCHE ?
effectué ?
effectués ?
verticale ne sont pas présents lorsque le mode de
gestion de l’énergie est activé.
devenue trop élevée et cela a enclenché la sécurité de
protection.
———
• S’il n’y a pas d’anomalie dans l’image et le son ; le bruit
est causé par le boîtier réagissant à des changements
de température. Ceci n’affectera pas le bon
fonctionnement de l’appareil.
• Laisser un certain espace entre l’affichage et les
composants connectés.
• Remplacer les deux piles par des neuves.
• Régler IR REMOTE sur ARRET dans le menu
OPTION3.
• Assigner un numéro d’ID à l’aide de la touche ID
SELECT ou régler le numéro d’ID sur ALL.
• Brancher le câble d’alimentation au secteur.
• Appuyer sur la touche d’alimentation du moniteur pour
l’allumer.
• Remplacer les deux piles par des neuves.
• Régler IR REMOTE sur MARCHE dans le menu
OPTION3.
• Assigner un numéro d’ID à l’aide de la touche ID
SELECT ou régler le numéro d’ID sur ALL.
• Diriger la télécommande vers le capteur du moniteur en
appuyant sur la touche ou retirer l’obstacle.
• Éliminer la source de lumière en tirant les rideaux ou en
dirigeant la lumière dans une direction différente.
• Brancher le câble d’alimentation au secteur.
• Débrancher le câble de commande du moniteur.
• Régler le VERROUILLAGE sur ARRET.
• Remplacer les deux piles par des neuves.
• Augmenter le volume.
• Appuyer sur la touche sourdine de la télécommande.
• Raccorder les haut-parleurs correctement.
• Régler correctement AUDIO INPUT dans le menu
AUDIO.
• Ajuster les commandes de l’image est nécessaire.
Essayer un autre emplacement pour le moniteur.
S’assurer que tous les raccordements sont sûrs.
• Ajuster les commandes de l’image comme nécessaire.
Vérifier l’assignement des broches et les connexions.
• Régler la teinte et la couleur (Menu “IMAGE”).
• Mettre l’ordinateur en marche .
• Connecter une source au moniteur.
• Activer l’ordinateur (déplacer la souris, etc.).
• Régler le MODE BOUCLE sur ARRET.
• Ajuster “REGLAGE IMAGE” correctement.
• Appuyer sur la touche “WIDE” (écran large) de la
télécommande et régler cor-rectement les dimensions.
• Sélectionner la résolution d’affichage correcte.
• Vérifier le signal en entrée.
• Eteindre rapidement l’appareil principal et attendre que
la température interne se soit abaissée. Voir*1.
• Eteindre rapidement l’appareil principal. Voir *2.
Solution
*1 Protection anti-surchauffe
Si la température du moniteur devient excessive, la protection contre les surchauffes entrera en action et coupera l’alimentation.
Dans ce cas, éteindre l’appareil et débrancher le câble d’alimentation. Si la température de la pièce dans laquelle le moniteur
est installé est particulièrement excessive, déplacer l’appareil dans un endroit plus frais et le laisser refroidir 60 minutes. Si le
problème persiste, prendre contact avec votre revendeur.
*2 Dans le cas suivant, éteindre immédiatement le moniteur et contacter un revendeur ou un centre agréé.
Le moniteur s’éteint 5 secondes après avoir été allumé et ensuite l’indicateur POWER/ST ANDBY clignote. Cela signifie que
le circuit d’alimentation électrique, la dalle d’affichage à plasma, le capteur de température ou un ventilateur au moins sont
défectueux.
Fr-14
Page 33

Caractéristiques
Dimensions de l’écran 36,3"(H)⳯20,3"(l) pouces
922(H)⳯515(l) mm
42" de diagonale
Rapport largeur/hauteur 16 / 9
Résolution 1024(H)⳯768(l) pixels
Pixel Pitch 0,036"(H)⳯0,027"(V) pouces
0,9(H)⳯0,671(V) mm
Traitement des couleurs 4.096 paliers, 68,7 milliards de couleurs
Signaux
Gamme de Horizontal : de 15,5 à 110,0 kHz
synchronisation (Automatique : scanner par incréments)
Vertical : de 50,0 à 120,0 Hz
(Automatique : scanner par incréments)
Signaux d’entrée RGB, NTSC (3,58/4,43), PAL (B,G,M,N),
P AL60, SECAM, HD*
1
, DVD*1 , DTV*
Bornes d’entrées (VIDÉO1 et RGB1 peuvent également servir de bornes de SORTIE)
RGB
Visuelle 1 (Analog)
Visuelle 2 (Analog)
Visuelle 3
(numérique)
Connecteur Mini sub D à 15 broches ⳯1
Connecteur BNC (R, G, B, HD, VD)⳯1
Connecteur
DVI-D
à 24 broches ⳯1
*
3
*
Vidéo
Visuelle 1
Connecteur BNC ⳯1
Visuelle 2 Connecteur RCA⳯1
Visuelle 3
DVD/HD
Visuelle 1
Visuelle 2
Visuelle 3
S-Vidéo : Connecteur DIN à 4 broches ⳯ 1
Connecteur RCA (Y, Cb/Pb, Cr/Pr)
Connecteur BNC (Y, Cb/Pb, Cr/Pr)⳯1*1,*
Connecteur
DVI-D
à 24 broches ⳯1
⳯ 1
1
*
2
3
*
Audio Connecteur RCA Stéréo⳯3 (sélectable)
Commande externe
Connecteur D-sub à 9 broches (RS- 232C)
Sortie son 8W+8W à 6 Ohm
Alimentation CA100-240V 50/60Hz
Ampérage nominal 4,5A (maximum)
Consommation de 285W (habituel)
l’alimentation
Dimensions 40,2 (L)⳯24 (l)⳯3,9 (P) pouces
1022 (L)⳯610 (l)⳯98 (P) mm
Poids 66 lbs / 30 kg (sans support)
Contexte d’utilisation
à
Température d’utilisation 0°C
Humidité 20
40°C / 32°F à 104°F
à
80% (sans condensation)
Altitude 720 à 1114 hPa
(0 à 9180 pieds / 0 à 2800 m)
à
Température de stockage -10°C
Humidité 10
50°C / 14°F à 122°F
à
90% (sans condensation)
Altitude 700 à 1114 hPa
(0 à 9840 pieds / 0 à 3000 m)
Autres caractéristiques
Convertisseur de lecture 3D à compensation de
mouvement (NTSC, P AL, 480I, 576I, 525I,
625I, 1035I, 1080I), Convertisseur d’appel 2-3
(NTSC, 480I, 525I, 1035I, 1080I (60Hz)),
Convertisseur d’appel 2-2 (P AL, 576I, 625I,
NTSC, 480I, 525I), Fonction zoom numérique
(réglable 100-900%), Mur d’images 4-25 à
multi-écrans, Auto-diagnostic, Anti image
rémanente (PLE VERROU1~3, INVERSION,
BLANC, ROTATION PIX (Auto1,2/Manuel)
SCREEN WIPE), Sélection de la température
des couleurs (haut/medium/basse +/basse -,
4 réglages utilisateur mémorisables),
Verrouillage des commandes (sauf alimentation
électrique), Auto-image, Saut d’entrée,
Ton couleurs, Ton bas (3 modes), Auto ID,
Minuterie programmable, Correction de
gamma (4 modes), Interface mise en boucle,
Plug and Play (DDC1, DDC2b, RGB3: DDC2b
uniquement), Opérations de DECOUPE
D’IMAGE
Réglementations UL 60950-1, CAN/CSA-C22.2 No.60950-1-03,
FCC classe B, ICES-003 classe B
1,59"
40,2" (1022)
36,3" (922)
20,3" (515)
1
Les unité sont indiqués en pouces
(40,4)
24" (610)
3,9"
(98)
2,31"
(57,6)
(mm)
Les caractéristiques techniques et spécifications peuvent faire
l’objet de modifications sans préavis.
2
*1Entrée de signaux HD/DVD/DTV compatibles sur ce système.
480P (60 Hz) 480I (60 Hz) 525P (60 Hz)
525I (60 Hz) 576P (50 Hz) 576I (50 Hz)
625P (50 Hz) 625I (50 Hz) 720P (60 Hz)
720P (50 Hz) 1035I (60 Hz) 1080I (50 Hz)
1080I (60 Hz) 1080P (50 Hz) 1080P (60 Hz)
2
*
Les connecteurs 5-BNC servent pour les entrées RGB/PC2 et
HD/DVD2. Choisir une entrée sous “SELECT BNC”.
3
Compatible avec HDCP.
*
Signaux supportés
• 640ⴒ480P @ 59,94/60Hz • 1920ⴒ1080I @ 50Hz
• 1280ⴒ720P @ 59,94/60Hz • 720ⴒ576P @ 50Hz
• 1920ⴒ1080I @ 59,94/60Hz • 1280ⴒ720P @ 50Hz
• 720ⴒ480P @ 59,94/60Hz
Remarque : Dans certains cas, un signal sur le moniteur plasma peut
ne pas être affiché correctement. Le problème peut être un manque de
cohérence avec la norme de l’équipement source (DVD, Boîtier
décodeur, etc…). Si vous rencontrez un tel problème, veuillez contacter
NEC Solutions (America), Inc. ainsi que le fabricant de l’équipement
source.
Fr-15
Page 34

Garantie limitée Moniteurs Plasma
NEC Solutions, Inc. (nommé ci-après NEC Solutions)
garantit que ce produit est exempt de tout défaut de
matériau et d’assemblage sous les termes suivants et, dans
les conditions établies ci-dessous, accepte de réparer ou
remplacer (au choix de NEC Solutions) toute pièce interne
de l’appareil qui s’avère défectueuse. Les pièces ou
produits de rechange peuvent être neufs ou remis en état
et auront les mêmes caractéristiques techniques que les
pièces ou produits d’origine.
COMBIEN DE TEMPS DURE LA GARANTIE ?
Les pièces et la main d’ouvre sont garantis pendant (1) un
an à compter de la date de premier achat.
A QUI BENEFICIE-T-ELLE ?
Seule l’acheteur initial peut profiter de la garantie.
CE QUE LA GARANTIE COUVRE ET CE
QU’ELLE NE COUVRE PAS
Sauf indication contraire ci-dessous, la garantie couvre
tous les défauts de matériau ou d’assemblage de ce produit.
Ce qui suit n’est pas couvert par la garantie :
1. Tout produit qui n’est pas distribué aux U.S.A. ou au Canada par
NEC Solutions ou qui n’est pas acheté aux U.S.A ou au Canada
par un distributeur agréé NEC Solutions.
2. Tout produit dont le numéro de série a été effacé, modifié ou
retiré.
3. Les dommages, détériorations ou dysfonctionnements résultants
de :
a. Accident, mauvaise utilisation, abus, négligence, feu, eau,
éclairs ou autres actes de la nature, modification non-autorisée
du produit ou non-respect des instructions fournies avec le
produit.
b. Réparation ou tentative de réparation par toute personne non
agréée par NEC Solutions.
c. Toute expédition du produit (les réclamations doivent être
présentées au transporteur).
d. Retrait ou installation du produit.
e. Toute autre cause qui n’est pas liée à un défaut du produit.
f. Brûlures ou images résiduelles sur le phosphore du panneau.
4. Cartons, mallettes de transport, batteries, boîtiers externes, bandes
magnétiques ou tout accessoire utilisé en association avec le
produit.
5. Réparations en dehors des U.S.A. ou du Canada.
CE QUE NOUS PAIERONS ET CE QUE NOUS
NE PAIERONS PAS
Nous paierons les coûts de main d’œuvre et de matériel
pour les éléments couverts par la garantie, mais nous ne
paierons pas pour ce qui suit :
1. Frais de retrait et d’installation.
2. Coûts des réglages techniques initiaux (configuration), y-compris
le réglage des commandes utilisateur. Ces coûts relèvent de la
responsabilité du revendeur NEC Solutions auquel le produit a
été acheté.
3. Frais d’envoi.
COMMENT OBTENIR LE SERVICE DE
GARANTIE
1. Pour obtenir le service de garantie, consultez le revendeur auquel
vous avez acheté le produit.
2. A chaque fois qu’une réparation est nécessaire, la facture datée
originale (ou une copie) doit être présentée comme preuve de la
garantie.
Veuillez également inclure à tout envoi votre nom, adresse et
une description du (des) problème(s).
3. Pour connaître le nom du centre de service agréé NEC Solutions
le plus proche, appeler NEC Solutions au 800-836-0655.
LIMITATIONS DE RESPONSABILITE
A l’exception des obligations spécifiquement établies dans
cette déclaration de garantie, nous ne serons pas
responsables de tout dommage direct, indirect, spécial,
accessoire, immatériel, ou de tout autre type de dommages,
qu’ils soient basés sur un contrat, une action délictuelle
ou toute autre théorie légale, et ceci que nous ayons été
informés de la possibilité de tels dommages ou non. Cette
garantie se substitue à toute autre garantie explicite ou
implicite, y-compris mais sans limiter, aux garanties
implicites de qualité marchande ou de compatibilité avec
un usage particulier.
EXCLUSION DE DOMMAGES
La responsabilité de NEC Solutions pour tout produit
défectueux est limitée à la réparation ou au remplacement
du produit, selon notre choix. NEC Solutions ne saurait
être responsable de :
1. Dommage causé à d’autres biens résultants de défauts de ce
produit, dommages de nuisance, perte de l’utilisation de ce
produit, perte de temps, pertes commerciale ; ou
2. Tout autre dommage, qu’il soit accessoire, immatériel ou autre.
Certains Etats ne permettent pas la limitation de durée d’une
garantie implicite et/ou ne permettent pas l’exclusion ou la
limitation des dommages accessoires ou immatériels, de sorte
que les limitations et exclusions peuvent ne pas s’appliquer dans
votre cas.
RELA TIONS ENTRE LA LEGISLATION LOCALE
ET LA GARANTIE
Cette garantie vous donne des droits légaux spécifiques,
et vous pouvez avoir également d’autres droits qui varient
d’un Etat à l’autre.
POUR PLUS D’INFORMATION
TELEPHONE 800-836-0655
NEC SOLUTIONS (AMERICA), INC.
1250 N. Arlington Heights Road, Suite 400
Itasca, Illinois 60143-1248
Remarque:
Il est NECESSAIRE d’obtenir une
autorisation avant de retourner tout produit à NEC
Solutions (America), Inc. pour réparations. Pour obtenir
cette autorisation, appeler NEC Solutions (America),
Inc.au 800-836-0655.
Fr-16
Page 35

Guía de inicio
(Modelo con función multi pantalla)
Para el funcionamiento de su monitor de plasma, consulte el CD-ROM.
Índice
Información importante ................................ Sp-2
Instalación ................................................... Sp-4
Necesidades de ventilación en el caso de
montaje en un sitio cerrado ................................Sp-4
Creación de una video wall (videopared)................ Sp-5
Sujeción de los cables........................................... Sp-5
Precauciones a tomar al instalar el monitor de plasma
verticalmente ....................................................Sp-6
Cómo emplear el mando a distancia ......................Sp-6
Instalación y cambio de pilas ................................. Sp-6
Utilización del modo de mando a distancia con
conexión de cable ................................................ Sp-6
Radio de acción ..................................................... Sp-6
Manipulación del mando a distancia ...................... Sp-6
Nombres y funciones de las partes ................ Sp-7
Vista Frontal ........................................................Sp-7
Vista Posterior/Placa de terminales ........................ Sp-8
Mando a distancia ...............................................Sp-9
Operaciones básicas .................................... Sp-10
POWER (alimentación) .......................................Sp-10
Para encender y apagar la unidad (ON/OFF):....... Sp-10
VOLUME (volumen) ............................................ Sp-10
Para ajustar el nivel del sonido: ............................ Sp-10
MUTE (silenciamiento) ........................................Sp-10
Para desactivar el sonido: ..................................... Sp-10
DISPLAY (pantalla de visualización) ......................Sp-10
Para comprobar los ajustes:.................................. Sp-10
DIGITAL ZOOM (zoom digital) ............................Sp-10
AUTO ADJUST (ajuste automático)....................... Sp-10
Para ajustar automáticamente el tamaño o la
calidad de la imagen: ......................................... Sp-10
OFF TIMER (temporizador de desconexión) ........... Sp-10
Para ajustar el temporizador de desconexión: ....... Sp-10
Para comprobar el tiempo que queda: .................. Sp-10
Cancelación del temporizador de desconexión: .... Sp-10
Controles OSM (en pantalla) ........................ Sp-11
Funciones de Menú ............................................ Sp-11
Árbol del Menú .................................................Sp-12
Solución de Problemas ................................ Sp-14
Especificaciones .......................................... Sp-15
Garantía limitada Monitores de plasma ................. Sp-16
Manual del usuario en CD-ROM
䢇 El manual del usuario completo se suministra en el CD-ROM
en PDF (Portable Document Format) y proporciona
información detallada del producto y del uso para su monitor
de plasma NEC.
Es necesario tener el programa Adobe Acrobat Reader™ o
Adobe Reader™ con el fin de poder visualizar o imprimir los
archivos PDF.
NOTA:
Es posible descargar los programas Adobe Acrobat
Reader o Adobe Reader del sitio web de Adobe.
Visite http://www.adobe.com y descargue la versión actual para
sus SO.
䢇 Visualización del manual del usuario (PDF)
[Windows]
1. Inserte el CD-ROM suministrado en la unidad de CD-ROM de su
ordenador.
2. Debería aparecer un menú automáticamente.
Si no sucede esto:
1) En la sobremesa de Windows, haga doble clic en el icono [My
Computer].
2) Haga doble clic en la letra de la unidad de CD-ROM de
[NECPLASMA-UM].
3) Haga doble clic en “start_menu.pdf”.
3. Haga clic en el nombre de su producto.
El manual del usuario aparecerá en la pantalla.
[Macintosh]
1. Inserte el CD-ROM suministrado en la unidad de CD-ROM de su
ordenador Macintosh.
2. Haga doble clic en el icono del CD-ROM [NECPLASMA-UM].
3. Haga doble clic en “start_menu.pdf”.
Se visualizará el menú de Start.
4. Haga clic en el nombre de su producto.
El manual del usuario aparecerá en la pantalla.
䢇 Copiado del manual del usuario (PDF) a su ordenador
Es posible copiar el manual del usuario suministrado en el
CD-ROM en el disco duro de su ordenador.
ESPAÑOL
Contenido del embalaje
䡺 Monitor de plasma
䡺 Cable de alimentación
䡺 Mando a distancia con dos pilas tamaño AAA
䡺 Manuales (Guía de inicio y CD-ROM)
䡺 Núcleo de ferrita
䡺 Abrazadera de cables
Accesorios opcionales
• Unidad de montaje para pared
• Unidad de montaje para techos
• Unidad de montaje inclinado
• Soporte para mesa
• Altavoces externos
Page 36

Información importante
Precauciones
Rogamos que lea este manual atentamente antes de utilizar el Monitor de
Plasma y que lo guarde en un lugar seguro para futuras consultas.
PRECAUTION..
RIESGO DE DESCARGA
ELÉCTRICA NO ABRIR
PRECAUCIÓN:
CON EL OBJETO DE DISMINUIR EL RIESGO DE
DESCARGAS ELÉCTRI-CAS, ROGAMOS NO
QUITAR LA TAPA.
DENTRO DE LA UNIDAD NO HAY PIEZAS QUE
PUEDAN SER REPA-RADAS POR EL USUARIO.
REMITIR LA ASISTENCIA TÉCNICA SÓLO A PERSONAL TÉCNICO CUALIFICADO.
Este símbolo advierte al usuario que la tensión sin aislar
dentro de la unidad puede ser lo suficientemente alta como
para producir descargas eléctricas. Por lo tanto, es peligroso
cualquier tipo de contacto con las piezas que se encuentran
dentro de la unidad.
Este símbolo advierte al usuario de la inclusión de literatura
importante concerniente al funcionamiento y mantenimiento
de la unidad. Por lo tanto, debe leerse atentamente con el
objeto de evitar cualquier tipo de problemas.
ADVERTENCIA
PARA EVITAR INCENDIOS Y PELIGROS DE DESCARGA
ELÉCTRICA, NO SE DEBE EXPONER LA UNIDAD A LA
LLUVIA NI A LA HUMEDAD. ADEMÁS, NO DEBE UTILIZARSE
LA T OMA POLARIZADA DE ALIMENT ACIÓN DE LA UNIDAD
CON CABLES ALARGADORES U OTRAS T OMAS, A MENOS
QUE LAS PUNTAS DE LOS ENCHUFES PUEDAN
INTRODUCIRSE A FONDO. ABSTENERSE DE ABRIR EL
APARA TO Y A QUE HA Y COMPONENTES DE AL T A TENSIÓN
DENTRO DE ÉL. REMITIR LA ASISTENCIA TÉCNICA A
PERSONAL DE SERVICIO TÉCNICO CUALIFICADO.
Advertencias y Precauciones de
Seguridad
Este monitor de plasma ha sido diseñado y fabricado con la idea de un
servicio largo en el tiempo y libre de problemas de asistencia técnica.
Consulte la sección “Procedimiento de limpieza del monitor de plasma”.
El panel de visualización de plasma consiste en elementos de
una imagen fina (células). Con más de un 99,99 por ciento de
células activas. Puede que algunas células no produzcan luz o no
se mantengan encendidas.
Para que el funcionamiento sea seguro y también, para evitar daños a la
unidad, rogamos leer y observar atentamente las siguientes instrucciones.
Para evitar riesgos de golpes e incendios:
1. Disponer de un adecuado espacio para la ventilación y así evitar
acumulaciones de calor interno. No cubra las rejillas de ventilación
posteriores ni instale la unidad en un mueble o en baldas cerradas.
Si instala la unidad en un mueble o en un estante, asegúrese de que
haya un espacio adecuado en la parte superior de la misma para que el
calor pueda elevarse y disiparse.
Si el monitor se calienta demasiado, se activará el pro-tector contra
recalentamiento y el monitor se apagará.
Si ocurriera esto, desconecte la alimentación del moni-tor y desenchufe
el cable de alimentación. Si la habitación donde está instalado el
monitor es particularmente cálida, traslade el monitor a un sitio más
fresco y espere 60 minutos a que se enfríe. Si persiste el problema,
póngase en contacto con el distribuidor.
No utilice el enchufe polarizado de esta unidad con cables o tomas de
2.
alargadores, a menos que las puntas del conector puedan insertarse a fondo.
3.
Desenchufe el cable de alimentación durante el transcurso de tormentas eléctricas
o si no se va a utilizar la unidad durante un periodo de tiempo prolongado.
4. Evite daños al cable de alimentación, y no intente modificar el mismo.
Desenchufe el cable de alimentación durante el transcurso de tormentas eléctricas
5.
o si no se va a utilizar la unidad durante un periodo de tiempo prolongado.
6. No abra el aparato ya que contiene componentes de alta tensión que
son potencialmente peligrosos. Si la unidad resulta dañada por esta
causa, la garantía quedará anuladainmediatamente. Además existe el
grave riesgo de descarga eléctrica.
7. No intente ningún mantenimiento técnico ni reparación de la unidad.
El fabricante no se hace responsable de ninguna lesión o daño corporal
ocasionado por personas no calificadas que intenten reparar el aparato
o abrir la tapa posterior. Remitir cualquier asistencia técnica necesaria
a los Centros de Servicio Técnico autorizados.
8. Este equipo debe conectarse a la toma de corriente general (MAIN)
Sp-2
con una conexión con protección a tierra.
9. La toma de corriente debe estar instalada cerca del equipo y debe ser
de fácil acceso.
Para evitar daños y prolongar la vida útil del aparato observe los
siguientes consejos:
1. Utilice sólo alimentación eléctrica de 100-240 V 50/60 Hz c.a. El
funcionamiento continuado en líneas de tensión de más de 100-240
voltios acortará la vida útil de la unidad, y podría ser causa de riesgos
de incendios.
2. Manipule la unidad con cuidado al instalarla y evite que se caiga.
Sitúe el aparato alejado de fuentes de calor , del polvo, y de la luz solar directa.
3.
4. Proteja la parte interior de la unidad contra líquidos y pequeños objetos
metálicos. En caso de accidente, desenchufe el cable de alimentación
y lleve la unidad a un Centro de Servicio Autorizado.
5. Evite que se produzcan golpes y arañazos en la superficie del panel ya
que esto estropeará la superficie de la pantalla.
6. Para una instalación y montaje correctos, se recomienda
encarecidamente tratar con un distribuidor autorizado.
Como todas las pantallas de visualización que se basan en fósforo (como por
7.
ejemplo, el monitor CRT) la emisión de luz emitida por el panel de
visualización de plasma se perderá gradualmente durante su uso normal.
8. Para evitar la sulfatación se recomienda encarecidamente no colocar
la unidad en los vestuarios de baños públicos ni baños termales.
9. No utilice la unidad en un vehículo en movimiento, debido a que esta
se puede caer o volcarse y causar lesiones.
No coloque la unidad sobre su costado, boca bajo o con la pantalla cara arriba
10.
o abajo, con el fin de evitar una posible combustión o una descar ga eléctrica.
Procedimiento de limpieza del monitor de plasma:
1. Utilice un paño suave y seco para limpiar el panel delantero y el área
del marco. No utilice nunca disolventes como, por ejemplo, alcohol o
diluyente para limpiar estas superficies.
2. Limpie las áreas de ventilación del monitor de plasma con una
aspiradora equipada con una boquilla de cepillo blando.
3. Para asegurar una ventilación apropiada, la limpieza de las áreas de
ventilación deberá realizarse mensualmente. Dependiendo del lugar
en que se instale el monitor de plasma tal vez sea necesario realizar la
limpieza con mayor frecuencia.
Recomendaciones para evitar o minimizar las quemaduras por fósforo:
Como todas las pantallas de visualización que se basan en fósforo y otros
tipos de visualizaciones de plasma de gas, los monitores de plasma pueden
ocasionar quemaduras por fósforo bajo ciertas condiciones. Estas
condiciones de funcionamiento tales como la visualización constante de
una imagen estática por un período prolongado de tiempo, pueden resultar
en una quemadura por fósforo si no se toman las precauciones debidas.
Para proyectar sus imágenes en este monitor de plasma, por favor observe
los siguientes consejos y recomendaciones para minimizar las
posibilidades de una quemadura por fósforo:
Asegúrese de activar y utilizar el protector de pantalla de su ordenador cuando
*
sea posible mientras lo usa con una fuente de entrada de ordenador.
* Reproduzca una imagen en movimiento.
* Cambie la posición de visualización del menú de vez en cuando.
* Siempre que termine de usar el monitor desconecte la alimentación.
Si el monitor de plasma sufre un uso prolongado o funciona de forma
continuada, tome las siguientes medidas para reducir la posibilidad de
una quemadura por fósforo:
* Baje los niveles de contraste y brillo lo más posible sin que la
visualización de la imagen se vea perjudicada.
* Visualice una imagen colorida con gran gradación (por ej. imágenes
fotográficas o fotos realistas).
* Cree un contenido de imagen de contraste mínimo entre las áreas
iluminadas y las oscuras, por ejemplo con caracteres sobre un fondo
negro. Utilice colores complementarios o pastel cuando sea posible.
* Evite visualizar imágenes de pocos colores que posean bordes
distintivos definidos entre colores.
Sonido de funcionamiento del monitor de plasma
El panel del monitor de plasma está compuesto por píxeles extremadamente
finos, dichos píxeles emiten luz de acuerdo a las señales de vídeo recibidas.
Este principio puede ocasionar que se escuche un zumbido o un ruido
eléctrico proveniente del monitor de plasma. T enga en cuenta también que
cuando la temperatura ambiente del monitor de plasma es alta, la velocidad
de rotación del motor del ventilador de refrigeración aumentará. Es posible
que escuche el sonido del motor del ventilador en ese momento.
Nota:
La garantía no cubre los siguientes elementos.
• Retención de imagen
• Sonido generado por el panel, ejemplos: Ruido del motor del
ventilador, y zumbido de circuitos eléctricos/panel de vidrio.
Póngase en contacto con proveedores calificados o distribuidores
autorizados para otros procedimientos recomendados que se ajustarán
mejor a sus necesidades en particular.
Page 37

Advertencia
No utilizar en salas de ordenadores como se
especifica en la Norma para la protección de equipos
electrónicos de procesamiento de datos informáticos
ANSI/NFPA 75.
Precaución
Este modelo es para uso sólo con los siguientes
accesorios opcionales. Si se usa con otros
accesorios opcionales puede ocasionarse
inestabilidad dando lugar a posibles lesiones.
Este equipo ha sido probado y se ha comprobado
que cumple con los límites para un dispositivo digital
de clase B, de acuerdo con la Parte 15 de las Reglas
de FCC. Esos límites están concebidos para proveer
una protección razonable contra interferencias
prejudiciales en una instalación residencial. Este
equipo genera, utiliza, y puede radiar energía de
frecuencia de radio y, si no se instala y se utiliza de
acuerdo con las instrucciones, puede causar
interferencias prejudiciales a las comunicaciones de
radio. Sin embargo, no hay ninguna garantía de que
no ocurrirá interferencia en una instalación particular.
Si este equipo causa interferencia perjudicial a la
recepción de radio o televisión, que se puede
determinar mediante el encendido y apagado del
equipo, se recomienda al usuario que intente corregir
la interferencia a través de una o más de las medidas
siguientes:
• Reoriente o reubique la antena de recepción.
• Aumente la separación entre el equipo y el receptor.
• Conecte el equipo a una toma de corriente en un
circuito diferente del cual el receptor está conectado.
• Consulte su revendedor o un técnico experimentado
de radio /TV para ayuda.
Este aparato digital de clase B cumple con la norma
Canadiense ICES-003.
Nombre del fabricante: NEC Viewtechnology, Ltd.
Altavoces: PX-42SP1U, PX-SP2U/S, PX-SP2U/B
Soporte: PX-ST1U, PX-ST1U/S
Contacte con NEC Solutions (America), Inc. para
obtener los accesorios opcionales aprobados.
Cómo deshacerse del
producto utilizado
La legislación de la UE puesta en práctica
en cada estado miembro requiere que los productos
eléctricos y electrónicos que lleven la marca
(izquierda) deben de deshacerse separadamente de
la basura normal. Esto incluye monitores plasma y
sus accesorios eléctricos. Cuando se deshaga de
tales productos, siga los consejos de su autoridad
local o pregunte en la tienda en la que adquirió el
producto.
Después de recoger los productos utilizados, se
vuelven a utilizar y a reciclar de forma adecuada.
Este esfuerzo nos ayuda a reducir a un nivel mínimo
los desechos, y también los impactos negativos a
la salud humana y al medio ambiente.
La marca en los productos eléctricos y electrónicos
se aplica sólo a los actuales estados miembros de
la Unión Europea.
NOT A:
Cuando conecte un ordenador a este monitor, utilice un
cable RGB que incluya el núcleo de ferrita en ambos
extremos del cable. Y en cuanto al cable de alimentación,
coloque los núcleos de ferrita suministrados. Si no hace
esto, este monitor no cumplirá con los estándares del
mandatorio FCC.
Coloque los centros de ferrita en ambos extremos del cable
de alimentación (suministrado).
Utilice la cinta para fijar el centro de ferrita (suministrado)
en el cable de alimentación.
Cable de alimentación (suministrado)
cinta
centro
cinta
centro
PRECAUTION
Al deshacerse de las pilas usadas, hágalo conforme
a las regulaciones gubernamentales o la normativa
pública de instrucciones medioambientales que se
apliquen en su país/localidad.
Sp-3
Page 38

50mm (2")
50
mm
(2") 50
mm
(2")
Pared
Pared
50mm (2")
50mm (2")
Instalación
Se pueden conectar monturas o bases opcionales al moni-tor de plasma en una de las dos siguientes maneras:
* Durante en se coloca de manera vertical. (Véase la ilustración A)
* Si se coloca con la pantalla boca abajo (Véase la ilustración B). Ponga la hoja de protección, que se colocó para cubrir el
monitor durante el embalaje, debajo de la superficie de la pantalla de forma tal que ésta no resulte arañada.
* No toque ni sujete la pantalla cuando transporte la unidad.
• Este dispositivo no puede ser instalado sobre sí mismo. Asegúrese de utilizar un soporte o una
unidad de montaje original. (unidad de montaje para pared, estante, etc.)
• Para instalar y montar correctamente este aparato, se recomienda altamente consultar a su
distribuidor entrenado y autorizado.
Un montaje incorrecto puede causar daños al equipo o lesiones a la persona que lo instale.
La garantía de este producto no cubrirá los daños causados por una instalación incorrecta.
* Utilice solamente el kit de instalación o el soporte suministrado por el fabricante y listado en
Opciones.
Ilustración A
Ilustración B
Necesidades de ventilación
en el caso de montaje en
un sitio cerrado
Para permitir que se disperse el calor, deje espacio entre
los objetos de alrededor, tal como se muestra en el
diagrama durante la instalación.
Sp-4
Page 39

Parte posterior de la unidad
agujeros de montaje
Creación de una video wall (videopared)
RGB
2
/
DVD
2
/
HD
2
RGB
1
R/
VD
G/ B/
HD
(
IN/OUT
)
Cr/Pr Y Cb/Pb
IN OUT
REMOTE
Señal RGB/
Señal DVD/HD
ENTRADA
Conector BNC
SALIDA
Señal RGBl/
Señal DVD/HD
Mando a distancia
ENTRADA
SALIDA
Mando a distancia
Con la capacidad de visualización de matriz incorporada, usted puede crear una video wall 4-25.
• Conecte los cables de señales y los de mando a distancia como se muestra más abajo.
Señal de vídeo Señal RGB/DVD/HD
Conector BNC
VIDEO
VIDEO
(
IN/OUT
1
)
VIDEO
VIDEO
2
Señal de VIDEO
Mando a distancia
ENTRADA
ENTRADA
Clavija auriculares RCA
3
AUDIO
(
MONO
)
R
L
1
Y
DVD
1
IN OUT
REMOTE
Nota:
1. Los terminales VIDEO1 y RGB1 se pueden utilizar para INPUT y OUTPUT.
Cuando LAZO (LOOP OUT) esté en ON, no conecte una señal OUTPUT pr ocedente de otra unidad, por que esto podrá
poner una carga extraor dinaria en el otro aparato y dañarlo.
2. LAZO no se puede poner en ON mientras las señales se introducen en el terminal RGB1.
LAZO se puede poner en ON mientras las señales se introducen en el terminal RGB1 si POWER está en ON.
3.
Información
• Para dar salida a las señales de lazo a otro monitor de plasma, ponga LAZO en ON.
• Para crear una video wall, ajuste correctamente los elementos del menú VIDEO WALL.
• Para conectar monitores, utilice un cable BNC de 1-2 metros (3,3-6,6 pies) (cualquier cable de venta en tiendas).
• Si la calidad de la imagen es pobre, no utilice el terminal de salida del monitor . Utilice un amplificador de distribución
(cualquier amplificador de distribución de venta en el comercio) para conectar las señales divididas a los respectivos
terminales INPUT del monitor.
• Al ser utilizada como una función de vídeo mosaico, el estándar son como máximo 4-pantallas con una señal
inferior a 1024⳯768, 60Hz.
• Cuando se utilice una pantalla-9 y sobre video wall, se recomienda particularmente el uso de un amplificador de
distribución.
• Del segundo monitor en adelante, las conexiones requieren un conector o cable de conversión BNC-RCA, un cable
con mini conector D-Sub de 15 contactos-cable BNC (×5) o un conector de conversión.
SALIDA
SALIDA
Señal de VIDEO
Mando a distancia
Sujeción de los cables
Utilizando las abrazaderas de cables suministradas con el
monitor de plasma, sujete los cables de señales y de audio
conectados al monitor en la parte posterior de la unidad.
Para colocar Para desmontar
1. 2.
agujero de montaje
abrazader
p
cables
Sp-5
Page 40

External Control
IN OUT
REMOTE
Precauciones a tomar al instalar el monitor de plasma verticalmente
• Utilice la unidad opcional. Cuando vaya a realizar la instalación, póngase en contacto con el
almacén donde hizo la compra.
• Coloque el monitor de tal forma que lo vea de frente, gírelo 90° en el sentido de las
agujas del reloj al instalarlo.
90°
• Después de instalarlo, verifique que la marca con el logotipo NEC se visualice en el
lado frontal.
• Asegúrese de ajustar “ANGULO OSM” a “VERT.” cuando
lo utilice.
* Si no se cumple con las precauciones anteriores puede provocar
un malfuncionamiento.
Lado de la cima
OPCION1
MENU/ENTER
OSM
DOWN UP LEFT/
VOLUME
SELEC. BNC
: RGB
-
RIGHT/
SELEC. D-SUB
+
INPUT SELECT
: RGB
/EXIT
SELEC. RGB
: AUTO
SELEC. HD
: 1080B
ENTRADA SKIP
: OFF
RESET TODO
: OFF
1024ⴒ768
SEL.
MENU/ENTER
OK
EXIT
RETURN
Cómo emplear el mando a distancia
Instalación y cambio de pilas
Introduzca las 2 pilas tamaño “AAA”, asegurándose de
ponerlas con la polaridad correcta.
1. Presione y abra la tapa.
2. Alinee las pilas de acuerdo con las indicaciones (+) y
(–) que hay en el interior del compartimiento.
3. Instale la tapa.
INPUT SELECT
VOLUME
MENU/ENTER
DOWN UP LEFT/-RIGHT/+/EXIT
Lado del fondo
Radio de acción
* Use el mando a distancia a una distancia de
aproximadamente 7 m/ 23 pies de la parte delantcra del
sensor de mando a distancia del monitor, y en ángulos
horizontal y vertical de 30° aproximadamente.
* El funcionamiento del mando a distancia puede verse
afectado si se expone el sensor de mando a distancia del
monitor a la luz solar directa o a luz artificial fuerte, o si
hay un obstáculo entre el sensor y el mando a distancia.
Aprox.
7m/23pies
Utilización del modo de mando a distancia
con conexión de cable
Conecte el cable de mando a distancia* al conector remoto del
mando a distancia y al terminal "REMOTE IN" del monitor.
Cuando se conecta el cable, el modo cambiará
automáticamente a mando a distancia con cable.
Cuando se utilice el modo de mando a distancia con cable,
el mando a distancia podrá hacerse funcionar incluso
aunque no tenga pilas.
Cable de mando a distancia*
Al conector remoto
Manipulación del mando a distancia
• Procure que el mando a distancia no se le caiga ni
tampoco lo maltrate.
• No permita que el mando a distancia se moje. Si la
unidad se mojara séquela inmediatamente.
• Evite el calor y la humedad.
• Cuando el mando a distancia no vaya a utilizarse durante
un período de tiempo prolongado, extraiga las pilas.
• No utilice pilas gastadas mezcladas con pilas nuevas, ni
tampoco mezcle pilas de distinto tipo.
• No abra las pilas, ni las caliente, ni las arroje al fuego.
• Cuando utilice el mando a distancia en el estado
inalámbrico, asegúrese de desconectar el cable remoto
del terminal REMOTE IN del monitor.
* El cable mini estéreo 1/8 deberá adquirirse separadamente.
Sp-6
Page 41

Nombres y funciones de las partes
Vista Frontal
INPUT SELECT
VOLUME
MENU/ENTER
DOWN UP LEFT/-RIGHT/+/EXIT
MENU/ENTER
7
VOLUME
DOWN UP LEFT/-RIGHT/
6
+
5
q Alimentación
Enciende y apaga el monitor.
w Ventana del sensor de mando a distancia
Recibe la señal proveniente del mando a distancia.
e Indicador POWER/STANDBY (alimentación/en
espera)
Cuando la alimentación
está activada............................... se ilumina verde.
Cuando la alimentación está
en el modo en espera ................. se ilumina rojo.
r INPUT SELECT / EXIT (selección de entrada/salir)
Cambia la entrada de datos.
Funcionan como botones EXIT (salir) en modo de
visualización en pantalla (OSM).
INPUT SELECT
/EXIT
4
1
2
3
t LEFT/- y RIGHT/+ (izquierda/derecha)
Para ampliar o reducir la imagen. Funcionan como
botones de CURSOR (
/ ) en el modo de
visualización en pantalla (OSM).
y VOLUME (disminución y aumento de volumen)
Para ajustar el nivel de volumen. Funcionan como
botones de CURSOR (▲/▼) en el modo de
visualización en pantalla (OSM).
u MENU/ENTER
Activa el modo de visualización en pantalla (OSM) y
muestra el menú principal.
ADVERTENCIA
El interruptor de activación/desactivación no
desconecta completamente la pantalla de plasma de la
fuente de alimentación.
Sp-7
Page 42

Vista Posterior/Placa de terminales
VIDEO
DVD
1
/ HD
1
RGB
2
/ DVD2 / HD
2
AUDIO
AUDIO
1
R/Cr/Pr G/Y B/Cb/Pb
YL/R L/RCb/Pb Cr/Pr
BD A
RGB
2
/ DVD2 / HD
(IN/OUT)
R
3
L
(
MONO
1
Y Cb/Pb Cr/Pr
)
R
(
)
MONO
L
R/Cr/Pr G /Y B/Cb/ Pb
AUDIO
2
DVD
1
/ HD
1
AUDIO
1
VIDEO
2
2
CE F GHIJK
2
RGB
1
AUDIO
3
RGB 3EXTERNAL CONTROL
(IN/OUT)
VD L/RHD
RGB
VDHD
(IN/OUT)
REMOTE
IN OUT
DVI
1
AUDIO
3
RGB
3
R
(
)
Digital RGB
DVI
(
)
L
MONO
EXTERNAL CONTROL
REMOTE
IN OUT
A AC IN
Aquí debe conectar el cable de alimentación incluido.
B EXT SPEAKER L y R(altavoces externos izquierdo
y derecho)
Aquí debe conectar los altavoces (opcionales).
Mantenga la polaridad correcta. Conecte el cable
(positivo) del altavoz al terminal EXT SPEAKER
y el cable
(negativo) del altavoz al terminal
EXT SPEAKER para ambos canales, el izquierdo
(LEFT) y el derecho (RIGHT).
Consulte el manual del propietario de sus altavoces.
C VIDEO1, 2, 3 (BNC, RCA, S-Video)
Conecte aquí videograbadoras, reproductores DVD,
reproductores de discos láser, etc.
VIDEO1 se puede utilizar para entrada o salida.
D AUDIO1, AUDIO2, AUDIO3
Estos son terminales de entrada de audio.
La entrada es seleccionable. En la pantalla de menú,
seleccione la imagen de vídeo que desea asignarles.
E DVD1/ HD1
Aquí debe conectar el DVD, Laser Disc de alta
definición, etc.
F RGB2 / DVD2 / HD2
RGB2: Para la entrada de la señal RGB
analógica y la señal de sincronización.
DVD2/ HD2: Aquí puede conectar los DVDs, las
fuentes de alta definición, laser discs,
etc.
Esta entrada se puede ajustar para el uso
con fuente RGB o componente.
H RGB3 (DVI 24 pines)
Conecte aquí una señal digital (TMDS) de una fuente
con una salida DVI.
Esta entrada se puede ajustar para el uso con fuente
RGB/PC3.
I EXTERNAL CONTROL (control externo)
Este terminal se utiliza cuando el monitor se maneja y
controla externamente (mediante RS-232C).
J REMOTE IN
(entrada de mando a distancia)
(DC +5V)
Conecte el cable del mando a distancia* en la toma de
control remoto del mando a distancia para poder utilizar
el mando a distancia con cable.
K REMOTE OUT
(salida de mando a distancia)
(C-MOS DC +5V)
Conecte el cable del mando a distancia* en la toma
REMOTE IN de otro monitor de plasma para poder
utilizar el mando a distancia con cable.
Ejemplo de conexión: Conexión a un sintonizador de TV.
PLASMA DISPLAY
VIDEO
IN
VIDEO
OUT
REMOTE
OUT
TV T uner
Remote Control
Carrier fHz: 38kHz
TV T uner
REMOTE
IN
G RGB1 (mini D-Sub 15-pin)
Conecte aquí un señal RGB analógica procedente de
un ordenador, etc. Esta entrada se puede utilizar como
entrada o salida.
* El cable mini estéreo 1/8 deberá adquirirse separadamente.
Sp-8
Page 43

Mando a distancia
q POWER ON/STANDBY
Para conectar y poner en espera la alimentación.
(No funciona cuando el indicador POWER/ST ANDBY
de la unidad principal está apagado.)
w RGB/PC
Pulse este botón para seleccionar RGB/PC como fuente.
T ambién se puede seleccionar RGB/PC por medio del
botón INPUT SELECT del monitor.
e DVD / HD
Pulse este botón para seleccionar DVD/HD como fuente.
DVD/HD también puede seleccionarse por medio del
botón INPUT SELECT del monitor.
r VIDEO
Pulse este botón para seleccionar VIDEO como fuente.
→ VIDEO1 → VIDEO2 → VIDEO3
También se puede seleccionar VIDEO por medio del
botón INPUT SELECT del monitor.
t MENU/ENTER
Pulse este botón para acceder a los controles OSM.
Mientras visualiza el menú principal, pulse este botón
para ir al submenú.
y CURSOR (▲/▼/
Utilice estos botones para seleccionar ítems o ajustes, y para
realizar ajustes o cambiar los patrones de visualización.
u EXIT (salir)
Pulse este botón para salir de los controles OSM en el
menú principal. Mientras visualiza el submenú, pulse
este botón para volver a la pantalla anterior.
/ )
i POINTER (apuntador)
Pulse este botón para visualizar el apuntador.
o ZOOM (+ /–)
Para ampliar o reducir la imagen.
!0 VOLUME (+ /–)
Ajusta el volumen del sonido.
!1 MUTE (silenciamiento)
Desactiva el sonido.
!2 WIDE (ancho de pantalla)
Detecta automáticamente las señales y establece la
relación de aspecto.
El botón WIDE no se activa para todas las señales.
!3 DISPLAY (visualizar)
Muestra los ajustes de la fuente en la pantalla.
!4 OFF TIMER (temporizador de desconexión)
Activa el temporizador de desconexión automática de
la unidad.
!5 SIDE BY SIDE
Pulse este botón para visualizar un par de imágenes en
el modo lado a lado.
!6 PICTURE IN PICTURE
Pulse este botón para visualizar un par de imágenes en
el modo imagen en imagen.
!7 SINGLE
Cancela el modo multipantalla.
!8 SELECT/FREEZE
Pulse este botón para seleccionar la imagen activa en
un modo de pantalla múltiple.
Cuando esté activa la función CONGEL.IMAG., puede
utilizarse este botón para mostrar imágenes fijas en la
pantalla secundaria.
!9 AUTO ADJUST
Pulse este botón para ajustar automáticamente la
imagen fina, el ajuste de imagen, la posición y el
contraste, o para cambiar automáticamente el tamaño
de la pantalla al modo ZOOM con el texto superpuesto
mostrado completamente sólo cuando la imagen
contiene zonas oscuras encima y debajo de la misma.
@0 ID SELECT (selección de identificación)
Establece el número de identificación en el mando a
distancia. El mando a distancia puede luego utilizarse
solamente con un monitor que tenga el mismo número
de identificación. Cuando se utilicen varios monitores
juntos, éstos podrán controlarse individualmente.
@1 CLEAR (cancelar)/SEAMLESS SW
Cancela el número establecido por el botón ID
SELECT.
Cuando esté activa la función CAMBIO RAPID, puede
utilizarse este botón para cambiar rápidamente la fuente
de entrada.
@2 Transmisor de señales del mando a distancia
Transmite las señales del mando a distancia.
@3 Conector de mando a distancia
Inserte el conector del cable remoto (El cable mini
estéreo 1/8) cuando utilice el mando a distancia en el
estado de conexión con cable.
Sp-9
Page 44

Operaciones básicas
POWER (alimentación)
Para encender y apagar la unidad (ON/OFF):
1. Enchufe el cable en una toma de corriente general activa
de CA.
2. Pulse el interruptor de la alimentación (en el aparato).
El indicador POWER/STANDBY se iluminará de color
rojo y se ajustará el modo en espera.
3. Pulse el botón POWER ON (en el mando a distancia) para
encender la unidad.
Cuando la unidad esté encendida se iluminará (verde) el
indicador POWER/STANDBY.
4. Pulse el botón POWER STANDBY (en el mando a
distancia) o el interruptor de la alimentación (en el aparato)
para apagar el aparato.
El indicador POWER/STANDBY se iluminará de color
rojo y se ajustará el modo en espera (sólo cuando se apaga
la unidad con el mando a distancia).
VOLUME (volumen)
Para ajustar el nivel del sonido:
1. Mantenga pulsado el botón VOLUME (en el mando a
distancia o en la unidad) para aumentar la salida de sonido
al nivel deseado.
2. Mantenga pulsado el botón VOLUME (en el mando a
distancia o la unidad) para disminuir el volumen al nivel
deseado.
MUTE (silenciamiento)
Para desactivar el sonido:
Pulse el botón MUTE en el mando a distancia para cancelar
el sonido; pulse este botón nuevamente para restablecer
el sonido.
DISPLAY (pantalla de visualización)
Para comprobar los ajustes:
1. Cada vez que se pulsa el botón DISPLAY, la pantalla
cambia.
2. Si no se pulsa el botón por un espacio aproximado de tres
segundos, la indicación desaparecerá.
DIGITAL ZOOM (zoom digital)
Zoom digital especifica la posición de la imagen y amplía
la imagen.
1. (Asegúrese de que NAVEG. ZOOM está desactivado.)
Pulse el botón POINTER para visualizar el apuntador. ( )
Para cambiar el tamaño de la imagen:
Pulse el botón ZOOM+ para ampliar la imagen.
La forma del apuntador cambiará, asemejándose a una
lupa. ( )
Para reducir la imagen y restablecer su tamaño original, pulse el botón ZOOM–.
Para cambiar la posición de la imagen:
Seleccione la posición con los botones ▲▼
2. Pulse el botón POINTER para borrar el apuntador.
.
AUTO ADJUST (ajuste automático)
Para ajustar automáticamente el tamaño o la
calidad de la imagen:
Pulse el botón AUT O ADJUST.
Información
Activación de AUTO ADJUST
Cuando se seleccione la entrada RGB (imagen fija):
La imagen fina, el ajuste de imagen, la posición y el
contraste se ajustarán automáticamente.
Cuando se seleccione la entrada RGB (imagen
móvil), VIDEO o Y/Pb/Pr (componente):
El tamaño de la pantalla cambiará automáticamente al
modo ZOOM con el texto superpuesto mostrado
completamente sólo cuando la imagen contenga áreas
oscuras encima y debajo de la misma.
OFF TIMER (temporizador de
desconexión)
Para ajustar el temporizador de desconexión:
El temporizador de desconexión puede ajustarse para que
desconecte la alimentación después de 30, 60, 90, o 120
minutos.
1. Pulse el botón OFF TIMER para activar el temporizador
a 30 minutos.
2. Pulse el botón OFF TIMER a la hora deseada.
3. El temporizador se activa cuando se desactiva el menú.
→ 30 → 60 → 90 → 120 → 0
APAGAR CONTADOR 30
Para comprobar el tiempo que queda:
1. Una vez que se ha ajustado el temporizador, pulse el botón
OFF TIMER una vez.
2. Se visualizará el tiempo restante, luego se desactivará
después de unos segundos.
3. Cuando queden cinco minutos, aparecerá el tiempo que
queda hasta que llegue a cero.
APAGAR CONTADOR 28
Cancelación del temporizador de desconexión:
1. Pulse el botón OFF TIMER dos veces seguidas.
2. El temporizador de desconexión queda cancelado.
APAGAR CONTADOR 0
Nota:
Después de que se desactive la alimentación con el
temporizador de desconexión ...
Se seguirá suministrando una ligera corriente al monitor .
Cuando salga de la habitación o no piense utilizar el
sistema durante un período de tiempo prolongado,
desconecte la alimentación del monitor.
Sp-10
Page 45

Controles OSM (en pantalla)
Funciones de Menú
La ventana OSM se visualiza con respecto a la
pantalla tal como se muestra en el diagrama.
* Dependiendo del modo de la pantalla, puede que el OSM
se visualice de forma ligeramente diferente.
En la explicación, la sección de OSM es mostrada en primer
plano.
MENU PRINCIPAL 1 / 2
IMAGEN
AUDIO
AJUSTE IMAGEN
OPCION1
OSM AVANZADO
: OFF
PAG. SIGUIEN.
MENU/ENTEROKEXIT
SEL.
Lo que sigue a continuación es una descripción de la
utilización de los menús y de los ítems seleccionados.
1. Pulse el botón MENU/ENTER en el mando a distancia
para visualizar el menú principal (MAIN MENU).
EXIT
MENU PRINCIPAL 1 / 2
IMAGEN
AUDIO
AJUSTE IMAGEN
OPCION1
OSM AVANZADO
PAG. SIGUIEN.
MENU/ENTEROKEXIT
SEL.
: OFF
EXIT
Nota:
Para cancelar el menú principal, pulse el botón
EXIT .
Información
Modo de menú avanzado
Cuando “OSM AVANZADO” se ponga en “ON” en el
menú principal (1/2) se mostrarán los elementos de todo
el menú.
MENU PRINCIPAL 1 / 2
IMAGEN
AUDIO
AJUSTE IMAGEN
OPCION1
OPCION2
OPCION3
OPCION4
OSM AVANZADO
PAG. SIGUIEN.
MENU/ENTEROKEXIT
SEL.
: ON
EXIT
* La pantalla que aparezca puede que sea diferente a las
que aparecen en este manual.
MENU PRINCIPAL 2 / 2
PAG. ANTERIOR
LENGUAJE
SISTEMA COLOR
INFORMACION FUENTE
MENU/ENTEROKEXIT
SEL.
EXIT
2. Pulse los botones de cursor ▲ ▼ en el mando a distancia
hasta que quede resaltado el menú al que desee acceder.
3. Pulse el botón MENU/ENTER del mando a distancia para
seleccionar un submenú o un ítem.
CONTRASTE
BRILLO
DEFINICION
COLOR
TINTE
MODE IMAGEN
NR
PAG. SIGUIEN.
SEL. ADJ. RETURN
IMAGEN 1 / 2
: NORMAL
: OFF
EXIT
: 52
: 32
: 16
: 32
GR
: 32
4. Ajuste el nivel o cambie el ajuste del ítem seleccionado
con los botones de cursor
del mando a distancia.
5. El ajuste o configuración que usted almacenó permanece.
El cambio es almacenado hasta que se cambia otra vez.
6. Repita los pasos 2 – 5 para ajustar otro ítem, o pulse el
botón EXIT del mando a distancia para volver al menú
principal.
* Cuando realice el ajuste utilizando la barra que se encuentra
en la parte inferior de la pantalla, pulse el botón
o
dentro de los siguientes 5 segundos. De lo contrario, el
ajuste actual será establecido y aparecerá la pantalla anterior.
Sp-11
Page 46

Árbol del Menú
* Para obtener más detalles sobre cada elemento de menú, remítase al CD-ROM.
:Las áreas indican el valor predeterminado.
←→
: Pulse el botón
o para ajustar.
:Los elementos de menú en un cuadro reglado se encuentran disponibles cuando OSM AV ANZADO se pone en ON.
Menú Principal Submenú Submenú 2 Submenú 3 Submenú 4 Reajuste
IMAGEN CONTRASTE ←→ 0←52→72 SÍ Sp-20
BRILLO ←→ 0←32→64 SÍ Sp-20
DEFINICION ←→ 0←16→32 SÍ Sp-20
COLOR ←→ 0←32→64 SÍ Sp-20
TINTE R←→G 0←32→64 SÍ Sp-20
MODE IMAGEN BRIGHT/NORMAL/TEATRO1/TEATRO2/DEFECTO SÍ Sp-20
NR OFF/NR-1/NR-2/NR-3 SÍ Sp-20
TEMP. COLOR BAJO/MEDIO/B/MEDIO/ALTO SÍ Sp-20
BALANCE BLANCO GANANCIA R ←→ 0←40→70 SÍ Sp-21
GAMMA 1←→2←…→4 SÍ Sp-21
TONO BAJO *
AFINAR COLOR ROJO A←→M0←32→64 SÍ Sp-21
Menú Principal Submenú Submenú 2 Submenú 3 Submenú 4 Reajuste
AUDIO GRAVES ←→ 0←13→26 SÍ Sp-22
AGUDOS ←→ 0←13→26 SÍ Sp-22
BALANCE L←→R -22←0→+22 SÍ Sp-22
AUDIO INPUT1 VIDEO 1-3 / HD/DVD 1-2 / RGB 1-3 SÍ Sp-22
AUDIO INPUT2 VIDEO 1-3 / HD/DVD 1-2 / RGB 1-3 SÍ Sp-22
AUDIO INPUT3 VIDEO 1-3 / HD/DVD 1-2 / RGB 1-3 SÍ Sp-22
GANANCIA V ←→ 0←40→70 SÍ Sp-21
GANANCIA AZ ←→ 0←40→70 SÍ Sp-21
BIAS ROJO ←→ 0←40→70 SÍ Sp-21
BIAS VERDE ←→ 0←40→70 SÍ Sp-21
BIAS AZUL ←→ 0←40→70 SÍ Sp-21
RESET OFF←→ON SÍ Sp-21
3
AUTO←→1←…→3 SÍ Sp-21
VERDE C←→A0←32→64 SÍ Sp-21
AZUL M←→C0←32→64 SÍ Sp-21
AMARILLO V←→R0←32→64 SÍ Sp-21
MAGENTA R←→A0←32→64 SÍ Sp-21
CIAN A←→V0←32→64 SÍ Sp-21
RESET OFF←→ON SÍ Sp-21
REFERENCIA
REFERENCIA
Menú Principal Submenú Submenú 2 Submenú 3 Submenú 4 Reajuste
AJUSTE IMAGEN MODO ASPECTO NORMAL/FULL/STADIUM/ZOOM/2.35:1/14:9/REAL*
Menú Principal Submenú Submenú 2 Submenú 3 Submenú 4 Reajuste
OPCION1 OSM MOSTRAR OSM OFF←→ON SÍ Sp-23
V-POSICION ←→ -64←0→+64 SÍ Sp-22
H-POSICION ←→ -128←0→+127 SÍ Sp-22
V-ALTURA ←→ 0←→64 SÍ Sp-22
H-ANCHURA ←→ 0←→64 SÍ Sp-22
AUTO IMAGEN OFF←→ON*
AJUSTE FINO*
AJUSTE IMAG.*
SELEC. BNC RGB←→COMP. SÍ Sp-23
SELEC. D-SUB RGB — Sp-23
SELEC. RGB AUTO SÍ Sp-23
SELEC. HD 1080B/1035I/1080A NO Sp-24
ENTRADA SKIP OFF←→ON SÍ Sp-24
RESET TODO OFF←→ON — Sp-24
1
←→*20←→64 SÍ Sp-22
1
←→*20←→128 SÍ Sp-22
AJUSTE OSM 1←…→6 SÍ Sp-23
ANGULO OSM ORIZ.←→VERT. SÍ Sp-23
OSM ORBITER OFF←→ON SÍ Sp-23
CONTRAST OSM BAJO←→NORMAL SÍ Sp-23
2
3
— Sp-22
NO Sp-22
REFERENCIA
REFERENCIA
Sp-12
Page 47

Menú Principal Submenú Submenú 2 Submenú 3 Submenú 4 Reajuste
REFERENCIA
OPCION2 AHORRO ENERG OFF←→ON SÍ Sp-25
MODE CINE OFF←→ON SÍ Sp-25
LARGA DURAC. PLE AUTO/BLOQ. 1/BLOQ. 2/BLOQ. 3 SÍ Sp-25
ORBITADOR AUTO 1 SÍ Sp-26
AUTO 2 SÍ Sp-26
MANUAL H-DOT/V-LINE/TIEMPO SÍ Sp-26
OFF SÍ Sp-26
INVERSIÓN OFF SÍ Sp-26
ON WORKING TIME/WAITING TIME SÍ Sp-26
BLANCO SÍ Sp-26
SCREEN WIPER OFF SÍ Sp-27
ON WORKING TIME/WAITING TIME/VELOCIDAD SÍ Sp-27
SOFT FOCUS OFF/1/2/3/4 SÍ Sp-27
NIVEL GRISES 0←…→3←…→15 SÍ Sp-27
S1/S2 AUTO←→OFF SÍ Sp-28
PICTURE SIZE*
3
OFF←→ON SÍ Sp-28
DVI SET UP PLUG/PLAY PC←→STB/DVD NO Sp-28
BLACK LEVEL LOW←→HIGH NO Sp-28
SUBTITULO APAGADO←→SUBTIT1~4←→TEXTO1~4 SÍ Sp-28
CONTRAST SUB BAJO←→NORMAL SÍ Sp-28
Menú Principal Submenú Submenú 2 Submenú 3 Submenú 4 Reajuste
REFERENCIA
OPCION3 TEMPORIZADOR TIEMPO PRES. DAYLITE SAVE OFF←→ON NO Sp-29
DÍA/HORA/MINUTOS NO Sp-29
PROGRAMA OFF SÍ Sp-29
ON DATE/ON/OFF(HORA, MINUTOS)/INPUT/FUNCION SÍ Sp-29
REPET MULTIP OFF SÍ Sp-30
ON MULTIMODO/T. FUNCIONA/MODO ENTRADA SÍ Sp-30
MODO PWR. ON ENTRADA ULTI / MULTI / VIDEO 1-3 / HD/DVD 1-2 / RGB 1-3 SÍ Sp-30
VOLUMEN ULTI←→0←…→44 SÍ Sp-30
BLOQUEO CONT OFF←→ON SÍ Sp-30
IR REMOTO OFF←→ON SÍ Sp-31
LAZO OFF←→ON SÍ Sp-31
ID REMOTO ALL←→1←…→4 NO Sp-31
NUMERO ID ALL←→1←…→256 SÍ Sp-31
VIDEO WALL DIVISOR OFF/1/4/9/16/25 SÍ Sp-32
POSICION
No.1←…→No.4/No.7←…→No.15/No.16←…→No.31/No.32←…→No.56
— Sp-32
MODO DISP. DIVIDIR←→BLANCO SÍ Sp-32
AUTO ID OFF←→ON SÍ Sp-33
PANTALLA MODO ASPECTO NORMAL/FULL/STADIUM/ZOOM/2.35:1/14:9/REAL*
V-POSICION/H-POSICION/V-ALTURA/H-ANCHURA/AUTO IMAGEN/AJUSTE FINO*1/AJUSTE IMAG.*
3
— Sp-33
1
P. ON DELAY OFF/ON/MODO1/MODO2 SÍ Sp-33
PLE LINK OFF←→ON SÍ Sp-33
REPETIR TEMP OFF SÍ Sp-34
ON DIVISOR/FUENTE/T. FUNCIONA SÍ Sp-34
Menú Principal Submenú Submenú 2 Submenú 3 Submenú 4 Reajuste
REFERENCIA
OPCION4 SUB. IMAGEN DET. SUB. IMAG OFF←→AUTO SÍ Sp-34
PANTALLA UNIDAS←→NORMAL SÍ Sp-34
TAMAÑO 20%←…→100% SÍ Sp-34
NAVEG. ZOOM OFF←→S BY S←→INF. IZQ←→INF. DCH←→SUP. DCH←→SUP. IZQ SÍ Sp-35
CONGEL. IMAG. OFF←→S BY S1←→S BY S2←→INF. IZQ←→INF. DCH←→SUP. DCH←→SUP. IZQ SÍ Sp-35
CAMBIO RAPID OFF SÍ Sp-36
ON SELEC1/SELEC2 SÍ Sp-36
INSERT. TEXT OFF/ALTO/MEDIO/BAJO/INF
ENTRADA/TAMAÑO/PANTALLA SÍ Sp-36
Menú Principal Submenú Submenú 2 Submenú 3 Submenú 4 Reajuste
REFERENCIA
OSM AVANZADO OFF←→ON SÍ Sp-37
LENGUAJE ENGLISH/DEUTSCH/FRANÇAIS/ESPAÑOL/ITALIANO/SVENSKA/У /PORTUGUÊS NO Sp-37
SISTEMA COLOR AUTO/3.58NTSC/4.43 NTSC/PAL/PAL 60/PAL-N/PAL-M/SECAM NO Sp-37
INFORMACION FUENTE
— — Sp-37
*1 Sólo cuando AUTO IMAGEN está desactivada (OFF)
*2 Sólo RGB/PC
*3 “PICTURE SIZE”, “REAL” y “TONO BAJO” son solamente para los tipos de 50 y 61 pulgadas.
Información
Restablecimiento de los ajustes por defecto de fábrica
Seleccione “RESET TODO” debajo del menú de OPCION1. Observe que esta acción también restablecerá otros ajustes a los valores por defecto de fábrica.
Sp-13
Page 48

Solución de Problemas
Si la calidad de la imagen es mala o se presenta algún otro problema, compruebe los ajustes, operaciones, etc., antes de llamar al
servicio técnico.
Síntoma
La unidad emite un sonido de chisporroteo.
La imagen está movida.
El sonido es ruidoso.
El mando a distancia funciona de manera
errónea.
El mando a distancia no funciona.
La alimentación del monitor no se activa
cuando se pulsa el botón de encendido del
mando a distancia.
El monitor no funciona cuando se pulsan los
botones del mando a distancia.
Los botones del panel delantero de la unidad
principal no funcionan.
No se produce ningún sonido o imagen.
La imagen aparece, pero no se produce
ningún sonido.
Mala calidad de imagen con entrada de
señales VIDEO.
Mala calidad de imagen con entrada de
señales RGB.
El matiz es pobre o los colores son débiles.
No aparece nada en la pantalla.
Parte de la imagen está cortada o la imagen
no está centrada.
La imagen es demasiado grande o
demasiado pequeña.
La imagen es inestable.
El indicador POWER/STANDBY se ilumina
de color rojo.
El indicador POWER/STANDBY parpadea de
color rojo.
El indicador POWER/STANDBY parpadea de
color verde y rojo, o verde.
• ¿Son normales la imagen y el sonido?
• ¿Se ha colocado un componente conectado
directamente delante o a un costado de la pantalla
de visualización?
• ¿Están gastadas las pilas del mando a distancia?
• ¿Está IR REMOTO en ON?
• ¿Se ha puesto un número de identificación para el
aparato principal?
• ¿Ha conectado el cable de alimentación del
monitor a la red general?
• ¿Están desactivados OFF todos los indicadores
del monitor?
• ¿Están gastadas las pilas del mando a distancia?
• ¿Está IR REMOTO en OFF?
• ¿Se ha puesto un número de identificación para el
aparato principal?
• ¿Está apuntado el mando a distancia al monitor, o
hay algún obstáculo entre el mando a distancia y
el monitor?
• ¿Hay luz solar directa o luz artificial fuerte sobre el
sensor de mando a distancia?
• ¿Están gastadas las pilas del mando a distancia?
• El cable de mando a distancia está conectado al
ter-minal REMOTE IN.
•
Los botones del panel delantero no funcionan en el
estado de "bloqueo de control".
• ¿Ha conectado el cable de alimentación del
monitor a la red general?
• ¿Está ajustado el volumen al mínimo?
• ¿Se ha ajustado el modo silenciamiento?
• ¿Están conectados los altavoces correctamente?
• ¿Se ha ajustado correctamente la entrada de
audio (AUDIO INPUT)?
• Ajuste incorrecto de los controles.
Interferencia local.
Interconexión de los cables.
La impedancia de entrada no está en el nivel
correcto.
• Ajuste incorrecto de los controles.
Conexión incorrecta del conector de 15 pines.
• ¿Se han ajustado correctamente el matiz y los
colores?
• ¿Está encendido el ordenado?
• ¿Existe una fuente conectada?
• ¿Está la función de ahorro de energía en el modo
en espera o en el modo desactivado OFF?
• ¿Está el LAZO en ON?
• ¿Se ha realizado adecuadamente el ajuste de
posición?
• ¿Se ha realizado correctamente el ajuste de
tamaño de pantalla?
• ¿Se ha realizado correctamente el ajuste de
resolución del ordenador?
• La señal de sincronización horizontal y/o vertical
no está presente cuando se activa el control
Intelligent Power Manager.
• La temperatura en el interior de la unidad principal
ha aumentado excesivamente y ha activado el
protector.
Comprobaciones
——————
• Si no hay ninguna anormalidad en la imagen y en el
sonido, el ruido es causado por la caja del proyector
que reacciona a los cambios de temperatura. Esto no
afectará el funcionamiento del equipo.
• Deje algo de espacio de separación entre la pantalla
de visualización y los componentes conectados.
• Reemplace ambas pilas por pilas nuevas.
• Ponga IR REMOTO en OFF en el menú OPCION3.
• Ponga un número de identificación con el botón ID
SELECT, o ponga el número de identificación en
ALL.
• Enchufe el cable de alimentación del monitor a una
toma de la red.
• Pulse el botón de encendido del monitor para activar
la alimentación.
• Reemplace ambas pilas por pilas nuevas.
• Ponga IR REMOTO en ON en el menú OPCION3.
• Ponga un número de identificación con el botón ID
SELECT, o ponga el número de identificación en
ALL.
• Apunte el mando a distancia al sensor de mando a
distancia del monitor al pulsar los botones, o retire el
obstáculo.
• Elimine la luz cerrando las cortinas, apuntando la luz
artificial en otra dirección, etc.
• Reemplace ambas pilas por pilas nuevas.
• Desconecte el cable de mando a distancia del
monitor.
• Ponga BLOQUEO CONT en OFF.
• Enchufe el cable de alimentación del monitor a una
toma de la red.
• Aumente el volumen.
• Pulse el botón de silenciamiento del mando a
distancia.
• Conecte los altavoces correctamente.
• Ajuste correctamente el ítem AUDIO INPUT. (entrada
de audio) en el menú AUDIO.
• Ajuste los controles de imagen según sea necesario.
Pruebe instalar el monitor en otro lugar.
Compruebe que todas las conexiones estén
debidamente aseguradas.
• Ajuste los controles de imagen según sea necesario.
Compruebe la asignación de pines y las conexiones.
• Ajuste el matiz y el color (en “IMAGEN”)
• Encienda la alimentación del ordenador.
• Conecte la fuente al monitor.
• Haga funcionar el ordenador (mueva el ratón, etc.)
• Ponga LAZO en OFF.
• Ajuste correctamente el ítem “AJUSTE IMAGEN”.
• Pulse el botón “WIDE” del mando a distancia y ajuste
correctamente.
• Ajuste a la resolución correcta.
• Compruebe la señal de entrada.
• Desconecte inmediatamente la alimentación de la
unidad principal y espere hasta que la temperatura
interna descienda. Véase *1.
• Desconecte inmediatamente la alimentación de la
unidad principal. Véase *2.
*1 Protector contra recalentamiento
Si el monitor se calienta demasiado, se activará el protector contra recalentamiento y el monitor se apagará. Si esto sucediera, desconecte la alimentación del monitor y
desenchufe el cable de alimentación. Si la habitación donde está instalado el monitor es particularmente calurosa, traslade el monitor a un sitio más fresco y espere 60
minutos hasta que el monitor se enfríe. Si persiste el problema, póngase en contacto con el distribuidor quien le ofrecerá asistencia técnica.
*2 En el siguiente caso, desconecte inmediatamente la alimentación del monitor y póngase en contacto con su distribuidor o centro autorizado.
El monitor se apagará 5 segundos después de ser encendido y el indicador POWER/STANDBY comenzará a parpadear. Esto indica que el circuito de
alimentación, el panel de plasma, el sensor de temperatura o uno o más ventiladores han sido estropeados.
Solución
Sp-14
Page 49

Especificaciones
Tamaño de la pantalla 36,3" (H)⳯20,3" (V) pulgadas
922 (H)⳯515 (V) mm
diagonal 42"
Proporción de la pantalla 16 : 9
Resolución 1024(H)⳯768(V) pixels
Tamaño de pixel 0,036"(H)⳯0,027"(V) pulgadas
0,9(H)⳯0,671(V) mm
Procesamiento del color 4.096 pasos, 68,7 billones de colores
Señales
Margen de Horizontal : 15,5 to 110,0 kHz
sincronización (automático: exploración de paso)
Vertical : 50,0 a 120,0 Hz
(automático: exploración de paso)
Señales de entrada RGB, NTSC (3.58/4.43), PAL (B,G,M,N),
P AL60, SECAM, HD*
Terminales de entrada
(VIDEO1 y RGB1 también se pueden utilizar como terminales OUTPUT)
1
, DVD*1 , DTV*
RGB
Visual 1 (Análogo) mini D-sub 15-pin⳯1
Visual 2 (Análogo) BNC (R, G, B, HD, VD)⳯1*
Visual 3 (Digital) DVI-D 24-pin⳯1*
3
2
Video
Visual 1 BNC⳯1
Visual 2 RCA-pin⳯1
Visual 3 S- Vídeo: DIN 4-pin⳯1
DVD/HD
Visual 1 RCA-pin (Y, Cb/Pb, Cr/Pr)⳯1*
Visual 2 BNC (Y, Cb/Pb, Cr/Pr)⳯1*
Visual 3 DVI-D 24-pin⳯1*
3
1
1, *2
Audio Estéreo RCA⳯3 (seleccionable)
External Control D-sub 9-pin⳯1(RS-232C)
Salida de sonido 8W+8W de 6 ohmios
Alimentación CA 100-240 V (50/60 Hz)
Amperaje nominal 4,5A (máximo)
Consumo de energía 285W (típico)
Dimensiones 40,2 (A)⳯24 (AI)⳯3,9 (F) pulgadas
1022 (A)⳯610 (AI)⳯98(F) mm
Peso 66 lbs / 30 kg (sin base)
Consideraciones ambientales
Temperatura de uso 0°C a 40°C / 32°F a 104°F
Humedad 20 a 80% (sin condensación)
Altitud 720 a 1114 hPa
(0 a 9.180 pies / 0 a 2.800 m)
Temperatura de almacenaje
-10°C a 50°C / 14°F a 122°F
Humedad 10 a 90% (sin condensación)
Altitud 700 a 1114 hPa
(0 a 9.840 pies / 0 a 3.000 m)
Otras características
Convertidor de exploración 3D de movimiento
compensado (NTSC, PAL, 480I, 576I, 525I, 625I,
1035I, 1080I), convertidor pull down 2-3 (NTSC, 480I,
525I, 1035I, 1080I (60Hz)), convertidor pull down
2-2 (PAL, 576I, 625I, NTSC, 480I, 525I), función de
zoom digital (100-900% seleccionable), múltiples
pantallas 4-25 Video W all, autodiagnóstico, prevención
de quemado de imagen (PLE BLOQ1-3, INVERSIÓN,
BLANCO, ORBITADOR (Auto 1, 2/Manual),
SCREEN WIPER), selección de temperatura del color
(alto / medio / medio/b / bajo, 4 memoria para el
usuario), bloqueo de control (excepto interruptor de la
alimentación), imagen automática, salto de entrada,
tonalidad de color (3 modos), identificación
automática, temporizador programable, corrección
gamma (4 modos), interfaz de bucle pasante, conexión
y reproducción (DDC1, DDC2b, RGB3: DDC2b
solamente), Funcionamiento de la MUL TIP ANT ALLA
Regulaciones UL 60950-1, CAN/CSA-C22.2 No.60950-1-03,
FCC clase B, ICES-003 clase B
1,59"
40,2" (1022)
36,3" (922)
20,3" (515)
Las unidades de medida son pulgadas
1
(40,4)
24" (610)
3,9"
(98)
2,31"
(57,6)
(mm)
Las características y especificaciones están sujetas a cambios sin
previo aviso.
*1Señales de entrada HD/DVD/DTV aceptadas por este sistema.
480P (60 Hz) 480I (60 Hz) 525P (60 Hz)
525I (60 Hz) 576P (50 Hz) 576I (50 Hz)
625P (50 Hz) 625I (50 Hz) 720P (60 Hz)
720P (50 Hz) 1035I (60 Hz) 1080I (50 Hz)
1080I (60 Hz) 1080P (50 Hz) 1080P (60 Hz)
2
*
Los conectores 5-BNC se utilizan como entrada RGB/PC2 y HD/
DVD2. Seleccione una de ellas bajo “SELEC. BNC”.
3
*
Compatible con HDCP.
Señales respaldadas
• 640ⴒ480P @ 59,94/60Hz • 1920ⴒ1080I @ 50Hz
• 1280ⴒ720P @ 59,94/60Hz • 720ⴒ576P @ 50Hz
• 1920ⴒ1080I @ 59,94/60Hz • 1280ⴒ720P @ 50Hz
• 720ⴒ480P @ 59,94/60Hz
Nota: En algunos casos es posible que no se visualice apropiadamente
una señal en el monitor de plasma. El problema puede ser una
inconsistencia con los estándares del equipo fuente (DVD, decodificador
superior, etc.). Si se le presenta este problema, póngase en contacto con
NEC Solutions (America), Inc. y también con el fabricante del equipo
fuente.
Sp-15
Page 50

Garantía limitada Monitores de plasma
NEC Solutions, Inc. (de ahora en adelante NEC Solutions)
garantiza que este producto está libre de defectos en
material y mano de obra bajo los términos siguientes y,
sujeto a las condiciones mencionadas más adelante,
acuerda reparar o reemplazar (a opción exclusiva de NEC
Solutions) cualquier pieza de la unidad que se compruebe
estar defectuosa. Las piezas de reemplazo pueden ser
nuevas o renovadas y estas cumplirán con las
especificaciones de las piezas o productos originales.
¿CUÁNTO DURA LA GARANTÍA?
Las piezas y el trabajo se garantizan por un periodo de un
(1) año desde la fecha de compra del primer cliente.
¿A QUIÉN CUBRE LA GARANTÍA?
Esta garantía puede sólo cumplirse para el primer
comprador.
QUE CUBRE Y QUE NO CUBRE LA GARANTÍA
Excepto por lo especificado a continuación, esta garantía
cubre todos los defectos en material o mano de obra en
este producto.
La garantía no cubre lo siguiente:
1. Cualquier producto que no sea distribuido en los EE.UU. o
Canadá por NEC Solutions o que no haya sido comprado en los
países antes mencionados a un distribuidor autorizado de NEC
Solutions.
2. Cualquier producto en el cual el número de serie haya sido
desfigurado, modificado o removido.
3. Daños, deterioro o malfuncionamiento resultado de:
a. Accidentes, uso incorrecto, abuso, negligencia, incendios,
inundaciones, relámpagos u otros fenómenos naturales,
modificación no autorizada del producto, o el no seguir las
instrucciones suministradas con el producto.
b. La reparación o intento de reparación por personas no
autorizadas por NEC Solutions.
c. Cualquier transporte del producto (los reclamos deben
presentarse al transportador).
d. Extracción o instalación del producto.
e. Cualquier otra causa que no esté relacionada con un defecto
del producto.
f. Quemaduras o imágenes residuales en el fósforo del panel.
4. Cajas de cartón, estuches de transporte, baterías, cajas externas,
cintas magnéticas o cualquier clase de accesorios utilizados en
conexión con el producto.
5. Servicios fuera de los EE.UU. y Canadá.
QUE PAGAREMOS Y QUE NO PAGAREMOS
Pagaremos los gastos de trabajo y materiales para los
elementos cubiertos, pero no pagaremos lo siguiente:
1. Costos de extracción o instalación.
2. Costos de ajustes técnicos iniciales (montaje), incluyendo el ajuste
de los controles de usuario. Estos costos son responsabilidad del
distribuidor de NEC Solutions donde se adquirió el producto.
3. Costos de envío.
COMO SE PUEDE OBTENER EL SERVICIO DE
GARANTÍA
1. Para obtener servicio para su producto, consulte al distribuidor
donde adquirió el producto.
2. Cada vez que se requiera de servicios de garantía, será necesario
presentar la factura original antigua (o una copia) como prueba
del cubrimiento de la garantía.
Incluya por favor en cualquier envío, su nombre, dirección y una
descripción del (de los) problema(s).
3. Para obtener información sobre los centros autorizados de
servicios de NEC Solutions más cercanos, llame a NEC Solutions
al 800-836-0655.
LIMITACIONES DE RESPONSABILIDAD
Excepto por las obligaciones determinadas
específicamente más adelante en esta declaración de
garantía, no seremos responsables de daños directos,
indirectos, especiales, consecuenciales ni de otro tipo,
basados en contratos, agravios o cualquier otra teoría legal,
ya sea que hayamos o no advertido sobre la posibilidad de
dichos daños. Esta garantía está en lugar de todas las
garantías expresadas o implícitas, incluyendo pero no
limitando, las garantías de comercialización o idoneidad
para un propósito en particular.
EXCLUSIÓN DE DAÑOS
La responsabilidad de NEC Solutions por cualquier
producto defectuoso está limitada a la reparación o
reemplazo del producto a nuestra discreción. NEC
Solutions no será responsable por:
1. Daños a propiedades causados por cualquier defecto en este
producto, daños basados en inconveniencia, perdidas de uso del
producto, perdidas de tiempo, perdidas comerciales; o
2. Cualquier otros daños ya sean fortuitos, consecuentes o de otra
manera. Algunos estados no permiten limitación en lo que respecta
al periodo de duración de una garantía implícita o no permiten la
exclusión o limitación de daños fortuitos o consecuentes, de tal
forma que es posible que las limitaciones y exclusiones
mencionadas anteriormente no se puedan aplicar en su caso.
COMO SE RELACIONA LA LEY ESTATAL CON
LA GARANTÍA
Esta garantía le proporciona derechos legales específicos,
y es posible que también adquiera otros derechos que
varían de estado a estado.
PARA OBTENER MÁS INFORMACIÓN,
TELÉFONO 800-836-0655
NEC SOLUTIONS (AMERICA), INC.
1250 N. Arlington Heights Road, Suite 400
Itasca, Illinois 60143-1248
Nota:
Todos los productos devueltos a NEC Solutions
(America), Inc. para servicio DEBEN tener aprobación
previa. Para obtener dicha aprobación, llame a NEC
Solutions (America), Inc. al 800-836-0655.
Sp-16
Page 51

Guia de iniciação
(Modelo de écran dividido melhorado)
Para o funcionamento do seu monitor plasma, consulte o CD-ROM.
Conteúdo
Informação importante .................................Po-2
Instalação .................................................... Po-4
Requisitos de ventilação para a montagem da
caixa............................................................... Po-4
Criar um vídeo-wall.............................................. Po-5
Manuseamento do cabo ....................................... Po-5
Precauções a ter quando o monitor plasma é
instalado na vertical ..........................................Po-6
Como utilizar o controle remoto ............................. Po-6
Instalação e substituição das baterias...................... Po-6
Utilizar o modo de controle remoto com fios ......... Po-6
Alcance de funcionamento ..................................... Po-6
Manusear o controle remoto................................... Po-6
Nomes de peças e função .............................. Po-7
Vista frontal ......................................................... Po-7
Vista posterior/Placa de terminais.......................... Po-8
Controle remoto ...................................................Po-9
Operações básicas....................................... Po-10
POWER ............................................................ Po-10
Para ligar (ON) e desligar (OFF) a unidade: ......... Po-10
VOLUME .......................................................... Po-10
Para ajustar o volume:.......................................... Po-10
MUTE ............................................................... Po-10
Para emudecer o som: .......................................... Po-10
DISPLAY ............................................................Po-10
Para verificar as definições: ................................. Po-10
DIGITAL ZOOM ................................................. Po-10
AUTO ADJUST .................................................. Po-10
Ajustar o tamanho ou qualidade da imagem
automaticamente: .............................................. Po-10
OFF TIMER ........................................................Po-10
Para configurar o temporizador de desligar: ......... Po-10
Para verificar o tempo restante: ............................ Po-10
Para cancelar o temporizador de desligar: ............ Po-10
Controles OSM (Menu no écran) ................... Po-11
Operações do Menu .......................................... Po-11
Árvore do Menu ................................................ Po-12
Resolução de problemas .............................. Po-14
Especificações .............................................Po-15
Garantia Limitada Monitores de Plasma ............... Po-16
Manual de usuário em CD-ROM
䢇 O manual de usuário completo é fornecido no CD-ROM, em
formato PDF (Portable Document Format) e fornece detalhes
do produto e informações para utilização do seu monitor de
plasma NEC.
Para visualizar e/ou imprimir os arquivos PDF, é necessário
ter instalado o programa Adobe Acrobat Reader™ ou Adobe
Reader™.
NOTA:
Adobe Acrobat Reader ou Adobe Reader podem ser
descarregados da página de Internet da Adobe.
Visite http://www .adobe.com e obtenha a versão atualizada para
o seu Sistema Operativo.
䢇 Visualizar o Manual de usuário (PDF)
[Windows]
1. Introduza o CD-ROM fornecido na unidade de CD-ROM do seu
computador.
2. Um menu será exibido automaticamente.
Se isto não acontecer:
1) Na área de trabalho do Windows, clique duplo no ícone [Meu
Computador].
2) Clique duplo no drive de CD-ROM [NECPLASMA-UM].
3) Clique duplo em “start_menu.pdf”.
3. Clique no nome de seu produto.
O manual do usuário será exibido na tela.
[Macintosh]
1. Introduza o CD-ROM fornecido na unidade de CD-ROM do seu
computador Macintosh.
2. Clique duplo no ícone de CD-ROM [NECPLASMA-UM].
3. Clique duplo em “start_menu.pdf”.
O Menu Inicial será exibido.
4. Clique no nome de seu produto.
O manual do usuário será exibido na tela.
䢇 Copiar o Manual de usuário (PDF) para o seu computador.
O manual de usuário no CD-ROM fornecido pode ser copiado
para o disco rígido do seu computador.
Conteúdo da embalagem
䡺 Monitor plasma
䡺 Cabo de alimentação
䡺 Controle remoto com duas baterias AAA
䡺 Manuais (Guia de iniciação e CD-ROM)
䡺 Centros de ferrita
䡺 Grampos de cabo
Opções
• Unidade de suporte de parede
• Unidade de suporte no teto
• Unidade de suporte inclinado
• Rack de Mesa
• Colunas
PORTUGUÊS
Page 52

Informação importante
Precauções
Leia atentamente este manual antes de usar seu monitor plasma e
mantenha-o à mão para futura consulta.
CUIDADO
RISCO DE CHOQUE ELÉTRICO
CUIDADO: PARA REDUZIR O PERIGO DE ELÉTRICO,
NÃO REMOVA A T AMPA. NÃO EFETUE A
MANUTENÇÃO DAS PEÇAS INTERNAS. A
MANUTENÇÃO DEVE SER EFETUADA POR
PESSOAL QUALIFICADO.
Este símbolo avisa o usuário que a voltagem nã
isolada dentro da unidade poderá ter magnitude
sufienciente para causar choque elétrico. Por esta
razão, é perigoso tocar qualquer parte no interior
desta unidade.
Este símbolo alerta o usuário que informações
importantes no que diz respeito à operação e
manutenção desta unidade foram incuídas. Assim,
deverão ser cuidadosamente lidas para evitar
quaisquer problemas.
NÃO ABRIR
A VISO
PARA EVIT AR PERIGO DE INCÊNDIO OU CHOQUE, NÃO
EXPONHA ESTA UNIDADE À CHUVA E UMIDADE.
TAMBÉM NÃO UTILIZE A FICHA POLARIZADA DESTA
UNIDADE EM RECEPTÁCULOS DE CABO DE EXTENSÃO
OU OUTRAS TOMADAS, A NÃO SER QUE SEJAM
INSERIDOS PINOS. EVITE ABRIR A CAIXA ONDE SE
ENCONTRAM OS COMPONENTES DE ALT A VOLTAGEM.
O REPARO DEVE SER EFETUADO POR PESSOAL
QUALIFICADO.
Avisos e precauções de segurança
Este monitor plasma foi desenhado e fabricado para funcionar
sem problemas e durante muito tempo. Não é necessária
qualquer manutenção para além da limpeza. Consulte a seção,
“Procedimento de limpeza do monitor plasma” na página
seguinte.
O painel de visualização plasma consiste em elementos de
imagem finos (células) com mais de 99.99% de células ativas.
Poderão existir células que não produzam luzes ou
permaneçam acesas.
Para uma operação segura e para evitar danos na unidade, leia
atentamente e siga as seguintes instruções.
Para evitar perigo de choque e incêndio:
1. Disponibilize espaço suficiente para evitar a acumulação de calor
interno. Não tape as saídas de ventilação da tampa posterior nem
instale a unidade dentro de um armário ou estante fechados.
Se instalar a unidade dentro de um armário, certifique-se que deixa
espaço adequado na parte superior da unidade para permitir a saída
de ar quente. Se o monitor se tornar demasiado quente, o pprotetor
de sobre-aquecimento é ativado e o monitor desliga. Caso isto
aconteça, desligue a corrente do monitor e desligue o cabo de
alimentação. Se o compartimento onde se encontra o monitor
instalado estiver demasiado quente, mova o monitor para um local
mais fresco e aguarde 60 minutos até que arrefeça. Se o problema
persistir, contate o seu fornecedor.
2. Não utilize a ficha polarizada da unidade com cabos de extensão ou
outras tomadas a não ser que sejam inseridos pinos.
3. Não exponha a unidade à água ou umidade.
4. Evite danificar o cabo de alimentação e não tente alterar o mesmo.
Desligue o cabo de alimentação durante tempestades elétricas ou se a
5.
unidade não for utilizada durante um longo período de tempo.
6. Não abra a caixa que tem componentes de alta voltagem
potencialmente perigosos no seu interior. Se a unidade for
danificada desta forma, a garantia é invalidada. Para além disso,
existe o risco de choque elétrico.
7. Não tente efetuar a manutenção ou reparo da unidade. O fabricante
não se responsabiliza por quaisquer lesões corporais ou danos
causados pela tentativa de anutenção por parte de pessoas não
qualificadas ou pela abertura da tampa posterior. Todas e quaisquer
reparos ou manutenções devem ser efetuados em Centros de
Assistência autorizados.
8. Este equipamento deve estar ligado a uma saída de corrente com
ligação à terra de proteção.
9. A tomada deve estar instalada perto do equipamento e facilmente
acessível.
Para evitar danos e aumentar a duração de funcionamento:
1. Utilize apenas a unidade com uma fonte de alimentação CA de 100240V 50/60Hz. O funcionamento contínuo em voltagens superiores
a 100-240 Volts CA diminui o tempo de vida útil da unidade e pode
até causar perigo de incêndio.
2. Manuseie a unidade com cuidado ao instalá-la e não a deixe cair.
3.
Instale a unidade longe do calor, poeira excessiva e da luz direta do sol.
4. Proteja o interior da unidade de líquidos e de pequenos objetos
metálicos. Em caso de acidente, desligue o cabo de alimentação e
envie para reparo a um Centro de Assistência autorizado.
5. Não bata nem risque a superfície do painel uma vez que pode
causar defeitos na superfície da tela.
6. Para a instalação e montagem corretas, recomendamos que contate
um fornecedor treinado e autorizado.
7. Tal como acontece com qualquer monitor à base de fósforo (como
um monitor CRT, por exemplo), a saída de luz vai diminuindo com
o decorrer do tempo de vida útil de um painel de plasma.
Para evitar a sulfurização, recomendamos que não coloque a unidade
8.
num compartimento de vestuário, num banheiro público ou sauna.
9. Não utilize a unidade num veículo móvel, uma vez que pode cair ou
tombar e causar lesões.
Não coloque a unidade de lado, virada ao contrário ou com a tela virada
10.
para cima ou para baixo para evitar a combustão ou choque elétrico.
Procedimento de limpeza do monitor plasma:
1. Utilize um pano seco para limpar o painel frontal e a área da
chanfradura. Nunca utilize solventes como álcool ou diluente para
limpar estas superfícies.
2. Limpe as área de ventilação do plasma com um aspirador com um
acessório de escova macia.
3. Para assegurar uma ventilação correta, a limpeza das áreas de
ventilação deve ser efetuada mensalmente. Poderá ser necessário
efetuar uma limpeza mais freqüente dependendo do ambiente no
qual o monitor plasma está instalado.
Recomendações para evitar ou minimizar queimar o fósforo:
Tal como todos os dispositivos de visualização à base de fósforo e
todos os monitores plasma a gás, os monitores plasma podem ser
susceptíveis à queima do fósforo sob determinadas circunstâncias.
Determinadas condições de funcionamento, como a visualização
contínua de uma imagem estática durante um longo período de tempo,
podem queimar o fósforo caso não sejam tomadas as devidas
precauções. Para proteger o seu investimento neste monitor plasma,
siga as seguintes diretrizes e recomendações para minimizar a
ocorrência de destruição da imagem:
* Ative e utilize sempre a função de protetor da tela do computador
durante a utilização com uma fonte de entrada para computador.
* Visualize uma imagem de movimento sempre que possível.
* Mude a posição da visualização de menus de vez em quando.
* Desligue sempre o monitor quando terminar a sua utilização.
Se o monitor plasma for utilizado durante muito tempo e de forma
contínua, toma as seguintes medidas para diminuir a queima de fósforo:
* Reduza os níveis de luminosidade e contraste o mais possível sem
prejudicar a percepção da imagem.
* Visualize uma imagem com muitas cores e graus de cores (por
exemplo, imagens fotográficas ou foto-realistas).
* Crie o conteúdo da imagem com o contraste mínimo entre as áreas de
luz e escuras, por exemplo, caracteres brancos em fundos pretos.
Utilize cores complementares ou pálidas sempre que possível.
* Evite visualizar imagens com poucas cores e margens distintas e
marcadas entre as cores.
Som com o monitor de plasma funcionando
O painel do monitor de plasma é composto de pixels extremamente
pequenos, e estes pixels emitem luz quando recebem sinais de vídeo.
Este princípio poderá causar um zunido ou zumbido elétrico vindo do
monitor de plasma. Note também que a velocidade de rotação do motor
da ventoinha de arrefecimento aumenta quando a temperatura ambiente
do monitor de plasma está alta. Neste caso, o som do motor da
ventoinha poderá ser ouvido.
Nota:
Os seguintes itens não estão cobertos pela garantia.
• Retenção da imagem
• Sons gerados pelo painel, por exemplo: Ruído do motor da
ventoinha, zumbido do circuito elétrico / painel de vidro.
Contate o seu fornecedor para outros procedimentos recomendados que
melhor se adeqüem às suas necessidades de aplicação especiais.
Po-2
Page 53

Aviso
Não é para utilização numa sala de computador
como definido no Padrão ANSI/NFPA 75 para a
protecção de computador elétrônico/equipamento
de processamento de dados.
Atenção
Este modelo deve ser utilizado apenas com os
seguintes acessórios opcionais. A utilização com
outros acessórios opcionais pode causar
instabilidade, e resultar em lesões.
Este equipamento foi testado e cumpre os limites
de um equipamento de digital de Classe B, de
acordo com a Parte 15 da regras FCC. Estes
limites foram concebidos para fornecer proteção
razoável contra interferência prejudicial numa
instalação residencial. Este equipamento gera,
utiliza e gera freqüências rádio e, se não for
instalado e utilizado de acordo com as instruções,
pode causar interferências perigosas às
comunicações rádio. No entanto, não existe a
garantia que a interferência não ocorra numa
instalação particular. Se este equipamento não
causar interferência perigosa à recepção de rádio
ou televisão, o que pode ser determinado ligando
e desligando o equipamento, o usuário é
encorajado a tentar corrigir a interferência por uma
ou mais das seguintes medidas:
• Reorientar ou recolocar a antena de recepção.
• Aumentar a separação entre o equipamento e o
receptor.
• Ligar o equipamento a uma tomada num circuito
diferente do qual o receptor está ligado.
• Consulte o distribuidor ou um técnico
especializado de TV/rádio para obter ajuda.
Este aparelho digital Classe B atende às normas
ICES-003 do Canadá.
Nome do fabricante: NEC Viewtechnology, Ltd.
Alto-falantes: PX-42SP1U, PX-SP2U/S, PX-SP2U/B
Suporte: PX-ST1U, PX-ST1U/S
Contate a NEC Solutions (America), Inc. para
informações acerca dos acessórios opcionais.
Descartar-se do seu
produto utilizado
A legislação da UE está implementada e
cada estado membro exige que os produtos
elétricos usados com a marca (deixada) devem
ser descartados separadamente do lixo
doméstico normal. Isto inclui monitores plasma
e os seus acessórios elétricos. Quando se
desfaz de tais produtos, siga as orientações da
autoridade local e/ou informe-se junto da loja
onde adquiriu o produto.
Após a recolha dos objetos, estes são
reutilizados e reciclados de uma forma correta.
Este esforço irá ajudar-nos a reduzir os
desperdícios bem como o impacto negativo para
a saúde pública e o ambiente no nível mínimo.
A marca nos produtos elétricos e elétrônicos
apenas se aplica aos Estados Membros da
União Européia.
NOT A:
Quando ligar um computador a este monitor, utilize um
cabo RGB incluindo os terminais de ferrita em ambas as
extremidades do cabo. Em relação ao cabo de corrente,
ligue os centros de ferrita fornecidos. Se não proceder
assim, este monitor não irá obedecer aos padrões FCC.
Coloque os centros de ferrita nas extremidades do cabo
de energia (fornecido).
Usar a fita para prender o núcleo de ferrite (fornecido)
ao cabo de energia.
Cabo de corrente (fornecido)
faixa faixa
centro
centro
ATENÇÃO
Quando se estiver a desfazer das baterias
usadas, obedeça aos regulamentos
governamentais ou regras de de instruções
públicas ambientais que se aplicam no seu país/
área.
Po-3
Page 54

Parede
Parede
50 mm
50 mm 50 mm
50 mm
50 mm
Instalação
Pode instalar suportes adicionais ao monitor plasma de uma das seguintes formas:
* Na verticial. (Ver figura A)
* Deitado com a tela virada para baixo (Ver figura B). Coloque a folha de proteção, a utilizada para envolver o monitor
quando embalado, por baixo da superfície da tela para não riscar.
* Não toque nem segure no monitor pela tela sempre que o transportar.
• Este dispositivo não pode ser instalado por si só. Utilize um suporte ou o encaixe original da
unidade. (Unidade de suporte de parede, base, etc.)
• Para a instalação correta e montagem, recomendamos que contate um fornecedor treinado e
autorizado.
O não cumprimento dos procedimentos corretos de montagem pode causar danos no
equipamento ou lesões no instalador.
A garantia do produto não cobre os danos causados por uma instalação incorreta.
* Utilize apenas o conjunto de montagem ou suporte fornecido pelo fabricante e listado em Options.
Figura A
Figura B
Requisitos de ventilação para a
montagem da caixa
Para a dispersão do calor, deixe espaço entre os objetos
envolventes como mostrado na figura aquando da
instalação.
Po-4
Page 55

Parte posterior da unidade
orifícios de montagem
Criar um vídeo-wall
Com a capacidade de visualização de matriz integrada, pode criar um vídeo-wall 4-25.
• Ligue os cabos de sinal e os cabos remotos como abaixo indicado.
Sinal de vídeo Sinal RGB/DVD/HD
Sinal VIDEO
Controle
remoto
IN
IN
Ficha RCA phono
Conector BNC
Conector BNC
VIDEO
VIDEO
(
IN/OUT
1
)
VIDEO 2VIDEO
3
AUDIO
(
MONO
)
R
L
1
Y
DVD
1
IN OUT
REMOTE
OUT
OUT
Sinal VIDEO
Controle
remoto
Sinal RGB/
sinal DVD/HD
Controle
remoto
IN
IN
Cr/Pr Y Cb/Pb
R/
G/ B/
RGB
2
/
DVD
2
/
HD
2
HD
VD
(
IN/OUT
RGB
1
)
IN OUT
REMOTE
OUT
OUT
Nota:
1. Os terminais VIDEO1 e RGB1 podem ser utilizados para INPUT ou OUTPUT.
Quando LOOP OUT está LIGADO, não conecte um sinal OUTPUT de outra unidade; isso iria sobrecarregar a outra
unidade podendo danificá-la.
2. LOOP OUT não pode ser LIGADO quando são enviados sinais para o terminal RGB1.
3. LOOP OUT pode ser LIGADO quando são enviados sinais para o terminal RGB1 se a corrente estiver conectada.
Informação
• Para enviar sinais para outro plasma, defina LOOP OUT para LIGADO.
• Para criar um vídeo-wall, defina corretamente os itens de menú VÍDEO-WALL.
• Para conectar monitores, utilize um cabo BNC de 1~2m (qualquer cabo disponível comercialmente).
• Se a qualidade da imagem for fraca, não utilize o terminal de saída do monitor. Utilize um amplificador de
distribuição (qualquer amplificador de distribuição disponível no mercado) para conectar sinais divididos aos
terminais INPUT do respectivo monitor.
• Utilizado com a função de vídeo-wall, é standard um máximo de 4 telas com sinal inferior a 1024⳯768, 60Hz.
• Recomendamos um amplificador de distribuição sempre que utilizar 9 telas e no vídeo-wall.
• A partir do segundo monitor, as conexões necessitam de um cabo ou conector de conversão BNC-RCA, um mini
cabo de D-Sub 15 pinos BNC (⳯5)/cabo ou conector de conversão.
Sinal RGB/
sinal DVD/HD
Controle
remoto
Manuseamento do cabo
Utilizando os grampos do cabo fornecidos com o
monitor plasma, agrupe na parte posterior da unidade os
cabos de sinal e de áudio conectados ao monitor.
Para ligar Para desligar
1. 2.
orifício de montagem
grampo
cabos
Po-5
Page 56

External Control
IN OUT
REMOTE
Precauções a ter quando o monitor plasma é instalado
na vertical
• Utilize a unidade opcional. Contate o seu local de compra para a instalação.
• Rode 90° no sentido horário como visto a partir da parte frontal ao instalar.
• Após a instalação, verifique se a marca do logotipo NEC é vista na parte frontal.
• Certifique-se que define “ANGULO OSM” para “V”
durante a utilização.
* O não cumprimento das precauções acima referidas
pode causar mau funcionamento.
Como utilizar o controle remoto
Instalação e substituição das baterias
Insira 2 pilhas “AAA”, certificando-se que as coloca na
polaridade correta.
1. Pressione a abra a tampa.
2. Alinhe as baterias de acordo com a indicação (+) e (–)
no interior do compartimento.
VOLUME
INPUT SELECT
MENU/ENTER
DOWN UP LEFT/-RIGHT/+/EXIT
Alcance de funcionamento
* Utilize o controle remoto numa distância até 7 m a partir
da parte da frente do sensor do controle remoto do
monitor e nso angulos horizontal e vertical até cerca de
30°.
* A operação do controle remoto poderá não funcionar se
o sensor do controle remoto do monitor estiver exposto à
luz direta do sol ou a forte luz artificial, ou caso exista
um obstáculo entre o sensor e o controle remoto.
90°
Lado superior
OPÇÃO1
MENU/ENTER
OSM
DOWN UP LEFT/
VOLUME
ENTRADA BNC
: RGB
-
RIGHT/
ENTR. D-SUB
+
INPUT SELECT
/EXIT
: RGB
SELECÇÃO RGB
: AUTO
SELEC. HD
: 1080B
ENTRADA SKIP
: DESLIG.
RESET TODOS
: DESLIG.
1024ⴒ768
SEL.
MENU/ENTER
OK
EXIT
VOLTAR
Lado inferior
3.Volte a colocar a tampa.
Utilizar o modo de controle remoto com fios
Conecte o cabo remoto* na tonda remota do controle
remoto e o terminal “REMOTE IN” no monitor. Quando
o cabo estiver conectado, o modo muda
automaticamente para o controle remoto com fios.
Quando é utilizado o modo de controle remoto com fios,
o controle remoto pode ser operado mesmo que não
estejam carregadas baterias.
Cabo do controle remoto*
Para a tomada remota
Aprox. 7m
Manusear o controle remoto
• Não deixe cair nem utilize incorretamente o controle
remoto.
• Não molhe o controle remoto. Se o controle rmeoto
ficar molhado, seque-o imediatamente.
• Evite o calor e a umidade.
• Quando não utilizar o controle remoto durante um
longo período de tempo, remova as baterias.
• Não utilize ao memso tempo baterias novas e antigas
nem utilize baterias de tipos diferentes.
• Não abandone as baterias, não as aqueça nem as atire
para o fogo.
• Sempre que utilizar o controle rmeoto no modo sem
fios, desconecte o cabo remoto do terminal REMOTE
IN no monitor.
*
O mini cabo 1/8 Stereo deve ser adquirido separadamente.
Po-6
Page 57

Nomes de peças e função
Vista frontal
INPUT SELECT
VOLUME
MENU/ENTER
DOWN UP LEFT/-RIGHT/+/EXIT
MENU/ENTER
7
VOLUME
DOWN UP LEFT/-RIGHT/
6
5
q Power
Liga e desliga o monitor.
w Janela do sensor remoto
Recebesinais do controle remoto.
e Indicador POWER/STANDBY
Quando ligado.......................... Acende a verde.
Quando no modo de standby ... Acende a vermelho.
r INPUT SELECT / EXIT
Ativa a entrada.
Funciona como botões EXIT no modo de menu no
écran (OSM).
INPUT SELECT
+
/EXIT
4
1
2
3
t LEFT/– e RIGHT/+
Aumenta ou reduz a imagem. Funciona como botões
CURSOR (
/ ) no modo de menu na écran
(OSM).
y VOLUME DOWN e UP
Ajusta o volume. Funciona como botões CURSOR
/
(
) no modo de menu no écran (OSM).
u MENU/ENTER
Define o modo de menu na tela (OSM) e visualiza o
menu principal.
AVISO
O interruptor de conexão/desconexão não desconecta
completamente o monitor plasma da corrente elétrica.
Po-7
Page 58

Vista posterior/Placa de terminais
VIDEO
DVD
1
/
HD
1
2
AUDIO
AUDIO
1
R/Cr/Pr G/Y B/Cb/Pb
YL/R L/RCb/Pb Cr/Pr
BD A
RGB
2
/
DVD
2
(IN/OUT)
R
3
L
(
MONO
1
Y Cb/Pb Cr/Pr
)
R
(
)
MONO
L
AUDIO
2
DVD
1
/
HD
1
AUDIO
1
VIDEO
2
/
R/Cr/Pr G /Y B/Cb/ Pb
CE F GHIJK
RGB
2
/
DVD
2
/
HD2RGB
1
AUDIO
3
RGB 3EXTERNAL CONTROL
(IN/OUT)
VD L/RHD
HD
2
RGB
VDHD
(IN/OUT)
REMOTE
IN OUT
DVI
1
AUDIO
3
RGB
3
R
(
)
Digital RGB
DVI
(
)
L
MONO
EXTERNAL CONTROL
REMOTE
IN OUT
A AC IN
Conecte o cabo de alimentação incluído aqui.
B EXT SPEAKER L e R
Conecte as colunas (opcional) aqui. Siga a
polaridade correta. Conecte o fio da coluna
(positivo) ao terminal EXT SPEAKER e o fio da
coluna
(negativo) ao terminal EXT
SPEAKER em ambos os canais LEFT e RIGHT.
Consulte o manual do usuário das colunas.
C VIDEO1, 2, 3 (BNC, RCA, S-Video)
Conecte VCRs, DVDs ou câmeras de vídeo, etc.
aqui. VIDEO1 pode ser utilizado como entrada ou
saída.
D AUDIO1, AUDIO2, AUDIO3
Estes são terminais de entrada de áudio. A entrada é
selecionável. Defina a que imagem de vídeo os
deseja alocar a partir da tele do menu de áudio.
E DVD1 / HD1
Conecte DVDs, discos de alta definição ou laser, etc.
aqui.
F RGB2/ DVD2/ HD2
RGB2: Pode conectar um sinal RGB análogo
e o sinal de sincronização.
DVD2/ HD2: Pode conectar DVDs, discos de alta
definição e laser, etc. aqui.
Esta entrada pode ser definida para
utilização com um RGB ou fonte de
componente.
G RGB1 (mini D-Sub 15 pinos)
Conecte um sinal RGB análogo a partir de um
computador, etc. aqui. Esta entrada pode ser
utilizada como entrada e saída.
H RGB3 (DVI 24 pinos)
Conecte um sinal digital (TMDS) a partir de uma
fonte com uma saída DVI.
Esta entrada pode ser defina para utilização com um
RGB/PC3.
I EXTERNAL CONTROL
Este terminal é utilizado sempre que operar e
controlar o monitor externamente (através do RS232C).
J REMOTE IN (DC +5V)
Conecte o cabo remoto* à tomada remota do
controle remoto para obter um controle remoto com
fios.
K REMOTE OUT (C-MOS DC +5V)
Conecte o cabo remoto* à tomada REMOTE IN de
outro monitor para obter um controle remoto com
fios.
Exemplo de Conexão: Conectando um sintonizador de TV.
PLASMA DISPLAY
VIDEO
IN
VIDEO
OUT
REMOTE
OUT
TV T uner
Remote Control
Carrier fHz: 38kHz
TV T uner
REMOTE
IN
* O mini cabo 1/8 deve ser adquirido separadamente.
Po-8
Page 59

Controle remoto
q POWER ON/STANDBY
Permite ligar ou colocar em standby.
(Isto não funciona quando o indicador POWER/
STANDBY da unidade principal estiver desligado.)
w RGB / PC
Pressione este botão para selecionar RGB/PC como
fonte.
RGB/PC também pode ser selecionado utilizando o
botão INPUT SELECT no monitor.
e DVD / HD
Pressione este botão para selecionar DVD/HD como
fonte.
DVD/HD também pode ser selecionado utilizando o
botão INPUT SELECT no monitor.
r VIDEO
Pressione este botão para selecionar VIDEO como
fonte.
VIDEO também pode ser selecionado utilizando o
botão INPUT SELECT no monitor.
t MENU/ENTER
Pressione este botão para acessar aos controles
OSM.
Pressione este botão durante a visualização do menu
principal para passar ao submenu.
y CURSOR (
Utilize estes botões para selecionar itens ou
definições e para ajustar as definições ou mudar os
modelos de écran.
→ VIDEO1 → VIDEO2 → VIDEO3
/ /
/ )
u EXIT
Pressione este botão para sair dos controles OSM no
menu principal. Pressione este botão durante a
visualização do submenu para voltar ao menu
anterior.
i POINTER
Pressione este botão para visualizar o cursor.
o ZOOM (+ /–)
Aumenta ou reduz a imagem.
!0 VOLUME (+ /–)
Ajsuta o volume.
!1 MUTE
Emudece o som.
!2 WIDE
Detecta automaticamente o sinal e define o rácio de
aspecto. O botão Wide não está ativo para todos os
sinais.
!3 DISPLAY
Visualiza as definições da fonte no écran.
!4 OFF TIMER
Ativa o temporizador de desligar a unidade.
!5 SIDE BY SIDE
Pressione este botão para mostrar algumas imagens
no modo lado-a-lado.
!6 PICTURE IN PICTURE
Pressione este botão para mostrar algumas imagens
no modo imagem-na-imagem.
!7 SINGLE
Cancela o modo de écran dividido.
!8 SELECT/FREEZE
Pressione este botão para selecionar a imagem ativa
no modo de écran dividido.
Quando a função IMG. FIXA está ativa, este botão
pode ser utilizado para visualizar imagens estáticas
no sub écran.
!9 AUTO ADJUST
Pressione este botão para ajustar AJUSTE FINO,
AJUSTE IMAG., POSIÇÃO, e CONTRASTE
automaticamente, ou para mudar o tamanho do écran
para o modo ZOOM automaticamente com a legenda
sobreposta visualizada na totalidade apenas quando a
imagem incluir áreas escuras em cima ou em baixo da
imagem.
@0 ID SELECT
Defina o número de identificação no controle
remoto. O controle remoto pode então ser utilizado
apenas para um écran com o mesmo número de
identificação. Quando são utilizados váriso écrans ao
mesmo tempo, estes podem ser contorlados
individualmente.
@1 CLEAR/SEAMLESS SW
Apaga o número definido pelo botão ID SELECT.
Quando a função TROCA RÁPIDA está ativa, este
botão pode ser utilizado para mudar rapidamente a
fonte de entrada.
@2 Transmissor de sinal do controle remoto
Transmite os sinais do controle remoto.
@3 Tomada remota
Insira a ficha do cabo remoto (mini cabo 1/8 Stereo)
aqui sempre que utilizar o controle remoto fornecido
Po-9
no modo com fios.
Page 60

Operações básicas
POWER
Para ligar (ON) e desligar (OFF) a unidade:
1. Ligue o cabo de corrente a uma tomada CA ativa.
2. Pressione o botão de corrente (na unidade).
O indicador POWER/ST ANDBY do monitor iluminase em vermelho e o modo de prontidão é definido.
3. Pressione o botão POWER ON (no controle remoto)
para ligar a unidade.
O indicador POWER/ST ANDBY irá iluminar-se (em
verde) quando a unidade estiver ligada.
4. Pressione o botão POWER ST ANDBY button (no
controle remoto) ou o botão de corrente (na unidade)
para desligar a unidade.
O indicador POWER/ST ANDBY fica vermelho e o
estado de prontidão é definido (apenas quando se
desliga a unidade com o controle remoto).
VOLUME
Para ajustar o volume:
1. Mantenha pressionado VOLUME (no controle
remoto ou na unidade) para aumentar para o nível
desejado.
2. Mantenha pressionado VOLUME (no controle
remoto ou na unidade) para diminuir para o nível
desejado.
MUTE
Para emudecer o som:
Pressione o botão MUTE no controle remoto para
emudecer o som; pressione novamente para restaurar.
DISPLAY
Para verificar as definições:
1. O écran muda de cada vez que é pressionado o botão
DISPLAY.
2. Se o botão não for premido durante aproximadamente
três segundos, o menu desaparece.
DIGITAL ZOOM
O zoom digital especifica a posição da imagem e
aumenta a figura.
1. (Certifique-se que NAV. ZOOM está desligado)
Pressione o botão POINTER para visualizar o cursor. ( )
Para alterar o tamanho da imagem:
Pressione o botão ZOOM + e amplie a imagem.
O cursor irá mudar ficando semelhante a uma lupa.( )
Se pressionar o botão ZOOM – irá reduzir a imagem e
fazê-la voltar ao tamanho original.
Para alterar a posição da imagem:
Selecione a posição com os botões
2. Pressione o botão POINTER para deletar o cursor.
.
AUTO ADJUST
Ajustar o tamanho ou qualidade da imagem
automaticamente:
Pressione o botão AUTO ADJUST.
Informação
Definição AUTO ADJUST ON
Quando a introdução RGB (imagem parada) for
selecionada: AJUSTE FINO, AJUSTE IMAG.,
POSIÇÃO, e CONTRASTE serão ajustados
automaticamente.
Quando a introdução RGB (imagem parada),
VIDEO ou Y/Pb/Pr (componente) for
selecionada: O tamanho do écran muda para o
modo ZOOM automaticamente com a legenda
imposta a ser visualizada completamente apenas
quando a imagem contiver áreas a negro por cima e
por baixo a imagem.
OFF TIMER
Para configurar o temporizador de desligar:
O temporizador de desligar pode ser definido para
desligar após 30, 60, 90 ou 120 minutos.
1. Pressione o botão OFF TIMER para iniciar o
temporizador em 30 minutos.
2. Pressione o botão OFF TIMER para o tempo desejado.
3. O temporizador inicia quando o menu desaparecer.
→ 30 → 60 → 90 → 120 → 0
DESLIGAR TEMP. 30
Para verificar o tempo restante:
1. Após o temporizador de desligar ter sido definido,
pressione o botão OFF TIMER uma vez.
2. É visualizado o tempo restante, de seguida desliga-se
após alguns segundos.
3. Quando faltarem cinco minutos o tempo restante irá
aparecer até chegar a zero.
DESLIGAR TEMP. 28
Para cancelar o temporizador de desligar:
1. Pressione o botão OFF TIMER duas vezes seguidas.
2. O temporizador de desligar é cancelado.
DESLIGAR TEMP. 0
Nota:
Após a corrente ser desligada com o temporizador de
desligar ...
Ainda fica aplicada ums pequena corrente ao monitor.
Quando deixar a sala ou não planear utilizar o sistema
durante muito tempo, desligue a alimentação do
monitor.
Po-10
Page 61

Controles OSM (Menu no écran)
Operações do Menu
A janela OSM é visualizada com respeito ao écran
como mostrado no diagrama.
* Dependendo do modo do écran, o OSM pode ser
visualizado de forma diferente.
Na explicação, a seção OSM é mostrada em destaque.
MENU PRINCIPAL 1 / 2
IMAGEM
ÁUDIO
AJUSTE DE IMAGEM
OPÇÃO1
OSM AVANÇADO
: DESLIG.
PÁG. SEG.
MENU/ENTEROKEXIT
SEL.
A secção seguinte descreve a forma como utilizar os
menus e os itens seleccionados.
1. Pressione o botão MENU/ENTER no controle remoto
para visualizar o MENU PRINCIPAL.
SAIR
MENU PRINCIPAL 1 / 2
IMAGEM
ÁUDIO
AJUSTE DE IMAGEM
OPÇÃO1
OSM AVANÇADO
PÁ G. SEG.
MENU/ENTEROKEXIT
SEL.
: DESLIG.
SAIR
Nota:
Este menu principal desaparece pr essionando o
botão EXIT .
Informação
䡵 Modo menu avançado
Quando estiver definido “OSM AVANÇADO” para
“LIGADO” no menu principal (1/2), serão mostrados
todos os itens de menu.
MENU PRINCIPAL 1 / 2
IMAGEM
ÁUDIO
AJUSTE DE IMAGEM
OPÇÃO1
OPÇÃO2
OPÇÃO3
OPÇÃO4
OSM AVANÇADO
PÁ G. SEG.
MENU/ENTEROKEXIT
SEL.
: LIGADO
SAIR
* A tela real pode ser diferente das que aparecem neste
manual.
MENU PRINCIPAL 2 / 2
PÁG. ANT.
LINGUAGEM
SISTEMA DE CORES
INFORM. DE SINAL
MENU/ENTEROKEXIT
SEL.
SAIR
2. Pressione os botões de cursor 䊱䊲 no controle remoto
para realçar o menu que deseja introduzir.
3. Pressione o botão MENU/ENTER no controle remoto
para selecionar um submenu ou item.
CONTRASTE
BRILHO
DEFINIÇÃO
COR
TONALIIDADE
MODO IMAGEM
NR
PÁG. SEG.
SEL. ADJ. VOLTAR
IMAGEM 1 / 2
: NORMAL
: DESLIG.
EXIT
: 52
: 32
: 16
: 32
GR
: 32
4. Ajuste o nível ou altere a definição do item selecionado
utilizando os botões do cursor
䊴 䊳
no controle remoto.
5. Os ajustes ou definições que estão guardados em
memória. A alteração é armazenada até qua a altere
novamente.
6. Repita passos 2 – 5 para ajustar ao item adicional , ou
pressione o botão EXIT no controle remoto para voltar
ao menu principal.
* Quando estiver a ajustar utilizando a barra no fundo do
䊴
écran, pressione o botão
ou 䊳 em 5 segundos. Se não,
a definição corrente é definida e aparece a imagem
anterior.
Po-11
Page 62

Árvore do Menu
* Para mais detalhes acerca de cada item do menu, consulte o CD-ROM.
: As áreas sombreadas indicam o valor pré-definido.
ⳮ←→Ⳮ: Pressione o botão
䊴
ou 䊳 para ajustar.
: Os itens de menu estão numa caixa ordenada quando OSM AVANÇADO estiver definido para LIGADO.
Menu principal Submenu Submenu 2 Submenu 3 Submenu 4 RESET REFERENCE
IMAGEM CONTRASTE ⳮ←→Ⳮ 0←52→72 SIM Po-20
BRILHO ⳮ←→Ⳮ 0←32→64 SIM Po-20
DEFINIÇÃO ⳮ←→Ⳮ 0←16→32 SIM Po-20
COR ⳮ←→Ⳮ 0←32→64 SIM Po-20
TONALIIDADE R←→G 0←32→64 SIM Po-20
MODO IMAGEM BRILHO/NORMAL/CINEMA1/CINEMA2/PADRÃO SIM Po-20
NR DESLIG./NR-1/NR-2/NR-3 SIM Po-20
TEMP. DE COR BAIXO -/BAIXO +/MÉDIO/ALTO SIM Po-20
BALANÇO DE BRANCOS
GAMA 1←→2←…→4 SIM Po-21
TOM BAIXO *
AFINAR COR VERMELHO A←→M0←32→64 SIM Po-21
LUM. VERMELHO ⳮ←→Ⳮ 0←40→70 SIM Po-21
LUM. VERDE ⳮ←→Ⳮ 0←40→70 SIM Po-21
LUM. AZUL ⳮ←→Ⳮ 0←40→70 SIM Po-21
CONT. VERM. ⳮ←→Ⳮ 0←40→70 SIM Po-21
CONT. VERDE ⳮ←→Ⳮ 0←40→70 SIM Po-21
CONT. AZUL ⳮ←→Ⳮ 0←40→70 SIM Po-21
RESET DESLIG.←→LIGADO SIM Po-21
3
AUTO←→1←…→3 SIM Po-21
VERDE C←→A0←32→64 SIM Po-21
AZUL M←→C0←32→64 SIM Po-21
AMARELO V←→V0←32→64 SIM Po-21
MAGENTA V←→A0←32→64 SIM Po-21
CIAN A←→V0←32→64 SIM Po-21
RESET DESLIG.←→LIGADO SIM Po-21
Menu principal Submenu Submenu 2 Submenu 3 Submenu 4 RESET REFERENCE
ÁUDIO GRAVES ⳮ←→Ⳮ 0←13→26 SIM Po-22
AGUDOS ⳮ←→Ⳮ 0←13→26 SIM Po-22
BALANÇO L←→R -22←0→+22 SIM Po-22
AUDIO INPUT1 VÍDEO 1-3 / HD/DVD 1-2 / RGB 1-3 SIM Po-22
AUDIO INPUT2 VÍDEO 1-3 / HD/DVD 1-2 / RGB 1-3 SIM Po-22
AUDIO INPUT3 VÍDEO 1-3 / HD/DVD 1-2 / RGB 1-3 SIM Po-22
Menu principal Submenu Submenu 2 Submenu 3 Submenu 4 RESET REFERENCE
AJUSTE DE IMAGEM
Menu principal Submenu Submenu 2 Submenu 3 Submenu 4 RESET REFERENCE
OPÇÃO1 OSM VISOR OSM DESLIG.←→LIGADO SIM Po-23
MODO ASPECTO NORMAL/COMPLETO/ESTÁDIO/ZOOM/2.35:1/14:9/REAL*
POSIÇÃO-V ⳮ←→Ⳮ -64←0→+64 SIM Po-22
POSIÇÃO-H ⳮ←→Ⳮ -128←0→+127 SIM Po-22
ALTURA-V ⳮ←→Ⳮ 0←→64 SIM Po-22
LARGURA-H ⳮ←→Ⳮ 0←→64 SIM Po-22
IMAGEM AUTO DESLIG.←→LIGADO*
AJUSTE FINO*
AJUSTE IMAG.*
ENTRADA BNC RGB←→COMP. SIM Po-23
ENTR. D-SUB RGB — Po-23
SELECÇÃO RGB AUTO SIM Po-23
SELEC. HD 1080B/1035I/1080A NÃO Po-24
ENTRADA SKIP DESLIG.←→LIGADO SIM Po-24
RESET TODOS DESLIG.←→LIGADO — Po-24
1
ⳮ←→Ⳮ*20←→64 SIM Po-22
1
ⳮ←→Ⳮ*20←→128 SIM Po-22
AJUSTE OSM 1←…→6 SIM Po-23
ANGULO OSM H←→V SIM Po-23
ROTAÇÃO OSM DESLIG.←→LIGADO SIM Po-23
CONTR. OSM BAIXO←→NORMAL SIM Po-23
2
3
— Po-22
NÃO Po-22
Po-12
Page 63

Menu principal Submenu Submenu 2 Submenu 3 Submenu 4 RESET REFERENCE
OPÇÃO2 CONF. ENERGIA DESLIG.←→LIGADO SIM Po-25
MODO CINEMA DESLIG.←→LIGADO SIM Po-25
LONG. DURAÇÃO PLE AUTO/FIXAR1/FIXAR2/FIXAR3 SIM Po-25
ROTAÇÃO AUTO 1 SIM Po-26
AUTO 2 SIM Po-26
MANUAL PIXEL-H/LINHA-V/TEMPO SIM Po-26
DESLIG. SIM Po-26
INVERSÃO DESLIG. SIM Po-26
LIGADO TEMP. FUNC./TEMP. ESPERA SIM Po-26
BRANCO SIM Po-26
VARRER ÉCRAN DESLIG. SIM Po-27
LIGADO TEMP. FUNC./TEMP. ESPERA/VELOCIDADE SIM Po-27
SOFT FOCUS DESLIG./1/2/3/4 SIM Po-27
NÍV. CINZA 0←…→3←…→15 SIM Po-27
S1/S2 AUTO←→DESLIG. SIM Po-28
TAM. IMAGEM*
3
DESLIG.←→LIGADO SIM Po-28
CONF. DVI PLUG/PLAY PC←→STB/DVD NÃO Po-28
NÍVEL PRETO BAIXO←→ALTO NÃO Po-28
SUBTÍTULO DESLIG.←→CC1~4←→TEXTO1~4 SIM Po-28
CONT. SUBT. BAIXO←→NORMAL SIM Po-28
Menu principal Submenu Submenu 2 Submenu 3 Submenu 4 RESET REFERENCE
OPÇÃO3 TEMPORIZADOR TEMPO REAL HORA VERÃO DESLIG.←→LIGADO NÃO Po-29
DIA/HORA/MINUTOS NÃO Po-29
PROGRAMAR DESLIG. SIM Po-29
LIGADO
DATA/LIG./DESL.(HORA, MINUTOS)/ENTR./FUNÇÃO
SIM Po-29
MULTI REPEAT DESLIG. SIM Po-30
LIGADO MULTI-MODO/TEMP. FUNC./MODO ENTR. SIM Po-30
MODO LIGADO ENTRADA ÚLTIMO/MULTI/ VÍDEO 1-3 / HD/DVD 1-2 / RGB 1-3 SIM Po-30
VOLUME ÚLTIMO←→0←…→44 SIM Po-30
CONTROL BLOQ. DESLIG.←→LIGADO SIM Po-30
CONTROLO IV DESLIG.←→LIGADO SIM Po-31
LOOP OUT DESLIG.←→LIGADO SIM Po-31
ID CONTROLO TDS←→1←…→4NÃO Po-31
NÚMERO ID TDS←→1←…→256 SIM Po-31
VÍDEO-WALL DIVISOR DESLIG./1/4/9/16/25 SIM Po-32
POSIÇÃO
No.1←…→No.4/No.7←…→No.15/No.16←…→No.31/No.32←…→No.56
— Po-32
MODO ÉCRAN DIVIDIR←→BRANCO SIM Po-32
AUTO ID DESLIG.←→LIGADO SIM Po-32
AJUSTE IMAG. MODO ASPECTO
POSIÇÃO-V/POSIÇÃO-H/ALTURA-V/LARGURA-H/IMAGEM AUTO/
AJUSTE FINO*
NORMAL/COMPLETO/ESTÁDIO/ZOOM/2.35:1/14:9/REAL
1
/AJUSTE IMAG.*
1
*3— Po-33
ATRASO START DESLIG./LIGADO/MODO1/MODO2 SIM Po-33
LIGAÇÃO PLE DESLIG.←→LIGADO SIM Po-33
REPT. TEMP. DESLIG. SIM Po-34
LIGADO DIVISOR/FONTE/TEMP.FUNC. SIM Po-34
Menu principal Submenu Submenu 2 Submenu 3 Submenu 4 RESET REFERENCE
OPÇÃO4 SUB. IMAGEM DET. IMAG SEC. DESLIG.←→AUTO SIM Po-34
ECRAN JUNTAS←→NORMAL SIM Po-34
TAMANHO 20%←…→100% SIM Po-34
NAV. ZOOM
IMG. FIXA
DESLIG.←→S BY S←→INF. ESQ←→INF. DER←→SUP. DER←→SUP. ESQ
DESLIG.←→S BY S1←→S BY S2←→INF. ESQ←→INF. DER←→SUP. DER←→SUP. ESQ
SIM Po-34
SIM Po-35
TROCA RÁPIDA DESLIG. SIM Po-35
LIGADO SELEC.1/SELEC.2 SIM Po-35
INSERT. TEXT DESLIG./ACIMA/MEIO/BAIXO/INF
ENTRADA/TAMANHO/ECRAN SIM Po-36
Menu principal Submenu Submenu 2 Submenu 3 Submenu 4 RESET REFERENCE
OSM AVANÇADO DESLIG.←→LIGADO SIM Po-36
LINGUAGEM ENGLISH/DEUTSCH/FRANÇAIS/ESPAÑOL/ITALIANO/SVENSKA/У /PORTUGUÊSNÃO Po-36
SISTEMA DE CORES
INFORM. DE SINAL
AUTO/3.58NTSC/4.43 NTSC/PAL/PAL 60/PAL-N/PAL-M/SECAM NÃO Po-37
— — Po-37
*1 Apenas quando IMAGEM AUTO estiver DESLIG.
*2 Apenas RGB/PC
*3 “TAM. IMAGEM”, “REAL” e “TOM BAIXO” são apenas para os tipos de 50 e 61 polegadas.
Informação
䡵 Restaurar todas as pré-definições do fabricante
Selecione “RESET TODOS” no menu OPÇÃO1. Note que isto também restaura outras definições para as pré-definições do fabricante.
Po-13
Page 64

Resolução de problemas
Se a qualidade de imagem é fraca ou se existir qualquer outro problema, verifique os ajustamentos, funcionamento,
etc., antes de solicitar assistência.
Sintoma
A unidade emite um ruído de estalos.
A imagem está perturbada.
Som é ruidoso.
O controle remoto funciona mal.
O controle remoto não funciona.
O monitor não liga, quando se pressiona o
botão no controle remoto.
O monitor não funciona, quando se
pressionam os botões no controle remoto.
Os botões do painel frontal da unidade
principal não funcionam.
Não é produzido som ou imagem.
Aparece a imagem, mas não é produzido
som.
Imagem fraca com sinal de entrada VIDEO.
Imagem fraca com sinal de entrada RGB.
O tom é pobre ou as cores são fracas.
Nada aparece no écran.
Parte da imagem é cortada ou a imagem não
está centrada.
A imagem é muito grande ou muito pequena.
A imagem está instável.
O indicador POWER/STANDBY está
iluminado em vermelho.
O indicador POWER/STANDBY está
intermitente em vermelho.
O indicador POWER/STANDBY está
intermitente em vermelho e verde, ou em
verde.
• A imagem e o som estão normais?
• Está algum componente conectado diretamente
na frente ou ao lado do monitor?
• As baterias do controle remoto estão gastas?
• CONTROLO IV está definido para LIGADO?
• Foi definido um número de ID para a unidade
principal?
• O cabo de conexão do monitor está conectado
em uma tomada de corrente?
• Todos os indicadores do monitor estão
desligados?
• As baterias do controle remoto estão gastas?
• CONTROLO IV está definido para DESLIG.?
• Foi definido um número de ID para a unidade
principal?
• O controle remoto está apontado para o monitor,
ou existe algum obstáculo entre o controle
remoto e o monitor?
• A luz direta do sol ou uma luz artificial forte está a
incidir no sensor do controle remoto do monitor?
• As baterias do controle remoto estão gastas?
• O cabo remoto está conectado no terminal
REMOTE IN (com fios).
• Os botões do painel frontal não funcionam
durante o CONTROL BLOQ..
• O cabo de conexão do monitor está ligado numa
tomada de corrente?
• O volume está ajustado no mínimo?
• Está definido o modo de emudecimento?
• As colunas estão devidamente conectadas?
• AUDIO INPUT está ajustado corretamente?
• Ajustes de controle indevidos.
Interferência local.
Interconexões do cabo.
A impedância de entrada não está no nível
correto.
• Ajustes de controle indevidos.
Conexões incorretas no conector de 15 pinos.
• O tom e as cores estão devidamente ajustados?
• A corrente do computador está ligada?
• Está conectada uma fonte?
• A função de gerenciamento de energia está no
modo estado de prontidão ou desligada?
• LOOP OUT está ajustado para LIGADO?
• A posição está devidamente ajustada?
• O tamanho do écran está devidamente ajustado?
• A resolução do computador está devidamente
ajustada?
• A sincronização de sinal horizontal e / ou vertical
não está presente quando o controle de
Intelligent Power Manager está ligado.
• A temperatura dentro da unidade principal ficou
muito alta e ativou a proteção.
Verificações
–––––
Solução
• Se não existirem anomalias na imagem e no som, o
ruído é causado pela reação do compartimento às
alterações de temperatura. Isto não afeta o
desempenho.
• Deixe algum espaço entre o monitor e os
componentes conectados.
• Substitua ambas as baterias por novas.
• Ajuste CONTROLO IV DESLIG. no menu OPÇÃO3.
• Defina um número ID, com o botão ID SELECT, ou
defina o número ID para TDS.
• Ligue o cabo de conexão do monitor numa tomada
de corrente?
• Pressione o botão de corrente no monitor, para ligar
a energia.
• Substitua ambas as baterias por novas.
• Defina CONTROLO IV LIGADO.
• Defina um número ID, com o botão ID SELECT, ou
defina o número ID para TDS.
• Aponte o controle remoto ao sensor de controle
remoto do monitor quando pressionar os botões, ou
remova o obstáculo.
• Elimine a luz, fechando as cortinas, apontando a luz
para outra direção, etc.
• Substitua ambas as baterias por novas.
• Desligue o cabo remoto do monitor.
• Defina o CONTROL BLOQ. para DESLIG..
• Ligue o cabo de conexão do monitor numa tomada
de corrente.
• Aumente o volume.
• Pressione o botão MUTE do controle remoto.
• Conecte devidamente as colunas.
•
Defina corretamente AUDIO INPUT no menu ÁUDIO.
• Ajuste o controle de imagem conforme o necessário.
Experimente outra localização para o monitor.
Certifique-se que todas as conexões estão seguras.
• Ajuste os controles de imagem conforme o
necessário.
Verifique a posição dos pinos e as conexões.
• Ajuste o tom e as cores (em IMAGEM).
• Ligue a corrente do computador.
• Conecte a fonte ao monitor.
• Funcione com o computador (mova o rato, etc.).
• Defina LOOP OUT DESLIG..
• Ajuste corretamente AJUSTE DE IMAGEM.
• Pressione o botão WIDE no controle remoto e ajuste
devidamente.
• Defina a resolução apropriada.
• Verifique a entrada de sinal.
• Desligue imediatamente a corrente da unidade
principal e aguarde até que baixe a temperatura
interna. Ver*1.
• Desligue imediatamente a corrente da unidade
principal. Ver *2.
*1 Proteção de sobre-aquecimento
Se o monitor aquecer demasiado, a proteção de sobre-aquecimento é ativada e o monitor é desligado. Se isso acontecer,
desligue a corrente do monitor e tire a ficha da tomada de corrente. Se o compartimento onde o monitor está instalado é
particularmente quente, mude o monitor para uma localização mais fresca e aguarde que o monitor arrefeça durante 60
minutos. Se o problema persistir, contate o seu fornecedor.
*2 No caso seguinte, desligue imediatamente o monitor, e contate o seu fornecedor ou um Centro de Assistência autorizado.
O monitor desliga 5 segundos depois de ligar e, nessa altura, o indicador POWER/ST ANDBY fica intermitente. Isso
indica que o circuito da fonte de alimentação, o painel de visualização plasma, o sensor de temperatura ou uma, ou mais,
ventoinhas estão danificadas.
Po-14
Page 65

Especificações
Tamanho do écran 36,3"(H)⳯20,3"(V) polegadas
922(H)⳯515(V) mm
diagonal 42"
Relação alt./larg. 16 : 9
Resolução 1024(H)⳯768(V) pixels
Pixel Pitch 0,036"(H)⳯0,027"(V) polegadas
0,9(H)⳯0,671(V) mm
Processamento de cores 4,096 passos, 68,7 biliões de cores
Sinais
Alcance de sincronização
Horizontal : 15,5 a 110,0 kHz
(automático : pesquisa por passo)
Vertical : 50,0 a120,0 Hz
(automáticopesquisa por passo)
Sinais de entrada RGB, NTSC (3,58/4,43),
PAL (B,G,M,N), PAL60, SECAM,
Terminais de entrada
*1
HD
, DVD*1, DTV
(VIDEO1 e RGB1 pode-se depois também utilizar como terminais de saída)
*1
RGB
Visual 1 (Análogo) mini D-sub 15-pinos⳯1
Visual 2 (Análogo) BNC (R, G, B, HD, VD)⳯1
Visual 3 (Digital) DVI-I 24-pin x 1
*3
*2
Vídeo
Visual 1 BNC⳯1
Visual 2 Pino RCA⳯1
Visual 3 S-Vídeo: DIN 4 pinos⳯1
DVD/HD
Visual 1 Pino RCA (Y, Cb/Pb, Cr/Pr)⳯1
Visual 2 BNC (Y, Cb/Pb, Cr/Pr)⳯1
Visual 3 DVI-D 24 pinos⳯1
*3
*1
*1, *2
Áudio RCA Stereo⳯3 (Selecionável)
Controle externo D-sub 9-pinos 1(RS-232C)
Saída de som 8W+8W a 6 ohm
Fonte de alimentação de energia
AC100-240V 50/60Hz
Taxa atual 4,5A (máximo)
Consumo de energia 285W (normal)
Dimensões 40,2 (L)⳯24 (A)⳯3,9 (P) polegadas
1022 (L)⳯610 (A)⳯98(P) mm
Peso 66 lbs / 30 kg (sem suporte)
Considerações ambientais
Temperatura de funcionamento
0°C a 40°C / 32°F a 104°F
Umidade 20 a 80% (sem condensação)
Altitude 720 a 1114 hPa
(0 a 9180 pés / 0 a 2800 m)
Temperatura de armazenamento
-10°C a 50°C / 14°F a 122°F
Umidade 10 a 90% (sem condensação)
Altitude 700 a 1114 hPa
(0 a 9840 pés / 0 a 3000 m)
Outras características
Compensação de movimento 3D Conversão de pesquisa
3D (NTSC, PAL, 480I, 576I, 525I, 625I, 1035I, 1080I),
Conversor 2-3 (NTSC, 480I, 525I, 1035I, 1080I
(60Hz)),Conversor 2-2 (PAL, 576I, 625I, NTSC, 480I,
525I), Função de zoom digital (Selecionável 100-900%),
Multi-tela Vídeo-Wall 4-25, Auto-diagnóstico,
Ferramentas de redução de imagens queimadas (PLE
FIXAR1~3, INVERSÃO, BRANCO, ROTAÇÃO
(Auto1,2/Manual), VARRER ÉCRAN), Seleção da
temperatura da cor (alto/médio/baixo +/baixo -, o usuário
tem 4 memórias), Bloqueio de controle (Exceto
interruptor de energia), Auto Imagem, Saltar
introdução,Acerto de cores, Tom baixo (modo 3), Auto
ID, Temporizador programável, Correção Gamma (modo
4), Interface “loop through”, Plug and play (DDC1,
DDC2b, RGB3: DDC2b apenas), Operações para dividir
tela
Classificaçao UL 60950-1, CAN/CSA-C22.2 No.60950-1-03,
FCC class B, ICES-003 class B
40,2" (1022)
36,3" (922)
1,59"
(40,4)
24" (610)
20,3" (515)
As unidades são em polegadas
3,9"
(98)
2,31"
(57,6)
(mm)
As características e especificações podem estar sujeitas a
alterações sem aviso prévio.
*1Sinais de entrada suportados neste sistema HD/
DVD/DTV.
480P (60 Hz) 480I (60 Hz) 525P (60 Hz)
525I (60 Hz) 576P (50 Hz) 576I (50 Hz)
625P (50 Hz) 625I (50 Hz) 720P (60 Hz)
720P (50 Hz) 1035I (60 Hz) 1080I (50 Hz)
1080I (60 Hz) 1080P (50 Hz) 1080P (60 Hz)
*2Os 5 conectores BNC são utilizados nas entradas
RGB/PC2 e HD/DVD2. Selecione um deles em
“ENTRADA BNC”.
*3Compatível com HDCP.
Sinais suportados
• 640ⴒ480P @ 59,94/60Hz • 1920ⴒ1080I @ 50Hz
• 1280ⴒ720P @ 59,94/60Hz • 720ⴒ576P @ 50Hz
• 1920ⴒ1080I @ 59,94/60Hz • 1280ⴒ720P @ 50Hz
• 720ⴒ480P @ 59,94/60Hz
Nota: Em alguns casos o sinal no monitor plasma pode não
ser visualizado corretamente. O problema pode ser de
inconsistência de padrões no equipamento de origem (DVD,
caixa descodificação, etc...). Se tiver algum problema deste
género contate a NEC Solutions (Ameria) Inc. e também o
fabricante do equipamento de fonte.
Po-15
Page 66

Garantia Limitada Monitores de Plasma
NEC Solutions, Inc. (a seguir designado NEC Solutions)
garante que este produto não tem defeitos de material
nem de mão-de-obra, de acordo com seguintes termos e
sujeito às condições apresentadas abaixo, e concorda em
reparar ou substituir (segundo o critério de NEC
Solutions) qualquer peça da unidade correspondente
comprovadamente defeituosa. As peças ou os produtos a
substituir podem ser novas ou recuperadas e devem
cumprir as especificações das peças ou produtos
originais.
DE QUANTO TEMPO É A GARANTIA?
Peças e mão-de-obra são garantidas por (1) um ano a
partir da data da compra pelo primeiro cliente.
QUEM ESTÁ PROTEGIDO?
Esta garantia só pode ser acionada pelo primeiro
comprador.
O QUE ESTÁ COBERTO E O QUE NÃO ESTÁ
COBERTO
Com exceção do que está especificado abaixo, esta
garantia cobre todos os defeitos do material ou da mãode-obra deste produto. O seguinte não está coberto pela
garantia:
1. Qualquer produto que não seja distribuído nos EUA ou no
Canadá por NEC Solutions ou que não seja comprado nos
EUA ou no Canadá num agente autorizado da NEC Solutions.
2. Qualquer produto cujo número de série tenha sido adulterado,
modificado ou retirado.
3. Danos, deterioração ou mau funcionamento resultante de:
a. Acidente, utilização imprópria, abuso, negligência, fogo,
água, relâmpago ou outras causas naturais, modificação não
autorizada do produto, ou falha na observância das
instruções fornecidas com o produto.
b. Reparação ou tentativa de reparação por alguém não
autorizado por NEC Solutions.
c. Qualquer despacho do produto (as reclamações devem ser
apresentadas ao transportador).
d. Remoção ou instalação do produto.
e. Qualquer outra causa que não seja relacionada com um
defeito do produto.
f. Queimaduras ou riscos no material fluorescente do painel.
4. Caixas, caixas de transporte, baterias, móveis externos, fitas
magnéticas, ou quaisquer acessórios utilizados em conjunto
com o produto.
5. Assistência fora dos EUA e Canadá.
O QUE PAGAMOS E O QUE NÃO PAGAMOS
Pagamos a mão-de-obra e as despesas com material para
os itens cobertos, mas não pagamos o seguinte:
1. Encargos com remoção ou instalação.
2. Custos com os ajustes técnicos iniciais (configuração),
incluindo ajuste de controles de usuário. Estes custos são da
responsabilidade do agente NEC Solutions de quem o produto
foi comprado.
3. Encargos com despachos.
COMO OBTER A ASSISTÊNCIA DA GARANTIA
1. Para obter assistência ao seu produto, consulte o agente de
quem comprou o produto.
2. Sempre que a assistência de garantia é solicitada, a fatura de
compra original (ou uma cópia) deve ser apresentada como
prova da cobertura da garantia.
Em qualquer correspondência também deve incluir o seu
nome, endereço e uma descrição do(s) problema(s).
3. Para obter informações do serviço de assistência autorizada da
NEC Solutions mais próximo, telefone para NEC Solutions
pelo número 800-836-0655.
LIMITES DE RESPONSABILIDADE
Exceto para as obrigações especificas apresentadas
nesta declaração de garantia, não seremos responsáveis
por qualquer dano direto, indireto, especial, acidental,
conseqüencial ou qualquer outro tipo de danos, ainda
que baseado em contrato, prejuízo, ou qualquer outra
teoria legal, ainda que tenhamos sido, ou não, avisados
para a possibilidade de ocorrência desses danos. Esta
garantia tem ascendência sobre todas as outras garantias
expressas ou implícitas, incluindo, mas não limitado a,
as garantias implícitas de comercialidade ou
oportunidade, com uma finalidade particular.
EXCLUSÃO DE DANOS
A responsabilidade de NEC Solutions’ para qualquer
produto com defeito é limitada a reparar ou substituir o
produto, segundo a nossa opção. NEC Solutions não é
responsável por:
1. Danos em outros bens causados por qualquer defeito neste
produto, danos baseados em inconveniência, perda de uso do
produto, perda de tempo, perda comercial; ou
2. Quaisquer outros danos ainda que acidentais, conseqüenciais
ou outros. Alguns estados não permitem limitação no tempo de
duração de uma garantia implícita e/ou não permitem a
exclusão ou limitação de danos acidentais ou conseqüenciais,
pelo que as limitações e exclusões acima podem não se aplicar
ao seu caso.
COMO AS LEIS ESTADUAIS SE REFEREM À
GARANTIA
Esta garantia concede-lhe direitos legais específicos, e
também outros possíveis direitos que podem variar de
um estado para outro.
PARA MAIS INFORMAÇÃO,
TELEFONE 800-836-0655
NEC SOLUTIONS (AMERICA), INC.
1250 N. Arlington Heights Road, Suite 400
Itasca, Illinois 60143-1248
Nota:
Todos os produtos devolvidos a NEC Solutions
(America), Inc. para assistência TÊM que obter
aprovação antecipada. Para obter apr ovação, telefone
para NEC Solutions (America), Inc., para o nº 800-836-
0655.
Po-16
Page 67

202
Page 68

igh
d,
te
ois
1248
DECLARATION OF CONFORMITY
y
This device complies with Part 15 of FCC Rules. Operation is subject to the following two conditions. (1) This device ma
not cause harmful interference, and (2) this device must accept any interference received, including interference that may
cause undesired operation.
U.S. Responsible Party:
Address:
Tel. No.:
Type of Product:
Equipment Classification:
Models:
conforms to the technical standards as specified in the FCC Rules.
Printed on recycled paper
NEC SOLUTIONS (AMERICA), INC.
1250 N. Arlington Heights Road, Suite 400
Itasca, Illinois 60143-1248
800-836-0655
Plasma Display
Class B Peripheral
PX-42XM4A
We hereby declare that the equipment specified above
NEC and the NEC logo are registered trademarks of
NEC Solutions (America), Inc.
ngton
tasca,n
e
ts
oa
i
-
NEC Corporation
Printed in Japan
7S802471
204
 Loading...