

Nakamichi IBX-2, BX-2 Owner's Manual
\-,
Nakamichi
IBX-2
2
Head
Cassette Deck
Owner's Manual
f'E
l-!
g
<F
HgF
H
ile
Ef
sgg
F'dd
1;riii:i;l
;;iiiii;;i
;ii;iir;;i
ii;;i5iii
o lo
d
i
x+
o:;
3.f
g.f
sFL
9
z
st
otS
AA
CAUTION-
TO REDUCE
THE RISK OF
ELECTRIC
SHOCK,
DO NOT
REMOVE
COVER
(OR
BACK). NO
USER-SERVICEABLE
PARTS INSIDE.
REFER SERVICING
TO
QUALIFIED
SERVICE
PERSONNEL.
I
RISK OF ELEITRIT
5HIItK. DO TIOTOPEN
I
The lightning
flash with arrowhead
symbol,
within an equilateral triangle,
is
intended to alert
the user of the
oresence
of
uninsulated
"dangerous
voltage"
within
the
product's
enclosure;
that may
be of sufficient
magnitude to constitute a
risk of electric
shock to
oersons.
The
exclamation
ooint
within
an
equilateral triangle
is intended to alert
the
user of the
presence
of important
operating
and maintenance
(servicing)
instructions,
in the literature
accompanyi
ng
the
appliance.
Congratulations!
You
have chosen a
very fine cassette
deck.
The
Nakamichi
BX-2 was developed
on
the basis of
this company's
extensive
experience
with high-grade cassette
decks.
While incorporating
much of
Nakamichi's
superior technology
and
following
its
sound
policy,
this basic
model delivers
high
overall characteristics
and
represents
an extraordinary
value at a moderate
price.
Please take
the time
to read this
manual in
its entirety
to fully acquaint
yourself
with
this cassette
deck.
Thank
you.
Nakamichi Corporation.
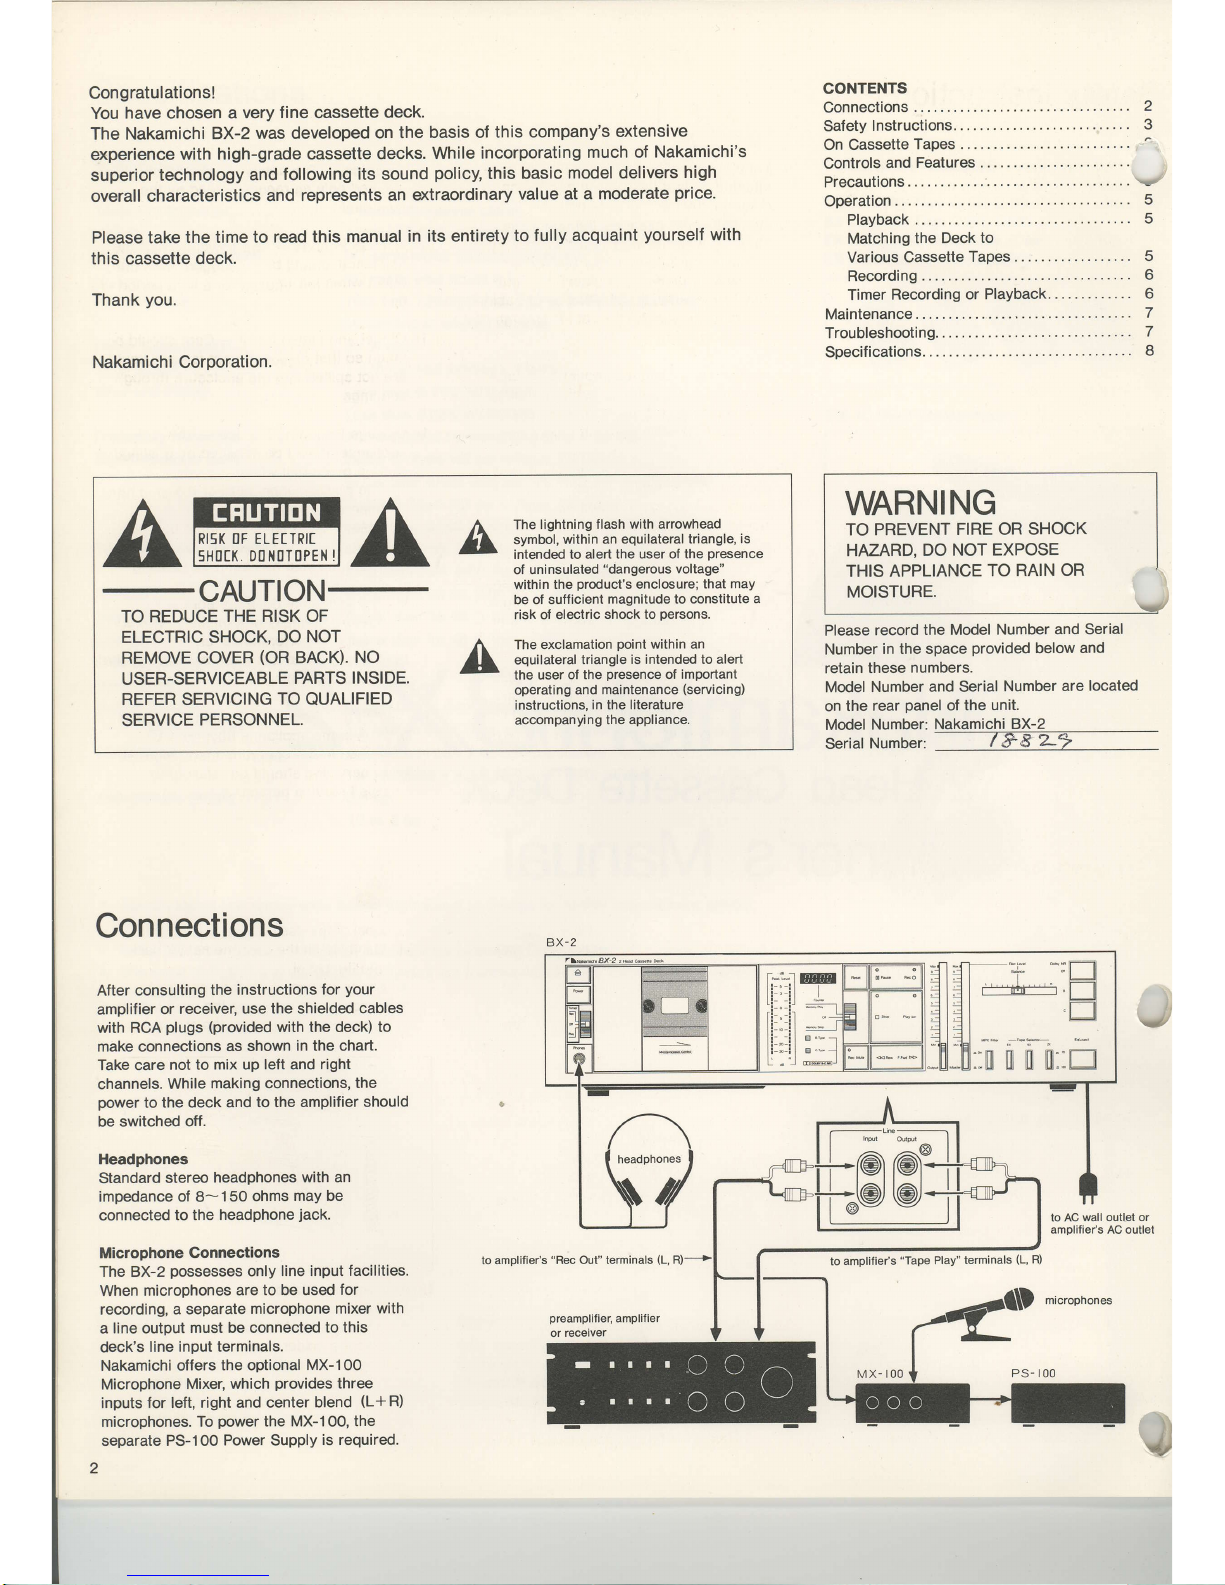
Connections
After
consulting
the instructions
for
your
amplifier
or receiver, use
the shielded cables
with RCA
plugs
(provided
with the deck)
to
make connections
as shown
in the chart.
Take care not to
mix up left and
right
channels.
While
making connections,
the
power
to
the deck and
to the amplifier should
be switched off.
Headphones
Standard
stereo
headphones
with an
impedance of 8- 1 50
ohms
may be
connected
to the
headphone
jack.
Microphone Connections
The BX-2
possesses
only
line input facilities.
When microohones
are to be used
for
recording, a separate
microphone
mixer with
a line output
must be connected
to this
deck's
line input
terminals.
Nakamichi offers
the ootional
MX-1
00
Microphone
Mixer, which
provides
three
inputs
for left, right and
center blend
(L+R)
microphones. To
power
the MX-1 O0,
the
separate PS-100
Power Supply
is required.
2
CONTENTS
Connections
Safety
Instructions.
. . .
On Cassette
Tapes
.
Controls
and Features
z
e
Precautions.
.........
..'
Operation
........... . 5
Playback
......... 5
Matching
the Deck
to
Various Cassette
Tapes.
.
........ 5
Recording
........
6
Timer
Recording or Playback.
............ 6
Maintenance.
........ 7
TroubleshootinS.
. . .. ..
....... 7
Specifications.
....... I
WARNING
TO PREVENT
FIRE OR SHOCK
HAZARD,
DO
NOT EXPOSE
THIS
APPLIANCE
TO RAIN
OR
MOISTURE.
Please record
the Model
Number and Serial
Number
in the space
provided
below
and
retain
these
numbers.
Model
Number and Serial
Number
are
located
on
the
rear
panel
of the
unit.
Model
Number:
Nakamichi BX-2
Seriaf
Number:@
J
to AC
wall outlet or
amplifier's
AC outlet
to
amplifier's
"Rec
Out"
terminals
(L,
to
amplilier's
"Tape
Play"
terminals
(L,
R)
Safety
Instructions
r
following safety instructions
have
been
\r6luded in
compliance with
safety
standard
regulations.
Please read
them
carefully.
1. Read Instructions
-
All the
safety and
operating instructions
should
be
read
before
the appliance is
operated.
2.
Retain
instructions
-
The
safety and
operating instructions
should be retained
lor
future reference.
3. Heed Warnings
-
All warnings
on
the
appliance
and in the operating instructions
should be adhered.
4.
Follow lnstructions
-
All operating
and
use instructions
should
be followed.
5.
Water
and Moisture
-
The
appliance
should
not
be used
near
water
-
for
.
example, near a bathtub, washbowl,
,
kitchen
sink,
laundry
tub, in a wet
arbasement,
or near a swimming
pool,
etc.
6. Carts and
Stands - The
appliance should
be used
only with a
cart or stand that is
recommended
by the manufacturer.
7.
Wall or
Ceiling Mounting
-
The appliance
should be mounted
to a wall
or ceiling only
as recommended
by the manufacturer.
On
Cassette
Tapes
Precautions
1. C-120 cassettes
(playing
time one
hour
per
side) contain extremely thin tape
1,
which breaks
or snarls easily, is
Vsometimes
subject to
stretching and also
is of low sensitivity.
Therefore,
C-120
cassettes are
not
recommended
for
high{idelity recording.
2. Do not
pull
out the tape from
the cassette
housing.
3. Be careful not to turn the
cassette reels
with the fingers, causing
tape slackening.
4. Store cassette tapes away
from heat, high
humidity,
dust, and magnetic fields
such
as caused by
speakers, TV sets etc.
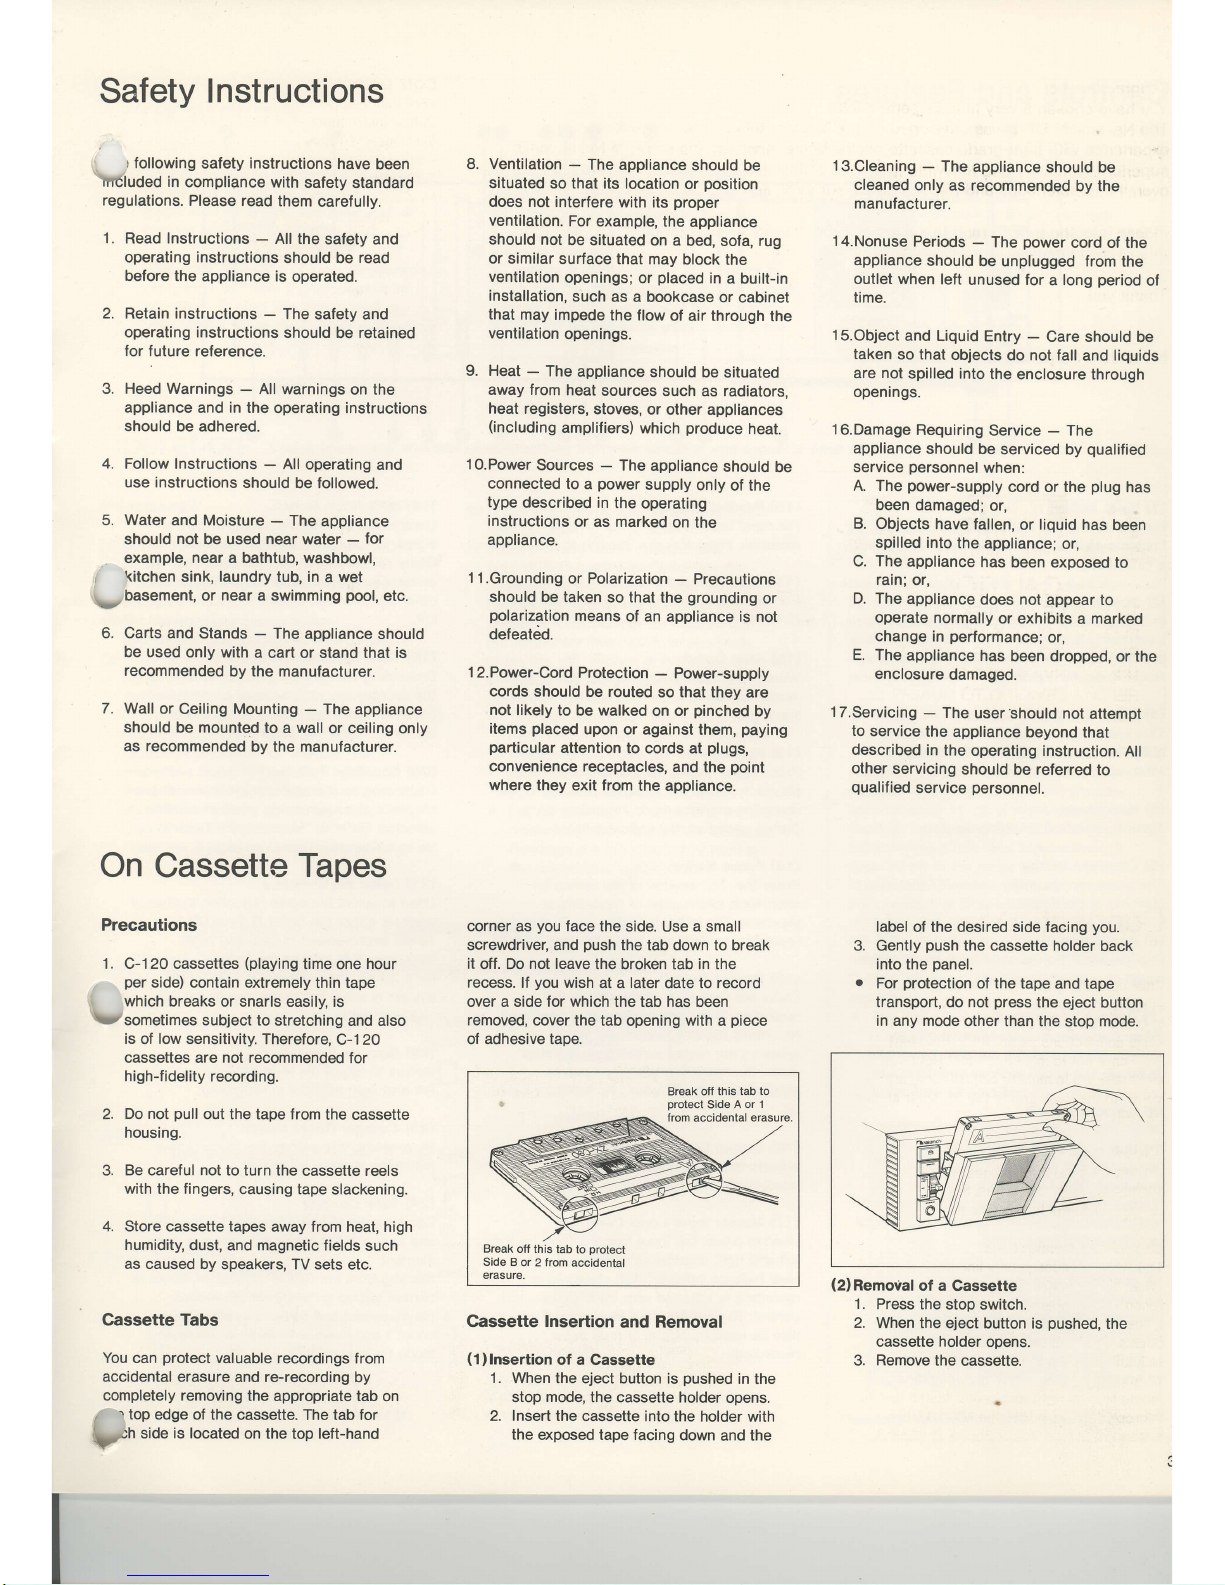
Cassette Tabs
You can
protect
valuable
recordings from
accidental erasure
and re-recording
by
completely removing
the appropriate tab
on
/
r
top edge of the cassette.
The tab for
pn
.io" is located
on the top left-hand
8. Ventilation
-
The
appliance
should be
situated
so that its location
or
position
does not interfere
with its
proper
ventilation.
For
example, the
appliance
should
not
be situated
on a bed,
sofa, rug
or similar
surface that may
block the
ventilation
openings;
or
placed
in
a built-in
installation,
such as
a bookcase
or cabinet
that
may impede
the flow
of
air through
the
ventilation
openings.
9. Heat
-
The
appliance
should be
situated
away from
heat
sources
such as radiators,
heat registers,
stoves, or
other appliances
(including
amplifiers)
which
produce
heat.
1O.Power
Sources - The
appliance
should
be
connected
to
a
power
supply
only of
the
type
described in the
operating
instructions
or as marked
on
the
appliance.
1 l.Grounding
or Polarization
-
Precautions
should be taken
so that
the
grounding
or
polarization
means
of an
appliance is not
defeatdd.
1 2.Power-Cord
Protection
-
Power-supply
cords
should be routed
so that they are
not likely
to be walked
on or
pinched
by
items
placed
upon or against
them,
paying
particular
attention
to cords at
plugs,
convenience receptacles,
and
the
point
where
they exit from
the appliance.
corner as
you
face the
side. Use a small
screwdriver, and
push
the tab down to break
it off.
Do
not leave
the broken tab in the
recess.
lf
you
wish
at a
later
date to record
over a side for which the tab has been
removed, cover the tab
opening with a
piece
of adhesive
tape.
Cassette Insertion
and
Removal
(1)lnsertion
of a Gassette
1. When
the eject button is
pushed
in the
stop
mode,
the cassette holder
opens.
2. Insert the cassette
into the holder
with
the exposed tape facing
down
and
the
l3.Cleaning
-
The
appliance
should be
cleaned
only as recommended
by the
manufacturer.
'1
4.Nonuse Periods
-
The
power
cord of the
appliance
should
be unplugged from
the
outlet when
left
unused for a long
period
of
time.
1S.Object
and Liquid
Entry
-
Care should be
taken
so that
objects
do not fall and liquids
are not
spilled into
the
enclosure through
openings.
16.Damage
Requiring
Service
-
The
appliance
should be
serviced by
qualified
service
personnel
when:
A. The
power-supply
cord or the
plug
has
been damaged;
or,
B. Objects
have fallen,
or
liquid
has been
spilled into
the
appliance;
or,
C. The
appliance
has
been exposed to
rain;
or,
D.
The appliance
does not
appear to
operate normally
or exhibits a marked
change in
performance;
or,
E.
The appliance
has
been dropped,
or the
enclosure
damaged
lT.Servicing
-
The
user'should
not
attempt
to
service
the appliance
beyond
that
described
in the
operating instruction.
All
other
servicing
should
be referred
to
qualified
service
personnel.
label
of the desired side facing
you.
Gently
push
the cassette
holder back
into
the
panel.
For
protection
of the tape and tape
transport, do not
press
the eject button
in any mode
other than the
stop
mode.
(2)Removal
of a Cassette
1.
Press the stop
switch.
2. When
the eject button is
pushed,
the
cassette holder opens.
3. Remove the
cassette.
Break off this
tab to
protect
Side
A or 1
trom accidental erasure
Break
off this
tab to
protect
Side B
or 2 from accidental
erasure.
 Loading...