


 RLD CLASS HI F
OWNERS MANUAL
Speakers: SL2, allæ, Ariva, axent, axess, n-SATS, n-CENT, n-SUB.

IMPORTANT
In order to comply with current European safety regulations it is essential that the Naim loudspeaker connectors supplied with amplifiers and loudspeakers are used.
Do not under any circumstances allow anyone to modify your Naim equipment without first checking with the factory, your dealer, or your distributor. Unauthorised modifications will invalidate your guarantee.
For your own safety do not under any circumstances open Naim equipment without first disconnecting it from the mains.
Warning: an apparatus with CLASS I construction shall be connected to a mains socket outlet with a protective earthing connection.
Where the mains plug or an appliance coupler is used as the disconnect device, the disconnect device shall remain readily operable. To disconnect the equipment from the mains remove the mains plug from the mains outlet.
The following label is attached to all mains powered equipment:
WARNING
THIS APPARATUS
MUST BE EARTHED
NOTE
This equipment has been tested and found to comply with the relevant EMC and Safety Standards, and, where applicable, also complies with the limits for a class B digital device, pursuant to Part 15 of the FCC Rules.
These limits are designed to provide reasonable protection against harmful interference in a residential installation.
This equipment generates, uses and can radiate radio frequency and, if not installed and used in accordance with the instructions, may cause harmful interference to radio communications. However, there is no guarantee that interference will not occur in a particular installation. If this equipment does cause harmful interference to radio or television reception, which can be determined by turning off and on, the user is encouraged to try to correct the interference by one or more of the following measures:
•Reorient or relocate the receiving antenna.
•Increase the separation between the equipment and the receiver.
•Connect the equipment into an outlet on a circuit different from that to which the receiver is connected.
•Consult your Naim dealer or an experienced radio/TV technician for help.
Contents
Page Section
11 Equipment Installation
2Connections
3Mains Power Connection
24 General Installation
3 |
5 |
SL2 |
6 |
6 |
allæ |
8 |
7 |
Ariva |
10 |
8 |
axent and axess |
12 |
9 |
n-SATS |
14 |
10 |
n-CENT |
15 |
11 |
n-SUB |
19 |
12 |
Declaration of Conformity |

Introduction
Naim Audio products are conceived with performance as the top priority. Careful installation will help ensure that their full potential is achieved. This manual covers the SL2, allæ, Ariva, axent, axess, n-SATS and n-CENT loudspeakers and the n-SUB active sub-woofer. It begins with general installation notes and statutory safety warnings for all Naim Audio products. Product specific information begins in Section 5.
1 Equipment Installation
Normally your Naim Audio equipment will have been installed by the dealer who sold it to you - even if you live outside their immediate vicinity. In any event however your dealer is responsible for making sure that the system performs as it should. Information given here is not intended to reduce this responsibility in any way.
2 Connections
It is important for both safety and performance that the standard cables supplied are not modified.
2.1 Interconnect Cables
If options are available with your equipment and installation, DIN interconnect sockets should be used in preference to RCA Phono sockets. One end of each Naim interconnect cable is marked with a band to establish its correct orientation. The band denotes the end that connects to the signal source.
Interconnect plugs and sockets should be kept clean and free from corrosion. The easiest way to clean them is to switch off the equipment, pull the plugs out of their sockets, and push them back in again. Contact cleaners and “enhancers” should not be used as the film they tend to deposit may degrade the sound.
2.2 Loudspeaker Cables
Loudspeaker cables are vitally important and your dealer should make them up to suit your installation. The cables should each be at least 3.5 metres long and of equal length. The recommended maximum is normally 20 metres although longer cables may be viable with some Naim amplifiers. Contact your dealer or Naim Audio for advice.
Many Naim amplifiers are designed only to work with Naim loudspeaker cable and using alternatives may degrade the performance or even damage the amplifier. Naim loudspeaker cable is directional and should be oriented so that the printed arrow points towards the speakers. The amplifier/loudspeaker connectors supplied are designed to make a robust electromechanical connection and to comply with European safety regulations. They should be used in preference to alternatives.
3 Mains Power Connection
Where fused plugs are used 13 amp fuses should be fitted. Fuses of a lower rating will fail after a period of use. Do not wire voltage dependent resistors or noise suppressors into mains plugs. They degrade the mains supply and the sound.
3.1 Mains Plug Wiring
In some territories a mains plug may need to be fitted to the supplied mains lead. As the colours of the wires in the mains lead may not correspond with the coloured markings identifying the terminals in the plug proceed as follows:
The wire which is coloured GREEN-AND-YELLOW must be connected to the terminal in the plug which is marked by the letter E or by the safety earth symbol or coloured GREEN or
GREEN and YELLOW.
The wire which is coloured BLUE must be connected to the terminal in the plug which is marked with the letter N or coloured BLACK.
The wire which is coloured BROWN must be connected to the terminal in the plug which is marked with the letter L or coloured
RED.
3.2 Non-rewirable Mains Plugs
If a non-rewirable plug is cut from a mains lead (for whatever purpose) the plug MUST be disposed of in a way to render it totally useless. Considerable shock hazard exists if the cut-off plug is inserted into a mains outlet.
3.3 Mains Circuits and Cables
A hi-fi system usually shares a mains circuit with other household equipment some of which can cause distortion of the mains waveform. This distortion can in turn lead to a mechanical hum from power amplifier and power supply transformers. Naim transformers are large in size with heavy gauge windings, making them relatively sensitive to such distortion, and it may be necessary to take account of transformer hum when siting your equipment.
Transformer hum is not transmitted through the speakers and has no effect on the performance of the system; however, a separate mains circuit may reduce it. Such a circuit (ideally with a 30 or 45 Amp rating) will also improve system performance. Advice on the installation of a separate mains circuit should be sought from a qualified electrician.
Do not substitute alternative mains leads and plugs to those supplied. They are selected to offer the best possible performance.
1

Introduction
4 General Installation
Naim equipment is designed to offer the finest performance possible avoiding compromise wherever practical. This can lead to circumstances that may be unfamiliar. The notes that follow contain advice specifically related to Naim equipment as well as more general warnings about the use of domestic audio products. Please read them carefully.
4.1 Siting The Equipment
In order to reduce the risk of hum audible from the loudspeakers, power supplies and power amplifiers should be located a reasonable distance away from other equipment. The maximum separation distance for connected equipment is that allowed by the standard interconnect lead.
Some Naim equipment is extremely heavy. Check the weight of the equipment prior to lifting and if necessary use more than one person so that it can be moved safely. Ensure that your equipment rack or table can easily support the weight and is stable.
Some speakers and stands are intended to be used with floor spikes fitted. Care should be taken when siting and moving them to avoid personal injury or damage to cables and surfaces. Floor protectors are available from your local dealer or distributor to protect non carpeted floors.
4.2 Switching On
Source components and power supplies should be switched on before the power amplifiers. Always switch amplifiers off and wait a minute before connecting or disconnecting any leads. Always use the power switch on the product rather than a mains outlet switch.
A “thump” may be heard from the loudspeakers as power amplifiers are switched on. This is normal, will not cause any loudspeaker damage and does not point to any fault or problem. A mild “pop” may also be heard shortly after power amplifiers are switched off.
4.3 Running In
Naim equipment takes a considerable time to run in before it performs at its best. The duration varies, but under some
conditions the sound may continue to improve for over a month. Better and more consistent performance will be achieved if
the system is left switched on for long periods. It is worth remembering however that equipment left connected to the mains can be damaged by lightning.
4.4 Radio Interference
In some circumstances, depending on where you live and the earthing arrangements in your home, you may experience radio frequency interference. Controls on broadcasting in some territories allow very high levels of radio frequency radiation and both the choice and exact siting of equipment may be critical. Susceptibility to radio frequency interference is related to the wide internal bandwidth necessary for high sound quality. Systems incorporating moving coil phono preamplifiers and
active crossovers are more likely to suffer. A radio frequency filter kit is available for some Naim equipment but sound quality will be progressively compromised as more elements of the
kit are fitted. In situations of extreme radio interference Naim equipment may be unsuitable.
4.5 Non-standard Cables
Use of non-standard speaker cables or interconnects may invalidate your guarantee.
4.6 Lightning Precautions
Your Naim hi-fi system can be damaged by lightning. Power amplifiers are particularly at risk and should be turned off and disconnected from the mains when there is risk of lightning strike. For complete protection all mains plugs and any aerial cables should be disconnected when not in use.
4.7 Liquid Precautions
Equipment must not be exposed to dripping or splashing and no objects filled with liquid, such as vases, should be placed on the equipment.
4.8 Equipment Fuses
Mains powered Naim Audio equipment is fitted with a mains input fuse on the rear panel adjacent to the mains input socket. Replace it if necessary only with the spare fuse supplied or with identical fuses. Repeated failure of this fuse points to an equipment or system fault that should be investigated by your dealer or at the factory by Naim itself.
4.9 Problems?
Consumer protection varies from country to country. In most territories a dealer must be prepared to take back any equipment he has sold if it cannot be made to work
satisfactorily. A problem may be due to a fault in the system or its installation so it is essential to make full use of your dealer’s diagnostic skills. Please contact your local distributor, or Naim Audio directly, if any difficulties cannot be resolved.
Some Naim equipment is made in special versions for different territories and this makes it impracticable to arrange international guarantees. Please establish the local guarantee arrangements with your dealer. Contact Naim Audio directly for help and advice if necessary.
4.10 Repairs and Updates
It is essential that repairs and updates are only carried out by an authorised Naim dealer or at the factory by Naim itself. Many components are custom made, tested or matched and appropriate replacements are often unobtainable from other sources.
Direct contact to Naim for service or update information should be made initially through the Service Department:
Tel: +44 (0)1722 332266
Email: service@naim-uk.com
Please quote the product serial number (found on its rear panel) in all correspondence.
2

SL2
5 Introduction and Positioning
Naim loudspeakers are precision acoustic instruments that will only achieve optimal performance if installed and set up carefully. Please read these instructions before unpacking, installing and using the loudspeakers. Please also retain the packaging for future use.
The performance of any loudspeaker will be influenced by the room and position in which it is located. Even small changes of loudspeaker position can significantly influence the sound. Choose a site where the loudspeakers can be located between 1.2m and 4m apart (4ft and 13ft), clear of room corners, and where each loudspeaker is between 10cm and 45cm (4” and 18”) away from a
solid rear wall. The distance between the speakers and the rear wall is the aspect of positioning most likely to require adjustment as you become familiar with the characteristics of the loudspeakers in your room.
The SL2 is not magnetically shielded and should be kept well away from CRT displays. Should a display suffer picture distortion caused by the proximity of an SL2 contact your dealer or installer for advice.
Loudspeakers, like many hi-fi components, will take time to stabilise and “run-in” and can be expected to improve with use even over a period of weeks. For this reason it is prudent not to finalise SL2 positioning until the system has been operating for at least one week.
5.1 Unpacking SL2
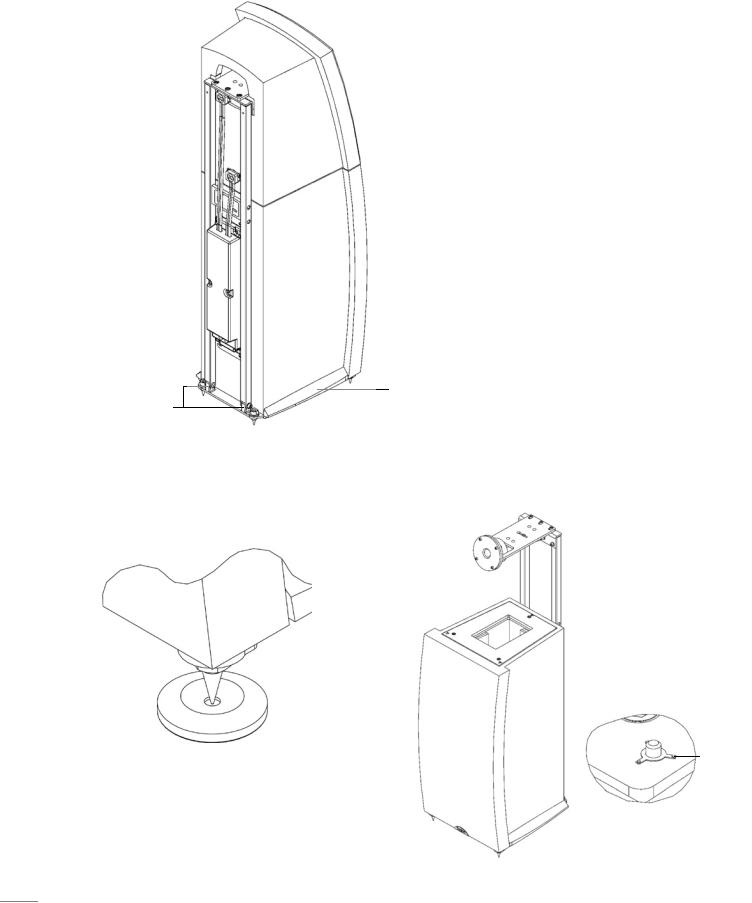
To minimise the risk of accident and damage, SL2 components should be removed from the packaging one speaker at a time and in the following order. Components referred to in the following paragraphs can be identified through Diagram 5.3.
Remove the central packing piece and Tweeter Suspension Assembly. Separate the two and place the Tweeter Suspension Assembly to one side.
Remove the card shield containing the Grille. Place the Grille to one side. Also remove the card packing piece that protects the curved top of the Upper Cabinet.
Carefully lift the Upper Cabinet out of the carton and place it to one side. Take care not to damage either the drive unit or the aluminium plate on the underside of the cabinet.
Now lift the Lower Cabinet, together with its foam end-caps out of the carton. Stand it on the floor, plinth lowermost, and remove the top foam end-cap. Turn the cabinet upside down being careful not to damage the aluminium plate. Finally remove the sprung foam end-cap by pulling its sides outward and lifting it over the plinth.
it using the bolts and allen key supplied. The Tweeter Suspension Assembly should be fixed as close to vertical as possible. Use the back of the Lower Cabinet as a guide.
Now move each Lower Cabinet with the Tweeter Suspension
Assembly attached into the appropriate position. Take care not to place them so close to the wall that the rear spikes foul any carpet gripper that may be fitted. Also leave some space for final adjustment of the Tweeter Suspension Assembly and for the connecting cables.
Adjust the spikes so that the cabinets are upright (a small spirit level will help) and do not rock. Tighten the lock-nuts with an appropriate spanner. Check again, once the lock-nuts are tightened, that the cabinets do not rock on the spikes.
Note: With thick carpet and underlay it can be difficult to ensure that the spikes are resting on the floor. Small slits cut into the carpet once the loudspeaker position is finalised will help.
Note: If you intend to install the SL2 on a non-carpeted floor the spikes should be used in conjunction with Naim Floor Protectors (see Diagram 5.4) and set up so that just the tip extends beyond the lock nut. Your retailer or distributor will be able to supply Floor Protectors.
5.2 Assembling and Installing SL2
Stage 1
With each Lower Cabinet upside down the floor spikes can be fitted. Screw a spike and lock-nut into each threaded hole in the plinth. If the loudspeakers are to stand on a thick carpet, leave a generous length of spike protruding past the lock-nut. If they are to stand on thinly carpeted or plain floor, the spike length should be reduced. In either case, best results will be achieved when the spike length is set to the minimum required for the spike lock-nuts to sit just above the carpet pile.
Stage 2
Take each Tweeter Suspension Assembly in turn and offer it up to the Tweeter Mounting Points on the rear of each Plinth. Attach
Stage 3
The pack containing this manual also contains Cabinet Interface Pins and Cabinet Spacers. Fit a Pin and a Spacer to the three holes in the aluminium top surface of each Lower Cabinet.
There are two holes at the front and one at the back. Spare Pins and Spacers are included in the pack. The Pins should be a loose fit in the holes. See Diagram 5.5
Now take each Upper Cabinet in turn and carefully lower it onto the appropriate Lower Cabinet locating the Pins in the corresponding holes on its underside. At the same time as each Upper Cabinet is lowered onto each Lower Cabinet, the tweeters must be inserted through the apertures of the Upper Cabinets. The loose fit of the Pins allows some adjustment of the alignment of the two cabinets. See Diagram 5.6
3
SL2
5.3 SL2 Components
Tweeter Suspension
Assembly
Passive Crossover
Unit
Tweeter Mounting
Points
5.4 Floor Protectors
Naim Floor Protectors can be used to if the SL2 is to be nstalled on a non-carpeted floor
Grille
Upper Cabinet
Lower Cabinet
Note: The metal bar across the rear underside of the SL2 that attaches the Lower Cabinet to the Plinth is intended to be slightly loose.
Plinth
5.5 SL2 Assembly
Tweeter Suspension

 Assembly
Pin
Spacer
4
SL2
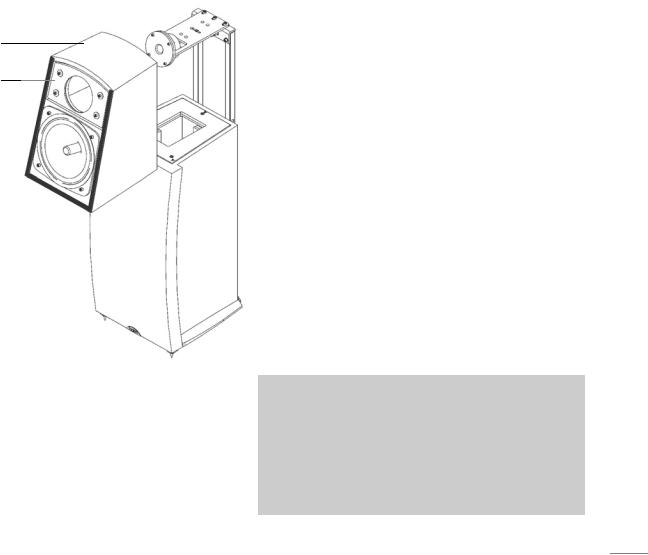
It is vitally important for correct operation of SL2 that the Upper Cabinets are located properly on the Lower Cabinets, that the Pins are in place and that the two cabinets only touch via the spacers.
The alignment of the Tweeter within the Upper Cabinets can be adjusted via either the two bolts connecting the Tweeter
Suspension Assembly to the Plinth or the four screws that attach the Tweeter Adjustment Panel around the front face of the Tweeter. If the four adjustment panel bolts are loosened they should be re-tightened as securely as possible. As well as being adjusted to sit centrally when viewed from the front, and flush with the front panel, the Tweeter must oscillate freely without touching any part of either cabinet.
Finally fit a Grille to each SL2 by aligning it with the top of the Lower Cabinet before pushing it gently against the fixing tape on the Upper Cabinet. The lower edge of the Grille should not
5.6 SL2 Assembly
Upper
Cabinet
Tweeter
Adjustment Pane
touch the Lower Cabinet. The card spacing jig packed with this manual can be used to support the bottom edge of the Grille as it is fitted. Seen from the side, the Grille should continue the curved form of the front of the Lower Cabinet.
5.7 Connection
If the loudspeakers are to be used with Naim amplification, Naim loudspeaker cable will produce the best results and is necessary with some amplifiers. Cable lengths to both loudspeakers should be equal and be between 3.5 metres and 20 metres (11.5ft and 66ft). Your local retailer will be able to make up cables of the appropriate length.
If the SL2 is to be used in an active system, speaker cables with their custom Naim plugs should be connected to the appropriate input sockets on the back of the Tweeter Suspension Arm (HF) and Upper Cabinet (LF). Ensure that each positive plug
- identified by a rib on the side of the cable and a tag marked “pos” on the side of the connector body - is inserted to the red input sockets.
If the SL2 is to be used in a passive system, the Passive Crossover Units must be mounted to the back of each Lower Cabinet. Screws and decoupling grommets are supplied in the pack that contains the passive crossovers. Tighten the screws so that the screw heads just touch the decoupling grommets without compressing them.
The output cables from the Passive Crossover Units must be connected to the input sockets on the back of the speaker, the longer cable to the sockets on the back of each Tweeter Suspension Assembly and the shorter cable to the sockets on each Upper Cabinet. The cables should be dressed such that they do not touch any other SL2 component and such that the output plugs align naturally with input sockets. Stress in the cables will interfere with the decoupling between SL2 components.
Finally the amplifier output speaker cables, with their custom Naim plugs, should be connected to the input sockets on the back of the Passive Crossover Units. Ensure that each positive plug - identified by a rib on the side of the cable and a tag marked “pos” on the side of the connector body - is inserted to the red input sockets.
SL2 Specification
Frequency Response: |
30Hz - 20kHz |
Sensitivity: |
88dB/1W/1m |
Power Handling: |
150 Watts (music programme) |
Impedance: |
6Ω (nominal) |
Dimensions (H x W x D): |
1027 x 282 x 310mm |
Weight (unpacked): |
25.4kg |
Standard Finishes: |
Cherry, Maple, Black |
5
 Loading...